pneumatic and oxygen delivery testing standards - …njsfac.net/forms/pneumatictestingguide.pdf ·...
TRANSCRIPT
Pneumatic and Oxygen Delivery Testing Standards
A guide to testing suction units, and
oxygen delivery systems.
(4th edition)

2
Copyright and reproduction
Copyright: © New Jersey Department of Health and Senior Services,
1989 – 1997, Third Edition, May 1997 1997 – 2003, Fourth Edition, October 2003
Prepared by: New Jersey Department of Health and Senior Services
Office of Emergency Medical Services (OEMS) PO Box 360 Trenton, NJ 08625-0360
First Edition Authors: Ron Hockemeier, Sherry Nidich Fourth Edition Editors: Chuck McSweeney, Maryanne Giblin,
Andrea Davis, Jim Baca Graphics: Phil Gordemer
Microcomputer Applications Manager CADD Value Corporation, Marlton, NJ
Reproduction: Subsequent editions edited and updated by OEMS staff Coping, quoting or reprinting any portion of this guide is permissible with notification in writing to the Department of Health and Senior Services Office of Emergency Medical Services at P.O. Box 360, Trenton, NJ 08625.
3
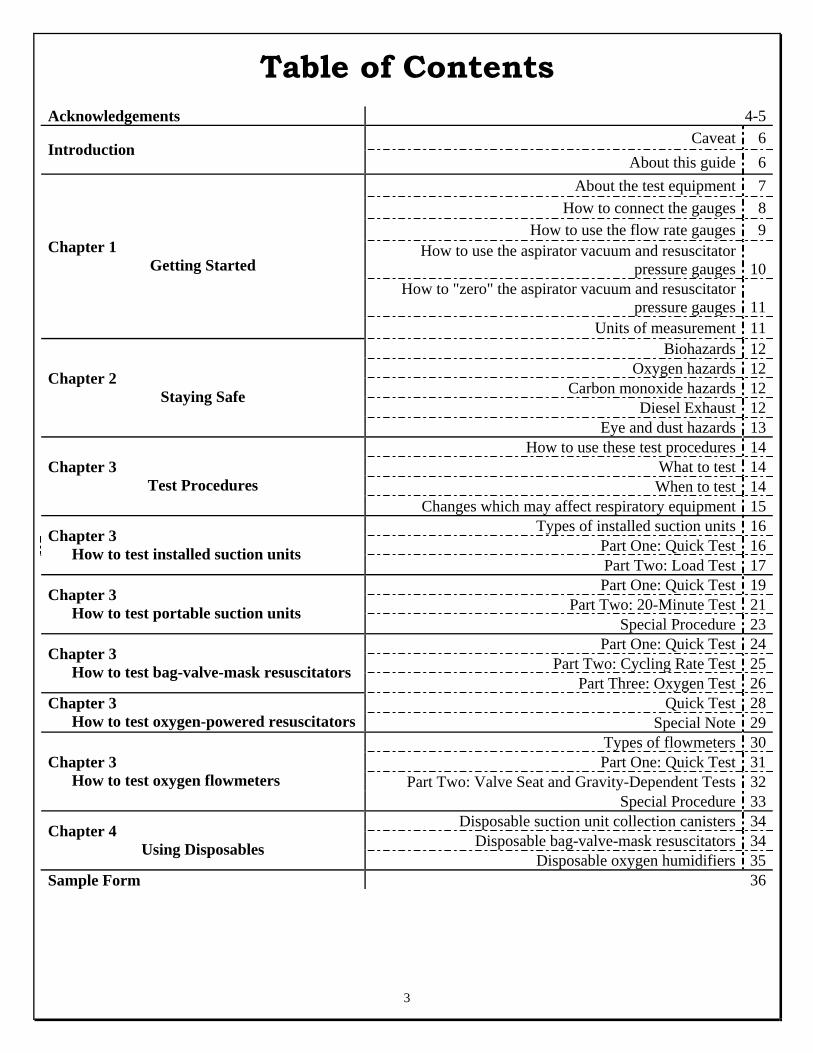
Table of Contents Acknowledgements 4-5
Caveat 6Introduction
About this guide 6About the test equipment 7
How to connect the gauges 8How to use the flow rate gauges 9
How to use the aspirator vacuum and resuscitator pressure gauges 10
How to "zero" the aspirator vacuum and resuscitator pressure gauges 11
Chapter 1 Getting Started
Units of measurement 11Biohazards 12
Oxygen hazards 12Carbon monoxide hazards 12
Diesel Exhaust 12
Chapter 2 Staying Safe
Eye and dust hazards 13How to use these test procedures 14
What to test 14When to test 14
Chapter 3 Test Procedures
Changes which may affect respiratory equipment 15Types of installed suction units 16
Part One: Quick Test 16Chapter 3 How to test installed suction units
Part Two: Load Test 17Part One: Quick Test 19
Part Two: 20-Minute Test 21Chapter 3 How to test portable suction units
Special Procedure 23Part One: Quick Test 24
Part Two: Cycling Rate Test 25Chapter 3 How to test bag-valve-mask resuscitators
Part Three: Oxygen Test 26Quick Test 28Chapter 3
How to test oxygen-powered resuscitators Special Note 29Types of flowmeters 30Part One: Quick Test 31
Part Two: Valve Seat and Gravity-Dependent Tests 32Chapter 3
How to test oxygen flowmeters Special Procedure 33
Disposable suction unit collection canisters 34Disposable bag-valve-mask resuscitators 34Chapter 4
Using Disposables Disposable oxygen humidifiers 35
Sample Form 36
4
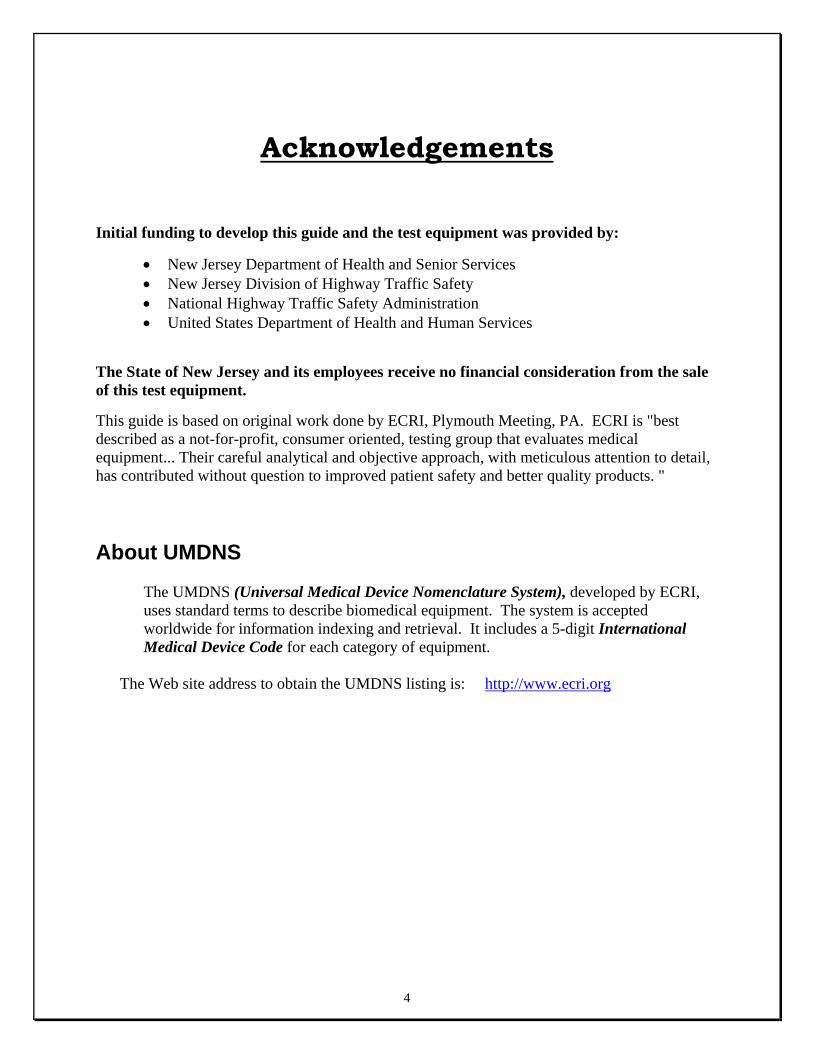
Acknowledgements
Initial funding to develop this guide and the test equipment was provided by:
• New Jersey Department of Health and Senior Services • New Jersey Division of Highway Traffic Safety • National Highway Traffic Safety Administration • United States Department of Health and Human Services
The State of New Jersey and its employees receive no financial consideration from the sale of this test equipment. This guide is based on original work done by ECRI, Plymouth Meeting, PA. ECRI is "best described as a not-for-profit, consumer oriented, testing group that evaluates medical equipment... Their careful analytical and objective approach, with meticulous attention to detail, has contributed without question to improved patient safety and better quality products. "
About UMDNS
The UMDNS (Universal Medical Device Nomenclature System), developed by ECRI, uses standard terms to describe biomedical equipment. The system is accepted worldwide for information indexing and retrieval. It includes a 5-digit International Medical Device Code for each category of equipment.
The Web site address to obtain the UMDNS listing is: http://www.ecri.org

5
Acknowledgements
Clinical Applications of Ventilatory Support Primary sources for the test standards in this guide are:
• American Heart Association • ECRI
Secondary sources for the test standards, and (where available) the test procedures are: American Association for Respiratory Care American Academy of Orthopedic Surgeons American college of Surgeons American Society of Anesthesiologists American Society for Testing and Materials Compressed Gas Association Defense Personnel Support Center International Standards Organization National Academy of Sciences National Research Council National Highway Traffic Safety Administration United States General Services Administration
Bob Spooner, PhD (ECRI) provided extensive guidance as the guide.
The fourth edition of this guide was prepared with the support of:
Clifton R. Lacy, M.D., Commissioner, Health and Senior Services James S. Blumenstock, Deputy Commissioner, Health and Senior Services Karen Halupke, Director, Office of Emergency Medical Services
6
Introduction
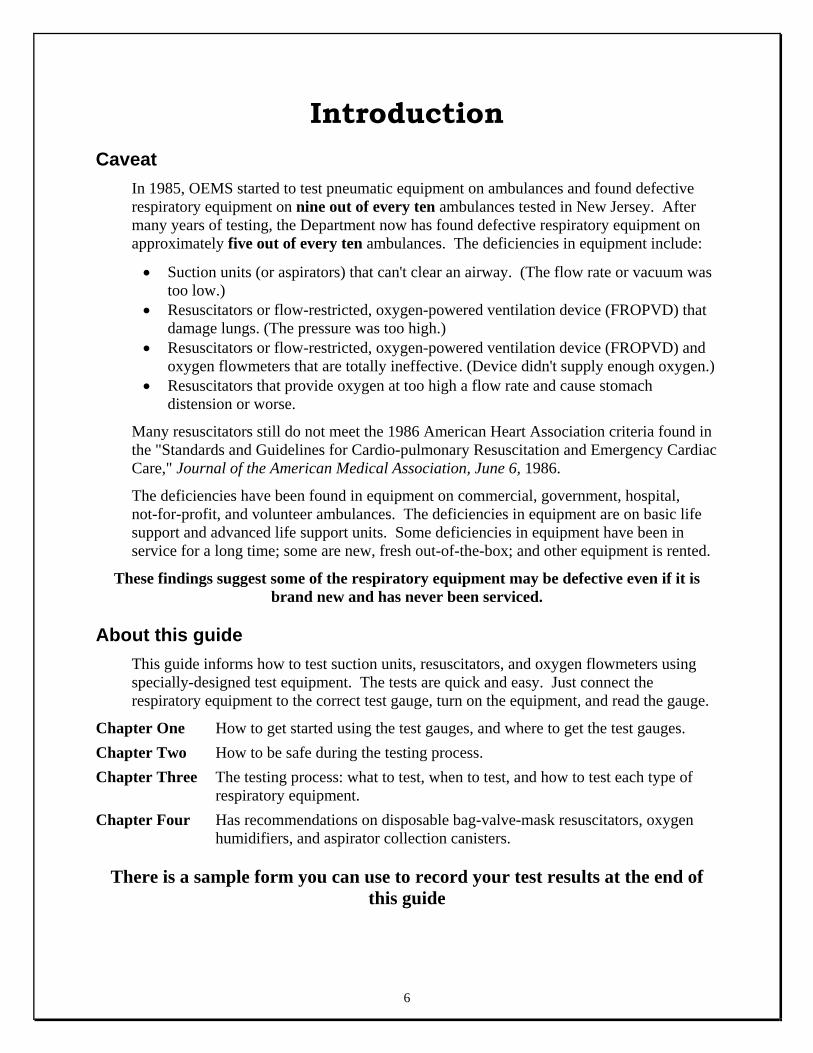
Caveat
In 1985, OEMS started to test pneumatic equipment on ambulances and found defective respiratory equipment on nine out of every ten ambulances tested in New Jersey. After many years of testing, the Department now has found defective respiratory equipment on approximately five out of every ten ambulances. The deficiencies in equipment include:
• Suction units (or aspirators) that can't clear an airway. (The flow rate or vacuum was too low.)
• Resuscitators or flow-restricted, oxygen-powered ventilation device (FROPVD) that damage lungs. (The pressure was too high.)
• Resuscitators or flow-restricted, oxygen-powered ventilation device (FROPVD) and oxygen flowmeters that are totally ineffective. (Device didn't supply enough oxygen.)
• Resuscitators that provide oxygen at too high a flow rate and cause stomach distension or worse.
Many resuscitators still do not meet the 1986 American Heart Association criteria found in the "Standards and Guidelines for Cardio-pulmonary Resuscitation and Emergency Cardiac Care," Journal of the American Medical Association, June 6, 1986.
The deficiencies have been found in equipment on commercial, government, hospital, not-for-profit, and volunteer ambulances. The deficiencies in equipment are on basic life support and advanced life support units. Some deficiencies in equipment have been in service for a long time; some are new, fresh out-of-the-box; and other equipment is rented.
These findings suggest some of the respiratory equipment may be defective even if it is brand new and has never been serviced.
About this guide
This guide informs how to test suction units, resuscitators, and oxygen flowmeters using specially-designed test equipment. The tests are quick and easy. Just connect the respiratory equipment to the correct test gauge, turn on the equipment, and read the gauge.
Chapter One How to get started using the test gauges, and where to get the test gauges.
Chapter Two How to be safe during the testing process.
Chapter Three The testing process: what to test, when to test, and how to test each type of respiratory equipment.
Chapter Four Has recommendations on disposable bag-valve-mask resuscitators, oxygen humidifiers, and aspirator collection canisters.
There is a sample form you can use to record your test results at the end of
this guide

Chapter 1
About the test equipment
Testing respiratory equipment is performed using specially designed test equipment. The complete set of test equipment consists of five test gauges, a carrying case, and test aids. There's a gauge to test the:
• Suction unit (or aspirator) vacuum • Suction unit (or aspirator) flow rate.
• Resuscitator or flow-restricted, oxygen-powered ventilation device (FROPVD) pressure
• Resuscitator or flow-restricted, oxygen-
powered ventilation device (FROPVD) flow rate
• Flowmeter flow rate
7
Getting Started
8
Chapter 1
About the test equipment – continued
Each gauge is sturdy, easy to use, and has a custom, color-coded and numbered scale. When testing suction units and resuscitators, a reading "in the green" means the respiratory equipment meets national criteria, a reading "in the red" means the equipment isn't operating correctly. When testing oxygen flowmeters, check the flowmeter for accuracy.
The test aids consist of:
o A small, standard tip screwdriver to "zero" the aspirator vacuum and the resuscitator pressure gauges.
o An adapter to connect a suction unit that has different size suction tubing, to the test gauges.
o A universal oxygen supply hose to connect oxygen flowmeters to the test gauge.
o A test lung, with a 15/22mm tee fitting, which you'll need to test certain oxygen powered resuscitators.
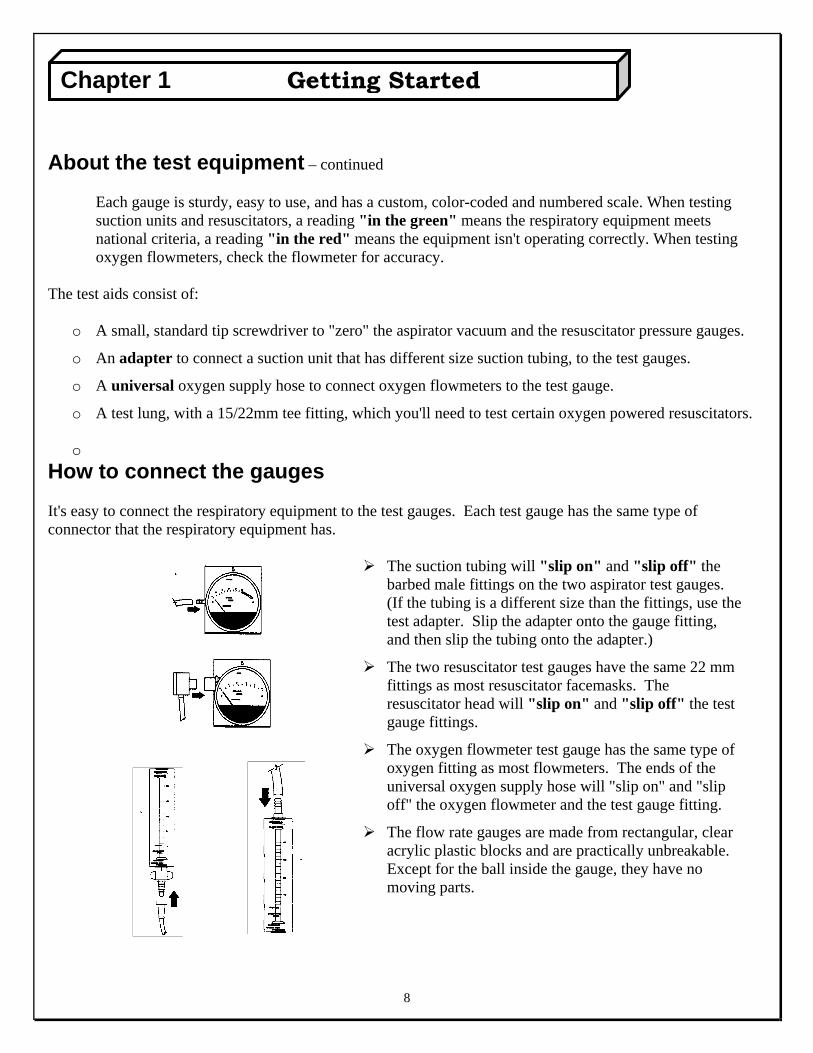
o How to connect the gauges It's easy to connect the respiratory equipment to the test gauges. Each test gauge has the same type of connector that the respiratory equipment has.
The suction tubing will "slip on" and "slip off" the barbed male fittings on the two aspirator test gauges. (If the tubing is a different size than the fittings, use the test adapter. Slip the adapter onto the gauge fitting, and then slip the tubing onto the adapter.)
The two resuscitator test gauges have the same 22 mm fittings as most resuscitator facemasks. The resuscitator head will "slip on" and "slip off" the test gauge fittings.
The oxygen flowmeter test gauge has the same type of oxygen fitting as most flowmeters. The ends of the universal oxygen supply hose will "slip on" and "slip off" the oxygen flowmeter and the test gauge fitting.
The flow rate gauges are made from rectangular, clear acrylic plastic blocks and are practically unbreakable. Except for the ball inside the gauge, they have no moving parts.
Getting Started

9
Chapter 1
How to use the flow rate gauges
Each flow rate gauge measures L/min (liters per minute).
Each gauge has a vertical scale. The scale reads from the bottom to top
Position the gauge in front of you; keep the gauge at eye level when it is read. If it is not held straight up, the gauge will not give an accurate reading.
The flow rate gauges are gravity-dependent; the device must be straight up and down when completing a test. If the gauge is tilted, the reading will be inaccurate.
Hold the flow rate gauges level when completing a test. The gauges can also be mounted on a stand or hanger. (Use the two 6/32 machine screw holes on the back of each gauge). How you hold or mount the gauge is not critical as long as:
The gauge is straight up and down, and
Able to read the scale, and
Do not block the end openings.
There is no maintenance to these devices. The flow rate gauges were calibrated at the factory and never have to be recalibrated. That is, unless the gauges are damaged, otherwise they will always be accurate. If the ball (inside the gauge) ever sticks, return the gauge to the vendor for cleaning and service.
Perform regular cleaning on the outside and the inside of the flow rate gauges. Use only mild soap and water.
Getting Started
10
Chapter 1
How to use the aspirator vacuum and resuscitator pressure gauges
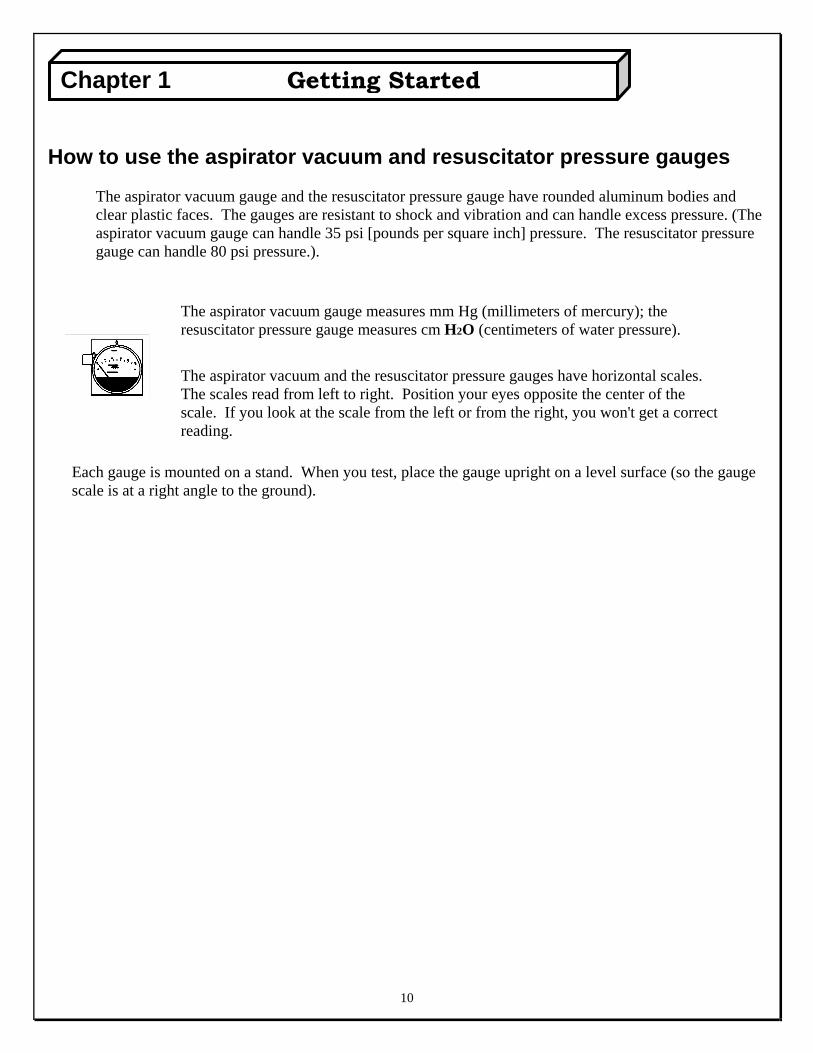
The aspirator vacuum gauge and the resuscitator pressure gauge have rounded aluminum bodies and clear plastic faces. The gauges are resistant to shock and vibration and can handle excess pressure. (The aspirator vacuum gauge can handle 35 psi [pounds per square inch] pressure. The resuscitator pressure gauge can handle 80 psi pressure.).
The aspirator vacuum gauge measures mm Hg (millimeters of mercury); the resuscitator pressure gauge measures cm H2O (centimeters of water pressure).
The aspirator vacuum and the resuscitator pressure gauges have horizontal scales. The scales read from left to right. Position your eyes opposite the center of the scale. If you look at the scale from the left or from the right, you won't get a correct reading.
Each gauge is mounted on a stand. When you test, place the gauge upright on a level surface (so the gauge scale is at a right angle to the ground).
Getting Started

11
Chapter 1
How to use the aspirator vacuum and resuscitator pressure gauges - continued
Clean only the outside of the aspirator vacuum and resuscitator pressure gauges. Use only mild soap and water.
Maintenance is not necessary. The gauges were calibrated at the factory. If needed, they can be recalibrated at the factory.
How to "zero" the aspirator vacuum and resuscitator pressure gauges
You may have to "zero" the aspirator vacuum or resuscitator pressure gauge before a test. The proper procedure is as follows:
1. Stand the gauge upright on a level surface.
2. Look at the gauge needle.
3. If the needle isn't on the zero:
a. Locate the small screw at the very bottom of the gauge face.
b. Use a screwdriver to turn the screw until the needle is on the zero.
Under normal conditions, check the gauges for accuracy once a year. It probably won't happen, but if you can no longer "zero the gauge," have it checked for accuracy immediately. If dirt or any other foreign matter is ever visible inside the gauge face, return the gauge to your vendor or to the factory for servicing.
Ask your vendor, state EMS office, or the factory about accuracy checking services.
Units of measurement
Use the following units of measurement:
cm H2O (centimeters of water). Resuscitator inspiratory pressure is measured in cm H20. (1.0 cm H20 equals about 0.0144 psi.)
L/min (liters per minute). All flow rates are measured in L/min.
mm Hg (millimeters of mercury). Suction unit vacuum is measured in mm Hg. (1.0 mm Hg equals about 0.019 psi.)
Getting Started

12
Chapter 2
Biohazards
Respiratory equipment can be a source of infection to you and to your patient. The following steps should be taken after each use or testing of equipment to protect against cross-contamination:
Clean respiratory equipment after each use. Wear gloves and follow the latest infection control cleaning instructions.
Safely discard your disposable items.
If you suspect a piece of respiratory equipment may be contaminated, clean it before using or performing a test or prior to storage.
Thoroughly wash hands when tests are complete. (Wear gloves if hesitant of the cleanliness of equipment).
Clean only the outside of the aspirator vacuum and resuscitator pressure gauges.
You may clean the outside and inside of the flow rate gauges.
Do not use chlorine bleach; it will damage the gauges.
Oxygen hazards
Follow normal oxygen precautions. In addition, insure the following:
Never permit oil, grease, or other combustible material to come in contact with any test gauge. (All the gauges will be used in an oxygen-rich environment. Three of them will be used to test oxygen equipment.)
Thoroughly wash hands before you start these tests. (There may be oil residue on your hands).
Contamination with oil or other substances may result during a troubleshooting session; thoroughly wash your hands before you resume testing.
Carbon monoxide and diesel exhaust hazards
To perform testing on installed vehicle suction devices you may have to run the vehicles engine in order not to drain the vehicle battery system. Excessive levels of carbon monoxide have been found in most ambulance garages (and in adjacent offices and lounges). Diesel exhaust is made up of soot and gases, containing thousands of different chemical substances, which may create health problems.
Staying Safe
13
Chapter 2
Carbon monoxide and diesel exhaust hazards - continued
If vehicle is housed in a garage, do one of the following:
Drive the ambulance out of the building before the test. Park it where exhaust fumes can't blow into the building. Keep the garage doors open to reduce the level of carbon monoxide, which may linger inside the building.
Attach an exhaust hose to the vehicle's tailpipe and channel the exhaust fumes to the outside of the building.
Turn on a building exhaust fan. (Be sure the fan is large enough to remove all the exhaust fumes.) For more information on carbon monoxide in ambulances and in ambulance stations, send us a note and ask for:
Health Hazard Alert. Carbon Monoxide in Ambulances: a Hazard to Patients and Ambulance Personnel You can also get information on diesel exhaust at www.osha.org
Eye and dust hazards
When testing the pressure of resuscitators (or flow-restricted, oxygen-powered ventilation device (FROPVD) s), the test gauge may be "hit" with over 50 psi pressure from a defective oxygen-powered resuscitator. If that happens, an ordinary test gauge can fail and possibly cause injury. Always use a gauge that accepts excess pressure. The resuscitator pressure gauge described in this guide (Dwyer Instruments ® part numbers 12-193861-00, -01, and -02) can accept up to 80 psi.
When testing the flow rate of resuscitators and oxygen flowmeters, oxygen or air will "shoot" (or blow) out of the top of the test gauges. (With an oxygen-powered resuscitator or flow-restricted, oxygen-powered ventilation device (FROPVD), there may be 100 L/min or greater coming out the top.) Insure all of the following:
Keep the top of the gauge above eye level.
Do not "point" the top of the gauge at anyone.
Do not let anyone look into the top of the gauge.
Do not let anyone stand over you, if you kneel or sit down to do a test.
Staying Safe

How to use these test procedures
There's a test procedure in this chapter for each type of respiratory equipment. Each procedure has a "Quick Test" as Part One. Three of the procedures also have a Part Two; the bag-valve-mask resuscitator procedure has a Part Two and a Part Three.
Use the "Quick Test" each time you test your respiratory equipment.
Use the "Quick Test," plus the other parts, to do an "In-depth Test." What to test
Keep a record of all test results. Feel free to use the sample form (at the end of this guide) or use a form you have created.
If someone uses respiratory equipment to perform patient care, re-test it before using again. Normally, you would not test disposable equipment.
Testing, on respiratory equipment, should be performed:
On mobility assistant vehicles (MAV’s) ambulances and mobile intensive care units.
On equipment used by first responders (including any equipment used by your own members).
On equipment used by police, fire, rescue and other emergency personnel.
On equipment used in factories and in other workplaces.
On equipment whether you own, lease, rent, or borrow. When to test
All respiratory equipment should be tested every six months. Critical respiratory equipment, such as resuscitators, flow-restricted, oxygen-powered ventilation device (FROPVD) s, suction units, and aspirators, should be tested frequently. Specifically:
1. Perform a complete "In-depth Test" of all your current respiratory equipment as soon as possible.
2. Perform a complete "In-depth Test" of any new respiratory equipment before you use it.
3. Perform a "Quick Test" of critical equipment, such as suction units and resuscitators, after each use.
4. Perform a "Quick Test" of any equipment each time it is disassembled and reassembled.
5. Perform a "Quick Test" of any equipment you haven't used in three months.
6. Perform a complete "In-depth (re)Test" of all your respiratory equipment every six months.
14
Chapter 3 Test Procedures
15
Chapter 3
When to test - continued
7. Perform a "20-Minute Test" of each set of nickel cadmium ("NiCad") portable suction unit batteries every month.
(If a nickel cadmium battery isn't deep-cycled, it takes a "set.". If that happens, a "fully charged" battery will operate for only a few minutes, or will provide inadequate power.)
8. Perform a "20-Minute Test" of each set of any other spare suction unit batteries every six months.
9. Complete an "In-depth (re)Test" of any of your equipment that may be affected by a change listed below. Perform the test as soon as the change occurs.
Changes that may affect respiratory equipment
CHANGE MAY AFFECT
Vehicle is in a major accident All respiratory equipment
Equipment is dropped or damaged The equipment that was dropped or damaged
Generator, alternator, or other major electrical work done on vehicle Installed electrically-powered suction unit
Lights or other electrical equipment added to vehicle Installed electrically-powered suction unit
A tune-up, other engine work, or major body work done to vehicle Installed electrically-powered suction unit
Change suction unit "vacuum supply" or your suction unit piping Any suction unit that may be attached to that system
Change oxygen regulator or oxygen piping Any oxygen equipment, or bag-valve-mask resuscitator, that may be attached to that system
Receive a new battery for portable suction unit Battery-operated portable suction unit
Receive a different make or model of oxygen humidifier Oxygen flowmeter where the humidifier is connected
Respiratory equipment repaired or serviced The equipment that was repaired or serviced
Replace the disposable collection canister on suction unit The suction unit with the replacement canister.
Test Procedures

16
Chapter 3
How to test installed suction units UMDNS: Aspirators, Emergency (15-016)
Types of installed suction units
This section describes the suction units installed in ambulances.
Electrical suction units (aspirators) draw vacuum from an electrical pump. An electrical suction unit will:
• Have a switch to turn the pump on and off.
• Continue to operate if the vehicle engine is turned off (and the electrical power is left on).
• Stop if the master electrical switch is turned off.
• Usually make a noise that you can hear when it's operating.
Engine vacuum-operated suction units are no longer allowed to be used in ambulances. All installed suctions units must be powered by an electrical pump powered by the ambulance batteries.
Part One: Quick Test
This section of the test shows if your installed suction unit is working correctly
1. Start-up
• Start the ambulance engine.
2. Test the vacuum
a. Stand the aspirator vacuum gauge where it's readable and upright. Zero the gauge, if needed.
b. Connect the suction tubing to the aspirator vacuum gauge. Use a test adapter, if needed. Begin timing the test as soon as you connect the suction tubing to the gauge.
c. Read the gauge at the end of four seconds.
Test Standard: Vacuum must reach 300 mm Hg or greater within four seconds.
d. Read the gauge again when maximum vacuum is reached. (Maximum vacuum is reached when the gauge needle stops moving.)
Test Standard: Maximum vacuum must reach, and remain at, 400 mm Hg or greater.
e. Look at the suction tubing.
Test Standard: Suction tubing must not collapse.
f. Remove the suction tubing from the vacuum gauge. (Keep the suction unit operating.)
Test Procedures
17
Chapter 3
Part One: Quick Test - continued
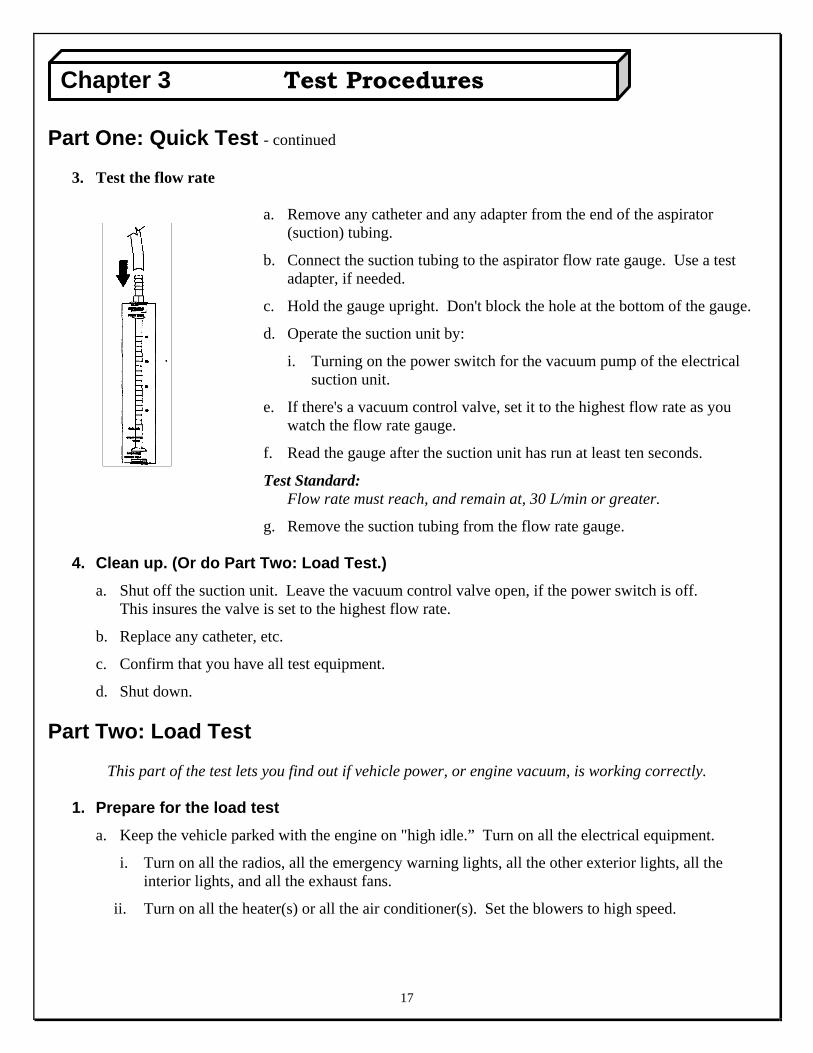
3. Test the flow rate
a. Remove any catheter and any adapter from the end of the aspirator (suction) tubing.
b. Connect the suction tubing to the aspirator flow rate gauge. Use a test adapter, if needed.
c. Hold the gauge upright. Don't block the hole at the bottom of the gauge.
d. Operate the suction unit by:
i. Turning on the power switch for the vacuum pump of the electrical suction unit.
e. If there's a vacuum control valve, set it to the highest flow rate as you watch the flow rate gauge.
f. Read the gauge after the suction unit has run at least ten seconds.
Test Standard: Flow rate must reach, and remain at, 30 L/min or greater.
g. Remove the suction tubing from the flow rate gauge.
4. Clean up. (Or do Part Two: Load Test.)
a. Shut off the suction unit. Leave the vacuum control valve open, if the power switch is off. This insures the valve is set to the highest flow rate.
b. Replace any catheter, etc.
c. Confirm that you have all test equipment.
d. Shut down. Part Two: Load Test
This part of the test lets you find out if vehicle power, or engine vacuum, is working correctly.
1. Prepare for the load test
a. Keep the vehicle parked with the engine on "high idle.” Turn on all the electrical equipment.
i. Turn on all the radios, all the emergency warning lights, all the other exterior lights, all the interior lights, and all the exhaust fans.
ii. Turn on all the heater(s) or all the air conditioner(s). Set the blowers to high speed.
Test Procedures

18
2. Test the vacuum
Chapter 3
a. Stand the aspirator vacuum gauge where it's readable and upright.
b. Connect the suction tubing to the aspirator vacuum gauge. Begin timing the test as soon as you connect the suction tubing to the gauge.
c. Read the gauge at the end of four seconds.
Test Standard: Vacuum must reach -300 mm Hg or greater within four seconds. (The reading may not match the reading you got in the Quick Test.)
d. Read the gauge again when maximum vacuum is reached.
Test Standard: Maximum vacuum must reach, and remain at, -400 mm Hg or greater. (The reading may not match the reading you got in the Quick Test.)
e. Remove the suction tubing from the vacuum gauge. (Keep the suction unit operating.)
3. Test the flow rate
a. While the suction unit is operating.
b. Connect the suction tubing to the aspirator flow rate gauge.
c. Hold the gauge upright. Don't block the hole at the bottom of the gauge.
d. Read the gauge after the suction unit has run at least ten seconds.
Test Standard: Flow rate must reach, and remain at, 30 L/min or greater. (The reading may not match the reading you got in the Quick Test.)
e. Remove the suction tubing from the flow rate gauge
4. Clean up
a. Turn off the electrical equipment.
b. Shut off the suction unit. You can leave the vacuum control valve open, if the power switch is off. This insures the valve is set to the highest flow rate.)
c. Replace any catheter, etc.
d. Confirm that you have all test equipment.
e. Shut down.
Test Procedures

19
Chapter 3
How to test portable suction units UMDNS: Aspirators, Emergency (15-016) Part One: Quick Test
This part of the test lets you find out if your portable suction unit is working correctly.
1. Test the vacuum
a. Stand the aspirator vacuum gauge where it's readable and upright. Zero the gauge, if needed.
b. Connect the suction tubing to the aspirator vacuum gauge. Use a test adapter, if needed. Begin timing the test as soon as you connect the suction tubing to the gauge.
c. Read the gauge at the end of four seconds.
Test Standard: Vacuum must reach -300 mm Hg or greater within four seconds.
d. Read the gauge again when maximum vacuum is reached. (Maximum vacuum is reached when the gauge needle stops moving.)
Test Standard: Maximum vacuum must reach, and remain at, -400 mm Hg or greater.
e. Look at the suction tubing.
Test Standard: Suction tubing must not collapse.
f. Remove the suction tubing from the gauge. (Keep the suction unit operating.)
Test Procedures
20
Chapter 3
Part One: Quick Test - continued
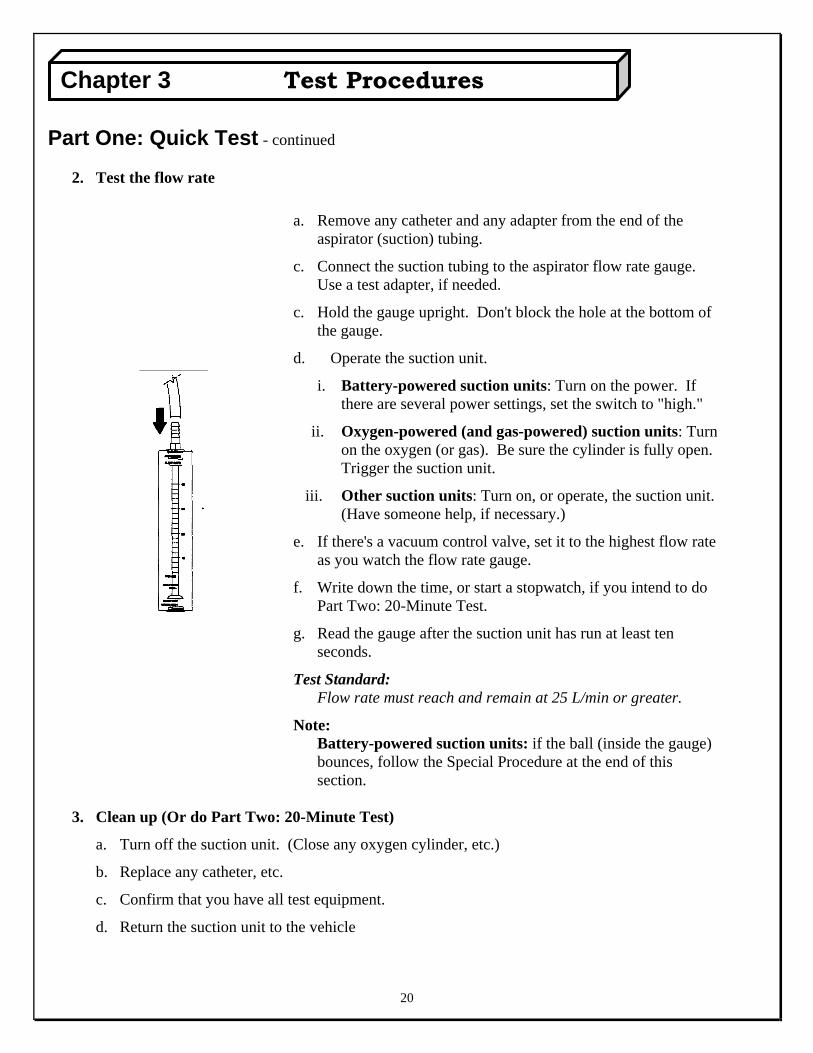
2. Test the flow rate
a. Remove any catheter and any adapter from the end of the
aspirator (suction) tubing.
c. Connect the suction tubing to the aspirator flow rate gauge. Use a test adapter, if needed.
c. Hold the gauge upright. Don't block the hole at the bottom of the gauge.
d. Operate the suction unit.
i. Battery-powered suction units: Turn on the power. If there are several power settings, set the switch to "high."
ii. Oxygen-powered (and gas-powered) suction units: Turn on the oxygen (or gas). Be sure the cylinder is fully open. Trigger the suction unit.
iii. Other suction units: Turn on, or operate, the suction unit. (Have someone help, if necessary.)
e. If there's a vacuum control valve, set it to the highest flow rate as you watch the flow rate gauge.
f. Write down the time, or start a stopwatch, if you intend to do Part Two: 20-Minute Test.
g. Read the gauge after the suction unit has run at least ten seconds.
Test Standard: Flow rate must reach and remain at 25 L/min or greater.
Note: Battery-powered suction units: if the ball (inside the gauge) bounces, follow the Special Procedure at the end of this section.
3. Clean up (Or do Part Two: 20-Minute Test)
a. Turn off the suction unit. (Close any oxygen cylinder, etc.)
b. Replace any catheter, etc.
c. Confirm that you have all test equipment.
d. Return the suction unit to the vehicle
Test Procedures

21
Chapter 3
Part Two: 20-Minute Test
This section of the test shows if your battery, or your vacuum supply, is working correctly (and will keep working during lengthy on-scene care).
Your battery, or your vacuum supply, probably will be "drained" after you do this part of the test. If possible, use a backup suction unit while this unit is "recharging.”
1. Keep the suction unit running for 20 minutes
Test Standard:
Suction unit must operate for at least 20 minutes.
2. After 20 minutes, test the vacuum
a. Stand the aspirator vacuum gauge where it's readable and upright.
b. Connect the suction tubing to the aspirator vacuum gauge. Use a test adapter, if needed. Begin timing the test as soon as you connect the suction tubing to the gauge.
c. Read the gauge at the end of four seconds.
Test Standard: Vacuum must reach -300 mm Hg or greater within four seconds. (The reading may not match the reading you got in the Quick Test.)
d. Read the gauge again when maximum vacuum is reached.
Test Standard: Maximum vacuum must reach and remain at -400 mm Hg or greater. (The reading may not match the reading you got in the Quick Test.)
Note: Battery-powered aspirators: if the pump stalls, it usually means the aspirator batteries should be:
Recharged, or
Replaced, or
Deep discharged, then recharged if the aspirator has NiCad batteries.
e. Remove the suction tubing from the gauge.
f. Keep the suction unit operating.
Test Procedures

22
Part Two: 20-Minute Test - continued
Chapter 3
3. Test the flow rate
a. Connect the suction tubing to the aspirator flow rate gauge.
b. Hold the gauge upright. Don't block the hole at the bottom of the gauge.
c. Read the gauge after the suction unit has been connected at least ten seconds.
Test Standard: Flow rate must reach, and remain at, 25 L/min or greater. (The reading may not match the reading you got in the Quick Test.)
d. Remove the suction tubing from the gauge.
f. Close any vacuum control valve.
4. Clean up
a. If the battery-powered suction unit:
i. Has a NiCad battery:
Keep the power on.
Keep the suction unit running until the battery is completely discharged (and the suction unit "dies".)
Then turn the power off.
ii. Has another type of battery, turn the power off.
b. Other suction units: Turn off the suction unit. (Close any oxygen cylinder, etc.)
c. Replace any catheter, etc.
d. Confirm that you have all test equipment.
e. If possible:
i. Replace this suction unit with a spare suction unit; or
ii. Battery-powered suction units: replace the battery you just tested with another battery, or
iii. Other suction units: if necessary, replace the "vacuum supply."
f. Return the suction unit to the vehicle.
g. Battery-powered suction units: immediately recharge the battery that was just tested. (Some batteries may be damaged if left fully drained for any length of time.)
i. Follow the manufacturer's directions for the method and the length of time needed
Test Procedures
23
Chapter 3
4. Clean up. - continued
ii. It may be better to recharge the battery with an AC-powered ("household current") recharger, instead of in the vehicle. Many vehicle recharges only do slow "trickle charging."
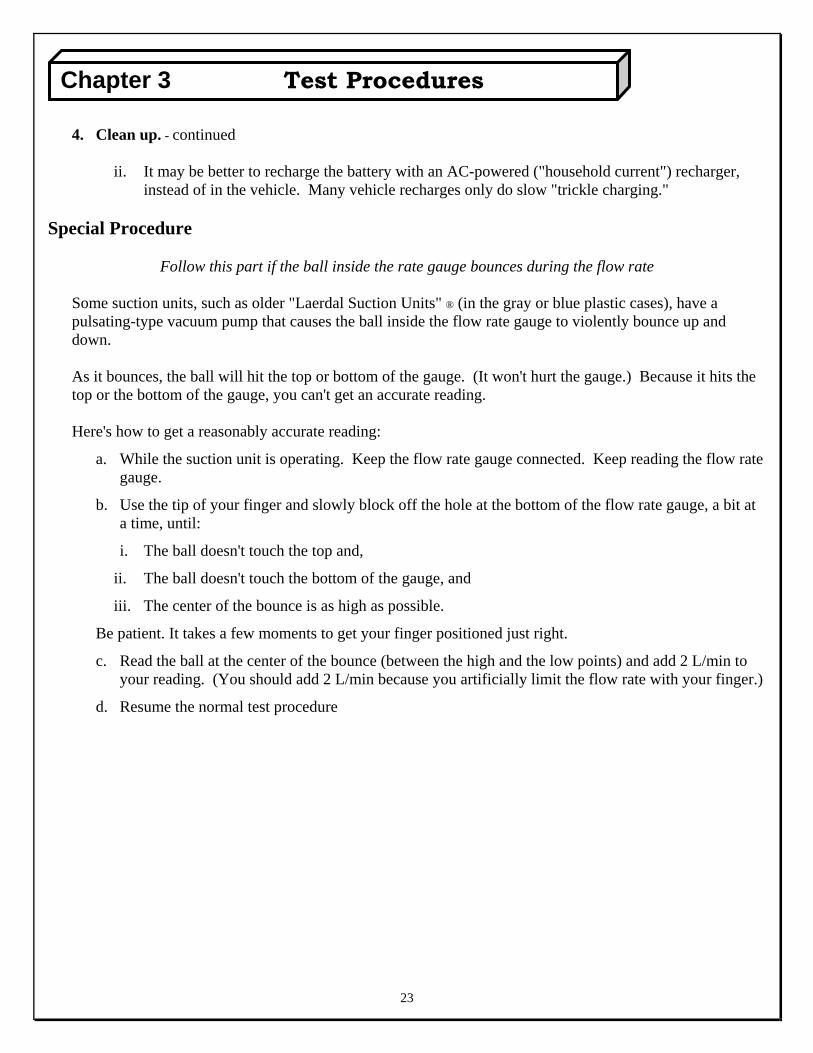
Special Procedure
Follow this part if the ball inside the rate gauge bounces during the flow rate
Some suction units, such as older "Laerdal Suction Units" ® (in the gray or blue plastic cases), have a pulsating-type vacuum pump that causes the ball inside the flow rate gauge to violently bounce up and down.
As it bounces, the ball will hit the top or bottom of the gauge. (It won't hurt the gauge.) Because it hits the top or the bottom of the gauge, you can't get an accurate reading.
Here's how to get a reasonably accurate reading:
a. While the suction unit is operating. Keep the flow rate gauge connected. Keep reading the flow rate gauge.
b. Use the tip of your finger and slowly block off the hole at the bottom of the flow rate gauge, a bit at a time, until:
i. The ball doesn't touch the top and,
ii. The ball doesn't touch the bottom of the gauge, and
iii. The center of the bounce is as high as possible.
Be patient. It takes a few moments to get your finger positioned just right.
c. Read the ball at the center of the bounce (between the high and the low points) and add 2 L/min to your reading. (You should add 2 L/min because you artificially limit the flow rate with your finger.)
d. Resume the normal test procedure
Test Procedures
Chapter 3
How to test bag-valve-mask resuscitators UMDNS: Resuscitators, Pulmonary, Manual (13-357)
Resuscitators, Pulmonary, Manual, Reusable (17-591) Resuscitators, Pulmonary, Manual, Disposable (17-592)
This section of the test lets you find out if your bag-valve-mask is working correctly. Normally, you would not test disposable equipment.
Part One: Quick Test
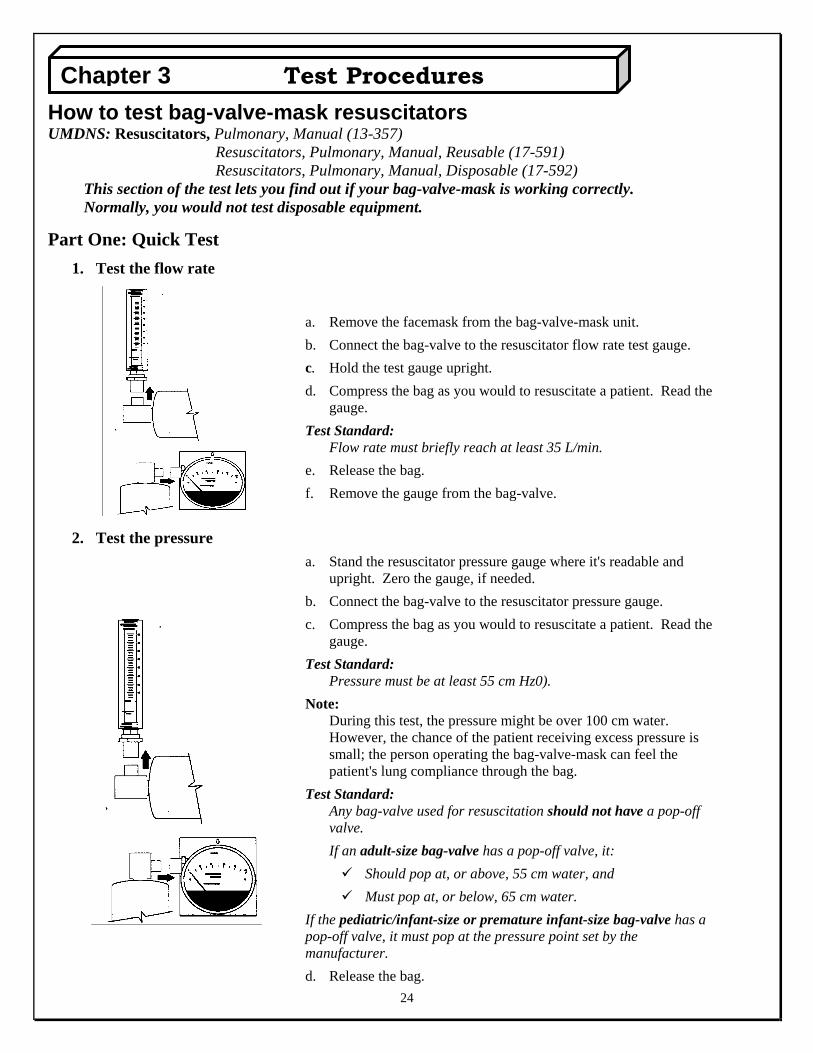
1. Test the flow rate
a. Remove the facemask from the bag-valve-mask unit.
b. Connect the bag-valve to the resuscitator flow rate test gauge.
c. Hold the test gauge upright.
d. Compress the bag as you would to resuscitate a patient. Read the gauge.
Test Standard: Flow rate must briefly reach at least 35 L/min.
e. Release the bag.
f. Remove the gauge from the bag-valve.
2. Test the pressure
a. Stand the resuscitator pressure gauge where it's readable and upright. Zero the gauge, if needed.
b. Connect the bag-valve to the resuscitator pressure gauge.
c. Compress the bag as you would to resuscitate a patient. Read the gauge.
Test Standard: Pressure must be at least 55 cm Hz0).
Note: During this test, the pressure might be over 100 cm water. However, the chance of the patient receiving excess pressure is small; the person operating the bag-valve-mask can feel the patient's lung compliance through the bag.
Test Standard: Any bag-valve used for resuscitation should not have a pop-off valve.
If an adult-size bag-valve has a pop-off valve, it:
Should pop at, or above, 55 cm water, and
Must pop at, or below, 65 cm water.
If the pediatric/infant-size or premature infant-size bag-valve has a pop-off valve, it must pop at the pressure point set by the manufacturer.
d. Release the bag. 24
Test Procedures

Part One: Quick Test - continued
3. Test for leaks.
a. Keep the bag-valve connected to the resuscitator pressure gauge.
b. Partially compress the bag. (Between one-half and two-thirds deflation is good.)
c. Keep your grip constant, once you compress the bag. (Don't move your hand; keep it in the same position. Don't release the bag; don't squeeze the bag any further.)
d. Watch the gauge.
Test Standard: The bag and the one-way valve must not leak.
The pressure should stay the same or should drop very slowly. If the pressure rapidly drops (and you haven’t moved your hands), either the bag or the one-way valve leaks.
4. Test the expiration port.
a. Release the bag.
Test Standard:
The expiration port must release the pressure.
The pressure should drop very quickly as soon as you release the bag. If the pressure doesn't drop, the expiration port is blocked.
b. Remove the gauge from the bag-valve.
5. Clean up. (Or do Part Two: Cycling Rate Test, and Part Three: Oxygen Test.)
This section of the test shows if the bag is working correctly.
a. Replace the facemask, etc.
b. Confirm that you have all your test equipment.
c. Return the bag-valve-mask resuscitator to the vehicle.
Part Two: Cycling Rate Test
1. Test the cycling rate
a. Hold the bag (of the bag-valve) with both hands. Begin timing yourself as you start to compress/release the bag.
i. Compress the bag so it fully deflates, then
ii. Immediately release your grip and let the bag completely refill.
iii. Immediately compress the bag, etc.
25
Chapter 3 Test Procedures
1. Test the cycling rate - continued
b. Continue compressing/releasing the bag (as you count your compressions) for 30 seconds.
c. Multiply the number of deflating/refilling cycles by two.
Test Standard for:
adult-size bags: the cycling rate must be at least 20 per minute.
pediatric-size bags: the cycling rate must be at least 40 per minute.
infant-size bags: the cycling rate must be at least 40 per minute.
Test Standard for all bags: the bag should:
Compress easily, and
Quickly re-expand to its original shape.
2. Clean up (Or do Part Three: Oxygen Test)
a. Replace the facemask, etc.
b. Confirm that you have all your test equipment.
c. Return the bag-valve-mask resuscitator to the vehicle. Part Three: Oxygen Test
This section of the test lets you find out if your oxygen supply and attachments are working correctly.
1. Set up your oxygen supply
a. Attach the bag-valve portion to the oxygen system as you would to resuscitate a patient.
b. Slowly turn on the oxygen. Make sure the cylinder is fully open.
c. Set the oxygen flow rate to "flush," unless otherwise recommended by the manufacturer of the bag-valve-mask resuscitator.
2. Test the flow rate
a. Connect the bag-valve to the resuscitator flow rate gauge.
b. Hold the test gauge upright.
c. Compress the bag as you would to resuscitate a patient. Read the gauge.
Test Standard:
Flow rate must briefly reach at least 35 L/min.
d. Release the bag.
e. Remove the gauge from the bag-valve.
26
Chapter 3 Test Procedures

3. Test the pressure.
a. Stand the resuscitator pressure gauge where it's readable and upright.
b. Connect the bag-valve to the resuscitator pressure gauge.
c. Compress the bag as you would to resuscitate a patient. Read the pressure gauge.
Test Standard:
Pressure must be at least 55 cm H20 (and can be over 100 cm H2O).
Test Standard: If the adult-size bag-valve has a pop-off valve, it:
Should pop at, or above, 55 cm H2O, and
Must pop at, or below, 65 cm H2O.
Test Standard:
If the pediatric or infant-size bag-valve has a pop-off valve, it must pop at the pressure point set by the manufacturer.
Note: Current national standards do not indicate what the pop-off pressures should be for pediatric or infant-size units.
d. Release the bag.
e. Remove the gauge from the bag-valve.
4. Test the cycling rate.
a. Hold the bag (of the bag-valve portion) with both hands. Begin timing yourself as you start to
compress the bag.
i. Compress the bag so it fully deflates, then
ii. Immediately release your grip and let the bag completely refill.
iii. Immediately compress the bag, etc
b. Continue compressing/releasing the bag (as you count your compressions) for 30 seconds.
c. Multiply the number of deflating/refilling cycles by two.
Test Standard for: adult-size bags: the cycling rate must be at least 20 per minute.
pediatric-size bags: the cycling rate must be at least 40 per minute.
infant-size bags: the cycling rate must be at least 40 per minute.
Test Standard for all bags: The bag should:
Compress easily, and
Quickly re-expand to its original shape.
27
Chapter 3 Test Procedures
5. Clean up.
a. Replace the facemask, etc.
b. Confirm that you have all test equipment.
c. Return the bag-valve-mask resuscitator to the vehicle. How to test oxygen-powered resuscitators UMDNS: Resuscitators: Pulmonary, Gas-Powered (13-366) Quick Test
This is the only section for this test. There is no Part Two.
1. Test the resuscitator (or flow-restricted, oxygen-powered ventilation device (FROPVD)) head for leaks.
a. Slowly turn on the oxygen. ("Crack the tank.")
b. Immediately check for oxygen coming out of the resuscitator head.
Test Standard: Any oxygen flow should stop within one second.
c. Then make sure the cylinder is fully open.
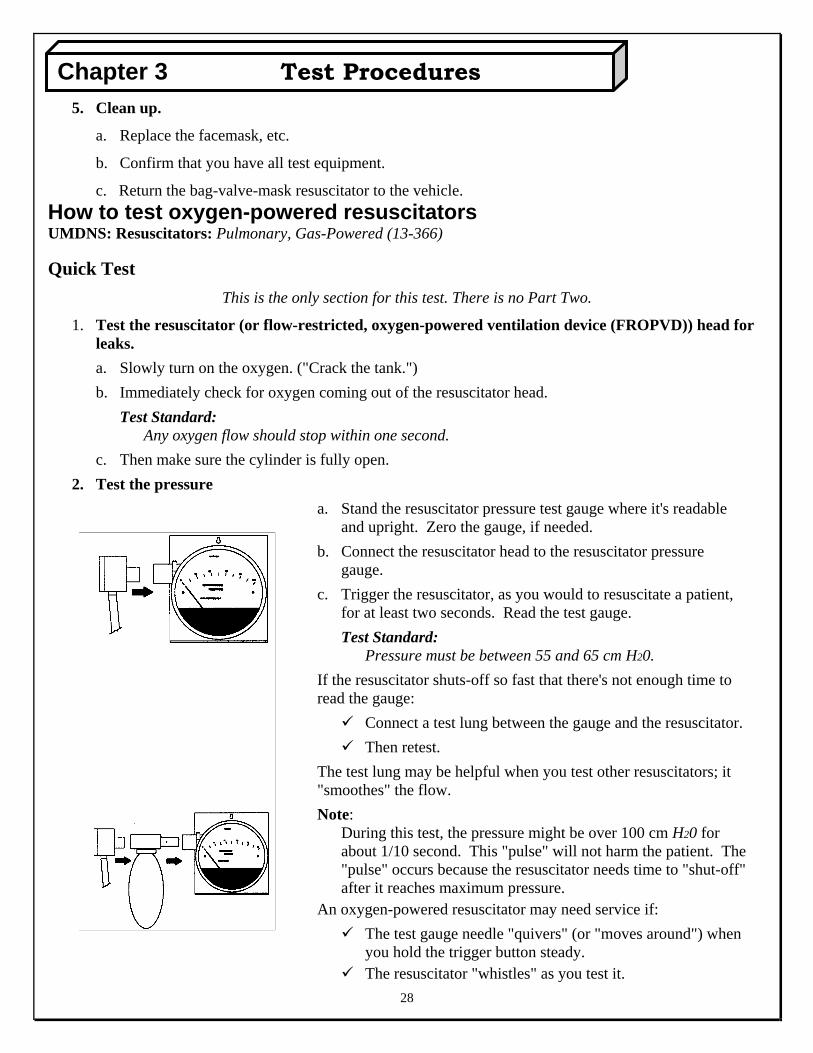
2. Test the pressure
a. Stand the resuscitator pressure test gauge where it's readable and upright. Zero the gauge, if needed.
b. Connect the resuscitator head to the resuscitator pressure gauge.
c. Trigger the resuscitator, as you would to resuscitate a patient, for at least two seconds. Read the test gauge.
Test Standard: Pressure must be between 55 and 65 cm H20.
If the resuscitator shuts-off so fast that there's not enough time to read the gauge:
Connect a test lung between the gauge and the resuscitator.
Then retest.
The test lung may be helpful when you test other resuscitators; it "smoothes" the flow.
Note: During this test, the pressure might be over 100 cm H20 for about 1/10 second. This "pulse" will not harm the patient. The "pulse" occurs because the resuscitator needs time to "shut-off" after it reaches maximum pressure.
An oxygen-powered resuscitator may need service if:
The test gauge needle "quivers" (or "moves around") when you hold the trigger button steady.
The resuscitator "whistles" as you test it. 28
Chapter 3 Test Procedures
Chapter 3
Quick Test - continued
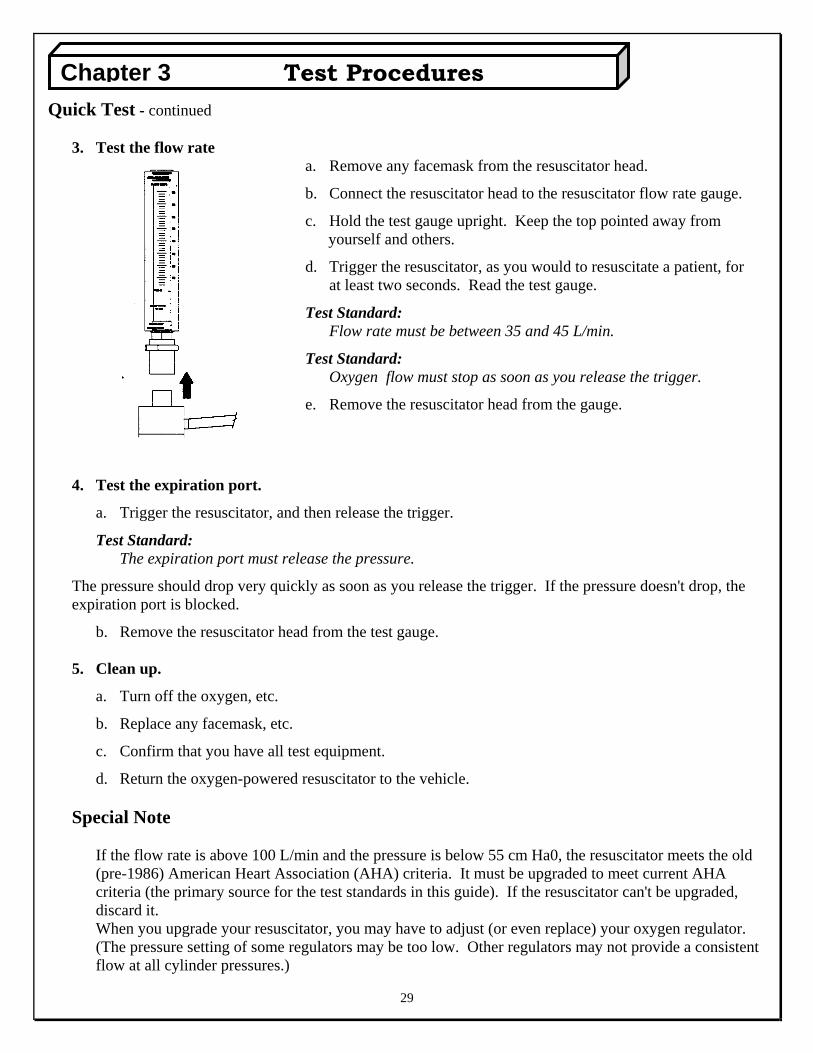
3. Test the flow rate
a. Remove any facemask from the resuscitator head.
b. Connect the resuscitator head to the resuscitator flow rate gauge.
c. Hold the test gauge upright. Keep the top pointed away from yourself and others.
d. Trigger the resuscitator, as you would to resuscitate a patient, for at least two seconds. Read the test gauge.
Test Standard: Flow rate must be between 35 and 45 L/min.
Test Standard: Oxygen flow must stop as soon as you release the trigger.
e. Remove the resuscitator head from the gauge.
4. Test the expiration port.
a. Trigger the resuscitator, and then release the trigger.
Test Standard: The expiration port must release the pressure.
The pressure should drop very quickly as soon as you release the trigger. If the pressure doesn't drop, the expiration port is blocked.
b. Remove the resuscitator head from the test gauge.
5. Clean up.
a. Turn off the oxygen, etc.
b. Replace any facemask, etc.
c. Confirm that you have all test equipment.
d. Return the oxygen-powered resuscitator to the vehicle.
Special Note
If the flow rate is above 100 L/min and the pressure is below 55 cm Ha0, the resuscitator meets the old (pre-1986) American Heart Association (AHA) criteria. It must be upgraded to meet current AHA criteria (the primary source for the test standards in this guide). If the resuscitator can't be upgraded, discard it. When you upgrade your resuscitator, you may have to adjust (or even replace) your oxygen regulator. (The pressure setting of some regulators may be too low. Other regulators may not provide a consistent flow at all cylinder pressures.)
29
Test Procedures
Special Note - continued
The flow rate of many existing oxygen-powered resuscitators and flow-restricted, oxygen-powered ventilation device (FROPVD) resuscitators is reduced by placing a "flow rate reducer" (supplied by the manufacturer) in the oxygen supply hose. Reducing the oxygen supply to a flow-restricted, oxygen- powered ventilation device (FROPVD) resuscitator may mean:
Patients who are resuscitated will receive oxygen at a flow rate that meets AHA criteria.
Breathing patients who receive oxygen via the flow-restricted, oxygen-powered ventilation device (FROPVD) (triggered when the patient inhales), may not receive enough oxygen.
Contact the manufacturer to confirm that an upgraded flow-restricted, oxygen-powered ventilation device (FROPVD) resuscitator will provide clinically adequate amounts of oxygen when used as a flow-restricted, oxygen-powered ventilation device (FROPVD).
How to test oxygen flowmeters UMDNS: Flowmeters, Gas (11-748)
Humidifiers Non-heated (12-051)
Types of flowmeters
This section describes the two generic types of oxygen flowmeters.
Dial-type flowmeters:
Provide oxygen only at specific, preset flow rates. The possible flow rate settings are marked on a dial.
Non-dial-type flowmeters:
Provide oxygen at any point in their range. The flow rate will be shown by:
A "floating ball," or
A "rising stem," or
A small oxygen gauge.
30
Chapter 3 Test Procedures
Part One: Quick Test
This section of the test lets you find out if your flowmeter is accurate.
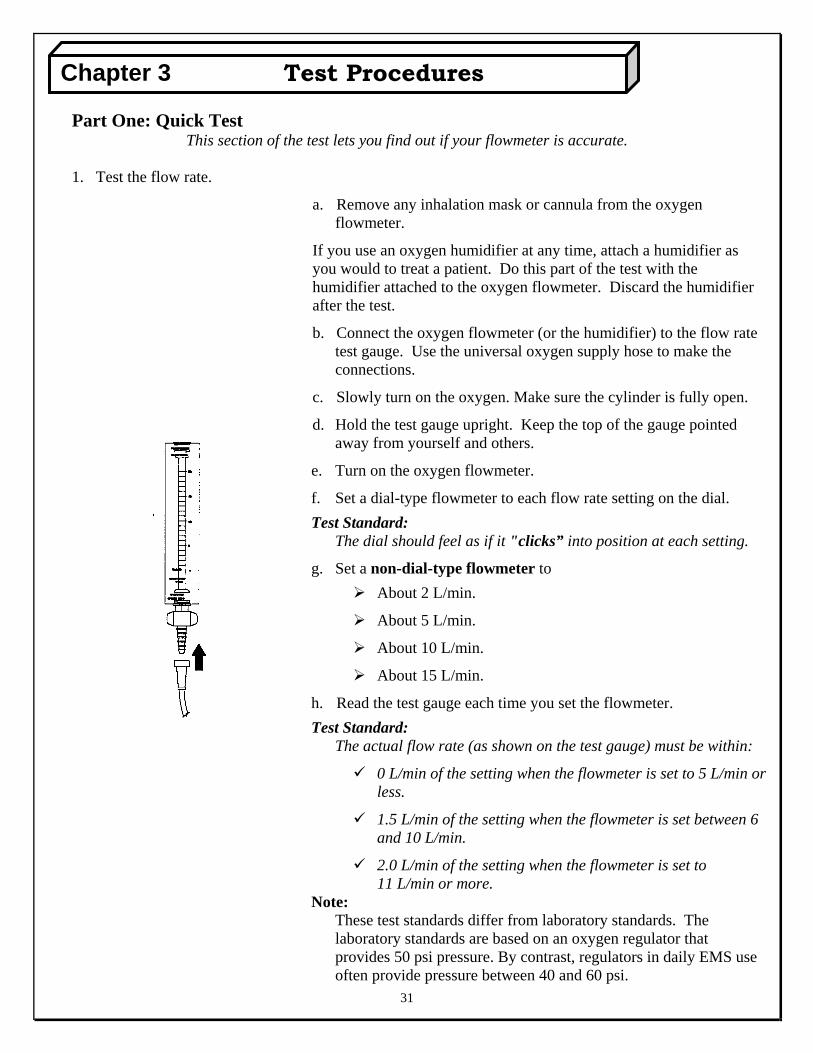
1. Test the flow rate.
a. Remove any inhalation mask or cannula from the oxygen flowmeter.
If you use an oxygen humidifier at any time, attach a humidifier as you would to treat a patient. Do this part of the test with the humidifier attached to the oxygen flowmeter. Discard the humidifier after the test.
b. Connect the oxygen flowmeter (or the humidifier) to the flow rate test gauge. Use the universal oxygen supply hose to make the connections.
c. Slowly turn on the oxygen. Make sure the cylinder is fully open.
d. Hold the test gauge upright. Keep the top of the gauge pointed away from yourself and others.
e. Turn on the oxygen flowmeter.
f. Set a dial-type flowmeter to each flow rate setting on the dial.
Test Standard: The dial should feel as if it "clicks” into position at each setting.
g. Set a non-dial-type flowmeter to
About 2 L/min.
About 5 L/min.
About 10 L/min.
About 15 L/min.
h. Read the test gauge each time you set the flowmeter.
Test Standard: The actual flow rate (as shown on the test gauge) must be within:
0 L/min of the setting when the flowmeter is set to 5 L/min orless.
1.5 L/min of the setting when the flowmeter is set between 6 and 10 L/min.
2.0 L/min of the setting when the flowmeter is set to 11 L/min or more.
Note: These test standards differ from laboratory standards. The laboratory standards are based on an oxygen regulator that provides 50 psi pressure. By contrast, regulators in daily EMS use often provide pressure between 40 and 60 psi.
31
Chapter 3 Test Procedures
32
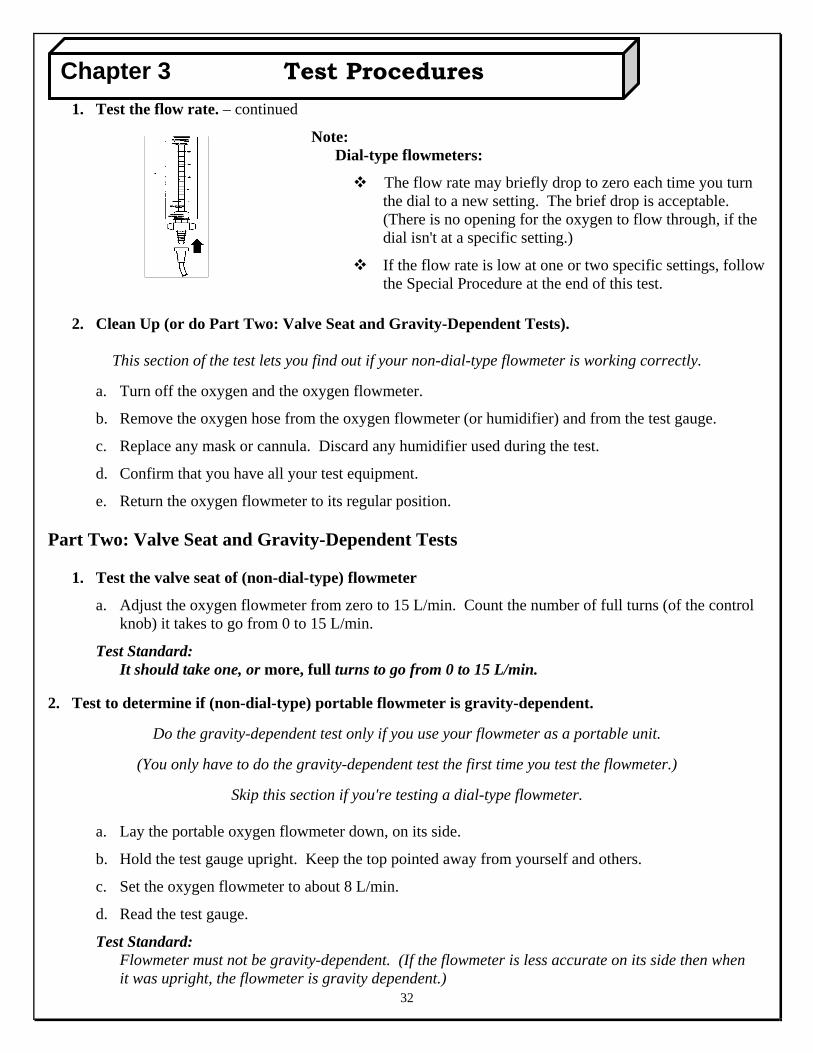
1. Test the flow rate. – continued
Chapter 3
Note: Dial-type flowmeters:
The flow rate may briefly drop to zero each time you turn the dial to a new setting. The brief drop is acceptable. (There is no opening for the oxygen to flow through, if the dial isn't at a specific setting.)
If the flow rate is low at one or two specific settings, follow the Special Procedure at the end of this test.
2. Clean Up (or do Part Two: Valve Seat and Gravity-Dependent Tests).
This section of the test lets you find out if your non-dial-type flowmeter is working correctly.
a. Turn off the oxygen and the oxygen flowmeter.
b. Remove the oxygen hose from the oxygen flowmeter (or humidifier) and from the test gauge.
c. Replace any mask or cannula. Discard any humidifier used during the test.
d. Confirm that you have all your test equipment.
e. Return the oxygen flowmeter to its regular position. Part Two: Valve Seat and Gravity-Dependent Tests
1. Test the valve seat of (non-dial-type) flowmeter
a. Adjust the oxygen flowmeter from zero to 15 L/min. Count the number of full turns (of the control knob) it takes to go from 0 to 15 L/min.
Test Standard: It should take one, or more, full turns to go from 0 to 15 L/min.
2. Test to determine if (non-dial-type) portable flowmeter is gravity-dependent.
Do the gravity-dependent test only if you use your flowmeter as a portable unit.
(You only have to do the gravity-dependent test the first time you test the flowmeter.)
Skip this section if you're testing a dial-type flowmeter.
a. Lay the portable oxygen flowmeter down, on its side.
b. Hold the test gauge upright. Keep the top pointed away from yourself and others.
c. Set the oxygen flowmeter to about 8 L/min.
d. Read the test gauge.
Test Standard: Flowmeter must not be gravity-dependent. (If the flowmeter is less accurate on its side then when it was upright, the flowmeter is gravity dependent.)
Test Procedures

33
Chapter 3
3. Clean Up
a. Turn off the oxygen and the oxygen flowmeter.
b. Disconnect the test gauge from the oxygen flowmeter.
c. Replace any mask or cannula.
d. Confirm that you have all test equipment.
e. Return the portable unit to the vehicle.
Special Procedure
Follow this section of the test if your dial-type flowmeter had a low flow rate at one or two settings.
Test to find out if the low flow rate on a dial-type flowmeter was a "false reading."
a. Keep the oxygen flowmeter operating. Keep the test gauge connected. Keep reading the test gauge.
b. Set the flowmeter to zero (or off), and then set it directly to the setting that was low.
c. Read the test gauge.
If the flow rate meets the test standards, the low flow rate was false. (The internal parts of the flowmeter "stayed" at the lower setting during your first test.)
If the flow rate is still low, the oxygen flowmeter needs repair.
d. Resume the normal test procedure.
Test Procedures
34
Chapter 4
UMDNS: Canisters, Aspirator Collection (10-211) Resuscitators, Pulmonary, Manual, Disposable (17-592) Humidifiers, Nonheated (12-051)
Disposable suction unit collection canisters
Disposable collection canisters can fail in use. If the canister leaks because a lid isn't tight or some other problem, you'll "loose" vacuum. If the canister has a blocked interior port, a good flow rate will not occur.
If using a disposable collection canister, perform all of the following:
1. Carry a spare canister in case there's a problem with the first unit.
2. Visually check each canister for defects when first received.
3. Store the canister following the manufacturer's instructions.
4. Be sure everyone knows how to connect each brand of canister to the suction unit.
5. Do a "Quick Test" when you install a new canister.
Disposable bag-valve-mask resuscitators
Some brands of disposable bag-valve-mask resuscitators had high failure rates when it first came onto the market. Those problems seem to have been corrected. However, it is still possible for a disposable unit to fail when you try to use it.
If you use a disposable bag-valve-mask resuscitator, perform all of the following:
1. Carry a spare bag-valve-mask resuscitator in case there's a problem with the first unit.
2. Visually check each resuscitator for defects when first received.
3. Store the resuscitator following the manufacturer's instructions.
Don't crush or fold a disposable unit when you place it into a "jump bag" or a compartment.
Don't store a disposable unit in a soft-sided "jump bag" unless it's well protected from crushing.
4. Be sure everyone knows how to:
Assemble each brand of disposable resuscitator that your agency uses, and
How to connect each brand of resuscitator to an oxygen source.
Manufactures of bag-valve-mask’s can be sold compressed in boxes, i.e., Ambu Spur, should be opened to full extension for storage. If not extended they may not provide adequate oxygen when in use.
5. Do a complete "In-depth Test" if you start to use a new brand that just came onto the market.
Discard any unit that you test.
Using Disposables

35
Chapter 4
Disposable bag-valve-mask resuscitators - continued
6. If you use disposable units in freezing temperatures, test each brand you use to determine which is best for your climate. Chill the unit to the coldest temperature you regularly encounter, then do a complete "In-depth Test" of that unit. Discard any unit that you test.
Disposable oxygen humidifiers
Oxygen humidifiers can be a source of infection. If you use humidifiers, be sure to use only new, unused, single service, disposable humidifiers.
Some disposable humidifiers have failed in use. If you use humidifiers, test one unit as a sample, then discard. (Use the test procedure for oxygen flowmeters.) Do not test all your disposable humidifiers; you'll contaminate each unit that you test.
If you use humidifiers, perform all of the following when you give oxygen to a patient:
1. Confirm that oxygen is flowing from the mask or cannula.
2. As soon as you set the oxygen flowmeter (and periodically after that) look at the pop-off valve on the humidifier to see that it hasn't popped.
A popped valve means that your patient isn't receiving all the oxygen from the flowmeter; some oxygen is going to the atmosphere. If that happens, either:
a. Replace the humidifier with a spare humidifier, or
b. Remove the humidifier and connect the mask (or cannula) hose directly to the flowmeter.
Make sure everyone knows where the pop-off valve is, and what it looks like when closed, on each brand of humidifier.
Using Disposables
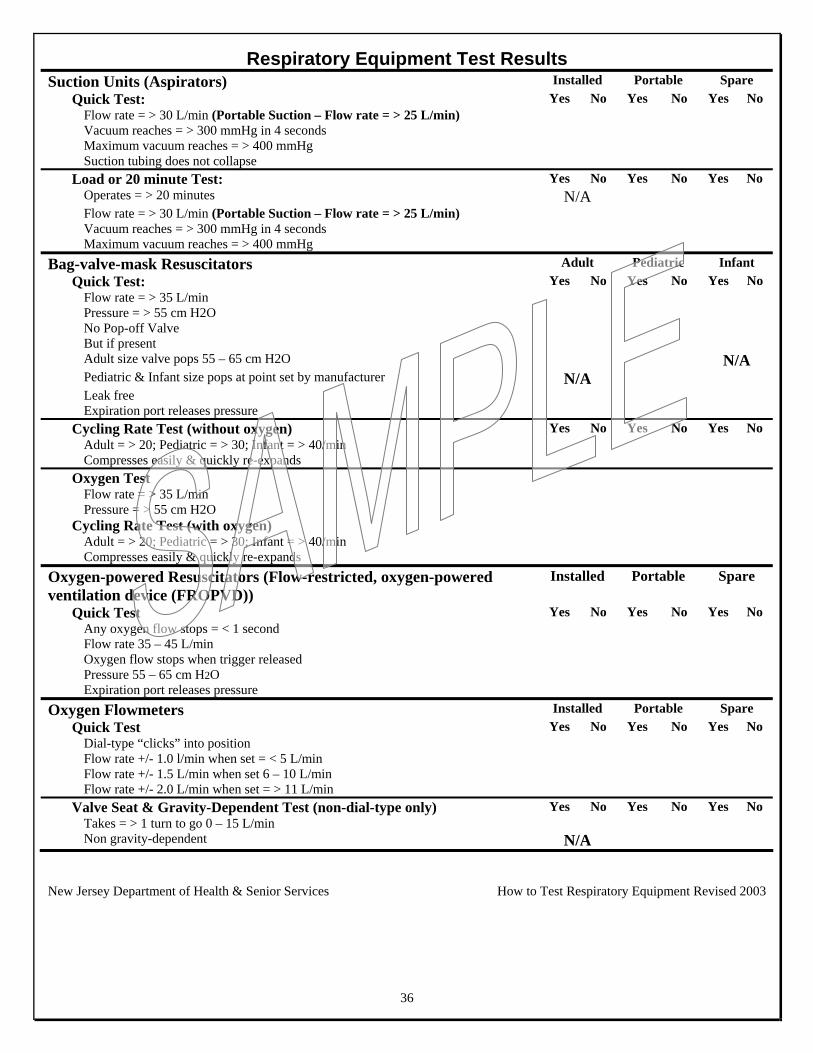
Respiratory Equipment Test Results Suction Units (Aspirators) Installed Portable Spare
Quick Test: Yes No Yes No Yes No Flow rate = > 30 L/min (Portable Suction – Flow rate = > 25 L/min) � � � � � �
Vacuum reaches = > 300 mmHg in 4 seconds � � � � � �
Maximum vacuum reaches = > 400 mmHg � � � � � �
Suction tubing does not collapse � � � � � �
Load or 20 minute Test: Yes No Yes No Yes No Operates = > 20 minutes N/A � � � �
Flow rate = > 30 L/min (Portable Suction – Flow rate = > 25 L/min) � � � � � �
Vacuum reaches = > 300 mmHg in 4 seconds � � � � � �
Maximum vacuum reaches = > 400 mmHg � � � � � �
Bag-valve-mask Resuscitators Adult Pediatric Infant Quick Test: Yes No Yes No Yes No
Flow rate = > 35 L/min � � � � � �
Pressure = > 55 cm H2O � � � � � �
No Pop-off Valve � � � � � �
But if present � � � � � �
Adult size valve pops 55 – 65 cm H2O � � � � N/A Pediatric & Infant size pops at point set by manufacturer N/A � � � �
Leak free � � � � � �
Expiration port releases pressure � � � � � �
Cycling Rate Test (without oxygen) Yes No Yes No Yes No Adult = > 20; Pediatric = > 30; Infant = > 40/min � � � � � �
Compresses easily & quickly re-expands � � � � � �
Oxygen Test
Flow rate = > 35 L/min � � � � � �
Pressure = > 55 cm H2O � � � � � �
Cycling Rate Test (with oxygen)
Adult = > 20; Pediatric = > 30; Infant = > 40/min � � � � � �
Compresses easily & quickly re-expands � � � � � �
Oxygen-powered Resuscitators (Flow-restricted, oxygen-powered ventilation device (FROPVD))
Installed Portable Spare
Quick Test Yes No Yes No Yes No Any oxygen flow stops = < 1 second � � � � � �
Flow rate 35 – 45 L/min � � � � � �
Oxygen flow stops when trigger released � � � � � �
Pressure 55 – 65 cm H2O � � � � � �
Expiration port releases pressure � � � � � �
Oxygen Flowmeters Installed Portable Spare Quick Test Yes No Yes No Yes No
Dial-type “clicks” into position � � � � � �
Flow rate +/- 1.0 l/min when set = < 5 L/min � � � � � �
Flow rate +/- 1.5 L/min when set 6 – 10 L/min � � � � � �
Flow rate +/- 2.0 L/min when set = > 11 L/min � � � � � �
Valve Seat & Gravity-Dependent Test (non-dial-type only) Yes No Yes No Yes No Takes = > 1 turn to go 0 – 15 L/min � � � � � �
Non gravity-dependent N/A � � � �
36
New Jersey Department of Health & Senior Services How to Test Respiratory Equipment Revised 2003