point of sale - maddenco of sale.pdf · hot sheet pricing inquiry ... this document will cover...
TRANSCRIPT

POINT OF SALE
MaddenCo Inc. Revised October 2009
Copyright © 2009 by MaddenCo, Inc
All rights reserved.

2
Please understand that MaddenCo has expended substantial sums in developing and maintaining its software, systems and related materials, and as a result, it has and will continue to have substantial proprietary interest and valuable trade secrets therein. Also understand that MaddenCo's software, systems, related materials and the "ideas" represented by software, as well as the physical materials, are valuable trade secrets and are strictly confidential material, and important, and that its confidentiality gravely affects the successful conduct of the business of MaddenCo.
3
Table of Contents
INTRODUCTION ............................................................................................................................. 7
COUNTER BILLING ....................................................................................................................... 9
WORK WITH OUTSTANDING ESTIMATES, WORK ORDERS AND INVOICES....................... 10 SEARCH FOR A TICKET.................................................................................................................. 10 WORK WITH A TICKET.................................................................................................................... 11
Edit an Outstanding Estimate, Work Order or Invoice ........................................................... 11 Void an Outstanding Estimate, Work Order or Invoice .......................................................... 11 Display an Outstanding Estimate, Work Order or Invoice...................................................... 15 Copy Line Items From a Work Order to an Estimate ............................................................. 15 Change an Estimate to a Work Order .................................................................................... 17 Assign a Mechanic to Detail Line Items ................................................................................. 17 Enter Outside Purchase Information ...................................................................................... 17 Reset an Outstanding Ticket .................................................................................................. 18
AVAILABLE FUNCTIONS ................................................................................................................. 19 Product Inquiry ....................................................................................................................... 19
Show Only Certain Products............................................................................................... 19 Display Products By Size, Vendor, Product Number or Search Key.................................. 20 Product and Pricing Inquiry Views...................................................................................... 21 View 1 ................................................................................................................................. 22 View 2 ................................................................................................................................. 24 Views 3, 4, 5 and 6 ............................................................................................................. 25 View 7 ................................................................................................................................. 25 View 8 ................................................................................................................................. 26 View 9 ................................................................................................................................. 26 View 10 ............................................................................................................................... 27 View 11 ............................................................................................................................... 27 View 12 ............................................................................................................................... 28 View 13 ............................................................................................................................... 29 View 14 ............................................................................................................................... 30 View 15, 16, 17, and 18 ...................................................................................................... 31 Display Product URL (Internet Address) ............................................................................ 39 Product Inquiry View Selection and Defaults...................................................................... 41 Product Inquiry Options ...................................................................................................... 41
Hot Sheet Pricing Inquiry........................................................................................................ 49 Hot Sheet Inquiry.................................................................................................................... 51
VEHICLE HISTORY FILE................................................................................................................. 56 Work With Vehicles ................................................................................................................ 57 View a Vehicle’s History ......................................................................................................... 58 Inactivate a Vehicle Record.................................................................................................... 59 Merge Vehicle Records .......................................................................................................... 60 Create a New Vehicle Record ................................................................................................ 61 AAIA Vehicle Database .......................................................................................................... 61 Vehicle History Tax Exempt Codes........................................................................................ 68 Vehicle Maintenance Functions ............................................................................................. 72
START AN INVOICE WITH A VEHICLE ...................................................................................... 77 WORK WITH VEHICLES .................................................................................................................. 78 CUSTOMER NUMBER..................................................................................................................... 79 INVOICE HEADER .......................................................................................................................... 80
Salesman Number.................................................................................................................. 80 Ship to Customer.................................................................................................................... 80

4
Pickup at Store ....................................................................................................................... 80 Terms Code............................................................................................................................ 81 Customer Tax Exempt Code.................................................................................................. 81 State Code and Tax Authority ................................................................................................ 81
ADDING DETAIL LINE ITEMS............................................................................................................ 81 Find a Product ........................................................................................................................ 83 Select a Product to Bill ........................................................................................................... 83 Product Quantity and Price .................................................................................................... 84 Find Price ............................................................................................................................... 85 Auto-bill Products ................................................................................................................... 86 Packages................................................................................................................................ 87 Auto Products ......................................................................................................................... 88 Edit a Line Item ...................................................................................................................... 89
Costs................................................................................................................................... 91 Change Cost ....................................................................................................................... 91 Protect FET......................................................................................................................... 91
Deleting a Detail Line Item ..................................................................................................... 91 Add Additional Detail Line Items ............................................................................................ 92 Add a Message Line to a Ticket............................................................................................. 92 Subtotal Categories................................................................................................................ 92 F8 Change View..................................................................................................................... 92
END AN INVOICE OR WORK ORDER................................................................................................. 93 Mileage, License Number and VIN# Input ............................................................................. 94 Tendering the Invoice............................................................................................................. 95
Tendering Cash .................................................................................................................. 97 Check Payments................................................................................................................. 98 Electronic Check Verification .............................................................................................. 98 Credit Card Payments ........................................................................................................ 99
START AN INVOICE WITHOUT A VEHICLE ............................................................................ 101 NEXT INVOICE NUMBER............................................................................................................... 102 CUSTOMER NUMBER TO BE INVOICED .......................................................................................... 102 INVOICE HEADER........................................................................................................................ 103
Ship to Customer Number.................................................................................................... 104 Pickup at Store ..................................................................................................................... 104
SELECTING MULTIPLE PRODUCTS TO BILL..................................................................................... 105 Purchase Order Required .................................................................................................... 107 Closing a Charge (on account) Invoice ................................................................................ 108
PROCESSING A TIRE ADJUSTMENT ...................................................................................... 109 BILL THE CUSTOMER THE REPLACEMENT TIRE(S) .......................................................................... 109 PROCESS THE ADJUSTMENT CREDIT ............................................................................................ 110
Enter the Product Number to be Adjusted ........................................................................... 110 Enter Adjustment Information............................................................................................... 111 Edit Adjustment amount and Enter Claim Number .............................................................. 113 Adjustment Ticket Detail....................................................................................................... 114
CASING PURCHASE IN POINT OF SALE ................................................................................ 115 FIND CASING PRODUCT NUMBER.................................................................................................. 116 QUANTITY AND PRICE OF THE CASING PURCHASE ......................................................................... 117 AUTOMATICALLY RECEIVE CASING PURCHASE .............................................................................. 118
CREDITS IN POINT OF SALE.................................................................................................... 119
ESTIMATES IN POS................................................................................................................... 121 NEXT ESTIMATE NUMBER ............................................................................................................ 121

5
END THE ESTIMATE..................................................................................................................... 122 EMAIL AN ESTIMATE FROM POINT OF SALE................................................................................... 124
APPENDIX A AUTO BILLING................................................................................................ 127 SETTING UP AUTO BILLING.......................................................................................................... 127
Customer Auto-bill Code ...................................................................................................... 127 Product Auto-bill Code ......................................................................................................... 128 Control File Maintenance ..................................................................................................... 128
Product.............................................................................................................................. 129 Quantity............................................................................................................................. 129 Multiply Quantity By .......................................................................................................... 129 % of Original Item's Price Min Price Max Price ........................................................... 129 Free................................................................................................................................... 130 Allow Delete ...................................................................................................................... 130 Include in Inquiry Total Price ............................................................................................ 130
Auto Bill Messages............................................................................................................... 130 Auto Bill Product Registration Input Line(s) ......................................................................... 131 Auto-bill Products in POS..................................................................................................... 132
APPENDIX B TENDER MAINTENANCE ................................................................................. 133 TENDER CODE MAINTENANCE..................................................................................................... 133 STORE TENDER MASTER MAINTENANCE...................................................................................... 135
APPENDIX C SETTING UP CREDIT REASON CODES ......................................................... 139 CREDIT REASON CODES............................................................................................................. 139
APPENDIX D SETTING UP AND USING PACKAGES .......................................................... 140 PACKAGE PRODUCTS ................................................................................................................. 140
Package Bill of Material........................................................................................................ 140 Package calculations ........................................................................................................ 143

6

7
Introduction In this document, we will explain how to create and edit estimates, work orders and invoices in the Tire Dealer System’s Point of Sale module. We will cover using your customers’ vehicle information to create work orders and how to link invoiced items to those vehicles. We will discuss how to search for product information, including availability and pricing, and how to add products to a work order. Finally, we will cover processing tire adjustments and casing purchases and recording outside purchase information. From the Starting Menu, take Option 1 for the Tire Dealer System.
This will take a user to the Tire Dealer System menu.

8
Here, take Option 8 – for the Point of Sale menu.

9
Counter Billing
This document will cover Counter Billing – Option 4.
10
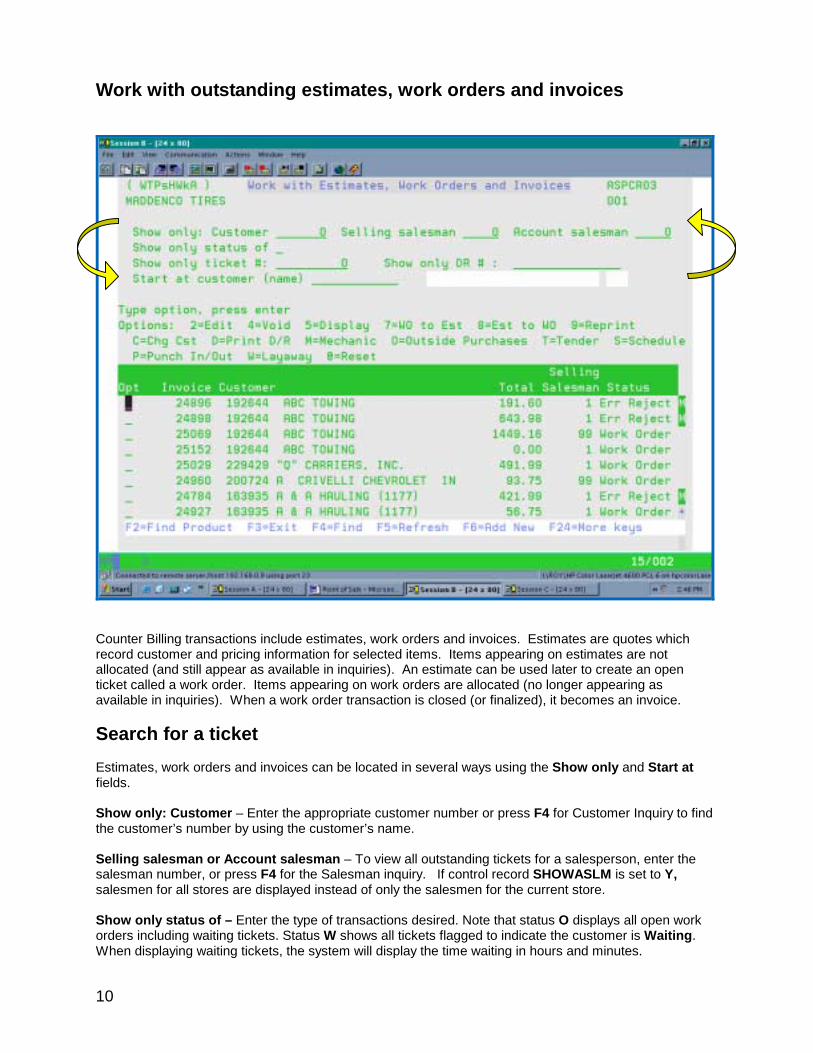
Work with outstanding estimates, work orders and invoices
Counter Billing transactions include estimates, work orders and invoices. Estimates are quotes which record customer and pricing information for selected items. Items appearing on estimates are not allocated (and still appear as available in inquiries). An estimate can be used later to create an open ticket called a work order. Items appearing on work orders are allocated (no longer appearing as available in inquiries). When a work order transaction is closed (or finalized), it becomes an invoice. Search for a ticket Estimates, work orders and invoices can be located in several ways using the Show only and Start at fields. Show only: Customer – Enter the appropriate customer number or press F4 for Customer Inquiry to find the customer’s number by using the customer’s name. Selling salesman or Account salesman – To view all outstanding tickets for a salesperson, enter the salesman number, or press F4 for the Salesman inquiry. If control record SHOWASLM is set to Y, salesmen for all stores are displayed instead of only the salesmen for the current store. Show only status of – Enter the type of transactions desired. Note that status O displays all open work orders including waiting tickets. Status W shows all tickets flagged to indicate the customer is Waiting. When displaying waiting tickets, the system will display the time waiting in hours and minutes.

11
Status I will show only Invoiced transactions. When displaying closed invoices, the F8 Change View function changes the status column to display:
• Method of payment used for the invoice (Split indicates several methods of payment) • Balanced, if the invoice was included in the cash drawer when the drawer was balanced (if
control record POSUPBAL is set to Y.) • Closing salesman (if control record CDBYSLM is set to Y)
Status V shows only Voided transactions. Voided estimates are not displayed in the list of tickets unless control record SHOWCNCL is set to Y. Press F4 to see a list of possible status codes. Show only ticket # - Enter the ticket number to display only that ticket. Show only reference # - Enter the reference number to display only the ticket associated with that reference number. This option is used to locate specific national account transactions. A user can change the label on this field to display Show only DR#, if control record REFORDR is set to D. Start at customer – Enter the customer’s name to display tickets alphabetically starting at the input customer name. Work with a ticket Enter the option desired beside the appropriate ticket: Edit an Outstanding Estimate, Work Order or Invoice To edit a ticket, enter Option 2 beside the ticket and press <enter>. Here you can add ship to information or add additional products. For a closed invoice, a user can change the terms, salesman number, mechanic number and payment method. Once an invoice has been processed by the daily update, it is no longer available to edit.
Void an Outstanding Estimate, Work Order or Invoice Enter a <4> next to estimates or work orders to void the transaction. If control record VCLOSED is set to Y, a user can also void a closed invoice by entering Option <4> beside the ticket, if the user has authority to void an invoice If control record OPALVOID is answered with a N, then the user will not be allowed to void a workorder or invoice that contains an item with an outside purchase quantity. The user must first remove the outside purchase quantity. If control record OPALWDEL is answered with a N, then the user will not be allowed to delete a line item from a workorder that contains an outside purchase quantity. The user must first remove the outside purchase information.

12
Additionally, a password can be required when voiding a ticket, if control record VPWDREQ is set to Y. Please call Technical Support to implement this feature.
Enter in your salesman number and password and press <enter>.

13
Whether a password is required or not, the void confirmation screen will be displayed.
Entering an N will end the void function and you will return to the Work with Estimates, Work orders and Invoices screen. The transaction status will not change. If you answered Y to void the ticket, an additional screen will be displayed to enter the reason for voiding this ticket. Entry of a reason is mandatory.

14
If control record VOIDMEMO is set to Y, an additional memo screen is displayed after the void reason screen.
Additional information about the transaction may be entered here. After pressing <enter>, a user will return to the ‘Work with Estimates, Work Orders and Invoices’ screen. The ticket’s status now indicates Void and the ticket will be removed during the next update. Voided work orders and invoices are updated to invoice history. Voided estimates can also post to invoice history if control record POSESTVD is answered Y.
15
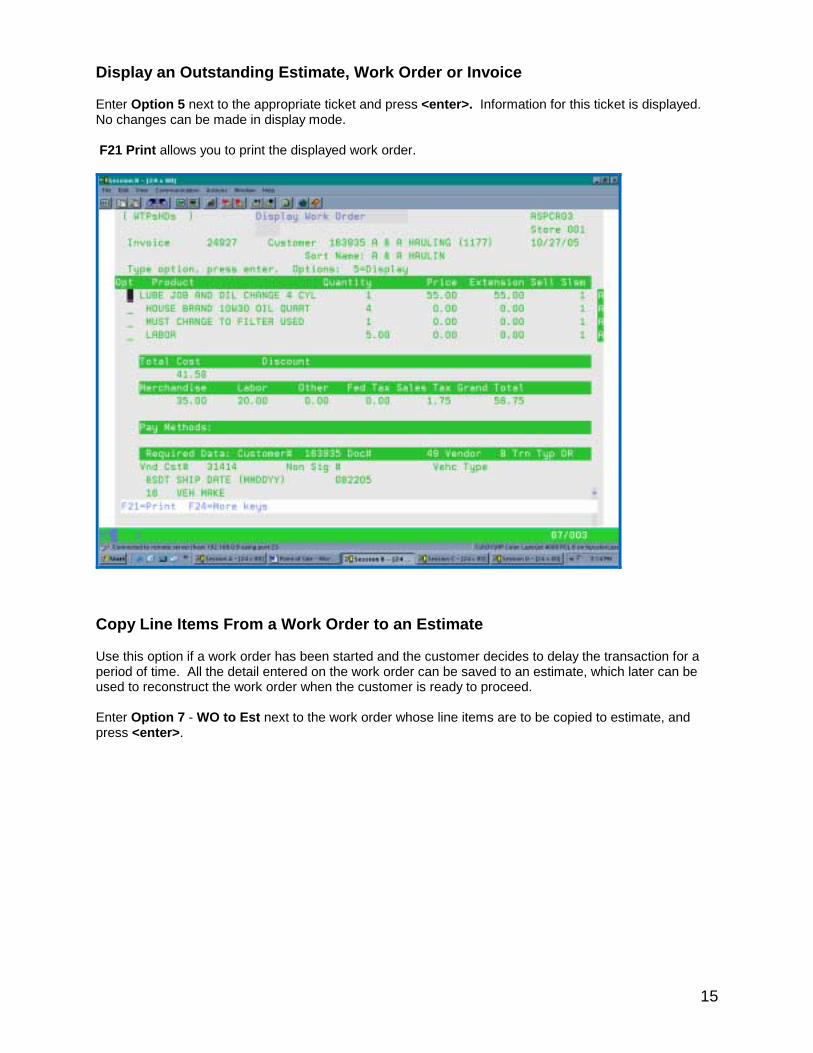
Display an Outstanding Estimate, Work Order or Invoice Enter Option 5 next to the appropriate ticket and press <enter>. Information for this ticket is displayed. No changes can be made in display mode. F21 Print allows you to print the displayed work order.
Copy Line Items From a Work Order to an Estimate Use this option if a work order has been started and the customer decides to delay the transaction for a period of time. All the detail entered on the work order can be saved to an estimate, which later can be used to reconstruct the work order when the customer is ready to proceed. Enter Option 7 - WO to Est next to the work order whose line items are to be copied to estimate, and press <enter>.
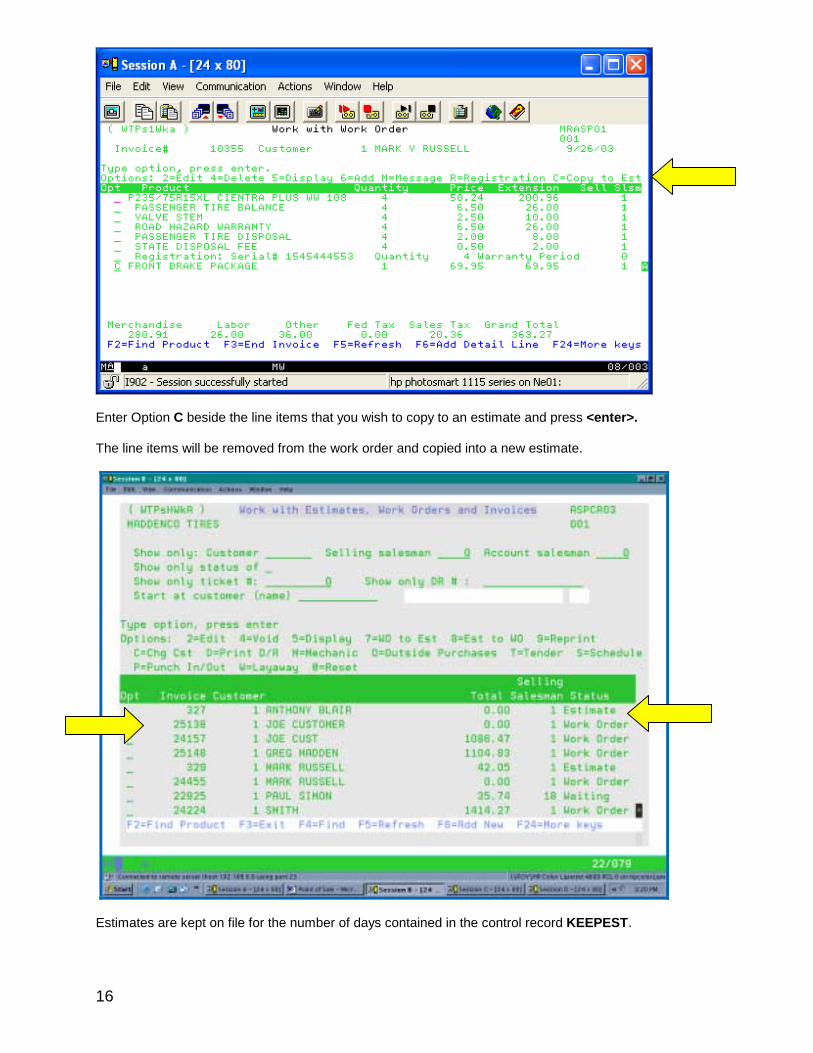
16
Enter Option C beside the line items that you wish to copy to an estimate and press <enter>. The line items will be removed from the work order and copied into a new estimate.
Estimates are kept on file for the number of days contained in the control record KEEPEST.

17
Change an Estimate to a Work Order When a customer comes back in to complete a transaction and has an estimate on file, you may enter Option 8 - Est to WO beside the estimate to create an open work order containing all the details. The system will assign the next invoice number to the work order and open up the ticket to be processed. Reprint a Ticket Enter Option 9 - Reprint beside the desired ticket to be reprinted and press <enter>. The ticket will print to the printer that is set up in the appropriate control records INVC, WRKO or ESTM. If control record POSRPINP is set to Y, you may enter a printer id. Assign a Mechanic to Detail Line Items Enter Option M beside a ticket to display a screen allowing entry of mechanic numbers on any line items requiring a mechanic (items with a Y in the mechanic commissionable field in product maintenance.).
<F4> to display a list of Mechanic numbers. Enter Outside Purchase Information Enter Option O beside the ticket and press <enter>. A screen is displayed allowing the entry of the outside purchase information. The outside purchase feature will be discussed in greater depth in the Advanced Point of Sale document.

18
Reset an Outstanding Ticket Occasionally, open tickets indicate a status of In Use, even though no one is working with the ticket. This status indicates the ticket processing did not end normally. This can happen when power failures or fleeting communication issues cause a workstation to lose contact with the system while a transaction is being edited. In order to access the ticket, it must be reset. If a user has authority to reset the ticket, the user should enter Option @ beside it and press <enter>. This will restore the ticket’s proper status.
19
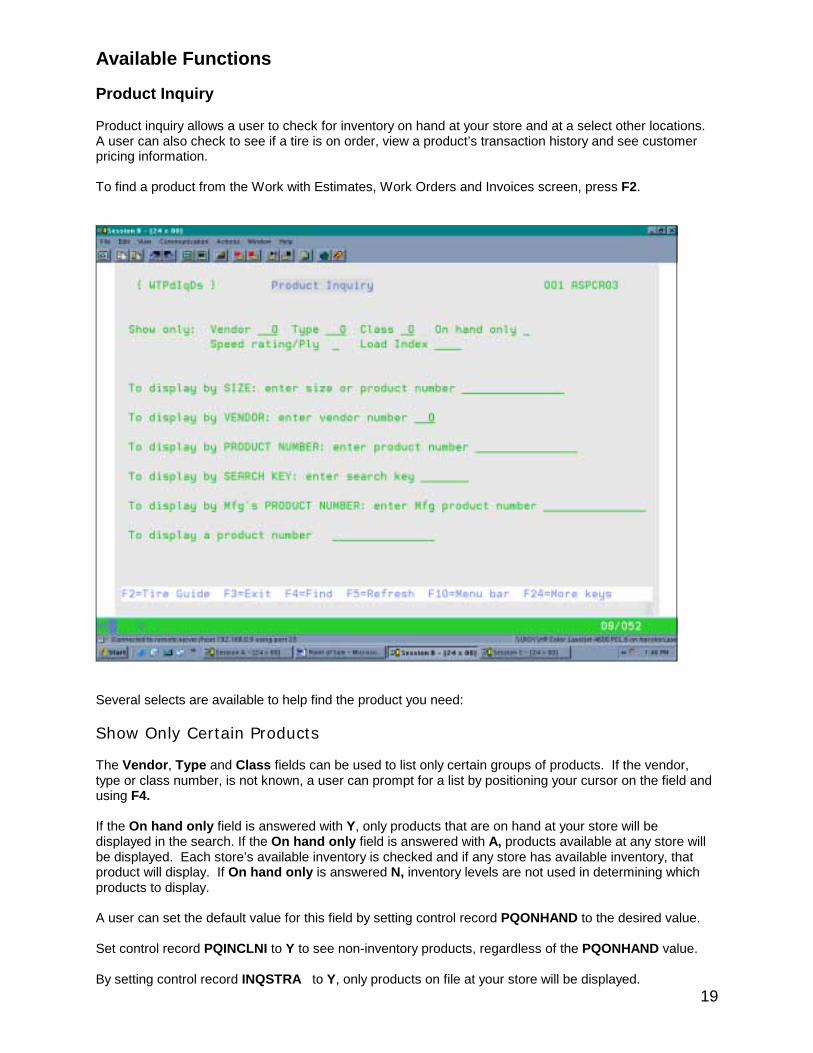
Available Functions Product Inquiry Product inquiry allows a user to check for inventory on hand at your store and at a select other locations. A user can also check to see if a tire is on order, view a product’s transaction history and see customer pricing information. To find a product from the Work with Estimates, Work Orders and Invoices screen, press F2.
Several selects are available to help find the product you need: Show Only Certain Products The Vendor, Type and Class fields can be used to list only certain groups of products. If the vendor, type or class number, is not known, a user can prompt for a list by positioning your cursor on the field and using F4. If the On hand only field is answered with Y, only products that are on hand at your store will be displayed in the search. If the On hand only field is answered with A, products available at any store will be displayed. Each store’s available inventory is checked and if any store has available inventory, that product will display. If On hand only is answered N, inventory levels are not used in determining which products to display. A user can set the default value for this field by setting control record PQONHAND to the desired value. Set control record PQINCLNI to Y to see non-inventory products, regardless of the PQONHAND value. By setting control record INQSTRA to Y, only products on file at your store will be displayed.

20
Control record PQSOSPED allows a tire’s Speed rating/Ply to be used as a select in the Product Inquiry. Set this record to Y to see only products with the same speed rating as entered, or set to G to see products with an equal or greater speed rating. Control record PQSOLOAD allows a tire’s Load Index to be used as a select in the Product Inquiry. Set this record to Y to see only products with the same load index rating as entered, or set to G to see products with an equal or greater load rating. A user can press <F4> to prompt for a list of speed ratings or load indices. Display Products By Size, Vendor, Product Number or Search Key Products can be found using size, vendor, product number or search key information. Control record PQSTART contains a value indicating the field to first position the cursor: S to start at size, V to start at vendor, P to start at product, H to start at search key, 1 to start at the single product number line or O to start at the Show only selection entry line. Display by size Enter a product number or SIZE to display products whose size match the search value. Display by vendor Enter a VENDOR number to display the products for the entered vendor. Display by product number Enter a PRODUCT NUMBER to display products starting with the entered product number. Display by search key Products can be assigned a SEARCH KEY in product maintenance that can be used to search for categories of products. An example could be labor, valves, filters, or shocks. The search key could also be a model. Enter the search key to display the products matching the entered value. Refer to product maintenance to learn more about setting up search keys. Display a manufacturer’s product Enter in a Mfg’s PRODUCT NUMBER to display only products with this Manufacturer’s number. This view allows a user to search for multiple products and lines that carry like manufacturer’s product numbers. Display a product Enter in a PRODUCT NUMBER to display only that product’s information. If control record PQPOSSCR is set to Y, an abbreviated product inquiry screen is displayed with fewer options.

21
Product and Pricing Inquiry Views Customer specific pricing will be displayed in product inquiry, if a user enters a customer number in the Show only: Customer field on the Work with Estimates, Work Orders and Invoices screen before pressing <F2> to Find Product. You can set a default customer number for the product inquiry by setting up control record PQDFTCST with the desired seven-digit customer number. Typically, this is set with the walk-in customer number. Additionally, a user can limit which products are displayed to only those an entered customer is allowed to purchase, if Can Buy maintenance has been set up for the entered customer. Set control record PQCANBUY to Y. See the Accounts Receivable document for information on implementing the Can Buy feature. Two control records determine the overall order in which products appear in the inquiry. First, INQSIZE indicates the product inquiry is done by Size (if set to Y) or by Class then Size (if the record is set to N.) The default setting is by Class/Size. Next, control record PQSORT defaults to ordering products by TYPE/WALL CODE (a value of TW). The order may be changed by setting the control record to other values:
• S9 (where 9 represents one of the selling price levels). • P$x9 (dollar profit) where x is A for actual or R for replacement Cost, 9 is selling a price level • P%x9 (dollar profit %) where x is A for actual or R for replacement Cost, 9 is a selling price level • SEARCH (by search key) • VT (by vendor, type, wall code (within size)) • RATE (by products’ speed ratings). Speed ratings are displayed in the order: undefined ratings,
un-rated (blank), M, N, P, Q, R, S, T, U, H, V, Z, W, and then Y rated. Further, letters A thru L will display alphabetically. B thru L are often used as the ply rating for truck and farm tires.
• OH (most available inventory). As available inventory for a product is constantly changing, the order in which products are displayed (within size) will be constantly changing if a user chooses this sort. This may not be what is desired. This value will create more of a processing load on the system as inventory levels change throughout the day.
NOTE: If the product inquiry sort order is changed by changing the value of the PQSORT
control record, a user must re-order the product file by running a program on the Miscellaneous Product menu - Create Product Inquiry "Extra”.
To get to this option, select the More Options Menu from the Tire Dealer Start Menu. Select the Other Options Menu and then the Miscellaneous Other Options Menu. This program may take a long time to run if the Product File is very large. A user must have special authority to access this option.

22
Use the <F8> and <F9> keys to roll forward and backwards through the different views. View 1
This view shows the price for one, two and four tires at the customer’s price.

23
If control record PQSWIMSG is set to Y, then line two of each product will list the product number, manufacturer’s warranty and the U.T.Q.G. Line three lists up to 75 characters of information about the tire. This product information can be added to a product thru product maintenance by using the F8 - Info function. Refer to the product maintenance manual for more information on this feature. If control record PQMSRPPC is set up with a price code, an optional field displaying the M.S.R.P is displayed as well.

24
View 2
View 2 displays the product number, description, price and availability. The availability shows for this store and the total available at all other stores. The price includes Federal Excise Tax, if applicable. If the entered customer has a discounted price set up for an item, the correct price is displayed and is flagged with d to designate a discounted price.

25
Views 3, 4, 5 and 6 These views show the available inventory by store.
Up to 24 stores can be designated for viewing. Control records PNQTBL and PNQTB2 can each contain up to twelve three digit store numbers to indicate the stores whose inventory will be displayed in the inquiry. Control records PNQTB999 and PNQT2999 allow a user to set up an inquiry store list by individual store (that’s the 999 in the key.) This can be useful if a user wants stores in a certain area or region to view products for stores only in that region. View 7
View 7 shows the inventory on order by select stores.

26
View 8
View 8 displays the product description, product class, size code, sort value, and product number. View 9
View 9 displays the product description, two price levels and availability. You may choose which price levels are displayed by answering control records PQSLPRC1 and PQSLPRC2 with the desired price levels. The label for each price is contained in the control record PQHDPRC9 (where the 9 is replaced with a price level.) The price displayed in this view does not include FET. Notice the FET is displayed as a separate column.

27
View 10
View 10 is similar to the look of View 1. In this view, though, the products are displayed with the price for one, one plus any added auto bill products and four plus any added auto bill products. The automatic billing of products is detailed in the later section Auto Billing. As with view 1, the additional product information is displayed if control record PQSWIMSG is answered with Y. The M.S.R.P. is displayed if control record PQMSRPPC is set up with a valid price code. View 11
This view shows the customer’s price plus FET, along with product quantity on hand, quantity allocated, and quantity available (memo – allocated).

28
View 12 Limited Order Entry View
The above view is available from all product inquiries, by size, by vendor, by product number, and by search key. This view shows product description, the customer’s price per unit, and a message indicating product availability. It is expected that this view will be used by clients allowing their customers to access their system to place orders and view inventory, but not wanting their customers to see on hand unit information. Product availability is listed for each product as:
• Available – indicating there is adequate stock at this location. • Low stock – indicating product is on hand, but at low level. The low stock level threshold may be
set using control record PQMINLOW. Set the value to the stock level at which products will display low stock.
• Available at other locations -- indicating no inventory at this location, but other locations have adequate stock on hand.
• Low stock at other locations -- indicating no inventory at this location and only limited inventory at other locations.
• On order – indicating no available product at this location, but the product is on order from the vendor.
• On order at other locations – indicating the product is not available or on order at this location and the product is on order at other locations.
• Out of stock – indicating the product is not available and is not on order.

29
View 13 Product Inquiry showing Distributor’s Available Inventory If a company is an ASP client doing business through the Tire Dealer Network, an additional column can be displayed in product inquiry: Available inventory at a selected distributor.
Only the available inventory of another ASP client can be shown. MaddenCo must set the appropriate control records to enable this display.

30
View 14 Manufacturer’s Product Number View
This view lists the manufacturer’s product number, the company’s product number, 30 characters of product description, price plus FET, and available inventory. Prices over $999.99 will show as 999.99+. Available inventory will show as 99+ if the available inventory level is more than 99 units. (Likewise it will show 99- if quantity available is more than 99 units negative). This view is available in all product inquiries, by size, by vendor, by product number, and by search key. Inquiring by manufacturer’s product number will always start with this view, since it shows the manufacturer’s product number.

31
View 15, 16, 17, and 18 Custom view. These views are designed by the user. Up to nine product fields can be displayed on each view. These Views are determined by control records which will need to be added. These control records can be created by user, workstation or store, and/or system wide. This gives you the flexibility to show the end user only the information that they would like to see. . However, it is suggested that the custom views initially be set up system wide. You can add control records PQVIEW15, PQVIEW16, PQVIEW17, and PQVIEW18 to use this feature. This is an example of PQVIEW15.
Up to nine field codes indicating the data to be displayed in each view can be added. Use the ‘Find fields to display’ function to get a list of the data available for display as shown on the next page.

32
The Find Product Inquiry Codes panel will display a list of all data available for display for a product. Select the fields to be displayed by placing a number, 1 thru 9, next to the field desired to be displayed. The fields will be displayed in the sequence of the number placed next to them.
Also, note the number in front of each field description. This is the width of the field you are selecting. There are 74 characters allowed for each product, so don’t choose fields totaling more then 74 characters.

33
The code for each field will be returned along with the width of each field.
The total width of each field and a one-character space between each field is displayed. A total width is also displayed. The above example shows that 68 characters have been selected to display on View 15. 74 characters are available.

34
Product Inquiry View 15 is displayed above. This is the result of control key PQVIEW15 which was just added.

35
Note control record PQVIEW16, above. The total width has been exceeded.

36
The view generated from the control record above would look like this.
Note, the Hot Sheet Expiration date is truncated and the Replacement Cost dose not even show. This is because the total width has been exceeded.

37
One possibility would be to show the Product Number instead of the Description in the second view. This would save 17 characters putting our total width at 68, which is well within our 74 limit.

38
Above is the view with the Product Number instead of the product description.

39
Display Product URL (Internet Address) All product inquiry views have <F11> - Show Internet Address, if control record PQSHWURL is set to Y. The Internet address links to a manufacturer’s web site page can be added to the product in product maintenance. The user must have a w/s with an Internet browser in order to use this function.
To display this web page from product inquiry, you would double click on the associated Internet address. The terminal must be Internet capable for this function to display web pages. The Client Access session must be set up to display the URL as a ‘Hot Spot’ in order to launch your browser to the product’s web page.

40
The example, a passenger car tire’s web page is shown, where a user can look up information on all Michelin passenger car tires. A specific product page could be associated with a product record. See the Advanced Point of Sale Document for details on setting up this feature.
41
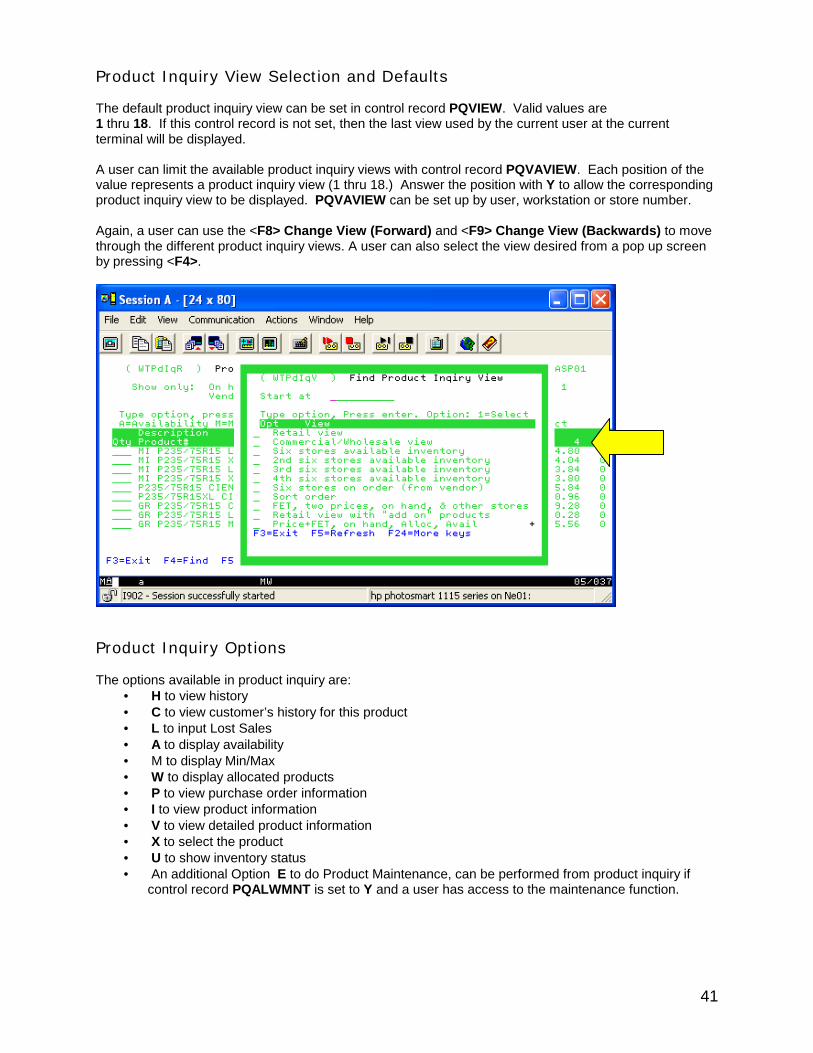
Product Inquiry View Selection and Defaults The default product inquiry view can be set in control record PQVIEW. Valid values are 1 thru 18. If this control record is not set, then the last view used by the current user at the current terminal will be displayed. A user can limit the available product inquiry views with control record PQVAVIEW. Each position of the value represents a product inquiry view (1 thru 18.) Answer the position with Y to allow the corresponding product inquiry view to be displayed. PQVAVIEW can be set up by user, workstation or store number. Again, a user can use the <F8> Change View (Forward) and <F9> Change View (Backwards) to move through the different product inquiry views. A user can also select the view desired from a pop up screen by pressing <F4>.
Product Inquiry Options The options available in product inquiry are:
• H to view history • C to view customer’s history for this product • L to input Lost Sales • A to display availability • M to display Min/Max • W to display allocated products • P to view purchase order information • I to view product information • V to view detailed product information • X to select the product • U to show inventory status • An additional Option E to do Product Maintenance, can be performed from product inquiry if
control record PQALWMNT is set to Y and a user has access to the maintenance function.

42
Option H - Product History
This option will display any movement of this product within the designated time period. History is displayed chronologically showing the date, type of transaction, reference number, quantity, price, cost and balance. Detailed information can be displayed by entering Option 5 next to the transaction and press <enter>. A user can display only a certain transaction type, a specific customer’s history or a report number.

43
Option C - Customer History Enter Option C beside a product and Product History pertaining to only the Product Inquiry customer will be displayed.
The history can be displayed by a date range and will show you the date, reference number, quantity, price and cost for the previous transactions. This is a good way to look up previous prices for this customer. The customer number and the product number can be changed to display different records. If control record PHIQUSIH is set to N, then a new version of the history inquiry by customer is used based on invoice history. .
44
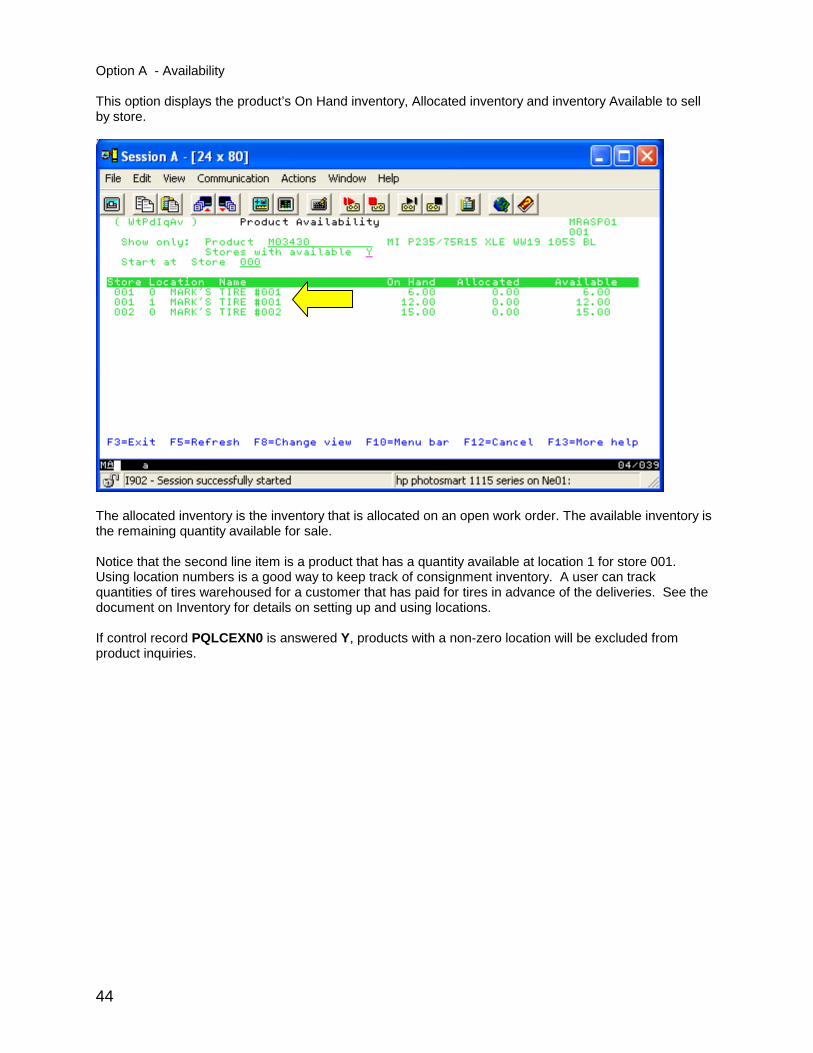
Option A - Availability This option displays the product’s On Hand inventory, Allocated inventory and inventory Available to sell by store.
The allocated inventory is the inventory that is allocated on an open work order. The available inventory is the remaining quantity available for sale. Notice that the second line item is a product that has a quantity available at location 1 for store 001. Using location numbers is a good way to keep track of consignment inventory. A user can track quantities of tires warehoused for a customer that has paid for tires in advance of the deliveries. See the document on Inventory for details on setting up and using locations. If control record PQLCEXN0 is answered Y, products with a non-zero location will be excluded from product inquiries.

45
Option M - Min/Max This option shows on hand, on order, allocated, available, minimum, maximum, and the suggested order quantities.
Option W - Allocated inventory This option will display the detailed information of where a product is allocated.
This option can help determine why a particular tire is not available – even though a user can see one on the rack. The inquiry shows the work order where the product is allocated.

46
Option P - Purchase Order Information This option displays any open purchase orders for this product, along with the ordered quantity and quantity remaining.
Option I - Product Information This option displays the inventory quantity, customer’s price, all price levels, and product SPIFF information.
For information on setting up and maintaining product SPIFs, refer to the Advanced Point of Sale document.

47
Option V - View Detail Product Information This option displays detailed information on the product, its inventory and sales.
The date last sold and received are displayed. The center section displays detailed inventory information. The bottom section displays detailed month to date sales and the six selling price levels. Option X - Select a Product Use option X to select the product to work with in counter billing.

48
Option E – Product Maintenance Control record PQALWMNT must be set to Y to enable this option in product inquiry. This control record can, and probably should, be set by user. The option takes a user directly into Product Maintenance for the selected item.

49
Hot Sheet Pricing Inquiry
In addition to the standard product inquiries, there is another way to find sale prices for products that need to move: Hot Sheet prices. These are special prices set up in a Product Maintenance Menu option, with the purpose of liquidating items thru bargain pricing.
In customer maintenance, a customer can be flagged to not allow Hot Sheet prices.
Allow Hot Sheet must be set to Y or be blank to allow a customer to take advantage of Hot Sheet pricing.
Individual products can be flagged to not allow Hot Sheet price maintenance to be entered. See the document on Product Maintenance for details on setting up Hot Sheet Pricing on products.
Hot Sheet Pricing in Product Inquiry
Hot Sheet prices will display in product inquiry if the customer is allowed Hot Sheet prices. The lower of the current Hot Sheet price or the customer’s price with any discounts applied will be displayed. A customer’s discounts, if any, will not be applied to the Hot Sheet price.
If using price when sorting products within Product Inquiry, it is recommend that the “Create Product Inq Extra” option be used from the Miscellaneous Product Menu. This will rebuild the product inquiry file using Hot Sheet Prices.

50
On some panels a lower case h will display next to prices that are the Hot Sheet prices. This is similar to the lower case d that denotes a discounted price. This will alert you that a Hot Sheet price is being displayed.

51
Hot Sheet Inquiry A list of all products on the Hot Sheet is available from the initial Product Inquiry panel, if Hot Sheet prices are allowed for the customer.

52
.
Products appear in the same order as in Product Inquiry.
Hot Sheet Inquiry is available to Limited Order Entry users, as well.
All views of the Product Inquiry by Size are available to the Hot Sheet Inquiry. If Limited Order Entry customers or your own users are restricted to particular views, only those views will be available to the customer or user.

53
Starting a Ticket from Product Inquiry or Hot Sheet Inquiry A Point of Sale ticket can be started from Product Inquiry. If you access Product Inquiry with a customer number (which you would do to get the correct pricing anyway,) and input quantities, a user will be asked whether an invoice should be started.
There is a customer number in our Show only : Customer field. Now press <F2> to Find Product, and start the search. If control record POSUSDFC is set to Y, and a Show Only Customer number has not been entered, the default customer from control record PQDFTCST is used as the invoice customer. In the example, products have been selected to sell by keying in quantities desired. Up to 200 products can be selected.
54
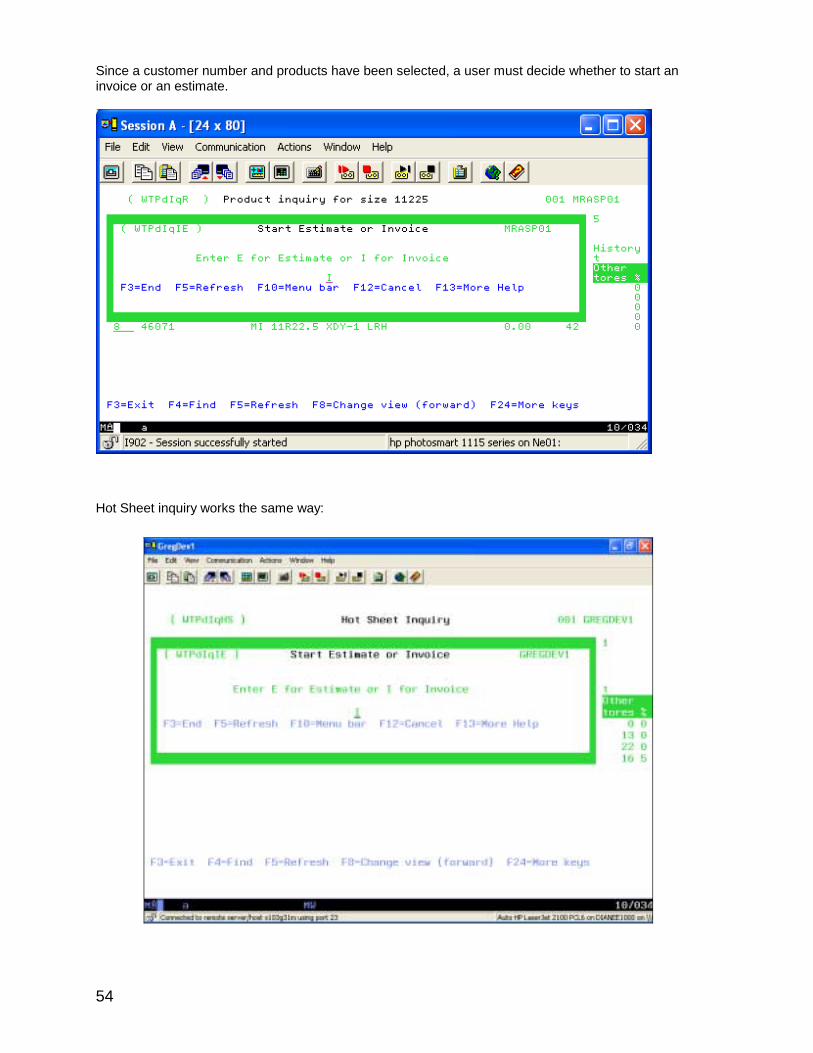
Since a customer number and products have been selected, a user must decide whether to start an invoice or an estimate.
Hot Sheet inquiry works the same way:

55
All selected products will automatically be added to the ticket along with any applicable automatically billed products.

56
Vehicle History File A user will want to associate the customer’s vehicle with this sale.
There are nine ways to search for customer vehicles from the Work with Vehicles by Owner screen. A user can change the type of search by pressing <F9> Search By. The nine search options are:
• Home phone number • Work phone number • Customer name • License number • VIN number • Last 8 digits of the VIN number • Fleet unit number • Customer number • All phone numbers
Control record VEHCFIND can be set up with nine Ys or Ns to determine which of the nine searches will be available. The default value is YYYYYYYYY. The order of the searches is as listed above. Control record VPHAC999 (where 999 represents the store number) contains the default area code for vehicle searches and entry of new vehicle records. Available functions in the Work with Vehicles by Owner are F3 Exit, F5 Refresh, F6 Add vehicle, F8 Change view, F9 Search by, F12 Cancel and F13 Help.
57
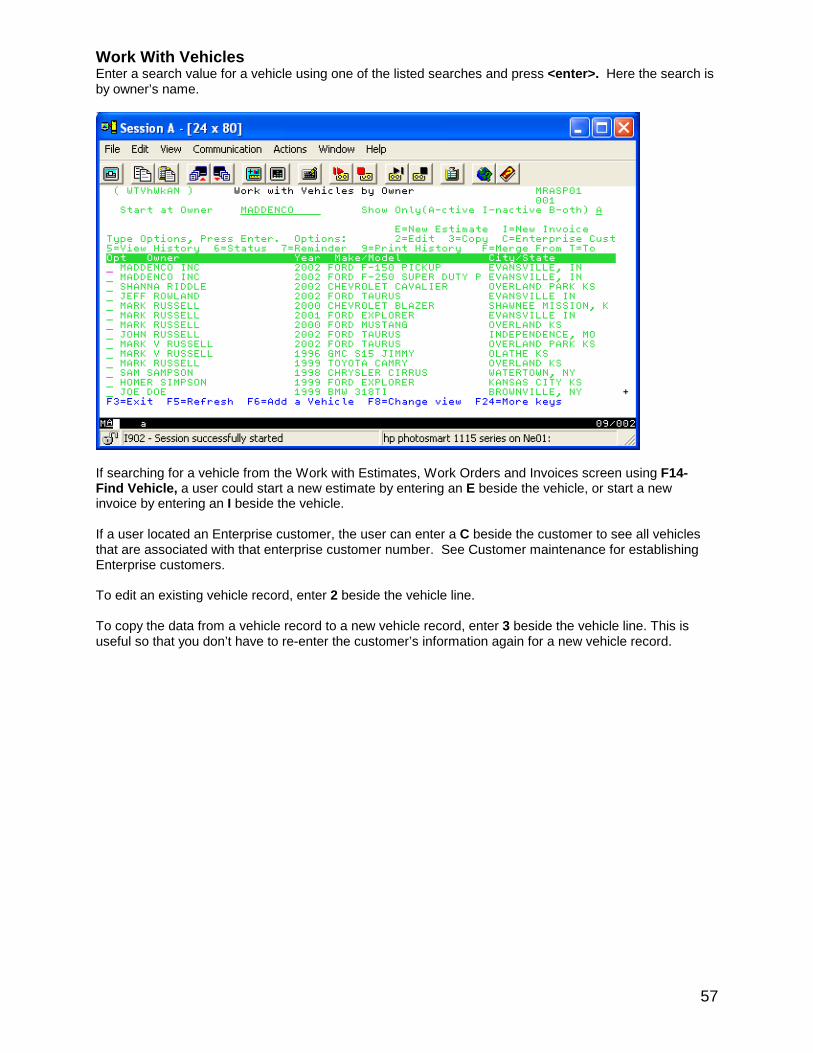
Work With Vehicles Enter a search value for a vehicle using one of the listed searches and press <enter>. Here the search is by owner’s name.
If searching for a vehicle from the Work with Estimates, Work Orders and Invoices screen using F14- Find Vehicle, a user could start a new estimate by entering an E beside the vehicle, or start a new invoice by entering an I beside the vehicle. If a user located an Enterprise customer, the user can enter a C beside the customer to see all vehicles that are associated with that enterprise customer number. See Customer maintenance for establishing Enterprise customers. To edit an existing vehicle record, enter 2 beside the vehicle line. To copy the data from a vehicle record to a new vehicle record, enter 3 beside the vehicle line. This is useful so that you don’t have to re-enter the customer’s information again for a new vehicle record.

58
View a Vehicle’s History Enter 5 beside a vehicle to view a vehicle’s history.
A user can enter a start date for the history. Enter Option I to view an entire invoice. Pressing <F8> will change the view and display the invoice number and date. <F8> again displays the mechanic number, if one was assigned to a product. Pressing <F8> again brings us back to the original view. <F9> will print the history for this vehicle file.

59
Inactivate a Vehicle Record Option 6 – Will allow a user to change a vehicles status to inactive and vice versa.
Enter a Y and press <enter> to inactivate the vehicle record. This is useful if a customer has sold a vehicle. Option 7 – Reminder will allow a user to enter a message for a customer’s vehicle record.
Answer the Print as Reminder Y/N prompt with Y in order to print this information as a Service Reminder Card from the Merchandising Module.

60
Option 9 – Print a vehicle history This option prints a report showing history for the selected vehicle. If control record VHPRTDTR is set to Y, a user will be prompted to input a date range. Only history within that range will print. Merge Vehicle Records If control record VEHCMRGE is answered Y, Options F and T are available to merge the history of two vehicle together. This will allow a user to merge records if a vehicle mistakenly is entered into the system twice. Enter F (from) beside a vehicle record that should be eliminated and T (to) beside the vehicle that should receive the additional data. Press <enter> and then confirm the merger.
Enter Y and press <enter> to merge the records.

61
Create a New Vehicle Record To create a new vehicle record, press <F6> from the Work with Vehicles by screen or take Option 3 to copy another vehicle record. AAIA Vehicle Database The AAIA, Automotive Aftermarket Industry Association, vehicle database is included in our Point of Sale module. This database has an assigned number for most every vehicle made. Using this identification will insure complete, consistent descriptions for vehicles entered into the system. Use of the database is a requirement for use of the Mighty Auto Parts Fitment Catalog, also included in Point of Sale. If using this database, set control record USEAPAA# to Y. The AAIA Vehicle Number will be in our vehicle file. The following is an example of how the database lookup is performed. Vehicle year
Enter the vehicle year. A user can enter the make or first letter or two of the vehicle make to prompt the selection of the vehicle make.

62
Vehicle Make
Select the make of the vehicle with Option 1 and press <enter>. Vehicle model
Select the vehicle model. A user can enter a letter or two in the Start at Model field to help narrow the search.
63
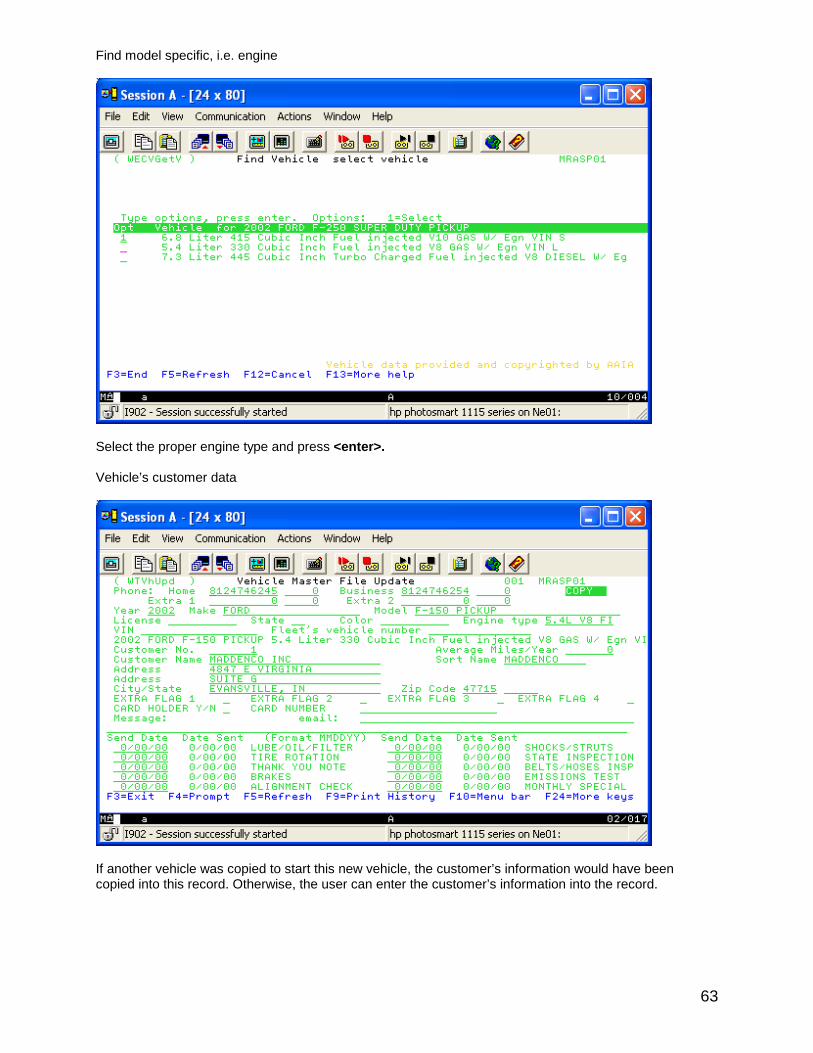
Find model specific, i.e. engine
Select the proper engine type and press <enter>. Vehicle’s customer data
If another vehicle was copied to start this new vehicle, the customer’s information would have been copied into this record. Otherwise, the user can enter the customer’s information into the record.

64
Vehicle maintenance information Phone numbers Name & Address look up using phone number In Point of Sale, when creating a new vehicle, enter the phone number and the customer’s name and address will be displayed if the phone number is a listed number. This feature uses the Internet to a service that provides the name and address based on a listed phone number. To turn on this feature, add control record VEHPHNWP with the value of Y.
Just key in the customer’s phone number and press <enter>.
The screen is now displayed with the customer’s name, address, zip and sort name already completed.

65
Area code The area code can be made mandatory by setting control record VMMANARC to Y. This will be useful if the user is in an area of the country that requires the full 10 digit phone number for dialing. A user can set the default area code for each store by setting control record VPHAC999 (where 999 is replaced with the store number) with a value of the 3 digit area code for that store. Vehicle information The vehicle information chosen from the AAIA database will be displayed. This can be manually overwritten, but it is not recommended. Year When adding a vehicle, the input of the vehicle’s year will not be required if control record VMMANYER is set to N. License number and state To decrease the possibility of duplicating vehicles, set up control records VMLICDUP, VMLICSPC and VMLICSCH. If control record VMLICDUP is set to N, duplicate license numbers for any given state are not allowed. Answer control record VMLICSPC with an N to prohibit spaces between characters of the license number. Set control record VMLICSCH to N to prohibit any special characters. By eliminating the spaces and special characters, you will prevent your employees from entering license number 123-ABC as 123 ABC or 123*ABC. This should aid in locating the correct vehicle by license number. If a user wants to be prompted for a missing license number when you close a Point of Sale invoice rather than when the invoice is created, set control record MANDLIC to Y. This also makes an entry in the state code field mandatory. If MANDLIC is set to N, a user can still require entry of a state code by setting control record VMMANSTE to Y. Additionally, a user can validate the entry in the state field by setting control record VALSTATE to Y. A default state code can be entered in control record VHLSTADF. If VMMANSTE is set to N, entry of a state code is optional. The license number is no longer a mandatory field. A user can input a blank license number, if control record VMLICMND is set to N. A user may also need to change the MANDLIC and VMLICDUP control records. If requiring invoices to be associated with vehicles (VECHMAND is set to Y), what should a user do for invoices that don’t involve a vehicle? A user can set up a dummy vehicle for carryout sales by setting up control record NONVEHC with a value of something like CARRYOUT or NONVEHICLE. For sales unrelated to a vehicle, a user can then search for the NONVEHICLE license number and select it to associate with the ticket. If a user sets control record NONVEHCE to N, then the “non-vehicle” file cannot be edited. Vehicle color This field is optional, but it can be valuable if a customer has multiple, similar vehicles. Vehicle Identification Number (VIN) An entry in the VIN field can be made mandatory by setting control record VMVINMND to Y. If the VIN field is left blank, input can also be made mandatory when closing an invoice by setting control record MANDVIN to Y. This control record will override VMVINMND.

66
Fleet vehicle unit number Use this field to record a fleet’s unit number for a vehicle. This field is optional, but is useful for tracking commercial fleet vehicles. If control record VMFLTSCH is set to N, special characters are not allowed to be input in a vehicle’s fleet number when adding or editing a vehicle. If control record VMFLTSPC is set to N, embedded spaces are not allowed to be input in a vehicle’s fleet number when adding or editing a vehicle. In vehicle maintenance, a user can require input of the Fleet’s vehicle number for all of the fleet’s vehicles if control record VMMANFLT is answered Y. Customer number This is the customer to be used for invoicing items for this vehicle. A user can enter the customer number or press <F4> to search for the customer by name. The customer number on the vehicle will override the customer number input when starting an invoice in POS. Customer information Here a user will enter the customer’s name address and a sort name that the system will use to search for this vehicle. The sort name can be set the same as the name field if control record VNAMTOSR has a value of Y. A complete name and address can be made mandatory by setting control record VMMANADD with a value of Y. If control record ZIPCITYN is set to Y, a user can enter just the zip code and the system will fill in the City/State. A default zip code can be set up by control record ZIPCODE or ZIPCD999, where 999 is replaced with the store number, to set up a different default zip codes for multiple stores. If a user needs to enter non-USA zip codes, set control record ZIPUSA to N and the zip code will print as 10 continuous characters on invoices. Vehicle extra flags A user can use the four Extra Flags to flag vehicles for your own purposes. These can be used for selecting vehicles when printing reports from the Merchandising menu. Input into these fields can be made mandatory, and the input validated by setting up control records VMEXTRF9 where 9 is replaced with a 1 to 4 indicating which Extra Flag number being used. The first character of this record’s data will be Y or N indicating input in the Extra Flag is mandatory. The second character of the data is a Y or N indicating if this field will be validated for a correct value. The last 15 characters of data entered in the record will be the description of the Extra Flag. The valid inputs would be set up by control record VMEXTR9x where 9 is replaced with the extra flag number and x is replaced with a single character value that will be used as an input value. The remaining 15 characters will be the description of this value for the inquiry window. An example: A user wants to make vehicle Extra Flag 1 a mandatory input field called CUSTOMER TYPE, used to indicate if a customer is Commercial or Retail. The input validation should be either C or R. The user should set up control record VMEXTRF1 with a value of YYCUSTOMER TYPE. The user should define the valid values for this field in control records VMEXTR1C with data of COMMERCIAL, and VMEXTR1R with data of RETAIL.

67
Card holder Y/N Set control record VMCARDYN to Y to use the Card Holder feature. This allows input into this field, whose name can be customized with your 15 character description. Control record VMCARDNO can be set up with the first character of Y or N to determine if input in the Card Holder field is mandatory. The description for this field should be entered in the remaining 15 characters of the VMCARDNO control record. Email address This address can be used to email vehicle reminders. The email address entered can be validated to be in a correct email format ([email protected]), if control record EMVEHVAL is set to Y. This does not validate the address to be an active email address. Message Here a user can enter a one line message for this vehicle. Safety reminder information This is only available if control record SAFETYI is set to Y. Refer to the Merchandising Manual for more information on this feature.

68
Vehicle History Tax Exempt Codes In vehicle maintenance, a user can add a tax-exempt certificate and exempt code that is valid for that vehicle. This exempt code will override the customer tax-exempt code. Answer control record VMTAXEXC with a value of Y to allow input of the tax-exempt code and number. This control record is also used in POS to override the customer’s tax-exempt code with the vehicle’s.
The vehicle tax-exempt code will be limited to a one character exempt code. The exemption number can also be input. There is also an expiration date for the tax-exempt code & number. If expired, the vehicle tax-exempt code will not be used.

69
If expired, the user will get a message telling them that the exemption has expired and will not be used.
In this case, the customer’s tax-exempt code is used since the vehicle tax-exempt code has expired.

70
When inputting an invoice for this vehicle, the tax-exempt code will be pulled from the vehicle master, unless it has expired.
A warning message can also be displayed letting the user know that the tax exemption is going to expire in X number of days. The number of days to check is determined by control record VMTAXEXP. It can be up to 999 days.

71
The vehicle exemption code and number can also print on the work order or invoice. To print the exemption on the workorder or invoice, add control record PRTVHTAX. The first position contains a Y or N, the next 15 characters contain the description to print on the workorder or invoice for this field.

72
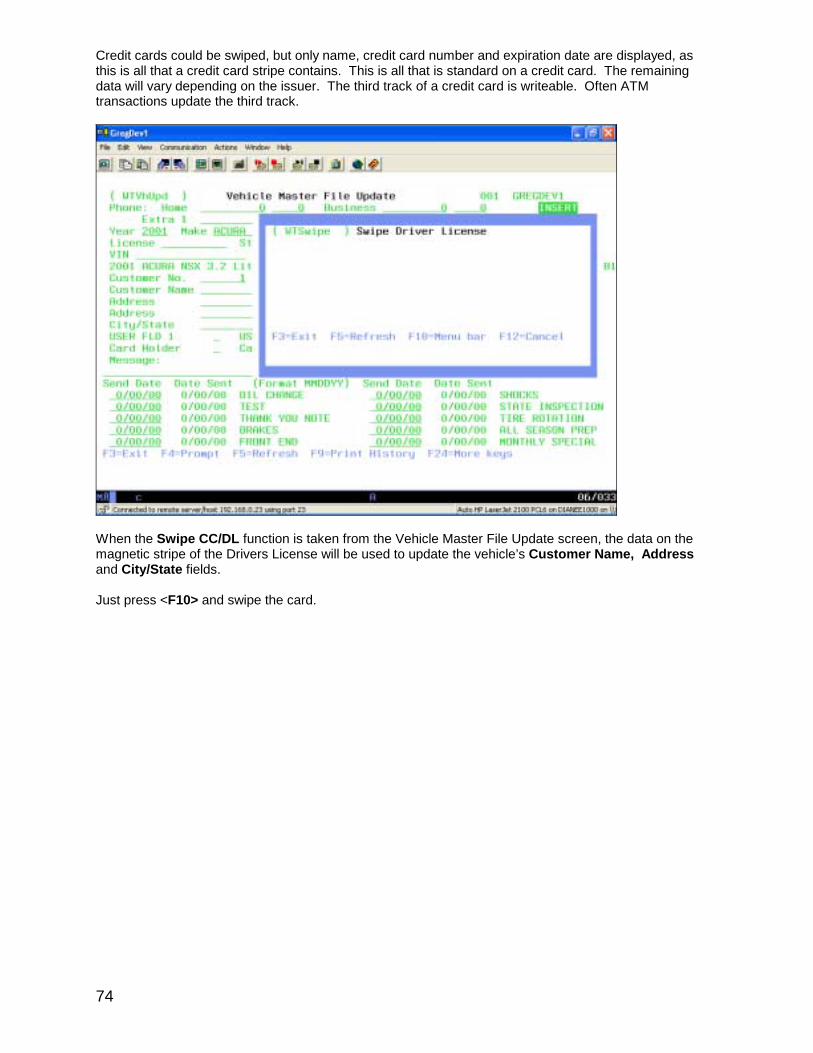
Vehicle Maintenance Functions F9 Print history - This function key will prompt to print vehicle history for this vehicle. F10 Swipe CC/DL - This function allows a Driver’s License to be swiped and its contents either displayed on the screen or be used to populate the name and address for a new ticket or new vehicle.
• This is only useful if a state has a magnetic stripe on the Driver’s License. • It is only useful if there is a mag-stripe reader/credit card reader attached to the keyboard. • To be most useful, the credit card reader will need to be able to read all three tracks on the
Driver’s License.
When the F10 - Swipe CC/DL function is taken from the Vehicle Maintenance or the Work with Point of Sale Tickets screens, the data on the magnetic stripe of the Driver’s License will be displayed. Press <F10> and swipe the card.

73
The content of the magnetic strip will be displayed. The mag stripe is composed of three tracks. Not all credit card readers read all tracks. Above is an example of the output from a typical credit card reader, reading only the first two tracks.
Here is an example of a credit card reader that reads all three tracks. Sex, eye and hair color, height and weight, and probably most useful, zip code are contained in the third track.
74
Credit cards could be swiped, but only name, credit card number and expiration date are displayed, as this is all that a credit card stripe contains. This is all that is standard on a credit card. The remaining data will vary depending on the issuer. The third track of a credit card is writeable. Often ATM transactions update the third track.
When the Swipe CC/DL function is taken from the Vehicle Master File Update screen, the data on the magnetic stripe of the Drivers License will be used to update the vehicle’s Customer Name, Address and City/State fields. Just press <F10> and swipe the card.
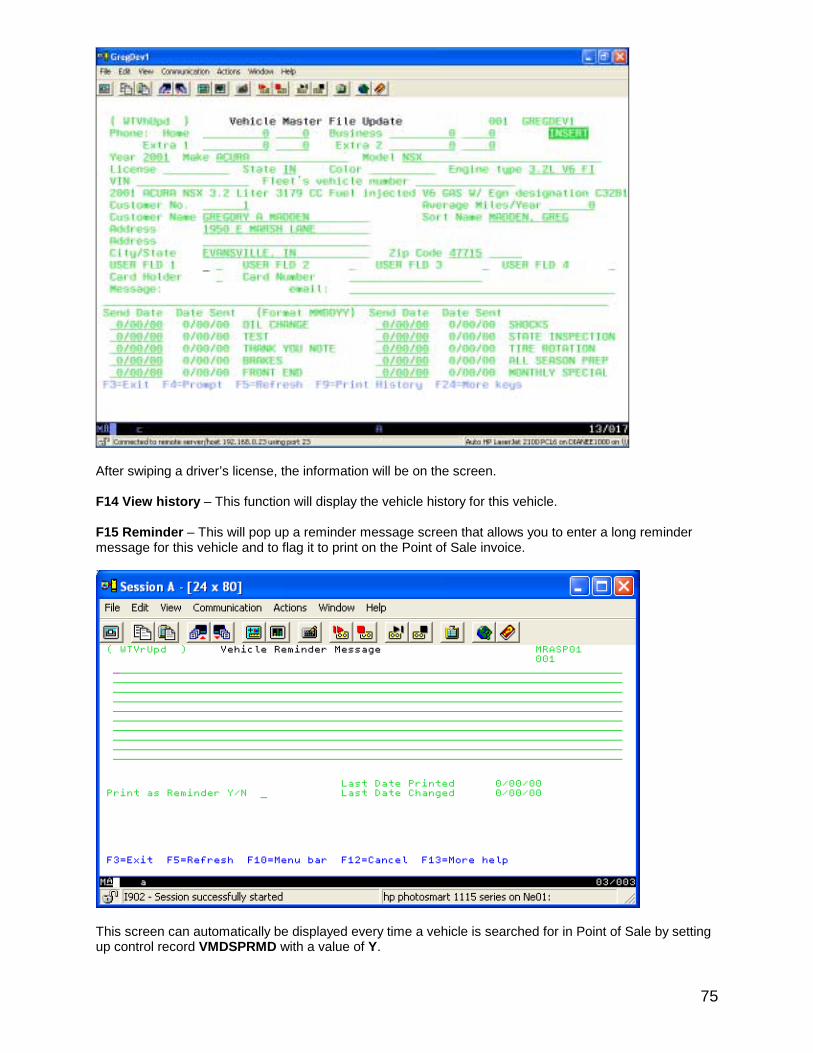
75
After swiping a driver’s license, the information will be on the screen. F14 View history – This function will display the vehicle history for this vehicle. F15 Reminder – This will pop up a reminder message screen that allows you to enter a long reminder message for this vehicle and to flag it to print on the Point of Sale invoice.
This screen can automatically be displayed every time a vehicle is searched for in Point of Sale by setting up control record VMDSPRMD with a value of Y.

76
F16 Get AAIA – By pressing this function key, the system will go through the AAIA vehicle look up to select or re-select the correct vehicle from the AAIA database. F17 Assign PIN – This function is used to set a PIN number and password to a vehicle for access from the Internet. To find out more on this feature refer to the Merchandising Manual or contact MaddenCo.

77
Start an invoice with a vehicle An invoice can be started with or without a vehicle record attached. In this first example, a vehicle will be selected to attach to this invoice from a prompt. You can also press <F14> – Find Vehicle from the Work with Estimates, Work Orders, and Invoices screen to manually go to the vehicle file and select a vehicle to invoice.
To get started, press <F6> to Add a New Invoice.

78
Work with vehicles The system will now prompt for the vehicle being serviced.
Type in the customer’s last name, or just the first few letters and press <enter>. A list of vehicles will appear starting alphabetically with the name entered.
If the vehicle sought for is in the system, select it with Option I - Invoice and press <enter>. If the customer’s vehicle is not listed, add the vehicle as discussed earlier.

79
Remember, a user can search for the customer’s vehicle a number of ways, as mentioned earlier. If a user doesn’t find the vehicle with the customer’s name, the user should search by tag or phone number. Customer number Next, we’ll find the customer number
Select the customer by entering a 1 beside the record.

80
Invoice header After selecting the vehicle record, the invoice header is displayed. .
The customer’s information is moved into the invoice from the vehicle history file. Salesman Number Enter the selling salesman number and other information, such as a purchase order number, reference number and vehicle mileage. If the salesman field is protected, the customer record has been flagged to move Account Salesman to Selling Salesman. Notice that the customer’s vehicle information is displayed on the header screen. Ship to Customer Enter a different customer number in the ship to field to retrieve delivery information from another customer record. Control record SHIPCST must be answered with Y to use this feature. When using ship to customers, control record USESHP2C allows use of the ship to customer’s state’s tax and exempt codes along with other fields instead of the invoice customer’s information. For some customer classes, a user might not want to allow this. Control record OVRSHPCC can be set up to protect a customer class from this feature. The control record contains 10 Y’s or N’s representing customer classes 0-9. If the record has a Y for the invoice customer’s class, the invoice customer’s information will be used. Pickup at Store This field has a direct impact on the sales tax charged on this invoice. If this field is answered Y, the store’s state code and taxing authority are used to determine the tax rate. This information is stored in control record COSTA999 (where 999 is replaced with each store’s number). If Pick Up at Store answered N, the customer’s (or, as above, ship to customer’s) tax information will be used. The default value of this field can be set up in control record PCKUPYN. If the invoice customer's home store (a field in customer maintenance) is not the same as the selling
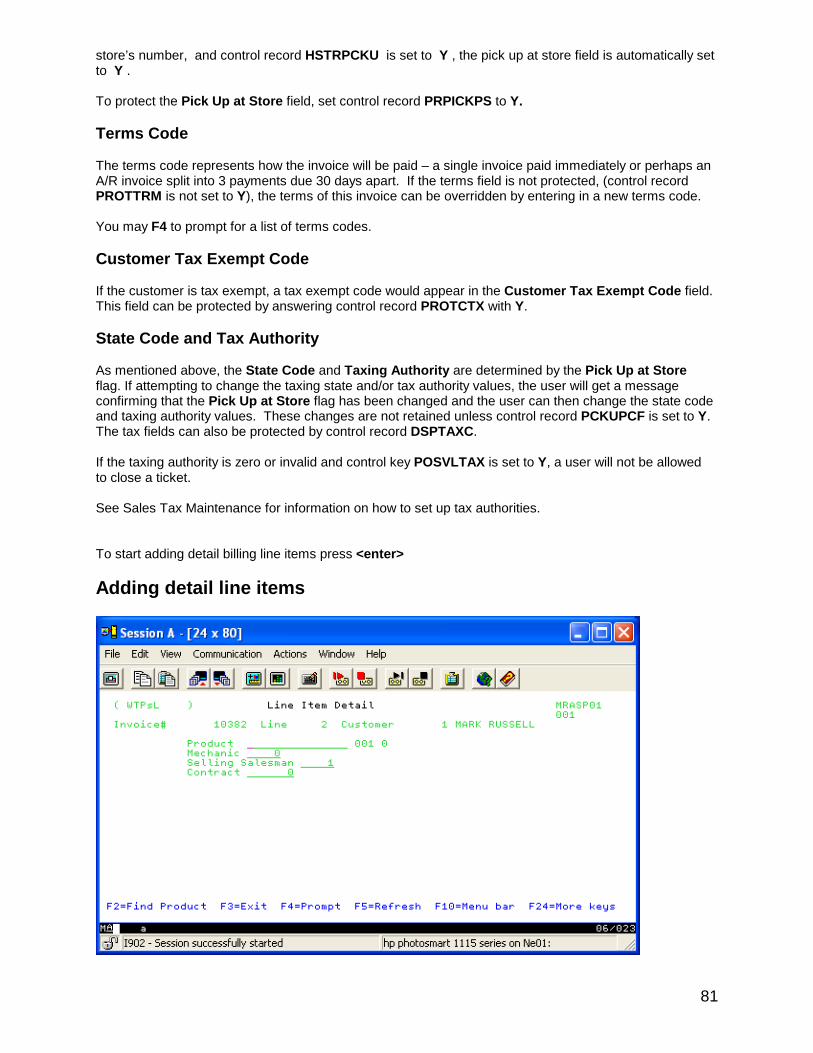
81
store’s number, and control record HSTRPCKU is set to Y , the pick up at store field is automatically set to Y . To protect the Pick Up at Store field, set control record PRPICKPS to Y. Terms Code The terms code represents how the invoice will be paid – a single invoice paid immediately or perhaps an A/R invoice split into 3 payments due 30 days apart. If the terms field is not protected, (control record PROTTRM is not set to Y), the terms of this invoice can be overridden by entering in a new terms code. You may F4 to prompt for a list of terms codes. Customer Tax Exempt Code If the customer is tax exempt, a tax exempt code would appear in the Customer Tax Exempt Code field. This field can be protected by answering control record PROTCTX with Y. State Code and Tax Authority As mentioned above, the State Code and Taxing Authority are determined by the Pick Up at Store flag. If attempting to change the taxing state and/or tax authority values, the user will get a message confirming that the Pick Up at Store flag has been changed and the user can then change the state code and taxing authority values. These changes are not retained unless control record PCKUPCF is set to Y. The tax fields can also be protected by control record DSPTAXC. If the taxing authority is zero or invalid and control key POSVLTAX is set to Y, a user will not be allowed to close a ticket. See Sales Tax Maintenance for information on how to set up tax authorities. To start adding detail billing line items press <enter> Adding detail line items
82
If control record POSAINSL is answered with a Y, the system automatically brings up the line item detail screen to begin entering product. If control record POSAINSS is answered with a Y, then the system will stay in the insert product mode until <F3> is pressed to view the detail product information. Enter the product number desired to be billed and press <enter>, or press <F2> to find a product.

83
Find a Product Product inquiry was discussed earlier.
Here, the search is done by size. Select a Product to Bill A list of the products will be displayed based the search.
The customer’s price for the product is displayed on the screen. The price can be edited later if needed. You can type Option X beside the product to select it, or enter the quantity to bill on the option line. Press <enter> to add this product to the detail of the invoice.
84
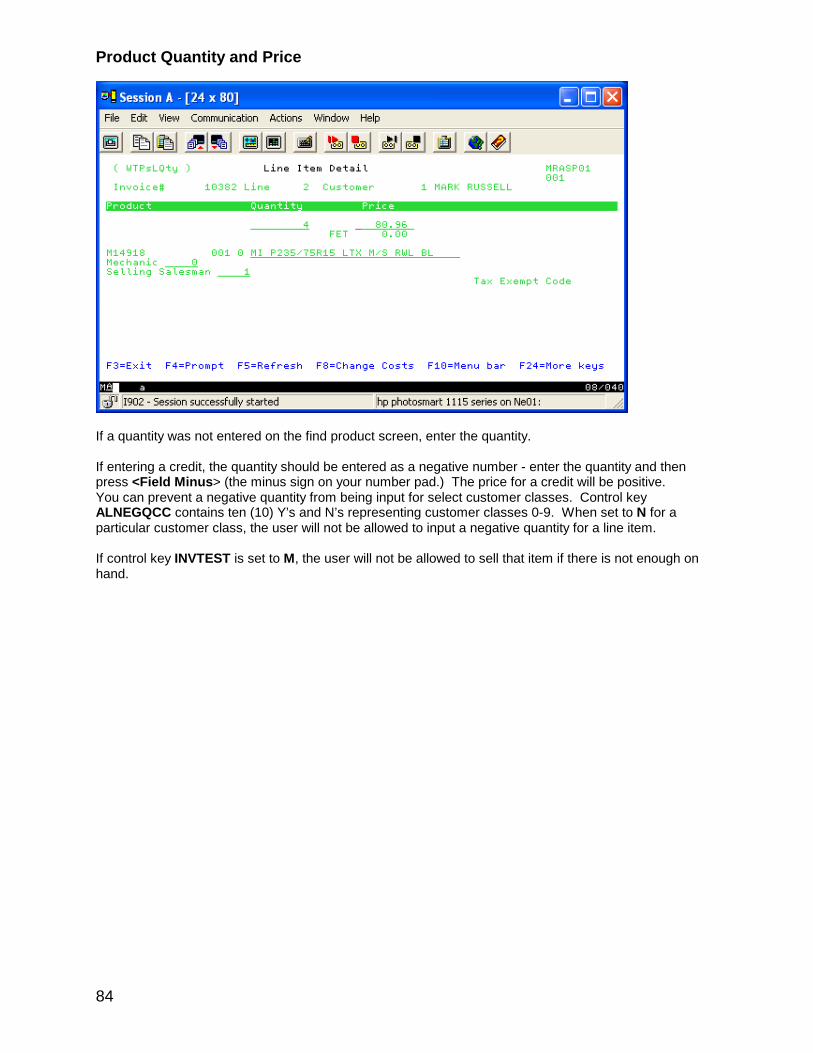
Product Quantity and Price
If a quantity was not entered on the find product screen, enter the quantity. If entering a credit, the quantity should be entered as a negative number - enter the quantity and then press <Field Minus> (the minus sign on your number pad.) The price for a credit will be positive. You can prevent a negative quantity from being input for select customer classes. Control key ALNEGQCC contains ten (10) Y’s and N’s representing customer classes 0-9. When set to N for a particular customer class, the user will not be allowed to input a negative quantity for a line item. If control key INVTEST is set to M, the user will not be allowed to sell that item if there is not enough on hand.

85
Find Price If control record FINDPRIC has been set to Y, move your cursor to the price field and press <F4> to display a window listing price levels and, optionally, profit margins for the product.
Existing control records PQHDPRC1 thru PQHDPRC8, PQHIDPRC, and DSPNCST dictate which prices and costs will be displayed. Control records PRFTDSP and PRFTYPE determine if profit margins are displayed

86
Detail line items
Additional views of the product detail screen are available using F8 – Change View. These views offer profit $ and % profit if control record PRFTDSP is answered Y. Set control record PRFTTYPE to A to use actual cost as the base for gross profit calculations or to R to use replacement cost as the base. Shipping weight is displayed if control record SHPRCPOS is set to Y. Auto-bill Products Both customers and products can have auto bill codes. When control records are set for a particular combination of customer auto bill code and product auto bill code, and that combination is used on an invoice, items can be automatically added to the invoice. Triggering products can be set to have up to nine line items automatically bill. On this invoice, a MI P235/75R15 LTX M/S RWL BL was sold, which triggered six additional line items. Notice that one of those products is a record on which to enter the registration for this tire. If the auto bill control record has the FREE Y/N field set to a Y, then the auto billed item is billed at no charge. See the Appendix A for more information on how to set up Auto Billing. Additional items can be automatically billed in different ways.

87
Packages Package products allow for billing a customer one price for a job that may have several components, such as an oil change that consists of lube, oil and filter. Pricing is assigned to the package product. This is the amount charged for the package, regardless of the price of its contents (products contained in the package Bill of Material.) Products added to, or removed, from the package during invoice input do not affect the selling price of the package. In invoice input, package contents appear as indented lines below the package product.
Notice that only the price for the package item appears when a package item is sold. The components are displayed, but no selling price is listed. If control record PKGCHGPD is set to Y, then the product number sold in a package can be changed to another product, but only if the product changed has the same product class and type. If control record PKGCHGVC is set to N, then the product class does not have to be the same. Likewise, if control record PKGCHGVT is set to N, then the product type does not have to be the same. It is recommended to not set both of these control records to N. If so, then someone could replace an oil filter on a lube package with a new set of tires – that would be billed at the price of an oil change. See Appendix D for details on setting up and using packages in Point of Sale.

88
Auto Products The Auto Product feature allows products to be added to all work orders automatically. Set control record ATPRDYN to Y to enable this feature. Control record AUTOPROD contains the product number to add. If wanting to automatically add multiple products to a work order, use control records AUTOPRD9, where 9 represents a sequence number from 1 to 9. These keys identify up to 9 products to add automatically. These items will be billed on every work order. Set control record ATPRDDLT to Y to allow users to delete auto products. You can exempt certain customers from all automatic product billing by answering control records ATPRD9 with Y . The 9 represents the customer’s auto bill code. Further, certain customers can be exempt from being billed for certain automatic products, by answering control records ATPRD9X with Y. Here the 9 represents the 9 on control record AUTOPRD9, indicating which Automatic item is to be omitted. The X represents the customer’s auto bill code. Auto billing for an Automatic product Automatic products can trigger their own group of auto billed products, if they have Auto Bill Codes assigned to their product records. The result is just as if you had manually entered the auto product, and it triggered the auto billing of additional products. To use this feature, set control record AUTOPRAB to Y. In product maintenance, and add Auto Bill Cd values to the automatic products’ records. You may also need to set up additional AUT7889 control records (see the Auto Bill section.) The customer’s auto bill code and the auto product’s auto bill code are used to read for any existing auto bill control records (AUT7889) to find additional products to bill, just like regular auto billing.

89
Edit a Line Item A line item can be edited by entering Option 2 beside the line and pressing <enter>.
The line item detail screen is displayed. Press <enter> to move to the next sceen, where the quantity, price, FET, description, mechanic, and selling salesman can be edited.
If you change the quantity of an item with auto billed products, the quantity of the auto billed items will change as well.
90
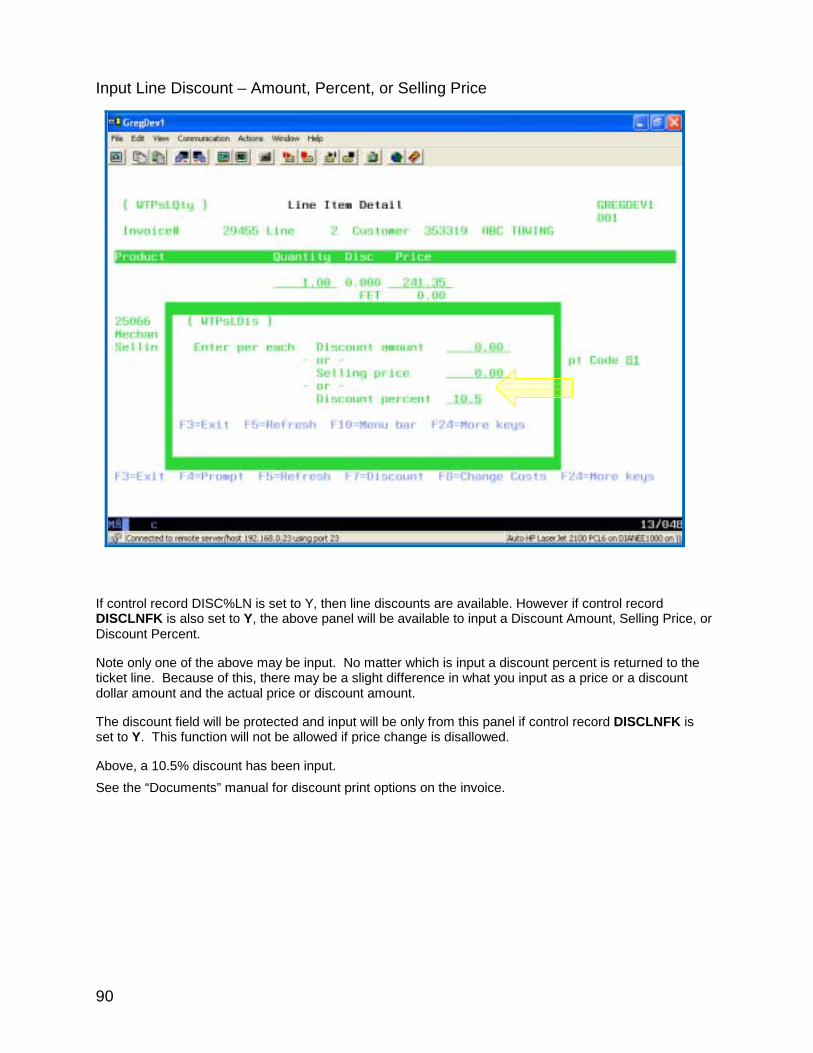
Input Line Discount – Amount, Percent, or Selling Price
If control record DISC%LN is set to Y, then line discounts are available. However if control record DISCLNFK is also set to Y, the above panel will be available to input a Discount Amount, Selling Price, or Discount Percent.
Note only one of the above may be input. No matter which is input a discount percent is returned to the ticket line. Because of this, there may be a slight difference in what you input as a price or a discount dollar amount and the actual price or discount amount.
The discount field will be protected and input will be only from this panel if control record DISCLNFK is set to Y. This function will not be allowed if price change is disallowed.
Above, a 10.5% discount has been input. See the “Documents” manual for discount print options on the invoice.

91
Costs For the most part, product costs come from the product record. An exception is a product set to use the employee rate as cost. In such a product’s maintenance, the Use Employee Rate as Cost field must be set to Y and the product should be Mechanic Commissionable. In Salesman Maintenance, the Mechanic’s hourly rate is recorded in the Pay Rate field. When the product is sold in Point of Sale, the actual and replacement costs for the item are taken from the Mechanic’s Pay Rate field. This allows you to track labor costs. Control record USEEMPRT must be set to Y to use this feature. Change Cost If control record DSPNCST is set to Y, then no cost is displayed on the screen. If this control record has a value of N, then the cost is displayed. If the record has a value of R, only the actual cost is displayed. A value of A displays only Replacement cost. Press <F8> Change Costs to display the cost fields if control record COSTCHG is set to Y.
Individual products can be flagged in product maintenance to allow, or even require, costs to be input. The COSTCHG control record will override a product’s cost flag. Protect FET The FET amount can be protected by setting control record PROTFET to Y. FET can be automatically zeroed for certain customer classes, such as State Government accounts, using control record ZEROFET. This record contains ten Ys or Ns, representing the customer classes 0 thru 9. If there is a Y entered for a particular customer class, the FET for items sold to customers in that class will be zero dollars. Keep in mind that this is set up by classes 0 thru 9: the first position is customer class 0 not 1. Deleting a Detail Line Item A detail line item can be deleted by entering Option 4 beside the line item and pressing <enter>. If you delete a line item that has auto bill line items attached, the auto bill line items will be deleted also. Deleting a package line item will delete the entire package.

92
Some individual components of a package or individual auto billed items may be deleted if they are set up to allow this. Add Additional Detail Line Items To add more detail line items to a ticket, take <F6> - Add Detail Line. This will display the input screen to allow you to enter the next product number. To add a detail line in the middle of the ticket, enter Option 6 beside the line you wish to add the product after and press <enter>. This will add the new line after any associated product lines. For example, if entering a 6 next to the tires on our invoice, the new line would follow the registration line. The tires are associated with all the autobill line items. The same is true for package products. Add a Message Line to a Ticket Press <F7> to add a message line as the next detail line item or enter Option (M) on a line item if you want to attach a message to the line item. When attaching a message to a product triggering auto billed items or to a package product, the message will be displayed at the bottom of the group of products that are associated with that product. Subtotal Categories
As shown, each line shows the extended selling price. The invoice total value is then broken out into individual categories at the bottom of the screen: Merchandise, Labor, Other, Federal Excise Tax, Sales Tax and the Grand Total. Each product can be assigned to a category in product maintenance. See the Product Maintenance section for more information. F8 Change View By pressing <F8>, you can change the view of the detailed lines. The system will roll through views displaying product number, profit dollars and profit percent.

93
End an invoice or work order To end this invoice, press <F3> to end or exit. A screen will be displayed asking whether this invoice is to be closed.
To leave this ticket as an open work order, then answer with N. The default answer for the Is INVOICE to be closed Y/N question can be set up in control record CLINVYN. This field can also be protected by setting control record PROTCLIN to a Y. This can be useful for certain employees to be able to edit or add to a ticket but not close the invoice. If not closing the invoice, answer the If Not Closing, Reason field with a W to indicate the customer is waiting. The answer to the Print WORK ORDER now Y/N question will default to the value of control record PRTWODFT. This field can be protected by contol record PROTPRWO. For national account customers, the answer to this question can be defaulted to N, if control record DPWONAYN is set to Y. We will answer Is INVOICE to be closed Y/N with Y to close this invoice.

94
Mileage, License Number and VIN# Input If control record MANDMILE is answered Y and no mileage has been entered for this ticket, the following screen will be displayed:
Enter the correct mileage and press <enter>. If control record MANDLIC is answered Y and the license number field is blank in the vehicle record, an input screen will be displayed (unless VMLICMND is set to N). If MANDLIC is answered with an O, input is mandatory before you exiting the workorder.
Enter the license information and press <enter>.

95
Finally, if MANDVIN is answered with a Y and the VIN number field is blank for this vehicle, the following screen will be displayed.
Input the VIN number and press <enter>. Other information the system can prompt is located in the Advanced Point of Sale manual. Tendering the Invoice
Finally, it is now time to tender the invoice. The methods of payment valid for this customer are displayed. The payment appears beside the tender assigned to the customer in Customer Maintenance. The invoice amount may be split between a number of approved payment methods. The tender types can be limited to cash type tenders by placing a C in the customer’s PAST Y/N field in Customer Maintenance.

96
Prevent negative invoices from being closed by answering control record NEGINVC with Y.
Negative invoices can also be prevented by customer class. Set NEGINVCC to 10 Ys or Ns indicating whether to allow negative invoices for the corresponding customer class – 0 thru 9.

97
Tendering Cash Enter the amount of cash received on the cash payment line and press <enter>.
Set control record CASHCHYN with Y to display Change Returned when entering an overpayment of an invoice. Control record CASHCHG contains the cash tender code to use in calculating the amount of change returned. Overtendering will also cause the closed invoice to indicate a Split status on the Work with Estimates, Work Orders and Invoices screen. This amount will print on the invoice, as well. Tenders must be flagged to allow overtendering.

98
Check Payments Enter the payment on the check payment tender and press <enter>.
Set ORDAUTH to Y to display a screen to enter a check information. Press <enter> to close the invoice. Electronic Check Verification If the ROI credit card and check verification processing module is installed and control records ROICHECK and ROISWCHK are set to Y, the following screen will appear instead of the check verification screen.

99
Credit Card Payments Enter the invoice amount on the desired credit card tender or split the amount between different payment types. Press <enter>.
A screen is displayed to allow entry of the credit card number, expiration date and authorization number. If control record CRCRSTTY is set to Y, the credit card type is restricted to the credit card used to tender the invoice. This helps insure the individual credit card totals are correct at the end of the day. Press <enter> to close the invoice or to continue to the next screen to enter the more credit card information, if more than one credit card tender has been used. Set control record CCAUTHVN to Y to limit the entry of credit card and authorization numbers to numeric values only. If control record CCAUTHVA is set to Y, the message For “voice” approval only will appear below the authorization heading. All of these tender features are set up in the Store Tender Master Maintenance. See Appendix B for a brief description of the Store Tender Master Maintenance set-up.
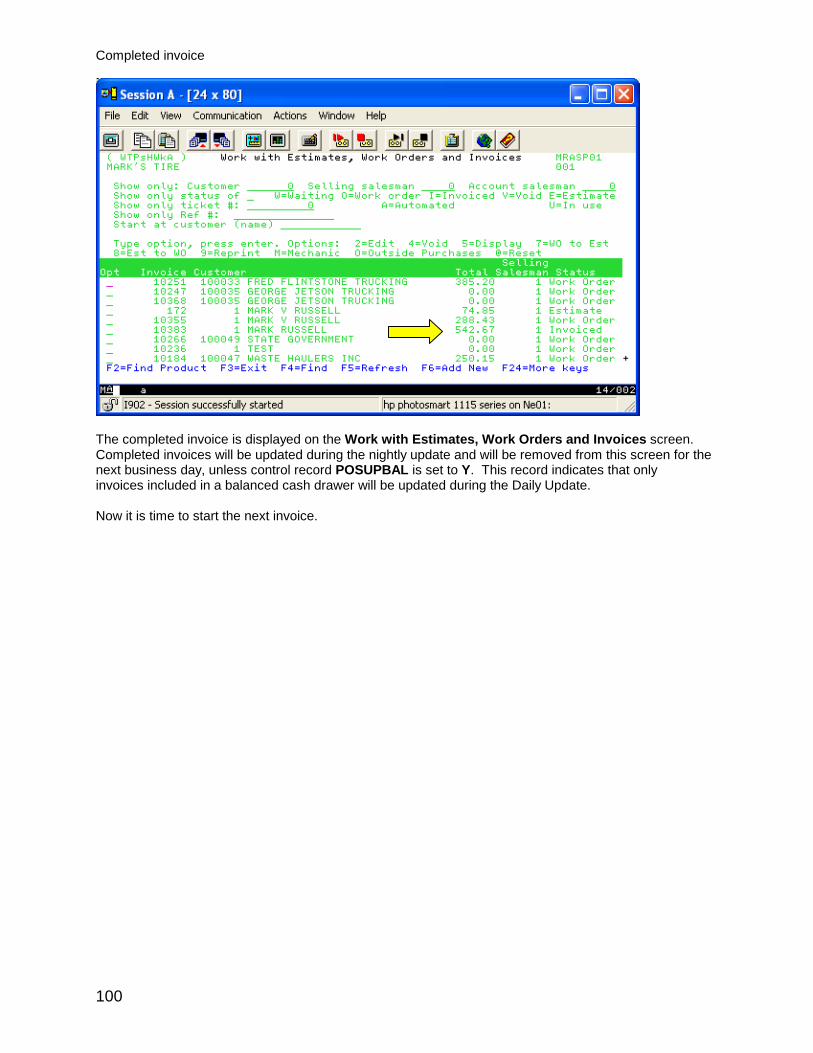
100
Completed invoice
The completed invoice is displayed on the Work with Estimates, Work Orders and Invoices screen. Completed invoices will be updated during the nightly update and will be removed from this screen for the next business day, unless control record POSUPBAL is set to Y. This record indicates that only invoices included in a balanced cash drawer will be updated during the Daily Update. Now it is time to start the next invoice.

101
Start an invoice without a vehicle From the work with outstanding estimates, work orders and invoice screen, press <F6> to add an invoice.
The counter billing screen is displayed.
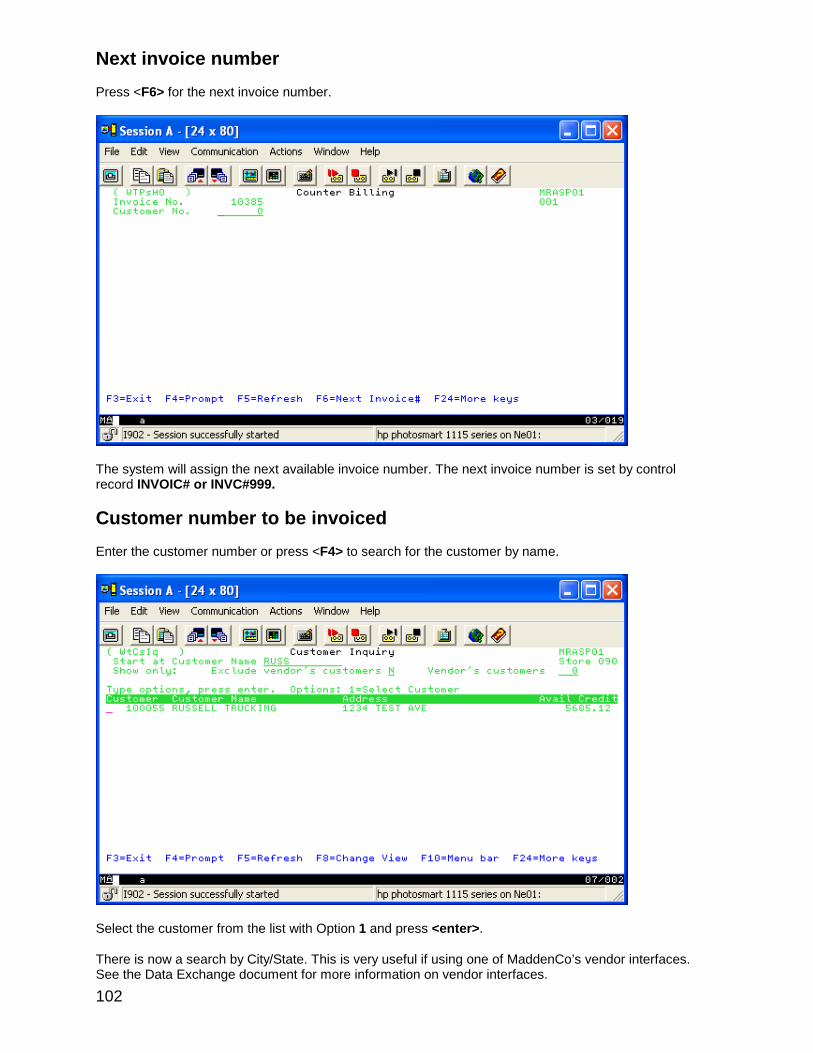
102
Next invoice number Press <F6> for the next invoice number.
The system will assign the next available invoice number. The next invoice number is set by control record INVOIC# or INVC#999. Customer number to be invoiced Enter the customer number or press <F4> to search for the customer by name.
Select the customer from the list with Option 1 and press <enter>. There is now a search by City/State. This is very useful if using one of MaddenCo’s vendor interfaces. See the Data Exchange document for more information on vendor interfaces.

103
Press <enter> to display the invoice header information. Invoice Header
In this example, the customer’s account has two messages attached to it. The first inidicates a P.O. is required and the second tells us the truck number and wheel position must be on all invoices. See the A/R document for details on setting up customer messages and memos. Enter your salesman number and other needed information in the header, such ship to information, location, P.O. number, reference number and vehicle information. If control record POSINRT is answered Y, a Route Code field is available for input on the POS header screen.

104
Ship to Customer Number If control record SHIPCST is set to Y, then a ship to customer number can be entered. Or, press <F4> to prompt for the customer number. Remember, if control record USESHP2C is set to Y, the Ship to Customer entered will be used to retrieve information like account salesman, route code, tender type and the customer's memo and messages. Pickup at Store As previously discussed, the field will control the taxing state code, authority and tax exempt codes used for calculating sales tax on the ticket. If Pickup at Store is Y, the store’s state code and taxing authority are used for the sale, if answered N, the customer’s state code and taxing authority are used.
If control record PCKUPCF is set to Y, a confirmation message is displayed showing the taxing authority may have changed. Again, to protect the Pickup at Store field, answer control record PRPICKPS with a value of Y. Press <Enter> to continue.

105
Input the first product number or press <F2> to search for the product as discussed earlier. Selecting multiple products to bill
Here is a product inquiry by size for 11R22.5, limited to Michelin tires. Select 2 steer tires and 8 drive tires. Press <enter>. The tires will be billed at the price shown. Remember that View 2 includes the Federal Excise Tax.

106
Notice the auto billed additional items.
A couple of message lines have been added to this invoice. Note the FET is subtotaled at the bottom of the screen.

107
Purchase Order Required Press <F3> to end invoice and answer Y to close at the Is INVOICE to be closed Y/N prompt. If a Purchase Order is required, but not yet entered in the invoice header, a screen will be displayed to enter the Purchase Order information.
Enter the Purchase Order number and press <enter>. The system will then go to the method of payment screen.
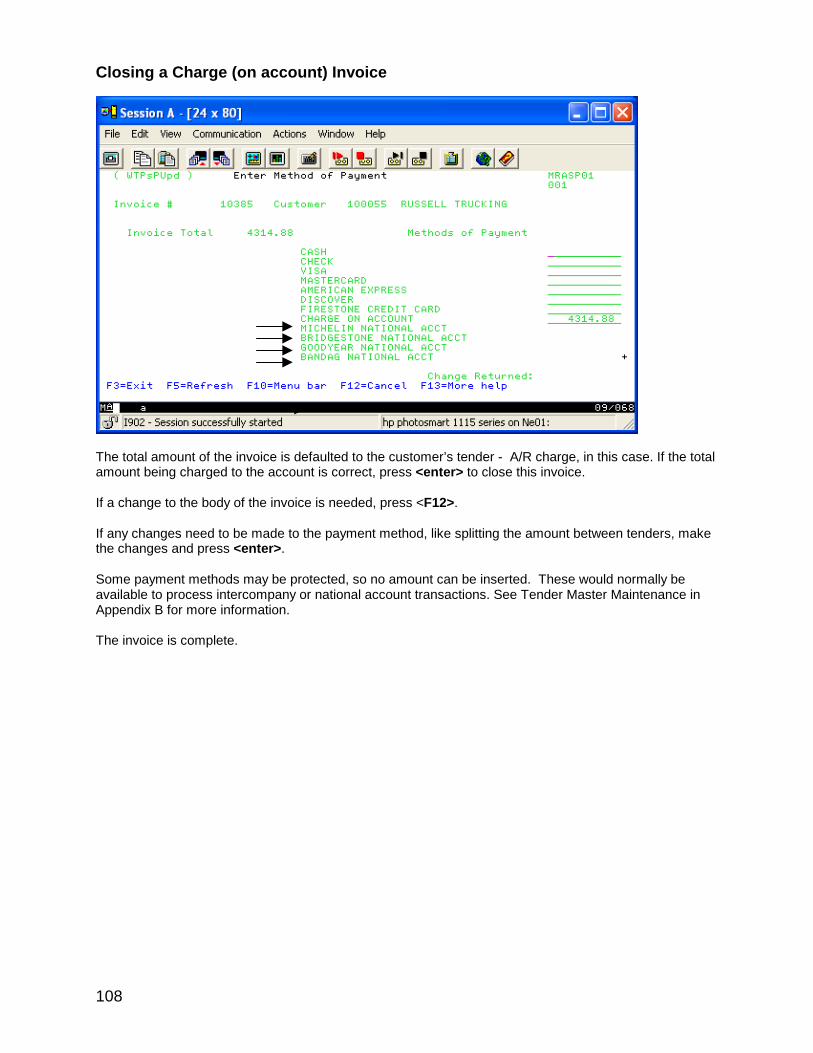
108
Closing a Charge (on account) Invoice
The total amount of the invoice is defaulted to the customer’s tender - A/R charge, in this case. If the total amount being charged to the account is correct, press <enter> to close this invoice. If a change to the body of the invoice is needed, press <F12>. If any changes need to be made to the payment method, like splitting the amount between tenders, make the changes and press <enter>. Some payment methods may be protected, so no amount can be inserted. These would normally be available to process intercompany or national account transactions. See Tender Master Maintenance in Appendix B for more information. The invoice is complete.

109
Processing a tire adjustment Bill the customer the replacement tire(s) Start an invoice for the customer as discussed in the previous sections. Enter in whatever header information is required and bill the customer for the new replacement tire(s).
One tire and the auto billed products associated with that product were billed. In this case, delete the tire disposal line, (Option 4), because the tire will be sent back to the manufacturer. Now we’ll adjust the defective tire taken off the vehicle. Press <F6> to add a detail line item to the ticket.
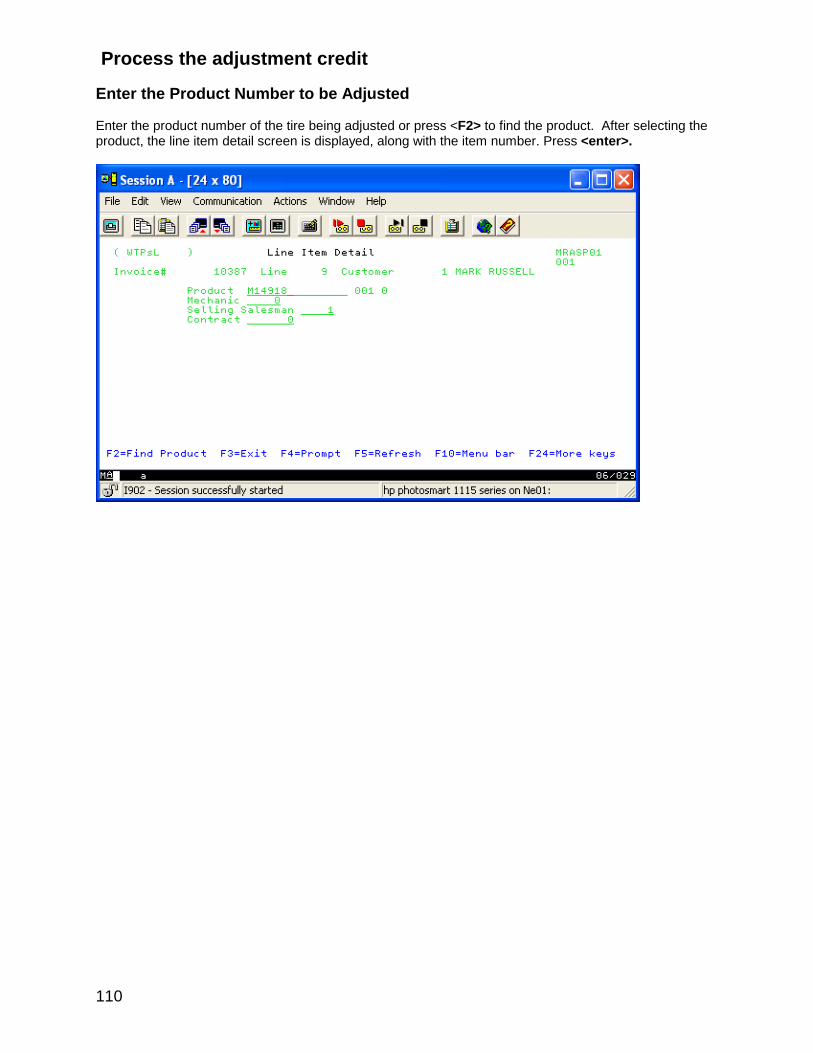
110
Process the adjustment credit Enter the Product Number to be Adjusted Enter the product number of the tire being adjusted or press <F2> to find the product. After selecting the product, the line item detail screen is displayed, along with the item number. Press <enter>.

111
Enter Adjustment Information A screen is displayed to input the quantity and price.
The <F24> function displays additional available function keys. Use <F20> - Tire Adjustment to process the adjustment.
Enter the defective tire’s remaining tread depth.
112
The original tread depth from the product record should be displayed. If not, enter the number, and press <enter>. The system calculates the adjustment credit amount based on the information entered. Original tread depth – remaining tread depth input tread used -------------------------------------------------------------------- OR ----------------------------------- Original tread depth – minimum allowable tread tread originally available to use (value of control record ADJTSUBT ) The system subtracts the resulting percentage from 100 percent to come up with the percent of the adjustment. The regular selling price is multiplied by this adjustment percent to determine the amount of credit the customer is due. A question appears when you add an adjustment line: Add adjusted product as a sale? If Y, a sale for the replacement product is automatically added to the invoice. If using this option, there’s no need to do the first step in our example of adding the replacement item manually.

113
Edit Adjustment amount and Enter Claim Number
If control record ADJNEG1 has a value of Y, the originally entered quantity of 1 is automatically set to 1-. Edit the dollar amount of the adjustment, if needed. If control record ADJCLAIM is answered Y, the manufacturer’s claim number will need to be added.

114
Adjustment Ticket Detail
Notice our adjustment credit is flagged with J .is screwed. A default product class for adjustments can be set by setting up control record ADJPDCS with the desired class number. This allows for posting adjustments in General Ledger differently than new tires. The adjustment class could also be set as non-merchandise so that it can be excluded on sales and commission reports. In Product Class Maintenance, it is possible to flag which product classes allow adjustments. Product Class Maintenance also allows adjustments for a particular class to post zero FET, based on the percent of the adjustment. An adjustment credit does not affect the inventory quantity, and is shown as non-inventory quantity in product history. Of course, the replacement tire affects inventory. Press <F3> to exit the invoice and close it as discussed previously. A second invoice can automatically be created to send to the vendor. This is covered in the Advanced Point of Sale manual.

115
Casing purchase in Point of Sale Start an invoice and continue to the screen to add detail line items. Bill any line items that are being purchased.
Use the <F24> function to show more keys and <F23> - Casing Purchase will be displayed. Press <F23> to display the Casing Purchase Input screen.
Enter the casing product number or press <F4> to find the product number.

116
Find casing product number Product inquiry brings up the familiar product inquiry screen.
This time, search by size and casing class 50.
Use Option X to select the correct casing product number and press <enter> to return to the casing purchase input. Press <enter> again to input the quantity and price of the casing credit.
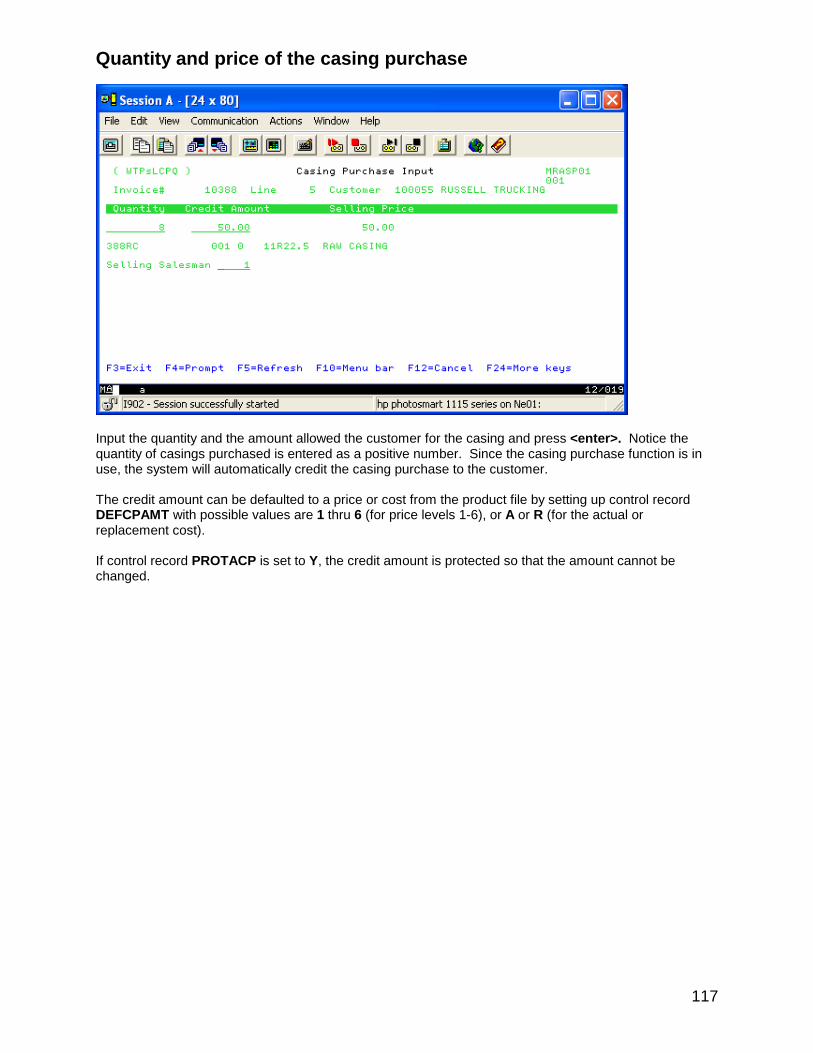
117
Quantity and price of the casing purchase
Input the quantity and the amount allowed the customer for the casing and press <enter>. Notice the quantity of casings purchased is entered as a positive number. Since the casing purchase function is in use, the system will automatically credit the casing purchase to the customer. The credit amount can be defaulted to a price or cost from the product file by setting up control record DEFCPAMT with possible values are 1 thru 6 (for price levels 1-6), or A or R (for the actual or replacement cost). If control record PROTACP is set to Y, the credit amount is protected so that the amount cannot be changed.

118
The casing credits appear on the invoice.
The casing credit is marked with P to indicate a purchase. The invoice can be closed in the normal fashion. As with tire adjustments, you may set a default product class for casing purchases by setting control record CPPRDCLS with the desired class. This allows us to post General Ledger differently than regular sales, and allows casing purchases to be excluded from sales and commission reports, if desired. Control record TXECDDFT contains the default product tax-exempt code to use for casing purchases. Automatically receive casing purchase An inventory receiver is automatically created to receive the casing into inventory at the credited cost.
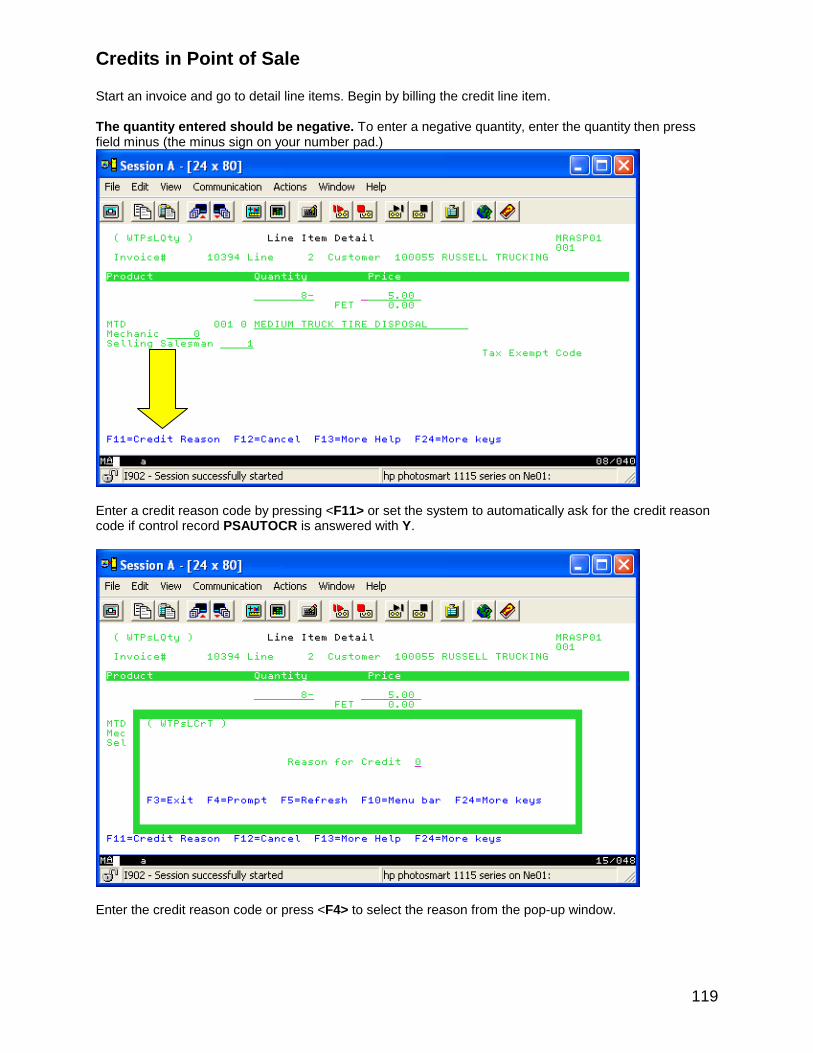
119
Credits in Point of Sale Start an invoice and go to detail line items. Begin by billing the credit line item. The quantity entered should be negative. To enter a negative quantity, enter the quantity then press field minus (the minus sign on your number pad.)
Enter a credit reason code by pressing <F11> or set the system to automatically ask for the credit reason code if control record PSAUTOCR is answered with Y.
Enter the credit reason code or press <F4> to select the reason from the pop-up window.

120
Up to nine different credit reason codes can be defined by control records CREDRSN9, where 9 is replaced with 1 thru 9. Refer to Setting up Credit Reason Codes in Appendix C for more information.
Our credit appears on the invoice. Close the invoice the standard way.

121
Estimates in POS Control record ESTIMYN must have a value of Y for this feature to be available.
From the Work with Estimates, Work Orders and Invoices screen, press F6 to add a new ticket.
Next estimate number Press <F24> for more keys, there will be F8 - Next Estimate #. Take this function to get the next number. The estimate number is in a different number series than invoice and work order numbers. The next estimate number is a system maintained value stored in control record NXTEST#. Enter or prompt for the customer number and press <enter>.

122
An estimate is created in the same way as an invoice or work order. Enter the salesman number and any other information needed in the header and press <enter>. When creating an estimate for a cash customer, a vehicle may not be needed. Bypass the vehicle selection by answering control record ESTBYPSV with Y. When turning the estimate into a work order, there will be a prompt for the vehicle. The vehicle selected must be for the same customer for which the estimate was created. Add the detail line items to the estimate.
End the estimate Press <F3> to end the estimate.

123
Enter a Y or just press <enter> if wanting to print a copy of the estimate. Enter N if wanting to end the estimate but not print a copy.
The estimate is displayed on the Work with Estimates, Work Orders and Invoices screen Estimates are retained for the number of days indicated in control record KEEPEST. If this control record is not on file, the system will purge all estimates from the system during the next update.

124
Email an Estimate from Point of Sale An estimate can be emailed to a customer, if a valid email address had been entered in customer maintenance for document type ESTM. In Customer Maintenance, press <F18> – Email addresses to add an email address for this document type.
Use control record EMFRxxxx, where xxxx is replaced with ESTM, to enter a ‘from’ email address for Estimates only. If this key is not on file, the ‘from’ address is obtained from control record EMFR. If there is an email Subject description in control record EMSBxxxx, (where xxxx is replaced with ESTM), this will be the subject on the estimate email.

125
To send an estimate to an address associated with a vehicle, set control record EMESTVEH to Y. Every time an estimate that has a vehicle associated with the transaction is printed, the estimate will also be emailed to the address in the email address field in the vehicle master record. If the customer’s email address is setup in the customer record and in the vehicle master record, two emails will be sent. These control records can be set up by store.

126

127
Appendix A Auto Billing Setting up Auto Billing The Auto Billing feature can be used to routinely include a set of related items on an invoice when a triggering product is sold. For example, when a salesperson enters a passenger tire on an invoice to a retail customer, the system can automatically add mount, balance, valve stems, road hazard warranty or other standard items to the invoice. An automatic message may also be included in auto billing. Even a fixed dollar disposal fee can be auto billed when selling a tire. By automatically adding products, there is less keying for the salesperson and a greater likelihood these items will actually be billed. Control records determine which items will trigger the list of products you designate. These records use a combination of Auto Bill Codes from both the customer and product records. When entering a product on an invoice, the system checks to see if the auto billing criteria has been met. If it has, the screen will list all of the related line items. With each additional product you enter on the invoice, a new set of related items can be billed. To help keep track of the changes and additions made in maintenance, set control record MAINTLOG to Y. Customer Auto-bill Code
Enter an Auto Bill Code on each customer subject to auto billed products. This field is alphanumeric to allow a wide range of auto bill schemes.

128
Product Auto-bill Code
Each product that will trigger the billing of additional products needs to have a value entered in its Auto Bill Code field in product maintenance. This field is also alphanumeric. Control File Maintenance
The combination of the customer and product auto bill codes and a value representing the sequence in which the products should be added to an invoice are specified using control record AUT788x. The 7 represents the code entered in the customer's Auto Bill Code field. The 88 represents the code entered in the triggering product's Auto Bill Code field. The x represents a number or letter from 0 to 9 and A to Z

129
that is the order in which the add-on products will be included on the invoice, with zero being first and nine being last. If auto billing less than ten (10) items, use sequence 0 to 9. If auto billing more than ten (10) items, use sequence A to Z. Note that A to Z will appear ahead of sequence numbers 0 to 9 when viewed in the control file, but sequence numbers 0 to 9 will appear before a to Z when billing. If auto billing multiple items, be aware that the sequence numbers for a particular customer and product auto bill combination must be used consecutively. In other words, use the sequence numbers one after another, leaving no gaps in the sequence. At the first sign of a missing sequence number, the auto billing will end, leaving any remaining items unbilled. In the example, LUGNUTS will automatically be billed when selling a medium truck tire (product auto bill code of 05) to a commercial customer (customer auto bill code of 1). Remember, the last digit of the control record is the sequence number. In control file maintenance, we’ll add control record AUT1051.
Product Enter the product number for the related item to be added in the Product to Auto-bill field. This product number must exist in the product file. Quantity Specify the Quantity to use for this auto billed item. If no quantity is entered in the control record, the quantity of the triggering product will be used. If selling 4 tires, bill 4 lug nuts sets. If control record NEGABIL is answered Y, a negative quantity can be auto billed. For example, set the quantity to negative 1 to issue a discount or rebate. Multiply Quantity By Auto Bill control records also allow multiple quantities to be billed per triggering item quantity. If the Multiply quantity by field is not zero, the quantity of the triggering item will be multiplied by this number. For example, if selling four tires and auto-bill lug nuts with a “Multiply quantity by” of five, it is possible to auto-bill twenty lug nuts by setting the Multiply quantity by to 5. The Multiply quantity by can also be set to a negative number. % of Original Item's Price Min Price Max Price Enter a percentage to use for calculating the price of an auto billed item. The calculation will take the price of the triggering item, times the percentage entered in the % of original item's price field.

130
If using this percentage calculation, a minimum and maximum price can be specified. For example, sell a tire and auto bill a road hazard package priced at 10% of the tire price, but limit this item’s price to a Min Price of $6.00 and Max Price of $20.00. Free If wanting to add an auto billed item to an invoice, but not wanting to charge for it, set the Free field to Y. this will show a free balancing and tire rotation items. The Free field and pricing entries cannot be used together. Allow Delete It is possible to prevent users from deleting an auto billed item by setting the Allow Delete field to N. Include in Inquiry Total Price If the Include in Inquiry Total Price field is answered with an N, the auto billed product’s price will not be included in the + pricing columns in Product Inquiry View 10. Auto Bill Messages
It is possible to auto bill a message line if the auto bill control record contains the value *MSG as the first four characters of the Product to Auto-bill field. The message will contain the remaining characters (positions 5 thru 15) in the Product to Auto-bill field. After the auto billed items have been added, the message can then be edited as necessary. Auto billed messages can be used as reminders for salespeople to prompt them to enter required information when selling a triggering item. If the first 10 characters of the Description for the message line are *MANDATORY, then the message line cannot be deleted. The description must also be changed before the ticket can be closed. You must set control record CHKMANMS to a Y, to enable this feature.

131
Auto Bill Product Registration Input Line(s)
If the auto bill control record Product to Auto-bill field contains the value *REGISTRATION, a blank tire registration message line will be added to the ticket. The *REGISTRATION is a special code that does not have to exist in the product file. One registration message will be added for each product billed. If you bill 4 tires then 4 registration messages will be added. The invoice cannot be closed until this quantity matches. To be sure a tire registration for each tire sold, it is possible to validate that the number of registration messages matches the number of tires sold. Answer control record REGISTVQ with Y to validate auto bill registration lines are for the same quantity as the triggering products. If control record REGISTRQ is set to Y, all tire registrations must be completed before an invoice can be closed.

132
Auto-bill Products in POS Auto billed items appear on the invoice.
It is suggested to auto bill products normally added when a product is sold. Even if the customer declines an item, it is much easier and faster to delete an item from a ticket than it is to add an item to the ticket. Not only will auto billing speed up the input, but will also help to ensure that items are not missed or forgotten when billing a customer. Any product not billed at this point will affect the bottom line.
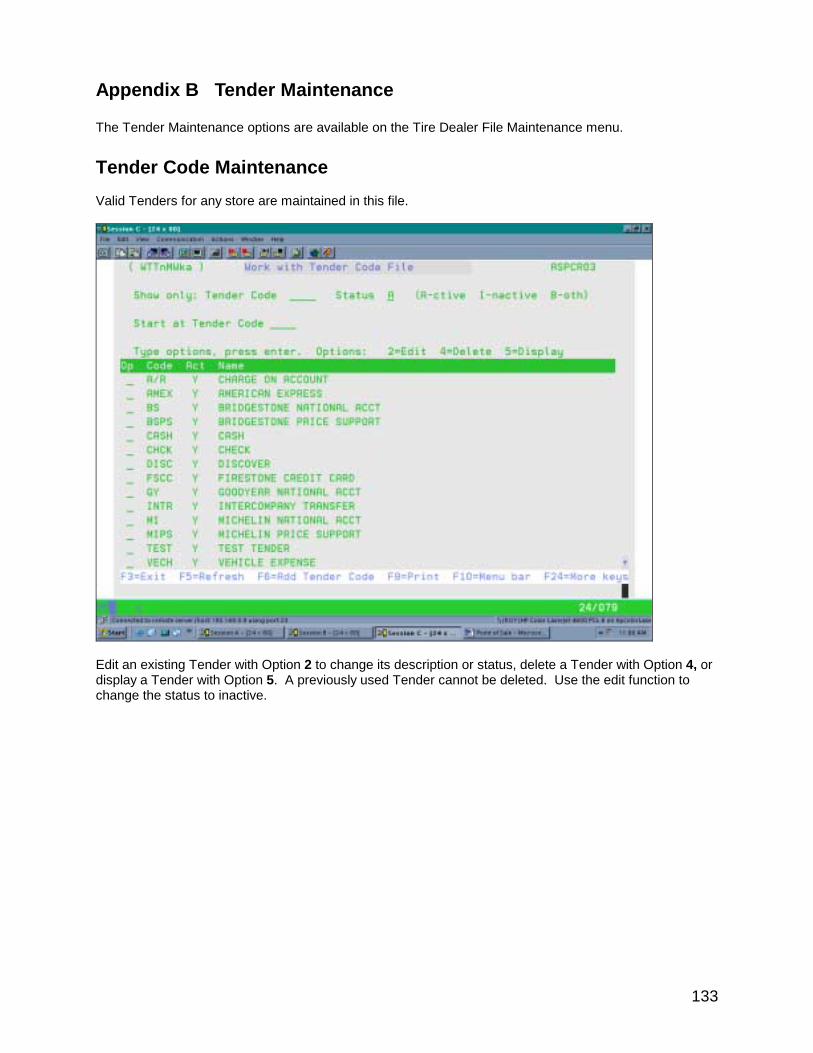
133
Appendix B Tender Maintenance The Tender Maintenance options are available on the Tire Dealer File Maintenance menu. Tender Code Maintenance Valid Tenders for any store are maintained in this file.
Edit an existing Tender with Option 2 to change its description or status, delete a Tender with Option 4, or display a Tender with Option 5. A previously used Tender cannot be deleted. Use the edit function to change the status to inactive.

134
Use Option 6 to create a new Tender.
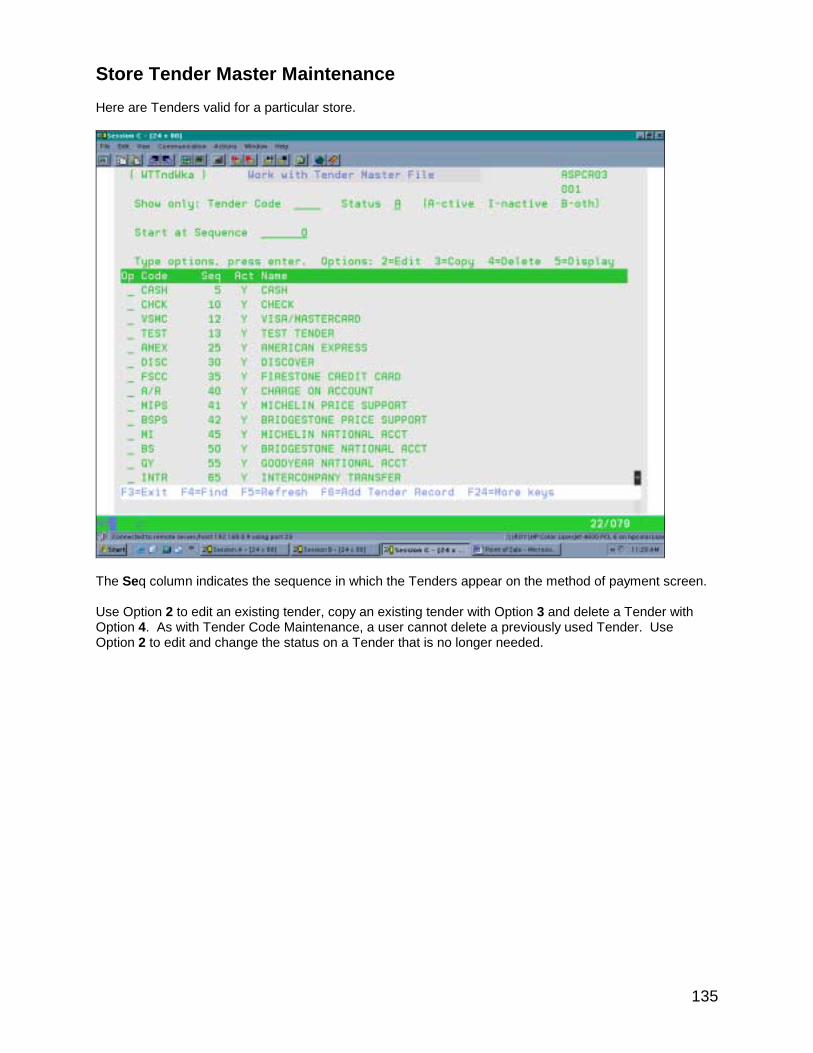
135
Store Tender Master Maintenance Here are Tenders valid for a particular store.
The Seq column indicates the sequence in which the Tenders appear on the method of payment screen. Use Option 2 to edit an existing tender, copy an existing tender with Option 3 and delete a Tender with Option 4. As with Tender Code Maintenance, a user cannot delete a previously used Tender. Use Option 2 to edit and change the status on a Tender that is no longer needed.

136
To copy changes to other stores: ( WMsgYn ) Do you wish to copy changes to other stores: Type "Y" or "N" to above. Press enter. Y F3=Exit F5=Refresh F12=Cancel F14=Humor Use Option S to send Tender information to the stores you have selected. Press <F14> to display a list of stores receiving Tender information. The Copy function is an easy way to create Tenders in a new store. A user will still need to edit the new Tender to customize G/L information. To add a Tender, use Option 6.
The sequence number controls this Tender’s placement on the method of payment screen. The new Tender must already exist in Tender Code Maintenance.
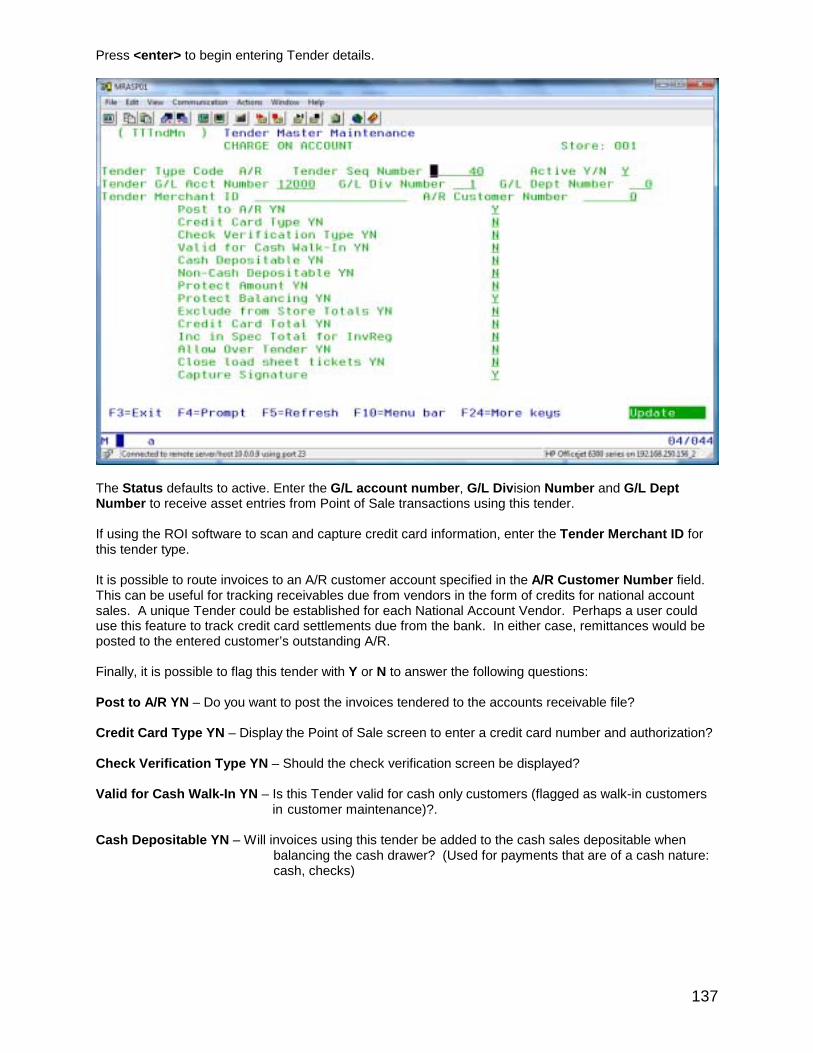
137
Press <enter> to begin entering Tender details.
The Status defaults to active. Enter the G/L account number, G/L Division Number and G/L Dept Number to receive asset entries from Point of Sale transactions using this tender. If using the ROI software to scan and capture credit card information, enter the Tender Merchant ID for this tender type. It is possible to route invoices to an A/R customer account specified in the A/R Customer Number field. This can be useful for tracking receivables due from vendors in the form of credits for national account sales. A unique Tender could be established for each National Account Vendor. Perhaps a user could use this feature to track credit card settlements due from the bank. In either case, remittances would be posted to the entered customer’s outstanding A/R. Finally, it is possible to flag this tender with Y or N to answer the following questions: Post to A/R YN – Do you want to post the invoices tendered to the accounts receivable file? Credit Card Type YN – Display the Point of Sale screen to enter a credit card number and authorization? Check Verification Type YN – Should the check verification screen be displayed? Valid for Cash Walk-In YN – Is this Tender valid for cash only customers (flagged as walk-in customers in customer maintenance)?. Cash Depositable YN – Will invoices using this tender be added to the cash sales depositable when
balancing the cash drawer? (Used for payments that are of a cash nature: cash, checks)
138
Non-Cash Depositable YN – Will invoices using this Tender be added to the non-cash depositable
amount in the cash drawer? (Perhaps a credit card payment immediately credited to your account by the bank.)
Protect Amount YN – Do you want to protect this Tender amount from being changed in Point of Sale? (Useful for intercompany or national account invoices using an assigned tender.) Protect Balancing YN – Do you want to protect this tender’s total amount from being changed when the
cash drawer is being balanced?
Exclude from Store Totals YN – Do you want to exclude this tender’s total from the store totals inquiry? This is useful to exclude intercompany sales from the inquiry totals.
Credit Card Total YN – Do you want this tender type included in the credit card total when balancing the cash drawer? Inc in Special Total for Invoice Register – Do you want to include invoices using this tender from the
special total on the invoice register printed during the nightly update? See the Point of Sale Invoice Edit List entry in the online Help Inquiry for more information on this feature.
Allow over tender Y/N – Do you want to allow this tender to be over tendered (overpaid)? This can be
used for such as cash if you want to indicate change given. It can be used for checks, if you allow customers to overpay invoices and receive change in return. The system will calculate the amount of change to return.
Close Load Sheets Y/N – Do you want to allow invoices for customers using this tender type to be
closed with the Close Invoices option in the Order Entry module. Capture Signature Y/N – Do you want to capture signature? Set this to Y if you want to capture a
signature at POS for a ticket that is entered with that tender type. This enhancement allows for tickets tendered as inter-company to be excluded from signature capture. Control record POSSIGCP must also be set to Y for signatures to be captured. This control record can be set by workstation ID so that only workstations with a signature pad will prompt for a signature.
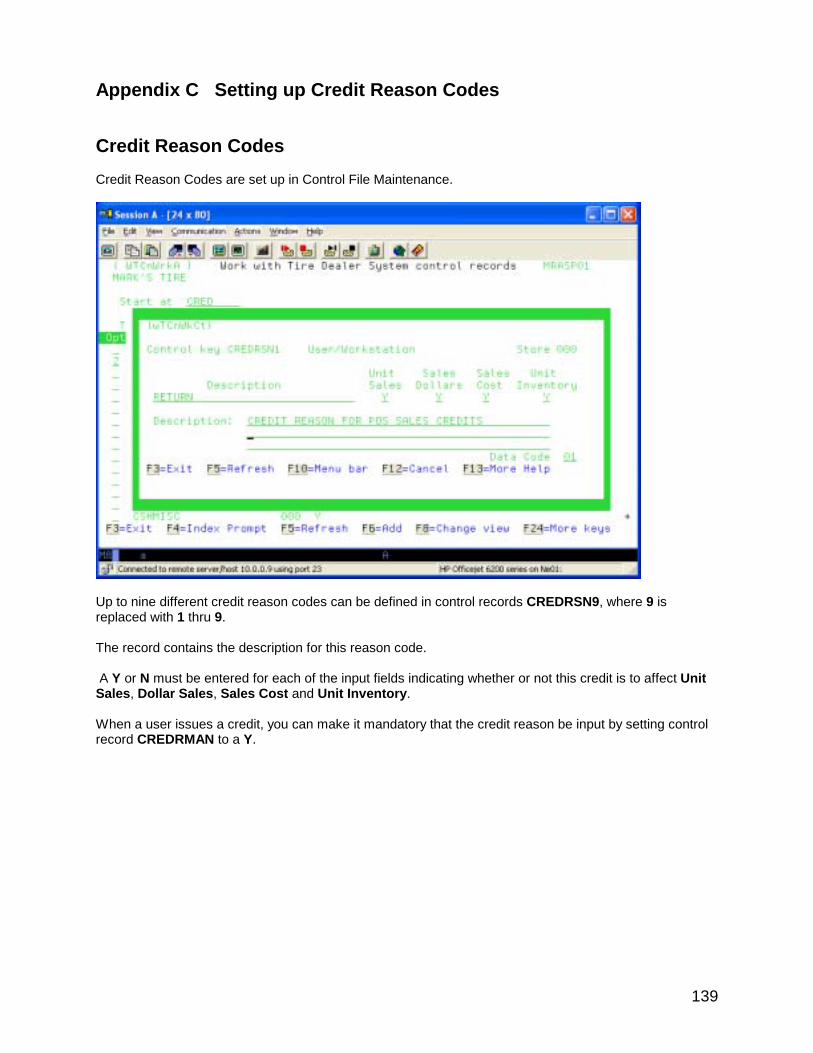
139
Appendix C Setting up Credit Reason Codes Credit Reason Codes Credit Reason Codes are set up in Control File Maintenance.
Up to nine different credit reason codes can be defined in control records CREDRSN9, where 9 is replaced with 1 thru 9. The record contains the description for this reason code. A Y or N must be entered for each of the input fields indicating whether or not this credit is to affect Unit Sales, Dollar Sales, Sales Cost and Unit Inventory. When a user issues a credit, you can make it mandatory that the credit reason be input by setting control record CREDRMAN to a Y.

140
Appendix D Setting up and Using Packages Package Products
To flag a product as a "Package", set it’s Auto Bill Code to *P in product maintenance. F10 - Package contents is available to add a Bill of Material for the package. Package Bill of Material For Example: Lube. Oil and Filter
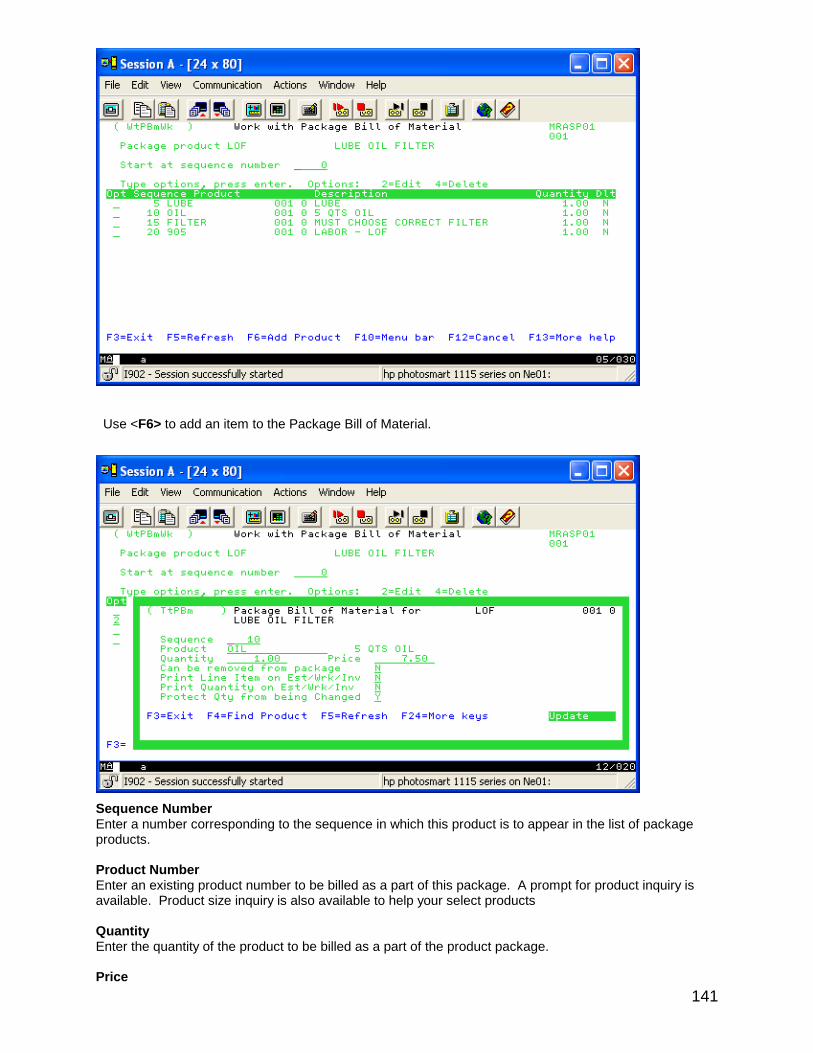
141
Use <F6> to add an item to the Package Bill of Material.
Sequence Number Enter a number corresponding to the sequence in which this product is to appear in the list of package products. Product Number Enter an existing product number to be billed as a part of this package. A prompt for product inquiry is available. Product size inquiry is also available to help your select products Quantity Enter the quantity of the product to be billed as a part of the product package. Price

142
It is possible to enter the price of the product to be billed as a part of the product package. This is the price per item, not the extended price. If a price is input, it will be used when posting to Sales, G/L, and calculating sales tax. If no price in input during setup, then the price posted to Sales and G/L will be prorated. The sales tax will be calculated on the main package line only. Can be removed from Package Enter Y or N allow/prevent the line entry to be removed from the package on a Point of Sale invoice. Print line on EST/WRK/INV Y or N whether to print this package line item on the ticket. Print quantity on EST/WRK/INV Y or N whether to print the quantity of this line item. Protect quantity from being changed. Y or N whether to protect the quantity of this item from being changed. A standard message can be added to the package as well by using the function key <F7>.
If the first 10 characters of the Description for the message line are *MANDATORY, then the message line cannot be deleted. The description must also be changed before the ticket can be closed. You must set control record CHKMANMS to a Y, to enable this feature.

143
Package calculations Within the store total inquiry (sales not yet updated), package sales appear as sales of the package product number. However, when a package sale is posted (processed through the nightly update), the value of the package sale is prorated amongst the products contained in the package. Only the unit sale of the package product is posted. To indicate which cost is used in computing the prorated price for individual package component products during the Point of Sale update, control record PKGCSTAR to A for Actual or R for replacement cost. Remember, a user can assign specific costs to be used for these calculations in the package bill of materials set up for a component item. The selling price prorated for each item is based on a calculation using an item’s cost times its quantity in the package. This extended cost is divided by the extended costs for all items in the package to determine the percentage of the selling price to be allocated to a particular component item. For Example: Package 'Super Duper Lube Job' Product Number: SDLJ Price: $69.99 SDLJ contains an oil filter, air filter, three gas line filters, oil, and grease. On the Point of Sale ticket it may look something like this: Qty Price Super Duper Lube Job 1 69.99 XYZ Oil Filter 1 0.00 ABC Air Filter 1 0.00 Hot Dog Gas Filters 3 0.00 Quacker State Oil 7 0.00 Duck Billed Grease 2 0.00 Labor 10 0.00 The cost of each item in the package is as follows: Item cost Qty Extended cost XYZ Oil Filter $4.00 1 $4.00 ABC Air Filter 3.00 1 3.00 Hot Dog Gas Filters 1.00 3 3.00 Quacker State Oil 0.50 7 3.50 Duck Billed Grease 0.25 2 0.50 Labor 3.00 10 30.00 Total Cost $44.00. Posted to sales, inventory and general ledger: Qty Price Extended Cost Item Price Calculation Each Price (Selling price /Total cost x extended item cost ) Quantity 1 Super Duper Lube Job $ 0.01 -$ .01 $0.00 1 XYZ Oil Filter 6.36 6.36 4.00 69.99/44.00 x 4.00 = 6.36 / 1 = 6.36. 1 ABC Air Filter 4.77 4.77 3.00 69.99/44.00 x 3.00 = 4.77 / 1 = 4.77 3 Hot Dog Gas Filters 1.59 4.77 1.00 69.99/44.00 x 3.00 = 4.77 / 3 = 1.59 7 Quacker State Oil .80 5.60 .50 69.99/44.00 x 3.50 = 5.57 / 7 = .80 2 Duck Billed Grease .40 .80 .25 69.99/44.00 x .50 = .79 / 2 = .40 10 Labor Units 4.77 47.70 3.00 69.99/44.00 x 30.00 = 47.72 / 10 = 4.77 $70.00 Notice the - $0.01 posted to Super Duper Lube Job. This amount is due to rounding in the calculations dealing with fractions of a penny. If adding the prorated extended price value of all the items, the sum is $70.00. Since the charge was only $69.99 for the package product, the extra penny must be placed somewhere. End