polycom controller code for crestron systems,...
TRANSCRIPT
©2008 Polycom, Inc. All rights reserved. Polycom®, the Polycom logo, and VSX® are registered trademarks of Polycom, Inc. All other trademarks are the property of Polycom, Inc. or their respective companies.
Introduction This document describes version 2.0 of the Polycom Controller Code for Crestron Systems, which provides an interface between a Crestron® control system and a Polycom® HDX or VSX® system. The Polycom Controller Code for Crestron Systems supports an RS-232 serial protocol or control over IP and was tested using Polycom HDX software version 2.0.1 and VSX software version 8.7. Both platforms share a common master code file but have separate touch panel files. The required RS-232 communication settings are a default baud rate of 9600, 8 data bits, 1 stop bit, no parity, and no flow control. The required serial cable uses pins 2, 3, and 5. Pin 2 is wired to pin 3, pin 3 is wired to pin 2, and pin 5 is wired to pin 5. Implementation When serially controlled, the Polycom Controller Code for Crestron Systems communicates with the Polycom HDX or VSX system and exchanges information upon initialization. When IP controlled, the Polycom Controller Code for Crestron Systems communicates with the Polycom HDX or VSX system after you set the IP address in the IP table of the Crestron master code and initiate IP control by touching Connect IP on the System Setup page (Polycom HDX systems) or on the Conference Setup page (VSX systems). Supported Touch Panel Sizes The Polycom Controller Code for Crestron Systems supports touch panels of 12 inches and larger. Features The Polycom Controller Code for Crestron Systems enables you to do the following:
- Manually place and hang up an IP, ISDN, or POTS call - Dial from the Polycom HDX or VSX system directory - Enable or disable far-end or near-end camera control - Select the main video source - Set up to six camera presets - Adjust the speaker volume level, and mute or unmute the microphone - Enable or disable Auto Answer, Do Not Disturb, and Auto Mute - Select a multipoint viewing mode (auto, presentation, discussion, or full screen) - Enable or disable the Picture-in-Picture (PIP) and specify the PIP location - Simulate all remote control functionality - Start or stop sending content - Reboot the Polycom HDX or VSX system - Reinitialize the system
Version 2.0
Polycom Controller Code for Crestron Systems
©2008 Polycom, Inc. All rights reserved. Polycom®, the Polycom logo, and VSX® are registered trademarks of Polycom, Inc. All other trademarks are the property of Polycom, Inc. or their respective companies.
Polycom HDX Panel Pages Overview Every page in the Polycom Controller Code for Crestron Systems includes a menu for navigating to a different page, an Exit button that returns the touch panel to the Polycom Logo page, and a button for switching the video to full-screen mode. Many of the pages in the Polycom Controller Code for Crestron Systems also include buttons for increasing or decreasing the volume and muting the microphone. Polycom Logo Page The Polycom Logo page is displayed after you have loaded the touch panel and the Crestron sample code onto your master. Touch the Polycom Logo page to navigate to the Place a Call Controls page.
©2008 Polycom, Inc. All rights reserved. Polycom®, the Polycom logo, and VSX® are registered trademarks of Polycom, Inc. All other trademarks are the property of Polycom, Inc. or their respective companies.
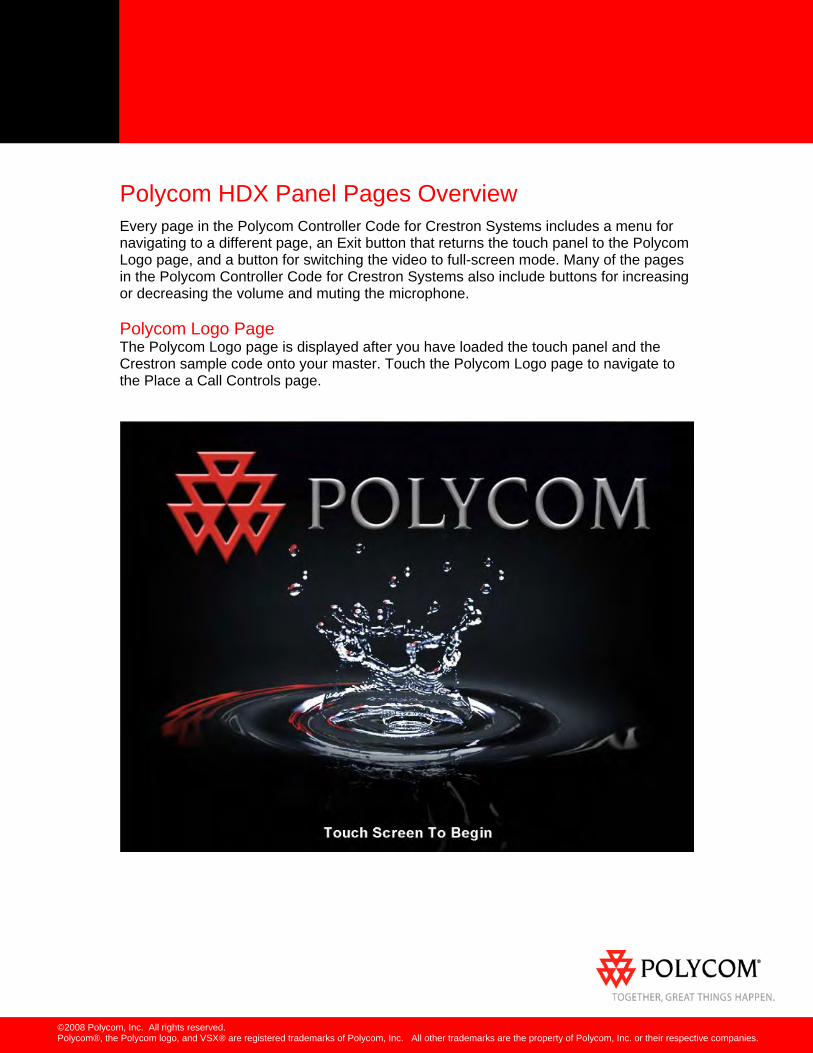
Place A Call Controls Page - Video On the Place A Call Controls page, you can manually dial and hang up an ISDN or IP video call, select the desired speed up to 4096 k, or place or add an audio-only call.
New in Version 2.0 Version 2.0 includes support for DTMF tones.
©2008 Polycom, Inc. All rights reserved. Polycom®, the Polycom logo, and VSX® are registered trademarks of Polycom, Inc. All other trademarks are the property of Polycom, Inc. or their respective companies.
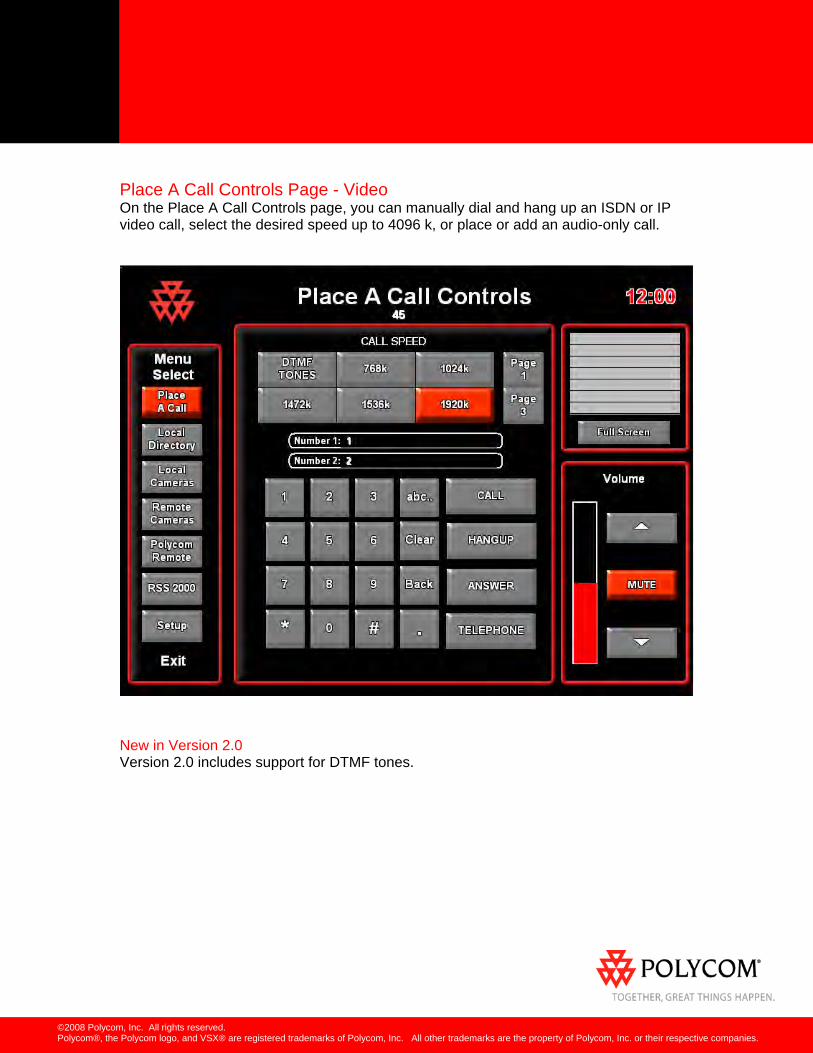
Phone Dialing Controls Page - Audio On the Phone Dialing Controls page, you can manually dial and hang up an audio-only call.
New in Version 2.0 Version 2.0 includes support for DTMF tones and phone flash.
©2008 Polycom, Inc. All rights reserved. Polycom®, the Polycom logo, and VSX® are registered trademarks of Polycom, Inc. All other trademarks are the property of Polycom, Inc. or their respective companies.
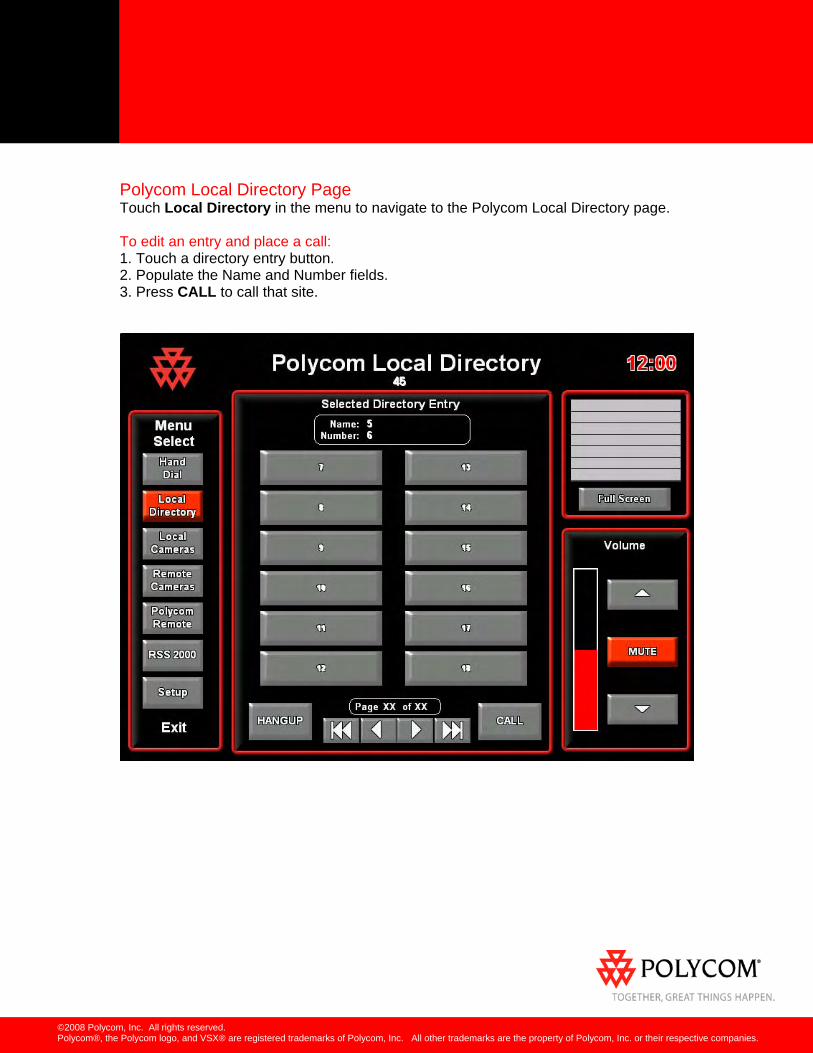
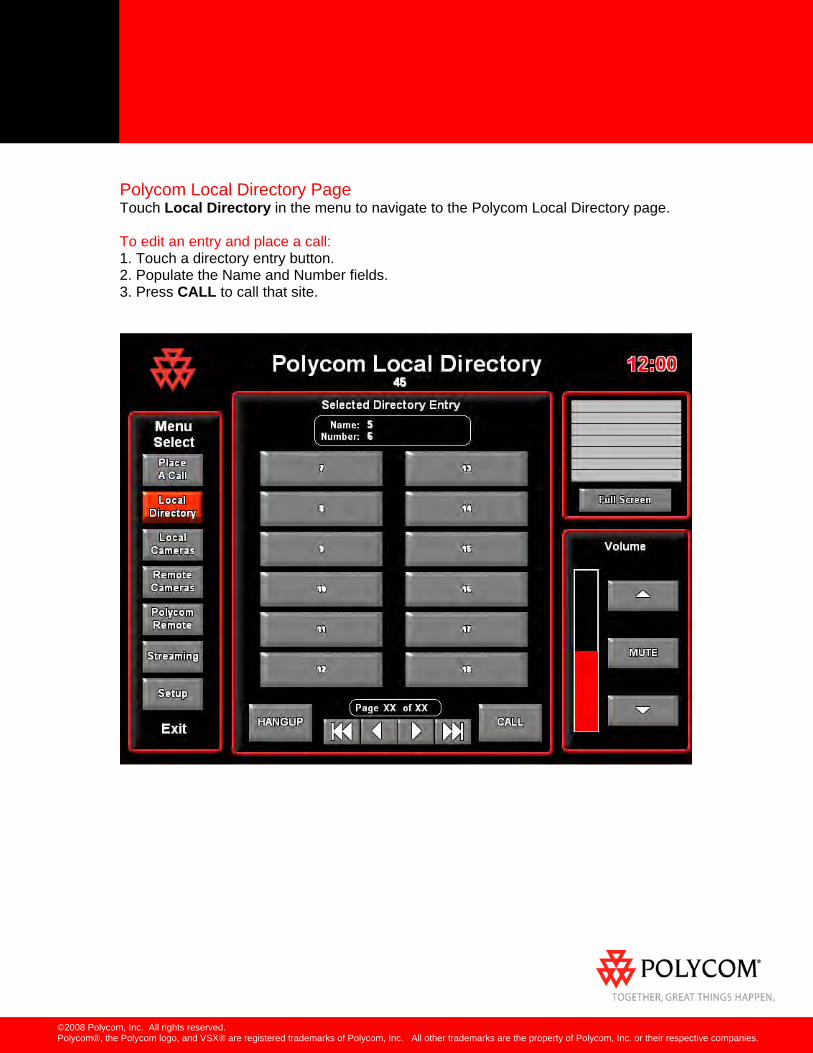
Polycom Local Directory Page Touch Local Directory in the menu to navigate to the Polycom Local Directory page. To edit an entry and place a call: 1. Touch a directory entry button. 2. Populate the Name and Number fields. 3. Press CALL to call that site.
©2008 Polycom, Inc. All rights reserved. Polycom®, the Polycom logo, and VSX® are registered trademarks of Polycom, Inc. All other trademarks are the property of Polycom, Inc. or their respective companies.
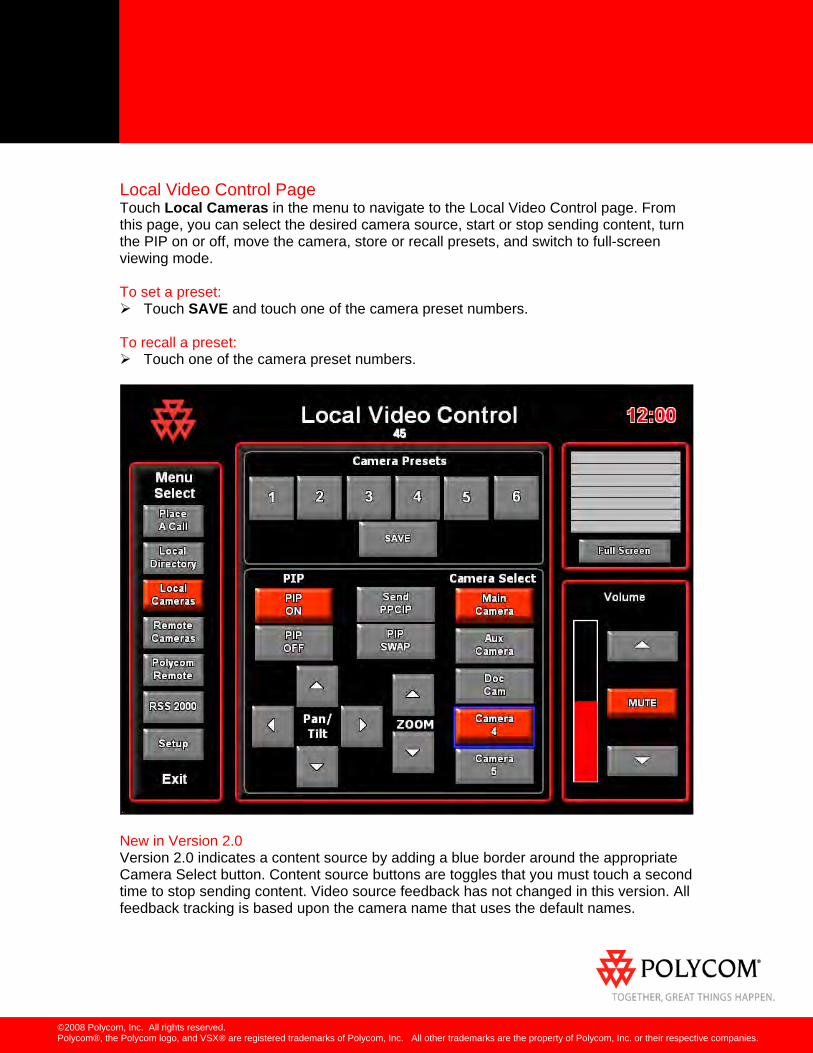
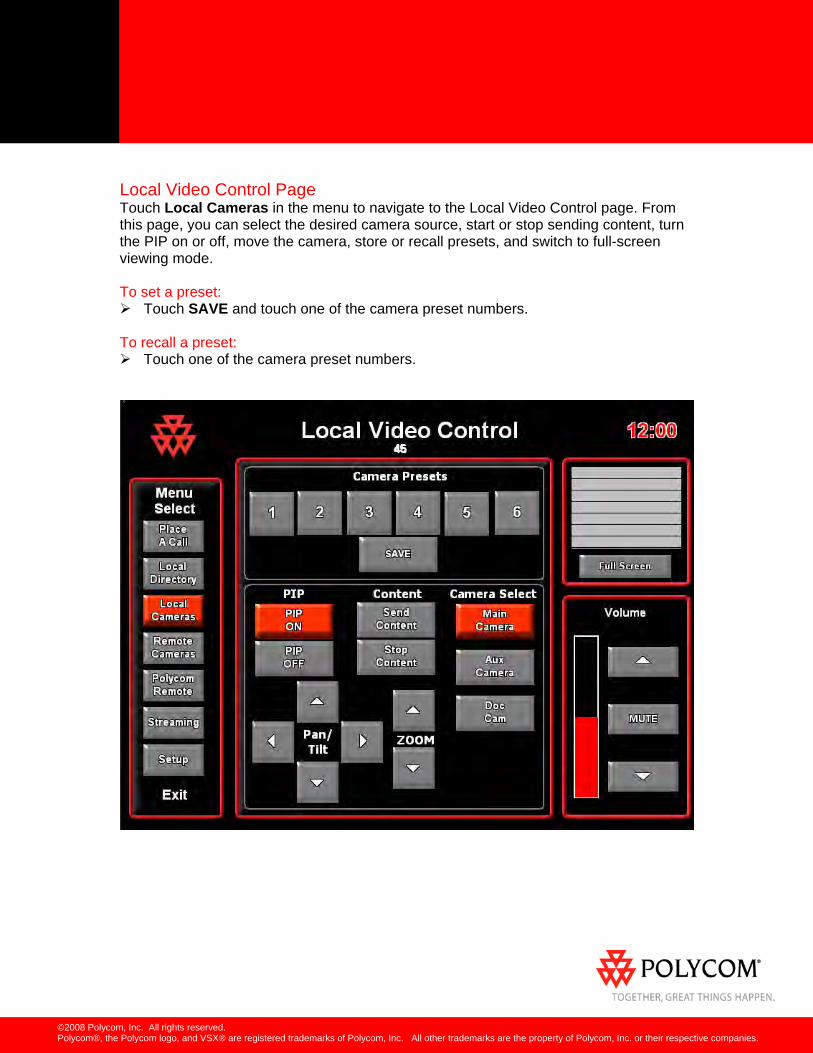
Local Video Control Page Touch Local Cameras in the menu to navigate to the Local Video Control page. From this page, you can select the desired camera source, start or stop sending content, turn the PIP on or off, move the camera, store or recall presets, and switch to full-screen viewing mode. To set a preset:
Touch SAVE and touch one of the camera preset numbers. To recall a preset:
Touch one of the camera preset numbers.
New in Version 2.0 Version 2.0 indicates a content source by adding a blue border around the appropriate Camera Select button. Content source buttons are toggles that you must touch a second time to stop sending content. Video source feedback has not changed in this version. All feedback tracking is based upon the camera name that uses the default names.
©2008 Polycom, Inc. All rights reserved. Polycom®, the Polycom logo, and VSX® are registered trademarks of Polycom, Inc. All other trademarks are the property of Polycom, Inc. or their respective companies.
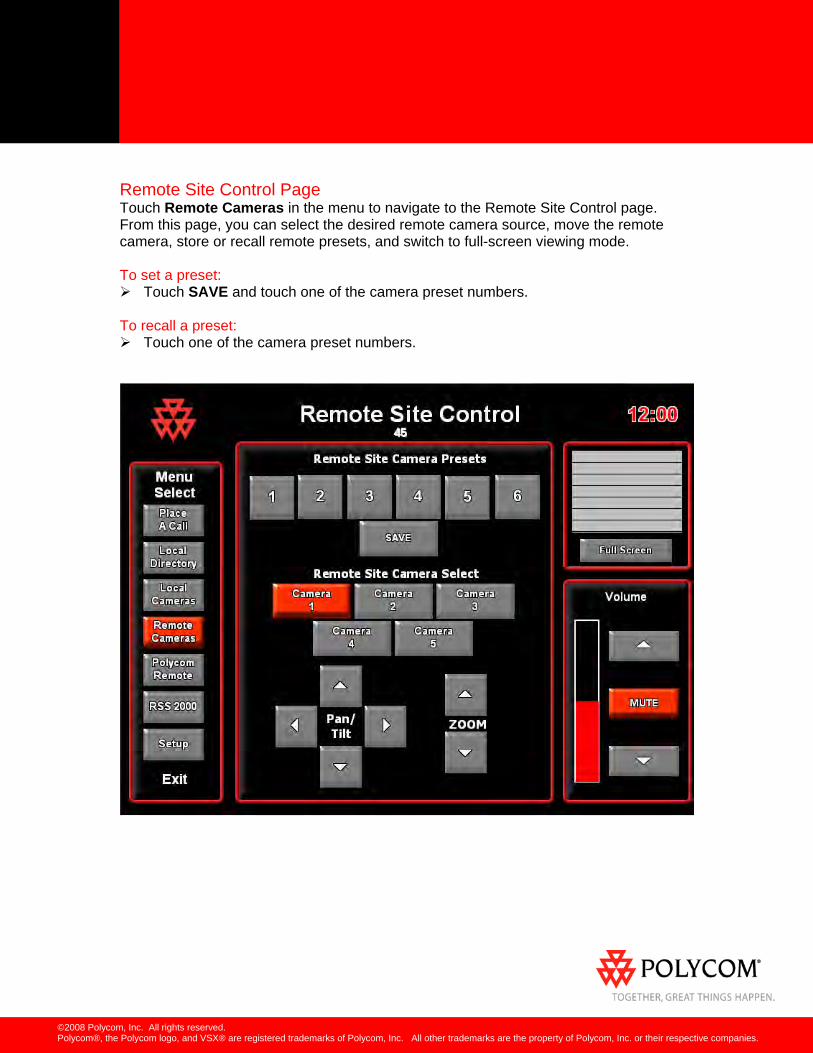
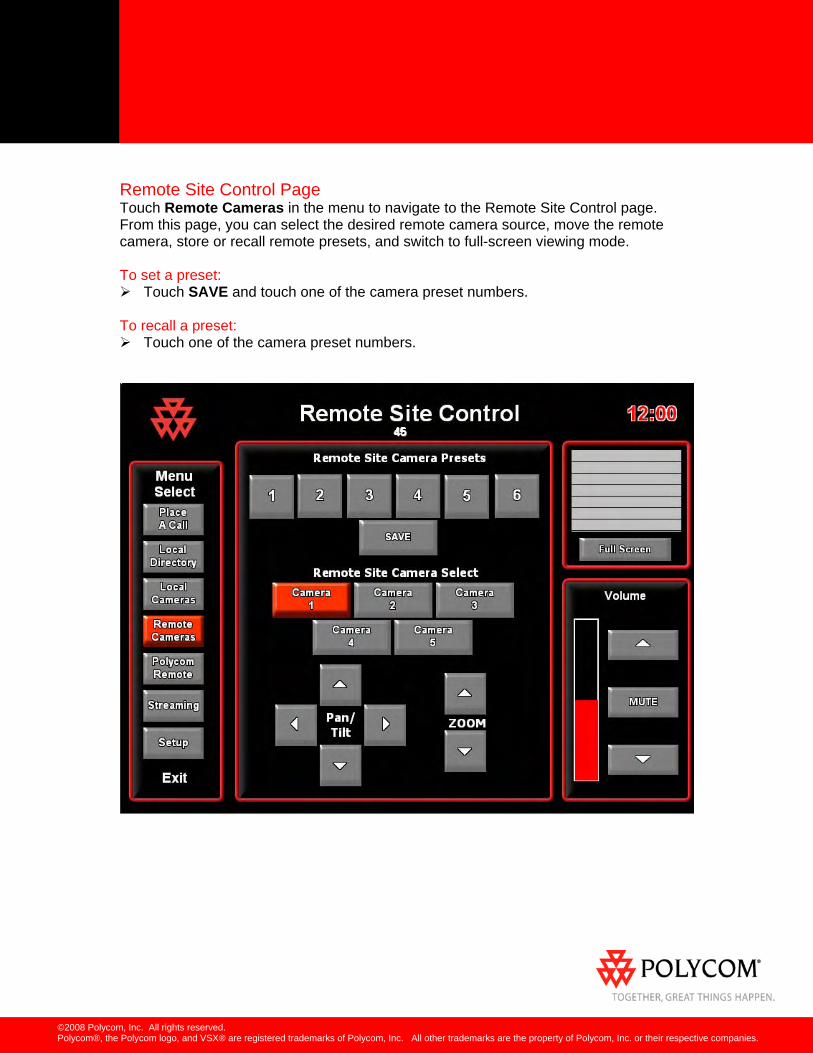
Remote Site Control Page Touch Remote Cameras in the menu to navigate to the Remote Site Control page. From this page, you can select the desired remote camera source, move the remote camera, store or recall remote presets, and switch to full-screen viewing mode. To set a preset:
Touch SAVE and touch one of the camera preset numbers. To recall a preset:
Touch one of the camera preset numbers.

©2008 Polycom, Inc. All rights reserved. Polycom®, the Polycom logo, and VSX® are registered trademarks of Polycom, Inc. All other trademarks are the property of Polycom, Inc. or their respective companies.
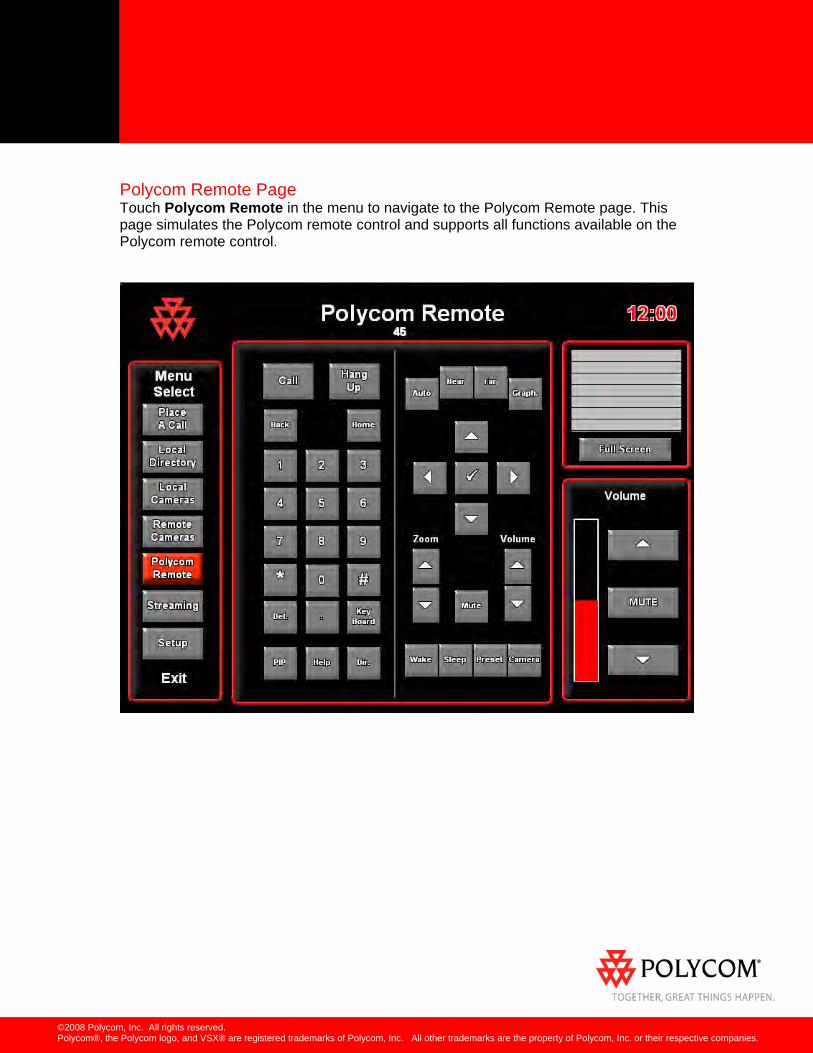
Polycom Remote Page Touch Polycom Remote in the menu to navigate to the Polycom Remote page. This page simulates the Polycom remote control and supports all functions available on the Polycom remote control.
©2008 Polycom, Inc. All rights reserved. Polycom®, the Polycom logo, and VSX® are registered trademarks of Polycom, Inc. All other trademarks are the property of Polycom, Inc. or their respective companies.
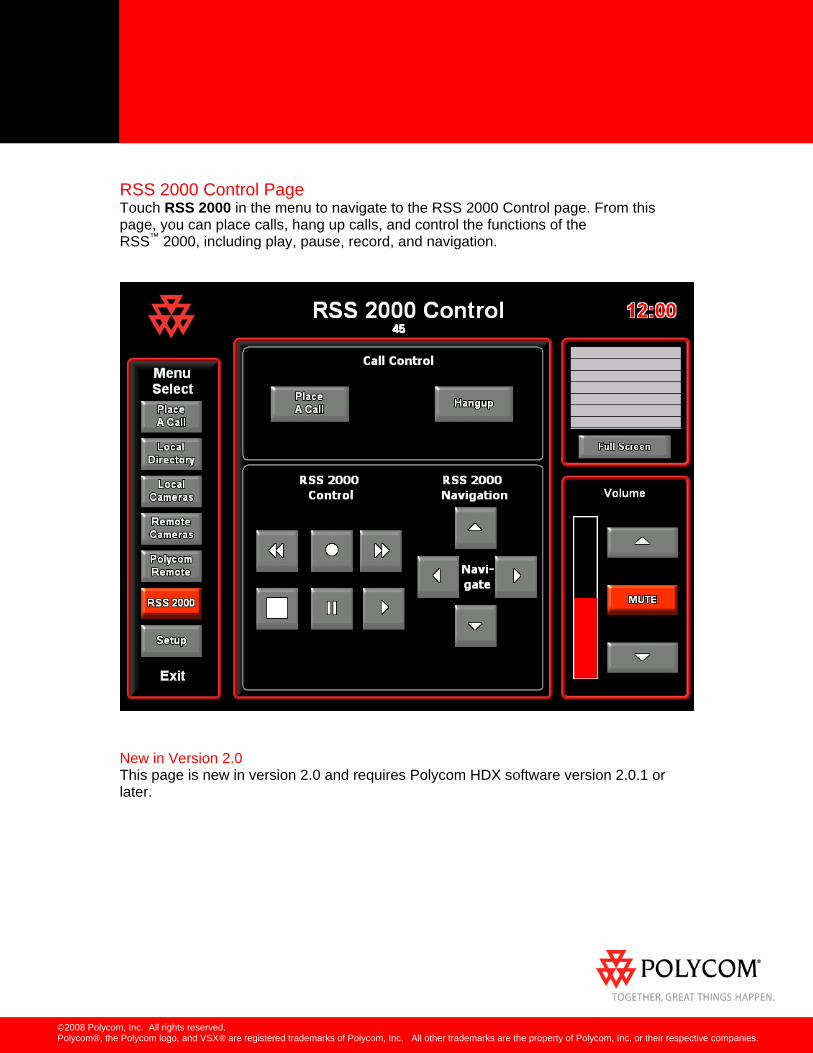
RSS 2000 Control Page Touch RSS 2000 in the menu to navigate to the RSS 2000 Control page. From this page, you can place calls, hang up calls, and control the functions of the RSS™ 2000, including play, pause, record, and navigation.
New in Version 2.0 This page is new in version 2.0 and requires Polycom HDX software version 2.0.1 or later.
©2008 Polycom, Inc. All rights reserved. Polycom®, the Polycom logo, and VSX® are registered trademarks of Polycom, Inc. All other trademarks are the property of Polycom, Inc. or their respective companies.
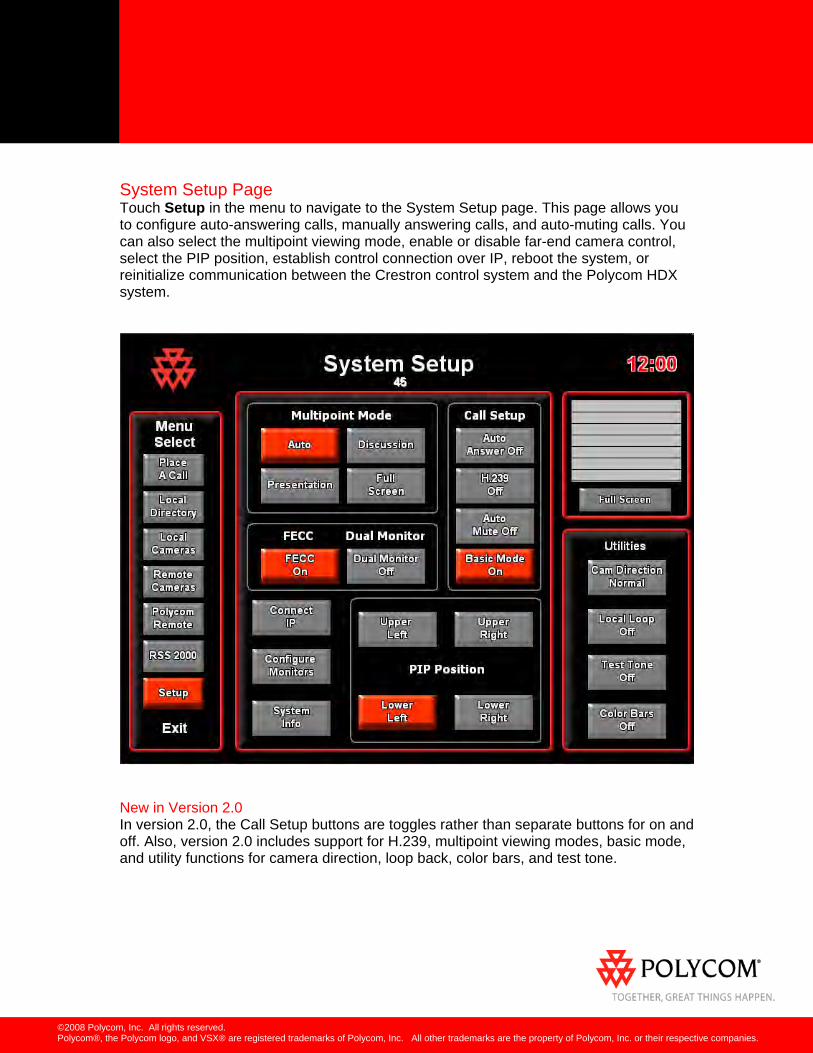
System Setup Page Touch Setup in the menu to navigate to the System Setup page. This page allows you to configure auto-answering calls, manually answering calls, and auto-muting calls. You can also select the multipoint viewing mode, enable or disable far-end camera control, select the PIP position, establish control connection over IP, reboot the system, or reinitialize communication between the Crestron control system and the Polycom HDX system.
New in Version 2.0 In version 2.0, the Call Setup buttons are toggles rather than separate buttons for on and off. Also, version 2.0 includes support for H.239, multipoint viewing modes, basic mode, and utility functions for camera direction, loop back, color bars, and test tone.
©2008 Polycom, Inc. All rights reserved. Polycom®, the Polycom logo, and VSX® are registered trademarks of Polycom, Inc. All other trademarks are the property of Polycom, Inc. or their respective companies.
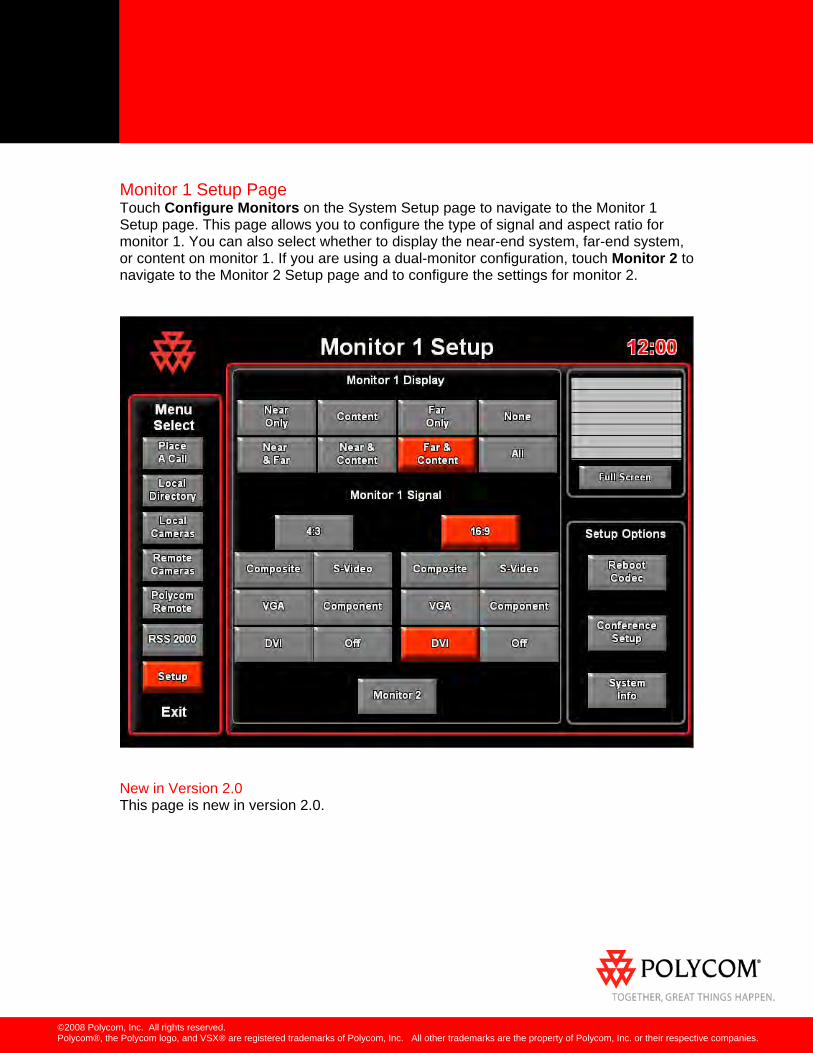
Monitor 1 Setup Page Touch Configure Monitors on the System Setup page to navigate to the Monitor 1 Setup page. This page allows you to configure the type of signal and aspect ratio for monitor 1. You can also select whether to display the near-end system, far-end system, or content on monitor 1. If you are using a dual-monitor configuration, touch Monitor 2 to navigate to the Monitor 2 Setup page and to configure the settings for monitor 2.
New in Version 2.0 This page is new in version 2.0.

©2008 Polycom, Inc. All rights reserved. Polycom®, the Polycom logo, and VSX® are registered trademarks of Polycom, Inc. All other trademarks are the property of Polycom, Inc. or their respective companies.
System Information Page Touch System Info on the Monitor 1 Setup page to navigate to the System Information page. This page provides the system name, model, serial number, ISDN number, IP address, software version, E.164 name, H.323 name, gatekeeper IP address, and room number of the Polycom HDX system.
New in Version 2.0 This page is new in version 2.0.
©2008 Polycom, Inc. All rights reserved. Polycom®, the Polycom logo, and VSX® are registered trademarks of Polycom, Inc. All other trademarks are the property of Polycom, Inc. or their respective companies.
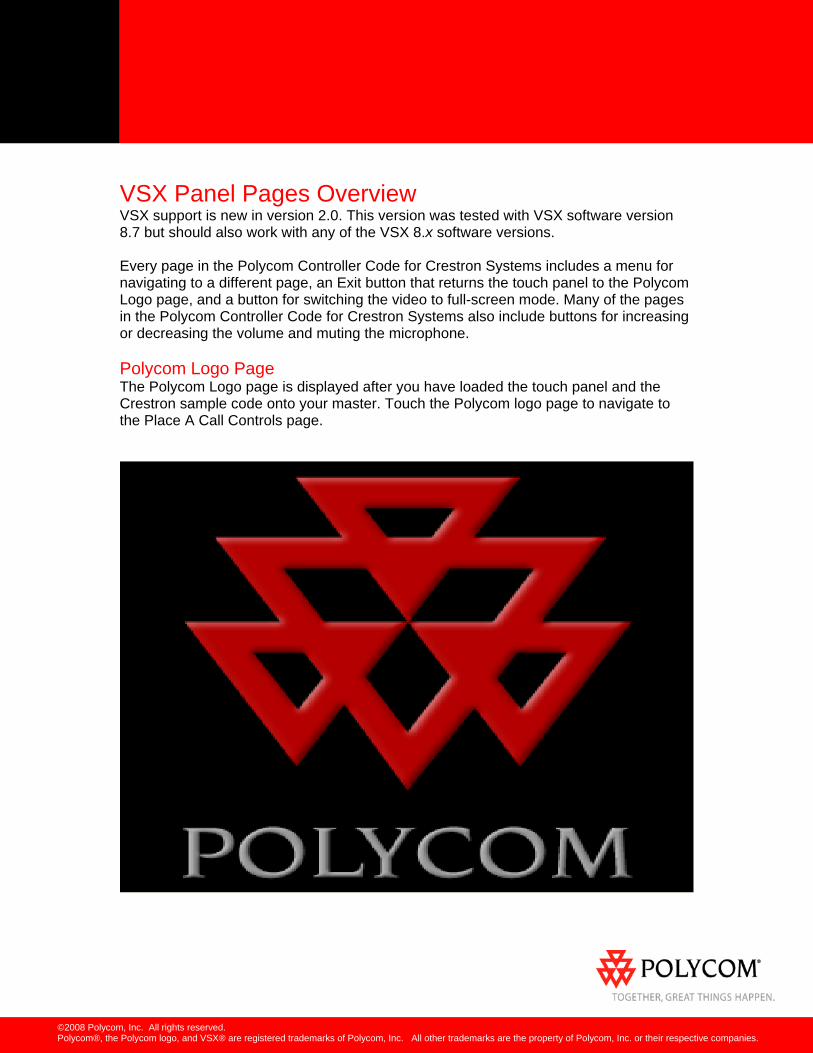
VSX Panel Pages Overview VSX support is new in version 2.0. This version was tested with VSX software version 8.7 but should also work with any of the VSX 8.x software versions. Every page in the Polycom Controller Code for Crestron Systems includes a menu for navigating to a different page, an Exit button that returns the touch panel to the Polycom Logo page, and a button for switching the video to full-screen mode. Many of the pages in the Polycom Controller Code for Crestron Systems also include buttons for increasing or decreasing the volume and muting the microphone. Polycom Logo Page The Polycom Logo page is displayed after you have loaded the touch panel and the Crestron sample code onto your master. Touch the Polycom logo page to navigate to the Place A Call Controls page.
©2008 Polycom, Inc. All rights reserved. Polycom®, the Polycom logo, and VSX® are registered trademarks of Polycom, Inc. All other trademarks are the property of Polycom, Inc. or their respective companies.
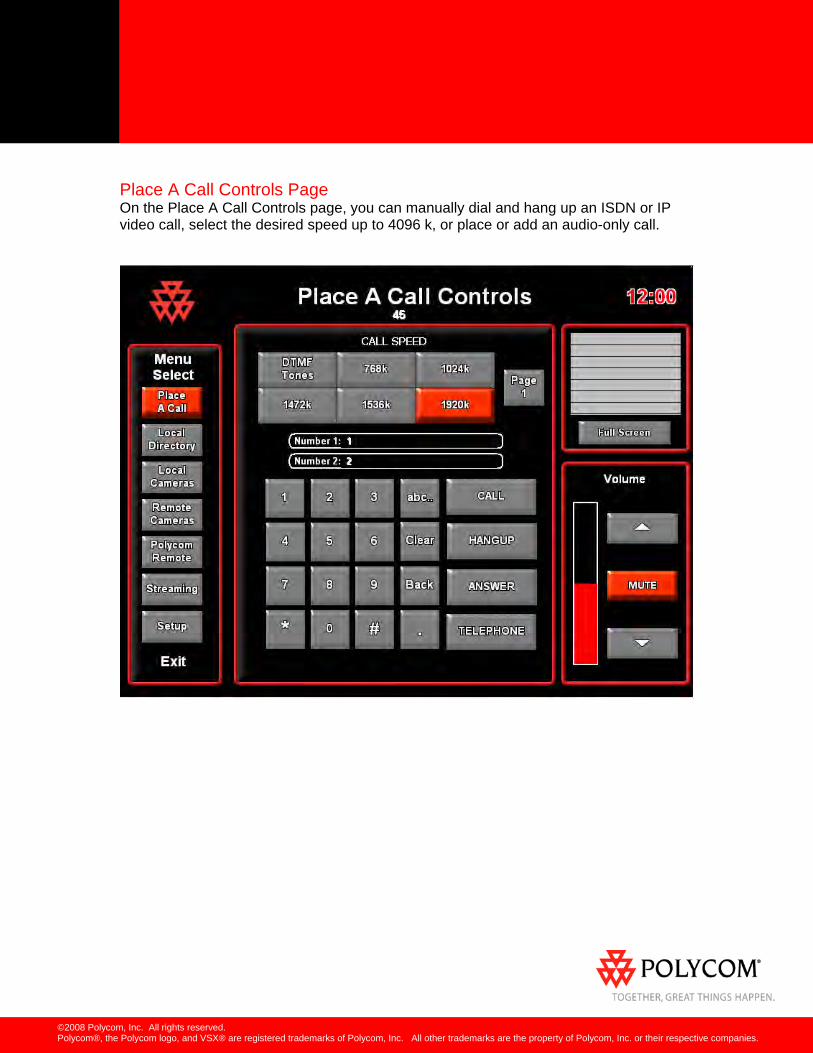
Place A Call Controls Page On the Place A Call Controls page, you can manually dial and hang up an ISDN or IP video call, select the desired speed up to 4096 k, or place or add an audio-only call.
©2008 Polycom, Inc. All rights reserved. Polycom®, the Polycom logo, and VSX® are registered trademarks of Polycom, Inc. All other trademarks are the property of Polycom, Inc. or their respective companies.
Polycom Local Directory Page Touch Local Directory in the menu to navigate to the Polycom Local Directory page. To edit an entry and place a call: 1. Touch a directory entry button. 2. Populate the Name and Number fields. 3. Press CALL to call that site.
©2008 Polycom, Inc. All rights reserved. Polycom®, the Polycom logo, and VSX® are registered trademarks of Polycom, Inc. All other trademarks are the property of Polycom, Inc. or their respective companies.
Local Video Control Page Touch Local Cameras in the menu to navigate to the Local Video Control page. From this page, you can select the desired camera source, start or stop sending content, turn the PIP on or off, move the camera, store or recall presets, and switch to full-screen viewing mode. To set a preset:
Touch SAVE and touch one of the camera preset numbers. To recall a preset:
Touch one of the camera preset numbers.
©2008 Polycom, Inc. All rights reserved. Polycom®, the Polycom logo, and VSX® are registered trademarks of Polycom, Inc. All other trademarks are the property of Polycom, Inc. or their respective companies.
Remote Site Control Page Touch Remote Cameras in the menu to navigate to the Remote Site Control page. From this page, you can select the desired remote camera source, move the remote camera, store or recall remote presets, and switch to full-screen viewing mode. To set a preset:
Touch SAVE and touch one of the camera preset numbers. To recall a preset:
Touch one of the camera preset numbers.
©2008 Polycom, Inc. All rights reserved. Polycom®, the Polycom logo, and VSX® are registered trademarks of Polycom, Inc. All other trademarks are the property of Polycom, Inc. or their respective companies.
Polycom Remote Page Touch Polycom Remote in the menu to navigate to the Polycom Remote page. This page simulates the Polycom remote control and supports all functions available on the Polycom remote control.
©2008 Polycom, Inc. All rights reserved. Polycom®, the Polycom logo, and VSX® are registered trademarks of Polycom, Inc. All other trademarks are the property of Polycom, Inc. or their respective companies.
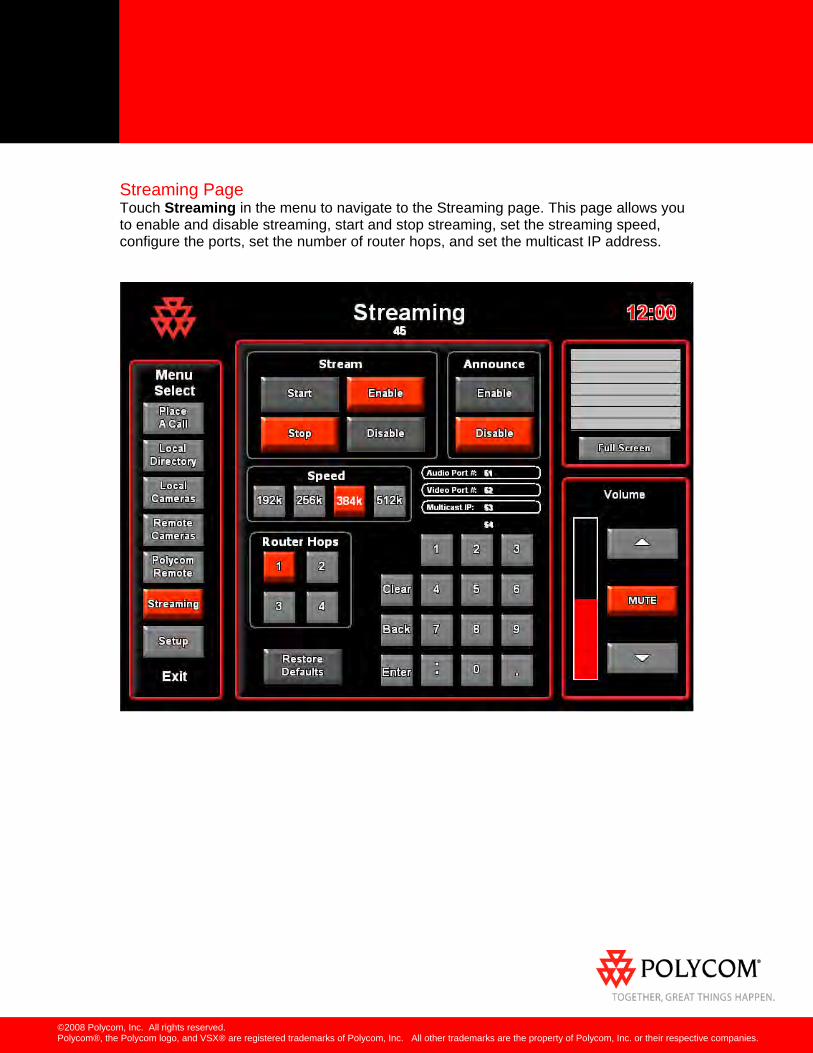
Streaming Page Touch Streaming in the menu to navigate to the Streaming page. This page allows you to enable and disable streaming, start and stop streaming, set the streaming speed, configure the ports, set the number of router hops, and set the multicast IP address.

©2008 Polycom, Inc. All rights reserved. Polycom®, the Polycom logo, and VSX® are registered trademarks of Polycom, Inc. All other trademarks are the property of Polycom, Inc. or their respective companies.
Conference Setup Page Touch Setup in the menu to navigate to the Conference Setup page. This page allows you to configure auto-answering calls, manually answering calls, and auto-muting calls. You can also select the multipoint viewing mode, enable or disable far-end camera control, select the PIP position, establish control connection over IP, reboot the system, or reinitialize communication between the Crestron control system and the VSX system.
©2008 Polycom, Inc. All rights reserved. Polycom®, the Polycom logo, and VSX® are registered trademarks of Polycom, Inc. All other trademarks are the property of Polycom, Inc. or their respective companies.
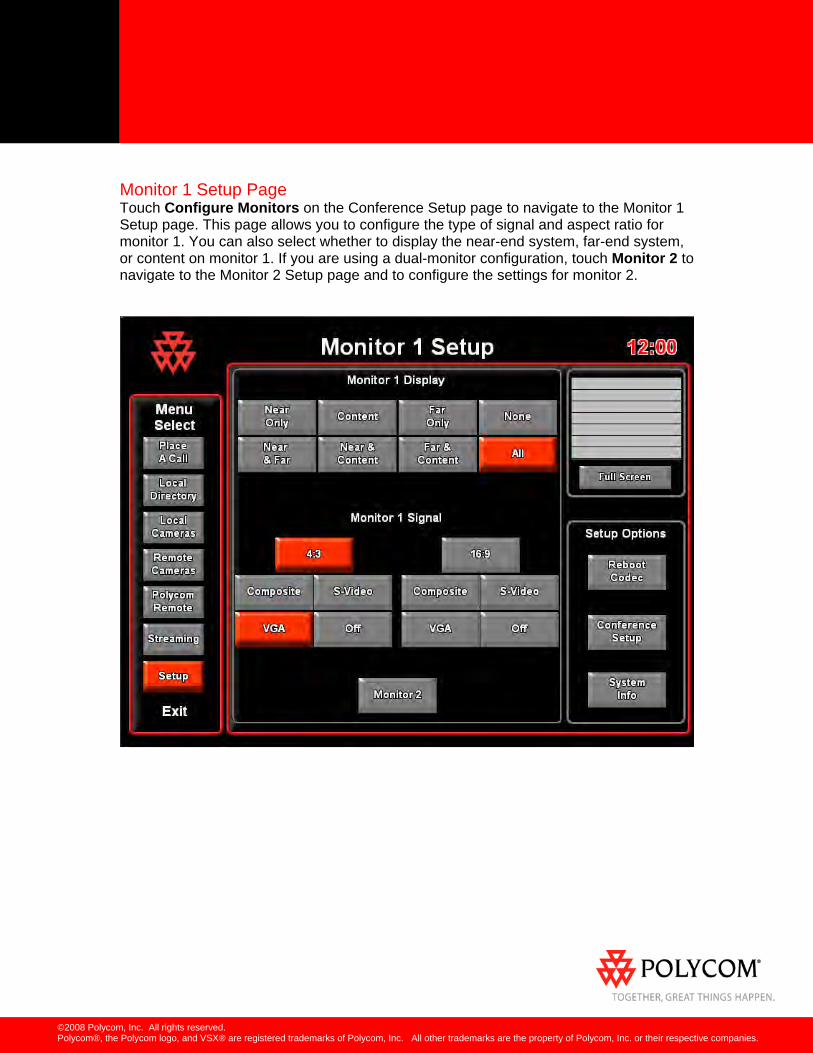
Monitor 1 Setup Page Touch Configure Monitors on the Conference Setup page to navigate to the Monitor 1 Setup page. This page allows you to configure the type of signal and aspect ratio for monitor 1. You can also select whether to display the near-end system, far-end system, or content on monitor 1. If you are using a dual-monitor configuration, touch Monitor 2 to navigate to the Monitor 2 Setup page and to configure the settings for monitor 2.
©2008 Polycom, Inc. All rights reserved. Polycom®, the Polycom logo, and VSX® are registered trademarks of Polycom, Inc. All other trademarks are the property of Polycom, Inc. or their respective companies.
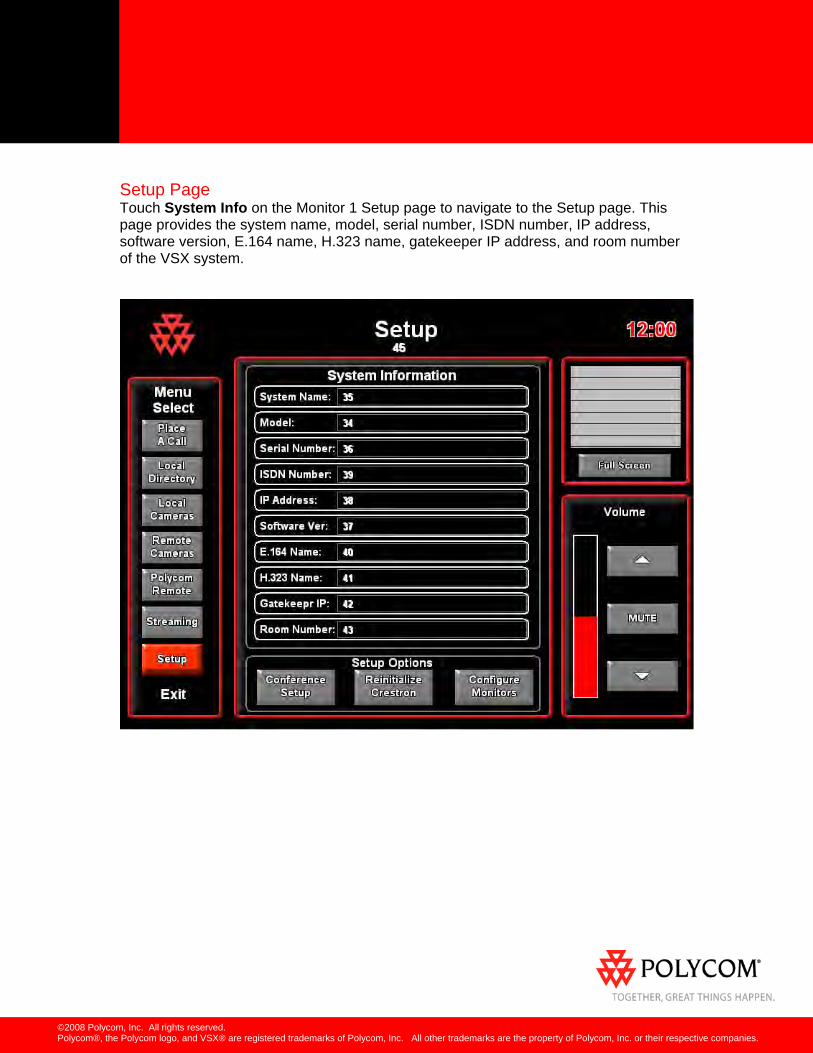
Setup Page Touch System Info on the Monitor 1 Setup page to navigate to the Setup page. This page provides the system name, model, serial number, ISDN number, IP address, software version, E.164 name, H.323 name, gatekeeper IP address, and room number of the VSX system.
©2008 Polycom, Inc. All rights reserved. Polycom®, the Polycom logo, and VSX® are registered trademarks of Polycom, Inc. All other trademarks are the property of Polycom, Inc. or their respective companies.
Polycom Controller Code for Crestron Systems: Release Notes, Version 2.0 New Features in Version 2.0: • Support for the VSX platform. Polycom HDX and VSX systems use common code
but separate touch panel files. • Support for the RSS 2000 (Polycom HDX systems only). • DTMF Tones button (Place a Call Controls page and Phone Dialing Controls page
on Polycom HDX systems, or Place a Call Controls page on VSX systems). • Phone Flash button (Phone Dialing Controls page). • Feedback now tracks content sources and video sources separately to allow active
feedback for both the people and video sources (Local Video Control page). Content sources display a blue border and toggle. Tracking is based on camera names and uses default names.
• Updated names in the S1 Serial I/O logic symbol (Polycom HDX systems only). • Setup for dual-monitor mode, H.239, basic mode, monitor configuration, and display
configuration. • System Information page (Polycom HDX systems) and Setup page (VSX systems). • Call status information provides connection status and call speed under page names. • Utilities functions (System Setup page on Polycom HDX systems, or Conference
Setup page on VSX systems). Feature Limitations in Version 2.0: • Phone flash returns a failed message (Polycom HDX systems only). • The IP address and an ISDN number for the same Polycom HDX or VSX system
must be entered as separate entries in the phone book (Polycom Local Directory page).
• Holding down the delete key for continuous deleting of an entry is not supported (Polycom Remote page).
• Camera pan or tilt movement is not fully supported (Polycom Remote page).
Polycom Controller Code for Crestron Systems: Release Notes, Version 1.0 Feature Limitation in Version 1.0: • You must press the camera button once to send content and once to stop sending as
content. Status feedback is updated for the last item selected if sending both content and video (Local Video Control page). This feature limitation does not apply when using People+Content™ IP.