popcorn maker - jamie oliver · once the popcorn has begun popping, let it cook for a while, and as...
TRANSCRIPT

POPCORN MAKER JAMIE & JIMMY’S FRIDAY NIGHT FEAST SERIES 6
Overview An ambitious theatrical popcorn maker, with a gas heated popcorn kettle that has a hinge mechanism to pour the popcorn down a acrylic chute into a large hopper.
The popcorn can be stored in a see-through box (hopper) until it is eaten by guests - and provides a real spectacle as the corn jumps out of the kettle lid and falls down the chute.

1
What you will need ● Stainless Steel Stock pot with thick
aluminium base ● 2x jubilee clips ● Acrylic (laser cut to size) ● Straight mounting brackets ● Motor with high ratio gear box ● Flanged Bearings ● 1” box section steel ● Camping gas stove ● Butane Gas for stove
● 12v Battery ● 20mm Stainless steel rod ● 3mm Aluminium Sheet ● 1mm Stainless sheet ● Aluminium Angle ● Hinges ● M4 Fasteners ● Velcro strap ● 2x 20mm Shaft Clamp
Tools & Safety equipment ● Mig Welder ● Angle Grinder ● Drill ● Screwdriver ● Ruler ● Tape Measure ● Marker ● Taps ● Hex driver
● Welding Mask ● Welding Gloves ● UV Safety glasses ● Gloves ● Mask ● Hearing Protection ● G-Clamp
SAFETY PRECAUTIONS For welding activities - Full PPE should be worn such as; face shield/protection flame retardant clothing and gloves. Please note that even viewing wielding can cause UV damage to eyes, so UV eye protection is required for spectators. Welding can also spit hot metal, quite substantial distances so any spectators or anything flammable should be kept at a safe distance. Fire Extinguishing Equipment will be required for welding.

2
How to build a Popcorn Maker
I. CUT A LIP IN STAINLESS STEEL POT - THE POPCORN KETTLE
● Mark out where the lip needs to be cut at a 45 degree angle. ● Use a pen and a line of string to ensure you get the correct lip angle. ● Secure the pot with G-clamps/vice onto a sturdy table. ● Using appropriate clothing, dust mask, hearing protection and safety goggles
- use an angle grinder to cut the lip. ● Deburr the edges with a file. ● Use: Pen/ruler/Angle Grinder/G-Clamp ● Wear: Hearing protection, Safety goggles, Dust mask
3
II. MAKE LID + ATTACH WITH HINGES
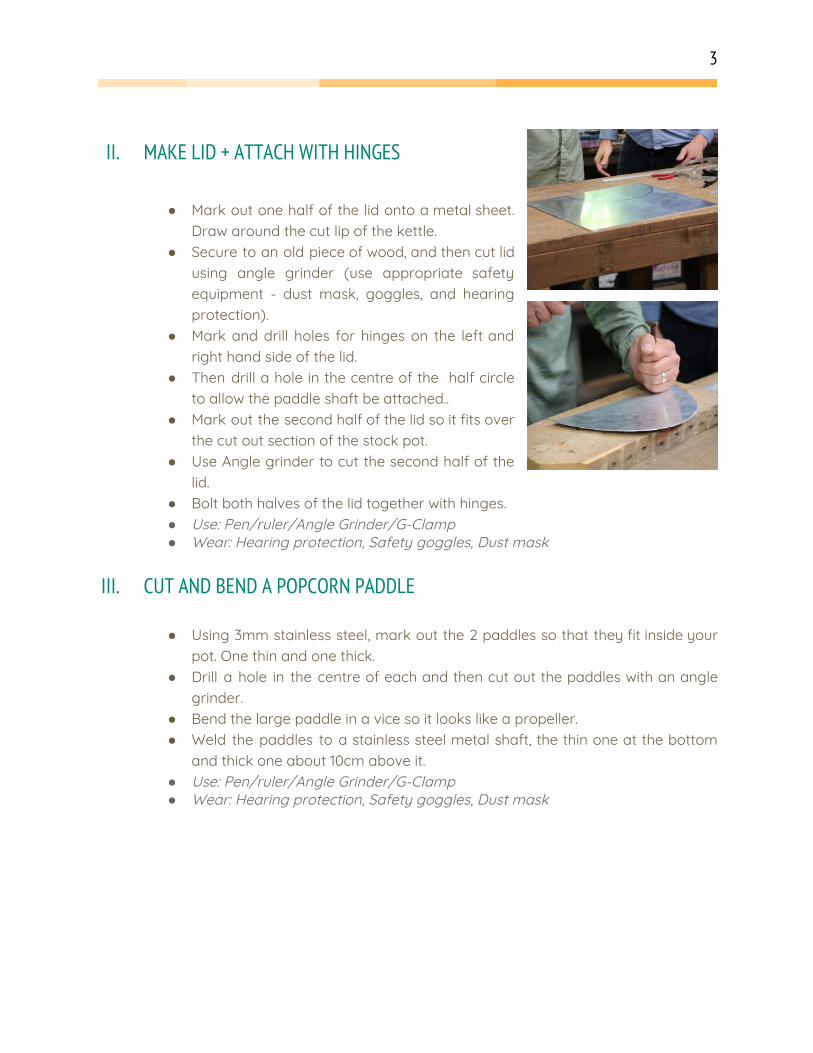
● Mark out one half of the lid onto a metal sheet. Draw around the cut lip of the kettle.
● Secure to an old piece of wood, and then cut lid using angle grinder (use appropriate safety equipment - dust mask, goggles, and hearing protection).
● Mark and drill holes for hinges on the left and right hand side of the lid.
● Then drill a hole in the centre of the half circle to allow the paddle shaft be attached..
● Mark out the second half of the lid so it fits over the cut out section of the stock pot.
● Use Angle grinder to cut the second half of the lid.
● Bolt both halves of the lid together with hinges. ● Use: Pen/ruler/Angle Grinder/G-Clamp ● Wear: Hearing protection, Safety goggles, Dust mask
III. CUT AND BEND A POPCORN PADDLE
● Using 3mm stainless steel, mark out the 2 paddles so that they fit inside your pot. One thin and one thick.
● Drill a hole in the centre of each and then cut out the paddles with an angle grinder.
● Bend the large paddle in a vice so it looks like a propeller. ● Weld the paddles to a stainless steel metal shaft, the thin one at the bottom
and thick one about 10cm above it. ● Use: Pen/ruler/Angle Grinder/G-Clamp ● Wear: Hearing protection, Safety goggles, Dust mask

4
IV. ATTACH MOTOR & BATTERY + SECURE TO LID ● An electric motor and battery will spin the paddle around inside the pot.
● This requires a fixture to hold the motor in place in line with the paddle shaft.
● Welding box metal into an L shape the same height as your popcorn kettle and attaching a motor plate will provide a secure holder for the motor. This is also where the battery will sit.
● Wire the motor to the battery. Attach with a velcro strap.
● Use the sheet metal left over to bend a metal cover - with a hole drilled into it so a little electric switch can be used to turn the paddle motor on and off.

5
V. CUT STRUCTURE + WELD
● Use box steel to create a frame to hold the pot and it’s hinge mechanism up high, the collecting chamber (called a hopper) down below and space for the chute.
● Use an angle grinder or hacksaw to cut the pieces to the length required. (use appropriate safety equipment - dust mask, goggles, and hearing protection)
● Deburr with a file before preparing for welding. ● Weld the pieces of the box steel together to create the frame with a MIG
welder. This requires suitable knowledge of welding and safety equipment. Do not attempt to weld metal together unless you have the required safety training and equipment.
VI. CONSTRUCT HINGE + GAS HEATER MECHANISM
● So that the popcorn can be poured out once ready - a basic hinge mechanism can be attached to the top of the structure.
● Construct two small C shapes of box steel - one will welded directly to the structure and the other will act as the base of the hinge mechanism and hold the popcorn kettle in place.
6
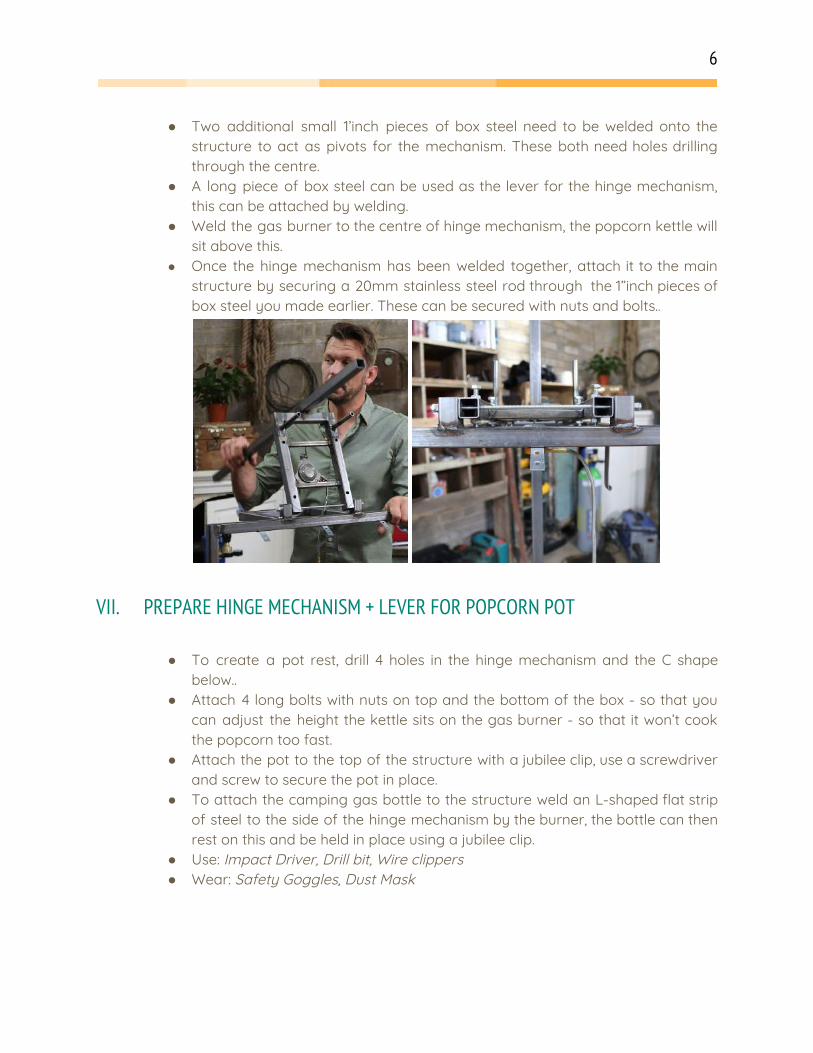
● Two additional small 1’inch pieces of box steel need to be welded onto the structure to act as pivots for the mechanism. These both need holes drilling through the centre.
● A long piece of box steel can be used as the lever for the hinge mechanism, this can be attached by welding.
● Weld the gas burner to the centre of hinge mechanism, the popcorn kettle will sit above this.
● Once the hinge mechanism has been welded together, attach it to the main structure by securing a 20mm stainless steel rod through the 1”inch pieces of box steel you made earlier. These can be secured with nuts and bolts..
VII. PREPARE HINGE MECHANISM + LEVER FOR POPCORN POT
● To create a pot rest, drill 4 holes in the hinge mechanism and the C shape below..
● Attach 4 long bolts with nuts on top and the bottom of the box - so that you can adjust the height the kettle sits on the gas burner - so that it won’t cook the popcorn too fast.
● Attach the pot to the top of the structure with a jubilee clip, use a screwdriver and screw to secure the pot in place.
● To attach the camping gas bottle to the structure weld an L-shaped flat strip of steel to the side of the hinge mechanism by the burner, the bottle can then rest on this and be held in place using a jubilee clip.
● Use: Impact Driver, Drill bit, Wire clippers ● Wear: Safety Goggles, Dust Mask

7
VIII. BUILD THE ACRYLIC BOX + ATTACH TO MAIN STRUCTURE
● To collect the popcorn - a large plastic box is required. This can be made from other materials - but acrylic is easy to clean as it will be storing fresh popcorn.
● Cut Acrylic to size or you can order pre cut acrylic online. ● Use aluminium angles in the corners to attach the pieces and give the box
strength. Drill holes every 15cm and bolt through with M5 bolts and nuts.
IX. BUILD ACRYLIC CHUTE
● This really adds the fun to this build - a chute for the popcorn to slide down! ● You can make a basic one of these by buying an acrylic sheet, or order
on-line. ● Laser cut acrylic can be easily ordered to size online, or you can cut out a
chute yourself. If cutting the acrylic yourself ensure the correct Personal Protection Equipment is used.
● We’ve added triangle ‘dividers’, also bought online to add a ‘pinball effect’ to the popcorn as it falls from the kettle.
● We’ve also made sides to the chute to guide the popcorn into the tray / hopper and to prevent the popcorn blowing away in the wind.
● Attach using M5, dome head nuts and bolts.

8
Specific Safety Notes ● This build is intended for outdoor and indoor use. ● It MUST be attended at all times, otherwise the popcorn and oil could catch
fire. ● Maintaining a medium heat is essential, otherwise the popcorn kettle pot will
burn and you will notice a lot of smoke so ensure that you are in a well ventilated space
● Once the popcorn has begun popping, let it cook for a while, and as soon as the rate of popping reduces - turn off the heat and then pour the popcorn down the chute and into the hopper.
● Once you have made all your popcorn, take off the popcorn kettle and clean. ● Clean the acrylic chute and hopper with water and microfibre ONLY, do not
scrub - as this will cause the material to scratch.
End User Notice Your Popcorn maker can be used indoors (if well ventilated) or outdoors, but only if attended at all times when the gas it lit and on. Only use power tools in accordance with manufacturers instructions and ensure all necessary safety equipment is worn at all times. Only attempt spot welding if you have training and the correct safety equipment. The instructions in this document are intended as a guide only, any build you do is at your own risk. You should regularly assess the safety of the Build during construction and afterwards.

9
General Safety Guidelines
Flames When lighting fires, using naked flames or tools that can generate sparks, please ensure that there is adequate space in the surrounding area and that there are no dry or flammable surfaces nearby. Having a water or sand bucket or a suitable fire extinguisher on hand is a good safety precaution.
Food Prep Please clean all surfaces thoroughly before serving food.
Tools When using tools, please ensure that you have read the instructions carefully and that you have the correct Personal Protective Equipment to operate them safely. If you are not experienced at using them seek help or advice from those more experienced on how to use them safely.
Heat Please be mindful that metal gets incredibly hot when heated so please be careful around hot surfaces, make sure others are kept at a safe distance and that you use the correct Personal Protective Equipment (PPE) including protective clothing when handling or working near these builds. Once you have finished using the build, remain a safe distance from the build for a least one hour.
Children
Make sure that children and others are kept at a safe distance throughout the making of the build and whilst you are using it. Ensure that the build is given enough time to cool fully before you leave it unattended.

10
Personal Protection Equipment (PPE) Safety Guidelines
TOOL ADVICE
For any tasks that will generate dust / particles a dust mask is advised
ANGLE GRINDER ● Hearing Protection ● Safety goggles ● Dust mask ● NO GLOVES (spinning equipment) ● Long sleeve cotton clothing ● Safety boots
JIGSAW ● Safety goggles ● Dust mask ● NO GLOVES (spinning equipment) ● Safety boots
MITRE or CHOP SAW ● Safety goggles ● Dust mask ● NO GLOVES (spinning equipment) ● HEARING PROTECTION ● Safety Boots
MIG WELDER ● Welding clothing ● UV welding mask ● UV eye protection for observers ● Welding gloves
IMPACT DRIVER (DRILL) ● Safety goggles ● NO GLOVES (spinning equipment)
HAND SAW ● Safety boots ● Safety Gloves to be worn for all non rotating saws
FILING ● Gloves (especially for metal work)
HACK SAW ● Safety boots ● Safety Gloves to be worn for all non rotating saws
BENCH DRILL ● Safety goggles / Bench drill guard ● Safety boots
WIRE CLIPPERS/CUTTERS
● Safety goggles
LIGHTING FIRES ● Fire safety gloves (for putting coals onto a lit fire)
11
● Bucket of water ● Suitable Fire extinguisher ● Fire poking tools (metal)
CHISEL/HAMMER ● Safety Goggles ● Safety Gloves
TAPER DRILL BIT ● Safety goggles ● SAFETY rigger GLOVE for securing metal bowl.