portal user manual (retaile
TRANSCRIPT

Portal User Manual (Retailer)
From SIGipedia
Contents
1 Web Rating Portal for our Retail Agents
1.1 Creating a new Indication
1.1.1 Creating a GL Indication
1.1.2 Creating a Property Indication
1.1.3 Creating a Inland Marine Indication
1.2 Completing an Application
1.3 Additional coverages and Premium Summary
1.4 Finish
1.5 Retrieving a Rate Indication
2 Retail Portal Administration
2.1 Agency Details
2.2 User Maintenance
2.2.1 Add a User
2.2.2 Edit a User
2.2.3 Delete a User
2.2.4 Lock a User
2.2.5 Agency Reports
Web Rating Portal for our Retail Agents
The retail portal was created to quickly and conveniently create a indication. You have the ability to create a monoline GL, monoline Property,
Package GL and Inland Marine, Package GL and Property, Package Property and Inland Marine. You also have the ability to create a Vacant
Building quote monoline GL, monoline Property or Package GL and Property. We do not currently support monoline Inland Marine.
In addition to creating an indication you also have the ability to create a ACORD application if you desire. It is not required. As well as the ability to
email the ACORD application or the indication to the Underwriter.
Creating a new Indication
Creating a GL Indication
Your default limits of insurance should also be displayed.
The retailer can now start the process to achieve a rate indication.
Either ZIP CODE or TERRITORY is required. If the zip code is provided the territory will be automatically populated.
Note: Owner payroll is defaulted based on state requirement. Employee payroll is to exclude owner payroll.
Portal User Manual (Retailer) - SIGipedia http://sigipedia/mediawiki/index.php/Portal_User_Manual_%28Retailer%29
1 of 12 9/7/2011 10:58 AM

Click the + plus sign to enter classes. The following screen will be presented. To view the list of eligible classes, click
VIEW AVAILABLE CLASSES and a listing will be displayed.
Portal User Manual (Retailer) - SIGipedia http://sigipedia/mediawiki/index.php/Portal_User_Manual_%28Retailer%29
2 of 12 9/7/2011 10:58 AM
Enter the percentage of the total exposure applicable to this class. If more than one class is entered, the exposure must total 100%. The retailer cannot
continue in a indication if the exposure total does not equal 100%. The only nonnumeric value should be “If Any”. The percentage number should
always be greater than 0 if not rated on an “If Any” basis.
When finished, click ADD CLASS to add this class to the indication.
Note: Footnotes for the class entered will appear at the bottom of the screen
Once all classes have been selected and are on the indication, click RATE to develop the rate indication.
You will notice the wording referencing discretionary pricing being available on this class subject to premium and Underwriting authorities. We will
review and determine if additional premium adjustments are applicable.
Additionally, there are EDIT and DELETE icons for each class listed where the class exposure can be modified or the class can be deleted entirely
from the indication.
Click NEXT to continue the indication.
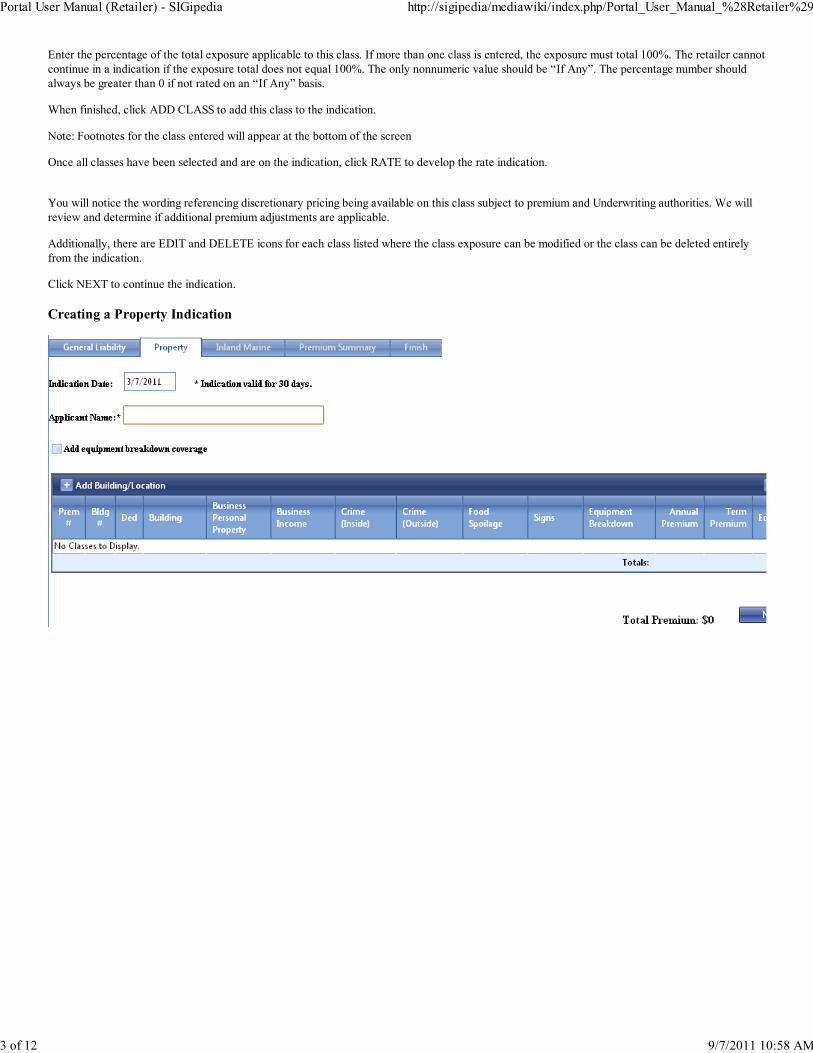
Creating a Property Indication
Portal User Manual (Retailer) - SIGipedia http://sigipedia/mediawiki/index.php/Portal_User_Manual_%28Retailer%29
3 of 12 9/7/2011 10:58 AM

Creating a Inland Marine Indication
Remember Inland Marine Indications can only be written in a package policy.
Portal User Manual (Retailer) - SIGipedia http://sigipedia/mediawiki/index.php/Portal_User_Manual_%28Retailer%29
4 of 12 9/7/2011 10:58 AM

Completing an Application
Once you click on the button to Save and Complete Application, you will now go through several screens asking questions about the applicant and the
risk. Many of the fields are defaulted to “no”, however, you are encouraged to provide as much information as possible to assist in underwriting the
risk. Notice the indication reference number is printed on the screen.
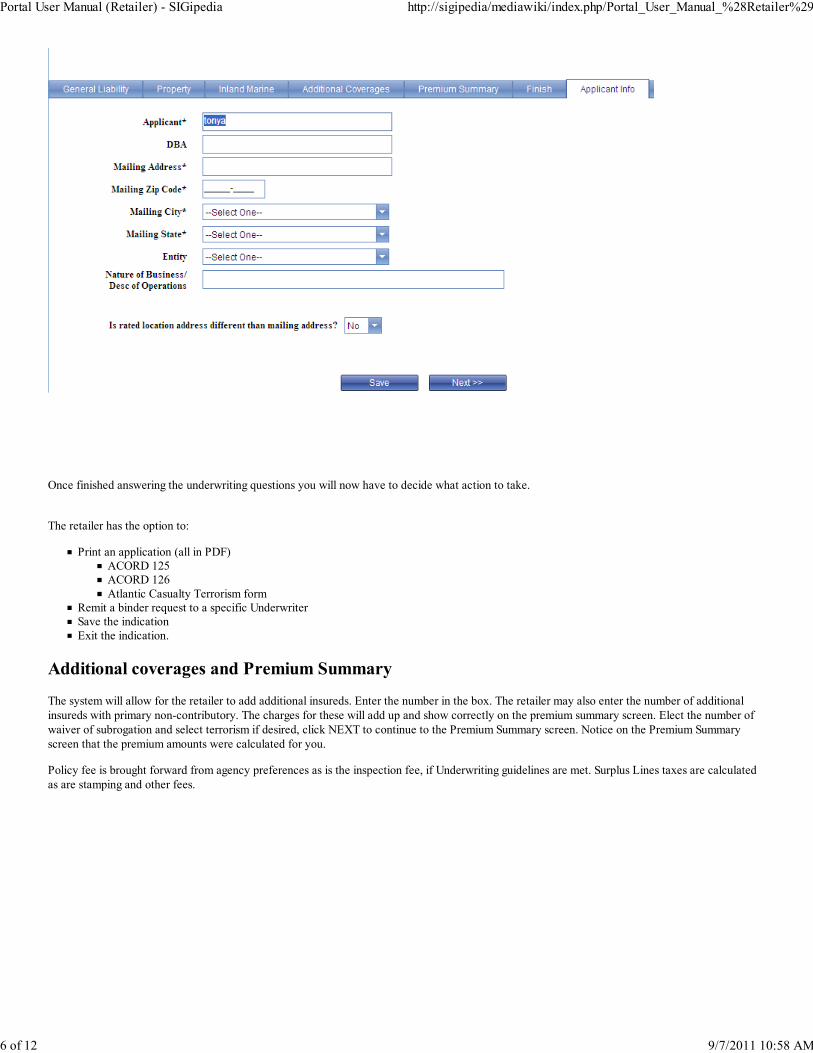
Below are the first screen prints from the Application screens. There are two of these screens, so you will go through each screen answering as many
questions as possible.
Portal User Manual (Retailer) - SIGipedia http://sigipedia/mediawiki/index.php/Portal_User_Manual_%28Retailer%29
5 of 12 9/7/2011 10:58 AM
Once finished answering the underwriting questions you will now have to decide what action to take.
The retailer has the option to:
Print an application (all in PDF)
ACORD 125
ACORD 126
Atlantic Casualty Terrorism form
Remit a binder request to a specific Underwriter
Save the indication
Exit the indication.
Additional coverages and Premium Summary
The system will allow for the retailer to add additional insureds. Enter the number in the box. The retailer may also enter the number of additional
insureds with primary non-contributory. The charges for these will add up and show correctly on the premium summary screen. Elect the number of
waiver of subrogation and select terrorism if desired, click NEXT to continue to the Premium Summary screen. Notice on the Premium Summary
screen that the premium amounts were calculated for you.
Policy fee is brought forward from agency preferences as is the inspection fee, if Underwriting guidelines are met. Surplus Lines taxes are calculated
as are stamping and other fees.
Portal User Manual (Retailer) - SIGipedia http://sigipedia/mediawiki/index.php/Portal_User_Manual_%28Retailer%29
6 of 12 9/7/2011 10:58 AM

Finish
Clicking NEXT you will see several options, and they are to:
Print a Rate Indication worksheet detailing rates, premiums and forms
Save the indication and proceed to complete an ACORD application and ultimately a binder request
Save the indication and exit the system
Email the indication to your underwriter
Portal User Manual (Retailer) - SIGipedia http://sigipedia/mediawiki/index.php/Portal_User_Manual_%28Retailer%29
7 of 12 9/7/2011 10:58 AM

If the button EMAIL Indication to Underwriter is pressed, you will have the option to select which Underwriter to remit this to and you have the
ability to add comments to the indication request. An email will be delivered with the rating worksheet and comments, if supplied.
Retail agents have the ability to attach documents (loss runs, inspections, etc.) when emailing the rate indication. On the print/bind indication tab,
beside attachment, click on the “Browse” button select a file and then click on “add file” button. The attached document will then show on the
screen.
Portal User Manual (Retailer) - SIGipedia http://sigipedia/mediawiki/index.php/Portal_User_Manual_%28Retailer%29
8 of 12 9/7/2011 10:58 AM

If a document was attached in error click on the file to remove.
Retrieving a Rate Indication
When you initially enter the system by default a new indication will be started. If you click on ON-LINE RATING you will have the option to retrieve
an existing indication. Simply click RETRIEVE INDICATION to retrieve an existing rate indication.
Click on RETRIEVE and the following screen will be displayed. By default only your indications will be shown. To see everyone within your agency
check the checkbox.
Retail Portal Administration
Portal User Manual (Retailer) - SIGipedia http://sigipedia/mediawiki/index.php/Portal_User_Manual_%28Retailer%29
9 of 12 9/7/2011 10:58 AM

We place great value in the relationship we have with our Retail Agents. One of our goals is to provide our agents with the tools they need to
effectively service and support their customers. Offering rate indication capability is becoming a more important consideration for our retail agents,
and we are pleased to announce we have a solution for our retailers to consider implementing.
Depending upon your role as either executive or administrator, you may not see all the menu items as listed below. The below menu is the executive
menu. The agency reports will only be visible to the person designated with the executive role.
Agency Details
Both the executive and the administrator may change the retailer information.
User Maintenance
Here you will add the users that will be allowed to create indications on the retail portal.
Add a User
Portal User Manual (Retailer) - SIGipedia http://sigipedia/mediawiki/index.php/Portal_User_Manual_%28Retailer%29
10 of 12 9/7/2011 10:58 AM

Click on the which will open the below screen:
Select a role: Executive, Admin, User. Executive will only be displayed if you are logged in as a executive and wish to create another executive
account.
The User role can log into the retail portal and create a indication.
The Administrator role can log into the retail portal and create a indication, modify the retailer information and add, edit, delete users
along with reset passwords.
The Executive role has all the abilities the Administrator does in addition to being able to produce reports.
Enter the person's name
Enter a email account
Then click "Add" and the person will be added and sent a email with directions for changing their password.
Edit a User
Click to edit a user
Delete a User
Click to delete a user. You will be prompted with the following screen to continue.
Lock a User
Portal User Manual (Retailer) - SIGipedia http://sigipedia/mediawiki/index.php/Portal_User_Manual_%28Retailer%29
11 of 12 9/7/2011 10:58 AM

Click to lock a user. In the screen below the user John Smith's account has been locked and he will no longer be able to log in.
Agency Reports
Retrieved from "http://sigipedia/mediawiki/index.php/Portal_User_Manual_(Retailer)"
This page was last modified on 18 August 2011, at 12:51.
Portal User Manual (Retailer) - SIGipedia http://sigipedia/mediawiki/index.php/Portal_User_Manual_%28Retailer%29
12 of 12 9/7/2011 10:58 AM