portascanuser's v4 guide -...
TRANSCRIPT

Portascan
Ultrasound
Scanner
Users’Guide

Page 1
Portascan
Explanation of Symbols
Refer to instructions
Class II
Type BF
Conforms to European CommunityDirective 93/42/EEC
External supply, centre positive
On/Off Keypad
Menu
Sagittal Scan
Brightness Control
Printer
Display Zoom In & Out
Freeze/Scan

Page 2
Portascan
Table of Contents Page
Explanation of Symbols 1
Important Information 3
Cautions 4
Installation - Printer set up 5
Battery Installation 5
Operating the Bladder Scanner 6
Operating the Bladder Scanner 6
Printing 8
Training video 8
Setting the date and time 9
Adjusting the brightness 10
Charging 11
Cleaning 14
Handling and care 15
Safety and performance 15
Warnings and Precautions 16
Troubleshooting 17
Avoiding or identifying and resolvingadverse electromagnetic effects
18
Warranty 19
Disclaimer of additional guarantees 19
Technical information 20
Acoustic output information 23

Page 3
Portascan
Important Information
Product Description
The Portascan bladder volume instrument is a battery operated, portableB-mode ultrasonic scanner, intended for the non-invasive measurement ofurinary bladder volume. The scanner includes an 6.5² colour LCD screento display cross sectional images of the bladder. A mechanical sectorscanning transducer with a round crystal provides a symmetricalultrasound beam gives high lateral and transverse resolution with highsensitivity and low signal to noise ratio. The estimated bladder volume isautomatically calculated in millilitres and displayed on the screen.
Notice To All Operators
Caution: United States Federal law restricts this device to use by or on the
order of the Physician.
The Portascan should be used only by individuals who have been trained and
authorized by their physician
All operators should read this Operator’s Manual. Do not attempt to operate the
Portascan until all instructions and procedures in this manual have been read
and thoroughly understood. Failure to comply with instructions may
compromise the performance of the instrument.
�This a class A product. The product is suitable for use in all
establishments other than domestic. This product is allowed in
domestic establishments under the jurisdiction of a health care
professional (according to IEC60601-1--2 clause 36.201.1.8).
Biological Safety
To date, exposure to pulsed diagnostic ultrasound has not been shown toproduce adverse effects. Ultrasound, however, should be used only by amedical professional when clinically indicated, using the lowest exposuretimes possible commensurate with clinical utility.
The ultrasonic output power of the Portascan is not user-adjustable and islimited to the minimum level necessary for effective performance. Data onacoustic output levels can be found in the “Technical Description” sectionof this manual.
Page 4
Portascan
Statement of Intended Use
The portascan projects ultrasound energy through the lower abdomen ofthe patient to obtain an image of the bladder that is used todetermine bladder volume non-invasively.
Warning: Not intended for fetal use.
Warning: not intended to be used on pregnant patients.
Warning: There is a possible explosion hazard if the Portascanis used in the presence of flammable anaesthetics.
Ultrasound coupling gel
Use an ultrasound coupling gel to prepare the probe for an exam. Certainultrasound gels may be toxic to human reproductive cells. It isrecommended that you check with the product’s manufacturer todetermine appropriate use.
Agents and procedures that may damage the probes
Some agents and procedures damage probes. Use of any of thefollowing procedures or products WILL VOID your probe warranty.
Agents that contain the following chemicals are known to damage theprobe:
� Acetone
� Methanol
� Denatured ethyl alcohol
� Mineral oil
� Iodine
� Any lotions or gels containing perfume
Check with the ultrasound gel manufacturer regarding gel contents. If you
have additional questions please contact your representative.

Page 5
Portascan
fig 3
fig 1
fig 2
Access to the inner compartment is gained by
pressing the catch situated on the front of the
case (see fig 1). Lift the lid until it stays in the
upright position.
Installation of the the Thermal Paper
To install the paper roll in the printer, first lift
the printer lid and push forward the green
release bar located at the front of the paper
well (fig 2). Feed the paper in under this bar
and gently push the paper forward until the
paper emerges from front paper slot (fig 3).
Lock the green release bar by pushing down
until it clicks into position. Drop the roll into the
well and rotate the roll to take up the excess
paper. Finally close the printer lid ready for
operation.
Paper jam
If the paper type will not feed, push the print
green release bar located at the front of the
paper well (fig 2). Gently pull the paper either
forward or backward to clear the paper jam.
Lock the green release bar by pushing down
until it clicks into position
Paper Roll Replacement
Use only the recommended thermal paper
type AFP-235 or equivalent long-term
preservable paper, or mid-term preservable
paper type FH65BC-3C or equivalent 58mm
wide.
Installation

Page 6
Portascan
When the battery is almost empty, a low-battery
indication will appear on the screen. The battery will
operate for a further 10 minutes.
(For Battery charging see page 13)
Caution• Do not open, throw in the fire, heat or short circuit.
• Charge only with Mediwatch charger provided.
• Do not use the battery pack in any other devices
than that specified.
• Be sure the battery is within a temperature range
of 0 to 40ºC.
• Storage temperature: -20ºC to 30ºC.
• Remove battery when not in use.
Connecting the Probe
Insert the probe plug into the socket mounted on the
right hand side of the probe well (see fig 1). Push the
connector home and turn the ring clockwise to lock.
To remove, reverse the above actions.
Probe Stowage
To store the probe position the probe into the cradleprovided on the left side of the display screen (seefig 5)
The probe may stowed with the connection made tothe case. Ensure the lid catch is securely latchedwhen closed to keep the probe firmly in place.
fig 4
fig 7
Inserting the Battery
Insert the battery (fig 6) into the recess located in therear of the case. Push until the latch clicks to lock it in place.
To Remove, press the latch on the side of the case(fig 7). The battery can then easily be removed.
fig 6
fig 5

Page 7
Portascan
Operating the bladder scanner
Turn the scanner on by pressing the On/Off button
( fig 8 ). Assuming that the training video is not
shown it will take roughly 20 seconds before the
unit is ready for operation.
To perform an estimated reading:
1. Apply a squirt of ultrasound gel to the head of
the probe (fig 9).
2. Gently place the probe approximately two
finger widths above the pubic bone. A ridge in
the plastic of the probe and a logo are used to
indicate the probe orientation (fig 10). The
probe should be orientated so that these are
facing the right hand side of the patient.
3. Press the Scan button to activate
scanning.
4. Adjust the location of the probe so that the
displayed bladder is positioned as near
central as possible in the scanned image (fig
12).
5. Adjust the location of the probe so that the
largest possible cross section of the bladder is
displayed.
6. Hold the probe steady and press the ‘Scan’
button to activate the volume
measurement.
fig 8
fig 10
fig 9
fig 11

Page 8
Portascan
When the ‘Scan’ button
is pressed the displayed
picture is frozen and the
bladder outlined by a
dashed line (fig 13). The
bladder volume is
calculated based on the
shape of the bladder
within this area.
In some cases the
displayed bladder outline
may not correspond with
what would be expected.
This is normal, but if the
outline is significantly
different, the
measurement should be
repeated.
A more accurate
measurement of the
bladder volume should be
measured as described in
the Advaced scan section
on page 10.
If no bladder is visiblethen the bladder is nearempty and the volumemay be assumed to be<10ml. However,bladders of less than 50millilitres are not usuallyconsidered significant.Fig 13 - Bladder outline highlighted
Fig 12 - Bladder centralised
Page 9
Portascan
Scan depth
The default scan depth should be appropriate for most bladders.
However, if the bladder is particularly large then the scan depth should be
increased. The scan depth is adjusted in a cyclic fashion by repeatedly
pressing the Depth button . At the 3.5MHz setting there are five
different depth settings and at 5 MHz there are four different ones.
Probe frequency
The default probe frequency is 3.5 MHz. A higher probe frequency (5
MHz) can be selected for paediatric work using the on-screen menu
system. With the unit turned on press the Shift key to activate the
on-screen menu display. Then press the Brightness (Down) key until the
‘Set Probe Frequency’ menu item is highlighted. Select that item by
pressing the Scan button and then use the Brightness key to
highlight the appropriate frequency. Finally press the Scan button again to
select the frequency.
� Probe frequency cannot be changed whilst scanning.
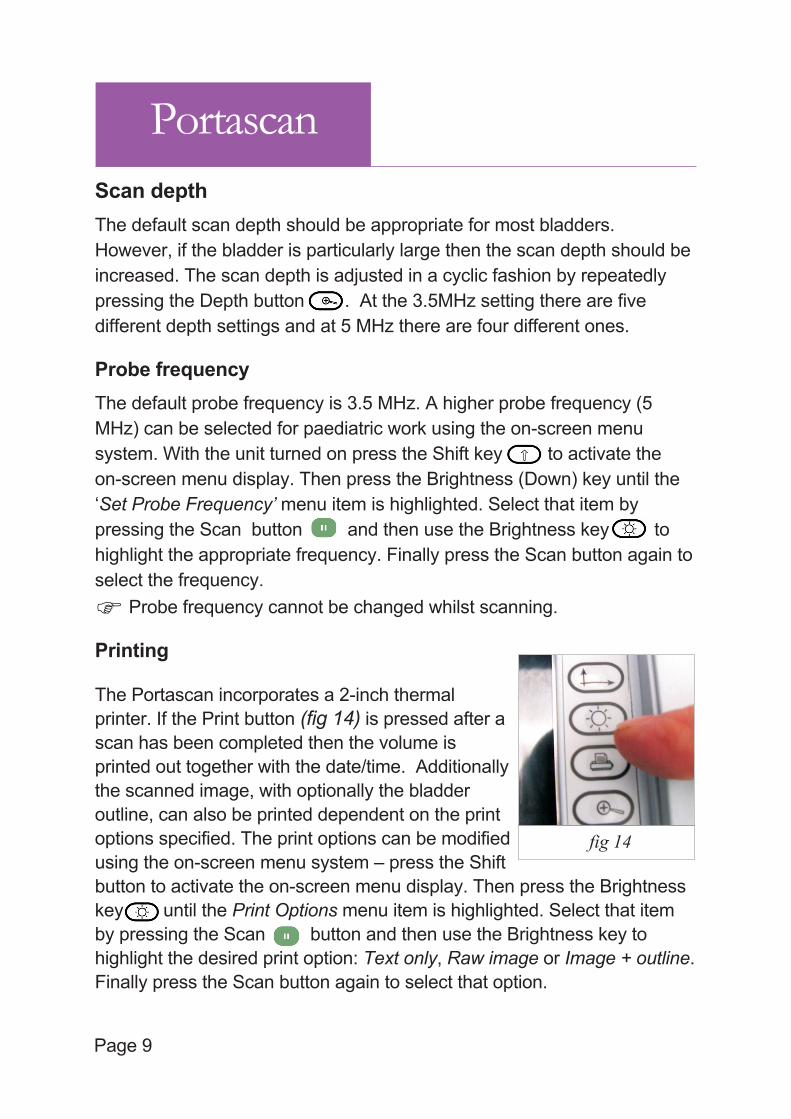
Printing
The Portascan incorporates a 2-inch thermal
printer. If the Print button (fig 14) is pressed after a
scan has been completed then the volume is
printed out together with the date/time. Additionally
the scanned image, with optionally the bladder
outline, can also be printed dependent on the print
options specified. The print options can be modified
using the on-screen menu system – press the Shift
button to activate the on-screen menu display. Then press the Brightness
key until the Print Options menu item is highlighted. Select that item
by pressing the Scan button and then use the Brightness key to
highlight the desired print option: Text only, Raw image or Image + outline.
Finally press the Scan button again to select that option.
fig 14

Page 10
Portacan
Advanced scan
To ensure “accurate” scans, the advancedscan must be used and will measure +/-20%.To conduct an advanced scan, first perform thenormal scanning procedure to get a bladderoutline in the transverse plane. Then, press theSagittal Scan button (fig15) and repeat thescanning procedure, but this time orientate theprobe with the logo and ridge pointingtowards the patient’s head. The volumedisplayed at the end of this procedure will bebased on a two-plane computation.
Training Video (Supplied separately on enclosed CD ROM)
Insert the training CD into your PC. Click on the drive letter of your CDROM drive in “My Computer”. Double click on the file “Bardscan ” to runthe training program. To exit the program at any time, select “File”, fromthe pull down menu of the Windows media player tool bar and click “Exit”.
Storing images
Up to 20 images can be stored to non-volatile memory. To store thecurrently displayed image press the Shift button to activate the on-screenmenu display. Then press the Brightness key once so that the Saveimage menu item is highlighted. Select that item by pressing the Scanbutton and then use the Brightness key (fig 16) to highlight the desiredstorage location – the images are named image 1 to image 20. Finallypress the Scan button once more to store the image.The current date and time are appended to theimage name so that it can more easily be identifiedat a later date.
Retrieving images
To retrieve an image press the ‘Menu’ button to
activate the on-screen menu display. Then press the
Brightness key twice so that the Load image menu
item is highlighted. Select that item by pressing the
Scan button and then press the Brightness button to highlight
the desired stored image. Finally press the Scan button once more to
retrieve the image.
fig 15
Fig 16

Page 11
Portascan
Setting Date/Time
To adjust either the date or time use the following
procedure.
• Press the ‘Menu’ button . A menu will appear
showing ‘Date/Time’ at the bottom of the menu
(fig18). The keypad symbols change their
meaning. See the new description displayed in the
display to the left of the keyboard. Use the scroll
buttons to highlight ‘Date/Time’
• Press the ‘Scan’ button . A second menu will appear showing
‘date’ with ‘time’ underneath. Use the scroll buttons to highlight the item
to be changed. Again press the ‘Scan’ button to display the actual
time or date
• Increment or decrement the value
highlighted (minutes or days) when
correct press the printer button (fig
14). The highlight will move to the
next number (days or months).
Again, increment or decrement the
value highlighted when correct press
the printer button (fig 14). The
highlight will move to the next
number (seconds or years).
• When the time or date has been set to the correct value press the Scan
button to return to the main program.
Male/Female Bladders
In the female, the bladder lies in front of and below the uterus. This cancause an error recognising the organ if a small residual is present allowingthe bladder to be confused with the vagina. A sagittal view of the selectedbladder will confirm the correct organ as the vagina/uterus will appearcircular in the transverse scan, and tube like in the in the sagittal scan.
In the male scan the bladder can be partly obscured by the pubic bone
and the bladder should be viewed at a slightly oblique angle. (Less than
90� to the upper abdomen).
Fig 17
fig 18

Page 12
Portascan
Adjusting the brightness
The LCD screen has two different brightness levels.
The brightness is adjusted in a cyclic fashion by
repeatedly pressing the Brightness button (fig 19).
The brightness should be set to the minimum level
in which the displayed image is clearly visible. The
brightness selected becomes the default value and
is used the next time the unit is switched on. Note
that the brighter the display the shorter the battery
life.
Contrast
Contrast can only be adjusted whilst actively scanning. The following
procedure is used:
• Press the ‘Menu’ key – the adjust contrast menu key will be
displayed. Press the ‘Brightness’ key to highlight ‘Adjust Contrast’.
• Press the scan key to accept.
• To increase the contrast press the ‘’Sagittal Scan button – repeat
as necessary.
• To decrease the contrast press the Brightness button – repeat as
necessary.
• When the desired contrast is achieved press the ‘Menu’ button again.
Note: That when the contrast is changed, the new value is displayed
towards the bottom right of the screen.
It is recommended that the contrast level is used within the range –5 to
10.
� To reset the contrast to the default value, place the scanner into
scanning mode by pressing the ‘Scan’ button. This will enable the
operator to observe any change. Then press the ‘Menu’ button and
whilst still holding down the ‘Menu’ button press the ‘Zoom’ button.
Power Saving Mode
After 2 ½ minutes of inactivity, the Screen automatically turns off - press
any key to re-activate the screen. The unit will automatically turn off after 5
minutes of inactivity.
Fig 19

Page 13
Portascan
Charging the Battery
When supplied, the battery will only have a small charge. Recharge the
battery using the charger supplied. Insert the charger dc plug into the
battery pack socket (see fig ) Insert the mains lead into the charger and
connect to the mains and switch the mains on. The charger light on the
battery pack will be illuminated. When the battery pack is fully charged the
charger light will extinguish. The
battery pack will now be almost fully
charged. Leaving the battery pack on
charge for a further hour will allow the
battery to trickle charge to full charge.
Switch off the mains and remove the
battery ready for use.
� Use only the battery charger
recommended for use with the
Portaflow. For a replacement
contact your local supplier or the
manufacturer.
fig 19
Parts and Accessories
Quantity Part Number Description
1 PA-00143 Probe
1 PA-00141 Battery Pack 12v
1 PA-00142 Battery Charger
1 PA-00090 Acoustic Coupling Gel
1 PA-00140 Carrying Case
12 PA-00144 Printer Paper
1 PA-00136 Operators Manual

Portascan
Page 14
General Probe CleaningCleaning the probe is done by first removing the ultrasound coupling gel with a
soft tissue and then gently wipe the probe dry using a new tissue or dry cloth.
If the probe is very dirty one can do the following:
• Scrub the probe with your hands with water or with water and milddetergent. Use a damped soft cloth or towel. Never use an abrasivesponge.
• When using running water be sure that you always have the probe tippointing upwards and the cable downwards.
• Wipe the probe dry with a towel.
• Disinfect the probe using Cidex tm Activated Dialdegyde Solution accordingto the manufacturers directions.
• To disinfect the probe mildly, use a cloth damped with 70% or less, alcoholsolution. Do not soak the probe in an alcohol solution.
After it has been cleaned and disinfected the probes can be stored, either in the
probe holder on the scanner, or in its original case.
� NOTE: Always follow these basic precautions for cleaning and high level
disinfection.
• DO NOT soak the probe in alcohol. Alcohol is nearly inactive againstcertain organisms.
• DO NOT rub the probe with an abrasive sponge when washing with sapand water. Use a soft cloth or towel.
The following procedures are known to damage probes:
• Autoclaving
• Soaking the probe in chlorine bleach
• NOTE: High-level disinfect probes ONLY by soaking in the recommendliquid germicide. Other methods are NOT allowed. These could damagethe probes.
Cleaning of the Scanner or Battery
Wipe the scanner or Battery gently dry using a new tissue or dry cloth.
If the scanner is very dirty one can do the following:• Wipe the scanner or Battery gently with a damp cloth• Wipe the scanner or Battery dry with a towel
To disinfect the scanner or Battery mildly, use a cloth damped with 70%, or less,
alcohol solution. Do not soak the scanner in an alcohol solution.
Cleaning the protective Case
If the protective case is dirty, use a damp cloth to wipe the case clean.

Page 15
Portascan
Handling and Care
Although the scanner is produced with the utmost care and only the highest
quality components are used, maintenance will be necessary from time to time
to ensure trouble-free operation.
A contract for yearly service can be made with your local representative.
� Remove loose dust from the exterior with a soft cloth or a dry brush.
� A solution of water with a mild detergent may be used. Avoid abrasive
cleaners.
� Check the ventilation fan, at the rear of the scanner, for proper operation.
Safety and Performance Summary
The Portascan computes the volume of the bladder based upon the area of the
on-screen cross sectional area of the bladder. Be sure to hold the Probe
motionless during scans.
The most accurate measurements are obtained when the patient is resting
quietly in the supine position.
The accuracy of the result is compromised if the user does not obtain an
optimal, repeatable image.
Errors in usage tend to result in underestimation of bladder volume except in
cases where the probe is moved while scanning is taking place.
The Portascan is not intended for use on pregnant patients.
The patient should not have a catheter in the bladder. This could affect the
accuracy of the instrument by creating micro bubbles in the bladder.
Do not use the Portascan on patient s with open skin or wounds in the
suprapubic region.
Warning: There is a possible explosion hazard if the Portascan is used in the
presence of flammable anaesthetics.
Warnings and Precautions
Always follow these basic precautions:
Inspect the probe daily for cracks and other damage.
DO NOT use a probe that has been cracked or damaged

Page 16
Portascan
Warnings and Precautions
• To avoid the risk of explosion the equipment must not be operated in thepresence of flammable anaesthetics
• To avoid the risk of shock do not open the equipment. Refer servicing toqualified personnel only
• Be careful not to place the patient in contact with the ultrasound equipmentor other devices. If the ultrasound or other equipment are defective, thereis a risk of electrical shock.
• The use of non-Mediwatch components with this scanner may result indamage to Mediwatch components
• To prevent hazards, refer to your local requirements for adequate electricalinstallation in the case of class II type BF equipment.
• Do not subject the equipment to excessive shock
The manufacturer, assembler, installer or importer considers himself
responsible for the effects on safety, reliability and performance of this product
only if:
Assembly operations, extensions, re-adjustments, modifications or repairs are
carried out by persons authorised by him.
The electrical installation of the relevant room complies with IEC
requirements.
The product is used in accordance with the instructions for use.
• While there is no danger to the patient with an implantable pulse generator,ultrasonic scanning equipment could cause mechanical damage to the IPGif used directly over the device’s implant site.
• Do not use the equipment in locations subject to intense electric ormagnetic fields
• Do not use the equipment near devices generating high frequencies. Ifused near such devices , the equipment may malfunction or adverselyaffect the device.
• To guarantee proper unit operation, do not operate the scanner in anenvironment with a temperature in excess 0- 40 °C. If the equipment isused in a small the temperature may rise. Proper ventilation must beprovided.
• Avoid installation near a heater or in direct sunlight.
• Inspect the probe carefully after a fall. A dangerous situation may arise duedamaged insulation.
• The LCD screen is fragile and must be treated accordingly

Page 17
Portascan
Trouble Shooting
Probe Too Hot
If after start up the Portascan displays ‘Probe too Hot’, check that a probeis installed or that the correct probe is fitted.
If whilst in use the Portascan displays ‘Probe too Hot’ shutdown thescanner for a few minutes then try again. If the problem persists, contactyour supplier.
Recharge Message
When the battery charge is too low to allow normal operation but not toolow to permit operation of the internal circuitry, a recharge screen will bedisplayed reading: “INSUFFICIENT POWER TO SCAN. RECHARGEBATTERY ”. The battery must be recharged as soon as possible.
Clearing Paper Jam
See page 5, reference ‘Paper Jam’.
Caution: If the paper jam is inaccessible do not try to disassemble theprinter. Return the instrument to the manufacturer for service.
Battery Appears Dead
Most scanner problems are due to a discharged battery and can be fixedby simply replacing the battery with a freshly charged one. Check thebattery icon in the upper-right corner of the scanner’s LCD screen. If thebattery icon is not darkened, replace the battery with a freshly chargedone to see if that solves the problem.
Safe Mode Message
If the Portascan comes up in ‘safe mode’ allow the scanner to shut down
itself and then press the start button to start it up again.
• A warning is displayed to the operator when the internal temperature ishigher than 60ºC.
• The system shuts down when the temperature exceeds 70ºC
• The probe will stop vibrating when the temperature exceeds 42ºC. Awarning will be displayed on the screen.

Page 18
Portascan
Avoiding , Identifying and Resolving Adverse Electromagnetic Effects
Although the system has been tested satisfactorily to ElectromagneticComparability Standards, it is recommended that the followingprecautions are taken:
• That the system is not used with patients with active implants, such asheart pacemakers.
• That the device is not used simultaneously, on a patient, with otheractive diagnostic devices such as blood pressure monitoringequipment.
An indication of adverse electromagnetic effects from the Portascan onanother electronic devise would be a degradation of performance in thatother device when the Portascan is operated simultaneously. If suchinterference is suspected, separate the two devices as much as possible,or discontinue simultaneous operation, if practical, and contact Mediwatch(UK) Limited .
The Portascan will operate normally in the proximity of other potentialinterference sources, and has demonstrated immunity at a field strengthof 3 V/m (per EN60601-1-2). In the event of any external electricaldisturbance causing an abnormal condition, ensure the scanner has shutdown, switch the scanner back on and continue using the scanner asnormal.
No other precautions need be taken as regards exposure in reasonablyforeseeable environmental conditions to magnetic fields, pressure orvariations in pressure, acceleration, or thermal ignition sources.
Technical Support and Extended Maintenance
For Technical advise and maintenance
Technical Support Department Tel 01788 547888
Mediwatch (UK) Limited Fax 01788 536434
Swift House
Cosford Lane
Rugby
Warwickshire
CV21 1QN

Page 19
Portascan
Warranty
Mediwatch (UK) Ltd guarantees the Portascan against defects in material
and workmanship. This guarantee applies for 1 (one) year from the date
of purchase from Mediwatch (UK) Ltd. This guarantee is given only to the
original purchaser of the Portascan. Battery Packs are guaranteed for a
period of 6 months from the date of purchase from Mediwatch (UK) Ltd.
*This guarantee does not cover equipment sold as used.
Pursuant to this guarantee, Mediwatch (UK) Ltd will repair or replace
products which prove to be defective during the guarantee period,
provided that the repair is performed by Mediwatch (UK) Ltd or a
Mediwatch authorized service organization, and the instrument is returned
to Mediwatch (UK) Ltd for service.
In some countries, this guarantee statement is for information only.
Specific guarantee terms may be found in the sales contract.
Disclaimer of Additional Guaranties
These are no understandings, agreements, representations, of
guarantees, expressed or implied (including guarantees of merchantability
or fitness for a particular purpose) other than those set forth in the
preceding section, “guarantee.” The contents of this Operators Manual do
not constitute a guarantee.
Connections to External Ports
External ports are provided to allow fault finding or to facilitate software
updates by qualified technical personnel only. Equipment connected to
these ports must comply with EN60950. Also any electrically powered
equipment connecting to these ports must not be accessible to a patient
(Unless complying with EN60601-1).

Page 20
Portascan
Technical specifications of the scanner.
Connections
10-13,5V dcPower input: Connects instrument to operatingpower.
Power consumption 12VA
Scanning method Mechanical Sector
Display modes B-mode
Probe frequency 3.5/5.0MHz
Max image depth 20 cm
Scan convertor Full digital, 512 x 512 x8
Bladder Volume 0 to 1500 ml
Accuracy0-699 ml ±20%, ±20 ml
700 ml to 1500ml, ±25%, ±25 ml
(Accuracy is based upon usage as per instructions and scanning a tissueequivalent phantom)
Display format 6.5 inch colour TFT LCD
Battery12 Volt rechargeable at least 1.5 hours continuousoperation
Dimensions WxDxH = 36 x 25 x 9 cm
Weight 3.5 Kg with battery and probe
Enclosure leakage andEarth leakage current
Within specification for class II type BF accordingto EN 60601 -1
Environmental OperatingConditions
Temperature 8-40ºC Humidity up to 90% (20ºC)
General storageconditions
Temperature 0-50ºC
StandardsEN 60601-1 & Class II, Type BF handheldequipment.

Portascan
Page 21
NOTE: If storage is lower than 8ºC, allow the probe oil in the mechanical sector
probes sufficient time to warm up before switching on the scanner.
NOTE: The supplier will make available on request such circuit diagrams,
component, part lists, description, calibration instructions or other
information which will assist your appropriately qualified technical
personnel to repair those parts of equipment which are classified by the
manufacturer as repairable.
NOTE: The use of ACCESSORY equipment not complying with the equivalent
safety requirements of this equipment may lead to a reduced level of
safety of the resulting system. Consideration relating to the choice shall
include:
-Use of the accessory in the PATIENT VICINITY
-Evidence that the safety certification of the ACCESSORY has been
performed in accordance to the appropriate IEC 60601-1/IEC950 and/or IEC
60601-1-1 harmonized national standard.
Adjustable dynamic range 40 dB to 60 dB
Max Frame rate 15 frames/sec
Image angles 80º
Grey Shades 256
Battery
Voltage 12 V dc
Capacity 2.2 Ah
Type NIMH
Printer
Effective printing width 48mm
Head configuration 384 dots/line
Dot Pitch 0.125 (vertical direction) x 0.125 (horizontal)
Device and Battery Disposal
When the device reaches the end of its useful life please dispose of it in
accordance with local government Regulations or at a recycling centre.

Portascan
Page 22
Acoustic Output information for the 3.5/5.0 MHz Mechanical sector (ref
IEC1157)
ParameterMode
B Wo max.
P_ (MPa) 1.2
Ispta (mW.cm2) 2.8
System settings Frequency modeFocus PointScan angleScan depth
5.0HMz1.0Min. scan angleMin. scan depth
Lp (mm) 53.8
Wpb6 (_I_) (mm) 2.4
Wpb6 (_II_) (mm) 2.4
Prr (KHz) 1708
Srr (Hz) 28
MI 0.4
Output Beam Dimensions
Area (mm²)
Ø,Ð (mm), (º)
520.6
19.35
Fawr (MHz) 3.2
Acoustic power up fraction (%) 100
Acoustic power up fraction (%) 0
Maximum Power (mW) 2.6
Iob (mW/cm²) 0.6
Power up mode B
Initialisation mode B
Acoustic output freeze YES
L tt (mm) 7.29
Lts (mm) CONTACT

Manufactured by:
Mediwatch (UK) Ltd
Swift House
Cosford Lane
Rugby
Warwickshire
CV21 1QN
Part
No.P
A-0
0136
Ver
512/1
1/0
4
0843
Distributed by:
Mediwatch (UK) Ltd
Swift House
Cosford Lane
Rugby
Warwickshire
CV21 1QN