positions user manual - cmegroup.com€¦ · positions manual global operations education 2 1.0...
TRANSCRIPT


Positions Manual
Global Operations Education 2
1.0 Introduction
The CME Positions System is a web-based application that provides users access to position data. The system allows member firms to:
View the status of the positions throughout the day as the system is updated real-time to reflect all changes.
View positions, enter on-line position adjustments, position change submission (PCS) updates, and position spread updates.
View variation and premium information.
View intra-day and end-of-day snapshots of their position data for the current day and three prior days.
The Positions System provides the following features:
Access: CME Positions is accessed through CME Connect.
Search Capabilities: Users have more search capabilities. For example, users can search for multiple contracts on a singe screen.
Excel Downloads: Users can download search results into an excel spreadsheet.
Entering Exercises: Users can enter multiple options instructions within one account. Users will no longer have to keep tally of the number of options exercised.
Note: This system is currently being used by NYMEX customers and this new release will now incorporate CBOT products.
Requesting Access
Access to CME Positions is granted by written request from an officer of the clearing member firm. To request access, complete the following actions:
Download the Member Firm On-Line System Access Request Form.
Complete the form and ensure it is signed by an officer from the clearing member firm.
Access can be granted at two levels:
o Firm User: This option will give you access to all position accounts under
clearing firms for which you are authorized.
o Account User: This option will give you access to specific position accounts
under clearing firms for which you are authorized.
Fax the form to the Customer Support Group at 312-338-2626.
Allow 48 hours for the request to be processed.

Positions Manual
Global Operations Education 3
Accessing Positions in Production
1. Log on to CME Connect at http://connect.cme.com. The Logon window will display.
2. Enter your CME Connect User Name and Password. Ensure the CME Portal product pulldown option has been selected.
3. Click Login.
4. Click Positions from the list of programs displayed. The Positions menu will appear.
Accessing Positions Certification NOTE: When beginning to learn Positions functions, you should avoid using the Production Environment. Instead, access the Certification Environment while you practice.
1. Log on to http://connectcert.cme.com/
2. Enter your CME Connect User Name and Password. Ensure the CME Portal product pulldown option has been selected.
3. Click Login.
4. Click Positions New Release from the list of programs displayed. The Positions menu will appear.
Position Management System Timetable
Please contact CME Clearing Services at 312-207-2525 for information on the following:
o Firm submission deadlines for position adjustments
o Option exercise/do not exercise instructions and PCS updates
o Position processing cycles
Logging off Positions To exit Positions, close the browser. There is no explicit logout function.

Positions Manual
Global Operations Education 4
2.0 Overview:
After logging in, you see the Positions List Search Criteria screen. This screen lets you search for positions held by clearing firms. Your log-in id will determine which records you may view. The menu bar is shown below.
3.0 Search Screen
There are no “required” search criteria on any search screen, but criteria must be valid. For example, a product code must be valid for the exchange selected. The defaults settings will result in the broadest possible searches and may return more records than you need. Complete the search criteria fields to return more targeted results. Depending on the item you select from the menu bar, the search criteria will vary. A sample Search Criteria screen is on the next page.
Select Positions
to access a list of current positions or a variation and premium summary.
Select Open Instruction to
enter or edit option or to review a list or a summary of option instructions.
Select Adjustments to
enter equal adjustments or review a list of adjustments.
Select PCS to
inquire or update a PCS or Spread value
Positions Manual
Global Operations Education 5
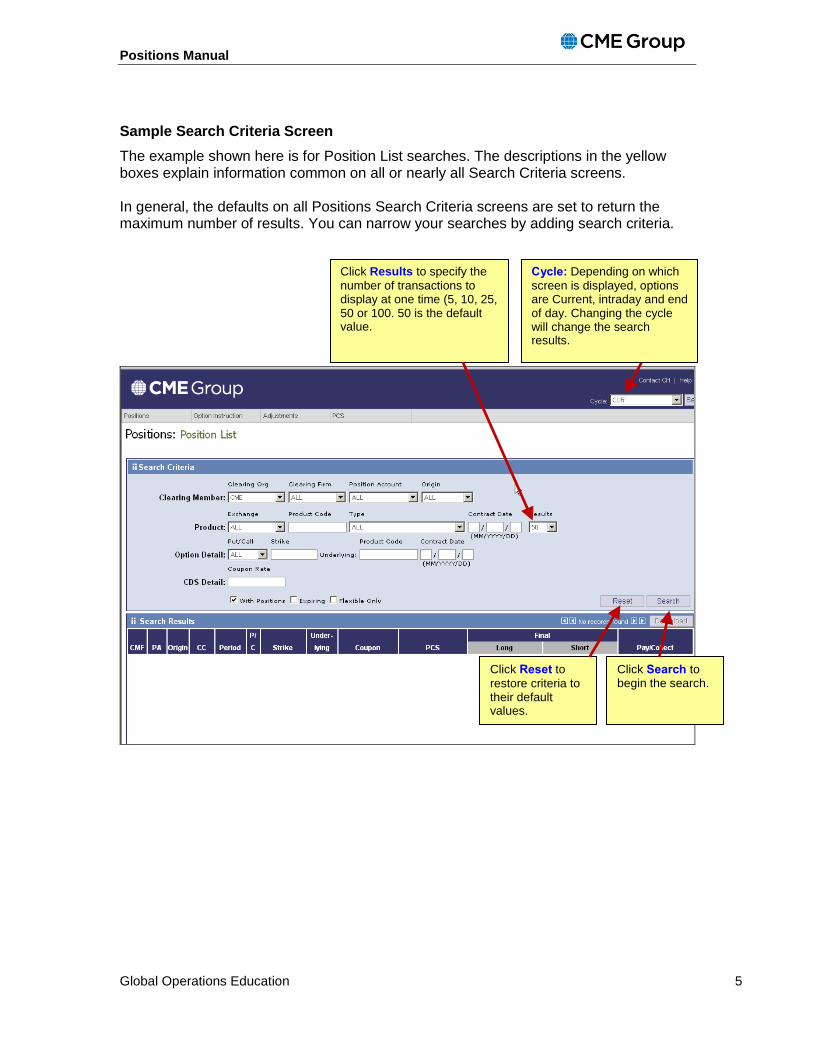
Sample Search Criteria Screen
The example shown here is for Position List searches. The descriptions in the yellow boxes explain information common on all or nearly all Search Criteria screens. In general, the defaults on all Positions Search Criteria screens are set to return the maximum number of results. You can narrow your searches by adding search criteria.
Click Reset to
restore criteria to their default values.
Click Results to specify the
number of transactions to display at one time (5, 10, 25, 50 or 100. 50 is the default value.
Cycle: Depending on which
screen is displayed, options are Current, intraday and end of day. Changing the cycle will change the search results.
Click Search to begin the search.

Positions Manual
Global Operations Education 6
Sample Search Results Screen
Special Sort feature: You can sort many of the columns in an ascending or descending order. To see if a column can be sorted, roll the cursor over the title. If the cursor changes to a hand, you may sort the column.
Click the hyperlink to go to Position
Details.
Click Download to send the results to a spreadsheet.
Click the arrows to view additional pages of results.
Positions Manual
Global Operations Education 7
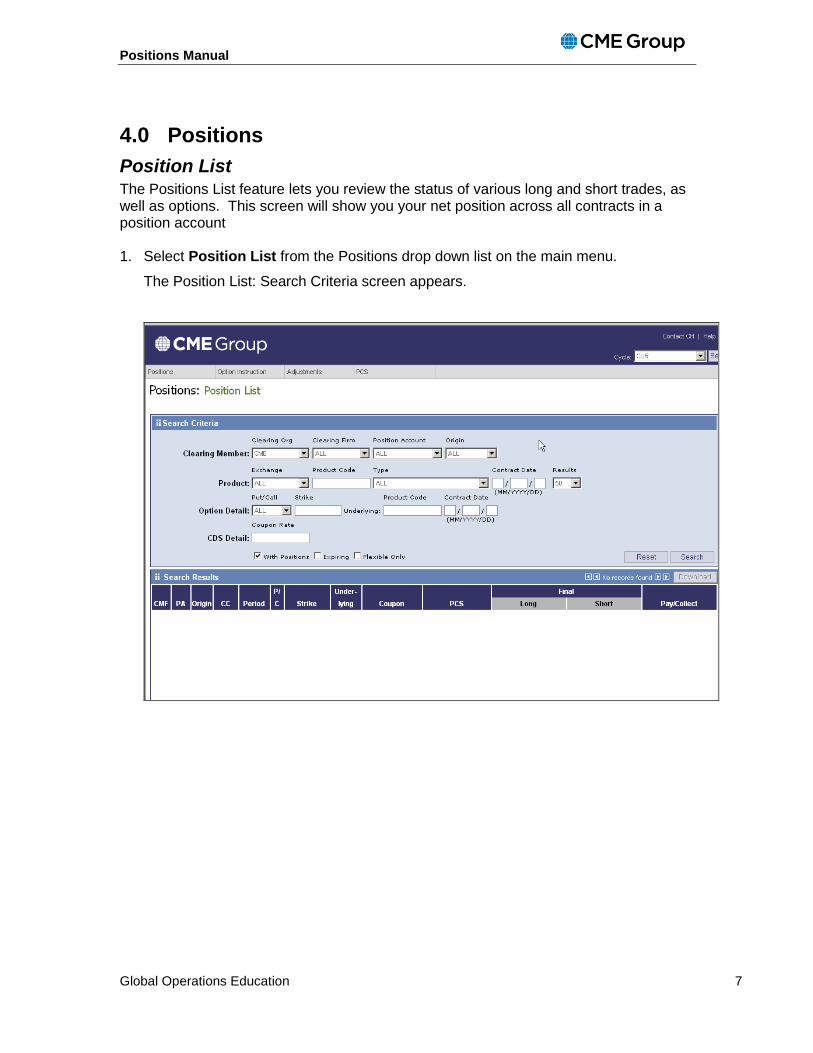
4.0 Positions
Position List The Positions List feature lets you review the status of various long and short trades, as well as options. This screen will show you your net position across all contracts in a position account 1. Select Position List from the Positions drop down list on the main menu.
The Position List: Search Criteria screen appears.

Positions Manual
Global Operations Education 8
Field/Checkbox Definition/Function
Clearing Org This field is set to CME by default.
Clearing Firm This is the Clearing Firm Number.
Position Account This field is the account under which the positions are held.
Origin This is the origin for the position.
o Customer or House
Product Exchange This is the exchange where the product is traded
Product Code This is the two digit product code
Type This allows you to search for your position based on type:
o Future
o Option
o Combo
o Credit Default Swap
o Forward
o Interest Rate SWAP
o Physical
Contract Date This allow you to search by contract month/year
Results This allows you to specify the number of rows to be viewed in the search results
Option Detail (P/C) This allows you to search by:
o All
o Put
o Call
Strike This allows you to search by strike price. Data in these fields should be entered in decimal format.
Underlying Product Code
Contract Date
Coupon Rate This does not apply to NYMEX.
With Positions: Select to execute a search to all contracts where the firm may has a position.
Expiring: Select to display only contracts that are expiring on the current business day.
Flexible Only: Select to display data for Flex options only. This does not apply to NYMEX.

Positions Manual
Global Operations Education 9
2. Enter search criteria and click Search.
The search results screen appears.
3. To review product details, click the hyperlink for the transaction. (See page xx.)
4. When you are finished reviewing, you may do one of the following:
Click or to review more pages meeting your search criteria.
Download the results to a spreadsheet.
Revise the search criteria to review different lists of positions.
Select another feature from the menu bar.
Positions Manual
Global Operations Education 10
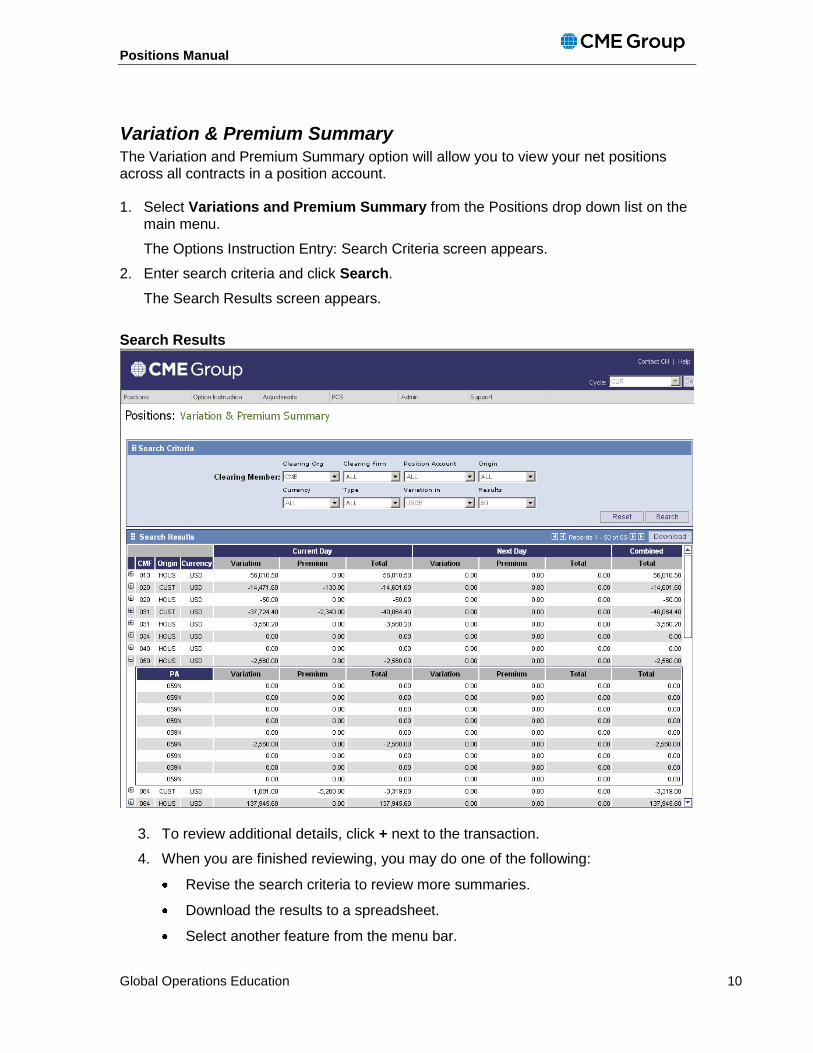
Variation & Premium Summary The Variation and Premium Summary option will allow you to view your net positions across all contracts in a position account. 1. Select Variations and Premium Summary from the Positions drop down list on the
main menu.
The Options Instruction Entry: Search Criteria screen appears.
2. Enter search criteria and click Search.
The Search Results screen appears.
Search Results
3. To review additional details, click + next to the transaction.
4. When you are finished reviewing, you may do one of the following:
Revise the search criteria to review more summaries.
Download the results to a spreadsheet.
Select another feature from the menu bar.

Positions Manual
Global Operations Education 11
5.0 Options Instruction
Options Instruction Entry
1. Select Options Instruction Entry from the Option Instruction drop down list on the main menu.
The Options Instruction Entry: Search Criteria screen appears.
2. Enter search criteria and click Search. Clearing Firm, Position Account and Origin are required.
The search results screen appears.
3. To enter an option instruction, click the radio button next to the transaction and click Select.
The Option Instruction Entry Details screen, shown on the next page, appears.

Positions Manual
Global Operations Education 12
Option Instruction Entry Details Screen
4. Select the Exercise or Abandon function from the dropdown list and enter a quantity. The account number is optional.
Note: you cannot abandon an option until the expiration date.
5. Click Add.
The instruction is saved and appears in the list box below the entry fields.
Note: your changes will not appear on the transaction line itself. They will appear for the transaction when you click Back.
6. Do one of the following:
Enter additional instructions.
Click Back to return to the Search Results screen.
Select another feature from the menu bar.

Positions Manual
Global Operations Education 13
Options Instructions List—Edit and Delete Options Instructions
This screen lets you edit, view or delete option instructions. You can change the quantity or account number for a transaction or delete it. You are not allowed, however, to change the function.
1. Select Options Instruction List from the Option Instruction drop down list on the main menu.
The Options Instruction List: Search Criteria screen appears.
Enter search criteria and click Search. The search results screen appears.
2. To edit an instruction, select the check box button next to the transaction, change the Quantity or Account Number and click Update.
3. To delete an instruction, select the check box button next to the transaction and click Delete.
Note: You cannot change an option that is past its deadline. If the option is past its deadline, the checkbox, Quantity, and Account Number fields will be grayed out.
4. Do one of the following:
Revise the search criteria to edit more transactions.
Download the results to a spreadsheet.
Select another feature from the menu bar.
Positions Manual
Global Operations Education 14
6.0 Options Instructions Summary 1. Select Options Instruction Summary from the Option Instruction drop down list on
the main menu.
The Options Instruction List: Search Criteria screen appears.
2. Select the Instruction Type from the dropdown menu. The choices are:
Type Displays
All Data for all option instructions
Abandons Option instructions for abandonment requests
Assignments Assignments only. Will have data only after the option exercise process has run in Clearing
Contrary Instructions
All abandonments or out-of-the-money exercises. Default value
Exercises All exercises
OTM Exercises Displays only option instructions that are out-of-the-money
3. Enter search criteria and click Search.
The search results screen appears.

Positions Manual
Global Operations Education 15
4. To review additional details, click + next to the transaction.
5. When you are finished reviewing, you may do one of the following:
Revise the search criteria to review more summaries.
Download the results to a spreadsheet.
Select another feature from the menu bar.

Positions Manual
Global Operations Education 16
7.0 Adjustments
Equal Adjustment Entry This screen lets you enter adjustments to your incoming position in a contract.
1. Select Equal Adjustment Entry from the Adjustment drop down list on the main menu.
The Equal Adjustment Entry: Search Criteria screen appears.
2. Enter search criteria and click Search.
The search results screen appears.
3. Enter needed adjustments in the field provided.
4. When you finish entering data, click Update.
Note: If you would like to correct an adjustment, then enter the correct number and click on Update. If you want to remove an adjustment than enter zero.
5. You may do one of the following:
Enter more adjustments.
Revise the search criteria to review more summaries.
Download the results to a spreadsheet.
Select another feature from the menu bar.

Positions Manual
Global Operations Education 17
Adjustment List
The adjustment list allows you to see a list of adjustments that have been entered for the day.
1. Select Adjustment List from the Adjustments drop-down list on the main menu.
The Adjustment List: Search Criteria screen appears.
2. Enter search criteria and click Search.
The search results screen appears.

Positions Manual
Global Operations Education 18
8.0 PCS
PCS List
The PCS (Position Change Submission) Screen lets you submit final long positions which are affected by current day matched trades. From this screen you can update PCS information and lock those values from further updates.
1. Select PCS List from the PCS dropdown list on the main menu.
The PCS: Search Criteria screen appears.
2. Enter search criteria and click Search.
The search results screen appears.
3. Enter position information in the field provided. If you would like, then you can select the Lock to prevent further updates to a transaction.
4. When you are finished, click Update.
Note: If you need to change PCS information, click the Lock checkbox to clear the check and make your changes.
5. You may do one of the following:
Enter more data.
Revise the search criteria to review more PCS information.

Positions Manual
Global Operations Education 19
Download the results to a spreadsheet.
Select another feature from the menu bar.

Positions Manual
Global Operations Education 20
Spread List Clearing firms may reduce their performance bond requirements by reporting bona fide inter- and intra-commodity spreads within the same position account. These spreads offset some of the risk normally associated with naked, or non-spread positions.
From this screen you can update spread information and lock those values from further updates.
1. Select Spread List from the PCS dropdown list on the main menu.
The Spread List: Search Criteria screen appears.
2. Enter search criteria and click Search.
The search results screen appears.
3. Enter spread information in the fields provided. Click Lock to lock a transaction.
4. When you are finished, click Update.
Note: If you need to change Spread information, click Lock checkbox once again and make your changes.
5. You may do one of the following:
Enter more data.
Revise the search criteria to review more spread information.

Positions Manual
Global Operations Education 21
Download the results to a spreadsheet.
Select another feature from the menu bar.

Positions Manual
Global Operations Education 22
9.0 Position Details
Position Details: Position 1. From any screen listing commodity codes, Click the hyperlink for more information
about a transaction.
The Positions Details screen appears, as shown below.
From this screen, you may review
Start of Day & Quantity Adjustments: click Position Adjustments to go to the Position Adjustments screen.
Spread: click InterCommodity or IntraCommodity to go to the Spread screen.
Summary Position: Click PCS to go to the PCS screen.
You may view more details by clicking on the tab:
Trade Composition—Matched
Trade Composition—Unmatched
Product Detail
Click to go to PCS screen.
Click either link to go to Spread List screen.
Click to go to Positions Adjustments screen.

Positions Manual
Global Operations Education 23
Position Details: Trade Composition – Matched Tab

Positions Manual
Global Operations Education 24
Position Details: Trade Composition – Unmatched Tab

Positions Manual
Global Operations Education 25
Position Details: Product Details

Positions Manual
Global Operations Education 26
FAQ
1. Who can I contact for support?
Please contact CME Clearing Services at 312-207-2525.

Positions Manual
Global Operations Education 27
20 South Wacker Drive Chicago, Illinois 60606-7499 Tel: 1 312 930 1000 Fax: 1 312 466 4410 E-mail: [email protected] Futures trading is not suitable for all investors, and involves the risk of loss. Futures are a leveraged investment, and because only a percentage of a contract’s value is required to trade, it is possible to lose more than the amount of money deposited for a futures position. Therefore, traders should only use funds that they can afford to lose without affecting their lifestyles. And only a portion of those funds should be devoted to any one trade because they cannot expect to profit on every trade. The Globe Logo, CME®, Chicago Mercantile Exchange®, and Globex® are trademarks of Chicago Mercantile Exchange Inc. CBOT® and the Chicago Board of Trade® are trademarks of the Board of Trade of the City of Chicago. NYMEX, New York Mercantile Exchange, and ClearPort are trademarks of New York Mercantile Exchange, Inc. COMEX is a trademark of Commodity Exchange, Inc. CME Group is a trademark of CME Group Inc. All other trademarks are the property of their respective owners. The information within this presentation has been compiled by CME Group for general purposes only. CME Group assumes no responsibility for any errors or omissions. Although every attempt has been made to ensure the accuracy of the information within this presentation, CME Group assumes no responsibility for any errors or omissions. Additionally, all examples in this presentation are hypothetical situations, used for explanation purposes only, and should not be considered investment advice or the results of actual market experience. All matters pertaining to rules and specifications herein are made subject to and are superseded by official CME, CBOT, NYMEX and CME Group rules. Current rules should be consulted in all cases concerning contract specifications. Copyright © 2010 CME Group. All rights reserved.

Positions Manual
Global Operations Education 28