post haste user manual · 2019-09-06 · post haste user manual! ! 6 post haste will ask you where...
TRANSCRIPT

Post Haste User Manual! ! �1
Post Haste!
User Manual!!Simplify your creative workflows by organizing your assets before you start. Post Haste makes it easy to create customized templates for your project.!!Set up filename parameters such as project name, client and date to enforce a common naming convention. Use folder breaks to create a folder hierarchy from your parameters.!!Modify the included templates to meet your needs or create your own from scratch using the built-in template editor.!!Post Haste is ideal for shared environments. Set the template location on each computer to a shared storage area and assign a default template for each department.!!With unlimited templates and customization options, Post Haste is flexible enough to accommodate the needs of every facility. !!!!
!!
Last updated Nov 18, 2014

Post Haste User Manual! ! �2
Contents!Template View! 3! New Project View! 5! Variables! 7! Preferences! 8!
General! 8! Project! 10! Parameters! 12! Kollaborate! 15! Global Hotkeys! 19!
Additional Customization! 20! Custom Project Presets! 20!
Support! 21
Last updated Nov 18, 2014
Post Haste User Manual! ! �3
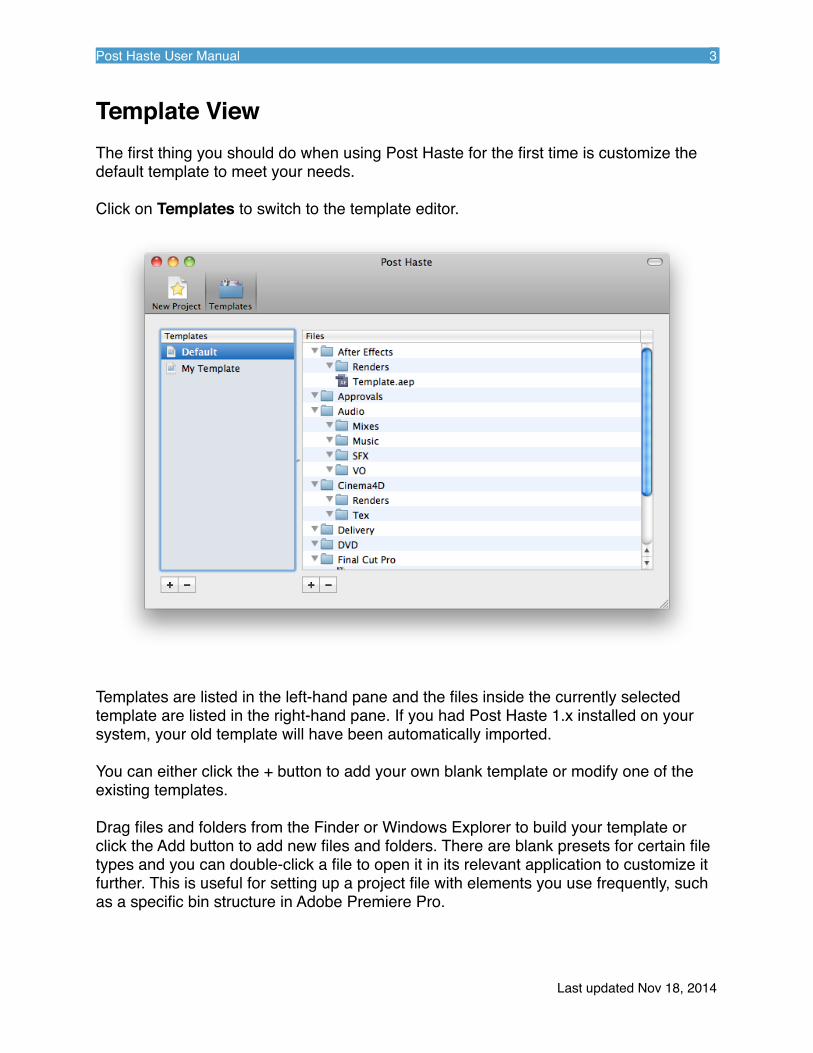
Template View!!The first thing you should do when using Post Haste for the first time is customize the default template to meet your needs.!!Click on Templates to switch to the template editor.!
!Templates are listed in the left-hand pane and the files inside the currently selected template are listed in the right-hand pane. If you had Post Haste 1.x installed on your system, your old template will have been automatically imported.!!You can either click the + button to add your own blank template or modify one of the existing templates.!!Drag files and folders from the Finder or Windows Explorer to build your template or click the Add button to add new files and folders. There are blank presets for certain file types and you can double-click a file to open it in its relevant application to customize it further. This is useful for setting up a project file with elements you use frequently, such as a specific bin structure in Adobe Premiere Pro.!!
Last updated Nov 18, 2014

Post Haste User Manual! ! �4
A template can be assigned as the default template by right-clicking it and selecting Set as Default. This will cause the template to be selected whenever you launch Post Haste, otherwise the last used template will be selected. This is set on a per-user basis and can be useful as a way of recommending a particular template to a certain group of users.!!To unassign a template as the default, right-click it and select Unset as Default. Only one template can be the default at a time.!!For more file naming options, see the Variables section.
Last updated Nov 18, 2014

Post Haste User Manual! ! �5
New Project View!!The project view allows you to specify parameters such as project name, client and editor that will make up the project folder’s name. Any field left blank will not be included in the filename.!!As you modify parameters, the preview field at the bottom of the window will update to show what the filename will look like. Parameters can be fully customized in preferences.!!In the bottom right corner is an option for the type of project - Local, Cloud or Local and Cloud. The cloud options require a Kollaborate account, which is covered in more detail in the Kollaborate section of this manual.!!Once you have set up the parameters for the project, select the desired template and click Create Project.!
Last updated Nov 18, 2014

Post Haste User Manual! ! �6
Post Haste will ask you where to create the new project folder. !!The Mac version has an option marked Always use this location - if ticked, the software will create future projects at this location without asking. For Windows users the location can be set in Preferences.!
!Once the project is created, a new Finder or Windows Explorer window will appear showing the contents of the folder. You can now begin work on your new project.!!
Last updated Nov 18, 2014

Post Haste User Manual! ! �7
Variables!!You can place variables in filenames inside your template and Post Haste will automatically replace these variables with the values you specify in the Project pane.!!To specify a variable, enclose the parameter name inside square brackets. For example, to append the client name to a folder, add [client] to the folder name. When specifying variables, capitalization does not matter but spaces and punctuation must match.!!If a parameter is left blank, variable fields are populated with blank data. However, if a variable makes up the entire filename (e.g. [project].fcp) then the file or folder is not created. This can be useful for selectively creating files based on the parameters the user specifies, but if you want to prevent this you can tick “Cannot be Empty” next to the parameter in preferences.!!Additionally, any file or folder named “Template” will be automatically renamed to the entire project name (or the last element in the path if you have folder breaks switched on).!!!!
Last updated Nov 18, 2014

Post Haste User Manual! ! �8
Preferences!!General!
Template Location - Allows you to specify where template files will be stored. If you are in a networked environment, you may find it useful to store the templates in a shared storage area so that everyone can access the same templates.!Open folder after creating project - This automatically opens the new project folder in Finder or Windows Explorer after it is created.!!Quit Post Haste after creating project - Automatically exits the application after a new project is created.!!Show Growl / Notification Center alerts - Shows an on-screen alert when a project is successfully created.!!Show recent projects - Displays 5 recently-created projects in a list in the File menu, allowing you to quickly navigate to them.!!
Last updated Nov 18, 2014
Post Haste User Manual! ! �9
Send anonymous analytics and usage data - Sends anonymous information to help us catch errors and improve the app. This system is opt-in and no data is sent if this option is deselected. !!Require administrator password at launch (not supported in Windows version) - Asks you for an administrator password when launching the application. This can help prevent abuse in a shared environment.!!Require administrator to edit templates (not supported in Windows version) - Asks you for an administrator password when trying to make changes to a template. This can help prevent abuse in a shared environment.!!Require administrator password to view preferences (not supported in Windows version) - Asks you for an administrator password when opening the preferences window. This can help prevent abuse in a shared environment.!!Prevent users from overwriting existing projects - Shows an error if a project already exists instead of asking the user if they want to overwrite it.!!
Last updated Nov 18, 2014

Post Haste User Manual! ! �10
Project!
!!Fixed project location - If this setting is enabled, Post Haste will automatically create new projects at the specified location and will not prompt you to choose a destination.!!Strict naming - Restricts input to letters, numbers and - and _ characters. Spaces and symbols are not allowed.!!Automatically rename files called “Template” to the project name - Any file called “Template” will be automatically renamed to the project name or the last path component if using folder breaks.!!Date format - Allows you to choose the format that date parameters will use. If none of the default options meet your needs, select Custom and type a custom format into the box. !!The following variables can be used to create custom dates:!!! %a! Abbreviated weekday name!! %A! Full weekday name!
Last updated Nov 18, 2014
Post Haste User Manual! ! �11
! %b! Abbreviated month name!! %B! Full month name!! %d! Day of month as a decimal number (01-31)!! %e! Day of month as a decimal number without leading zeros!! %F! Milliseconds as a decimal number (000-999)!! %H! Hour as a decimal number (00-23)!! %I! Hour as a decimal number!(01-12)!! %j! Day of the year as a decimal number (001-366)!! %m! Month as a decimal number (01-12)!! %M! Minute as a decimal number (00-59)!! %p! AM / PM!! %S! Second as a decimal number (00-59)!! %w! Weekday as a decimal number (0-6), where Sunday is 0!! %y! Year without century (00-99)! !!Separator character - This is the character that will separate each filename parameter. Specify a blank value to have no separator.
Last updated Nov 18, 2014

Post Haste User Manual! ! �12
Parameters!
!!This pane allows you to specify parameters that will appear in the main project pane. As you adjust these parameters, the project view and preview will automatically update, so you may find it useful to position the main window so that you can see it alongside the preference window.!!In the Mac version, drag the items to change their ordering and use the + and - buttons to add and remove them. In the Windows version, use the Up and Down arrow buttons to change the parameter order and start typing in a new row to add a parameter. !!Type - The following parameter types are available:!
• Text - Regular text!• Number - A number!• Number (auto-increment) - A number that will automatically increment by 1
after a new project is created. This is useful if you need a unique number such as a project ID.!
• Date - The current date. If you wish to manually specify a date, change the type
Last updated Nov 18, 2014

Post Haste User Manual! ! �13
to Text.!• User - The username of the currently logged in user. If you wish to manually
specify this, change the type to Text.!• List - A dropdown list of fixed values that is uneditable.!
!Default Value - The value to revert to when pressing the Backspace or Delete key over a field in the project view. For List type parameters, use this field to specify the items in the list, separated with commas.!Save History - This saves every value that you enter into the field and presents it in a dropdown menu. This saves time when you need to frequently enter particular values, such as the name of a regular client.!!Folder Break - Creates a new folder at the start of the selected parameter, allowing you to create a folder hierarchy such as Client > Project Name > Date. Ticking no boxes creates a single folder. Ticking all boxes creates a new folder for every parameter.!The easiest way to understand this feature is to tick the boxes and watch what happens in the preview box in the main window. As an example, the settings in the screenshot above created the following hierarchy:!
Use in Path - Specifies that the value of the parameter will be used in the project’s path name. Switch this off if you have a parameter that you’d like to use as a filename variable in the template without including it in the main project path.!!Locked - Prevents users from modifying the default or auto-generated value for the parameter.!Cannot be Empty - Forces the user to fill in a value for this field before they can create a new project.!!Unique Project ID - This tells Post Haste to check that this field’s value is unique with Kollaborate Server. This allows you to ensure that co-workers are not creating duplicate project IDs on other computers. This is currently a Mac-only feature.!!Use the Import and Export buttons to transfer your parameter settings to another
Last updated Nov 18, 2014
Post Haste User Manual! ! �14
computer. The .phpparam files created by this process are compatible with the Windows and Mac versions of Post Haste.!You can also sync settings between computers on the Mac version via Kollaborate. To do this, go to Post Haste > Preference Sync in the menu at the top of the screen.!!
Last updated Nov 18, 2014

Post Haste User Manual! ! �15
Kollaborate!!Kollaborate is a cloud workflow platform that provides quick and easy file sharing, team collaboration, project management and seamless integration with Digital Rebellion applications. In order to use cloud features in Post Haste you must have a paid or trial account, or be running Kollaborate Server in-house.!Note: Kollaborate integration is currently only available on the Mac version of Post Haste but will be coming to Windows soon.!
!!Kollaborate Server is a version of Kollaborate that businesses can run in-house on their own servers and storage. If you are running Kollaborate Server in-house, go to the Local Server tab, tick the box to use Kollaborate Server and then enter the URL to your Kollaborate Server installation - such as http://1.2.3.4/kollaborate or https://subdomain.mysite.com.!!Important: if you signed up for an account at www.kollaborate.tv you are using the cloud version and not the server edition so you do not need to enter anything into these fields.!
Last updated Nov 18, 2014

Post Haste User Manual! ! �16
!!To get started, make sure you have an account on Kollaborate or your in-house Kollaborate Server installation. Users cannot sign up for Kollaborate Server accounts so ask your system admin to create one for you if you don’t have an account already.!!Then enter your email address and password into the Credentials form on the Authorize page and click the Authorize button. If you entered them successfully, after a few seconds Post Haste will show a message saying that it is now linked to your Kollaborate account.!!
Last updated Nov 18, 2014
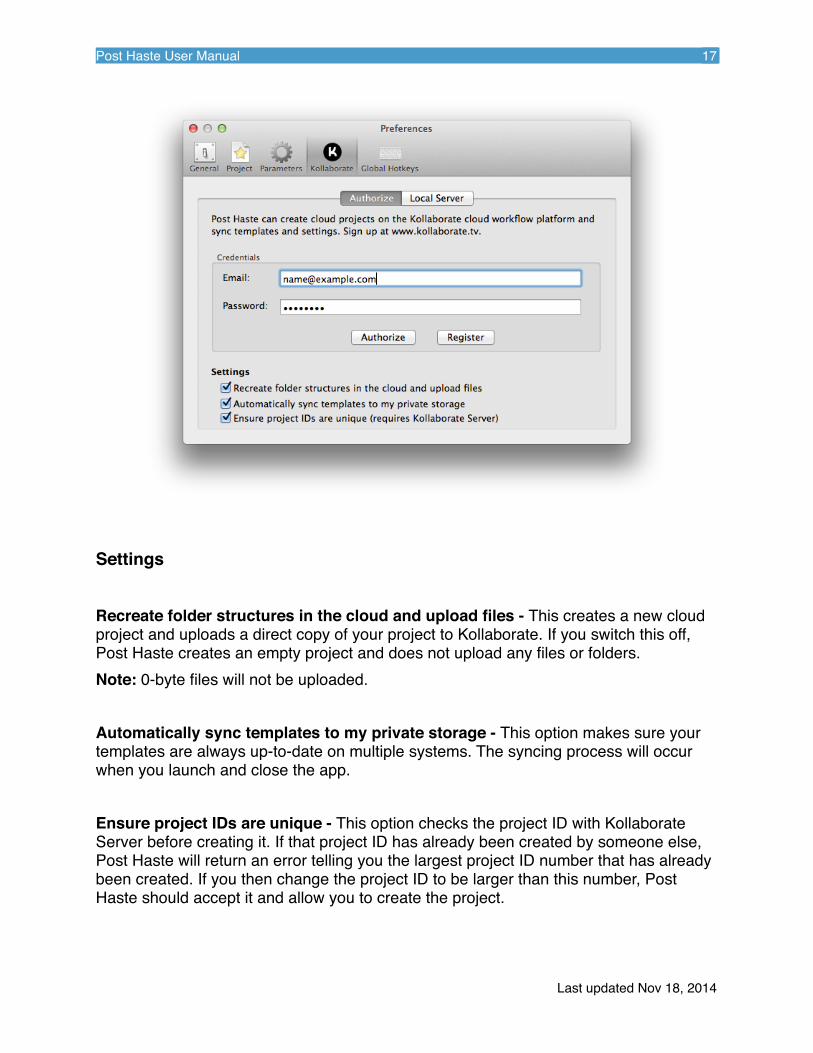
Post Haste User Manual! ! �17
!
Settings!!Recreate folder structures in the cloud and upload files - This creates a new cloud project and uploads a direct copy of your project to Kollaborate. If you switch this off, Post Haste creates an empty project and does not upload any files or folders. !Note: 0-byte files will not be uploaded.!!Automatically sync templates to my private storage - This option makes sure your templates are always up-to-date on multiple systems. The syncing process will occur when you launch and close the app.!!Ensure project IDs are unique - This option checks the project ID with Kollaborate Server before creating it. If that project ID has already been created by someone else, Post Haste will return an error telling you the largest project ID number that has already been created. If you then change the project ID to be larger than this number, Post Haste should accept it and allow you to create the project.!!
Last updated Nov 18, 2014

Post Haste User Manual! ! �18
!!In order for this to work the following needs to be in place:!1. Your company needs to be running Kollaborate Server in-house.!2. You need to have ticked the box to allow Kollaborate Server in the Local Server tab
and entered the URL to your Kollaborate Server installation.!3. You need to have logged into your Kollaborate Server account from the Authorize tab
and clicked the Authorize button.!4. Ensure project IDs are unique needs to be ticked.!5. In the Parameters pane of the preferences window, one parameter needs to have the
Unique Project ID option ticked next to it (you’ll need to scroll to the right to see it).!!!!
Last updated Nov 18, 2014

Post Haste User Manual! ! �19
Global Hotkeys!
!!This pane allows you to set hotkeys to speed up your workflow. This function requires you to have Pro Maintenance Tools or FCS Maintenance Pack installed on your system and is only supported by the standalone Mac version of Post Haste or the version bundled with Pro Media Tools. It is not available in the Windows version.!!!
Last updated Nov 18, 2014

Post Haste User Manual! ! �20
Additional Customization!!Custom Project Presets!!You can add custom project presets to the Add menu in the template editor by copying them to ~/Library/Application Support/Digital Rebellion/Post Haste/Project Templates. The filename of the project should be descriptive as it will be used as the name of the preset in the menu.
Last updated Nov 18, 2014

Post Haste User Manual! ! �21
Support!!Email support can be accessed directly within the application.!
! To report a bug or any other issue, go to Help > Report a Bug. !! To request a new feature, go to Help > Suggest a Feature.!!
When emailing customer support, it is helpful to include log files from the application. To access the logs, go to Help > Troubleshooting > View Log.
Last updated Nov 18, 2014