posture - kundaliny yoga, sat nam rasayan, …sbss.it/pdf/ttpostures_new.pdf · ¥310 ¥ kri...
TRANSCRIPT
PART EIGHT
Posture

Postures

KRI INTERNATIONAL TEACHERTRAINING MANUALLEVEL 1 • 309 •COPYRIGHT YOGIBHAJAN 2003
Postures
There are eighty-four postures of yoga,
but all people, whether Westerner or
Easterner, have done them in the womb
of the mother. So you are yogis anyway.
- YOGI BHAJAN
Postures
CHAPTER 27
• 310 • KRI INTERNATIONAL TEACHERTRAINING MANUALLEVEL 1
Postures
COPYRIGHT YOGIBHAJAN 2003
CHAPTER 27
The practice of Kundalini Yoga is done in kriyas and sets, and the effect of a particular
exercise is determined by its placement within that set, its relationship to the other exer-
cises in the set, the breath, mantra, mudras, and locks used.
The purpose of this section is to help with some of the basic, most commonly used
postures in Kundalini Yoga. They are presented in this way:
4 Instruction. Describing how to do the posture.
4 Checkpoints. Tips for getting the most of out a posture, bringing attention to com-
mon mistakes, and cor recting form and alignment. Remember Yogi Bhajan has said that
if a student is not comfortable doing any of the postures, they may skip them, and still
receive the benefit of the kriya from the group energy generated by the class.
4 Variation. Some postures appear in different kriyas in different variations, as taught
by Yogi Bhajan. Do not interchange one variation of a posture for another, as we do not
substitute postures in Kundalini Yoga kriyas. Follow the instructions as given by the
Master.
In general, with most Kundalini Yoga postures:.
4 Neck Lock. Check that the neck is in the proper alignment appropriate to the
posture. In general, when sitting erect, Neck Lock should be applied, unless other
instruction is given.
4 To end an exercise. In general, inhale deeply and briefly hold, exhale deeply and
briefly hold. You may apply mulbandh, unless other instruction is given.
Some of the Basic Postures Used in Kundalini Yoga
KRI INTERNATIONAL TEACHERTRAINING MANUALLEVEL 1 • 311 •
Postures
COPYRIGHT YOGIBHAJAN 2003
CHAPTER 27
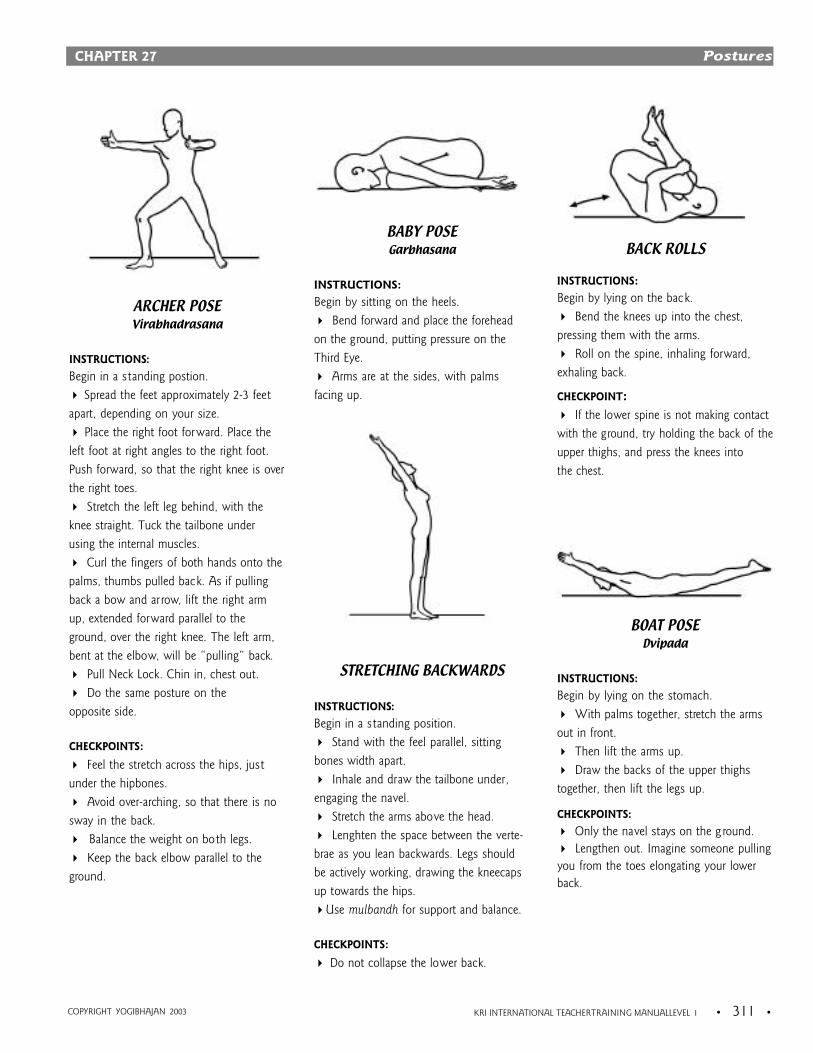
ARCHER POSEVirabhadrasana
INSTRUCTIONS:
Begin in a standing postion.
4 Spread the feet approximately 2-3 feet
apart, depending on your size.
4 Place the right foot forward. Place the
left foot at right angles to the right foot.
Push forward, so that the right knee is over
the right toes.
4 Stretch the left leg behind, with the
knee straight. Tuck the tailbone under
using the internal muscles.
4 Curl the fingers of both hands onto the
palms, thumbs pulled back. As if pulling
back a bow and arrow, lift the right arm
up, extended forward parallel to the
ground, over the right knee. The left arm,
bent at the elbow, will be “pulling” back.
4 Pull Neck Lock. Chin in, chest out.
4 Do the same posture on the
opposite side.
CHECKPOINTS:
4 Feel the stretch across the hips, just
under the hipbones.
4 Avoid over-arching, so that there is no
sway in the back.
4 Balance the weight on both legs.
4 Keep the back elbow parallel to the
ground.
BACK ROLLS
INSTRUCTIONS:
Begin by lying on the back.
4 Bend the knees up into the chest,
pressing them with the arms.
4 Roll on the spine, inhaling forward,
exhaling back.
CHECKPOINT:
4 If the lower spine is not making contact
with the ground, try holding the back of the
upper thighs, and press the knees into
the chest.
BOAT POSEDvipada
INSTRUCTIONS:
Begin by lying on the stomach.
4 With palms together, stretch the arms
out in front.
4 Then lift the arms up.
4 Draw the backs of the upper thighs
together, then lift the legs up.
CHECKPOINTS:
4 Only the navel stays on the g round.
4 Lengthen out. Imagine someone pulling
you from the toes elongating your lower
back.
BABY POSEGarbhasana
INSTRUCTIONS:
Begin by sitting on the heels.
4 Bend forward and place the forehead
on the ground, putting pressure on the
Third Eye.
4 Arms are at the sides, with palms
facing up.
STRETCHING BACKWARDS
INSTRUCTIONS:
Begin in a standing position.
4 Stand with the feel parallel, sitting
bones width apart.
4 Inhale and draw the tailbone under,
engaging the navel.
4 Stretch the arms above the head.
4 Lenghten the space between the verte-
brae as you lean backwards. Legs should
be actively working, drawing the kneecaps
up towards the hips.
4Use mulbandh for support and balance.
CHECKPOINTS:
4 Do not collapse the lower back.
• 312 • KRI INTERNATIONAL TEACHERTRAINING MANUALLEVEL 1
Postures
COPYRIGHT YOGIBHAJAN 2003
CHAPTER 27
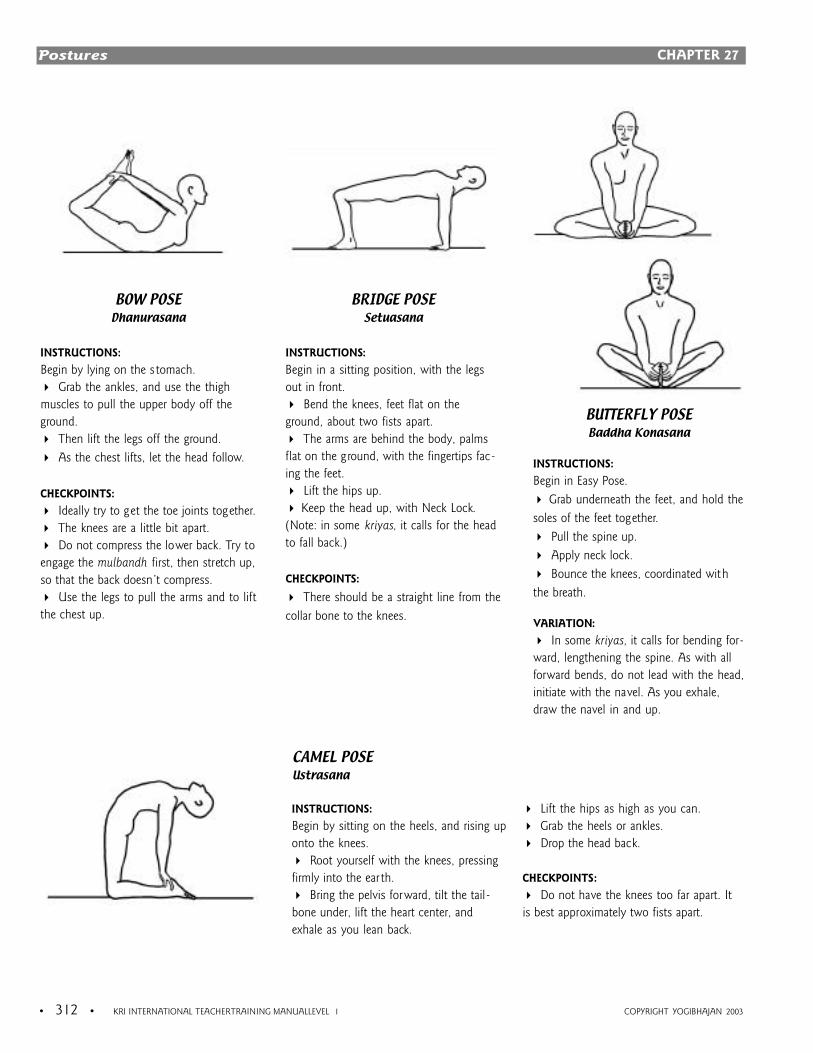
BOW POSEDhanurasana
INSTRUCTIONS:
Begin by lying on the stomach.
4 Grab the ankles, and use the thigh
muscles to pull the upper body off the
ground.
4 Then lift the legs off the ground.
4 As the chest lifts, let the head follow.
CHECKPOINTS:
4 Ideally try to get the toe joints together.
4 The knees are a little bit apart.
4 Do not compress the lower back. Try to
engage the mulbandh first, then stretch up,
so that the back doesn’t compress.
4 Use the legs to pull the arms and to lift
the chest up.
BUTTERFLY POSEBaddha Konasana
INSTRUCTIONS:
Begin in Easy Pose.
4 Grab underneath the feet, and hold the
soles of the feet together.
4 Pull the spine up.
4 Apply neck lock.
4 Bounce the knees, coordinated with
the breath.
VARIATION:
4 In some kriyas, it calls for bending for-
ward, lengthening the spine. As with all
forward bends, do not lead with the head,
initiate with the navel. As you exhale,
draw the navel in and up.
BRIDGE POSESetuasana
INSTRUCTIONS:
Begin in a sitting position, with the legs
out in front.
4 Bend the knees, feet flat on the
ground, about two fists apart.
4 The arms are behind the body, palms
flat on the ground, with the fingertips fac -
ing the feet.
4 Lift the hips up.
4 Keep the head up, with Neck Lock.
(Note: in some kriyas, it calls for the head
to fall back.)
CHECKPOINTS:
4 There should be a straight line from the
collar bone to the knees.
INSTRUCTIONS:
Begin by sitting on the heels, and rising up
onto the knees.
4 Root yourself with the knees, pressing
firmly into the ear th.
4 Bring the pelvis forward, tilt the tail -
bone under, lift the heart center, and
exhale as you lean back.
4 Lift the hips as high as you can.
4 Grab the heels or ankles.
4 Drop the head back.
CHECKPOINTS:
4 Do not have the knees too far apart. It
is best approximately two fists apart.
CAMEL POSEUstrasana
KRI INTERNATIONAL TEACHERTRAINING MANUALLEVEL 1 • 313 •
Postures
COPYRIGHT YOGIBHAJAN 2003
CHAPTER 27
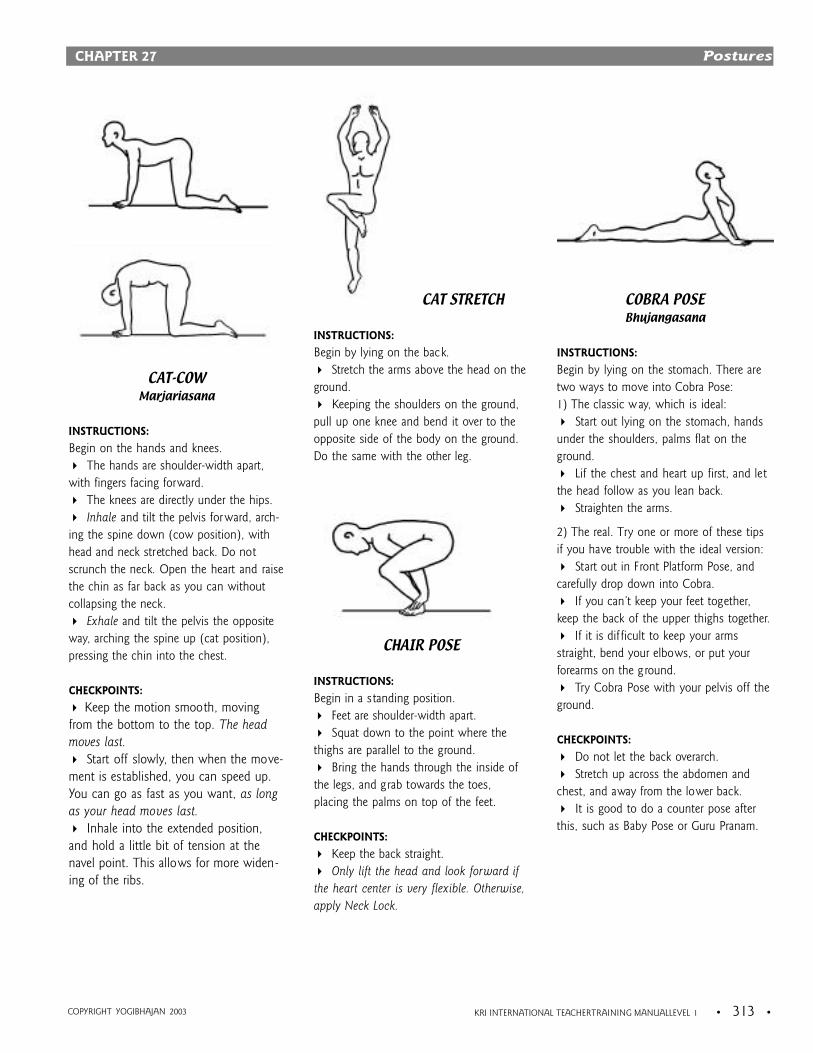
CAT-COWMarjariasana
INSTRUCTIONS:
Begin on the hands and knees.
4 The hands are shoulder-width apart,
with fingers facing forward.
4 The knees are directly under the hips.
4 Inhale and tilt the pelvis forward, arch-
ing the spine down (cow position), with
head and neck stretched back. Do not
scrunch the neck. Open the heart and raise
the chin as far back as you can without
collapsing the neck.
4 Exhale and tilt the pelvis the opposite
way, arching the spine up (cat position),
pressing the chin into the chest.
CHECKPOINTS:
4 Keep the motion smooth, moving
from the bottom to the top. The head
moves last.
4 Start off slowly, then when the move-
ment is established, you can speed up.
You can go as fast as you want, as long
as your head moves last.
4 Inhale into the extended position,
and hold a little bit of tension at the
navel point. This allows for more widen-
ing of the ribs.
COBRA POSEBhujangasana
INSTRUCTIONS:
Begin by lying on the stomach. There are
two ways to move into Cobra Pose:
1) The classic way, which is ideal:
4 Start out lying on the stomach, hands
under the shoulders, palms flat on the
ground.
4 Lif the chest and heart up first, and let
the head follow as you lean back.
4 Straighten the arms.
2) The real. Try one or more of these tips
if you have trouble with the ideal version:
4 Start out in Front Platform Pose, and
carefully drop down into Cobra.
4 If you can’t keep your feet together,
keep the back of the upper thighs together.
4 If it is difficult to keep your arms
straight, bend your elbows, or put your
forearms on the ground.
4 Try Cobra Pose with your pelvis off the
ground.
CHECKPOINTS:
4 Do not let the back overarch.
4 Stretch up across the abdomen and
chest, and away from the lower back.
4 It is good to do a counter pose after
this, such as Baby Pose or Guru Pranam.
CAT STRETCH
INSTRUCTIONS:
Begin by lying on the back.
4 Stretch the arms above the head on the
ground.
4 Keeping the shoulders on the ground,
pull up one knee and bend it over to the
opposite side of the body on the ground.
Do the same with the other leg.
CHAIR POSE
INSTRUCTIONS:
Begin in a standing position.
4 Feet are shoulder-width apart.
4 Squat down to the point where the
thighs are parallel to the ground.
4 Bring the hands through the inside of
the legs, and grab towards the toes,
placing the palms on top of the feet.
CHECKPOINTS:
4 Keep the back straight.
4 Only lift the head and look forward if
the heart center is very flexible. Otherwise,
apply Neck Lock.
• 314 • KRI INTERNATIONAL TEACHERTRAINING MANUALLEVEL 1
Postures
COPYRIGHT YOGIBHAJAN 2003
CHAPTER 27
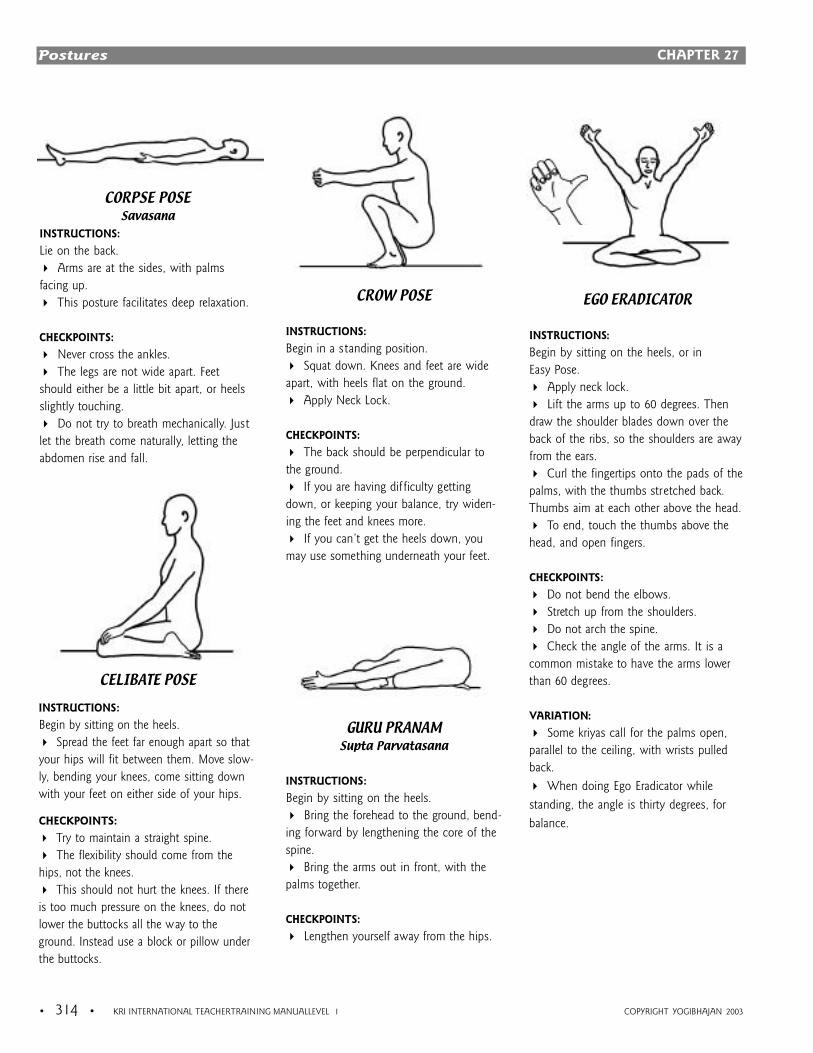
CORPSE POSESavasana
INSTRUCTIONS:
Lie on the back.
4 Arms are at the sides, with palms
facing up.
4 This posture facilitates deep relaxation.
CHECKPOINTS:
4 Never cross the ankles.
4 The legs are not wide apart. Feet
should either be a little bit apart, or heels
slightly touching.
4 Do not try to breath mechanically. Just
let the breath come naturally, letting the
abdomen rise and fall.
EGO ERADICATOR
INSTRUCTIONS:
Begin by sitting on the heels, or in
Easy Pose.
4 Apply neck lock.
4 Lift the arms up to 60 degrees. Then
draw the shoulder blades down over the
back of the ribs, so the shoulders are away
from the ears.
4 Curl the fingertips onto the pads of the
palms, with the thumbs stretched back.
Thumbs aim at each other above the head.
4 To end, touch the thumbs above the
head, and open fingers.
CHECKPOINTS:
4 Do not bend the elbows.
4 Stretch up from the shoulders.
4 Do not arch the spine.
4 Check the angle of the arms. It is a
common mistake to have the arms lower
than 60 degrees.
VARIATION:
4 Some kriyas call for the palms open,
parallel to the ceiling, with wrists pulled
back.
4 When doing Ego Eradicator while
standing, the angle is thirty degrees, for
balance.
CROW POSE
INSTRUCTIONS:
Begin in a standing position.
4 Squat down. Knees and feet are wide
apart, with heels flat on the ground.
4 Apply Neck Lock.
CHECKPOINTS:
4 The back should be perpendicular to
the ground.
4 If you are having difficulty getting
down, or keeping your balance, try widen-
ing the feet and knees more.
4 If you can’t get the heels down, you
may use something underneath your feet.
GURU PRANAMSupta Parvatasana
INSTRUCTIONS:
Begin by sitting on the heels.
4 Bring the forehead to the ground, bend-
ing forward by lengthening the core of the
spine.
4 Bring the arms out in front, with the
palms together.
CHECKPOINTS:
4 Lengthen yourself away from the hips.
CELIBATE POSE
INSTRUCTIONS:
Begin by sitting on the heels.
4 Spread the feet far enough apart so that
your hips will fit between them. Move slow-
ly, bending your knees, come sitting down
with your feet on either side of your hips.
CHECKPOINTS:
4 Try to maintain a straight spine.
4 The flexibility should come from the
hips, not the knees.
4 This should not hurt the knees. If there
is too much pressure on the knees, do not
lower the buttocks all the way to the
ground. Instead use a block or pillow under
the buttocks.
KRI INTERNATIONAL TEACHERTRAINING MANUALLEVEL 1 • 315 •
Postures
COPYRIGHT YOGIBHAJAN 2003
CHAPTER 27
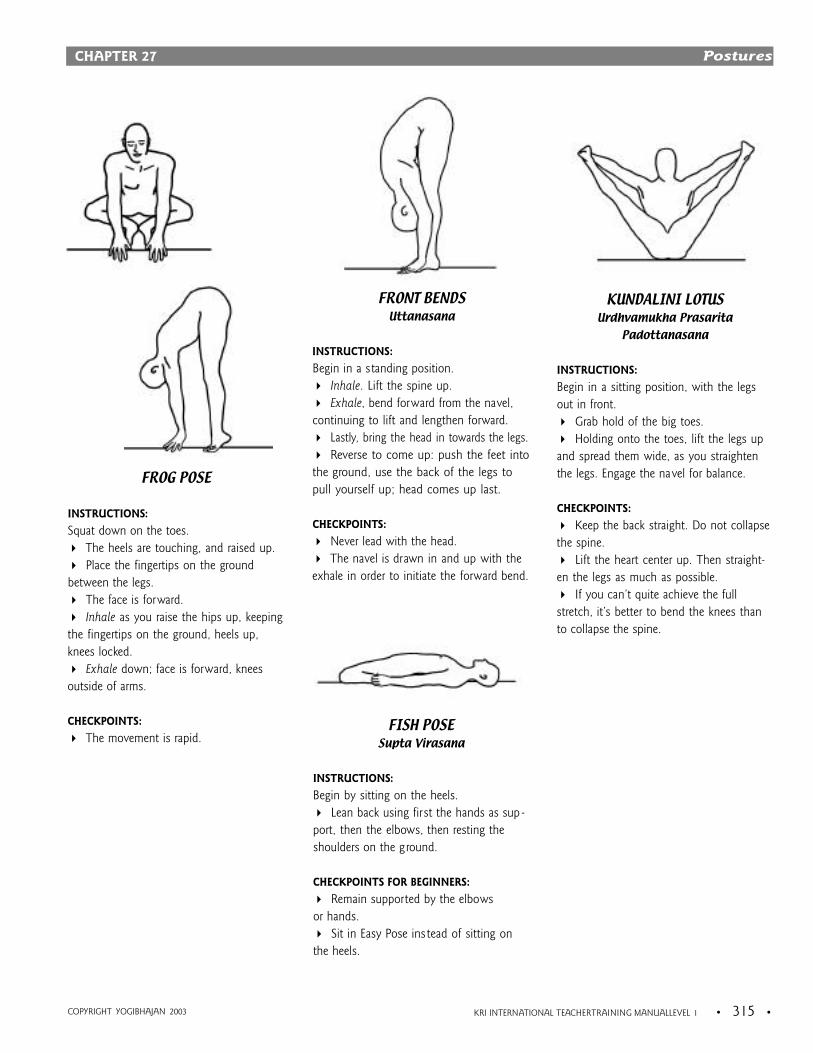
FROG POSE
INSTRUCTIONS:
Squat down on the toes.
4 The heels are touching, and raised up.
4 Place the fingertips on the ground
between the legs.
4 The face is forward.
4 Inhale as you raise the hips up, keeping
the fingertips on the ground, heels up,
knees locked.
4 Exhale down; face is forward, knees
outside of arms.
CHECKPOINTS:
4 The movement is rapid.
KUNDALINI LOTUSUrdhvamukha Prasarita
Padottanasana
INSTRUCTIONS:
Begin in a sitting position, with the legs
out in front.
4 Grab hold of the big toes.
4 Holding onto the toes, lift the legs up
and spread them wide, as you straighten
the legs. Engage the navel for balance.
CHECKPOINTS:
4 Keep the back straight. Do not collapse
the spine.
4 Lift the heart center up. Then straight-
en the legs as much as possible.
4 If you can’t quite achieve the full
stretch, it’s better to bend the knees than
to collapse the spine.
FRONT BENDSUttanasana
INSTRUCTIONS:
Begin in a standing position.
4 Inhale. Lift the spine up.
4 Exhale, bend forward from the navel,
continuing to lift and lengthen forward.
4 Lastly, bring the head in towards the legs.
4 Reverse to come up: push the feet into
the ground, use the back of the legs to
pull yourself up; head comes up last.
CHECKPOINTS:
4 Never lead with the head.
4 The navel is drawn in and up with the
exhale in order to initiate the forward bend.
FISH POSESupta Virasana
INSTRUCTIONS:
Begin by sitting on the heels.
4 Lean back using first the hands as sup -
port, then the elbows, then resting the
shoulders on the ground.
CHECKPOINTS FOR BEGINNERS:
4 Remain supported by the elbows
or hands.
4 Sit in Easy Pose instead of sitting on
the heels.
• 316 • KRI INTERNATIONAL TEACHERTRAINING MANUAL LEVEL 1
Postures
COPYRIGHT YOGIBHAJAN 2003
CHAPTER 27
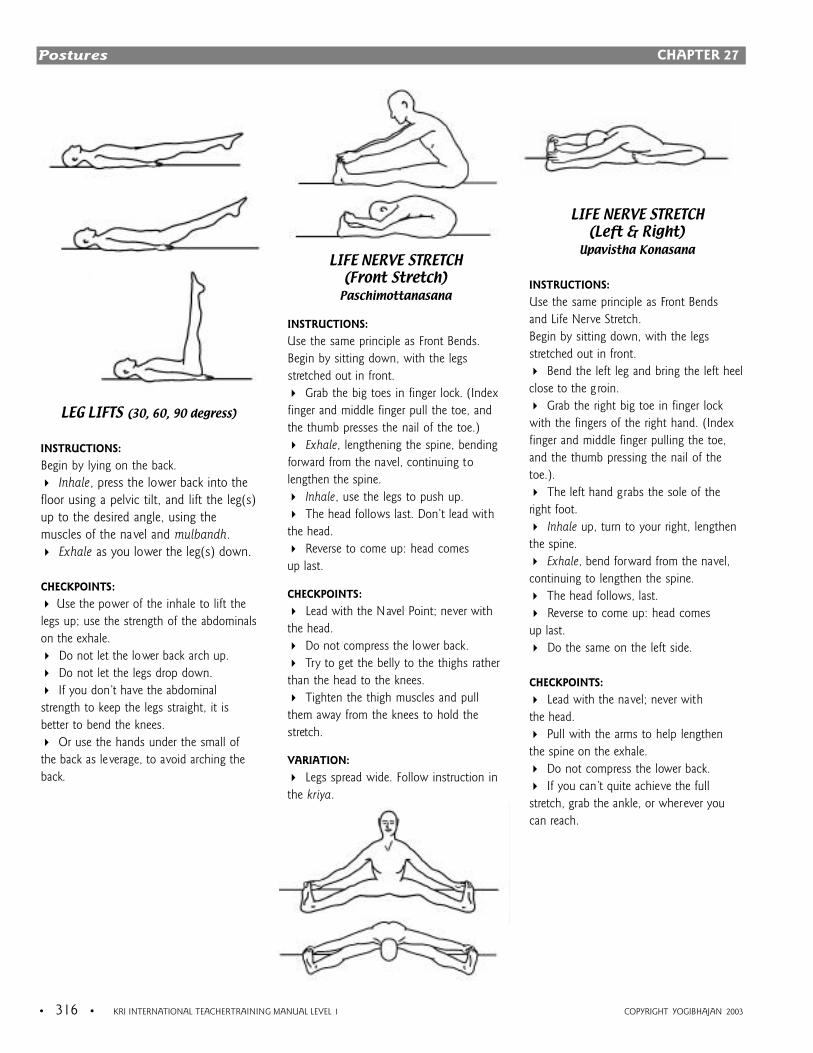
LEG LIFTS (30, 60, 90 degress)
INSTRUCTIONS:
Begin by lying on the back.
4 Inhale, press the lower back into the
floor using a pelvic tilt, and lift the leg(s)
up to the desired angle, using the
muscles of the navel and mulbandh.
4 Exhale as you lower the leg(s) down.
CHECKPOINTS:
4 Use the power of the inhale to lift the
legs up; use the strength of the abdominals
on the exhale.
4 Do not let the lower back arch up.
4 Do not let the legs drop down.
4 If you don’t have the abdominal
strength to keep the legs straight, it is
better to bend the knees.
4 Or use the hands under the small of
the back as leverage, to avoid arching the
back.
LIFE NERVE STRETCH(Left & Right)
Upavistha Konasana
INSTRUCTIONS:
Use the same principle as Front Bends
and Life Nerve Stretch.
Begin by sitting down, with the legs
stretched out in front.
4 Bend the left leg and bring the left heel
close to the g roin.
4 Grab the right big toe in finger lock
with the fingers of the right hand. (Index
finger and middle finger pulling the toe,
and the thumb pressing the nail of the
toe.).
4 The left hand grabs the sole of the
right foot.
4 Inhale up, turn to your right, lengthen
the spine.
4 Exhale, bend forward from the navel,
continuing to lengthen the spine.
4 The head follows, last.
4 Reverse to come up: head comes
up last.
4 Do the same on the left side.
CHECKPOINTS:
4 Lead with the navel; never with
the head.
4 Pull with the arms to help lengthen
the spine on the exhale.
4 Do not compress the lower back.
4 If you can’t quite achieve the full
stretch, grab the ankle, or wherever you
can reach.
LIFE NERVE STRETCH(Front Stretch)
Paschimottanasana
INSTRUCTIONS:
Use the same principle as Front Bends.
Begin by sitting down, with the legs
stretched out in front.
4 Grab the big toes in finger lock. (Index
finger and middle finger pull the toe, and
the thumb presses the nail of the toe.)
4 Exhale, lengthening the spine, bending
forward from the navel, continuing to
lengthen the spine.
4 Inhale, use the legs to push up.
4 The head follows last. Don’t lead with
the head.
4 Reverse to come up: head comes
up last.
CHECKPOINTS:
4 Lead with the Navel Point; never with
the head.
4 Do not compress the lower back.
4 Try to get the belly to the thighs rather
than the head to the knees.
4 Tighten the thigh muscles and pull
them away from the knees to hold the
stretch.
VARIATION:
4 Legs spread wide. Follow instruction in
the kriya.
KRI INTERNATIONAL TEACHERTRAINING MANUALLEVEL 1 • 317 •
Postures
COPYRIGHT YOGIBHAJAN 2003
CHAPTER 27
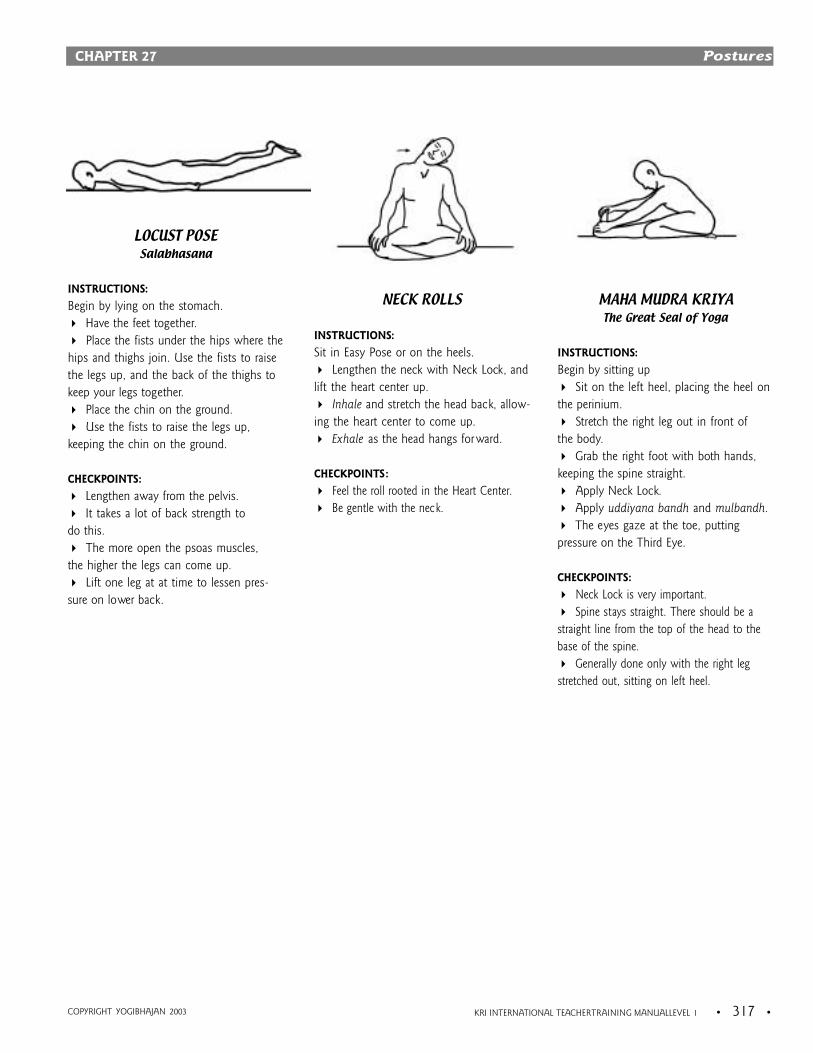
LOCUST POSESalabhasana
INSTRUCTIONS:
Begin by lying on the stomach.
4 Have the feet together.
4 Place the fists under the hips where the
hips and thighs join. Use the fists to raise
the legs up, and the back of the thighs to
keep your legs together.
4 Place the chin on the ground.
4 Use the fists to raise the legs up,
keeping the chin on the ground.
CHECKPOINTS:
4 Lengthen away from the pelvis.
4 It takes a lot of back strength to
do this.
4 The more open the psoas muscles,
the higher the legs can come up.
4 Lift one leg at at time to lessen pres-
sure on lower back.
MAHA MUDRA KRIYAThe Great Seal of Yoga
INSTRUCTIONS:
Begin by sitting up
4 Sit on the left heel, placing the heel on
the perinium.
4 Stretch the right leg out in front of
the body.
4 Grab the right foot with both hands,
keeping the spine straight.
4 Apply Neck Lock.
4 Apply uddiyana bandh and mulbandh.
4 The eyes gaze at the toe, putting
pressure on the Third Eye.
CHECKPOINTS:
4 Neck Lock is very important.
4 Spine stays straight. There should be a
straight line from the top of the head to the
base of the spine.
4 Generally done only with the right leg
stretched out, sitting on left heel.
NECK ROLLS
INSTRUCTIONS:
Sit in Easy Pose or on the heels.
4 Lengthen the neck with Neck Lock, and
lift the heart center up.
4 Inhale and stretch the head back, allow-
ing the heart center to come up.
4 Exhale as the head hangs forward.
CHECKPOINTS:
4 Feel the roll rooted in the Heart Center.
4 Be gentle with the neck.
• 318 • KRI INTERNATIONAL TEACHERTRAINING MANUALLEVEL 1
Postures
COPYRIGHT YOGIBHAJAN 2003
CHAPTER 27
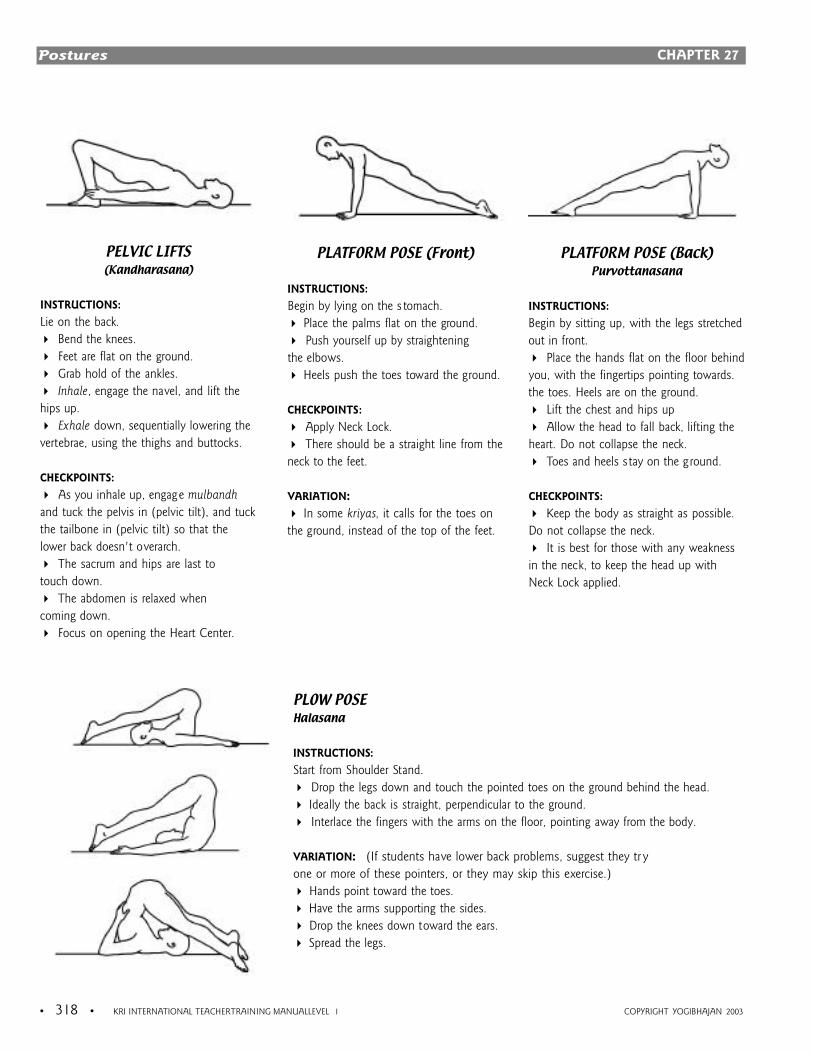
PELVIC LIFTS(Kandharasana)
INSTRUCTIONS:
Lie on the back.
4 Bend the knees.
4 Feet are flat on the ground.
4 Grab hold of the ankles.
4 Inhale, engage the navel, and lift the
hips up.
4 Exhale down, sequentially lowering the
vertebrae, using the thighs and buttocks.
CHECKPOINTS:
4 As you inhale up, engage mulbandh
and tuck the pelvis in (pelvic tilt), and tuck
the tailbone in (pelvic tilt) so that the
lower back doesn't overarch.
4 The sacrum and hips are last to
touch down.
4 The abdomen is relaxed when
coming down.
4 Focus on opening the Heart Center.
PLATFORM POSE (Back)Purvottanasana
INSTRUCTIONS:
Begin by sitting up, with the legs stretched
out in front.
4 Place the hands flat on the floor behind
you, with the fingertips pointing towards.
the toes. Heels are on the ground.
4 Lift the chest and hips up
4 Allow the head to fall back, lifting the
heart. Do not collapse the neck.
4 Toes and heels s tay on the ground.
CHECKPOINTS:
4 Keep the body as straight as possible.
Do not collapse the neck.
4 It is best for those with any weakness
in the neck, to keep the head up with
Neck Lock applied.
PLATFORM POSE (Front)
INSTRUCTIONS:
Begin by lying on the s tomach.
4 Place the palms flat on the ground.
4 Push yourself up by straightening
the elbows.
4 Heels push the toes toward the ground.
CHECKPOINTS:
4 Apply Neck Lock.
4 There should be a straight line from the
neck to the feet.
VARIATION:
4 In some kriyas, it calls for the toes on
the ground, instead of the top of the feet.
PLOW POSEHalasana
INSTRUCTIONS:
Start from Shoulder Stand.
4 Drop the legs down and touch the pointed toes on the ground behind the head.
4 Ideally the back is straight, perpendicular to the ground.
4 Interlace the fingers with the arms on the floor, pointing away from the body.
VARIATION: (If students have lower back problems, suggest they tr y
one or more of these pointers, or they may skip this exercise.)
4 Hands point toward the toes.
4 Have the arms supporting the sides.
4 Drop the knees down toward the ears.
4 Spread the legs.
KRI INTERNATIONAL TEACHERTRAINING MANUALLEVEL 1 • 319 •
Postures
COPYRIGHT YOGIBHAJAN 2003
CHAPTER 27
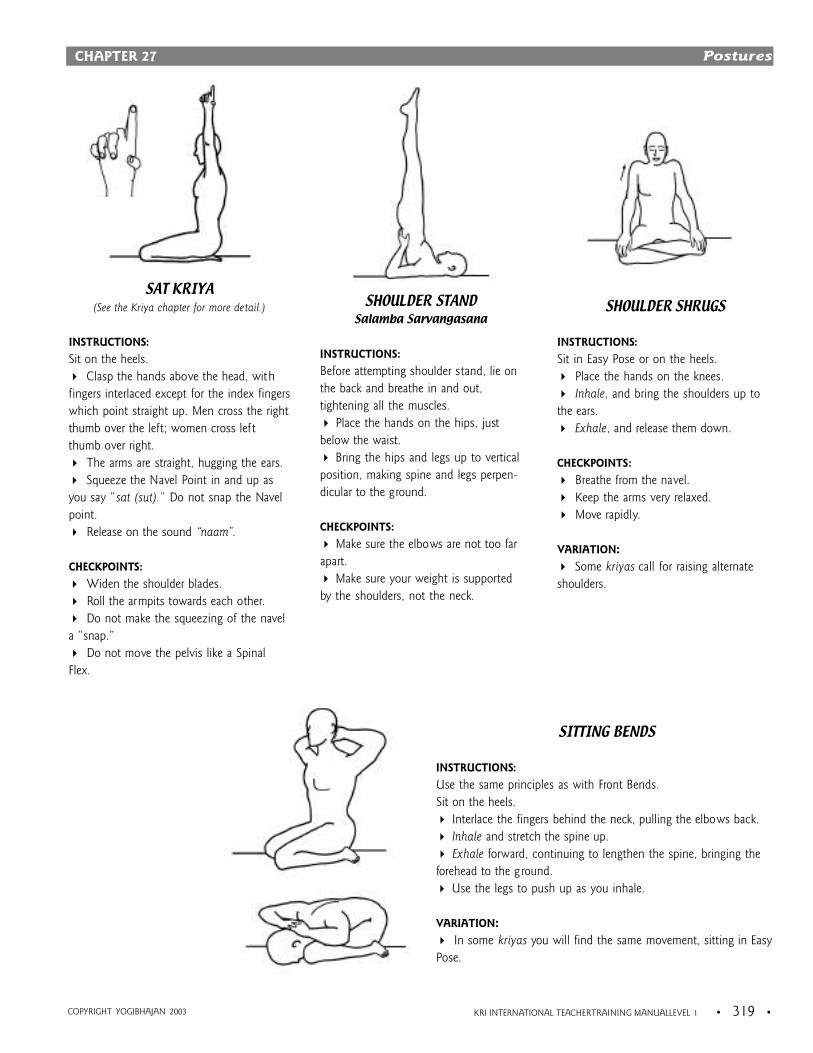
SAT KRIYA (See the Kriya chapter for more detail.)
INSTRUCTIONS:
Sit on the heels.
4 Clasp the hands above the head, with
fingers interlaced except for the index fingers
which point straight up. Men cross the right
thumb over the left; women cross left
thumb over right.
4 The arms are straight, hugging the ears.
4 Squeeze the Navel Point in and up as
you say “sat (sut).” Do not snap the Navel
point.
4 Release on the sound “naam”.
CHECKPOINTS:
4 Widen the shoulder blades.
4 Roll the armpits towards each other.
4 Do not make the squeezing of the navel
a “snap.”
4 Do not move the pelvis like a Spinal
Flex.
SHOULDER SHRUGS
INSTRUCTIONS:
Sit in Easy Pose or on the heels.
4 Place the hands on the knees.
4 Inhale, and bring the shoulders up to
the ears.
4 Exhale, and release them down.
CHECKPOINTS:
4 Breathe from the navel.
4 Keep the arms very relaxed.
4 Move rapidly.
VARIATION:
4 Some kriyas call for raising alternate
shoulders.
SHOULDER STANDSalamba Sarvangasana
INSTRUCTIONS:
Before attempting shoulder stand, lie on
the back and breathe in and out,
tightening all the muscles.
4 Place the hands on the hips, just
below the waist.
4 Bring the hips and legs up to vertical
position, making spine and legs perpen-
dicular to the ground.
CHECKPOINTS:
4 Make sure the elbows are not too far
apart.
4 Make sure your weight is supported
by the shoulders, not the neck.
SITTING BENDS
INSTRUCTIONS:
Use the same principles as with Front Bends.
Sit on the heels.
4 Interlace the fingers behind the neck, pulling the elbows back.
4 Inhale and stretch the spine up.
4 Exhale forward, continuing to lengthen the spine, bringing the
forehead to the g round.
4 Use the legs to push up as you inhale.
VARIATION:
4 In some kriyas you will find the same movement, sitting in Easy
Pose.
• 320 • KRI INTERNATIONAL TEACHERTRAINING MANUALLEVEL 1
Postures
COPYRIGHT YOGIBHAJAN 2003
CHAPTER 27
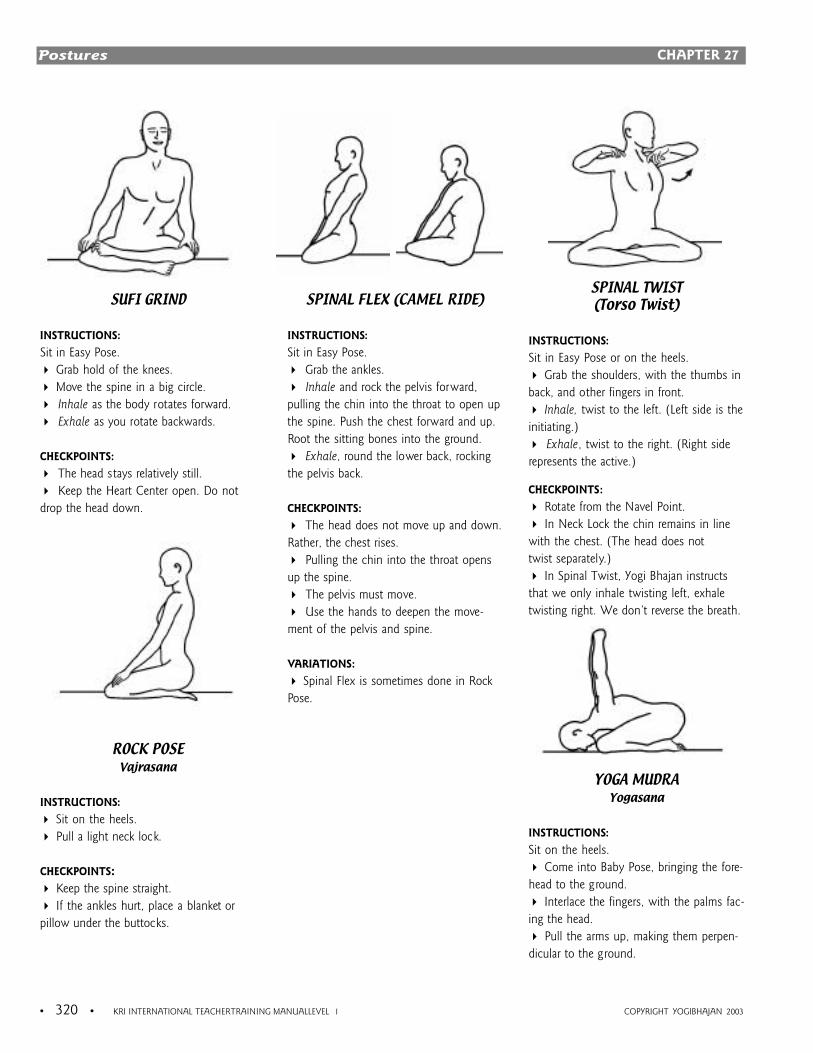
SUFI GRIND
INSTRUCTIONS:
Sit in Easy Pose.
4 Grab hold of the knees.
4 Move the spine in a big circle.
4 Inhale as the body rotates forward.
4 Exhale as you rotate backwards.
CHECKPOINTS:
4 The head stays relatively still.
4 Keep the Heart Center open. Do not
drop the head down.
ROCK POSEVajrasana
INSTRUCTIONS:
4 Sit on the heels.
4 Pull a light neck lock.
CHECKPOINTS:
4 Keep the spine straight.
4 If the ankles hurt, place a blanket or
pillow under the buttocks.
SPINAL TWIST(Torso Twist)
INSTRUCTIONS:
Sit in Easy Pose or on the heels.
4 Grab the shoulders, with the thumbs in
back, and other fingers in front.
4 Inhale, twist to the left. (Left side is the
initiating.)
4 Exhale, twist to the right. (Right side
represents the active.)
CHECKPOINTS:
4 Rotate from the Navel Point.
4 In Neck Lock the chin remains in line
with the chest. (The head does not
twist separately.)
4 In Spinal Twist, Yogi Bhajan instructs
that we only inhale twisting left, exhale
twisting right. We don’t reverse the breath.
YOGA MUDRAYogasana
INSTRUCTIONS:
Sit on the heels.
4 Come into Baby Pose, bringing the fore-
head to the ground.
4 Interlace the fingers, with the palms fac-
ing the head.
4 Pull the arms up, making them perpen-
dicular to the ground.
SPINAL FLEX (CAMEL RIDE)
INSTRUCTIONS:
Sit in Easy Pose.
4 Grab the ankles.
4 Inhale and rock the pelvis forward,
pulling the chin into the throat to open up
the spine. Push the chest forward and up.
Root the sitting bones into the ground.
4 Exhale, round the lower back, rocking
the pelvis back.
CHECKPOINTS:
4 The head does not move up and down.
Rather, the chest rises.
4 Pulling the chin into the throat opens
up the spine.
4 The pelvis must move.
4 Use the hands to deepen the move-
ment of the pelvis and spine.
VARIATIONS:
4 Spinal Flex is sometimes done in Rock
Pose.
KRI INTERNATIONAL TEACHERTRAINING MANUALLEVEL 1 • 321 •
Postures
COPYRIGHT YOGIBHAJAN 2003
CHAPTER 27
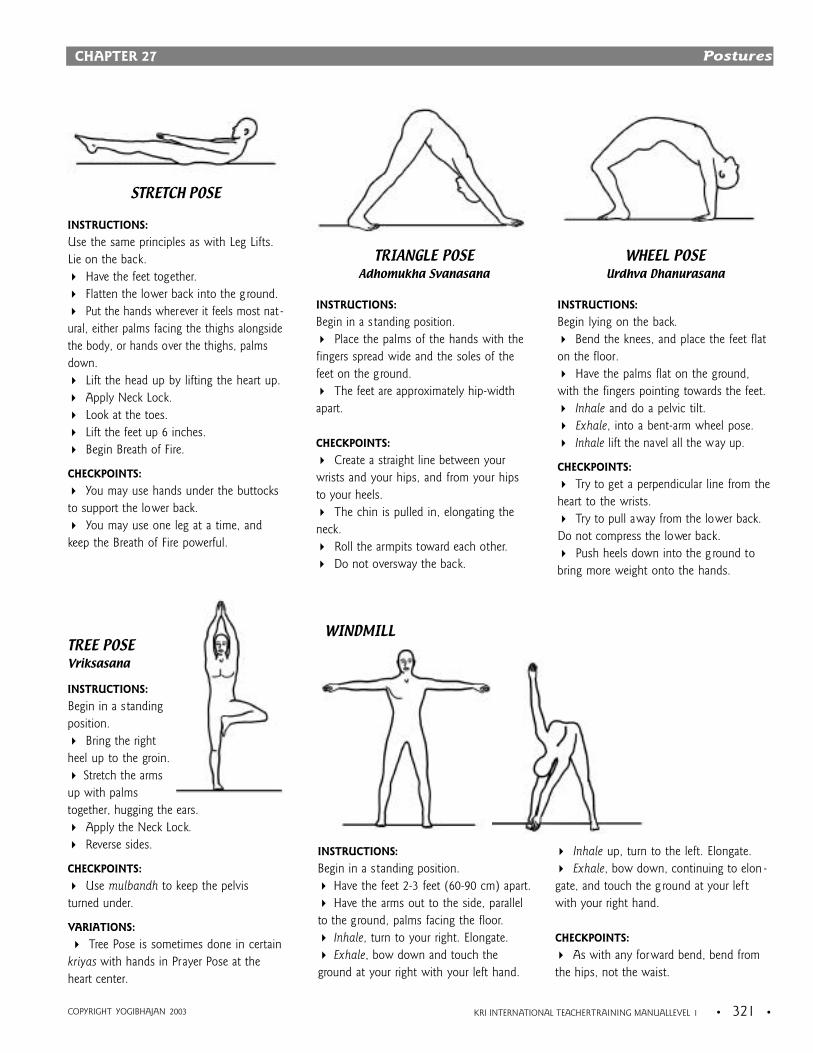
STRETCH POSE
INSTRUCTIONS:
Use the same principles as with Leg Lifts.
Lie on the back.
4 Have the feet together.
4 Flatten the lower back into the g round.
4 Put the hands wherever it feels most nat -
ural, either palms facing the thighs alongside
the body, or hands over the thighs, palms
down.
4 Lift the head up by lifting the heart up.
4 Apply Neck Lock.
4 Look at the toes.
4 Lift the feet up 6 inches.
4 Begin Breath of Fire.
CHECKPOINTS:
4 You may use hands under the buttocks
to support the lower back.
4 You may use one leg at a time, and
keep the Breath of Fire powerful.
TREE POSEVriksasana
INSTRUCTIONS:
Begin in a standing
position.
4 Bring the right
heel up to the groin.
4 Stretch the arms
up with palms
together, hugging the ears.
4 Apply the Neck Lock.
4 Reverse sides.
CHECKPOINTS:
4 Use mulbandh to keep the pelvis
turned under.
VARIATIONS:
4 Tree Pose is sometimes done in certain
kriyas with hands in Prayer Pose at the
heart center.
WHEEL POSEUrdhva Dhanurasana
INSTRUCTIONS:
Begin lying on the back.
4 Bend the knees, and place the feet flat
on the floor.
4 Have the palms flat on the ground,
with the fingers pointing towards the feet.
4 Inhale and do a pelvic tilt.
4 Exhale, into a bent-arm wheel pose.
4 Inhale lift the navel all the way up.
CHECKPOINTS:
4 Try to get a perpendicular line from the
heart to the wrists.
4 Try to pull away from the lower back.
Do not compress the lower back.
4 Push heels down into the g round to
bring more weight onto the hands.
TRIANGLE POSEAdhomukha Svanasana
INSTRUCTIONS:
Begin in a standing position.
4 Place the palms of the hands with the
fingers spread wide and the soles of the
feet on the ground.
4 The feet are approximately hip-width
apart.
CHECKPOINTS:
4 Create a straight line between your
wrists and your hips, and from your hips
to your heels.
4 The chin is pulled in, elongating the
neck.
4 Roll the armpits toward each other.
4 Do not oversway the back.
INSTRUCTIONS:
Begin in a standing position.
4 Have the feet 2-3 feet (60-90 cm) apart.
4 Have the arms out to the side, parallel
to the ground, palms facing the floor.
4 Inhale, turn to your right. Elongate.
4 Exhale, bow down and touch the
ground at your right with your left hand.
4 Inhale up, turn to the left. Elongate.
4 Exhale, bow down, continuing to elon -
gate, and touch the g round at your left
with your right hand.
CHECKPOINTS:
4 As with any forward bend, bend from
the hips, not the waist.
WINDMILL