power of powerpoint - greg creech is designed for listing text and using lots of graphics and...
TRANSCRIPT

International Association of
Administrative Professionals and
Greg Creech present –
Creating
Powerful
PowerPoint®
Presentations Written and Presented by : Greg Creech Microsoft Certified Application Specialist –Instructor
CompTIA Certified Technical Trainer +
Sunday, July 28 10:00 AM – 12:00 PM and
Tuesday, July 30, 11:30 AM – 12:30 PM
Page 2 C r e a t i n g P o w e r f u l P o w e r P o i n t P r e s e n t a t i o n s
IAAP and Greg Creech
www.iaap-hq.org EFAM 2013 gregcreech.com Greg Creech © 2013 No Distribution or Duplication
Exclusive for IAAP and Techedutainment Services.
While I have made every effort to ensure the accuracy of this document, including grammar
and instructions, I make mistakes. (Surprise!) If you find an error or want to provide
constructive feedback, please contact me. Thank you! Enjoy PowerPoint and this document.
Greg Creech
Techedutainment Services, Inc.
P. O. Box 1431
Pine Lake, GA 30072
www.gregcreech.com
Association Memberships, Certifications, and Awards:
International Association of Administrative Professionals– Atlanta Chapter
American Society of Training and Development Member – Atlanta Chapter
Society for Human Resources Management– Atlanta Chapter
Microsoft Office User Specialist Certification – Instructor
A+ Certified through CompTIA
Microsoft Certified Technical Trainer
2007 Top Non-Credit Programs (my Microsoft® Office Suite) by University Continuing
Education Associations’ Southern Regaion
2009 Faculty Award for the Association of Continuing Higher Education (for my work
at Emory University)
PowerPoint ® is a most excellent product from Microsoft ® Corporation and is part of the
Office ® Suite of products and services.
Copyright © 2013 Greg Creech, Techedutainment Services, Inc.. All rights reserved. This
publication, or any part thereof, may not be reproduced or transmitted in any form or by any
means, electronic or mechanical, including photocopying, recording, storage in an information
retrieval system, or otherwise, without express written permission of Greg Creech, P. O. Box
1431, Pine Lake, GA 30072-1431, www.gregcreech.com.
Page 3 C r e a t i n g P o w e r f u l P o w e r P o i n t P r e s e n t a t i o n s
IAAP and Greg Creech
www.iaap-hq.org EFAM 2013 gregcreech.com Greg Creech © 2013 No Distribution or Duplication
Exclusive for IAAP and Techedutainment Services.
Power of PowerPoint Oops & Legal Stuff ................................................................................................................... 2
Table of Contents .......................................................................................................................................................... 3
About IAAP and Greg Creech ...................................................................................................................................... 5
About the manual ......................................................................................................................................................... 5
Welcome to the Power Of PowerPoint®! ...................................................................................................................... 6
Who’s Running The Show, Anyway? .................................................................................................................... 6
Our Presentation ........................................................................................................................................................... 9
Title Slide – Slide 1 ..................................................................................................................................................... 10
What A Great Opening! ........................................................................................................................................ 10 Step 1: How to create a new presentation and Title Slide.................................................................................... 10 Step 2: How ‘bout That – Time to Format! ......................................................................................................... 11
Slide Two: A Bullet List .............................................................................................................................................. 13
Dodging the Bullet with Animation ...................................................................................................................... 13 New Slide and Layouts ........................................................................................................................................ 13 Headers and Footers ............................................................................................................................................ 14
Don’t Hesitate, Let’s Animate .................................................................................................................................... 17
Animation Schemes ............................................................................................................................................... 18
Custom Animation ................................................................................................................................................. 19 Task Pane ............................................................................................................................................................. 19
Custom Animation – Special Effects .................................................................................................................... 21 Animating a Title Slide – Show Time Folks! ...................................................................................................... 21
Slide Transition ........................................................................................................................................................... 25
Slide Three: Title, Text, and Clip Art ......................................................................................................................... 27
A Whole Lot Going on Here ................................................................................................................................. 27 First The Title ...................................................................................................................................................... 27 Second the Text ................................................................................................................................................... 27 Third the Clip Art ................................................................................................................................................ 28
Time to Animate the Slide ..................................................................................................................................... 29
Animation Order and Re-Ordering ..................................................................................................................... 30
Slide Design ................................................................................................................................................................ 31
Themes .................................................................................................................................................................... 31
Color Design ........................................................................................................................................................... 32
The Photo Gallery ....................................................................................................................................................... 33
Important Photograph Gotchas! .......................................................................................................................... 33
How to add a picture. ............................................................................................................................................ 34
Photo Gallery Slide ................................................................................................................................................ 35

Page 4 C r e a t i n g P o w e r f u l P o w e r P o i n t P r e s e n t a t i o n s
IAAP and Greg Creech
www.iaap-hq.org EFAM 2013 gregcreech.com Greg Creech © 2013 No Distribution or Duplication
Exclusive for IAAP and Techedutainment Services.
Format Picture Tab ............................................................................................................................................... 35
Sound, Movies, Action! – Multi-Media ...................................................................................................................... 36
Compact Disc – Multi-Media: Sound Bytes ........................................................................................................ 37
Sound Options Tab ................................................................................................................................................ 39
Music, Narration, or other Sound from a File .................................................................................................... 40
Clip Art Magic Media ........................................................................................................................................... 42 Clip Art Sound and Music Gallery ...................................................................................................................... 42 Animated Clip Art ............................................................................................................................................... 43
You’re in the Movies ................................................................................................................................................... 44
Action, Action We Want Action - Action Buttons ...................................................................................................... 46
Templates and The Master ......................................................................................................................................... 50
Master View Tabs .................................................................................................................................................. 51
Photo Album .......................................................................................................................................................... 53
The New Power of PowerPoint .................................................................................................................................. 54
Creating a Presentation in 2010 ........................................................................................................................... 54 Artistic Effects on Photos .................................................................................................................................... 56 Design Tab ........................................................................................................................................................... 56
Transition Tab ....................................................................................................................................................... 58
Animation Tab - Improved ................................................................................................................................... 58
Animation Painter ................................................................................................................................................. 59
Video Tools – Format and Playback Tabs in PowerPoint ......................................................................................... 60
PowerPoint’s View Tab .............................................................................................................................................. 63
Powerful Index of PowerPoint ................................................................................................................................... 67
Page 5 C r e a t i n g P o w e r f u l P o w e r P o i n t P r e s e n t a t i o n s
IAAP and Greg Creech
www.iaap-hq.org EFAM 2013 gregcreech.com Greg Creech © 2013 No Distribution or Duplication
Exclusive for IAAP and Techedutainment Services.
On January 5, 1981, I entered the world of being an administrative professional as the only male Steno Clerk in Columbia, SC at Southern Bell. As my manager, Becky Davis, introduced me to all of the women, one funny woman exclaimed: “Well, there goes the steno pool; they let a rooster in the hen house!” Later in the day, I used an IBM Selectric typewriter to type a proposal. As it typed, I noticed the silence in the room and looked up to see everyone staring at me. The funny woman said: “I’ve never seen a man that could type like that. Who would’ve thought.” I could type 70 WPM with no mistakes. I worked in Sales and Marketing at AT&T in many clerical, administrative, and management positions. My longest responsibility for over 10 years was as a Compensation Manager in Sales and Marketing for various sales organizations , and in 1998, I took an early retirement buy out package as an Operations Manager. AT&T supported my comedy, musical, and motivational presentations internally and externally, too, so I had the best of both worlds: administrative position and entertaining presenter. I continue to enjoy at&t as a customer and supplier. Since 1998, I have pursued my passion and love of technology, education, comedy/humor, music, and administration. In April, 2006 for Administrative Professional Day, I presented my musical, humorous stress management speech at Midlands Technical College with over 650 admins in my home town of Columbia, SC. Four months later, I and Mary Stuckey, my neighbor, were at a neighborhood meeting and she informed me that she was being installed as President – Georgia Division of IAAP. Mary and I have been neighbors for 9 years at that point and we never knew of our administrative connections. I told her about my presentations and programs. In November, 2006 at an IAAP Educational Seminar in Macon, GA I presented my humorous, musical presentation on business communication, stress management, and career development entitled “SMILE”. I joined IAAP in 2007. The presentation was a hit and I have been blessed by frequently presenting at chapter meetings, conferences, and other events. Being at EFAM is an absolute dream come true for me and I owe much thanks to my sisters in Georgia chapters for all of the good recommendations, referrals, prayers, and compliments. I hope you enjoy my presentations as much as I enjoy presenting them.
This handout is a sample of a much larger book/manual that I have written and have available for purchase. I concentrate on Office 2007, as many of the features transfer to Office 2010. I am updating all of my manuals, materials, files, and videos to Office 2013/Office 365, so look for my updated materials over the next year (or so) for Access, Excel, PowerPoint, Word, OneNote, Outlook, Windows 8 and combinations of applications. You may view descriptions and purchase my materials through www.gregcreech.com. I have free videos, handouts, like this one, and other materials available at my website, too.
Page 6 C r e a t i n g P o w e r f u l P o w e r P o i n t P r e s e n t a t i o n s
IAAP and Greg Creech
www.iaap-hq.org EFAM 2013 gregcreech.com Greg Creech © 2013 No Distribution or Duplication
Exclusive for IAAP and Techedutainment Services.
Welcome to your course on the Power of PowerPoint®! PowerPoint is a great presentation
application from Microsoft Corporation and is included in the Office Suite of products.
PowerPoint is an effective and entertaining way of presenting information. Since we are in the
Information Age, use PowerPoint any time you want to display information. From invitations
and greeting cards to education and motivation presentations, PowerPoint is for you and our
Age of Information. Whether in an auditorium, kiosk, classroom, or courtroom PowerPoint is
everywhere. There are tons of great applications for using PowerPoint and we will examine
many of them in this course.
We will have fun and learn – a process I entitle “Flurning”, so we will “flurn” PowerPoint. Of all
of the applications in which I work, PowerPoint is the most entertaining and fun that I can have
with a computer short of playing Solitaire or other games. You will find that PowerPoint is the
most fun you can have and stay in the Office Suite.
This course combines the introductory, intermediate, and the advanced functions of
PowerPoint into one handy, dandy document. I’ll provide presentation tips, too.
Who’s Running The Show, Anyway? Although PowerPoint is powerful, the application does not replace the presenter, trainer,
speaker, salesperson, or any other person using PowerPoint. PowerPoint is a vehicle to
accentuate your message and help educate others on your material. I have witnessed too
many professionals overwhelm and bore audiences with too much text, animation, shocking
colors, and the list can go on. Word is designed for manuals and documents with lots of text;
PowerPoint is designed for listing text and using lots of graphics and movement. You tell the
story; you relate the information; you are the true power of PowerPoint. PowerPoint is your
assistant, your helper, and your documenter. If PowerPoint tells and displays the entire
message and information, who needs you? Just give the handout and go home. No way! A
machine can never replace your voice, your look, and your original style of presenting;
however, a machine can help you strengthen your information and enhance your style of
presentation.
Page 7 C r e a t i n g P o w e r f u l P o w e r P o i n t P r e s e n t a t i o n s
IAAP and Greg Creech
www.iaap-hq.org EFAM 2013 gregcreech.com Greg Creech © 2013 No Distribution or Duplication
Exclusive for IAAP and Techedutainment Services.
I will provide helpful presentation tips and design tips that training materials, fellow presenters,
my theatre and presentation history have taught me. Also, I am a member of the National
Speaker’s Association and American Society of Training and Development. If you seek training
and/or speaking as a profession, please consider joining these outstanding organizations. Both
organizations are excellent sources and resources of presentation tools and tips. Here are
some design and presentation tips to keep in mind as we build our presentations.
No more than 6 (or so) words per line,
No more that 6 (or so) lines per slide,
Use sans serif fonts – fonts without little strokes - (Tahoma, Arial, Moderne) for Titles,
Headings – sans serif fonts bring a attention, Notice that most business and road signs
are sans serif,
Use serif fonts (Times New Roman, Georgia) for Bullets and multiple text lines – serif
fonts help our eyes read and reduces eyestrain, Notice that most magazine articles
and books are written serif fonts,
Avoid bright colors as backgrounds, use bright colors to accentuate or enhance your
presentation,
Customize – avoid the templates in PowerPoint (Most business people have seen all of
these templates) – use your creativity to develop your own template and style. This
course is designed to help you accomplish customization,
Avoid using too many fonts (generally a maximum of 3) in a slide show or
presentation,
Use graphics to re-enforce your message and cartoons to invoke humor,
Use animation for disclosure – displaying one bullet item at a time,
Do not use PowerPoint to write a book,
Do not over use the color Red – people literally see Red and emotionally feel
uncomfortable if you use too much Red in your presentation, Green will make people
think of money, Bright Yellow will evoke weakness, Orange induces hunger, etc.
If you provide handouts, wait until the end of your presentation to distribute them –
the sound of rustling paper is not pleasant and your audience will concentrate on the
written word not your spoken information Slide 2
We will build several PowerPoint presentations in this course. We will build a presentation
using many of the types of slides and will learn new items as we build each slide and add
Page 8 C r e a t i n g P o w e r f u l P o w e r P o i n t P r e s e n t a t i o n s
IAAP and Greg Creech
www.iaap-hq.org EFAM 2013 gregcreech.com Greg Creech © 2013 No Distribution or Duplication
Exclusive for IAAP and Techedutainment Services.
functionality and enhancements as we go. We will begin with a title slide, build a bulleted list,
and many other types of slides, including slides with photographs, diagrams, and charts.
We will construct our first presentation with a blank background for us to customize through
Microsoft’s templates and then our own custom template. I will overview the slides that you
will be preparing and they are contained in a PowerPoint file entitled Power of PowerPoint.
The second presentation we will construct will be a design Template that we customize using
Title and Slide Master. I believe that designing your own color schemes, logos, and other
customization techniques will help your creativity, impress your audience, and illustrate your
presentation and message better. PowerPoint is an invaluable branding tool for your
organization, too, and knowing how to customize and manipulate PowerPoint can help in your
branding and creativity. You’ll be self-sufficient, too. Also, the world will know you took a class
from me and I will be proud of your originality. (Often my students or clients surpass me in
their designs and attractiveness of their slides, I applaud them and ask permission to use their
backgrounds.)
Our final presentation will be an invitation or electronic greeting card that you design to send to
your friends or associates.
Enjoy the process of “flurning” the Power of PowerPoint. I know I will enjoy teaching you.
Now, as we say in theatre and presenting: On with the (slide) show!
Write your notes here: _____________________________________
___________________________________________________________
___________________________________________________________
Page 9 C r e a t i n g P o w e r f u l P o w e r P o i n t P r e s e n t a t i o n s
IAAP and Greg Creech
www.iaap-hq.org EFAM 2013 gregcreech.com Greg Creech © 2013 No Distribution or Duplication
Exclusive for IAAP and Techedutainment Services.
Let’s get started with building our own presentation. The Power of PowerPoint file is printed
for this training package; this shows how using PowerPoint as a handout and training document
can be effective. I have included the slide presentation file at the end of this document using a
feature that we will learn on how to send PowerPoint slides to Word – a great, easy and very
efficient PowerPoint feature. PowerPoint is much more than a screen or “live” presentation
tool.
We will use the items that we previously covered, such as views and task panes, as we build
your presentation. So we will review the first 40 or so pages as we learn more about
PowerPoint and you may use the first section of this book as a guide and reference as you
construct future presentations or get a new computer and new copy of Office.
I encourage you to type in your own information and begin building a presentation to fit your
needs and your applications. I will offer text for you to type, of course, but you’ll get a lot more
out of this course if you use your own imagination and wording. We will use logos, pictures,
videos, music, and all types of multimedia for your presentation; you should know where these
items are located prior to our inserting, customizing, and displaying them in our slide show. So,
go ahead and start collecting your logos, pictures, etc. for our time together, now.
Also, don’t worry that your presentation is plain and boring looking. We will change that later
in our third slide. We will use some of PowerPoint’s design templates and we will design our
own design templates later in the course. We will also create our own logos, color schemes,
and other nifty PowerPoint formatting and design features, but first we need slides and
information in which to work so let’s start building the presentation and our fantastic slide
show!
Page 10 C r e a t i n g P o w e r f u l P o w e r P o i n t P r e s e n t a t i o n s
IAAP and Greg Creech
www.iaap-hq.org EFAM 2013 gregcreech.com Greg Creech © 2013 No Distribution or Duplication
Exclusive for IAAP and Techedutainment Services.
What A Great Opening!
Step 1: How to create a new presentation and Title Slide. At the Start-up of PowerPoint, you are at the Title Page of a New Presentation, if you are
already in PowerPoint,
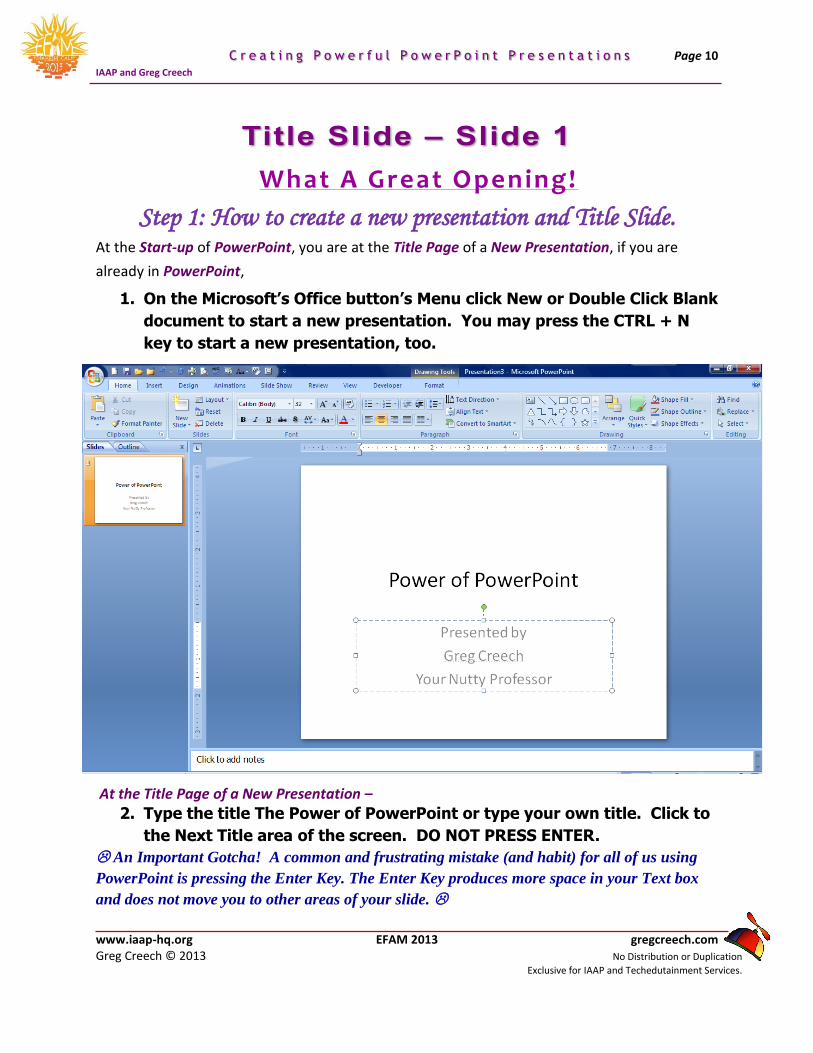
1. On the Microsoft’s Office button’s Menu click New or Double Click Blank
document to start a new presentation. You may press the CTRL + N
key to start a new presentation, too.
At the Title Page of a New Presentation –
2. Type the title The Power of PowerPoint or type your own title. Click to
the Next Title area of the screen. DO NOT PRESS ENTER.
An Important Gotcha! A common and frustrating mistake (and habit) for all of us using
PowerPoint is pressing the Enter Key. The Enter Key produces more space in your Text box
and does not move you to other areas of your slide.
Page 11 C r e a t i n g P o w e r f u l P o w e r P o i n t P r e s e n t a t i o n s
IAAP and Greg Creech
www.iaap-hq.org EFAM 2013 gregcreech.com Greg Creech © 2013 No Distribution or Duplication
Exclusive for IAAP and Techedutainment Services.
I click from area to area.
3. Then Click in the secondary title area and type: Your own sub title or
type Your Name on one line, press enter, type your Title on the second
line and press enter. Type your slogan or a phrase on the third line, as
displayed on the previous page.
Step 2: How ‘bout That – Time to Format! Let’s use the Formatting buttons on the Home Tab. After entering information in the title
areas.
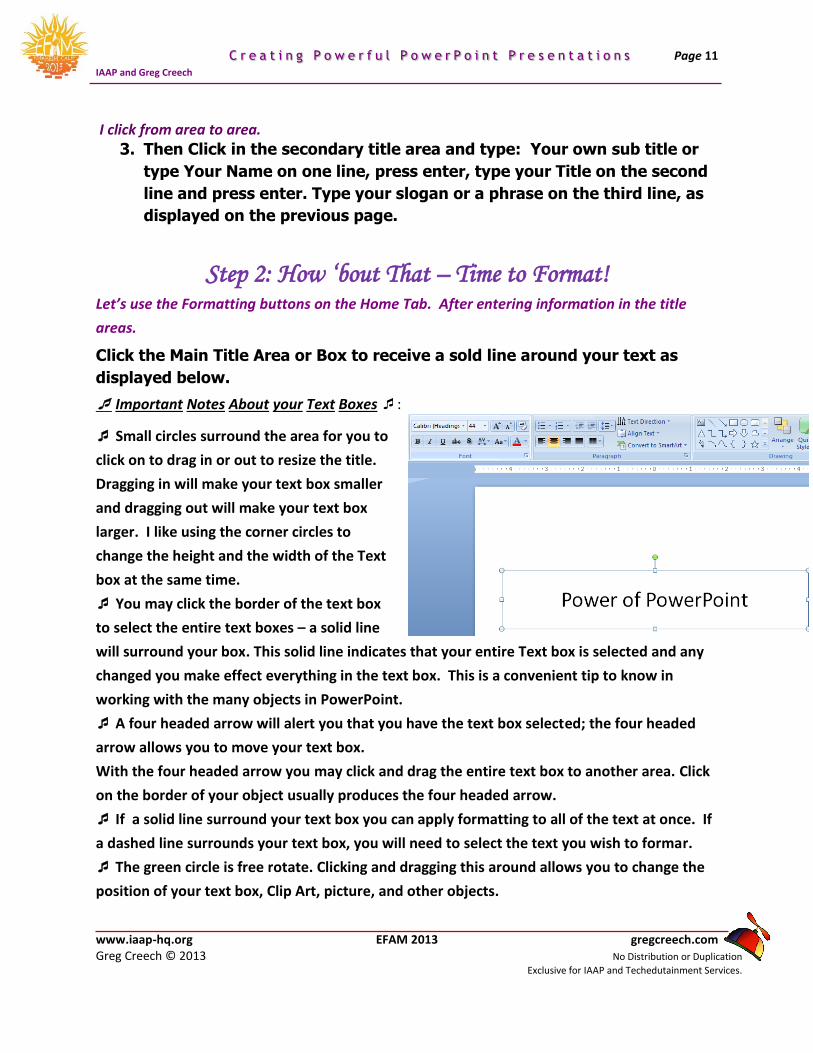
Click the Main Title Area or Box to receive a sold line around your text as
displayed below.
Important Notes About your Text Boxes :
Small circles surround the area for you to
click on to drag in or out to resize the title.
Dragging in will make your text box smaller
and dragging out will make your text box
larger. I like using the corner circles to
change the height and the width of the Text
box at the same time.
You may click the border of the text box
to select the entire text boxes – a solid line
will surround your box. This solid line indicates that your entire Text box is selected and any
changed you make effect everything in the text box. This is a convenient tip to know in
working with the many objects in PowerPoint.
A four headed arrow will alert you that you have the text box selected; the four headed
arrow allows you to move your text box.
With the four headed arrow you may click and drag the entire text box to another area. Click
on the border of your object usually produces the four headed arrow.
If a solid line surround your text box you can apply formatting to all of the text at once. If
a dashed line surrounds your text box, you will need to select the text you wish to formar.
The green circle is free rotate. Clicking and dragging this around allows you to change the
position of your text box, Clip Art, picture, and other objects.
Page 12 C r e a t i n g P o w e r f u l P o w e r P o i n t P r e s e n t a t i o n s
IAAP and Greg Creech
www.iaap-hq.org EFAM 2013 gregcreech.com Greg Creech © 2013 No Distribution or Duplication
Exclusive for IAAP and Techedutainment Services.
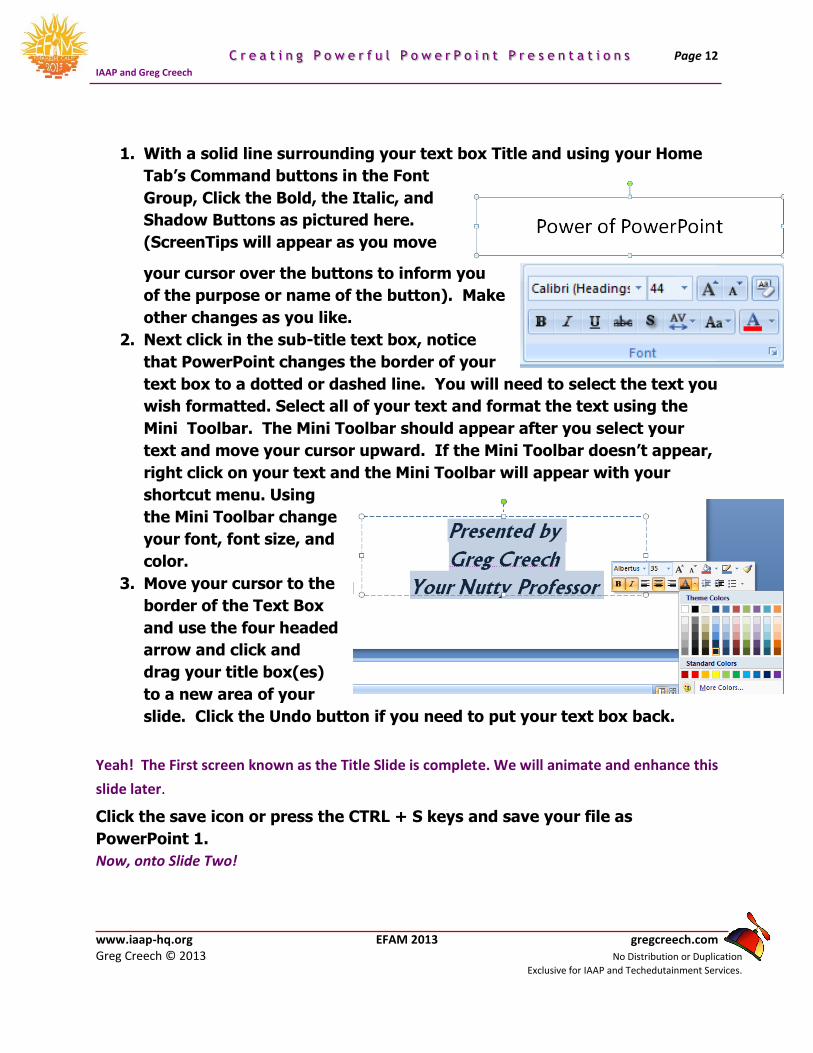
1. With a solid line surrounding your text box Title and using your Home
Tab’s Command buttons in the Font
Group, Click the Bold, the Italic, and
Shadow Buttons as pictured here.
(ScreenTips will appear as you move
your cursor over the buttons to inform you
of the purpose or name of the button). Make
other changes as you like.
2. Next click in the sub-title text box, notice
that PowerPoint changes the border of your
text box to a dotted or dashed line. You will need to select the text you
wish formatted. Select all of your text and format the text using the
Mini Toolbar. The Mini Toolbar should appear after you select your
text and move your cursor upward. If the Mini Toolbar doesn’t appear,
right click on your text and the Mini Toolbar will appear with your
shortcut menu. Using
the Mini Toolbar change
your font, font size, and
color.
3. Move your cursor to the
border of the Text Box
and use the four headed
arrow and click and
drag your title box(es)
to a new area of your
slide. Click the Undo button if you need to put your text box back.
Yeah! The First screen known as the Title Slide is complete. We will animate and enhance this
slide later.
Click the save icon or press the CTRL + S keys and save your file as
PowerPoint 1.
Now, onto Slide Two!
Page 13 C r e a t i n g P o w e r f u l P o w e r P o i n t P r e s e n t a t i o n s
IAAP and Greg Creech
www.iaap-hq.org EFAM 2013 gregcreech.com Greg Creech © 2013 No Distribution or Duplication
Exclusive for IAAP and Techedutainment Services.
Dodging the Bullet with Animation
New Slide and Layouts Time for a new slide. Slide Two will be a bullet list in a text box. To create a new slide, we will
click the New Slide command button and from the menu select the type of slide we wish – we
will use Title and Content for this slide and subsequent slides for our presentation.
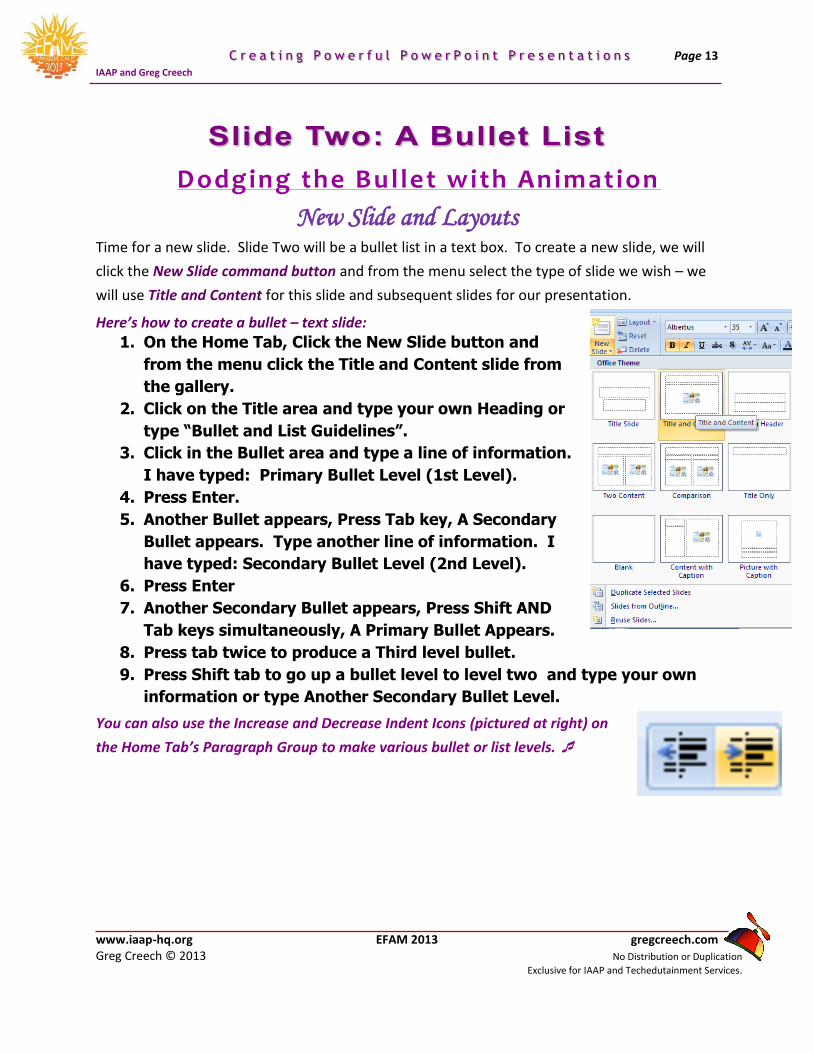
Here’s how to create a bullet – text slide:
1. On the Home Tab, Click the New Slide button and
from the menu click the Title and Content slide from
the gallery.
2. Click on the Title area and type your own Heading or
type “Bullet and List Guidelines”.
3. Click in the Bullet area and type a line of information.
I have typed: Primary Bullet Level (1st Level).
4. Press Enter.
5. Another Bullet appears, Press Tab key, A Secondary
Bullet appears. Type another line of information. I
have typed: Secondary Bullet Level (2nd Level).
6. Press Enter
7. Another Secondary Bullet appears, Press Shift AND
Tab keys simultaneously, A Primary Bullet Appears.
8. Press tab twice to produce a Third level bullet.
9. Press Shift tab to go up a bullet level to level two and type your own
information or type Another Secondary Bullet Level.
You can also use the Increase and Decrease Indent Icons (pictured at right) on
the Home Tab’s Paragraph Group to make various bullet or list levels.
Page 14 C r e a t i n g P o w e r f u l P o w e r P o i n t P r e s e n t a t i o n s
IAAP and Greg Creech
www.iaap-hq.org EFAM 2013 gregcreech.com Greg Creech © 2013 No Distribution or Duplication
Exclusive for IAAP and Techedutainment Services.
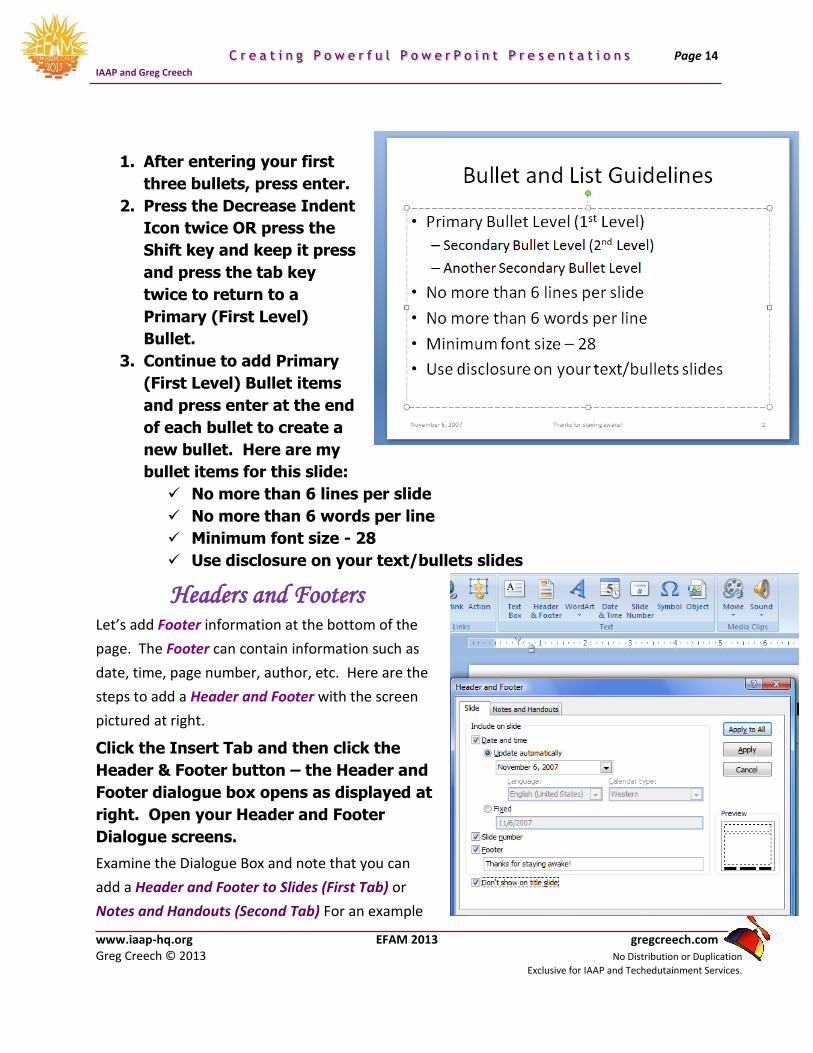
1. After entering your first
three bullets, press enter.
2. Press the Decrease Indent
Icon twice OR press the
Shift key and keep it press
and press the tab key
twice to return to a
Primary (First Level)
Bullet.
3. Continue to add Primary
(First Level) Bullet items
and press enter at the end
of each bullet to create a
new bullet. Here are my
bullet items for this slide:
No more than 6 lines per slide
No more than 6 words per line
Minimum font size - 28
Use disclosure on your text/bullets slides
Headers and Footers Let’s add Footer information at the bottom of the
page. The Footer can contain information such as
date, time, page number, author, etc. Here are the
steps to add a Header and Footer with the screen
pictured at right.
Click the Insert Tab and then click the
Header & Footer button – the Header and
Footer dialogue box opens as displayed at
right. Open your Header and Footer
Dialogue screens.
Examine the Dialogue Box and note that you can
add a Header and Footer to Slides (First Tab) or
Notes and Handouts (Second Tab) For an example
Page 15 C r e a t i n g P o w e r f u l P o w e r P o i n t P r e s e n t a t i o n s
IAAP and Greg Creech
www.iaap-hq.org EFAM 2013 gregcreech.com Greg Creech © 2013 No Distribution or Duplication
Exclusive for IAAP and Techedutainment Services.
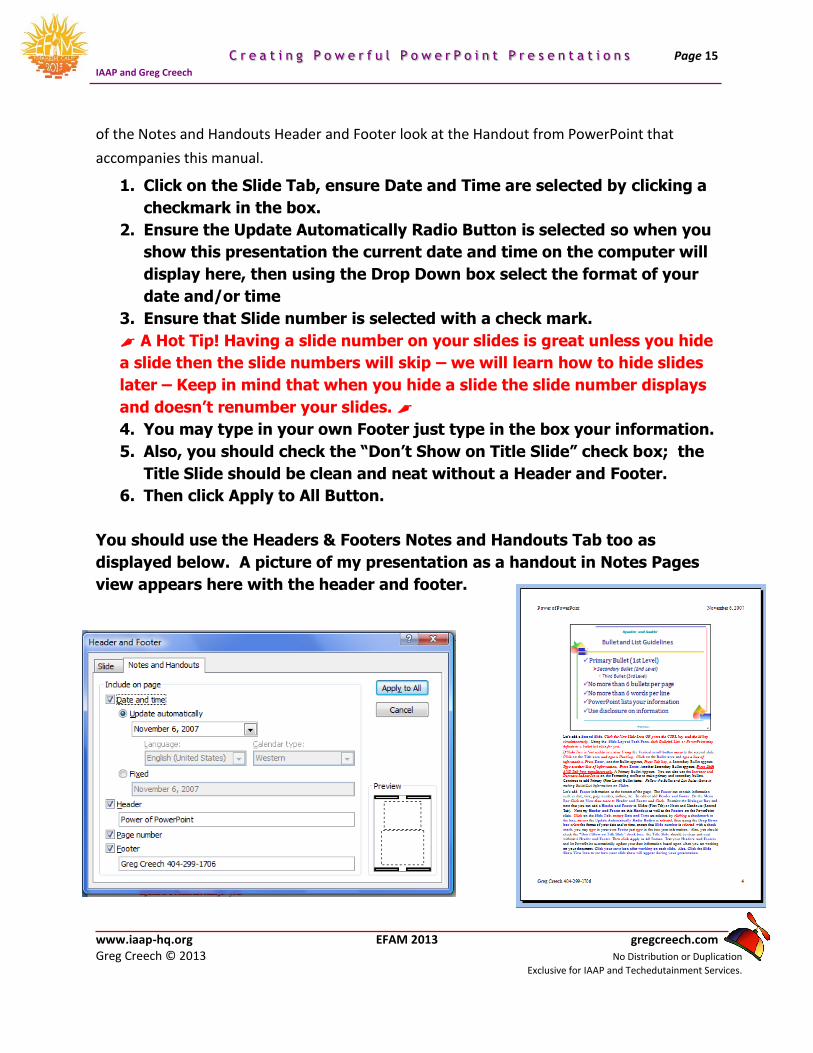
of the Notes and Handouts Header and Footer look at the Handout from PowerPoint that
accompanies this manual.
1. Click on the Slide Tab, ensure Date and Time are selected by clicking a
checkmark in the box.
2. Ensure the Update Automatically Radio Button is selected so when you
show this presentation the current date and time on the computer will
display here, then using the Drop Down box select the format of your
date and/or time
3. Ensure that Slide number is selected with a check mark.
A Hot Tip! Having a slide number on your slides is great unless you hide
a slide then the slide numbers will skip – we will learn how to hide slides
later – Keep in mind that when you hide a slide the slide number displays
and doesn’t renumber your slides.
4. You may type in your own Footer just type in the box your information.
5. Also, you should check the “Don’t Show on Title Slide” check box; the
Title Slide should be clean and neat without a Header and Footer.
6. Then click Apply to All Button.
You should use the Headers & Footers Notes and Handouts Tab too as
displayed below. A picture of my presentation as a handout in Notes Pages
view appears here with the header and footer.
Page 16 C r e a t i n g P o w e r f u l P o w e r P o i n t P r e s e n t a t i o n s
IAAP and Greg Creech
www.iaap-hq.org EFAM 2013 gregcreech.com Greg Creech © 2013 No Distribution or Duplication
Exclusive for IAAP and Techedutainment Services.
Test your Headers and Footers and let PowerPoint automatically update your date
information based upon when you are working on your document.
1. Navigate to your Title Slide and notice that Header and Footer is not
there.
2. Click your save icon or Press the CTRL + S keys after working on each
slide.
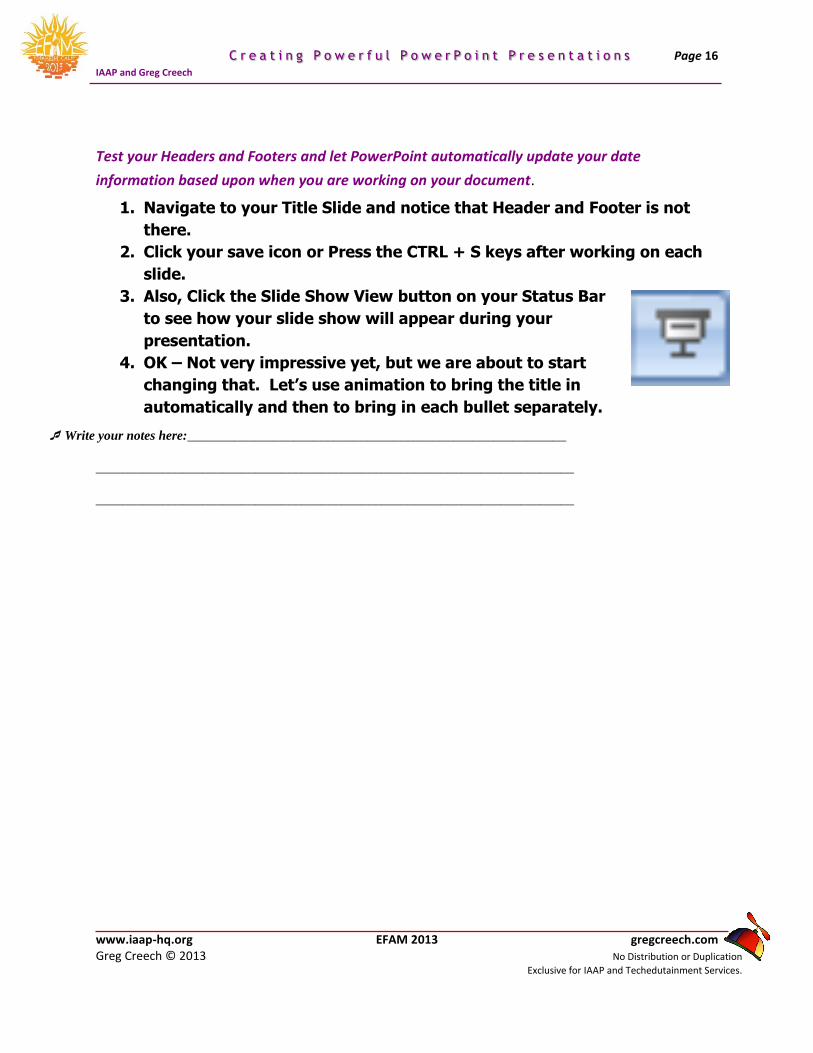
3. Also, Click the Slide Show View button on your Status Bar
to see how your slide show will appear during your
presentation.
4. OK – Not very impressive yet, but we are about to start
changing that. Let’s use animation to bring the title in
automatically and then to bring in each bullet separately.
Write your notes here:_________________________________________________________
________________________________________________________________________
________________________________________________________________________
Page 17 C r e a t i n g P o w e r f u l P o w e r P o i n t P r e s e n t a t i o n s
IAAP and Greg Creech
www.iaap-hq.org EFAM 2013 gregcreech.com Greg Creech © 2013 No Distribution or Duplication
Exclusive for IAAP and Techedutainment Services.
Animation is an important and fun feature to learn in PowerPoint. We will spend a lot of time
on Animation and using the various features in PowerPoint’s Animation. While you can
certainly go overboard and drive your audience crazy with all of the dizzying and eye catching
animations, I encourage you to use a lot of the animation features and to go “overboard” as
you learn. In your “real” presentations, your animations should be appropriate and add to your
presentation’s movement and practicality. Don’t let PowerPoint’s animations upstage you,
your message, or the content of your presentation. You should be consistent in the animations
of your titles and other objects that repeat in PowerPoint and you should use animations to
facilitate the ease of presenting with PowerPoint and not let PowerPoint overpower you and
your message.
Animation is very important to bullet list and text in PowerPoint. You want to bring in each
bullet item separately. This is termed disclosure. Using disclosure allows to speak on each item
and to have the audience focus on that one item as you speak. If you don’t animate your bullet
list, the audience will be overwhelmed with the amount of information. For the past several
years Corporate Americans have been taught to concentrate on the “bottom line” and that is
exactly what most of us will do in a presentation that does not use animation. Subconsciously
we will pay attention to the last item on the bullet list. Our focus is distracted and your spoken
message will not have the impact and the attention that each bullet deserves because of the
number of bullets. Animation corrects this and provides a practical, efficient, and entertaining
way to keep and enhance your message and the audience’s attention and focus.
Custom Animation is necessary in not only animating your items and objects in PowerPoint and
accentuating your message but also in creating and editing multimedia’s components of
PowerPoint such as music, sounds, and videos, which we will learn later. Learning Custom
Animation early in our education of PowerPoint is important in keeping you awake and
interested in PowerPoint, and Custom Animation will help us as we continue learning other
types of slides and multimedia.
So, Don’t Hesitate, Let’s Animate!
Page 18 C r e a t i n g P o w e r f u l P o w e r P o i n t P r e s e n t a t i o n s
IAAP and Greg Creech
www.iaap-hq.org EFAM 2013 gregcreech.com Greg Creech © 2013 No Distribution or Duplication
Exclusive for IAAP and Techedutainment Services.
Animation Schemes 1. Open your PowerPoint 1 file, if it is not already open for you.
2. In the Normal view, click in Slide Two’s Bullet List and Click the
Animate tab on the Ribbon.
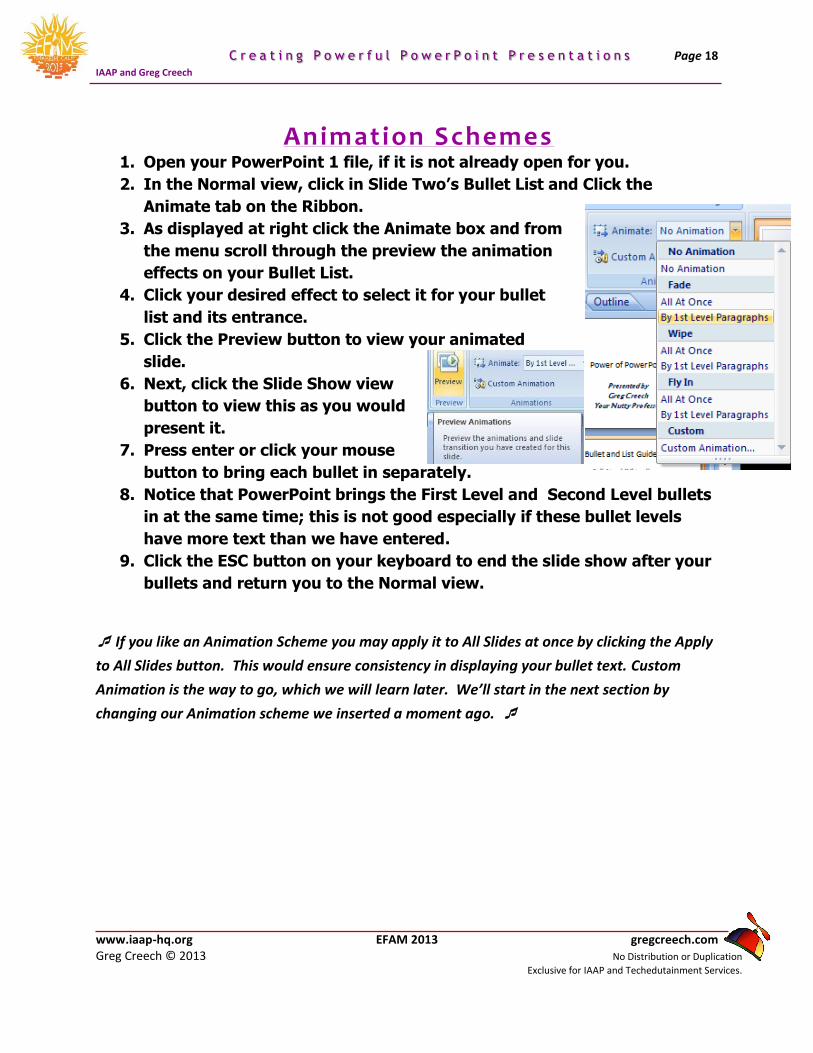
3. As displayed at right click the Animate box and from
the menu scroll through the preview the animation
effects on your Bullet List.
4. Click your desired effect to select it for your bullet
list and its entrance.
5. Click the Preview button to view your animated
slide.
6. Next, click the Slide Show view
button to view this as you would
present it.
7. Press enter or click your mouse
button to bring each bullet in separately.
8. Notice that PowerPoint brings the First Level and Second Level bullets
in at the same time; this is not good especially if these bullet levels
have more text than we have entered.
9. Click the ESC button on your keyboard to end the slide show after your
bullets and return you to the Normal view.
If you like an Animation Scheme you may apply it to All Slides at once by clicking the Apply
to All Slides button. This would ensure consistency in displaying your bullet text. Custom
Animation is the way to go, which we will learn later. We’ll start in the next section by
changing our Animation scheme we inserted a moment ago.
Page 19 C r e a t i n g P o w e r f u l P o w e r P o i n t P r e s e n t a t i o n s
IAAP and Greg Creech
www.iaap-hq.org EFAM 2013 gregcreech.com Greg Creech © 2013 No Distribution or Duplication
Exclusive for IAAP and Techedutainment Services.
Custom Animation
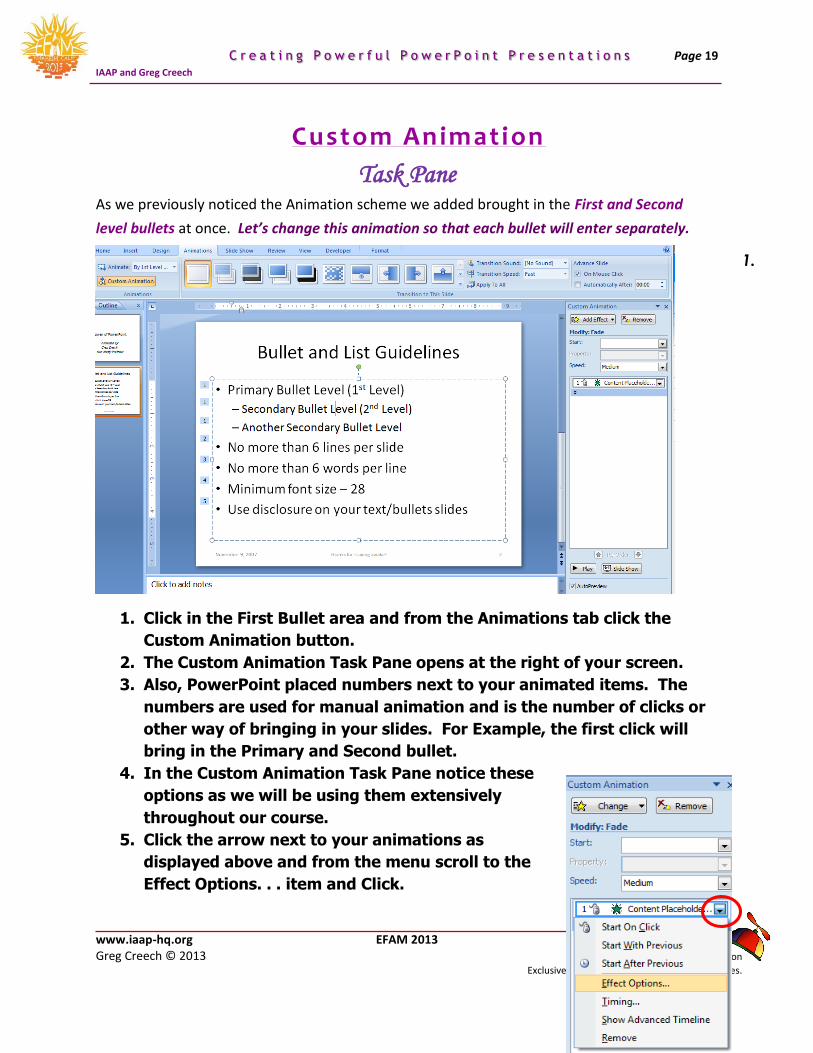
Task Pane As we previously noticed the Animation scheme we added brought in the First and Second
level bullets at once. Let’s change this animation so that each bullet will enter separately.
1.
1. Click in the First Bullet area and from the Animations tab click the
Custom Animation button.
2. The Custom Animation Task Pane opens at the right of your screen.
3. Also, PowerPoint placed numbers next to your animated items. The
numbers are used for manual animation and is the number of clicks or
other way of bringing in your slides. For Example, the first click will
bring in the Primary and Second bullet.
4. In the Custom Animation Task Pane notice these
options as we will be using them extensively
throughout our course.
5. Click the arrow next to your animations as
displayed above and from the menu scroll to the
Effect Options. . . item and Click.
Page 20 C r e a t i n g P o w e r f u l P o w e r P o i n t P r e s e n t a t i o n s
IAAP and Greg Creech
www.iaap-hq.org EFAM 2013 gregcreech.com Greg Creech © 2013 No Distribution or Duplication
Exclusive for IAAP and Techedutainment Services.
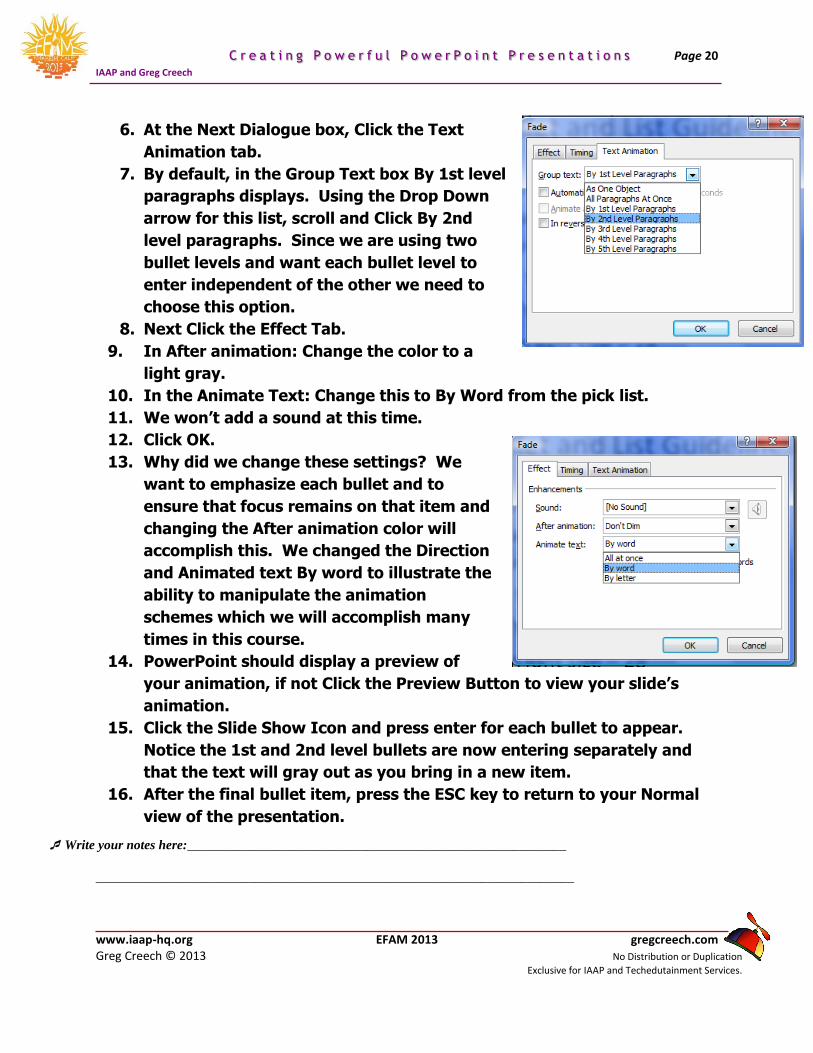
6. At the Next Dialogue box, Click the Text
Animation tab.
7. By default, in the Group Text box By 1st level
paragraphs displays. Using the Drop Down
arrow for this list, scroll and Click By 2nd
level paragraphs. Since we are using two
bullet levels and want each bullet level to
enter independent of the other we need to
choose this option.
8. Next Click the Effect Tab.
9. In After animation: Change the color to a
light gray.
10. In the Animate Text: Change this to By Word from the pick list.
11. We won’t add a sound at this time.
12. Click OK.
13. Why did we change these settings? We
want to emphasize each bullet and to
ensure that focus remains on that item and
changing the After animation color will
accomplish this. We changed the Direction
and Animated text By word to illustrate the
ability to manipulate the animation
schemes which we will accomplish many
times in this course.
14. PowerPoint should display a preview of
your animation, if not Click the Preview Button to view your slide’s
animation.
15. Click the Slide Show Icon and press enter for each bullet to appear.
Notice the 1st and 2nd level bullets are now entering separately and
that the text will gray out as you bring in a new item.
16. After the final bullet item, press the ESC key to return to your Normal
view of the presentation.
Write your notes here:_________________________________________________________
________________________________________________________________________
Page 21 C r e a t i n g P o w e r f u l P o w e r P o i n t P r e s e n t a t i o n s
IAAP and Greg Creech
www.iaap-hq.org EFAM 2013 gregcreech.com Greg Creech © 2013 No Distribution or Duplication
Exclusive for IAAP and Techedutainment Services.
Custom Animation – Special Effects
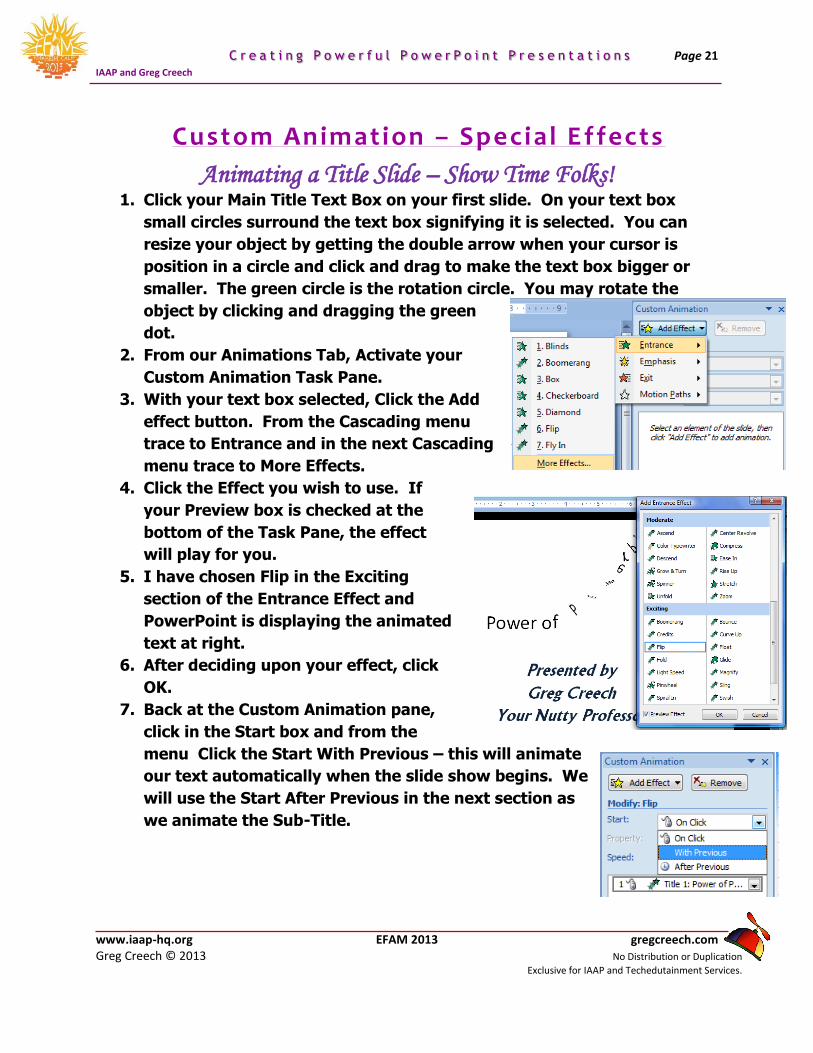
Animating a Title Slide – Show Time Folks! 1. Click your Main Title Text Box on your first slide. On your text box
small circles surround the text box signifying it is selected. You can
resize your object by getting the double arrow when your cursor is
position in a circle and click and drag to make the text box bigger or
smaller. The green circle is the rotation circle. You may rotate the
object by clicking and dragging the green
dot.
2. From our Animations Tab, Activate your
Custom Animation Task Pane.
3. With your text box selected, Click the Add
effect button. From the Cascading menu
trace to Entrance and in the next Cascading
menu trace to More Effects.
4. Click the Effect you wish to use. If
your Preview box is checked at the
bottom of the Task Pane, the effect
will play for you.
5. I have chosen Flip in the Exciting
section of the Entrance Effect and
PowerPoint is displaying the animated
text at right.
6. After deciding upon your effect, click
OK.
7. Back at the Custom Animation pane,
click in the Start box and from the
menu Click the Start With Previous – this will animate
our text automatically when the slide show begins. We
will use the Start After Previous in the next section as
we animate the Sub-Title.
Page 22 C r e a t i n g P o w e r f u l P o w e r P o i n t P r e s e n t a t i o n s
IAAP and Greg Creech
www.iaap-hq.org EFAM 2013 gregcreech.com Greg Creech © 2013 No Distribution or Duplication
Exclusive for IAAP and Techedutainment Services.
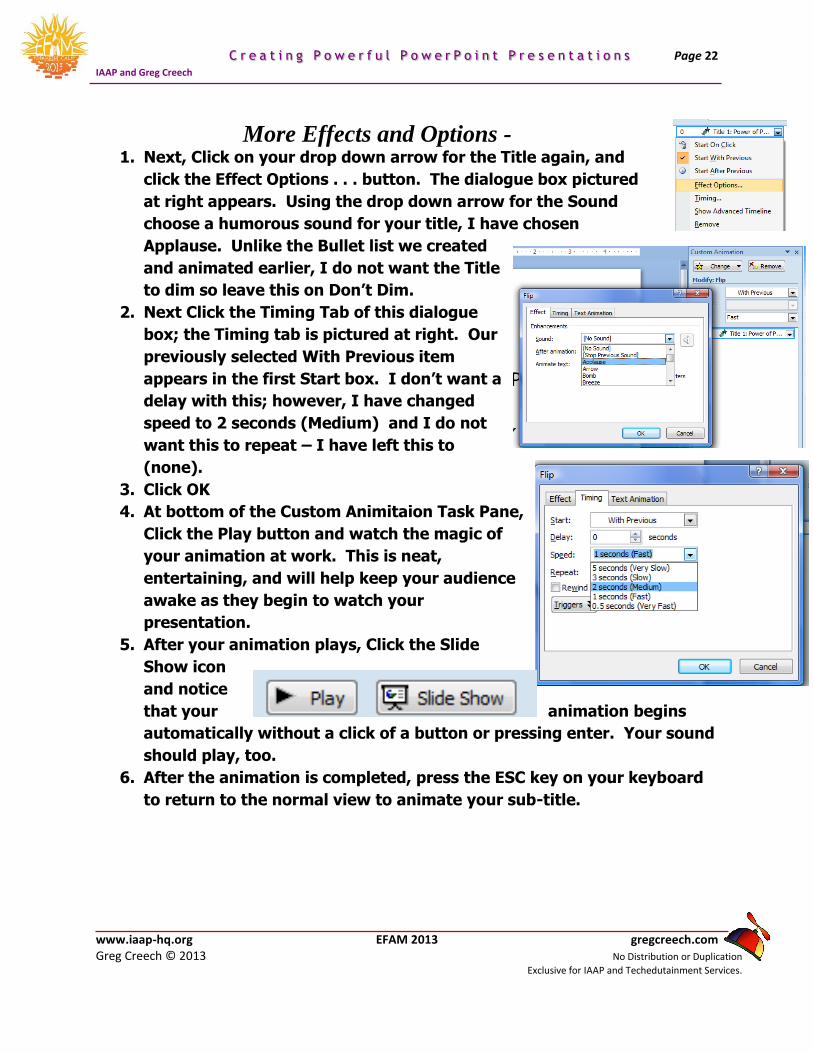
More Effects and Options - 1. Next, Click on your drop down arrow for the Title again, and
click the Effect Options . . . button. The dialogue box pictured
at right appears. Using the drop down arrow for the Sound
choose a humorous sound for your title, I have chosen
Applause. Unlike the Bullet list we created
and animated earlier, I do not want the Title
to dim so leave this on Don’t Dim.
2. Next Click the Timing Tab of this dialogue
box; the Timing tab is pictured at right. Our
previously selected With Previous item
appears in the first Start box. I don’t want a
delay with this; however, I have changed
speed to 2 seconds (Medium) and I do not
want this to repeat – I have left this to
(none).
3. Click OK
4. At bottom of the Custom Animitaion Task Pane,
Click the Play button and watch the magic of
your animation at work. This is neat,
entertaining, and will help keep your audience
awake as they begin to watch your
presentation.
5. After your animation plays, Click the Slide
Show icon
and notice
that your animation begins
automatically without a click of a button or pressing enter. Your sound
should play, too.
6. After the animation is completed, press the ESC key on your keyboard
to return to the normal view to animate your sub-title.

Page 23 C r e a t i n g P o w e r f u l P o w e r P o i n t P r e s e n t a t i o n s
IAAP and Greg Creech
www.iaap-hq.org EFAM 2013 gregcreech.com Greg Creech © 2013 No Distribution or Duplication
Exclusive for IAAP and Techedutainment Services.
Even More Effects and Options - 1. On your Title Slide, Click in your Sub-Title
text box and ensure the text box is selected.
As we accomplished previously, we will add
animation to this text box and have it play
automatically for us.
2. With your Custom Animation Task Pane
active and your Sub-Title Text box selected,
Click the Add Effect Icon. In the cascading
menu trace to Entrance and in this Cascading menu click the More
Effects item.
3. I have scrolled down to the Exciting area and clicked
Spiral In. With the Preview Effect box checked at the
bottom of the dialogue box the Effect will play for you
when you click it. You may need to move the Add
Entrance Effect dialogue box in order to fully view
your animation to do this – click on the title bar of
this box and drag it away from the area of your
animated slide.
4. Click a few of the effects and finally choose one you
like and Click OK.
5. Click the Play icon to view your animation.
6. Our newly added animation to the sub-title text will
work on Mouse Click or pressing enter, let’s change
this so that the text will animate automatically after
our Title Text.
7. Click the drop down arrow next to your animation and
click the Start After Previous item as pictured at right.
8. Change your Speed to Medium.
Page 24 C r e a t i n g P o w e r f u l P o w e r P o i n t P r e s e n t a t i o n s
IAAP and Greg Creech
www.iaap-hq.org EFAM 2013 gregcreech.com Greg Creech © 2013 No Distribution or Duplication
Exclusive for IAAP and Techedutainment Services.
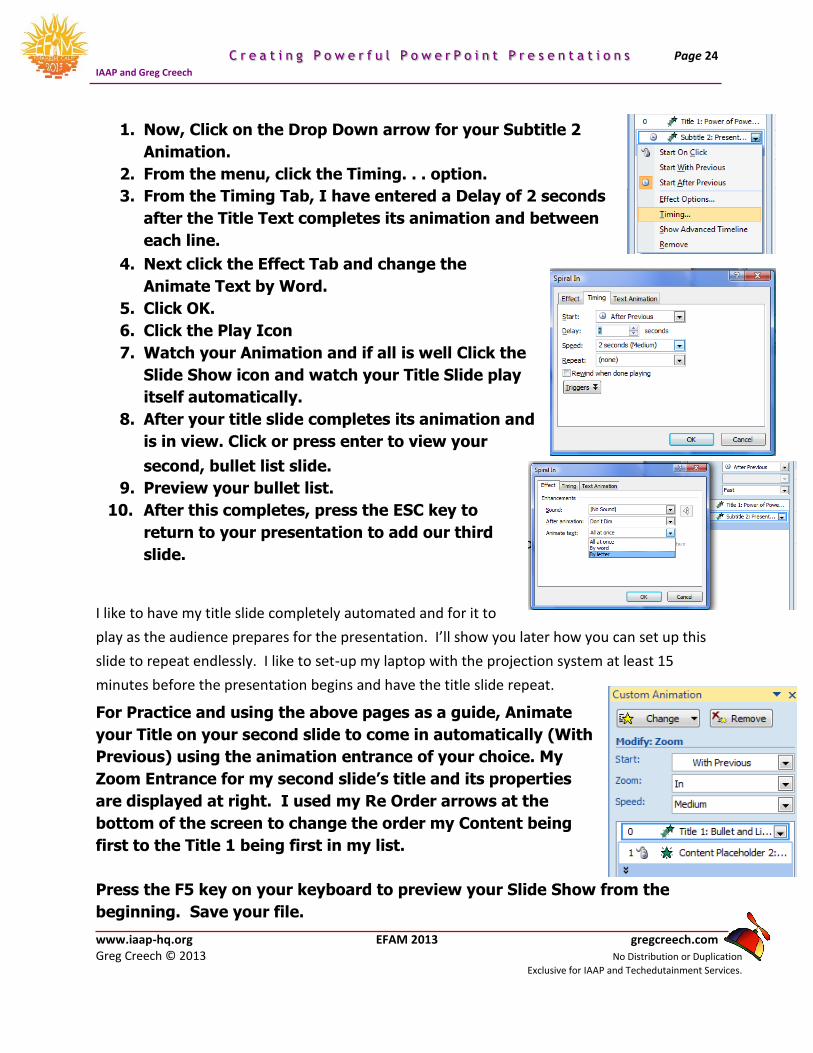
1. Now, Click on the Drop Down arrow for your Subtitle 2
Animation.
2. From the menu, click the Timing. . . option.
3. From the Timing Tab, I have entered a Delay of 2 seconds
after the Title Text completes its animation and between
each line.
4. Next click the Effect Tab and change the
Animate Text by Word.
5. Click OK.
6. Click the Play Icon
7. Watch your Animation and if all is well Click the
Slide Show icon and watch your Title Slide play
itself automatically.
8. After your title slide completes its animation and
is in view. Click or press enter to view your
second, bullet list slide.
9. Preview your bullet list.
10. After this completes, press the ESC key to
return to your presentation to add our third
slide.
I like to have my title slide completely automated and for it to
play as the audience prepares for the presentation. I’ll show you later how you can set up this
slide to repeat endlessly. I like to set-up my laptop with the projection system at least 15
minutes before the presentation begins and have the title slide repeat.
For Practice and using the above pages as a guide, Animate
your Title on your second slide to come in automatically (With
Previous) using the animation entrance of your choice. My
Zoom Entrance for my second slide’s title and its properties
are displayed at right. I used my Re Order arrows at the
bottom of the screen to change the order my Content being
first to the Title 1 being first in my list.
Press the F5 key on your keyboard to preview your Slide Show from the
beginning. Save your file.
Page 25 C r e a t i n g P o w e r f u l P o w e r P o i n t P r e s e n t a t i o n s
IAAP and Greg Creech
www.iaap-hq.org EFAM 2013 gregcreech.com Greg Creech © 2013 No Distribution or Duplication
Exclusive for IAAP and Techedutainment Services.
Another type of animation that you will want to use in your slide show is slide transition. Slide
transition is how each slide moves from one to another slide in the Slide Show View.
Animation is movement within a slide, and transition is movement between slides. You may
apply Slide Transition using your Transition to this Slide Group.
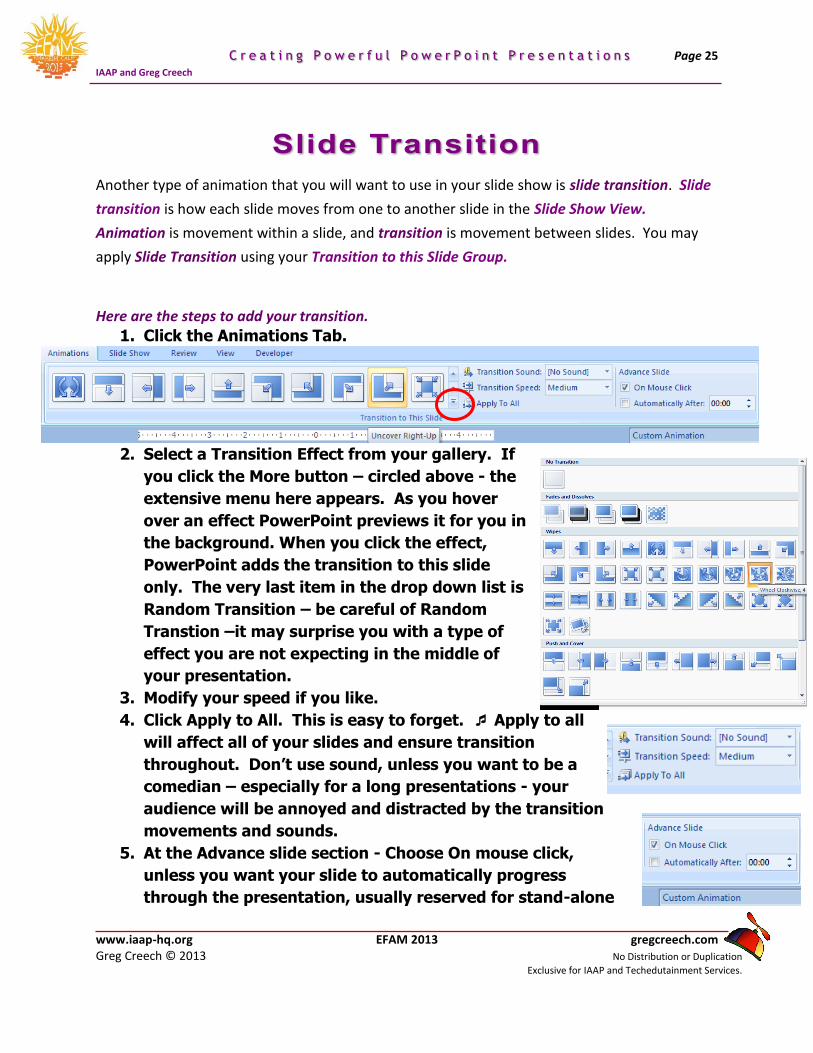
Here are the steps to add your transition.
1. Click the Animations Tab.
2. Select a Transition Effect from your gallery. If
you click the More button – circled above - the
extensive menu here appears. As you hover
over an effect PowerPoint previews it for you in
the background. When you click the effect,
PowerPoint adds the transition to this slide
only. The very last item in the drop down list is
Random Transition – be careful of Random
Transtion –it may surprise you with a type of
effect you are not expecting in the middle of
your presentation.
3. Modify your speed if you like.
4. Click Apply to All. This is easy to forget. Apply to all
will affect all of your slides and ensure transition
throughout. Don’t use sound, unless you want to be a
comedian – especially for a long presentations - your
audience will be annoyed and distracted by the transition
movements and sounds.
5. At the Advance slide section - Choose On mouse click,
unless you want your slide to automatically progress
through the presentation, usually reserved for stand-alone
Page 26 C r e a t i n g P o w e r f u l P o w e r P o i n t P r e s e n t a t i o n s
IAAP and Greg Creech
www.iaap-hq.org EFAM 2013 gregcreech.com Greg Creech © 2013 No Distribution or Duplication
Exclusive for IAAP and Techedutainment Services.
or kiosks presentations in which PowerPoint is used without a speaker
or presenter.
6. Place your presentation in Slide Show and preview your entire slide show
and the transitions from one slide to another.
Write your notes here:_________________________________________________________
________________________________________________________________________
________________________________________________________________________
Page 27 C r e a t i n g P o w e r f u l P o w e r P o i n t P r e s e n t a t i o n s
IAAP and Greg Creech
www.iaap-hq.org EFAM 2013 gregcreech.com Greg Creech © 2013 No Distribution or Duplication
Exclusive for IAAP and Techedutainment Services.
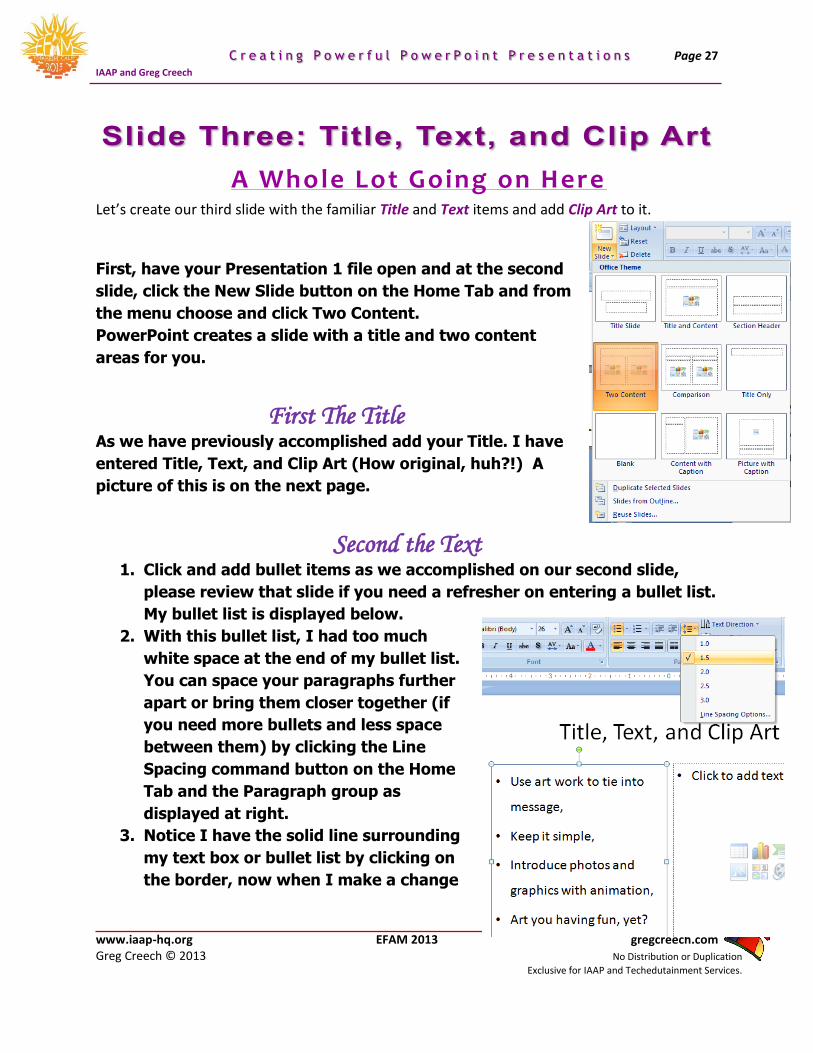
A Whole Lot Going on Here Let’s create our third slide with the familiar Title and Text items and add Clip Art to it.
First, have your Presentation 1 file open and at the second
slide, click the New Slide button on the Home Tab and from
the menu choose and click Two Content.
PowerPoint creates a slide with a title and two content
areas for you.
First The Title As we have previously accomplished add your Title. I have
entered Title, Text, and Clip Art (How original, huh?!) A
picture of this is on the next page.
Second the Text 1. Click and add bullet items as we accomplished on our second slide,
please review that slide if you need a refresher on entering a bullet list.
My bullet list is displayed below.
2. With this bullet list, I had too much
white space at the end of my bullet list.
You can space your paragraphs further
apart or bring them closer together (if
you need more bullets and less space
between them) by clicking the Line
Spacing command button on the Home
Tab and the Paragraph group as
displayed at right.
3. Notice I have the solid line surrounding
my text box or bullet list by clicking on
the border, now when I make a change
Page 28 C r e a t i n g P o w e r f u l P o w e r P o i n t P r e s e n t a t i o n s
IAAP and Greg Creech
www.iaap-hq.org EFAM 2013 gregcreech.com Greg Creech © 2013 No Distribution or Duplication
Exclusive for IAAP and Techedutainment Services.
including the line spacing all of the paragraphs and text are effected.
A Hot Tip: To change the line spacing of only one paragraph, simply click in that paragraph and make your changes. You can click and drag also select any or all paragraphs to format and use Line Spacing. The Line Spacing Options provides further customization for your line spacing and paragraph formatting.
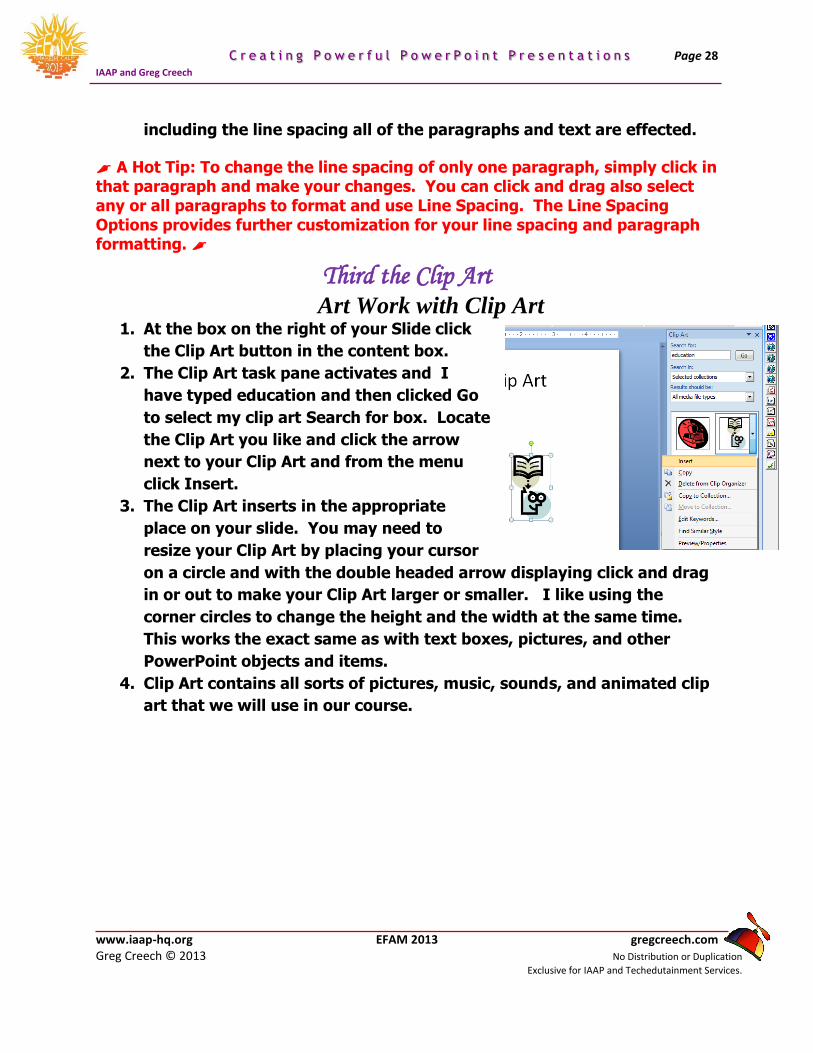
Third the Clip Art Art Work with Clip Art
1. At the box on the right of your Slide click
the Clip Art button in the content box.
2. The Clip Art task pane activates and I
have typed education and then clicked Go
to select my clip art Search for box. Locate
the Clip Art you like and click the arrow
next to your Clip Art and from the menu
click Insert.
3. The Clip Art inserts in the appropriate
place on your slide. You may need to
resize your Clip Art by placing your cursor
on a circle and with the double headed arrow displaying click and drag
in or out to make your Clip Art larger or smaller. I like using the
corner circles to change the height and the width at the same time.
This works the exact same as with text boxes, pictures, and other
PowerPoint objects and items.
4. Clip Art contains all sorts of pictures, music, sounds, and animated clip
art that we will use in our course.
Page 29 C r e a t i n g P o w e r f u l P o w e r P o i n t P r e s e n t a t i o n s
IAAP and Greg Creech
www.iaap-hq.org EFAM 2013 gregcreech.com Greg Creech © 2013 No Distribution or Duplication
Exclusive for IAAP and Techedutainment Services.
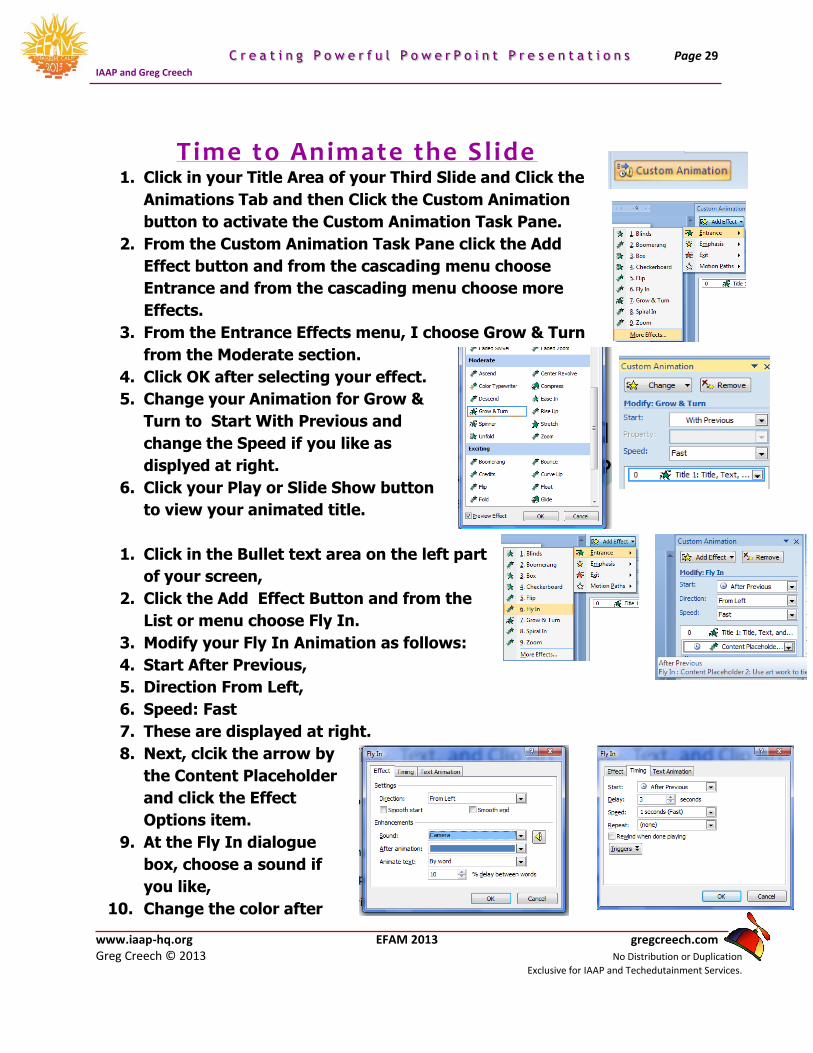
Time to Animate the Sl ide 1. Click in your Title Area of your Third Slide and Click the
Animations Tab and then Click the Custom Animation
button to activate the Custom Animation Task Pane.
2. From the Custom Animation Task Pane click the Add
Effect button and from the cascading menu choose
Entrance and from the cascading menu choose more
Effects.
3. From the Entrance Effects menu, I choose Grow & Turn
from the Moderate section.
4. Click OK after selecting your effect.
5. Change your Animation for Grow &
Turn to Start With Previous and
change the Speed if you like as
displyed at right.
6. Click your Play or Slide Show button
to view your animated title.
1. Click in the Bullet text area on the left part
of your screen,
2. Click the Add Effect Button and from the
List or menu choose Fly In.
3. Modify your Fly In Animation as follows:
4. Start After Previous,
5. Direction From Left,
6. Speed: Fast
7. These are displayed at right.
8. Next, clcik the arrow by
the Content Placeholder
and click the Effect
Options item.
9. At the Fly In dialogue
box, choose a sound if
you like,
10. Change the color after
Page 30 C r e a t i n g P o w e r f u l P o w e r P o i n t P r e s e n t a t i o n s
IAAP and Greg Creech
www.iaap-hq.org EFAM 2013 gregcreech.com Greg Creech © 2013 No Distribution or Duplication
Exclusive for IAAP and Techedutainment Services.
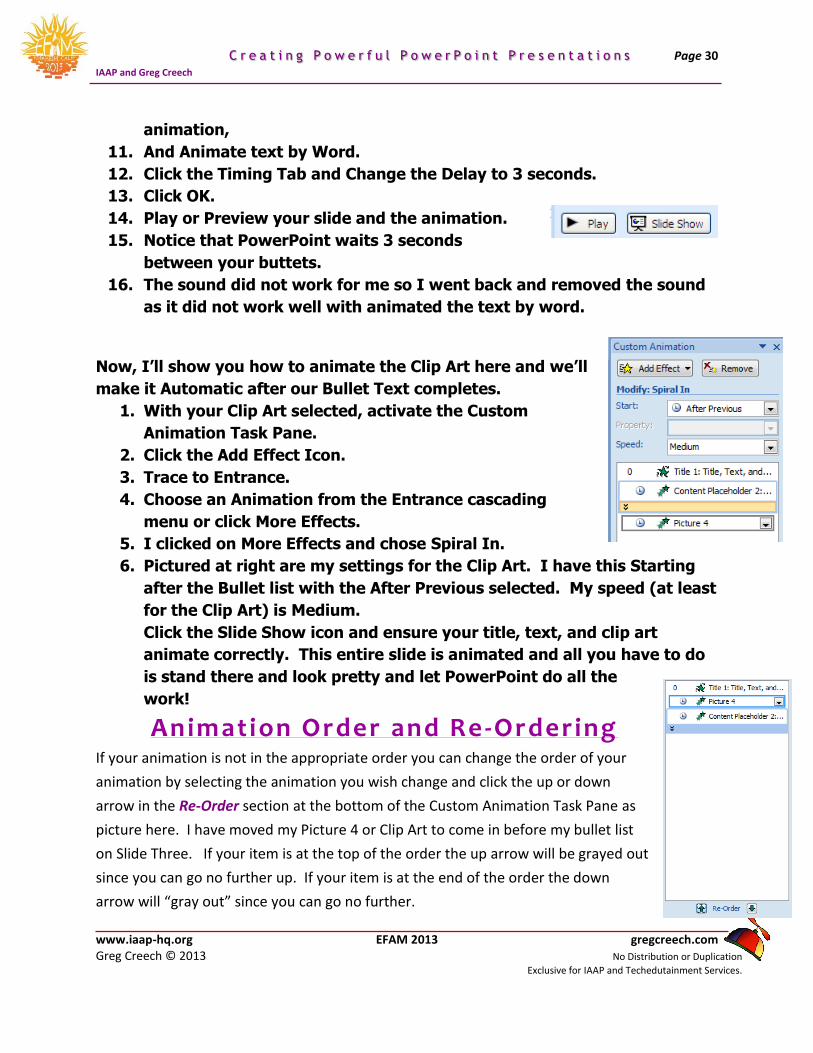
animation,
11. And Animate text by Word.
12. Click the Timing Tab and Change the Delay to 3 seconds.
13. Click OK.
14. Play or Preview your slide and the animation.
15. Notice that PowerPoint waits 3 seconds
between your buttets.
16. The sound did not work for me so I went back and removed the sound
as it did not work well with animated the text by word.
Now, I’ll show you how to animate the Clip Art here and we’ll
make it Automatic after our Bullet Text completes.
1. With your Clip Art selected, activate the Custom
Animation Task Pane.
2. Click the Add Effect Icon.
3. Trace to Entrance.
4. Choose an Animation from the Entrance cascading
menu or click More Effects.
5. I clicked on More Effects and chose Spiral In.
6. Pictured at right are my settings for the Clip Art. I have this Starting
after the Bullet list with the After Previous selected. My speed (at least
for the Clip Art) is Medium.
Click the Slide Show icon and ensure your title, text, and clip art
animate correctly. This entire slide is animated and all you have to do
is stand there and look pretty and let PowerPoint do all the
work!
Animation Order and Re -Ordering If your animation is not in the appropriate order you can change the order of your
animation by selecting the animation you wish change and click the up or down
arrow in the Re-Order section at the bottom of the Custom Animation Task Pane as
picture here. I have moved my Picture 4 or Clip Art to come in before my bullet list
on Slide Three. If your item is at the top of the order the up arrow will be grayed out
since you can go no further up. If your item is at the end of the order the down
arrow will “gray out” since you can go no further.

Page 31 C r e a t i n g P o w e r f u l P o w e r P o i n t P r e s e n t a t i o n s
IAAP and Greg Creech
www.iaap-hq.org EFAM 2013 gregcreech.com Greg Creech © 2013 No Distribution or Duplication
Exclusive for IAAP and Techedutainment Services.
PowerPoint’s Design Tab allows you to easily and quickly move from one type of design to
another. Let’s first change your Design using the Slide Design Tab.
Cautionary Note: While PowerPoint’s Design templates are beautiful and professional, many
of us have seen these schemes ad nausea. Use PowerPoint’s design templates to get ideas and
to use in case of emergencies. You should design your own PowerPoint template and use it to
produce custom designs and to help you in branding your products, services, or other
educational elements. Your marketing efforts and company/brand recognition will increase
dramatically by incorporating your own pictures, logos, and other design elements. For
example, three presentations I viewed within days used the same design template; I can’t
remember much about their presentations and since they used the same scheme – their
message ran together. While presenters that used their own design and unique templates,
captured my attention more and I remembered the information; their presentations were more
distinguishable. We will learn how to create our own backgrounds, logos, design schemes, and
color scheme later in the course. We will use PowerPoint’s for now and create our own,
custom design template later.
Pictured at right is the Themes for my Design Tab. You can scroll through your designs and
choose your own and you can also download other design templates from the Microsoft Office
website or other websites. There are some fantastic designs and color schemes.
Themes 1. In your Presentation 1 file, Click
the Design Tab, Scroll through
the Themses/designs and select
one.
2. Using the Drop Down arrow
next to your slide thumbnail
choose Apply to All Slides.
3. All of your slides are updated
with the new scheme.
4. Repeat this process selecting a
different Design Template.
Page 32 C r e a t i n g P o w e r f u l P o w e r P o i n t P r e s e n t a t i o n s
IAAP and Greg Creech
www.iaap-hq.org EFAM 2013 gregcreech.com Greg Creech © 2013 No Distribution or Duplication
Exclusive for IAAP and Techedutainment Services.
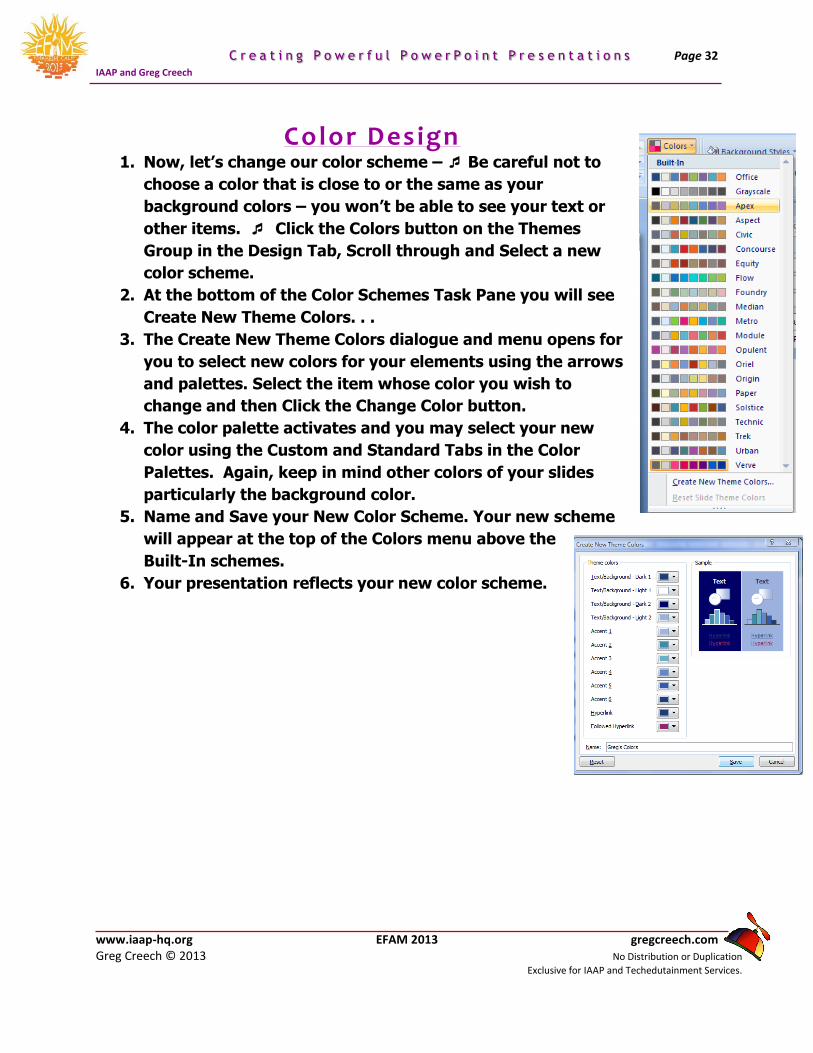
Color Design 1. Now, let’s change our color scheme – Be careful not to
choose a color that is close to or the same as your
background colors – you won’t be able to see your text or
other items. Click the Colors button on the Themes
Group in the Design Tab, Scroll through and Select a new
color scheme.
2. At the bottom of the Color Schemes Task Pane you will see
Create New Theme Colors. . .
3. The Create New Theme Colors dialogue and menu opens for
you to select new colors for your elements using the arrows
and palettes. Select the item whose color you wish to
change and then Click the Change Color button.
4. The color palette activates and you may select your new
color using the Custom and Standard Tabs in the Color
Palettes. Again, keep in mind other colors of your slides
particularly the background color.
5. Name and Save your New Color Scheme. Your new scheme
will appear at the top of the Colors menu above the
Built-In schemes.
6. Your presentation reflects your new color scheme.
Page 33 C r e a t i n g P o w e r f u l P o w e r P o i n t P r e s e n t a t i o n s
IAAP and Greg Creech
www.iaap-hq.org EFAM 2013 gregcreech.com Greg Creech © 2013 No Distribution or Duplication
Exclusive for IAAP and Techedutainment Services.
With the advent of digital photography and the Internet pictures have entered a new and
exciting age of sharing, marketing, and displaying. Photography and slide presentations have
always been terrific partners; now, PowerPoint with the Picture Tools and Format Tab and
animation effects takes your photographs beyond the static, boring methods of displaying
pictures that the old, fashion slide projector did.
Important Photograph Gotchas! Know where your pictures are stored on your hard drive, server, floppy, etc.
Know the size of your file – A large size file of your photo will increase the file size of
PowerPoint.
Use animation to introduce and or exit the picture.
Ensure the picture ties into your message.
Be careful using pictures as a background – due to color variations in photographs
finding a font size and color that can easily be viewed may be difficult, but not
impossible. I have seen some really great pictures as backgrounds that did not have a
lot of different colors or variations of shades.
The Color icon on the picture toolbar will allow you to “color” a photograph as a Washout;
this is good to lighten and fade a photo to use as a background.
You can Insert a Picture from a Scanner or Camera; however, I encourage you to use
software designed specifically for scanning or inserting pictures from a digital camera
not PowerPoint to scan or bring a picture into your computer.
While the Picture Format Tab and Dialogue Box is good, you may find that you would
prefer using a full photo editing application rather than PowerPoint’s Format for
pictures to enhance and modify your photography. For quick cropping, brightness,
and resizing, the Picture Format tab is quick and fine to use.
Page 34 C r e a t i n g P o w e r f u l P o w e r P o i n t P r e s e n t a t i o n s
IAAP and Greg Creech
www.iaap-hq.org EFAM 2013 gregcreech.com Greg Creech © 2013 No Distribution or Duplication
Exclusive for IAAP and Techedutainment Services.
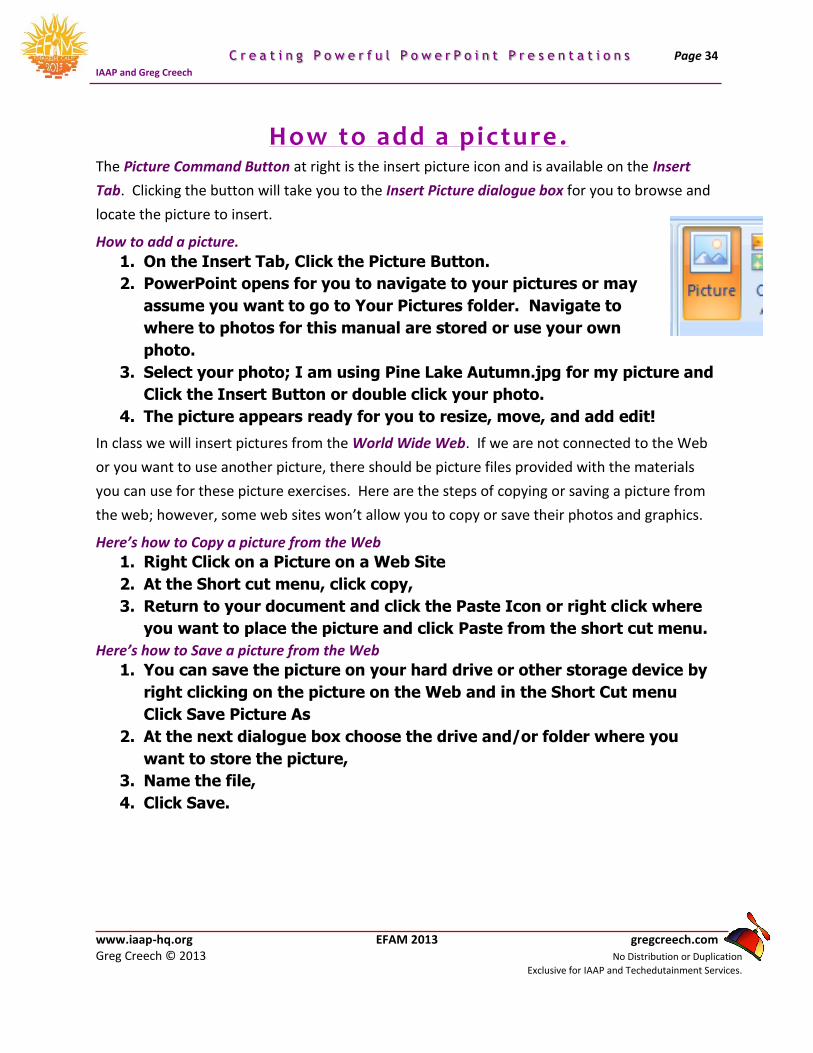
How to add a picture . The Picture Command Button at right is the insert picture icon and is available on the Insert
Tab. Clicking the button will take you to the Insert Picture dialogue box for you to browse and
locate the picture to insert.
How to add a picture.
1. On the Insert Tab, Click the Picture Button.
2. PowerPoint opens for you to navigate to your pictures or may
assume you want to go to Your Pictures folder. Navigate to
where to photos for this manual are stored or use your own
photo.
3. Select your photo; I am using Pine Lake Autumn.jpg for my picture and
Click the Insert Button or double click your photo.
4. The picture appears ready for you to resize, move, and add edit!
In class we will insert pictures from the World Wide Web. If we are not connected to the Web
or you want to use another picture, there should be picture files provided with the materials
you can use for these picture exercises. Here are the steps of copying or saving a picture from
the web; however, some web sites won’t allow you to copy or save their photos and graphics.
Here’s how to Copy a picture from the Web
1. Right Click on a Picture on a Web Site
2. At the Short cut menu, click copy,
3. Return to your document and click the Paste Icon or right click where
you want to place the picture and click Paste from the short cut menu.
Here’s how to Save a picture from the Web
1. You can save the picture on your hard drive or other storage device by
right clicking on the picture on the Web and in the Short Cut menu
Click Save Picture As
2. At the next dialogue box choose the drive and/or folder where you
want to store the picture,
3. Name the file,
4. Click Save.
Page 35 C r e a t i n g P o w e r f u l P o w e r P o i n t P r e s e n t a t i o n s
IAAP and Greg Creech
www.iaap-hq.org EFAM 2013 gregcreech.com Greg Creech © 2013 No Distribution or Duplication
Exclusive for IAAP and Techedutainment Services.
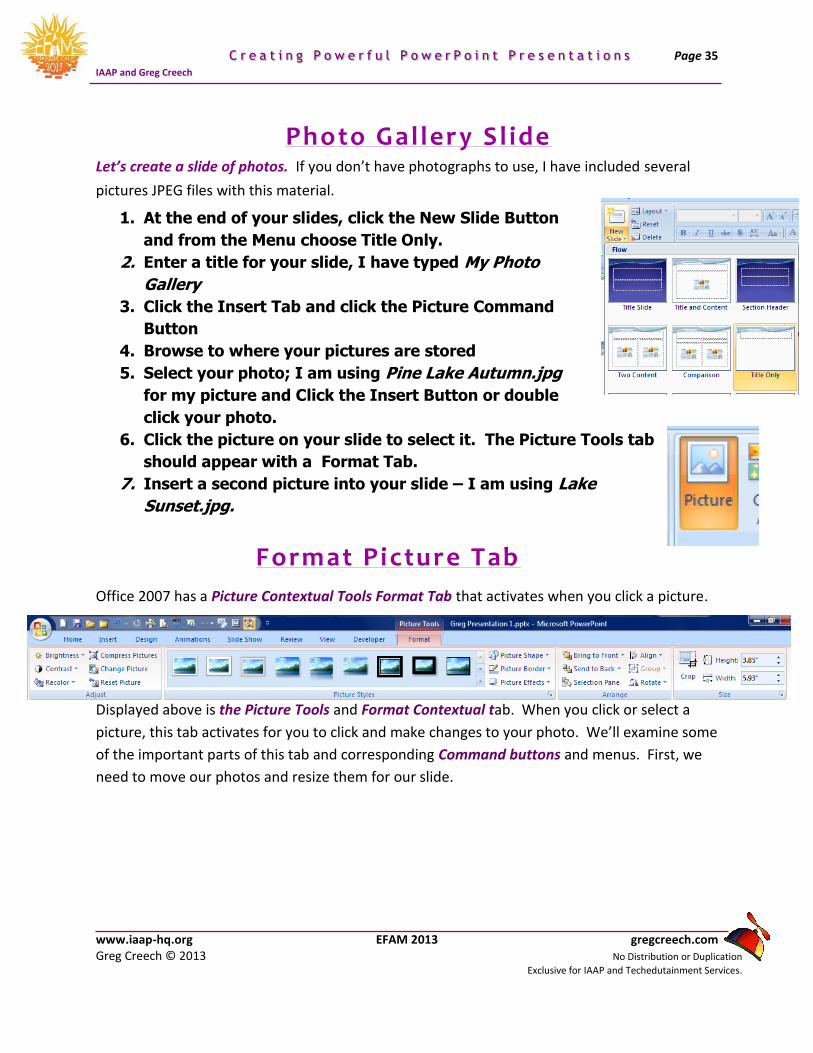
Photo Gallery Sl ide Let’s create a slide of photos. If you don’t have photographs to use, I have included several
pictures JPEG files with this material.
1. At the end of your slides, click the New Slide Button
and from the Menu choose Title Only.
2. Enter a title for your slide, I have typed My Photo
Gallery
3. Click the Insert Tab and click the Picture Command
Button
4. Browse to where your pictures are stored
5. Select your photo; I am using Pine Lake Autumn.jpg
for my picture and Click the Insert Button or double
click your photo.
6. Click the picture on your slide to select it. The Picture Tools tab
should appear with a Format Tab.
7. Insert a second picture into your slide – I am using Lake
Sunset.jpg.
Format Picture Tab
Office 2007 has a Picture Contextual Tools Format Tab that activates when you click a picture.
Displayed above is the Picture Tools and Format Contextual tab. When you click or select a
picture, this tab activates for you to click and make changes to your photo. We’ll examine some
of the important parts of this tab and corresponding Command buttons and menus. First, we
need to move our photos and resize them for our slide.
Page 36 C r e a t i n g P o w e r f u l P o w e r P o i n t P r e s e n t a t i o n s
IAAP and Greg Creech
www.iaap-hq.org EFAM 2013 gregcreech.com Greg Creech © 2013 No Distribution or Duplication
Exclusive for IAAP and Techedutainment Services.
We have studied using simple sounds in PowerPoint through Animation and we have animated
pictures in PowerPoint. Now, we learn how PowerPoint can display motion pictures and more
extensive sound files. We will also look at how PowerPoint can automate and animate your
tasks during a presentation through items called Action Buttons which can act as intelligent
hyperlinks to run programs, open files, and display web sites. PowerPoint does a good job in
allowing you to insert sounds, play specific CD selections, and to play Videos or Movies from
files. We will play a CD selection automatically in PowerPoint, so have your favorite music CD
available. We will insert an animated GIF file which is an animated Clip Art and we will insert a
very quick movie. We will insert Clip Art music and look at other music options.
PowerPoint can manage and play various types of multi-media files. These include sound files
in the format of wav, midi, mp3, and others. Movie file types include mpeg, avi, wmv, and
others.
I encourage you to play with your multi-media components of PowerPoint to strengthen and
enhance your message. We will use more of the Custom Animation features with Multi Media
and will see how Custom Animation can change based upon your media sound and movie files.
We studied Custom Animation a lot and now you will see a benefit. Learning Multi Media after
knowing the Custom Animation process cuts down tremendously in your learning curve.
Inserting a Movie or Music is easy; customize when and what the movie or music to play is the
tricky part and knowing Custom Animation will save you time and frustration in knowing all of
the options.
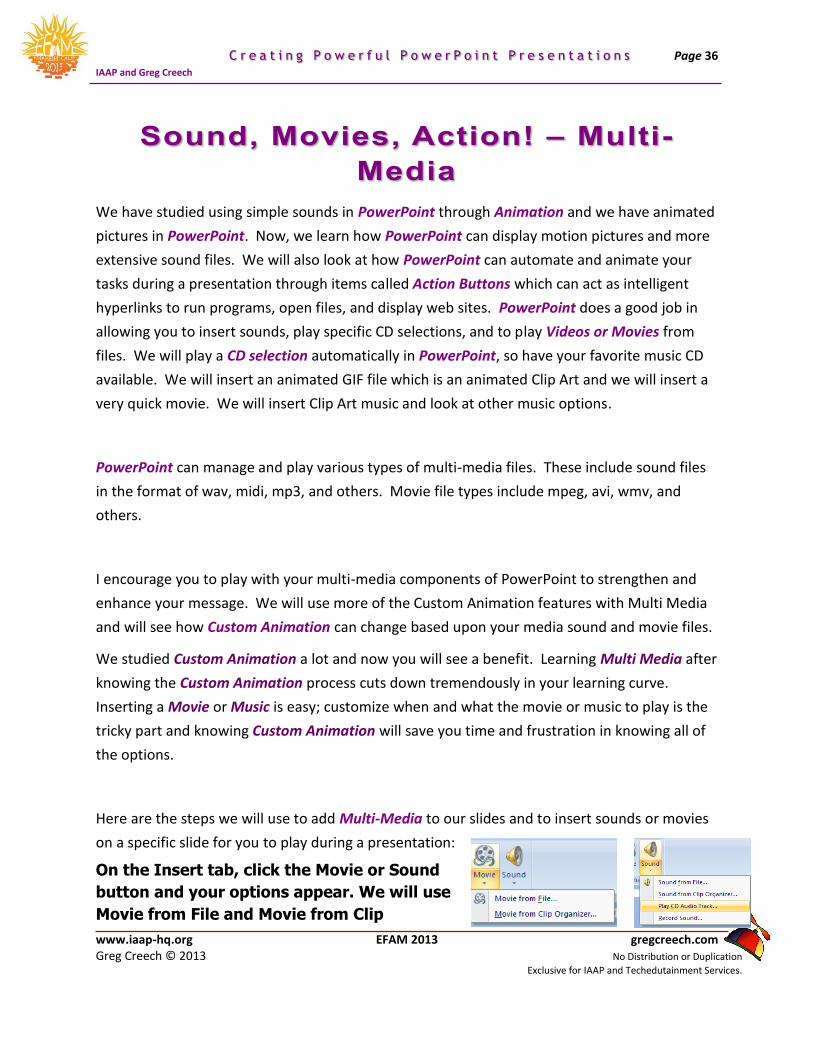
Here are the steps we will use to add Multi-Media to our slides and to insert sounds or movies
on a specific slide for you to play during a presentation:
On the Insert tab, click the Movie or Sound
button and your options appear. We will use
Movie from File and Movie from Clip
Page 37 C r e a t i n g P o w e r f u l P o w e r P o i n t P r e s e n t a t i o n s
IAAP and Greg Creech
www.iaap-hq.org EFAM 2013 gregcreech.com Greg Creech © 2013 No Distribution or Duplication
Exclusive for IAAP and Techedutainment Services.
Organizer and we will play a Sound from Clip Organizer and Play a CD Audio
Track.
Your movie or video may play automatically or using an icon that will appear for you to click
and have the video run. Sounds operate in the same manner. You insert a sound and you may
have the music or sound play automatically when the slide is opened or have it play when you
click an icon. You may select sounds from a Gallery, from a file on your computer or server,
Play a specific CD Audio Track (Just make sure you keep your CD in the CD Drive for PowerPoint
to Play!), or you can record a sound for PowerPoint to play.
Once you insert a sound or video, you may alter the timing to be automatic, to pause your slide
show, and other options through the Custom Animation pane we have worked in previously.
This is very similar to our previous methods of setting animation.
Let’s have music play when we open our presentation at the Title Slide and then we’ll add other music and movies in other slides.
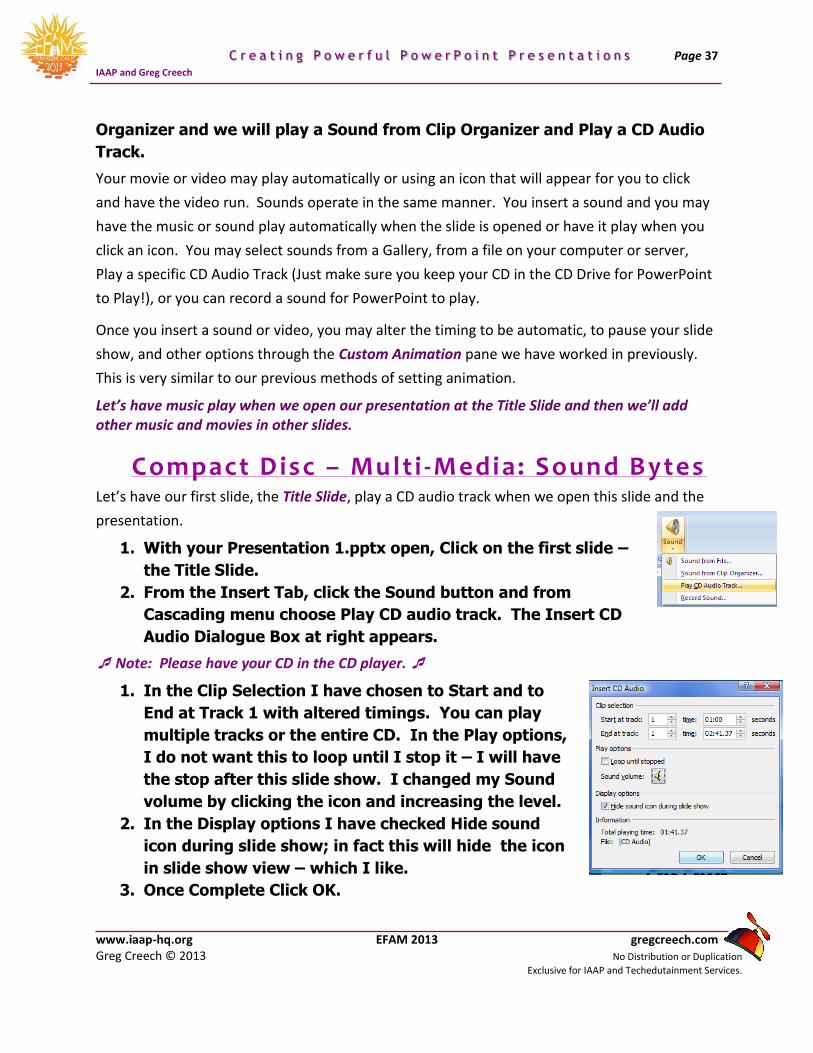
Compact Disc – Mult i -Media: Sound Bytes Let’s have our first slide, the Title Slide, play a CD audio track when we open this slide and the
presentation.
1. With your Presentation 1.pptx open, Click on the first slide –
the Title Slide.
2. From the Insert Tab, click the Sound button and from
Cascading menu choose Play CD audio track. The Insert CD
Audio Dialogue Box at right appears.
Note: Please have your CD in the CD player.
1. In the Clip Selection I have chosen to Start and to
End at Track 1 with altered timings. You can play
multiple tracks or the entire CD. In the Play options,
I do not want this to loop until I stop it – I will have
the stop after this slide show. I changed my Sound
volume by clicking the icon and increasing the level.
2. In the Display options I have checked Hide sound
icon during slide show; in fact this will hide the icon
in slide show view – which I like.
3. Once Complete Click OK.
Page 38 C r e a t i n g P o w e r f u l P o w e r P o i n t P r e s e n t a t i o n s
IAAP and Greg Creech
www.iaap-hq.org EFAM 2013 gregcreech.com Greg Creech © 2013 No Distribution or Duplication
Exclusive for IAAP and Techedutainment Services.
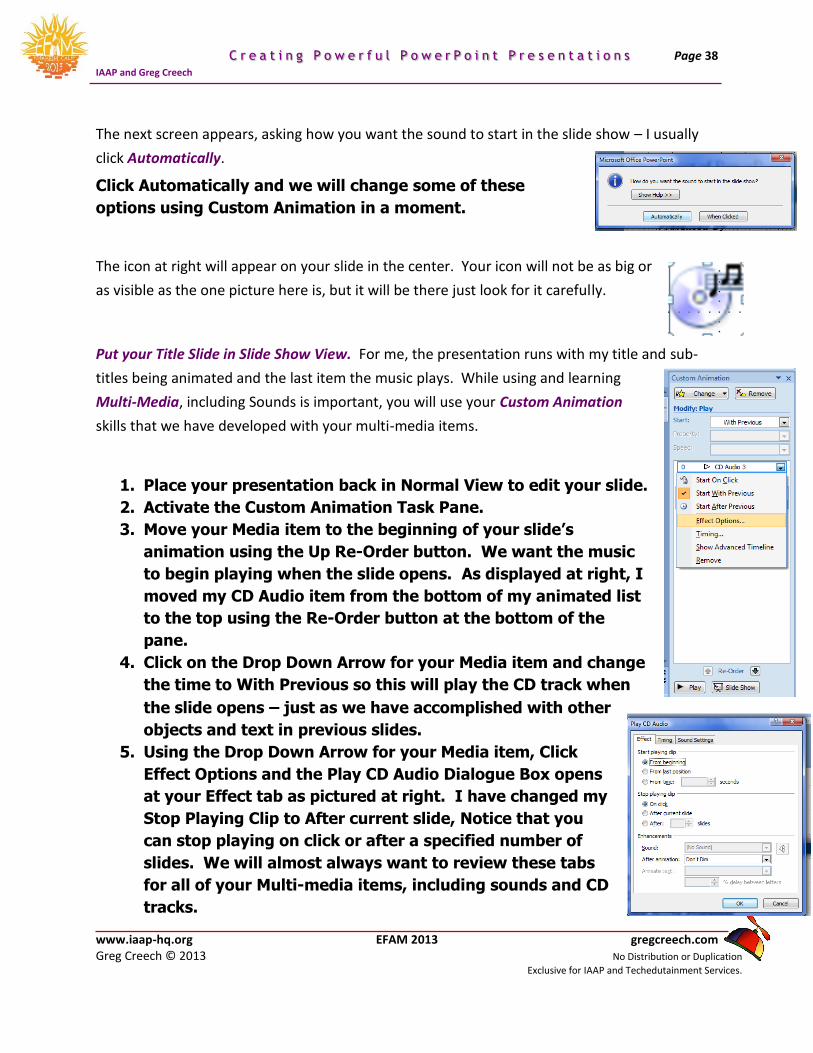
The next screen appears, asking how you want the sound to start in the slide show – I usually
click Automatically.
Click Automatically and we will change some of these
options using Custom Animation in a moment.
The icon at right will appear on your slide in the center. Your icon will not be as big or
as visible as the one picture here is, but it will be there just look for it carefully.
Put your Title Slide in Slide Show View. For me, the presentation runs with my title and sub-
titles being animated and the last item the music plays. While using and learning
Multi-Media, including Sounds is important, you will use your Custom Animation
skills that we have developed with your multi-media items.
1. Place your presentation back in Normal View to edit your slide.
2. Activate the Custom Animation Task Pane.
3. Move your Media item to the beginning of your slide’s
animation using the Up Re-Order button. We want the music
to begin playing when the slide opens. As displayed at right, I
moved my CD Audio item from the bottom of my animated list
to the top using the Re-Order button at the bottom of the
pane.
4. Click on the Drop Down Arrow for your Media item and change
the time to With Previous so this will play the CD track when
the slide opens – just as we have accomplished with other
objects and text in previous slides.
5. Using the Drop Down Arrow for your Media item, Click
Effect Options and the Play CD Audio Dialogue Box opens
at your Effect tab as pictured at right. I have changed my
Stop Playing Clip to After current slide, Notice that you
can stop playing on click or after a specified number of
slides. We will almost always want to review these tabs
for all of your Multi-media items, including sounds and CD
tracks.
Page 39 C r e a t i n g P o w e r f u l P o w e r P o i n t P r e s e n t a t i o n s
IAAP and Greg Creech
www.iaap-hq.org EFAM 2013 gregcreech.com Greg Creech © 2013 No Distribution or Duplication
Exclusive for IAAP and Techedutainment Services.
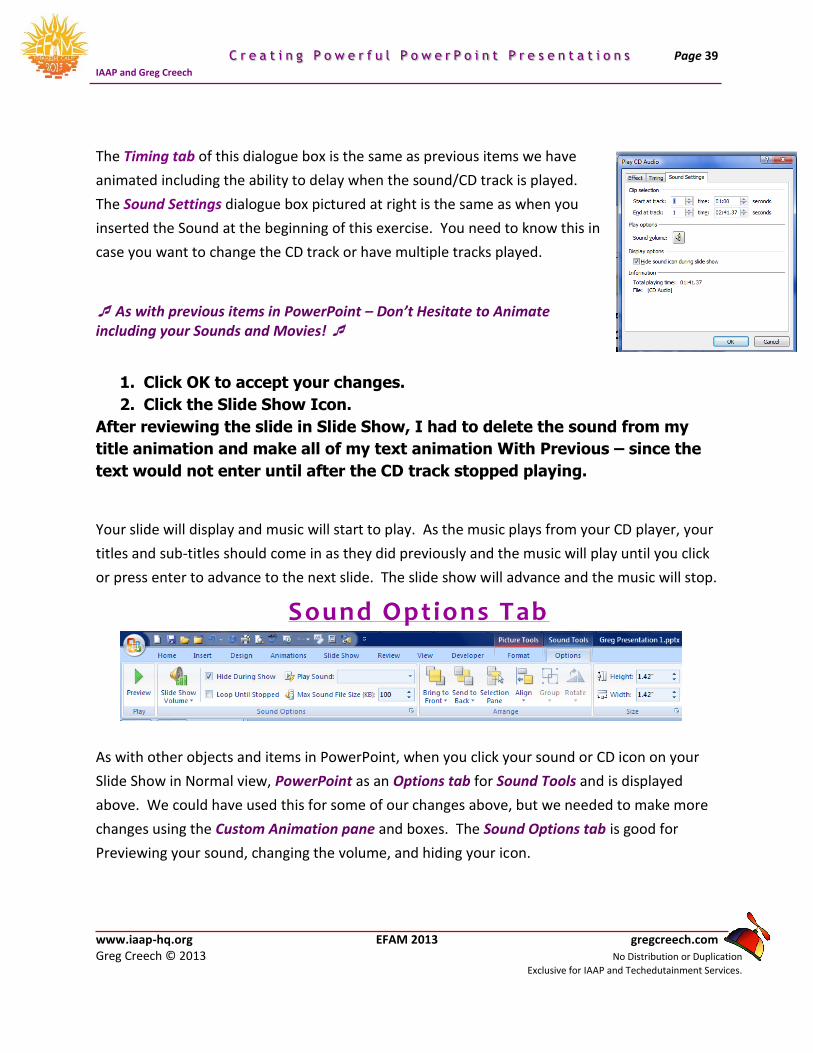
The Timing tab of this dialogue box is the same as previous items we have
animated including the ability to delay when the sound/CD track is played.
The Sound Settings dialogue box pictured at right is the same as when you
inserted the Sound at the beginning of this exercise. You need to know this in
case you want to change the CD track or have multiple tracks played.
As with previous items in PowerPoint – Don’t Hesitate to Animate including your Sounds and Movies!
1. Click OK to accept your changes.
2. Click the Slide Show Icon.
After reviewing the slide in Slide Show, I had to delete the sound from my
title animation and make all of my text animation With Previous – since the
text would not enter until after the CD track stopped playing.
Your slide will display and music will start to play. As the music plays from your CD player, your
titles and sub-titles should come in as they did previously and the music will play until you click
or press enter to advance to the next slide. The slide show will advance and the music will stop.
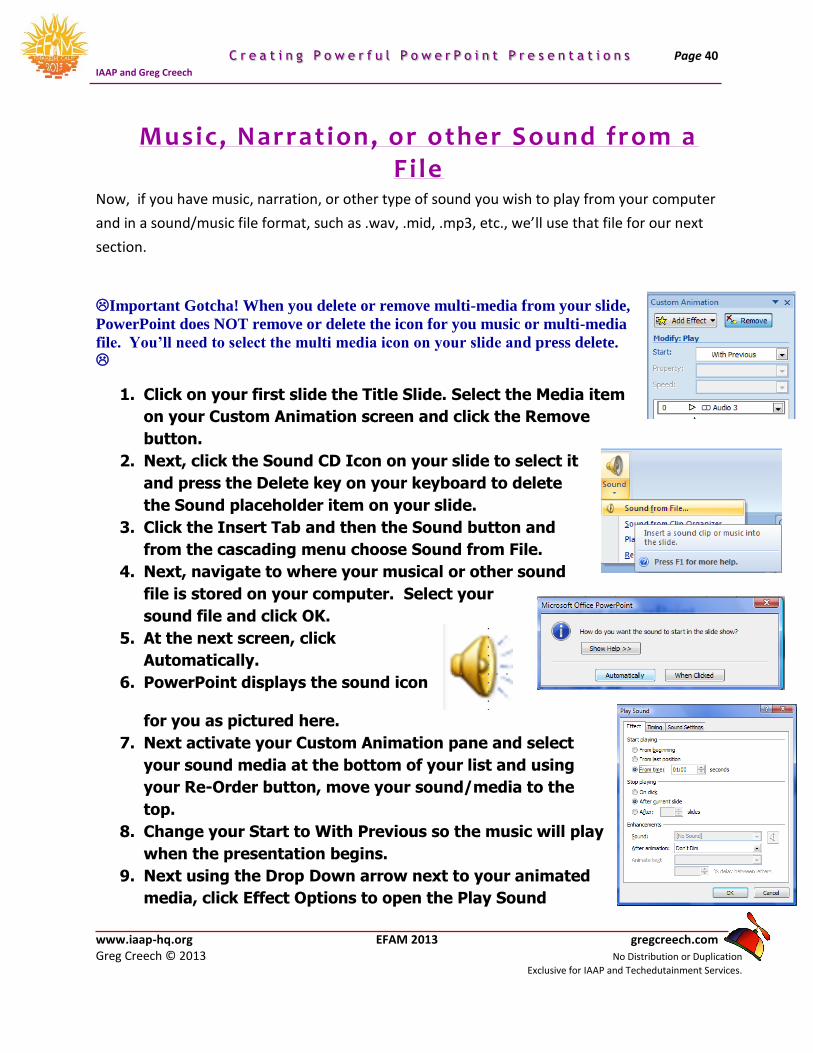
Sound Options Tab
As with other objects and items in PowerPoint, when you click your sound or CD icon on your
Slide Show in Normal view, PowerPoint as an Options tab for Sound Tools and is displayed
above. We could have used this for some of our changes above, but we needed to make more
changes using the Custom Animation pane and boxes. The Sound Options tab is good for
Previewing your sound, changing the volume, and hiding your icon.
Page 40 C r e a t i n g P o w e r f u l P o w e r P o i n t P r e s e n t a t i o n s
IAAP and Greg Creech
www.iaap-hq.org EFAM 2013 gregcreech.com Greg Creech © 2013 No Distribution or Duplication
Exclusive for IAAP and Techedutainment Services.
Music, Narration, or other Sound from a F i le
Now, if you have music, narration, or other type of sound you wish to play from your computer
and in a sound/music file format, such as .wav, .mid, .mp3, etc., we’ll use that file for our next
section.
Important Gotcha! When you delete or remove multi-media from your slide,
PowerPoint does NOT remove or delete the icon for you music or multi-media
file. You’ll need to select the multi media icon on your slide and press delete.
1. Click on your first slide the Title Slide. Select the Media item
on your Custom Animation screen and click the Remove
button.
2. Next, click the Sound CD Icon on your slide to select it
and press the Delete key on your keyboard to delete
the Sound placeholder item on your slide.
3. Click the Insert Tab and then the Sound button and
from the cascading menu choose Sound from File.
4. Next, navigate to where your musical or other sound
file is stored on your computer. Select your
sound file and click OK.
5. At the next screen, click
Automatically.
6. PowerPoint displays the sound icon
for you as pictured here.
7. Next activate your Custom Animation pane and select
your sound media at the bottom of your list and using
your Re-Order button, move your sound/media to the
top.
8. Change your Start to With Previous so the music will play
when the presentation begins.
9. Next using the Drop Down arrow next to your animated
media, click Effect Options to open the Play Sound
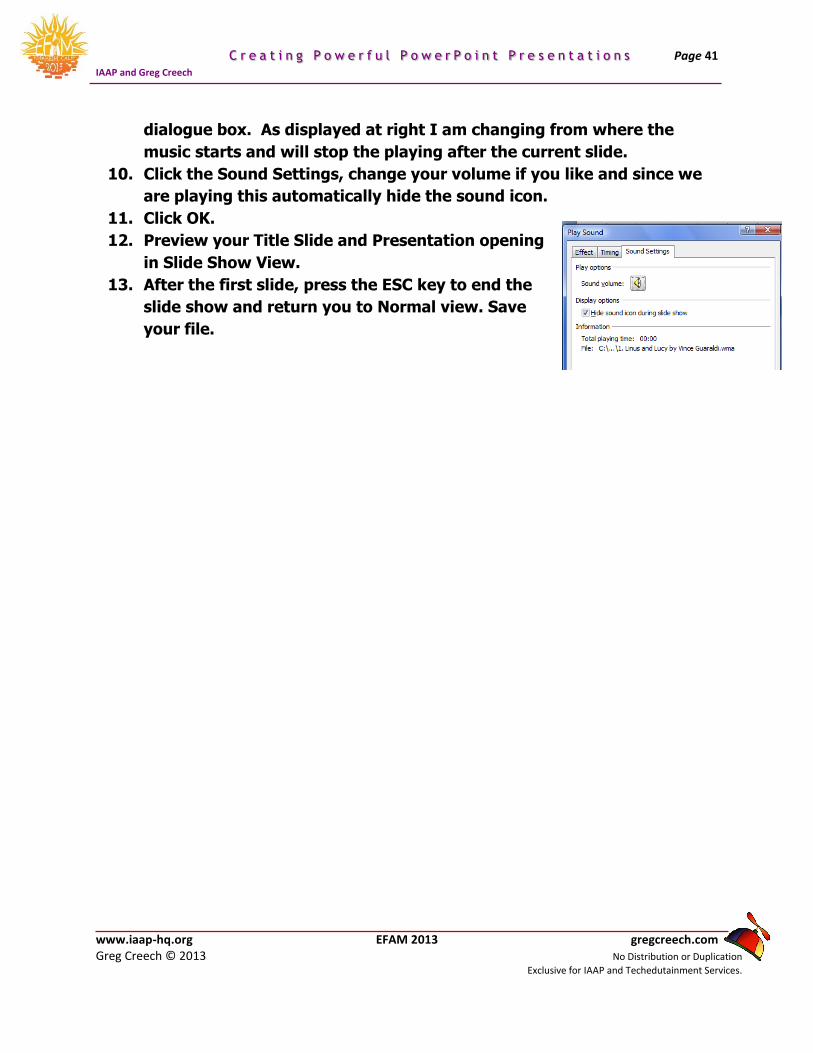
Page 41 C r e a t i n g P o w e r f u l P o w e r P o i n t P r e s e n t a t i o n s
IAAP and Greg Creech
www.iaap-hq.org EFAM 2013 gregcreech.com Greg Creech © 2013 No Distribution or Duplication
Exclusive for IAAP and Techedutainment Services.
dialogue box. As displayed at right I am changing from where the
music starts and will stop the playing after the current slide.
10. Click the Sound Settings, change your volume if you like and since we
are playing this automatically hide the sound icon.
11. Click OK.
12. Preview your Title Slide and Presentation opening
in Slide Show View.
13. After the first slide, press the ESC key to end the
slide show and return you to Normal view. Save
your file.
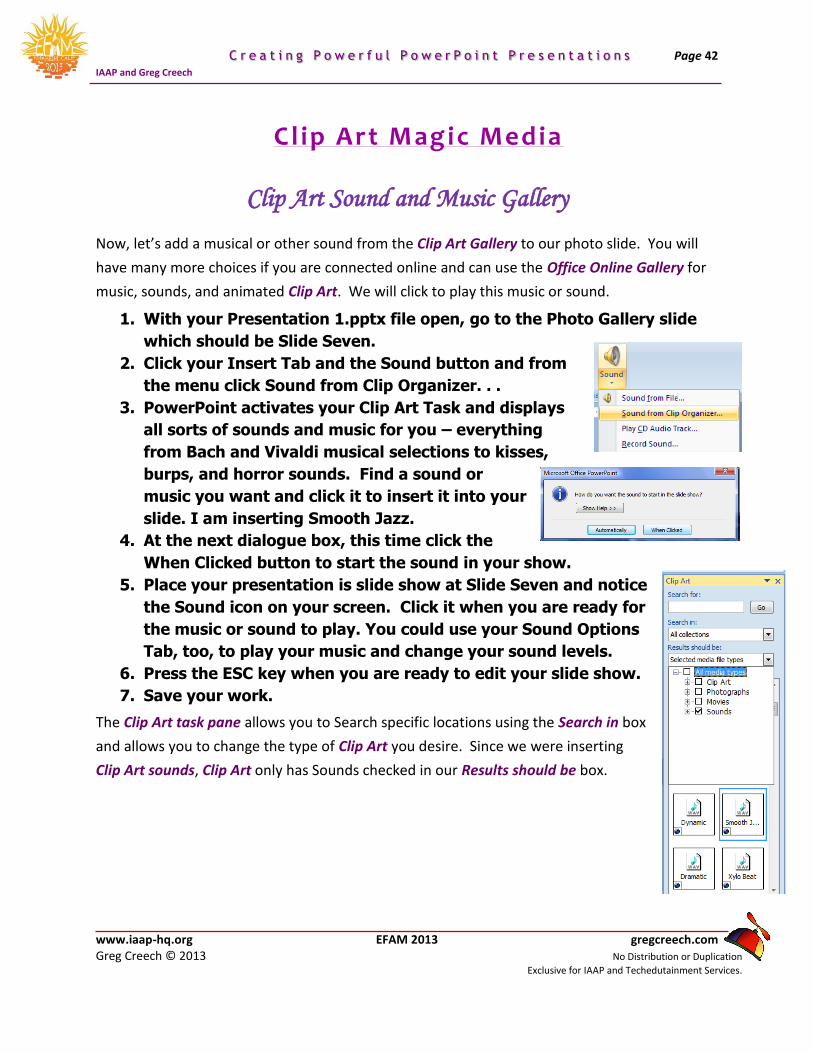
Page 42 C r e a t i n g P o w e r f u l P o w e r P o i n t P r e s e n t a t i o n s
IAAP and Greg Creech
www.iaap-hq.org EFAM 2013 gregcreech.com Greg Creech © 2013 No Distribution or Duplication
Exclusive for IAAP and Techedutainment Services.
Cl ip Art Magic Media
Clip Art Sound and Music Gallery
Now, let’s add a musical or other sound from the Clip Art Gallery to our photo slide. You will
have many more choices if you are connected online and can use the Office Online Gallery for
music, sounds, and animated Clip Art. We will click to play this music or sound.
1. With your Presentation 1.pptx file open, go to the Photo Gallery slide
which should be Slide Seven.
2. Click your Insert Tab and the Sound button and from
the menu click Sound from Clip Organizer. . .
3. PowerPoint activates your Clip Art Task and displays
all sorts of sounds and music for you – everything
from Bach and Vivaldi musical selections to kisses,
burps, and horror sounds. Find a sound or
music you want and click it to insert it into your
slide. I am inserting Smooth Jazz.
4. At the next dialogue box, this time click the
When Clicked button to start the sound in your show.
5. Place your presentation is slide show at Slide Seven and notice
the Sound icon on your screen. Click it when you are ready for
the music or sound to play. You could use your Sound Options
Tab, too, to play your music and change your sound levels.
6. Press the ESC key when you are ready to edit your slide show.
7. Save your work.
The Clip Art task pane allows you to Search specific locations using the Search in box
and allows you to change the type of Clip Art you desire. Since we were inserting
Clip Art sounds, Clip Art only has Sounds checked in our Results should be box.
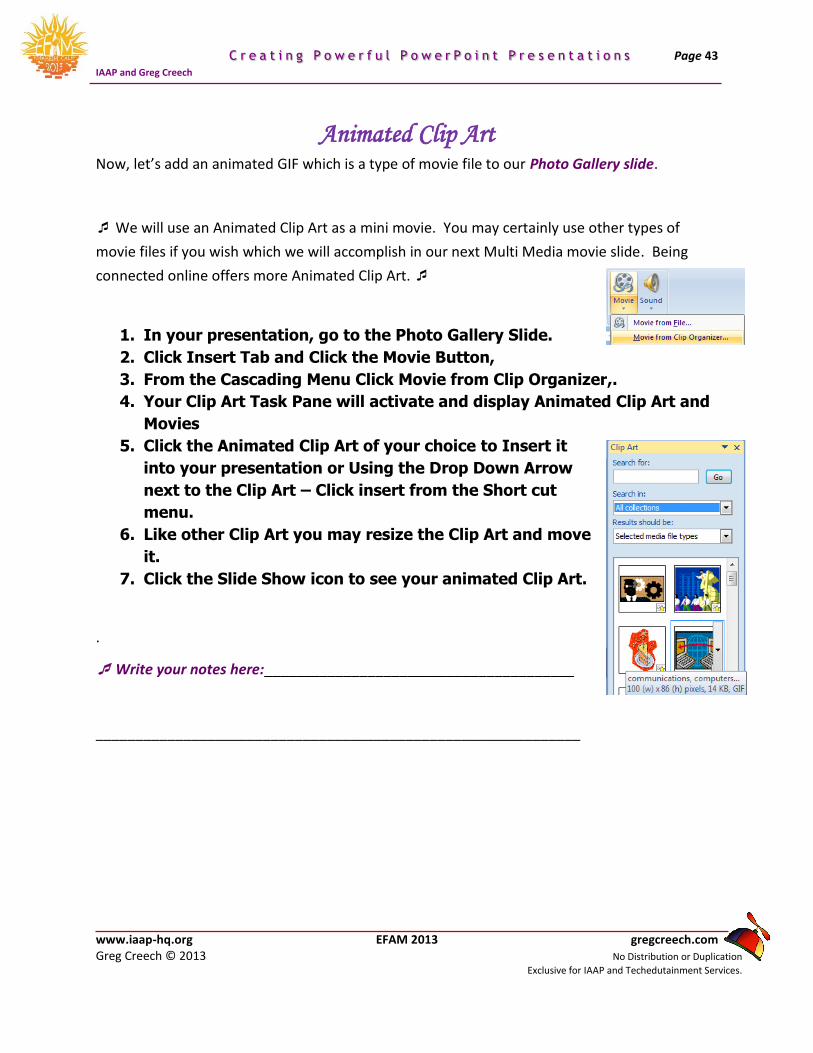
Page 43 C r e a t i n g P o w e r f u l P o w e r P o i n t P r e s e n t a t i o n s
IAAP and Greg Creech
www.iaap-hq.org EFAM 2013 gregcreech.com Greg Creech © 2013 No Distribution or Duplication
Exclusive for IAAP and Techedutainment Services.
Animated Clip Art Now, let’s add an animated GIF which is a type of movie file to our Photo Gallery slide.
We will use an Animated Clip Art as a mini movie. You may certainly use other types of
movie files if you wish which we will accomplish in our next Multi Media movie slide. Being
connected online offers more Animated Clip Art.
1. In your presentation, go to the Photo Gallery Slide.
2. Click Insert Tab and Click the Movie Button,
3. From the Cascading Menu Click Movie from Clip Organizer,.
4. Your Clip Art Task Pane will activate and display Animated Clip Art and
Movies
5. Click the Animated Clip Art of your choice to Insert it
into your presentation or Using the Drop Down Arrow
next to the Clip Art – Click insert from the Short cut
menu.
6. Like other Clip Art you may resize the Clip Art and move
it.
7. Click the Slide Show icon to see your animated Clip Art.
.
Write your notes here:_______________________________________
_____________________________________________________________
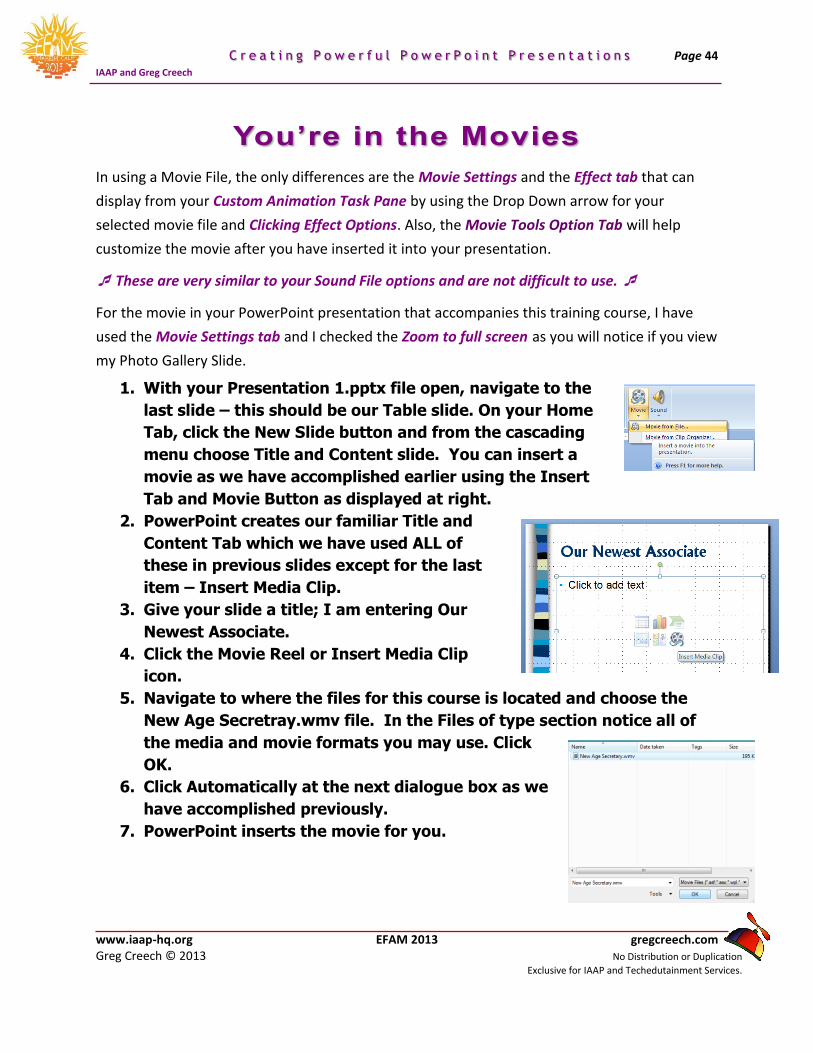
Page 44 C r e a t i n g P o w e r f u l P o w e r P o i n t P r e s e n t a t i o n s
IAAP and Greg Creech
www.iaap-hq.org EFAM 2013 gregcreech.com Greg Creech © 2013 No Distribution or Duplication
Exclusive for IAAP and Techedutainment Services.
In using a Movie File, the only differences are the Movie Settings and the Effect tab that can
display from your Custom Animation Task Pane by using the Drop Down arrow for your
selected movie file and Clicking Effect Options. Also, the Movie Tools Option Tab will help
customize the movie after you have inserted it into your presentation.
These are very similar to your Sound File options and are not difficult to use.
For the movie in your PowerPoint presentation that accompanies this training course, I have
used the Movie Settings tab and I checked the Zoom to full screen as you will notice if you view
my Photo Gallery Slide.
1. With your Presentation 1.pptx file open, navigate to the
last slide – this should be our Table slide. On your Home
Tab, click the New Slide button and from the cascading
menu choose Title and Content slide. You can insert a
movie as we have accomplished earlier using the Insert
Tab and Movie Button as displayed at right.
2. PowerPoint creates our familiar Title and
Content Tab which we have used ALL of
these in previous slides except for the last
item – Insert Media Clip.
3. Give your slide a title; I am entering Our
Newest Associate.
4. Click the Movie Reel or Insert Media Clip
icon.
5. Navigate to where the files for this course is located and choose the
New Age Secretray.wmv file. In the Files of type section notice all of
the media and movie formats you may use. Click
OK.
6. Click Automatically at the next dialogue box as we
have accomplished previously.
7. PowerPoint inserts the movie for you.
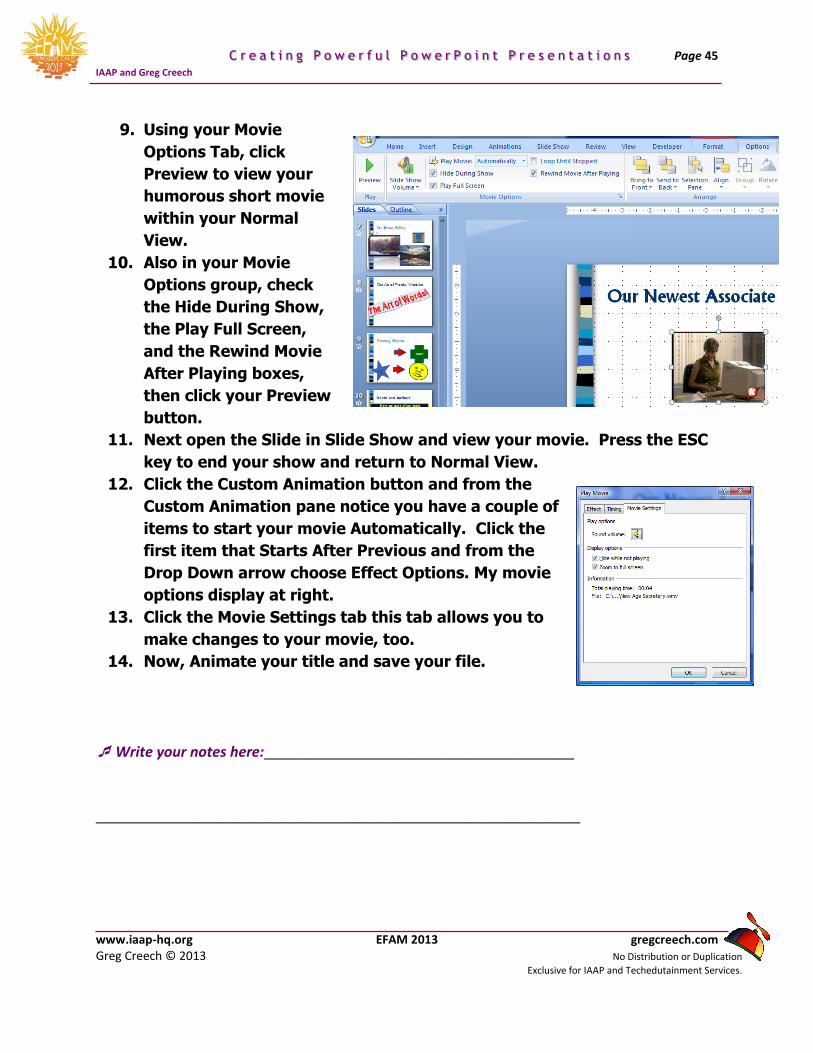
Page 45 C r e a t i n g P o w e r f u l P o w e r P o i n t P r e s e n t a t i o n s
IAAP and Greg Creech
www.iaap-hq.org EFAM 2013 gregcreech.com Greg Creech © 2013 No Distribution or Duplication
Exclusive for IAAP and Techedutainment Services.
9. Using your Movie
Options Tab, click
Preview to view your
humorous short movie
within your Normal
View.
10. Also in your Movie
Options group, check
the Hide During Show,
the Play Full Screen,
and the Rewind Movie
After Playing boxes,
then click your Preview
button.
11. Next open the Slide in Slide Show and view your movie. Press the ESC
key to end your show and return to Normal View.
12. Click the Custom Animation button and from the
Custom Animation pane notice you have a couple of
items to start your movie Automatically. Click the
first item that Starts After Previous and from the
Drop Down arrow choose Effect Options. My movie
options display at right.
13. Click the Movie Settings tab this tab allows you to
make changes to your movie, too.
14. Now, Animate your title and save your file.
Write your notes here:_______________________________________
_____________________________________________________________
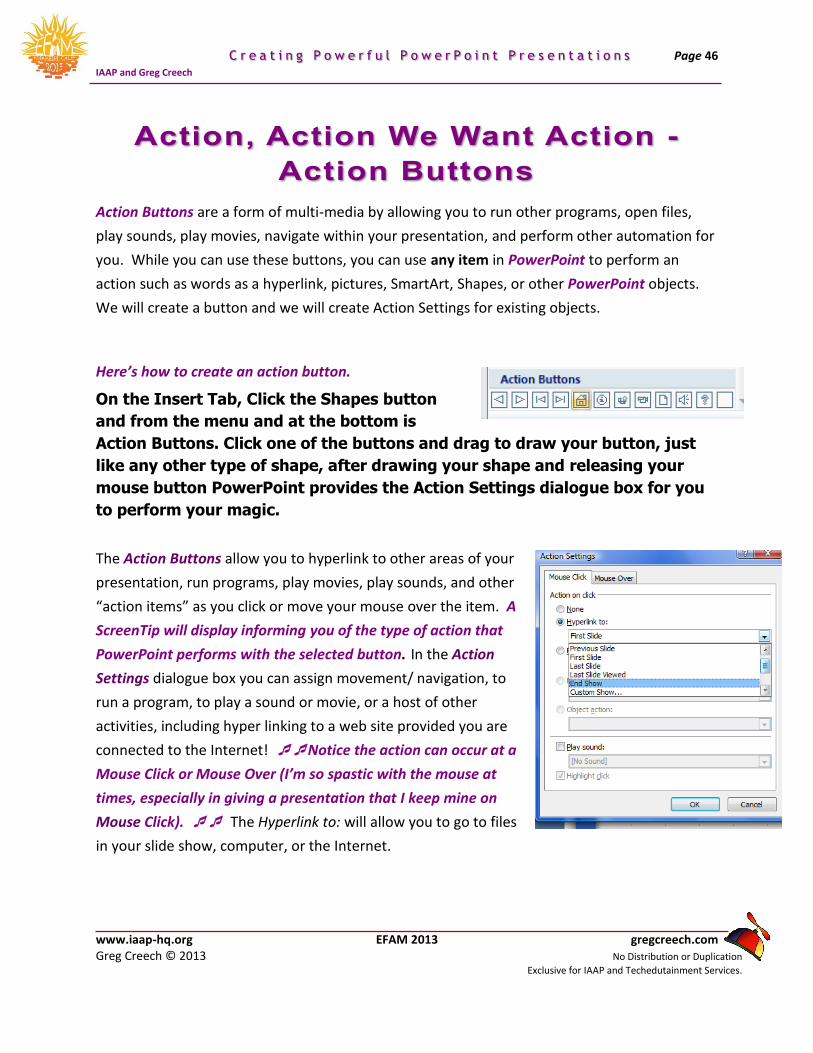
Page 46 C r e a t i n g P o w e r f u l P o w e r P o i n t P r e s e n t a t i o n s
IAAP and Greg Creech
www.iaap-hq.org EFAM 2013 gregcreech.com Greg Creech © 2013 No Distribution or Duplication
Exclusive for IAAP and Techedutainment Services.
Action Buttons are a form of multi-media by allowing you to run other programs, open files,
play sounds, play movies, navigate within your presentation, and perform other automation for
you. While you can use these buttons, you can use any item in PowerPoint to perform an
action such as words as a hyperlink, pictures, SmartArt, Shapes, or other PowerPoint objects.
We will create a button and we will create Action Settings for existing objects.
Here’s how to create an action button.
On the Insert Tab, Click the Shapes button
and from the menu and at the bottom is
Action Buttons. Click one of the buttons and drag to draw your button, just
like any other type of shape, after drawing your shape and releasing your
mouse button PowerPoint provides the Action Settings dialogue box for you
to perform your magic.
The Action Buttons allow you to hyperlink to other areas of your
presentation, run programs, play movies, play sounds, and other
“action items” as you click or move your mouse over the item. A
ScreenTip will display informing you of the type of action that
PowerPoint performs with the selected button. In the Action
Settings dialogue box you can assign movement/ navigation, to
run a program, to play a sound or movie, or a host of other
activities, including hyper linking to a web site provided you are
connected to the Internet! Notice the action can occur at a
Mouse Click or Mouse Over (I’m so spastic with the mouse at
times, especially in giving a presentation that I keep mine on
Mouse Click). The Hyperlink to: will allow you to go to files
in your slide show, computer, or the Internet.
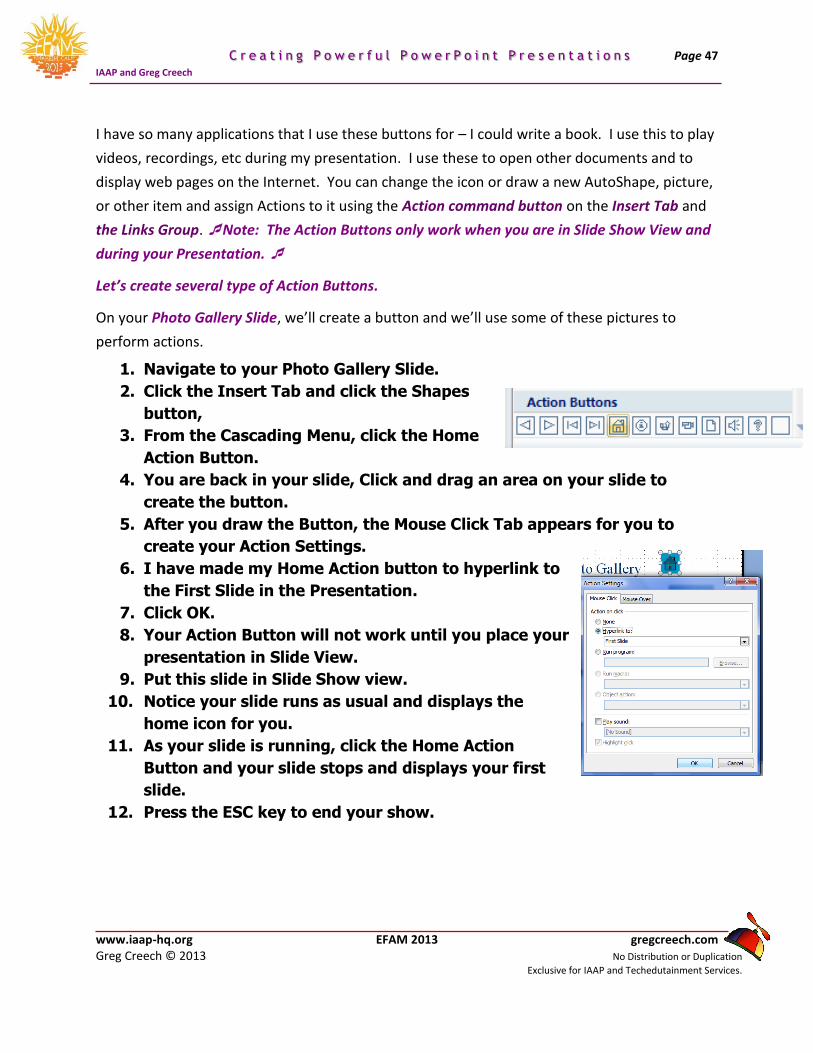
Page 47 C r e a t i n g P o w e r f u l P o w e r P o i n t P r e s e n t a t i o n s
IAAP and Greg Creech
www.iaap-hq.org EFAM 2013 gregcreech.com Greg Creech © 2013 No Distribution or Duplication
Exclusive for IAAP and Techedutainment Services.
I have so many applications that I use these buttons for – I could write a book. I use this to play
videos, recordings, etc during my presentation. I use these to open other documents and to
display web pages on the Internet. You can change the icon or draw a new AutoShape, picture,
or other item and assign Actions to it using the Action command button on the Insert Tab and
the Links Group. Note: The Action Buttons only work when you are in Slide Show View and
during your Presentation.
Let’s create several type of Action Buttons.
On your Photo Gallery Slide, we’ll create a button and we’ll use some of these pictures to
perform actions.
1. Navigate to your Photo Gallery Slide.
2. Click the Insert Tab and click the Shapes
button,
3. From the Cascading Menu, click the Home
Action Button.
4. You are back in your slide, Click and drag an area on your slide to
create the button.
5. After you draw the Button, the Mouse Click Tab appears for you to
create your Action Settings.
6. I have made my Home Action button to hyperlink to
the First Slide in the Presentation.
7. Click OK.
8. Your Action Button will not work until you place your
presentation in Slide View.
9. Put this slide in Slide Show view.
10. Notice your slide runs as usual and displays the
home icon for you.
11. As your slide is running, click the Home Action
Button and your slide stops and displays your first
slide.
12. Press the ESC key to end your show.
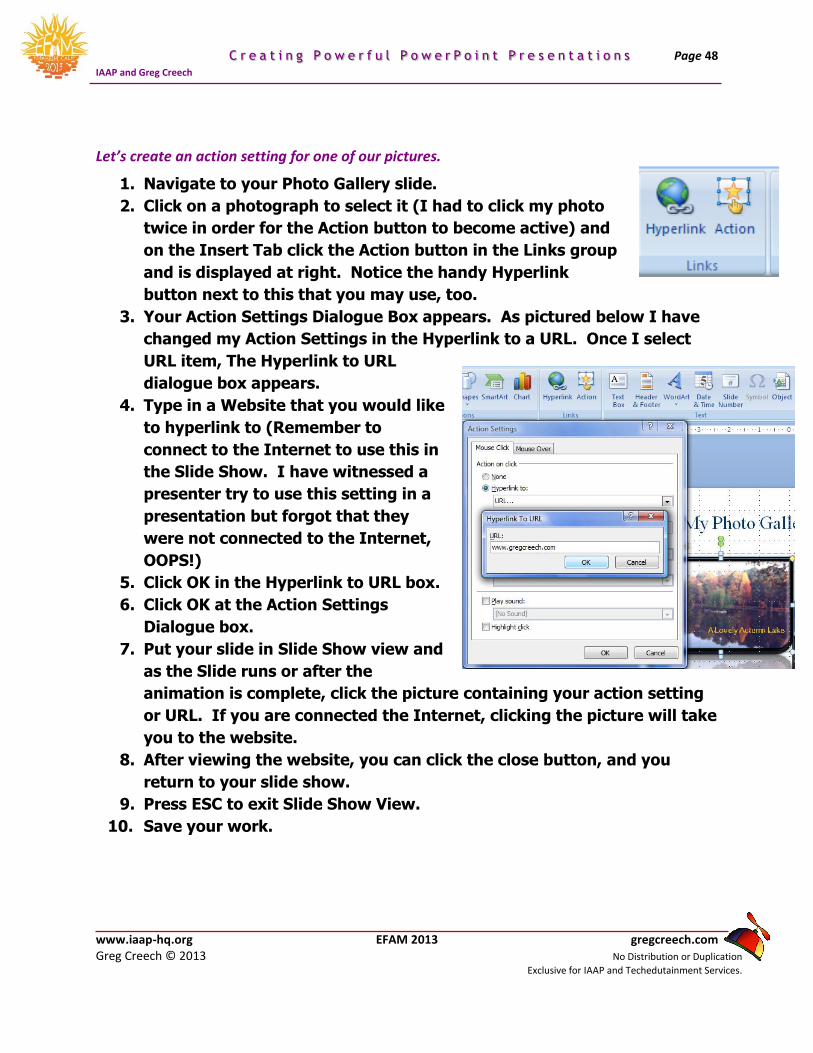
Page 48 C r e a t i n g P o w e r f u l P o w e r P o i n t P r e s e n t a t i o n s
IAAP and Greg Creech
www.iaap-hq.org EFAM 2013 gregcreech.com Greg Creech © 2013 No Distribution or Duplication
Exclusive for IAAP and Techedutainment Services.
Let’s create an action setting for one of our pictures.
1. Navigate to your Photo Gallery slide.
2. Click on a photograph to select it (I had to click my photo
twice in order for the Action button to become active) and
on the Insert Tab click the Action button in the Links group
and is displayed at right. Notice the handy Hyperlink
button next to this that you may use, too.
3. Your Action Settings Dialogue Box appears. As pictured below I have
changed my Action Settings in the Hyperlink to a URL. Once I select
URL item, The Hyperlink to URL
dialogue box appears.
4. Type in a Website that you would like
to hyperlink to (Remember to
connect to the Internet to use this in
the Slide Show. I have witnessed a
presenter try to use this setting in a
presentation but forgot that they
were not connected to the Internet,
OOPS!)
5. Click OK in the Hyperlink to URL box.
6. Click OK at the Action Settings
Dialogue box.
7. Put your slide in Slide Show view and
as the Slide runs or after the
animation is complete, click the picture containing your action setting
or URL. If you are connected the Internet, clicking the picture will take
you to the website.
8. After viewing the website, you can click the close button, and you
return to your slide show.
9. Press ESC to exit Slide Show View.
10. Save your work.
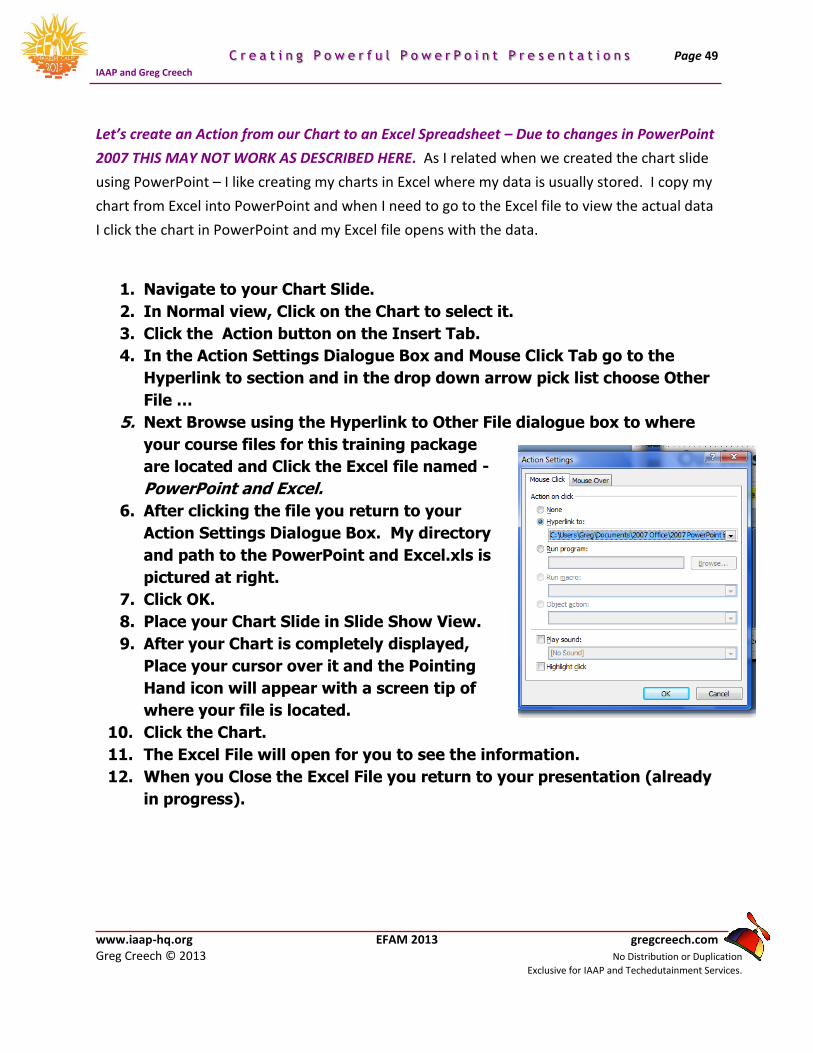
Page 49 C r e a t i n g P o w e r f u l P o w e r P o i n t P r e s e n t a t i o n s
IAAP and Greg Creech
www.iaap-hq.org EFAM 2013 gregcreech.com Greg Creech © 2013 No Distribution or Duplication
Exclusive for IAAP and Techedutainment Services.
Let’s create an Action from our Chart to an Excel Spreadsheet – Due to changes in PowerPoint
2007 THIS MAY NOT WORK AS DESCRIBED HERE. As I related when we created the chart slide
using PowerPoint – I like creating my charts in Excel where my data is usually stored. I copy my
chart from Excel into PowerPoint and when I need to go to the Excel file to view the actual data
I click the chart in PowerPoint and my Excel file opens with the data.
1. Navigate to your Chart Slide.
2. In Normal view, Click on the Chart to select it.
3. Click the Action button on the Insert Tab.
4. In the Action Settings Dialogue Box and Mouse Click Tab go to the
Hyperlink to section and in the drop down arrow pick list choose Other
File …
5. Next Browse using the Hyperlink to Other File dialogue box to where
your course files for this training package
are located and Click the Excel file named -
PowerPoint and Excel.
6. After clicking the file you return to your
Action Settings Dialogue Box. My directory
and path to the PowerPoint and Excel.xls is
pictured at right.
7. Click OK.
8. Place your Chart Slide in Slide Show View.
9. After your Chart is completely displayed,
Place your cursor over it and the Pointing
Hand icon will appear with a screen tip of
where your file is located.
10. Click the Chart.
11. The Excel File will open for you to see the information.
12. When you Close the Excel File you return to your presentation (already
in progress).
Page 50 C r e a t i n g P o w e r f u l P o w e r P o i n t P r e s e n t a t i o n s
IAAP and Greg Creech
www.iaap-hq.org EFAM 2013 gregcreech.com Greg Creech © 2013 No Distribution or Duplication
Exclusive for IAAP and Techedutainment Services.
Since we have learned many of the features and elements of PowerPoint and the associated
tabs, command buttons, etc., we are ready to develop our own templates and presentation
designs. As I wrote, avoid the PowerPoint Templates, except to learn, to get ideas, or to edit
and change them. Developing your own template can be fun, is creative, and impresses your
managers and audience beyond “presentation” belief. The branding and marketing of your
organization and products/services increase dramatically when you create your own design
template incorporating your logos, color schemes, and slogans. Let PowerPoint help you with
your marketing, branding, and creativity with your own template.
The Slide, Handout, and Notes Masters in PowerPoint allow you to make global changes to all
of your slides at one place. For example, if you use the Slide Master you can change the color
of your title or change a bullet in Slide Master and when you close out of slide master the color
change and new bullet will appear on all of your slides.
Templates should only be used for formatting, colors, backgrounds, and other items needed
for the slide show. Templates are NOT the slide show. Templates provide the style of fonts,
the type of bullets, the colors for items, graphics that are to appear on every slide, and so on.
Templates should NOT contain your words or titles, except for perhaps company name, slogans,
or other brief text that you want to appear on each slide.
We will use Title and Slide Master to create a Template that will contain only two or so slides
and then we will use our template on our existing PowerPoint file. Ready? Let’s be creative.
1. In PowerPoint, Click the New Presentation button – The piece of paper
button usually the first one on your Quick Access Toolbar – or Press the
CTRL + N keys to create a new presentation.
2. PowerPoint opens at a blank Title Slide.
3. Click the New Slide button and choose Title and Content from your
selections.
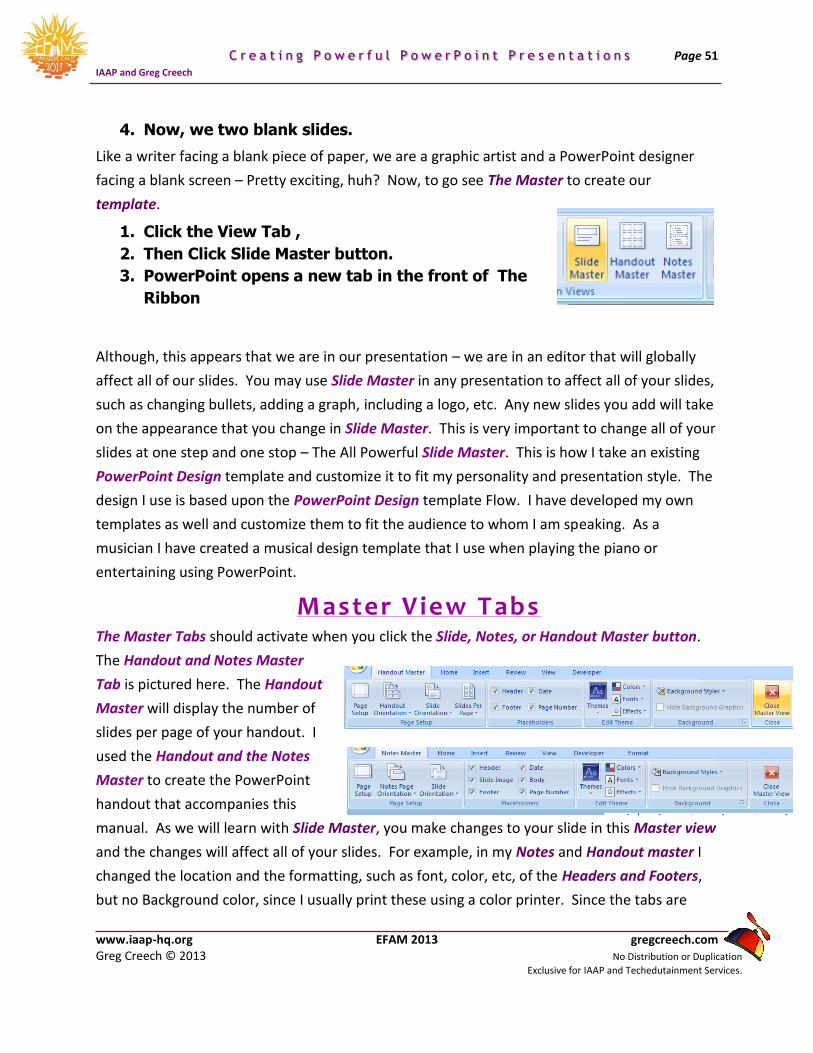
Page 51 C r e a t i n g P o w e r f u l P o w e r P o i n t P r e s e n t a t i o n s
IAAP and Greg Creech
www.iaap-hq.org EFAM 2013 gregcreech.com Greg Creech © 2013 No Distribution or Duplication
Exclusive for IAAP and Techedutainment Services.
4. Now, we two blank slides.
Like a writer facing a blank piece of paper, we are a graphic artist and a PowerPoint designer
facing a blank screen – Pretty exciting, huh? Now, to go see The Master to create our
template.
1. Click the View Tab ,
2. Then Click Slide Master button.
3. PowerPoint opens a new tab in the front of The
Ribbon
Although, this appears that we are in our presentation – we are in an editor that will globally
affect all of our slides. You may use Slide Master in any presentation to affect all of your slides,
such as changing bullets, adding a graph, including a logo, etc. Any new slides you add will take
on the appearance that you change in Slide Master. This is very important to change all of your
slides at one step and one stop – The All Powerful Slide Master. This is how I take an existing
PowerPoint Design template and customize it to fit my personality and presentation style. The
design I use is based upon the PowerPoint Design template Flow. I have developed my own
templates as well and customize them to fit the audience to whom I am speaking. As a
musician I have created a musical design template that I use when playing the piano or
entertaining using PowerPoint.
Master View Tabs The Master Tabs should activate when you click the Slide, Notes, or Handout Master button.
The Handout and Notes Master
Tab is pictured here. The Handout
Master will display the number of
slides per page of your handout. I
used the Handout and the Notes
Master to create the PowerPoint
handout that accompanies this
manual. As we will learn with Slide Master, you make changes to your slide in this Master view
and the changes will affect all of your slides. For example, in my Notes and Handout master I
changed the location and the formatting, such as font, color, etc, of the Headers and Footers,
but no Background color, since I usually print these using a color printer. Since the tabs are
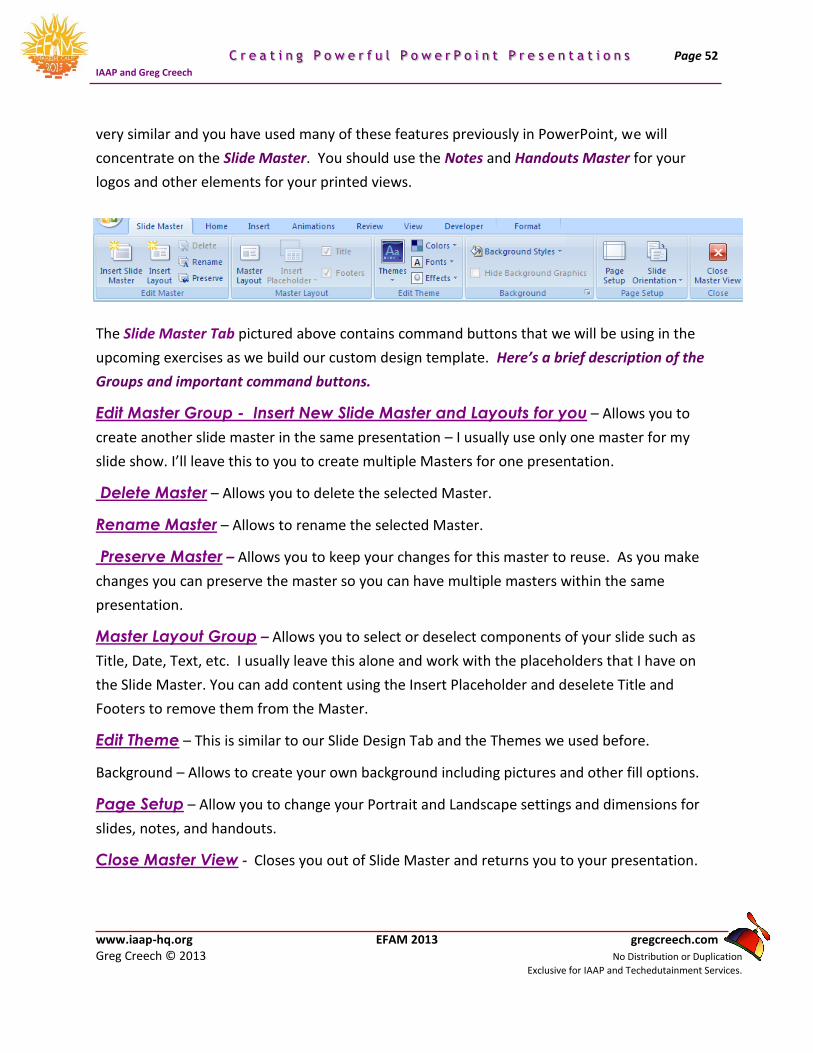
Page 52 C r e a t i n g P o w e r f u l P o w e r P o i n t P r e s e n t a t i o n s
IAAP and Greg Creech
www.iaap-hq.org EFAM 2013 gregcreech.com Greg Creech © 2013 No Distribution or Duplication
Exclusive for IAAP and Techedutainment Services.
very similar and you have used many of these features previously in PowerPoint, we will
concentrate on the Slide Master. You should use the Notes and Handouts Master for your
logos and other elements for your printed views.
The Slide Master Tab pictured above contains command buttons that we will be using in the
upcoming exercises as we build our custom design template. Here’s a brief description of the
Groups and important command buttons.
Edit Master Group - Insert New Slide Master and Layouts for you – Allows you to
create another slide master in the same presentation – I usually use only one master for my
slide show. I’ll leave this to you to create multiple Masters for one presentation.
Delete Master – Allows you to delete the selected Master.
Rename Master – Allows to rename the selected Master.
Preserve Master – Allows you to keep your changes for this master to reuse. As you make
changes you can preserve the master so you can have multiple masters within the same
presentation.
Master Layout Group – Allows you to select or deselect components of your slide such as
Title, Date, Text, etc. I usually leave this alone and work with the placeholders that I have on
the Slide Master. You can add content using the Insert Placeholder and deselete Title and
Footers to remove them from the Master.
Edit Theme – This is similar to our Slide Design Tab and the Themes we used before.
Background – Allows to create your own background including pictures and other fill options.
Page Setup – Allow you to change your Portrait and Landscape settings and dimensions for
slides, notes, and handouts.
Close Master View - Closes you out of Slide Master and returns you to your presentation.
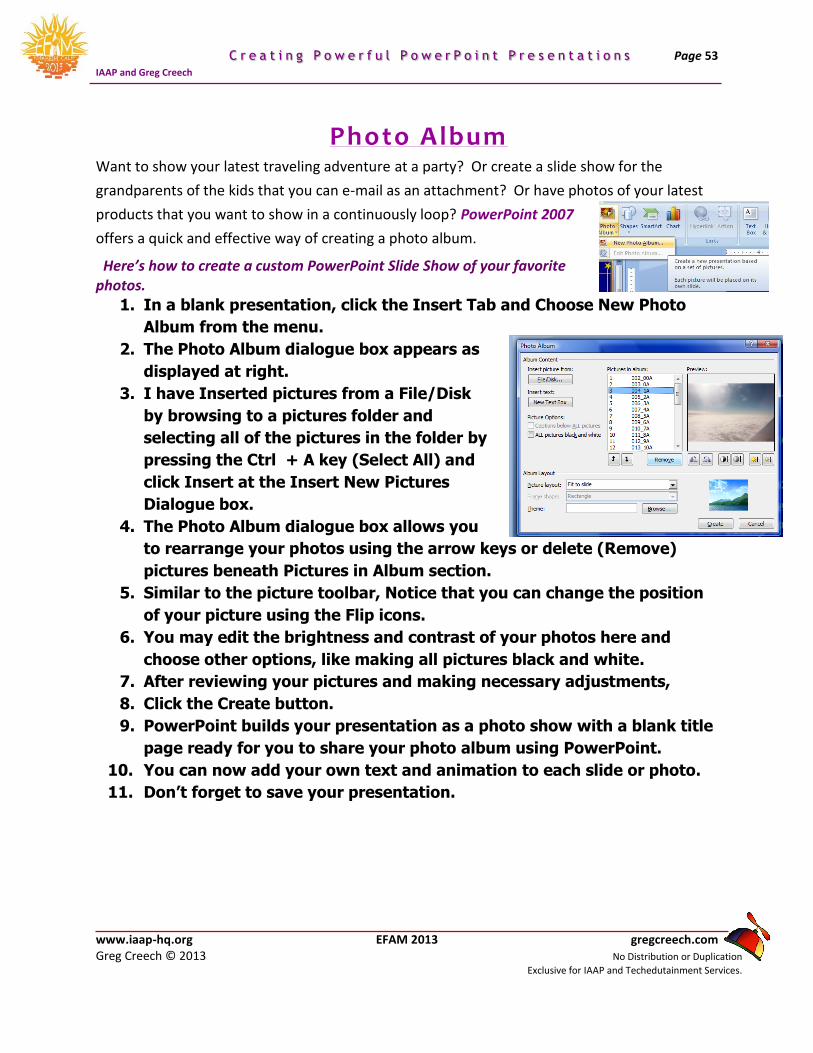
Page 53 C r e a t i n g P o w e r f u l P o w e r P o i n t P r e s e n t a t i o n s
IAAP and Greg Creech
www.iaap-hq.org EFAM 2013 gregcreech.com Greg Creech © 2013 No Distribution or Duplication
Exclusive for IAAP and Techedutainment Services.
Photo Album Want to show your latest traveling adventure at a party? Or create a slide show for the
grandparents of the kids that you can e-mail as an attachment? Or have photos of your latest
products that you want to show in a continuously loop? PowerPoint 2007
offers a quick and effective way of creating a photo album.
Here’s how to create a custom PowerPoint Slide Show of your favorite photos.
1. In a blank presentation, click the Insert Tab and Choose New Photo
Album from the menu.
2. The Photo Album dialogue box appears as
displayed at right.
3. I have Inserted pictures from a File/Disk
by browsing to a pictures folder and
selecting all of the pictures in the folder by
pressing the Ctrl + A key (Select All) and
click Insert at the Insert New Pictures
Dialogue box.
4. The Photo Album dialogue box allows you
to rearrange your photos using the arrow keys or delete (Remove)
pictures beneath Pictures in Album section.
5. Similar to the picture toolbar, Notice that you can change the position
of your picture using the Flip icons.
6. You may edit the brightness and contrast of your photos here and
choose other options, like making all pictures black and white.
7. After reviewing your pictures and making necessary adjustments,
8. Click the Create button.
9. PowerPoint builds your presentation as a photo show with a blank title
page ready for you to share your photo album using PowerPoint.
10. You can now add your own text and animation to each slide or photo.
11. Don’t forget to save your presentation.
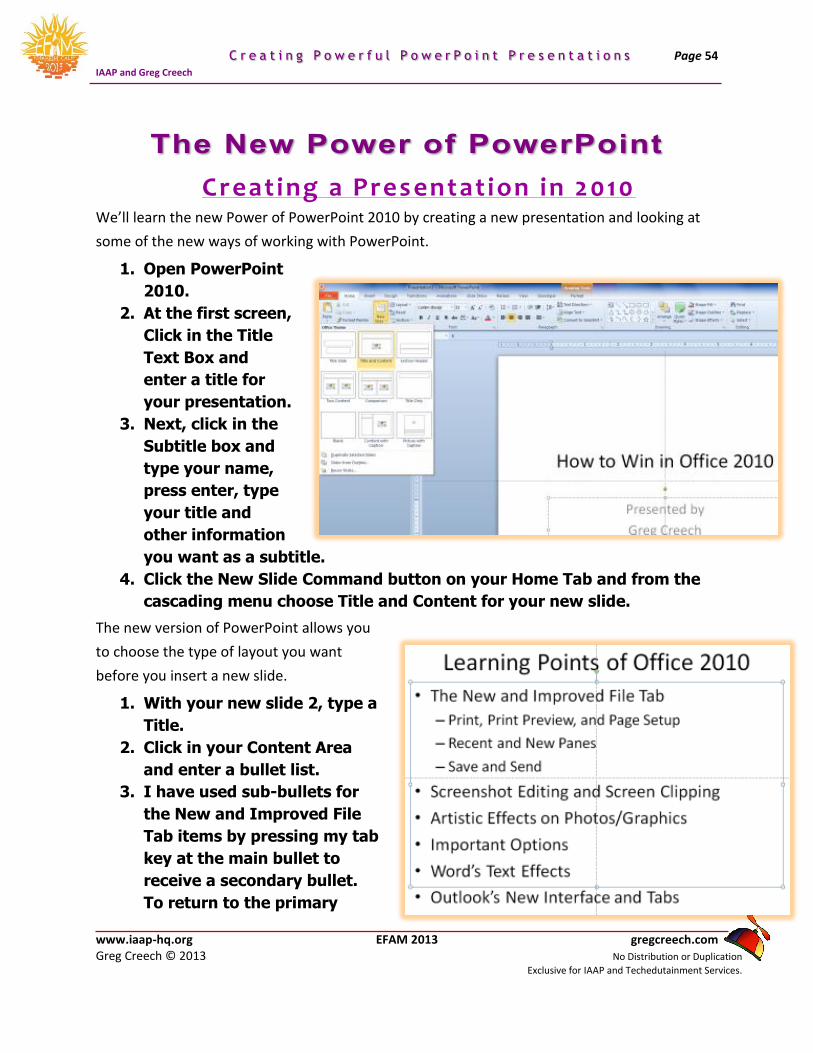
Page 54 C r e a t i n g P o w e r f u l P o w e r P o i n t P r e s e n t a t i o n s
IAAP and Greg Creech
www.iaap-hq.org EFAM 2013 gregcreech.com Greg Creech © 2013 No Distribution or Duplication
Exclusive for IAAP and Techedutainment Services.
Creating a Pres entation in 2010 We’ll learn the new Power of PowerPoint 2010 by creating a new presentation and looking at
some of the new ways of working with PowerPoint.
1. Open PowerPoint
2010.
2. At the first screen,
Click in the Title
Text Box and
enter a title for
your presentation.
3. Next, click in the
Subtitle box and
type your name,
press enter, type
your title and
other information
you want as a subtitle.
4. Click the New Slide Command button on your Home Tab and from the
cascading menu choose Title and Content for your new slide.
The new version of PowerPoint allows you
to choose the type of layout you want
before you insert a new slide.
1. With your new slide 2, type a
Title.
2. Click in your Content Area
and enter a bullet list.
3. I have used sub-bullets for
the New and Improved File
Tab items by pressing my tab
key at the main bullet to
receive a secondary bullet.
To return to the primary
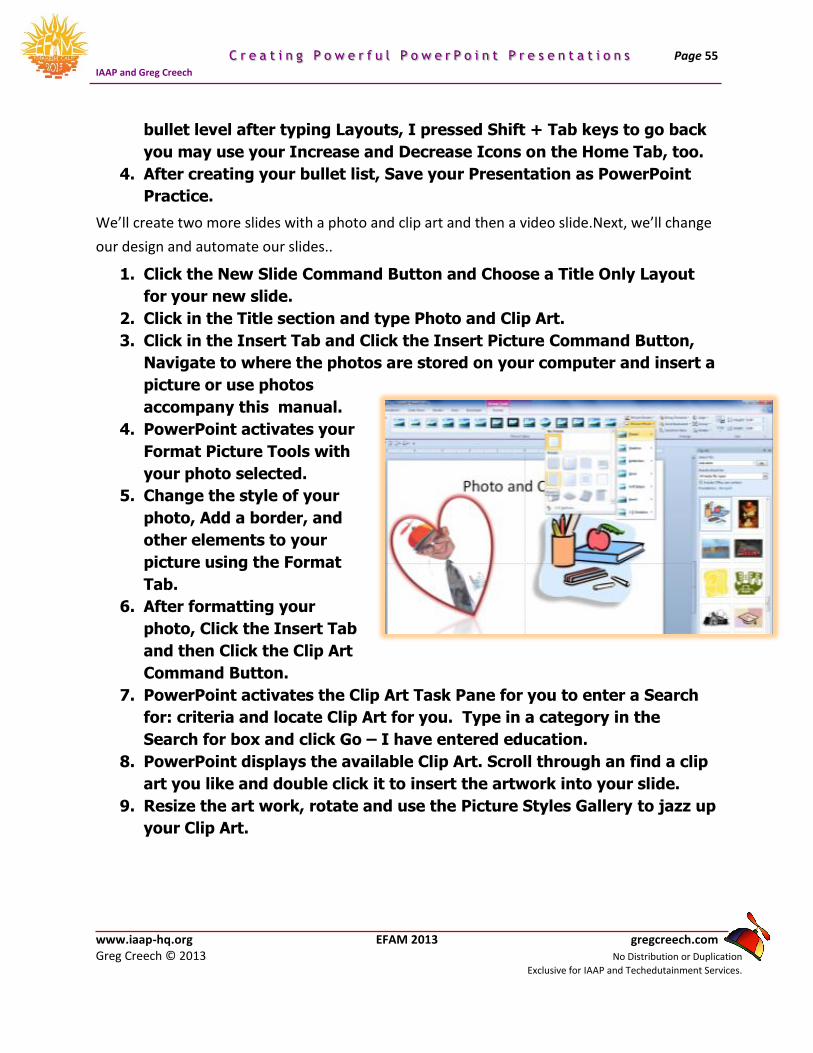
Page 55 C r e a t i n g P o w e r f u l P o w e r P o i n t P r e s e n t a t i o n s
IAAP and Greg Creech
www.iaap-hq.org EFAM 2013 gregcreech.com Greg Creech © 2013 No Distribution or Duplication
Exclusive for IAAP and Techedutainment Services.
bullet level after typing Layouts, I pressed Shift + Tab keys to go back
you may use your Increase and Decrease Icons on the Home Tab, too.
4. After creating your bullet list, Save your Presentation as PowerPoint
Practice.
We’ll create two more slides with a photo and clip art and then a video slide.Next, we’ll change
our design and automate our slides..
1. Click the New Slide Command Button and Choose a Title Only Layout
for your new slide.
2. Click in the Title section and type Photo and Clip Art.
3. Click in the Insert Tab and Click the Insert Picture Command Button,
Navigate to where the photos are stored on your computer and insert a
picture or use photos
accompany this manual.
4. PowerPoint activates your
Format Picture Tools with
your photo selected.
5. Change the style of your
photo, Add a border, and
other elements to your
picture using the Format
Tab.
6. After formatting your
photo, Click the Insert Tab
and then Click the Clip Art
Command Button.
7. PowerPoint activates the Clip Art Task Pane for you to enter a Search
for: criteria and locate Clip Art for you. Type in a category in the
Search for box and click Go – I have entered education.
8. PowerPoint displays the available Clip Art. Scroll through an find a clip
art you like and double click it to insert the artwork into your slide.
9. Resize the art work, rotate and use the Picture Styles Gallery to jazz up
your Clip Art.
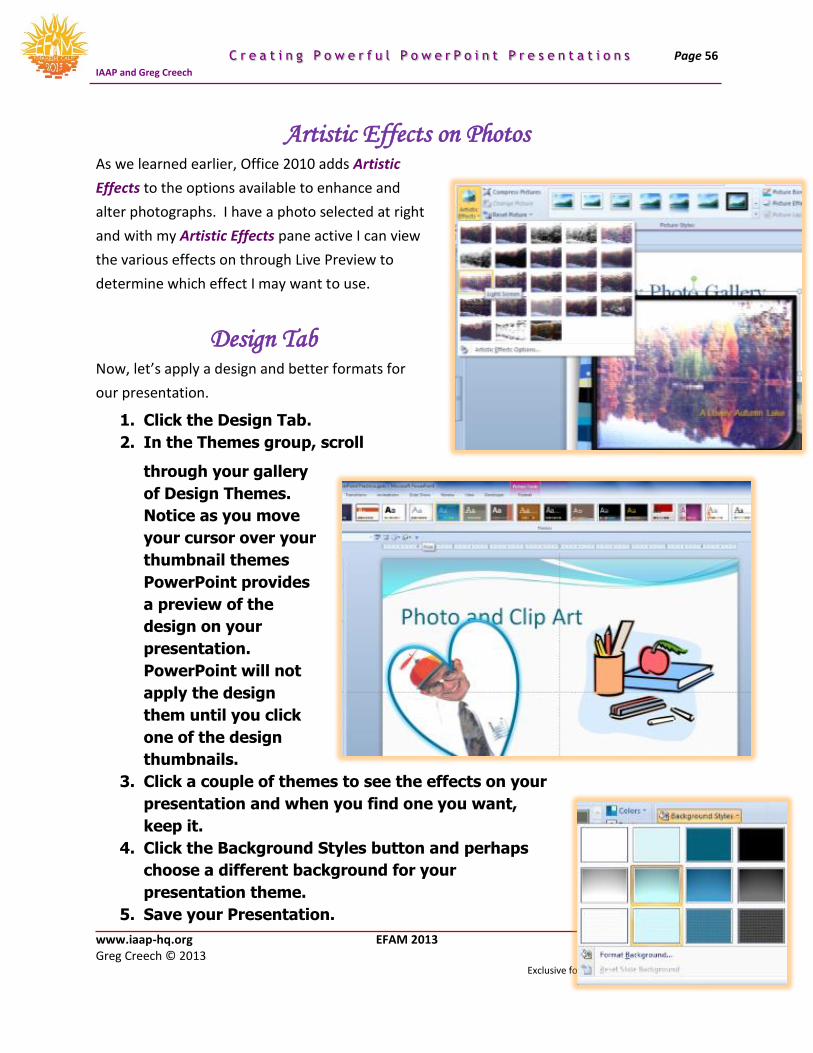
Page 56 C r e a t i n g P o w e r f u l P o w e r P o i n t P r e s e n t a t i o n s
IAAP and Greg Creech
www.iaap-hq.org EFAM 2013 gregcreech.com Greg Creech © 2013 No Distribution or Duplication
Exclusive for IAAP and Techedutainment Services.
Artistic Effects on Photos As we learned earlier, Office 2010 adds Artistic
Effects to the options available to enhance and
alter photographs. I have a photo selected at right
and with my Artistic Effects pane active I can view
the various effects on through Live Preview to
determine which effect I may want to use.
Design Tab Now, let’s apply a design and better formats for
our presentation.
1. Click the Design Tab.
2. In the Themes group, scroll
through your gallery
of Design Themes.
Notice as you move
your cursor over your
thumbnail themes
PowerPoint provides
a preview of the
design on your
presentation.
PowerPoint will not
apply the design
them until you click
one of the design
thumbnails.
3. Click a couple of themes to see the effects on your
presentation and when you find one you want,
keep it.
4. Click the Background Styles button and perhaps
choose a different background for your
presentation theme.
5. Save your Presentation.

Page 57 C r e a t i n g P o w e r f u l P o w e r P o i n t P r e s e n t a t i o n s
IAAP and Greg Creech
www.iaap-hq.org EFAM 2013 gregcreech.com Greg Creech © 2013 No Distribution or Duplication
Exclusive for IAAP and Techedutainment Services.
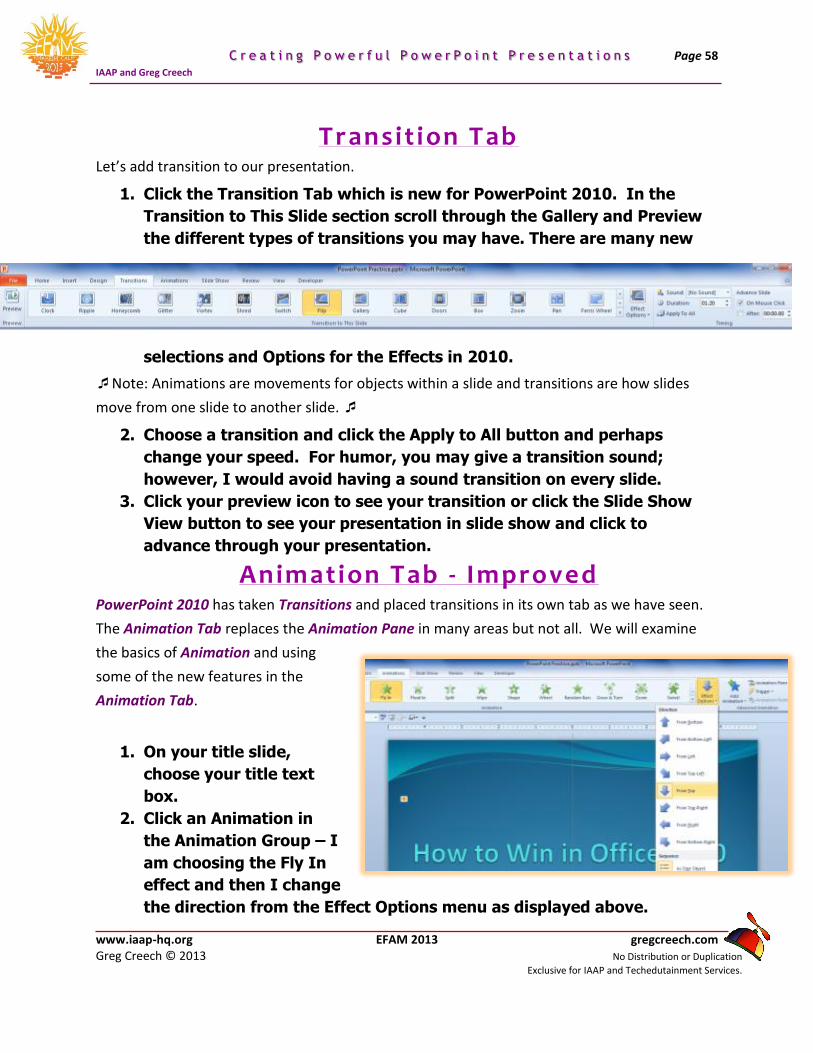
Page 58 C r e a t i n g P o w e r f u l P o w e r P o i n t P r e s e n t a t i o n s
IAAP and Greg Creech
www.iaap-hq.org EFAM 2013 gregcreech.com Greg Creech © 2013 No Distribution or Duplication
Exclusive for IAAP and Techedutainment Services.
Transit ion Tab Let’s add transition to our presentation.
1. Click the Transition Tab which is new for PowerPoint 2010. In the
Transition to This Slide section scroll through the Gallery and Preview
the different types of transitions you may have. There are many new
selections and Options for the Effects in 2010.
Note: Animations are movements for objects within a slide and transitions are how slides
move from one slide to another slide.
2. Choose a transition and click the Apply to All button and perhaps
change your speed. For humor, you may give a transition sound;
however, I would avoid having a sound transition on every slide.
3. Click your preview icon to see your transition or click the Slide Show
View button to see your presentation in slide show and click to
advance through your presentation.
Animation Tab - Improved PowerPoint 2010 has taken Transitions and placed transitions in its own tab as we have seen.
The Animation Tab replaces the Animation Pane in many areas but not all. We will examine
the basics of Animation and using
some of the new features in the
Animation Tab.
1. On your title slide,
choose your title text
box.
2. Click an Animation in
the Animation Group – I
am choosing the Fly In
effect and then I change
the direction from the Effect Options menu as displayed above.
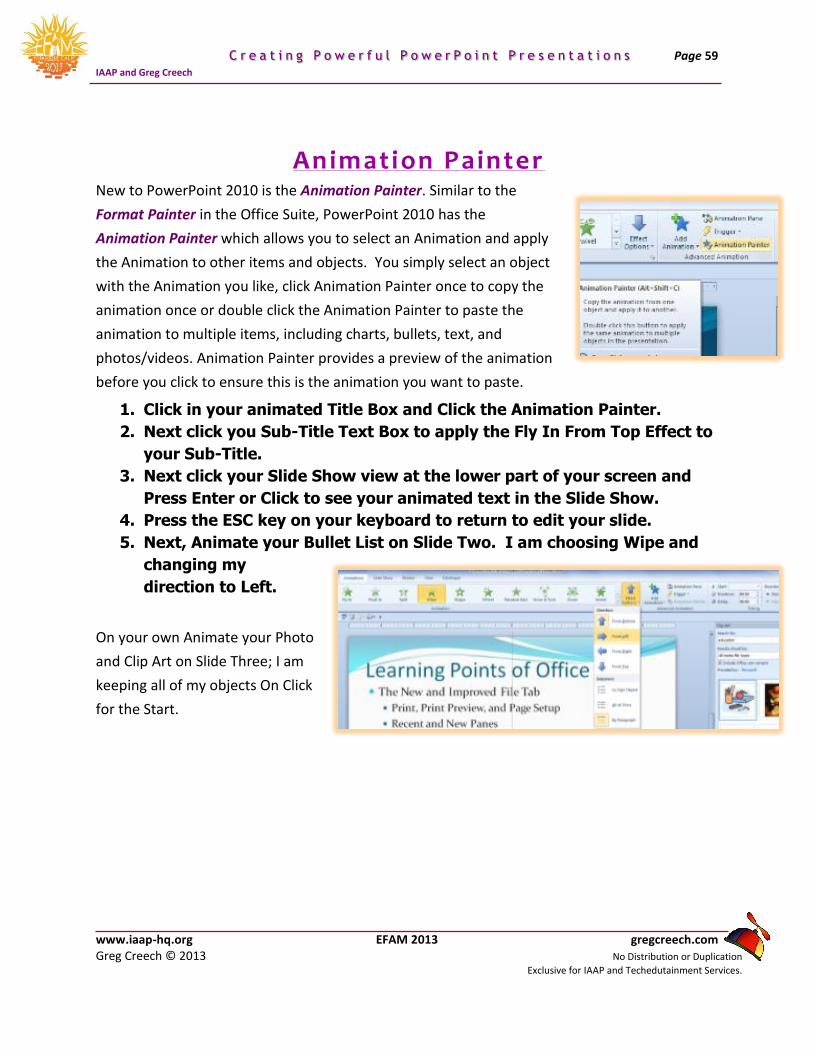
Page 59 C r e a t i n g P o w e r f u l P o w e r P o i n t P r e s e n t a t i o n s
IAAP and Greg Creech
www.iaap-hq.org EFAM 2013 gregcreech.com Greg Creech © 2013 No Distribution or Duplication
Exclusive for IAAP and Techedutainment Services.
Animation Painter New to PowerPoint 2010 is the Animation Painter. Similar to the
Format Painter in the Office Suite, PowerPoint 2010 has the
Animation Painter which allows you to select an Animation and apply
the Animation to other items and objects. You simply select an object
with the Animation you like, click Animation Painter once to copy the
animation once or double click the Animation Painter to paste the
animation to multiple items, including charts, bullets, text, and
photos/videos. Animation Painter provides a preview of the animation
before you click to ensure this is the animation you want to paste.
1. Click in your animated Title Box and Click the Animation Painter.
2. Next click you Sub-Title Text Box to apply the Fly In From Top Effect to
your Sub-Title.
3. Next click your Slide Show view at the lower part of your screen and
Press Enter or Click to see your animated text in the Slide Show.
4. Press the ESC key on your keyboard to return to edit your slide.
5. Next, Animate your Bullet List on Slide Two. I am choosing Wipe and
changing my
direction to Left.
On your own Animate your Photo
and Clip Art on Slide Three; I am
keeping all of my objects On Click
for the Start.
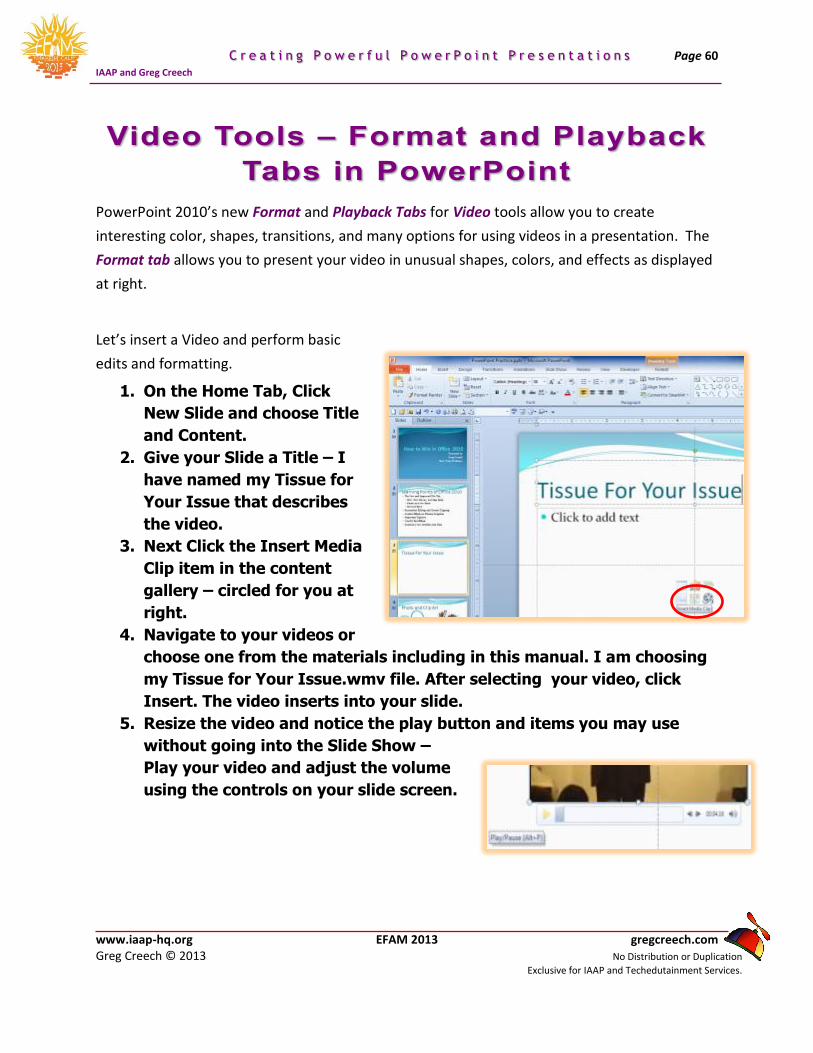
Page 60 C r e a t i n g P o w e r f u l P o w e r P o i n t P r e s e n t a t i o n s
IAAP and Greg Creech
www.iaap-hq.org EFAM 2013 gregcreech.com Greg Creech © 2013 No Distribution or Duplication
Exclusive for IAAP and Techedutainment Services.
PowerPoint 2010’s new Format and Playback Tabs for Video tools allow you to create
interesting color, shapes, transitions, and many options for using videos in a presentation. The
Format tab allows you to present your video in unusual shapes, colors, and effects as displayed
at right.
Let’s insert a Video and perform basic
edits and formatting.
1. On the Home Tab, Click
New Slide and choose Title
and Content.
2. Give your Slide a Title – I
have named my Tissue for
Your Issue that describes
the video.
3. Next Click the Insert Media
Clip item in the content
gallery – circled for you at
right.
4. Navigate to your videos or
choose one from the materials including in this manual. I am choosing
my Tissue for Your Issue.wmv file. After selecting your video, click
Insert. The video inserts into your slide.
5. Resize the video and notice the play button and items you may use
without going into the Slide Show –
Play your video and adjust the volume
using the controls on your slide screen.
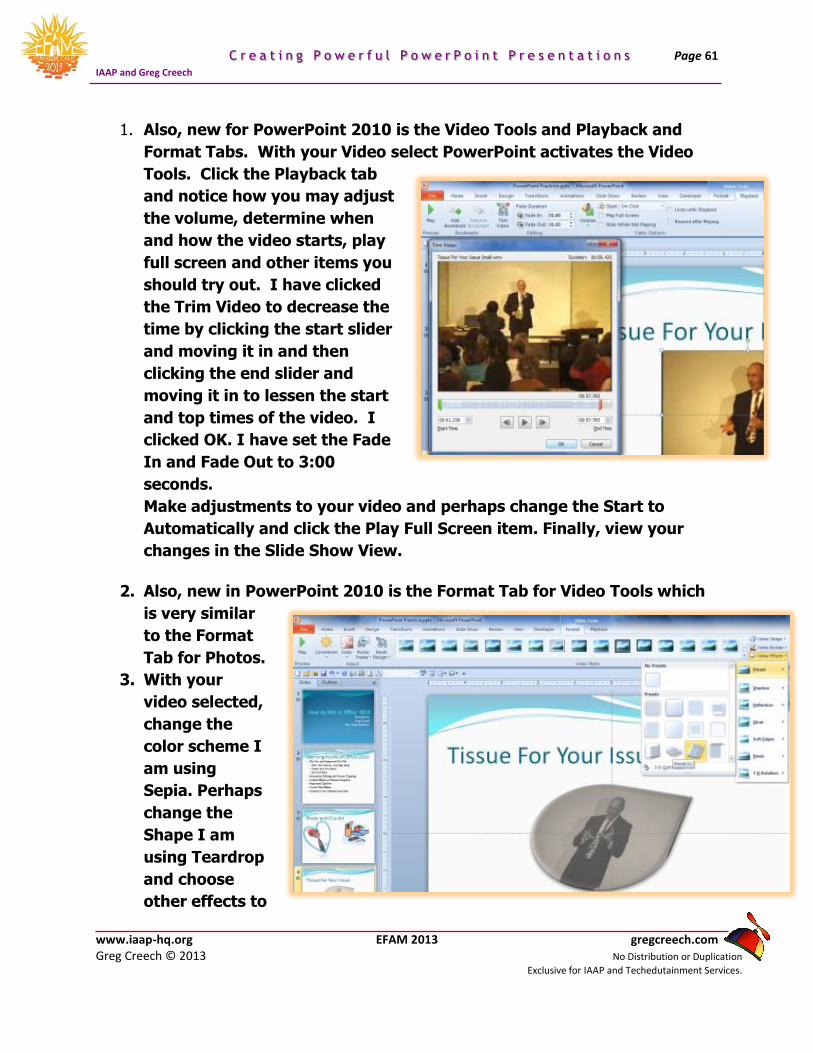
Page 61 C r e a t i n g P o w e r f u l P o w e r P o i n t P r e s e n t a t i o n s
IAAP and Greg Creech
www.iaap-hq.org EFAM 2013 gregcreech.com Greg Creech © 2013 No Distribution or Duplication
Exclusive for IAAP and Techedutainment Services.
1. Also, new for PowerPoint 2010 is the Video Tools and Playback and
Format Tabs. With your Video select PowerPoint activates the Video
Tools. Click the Playback tab
and notice how you may adjust
the volume, determine when
and how the video starts, play
full screen and other items you
should try out. I have clicked
the Trim Video to decrease the
time by clicking the start slider
and moving it in and then
clicking the end slider and
moving it in to lessen the start
and top times of the video. I
clicked OK. I have set the Fade
In and Fade Out to 3:00
seconds.
Make adjustments to your video and perhaps change the Start to
Automatically and click the Play Full Screen item. Finally, view your
changes in the Slide Show View.
2. Also, new in PowerPoint 2010 is the Format Tab for Video Tools which
is very similar
to the Format
Tab for Photos.
3. With your
video selected,
change the
color scheme I
am using
Sepia. Perhaps
change the
Shape I am
using Teardrop
and choose
other effects to

Page 62 C r e a t i n g P o w e r f u l P o w e r P o i n t P r e s e n t a t i o n s
IAAP and Greg Creech
www.iaap-hq.org EFAM 2013 gregcreech.com Greg Creech © 2013 No Distribution or Duplication
Exclusive for IAAP and Techedutainment Services.
make your video really tacky!
4. Play your video and look at your changes in the Slide Show View. Save
your Presentation.
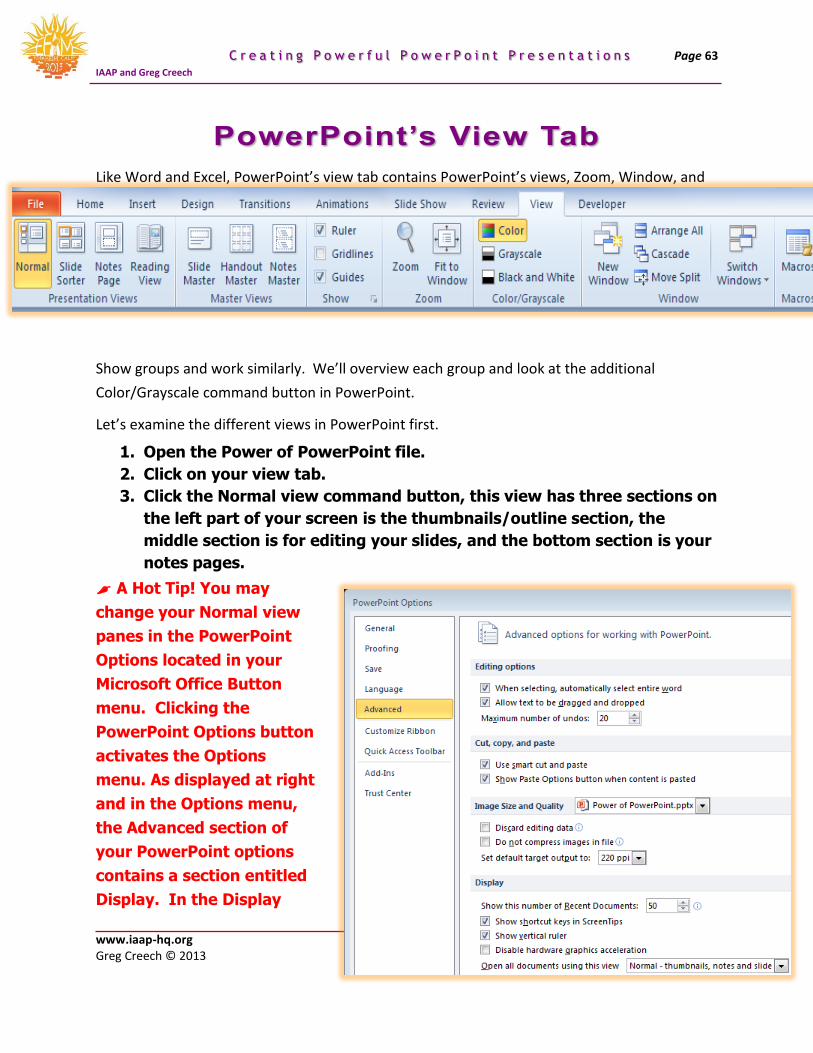
Page 63 C r e a t i n g P o w e r f u l P o w e r P o i n t P r e s e n t a t i o n s
IAAP and Greg Creech
www.iaap-hq.org EFAM 2013 gregcreech.com Greg Creech © 2013 No Distribution or Duplication
Exclusive for IAAP and Techedutainment Services.
Like Word and Excel, PowerPoint’s view tab contains PowerPoint’s views, Zoom, Window, and
Show groups and work similarly. We’ll overview each group and look at the additional
Color/Grayscale command button in PowerPoint.
Let’s examine the different views in PowerPoint first.
1. Open the Power of PowerPoint file.
2. Click on your view tab.
3. Click the Normal view command button, this view has three sections on
the left part of your screen is the thumbnails/outline section, the
middle section is for editing your slides, and the bottom section is your
notes pages.
A Hot Tip! You may
change your Normal view
panes in the PowerPoint
Options located in your
Microsoft Office Button
menu. Clicking the
PowerPoint Options button
activates the Options
menu. As displayed at right
and in the Options menu,
the Advanced section of
your PowerPoint options
contains a section entitled
Display. In the Display
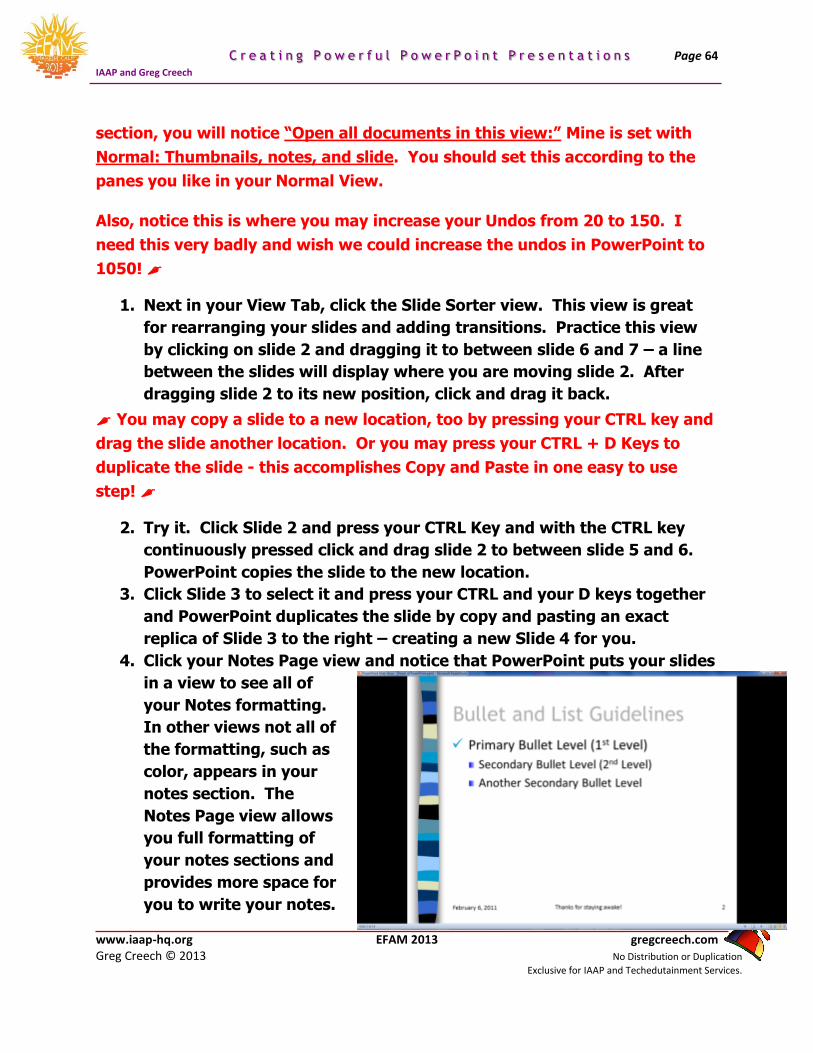
Page 64 C r e a t i n g P o w e r f u l P o w e r P o i n t P r e s e n t a t i o n s
IAAP and Greg Creech
www.iaap-hq.org EFAM 2013 gregcreech.com Greg Creech © 2013 No Distribution or Duplication
Exclusive for IAAP and Techedutainment Services.
section, you will notice “Open all documents in this view:” Mine is set with
Normal: Thumbnails, notes, and slide. You should set this according to the
panes you like in your Normal View.
Also, notice this is where you may increase your Undos from 20 to 150. I
need this very badly and wish we could increase the undos in PowerPoint to
1050!
1. Next in your View Tab, click the Slide Sorter view. This view is great
for rearranging your slides and adding transitions. Practice this view
by clicking on slide 2 and dragging it to between slide 6 and 7 – a line
between the slides will display where you are moving slide 2. After
dragging slide 2 to its new position, click and drag it back.
You may copy a slide to a new location, too by pressing your CTRL key and
drag the slide another location. Or you may press your CTRL + D Keys to
duplicate the slide - this accomplishes Copy and Paste in one easy to use
step!
2. Try it. Click Slide 2 and press your CTRL Key and with the CTRL key
continuously pressed click and drag slide 2 to between slide 5 and 6.
PowerPoint copies the slide to the new location.
3. Click Slide 3 to select it and press your CTRL and your D keys together
and PowerPoint duplicates the slide by copy and pasting an exact
replica of Slide 3 to the right – creating a new Slide 4 for you.
4. Click your Notes Page view and notice that PowerPoint puts your slides
in a view to see all of
your Notes formatting.
In other views not all of
the formatting, such as
color, appears in your
notes section. The
Notes Page view allows
you full formatting of
your notes sections and
provides more space for
you to write your notes.
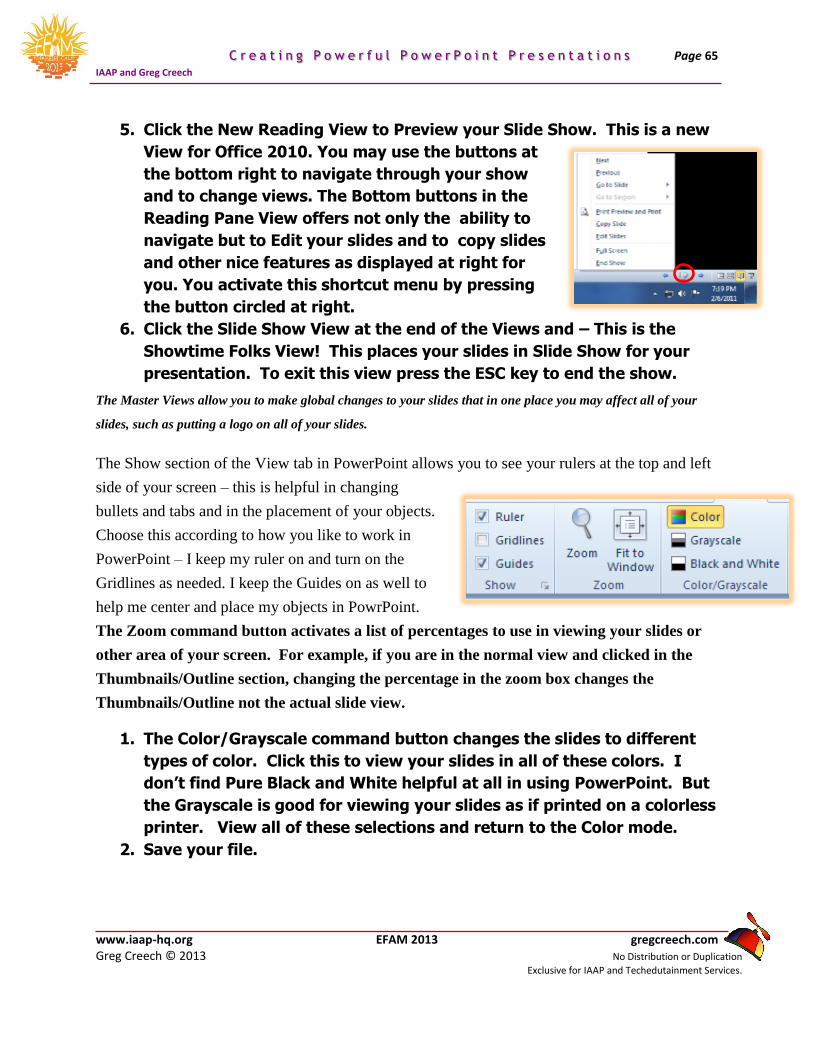
Page 65 C r e a t i n g P o w e r f u l P o w e r P o i n t P r e s e n t a t i o n s
IAAP and Greg Creech
www.iaap-hq.org EFAM 2013 gregcreech.com Greg Creech © 2013 No Distribution or Duplication
Exclusive for IAAP and Techedutainment Services.
5. Click the New Reading View to Preview your Slide Show. This is a new
View for Office 2010. You may use the buttons at
the bottom right to navigate through your show
and to change views. The Bottom buttons in the
Reading Pane View offers not only the ability to
navigate but to Edit your slides and to copy slides
and other nice features as displayed at right for
you. You activate this shortcut menu by pressing
the button circled at right.
6. Click the Slide Show View at the end of the Views and – This is the
Showtime Folks View! This places your slides in Slide Show for your
presentation. To exit this view press the ESC key to end the show.
The Master Views allow you to make global changes to your slides that in one place you may affect all of your
slides, such as putting a logo on all of your slides.
The Show section of the View tab in PowerPoint allows you to see your rulers at the top and left
side of your screen – this is helpful in changing
bullets and tabs and in the placement of your objects.
Choose this according to how you like to work in
PowerPoint – I keep my ruler on and turn on the
Gridlines as needed. I keep the Guides on as well to
help me center and place my objects in PowrPoint.
The Zoom command button activates a list of percentages to use in viewing your slides or
other area of your screen. For example, if you are in the normal view and clicked in the
Thumbnails/Outline section, changing the percentage in the zoom box changes the
Thumbnails/Outline not the actual slide view.
1. The Color/Grayscale command button changes the slides to different
types of color. Click this to view your slides in all of these colors. I
don’t find Pure Black and White helpful at all in using PowerPoint. But
the Grayscale is good for viewing your slides as if printed on a colorless
printer. View all of these selections and return to the Color mode.
2. Save your file.
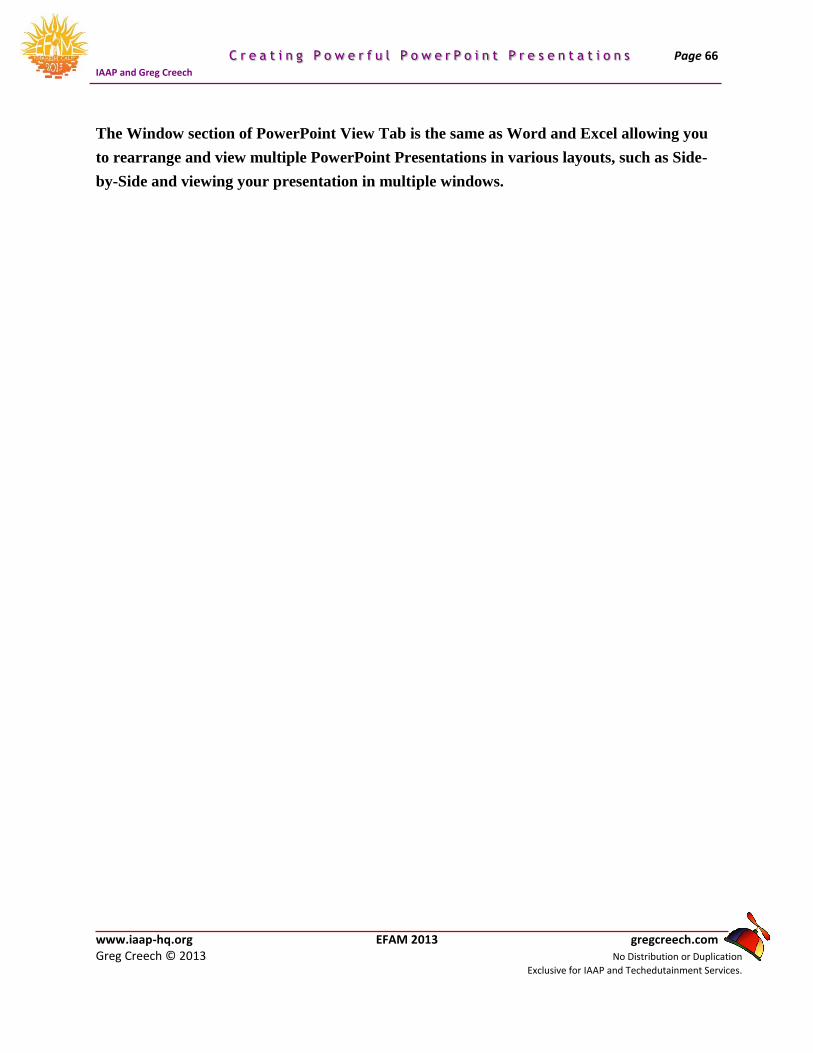
Page 66 C r e a t i n g P o w e r f u l P o w e r P o i n t P r e s e n t a t i o n s
IAAP and Greg Creech
www.iaap-hq.org EFAM 2013 gregcreech.com Greg Creech © 2013 No Distribution or Duplication
Exclusive for IAAP and Techedutainment Services.
The Window section of PowerPoint View Tab is the same as Word and Excel allowing you
to rearrange and view multiple PowerPoint Presentations in various layouts, such as Side-
by-Side and viewing your presentation in multiple windows.
Page 67 C r e a t i n g P o w e r f u l P o w e r P o i n t P r e s e n t a t i o n s
IAAP and Greg Creech
www.iaap-hq.org EFAM 2013 gregcreech.com Greg Creech © 2013 No Distribution or Duplication
Exclusive for IAAP and Techedutainment Services.
A
Action Buttons · 46 Animate Text · 20 Animate the Slide · 29 Animation Order · 30 Animation Painter · 59 Animation Schemes · 18 Animation Tab · 58 Artistic Effects · 56
B
Background Styles · 57 Bullet List · 13
C
CD audio track · 37 Clip Art · 28, 55 Clip Art sounds · 42 Color Design · 32 Custom Animation · 21 Custom Animation Task Pane · 19
D
Decrease Indent Icon · 14 Design Tab · 56 Design Template · 31 Design Themes · 56
E
Effects and Options · 22 Excel Spreadsheet · 49
F
Format Picture Menu · 35
H
Handout Master · 51 Headers and Footers · 14 How to add a picture · 34 hyperlink · 46
I
Increase and Decrease Indent Icons · 13 Insert Clip Art · 28 Insert Picture · 34, 55
L
Layout · 55
M
Master View · 51 Master View Tabs · 51 Movie Settings · 44 Movies · 44 Multi-Media · 36 music · 40
N
New Slide · 54 Notes Master · 51
P
Photo Album (New to 2003) · 53 picture · 34 Picture Contextual Tab · 35 Picture Styles Gallery · 55 Picture Tools and Format Contextual tab · 35 Play CD Audio Dialogue Box · 38 Playback Tabs · 60 presentation tips · 7
Page 68 C r e a t i n g P o w e r f u l P o w e r P o i n t P r e s e n t a t i o n s
IAAP and Greg Creech
www.iaap-hq.org EFAM 2013 gregcreech.com Greg Creech © 2013 No Distribution or Duplication
Exclusive for IAAP and Techedutainment Services.
S
sans serif fonts · 7 Slide Design · 31 Slide Design Tab · 31 Slide Master · 50, 51 Slide Master Tab · 52 Slide Show View · 58 Slide Sorter · 64 Slide Transition · 25 Sound from a File · 40 Sound Options Tab · 39 Sound Settings · 39 Sounds and CDs · 37
T
Template · 50
Templates and The Master · 50 Text Boxes · 11 Themes · 31 Title Slide · 10 Transition · 58 Transition Effect · 25 Transition Tab · 58 Transition to this Slide Group · 25 Trim Video · 61
U
URL · 48
V
Video tools · 60