power vs. emotion - nathan wilson, creator of...
TRANSCRIPT
Power vs. EmotionSinging Power is one of the common concerns among musicians - including me. Now,before we proceed with learning more about singing power, you'll want to quickly do a warmup.
I tend to hum in all three low, middle, and high voices as a warm-up. You literally just hum as low as you can, thenhum once again at a comfortable middle range, and then hum as high as possible without your dog chiming in.
Developing powerful vocals is actually a complex task, incorporating diaphragm strength, vocal cord muscle strength, using appropriate resonance, as well as jaw and throat relaxation.
Failure to pay attention to any of these various aspects could result in vocal abuse or damage, because many of us may squeeze our vocal cords or strain our throats in order to get a louder singing voice.
IMPORTANT: If you find that your voice or throat starts to hurt during your practice sessions, STOP your vocal exercises and REST your voice immediately! This will help you to avoid any vocal damage that might occur during your self-practice.
One very common mistake that singers may commit is to overblow or force too much air through their vocal cords when trying to increase singing power. This is usually
achieved by using more force in the abdominal muscles, causing the diaphragm to expel air faster through the vocal cords. If you took my EZ Harmonica course then the same concept here applies. Luckily for me, I'm NOT a powerful singer at all, so I rarely blow my voice out. I tend to sing more in falsetto because I do sing so often.
When we sing with power, we need to achieve a balanced sound, with a healthy mixture of breath and voice. In fact, we really need little air when we sing, and using too much air may result in too much tension being exerted on our vocal cords. An example of a singer that actually uses rather healthy power vocals is James Hetfield from Metallica. While we may not all love the sound of his voice (I'm not a big fan of Metallica) his studio vocals are always spot on in terms of power. Live - not so much. He actually tends to sing in middle voice in live concerts.
A good friend of mine, Kenny Mann (from Guitar Alliance) went to a Metallica show years ago, and the first thing he told me when he got back was that James Hetfield rarely did his signature growls, power vocals, or any of that. He said that Hetfield wasobviously trying to take care of his voice, and instead sang most everything more in middle voice.
Another important point to note when developing singing power is knowing how to place our voices in order to achieve a brighter and stronger sound when we sing. This all has to do with our low, middle, and high voicings. We can sing with power in all three voices, but you'll find it much more difficult to sing with power in a higher voicing.
A singer that is very good at high voicing power is Nate Ruess from the band "Fun." Another singer that was very good at high voicing power was Freddie Mercury from "Queen."
Finally, one more singer that has a great register with high voicing power is Steve Perry from "Journey."
These guys make it seem SOOOO easy - and they actually produce(d) an amazing sense of power using high vocals. For me, this just isn't all that possible. My power voice rarely comes out because I've hidden it for so many years.
Imagine that you are ‘throwing’ your voice across a hallway or room, making it bounce off the wall on the other side and come right back to you.
With power singing, you MUST keep your jaw relaxed and loose. It might seem as though a power singer (such as James Hetfield) pushes their vocals to the breaking point and really clench their jaws, but the truth is they don't. At least when they sing powerfully – CORRECTLY.
We want to reduce the strain on our throats by treating our low, middle, and high voicings as merely a passageway through which our voice is traveling.

Relaxing:
If we place one finger from each hand just below our ears, we should be able to feel our jaw gently ‘unhinging’ itself as we open our mouths. This should take place naturally and in a relaxed manner, and imagining the top part of our mouths lifting off the jaw will help us reduce unnecessary tension in our jaw muscles!
Many singers project their voice by belting, which usually means singing high notes in a lower vocal position or placement, usually in the middle voice, with an open throat and relaxed jaw. This allows singers to sound strong and loud, and not be overly nasal or screechy in the high notes.
Belting takes a lot of effort and practice to get correct, and is certainly one of the more difficult vocal techniques to try to master. It will require the expertise of an experienced vocal coach who would be able to help you build up your singing power. This is something I can't do. However, I CAN help you learn to sing with emotion.
Singing With EmotionI prefer to sing with emotion, but this is based mostly on the type of songs I enjoy - both as instruction and when writing my own songs. As guitar players FIRST and singers SECOND, this is actually a bit easier for us. We all know that a minor chord tends to sound sad or darker in terms of mood and tone.

We know that a Major chord tends to sound brighter, maybe in a way like sunshine. However, this isn't ALWAYS the case.
There are songs that have a Major chord progression and yet still feel rather depressing or blue. This is due to the emotion that the singer brings forth.
Forget How It Feels
Feeling sad and sounding sad are very different. To sound sad, you have to know how to get the right sound and produce it.
Use Vocal Techniques to “Feel the Sound”
It’s all about mouth sound in singing. This means that different mouth sounds create different feels. If you do them, you will sound a certain way—every time. Think of Christina Aguilera’s voice in "Say Something" by A Great Big World.
Watch “Say Something” by A Great Big World
She sounds edgy and emotional. She is one of the best "power AND emotion" singers I can think of to be honest. We could argue that she's TOO emotional (which can come across as fake) but she still has some serious singing chops. The technique is called a “creak” or “cry.” You don’t have to feel the emotion—just use the appropriate technique.
When you watch the video above, I want you to check out the way the male singer sounds. He, in many ways, seems completely VOID of any emotion. Almost like he's bored, right? He is still displaying emotion. This emotion is more of a "giving up" (he even says this!) or even a hopeless way of getting his point across. When Christina Aguilera comes in, you can't help but feel that the song becomes severely powerful and emotional. These contrasting vocal styles make this song so much better in my opinion.
You can also watch Mary J. Blige's performance with Sam Smith on "Stay With Me" and you'll see the same overall concept. The difference here is Sam Smith is MUCH more emotional with his vocals, where Mary J. Blige is more powerful. Talk about dynamics!
Watch “Stay With Me” by Sam Smith f/ Mary J. Blige
What Techniques Are Implied?In each of these songs the overall technique is (1) ENUNCIATION and (2) BREATH CONTROL.
We've discussed enunciation a bit, but the idea here is this: ANY singer can get more emotion by enunciating vowels and coloring tone with consonants. This does not mean singing the whole word as you might speak it. To enunciate in singing, you need to BREAK the word down into its phonetics. This adds clarity to the words, and your ear does the rest. If you are like me, when you say "something" (as in the "Say
Something" song) I usually drop the "g" when I speak. When I sing, I can't do this, not really anyway. It won't come across as emotional. It will come off as, well, lazy. When we sing in general, often we'll feel as though a word sounds goofy if we over-enunciate it. Try your best to look past this. If you aren't watching the video from "Say Something" - please - do so now. Listen to every single word. EVERY single word. You will find perfect enunciation - down to the word "I" - which ends up sounding more like an "eye" instead of just "I."
Funny....my wife LOVES Jason Mraz's music - but she hates watching him sing. She has an issue with his mouth. It doesn't bother me at all, but I have noticed what she istalking about. He does tend to over-enunciate at times, and this causes his mouth to look strange.
Here's an example:
Watch “A Beautiful Mess” by Jason Mraz
Watch his mouth - avoid anything else. His mouth has this "way" about it. He IS over-enunciating.
This brings up (2) with Breath Control. This dude is a MASTER of it. Listen to how beautiful his pitch during the "...this is..." from "and what a beautiful mess this is..." at about 1:04. By the way, when you listen closely, he IS a great singer, but really he's just using low, middle, and high voicings! Can you find them?
Connect the Emotion to the Vocal Sound
Here’s the key to all of this. It’s not enough to feel the emotion or just produce it—both elements have to be connected authentically for a performance to sound real. Take the “creak” example. If I’m using it, but my emotion isn’t behind it, I may soundsadder, but end up not giving a convincing performance. Skilled vocalists know how to express their emotion through their technique—not the other way around.
Emotion In Only One Voice
Watch “Let Her Go” by Passenger
This song is called "Let Her Go" by Passenger. One dude. One guitar. One voice. How in the world does he convey so much emotion into a very simple song? He uses one voice (high voice) but the way he sings it is soooo emotional to me at least.
You find yourself sucked into the song. The lyrics aren't all that impressive. How he achieves this "drawn in/sucked in" to the song process is simple. His voice becomes standardized. You know how he is going to sound, so you start listening to WHAT he is singing instead of HOW he is singing.
Sure, he sounds a bit like a leprechaun, It's not my intention to seem racist - I absolutely don't mean it that way! When you listen to a vocalist you just can't get around thinking "what does he/she sound like?"
For me, when I hear it I can immediately assume he's not American. His voice soundstoo enunciated for the typical American drawl.
Vowel Sounds
Which vowels you sing, and how clearly you produce them impacts the emotional intent. For example, the vowel in the word down is pronounced with the diphthong (ah-oo). So down is sung like “dah –oo” with the “n” sound at the very end. Pop singers add color in a diphthong by holding the first vowel (dah) longer than the second. If I then add a creak to only the last part of the vowel, it will sound like I’m becoming more pained.
Sing in the ShowerIf you just want to get into the “groove” of singing, and not worry about communicating effectively, sing in the shower, or the car or your living room before you go onstage or into the studio. Unchained from performance angst, you may discover some parts or phrasing that will ultimately help your “actual” performance communicate the lyrics better and move your listeners.
Build a Performance on One WordI will touch base on this more in another tutorial from "Repetition of Trusted Words" but I will give you yet another example. When Dave Grohl (Foo Fighters, drummer from Nirvana) was asked about the song "Skin and Bones" he said that his vocal
arrangement for the song was entirely based around ONE single word - bones. He made the comment that when we tried singing the word "bones" it always came out as flat. When you listen below you'll hear that he uses the word "bones" QUITE often.He said that he just worked on a way to pronounce the word and tried to stick to it.
He actually said...
"I pretended to be British. At least for that song. I had this thought that if I used moreof a (spoken vocal accent on "boWnEs") instead of just (spoken vocal accent on "bohnes") it worked better. I just made sure that I used the "w" and the "e" to make it sound British."
Watch “Skin and Bones” by Foo Fighters
When you listen to the song, you'll hear it. It's a bit strange, but he does it every time. Did you even notice it without it being pointed out? Also listen to when he says "set" and "get" - where both of those sound exactly the same.
I have a habit of saying "git" instead of "get" - where the "e" doesn't really sound like an E. More like an I.
While I don't do this with the word "set" - because I subconsciously know that there is such word as "sit" - by using "get" and trying to mimic "get" with "set" (even thoughthe order is different) you'll find that words that rhyme with the word in question

become MUCH easier.
Progressions in Low, Middle, and High
Today's lesson deals primarily with changing chords WHILE you find the low, middle, and high.
Remember:
1. While I am hesitant to say "key" - this is what is really going on. Every chord that begins the exercises is the key of the song. You will be singing in a low, middle, and high voicing using the first chord that is played.2. You can choose to start with ANY of the three low, middle, or high voicings. A wordof caution though: I highly recommend looking at the second chord in the progression to determine where you want to start in terms of your first voicing.3. We don't need lyrics. Instead, either "oooh" to yourself or "mmmm" to yourself for now using these three mouth positions:
Progression: F#m - D - F#m - ESince the F#m is the relative minor of A, we can use the same I - IV - I - V formation that generally works in A, which is A - D - A – E.
Instead, we simply alter the "A" and make it an F#m.

The first chord we play in this case is F#m. When you play F#m, you'll hear that is sounds rather sad. After all, it's a minor chord. However, does this mean that the F#m is the lowest sounding chord?
No. The lowest sounding chord in this progression is actually the E Major. When you play it you hear it immediately.
So, this means, for purpose of singing without an already established vocal pattern (such that you would hear in a song you are covering) you can assume that the F#m won't be sung lower than the E Major.
F#m = ?D Major = ? E Major = low
Our assumption that F#m is sad is still correct. When you play the D Major you'll hear it as a brighter chord. I bet you can fill in the blanks here:
F#m = ?D Major = high E Major = low
F#m must be assumed to be sung as the middle. Interestingly enough, it's the first chord in our progression. Have you noticed that so far every "first" chord seems to be

middle? It makes sense as the first chord in any progression begins the journey of low, middle, and high in any progression that we are creating.
Now, we are singing in the key of F#m - AND/OR in the key of A Major. As you'll recall, the "minor" isn't all that important. In essence it's just F#. The minor sound is created without any tonal interest. It's just a voice inflection with which you create a bit more air in your vocals.
Do This:Below are two pitch pipe mp3 files. They open in new tabs. Click on both of them, andthen alternate back and forth between tabs, clicking play. You'll hear how they "come together" - even though they DO sound tonally different.
What you are actually hearing is the low, middle, and high within each note (F# and A) alone.
Here is a pitch pipe in F#:Click Here
Here is a pitch pipe in A Major:Click Here
When you listen to the two above, you'll hear a TONAL difference, but you can still

sing in either F# or A Major regardless. The video below will explain:
http://vimeo.com/102164567
This process is the exact same if one guitarist is playing an A Major and another guitarist is playing an F#m. Playing them both together will work based on tone. They don't "sound" the exact same, but they can absolutely be played simultaneously and still work.
In a way, that's what you do with your vocals. In the examples below, I have created atable of events that I'd like you to try. This will help (hopefully) bring forth the concept of USING the guitar while you sing, but not focusing SOLELY on the chord progression.
Always remember we have three voices to choose from, and there are also low, middle, and high voicings within those as well. This is part of the octave concept.
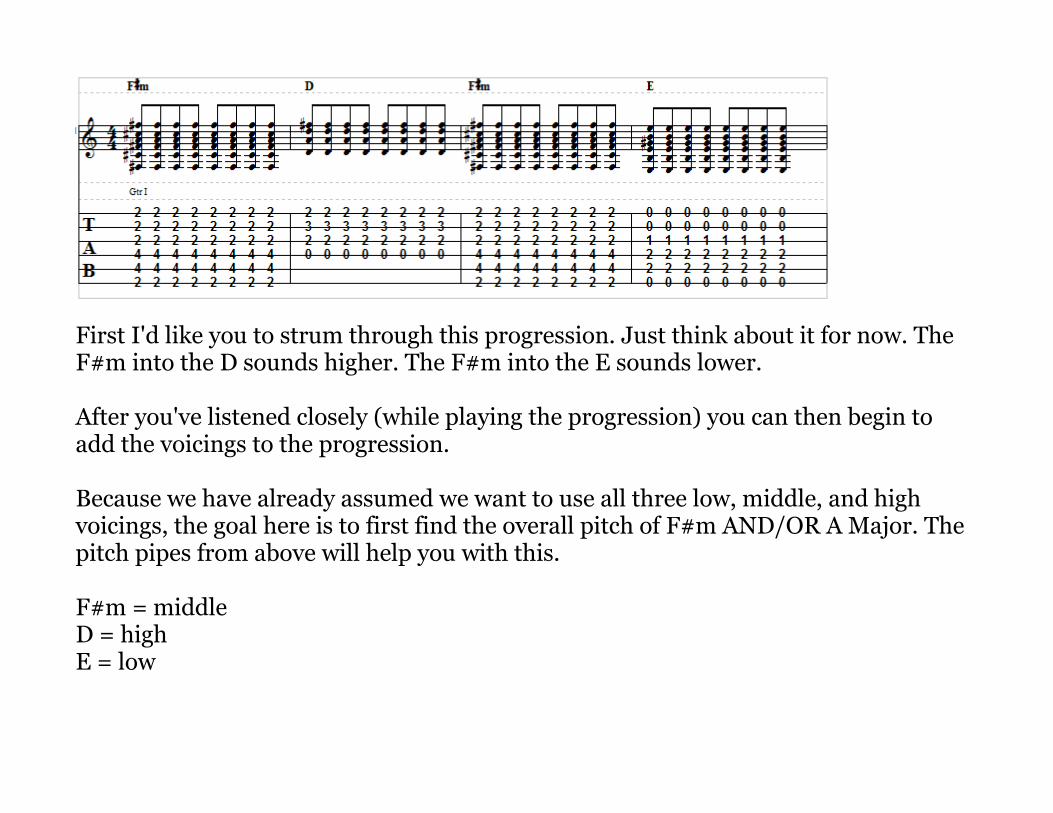
First I'd like you to strum through this progression. Just think about it for now. The F#m into the D sounds higher. The F#m into the E sounds lower.
After you've listened closely (while playing the progression) you can then begin to add the voicings to the progression.
Because we have already assumed we want to use all three low, middle, and high voicings, the goal here is to first find the overall pitch of F#m AND/OR A Major. The pitch pipes from above will help you with this.
F#m = middleD = highE = low
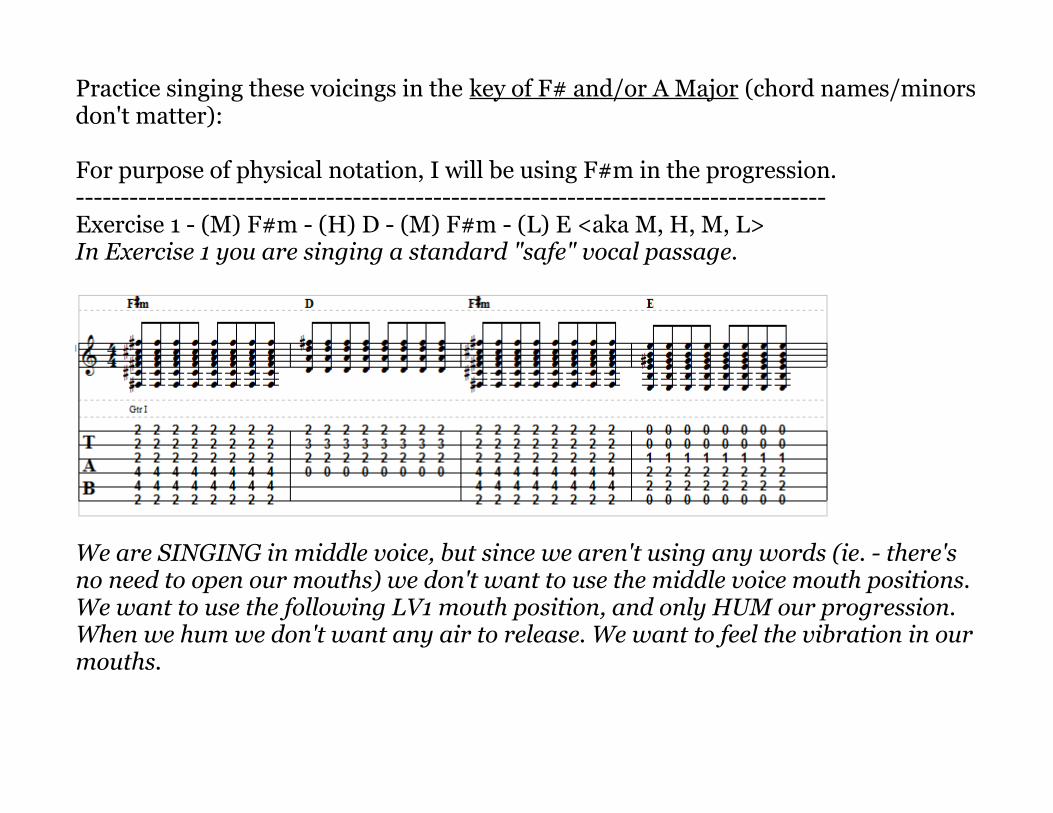
Practice singing these voicings in the key of F# and/or A Major (chord names/minorsdon't matter):
For purpose of physical notation, I will be using F#m in the progression.------------------------------------------------------------------------------------Exercise 1 - (M) F#m - (H) D - (M) F#m - (L) E <aka M, H, M, L>In Exercise 1 you are singing a standard "safe" vocal passage.
We are SINGING in middle voice, but since we aren't using any words (ie. - there's no need to open our mouths) we don't want to use the middle voice mouth positions.We want to use the following LV1 mouth position, and only HUM our progression. When we hum we don't want any air to release. We want to feel the vibration in ourmouths.
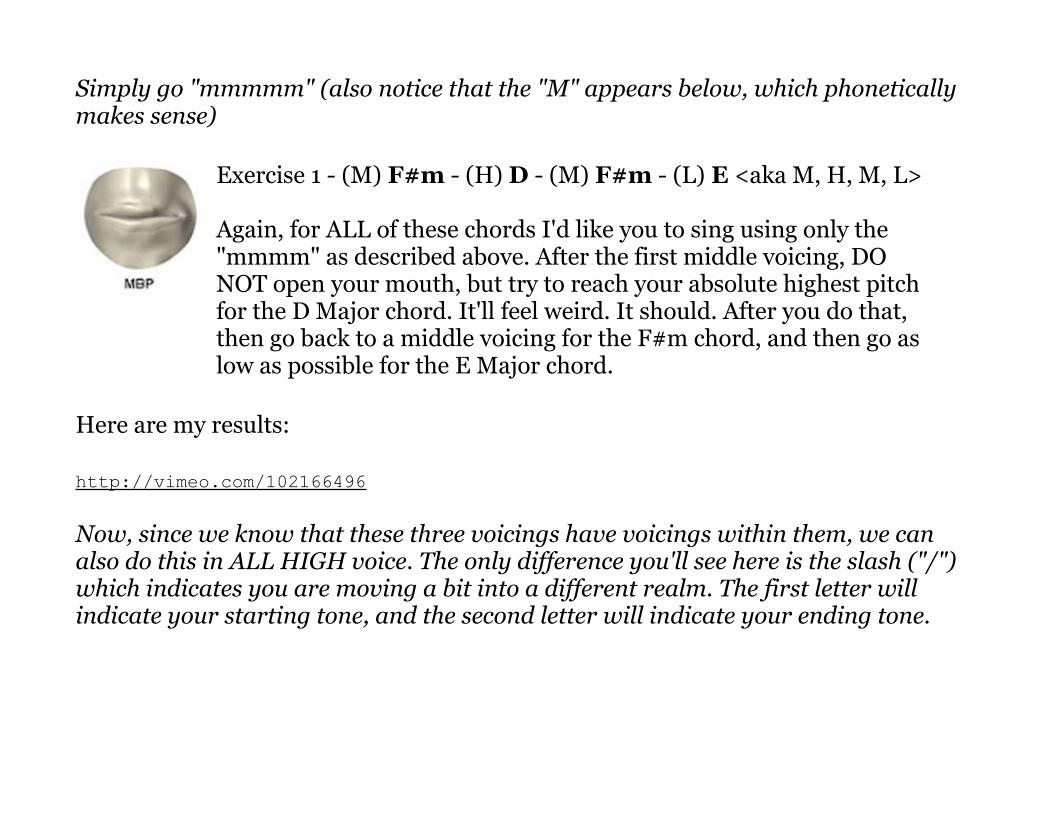
Simply go "mmmmm" (also notice that the "M" appears below, which phonetically makes sense)
Exercise 1 - (M) F#m - (H) D - (M) F#m - (L) E <aka M, H, M, L>
Again, for ALL of these chords I'd like you to sing using only the "mmmm" as described above. After the first middle voicing, DO NOT open your mouth, but try to reach your absolute highest pitch for the D Major chord. It'll feel weird. It should. After you do that, then go back to a middle voicing for the F#m chord, and then go as low as possible for the E Major chord.
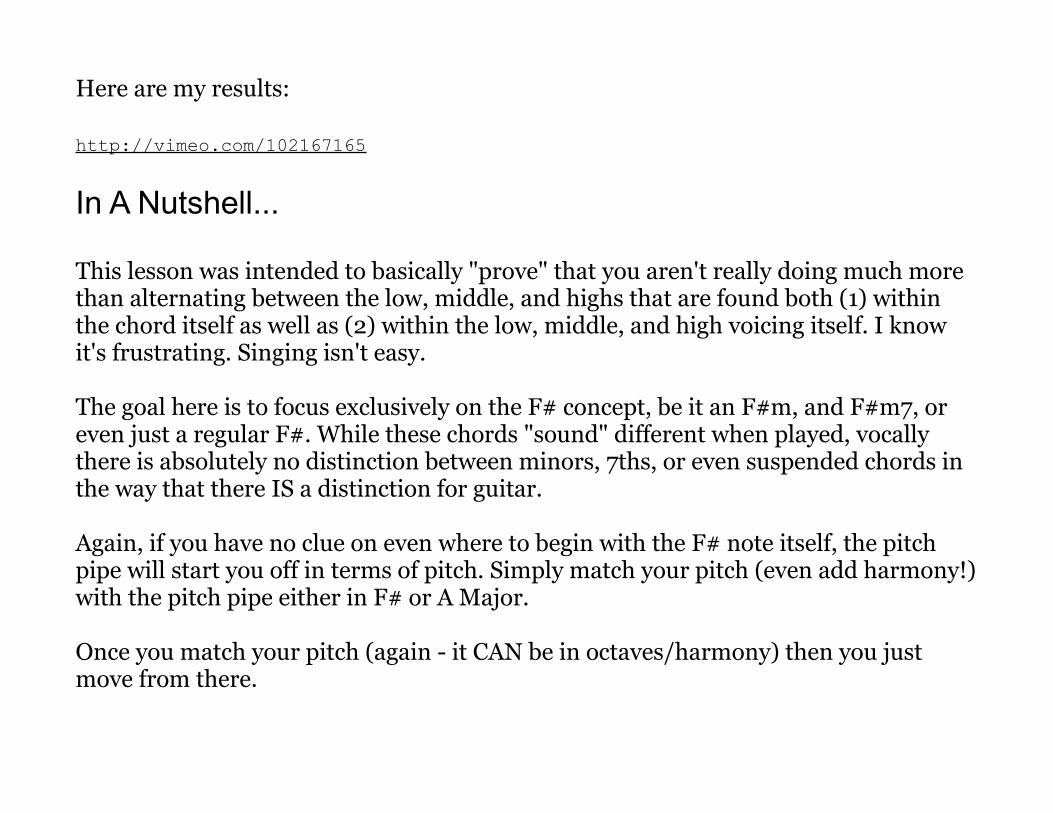
Here are my results:
http://vimeo.com/102166496
Now, since we know that these three voicings have voicings within them, we can also do this in ALL HIGH voice. The only difference you'll see here is the slash ("/") which indicates you are moving a bit into a different realm. The first letter will indicate your starting tone, and the second letter will indicate your ending tone.
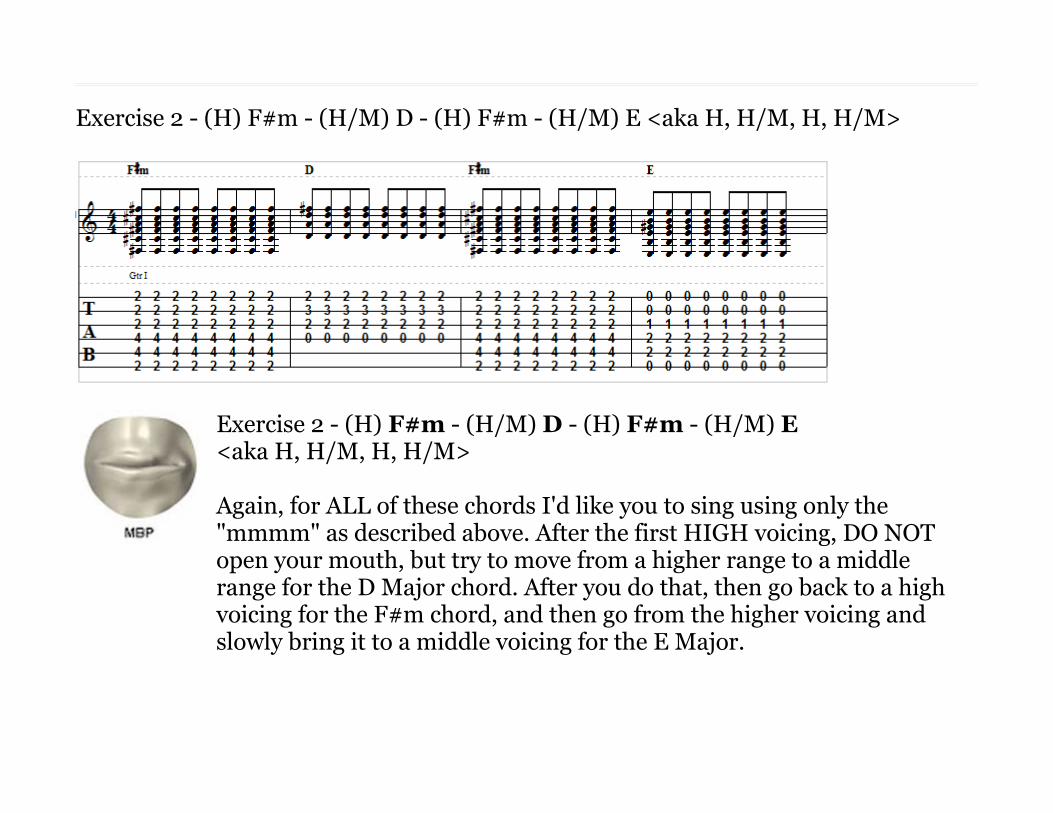
Exercise 2 - (H) F#m - (H/M) D - (H) F#m - (H/M) E <aka H, H/M, H, H/M>
Exercise 2 - (H) F#m - (H/M) D - (H) F#m - (H/M) E <aka H, H/M, H, H/M>
Again, for ALL of these chords I'd like you to sing using only the "mmmm" as described above. After the first HIGH voicing, DO NOT open your mouth, but try to move from a higher range to a middle range for the D Major chord. After you do that, then go back to a highvoicing for the F#m chord, and then go from the higher voicing and slowly bring it to a middle voicing for the E Major.

Here are my results:
http://vimeo.com/102166499
Finally, we can do this in ALL LOW voice as well.
The same situation from Exercise 2 applies.
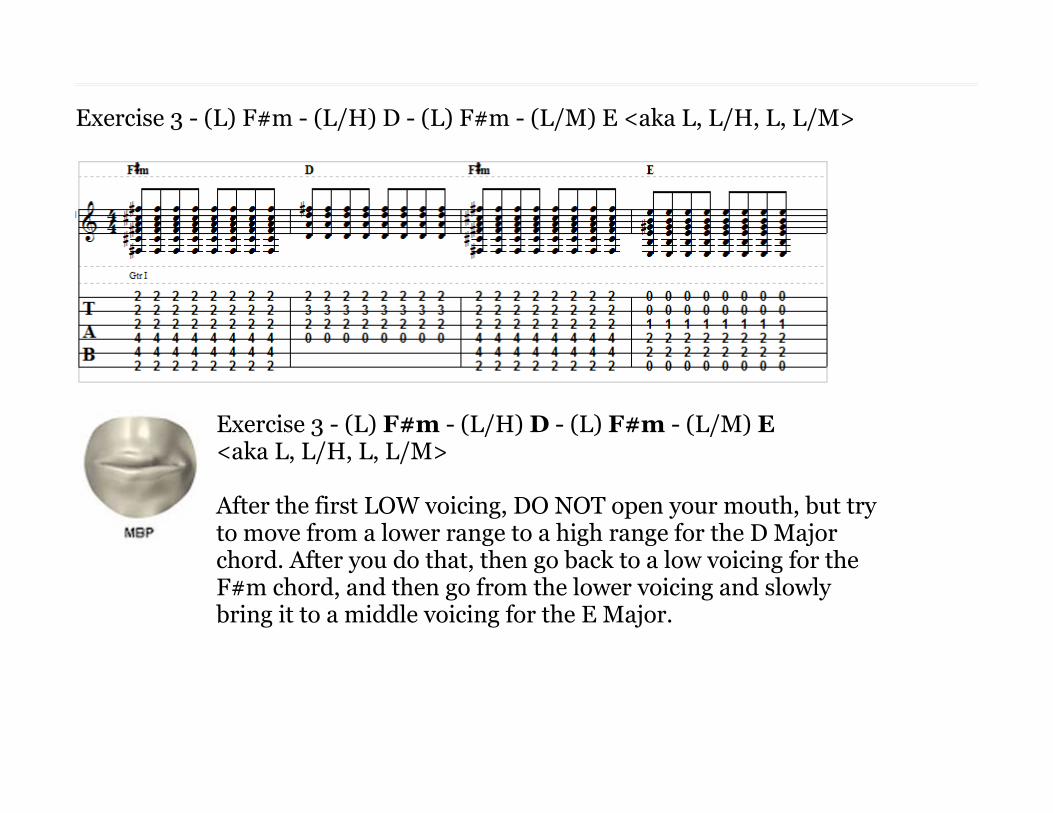
Exercise 3 - (L) F#m - (L/H) D - (L) F#m - (L/M) E <aka L, L/H, L, L/M>
Exercise 3 - (L) F#m - (L/H) D - (L) F#m - (L/M) E <aka L, L/H, L, L/M>
After the first LOW voicing, DO NOT open your mouth, but tryto move from a lower range to a high range for the D Major chord. After you do that, then go back to a low voicing for the F#m chord, and then go from the lower voicing and slowly bring it to a middle voicing for the E Major.
Here are my results:
http://vimeo.com/102167165
In A Nutshell...
This lesson was intended to basically "prove" that you aren't really doing much more than alternating between the low, middle, and highs that are found both (1) within the chord itself as well as (2) within the low, middle, and high voicing itself. I know it's frustrating. Singing isn't easy.
The goal here is to focus exclusively on the F# concept, be it an F#m, and F#m7, or even just a regular F#. While these chords "sound" different when played, vocally there is absolutely no distinction between minors, 7ths, or even suspended chords in the way that there IS a distinction for guitar.
Again, if you have no clue on even where to begin with the F# note itself, the pitch pipe will start you off in terms of pitch. Simply match your pitch (even add harmony!)with the pitch pipe either in F# or A Major.
Once you match your pitch (again - it CAN be in octaves/harmony) then you just move from there.
Track YourselfEnter these choices:Good - no problem at allOkay - you did pretty good, but not greatTerrible - you need a bit of work on this oneHow did you do with F#m - D - F#m - E in......Exercise 1 - (M) F#m - (H) D - (M) F#m - (L) E <aka M, H, M, L>
Exercise 2 - (H) F#m - (H/M) D - (H) F#m - (H/M) E <aka H, H/M, H, H/M>
Exercise 3 - (L) F#m - (L/H) D - (L) F#m - (L/M) E <aka L, L/H, L, L/M>
Progressions in Low, Middle, and High
Progression 1: G - C - G - DWe often here the G Major as a brighter chord, don't we?
When you examine the chord progression, you'll find that each chord sounds like this:
G = middleC = lowD = high
Why choose these three voicings? While we usually want to go to a middle voicing with C Major, you'll recall that I mentioned C Major has a natural "three voice" series anyway, just like the piano. In the case of C Major, we know that the G Major comes in both before AND after it. Simply strumming these two chords in open position allows you to realize the G Major tends to sound a bit brighter than C Major. So, because we know that G Major sounds higher than the C Major, we must take a look at the other chord. The other chord is a D Major. We already know that the D Major will sound higher than either the G or C Major chords. It's a matter of filling in the blanks.
This time we will be singing a different phrase. It's all about the "whoooaaaaooohhh" which will require a few different mouth position movements.
First we want to establish "what" we are singing. Since we are starting in G Major, we can (again) assume to start with the middle voicing. It's almost always a good startingpoint in terms of learning to sing. It's our anchor - our "safe" zone.
Here is a pitch pipe in G:Click Here
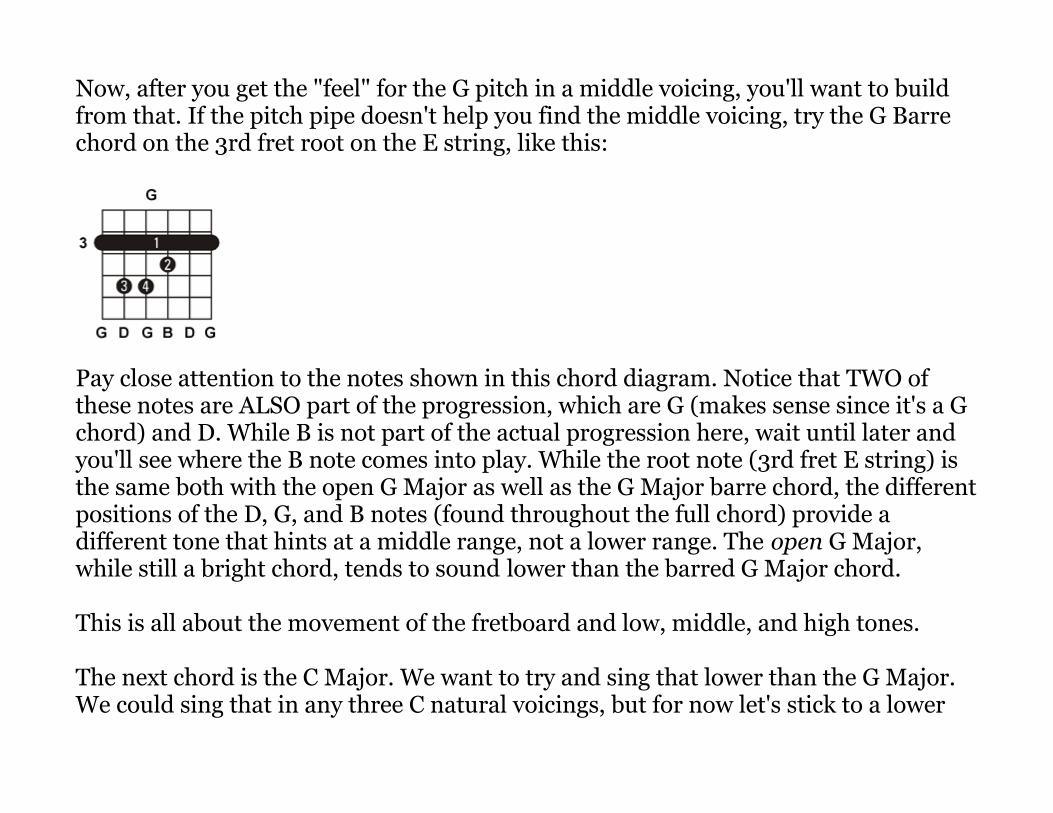
Now, after you get the "feel" for the G pitch in a middle voicing, you'll want to build from that. If the pitch pipe doesn't help you find the middle voicing, try the G Barre chord on the 3rd fret root on the E string, like this:
Pay close attention to the notes shown in this chord diagram. Notice that TWO of these notes are ALSO part of the progression, which are G (makes sense since it's a G chord) and D. While B is not part of the actual progression here, wait until later and you'll see where the B note comes into play. While the root note (3rd fret E string) is the same both with the open G Major as well as the G Major barre chord, the differentpositions of the D, G, and B notes (found throughout the full chord) provide a different tone that hints at a middle range, not a lower range. The open G Major, while still a bright chord, tends to sound lower than the barred G Major chord.
This is all about the movement of the fretboard and low, middle, and high tones.
The next chord is the C Major. We want to try and sing that lower than the G Major. We could sing that in any three C natural voicings, but for now let's stick to a lower

voicing. It's much easier.
Finally we have the D Major. We want to sing that one higher than either G or C. It's not as easy as it may seem. The D Major, unless you sing naturally in D, is sometimes a bit tricky to hit. When we get into progressions in D Major I'll be showing you a really neat song study on "What I Got" by Sublime, where Brad Nowell actually sings the D Major in a middle voicing basically THROUGHOUT the song. It's pretty neat - and a SUPER useful trick!
Mouth Positions: "Whoooaaaaooohhh"
Because we want to form the sound above (much like what you would hear in a chorus) we need to investigate which mouth positions to use. Remember: While each position has a natural tendency to move in either LV1, LV2, MV1, MV2, HV1, and HV2, we also use these mouth positions phonetically.
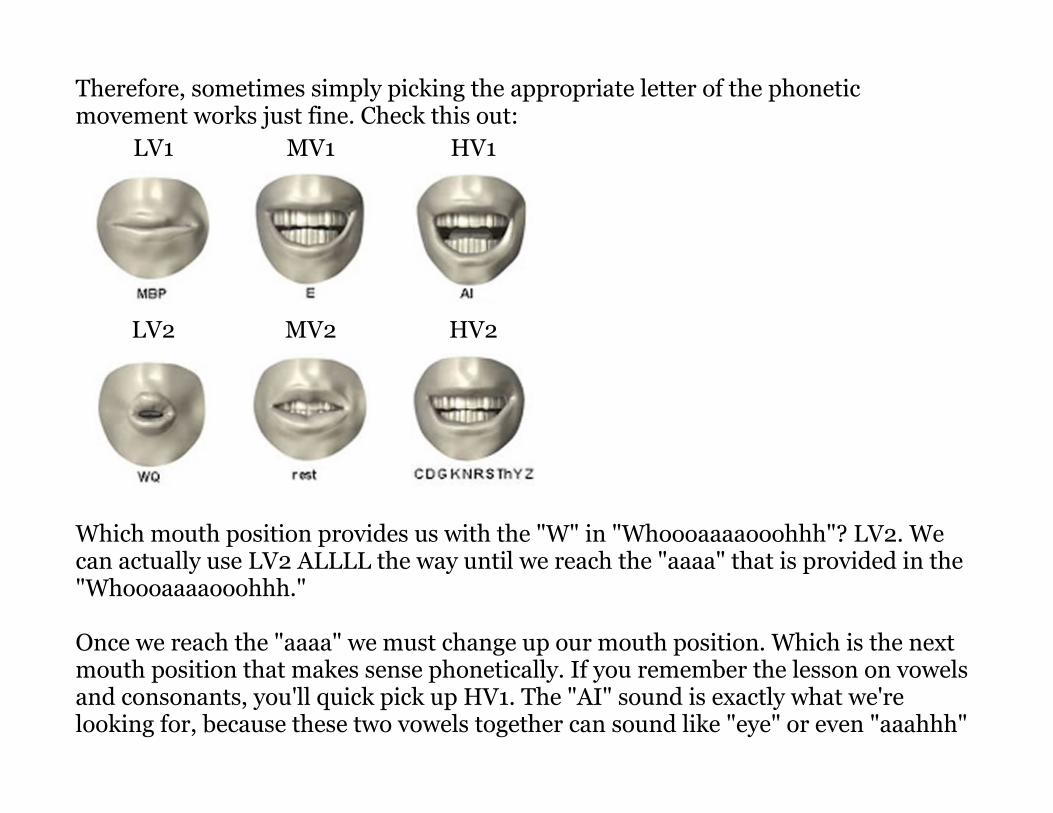
Therefore, sometimes simply picking the appropriate letter of the phonetic movement works just fine. Check this out:
LV1 MV1 HV1
LV2 MV2 HV2
Which mouth position provides us with the "W" in "Whoooaaaaooohhh"? LV2. We can actually use LV2 ALLLL the way until we reach the "aaaa" that is provided in the "Whoooaaaaooohhh."
Once we reach the "aaaa" we must change up our mouth position. Which is the next mouth position that makes sense phonetically. If you remember the lesson on vowels and consonants, you'll quick pick up HV1. The "AI" sound is exactly what we're looking for, because these two vowels together can sound like "eye" or even "aaahhh"

if we want. So, we know so far that we'll move from LV2 – HV1.
Immediately after the "Whoooaaaa......" we have the "....ooohhh" - which means we need to go BACK to LV2. While the letter "O" isn't in LV2 (it's just WQ) we still form the "O" mouth position don't we? If you're a smoker, it's about blowing smoke rings. If you drink from a straw, it's about creating the proper mouth position to keep the air from being pulled into your mouth. If you say "OOOOOH!" when someone gets hurt, it's the same position. The "W" is just as much the "O" in mouth position and movement.
Now, since we know which mouth positions we want to use, how do we attribute these positions to the chords we're playing?
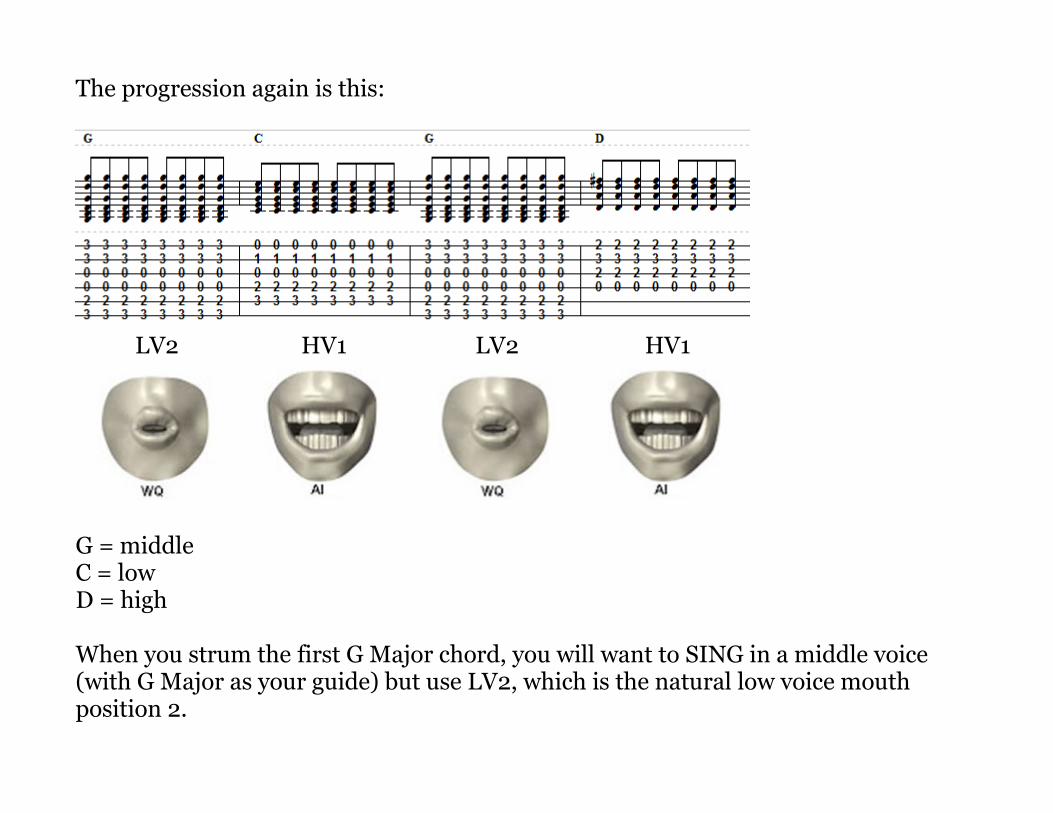
The progression again is this:
LV2 HV1 LV2 HV1
G = middleC = lowD = high
When you strum the first G Major chord, you will want to SING in a middle voice (with G Major as your guide) but use LV2, which is the natural low voice mouth position 2.
When you strum the C Major chord, you will want to SING in a low voice (with G Major as your guide) but use HV1, which is the natural high voice mouth position 1.When you strum the second G Major chord, you will want to SING in a middle voice again, and go back to LV2.
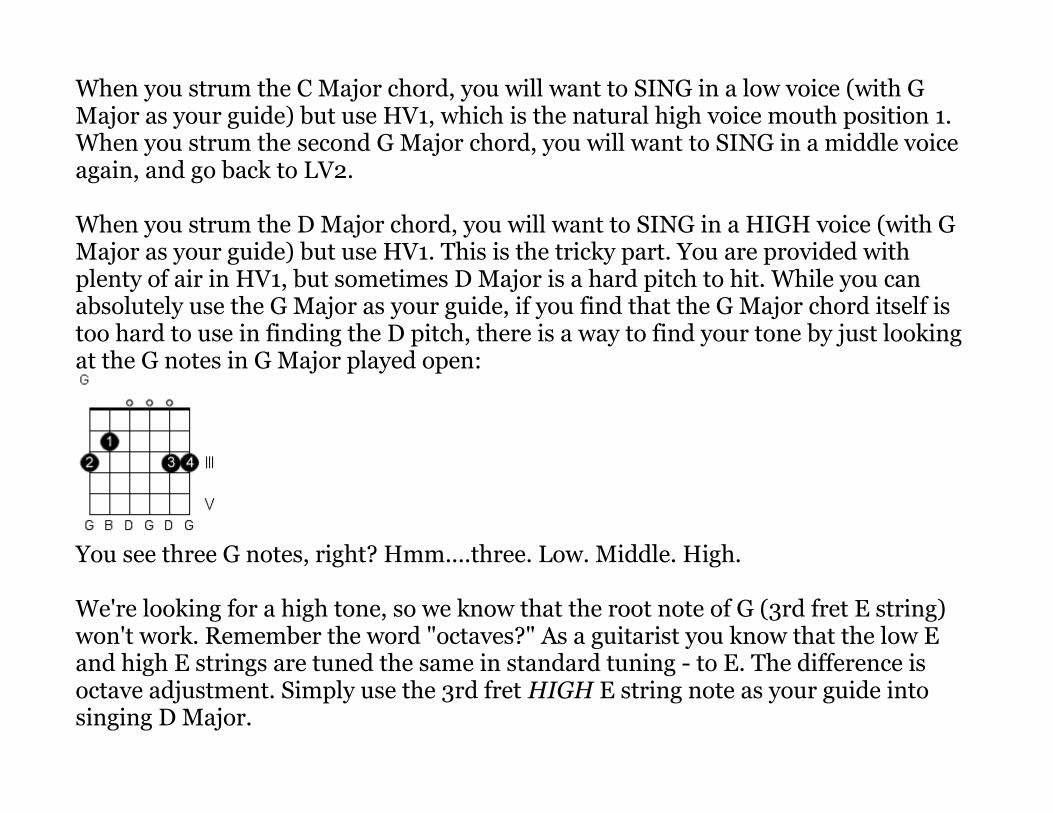
When you strum the D Major chord, you will want to SING in a HIGH voice (with G Major as your guide) but use HV1. This is the tricky part. You are provided with plenty of air in HV1, but sometimes D Major is a hard pitch to hit. While you can absolutely use the G Major as your guide, if you find that the G Major chord itself is too hard to use in finding the D pitch, there is a way to find your tone by just looking at the G notes in G Major played open:
You see three G notes, right? Hmm....three. Low. Middle. High.
We're looking for a high tone, so we know that the root note of G (3rd fret E string) won't work. Remember the word "octaves?" As a guitarist you know that the low E and high E strings are tuned the same in standard tuning - to E. The difference is octave adjustment. Simply use the 3rd fret HIGH E string note as your guide into singing D Major.

Why not just practice singing in the key of D? If you tried doing this, odds are you will start transposing the song into a different octave. You don't want to do this. This spells disaster for your singing. Instead, you USE G Major to guide you through the progression. In other words, simply take the high octave of G Major and try to hit that note. Again, this is the 3rd fret high E string note. While this note is a G note, and is NOT part of the standard D Major chord....
...we can once again go back to embellishment. Remember that? Yep! Often the D Major is accompanied by an embellishment, which I do all the time. Here is the result:
Eureka! This drills in my point about playing around with notes within a given chord.By learning to think outside the box a little you'll find that singing doesn't necessarily have the same rules as the guitar does.
When you sing either D Major or Dsus4, odds are you won't create a tonal difference in your vocals. The guitar does that for you. Even moreso, you'll RARELY find a D - Dsus4 chord progression with vocals. Why? There's no obvious vocal change!
Think about the part in "Stairway to Heaven" that does just this. At the end of the video below I'll show you what I mean.
Do This:Below is Exercise 1. Here is the G Major pitch pipe again if you want to use it:Click Here
It's important that you follow the mouth positions as provided based on measure. You'll see how they line up perfectly.------------------------------------------------------------------------------------Exercise 1 - (M) G - (L) C - (M) G - (H) D <aka M, L, M, H>
In Exercise 1 the parentheses indicate the actual tone/voicing you need to use. Keep in mind that you want to form the mouth positions under each measure below. Lookclosely and you'll see that really you're just repeating LV2 - HV1 twice. LV2 starts both G chords. Just remember that you want to try and sing the D Major in a high voicing, but don't try to actually sing in the key of D. Remember the embellishment. For that matter, when you sing the C Major you don't want to sing in the key of C asmuch as you want to try to hit the tones of G Major.
While I didn't explain that earlier, there's no need to as C Major has three natural positions anyway (ie the piano).
Remember that if you can't quite hit the C Major in low voicing, you can use the 1st fret of the B string, which is C4, which = middle C on your guitar. You aren't technically singing in the "key" of C Major. (Key is a VERY dangerous word, because there is such thing as "key of" and "key signature" - and they are NOT the same thing.
This requires a devoted knowledge of musical theory, and most likely something you and I have no business figuring out.
It's like trying to understand string theory or how black holes work.
We can spend countless years on just that topic alone. Instead, let's just "play" the game. After all, you are just looking for the tone.

Whoooaa aaaaahhhh Whoooaa aaaaahhhh
Middle Low Middle High
G = middleC = lowD = high
Here's my result:
http://vimeo.com/102253503
Now, what if we wanted to do this exact same thing in the relative minor of G?

Progression 2: Em - C - Em - DNotice that all I did was interchange the G with the Em. The overall progression is thesame....for now.
Exercise 2 - (M) Em - (L) C - (M) Em - (H) D <aka M, L, M, H>
Whoooaa aaaaahhhh Whoooaa aaaaahhhh
Middle Low Middle High
That's right. You can do the exact same thing! Again, relativity :)
Here's my result:
http://vimeo.com/102253505
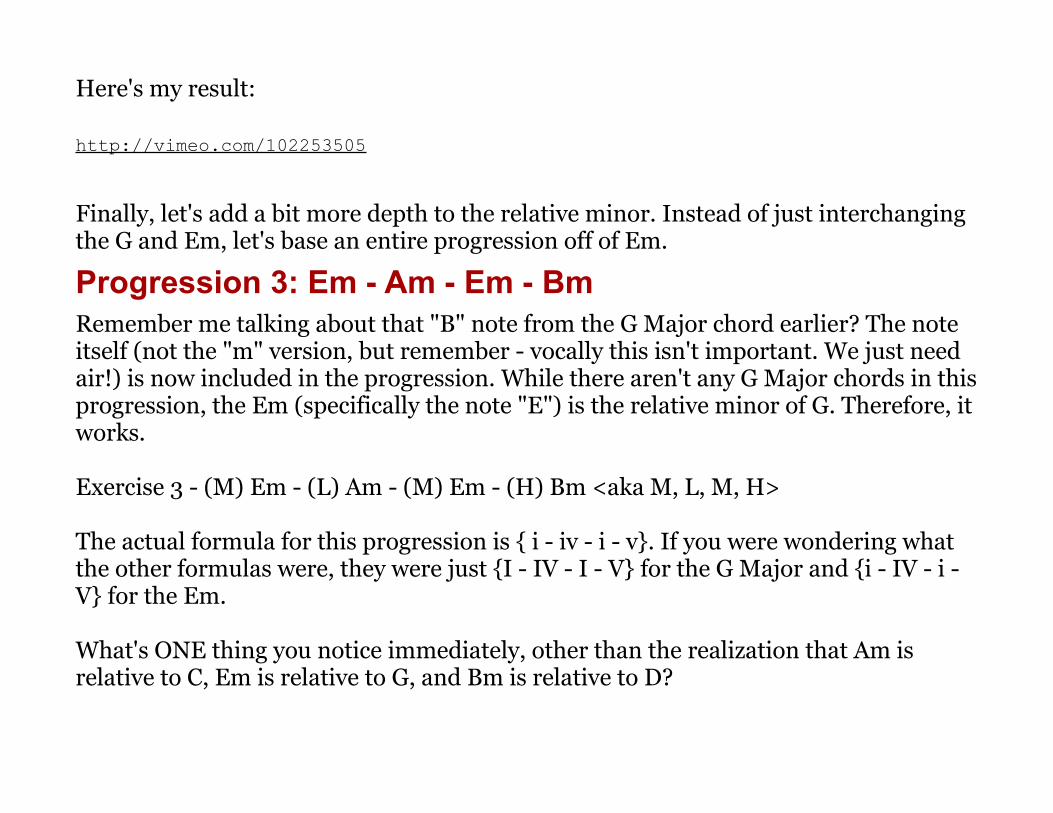
Finally, let's add a bit more depth to the relative minor. Instead of just interchanging the G and Em, let's base an entire progression off of Em.
Progression 3: Em - Am - Em - BmRemember me talking about that "B" note from the G Major chord earlier? The note itself (not the "m" version, but remember - vocally this isn't important. We just need air!) is now included in the progression. While there aren't any G Major chords in thisprogression, the Em (specifically the note "E") is the relative minor of G. Therefore, itworks.
Exercise 3 - (M) Em - (L) Am - (M) Em - (H) Bm <aka M, L, M, H>
The actual formula for this progression is { i - iv - i - v}. If you were wondering what the other formulas were, they were just {I - IV - I - V} for the G Major and {i - IV - i - V} for the Em.
What's ONE thing you notice immediately, other than the realization that Am is relative to C, Em is relative to G, and Bm is relative to D?
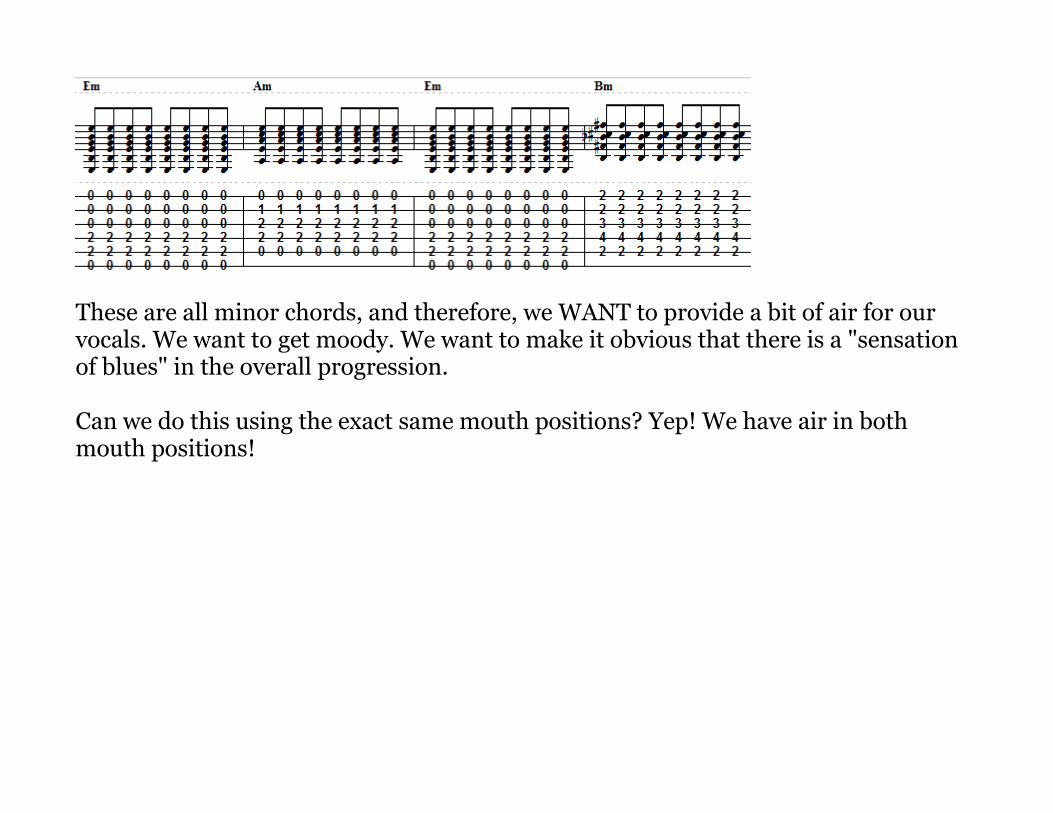
These are all minor chords, and therefore, we WANT to provide a bit of air for our vocals. We want to get moody. We want to make it obvious that there is a "sensation of blues" in the overall progression.
Can we do this using the exact same mouth positions? Yep! We have air in both mouth positions!
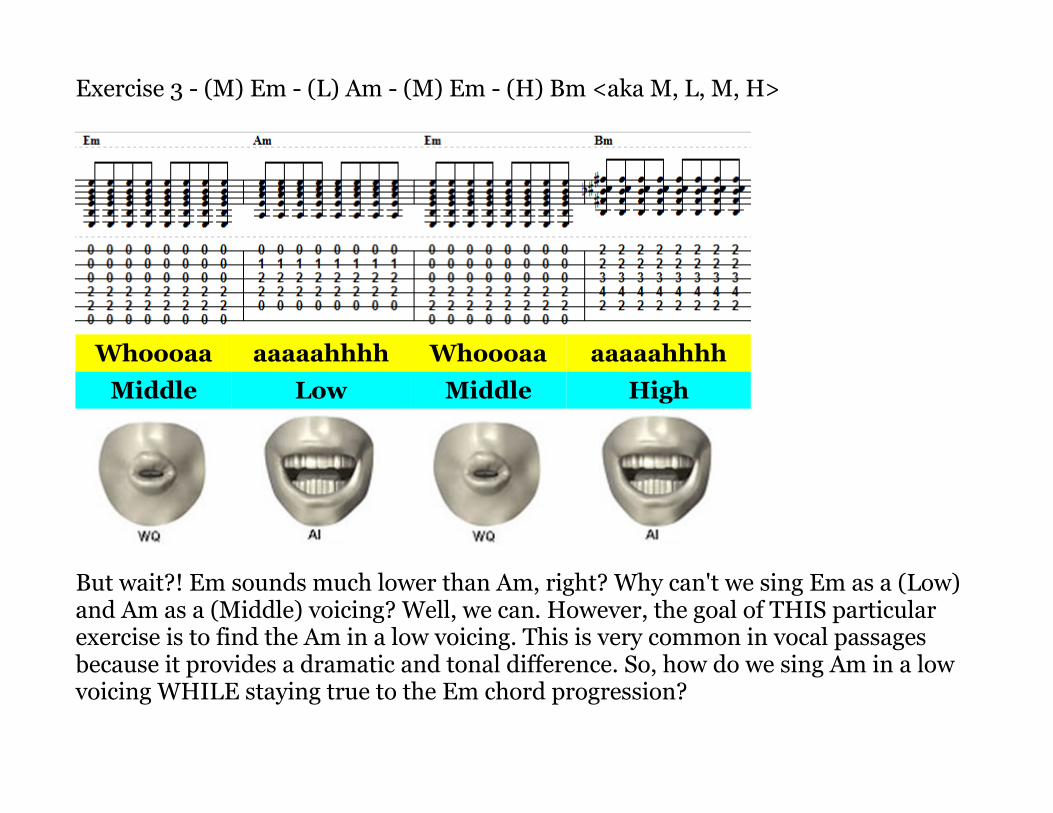
Exercise 3 - (M) Em - (L) Am - (M) Em - (H) Bm <aka M, L, M, H>
Whoooaa aaaaahhhh Whoooaa aaaaahhhh
Middle Low Middle High
But wait?! Em sounds much lower than Am, right? Why can't we sing Em as a (Low) and Am as a (Middle) voicing? Well, we can. However, the goal of THIS particular exercise is to find the Am in a low voicing. This is very common in vocal passages because it provides a dramatic and tonal difference. So, how do we sing Am in a low voicing WHILE staying true to the Em chord progression?

We have two options. One is much easier than the other.
Option 1 (recommended): Find the "low" Am of Em.
While Em is just the relative to G Major, we can actually use the Em just as we can the G Major. Here's the Em open chord with the notes used:
What will you find there? You will find a striking correlation between G Major and Em. Again, let's check those out side by side:
What notes do you see that are both found in these two chords? G and B. If you look at the low E string on your guitar, you will see the notes lined up like this:
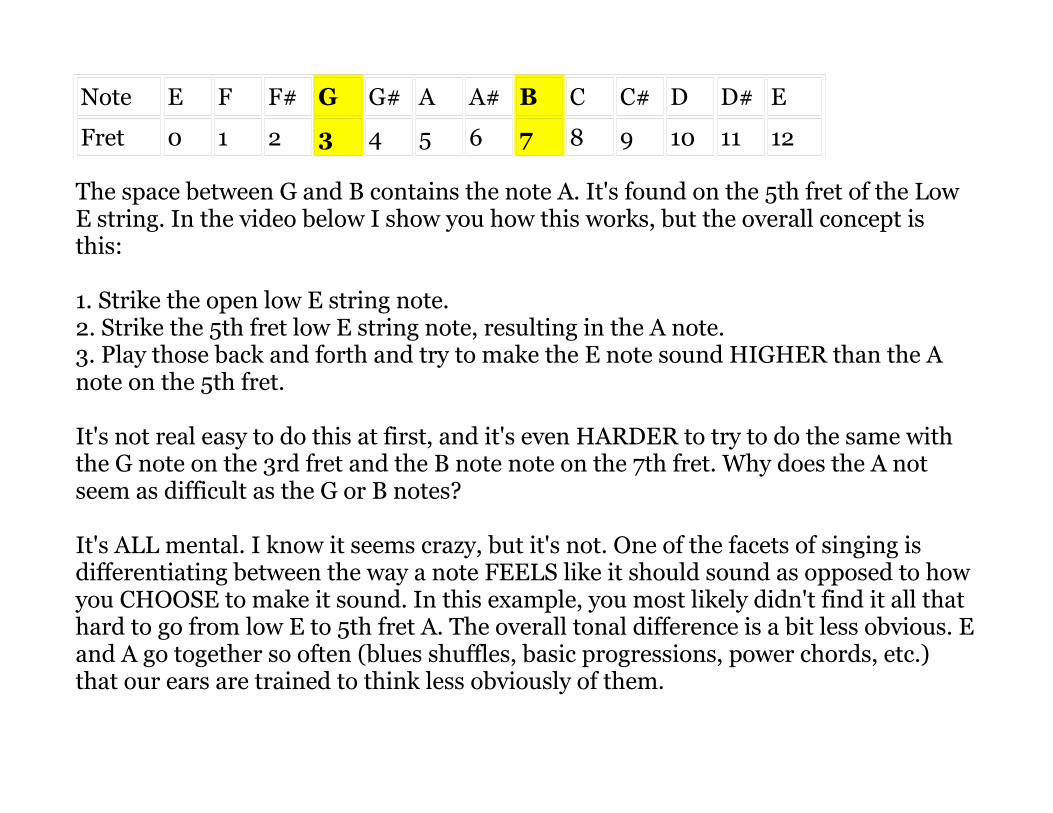
Note E F F# G G# A A# B C C# D D# E
Fret 0 1 2 3 4 5 6 7 8 9 10 11 12
The space between G and B contains the note A. It's found on the 5th fret of the Low E string. In the video below I show you how this works, but the overall concept is this:
1. Strike the open low E string note.2. Strike the 5th fret low E string note, resulting in the A note. 3. Play those back and forth and try to make the E note sound HIGHER than the A note on the 5th fret.
It's not real easy to do this at first, and it's even HARDER to try to do the same with the G note on the 3rd fret and the B note note on the 7th fret. Why does the A not seem as difficult as the G or B notes?
It's ALL mental. I know it seems crazy, but it's not. One of the facets of singing is differentiating between the way a note FEELS like it should sound as opposed to how you CHOOSE to make it sound. In this example, you most likely didn't find it all that hard to go from low E to 5th fret A. The overall tonal difference is a bit less obvious. Eand A go together so often (blues shuffles, basic progressions, power chords, etc.) that our ears are trained to think less obviously of them.

Exercise 3 - (M) Em - (L) Am - (M) Em - (H) Bm <aka M, L, M, H>
Whoooaa aaaaahhhh Whoooaa aaaaahhhh
Middle Low Middle High
Here's my result, followed by an explanation of finding Am within Em.http://vimeo.com/102253507
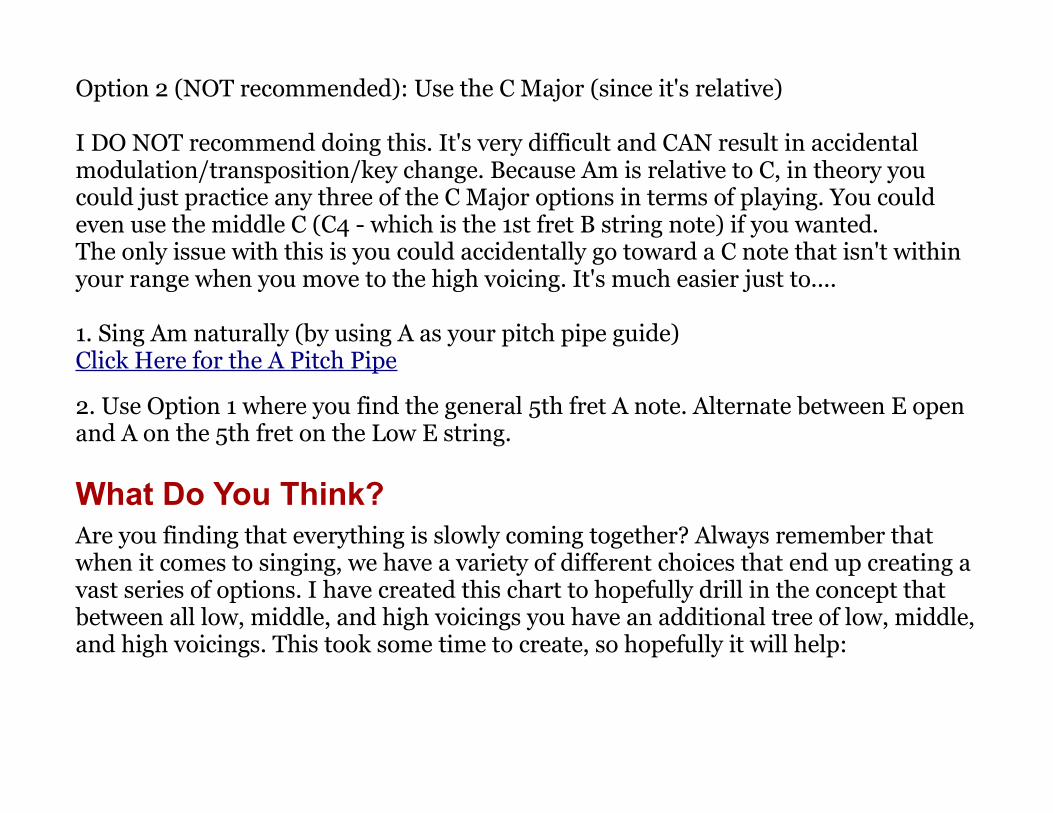
Option 2 (NOT recommended): Use the C Major (since it's relative)
I DO NOT recommend doing this. It's very difficult and CAN result in accidental modulation/transposition/key change. Because Am is relative to C, in theory you could just practice any three of the C Major options in terms of playing. You could even use the middle C (C4 - which is the 1st fret B string note) if you wanted.The only issue with this is you could accidentally go toward a C note that isn't within your range when you move to the high voicing. It's much easier just to....
1. Sing Am naturally (by using A as your pitch pipe guide)Click Here for the A Pitch Pipe
2. Use Option 1 where you find the general 5th fret A note. Alternate between E open and A on the 5th fret on the Low E string.
What Do You Think?Are you finding that everything is slowly coming together? Always remember that when it comes to singing, we have a variety of different choices that end up creating a vast series of options. I have created this chart to hopefully drill in the concept that between all low, middle, and high voicings you have an additional tree of low, middle,and high voicings. This took some time to create, so hopefully it will help:
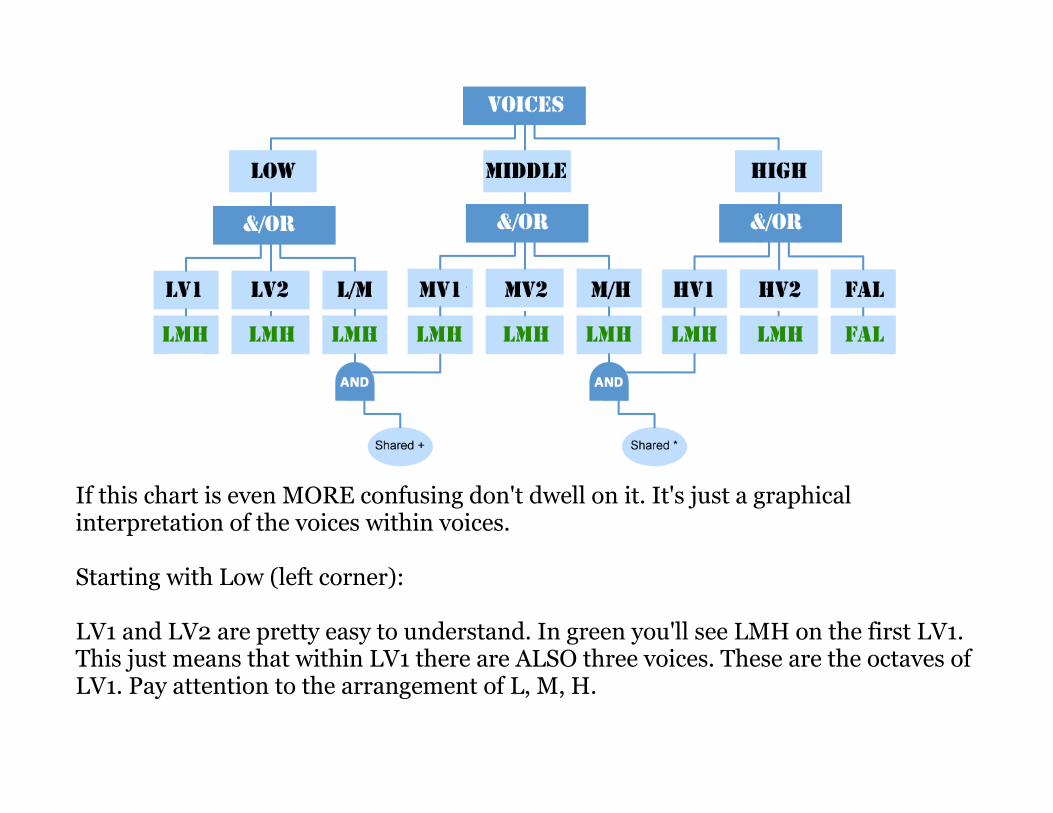
If this chart is even MORE confusing don't dwell on it. It's just a graphical interpretation of the voices within voices.
Starting with Low (left corner):
LV1 and LV2 are pretty easy to understand. In green you'll see LMH on the first LV1. This just means that within LV1 there are ALSO three voices. These are the octaves ofLV1. Pay attention to the arrangement of L, M, H.
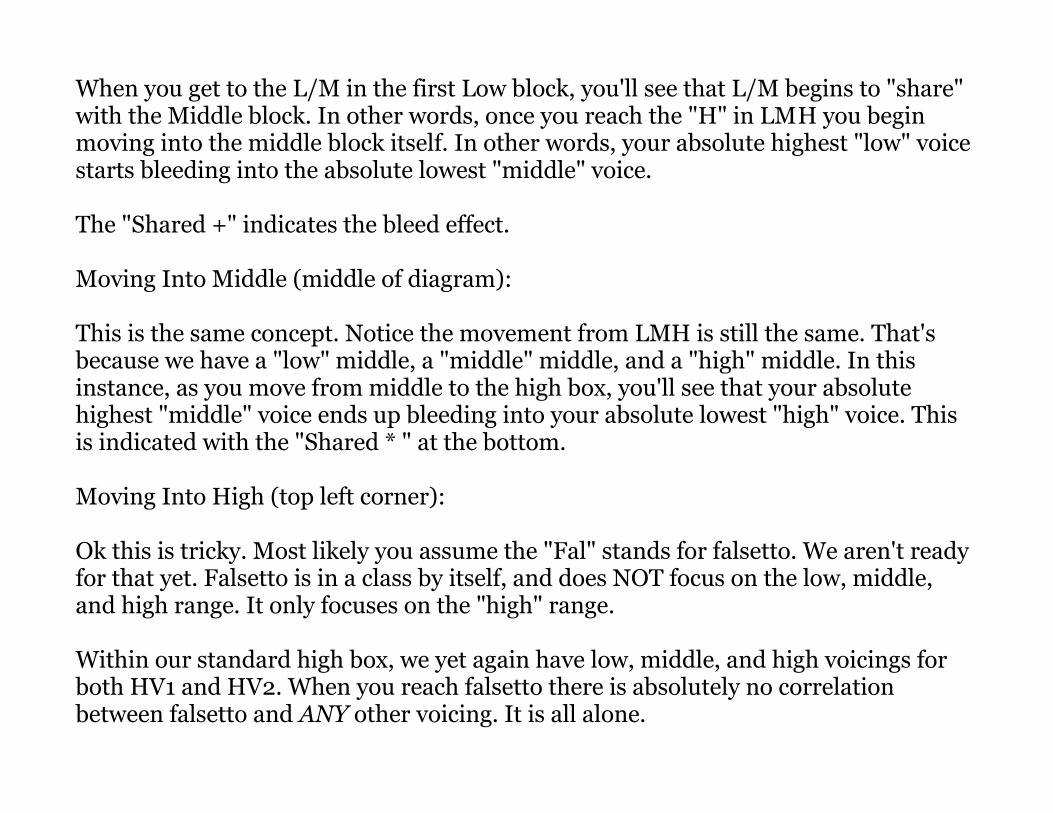
When you get to the L/M in the first Low block, you'll see that L/M begins to "share" with the Middle block. In other words, once you reach the "H" in LMH you begin moving into the middle block itself. In other words, your absolute highest "low" voice starts bleeding into the absolute lowest "middle" voice.
The "Shared +" indicates the bleed effect.
Moving Into Middle (middle of diagram):
This is the same concept. Notice the movement from LMH is still the same. That's because we have a "low" middle, a "middle" middle, and a "high" middle. In this instance, as you move from middle to the high box, you'll see that your absolute highest "middle" voice ends up bleeding into your absolute lowest "high" voice. This is indicated with the "Shared * " at the bottom.
Moving Into High (top left corner):
Ok this is tricky. Most likely you assume the "Fal" stands for falsetto. We aren't ready for that yet. Falsetto is in a class by itself, and does NOT focus on the low, middle, and high range. It only focuses on the "high" range.
Within our standard high box, we yet again have low, middle, and high voicings for both HV1 and HV2. When you reach falsetto there is absolutely no correlation between falsetto and ANY other voicing. It is all alone.
This should all make sense once we reach the tutorial on falsetto. For now, just examine the chart and don't worry too much if you don't follow it. I will try to compare this basic chart (with only vocals) to the guitar in another installment. That might help tremendously.
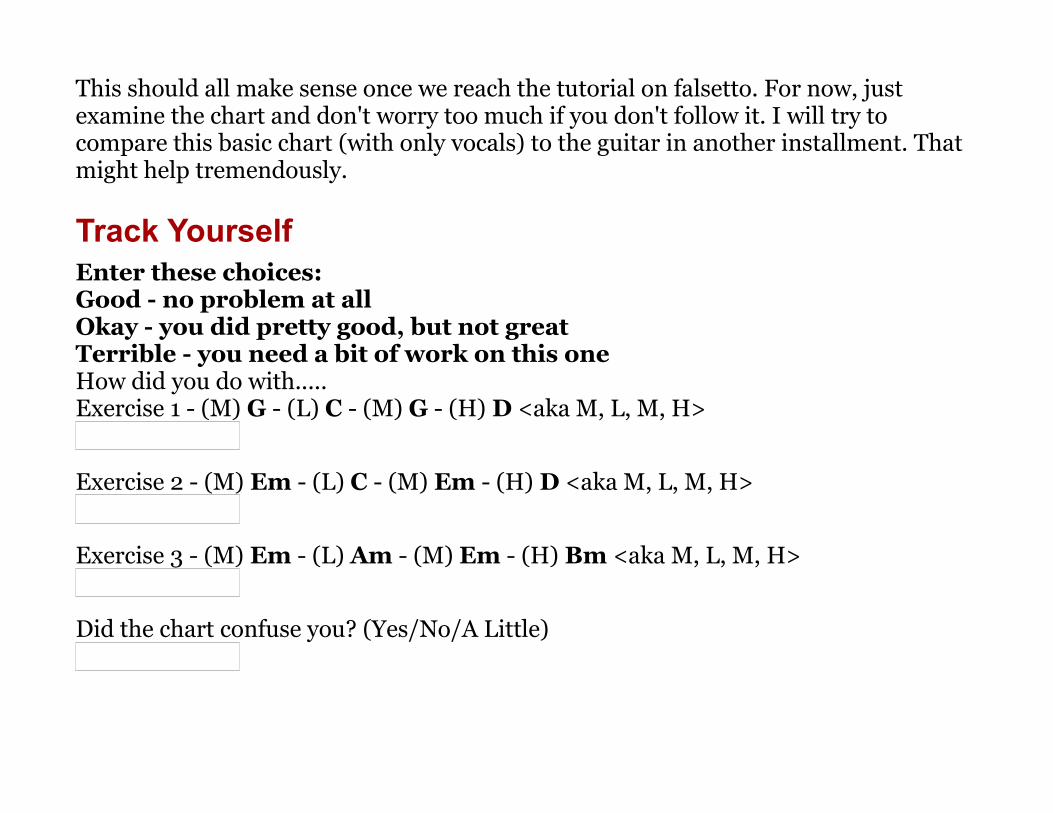
Track YourselfEnter these choices:Good - no problem at allOkay - you did pretty good, but not greatTerrible - you need a bit of work on this oneHow did you do with.....Exercise 1 - (M) G - (L) C - (M) G - (H) D <aka M, L, M, H>
Exercise 2 - (M) Em - (L) C - (M) Em - (H) D <aka M, L, M, H>
Exercise 3 - (M) Em - (L) Am - (M) Em - (H) Bm <aka M, L, M, H>
Did the chart confuse you? (Yes/No/A Little)

My Own SongSo, what do you do when you want to write your own song? When we write our own songs we have no guide in terms of "what" or "how" we want to sing. WE are the masterminds of our own song, and therefore we have to decide where we want to go with it.
In the song I wrote, there is nothing special about it. As a matter of fact, there are a ton of things I want to add to it, including a bridge. However, a few weeks ago I started writing this weird little guitar movement, which is the "riff" or whatever it's called during the verse. In this song I chose to keep everything mostly in one voice until we reach the chorus.

First Things First...Here is the song, with the included lyrics and the tab/chords being played. First just watch the "performance" of my original song. Please note: Don't laugh at my mic stand. I have a 6 year old daughter, and she tends to...well...break everything of mine.She was rocking out one day and dropped the mic stand, breaking the clip that holds the mic. Naturally, the "daddy" in me just wrapped it up with metallic duct tape. Oh, the king of "fixers" – baahhaa.
Second, I have 7 parakeets. Usually I move them outside when I record, but since thiswas just a quick recording I figured they'd be fine. They are some loud little critters! The good news is you can't really hear the two saltwater tanks I have. My wife and I tend to accumulate lots of animals.
http://vimeo.com/102521712
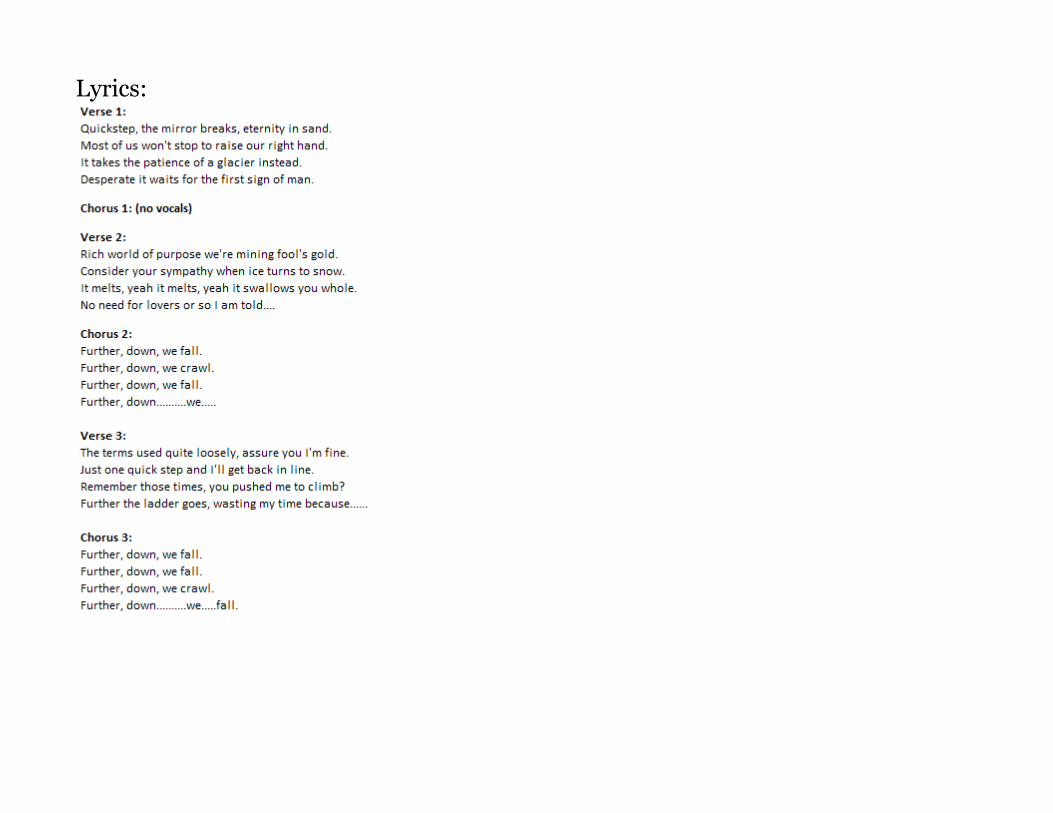
Lyrics:

Structure
Here is the main theme of the song:
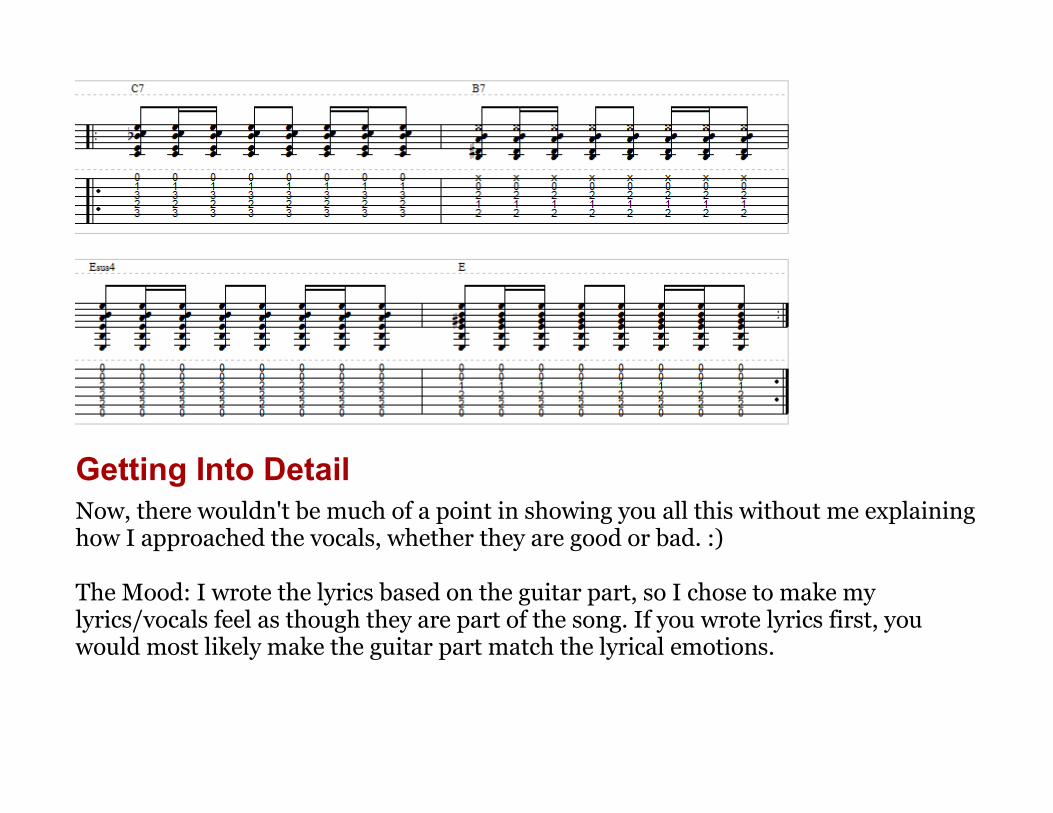
Here is the first chorus, which is just C7 - B7 (no lyrics):
Here is the chorus theme for the parts with lyrics:
Getting Into DetailNow, there wouldn't be much of a point in showing you all this without me explaininghow I approached the vocals, whether they are good or bad. :)
The Mood: I wrote the lyrics based on the guitar part, so I chose to make my lyrics/vocals feel as though they are part of the song. If you wrote lyrics first, you would most likely make the guitar part match the lyrical emotions.
The Vocal Approach: When I played these guitar parts I felt as though they were a LITTLE bluesy/jazzy and had a little bit of attitude. In many ways, I guess I chose to write lyrics that are informative toward a specific goal. In this case, the lyrics I wrote are based on the feeling of helplessness. I chose to use words that convey a sense of helplessness such as:
Glacier - how many times have you heard this word in a song? Not very often, huh? Well, Deadliest Catch was on the other night and all I could think of was being in a small boat headed straight for it - much like what happened with the Titanic. Talk about helplessness.
The phrase "...Remember those times you pushed me to climb, further the ladder goes, wasting my time..." - I am sure we all feel this way at times. We just keep on "keepin' on" and never really get anywhere. To me that is an extreme feeling of helplessness.
Finally, the entire chorus theme conveys a feeling of helplessness - At least to me it does. I chose to alternate between "fall" and "crawl" - but again - those feelings to me give us not only a feeling of helplessness, but also a sensation of "losing" something. In this case, maybe it's love. Maybe it's just a connection of some sort. Nonetheless, I kept everything in the lyrics so that they feel as though we are constantly spiraling downward.

Chords and Voicings for Verse ThemeWhile you can see my overall mouth position in the song, I am actually singing in mostly a low to middle voicing for the verse themes. My comfortable speaking/basic singing range is more middle in any situation. I just feel "right" there. So, how did I CHOOSE that I wanted to start in middle? Take a look at the tabbed out part again:
As you can see, the A and D strings never change. Those two notes are G (10th fret) and B (9th fret). You can grab a guitar tuner and pluck these two notes together. When you do so, odds are your tuner will register these two notes more as a B note. So, we can "base" the 9/10 as a B note for overall purposes.
However, we still have those walking notes on the low E string. These notes ring out (just the low E) as:
E (open) > D > C > BMeasure 1 - the end result are these three notes: E, G, and B. These three notes form the Em chord.When I sing, I am singing in a middle E(m).
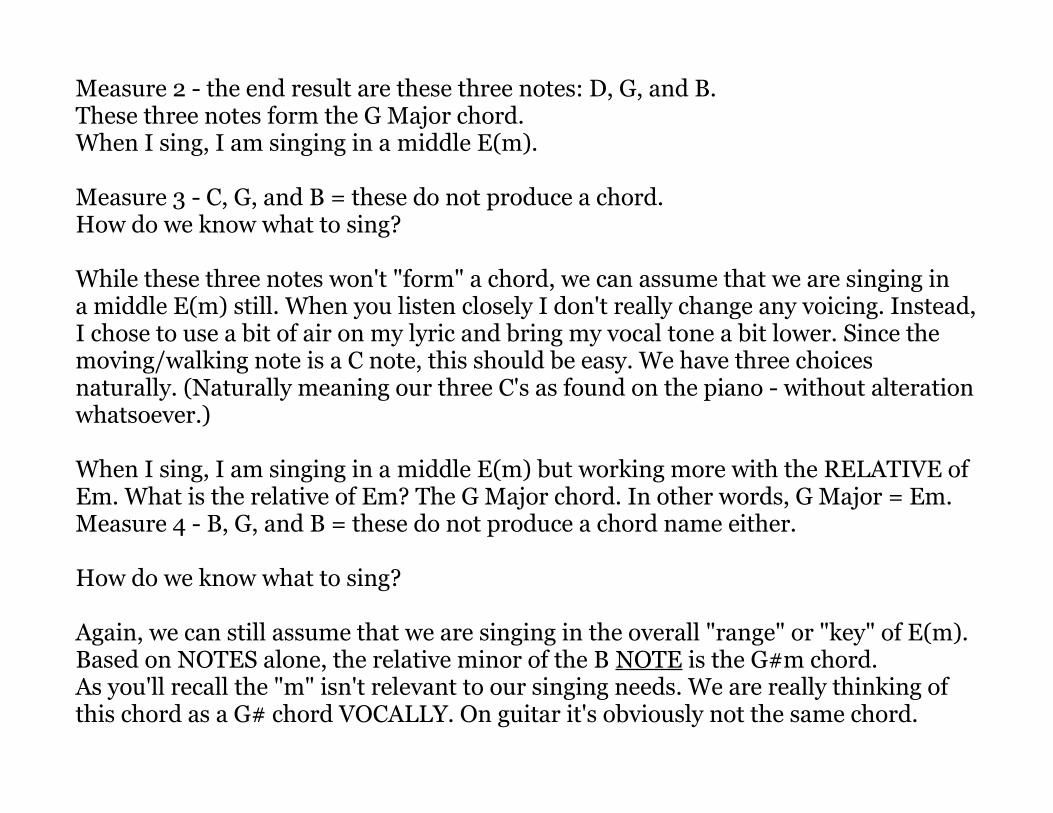
Measure 2 - the end result are these three notes: D, G, and B. These three notes form the G Major chord.When I sing, I am singing in a middle E(m).
Measure 3 - C, G, and B = these do not produce a chord. How do we know what to sing?
While these three notes won't "form" a chord, we can assume that we are singing in a middle E(m) still. When you listen closely I don't really change any voicing. Instead,I chose to use a bit of air on my lyric and bring my vocal tone a bit lower. Since the moving/walking note is a C note, this should be easy. We have three choices naturally. (Naturally meaning our three C's as found on the piano - without alterationwhatsoever.)
When I sing, I am singing in a middle E(m) but working more with the RELATIVE of Em. What is the relative of Em? The G Major chord. In other words, G Major = Em.Measure 4 - B, G, and B = these do not produce a chord name either.
How do we know what to sing?
Again, we can still assume that we are singing in the overall "range" or "key" of E(m). Based on NOTES alone, the relative minor of the B NOTE is the G#m chord.As you'll recall the "m" isn't relevant to our singing needs. We are really thinking of this chord as a G# chord VOCALLY. On guitar it's obviously not the same chord.

When you listen to the fourth measure you'll hear that I bring up my tone a bit. It's now just a bit higher than the third measure voicing, isn't it? My goal in measure 4 is to average a vocal range of G# and E(m). Because the first two measures were basically Em and G (on guitar) this works just fine. However, there is no chord formation being created.
The relative minor of the G NOTE is the Em chord. Interesting huh? Yet again we're reverting back to the overall theme of Em and G. In this case, we have the relative minor of G.
Arguably a rhythm guitar progression could just play this:

In this tab you'll see the top line as normal. The notes in parentheses indicate the notes being used. Because these two parts are being played together, the chord NOT in parentheses (Em - G - Em - G) indicates the bottom staff chord being played. When you look at the rhythm progression below it you'll see the progression is just repeated over and over. Yet - it works! (I made it cooler - I think - by making the violin the second guitar part. In THIS case the violin is in standard tuning.)

Mouth Positions - VerseIn the verse theme I used these mouth positions, which are self-explanatory because Iam just singing more middle the entire time. I just work vocally off the Major vs. relative minor concept:
MV1
MV2
Now, every other part in the song is actually a chord. That should be easy.
Chords and Voicings For The Chorus ThemeThe first chorus doesn't have vocals. Skip to the second chorus.The chords played here are just C7 - B7 - Esus4 - E. By now you can probably guess what's really going on, right?
Tear away the 7ths and suspended chord and you'll end up with:C - B - E – E
Because I want to create an obvious difference between verse and chorus, I went high(ish) on this. As I've mentioned before, I tend to do better on a high C than anything in the high range. Because I am no longer singing in E(m) I need to adjust based on the progression. I find the highest range of E(m) that I can, and then apply that to the C(7) chord itself. Technically I am singing in C, but I'm USING the E(m) tokeep me from transposing/modulating the overall key. This has mostly to do with a combined effort to "stay" in E(m) because the song doesn't change key as well as keeping true to a dynamic vocal change.
ALL of the chorus is in high voicing, so I know that since the chorus progression starts in C I'll want to bring my tone down just a bit to hit the B(7) chord. I'm now in the lower range of a high voicing of C.

Next is the series of E chords. The first E is actually an Esus4. Remember, focus on the E note. If you listen closely I don't really provide a vocal change from Esus4 - E doI? Instead, I choose to hold out the word/lyric "fall" and "crawl." This is a neat little trick that I learned over the years. Because they are both "E" based chords we can create a drawl with the vowel being used. In this case I hold a long "a" vowel sound. I'm aiming at a middle to high E note, but still staying true to the overall theme of C and E in terms of chord usage.
Mouth Positions - The Chorus (2 and 3)We know we want to stick to a higher range, so our choices are:
HV1
HV2
I can almost assure you that you'll find where I go with these mouth positions.
You can even watch the video again and you'll see exactly what I'm doing. Here's the video again for a full recap:
http://vimeo.com/102521712
So, What Do You Think?The overall goal on this lesson was to show you how to "think" without thinking too much about how you want to apply your own vocals to a song you write. As you have figured by now, the overall song is really in E vocally and Em for guitar. I have chosento alter the overall E range based on the chords/riffs used in the song. I never once had to stop and think about what key I am singing in at all. I just used the guitar to find a comfortable range.
If you'd like a copy of this lesson here are the reference files. The PTB files aren't the full song. They are just the audio examples played a few times.
1. Lyrics Sheet2. PTB File with the basic structure3. PTB File with the second guitar added
Note: If you want to play around with this song and send me what you came up with for any guitar parts, lead, etc. feel free to do so! I'll be glad to give you writing credits if I use it.