powerbroker desktops installation guide - e-spin group · beyondinsight installation guide...
TRANSCRIPT
BeyondInsight
Installation Guide
SECURITY IN CONTEXT
Revision/Update Information: October 2014
Software Version: 5.3
Document Revision: 0
Corporate Headquarters
5090 N. 40th Street
Phoenix, AZ 85018
Phone: 1 818‐575‐4000
COPYRIGHT NOTICE
Copyright © 2014 BeyondTrust Software, Inc. All rights reserved.
The information contained in this document is subject to change without notice.
No part of this document may be photocopied, reproduced or copied or translated in any manner to another language without theprior written consent of BeyondTrust Software.
BeyondTrust Software is not liable for errors contained herein or for any direct, indirect, special, incidental or consequentialdamages, including lost profit or lost data, whether based on warranty, contract, tort, or any other legal theory in connection withthe furnishing, performance, or use of this material.
All brand names and product names used in this document are trademarks, registered trademarks, or trade names of theirrespective holders. BeyondTrust Software is not associated with any other vendors or products mentioned in this document.

BeyondInsight Installation Guide Contents
BeyondTrust® October 2014 Page 3
Contents
Introduction ..................................................................................................................................................... 6
Documentation Set for BeyondInsight ......................................................................................... 6Contacting Support ................................................................................................................................. 6
Telephone ...................................................................................................................................... 6All other Regions: .......................................................................................................................... 6Online ............................................................................................................................................ 6
Preparing for Deployment ...............................................................................................................................7
Requirements ......................................................................................................................................... 7Mobility Module ............................................................................................................................ 7Cloud Connectors Module ............................................................................................................ 8
Patch Management Module ................................................................................................................... 8Requirements ................................................................................................................................ 8Windows Server 2012 Overview ................................................................................................. 10Installing WSUS Administration Console Using PowerShell ....................................................... 10Resolving Internal HTTP 500.19 Error ......................................................................................... 10
Deployment Recommendations ........................................................................................................... 11Database Recommendations ...................................................................................................... 11
Permissions ........................................................................................................................................... 11Installation Permissions .............................................................................................................. 11
Windows Server Settings ...................................................................................................................... 12Roles ............................................................................................................................................12
Installing BeyondInsight ................................................................................................................................. 14
Before Running the Installation ............................................................................................................ 14Migrating from REM ............................................................................................................................. 14
SQL Server Database ................................................................................................................... 14Installing BeyondInsight ....................................................................................................................... 14Configuring BeyondInsight ................................................................................................................... 15Upgrading Your License ........................................................................................................................ 16Setting up BeyondInsight to use a Fully Qualified Domain Name ....................................................... 17Configuring Windows Authentication to the Database ....................................................................... 17
SQL Server 2012 .......................................................................................................................... 17Changing Database Authentication ............................................................................................17
Retina Network Security Scanner ..................................................................................................................18
Requirements ....................................................................................................................................... 18Activating Central Policy ....................................................................................................................... 18Setting up Retina as a Client ................................................................................................................. 19Deploying Certificates to Remote Retina Computers .......................................................................... 21Additional Configuration Settings ........................................................................................................ 21
Verify Windows Configuration .................................................................................................... 21Verify Port Settings ...................................................................................................................... 21

BeyondInsight Installation Guide Contents
BeyondTrust® October 2014 Page 4
Verify IIS Settings ......................................................................................................................... 21Set and Verify NTLM Authentication and Unencrypted Password ............................................ 22Verify Central Policy Password .................................................................................................... 23
BeyondInsight Reporting and Analytics ......................................................................................................... 24
Requirements ....................................................................................................................................... 24General Requirements ................................................................................................................ 24Database Requirements .............................................................................................................. 25
Permissions ........................................................................................................................................... 25Permissions Required for BeyondInsight Configuration User .................................................... 25Permissions Required for the Web Proxy User .......................................................................... 26Permissions Required for the SSRS Proxy User .......................................................................... 27Permissions Required for the SQL Agent Service Running the Daily Sync Job ........................... 27BeyondInsight Requirements ...................................................................................................... 27Client Requirements .................................................................................................................... 27
Configure BeyondInsight Reporting and Analytics ............................................................................... 28Updating BeyondInsight Licensing ....................................................................................................... 30Creating User Groups in BeyondInsight ............................................................................................... 30Updating BeyondInsight Reporting ...................................................................................................... 30
PowerBroker for Windows ............................................................................................................................. 31
Generating a Certificate .............................................................................................................. 31Configuring PowerBroker for Windows ...................................................................................... 31
PowerBroker Servers for Unix & Linux .......................................................................................................... 33
Requirements ....................................................................................................................................... 33Generating a Certificate ....................................................................................................................... 33Exporting the BeyondInsight Server SSL Certificate ............................................................................ 33Configuring Keywords ........................................................................................................................... 34
Using the BeyondInsight Configuration Tool ................................................................................................. 35
Migrating REM‐1505 Appliance Data to BeyondInsight ................................................................................ 37
Running the Software Removal Tool ............................................................................................................. 38
Command Line Syntax .......................................................................................................................... 38
Working with Certificates .............................................................................................................................. 39
Working with BeyondInsight Certificates ............................................................................................. 39Server Certificate ......................................................................................................................... 39Client Certificate .......................................................................................................................... 40Troubleshooting Tips ................................................................................................................... 42Creating Certificates .................................................................................................................... 44
Using a Domain PKI for BeyondInsight Communication ...................................................................... 44Prerequisites ................................................................................................................................ 44Requirements .............................................................................................................................. 45Assigning the SSL Web Service Certificate in BeyondInsight ...................................................... 45Configuring a Client Certificate for PowerBroker for Windows ................................................. 46

BeyondInsight Installation Guide Contents
BeyondTrust® October 2014 Page 5
Configuring Auto Enrollment ...................................................................................................... 47
BeyondInsight Installation Guide Introduction
BeyondTrust® October 2014 Page 6
IntroductionThis guide provides the installation instructions and software requirements for BeyondInsight. For information about its features, benefits, functionality, and basic procedures, see the BeyondInsight User Guide.
The following sections include a list of documentation for the product, and where to get additional product information and technical assistance.
Documentation Set for BeyondInsight
The complete BeyondInsight documentation set includes the following:
• BeyondInsight Installation Guide
• BeyondInsight User Guide
• BeyondInsight Analytics and Reporting User Guide
Contacting Support
For support, go to our Customer Portal then follow the link to the product you need assistance with.
The Customer Portal contains information regarding contacting Technical Support by telephone and chat, along with product downloads, product installers, license management, account, latest product releases, product documentation, webcasts and product demos.
Telephone
Privileged Account Management SupportWithin Continental United States: 800.234.9072
Outside Continental United States: 818.575.4040
Vulnerability Management SupportNorth/South America: 866.529.2201 | 949.333.1997
+ enter access code
All other Regions:
Standard Support: 949.333.1995
+ enter access code
Platinum Support: 949.333.1996
+ enter access code
Online
http://www.beyondtrust.com/Resources/Support/
BeyondInsight Installation Guide Preparing for Deployment
BeyondTrust® October 2014 Page 7
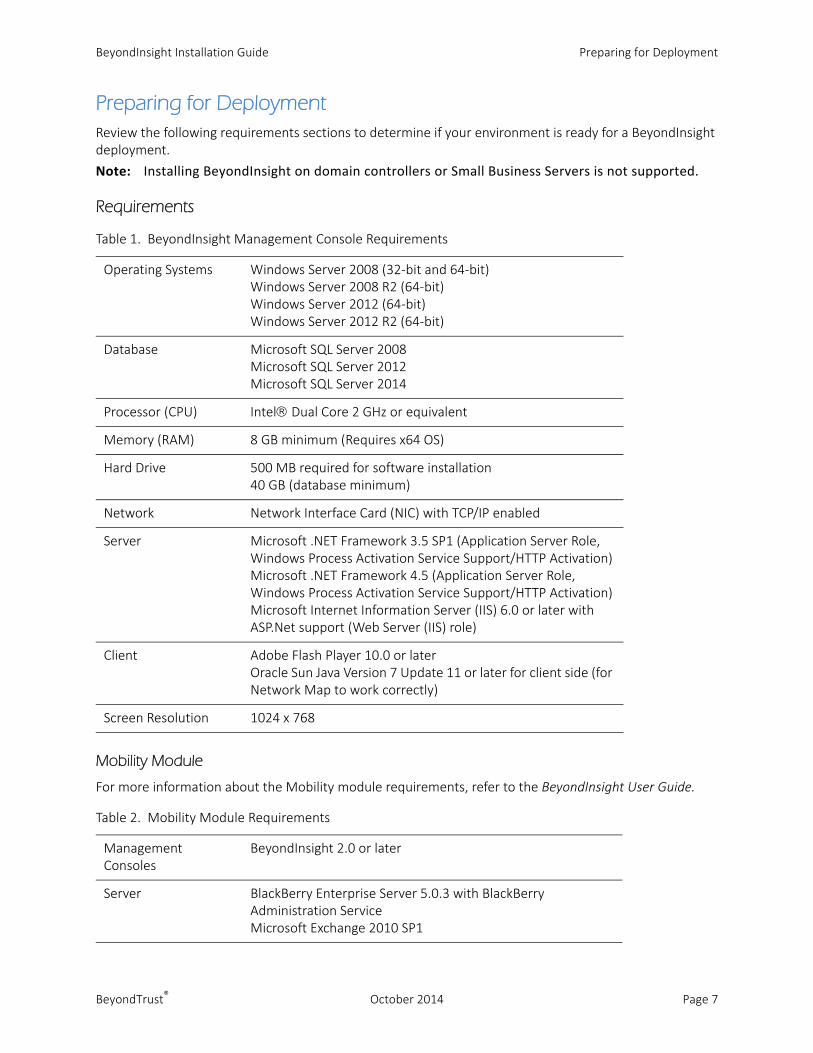
Preparing for DeploymentReview the following requirements sections to determine if your environment is ready for a BeyondInsight deployment.
Note: Installing BeyondInsight on domain controllers or Small Business Servers is not supported.
Requirements
Mobility Module
For more information about the Mobility module requirements, refer to the BeyondInsight User Guide.
Table 1. BeyondInsight Management Console Requirements
Operating Systems Windows Server 2008 (32‐bit and 64‐bit)Windows Server 2008 R2 (64‐bit)Windows Server 2012 (64‐bit)Windows Server 2012 R2 (64‐bit)
Database Microsoft SQL Server 2008Microsoft SQL Server 2012Microsoft SQL Server 2014
Processor (CPU) Intel Dual Core 2 GHz or equivalent
Memory (RAM) 8 GB minimum (Requires x64 OS)
Hard Drive 500 MB required for software installation40 GB (database minimum)
Network Network Interface Card (NIC) with TCP/IP enabled
Server Microsoft .NET Framework 3.5 SP1 (Application Server Role, Windows Process Activation Service Support/HTTP Activation)Microsoft .NET Framework 4.5 (Application Server Role, Windows Process Activation Service Support/HTTP Activation)Microsoft Internet Information Server (IIS) 6.0 or later with ASP.Net support (Web Server (IIS) role)
Client Adobe Flash Player 10.0 or laterOracle Sun Java Version 7 Update 11 or later for client side (for Network Map to work correctly)
Screen Resolution 1024 x 768
Table 2. Mobility Module Requirements
Management Consoles
BeyondInsight 2.0 or later
Server BlackBerry Enterprise Server 5.0.3 with BlackBerry Administration ServiceMicrosoft Exchange 2010 SP1

BeyondInsight Installation Guide Preparing for Deployment
BeyondTrust® October 2014 Page 8
Cloud Connectors Module
For more information about the Cloud Connectors module requirements, refer to the BeyondInsight User Guide.
Patch Management Module
For more information about the Patch Management module requirements, refer to the BeyondInsight User Guide.
Installation Notes
• Installing the Patch Management module on domain controllers or Small Business Servers is not supported.
• BITS and Microsoft WSUS Client must be enabled on all clients.
• The Patch Management module is deployed when you install BeyondInsight. Ensure that you apply the appropriate license. Contact your BeyondTrust representative.
Requirements
Windows Server 2012 WSUS Installation Requirements
• IIS
• Windows PowerShell
• .NET Framework 4.5 Features
• Microsoft Report View Redistributable 2008
http://www.microsoft.com/en‐us/download/details.aspx?id=3841
Windows Server 2012 R2 RequirementsAdd the following registry key and restart the WSUS Certificate Server service and WSUS Service.
HKEY_LOCAL_MACHINE\SOFTWARE\Wow6432Node\Microsoft\Update Services\Server\Setup
Create DWORD value: EnableSelfSignedCertificates = 1
Table 3. Cloud Connectors Module Requirements
Management Consoles
BeyondInsight 2.0 or later
VM targets VMWare Tools must be installed to scan the target.
Table 4. Patch Management Module Requirements
Management Consoles
BeyondInsight 2.0 or later
BeyondInsight Installation Guide Preparing for Deployment
BeyondTrust® October 2014 Page 9
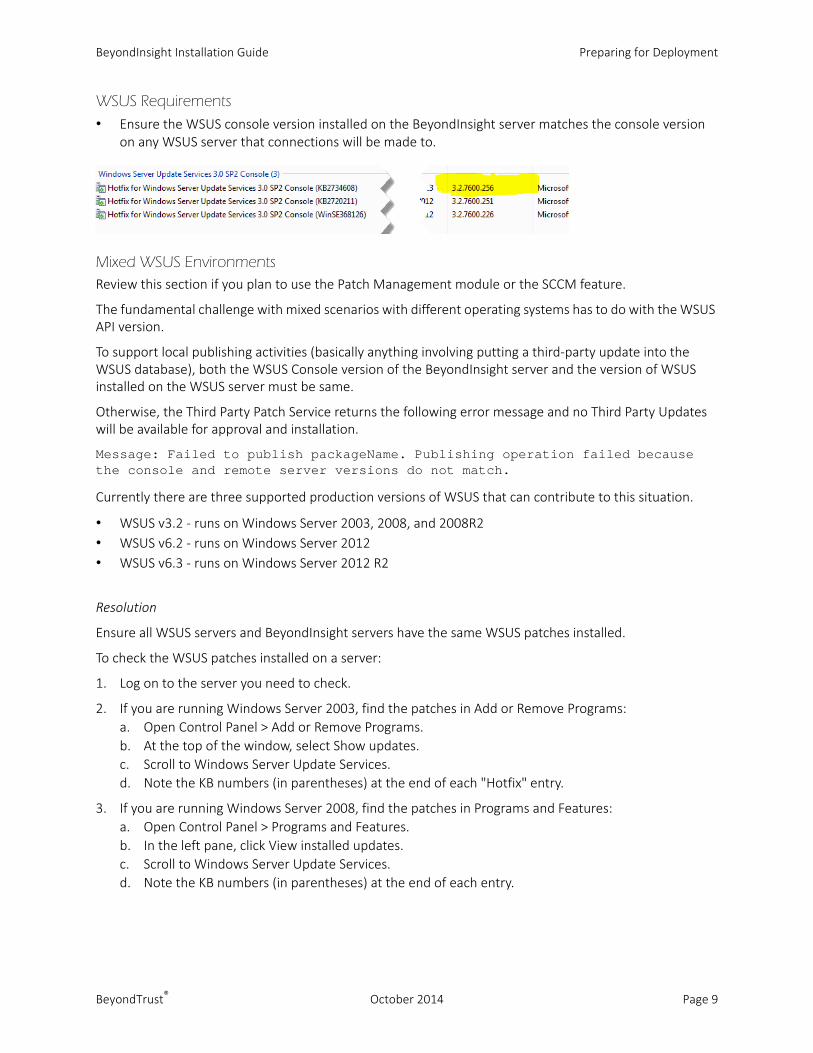
WSUS Requirements• Ensure the WSUS console version installed on the BeyondInsight server matches the console version
on any WSUS server that connections will be made to.
Mixed WSUS EnvironmentsReview this section if you plan to use the Patch Management module or the SCCM feature.
The fundamental challenge with mixed scenarios with different operating systems has to do with the WSUS API version.
To support local publishing activities (basically anything involving putting a third‐party update into the WSUS database), both the WSUS Console version of the BeyondInsight server and the version of WSUS installed on the WSUS server must be same.
Otherwise, the Third Party Patch Service returns the following error message and no Third Party Updates will be available for approval and installation.
Message: Failed to publish packageName. Publishing operation failed because the console and remote server versions do not match.
Currently there are three supported production versions of WSUS that can contribute to this situation.
• WSUS v3.2 ‐ runs on Windows Server 2003, 2008, and 2008R2
• WSUS v6.2 ‐ runs on Windows Server 2012
• WSUS v6.3 ‐ runs on Windows Server 2012 R2
Resolution
Ensure all WSUS servers and BeyondInsight servers have the same WSUS patches installed.
To check the WSUS patches installed on a server:
1. Log on to the server you need to check.
2. If you are running Windows Server 2003, find the patches in Add or Remove Programs:
a. Open Control Panel > Add or Remove Programs.
b. At the top of the window, select Show updates.
c. Scroll to Windows Server Update Services.
d. Note the KB numbers (in parentheses) at the end of each "Hotfix" entry.
3. If you are running Windows Server 2008, find the patches in Programs and Features:
a. Open Control Panel > Programs and Features.
b. In the left pane, click View installed updates.
c. Scroll to Windows Server Update Services.
d. Note the KB numbers (in parentheses) at the end of each entry.

BeyondInsight Installation Guide Preparing for Deployment
BeyondTrust® October 2014 Page 10
Windows Server 2012 Overview
Review the following articles to learn more about how Windows Server 2012 and WSUS work together.
• WSUS on Windows Server 2012 Overview
http://technet.microsoft.com/en‐us/library/hh852345.aspx
• Deploy Windows Server Update Services in Your Organization
http://technet.microsoft.com/en‐us/library/hh852340.aspx
• Difference between WSUS 3.2 and WSUS 6.0
http://social.technet.microsoft.com/Forums/windowsserver/en‐US/16d5f9bb‐98cc‐4285‐a886‐52fb2b99531e/difference‐between‐wsus‐30‐and‐wsus‐40
Installing WSUS Administration Console Using PowerShell
1. Open a Windows PowerShell console as an administrator.
2. Execute the following command:Install-WindowsFeature -Name UpdateServices-Ui
This command installs the console only and will not run a post‐install task.
Resolving Internal HTTP 500.19 Error
If Windows Server 2012, IIS, WSUS, and BeyondInsight are installed on the same server, and HTTP Error 500.19 occurs when you try to log on to BeyondInsight.
Windows Server 2012 is a 64‐bit only Operating System. When WSUS is installed, suscomp.dll is defined globally and loaded in every application pool. The BeyondInsight application pool is 32‐bit and will result in the error when the 64‐bit suscomp.dll attempts to load.
You can use one of the following ways to fix the issue.
Option 1
1. Back up IIS.
2. Open IIS Manager.
3. Click the server module node in the tree and select Modules.
4. Right‐click DynamicCompressionModule and select Unlock.
5. Right‐click on StaticCompressionModule and select Unlock.
6. Open the Default Web Site, and then open Modules.
7. Right‐click DynamicCompressionModules and select Remove.
8. Right‐click StaticCompressionModule and select Remove.
9. Do IISRESET from an elevated/administrative command prompt.
Option 2
Install BeyondInsight and WSUS on separate Windows Server 2012 servers.

BeyondInsight Installation Guide Preparing for Deployment
BeyondTrust® October 2014 Page 11
Deployment Recommendations
A BeyondInsight Server must be installed for every BeyondInsight agent environment of protection agents, Retina scan agents, or SecureIIS. This provides the real‐time recording of security events.
The most efficient deployment of BeyondTrust security solutions depends on your environment. You want to balance the workload between agents. Work with your BeyondTrust Security engineer to determine the number of agents you need to deploy.
Database Recommendations
For an enterprise environment, use SQL Server 2008 Standard or Enterprise editions.
Microsoft SQL Server Express (all versions) is not recommended for an enterprise environment due to connection limitations that prohibit BeyondInsight from scaling in Microsoft SQL Server Express environments with greater than 200 protection agent hosts or 1,024 Retina assets.
Permissions
Installation Permissions
Minimum Permissions Needed for the BeyondInsight AccountSQL Server database access
Ideally, assign the account installing BeyondInsight the sysadmin Server Role.
Otherwise, ensure at least the following SQL Server permissions are assigned to the account:
ALTER database BULKINSERT
CREATE Role CREATE Application Role
CREATE Schema CREATE Type
CREATE Table ALTER Table
UPDATE Table CREATE UNIQUE NONCLUSTERED INDEX
CREATE NONCLUSTERED INDEX CREATE PROCEDURE
ALTER PROCEDURE EXECUTE PROCEDURE
CREATE VIEW ALTER VIEW
GRANT EXEC, SELECT, INSERT, UPDATE, DELETE

BeyondInsight Installation Guide Preparing for Deployment
BeyondTrust® October 2014 Page 12
Windows Server Settings
Roles
Ensure the following roles are configured.
• Microsoft IIS 6.0 (or later) with ASP.NET support
• Microsoft .NET Framework 3.5 (or later)

BeyondInsight Installation Guide Preparing for Deployment
BeyondTrust® October 2014 Page 13
• Microsoft .NET Framework 4.5
• IIS 6 Compatibility (required to use the Patch Management module)
• Network connection, Internet access, and application access
– Verify that you can see the targets that you want to scan.
– You might need to disable firewalls for your scan targets or whitelist the Retina scanner.
– Confirm Internet connectivity, DNS resolution, and all proxy settings required for Internet connectivity.
– Verify that the IIS default web page displays without errors. Open your browser and enter localhost for the URL.
– Verify that MS SQL Server is running properly without any connectivity issues. You might want to download MS SQL Server Management Studio and open a connection.

BeyondInsight Installation Guide Installing BeyondInsight
BeyondTrust® October 2014 Page 14
Installing BeyondInsightBefore proceeding with your installation, review the “Preparing for Deployment,” page 7 to ensure necessary network and server settings are in place.
Before Running the Installation
Review the following important considerations before proceeding with the installation:
• Run the install as the Administrator account on the local computer if the server is not attached to a domain controller.
• Run BeyondInsight on a member server. Running BeyondInsight on a domain controller is not recommended.
• Ensure you have the BeyondInsight serial number.
Migrating from REM
Migrating from REM 3.7.x and later is supported. The following data is migrated from REM to BeyondInsight:
• Assets
• Vulnerabilities
• Attacks
• Address Groups
• Audit Groups
• Port Groups
• Protection Policies
Reports are not migrated.
To prepare for a REM migration:
1. Back up your REM database.
2. Uninstall existing versions of REM Event Server. The Event Server is integrated into BeyondInsight.
Do not uninstall REM Events Manager.
3. During the uninstall, select No for the following:
– “Would you like to remove the license for BeyondTrust Events Server?”
– “Would you like to remove the configuration information for BeyondTrust Events Server?”
4. Run the installation procedure as described. The configuration information will be migrated and the database upgraded from REM to BeyondInsight during the install.
SQL Server Database
Change the compatibility mode if your REM database is set to SQL Server 2000 compatibility mode. This mode is not supported for upgrades.
Installing BeyondInsight
Note: Microsoft .NET 4.5 Framework.Microsoft .NET 4.5 Framework is required for BeyondInsight 5.3. The BeyondInsight installer silently installs .NET 4.5 if is not detected on the server.
BeyondInsight Installation Guide Installing BeyondInsight
BeyondTrust® October 2014 Page 15
To install and configure BeyondInsight:
1. Double‐click the BeyondInsight installer executable.
2. Enter the serial number provided when you purchased the product.
To access your serial number on the client portal, select Product Licensing > Managing Your Serial Numbers.
3. Click Continue.
4. Select the check box to accept the terms of the licensing agreement.
5. Click Continue.
6. Click Continue to accept the default location or click Browse and select a destination folder.
7. Click Install.
A status bar indicates the progress of the install. After BeyondInsight installs, the Successful Installation window is displayed.
8. To run the BeyondInsight Configuration wizard, verify the Launch BeyondInsight Configuration check box is selected.
9. Click Finish.
After you restart your computer you can run the configuration wizard. See “Configuring BeyondInsight,” page 15.
If migrating from a previous REM installation, the BeyondInsight Configuration displays. Click OK to save the configuration and restart the services. Your BeyondInsight installation is complete at this point.
Configuring BeyondInsight
After you run the installation wizard, you are ready to configure the following:
• SQL Server database – The asset information retrieved during scans is stored in a SQL Server database. Configure an existing SQL Server database for BeyondInsight or install SQL Server Express if you are evaluating BeyondInsight.
Use SQL authentication when creating a database. Otherwise, BeyondTrust services and the app pool must be configured to run under a Windows account.
If you are using SSL SQL Server, you must turn on the settings: Encrypt Connection and Trust Server Certificate.
• Web site settings – BeyondInsight is a web application. You must set up a URL and virtual directory for BeyondInsight.
• Events Server port configuration – You can configure the Events Server Port Configuration for events for data insertion and secure communications certificates.
• Agent password (and Central policy password) – The agent password is needed when you deploy or locally configure BeyondInsight agents.
After you deploy protection agents or Retina scanner agents, you can update the policy information using Central Policy.
The password is required for the agent to authenticate with the BeyondInsight Central Policy server and send data encrypted.
• SNMP settings – BeyondInsight can use SNMP to manage events. BeyondInsight supports SNMPv1, SNMPv2, and SNMPV3. Using SNMP is optional.

BeyondInsight Installation Guide Installing BeyondInsight
BeyondTrust® October 2014 Page 16
• SMTP server information – BeyondInsight can be configured to send email notifications. Set the email server and email address here.
• BeyondInsight administrator user name and password – BeyondInsight requires administrator logon information. Configure the user name and password here.
To configure BeyondInsight:
1. On the Welcome to BeyondInsight Configuration Wizard window, click Next.
2. Go through the product registration pages and click Finish.
3. Select a database server, and then click Next.
Click Advanced to configure the database connection information. Click OK.
4. On the Web Site Information page, click Advanced to set the web site information.
For example, if you select the Default Website and the virtual directory is eEye.RetinaCS.Server the default URL to connect to BeyondInsight is: http://<BeyondInsight_Machine_Name>/ /eEye.RetinaCS.Server/
5. Enter an agent password.
6. BeyondInsight automatically enables the event server to accept BeyondInsight agents such as protection agents and Retina scanner agents. Click Advanced to configure SNMP.
7. On the Email Information page, enter the name of the email server and the BeyondInsight administrator email address.
Optionally, click Advanced to set the SMTP settings.
8. Enter the BeyondInsight administrator credentials.
9. Click Next to start the configuration.
Upgrading Your License
Use the BeyondInsight Configuration tool to update your license. You need to upgrade your license to extend your license or to extend the asset count purchased (for example, 500 assets to 1 000 assets).
To upgrade your license:
1. Select Start > All Programs > BeyondTrust > BeyondInsight> BeyondInsight Configuration.
2. Click Manage License.
3. On the License Management page, select Update License and click Next.
4. Enter the serial number and click Next.
5. Click Finish.
6. Click Apply to close the BeyondInsight Configuration tool.

BeyondInsight Installation Guide Installing BeyondInsight
BeyondTrust® October 2014 Page 17
Setting up BeyondInsight to use a Fully Qualified Domain Name
By default, BeyondInsight communicates to the Retina scanners and protection agents using the hostname.
If your company environment requires that you communicate over the Internet using FQDN, see the following knowledge base article to configure BeyondInsight to use FQDN:
http://www.eeye.com/Support/Knowledge‐Base/Article.aspx?id=KB000873
Configuring Windows Authentication to the Database
By default, BeyondInsight uses SQL authentication for the SQL Server database access.
Depending on how your environment is set up, you might want to change access to Windows authentication.
Note: The SQL Server database and BeyondInsight server must be in the same Windows domain.
SQL Server 2012
Note: The NT Authority\Network Service account is not created by default on SQL Server 2012.
You must create this account in SQL Server before changing the authentication mode.
Ensure that when you create the account, the permissions assigned on the BeyondInsight database include: Public and DBO access.
NT Authority\Network Service exists by default on SQL Server 2008 R2.
Changing Database Authentication
To change database authentication to Windows:
1. On the SQL Server computer, create a Windows group. For example, SQL Users.
2. Add a user to the group.
3. On the Select Users, Computers, or Groups dialog box, select the Object Types button.
4. Select the Computers check box and click OK.
5. Type the domain\computer account of the BeyondInsight server (or use Advanced and Find Now).
Example: If the computer domain is MyDomain and the BeyondInsight server is on MyRCS, you can assign permissions to the SQL Users group from all accounts on MyDomain\MyRCS.
This computer account maps to the Network Service account on the BeyondInsight computer.
6. Log on to SQL Server and add the SQL Users group to the database and the REM3Admins role in the BeyondInsight database.

BeyondInsight Installation Guide Retina Network Security Scanner
BeyondTrust® October 2014 Page 18
Retina Network Security ScannerA Retina scanner agent can either be deployed to the BeyondInsight server or on another computer.
To successfully add Retina to the management console, you must:
• Configure Central Policy in Retina. Central Policy allows BeyondInsight to manage the scanner agents.
• Deploy a client certificate to computers where Retina scanners are deployed.
• Set up Retina as a client. The management console needs to be aware of Retina as a supported application. You can then manage and review the Retina activities in the management console.
Use the Events Client Configuration tool to set this connection.
Requirements
Activating Central Policy
To activate Central Policy:
1. Start Retina.
2. Select Tools > Options.
3. Click the Management tab and select the Enable Central Policy check box.
4. From the Central Policy Type list, select one of the following:
– Version 1 – Select this version if you are running REM Event Manager (3.7.x and earlier) or BeyondInsight.
Table 5. Retina Scanner Agent Requirements
Operating Systems Windows Vista SP2 (32‐bit and 64‐bit)Windows 7 (32‐bit and 64‐bit)Windows 8 (32‐bit and 64‐bit)Windows 2003 SP2 Server (32‐bit)Windows Server 2008 (32‐bit and 64‐bit)Windows Server 2008 R2Windows Server 2012 (64‐bit)
Software MSXML 6.0 SP1Microsoft .Net Framework 2.0 (included with installer)
Network TCP/IP — Required for communicating with the BeyondInsight console, License Validation, and scanning remote machines
Processor Intel Pentium IV 1.4 Ghz (or compatible)
Memory (RAM) 512MB minimum
Hard Drive 1 GB minimum

BeyondInsight Installation Guide Retina Network Security Scanner
BeyondTrust® October 2014 Page 19
Can be used with Retina scanner agent or PowerBroker EPP to BeyondInsight (or REM) communication.
Communicates to the management console on port 10001 (Retina scanner agent) or port 2000 (PowerBroker Endpoint Protection Platform).
Version 1 is preferred for Retina scanner agents.
– Version 2 – Select this version if you are running REM Events Manager 3.7.10 or later.
Can be used with Retina scanner agent or PowerBroker EPP to BeyondInsight communication.
Communicates to the management console using https on port 443.
Version 2 is preferred for PowerBroker EPP.
5. In the Central Policy Server box, enter the BeyondInsight server, and in the Password box the agent password you entered during the install.
6. Type the scanner agent computer name in the Agent Name box and click Test. This will verify the Retina scanner agent can connect to the BeyondInsight server.
If Retina is running on another computer than the BeyondInsight server, you must configure the Events client on the computer.
Setting up Retina as a Client
The management console needs to be aware of Retina as a supported application. You can then manage and review the Retina activities in the management console.
Use the Events Client Configuration tool to set this connection. When you initially configure the settings, the Events Client Configuration tool is a wizard.
To configure Retina as a client:
1. Start Events Client Configuration to start the wizard, and then click Next.
2. Enter the host (machine name or IP address) and port for the BeyondInsight server. The default values are localhost and 21690.
3. Enter a name for the workgroup, description, and location. Click Next.
The workgroup name is a label to identify information sent from the Retina scanner agent. You can then sort scanned data based on the workgroup label. Depending on your environment, there might be more than one scanner agent with the same workgroup label.
4. Click Browse to go to the default location for client certificates and select the file EmsClientCert.pfx.
The default location is C:\Program Files (x86)\eEye Digital Security\Retina CS.
Enter the BeyondInsight administrator password when prompted.
5. Click Next.
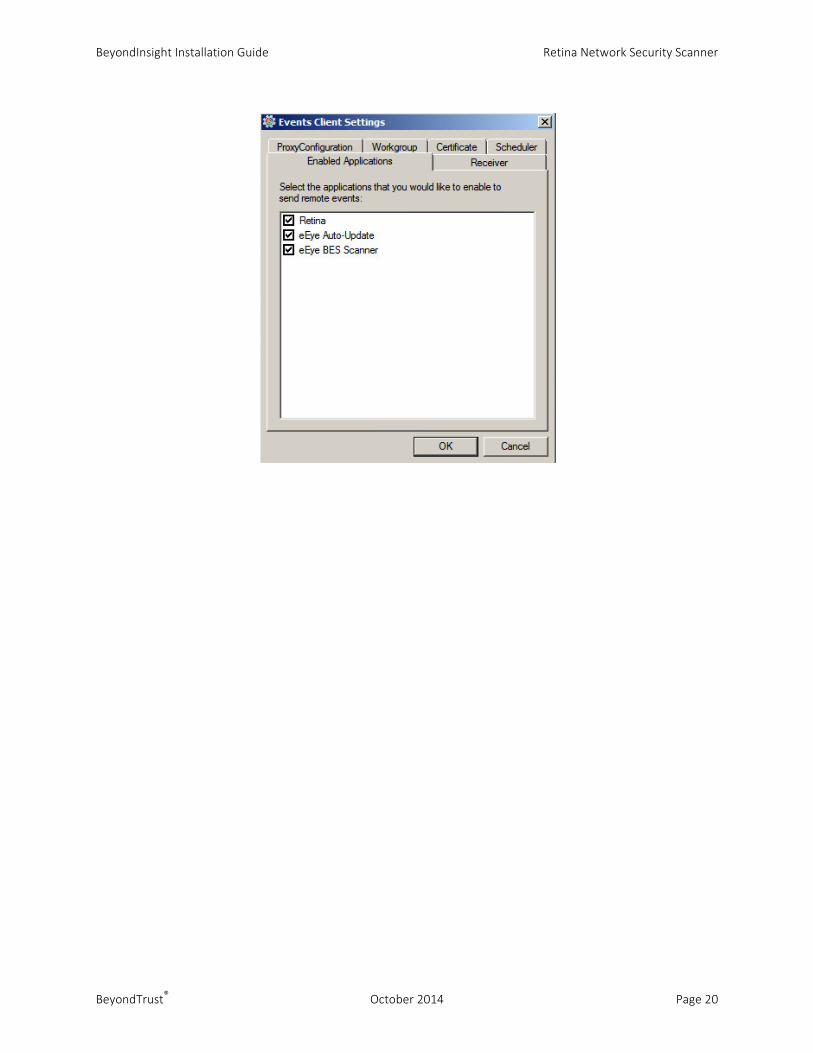
6. Select the Retina check box on the Event Aware Products page.
7. Click Next to test the connection. Otherwise, click Skip.
8. On the Test Passed page, click Next.
9. Click Finish.
After you configure the client, the Events Client Configuration tool is a tabbed dialog box.
BeyondInsight Installation Guide Retina Network Security Scanner
BeyondTrust® October 2014 Page 20

BeyondInsight Installation Guide Retina Network Security Scanner
BeyondTrust® October 2014 Page 21
Deploying Certificates to Remote Retina Computers
You need to use the BeyondInsight Configuration tool.
To copy a certificate to a remote Retina computer:1. Start BeyondInsight Configuration.
2. Select Certificate Management.
3. Select Export certificate.
4. Select Client Certificate and select a file with the extension .pki.
5. Copy the file to the Retina Scanner agent computer.
For more information, refer to the Retina Installation Guide located on the Client Portal under Documentation.
Additional Configuration Settings
Ensure the following environment settings are in place. These settings must be in place for Retina and Retina Protection Agent deployments.
Verify Windows Configuration
Use the Windows Control Panel to verify the following configuration settings for all target assets.
• Windows XP Guest Mode Disabled
• Windows XP Firewall Disabled
• File and Printer Sharing Enabled
Verify Port Settings
Verify the following ports are open for inbound TCP connections:
• Port 2000 – Protection agent to BeyondInsight
• Port 10001 – Retina to BeyondInsight
• Port 21690 – Retina scanner or Retina protection agent to BeyondInsight
• Port 21692 – BeyondInsight to another BeyondInsight server
Verify IIS Settings
To deploy Retina Protection Agents using HTTPS, ensure Windows authentication is enabled under IIS services.

BeyondInsight Installation Guide Retina Network Security Scanner
BeyondTrust® October 2014 Page 22
Set and Verify NTLM Authentication and Unencrypted Password
The Retina protection agents and Retina scanner agents retrieve the Central Policy file from BeyondInsight using the Microsoft Windows account, IUSER_RETINACS on the target BeyondInsight server.
To ensure the agents display as registered agents and retrieve the Central Policy file, the Windows NTLM authentication level must be the same for all agents and BeyondInsight.
If your domain authentication accounts use Kerberos, no NTLM compatibility problem exists.
You can use the Active Directory Group Policy Object (GPO) setting to verify the NTLM authentication level; or, you can set the level in the Windows Local Security Policy.
To verify the NTLM authentication level and unencrypted password settings in Windows Local Security Policy:
1. Select Start > Settings > Control Panel > Administrative Tools.
2. Select Local Security Policy.
3. Expand Local Policies, and then select Security Options.
4. Scroll to Network security: LAN Manager authentication level. Verify this setting is the same for all agents and BeyondInsight systems.
If not, double‐click Network security: LAN Manager authentication level.
5. Select the same authentication level for the Retina protection agent, Retina scanner, and BeyondInsight.
6. Click OK.
7. Scroll to Microsoft Network Client: Send unencrypted password to third‐party SMB servers and verify the setting is Disabled.
8. Select File > Exit.

BeyondInsight Installation Guide Retina Network Security Scanner
BeyondTrust® October 2014 Page 23
Verify Central Policy Password
The Central Policy password must be the same on all protection agents. If you change the Central Policy password, existing policies created under the original password cannot be implemented. The Central Policy password creates an IUSER_REM password.
To verify the Central Policy password:
1. Select Start > All Programs > eEye Digital Security > Retina CS > BeyondInsight Configuration.
2. Verify the password is identical for BeyondInsight and all protection agents.
3. Click OK.

BeyondInsight Installation Guide BeyondInsight Reporting and Analytics
BeyondTrust® October 2014 Page 24
BeyondInsight Reporting and Analytics
Requirements
Installation Notes:
• Installing BeyondInsight on domain controllers or Small Business Servers is not supported.
• REM is supported on BeyondInsight 2.1. BeyondInsight 2.5 (or later) is not supported.
General Requirements
BeyondInsight Management Console 2.0 or later
Table 6. BeyondInsight Requirements
Operating Systems Windows Server 2008 (32‐bit and 64‐bit)Windows Server 2008 R2 (64‐bit)Windows Server 2012 (64‐bit)Windows Server 2012 R2 (64‐bit)
Database Microsoft SQL Server 2008 (latest SP recommended)Microsoft SQL Server Standard or Enterprise editions onlyMicrosoft SQL Server Reporting ServicesMicrosoft SQL Server Analysis ServicesMicrosoft SQL Server Integration Services
Note: SQL Server collation must be set to SQL_Latin1_General_CP1_CI_AS
Processor (CPU) Intel Dual Core 2 GHz or equivalent
Memory (RAM) 8 GB minimum (Requires x64 OS)
Hard Drive Installation: 500MBDatabase: 40 GB (minimum)
Network Network Interface Card (NIC) with TCP/IP enabled
Server Microsoft .NET Framework 3.5 (included with installer package)
Client Microsoft Silverlight 5.0 or later

BeyondInsight Installation Guide BeyondInsight Reporting and Analytics
BeyondTrust® October 2014 Page 25
Database Requirements
The BeyondInsight data warehouse requires four SQL Server components to be configured in the environment on either the same machine as BeyondInsight or on a separate server.
The SQL Server components are available in either SQL Standard or SQL Enterprise editions only. SQL Enterprise should be used in large environments with a lot of historical data.
The SQL Server components that must be installed and pre‐configured are:
• SQL Database Server – Stores the star schema reporting database that is populated from pulling data from BeyondInsight.
• SQL Analysis Server – Stores the data cubes which make up the BeyondInsight reporting data.
• SQL Integration Services – Synchronizes the BeyondInsight database with the star schema and processes the cube for reporting. The Integration packages are managed by SQL Agent jobs located on the star schema database server.
This must be installed on the same server as the star schema database server.
• SQL Reporting Services – Serves up the BeyondInsight reports to clients.
This component can be installed on a separate machine from the other SQL components.
Permissions
The following sections provide detailed information about permissions needed for installing and using BeyondInsight reporting.
Permissions Required for BeyondInsight Configuration User
Account entered on this page of the configuration wizard: Step 1: Installation Credentials
• Local administrator rights to the SQL Analysis Services – this is needed to deploy the Analysis Services cube.
• Permission to create a registry key under HKEY_LOCAL_MACHINE\SOFTWARE\EEYE
• Log on as Batch Job security policy on the SQL Server computer.

BeyondInsight Installation Guide BeyondInsight Reporting and Analytics
BeyondTrust® October 2014 Page 26
Permissions Required for the Web Proxy User
Note: These permissions are automatically set up during installation if the installing user has permissions to.
Account entered on this page of the configuration wizard: Step 5: Web Service Credentials
Table 7. BeyondInsight Configuration Database Roles
Member in Role Database
Sysadmin BeyondInsight reportingRequired to:‐ install the SQL job and the SSIS packages.‐ create the BeyondInsight reporting database.‐ view SQL job statuses and details. Alternatively, add the configuration user to the SQLAgentRole of the MSDB database on the BeyondInsight server for lower privileges.
DBOwner BeyondInsightRequired to install the stored procedures for BeyondInsight reporting to synchronize data from the BeyondInsight management console.
System User This role is at the root of SQL Reporting Services management website and is required to read information from SSRS.
Browser This role is on the root folder settings for the SQL Report Services management website and is required to read and run reports deployed to SSRS.
Content Manager This role is on the root folder settings for the SQL Report Services management website and is required to deploy the reports to SSRS.
Table 8. Web Proxy User Roles
Member in Role Database
RetinaInsightReader BeyondInsight reporting
RetinaInsightUser BeyondInsight management console
RetinaInsightReader BeyondInsight reporting cube in SQL Analysis Services
System User This role is at the root of SQL Report Services management website and is required to deploy the reports to SSRS.
Browser This role is on the root folder settings for the SQL Report Services management website and is required to read and run reports deployed to SSRS.
BeyondInsight Installation Guide BeyondInsight Reporting and Analytics
BeyondTrust® October 2014 Page 27
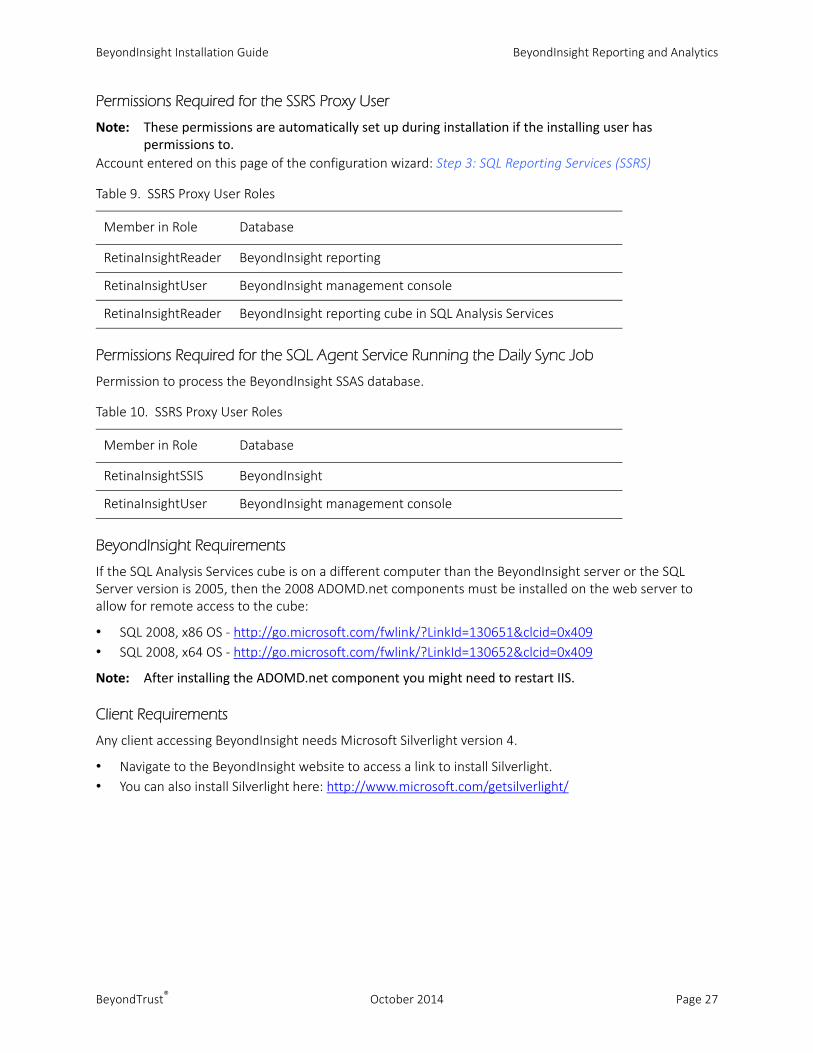
Permissions Required for the SSRS Proxy User
Note: These permissions are automatically set up during installation if the installing user has permissions to.
Account entered on this page of the configuration wizard: Step 3: SQL Reporting Services (SSRS)
Permissions Required for the SQL Agent Service Running the Daily Sync Job
Permission to process the BeyondInsight SSAS database.
BeyondInsight Requirements
If the SQL Analysis Services cube is on a different computer than the BeyondInsight server or the SQL Server version is 2005, then the 2008 ADOMD.net components must be installed on the web server to allow for remote access to the cube:
• SQL 2008, x86 OS ‐ http://go.microsoft.com/fwlink/?LinkId=130651&clcid=0x409
• SQL 2008, x64 OS ‐ http://go.microsoft.com/fwlink/?LinkId=130652&clcid=0x409
Note: After installing the ADOMD.net component you might need to restart IIS.
Client Requirements
Any client accessing BeyondInsight needs Microsoft Silverlight version 4.
• Navigate to the BeyondInsight website to access a link to install Silverlight.
• You can also install Silverlight here: http://www.microsoft.com/getsilverlight/
Table 9. SSRS Proxy User Roles
Member in Role Database
RetinaInsightReader BeyondInsight reporting
RetinaInsightUser BeyondInsight management console
RetinaInsightReader BeyondInsight reporting cube in SQL Analysis Services
Table 10. SSRS Proxy User Roles
Member in Role Database
RetinaInsightSSIS BeyondInsight
RetinaInsightUser BeyondInsight management console

BeyondInsight Installation Guide BeyondInsight Reporting and Analytics
BeyondTrust® October 2014 Page 28
Configure BeyondInsight Reporting and Analytics
This section provides information on configuring BeyondInsight.
To configure BeyondInsight:
1. Log on to BeyondInsight.
2. Click Configure Now to configure BeyondInsight.
3. Enter the credentials to install the BeyondInsight SQL Server components. The credentials must have the following rights:
• Install a new SQL database on the SQL Server
• Install a new Analysis Services cube on the Analysis Server
• Install SSIS packages in Integration Services
• Install reports and create folders in Reporting Services
• Schedule SQL Agent jobs
For more information, see “Permissions Required for BeyondInsight Configuration User,” page 25.
4. Enter the name of the SQL Server database and the BeyondInsight star schema.
Integration Services must also reside on this server. SQL authentication is currently not supported for this database.
For permission information, see “Permissions Required for the SSRS Proxy User,” page 27.
5. Enter the web service URL for SSRS and credentials.
The user will be automatically added to the necessary database roles. These credentials are stored with the Reporting Services data source.
For first time configuration, the SQL Server instance is queried and populates the Web Service URL box.
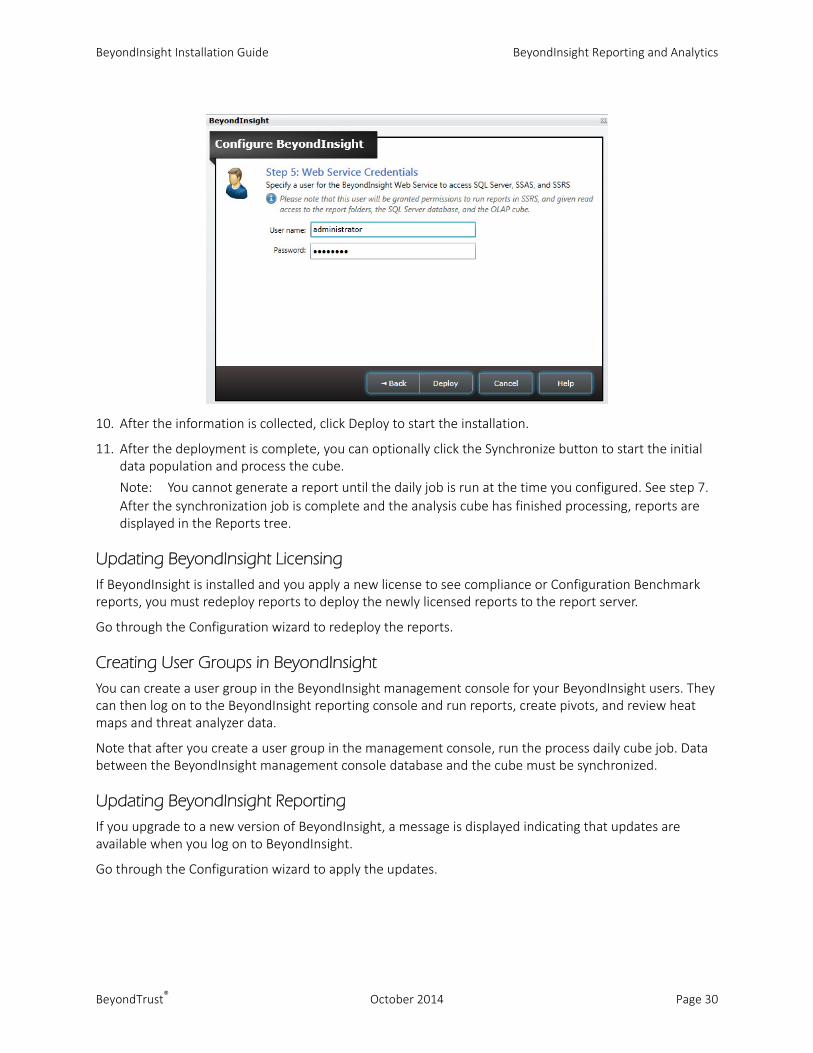
6. Enter the credentials for the Web Service user. The web service needs access to SQL Server and is granted access to the “eEye” folder in Reporting Services.

BeyondInsight Installation Guide BeyondInsight Reporting and Analytics
BeyondTrust® October 2014 Page 29
7. Select the start time for the data synchronization job. BeyondInsight extracts the latest data from the BeyondInsight management console database.
Schedule the synchronization during non‐peak hours to ensure efficient processing.
8. Enter the credentials for a SQL Server agent service account (optional).
9. Enter the credentials for the Web Service user. The web service needs access to SQL Server and is granted access to the “eEye” folder in Reporting Services.
For permissions information, see “Permissions Required for the Web Proxy User,” page 26.
BeyondInsight Installation Guide BeyondInsight Reporting and Analytics
BeyondTrust® October 2014 Page 30
10. After the information is collected, click Deploy to start the installation.
11. After the deployment is complete, you can optionally click the Synchronize button to start the initial data population and process the cube.
Note: You cannot generate a report until the daily job is run at the time you configured. See step 7.
After the synchronization job is complete and the analysis cube has finished processing, reports are displayed in the Reports tree.
Updating BeyondInsight Licensing
If BeyondInsight is installed and you apply a new license to see compliance or Configuration Benchmark reports, you must redeploy reports to deploy the newly licensed reports to the report server.
Go through the Configuration wizard to redeploy the reports.
Creating User Groups in BeyondInsight
You can create a user group in the BeyondInsight management console for your BeyondInsight users. They can then log on to the BeyondInsight reporting console and run reports, create pivots, and review heat maps and threat analyzer data.
Note that after you create a user group in the management console, run the process daily cube job. Data between the BeyondInsight management console database and the cube must be synchronized.
Updating BeyondInsight Reporting
If you upgrade to a new version of BeyondInsight, a message is displayed indicating that updates are available when you log on to BeyondInsight.
Go through the Configuration wizard to apply the updates.

BeyondInsight Installation Guide PowerBroker for Windows
BeyondTrust® October 2014 Page 31
PowerBroker for WindowsTo configure PowerBroker for Windows to forward events to BeyondInsight, you must follow the procedures in this section:
• Generating a Certificate
• Configuring BeyondInsight
BeyondInsight Community does not support PowerBroker for Windows.
Ensure that you have the appropriate license key for BeyondInsight.
Before proceeding, ensure all PowerBroker for Windows components and BeyondInsight are installed.
Note: Ensure the following patch is applied to Windows Server 2003 and Windows XP assets. The patch is needed to create strong certificates.
http://support.microsoft.com/kb/968730
Generating a Certificate
Generate a client certificate using the BeyondInsight Configuration tool. Certificates must be deployed to any asset where you are capturing events with PowerBroker for Windows.
After you generate a certificate, you can create an MSI. You can then set up a GPO with the MSI and deploy the certificate to your PowerBroker assets.
Note: Do not generate a client certificate if there is one created for either PowerBroker Endpoint Protection Platform or for Retina Network Security Scanner. You can use the existing client certificate for your PowerBroker for Windows assets.
To generate a certificate:
1. Run the configuration tool, and then click Certificate Management.
2. Select Generate Certificate, and then select Client Certificate from the Certificate type menu.
3. Enter a password.
4. Click OK.
Creating an MSI FileTo create an MSI file:
1. Run the BeyondInsight Configuration tool.
2. Click Generate Certificate msi.
The certinstaller.msi file is created in the following directory: C:\Program Files (x86)\eEye Digital Security\Retina CS\Utilities\msi
Configuring PowerBroker for Windows
Install the PowerBroker for Windows components as usual.
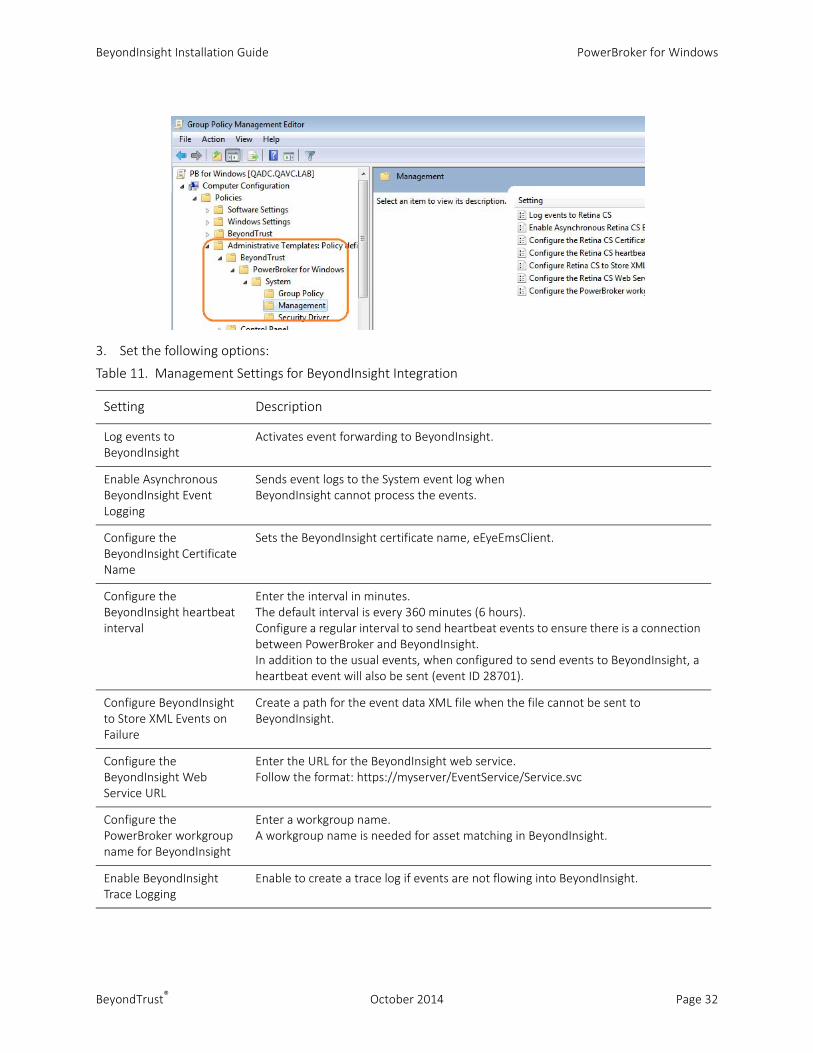
To configure PowerBroker for Windows:
1. Run the Group Policy Management Editor.
2. Go to the Management folder in the Administrative Templates section.
BeyondInsight Installation Guide PowerBroker for Windows
BeyondTrust® October 2014 Page 32
3. Set the following options:
Table 11. Management Settings for BeyondInsight Integration
Setting Description
Log events to BeyondInsight
Activates event forwarding to BeyondInsight.
Enable Asynchronous BeyondInsight Event Logging
Sends event logs to the System event log whenBeyondInsight cannot process the events.
Configure the BeyondInsight Certificate Name
Sets the BeyondInsight certificate name, eEyeEmsClient.
Configure the BeyondInsight heartbeat interval
Enter the interval in minutes.The default interval is every 360 minutes (6 hours).Configure a regular interval to send heartbeat events to ensure there is a connection between PowerBroker and BeyondInsight.In addition to the usual events, when configured to send events to BeyondInsight, a heartbeat event will also be sent (event ID 28701).
Configure BeyondInsight to Store XML Events on Failure
Create a path for the event data XML file when the file cannot be sent to BeyondInsight.
Configure the BeyondInsight Web Service URL
Enter the URL for the BeyondInsight web service.Follow the format: https://myserver/EventService/Service.svc
Configure the PowerBroker workgroup name for BeyondInsight
Enter a workgroup name.A workgroup name is needed for asset matching in BeyondInsight.
Enable BeyondInsight Trace Logging
Enable to create a trace log if events are not flowing into BeyondInsight.

BeyondInsight Installation Guide PowerBroker Servers for Unix & Linux
BeyondTrust® October 2014 Page 33
PowerBroker Servers for Unix & LinuxUse BeyondInsightto manage PowerBroker Servers event log records. Configure BeyondInsight and PowerBroker Servers to work together to send the event logs to the BeyondInsight management console.
This chapter provides information on preparing PowerBroker Servers to work with BeyondInsight.
Refer to the PowerBroker Servers product documentation for specific details on the keywords that must be configured.
Requirements
• BeyondInsight version 4.5 or later
• PowerBroker Servers version 7.5 or later
Generating a Certificate
1. Open the BeyondInsight Configuration Tool and select Certificate Management.
2. Select Export certificate.
3. Select Client certificate from the list.
4. Enter a password for the export file and provide the destination in the Path field.
5. Click OK to export the certificate as a PKCS#12 file (with a .pfx extension).
6. Using openssl, convert the certificate from PKCS#12 format (*.pfx file) to PEM format (*.pem):openssl pkcs12 –clcerts –in <full_pathname_of_pfx_to_convert> -
out <full_pathname_of_target_pem> –nodes
7. Securely copy the certificate to the PowerBroker Servers Unix & Linux Master and Logserver hosts.
8. In the PBUL settings file, assign the path and filename of this certificate to the keyword sslrcscertfile.
Exporting the BeyondInsight Server SSL Certificate
1. Open the Windows Certificate Manager (certmgr.msc) and expand the Trusted Root Certification Authorities folder.
2. In the details pane, select the BeyondInsight server SSL certificate in the Issued To field.
The certificate name contains the hostname of the BeyondInsight server and the text “eEye EMS CA”.
Example: RCS hostname is LA‐RETINACS‐01:
The certificate’s name is “LA‐RETINACS‐01 eEye EMS CA”
3. From the Action menu, select All Tasks > Export.
4. In the Certificate Export Wizard:
a. Select No when asked to export the private key, and then click Next.
b. Select the DER encoded binary X.509 (*.CER) format, and then click Next.
c. Provide the target destination of the certificate, and then click Next.
d. Confirm the settings, and then click Finish to export the certificate.
5. Using openssl, convert the certificate from DER format (*.cer) to PEM format (*.pem) using this command:openssl x509 -inform der -in

BeyondInsight Installation Guide PowerBroker Servers for Unix & Linux
BeyondTrust® October 2014 Page 34
<full_pathname_of_cer_to_convert> -out
<full_pathname_of_target_pem>
6. Securely copy the certificate to the PBUL Master and Logserver hosts.
7. In the PBUL settings file, assign the path and filename of this certificate to the keyword sslrcscafile.
For more information about importing the certificates, refer to “Solr Install” in the PowerBroker Servers Install Guide.
Configuring Keywords
If you have not done so during the PBUL installation, set the following keywords in pb.settings on the Master and Log server hosts:
• rcshost
• rcswebsvcport
• sslrcscertfile
• sslrcscafile
• rcseventstorefile
For a complete list of keywords that must be configured, refer to the PowerBroker Servers product documentation.

BeyondInsight Installation Guide Using the BeyondInsight Configuration Tool
BeyondTrust® October 2014 Page 35
Using the BeyondInsight Configuration ToolAfter you initially configure BeyondInsight, you can change settings using the BeyondInsight Configuration Tool.
The options configured during installation are described here, “Configuring BeyondInsight,” page 15.
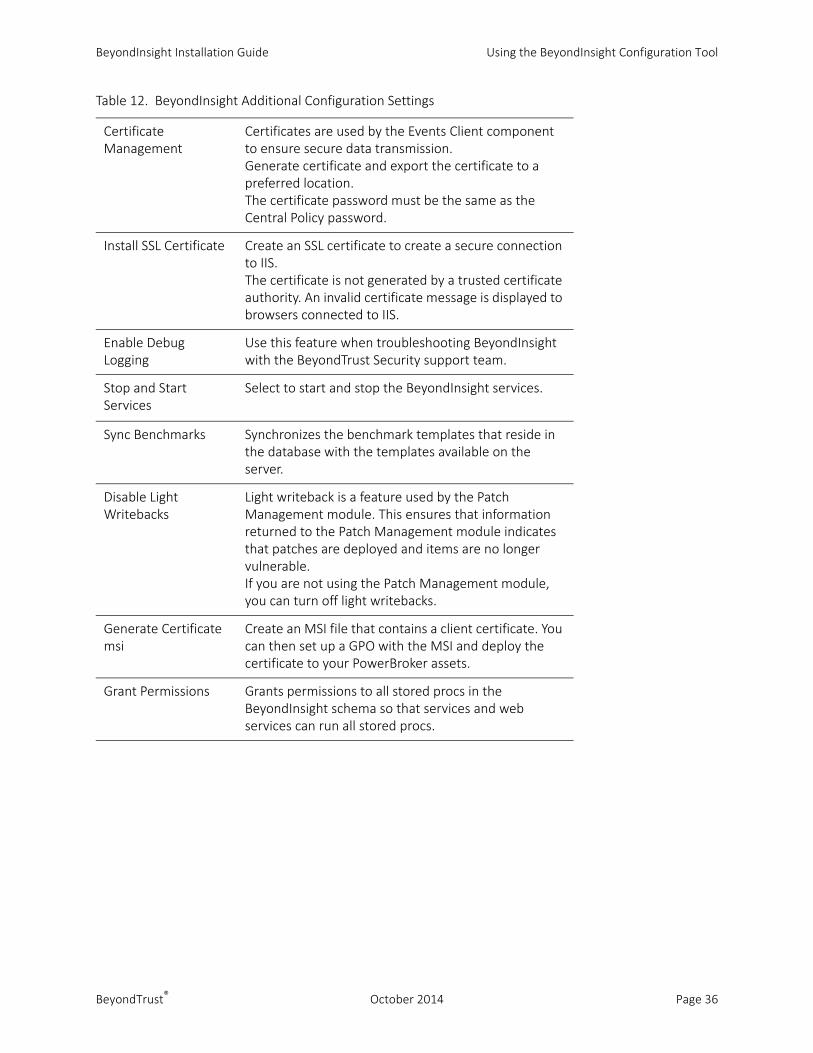
Table 12. BeyondInsight Additional Configuration Settings
Test Connection Click to test the connection to the SQL Server database.
Create Database Select to create a database.
Upgrade Database Use this feature to upgrade your BeyondInsight database.If you are upgrading from REM to BeyondInsight, enter the name of the REM database.
Manage License Use the License Manager to update your license or transfer the license (remove the license from the installation computer and move to another computer).
BeyondInsight Installation Guide Using the BeyondInsight Configuration Tool
BeyondTrust® October 2014 Page 36
Certificate Management
Certificates are used by the Events Client component to ensure secure data transmission.Generate certificate and export the certificate to a preferred location.The certificate password must be the same as the Central Policy password.
Install SSL Certificate Create an SSL certificate to create a secure connection to IIS.The certificate is not generated by a trusted certificate authority. An invalid certificate message is displayed to browsers connected to IIS.
Enable Debug Logging
Use this feature when troubleshooting BeyondInsight with the BeyondTrust Security support team.
Stop and Start Services
Select to start and stop the BeyondInsight services.
Sync Benchmarks Synchronizes the benchmark templates that reside in the database with the templates available on the server.
Disable Light Writebacks
Light writeback is a feature used by the Patch Management module. This ensures that information returned to the Patch Management module indicates that patches are deployed and items are no longer vulnerable. If you are not using the Patch Management module, you can turn off light writebacks.
Generate Certificate msi
Create an MSI file that contains a client certificate. You can then set up a GPO with the MSI and deploy the certificate to your PowerBroker assets.
Grant Permissions Grants permissions to all stored procs in the BeyondInsight schema so that services and web services can run all stored procs.
Table 12. BeyondInsight Additional Configuration Settings

BeyondInsight Installation Guide Migrating REM‐1505 Appliance Data to BeyondInsight
BeyondTrust® October 2014 Page 37
Migrating REM-1505 Appliance Data to BeyondInsightYou can migrate REM‐1505 appliance data to your BeyondInsight software install.
Go through the following list to migrate your data.
Install BeyondInsight
• Configure BeyondInsight to point to SQL server.
• Create a BeyondInsight database.
Import settings from existing REM system
• Stop all BeyondTrust services.
• Copy the REM Event Manager folder structure to the BeyondInsight system (address groups, port groups, etc… basically all xml configuration files).
• Copy the REM database to BeyondInsight.
• Rename the database to match the BeyondInsight name convention. Rename the original CS database first.
• Run BeyondInsight configuration and upgrade the database.
• Log on to BeyondInsight to verify all settings are imported properly.
Configure Retina Network Security Scanners
• Update the events client certificate on all Retina scanner agents to send events to the new BeyondInsight system (not the existing REM system).
• Update Central Policy servers on all Retina scanner agents so scanners are managed by the new BeyondInsight system (not the existing REM system). See “Activating Central Policy,” page 18.
• Scheduled jobs and reports. Edit any scheduled jobs that were imported so they use proper address groups and scanners.
Configure Retina Insight
• Ensure all SQL Server components required for Retina Insight are installed. See “BeyondInsight Reporting and Analytics,” page 24.
• Run the BeyondInsight reporting configuration. For more information, “Configure BeyondInsight Reporting and Analytics,” page 28.
BeyondInsight Installation Guide Running the Software Removal Tool
BeyondTrust® October 2014 Page 38
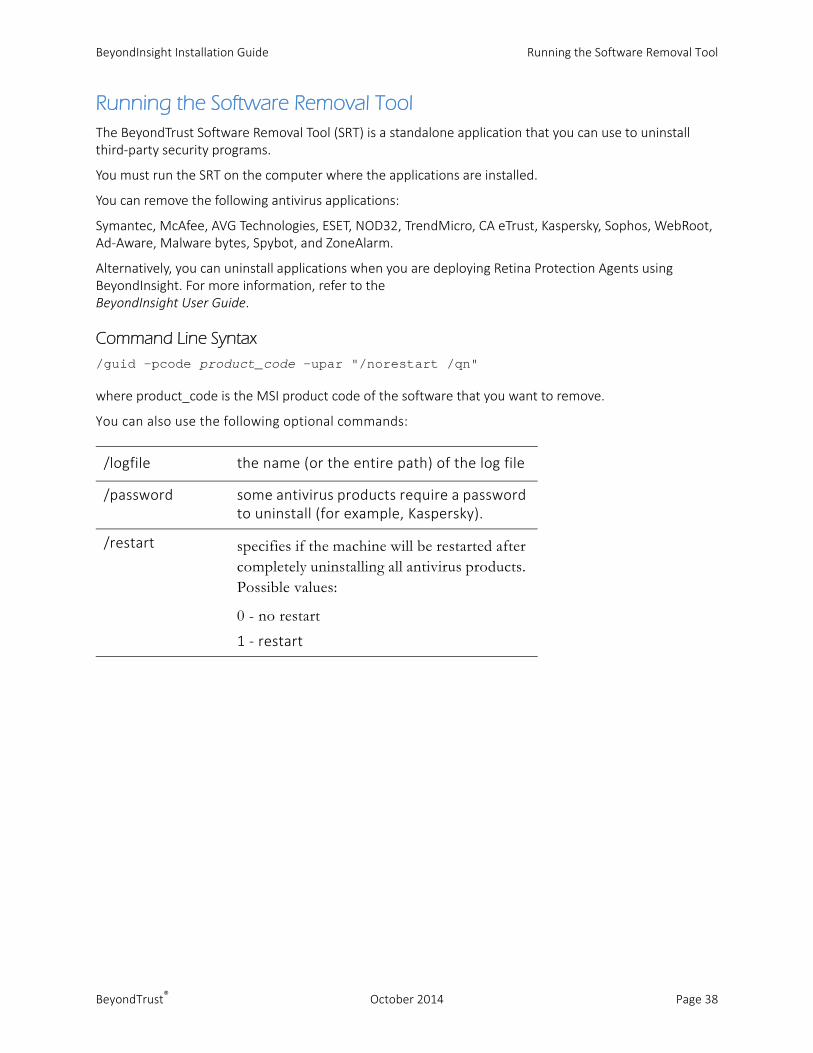
Running the Software Removal ToolThe BeyondTrust Software Removal Tool (SRT) is a standalone application that you can use to uninstall third‐party security programs.
You must run the SRT on the computer where the applications are installed.
You can remove the following antivirus applications:
Symantec, McAfee, AVG Technologies, ESET, NOD32, TrendMicro, CA eTrust, Kaspersky, Sophos, WebRoot, Ad‐Aware, Malware bytes, Spybot, and ZoneAlarm.
Alternatively, you can uninstall applications when you are deploying Retina Protection Agents using BeyondInsight. For more information, refer to the BeyondInsight User Guide.
Command Line Syntax/guid -pcode product_code -upar "/norestart /qn"
where product_code is the MSI product code of the software that you want to remove.
You can also use the following optional commands:
/logfile the name (or the entire path) of the log file
/password some antivirus products require a password to uninstall (for example, Kaspersky).
/restart specifies if the machine will be restarted after completely uninstalling all antivirus products. Possible values:
0 - no restart
1 ‐ restart

BeyondInsight Installation Guide Working with Certificates
BeyondTrust® October 2014 Page 39
Working with CertificatesCertificates are used for secure communication between agents and BeyondInsight.
There are two types of certificates used with BeyondInsight and PowerBroker agents:
• SSL certificate – Required to encrypt the communication
• Client certificate – Required to authenticate a client
You can use BeyondInsight certificates or create custom certificates.
Working with BeyondInsight Certificates
The following certificates are used for communication between all Retina and PowerBroker solutions and BeyondInsight:
• eEyeEmsCA ‐ Certification Authority (CA) certificate
The CA certificate generates and validates client and server certificates, and is located on both agent and server in the Trusted Root Certification Authorities in the Local Machine store.
• EmsClientCert ‐ Client authentication certificate
• eEyeEmsServer ‐ Server authentication certificate
Server Certificate
Install the eEyeEmsServer certificate on the server in the Local Machine Store, under the Personal Store. To verify that the certificate is valid, double‐click the certificate.
The screen capture on the left shows a valid certificate. The screen capture on the right shows an invalid certificate.
In the screen capture on the right, the eEyeEmsCA exists on the server but it is not the same one that was used for generating the eEyeEmsServer.
BeyondInsight Installation Guide Working with Certificates
BeyondTrust® October 2014 Page 40
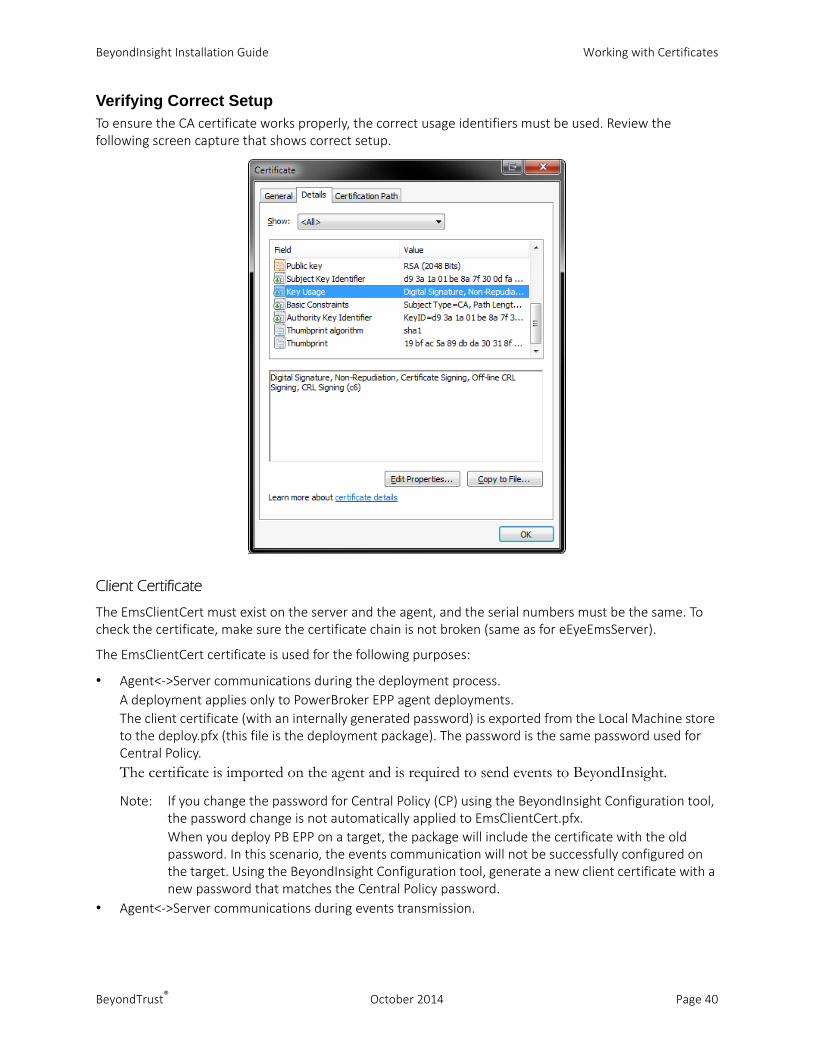
Verifying Correct SetupTo ensure the CA certificate works properly, the correct usage identifiers must be used. Review the following screen capture that shows correct setup.
Client Certificate
The EmsClientCert must exist on the server and the agent, and the serial numbers must be the same. To check the certificate, make sure the certificate chain is not broken (same as for eEyeEmsServer).
The EmsClientCert certificate is used for the following purposes:
• Agent<‐>Server communications during the deployment process.
A deployment applies only to PowerBroker EPP agent deployments.
The client certificate (with an internally generated password) is exported from the Local Machine store to the deploy.pfx (this file is the deployment package). The password is the same password used for Central Policy.
The certificate is imported on the agent and is required to send events to BeyondInsight.
Note: If you change the password for Central Policy (CP) using the BeyondInsight Configuration tool, the password change is not automatically applied to EmsClientCert.pfx.
When you deploy PB EPP on a target, the package will include the certificate with the old password. In this scenario, the events communication will not be successfully configured on the target. Using the BeyondInsight Configuration tool, generate a new client certificate with a new password that matches the Central Policy password.
• Agent<‐>Server communications during events transmission.
BeyondInsight Installation Guide Working with Certificates
BeyondTrust® October 2014 Page 41
When generating the client certificate using the BeyondInsight Configuration tool, the certificate is exported from the Local Machine store to: C:\program files\common files\eEye Digital Security\Shared Services Host\Certificates\EmsClientCert.pfx
The file uses the Central Policy password.
When connecting to the BeyondInsight Web Service (for example, PowerBroker for Windows connecting to the Event Service), the EmsClientCert is used to authenticate the client and the SSL certificate is used to encrypt the data. This prevents anonymous connections to the services. Typically, a Certification Authority (CA) such as VeriSign validates anonymous clients.
With BeyondInsight, a self‐signed CA is created and distributed with the client certificate. BeyondInsight can then work in a variety of environments especially where network connectivity is a problem. This avoids the need to register each system instance with an online CA.
Internally, each client certificate contains a private‐public key pair. During the SSL handshake the server requests the client certificate. The client authenticates the certificate before initiating the connection and the server again validates when it is received.
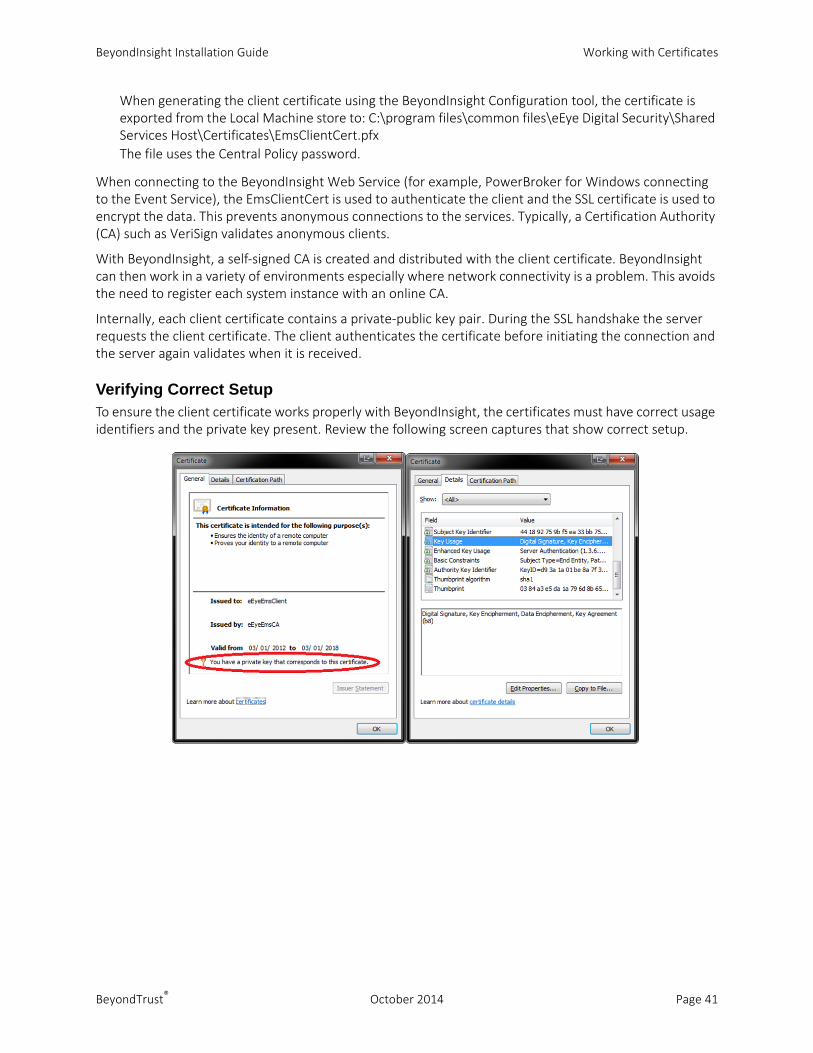
Verifying Correct SetupTo ensure the client certificate works properly with BeyondInsight, the certificates must have correct usage identifiers and the private key present. Review the following screen captures that show correct setup.
BeyondInsight Installation Guide Working with Certificates
BeyondTrust® October 2014 Page 42
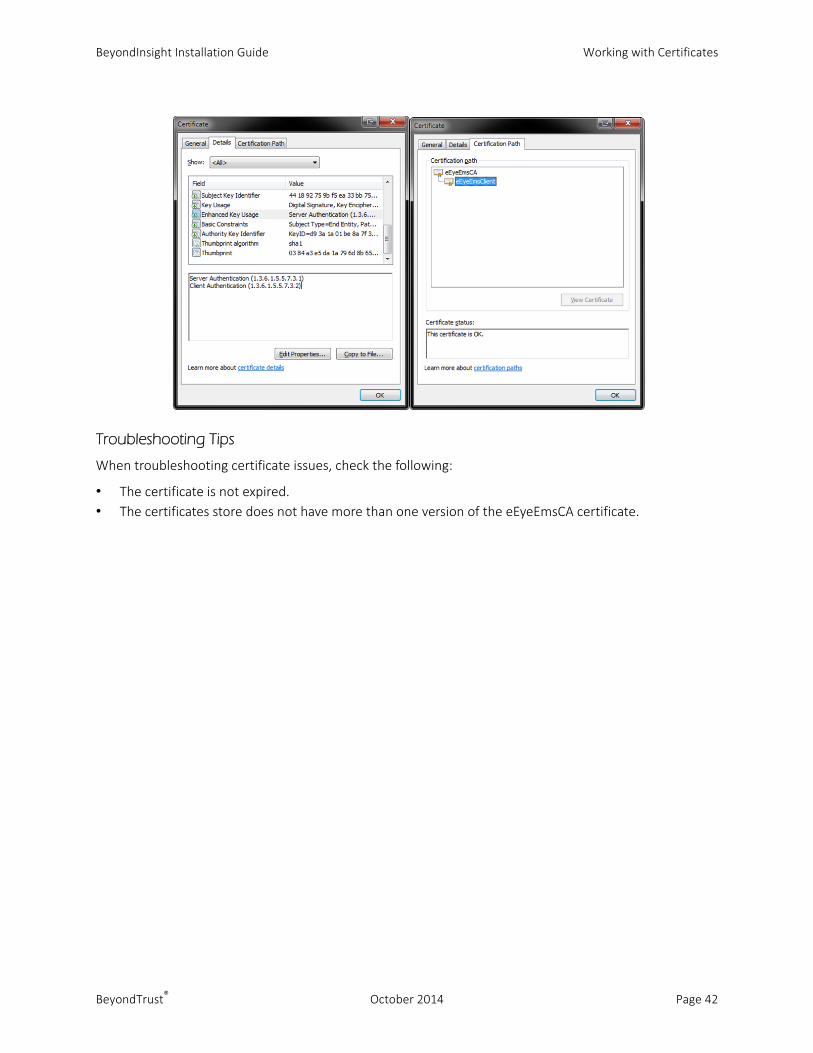
Troubleshooting Tips
When troubleshooting certificate issues, check the following:
• The certificate is not expired.
• The certificates store does not have more than one version of the eEyeEmsCA certificate.
BeyondInsight Installation Guide Working with Certificates
BeyondTrust® October 2014 Page 43
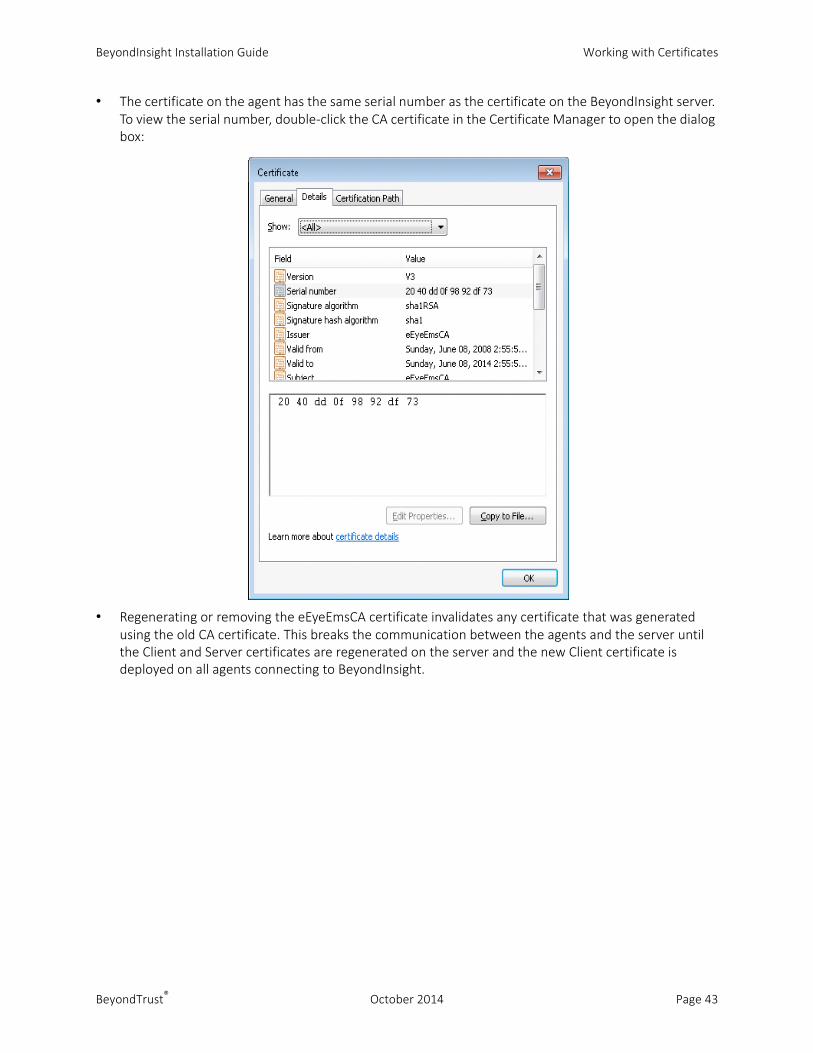
• The certificate on the agent has the same serial number as the certificate on the BeyondInsight server. To view the serial number, double‐click the CA certificate in the Certificate Manager to open the dialog box:
• Regenerating or removing the eEyeEmsCA certificate invalidates any certificate that was generated using the old CA certificate. This breaks the communication between the agents and the server until the Client and Server certificates are regenerated on the server and the new Client certificate is deployed on all agents connecting to BeyondInsight.
BeyondInsight Installation Guide Working with Certificates
BeyondTrust® October 2014 Page 44
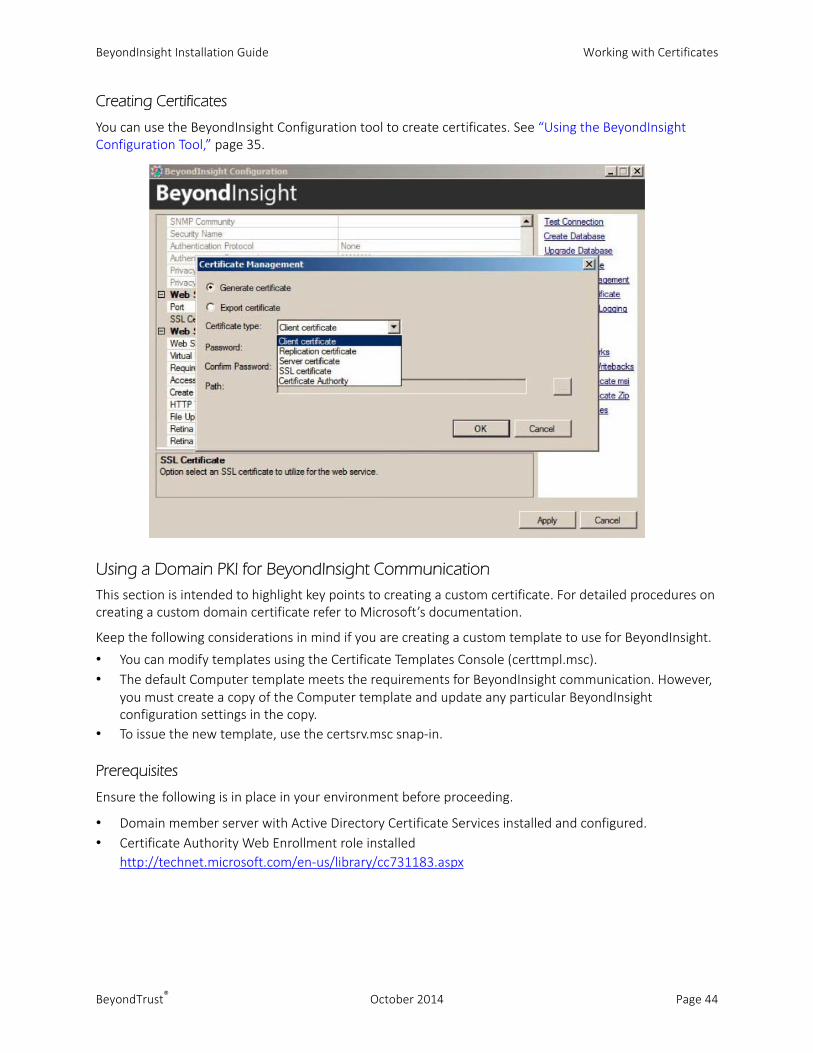
Creating Certificates
You can use the BeyondInsight Configuration tool to create certificates. See “Using the BeyondInsight Configuration Tool,” page 35.
Using a Domain PKI for BeyondInsight Communication
This section is intended to highlight key points to creating a custom certificate. For detailed procedures on creating a custom domain certificate refer to Microsoft’s documentation.
Keep the following considerations in mind if you are creating a custom template to use for BeyondInsight.
• You can modify templates using the Certificate Templates Console (certtmpl.msc).
• The default Computer template meets the requirements for BeyondInsight communication. However, you must create a copy of the Computer template and update any particular BeyondInsight configuration settings in the copy.
• To issue the new template, use the certsrv.msc snap‐in.
Prerequisites
Ensure the following is in place in your environment before proceeding.
• Domain member server with Active Directory Certificate Services installed and configured.
• Certificate Authority Web Enrollment role installed
http://technet.microsoft.com/en‐us/library/cc731183.aspx

BeyondInsight Installation Guide Working with Certificates
BeyondTrust® October 2014 Page 45
Requirements
• The certificates must be configured as Server Authentication and Client Authentication in the Intended Purposes section of the certificate.
• The Subject key must contain common text for all client certificates.
In the following example the common text is BTTest.
Assigning the SSL Web Service Certificate in BeyondInsight
1. Start the BeyondInsight Configuration Tool.
2. Scroll to Web Service in the list.
3. Select the domain PKI certificate from the list, and then click Apply.

BeyondInsight Installation Guide Working with Certificates
BeyondTrust® October 2014 Page 46
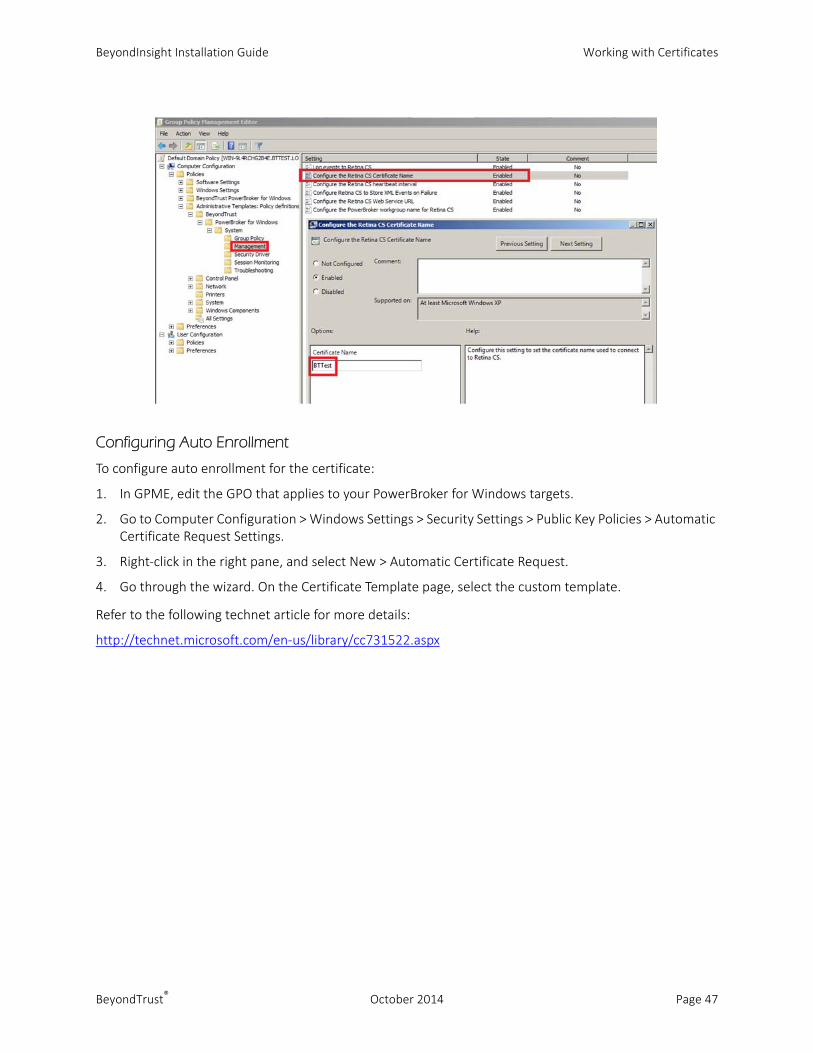
Configuring a Client Certificate for PowerBroker for Windows
1. Edit the GPO that you are using to deploy policy to your PowerBroker for Windows targets.
2. In GPME, go to Administrative Templates > BeyondTrust > PowerBroker for Windows > System > Management.
3. Double‐click the Configure the BeyondInsight Certificate Name setting.
4. Enter the common text in the client certificate Subject key.
BeyondInsight Installation Guide Working with Certificates
BeyondTrust® October 2014 Page 47
Configuring Auto Enrollment
To configure auto enrollment for the certificate:
1. In GPME, edit the GPO that applies to your PowerBroker for Windows targets.
2. Go to Computer Configuration > Windows Settings > Security Settings > Public Key Policies > Automatic Certificate Request Settings.
3. Right‐click in the right pane, and select New > Automatic Certificate Request.
4. Go through the wizard. On the Certificate Template page, select the custom template.
Refer to the following technet article for more details:
http://technet.microsoft.com/en‐us/library/cc731522.aspx