powerpoint presentations creating slide shows …edindex/officetutorials/lesson8.pdf · powerpoint...
TRANSCRIPT
ESSENTIAL MICROSOFT OFFICE 2000: Tutorial for Teachers Copyright © Bernard Poole, Rebecca Randall, 2000. All rights reserved
210
POWERPOINT PRESENTATIONS Creating slide shows and related teaching materials
LEARNING OUTCOMES This lesson introduces you to the basic features of PowerPoint which are particularly valuable in the teaching and learning environment. You will learn how to use PowerPoint to capture your ideas in outline form and convert those ideas into multimedia presentations. You will also learn how to use the application to create your own presentations both from scratch and with the help of one of the PowerPoint Wizards.
Most people think of a slide show as a way of presenting a series of still images or photographs using a slide projector. If you think about it, however, a slide does not have to be a still image; using PowerPoint it can also be an audio or video clip. For that matter, a slide does not have to be even a picture; it can also be text, an outline of ideas, whatever you want.
PowerPoint provides an easy-to-use multimedia presentation production system, which you will no doubt enjoy learning and which you and your students will find useful for individual or group projects of all kinds.
In the various courses that you take as an Education major you learn how to design curricula, with lesson plans and unit plans. You also learn methodologies for effective teaching. The better the teacher you are, the more PowerPoint will empower you in your work.
A caveat before you begin: Till now, the steps to accomplish the tasks assigned have been rather detailed. This time, however, the directions will be less specific, especially in the latter half of the lesson, because PowerPoint is a program you can easily figure out by just playing with it. You’ll find that you’ll quickly become confident about how to design and develop high quality multimedia slide presentations. So relax, and have fun!
Lesson 8: PowerPoint presentations
211
Fig. 8.1 Opening an existing presentation
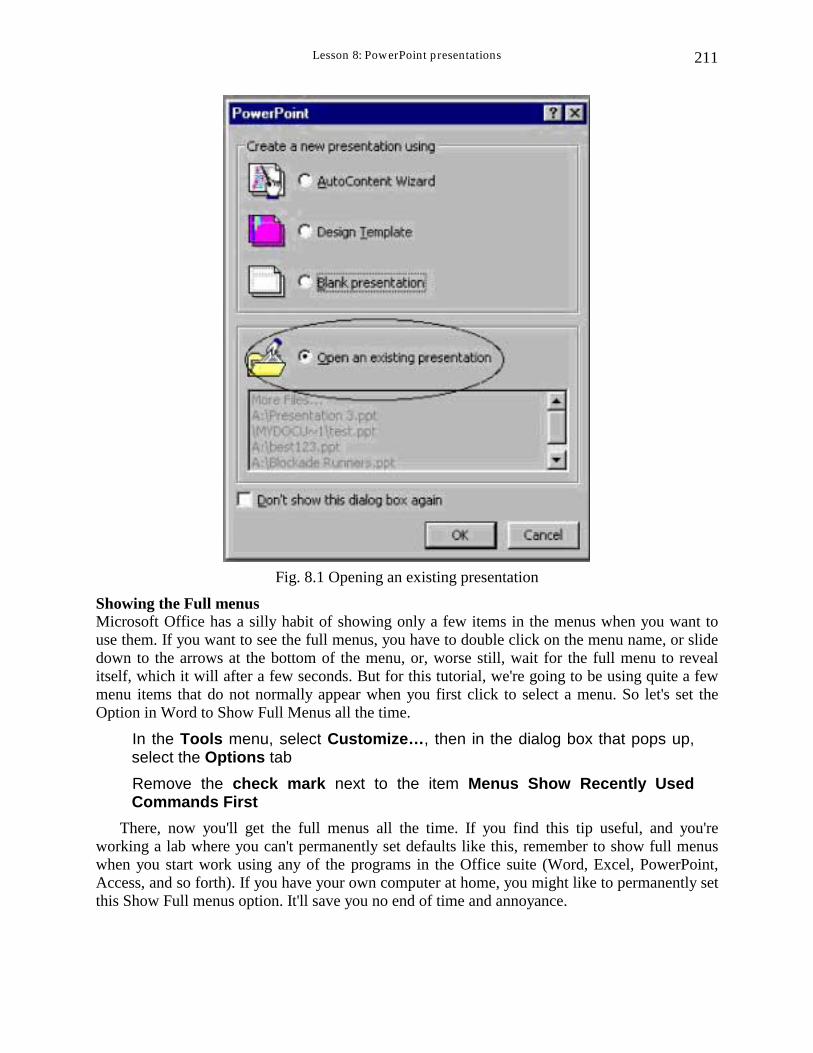
Showing the Full menus Microsoft Office has a silly habit of showing only a few items in the menus when you want to use them. If you want to see the full menus, you have to double click on the menu name, or slide down to the arrows at the bottom of the menu, or, worse still, wait for the full menu to reveal itself, which it will after a few seconds. But for this tutorial, we're going to be using quite a few menu items that do not normally appear when you first click to select a menu. So let's set the Option in Word to Show Full Menus all the time.
In the Tools menu, select Customize…, then in the dialog box that pops up, select the Options tab Remove the check mark next to the item Menus Show Recently Used Commands First
There, now you'll get the full menus all the time. If you find this tip useful, and you're working a lab where you can't permanently set defaults like this, remember to show full menus when you start work using any of the programs in the Office suite (Word, Excel, PowerPoint, Access, and so forth). If you have your own computer at home, you might like to permanently set this Show Full menus option. It'll save you no end of time and annoyance.
ESSENTIAL MICROSOFT OFFICE 2000: Tutorial for Teachers Copyright © Bernard Poole, Rebecca Randall, 2000. All rights reserved
212
8.1 POWERPOINT AT WORK Let’s start by looking at an example of a PowerPoint presentation.
Turn on your computer and open the Microsoft Office PowerPoint presentation program
Make sure you have your PowerPoint disk in the floppy disk drive
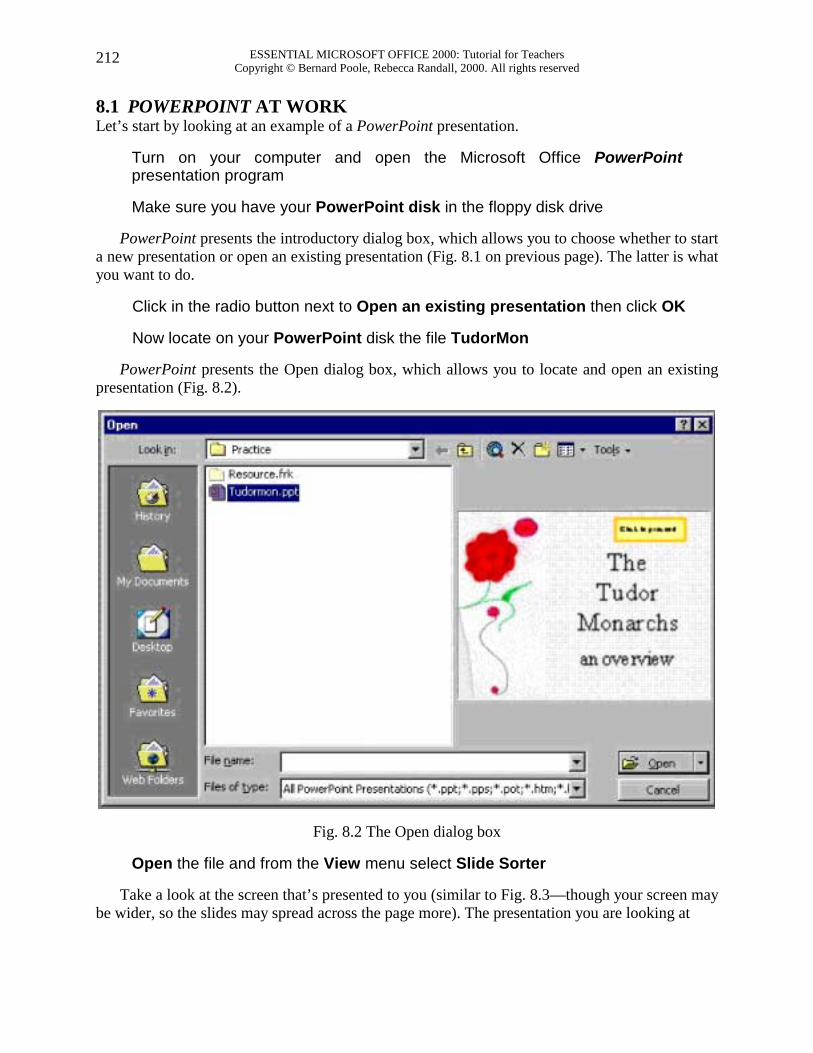
PowerPoint presents the introductory dialog box, which allows you to choose whether to start a new presentation or open an existing presentation (Fig. 8.1 on previous page). The latter is what you want to do.
Click in the radio button next to Open an existing presentation then click OK
Now locate on your PowerPoint disk the file TudorMon
PowerPoint presents the Open dialog box, which allows you to locate and open an existing presentation (Fig. 8.2).
Fig. 8.2 The Open dialog box
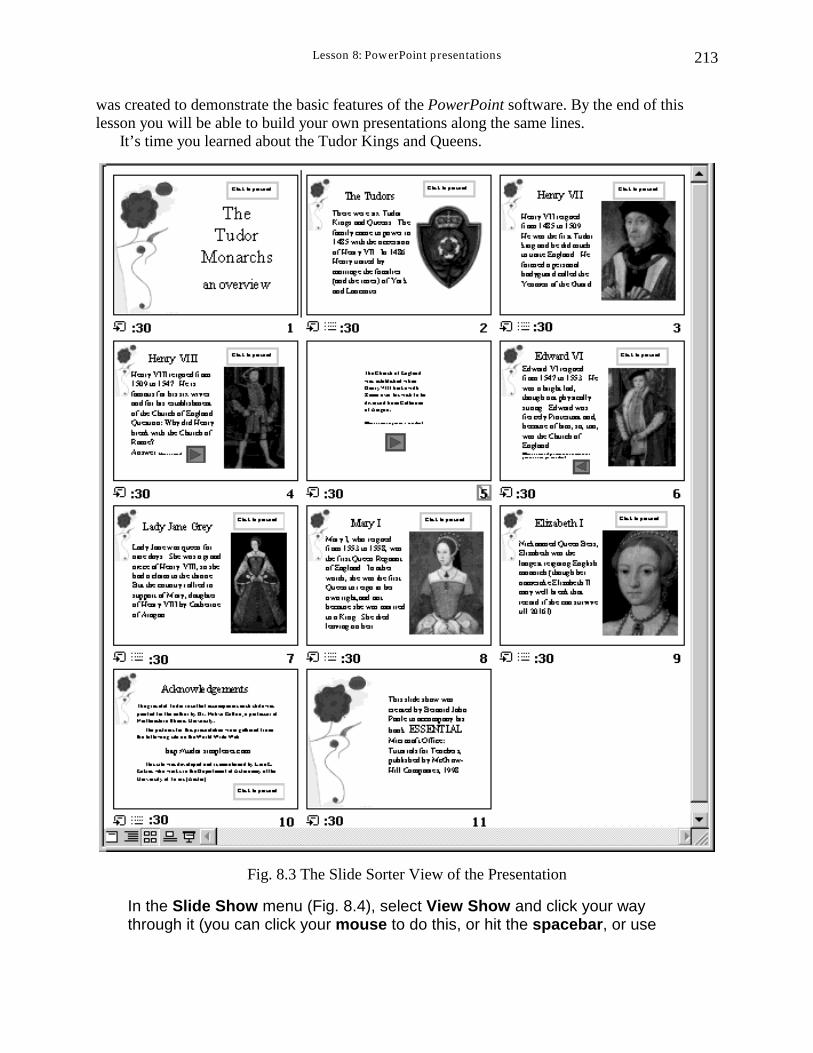
Open the file and from the View menu select Slide Sorter
Take a look at the screen that’s presented to you (similar to Fig. 8.3—though your screen may be wider, so the slides may spread across the page more). The presentation you are looking at
Lesson 8: PowerPoint presentations
213
was created to demonstrate the basic features of the PowerPoint software. By the end of this lesson you will be able to build your own presentations along the same lines.
It’s time you learned about the Tudor Kings and Queens.
Fig. 8.3 The Slide Sorter View of the Presentation
In the Slide Show menu (Fig. 8.4), select View Show and click your way through it (you can click your mouse to do this, or hit the spacebar, or use

ESSENTIAL MICROSOFT OFFICE 2000: Tutorial for Teachers Copyright © Bernard Poole, Rebecca Randall, 2000. All rights reserved
214
the arrow keys to go back and forth or click on the button to proceed to the next or previous slide)
Fig. 8.4 The Slide Show menu
The slides have been timed to allow the user to easily view and read what is on each slide without feeling rushed. If you want the slides to proceed at a faster pace simply click on the left mouse button.
When you have finished reviewing the Tudors slide show, exit the show by right clicking the mouse, then select the last menu option to End Show
Features to look out for in the demonstration presentation
Transition effects and text preset animations The transition effects from one slide to another and the text preset animations (which determine how the text will arrive on each slide) have been set at random for the demonstration. This is so that you get an idea of the variety of transitions and animations you can use in PowerPoint. Normally you would not want to use so many different styles since it might distract from the impact you are trying to make. A good designer homes in on a style that he or she likes best for a particular theme and tends to stay with it for all the slides in the set.
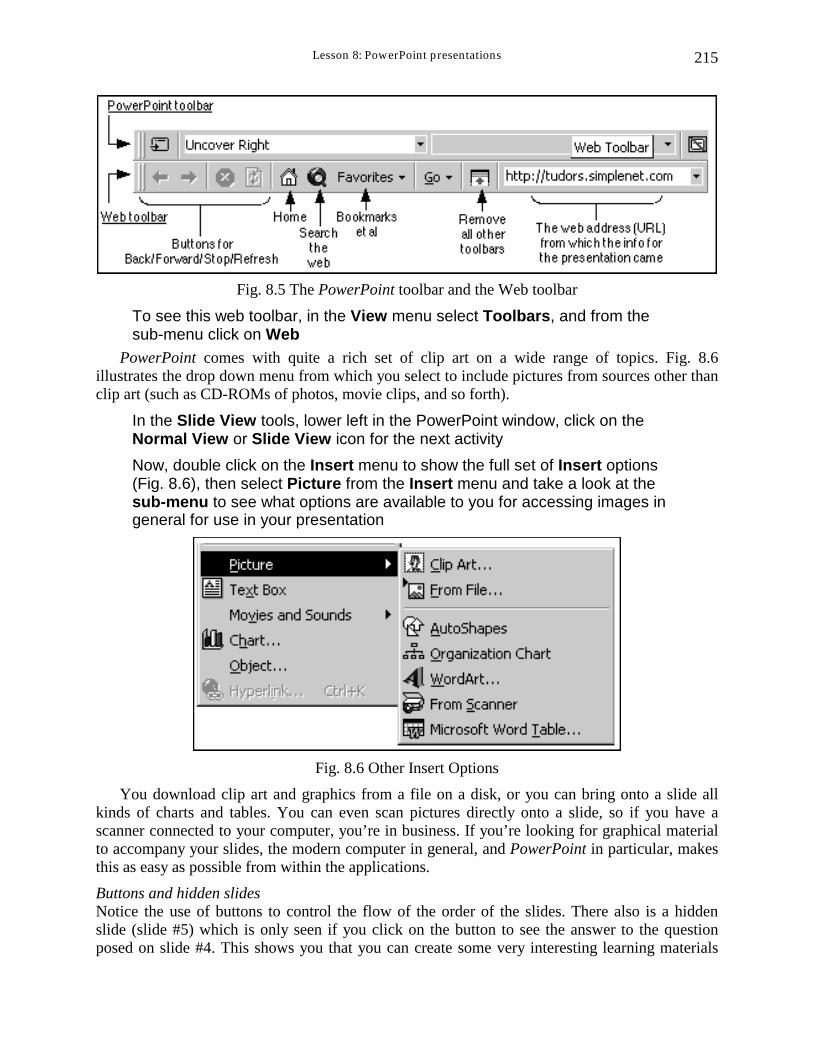
Illustrations and the World Wide Web The illustrations all came from the world wide web. Notice the high quality of those illustrations. PowerPoint makes it especially easy to download material from the web by including a web toolbar within the program itself (Fig. 8.5).
Lesson 8: PowerPoint presentations
215
Fig. 8.5 The PowerPoint toolbar and the Web toolbar
To see this web toolbar, in the View menu select Toolbars, and from the sub-menu click on Web
PowerPoint comes with quite a rich set of clip art on a wide range of topics. Fig. 8.6 illustrates the drop down menu from which you select to include pictures from sources other than clip art (such as CD-ROMs of photos, movie clips, and so forth).
In the Slide View tools, lower left in the PowerPoint window, click on the Normal View or Slide View icon for the next activity Now, double click on the Insert menu to show the full set of Insert options (Fig. 8.6), then select Picture from the Insert menu and take a look at the sub-menu to see what options are available to you for accessing images in general for use in your presentation
Fig. 8.6 Other Insert Options
You download clip art and graphics from a file on a disk, or you can bring onto a slide all kinds of charts and tables. You can even scan pictures directly onto a slide, so if you have a scanner connected to your computer, you’re in business. If you’re looking for graphical material to accompany your slides, the modern computer in general, and PowerPoint in particular, makes this as easy as possible from within the applications. Buttons and hidden slides Notice the use of buttons to control the flow of the order of the slides. There also is a hidden slide (slide #5) which is only seen if you click on the button to see the answer to the question posed on slide #4. This shows you that you can create some very interesting learning materials
ESSENTIAL MICROSOFT OFFICE 2000: Tutorial for Teachers Copyright © Bernard Poole, Rebecca Randall, 2000. All rights reserved
216
using PowerPoint. Your students, too, will have a ball using this software to develop projects of all kinds for every subject under the sun. Timing considerations If you look again at Fig. 8.3 on page 213, you’ll notice that under each slide is a number on the right, indicating which slide it is, and a ":30" on the left, showing that the slide will transition to the next in 30 seconds.
Now 30 seconds is more than enough time for anyone to read and absorb the data on a slide such as those in the presentation. So isn’t 30 seconds too long to hold the user’s attention? Won’t they get antsy waiting for the next slide?
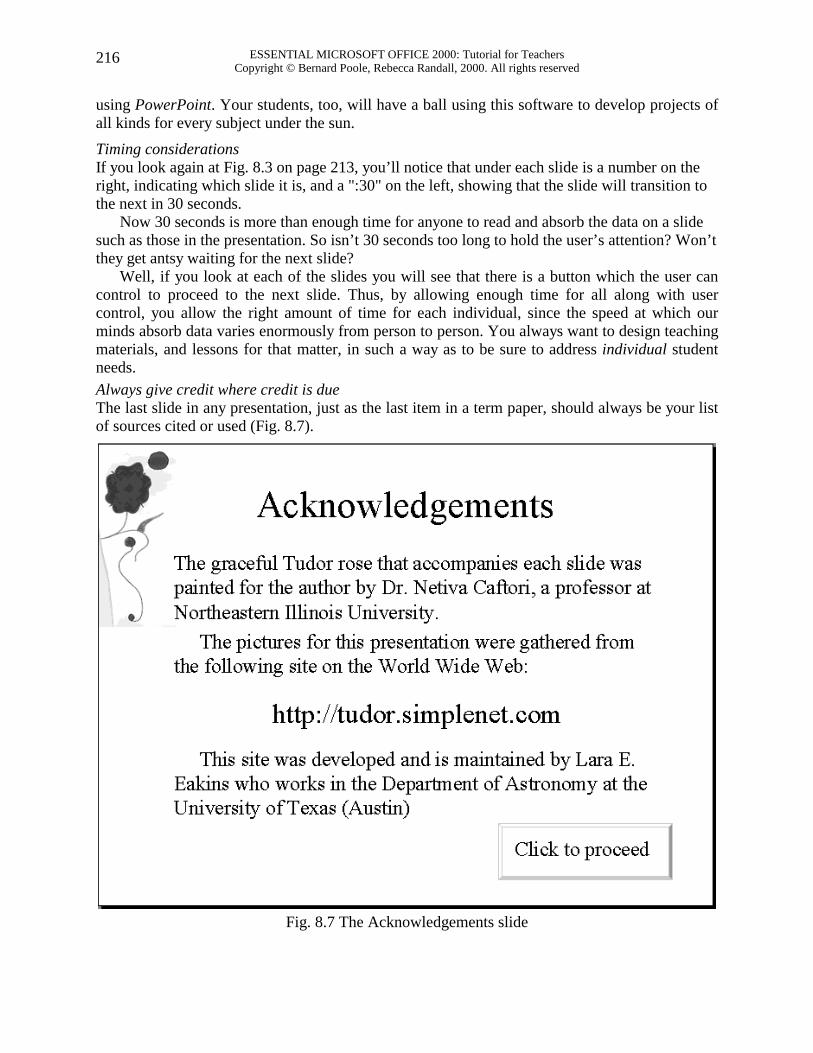
Well, if you look at each of the slides you will see that there is a button which the user can control to proceed to the next slide. Thus, by allowing enough time for all along with user control, you allow the right amount of time for each individual, since the speed at which our minds absorb data varies enormously from person to person. You always want to design teaching materials, and lessons for that matter, in such a way as to be sure to address individual student needs. Always give credit where credit is due The last slide in any presentation, just as the last item in a term paper, should always be your list of sources cited or used (Fig. 8.7).
Fig. 8.7 The Acknowledgements slide
Lesson 8: PowerPoint presentations
217
So much for an overview of PowerPoint. No doubt you are anxious to start creating your own presentation. The next section will help you do just that.
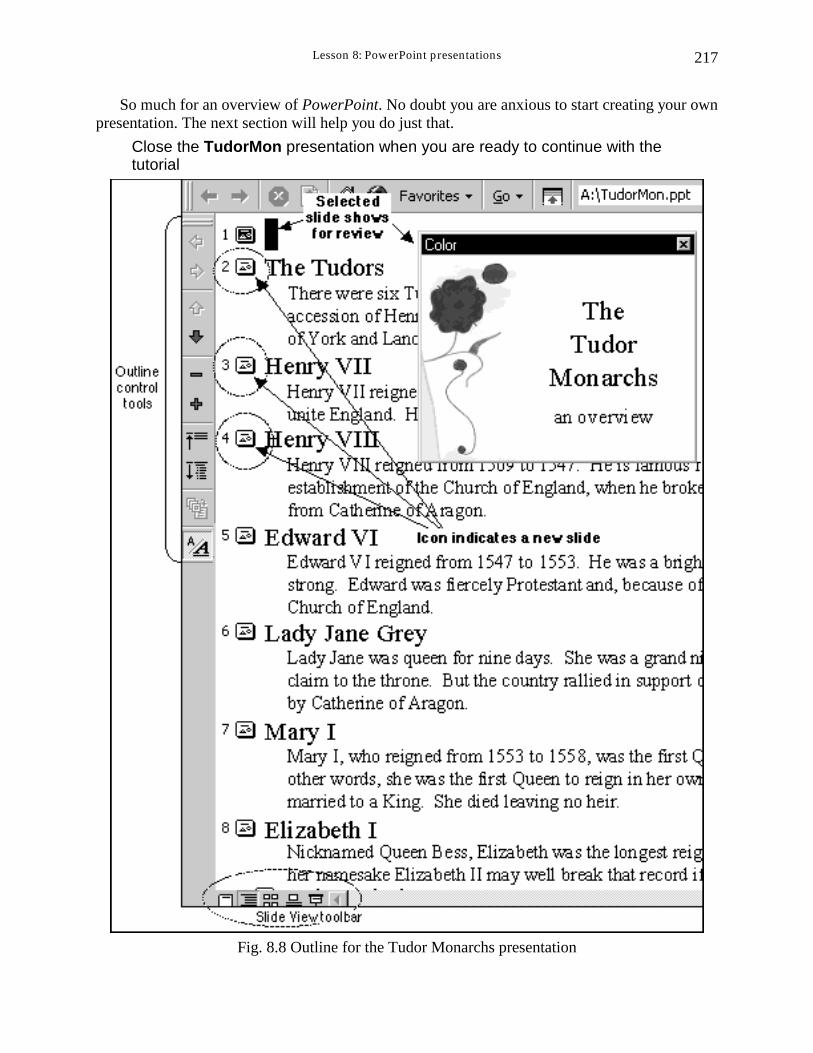
Close the TudorMon presentation when you are ready to continue with the tutorial
Fig. 8.8 Outline for the Tudor Monarchs presentation
ESSENTIAL MICROSOFT OFFICE 2000: Tutorial for Teachers Copyright © Bernard Poole, Rebecca Randall, 2000. All rights reserved
218
8.2 SOME THOUGHTS ABOUT PRESENTATIONS Making a presentation implies forethought and advance preparation. A presentation, like a term paper, is based on an outline (see the examples in Fig. 8.8 on previous page or Fig. 8.10 on the next page). In Fig. 8.8, you'll see a text-only list of each slide in the Tudor Monarchs presentation. Look at the title of each slide and compare the titles and text under each to an outline you would have made for a high school or college paper. Similar, right? This is why the outlining tool is built into PowerPoint.
Remember the golden rules of successful design: Rule 1—Plan; Rule 2—Plan; Rule 3—Plan! These golden rules apply whether you are designing a term paper, an audio-visual aid, a class outing, or a class syllabus and schedule.
You might begin with a brainstorming session to help you get an outline. During brainstorming, members of the group would come up with as many ideas as possible related to the topic of the discussion. Nobody's ideas would be rejected in the early stages so as to encourage a fertile flow of useful suggestions.
The result of the brainstorming session might be a somewhat disorganized list of ideas. This list might have been entered directly into the computer during the brainstorming session, or it might have been collected on a blackboard or flip chart. Before changing the list into outline form you would re-organize it so that the ideas flowed naturally from one to the other.
Along the way you might toss out some of the ideas for one reason or another. Eventually you'll have a working list which would end up as an outline, perhaps in a word processor document.
8.3 BUILDING THE PRESENTATION Preparation of the outline You are going to prepare a simple outline about Screenbeans which will give you the experience to prepare more detailed outlines on your own.
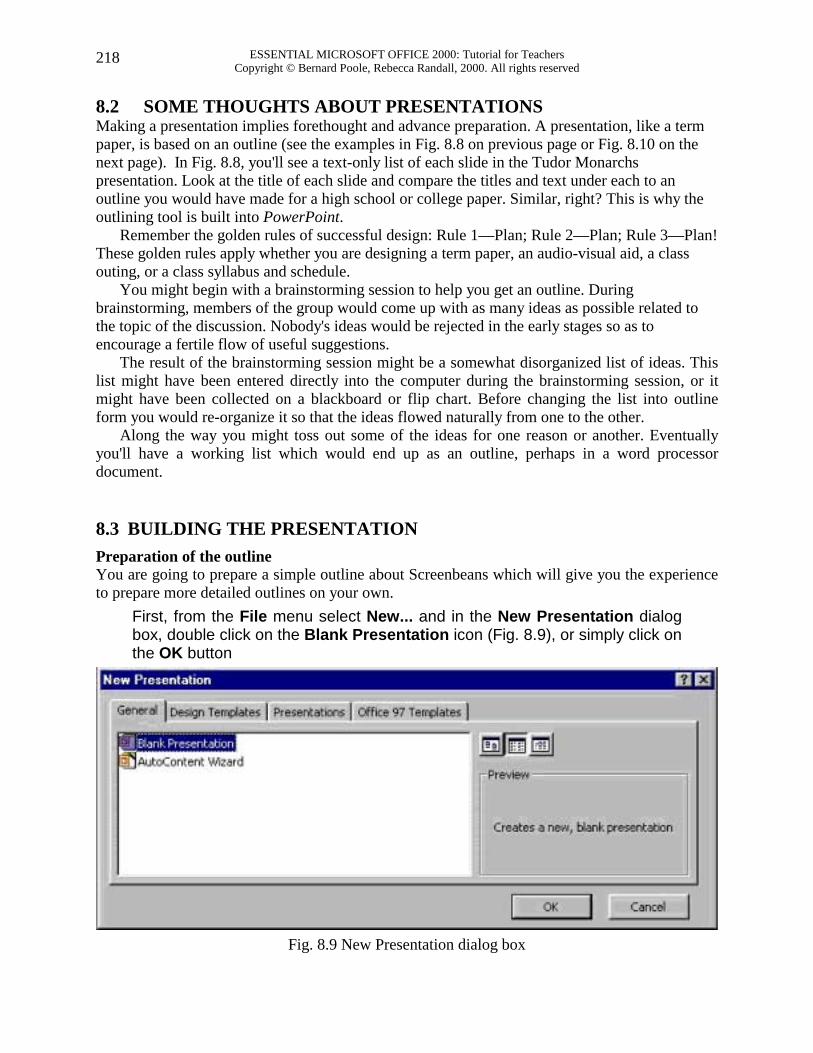
First, from the File menu select New... and in the New Presentation dialog box, double click on the Blank Presentation icon (Fig. 8.9), or simply click on the OK button
Fig. 8.9 New Presentation dialog box
Lesson 8: PowerPoint presentations
219
To create the Screenbeans outline as it appears in Fig. 8.11 on the next page here are the steps to follow.
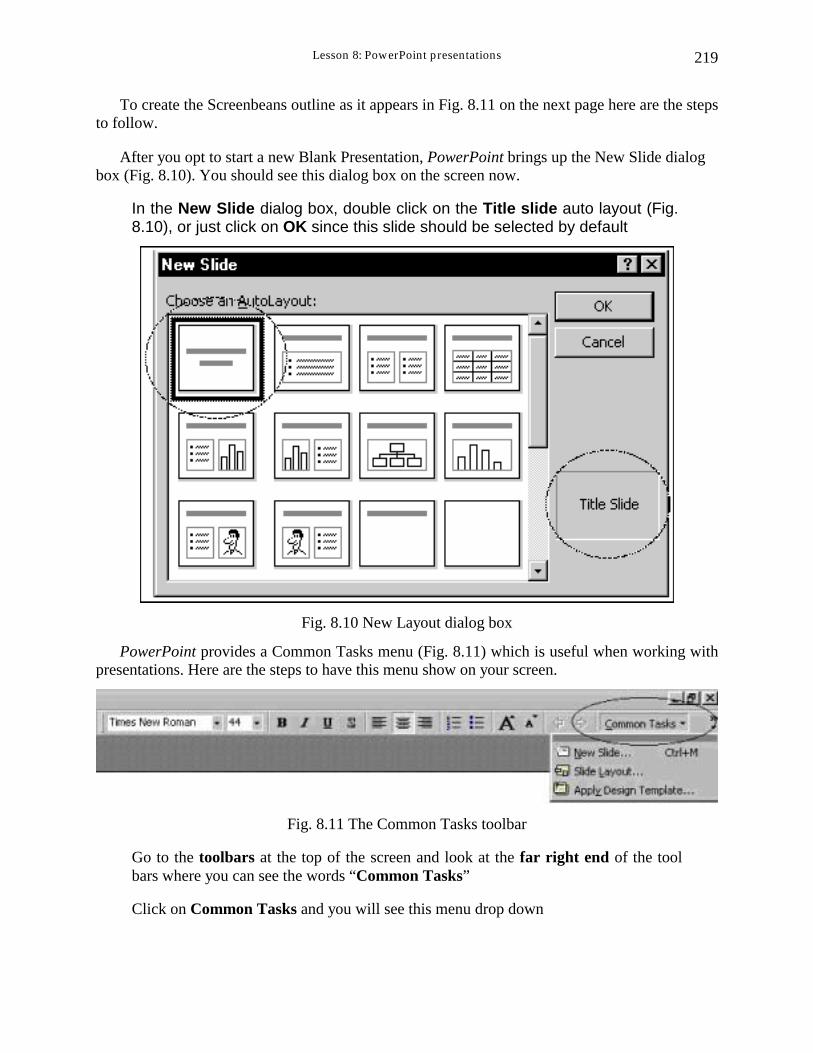
After you opt to start a new Blank Presentation, PowerPoint brings up the New Slide dialog box (Fig. 8.10). You should see this dialog box on the screen now.
In the New Slide dialog box, double click on the Title slide auto layout (Fig. 8.10), or just click on OK since this slide should be selected by default
Fig. 8.10 New Layout dialog box
PowerPoint provides a Common Tasks menu (Fig. 8.11) which is useful when working with presentations. Here are the steps to have this menu show on your screen.
Fig. 8.11 The Common Tasks toolbar
Go to the toolbars at the top of the screen and look at the far right end of the tool bars where you can see the words “Common Tasks”
Click on Common Tasks and you will see this menu drop down
ESSENTIAL MICROSOFT OFFICE 2000: Tutorial for Teachers Copyright © Bernard Poole, Rebecca Randall, 2000. All rights reserved
220
Whenever you need to create a new slide you can just click on the New Slide selection in the Common Tasks menu which will always be waiting on the screen now that you have dropped it down. If you wanted to, you could grab any of the toolbars and drag them elsewhere on the screen, where they become floating toolbars.
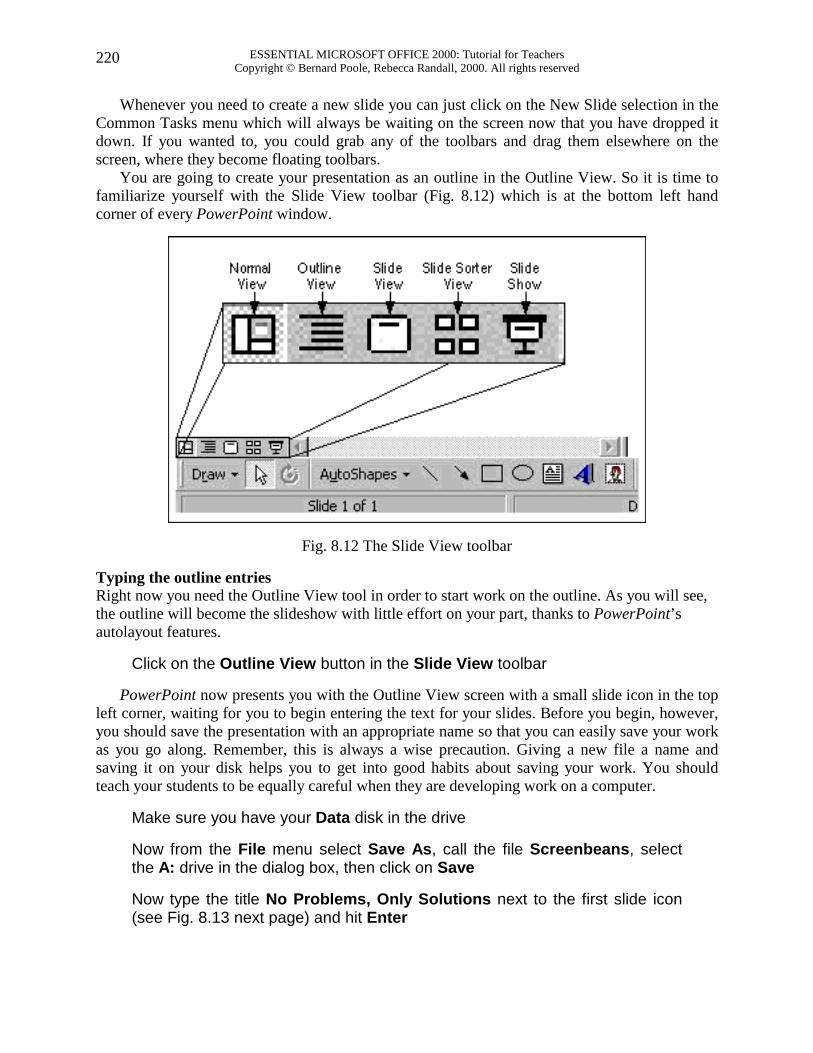
You are going to create your presentation as an outline in the Outline View. So it is time to familiarize yourself with the Slide View toolbar (Fig. 8.12) which is at the bottom left hand corner of every PowerPoint window.
Fig. 8.12 The Slide View toolbar
Typing the outline entries Right now you need the Outline View tool in order to start work on the outline. As you will see, the outline will become the slideshow with little effort on your part, thanks to PowerPoint’s autolayout features.
Click on the Outline View button in the Slide View toolbar
PowerPoint now presents you with the Outline View screen with a small slide icon in the top left corner, waiting for you to begin entering the text for your slides. Before you begin, however, you should save the presentation with an appropriate name so that you can easily save your work as you go along. Remember, this is always a wise precaution. Giving a new file a name and saving it on your disk helps you to get into good habits about saving your work. You should teach your students to be equally careful when they are developing work on a computer.
Make sure you have your Data disk in the drive
Now from the File menu select Save As, call the file Screenbeans, select the A: drive in the dialog box, then click on Save
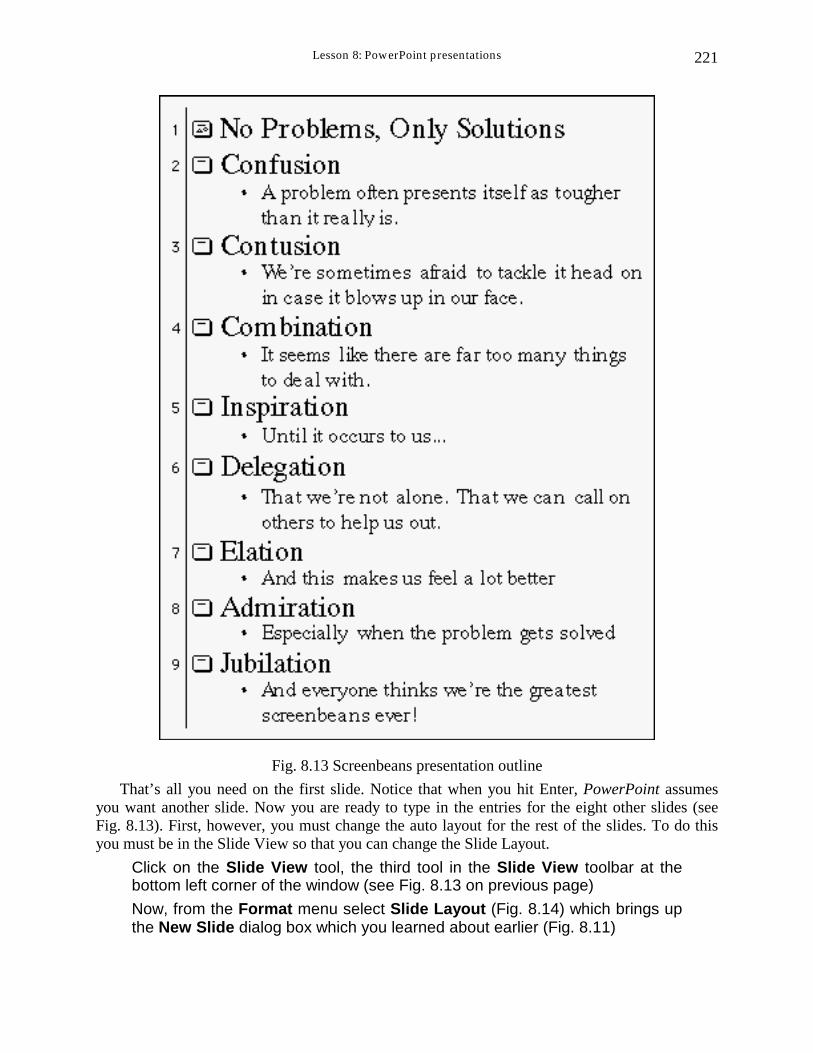
Now type the title No Problems, Only Solutions next to the first slide icon (see Fig. 8.13 next page) and hit Enter
Lesson 8: PowerPoint presentations
221
Fig. 8.13 Screenbeans presentation outline That’s all you need on the first slide. Notice that when you hit Enter, PowerPoint assumes
you want another slide. Now you are ready to type in the entries for the eight other slides (see Fig. 8.13). First, however, you must change the auto layout for the rest of the slides. To do this you must be in the Slide View so that you can change the Slide Layout.
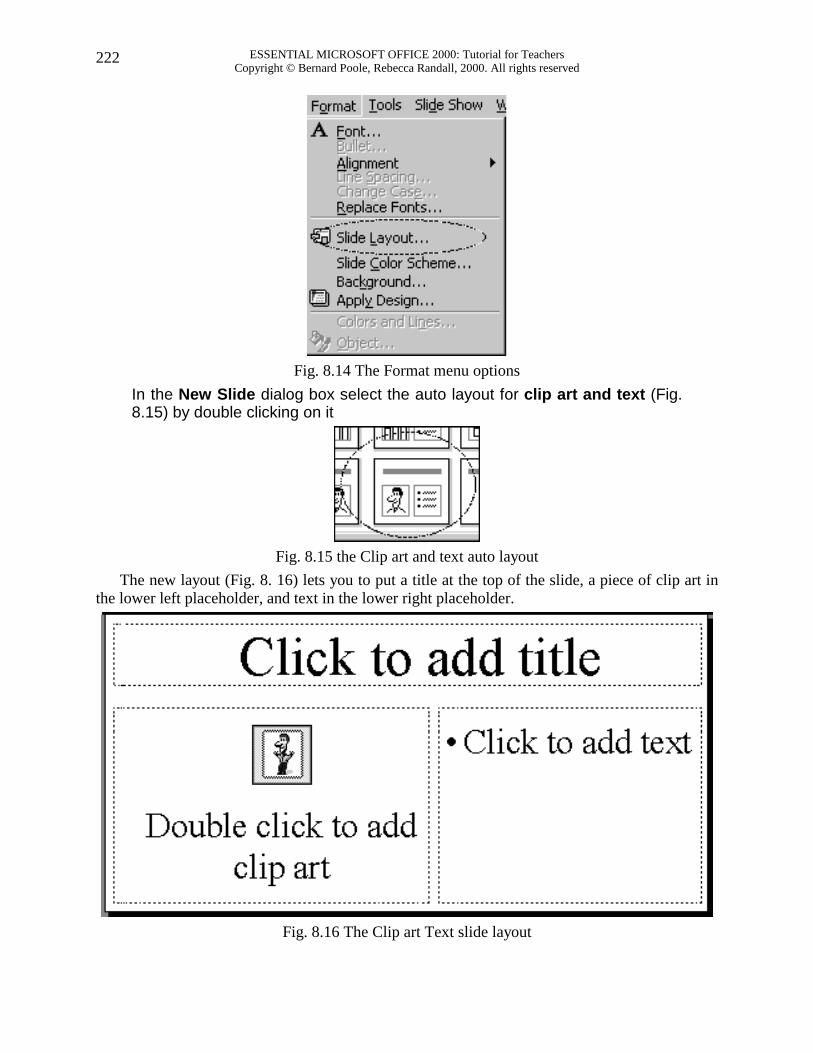
Click on the Slide View tool, the third tool in the Slide View toolbar at the bottom left corner of the window (see Fig. 8.13 on previous page) Now, from the Format menu select Slide Layout (Fig. 8.14) which brings up the New Slide dialog box which you learned about earlier (Fig. 8.11)
ESSENTIAL MICROSOFT OFFICE 2000: Tutorial for Teachers Copyright © Bernard Poole, Rebecca Randall, 2000. All rights reserved
222
Fig. 8.14 The Format menu options
In the New Slide dialog box select the auto layout for clip art and text (Fig. 8.15) by double clicking on it
Fig. 8.15 the Clip art and text auto layout
The new layout (Fig. 8. 16) lets you to put a title at the top of the slide, a piece of clip art in the lower left placeholder, and text in the lower right placeholder.
Fig. 8.16 The Clip art Text slide layout
Lesson 8: PowerPoint presentations
223
Return to the Outline View by clicking on the Outline View button in the Slide View toolbar at the bottom of the PowerPoint window Type Confusion for the second slide title, then hit Enter
Switching levels If you switch to the next level down, the text is automatically indented to the right. So moving the text to the left takes you up a level in an outline. Indenting the text to the right takes you down a level in an outline.
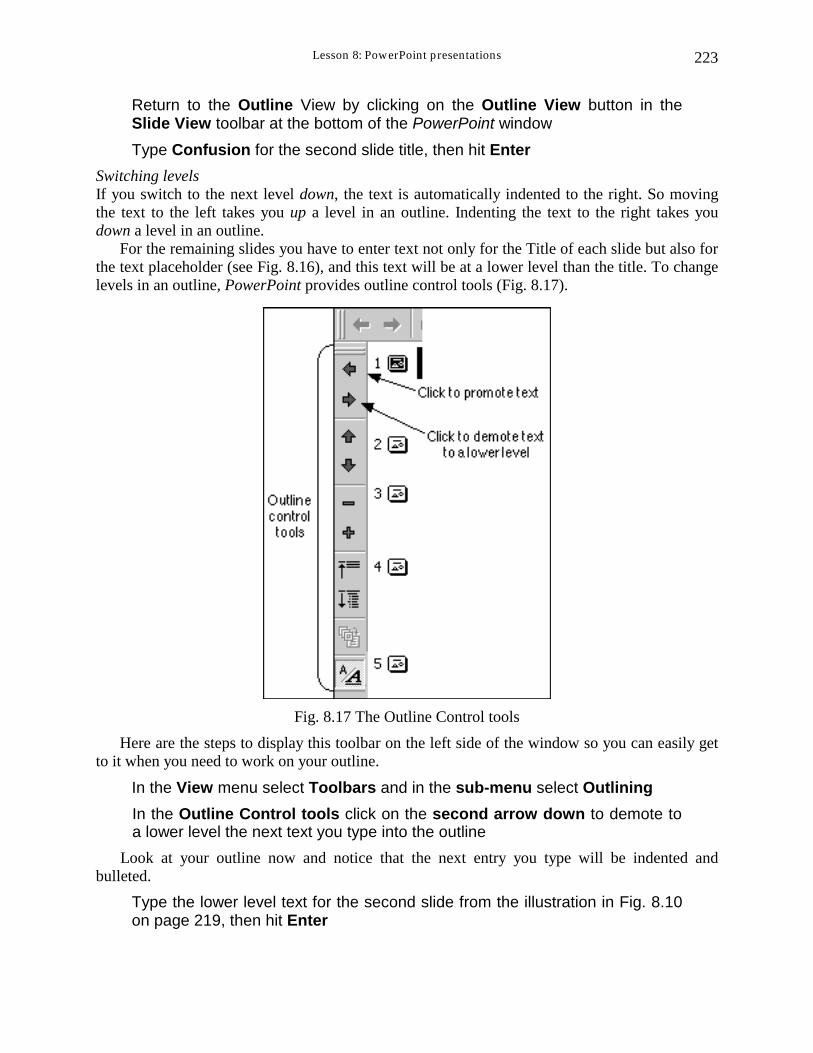
For the remaining slides you have to enter text not only for the Title of each slide but also for the text placeholder (see Fig. 8.16), and this text will be at a lower level than the title. To change levels in an outline, PowerPoint provides outline control tools (Fig. 8.17).
Fig. 8.17 The Outline Control tools
Here are the steps to display this toolbar on the left side of the window so you can easily get to it when you need to work on your outline.
In the View menu select Toolbars and in the sub-menu select Outlining In the Outline Control tools click on the second arrow down to demote to a lower level the next text you type into the outline
Look at your outline now and notice that the next entry you type will be indented and bulleted.
Type the lower level text for the second slide from the illustration in Fig. 8.10 on page 219, then hit Enter
ESSENTIAL MICROSOFT OFFICE 2000: Tutorial for Teachers Copyright © Bernard Poole, Rebecca Randall, 2000. All rights reserved
224
Raising text to a higher level That is all you need to do for the second slide for now. You will add the clip art in a moment. But first you should complete the outline. As you can see, you need to promote the next text item back to the top level for slide 3. To do this you will use the Outline control tools once more.
Click on the top arrow in the Outline Control tools (Fig. 8.17) to promote the next text item to the top level for the 3rd slide
This takes you up one level. Now you are at Level 1 of your outline and still on the same line. You should be starting to get the hang of this by now, especially if you have already
completed the seven preceding tutorials. Indeed, you should be starting to think of yourself as something of an expert with Microsoft Office in general, and with the various tools like PowerPoint in particular.
So go ahead now and complete the rest of the outline (using Fig. 8.13 on p. 221), promoting and demoting the text levels as you go along When you have typed the title and text entries for slide #9, be sure to save your work again with the file name Screenbeans
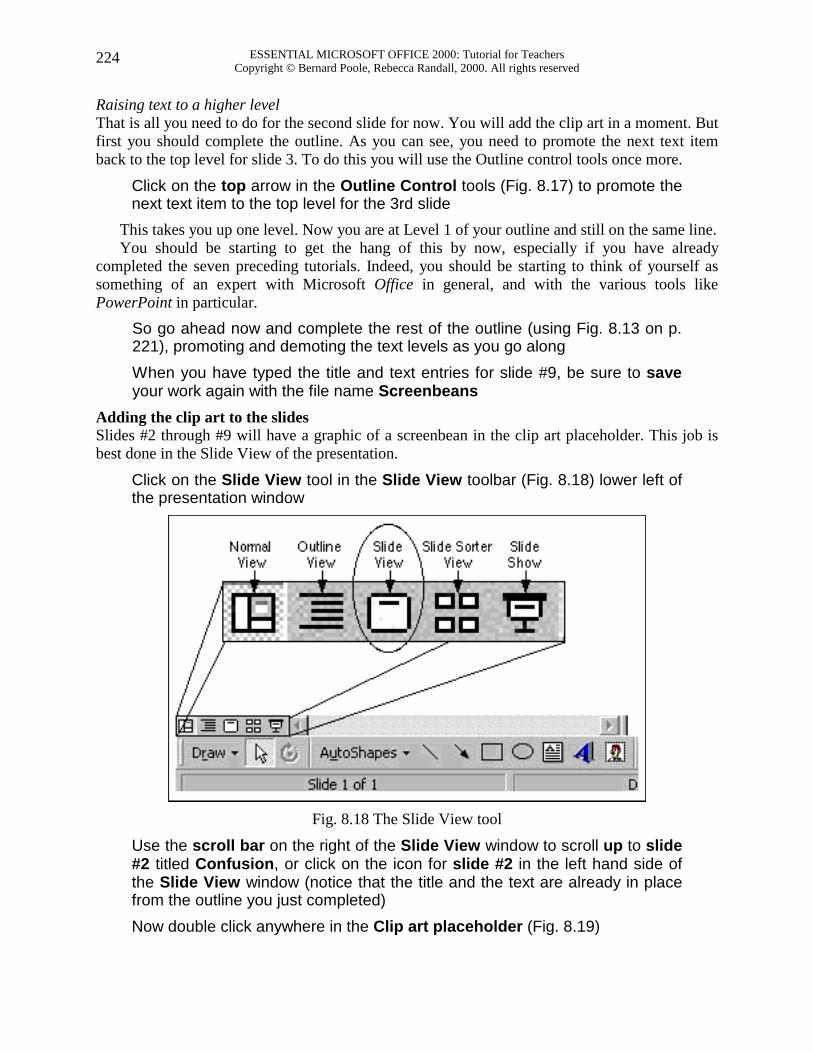
Adding the clip art to the slides Slides #2 through #9 will have a graphic of a screenbean in the clip art placeholder. This job is best done in the Slide View of the presentation.
Click on the Slide View tool in the Slide View toolbar (Fig. 8.18) lower left of the presentation window
Fig. 8.18 The Slide View tool
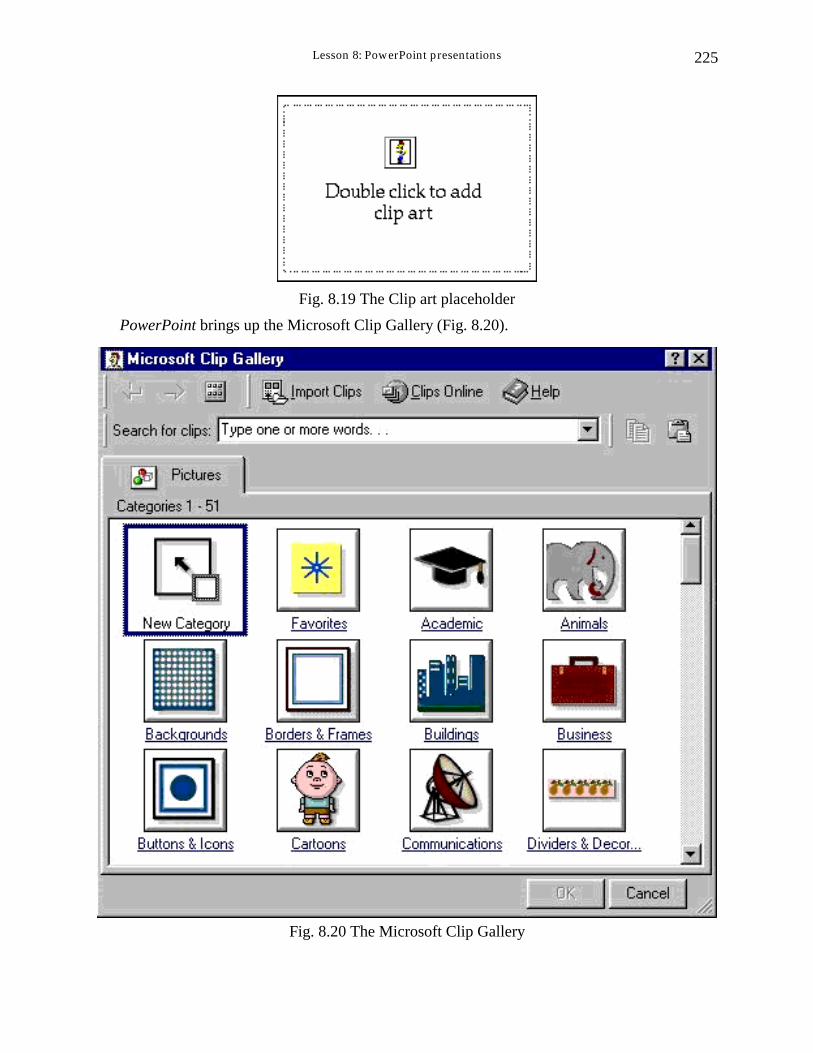
Use the scroll bar on the right of the Slide View window to scroll up to slide #2 titled Confusion, or click on the icon for slide #2 in the left hand side of the Slide View window (notice that the title and the text are already in place from the outline you just completed) Now double click anywhere in the Clip art placeholder (Fig. 8.19)
Lesson 8: PowerPoint presentations
225
Fig. 8.19 The Clip art placeholder
PowerPoint brings up the Microsoft Clip Gallery (Fig. 8.20).
Fig. 8.20 The Microsoft Clip Gallery
ESSENTIAL MICROSOFT OFFICE 2000: Tutorial for Teachers Copyright © Bernard Poole, Rebecca Randall, 2000. All rights reserved
226
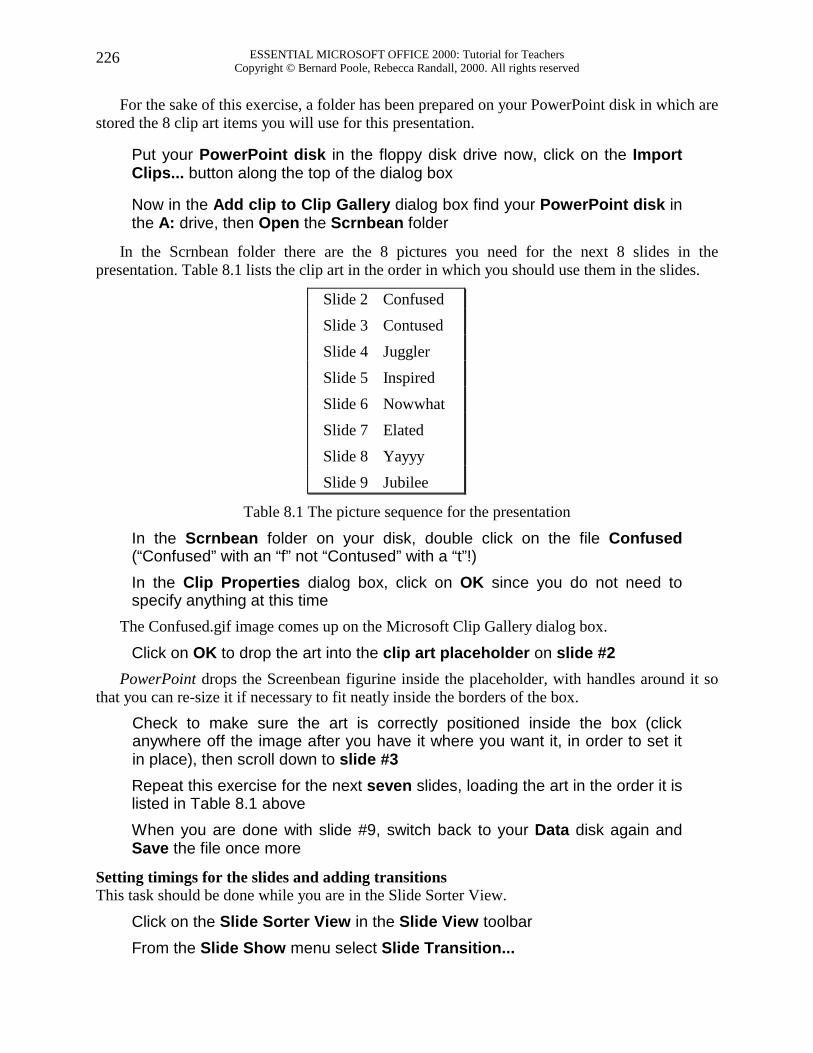
For the sake of this exercise, a folder has been prepared on your PowerPoint disk in which are stored the 8 clip art items you will use for this presentation.
Put your PowerPoint disk in the floppy disk drive now, click on the Import Clips... button along the top of the dialog box
Now in the Add clip to Clip Gallery dialog box find your PowerPoint disk in the A: drive, then Open the Scrnbean folder
In the Scrnbean folder there are the 8 pictures you need for the next 8 slides in the presentation. Table 8.1 lists the clip art in the order in which you should use them in the slides.
Slide 2 Confused Slide 3 Contused Slide 4 Juggler Slide 5 Inspired Slide 6 Nowwhat Slide 7 Elated Slide 8 Yayyy Slide 9 Jubilee
Table 8.1 The picture sequence for the presentation
In the Scrnbean folder on your disk, double click on the file Confused (“Confused” with an “f” not “Contused” with a “t”!) In the Clip Properties dialog box, click on OK since you do not need to specify anything at this time
The Confused.gif image comes up on the Microsoft Clip Gallery dialog box.
Click on OK to drop the art into the clip art placeholder on slide #2 PowerPoint drops the Screenbean figurine inside the placeholder, with handles around it so
that you can re-size it if necessary to fit neatly inside the borders of the box. Check to make sure the art is correctly positioned inside the box (click anywhere off the image after you have it where you want it, in order to set it in place), then scroll down to slide #3 Repeat this exercise for the next seven slides, loading the art in the order it is listed in Table 8.1 above When you are done with slide #9, switch back to your Data disk again and Save the file once more
Setting timings for the slides and adding transitions This task should be done while you are in the Slide Sorter View.
Click on the Slide Sorter View in the Slide View toolbar From the Slide Show menu select Slide Transition...

Lesson 8: PowerPoint presentations
227
This brings up the Slide Transition dialog box (Fig. 8.21).
Apply changesto all slides
Apply changes toselected slide(s) only
SelectTransition effects
Sound effectsdrop down menu
Timing tools
Fig. 8.21 The Slide Transition dialog box
Click in the Effect box just below the doggy picture to bring up the drop down menu of Transition effects Click on any slide you like, and try a few of the effects now (to select more than one slide, hold down the ctrl key while clicking on other slides)
In the lower left corner of the dialog box increase the Advance time to 10 (ten) seconds, but leave the check mark in the box next to On mouse click
This will allow you to advance to the next slide either manually (by clicking the mouse) or automatically (after 10 seconds).
Finally, for a sound effect choose Drum roll (if you don’t hear a drum roll when you eventually run the slide show, it may be because your speakers on your computer are set at mute)
You are going to Apply these timing and transition effects to All the slides, but as you can see, you could have different effects for each slide if you wanted.
Click on Apply to All
ESSENTIAL MICROSOFT OFFICE 2000: Tutorial for Teachers Copyright © Bernard Poole, Rebecca Randall, 2000. All rights reserved
228
Notice that the timing value ":10" has appeared underneath each slide. Choosing background and text colors and/or textures The easiest way to make your slides more interesting is to use one of the pre-set color schemes that come with PowerPoint.
From the Format menu select Slide Color Scheme... Choose any color scheme you like from those displayed. Try a few of them to see how they
look. Once you have chosen one, click on Apply to all
For more sophistication and variety you would choose Background from the Format menu in order to select from a wide range of colors and Fill Effects, including gradients, textures and patterns. You can even make your favorite pictures backgrounds for your slides. You can individualize each slide or apply the same design features to all the slides. Experiment with these background Colors and Fill Effects. The limit to what you can do is defined only by your imagination...
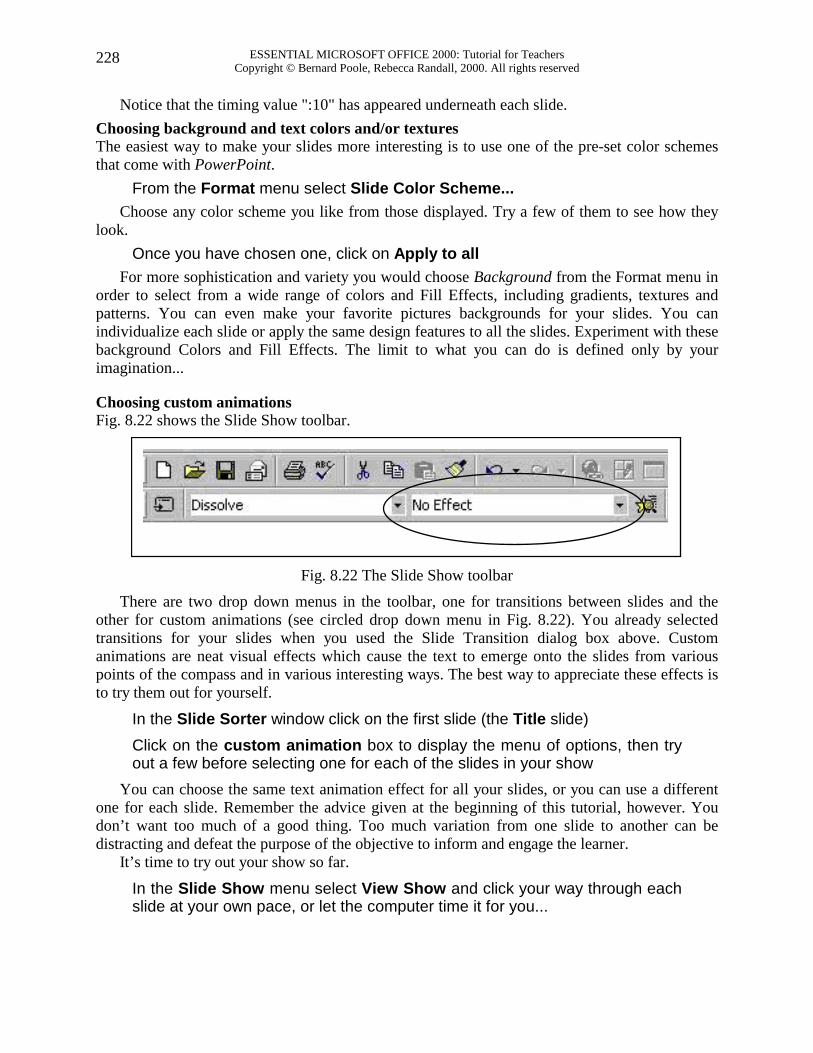
Choosing custom animations Fig. 8.22 shows the Slide Show toolbar.
Fig. 8.22 The Slide Show toolbar
There are two drop down menus in the toolbar, one for transitions between slides and the other for custom animations (see circled drop down menu in Fig. 8.22). You already selected transitions for your slides when you used the Slide Transition dialog box above. Custom animations are neat visual effects which cause the text to emerge onto the slides from various points of the compass and in various interesting ways. The best way to appreciate these effects is to try them out for yourself.
In the Slide Sorter window click on the first slide (the Title slide) Click on the custom animation box to display the menu of options, then try out a few before selecting one for each of the slides in your show
You can choose the same text animation effect for all your slides, or you can use a different one for each slide. Remember the advice given at the beginning of this tutorial, however. You don’t want too much of a good thing. Too much variation from one slide to another can be distracting and defeat the purpose of the objective to inform and engage the learner.
It’s time to try out your show so far.
In the Slide Show menu select View Show and click your way through each slide at your own pace, or let the computer time it for you...
Lesson 8: PowerPoint presentations
229
Hiding slides and using Action Buttons Action buttons allow you to control the sequence of the slides in a slide show. They also allow you to go to slides that would otherwise be hidden from the user’s view and passed over when the slide show was running.
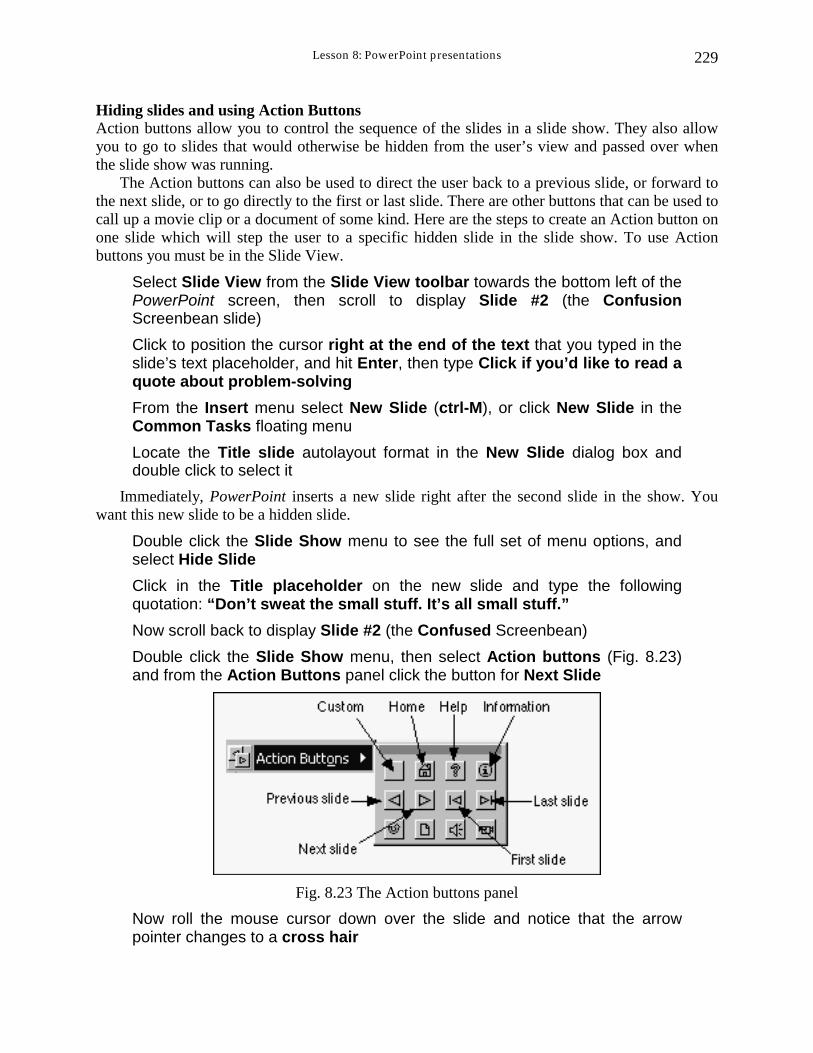
The Action buttons can also be used to direct the user back to a previous slide, or forward to the next slide, or to go directly to the first or last slide. There are other buttons that can be used to call up a movie clip or a document of some kind. Here are the steps to create an Action button on one slide which will step the user to a specific hidden slide in the slide show. To use Action buttons you must be in the Slide View.
Select Slide View from the Slide View toolbar towards the bottom left of the PowerPoint screen, then scroll to display Slide #2 (the Confusion Screenbean slide) Click to position the cursor right at the end of the text that you typed in the slide’s text placeholder, and hit Enter, then type Click if you’d like to read a quote about problem-solving From the Insert menu select New Slide (ctrl-M), or click New Slide in the Common Tasks floating menu Locate the Title slide autolayout format in the New Slide dialog box and double click to select it
Immediately, PowerPoint inserts a new slide right after the second slide in the show. You want this new slide to be a hidden slide.
Double click the Slide Show menu to see the full set of menu options, and select Hide Slide Click in the Title placeholder on the new slide and type the following quotation: “Don’t sweat the small stuff. It’s all small stuff.” Now scroll back to display Slide #2 (the Confused Screenbean) Double click the Slide Show menu, then select Action buttons (Fig. 8.23) and from the Action Buttons panel click the button for Next Slide
Fig. 8.23 The Action buttons panel
Now roll the mouse cursor down over the slide and notice that the arrow pointer changes to a cross hair
ESSENTIAL MICROSOFT OFFICE 2000: Tutorial for Teachers Copyright © Bernard Poole, Rebecca Randall, 2000. All rights reserved
230
Position the cross hair below the text that you typed in the slide’s text placeholder, then hold down the left mouse button and drag to create a box about a half inch square and then let go of the mouse button
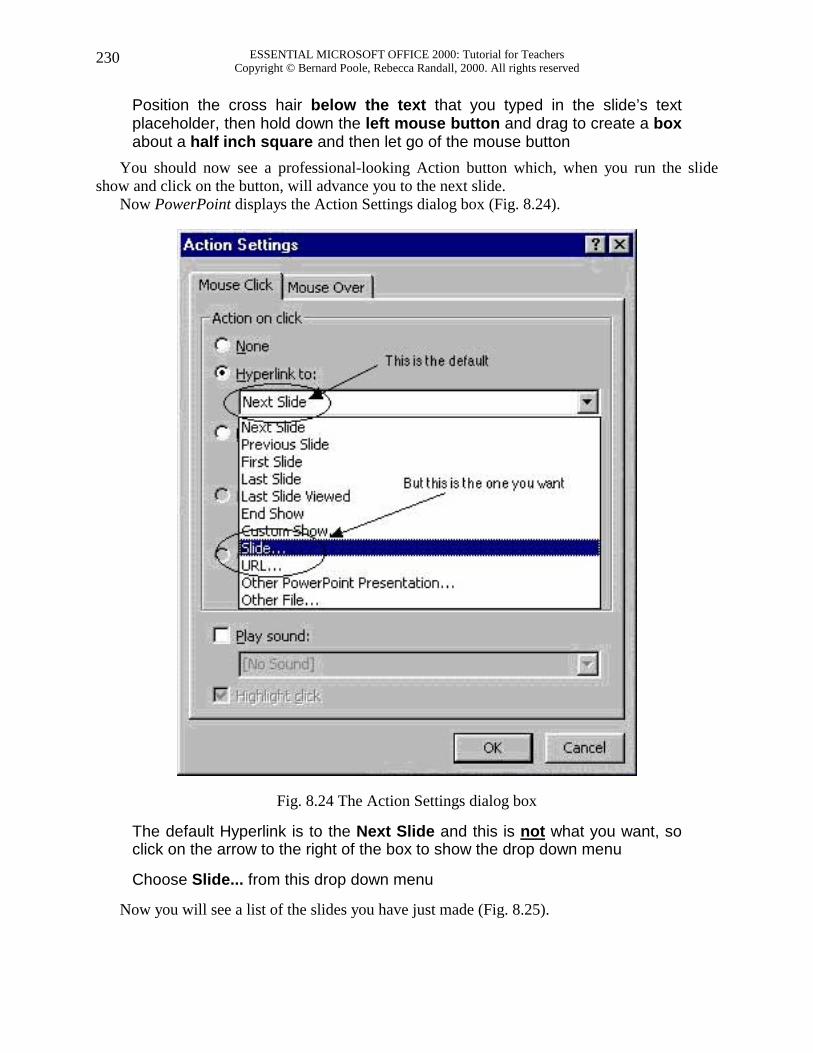
You should now see a professional-looking Action button which, when you run the slide show and click on the button, will advance you to the next slide.
Now PowerPoint displays the Action Settings dialog box (Fig. 8.24).
Fig. 8.24 The Action Settings dialog box
The default Hyperlink is to the Next Slide and this is not what you want, so click on the arrow to the right of the box to show the drop down menu
Choose Slide... from this drop down menu
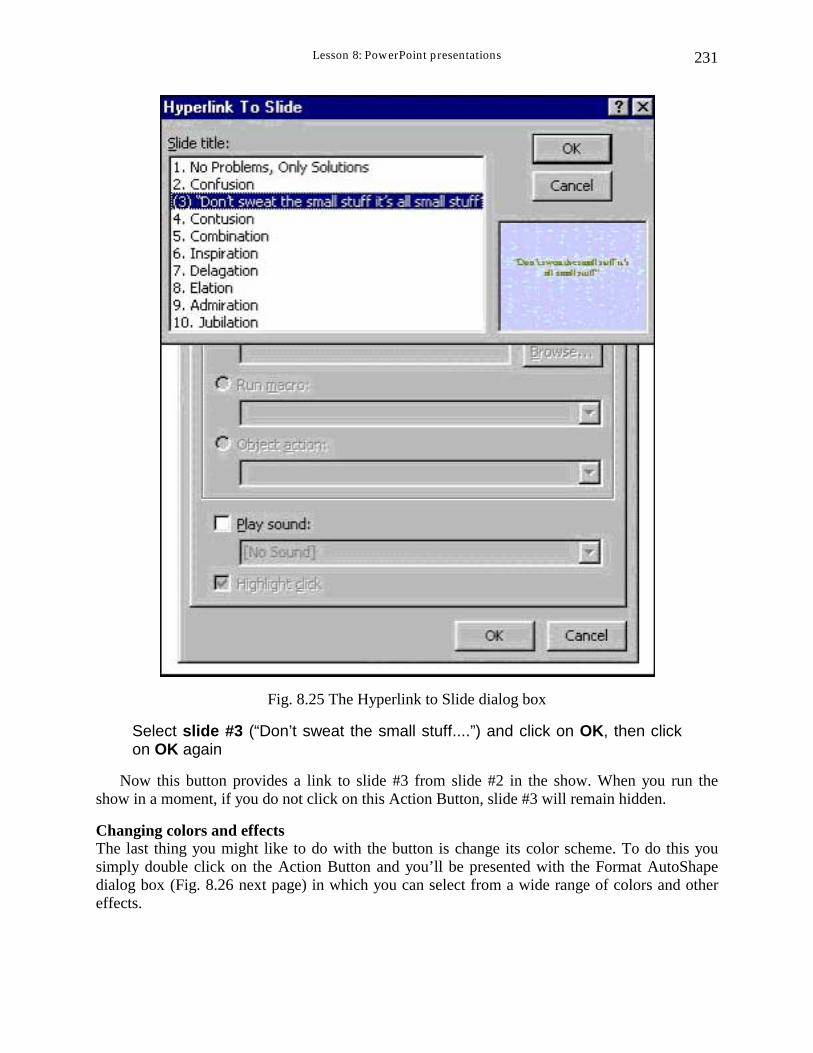
Now you will see a list of the slides you have just made (Fig. 8.25).
Lesson 8: PowerPoint presentations
231
Fig. 8.25 The Hyperlink to Slide dialog box
Select slide #3 (“Don’t sweat the small stuff....”) and click on OK, then click on OK again
Now this button provides a link to slide #3 from slide #2 in the show. When you run the show in a moment, if you do not click on this Action Button, slide #3 will remain hidden.
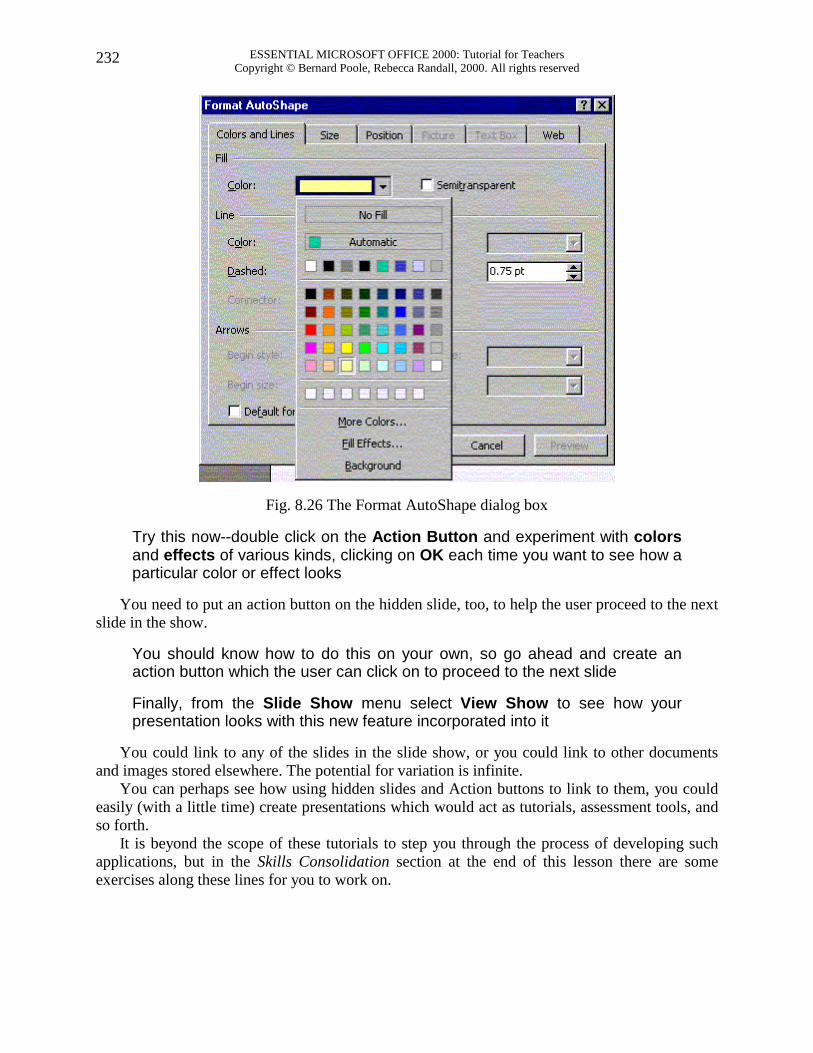
Changing colors and effects The last thing you might like to do with the button is change its color scheme. To do this you simply double click on the Action Button and you’ll be presented with the Format AutoShape dialog box (Fig. 8.26 next page) in which you can select from a wide range of colors and other effects.
ESSENTIAL MICROSOFT OFFICE 2000: Tutorial for Teachers Copyright © Bernard Poole, Rebecca Randall, 2000. All rights reserved
232
Fig. 8.26 The Format AutoShape dialog box
Try this now--double click on the Action Button and experiment with colors and effects of various kinds, clicking on OK each time you want to see how a particular color or effect looks
You need to put an action button on the hidden slide, too, to help the user proceed to the next slide in the show.
You should know how to do this on your own, so go ahead and create an action button which the user can click on to proceed to the next slide
Finally, from the Slide Show menu select View Show to see how your presentation looks with this new feature incorporated into it
You could link to any of the slides in the slide show, or you could link to other documents and images stored elsewhere. The potential for variation is infinite.
You can perhaps see how using hidden slides and Action buttons to link to them, you could easily (with a little time) create presentations which would act as tutorials, assessment tools, and so forth.
It is beyond the scope of these tutorials to step you through the process of developing such applications, but in the Skills Consolidation section at the end of this lesson there are some exercises along these lines for you to work on.
Lesson 8: PowerPoint presentations
233
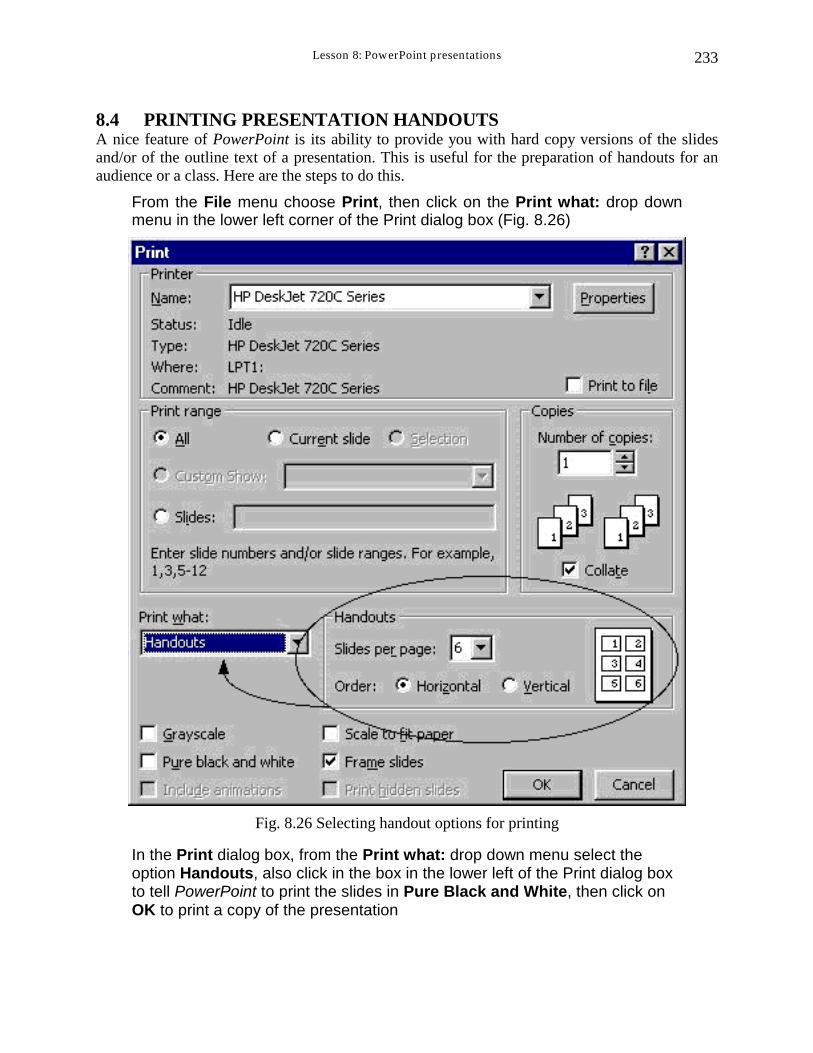
8.4 PRINTING PRESENTATION HANDOUTS A nice feature of PowerPoint is its ability to provide you with hard copy versions of the slides and/or of the outline text of a presentation. This is useful for the preparation of handouts for an audience or a class. Here are the steps to do this.
From the File menu choose Print, then click on the Print what: drop down menu in the lower left corner of the Print dialog box (Fig. 8.26)
Fig. 8.26 Selecting handout options for printing
In the Print dialog box, from the Print what: drop down menu select the option Handouts, also click in the box in the lower left of the Print dialog box to tell PowerPoint to print the slides in Pure Black and White, then click on OK to print a copy of the presentation
ESSENTIAL MICROSOFT OFFICE 2000: Tutorial for Teachers Copyright © Bernard Poole, Rebecca Randall, 2000. All rights reserved
234
In the handout options, you can choose two, four, six, or nine slides per page, and you can display the slides in order either horizontally or vertically. This handout can then be distributed to an audience or a class for note-taking, review or reinforcement.
LOOKING BACK Lesson 8 has been devoted to the PowerPoint program that is designed to help in the preparation of presentation materials of all kinds. It is not only a very useful tool, but also it is enjoyable to work with. Outlines and slide shows will add polish to the lessons or presentations you will prepare for your students and other groups during the course of your career. For example, a math or chemistry teacher might intersperse her lessons with professional-looking formula charts or chemical structures. Any teacher could make an impressive graphic introduction to a class. An administrator could do the same for her school, the presentation to be viewed in the office by visitors.
In this last lesson of ESSENTIAL Microsoft Office 2000 you have had the opportunity to prepare an outline and a slide show and to incorporate graphics into presentations. Now that you have learned the tools, you will be limited in the future only by your own imagination and creativity!
LOOKING FORWARD ESSENTIAL Microsoft Office 2000 has introduced you to many of the fundamental features of the PowerPoint integrated software package. But there are many more advanced features for you to learn. Your challenge now is to capitalize on your hard work in two ways.
• Use Microsoft Office 2000 as much as possible in order to consolidate your skills and sharpen them to the point where they become second nature.
• Extend your knowledge by studying the software beyond what you know. Step out on the path that leads to your becoming a power user of Microsoft Office 2000. Get hold of the Microsoft Office 2000 reference manual. Discover what else the software can do to improve the quality of your work and make you more productive. Knowledge is power. You will be surprised to discover what else Microsoft Office 2000 in particular, and the computer in general, can do for you.
SKILL CONSOLIDATION 1. Prepare a presentation on the subject of the American colonies. Make sure you have at least
five first level topics (five slides). 2. Prepare a presentation on the subject of US Presidents (or any subject of your choice that you
might use with a K-12 age group appropriate to your major). Make sure you have at least five first level topics (slides). Use the hidden slide feature and Action Buttons to ask a question or questions about the subject matter of the presentation. So you would ask a question on one slide (True/False or Multiple Choice, for example), then have Action Buttons on the same slide which would link to the hidden slides that have the answer (Correct or Incorrect) to the question. On the hidden slides you would then have an Action Button which would link to the next question or the next slide in the presentation.
Lesson 8: PowerPoint presentations
235
3. Prepare a presentation on the subject of the American movie scene. Make sure you have at least five first level topics. Use the hidden slide feature and Action Buttons to ask questions about the subject matter of the presentation. So you would ask a question on one slide (True/False or Multiple Choice, for example), then have Action Buttons on the same slide which would link to the hidden slides that have the answer (Correct or Incorrect) to the question. On the hidden slides you would then have an Action Button which would link to the next question or the next slide in the presentation.
4. Prepare a presentation in a style of your own choosing with at least three levels on the subject of contemporary music. Make sure you have at least five first level topics. Use the hidden slide feature and Action Buttons to ask questions about the subject matter of the presentation. So you would ask a question on one slide (True/False or Multiple Choice, for example), then have Action Buttons on the same slide which would link to the hidden slides that have the answer (Correct or Incorrect) to the question. On the hidden slides you would then have an Action Button which would link to the next question or the next slide in the presentation.
5. Create a slide show with yourself as the subject--you the person, you the teacher. Use graphics drawn from any source you like.
6. Create a slide show on the subject of pets. Use graphics from clip art or created in a Drawing or Painting environment. Make sure you have at least five first level topics. Use the hidden slide feature and Action Buttons to ask questions about the subject matter of the presentation. So you would ask a question on one slide (True/False or Multiple Choice, for example), then have Action Buttons on the same slide which would link to the hidden slides that have the answer (Correct or Incorrect) to the question. On the hidden slides you would then have an Action Button which would link to the next question or the next slide in the presentation.
7. Create a slide show on the subject of geometric shapes. Use graphics drawn from clip art or created in a Drawing or Painting environment. Use the hidden slide feature and Action Buttons to ask questions about the geometric shapes. So you would ask a question on one slide (True/False or Multiple Choice, for example), then have Action Buttons on the same slide which would link to the hidden slides that have the answer (Correct or Incorrect) to the question. On the hidden slides you would then have an Action Button which would link to the next question or the next slide in the presentation.