practice user guide -...
TRANSCRIPT

PRACTICE USER GUIDE
SyncDirect
Version 7.5.0.1
Updated June 2017
Practice User Guide | SyncDirect V 7.5.0.1
Reckon Limited | PAGE 2 OF 44
Author
Created and Published by Reckon Limited Level 12, 65 Berry Street North Sydney NSW 2060 Australia ACN 003 348 730 All Rights Reserved Copyright © 2015 Reckon Limited
Copyright & Trademarks
No part of these materials may be reproduced or transmitted in any form or by any means, including photocopying, without written permission of Reckon Limited.
Every effort has been made to ensure the accuracy and completeness of this manual. However, neither Reckon Limited, its subsidiaries, employees and agents, are liable for any errors or omissions. This document should not be relied on as a detailed specification of the system. In addition, Reckon Limited reserves the right to issue revisions, enhancements and improvements to Reckon APS software or any other Reckon software at any time without notice. Every effort will be made to ensure that the manual is updated concurrently and that the user is not inconvenienced as a result of any change.
Reckon, Reckon logos, R logos, Reckon APS, Advance and Accountable Technology are trademarks of Reckon Limited.

Practice User Guide | SyncDirect V 7.5.0.1
Reckon Limited | PAGE 3 OF 44
Contents
Introduction ............................................................................................................................ 5
What is SyncDirect?............................................................................................................... 5
SyncDirect – One Process .................................................................................................... 5
Step 1: Data Collection..................................................................................................................... 5
Step 2: Map to the XPA chart ........................................................................................................... 6
Step 3: Import to XPA....................................................................................................................... 6
Supported Data Sources ....................................................................................................... 6
Data Collection Methods ....................................................................................................... 6
Selecting the appropriate Collection Method ........................................................................ 7
Activating a SyncDirect Client .............................................................................................. 8
STEP ONE: Enable Client link to SyncDirect ....................................................................... 8
STEP TWO: Activate the Client ............................................................................................ 8
Establish the Access Method ............................................................................................... 9
Browse Method ................................................................................................................... 10
Reckon Accounts (Desktop) ........................................................................................................... 11
MYOB AccountRight v19 (Desktop) ............................................................................................... 12
MYOB AccountRight 2012+(Desktop) ............................................................................................ 13
Excel\Manual (Transactions) .......................................................................................................... 13
Excel\Manual (Trial Balance) ......................................................................................................... 17
Cloud Method ...................................................................................................................... 20
Reckon Accounts (Hosted) ............................................................................................................. 20
MYOB AccountRight 2012+ (Hosted) ............................................................................................. 22
Xero ........................................................................................................................................ 23
Reckon One ................................................................................................................................... 28
Email Request ................................................................................................................................ 30
Data Feed ........................................................................................................................... 31
Managing Multiple Clients ................................................................................................... 32
Client List View ..................................................................................................................... 32
Data Feed Status View ......................................................................................................... 32
Individual Client ................................................................................................................... 33
Viewing Client Data .............................................................................................................. 34
Normal View .......................................................................................................................... 34

Practice User Guide | SyncDirect V 7.5.0.1
Reckon Limited | PAGE 4 OF 44
Snaphots ............................................................................................................................. 34
Mapping to the XPA chart ................................................................................................... 36
Basic Mapping Process ...................................................................................................... 36
Advanced Mapping Process ............................................................................................... 37
Grid Selection Modes .......................................................................................................... 37
Displaying ‘Unmapped Elements’ only ........................................................................................... 38
Displaying expected ‘Target Elements’ only ................................................................................... 38
Using Show Predicted Mapping ..................................................................................................... 39
Using Show Codes ......................................................................................................................... 39
Filtering Columns ........................................................................................................................... 40
Other Mapping Functions ............................................................................................................... 40
Import data into XPA Ledger ............................................................................................... 41
Status History ....................................................................................................................... 42
Print ....................................................................................................................................... 43
Clear....................................................................................................................................... 43
Delete Data Feed .................................................................................................................. 44

Practice User Guide | SyncDirect V 7.5.0.1
Reckon Limited | PAGE 5 OF 44
Introduction
The purpose of this document is to assist and provide guidance in using the SyncDirect Module in conjunction with XPA.
What is SyncDirect?
SyncDirect is a cloud based technology which is integrated with the existing Advance suite of applications and will help streamline the compliance process.
Specifically, SyncDirect provides for the synchronisation of trial balance and/or journal transaction data movement from a client’s business accounting or cashbook application and their respective XPA ledger within your practice without the requirement to obtain a backup or separate data extract file from the client’s business application.
SyncDirect enables advisors to automate the gathering of client data from multiple client systems across multiple locations, normalise and aggregate the data to match your XPA Chart of Accounts structure, and then make that data available in XPA.
Businesses will always want choice when it comes to business accounting and cashbook software. The goal of having all of a firm’s clients on the same cloud accounting application and providing a “One Ledger” solution is a significant challenge. Instead, SyncDirect helps you implement “One Process” in your practice which can accommodate any applications your clients may be using now and into the future.
SyncDirect – One Process
Step 1: Data Collection
Client data can now be collected directly from the client application into a secure cloud based data warehouse, and the accountant can then import the data directly into XPA when they are ready to begin processing the job via the SyncDirect Console. This could be within minutes of requesting the client data.

Practice User Guide | SyncDirect V 7.5.0.1
Reckon Limited | PAGE 6 OF 44
Step 2: Map to the XPA chart
A mapping is required to “normalise” the data into the XPA chart structure used in the linked XPA file.
Step 3: Import to XPA
Once the correct data period is selected, the data is then imported into the respective client XPA ledger.
Supported Data Sources
SyncDirect is designed to support ‘one process’ for collecting data from clients regardless of which Business Accounting Software they use. SyncDirect supports collection of trial balance movement and transactional data movement from the following systems:
Desktop Systems
Reckon Accounts (Quickbooks) 2010-2016X (all versions)
MYOB AccountRight V18-19.X (all versions)
MYOB AccountRight 2012-16.X (Desktop)
Cloud and Hybrid Systems
MYOB AccountRight Live 2016.X (Cloud)
Xero
Reckon One
Reckon Accounts Hosted
Other ERPs
Exported Excel/CSV files (both Trial Balance and Journal Transactions methods supported)
Note: There are new adapters coming in 2017:
Intuit QBO
Data Collection Methods
There are four collection methods available to collect client data that is held either locally by the Accountant, on the Clients’ desktop or in the Cloud.
These are:
1. Browse Browse for a data file held on the local machine or local network. 2. Cloud Collect data from a system located in the cloud. 3. Data Feed Setup a data feed from your client’s desktop software. 4. Email Request data from your client’s desktop software via an email request.
Practice User Guide | SyncDirect V 7.5.0.1
Reckon Limited | PAGE 7 OF 44
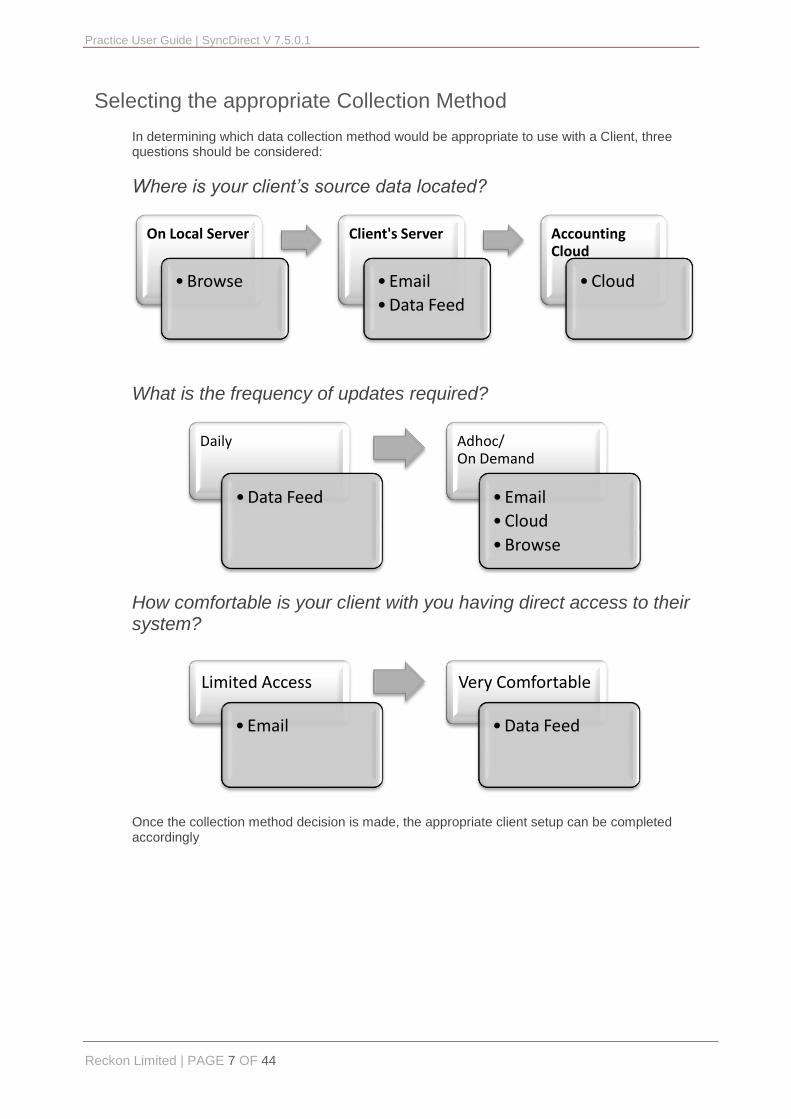
Selecting the appropriate Collection Method
In determining which data collection method would be appropriate to use with a Client, three questions should be considered:
Where is your client’s source data located?
What is the frequency of updates required?
How comfortable is your client with you having direct access to their system?
Once the collection method decision is made, the appropriate client setup can be completed accordingly
On Local Server
•Browse
Client's Server
•Data Feed
Accounting Cloud
•Cloud
Daily
•Data Feed
Adhoc/ On Demand
•Cloud
•Browse
Limited Access
Very Comfortable
•Data Feed

Practice User Guide | SyncDirect V 7.5.0.1
Reckon Limited | PAGE 8 OF 44
Activating a SyncDirect Client
Note
Some of these steps may need to be undertaken by a System Administrator with appropriate JOE Admin access
STEP ONE: Enable Client link to SyncDirect
Within Central Console, on the Attributes tab, change the SyncDirect Client Attribute to “Yes”.
STEP TWO: Activate the Client
Open the SyncDirect Status Console by double clicking the SyncDirect menu option under Xcede Professional Accounting on the Central Console Menu.
The Client List View presented shows all clients identified as SyncDirect Clients in Central Console by default, if no filters are set. To activate a licence, select the appropriate client in the grid, click Action then select Activate License. This will assign a SyncDirect License to the client and make SyncDirect functionality available for that client.

Practice User Guide | SyncDirect V 7.5.0.1
Reckon Limited | PAGE 9 OF 44
Note
Multiple client licences can be activated at once by selecting multiple lines using the Shift or Control Key to highlight the appropriate lines in the list.
Once the licence is activated and the console is refreshed, the Activated column will show the date the client was activated.
Establish the Access Method
There are two starting points to set up the Access Method:
From the SyncDirect Console in the Client List View, double click the desired client. This will launch back into a client specific view in the XPA Ledger Console.
From Central Console, use the filter to find the desired client, then Click SyncDirect in the XPA Ledgers band.
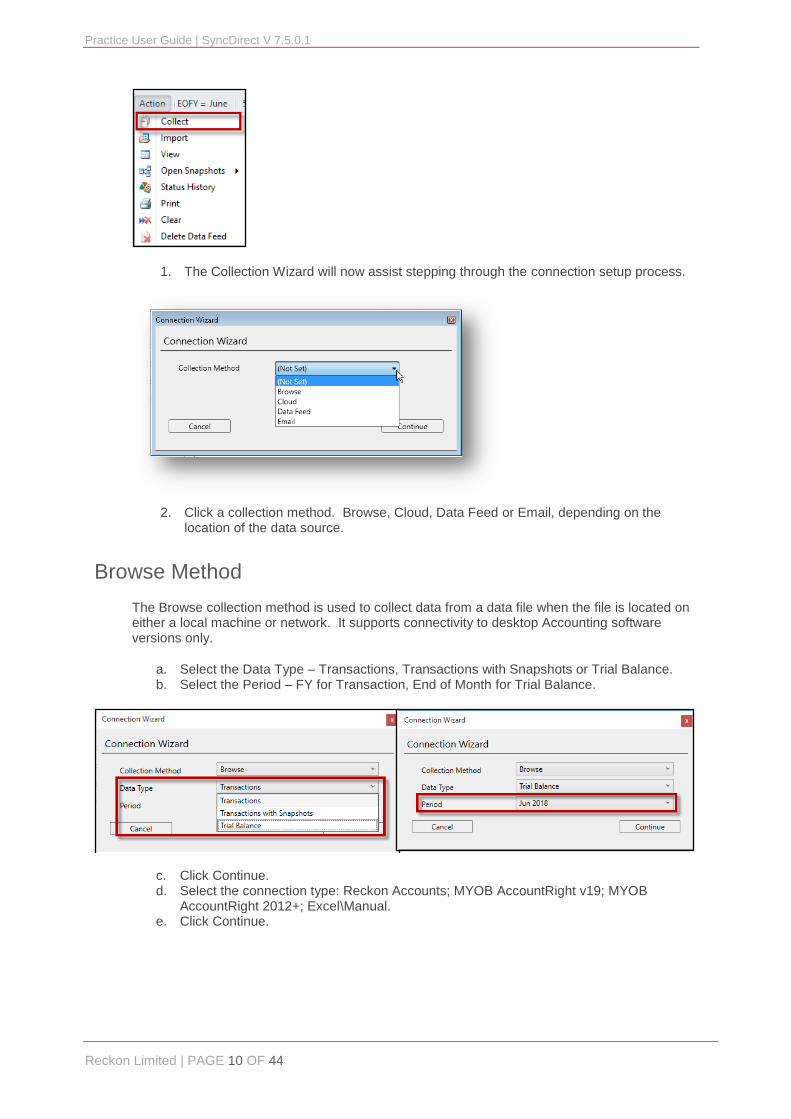
From Action, Click Collect.
Practice User Guide | SyncDirect V 7.5.0.1
Reckon Limited | PAGE 10 OF 44
1. The Collection Wizard will now assist stepping through the connection setup process.
2. Click a collection method. Browse, Cloud, Data Feed or Email, depending on the location of the data source.
Browse Method
The Browse collection method is used to collect data from a data file when the file is located on either a local machine or network. It supports connectivity to desktop Accounting software versions only.
a. Select the Data Type – Transactions, Transactions with Snapshots or Trial Balance. b. Select the Period – FY for Transaction, End of Month for Trial Balance.
c. Click Continue. d. Select the connection type: Reckon Accounts; MYOB AccountRight v19; MYOB
AccountRight 2012+; Excel\Manual. e. Click Continue.

Practice User Guide | SyncDirect V 7.5.0.1
Reckon Limited | PAGE 11 OF 44
Depending on the connection type selection, different options will be presented, prompting for the required information to complete the connection.
Reckon Accounts (Desktop)
To establish a link to a Reckon Accounts file using the Browse method, a copy of the clients data file must be available on the network, along with Reckon Accounts installed on the local machine.
After browsing to the file, the authority to allow the SyncDirect to access Reckon Accounts may be requested.

Practice User Guide | SyncDirect V 7.5.0.1
Reckon Limited | PAGE 12 OF 44
To setup access, the Reckon Accounts file must be open with the correct permissions applied for the first time connection.
You will need to open the file in Reckon Accounts.
In Reckon Accounts, navigate to Edit/Preferences/Integrated Applications.
Check the ‘Yes, always; allow access even if QuickBooks is not running’ option.
Also check the ‘Allow the application to access personal bank account numbers, customer credit card information, and other personal data’ and then click Continue.
MYOB AccountRight v19 (Desktop)
To establish the link, the MYOB Files’ username and password as well as the file access connection protocol is required. The correct version of MYOB must also be installed on the local machine.
To select the network or local data file location, click Browse, navigate to the file location, highlight it and click OK. Enter the correct Username and Password to access the file then select Multiuser access and TCPIP protocol. Click Continue to establish the connection to the source file.

Practice User Guide | SyncDirect V 7.5.0.1
Reckon Limited | PAGE 13 OF 44
MYOB AccountRight 2012+(Desktop)
To establish the link, the MYOB File username and password is required. The MYOB API settings will determine the network file location (if set correctly). The correct version of MYOB must also be installed on the local machine or network.
SyncDirect will look directly at the list of company files you have added to your MYOB Library. If the file you are looking for is not in the list click the ‘Refresh Companies’ button and check again. If the file is still missing, check the entry in the MYOB Library.
Excel\Manual (Transactions)
Selecting the Excel\Manual option to import transactions presents the data entry screen below to the user.

Practice User Guide | SyncDirect V 7.5.0.1
Reckon Limited | PAGE 14 OF 44
From this screen, click the Import from Excel button to browse for an Excel data file and start the collection process. The first step is to select the sheet within the workbook containing the data for import to load the data into SyncDirect.
Once the data has been loaded, the user needs to ‘profile’ the data, telling SyncDirect what data is in each column.

Practice User Guide | SyncDirect V 7.5.0.1
Reckon Limited | PAGE 15 OF 44
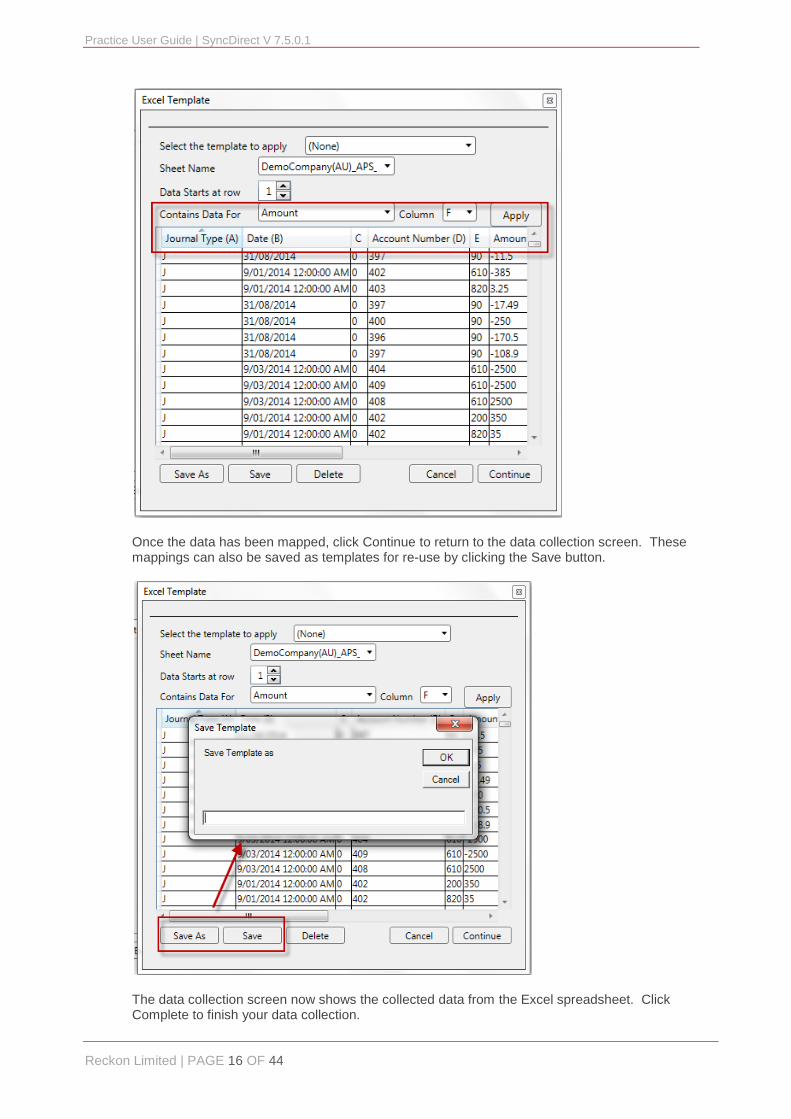
SyncDirect has pre-defined the data it requires for a successful import into XPA and populates these into the first dropdown. Select each of these columns in sequence, map them to a column label in the imported spreadsheet data and click apply to confirm.
Practice User Guide | SyncDirect V 7.5.0.1
Reckon Limited | PAGE 16 OF 44
Once the data has been mapped, click Continue to return to the data collection screen. These mappings can also be saved as templates for re-use by clicking the Save button.
The data collection screen now shows the collected data from the Excel spreadsheet. Click Complete to finish your data collection.

Practice User Guide | SyncDirect V 7.5.0.1
Reckon Limited | PAGE 17 OF 44
Note
The ‘Complete’ button will only be enabled when all required fields are completed. Incomplete fields will be highlighted in yellow
Excel\Manual (Trial Balance)
Selecting the Excel\Manual collection method to collect trial balance data presents a similar data collection screen, adjusted to focus on Trial Balance data rather than journal transactions. The Import from Excel button functions similarly to the transaction import method, however the process has been optimised for importing trial balance data rather than transactional data.
Both Dual column and single column formats are supported via the Import format type.

Practice User Guide | SyncDirect V 7.5.0.1
Reckon Limited | PAGE 18 OF 44
The data labels available for a trial balance also differ from transactional data imports.
Once the data in the spreadsheet has been mapped, it is imported to the data entry screen. If the data is valid, the Complete button will store the data in the cloud.

Practice User Guide | SyncDirect V 7.5.0.1
Reckon Limited | PAGE 19 OF 44
Note
The ‘Complete’ button will only be enabled when all required fields are completed.

Practice User Guide | SyncDirect V 7.5.0.1
Reckon Limited | PAGE 20 OF 44
Cloud Method
The Cloud collection method is used to collect data on demand from supported cloud accounting data sources directly (using their APIs).
a. Select the Data Type – Transactions, Transactions with Snapshots or Trial Balance. b. Select the Period – FY for Transaction, End of Month for Trial Balance.
c. Click Continue. d. Select the connection type: Reckon Accounts Hosted, MYOB AccountRight 2012+,
Xero or Reckon One. e. Click Continue.
Reckon Accounts Hosted
You can access Reckon Accounts Hosted data in the cloud by ticking the Hosted checkbox and entering the following credentials.
You will need to know the filename located at Q:\Upload\<yourfilename>.QBW (this is the default location)

Practice User Guide | SyncDirect V 7.5.0.1
Reckon Limited | PAGE 21 OF 44
Note
You will need to ensure that Reckon Accounts Hosted files have been previously opened in “multi user mode” to ensure multiple connections can be accepted.
You may also need to adjust the Preferences for Integrated Applications.
You will need to open the Reckon Accounts Hosted file.
In Reckon Accounts, navigate to Edit/Preferences/Integrated Applications/Company Preferences.
Highlight the Application shown above and then click on Properties.
Check that all the options match the below image and then click OK.

Practice User Guide | SyncDirect V 7.5.0.1
Reckon Limited | PAGE 22 OF 44
MYOB AccountRight 2012+ (Hosted)
To establish the link, to MYOB in the cloud you will need the Files’ username and password and to tick running in the cloud.
SyncDirect will look at the list of companies in your MYOB Library.
From the Company File drop down box, select the relevant file and enter the correct Username and Password to access the file. Click Continue to establish the connection to the source file. If the desired file is not in the list, then click the Refresh Companies button.
If there are connection issues, an error message indicating the source of the problem will be displayed. Press the Authorise button and re-enter file username and password.

Practice User Guide | SyncDirect V 7.5.0.1
Reckon Limited | PAGE 23 OF 44
Xero
To link to a Xero ledger, a Xero compatible web browser and a valid user name and password will be required. As part of Xero’s connection protocols, an authorisation key generated by the Xero website will need to be entered to allow access to the data.
Note
To collect Transactions with Snapshots your Xero Login will require Payroll with Administration rights.
There are 2 ways to do this:
Public Key (needs to be done every time you collect)
Private Key (only needs to be done once)
Public Key
This needs to be done every time you collect data but is easy to do.
Select Public in the Connection type box.
Click either Access AU File or Access NZ File depending on what file you are collecting from and the default internet browser will start a Xero web session. Note, if your default browser is not supported by Xero, copy and paste the web address into a Xero supported browser. Enter the appropriate user name and password and click Login.

Practice User Guide | SyncDirect V 7.5.0.1
Reckon Limited | PAGE 24 OF 44
A screen will appear asking you to select you Organisation. Choose the correct organisation and then click Allow access for 30 mins.
The Authorisation Key will then be displayed in new screen. Click on Copy code or write down the code.
Enter the code into the Xero authorisation box in the SyncDirect Console and click Continue (Note: you can copy and paste the key).

Practice User Guide | SyncDirect V 7.5.0.1
Reckon Limited | PAGE 25 OF 44
Note
This authorisation key lasts for 30 minutes. For future connections, the Connection Wizard process will need to be repeated.
Private Key
Before you can use the Private Key you need to setup and create the Private Key according to the Xero requirements. Instructions for this can be found on the Xero website at the link below.
https://developer.xero.com/documentation/api-guides/create-publicprivate-key
Once you have installed OpenSSL and created your Certificate you need to locate the certificate file. public_privatekey.pfx
This can usually be found at C:\OpenSSL-Win64\bin
Then rename the file to XeroCertificate.pfx and copy it to the Certificates folder in the ADV2000 folder.
C:\Adv2000\Certificates
You can now create your Private Key in Xero. Go to the Xero Developer site using the link below.
https://developer.xero.com/
Click on the MyApps tab and login with your Xero login details.
Select Private Key, set an Application name for SyncDirect and then complete the rest of the form. Ensure that you select the CORRECT Organisation.
Click Browse and select the location of the XeroCertificate.pfx file in the location below and then click save.
C:\Adv2000\Certificates

Practice User Guide | SyncDirect V 7.5.0.1
Reckon Limited | PAGE 26 OF 44
Once the Private Key has been created in Xero copy the Consumer Key to a txt file or straight into the Xero Collection process.
As you work through the collection process in SyncDirect for a Xero collection the third screen will ask for the collection type. Select Private and then paste the Private Key into the Consumer Key box.

Practice User Guide | SyncDirect V 7.5.0.1
Reckon Limited | PAGE 27 OF 44
Click Continue to complete the collection process. This also save the Private Key for future use.
IMPORTANT!
Please ensure you copy the correct Private Key from Xero to the matching client collection in SyncDirect.

Practice User Guide | SyncDirect V 7.5.0.1
Reckon Limited | PAGE 28 OF 44
Reckon One
To collect data from Reckon One select the Reckon One connection type and click Continue.
Then enter your Username and Password for the Reckon One Account and click Authorise.
Note
DO NOT enter your Customer ID number. You must use your Username.
Once your credentials have been Authorised your available Books will appear.
Select the Book from the drop down list that you wish to collect from and click Continue.

Practice User Guide | SyncDirect V 7.5.0.1
Reckon Limited | PAGE 29 OF 44

Practice User Guide | SyncDirect V 7.5.0.1
Reckon Limited | PAGE 30 OF 44
Email Request
The Email collection method is used to collect data from a client’s accounting system, with their complete timing and control on when the information is forwarded.
a. Select the Data Type – Transactions, Transactions with Snapshots or Trial Balance b. Select the Period – FY for Transaction, End of Month for Trial Balance
c. Click Continue. d. Select the connection type: Reckon Accounts; MYOB AccountRight 2012+. e. Click Continue.
IMPORTANT!
An exchange connected version of Microsoft Outlook must be installed on the workstation that is using the SyncDirect Console

Practice User Guide | SyncDirect V 7.5.0.1
Reckon Limited | PAGE 31 OF 44
Data Feed
A Data Feed is a permanent connection between the SyncDirect Console and the client application which allows for daily data transfers to occur automatically. This method requires a small application to run on the client’s system to act as the link between the client data and the SyncDirect Bureau. The application is secured by a username and password at the client end.
Set a Client Username and initial Client Password.
Also select the data type required, by ticking Collect tick box and setting a start date.
Press the Welcome Email button to have an email message generated in Outlook. Where necessary due to security settings, click to allow SyncDirect to access Outlook.
The appropriate information will populate into an Outlook email using the Firm’s Data Feed Template, ready to send to the client. Review the email message, add any additional details. Click send then Click, Continue.

Practice User Guide | SyncDirect V 7.5.0.1
Reckon Limited | PAGE 32 OF 44
The SyncDirect window will populate with the future data feed status lines when collections are successful.
Managing Multiple Clients
Within the SyncDirect Status Console there are two SyncDirect Status views available: a
Client List view; and a Data Feed Status view.
Client List View
At a glance, the Client List view shows if a client has been activated for use with SyncDirect. If there is an activated date present, it also lists their mapping status, which third party accounting system data was last drawn from and the access method it used. Each column can be filtered or the data can be grouped to obtain the desired view of this information.
Data Feed Status View
At a glance, the Data Feed Status’ page is designed to show the user the status of each data feed, when or if it has been requested for collection, whether client data has been received and when it was last imported into XPA (if applicable).
To access this information about all clients open the SyncDirect Status Console by clicking the SyncDirect menu option under Xcede Professional Accounting on the Central Console Menu.

Practice User Guide | SyncDirect V 7.5.0.1
Reckon Limited | PAGE 33 OF 44
Then Click the Data Feed Status link.
The user can establish a view of Client Data status according to the following statuses:
Not Due – The data feed is not yet due for collection.
Due – The data feed is due of collection.
Collected – The data feed has been uploaded to the bureau and ready for processing.
Imported – The data has been imported into XPA.
Changed – A new instance of client source data is available in the bureau.
Out Of Balance – The client source data does not balance.
Completed – The data will no longer be collected.
The screen is designed to assist users to manage the timeliness of collecting data from clients.
Note
Each column in the grid can be filtered, sorted and grouped. Irrelevant columns can also be hidden by dragging them into the data area of the grid
Individual Client
In Central Console, use the filter to find the desired client, then Click the XPA Ledgers band. Click on the SyncDirect link. As above, the user can establish a view of Client Data status according to the various statuses.

Practice User Guide | SyncDirect V 7.5.0.1
Reckon Limited | PAGE 34 OF 44
Viewing Client Data
There are 2 ways to view the data that has been uploaded into SyncDirect. The normal View option, which shows the data in a spreadsheet format or by using Snapshots which displays in a report format.
Normal View
Once data has been uploaded to the SyncDirect Console, either via Browse, Cloud, Data Feed or Email request, it can be viewed by selecting the period, choosing Action then View.
Snaphots
To view the Snapshots reports you will need to collect the data using the Transactions with Snapshots method. For details on how to do this refer to the “Establish the Access Method” section of this manual.
Once the data has been uploaded into Sync Direct you can then view the reports. Highlight the collection you wish to view and right mouse click or click on the Actions button and select Open Snapshots. At this point you can choose to open the reports in PDF or Excel.

Practice User Guide | SyncDirect V 7.5.0.1
Reckon Limited | PAGE 35 OF 44
If you choose Excel it will open up an Excel workbook displaying the report data from each report in a different worksheet. You will be able to manipulate the data as needed in the excel file.
If you choose PDF it will create the file in a PDF for viewing and printing purposes. It will Display a navigation bar down the left listing all the reports available for viewing. You can click on the report in the Navigation bar or scroll down through the reports.

Practice User Guide | SyncDirect V 7.5.0.1
Reckon Limited | PAGE 36 OF 44
Mapping to the XPA chart
Note
SyncDirect no-longer forces a client have a linked XPA ledger before a collection can occur. Before mapping for XPA, please make sure an XPA ledger has been linked.
Once the client source data is available it needs to be matched to the Target XPA Ledger. This is performed by using the Edit Mappings button for the particular Client. SyncDirect is designed to automate the mapping process as much as possible by accessing the chart of accounts directly from the linked XPA ledger.
Basic Mapping Process
The Mapping Screen is broken up into four main sections.
Client Elements from the Source system (MYOB, Reckon Accounts or XERO)
Target Elements from the XPA Ledger (selected ledger)
Predicted Elements
Mapped Elements
The ‘Client Elements’ are mapped to ‘Target Elements’ by dragging and dropping the Target element to the mapped code field. Alternatively you can input the ‘Target Element’ Account code directly into the mapped code field.

Practice User Guide | SyncDirect V 7.5.0.1
Reckon Limited | PAGE 37 OF 44
Advanced Mapping Process
The following features can help you save time and streamline your mapping process:
Grid Selection Modes
The Shift and Control keys can be utilised, in a similar manner to Excel, to multi select Client elements for aggregated mapping to a target element.
After selecting the multiple items to map, Click the target element on the right hand side. This will map all selected client elements to the selected target XPA account code. You can also use this method to apply the predicted codes to the selected client elements.

Practice User Guide | SyncDirect V 7.5.0.1
Reckon Limited | PAGE 38 OF 44
Hiding unused elements
By checking ‘Hide unused elements’ the Client Elements list is filtered to only show Chart of Account items in the client source data that contain values.
Displaying ‘Unmapped Elements’ only
By checking ‘Show unmapped items only’ only elements that have not been mapped are displayed.
Displaying expected ‘Target Elements’ only
By highlighting a Client Element item, then checking ‘Show expected target items only’, the Target Element list reduces to show only suggested items from the XPA chart.

Practice User Guide | SyncDirect V 7.5.0.1
Reckon Limited | PAGE 39 OF 44
Using Show Predicted Mapping
Over time as mappings are established with the Practice, SyncDirect learns mappings based on all previous entries and the categories/subcategories applied. The predicted mapping code is displayed in Green. To accept the predicted mapping, double click the green arrow on the appropriate field.
Note
For the predicted mapping function to be effective, sufficient historical mappings are required. A new bureau does not initially predicted mappings and it may take some time for accurate predictions to become available
Using Show Codes
To assist with the mapping process, the Source Data codes can be shown or hidden depending on their value.

Practice User Guide | SyncDirect V 7.5.0.1
Reckon Limited | PAGE 40 OF 44
Filtering Columns
The contents of either the Client or Target Element lists can be filtered by entering relevant terms in the blank row at the top of either table.
Other Mapping Functions
Export to Excel
This feature allows the user to export the mapping data to Excel. SyncDirect will launch Excel and the user will need to save the mapping data file.
Import from Excel
This feature allows for previously exported mappings to be imported and applied to the current client data set.
Import APS Mapping
This feature allows for mappings previously created using the Chart Mapping Toolbox in XPA to be used within the SyncDirect console.

Practice User Guide | SyncDirect V 7.5.0.1
Reckon Limited | PAGE 41 OF 44
IMPORTANT!
If using integrated assets in XPA, remember to code all Fixed Asset transactions (ie asset additions and sales) to the Asset Suspense account, NOT the Fixed Asset accounts.
Delete Unmapped
This allows for deleting some or all of the mapped Client Elements. A message box will appear to prompt for the relevant option.
Clear Current
Clears the mapping for the currently selected Client Elements.
Import data into XPA Ledger
Once the Client data has been uploaded into SyncDirect, the target XPA Ledger selected and mappings completed, the data can be imported into the XPA file.
Highlight the relevant data line, check the correct ledger is selected then from the Action menu Click Import.
At this stage, the data will be checked by the system, and then any alerts regarding the issues with mapping will be displayed, e.g. unmapped elements.

Practice User Guide | SyncDirect V 7.5.0.1
Reckon Limited | PAGE 42 OF 44
If any warnings are displayed, please review your mapping via the Edit Mapping option. Fix any issues with the mapping and try again.
If there are no issues with the mapping, SyncDirect will then write the data to the client XPA ledger. On completion of a successful import, a message will appear to indicate this accordingly.
Open the appropriate ledger in XPA and the data will have been imported into the ledger according to the mappings.
Status History
To review the history of a particular data feed, highlight the relevant line and then from the Action Menu Click Status History.
This will then display the Data Feed History screen.

Practice User Guide | SyncDirect V 7.5.0.1
Reckon Limited | PAGE 43 OF 44
The print option from the Action menu produces a list of all data feeds in the Clients’ list.
Clear
The clear option clears any previously collected data from the bureau. On success a message is displayed.
Practice User Guide | SyncDirect V 7.5.0.1
Reckon Limited | PAGE 44 OF 44
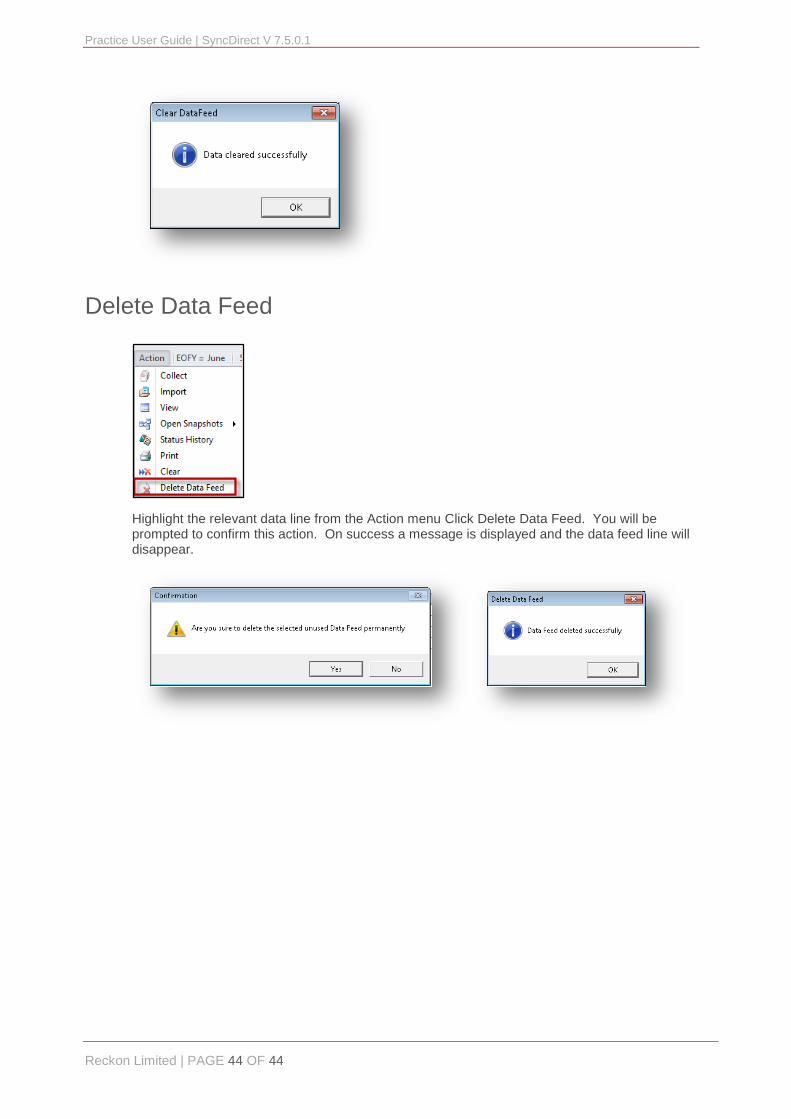
Delete Data Feed
Highlight the relevant data line from the Action menu Click Delete Data Feed. You will be prompted to confirm this action. On success a message is displayed and the data feed line will disappear.