precision id panels with the ion s5 system · precision id panels with the ion s5 ... precision id...
TRANSCRIPT

For Research, Forensic, or Paternity Use Only. Not for use in diagnostic procedures.
Precision ID Panels with the Ion S5™ SystemAPPLICATION GUIDE
for use with:Precision ID mtDNA panelsPrecision ID SNP panels
for use with:Precision ID Library KitPrecision ID IonCode™ 1−96 Kit in 96 Well PCR PlatePrecision ID DL8 KitIon 520™ & Ion 530™ Kit – OT2Ion S5™ Precision ID Chef & Sequencing KitIon 530™ Chip Kit
Catalog Numbers A30938, A31433, A25642, A25643, A26435, A30941, A33586, A33212, A27751, A33208,A35850, A27764Publication Number MAN0015831
Revision B.0

Manufacturer: Multiple Life Technologies Corporation manufacturing sites are responsible for manufacturing the products associated withthe workflow covered in this guide.
Corporate entity: Life Technologies Corporation | Carlsbad, CA 92008 USA | Toll Free in USA 1 800 955 6288
The information in this guide is subject to change without notice.
DISCLAIMER: TO THE EXTENT ALLOWED BY LAW, LIFE TECHNOLOGIES AND/OR ITS AFFILIATE(S) WILL NOT BE LIABLE FOR SPECIAL, INCIDENTAL,INDIRECT, PUNITIVE, MULTIPLE, OR CONSEQUENTIAL DAMAGES IN CONNECTION WITH OR ARISING FROM THIS DOCUMENT, INCLUDING YOURUSE OF IT.Validation Notice: The following Applied Biosystems™ panels have been internally tested but have not been validated under SWGDAM guidelines:Precision ID Ancestry Panel, Precision ID Identity Panel, Precision ID mtDNA Control Region Panel, and Precision ID mtDNA Whole Genome Panel.
Revision history: Pub. No. MAN0015831
Revision Date DescriptionB.0 19 July 2017 • Updated for use of the Precision ID DL8 Kit, the Ion S5™ Precision ID Chef & Sequencing Kit,
and the Precision ID IonCode™ 1−96 Kit in 96 Well PCR Plate.
• Optional library amplification procedure added to Chapter 2, “Prepare libraries manually“.
• “Load the Ion Chef™ System“ and “Clean the Ion Chef™ Instrument“ topics reorganized forease of use.
• Support added for the new Ion S5™ System user interface in Torrent Suite™ Software 5.2.
• Support added for manual cleaning of the Ion S5™ Sequencer, and for performing aninstrument reset run when a Reagents cartridge is loaded but not used in a run.
• Minor changes and corrections.
A.0 13 May 2016 New document.
Important Licensing Information: These products may be covered by one or more Limited Use Label Licenses. By use of these products, you acceptthe terms and conditions of all applicable Limited Use Label Licenses.Trademarks: All trademarks are the property of Thermo Fisher Scientific and its subsidiaries unless otherwise specified. TaqMan is a registeredtrademark of Roche Molecular Systems, Inc., used under permission and license. Eppendorf, LoBind, and MixMate are trademarks of Eppendorf AG.Agencourt and AMPure are trademarks of Beckman Coulter, Inc.
©2017 Thermo Fisher Scientific Inc. All rights reserved.

Contents
■ CHAPTER 1 Product information . . . . . . . . . . . . . . . . . . . . . . . . . . . . . . . . . . . . . . . 7
Product description . . . . . . . . . . . . . . . . . . . . . . . . . . . . . . . . . . . . . . . . . . . . . . . . . . . . . . . . . . . . . 8
Precision ID panel overview . . . . . . . . . . . . . . . . . . . . . . . . . . . . . . . . . . . . . . . . . . . . . . . . . . . . . . 9
SNP panels . . . . . . . . . . . . . . . . . . . . . . . . . . . . . . . . . . . . . . . . . . . . . . . . . . . . . . . . . . . . . . . . . . . . 10
Mitochondrial panels . . . . . . . . . . . . . . . . . . . . . . . . . . . . . . . . . . . . . . . . . . . . . . . . . . . . . . . . . . . 10Overview . . . . . . . . . . . . . . . . . . . . . . . . . . . . . . . . . . . . . . . . . . . . . . . . . . . . . . . . . . . . . . . . . 10Product requirement . . . . . . . . . . . . . . . . . . . . . . . . . . . . . . . . . . . . . . . . . . . . . . . . . . . . . . . 10Dual panel system and library amplification . . . . . . . . . . . . . . . . . . . . . . . . . . . . . . . . . . . 11PCR methodologies for manual library preparation . . . . . . . . . . . . . . . . . . . . . . . . . . . . 13About the primers . . . . . . . . . . . . . . . . . . . . . . . . . . . . . . . . . . . . . . . . . . . . . . . . . . . . . . . . . 13Degenerate primers . . . . . . . . . . . . . . . . . . . . . . . . . . . . . . . . . . . . . . . . . . . . . . . . . . . . . . . 13
Library preparation kits . . . . . . . . . . . . . . . . . . . . . . . . . . . . . . . . . . . . . . . . . . . . . . . . . . . . . . . . . 14Precision ID Library Kit . . . . . . . . . . . . . . . . . . . . . . . . . . . . . . . . . . . . . . . . . . . . . . . . . . . . 14Precision ID DL8 Kit . . . . . . . . . . . . . . . . . . . . . . . . . . . . . . . . . . . . . . . . . . . . . . . . . . . . . . . . 15
Precision ID IonCode™ 1−96 Kit in 96 Well PCR Plate . . . . . . . . . . . . . . . . . . . . . . . . . . . . . . . . 15
Template preparation kits . . . . . . . . . . . . . . . . . . . . . . . . . . . . . . . . . . . . . . . . . . . . . . . . . . . . . . . 16
Workflow . . . . . . . . . . . . . . . . . . . . . . . . . . . . . . . . . . . . . . . . . . . . . . . . . . . . . . . . . . . . . . . . . . . . . 16
■ CHAPTER 2 Prepare libraries manually . . . . . . . . . . . . . . . . . . . . . . . . . . . . . 17
DNA extraction and quantification kits . . . . . . . . . . . . . . . . . . . . . . . . . . . . . . . . . . . . . . . . . . . . 18Genomic DNA extraction kits . . . . . . . . . . . . . . . . . . . . . . . . . . . . . . . . . . . . . . . . . . . . . . . . 18Mitochondrial DNA extraction kits . . . . . . . . . . . . . . . . . . . . . . . . . . . . . . . . . . . . . . . . . . . 18Genomic DNA quantification kits . . . . . . . . . . . . . . . . . . . . . . . . . . . . . . . . . . . . . . . . . . . . . 18Mitochondrial DNA quantification kits . . . . . . . . . . . . . . . . . . . . . . . . . . . . . . . . . . . . . . . . 18
Required materials for manual library preparation, not supplied . . . . . . . . . . . . . . . . . . . . . 19
Workflow: Prepare libraries manually . . . . . . . . . . . . . . . . . . . . . . . . . . . . . . . . . . . . . . . . . . . . 20
Extract, then quantify input DNA . . . . . . . . . . . . . . . . . . . . . . . . . . . . . . . . . . . . . . . . . . . . . . . . . 20Guidelines for genomic DNA input per reaction . . . . . . . . . . . . . . . . . . . . . . . . . . . . . . . . 20Guidelines for mitochondrial DNA input per reaction . . . . . . . . . . . . . . . . . . . . . . . . . . . 20
Prepare DNA target amplification reactions . . . . . . . . . . . . . . . . . . . . . . . . . . . . . . . . . . . . . . . 21Prepare the SNP amplification reaction . . . . . . . . . . . . . . . . . . . . . . . . . . . . . . . . . . . . . . . 21Prepare the mtDNA amplification reaction . . . . . . . . . . . . . . . . . . . . . . . . . . . . . . . . . . . . 21
Amplify the targets . . . . . . . . . . . . . . . . . . . . . . . . . . . . . . . . . . . . . . . . . . . . . . . . . . . . . . . . . . . . . 24
Partially digest amplicons . . . . . . . . . . . . . . . . . . . . . . . . . . . . . . . . . . . . . . . . . . . . . . . . . . . . . . 25
Precision ID Panels with the Ion S5™ System Application Guide 3

Ligate adapters to the amplicons, then purify . . . . . . . . . . . . . . . . . . . . . . . . . . . . . . . . . . . . . 26Perform the ligation reaction . . . . . . . . . . . . . . . . . . . . . . . . . . . . . . . . . . . . . . . . . . . . . . . . 26Purify the libraries . . . . . . . . . . . . . . . . . . . . . . . . . . . . . . . . . . . . . . . . . . . . . . . . . . . . . . . . 27Elute the libraries . . . . . . . . . . . . . . . . . . . . . . . . . . . . . . . . . . . . . . . . . . . . . . . . . . . . . . . . . 28
Quantify the libraries by qPCR . . . . . . . . . . . . . . . . . . . . . . . . . . . . . . . . . . . . . . . . . . . . . . . . . . . 28Dilute the libraries for quantification . . . . . . . . . . . . . . . . . . . . . . . . . . . . . . . . . . . . . . . . . 28Quantify the libraries . . . . . . . . . . . . . . . . . . . . . . . . . . . . . . . . . . . . . . . . . . . . . . . . . . . . . . . 29
(Optional) Amplify and purify the libraries . . . . . . . . . . . . . . . . . . . . . . . . . . . . . . . . . . . . . . . . . 30Amplify the libraries . . . . . . . . . . . . . . . . . . . . . . . . . . . . . . . . . . . . . . . . . . . . . . . . . . . . . . . 30Purify the amplified libraries . . . . . . . . . . . . . . . . . . . . . . . . . . . . . . . . . . . . . . . . . . . . . . . . 31
Dilute, pool, and store the libraries . . . . . . . . . . . . . . . . . . . . . . . . . . . . . . . . . . . . . . . . . . . . . . . 32Dilute the libraries . . . . . . . . . . . . . . . . . . . . . . . . . . . . . . . . . . . . . . . . . . . . . . . . . . . . . . . . . 32(Optional) Pool the libraries . . . . . . . . . . . . . . . . . . . . . . . . . . . . . . . . . . . . . . . . . . . . . . . . 33Store the libraries . . . . . . . . . . . . . . . . . . . . . . . . . . . . . . . . . . . . . . . . . . . . . . . . . . . . . . . . . 33
■ CHAPTER 3 Prepare libraries using the Ion Chef™ Instrument . . . . 34
Software version requirements for library preparation . . . . . . . . . . . . . . . . . . . . . . . . . . . . . 35
Required materials for library preparation on the Ion Chef™ System, not supplied . . . . . . 35
Workflow: Prepare libraries using the Ion Chef™ Instrument . . . . . . . . . . . . . . . . . . . . . . . . 36
Extract, then quantify input DNA . . . . . . . . . . . . . . . . . . . . . . . . . . . . . . . . . . . . . . . . . . . . . . . . . 37Guidelines for genomic DNA input per reaction . . . . . . . . . . . . . . . . . . . . . . . . . . . . . . . . 37Guidelines for mitochondrial DNA input per reaction . . . . . . . . . . . . . . . . . . . . . . . . . . . 37
Dilute the gDNA samples . . . . . . . . . . . . . . . . . . . . . . . . . . . . . . . . . . . . . . . . . . . . . . . . . . . . . . . . 37
Thaw the reagents, then prepare the instrument . . . . . . . . . . . . . . . . . . . . . . . . . . . . . . . . . . . 37
(Optional) Create a sample set . . . . . . . . . . . . . . . . . . . . . . . . . . . . . . . . . . . . . . . . . . . . . . . . . . . 38
Add Precision ID primer pools to Positions A and B of the Reagents cartridge . . . . . . . . . . 38
Add the DNA to the Precision ID DL8 IonCode™ Barcode Adapters . . . . . . . . . . . . . . . . . . . . 39
Load the Ion Chef™ Instrument for library preparation . . . . . . . . . . . . . . . . . . . . . . . . . . . . . . 40
Run the Ion Chef™ Instrument . . . . . . . . . . . . . . . . . . . . . . . . . . . . . . . . . . . . . . . . . . . . . . . . . . . 42
Unload the Ion Chef™ Instrument . . . . . . . . . . . . . . . . . . . . . . . . . . . . . . . . . . . . . . . . . . . . . . . . 46
Dilute the libraries . . . . . . . . . . . . . . . . . . . . . . . . . . . . . . . . . . . . . . . . . . . . . . . . . . . . . . . . . . . . . 48
Clean the Ion Chef™ Instrument . . . . . . . . . . . . . . . . . . . . . . . . . . . . . . . . . . . . . . . . . . . . . . . . . . 49About the cleaning protocol . . . . . . . . . . . . . . . . . . . . . . . . . . . . . . . . . . . . . . . . . . . . . . . . . 49Clean the Ion Chef™ Instrument . . . . . . . . . . . . . . . . . . . . . . . . . . . . . . . . . . . . . . . . . . . . . 49
■ CHAPTER 4 Prepare the template on the Ion Chef™ Instrument . . . 51
Software version requirements for template preparation . . . . . . . . . . . . . . . . . . . . . . . . . . . 51
Required materials . . . . . . . . . . . . . . . . . . . . . . . . . . . . . . . . . . . . . . . . . . . . . . . . . . . . . . . . . . . . . 52Ion S5™ Precision ID Chef & Sequencing Kit components . . . . . . . . . . . . . . . . . . . . . . . . 52Compatible Ion Chip Kits . . . . . . . . . . . . . . . . . . . . . . . . . . . . . . . . . . . . . . . . . . . . . . . . . . . . 52
Workflow: Template preparation on the Ion Chef™ Instrument . . . . . . . . . . . . . . . . . . . . . . . 53
Create a Planned Run . . . . . . . . . . . . . . . . . . . . . . . . . . . . . . . . . . . . . . . . . . . . . . . . . . . . . . . . . . 54
Contents
4 Precision ID Panels with the Ion S5™ System Application Guide
Dilute the libraries for template preparation on the Ion Chef™ Instrument . . . . . . . . . . . . 55
Prepare the libraries and consumables . . . . . . . . . . . . . . . . . . . . . . . . . . . . . . . . . . . . . . . . . . . 56
Load the Ion Chef™ System . . . . . . . . . . . . . . . . . . . . . . . . . . . . . . . . . . . . . . . . . . . . . . . . . . . . . . 57Load the pipette tip racks and PCR plate . . . . . . . . . . . . . . . . . . . . . . . . . . . . . . . . . . . . . . 59Load the Reagents and Solutions cartridges . . . . . . . . . . . . . . . . . . . . . . . . . . . . . . . . . . 60Load the Recovery Tubes and Enrichment Cartridge v2 . . . . . . . . . . . . . . . . . . . . . . . . . 62Load the Chip-loading centrifuge . . . . . . . . . . . . . . . . . . . . . . . . . . . . . . . . . . . . . . . . . . . . 64Confirm that consumables are correctly installed . . . . . . . . . . . . . . . . . . . . . . . . . . . . . . 66Single chip loading workflow . . . . . . . . . . . . . . . . . . . . . . . . . . . . . . . . . . . . . . . . . . . . . . . . 66
Start the Ion Chef™ run . . . . . . . . . . . . . . . . . . . . . . . . . . . . . . . . . . . . . . . . . . . . . . . . . . . . . . . . . 68
Unload the chips for sequencing . . . . . . . . . . . . . . . . . . . . . . . . . . . . . . . . . . . . . . . . . . . . . . . . . 72
Clean the Ion Chef™ System . . . . . . . . . . . . . . . . . . . . . . . . . . . . . . . . . . . . . . . . . . . . . . . . . . . . . 73About the cleaning protocol . . . . . . . . . . . . . . . . . . . . . . . . . . . . . . . . . . . . . . . . . . . . . . . . . 73Materials required . . . . . . . . . . . . . . . . . . . . . . . . . . . . . . . . . . . . . . . . . . . . . . . . . . . . . . . . . 73Clean the Ion Chef™ Instrument . . . . . . . . . . . . . . . . . . . . . . . . . . . . . . . . . . . . . . . . . . . . . 73
■ CHAPTER 5 Prepare the template on theIon OneTouch™ 2 Instrument . . . . . . . . . . . . . . . . . . . . . . . . . . . . . . . . . . . . . . . . . . . . 78
Software version requirements for template preparation . . . . . . . . . . . . . . . . . . . . . . . . . . . . 78
Required materials from the Ion 520™ & Ion 530™ Kit – OT2 . . . . . . . . . . . . . . . . . . . . . . . . . . 78
Create a Planned Run . . . . . . . . . . . . . . . . . . . . . . . . . . . . . . . . . . . . . . . . . . . . . . . . . . . . . . . . . . 79
Dilute the libraries for OT2 template preparation . . . . . . . . . . . . . . . . . . . . . . . . . . . . . . . . . . . 80
■ CHAPTER 6 Sequence on the Ion S5™ System .. . . . . . . . . . . . . . . . . . . . . . 81
Software version requirements for sequencing . . . . . . . . . . . . . . . . . . . . . . . . . . . . . . . . . . . . 81
Workflow: Sequencing on the Ion S5™ Sequencer . . . . . . . . . . . . . . . . . . . . . . . . . . . . . . . . . . 82
Ion S5™ System component positions . . . . . . . . . . . . . . . . . . . . . . . . . . . . . . . . . . . . . . . . . . . . . 82
Required sequencer cleanings . . . . . . . . . . . . . . . . . . . . . . . . . . . . . . . . . . . . . . . . . . . . . . . . . . . 83
Before you begin . . . . . . . . . . . . . . . . . . . . . . . . . . . . . . . . . . . . . . . . . . . . . . . . . . . . . . . . . . . . . . 83
Initialize the sequencer . . . . . . . . . . . . . . . . . . . . . . . . . . . . . . . . . . . . . . . . . . . . . . . . . . . . . . . . . 84
Start the sequencing run . . . . . . . . . . . . . . . . . . . . . . . . . . . . . . . . . . . . . . . . . . . . . . . . . . . . . . . . 86
■ CHAPTER 7 Analyze the sequencing results . . . . . . . . . . . . . . . . . . . . . . . . . 88
Related documentation for data analysis . . . . . . . . . . . . . . . . . . . . . . . . . . . . . . . . . . . . . . . . . . 88
■ APPENDIX A Troubleshooting . . . . . . . . . . . . . . . . . . . . . . . . . . . . . . . . . . . . . . . . . 89
Manual library preparation . . . . . . . . . . . . . . . . . . . . . . . . . . . . . . . . . . . . . . . . . . . . . . . . . . . . . . 89
Contents
Precision ID Panels with the Ion S5™ System Application Guide 5

■ APPENDIX B Supplemental procedures . . . . . . . . . . . . . . . . . . . . . . . . . . . . . . 93
Perform a manual cleaning of the sequencer . . . . . . . . . . . . . . . . . . . . . . . . . . . . . . . . . . . . . . 93
Perform an instrument reset run with an initialized, unused SequencingReagents cartridge . . . . . . . . . . . . . . . . . . . . . . . . . . . . . . . . . . . . . . . . . . . . . . . . . . . . . . . . . . . . . 94
■ APPENDIX C Safety . . . . . . . . . . . . . . . . . . . . . . . . . . . . . . . . . . . . . . . . . . . . . . . . . . . . . 95
Chemical safety . . . . . . . . . . . . . . . . . . . . . . . . . . . . . . . . . . . . . . . . . . . . . . . . . . . . . . . . . . . . . . . . 96
Biological hazard safety . . . . . . . . . . . . . . . . . . . . . . . . . . . . . . . . . . . . . . . . . . . . . . . . . . . . . . . . . 97
■ Documentation and support . . . . . . . . . . . . . . . . . . . . . . . . . . . . . . . . . . . . . . . . . . . . . 98
Related documentation . . . . . . . . . . . . . . . . . . . . . . . . . . . . . . . . . . . . . . . . . . . . . . . . . . . . . . . . . 98
Customer and technical support . . . . . . . . . . . . . . . . . . . . . . . . . . . . . . . . . . . . . . . . . . . . . . . . . 99
Limited product warranty . . . . . . . . . . . . . . . . . . . . . . . . . . . . . . . . . . . . . . . . . . . . . . . . . . . . . . . 99
Contents
6 Precision ID Panels with the Ion S5™ System Application Guide
Product information
■ Product description . . . . . . . . . . . . . . . . . . . . . . . . . . . . . . . . . . . . . . . . . . . . . . . . . . . . 8
■ Precision ID panel overview . . . . . . . . . . . . . . . . . . . . . . . . . . . . . . . . . . . . . . . . . . . . 9
■ SNP panels . . . . . . . . . . . . . . . . . . . . . . . . . . . . . . . . . . . . . . . . . . . . . . . . . . . . . . . . . . 10
■ Mitochondrial panels . . . . . . . . . . . . . . . . . . . . . . . . . . . . . . . . . . . . . . . . . . . . . . . . . 10
■ Library preparation kits . . . . . . . . . . . . . . . . . . . . . . . . . . . . . . . . . . . . . . . . . . . . . . . 14
■ Precision ID IonCode™ 1−96 Kit in 96 Well PCR Plate . . . . . . . . . . . . . . . . . . . . . 15
■ Template preparation kits . . . . . . . . . . . . . . . . . . . . . . . . . . . . . . . . . . . . . . . . . . . . . 16
■ Workflow . . . . . . . . . . . . . . . . . . . . . . . . . . . . . . . . . . . . . . . . . . . . . . . . . . . . . . . . . . . 16
1
Precision ID Panels with the Ion S5™ System Application Guide 7

Product description
This guide covers the following products:
Item Cat. No.
Panels
Precision ID Ancestry Panel A25642
Precision ID Identity Panel A25643
Precision ID mtDNA Whole Genome Panel A30938
Precision ID mtDNA Control Region Panel A31443
Library preparation kits
Precision ID Library Kit A26435 (96 reactions)
A30941 (384 reactions)
Precision ID DL8 Kit A33212
Library preparation bundles
Precision ID Ancestry Panel and Library Kit Bundle A26807
Precision ID Identity Panel and Library Kit Bundle A26808
Barcode adapters
Precision ID IonCode™ 1−96 Kit in 96 Well PCR Plate A33586
Template preparation kits[1]
Ion S5™ Precision ID Chef & Sequencing Kit (2 runs perinitialization)
A33208
Ion S5™ Precision ID Chef & Sequencing Kit (1 run perinitialization)
A35850
Ion 520™ & Ion 530™ Kit – OT2 A27751
Sequencing chips
Ion 530™ Chip Kit A27764
Library and template preparation system
Precision ID Ion Chef™ System A30070
Ion OneTouch™ 2 System 4474779
Sequencer System
Precision ID Ion S5™ System A30067
Precision ID Ion S5™ XL System A30068
Chapter 1 Product informationProduct description1
8 Precision ID Panels with the Ion S5™ System Application Guide
Item Cat. No.
Sequencing kits [2]
Ion S5™ Precision ID Chef & Sequencing Kit (2 runs perinitialization)
A33208
Ion S5™ Precision ID Chef & Sequencing Kit (1 run perinitialization)
A35850
Ion 520™ & Ion 530™ Kit – OT2 A27751
[1] These kits also contain sequencing reagents for the Precision ID Ion S5™ System.[2] These kits also contain template preparation reagents.
Precision ID panel overview
Use any the following panels for preparing libraries on the Ion Chef™ Instrument orpreparing libraries manually.
Panel[1] Cat. No.Averageamplicon
size[2]Amount
No. ofprimerpairs
Storage
Precision ID Ancestry Panel A25642 127 bp 1 tube[3] 165 –30°C to –10°C
Precision ID Identity Panel A25643 138 bp 1 tube[3] 124
Precision ID mtDNA Whole Genome Panel A30938 163 bp 2 tubes[3] 81[4]
Precision ID mtDNA Control Region Panel A31443 153 bp 2 tubes[3] 7[5]
[1] For Research, Forensic, or Paternity Use Only. Not for use in diagnostic procedures. For licensing and limited use restrictions visit thermofisher.com/HIDlicensing.
[2] Libraries have an additional ~80 bp due to barcode adapters.[3] Sufficient for 96 reactions if preparing libraries manually, or 32 reactions if preparing libraries using the Ion Chef™ Instrument.[4] There are 81 primer pairs per tube for a total of 162 primer pairs. [5] There are 7 primer pairs per tube for a total of 14 primer pairs.
Chapter 1 Product informationPrecision ID panel overview 1
Precision ID Panels with the Ion S5™ System Application Guide 9

SNP panels
The Precision ID Ancestry Panel (Cat. No. A25642) and the Precision ID Identity Panel(Cat. No. A25643) contain pools of PCR primers for amplification of forensicallyrelevant genomic target regions. The primers contain proprietary modifications thatenable removal of primer sequences during library preparation, resulting in efficienttarget assessment during sequencing.
Mitochondrial panels
The Precision ID mtDNA Whole Genome Panel (Cat. No. A30938) and thePrecision ID mtDNA Control Region Panel (Cat. No. A31443) contain pools ofunlabeled AmpliSeq™-designed PCR primers for preparing libraries frommitochondrial DNA (mtDNA). Both kits are a dual-panel pool system with smallamplicon overlaps to cover the mtDNA genome.
The Precision ID mtDNA Whole Genome Panel covers the entire mtDNA genome(16,569 bp; see Figure 1). Each pool in this panel contains 81 primer pairs to produce atotal of 162 amplicons. This panel also contains degenerate primers to account forprimer-binding single nucleotide polymorphisms (SNPs) that prevent amplicondropouts.
The Precision ID mtDNA Control Region Panel only targets the MitochondrialControl Region. This panel targets positions 15954– 610 of the Control Region. TheControl Region contains the non-coding Hypervariable (HV) Regions I, II, and III (see Figure 2). Each pool contains 7 primer pairs to produce a total of 14 amplicons. Thispanel also contains degenerate primers to account for primer-binding SNPs.
This panel is designed for use with the Precision ID Library Kits (Cat. Nos. A26435,A30941) and the Precision ID DL8 Kit (Cat. No. A33212).
Overview
Productrequirement
Chapter 1 Product informationSNP panels1
10 Precision ID Panels with the Ion S5™ System Application Guide

A dual panel system covers the mtDNA Genome and Control Region. The followingfigures are visual representations of the dual panels, Hypervariable Regions, andinsert locations of the Precision ID mtDNA Control Region Panel.
Figure 1 Visual representation of the dual panel system. It does not accurately display theactual number of amplicons.
Figure 2 The Hypervariable Regions of the mtDNA Control Region and insert locations ofthe Precision ID mtDNA Control Region Panel.
Dual panel systemand libraryamplification
Chapter 1 Product informationMitochondrial panels 1
Precision ID Panels with the Ion S5™ System Application Guide 11

Insert locations of the Precision ID mtDNA Control Region Panel
Pool Amplicon Insert start Insert end Insert size Insertoverlap
1 1 15,954 16,069 116 14
2 2 16,056 16,131 76 22
1 3 16,110 16,225 116 4
2 4 16,222 16,341 120 3
1 5 16,339 16,458 120 11
2 6 16,448 16,552 105 11
1 7 16,542 80 108 65
2 8 16 119 104 1
1 9 119 248 130 1
2 10 248 329 82 31
1 11 299 411 113 27
2 12 385 480 96 21
1 13 460 543 84 25
2 14 519 610 92 N/A
Chapter 1 Product informationMitochondrial panels1
12 Precision ID Panels with the Ion S5™ System Application Guide
Three PCR methodologies for manual library preparation for mtDNA are described inthe following table. The methods are used to optimize reagent usage, and to optimizethe integrity of input mtDNA, or resulting coverage. However, no one system has allthese optimizations. The procedure that uses these methods is found in “Prepare themtDNA amplification reaction“ on page 21.
Method Sample type Reagent use Amplification and ligation reactions
Full Very low copynumber samples
2X Amplify each pool separately. In thebarcode ligation reaction, use thesame barcode adapter for BOTH pools.
2-in-1 Low copy numbersamples
2X Amplify each pool separately, thenpool 10 µL of each sample to create anew pool. Place 20 µL of the newpool into a single well. Proceed as ifprocessing one sample. In the barcodeligation reaction, use one barcodeadapter.
Conservative Non-degradedsamples
(for example,buccal)
1X Amplify each pool in a 10‑µLhalf‑reaction. Transfer one of thehalf‑reactions into the other, thenproceed as if processing one sample.In the barcode ligation reaction, useone barcode adapter.
Note: A new (clean) well is notrequired.
The dual-panel nature of the designs is necessary for whole genome sequencing.• For the Precision ID mtDNA Whole Genome Panel, there is an average 11-bp
amplicon overlap between the 2 pools. The average amplicon size is ~163 bp.• For the Precision ID mtDNA Control Region Panel, there is an average 18-bp
amplicon overlap between the 2 pools. The average amplicon size is ~153 bp.
Degenerate primers account for the high frequency of variants of mtDNA.Number of degenerate primers for each pool
Panel Pool 1 Pool 2 Variant frequencies[1, 2]
Precision IDmtDNA WholeGenome Panel
81 primer pairs
119 degenerates
81 primer pairs
164 degenerates
1000 Genomes:>5% population frequency
www.1000genomes.org
MitoMap: >700 count
www.mitomap.org
Precision IDmtDNA ControlRegion Panel
7 primer pairs
45 degenerates
7 primer pairs
68 degenerates
[1] Degenerates were designed to avoid dropouts caused by primer binding SNPs identified from these references.
[2] Additional degenerate primers were added after a round of global customer testing.
PCRmethodologies formanual librarypreparation
About the primers
Degenerateprimers
Chapter 1 Product informationMitochondrial panels 1
Precision ID Panels with the Ion S5™ System Application Guide 13

Library preparation kits
The Precision ID Library Kit provides reagents for the rapid preparation of librariesfrom Precision ID panels. These library kits use a plate-based protocol for easy samplehandling and tracking, and for compatibility with automation and high-throughputlaboratories. When used with Precision ID panels, this kit requires 1 ng of DNA pertarget amplification reaction. DNA from various sources, including bodily fluid andbone samples, can be used as starting material.
The Precision ID Library Kit is tailored for human identification needs and providesreagents for 96 or 384 libraries.
Item
Amount
StorageCat. No. A26435(96 reactions)
Cat. No. A30941(384
reactions)[1]
5X Ion AmpliSeq™ HiFi Mix (redcap)
384 µL 4 × 384 µL
–30°C to –10°C
FuPa Reagent (brown cap) 192 µL 4 × 192 µL
Switch Solution (yellow cap) 384 µL 4 × 384 µL
Platinum PCR SuperMix HiFi(black cap)
3 × 1.6 mL 12 × 1.6 mL
Library Amplification Primer Mix(white cap)
192 µL 4 × 192 µL
DNA Ligase (blue cap) 192 µL 4 × 192 µL
Low TE (clear cap) 12 mL 4 × 12 mL Roomtemperature
[1] Cat. No. A30941 provides four 96-reaction kits.
Precision IDLibrary Kit
Chapter 1 Product informationLibrary preparation kits1
14 Precision ID Panels with the Ion S5™ System Application Guide

The Precision ID DL8 Kit (Cat. No. A33212) contains materials sufficient forperforming 4 Ion Chef™ runs, with up to 8 Precision ID libraries prepared per run.Upon arrival, inspect all consumables and contact Technical Support if any of thecomponents have been damaged during shipping.
IMPORTANT! Store all consumables and cartridges under the recommendedconditions and in an upright position. Precision ID DL8 Solutions cartridges areshipped at ambient temperature, but need to be stored at 2°C to 8°C upon arrival.
Component Amount per kit Storage
Precision ID DL8 Supplies (Part No. A30935)
• Ion AmpliSeq™ Tip Cartridge L8
• Framed PCR Foil Seal
• Enrichment Cartridge
1 box with4 inserts
15°C to 30°C
Precision ID DL8 Reagents (Part No. A32926) 4 cartridges –30°C to –10°C
Precision ID DL8 Solutions (Part No. A30934) 4 cartridges 2°C to 8°C
Precision ID DL8 IonCode™ Barcode Adapters 1−32for Chef DL8 in 96 Well PCR Plates (Part No. A33419)
Set includes 4 PCR plates:
• Precision ID IonCode™ Barcode Adapters 1−8 forChef DL8 in 96 Well PCR Plate (red)
• Precision ID IonCode™ Barcode Adapters 9−16for Chef DL8 in 96 Well PCR Plate (yellow)
• Precision ID IonCode™ Barcode Adapters 17−24for Chef DL8 in 96 Well PCR Plate (green)
• Precision ID IonCode™ Barcode Adapters 25−32for Chef DL8 in 96 Well PCR Plate (blue)
1 set of 4 plates 15°C to 30°C
Precision ID IonCode™ 1−96 Kit in 96 Well PCR Plate
The Precision ID IonCode™ 1−96 Kit in 96 Well PCR Plate (Cat. No. A33586) contains aset of 96 unique barcode adapters in a 96-well plate format for use in manual librarypreparation. When used in combination with the Precision ID Library Kit, this kitenables pooling of up to 96 libraries for multiplex sequence analysis.
Component Quantity No. of reactions Storage
Precision ID IonCode™ 1−96 Kit in96 Well PCR Plate
1 × 96-well plate(20 µL/well)
960(10 reactionsper barcode)
–30ºC to –10ºC
Precision ID DL8Kit
Chapter 1 Product informationPrecision ID IonCode™ 1−96 Kit in 96 Well PCR Plate 1
Precision ID Panels with the Ion S5™ System Application Guide 15

Template preparation kits
For the template preparation kit for the Ion Chef™ System, see Chapter 4, “Prepare thetemplate on the Ion Chef™ Instrument“, and refer to “Required materials“ onpage 52.
For the template preparation kit for the Ion OneTouch™ 2 System, see Chapter 5,“Prepare the template on the Ion OneTouch™ 2 Instrument“, and refer to “Requiredmaterials from theIon 520™ & Ion 530™ Kit – OT2“ on page 78.
Workflow
Prepare the library manually: Prepare the library using the Ion Chef™
Instrument:
Librarypreparation Chapter 2, “Prepare libraries manually“ Chapter 3, “Prepare libraries using the
Ion Chef™ Instrument“
▼ ▼
Templatepreparation
Chapter 4, “Prepare the template on theIon Chef™ Instrument“
Chapter 4, “Prepare the template on theIon Chef™ Instrument“
▼
Sequencing Chapter 6, “Sequence on the Ion S5™ System“
Note: Before starting, ensure that· You have updated your Ion S5™ or Ion S5™ XL System to Torrent Suite™ Software
5.2.2.· You have installed appropriate BED and reference files into Torrent Suite™
Software.
Chapter 1 Product informationTemplate preparation kits1
16 Precision ID Panels with the Ion S5™ System Application Guide

Prepare libraries manually
■ DNA extraction and quantification kits . . . . . . . . . . . . . . . . . . . . . . . . . . . . . . . . . . 18
■ Required materials for manual library preparation, not supplied . . . . . . . . . . . 19
■ Workflow: Prepare libraries manually . . . . . . . . . . . . . . . . . . . . . . . . . . . . . . . . . . . 20
■ Extract, then quantify input DNA . . . . . . . . . . . . . . . . . . . . . . . . . . . . . . . . . . . . . . 20
■ Prepare DNA target amplification reactions . . . . . . . . . . . . . . . . . . . . . . . . . . . . . . 21
■ Amplify the targets . . . . . . . . . . . . . . . . . . . . . . . . . . . . . . . . . . . . . . . . . . . . . . . . . . . 24
■ Partially digest amplicons . . . . . . . . . . . . . . . . . . . . . . . . . . . . . . . . . . . . . . . . . . . . . 25
■ Ligate adapters to the amplicons, then purify . . . . . . . . . . . . . . . . . . . . . . . . . . . . 26
■ Quantify the libraries by qPCR . . . . . . . . . . . . . . . . . . . . . . . . . . . . . . . . . . . . . . . . 28
■ (Optional) Amplify and purify the libraries . . . . . . . . . . . . . . . . . . . . . . . . . . . . . . 30
■ Dilute, pool, and store the libraries . . . . . . . . . . . . . . . . . . . . . . . . . . . . . . . . . . . . . 32
To prepare libraries using the Ion Chef™ System, see Chapter 3, “Prepare librariesusing the Ion Chef™ Instrument“.
2
Precision ID Panels with the Ion S5™ System Application Guide 17

DNA extraction and quantification kits
We recommend the PrepFiler Express™and PrepFiler Express BTA™ Forensic DNAExtraction Kits for extracting, then purifying DNA from various forensic sampletypes:
• PrepFiler Express™ Forensic DNA Extraction Kit (Cat. No. 4441352) is designedfor common forensic sample types, including body fluid stains and swabs ofbody fluids.
• PrepFiler Express BTA™ Forensic DNA Extraction Kit (Cat. No. 4441351) isdesigned for challenging forensic sample types such as bone, teeth, and adhesive-containing substrates including cigarette butts, chewing gum, and tape lifts.
The kits are appropriate for use with samples containing potential PCR inhibitors.
We recommend the PrepFiler Express BTA™ Forensic DNA Extraction Kit(Cat. No. 4441351) for mtDNA extraction. If you are using this kit, follow themodification step listed in “Guidelines for mitochondrial DNA input per reaction“ onpage 20.
Several commercially available kits are appropriate for quantifying human DNA. Werecommend one of the following kits for quantifying DNA from forensic samples:
• Quantifiler™ Duo DNA Quantification Kit (Cat. No. 4387746)• Quantifiler™ Trio DNA Quantification Kit (Cat. No. 4482910)• Quantifiler™ HP DNA Quantification Kit (Cat. No. 4482911)• Quantifiler™ Human DNA Quantification Kit (Cat. No. 4343895)
The Quantifiler™ Trio DNA Quantification Kit uses multiple-copy target loci forexcellent detection sensitivity. The human-specific target loci (Small Autosomal, LargeAutosomal, and Y-chromosome targets) each consist of multiple copies dispersed onvarious autosomal chromosomes (Small Autosomal and Large Autosomal), ormultiple copies on the Y-chromosome. The primary quantification targets consist ofrelatively short amplicons (75 to 80 bases) to improve the detection of degraded DNAsamples. In addition, this kit contains Large Autosomal targets with a longeramplicon (>200 bases) to help in determining if a DNA sample is degraded.
The Quantifiler™ HP DNA Quantification Kit is the same as the Quantifiler™ TrioDNA Quantification Kit, but without the Y-chromosome targets.
Use any in-house method to quantify mtDNA, or use the Quantifiler™ HP orQuantifiler™ Trio DNA Quantification Kit listed in “Genomic DNA quantificationkits“ to approximate the amount of mtDNA in each sample.
Genomic DNAextraction kits
MitochondrialDNA extractionkits
Genomic DNAquantification kits
MitochondrialDNA quantificationkits
Chapter 2 Prepare libraries manuallyDNA extraction and quantification kits2
18 Precision ID Panels with the Ion S5™ System Application Guide

Required materials for manual library preparation, not supplied
Unless otherwise indicated, all materials are available through thermofisher.com.MLS: Fisher Scientific (fisherscientific.com) or other major laboratory supplier.
Item Source
Instruments and equipment
One of the following HID-approved PCR instruments andsoftware:
• 7500 Real-Time PCR Instrument
• GeneAmp™ PCR System 9700 with silver or gold block.
• Veriti™ 96‑Well Thermal Cycler
• ProFlex™ 96‑well PCR System
See web product pages
DynaMag™-96 Side Magnet, or other plate magnet 12331D
Pipettors (2–200 μL) MLS
Plates, tubes, and other consumables
MicroAmp™ Optical 96-Well Reaction Plate N8010560
4306737 (with barcode)
MicroAmp™ Clear Adhesive Film 4306311
MicroAmp™ Optical Film Compression Pad 4312639
Eppendorf™ DNA LoBind™ Microcentrifuge Tubes (0.5 mL and1.5 mL)
MLS
Low-retention, filtered pipette tips MLS
Accessories
(Optional) Eppendorf™ MixMate™ tool with 96 Tube holder
(for library preparation and elution)
Eppendorf
5353 000.014
Reagents
Agencourt™ AMPure™ XP Reagent Fisher ScientificNC9959336,
NC9933872, or MLS
Ion Library TaqMan® Quantitation Kit 4468802
Nuclease-free Water AM9932
Absolute ethanol MLS
Chapter 2 Prepare libraries manuallyRequired materials for manual library preparation, not supplied 2
Precision ID Panels with the Ion S5™ System Application Guide 19

Workflow: Prepare libraries manually
“Extract, then quantify input DNA“ on page 20
▼
“Prepare DNA target amplification reactions“ on page 21
▼
“Amplify the targets“ on page 24
▼
“Partially digest amplicons“ on page 25
▼
“Ligate adapters to the amplicons, then purify“ on page 26
▼
“Quantify the libraries by qPCR“ on page 28
▼
“Dilute, pool, and store the libraries“ on page 32
Extract, then quantify input DNA
• See “Genomic DNA extraction kits“ on page 18 for a list of recommendedgenomic DNA extraction kits.
• See “Genomic DNA quantification kits“ on page 18 for a list of recommendedgenomic DNA quantification kits.
• Use 1 ng of input genomic DNA per target amplification reaction for allPrecision ID panels.
• Use 0.1 ng of input gDNA per target amplification reaction for the mitochondrialpanels.
• If you are using the Quantifiler™ HP or Quantifiler™ Trio DNA Quantification Kit,estimate the mtDNA input by using 10% of the gDNA Small Amplicon (SA)quantity. For example, for non-degraded samples use 0.1 ng of gDNA.
• See “Mitochondrial DNA extraction kits“ on page 18 for a recommended mtDNAextraction kit.
• IMPORTANT! If you are using the PrepFiler Express BTA™ Forensic DNAExtraction Kit to extract mtDNA from non-BTA substrates such as blood orbuccal, perform this modification: During the lysis, incubate the column/tubeassembly at 56°C, then shake at 750 rpm for 40 minutes.
Guidelines forgenomic DNAinput per reaction
Guidelines formitochondrialDNA input perreaction
Chapter 2 Prepare libraries manuallyWorkflow: Prepare libraries manually2
20 Precision ID Panels with the Ion S5™ System Application Guide

Prepare DNA target amplification reactions
Refer to one of the following sections depending on the panel that you are using:• “Prepare the SNP amplification reaction“ on page 21• “Prepare the mtDNA amplification reaction“ on page 21
IMPORTANT! Ion AmpliSeq™ HiFi Mix is viscous. Pipet slowly, then mix thoroughly.
1. Add the following components to each well of a 96-well PCR plate.
Note: Prepare a master mix for multiple reactions.
Component Volume
5X Ion AmpliSeq™ HiFi Mix (red cap) 4 µL
Precision ID Identity Panel or Precision ID Ancestry Panel 10 µL
gDNA, 1 ng[1] X µL[2]
Nuclease-free Water 6 – X µL
Total 20 µL
[1] Less than 1 ng of gDNA can be used, but appropriately adjust the number of PCR cycles in “Amplify the targets“ on page 24.
[2] ≤6 µL
2. Seal the plate with a MicroAmp™ Clear Adhesive Film. To prevent evaporation,create a tight seal by applying pressure with an applicator.
3. Vortex the plate thoroughly, then centrifuge to collect droplets. Place aMicroAmp™ Compression Pad on the plate, then go to “Amplify the targets“ onpage 24.
IMPORTANT! Ion AmpliSeq™ HiFi Mix is viscous. Pipet slowly, then mix thoroughly.
1. Use the following table to choose the amplification method that is based on yoursample type. For descriptions of the methods, see “PCR methodologies formanual library preparation“ on page 13.
Sample type Method Go to
Very low copy number samples Full step 2
Low copy number samples 2-in-1 step 3
Non-degraded samples(for example, buccal)
Conservative step 4
Prepare the SNPamplificationreaction
Prepare themtDNAamplificationreaction
Chapter 2 Prepare libraries manuallyPrepare DNA target amplification reactions 2
Precision ID Panels with the Ion S5™ System Application Guide 21

2. For the Full method, prepare two master mixes, one for each pool:a. Prepare the master mix for Precision ID mtDNA panel Pool 1, then add to
each well of a 96-well plate:
Component Volume
5X Ion AmpliSeq™ HiFi Mix (red cap) 4 µL
Precision ID mtDNA panel Pool 1 10 µL
gDNA, 0.1 ng[1] X µL[2]
Nuclease-free Water 6 – X µL
Total 20 µL
[1] 0.1 ng ≈ 2900 mtDNA copies. gDNA quantifications were used to extrapolate the copy number of mtDNA. If more than 0.1 ng of gDNA is used, appropriately adjust the number of PCR cycles in “Amplify the targets“ on page 24.
[2] ≤6 µL
b. Prepare the master mix for Precision ID mtDNA panel Pool 2, then add toeach well of a 96-well plate:
Component Volume
5X Ion AmpliSeq™ HiFi Mix (red cap) 4 µL
Precision ID mtDNA panel Pool 2 10 µL
gDNA, 0.1 ng[1] X µL[2]
Nuclease-free Water 6 – X µL
Total 20 µL
[1] 0.1 ng ≈ 2900 mtDNA copies. gDNA quantifications were used to extrapolate the copy number of mtDNA. If more than 0.1 ng of gDNA is used, appropriately adjust the number of PCR cycles in “Amplify the targets“ on page 24.
[2] ≤6 µL
c. Continue the library preparation as if you are processing two samples. Go tostep 5.
3. For the 2-in-1 method, prepare two master mixes, one for each pool:a. Prepare the master mix for Precision ID mtDNA panel Pool 1, then add to
each well of a 96-well plate:
Component Volume
5X Ion AmpliSeq™ HiFi Mix (red cap) 4 µL
Precision ID mtDNA panel Pool 1 10 µL
gDNA, 0.1 ng[1] X µL[2]
Nuclease-free Water 6 – X µL
Total 20 µL
[1] 0.1 ng ≈ 2900 mtDNA copies. gDNA quantifications were used to extrapolate the copy number of mtDNA. If more than 0.1 ng of gDNA is used, appropriately adjust the number of PCR cycles in “Amplify the targets“ on page 24.
[2] ≤6 µL
Chapter 2 Prepare libraries manuallyPrepare DNA target amplification reactions2
22 Precision ID Panels with the Ion S5™ System Application Guide

b. Prepare the master mix for Precision ID mtDNA panel Pool 2, then add toeach well of a 96-well plate:
Component Volume
5X Ion AmpliSeq™ HiFi Mix (red cap) 4 µL
Precision ID mtDNA panel Pool 2 10 µL
gDNA, 0.1 ng[1] X µL[2]
Nuclease-free Water 6 – X µL
Total 20 µL
[1] 0.1 ng ≈ 2900 mtDNA copies. gDNA quantifications were used to extrapolate the copy number of mtDNA. If more than 0.1 ng of gDNA is used, appropriately adjust the number of PCR cycles in “Amplify the targets“ on page 24.
[2] ≤6 µL
c. Go to step 5.
4. For the Conservative method, prepare two master mixes, one for each pool:a. Prepare the master mix for Precision ID mtDNA panel Pool 1, then add to
each well of a 96-well plate:
Component Volume
5X Ion AmpliSeq™ HiFi Mix (red cap) 2 µL
Precision ID mtDNA panel Pool 1 5 µL
gDNA, 0.1 ng[1] X µL[2]
Nuclease-free Water 3– X µL
Total 10 µL
[1] 0.1 ng ≈ 2900 mtDNA copies. gDNA quantifications were used to extrapolate the copy number of mtDNA. If more than 0.1 ng of gDNA is used, appropriately adjust the number of PCR cycles in “Amplify the targets“ on page 24.
[2] ≤3 µL
b. Prepare the master mix for Precision ID mtDNA panel Pool 2, then add toeach well of a 96-well plate:
Component Volume
5X Ion AmpliSeq™ HiFi Mix (red cap) 2 µL
Precision ID mtDNA panel Pool 2 5 µL
gDNA, 0.1 ng[1] X µL[2]
Nuclease-free Water 3 – X µL
Total 10 µL
[1] 0.1 ng ≈ 2900 mtDNA copies. gDNA quantifications were used to extrapolate the copy number of mtDNA. If more than 0.1 ng of gDNA is used, appropriately adjust the number of PCR cycles in “Amplify the targets“ on page 24.
[2] ≤3 µL
c. Go to step 5.
Chapter 2 Prepare libraries manuallyPrepare DNA target amplification reactions 2
Precision ID Panels with the Ion S5™ System Application Guide 23
5. Seal the plate with a MicroAmp™ Clear Adhesive Film. To prevent evaporation,create a tight seal by applying pressure with an applicator.
6. Vortex the plate thoroughly, then centrifuge to collect droplets. Place aMicroAmp™ Compression Pad on the plate, then go to “Amplify the targets“ onpage 24.
Amplify the targets
The cycle number for target amplification depends on the panel and the amount ofinput DNA. Cycle numbers can be increased if the quality or quantity of input DNA isuncertain.
IMPORTANT! When amplifying multiple samples in a single PCR plate, ensure thatthe input DNA across the samples is roughly equivalent, or the PCR cycle number isbased on the sample with the lowest quantity. This ensures that the selected cyclenumber for target amplification is optimal for all the samples in the run.
Cycle numbers for each panel depending on input DNA
Panel Amount of inputgDNA Number of cycles
Precision ID SNP panels 1 ng (300 copies) 21 cycles
<1 ng (<300 copies) 21 cycles + 1 to 5 cycles
Precision ID mtDNA panels 0.1 ng (~2900 mtDNAcopies)[1]
21 cycles
<0.1 ng 21 cycles + 1 to 5 cycles
[1] gDNA quantification was used to extrapolate the copy number of mtDNA. The actual number of mtDNA copies varies from sample source (for example bone, blood, saliva, hair, etc.).
1. To amplify target regions, run the following program:
Stage Step Temperature Time
Hold Activate the enzyme 99°C 2 minutes
Cycle number(see preceding table)
Denature 99°C 15 seconds
Anneal and extend 60°C 4 minutes
Hold — 10°C Hold [1]
[1] Store reactions at 10°C overnight on the thermal cycler. For longer-term storage, store covered at –20°C for up to one month.
2. If you are performing an SNP amplification reaction, then this is a stoppingpoint. If you are performing a mtDNA amplification reaction, go to step 3.
STOPPING POINT For SNP amplification methods, the target amplificationreactions can be stored at 10°C overnight on the thermal cycler. For longer-termstorage, store at – 20°C for up to one month.
Chapter 2 Prepare libraries manuallyAmplify the targets2
24 Precision ID Panels with the Ion S5™ System Application Guide

3. If you are performing a mtDNA amplification, see the following table:
Method Action
Full method Proceed as if processing two samples. Use the samebarcode adaptor for BOTH pools.
2-in-1 method Transfer 10 µL from each pool into a new well, for atotal of 20 µL. Continue the library preparation as if youare processing one sample. Use one barcode adapter.
Conservative method Transfer 10 µL from Pool 2 into the well containingPool 1, for a total of 20 µL. Continue the librarypreparation as if you are processing one sample. Useone barcode adapter.
STOPPING POINT For the Full, 2-in-1, or Conservative amplification methods, thetarget amplification reactions can be stored at 10°C overnight on the thermalcycler. For longer-term storage, store covered at −20°C for up to one month.
Partially digest amplicons
1. Remove the plate seal, then add 2 µL of FuPa Reagent (brown cap) to eachamplified sample. The total volume is ~22 µL.
2. Seal the plate with a clear adhesive film, vortex thoroughly, then spin down tocollect droplets. Alternatively, mix by pipetting at least half the total volume upand down at least 5 times before sealing the plate.
3. Load in the thermal cycler, then setup and run the following thermal cyclingconditions:
Temperature Time
50°C 10 minutes
55°C 10 minutes
60°C 20 minutes
10°C Hold (for up to 1 hour)
STOPPING POINT Store the plate at –20°C.
Chapter 2 Prepare libraries manuallyPartially digest amplicons 2
Precision ID Panels with the Ion S5™ System Application Guide 25

Ligate adapters to the amplicons, then purify
You must ligate a different barcode to each library when:• sequencing multiple libraries on a single chip• sequencing multiple replicates of DNA libraries from the same sample on a single
chip
Precision ID IonCode™ Barcode Adapters are provided at the appropriateconcentration, and include forward and reverse adapters in a single well. No furtherhandling is necessary.
IMPORTANT! When handling barcoded adapters, avoid cross-contamination. Afteruse, reseal the Precision ID IonCode™ Barcode Adapter plate with adhesive film andstore at −30°C to −5°C.
IMPORTANT! If there is visible precipitate in the Switch Solution, vortex or pipet upand down at room temperature to resuspend.
1. Carefully remove the plate seal, then add the following components to each wellcontaining digested amplicons in the order listed.
IMPORTANT! Add the DNA Ligase last. Do not combine DNA Ligase andadapters before adding to digested amplicons.
Order ofaddition Component Volume
1 Switch Solution (yellow cap) 4 µL
2 Precision ID IonCode™ Barcode Adapters 2 µL
3 DNA Ligase (blue cap) 2 µL
— Total volume (including ~22 µL of digestedamplicon)
~30 µL
Note: If preparing libraries using the Precision ID mtDNA panels, and using the· Full method: use the same barcode for both pools· 2-in-1 method: use one barcode· Conservative method: use one barcode
Perform theligation reaction
Chapter 2 Prepare libraries manuallyLigate adapters to the amplicons, then purify2
26 Precision ID Panels with the Ion S5™ System Application Guide

2. Seal the plate with a new MicroAmp™ Adhesive Film, vortex thoroughly, thencentrifuge to collect droplets. Alternatively, mix by pipetting at least half the totalvolume up and down at least 5 times before sealing the plate.
3. Load the plate in the thermal cycler, then run the following thermal cyclingconditions depending on the panel:
Panel Temperature Time
Precision ID SNP panels orPrecision ID mtDNApanels
22°C 30 minutes
72°C 10 minutes
10°C Hold (for up to 1 hour)
STOPPING POINT Samples can be stored overnight at 10°C on the thermal cycler.For longer periods, store at –20°C.
IMPORTANT!· Bring Agencourt™ AMPure™ XP Reagent to room temperature, then vortex
thoroughly to disperse the beads before use. Pipet the solution slowly.· Freshly prepare 70% ethanol for the next steps: Combine 230 µL of ethanol with
100 µL of Nuclease-free Water per sample.· Do NOT substitute a Dynabeads™-based purification reagent for the Agencourt™
AMPure™ XP Reagent.
1. Carefully remove the plate seal, then add 45 µL (1.5X sample volume) ofAgencourt™ AMPure™ XP Reagent to each library.
2. Pipet up and down 5 times to mix the bead suspension with the DNAthoroughly, then incubate the mixture for 5 minutes at room temperature.Alternatively, use a plate mixer (such as the Eppendorf™ MixMate™ mixer withthe 96 × 0.2 mL PCR tube holder) to mix the bead suspension. Seal the plate, mixfor 5 minutes at 2,000 rpm at room temperature, then centrifuge the plate brieflyto collect droplets.
3. Place the plate in a magnetic rack (such as the DynaMag™–96 Side Magnet(Cat. No. 12331D), then incubate for 2 minutes or until solution clears.
4. Carefully remove, then discard the supernatant without disturbing the pellet.
5. Add 150 µL of freshly prepared 70% ethanol, then move the plate side-to-side inthe two positions of the magnet to wash the beads. Remove, then discard thesupernatant without disturbing the pellet.
Note: If your magnet does not have two positions for shifting the beads, removethe plate from the magnet and gently pipet up and down 5 times (with thepipettor set at 100 µL). Return the plate to the magnet, then incubate for2 minutes or until the solution clears.
6. Repeat step 5 for a second wash.
Purify thelibraries
Chapter 2 Prepare libraries manuallyLigate adapters to the amplicons, then purify 2
Precision ID Panels with the Ion S5™ System Application Guide 27

7. Ensure that all ethanol droplets are removed from the wells. Keep the plate in themagnet, then air-dry the beads at room temperature for 5 minutes. Do notoverdry.
Note: Residual ethanol inhibits PCR amplification. If needed, centrifuge theplate, then remove residual ethanol before air-drying the beads.
1. Remove the plate containing the library from the magnet, then add 50 µL of LowTE to the pellet to disperse the beads.
2. Seal the plate with a MicroAmp™ Clear Adhesive Film, then vortex thoroughly.
3. Incubate for 5 minutes at room temperature, then centrifuge to collect droplets.Alternatively, use a plate mixer (such as the Eppendorf™ MixMate™ mixer withthe 96 × 0.2-mL PCR tube holder) to mix the bead suspension. Seal the plate, mixfor 5 minutes at 2,000 rpm at room temperature, then centrifuge to collectdroplets.
IMPORTANT! For maximum recovery, ensure that the suspension incubates forat least 5 minutes at room temperature.
4. Place the plate on the magnet for at least 2 minutes.
STOPPING POINT Samples can be stored with beads at 4°C for up to one month. Forlong-term storage at −20°C, place the plate in the magnet, then transfer the samplesupernatants to a new plate. Do not store libraries at −20°C in the presence of beads.
Quantify the libraries by qPCR
After eluting each Precision ID library, determine concentration by qPCR with the IonLibrary TaqMan® Quantitation Kit (Cat. No. 4468802).
1. If samples have been stored at 4°C, vortex the plate, then centrifuge to collectdroplets.
2. Place the plate in the magnetic rack for 2 minutes, or until the supernatant clears.
3. Prepare 1:100 dilutions by removing 2 µL of supernatant, then combine with198 µL of Nuclease-free Water.
4. After removing the aliquots, store the plate at 4°C.
Elute the libraries
Dilute thelibraries forquantification
Chapter 2 Prepare libraries manuallyQuantify the libraries by qPCR2
28 Precision ID Panels with the Ion S5™ System Application Guide
Use the Ion Library TaqMan® Quantitation Kit to analyze each sample, standard, andnegative control in duplicate 20-µL reactions.
1. Prepare three 10-fold serial dilutions of the E. coli DH10B Ion Control Library(~68 pM; provided in the kit) at the concentrations listed in the following table.Label them as standards, then use these concentrations in the qPCR experimentsetup.
Standard Control Libraryvolume
Nuclease-free Watervolume Concentration
1 5 µL (undiluted) 45 µL 6.8 pM
2 5 µL Std 1 45 µL 0.68 pM
3 5 µL Std 2 45 µL 0.068 pM
2. Prepare reaction mixtures. For each sample, negative control, and standard,combine 10 µL of 2X TaqMan® qPCR Mix and 1 µL of 20X Ion TaqMan® Assay ina tube, then mix thoroughly.
Component Volume (1 reaction)
Ion Library TaqMan® qPCR Mix 10 µL
Ion Library TaqMan® Quantitation Assay, 20X 1 µL
3. Aliquot 11 µL into each well of a PCR plate.
4. Add 9 µL of the diluted (1:100) library, or 9 µL of each control library dilution, toeach well (two wells per sample), for a total reaction volume of 20 µL.
5. Set up the real-time PCR instrument:a. Enter the concentrations of the control library standards.
b. Select ROX™ Reference Dye as the passive reference dye.
c. Enter a reaction volume of 20 µL.
d. Select FAM™ dye/MGB as the TaqMan® probe reporter/quencher.
e. Enter the following run parameters, depending on your system:
Real-time PCR System Stage Temperature Time
7500 Real-Time PCR Instrumentwith SDS Software v1.2.3
Hold 50°C 2 minutes
Hold 95°C 20 seconds
40 Cycles95°C 3 seconds
60°C 32 seconds
7500 Real-Time PCR Instrumentwith HID Real-Time PCR AnalysisSoftware v1.1 or v1.2
Hold 50°C 2 minutes
Hold 95°C 20 seconds
Quantify thelibraries
Chapter 2 Prepare libraries manuallyQuantify the libraries by qPCR 2
Precision ID Panels with the Ion S5™ System Application Guide 29

Real-time PCR System Stage Temperature Time
7500 Real-Time PCR Instrumentwith HID Real-Time PCR AnalysisSoftware v1.1 or v1.2
40 Cycles95°C 3 seconds
60°C 30 seconds
6. Run the reactions, then collect the real-time data.
See “Dilute, pool, and store the libraries“ on page 32 for library concentrationsrequired for template preparation. Depending on your quantification results, proceedwith one of the following options:
• If sufficient library was prepared, continue to “Dilute, pool, and store thelibraries“ on page 32.
• If insufficient library was prepared, continue to “(Optional) Amplify and purifythe libraries“.
• Continue with less than optimal library concentration. See Appendix A,“Troubleshooting“ for effects of using low library concentration.
(Optional) Amplify and purify the libraries
A library that yields less than the recommended concentration can be rescued bylibrary amplification. Amplified libraries need to be purified before quantification anduse.
1. Combine 25 µL of each unamplified library (total undiluted library is ~50 µL,from “Elute the libraries“ on page 28) with 72 µL of Platinum™ PCR SuperMixHiFi and 3 µL of Library Amplification Primer Mix from the Precision ID LibraryKit in one well of a 96-well PCR plate.
Note: The Platinum™ PCR SuperMix HiFi and Library Amplification Primer Mixand can be combined before addition.
2. Seal the plate with MicroAmp™ Adhesive Film, vortex thoroughly, thencentrifuge briefly to collect droplets. Alternatively, mix by pipetting at least halfthe total volume up and down at least 5 times before sealing the plate.
3. Load the plate in a thermal cycler, then run the following program:
Stage Temperature Time
Hold 98°C 2 minutes
5−10 cycles 98°C 15 seconds
64°C 1 minute
Hold 10°C Hold (for up to 24 hours)
STOPPING POINT Samples can be held overnight or up to 24 hours at 10°C on thethermal cycler. For longer periods, store at −20°C.
Amplify thelibraries
Chapter 2 Prepare libraries manually(Optional) Amplify and purify the libraries2
30 Precision ID Panels with the Ion S5™ System Application Guide

Perform a two-round purification process with the Agencourt™ AMPure™ XP Reagent:• First round at 0.5X bead-to-sample-volume ratio: High molecular-weight DNA
is bound to beads, while amplicons and primers remain in solution. Save thesupernatant.
• Second round at 1.2X bead-to-original-sample-volume ratio: Amplicons arebound to beads, and primers remain in solution. Save the bead pellet, and elutethe amplicons from the beads.
IMPORTANT!· Bring Agencourt™ AMPure™ XP Reagent to room temperature and vortex
thoroughly to disperse the beads before use. Pipet the solution slowly.· Use freshly prepared 70% ethanol for the next steps. Combine 230 µL of ethanol
with 100 µL of Nuclease-free Water per sample.· Do NOT substitute a Dynabeads™-based purification reagent for the Agencourt™
AMPure™ XP Reagent.
First-round purification
1. Tap the plate gently on a hard flat surface, or centrifuge briefly to collect thecontents at the bottom of the wells, then remove the plate seal.
2. Add 25 µL (0.5X sample volume) of Agencourt™ AMPure™ XP Reagent to eachplate well containing ~50 µL of sample. Pipet up and down 5 times to mix thebead suspension with the DNA thoroughly.
3. Incubate the mixture for 5 minutes at room temperature.
4. Place the plate in a magnet such as the DynaMag™ Side Magnet for at least5 minutes or until the solution is clear.
5. Carefully transfer the supernatant from each well to a new well of the 96-wellPCR plate without disturbing the pellet.
IMPORTANT! The supernatant contains the desired amplicons. Do not discard!
Second-round purification
1. To the supernatant from step 4 above, add 60 µL (1.2X original sample volume)of Agencourt™ AMPure™ XP Reagent. Pipet up and down 5 times to mix thebead suspension with the DNA thoroughly.
2. Incubate the mixture for 5 minutes at room temperature.
3. Place the plate in the magnet for 3 minutes or until the solution is clear. Carefullyremove, then discard the supernatant without disturbing the pellet.
IMPORTANT! The amplicons are bound to the beads. Save the bead pellet.
Purify theamplified libraries
Chapter 2 Prepare libraries manually(Optional) Amplify and purify the libraries 2
Precision ID Panels with the Ion S5™ System Application Guide 31

4. Add 150 µL of freshly prepared 70% ethanol to each well, then move the plateside to side in the magnet to wash the beads. Remove and discard thesupernatant without disturbing the pellet.
Note: If your magnet does not have two positions for shifting the beads, removethe plate from the magnet and gently pipet up and down 5 times (with thepipettor set at 100 µL), then return the plate to the magnet and incubate for2 minutes or until the solution clears.
5. Repeat step 4 for a second wash.
6. Ensure that all ethanol droplets are removed from the wells. Keeping the plate inthe magnet, air-dry the beads at room temperature for 2−5 minutes. Do notoverdry.
7. Remove the plate from the magnet, then add 50 µL of Low TE to the pellet todisperse the beads.
8. Seal the plate with MicroAmp™ Adhesive Film, vortex thoroughly, thencentrifuge to collect droplets.Alternatively, use a plate mixer (such as the Eppendorf™ MixMate™ mixer withthe 96 × 0.2 mL PCR tube holder) to mix the bead suspension. Seal the plate, mixfor 5 minutes at 2,000 rpm at room temperature, then centrifuge to collectdroplets.
9. Incubate at room temperature for at least 2 minutes.
10. Place the plate in the magnet for at least 2 minutes, then analyze an aliquot of thesupernatant as described in “Quantify the libraries by qPCR“ on page 28.
IMPORTANT! The supernatant contains the desired amplicons. Do not discard!
Dilute, pool, and store the libraries
1. After the run is complete, calculate the average concentration of each undilutedlibrary using the following equation:Avg concentration of undiluted library = (qPCR quantity mean) × (librarydilution)For example:
• qPCR quantities mean: 3 pM• Sample library dilution: 100
The average concentration of the undiluted library: (3 pM) × (100) = 300 pM
Dilute thelibraries
Chapter 2 Prepare libraries manuallyDilute, pool, and store the libraries2
32 Precision ID Panels with the Ion S5™ System Application Guide

2. Dilute libraries as described in the following table.
Note: To ensure accurate dilution of sample library, avoid pipetting volumes of1 µL or less. For the example of a 1:15 dilution, dilute 2 µL of sample library in28 µL of low TE.
Recommended library dilutions based on template preparation instrument and panel
Template preparationinstrument Panel Dilute to Minimum volume Templating size in
Planned Run setup
Ion Chef™ System Precision ID SNP panels 30 pM 25 µL 200 bp
Precision ID mtDNApanels
30 pM 25 µL 200 bp
Ion OneTouch™ 2Instrument[1]
Precision ID SNP panels 30 pM 100 µL 200 bp
Precision ID mtDNApanels
30 pM 100 µL 200 bp
[1] When preparing template with the Ion OneTouch™ 2 Instrument, add the library at the concentration and volume specified in this table to the amplification solution (see the Ion 520™ & Ion 530™ Kit – OT2 User Guide (Pub. No. MAN0010844) without further dilution.
IMPORTANT! The quality of sequencing data relies on achieving the correctconcentration of starting library.
After diluting the sample library to its target concentration (pM), pool equal volumesof multiple diluted libraries. Use the pooled libraries in template preparationreactions on the Ion OneTouch™ 2 Instrument or Ion Chef™ Instrument.
Store both diluted and undiluted libraries at 2°C to 8°C for up to 1 month. For long-term storage, store libraries at –30°C to −10°C.
Note: Ensure that Agencourt™ AMPure™ XP beads are removed before storinglibraries at –30°C to −10°C.
(Optional) Pool thelibraries
Store the libraries
Chapter 2 Prepare libraries manuallyDilute, pool, and store the libraries 2
Precision ID Panels with the Ion S5™ System Application Guide 33

Prepare libraries using theIon Chef™ Instrument
■ Software version requirements for library preparation . . . . . . . . . . . . . . . . . . . . 35
■ Required materials for library preparation on the Ion Chef™ System,not supplied . . . . . . . . . . . . . . . . . . . . . . . . . . . . . . . . . . . . . . . . . . . . . . . . . . . . . . . . . 35
■ Workflow: Prepare libraries using the Ion Chef™ Instrument . . . . . . . . . . . . . . . 36
■ Extract, then quantify input DNA . . . . . . . . . . . . . . . . . . . . . . . . . . . . . . . . . . . . . . 37
■ Dilute the gDNA samples . . . . . . . . . . . . . . . . . . . . . . . . . . . . . . . . . . . . . . . . . . . . . 37
■ Thaw the reagents, then prepare the instrument . . . . . . . . . . . . . . . . . . . . . . . . . . 37
■ (Optional) Create a sample set . . . . . . . . . . . . . . . . . . . . . . . . . . . . . . . . . . . . . . . . . 38
■ Add Precision ID primer pools to Positions A and B of theReagents cartridge . . . . . . . . . . . . . . . . . . . . . . . . . . . . . . . . . . . . . . . . . . . . . . . . . . . . 38
■ Add the DNA to the Precision ID DL8 IonCode™ Barcode Adapters . . . . . . . . 39
■ Load the Ion Chef™ Instrument for library preparation . . . . . . . . . . . . . . . . . . . . 40
■ Run the Ion Chef™ Instrument . . . . . . . . . . . . . . . . . . . . . . . . . . . . . . . . . . . . . . . . . 42
■ Unload the Ion Chef™ Instrument . . . . . . . . . . . . . . . . . . . . . . . . . . . . . . . . . . . . . . 46
■ Dilute the libraries . . . . . . . . . . . . . . . . . . . . . . . . . . . . . . . . . . . . . . . . . . . . . . . . . . . 48
■ Clean the Ion Chef™ Instrument . . . . . . . . . . . . . . . . . . . . . . . . . . . . . . . . . . . . . . . . 49
This chapter contains brief procedures for automated HID library preparation on theIon Chef™ Instrument. For complete instrument procedures, troubleshooting andmaintenance information, see Ion AmpliSeq™ Library Preparation on the Ion Chef™ SystemUser Guide (Pub. No. MAN0013432) and Ion 520™ & Ion 530™ Kit – Chef User Guide(Pub. No. MAN0010846).
If you are preparing libraries manually, see Chapter 2, “Prepare libraries manually“.
3
34 Precision ID Panels with the Ion S5™ System Application Guide

Software version requirements for library preparation
Panel Software version required
Precision ID Ancestry Panel Torrent Suite™ Software5.2.2
Precision ID Identity Panel
Precision ID mtDNA Control Region Panel
Precision ID mtDNA Whole Genome Panel
Required materials for library preparation on the Ion Chef™ System,not supplied
Unless otherwise indicated, all materials are available through thermofisher.com.MLS: Fisher Scientific (fisherscientific.com) or other major laboratory supplier.
Item Source
Instruments and equipment
Non-interruptible Power Supply (UPS) [1] MLS
Microcentrifuge[2] MLS
Vortex mixer with a rubber platform MLS
Pipettors (2−1000 µL) MLS
Tubes, plates, and other consumables
Microcentrifuge tubes (1.5 mL or 1.7 mL) MLS
Filtered pipette tips MLS
Wipes, disposable lint-free MLS
Gloves, powder-free nitrile MLS
Reagents
Nuclease-free water, molecular biology grade MLS
Isopropyl alcohol, 70% solution MLS
[1] For laboratories that experience frequent power outages or line voltage fluctuations, we recommend using a non-interruptible power supply that is compatible with 2500 W output or higher.
[2] Must fit standard 0.2- and 1.5 mL microcentrifuge tubes and generate 21,000 × g.
Chapter 3 Prepare libraries using the Ion Chef™ InstrumentSoftware version requirements for library preparation 3
Precision ID Panels with the Ion S5™ System Application Guide 35

Workflow: Prepare libraries using the Ion Chef™ Instrument
“Extract, then quantify input DNA“ on page 20
▼
“Dilute the gDNA samples“ on page 37
▼
“Thaw the reagents, then prepare the instrument“ on page 37
▼
“(Optional) Create a sample set“ on page 38
▼
“Add Precision ID primer pools to Positions A and B of theReagents cartridge“ on page 38
▼
“Add the DNA to the Precision ID DL8 IonCode™ BarcodeAdapters“ on page 39
▼
“Load the Ion Chef™ Instrument for library preparation“ onpage 40
▼
“Run the Ion Chef™ Instrument“ on page 42
▼
“Unload the Ion Chef™ Instrument“ on page 46
▼
“Dilute the libraries“ on page 48
Chapter 3 Prepare libraries using the Ion Chef™ InstrumentWorkflow: Prepare libraries using the Ion Chef™ Instrument3
36 Precision ID Panels with the Ion S5™ System Application Guide

Extract, then quantify input DNA
• See “Genomic DNA extraction kits“ on page 18 for a list of recommendedgenomic DNA extraction kits.
• See “Genomic DNA quantification kits“ on page 18 for a list of recommendedgenomic DNA quantification kits.
• Use 1 ng of input genomic DNA per target amplification reaction for allPrecision ID panels.
• Use 0.1 ng of input gDNA per target amplification reaction for the mitochondrialpanels.
• If you are using the Quantifiler™ HP or Quantifiler™ Trio DNA Quantification Kit,estimate the mtDNA input by using 10% of the gDNA Small Amplicon (SA)quantity. For example, for non-degraded samples use 0.1 ng of gDNA.
• See “Mitochondrial DNA extraction kits“ on page 18 for a recommended mtDNAextraction kit.
• IMPORTANT! If you are using the PrepFiler Express BTA™ Forensic DNAExtraction Kit to extract mtDNA from non-BTA substrates such as blood orbuccal, perform this modification: During the lysis, incubate the column/tubeassembly at 56°C, then shake at 750 rpm for 40 minutes.
Dilute the gDNA samples
Dilute samples to 0.067 ng/µL with Nuclease-free Water. Prepare 15 µL of eachdiluted sample (1 ng) to prepare up to 8 libraries per Ion Chef™ run.
Thaw the reagents, then prepare the instrument
1. Before the run, thaw one Precision ID DL8 Reagents cartridge at roomtemperature for 20 minutes.
2. If needed, thaw Precision ID primer pools.
3. If not performed after a previous run, unload, then clean the Ion Chef™
Instrument (see “Clean the Ion Chef™ System“ on page 73).
4. Verify that the Ion Chef™ Instrument has a connection to the Torrent Server. Onthe Ion Chef™ home touchscreen, touch Settings, then Torrent Server to view theconnection status of your instrument.
Note: If the instrument is not connected, see the Ion Chef™ and Torrent ServerNetwork Setup User Guide (Pub. No. MAN0013444) for instructions on how toconfigure a direct or indirect network connection of the Ion Chef™ Instrument toa Torrent Server.
Guidelines forgenomic DNAinput per reaction
Guidelines formitochondrialDNA input perreaction
Chapter 3 Prepare libraries using the Ion Chef™ InstrumentExtract, then quantify input DNA 3
Precision ID Panels with the Ion S5™ System Application Guide 37

(Optional) Create a sample set
It is not necessary to create a sample set. Leave the sample set blank.
Add Precision ID primer pools to Positions A and B of the Reagentscartridge
1. Uncap all 4 tubes in positions A, B, C, and D in the Precision ID DL8 Reagentscartridge. Save the caps.
2. Add primer panels to the Precision ID DL8 Reagents cartridge using thefollowing guidelines (even if processing fewer than 8 samples):
If you are using Action
Precision ID SNP panels(Identity and Ancestry)
Pipet 150 µL of the Pool into the Position A tube and150 µL into the Position B tube.
Precision ID mtDNApanels[1]
Pipet 150 µL of Pool 1 into the Position A tube, and150 µL of Pool 2 into the Position B tube.
[1] The Ion Chef™ Instrument performs similarly to the 2-in-1 method, as described on page 13.
DD
AA
BB
CC
00012647
00012216
00012216
00012216
1
2
4
3
1 Position A (150 µL Pool 1)2 Position B (150 µL Pool 1 or 2)3 Position C (Empty tube)4 Position D (Output tube)
Note: When the run is complete, the tube in Position D contains 700 µL ofcombined barcoded libraries at a concentration of approximately 100 pM with1 ng of input DNA.
Note: If input DNA is <1 ng, then the library concentration is <100 pM andlibrary quantification with qPCR is required.
Chapter 3 Prepare libraries using the Ion Chef™ Instrument(Optional) Create a sample set3
38 Precision ID Panels with the Ion S5™ System Application Guide

Add the DNA to the Precision ID DL8 IonCode™ Barcode Adapters
1. Remove the plate seal from a Precision ID DL8 IonCode™ Barcode Adapters Plate(provided), then discard.
2. Pipet 15 µL of each DNA sample (0.067 ng/µL, 1 ng) into wells A1 to H1 of theplate as shown in the following figure.
IMPORTANT! Carefully inspect each well for air bubbles. Remove any airbubbles by gentle pipette mixing. Alternatively, centrifuge the plate briefly in aplate centrifuge.
1 2
1 Column 1 wells containing 15 μL of each diluted DNA sample (0.067 ng/μL).2 Column 6 wells containing 8 dried-down IonCode™ barcodes. Lowest number is in A6
and highest is in H6. All appear light blue in the actual plates.
Note: If processing fewer than 8 samples, it is preferable to add replicates orpositive control samples to the run. Otherwise, pipet 15 µL of Nuclease-freeWater into column 1 wells that do not contain a DNA sample.
Note: If processing 5 or fewer samples, quantify your output combined libraryby qPCR to ensure that an optimal concentration is used in templating reactions.
Chapter 3 Prepare libraries using the Ion Chef™ InstrumentAdd the DNA to the Precision ID DL8 IonCode™ Barcode Adapters 3
Precision ID Panels with the Ion S5™ System Application Guide 39
Load the Ion Chef™ Instrument for library preparation
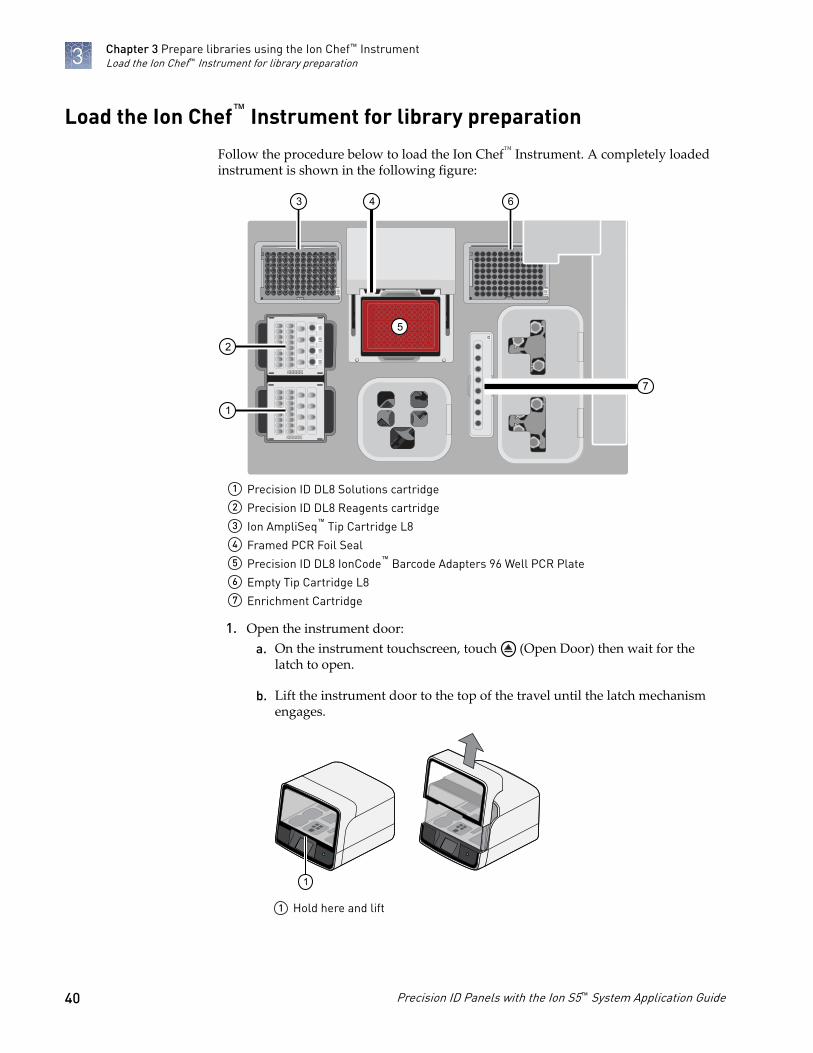
Follow the procedure below to load the Ion Chef™ Instrument. A completely loadedinstrument is shown in the following figure:
A
B
C
D
E
F
G
H
1 2 3 4 5 6 7 8 9 10 11 12
1
5
7
3
2
4 6
1 Precision ID DL8 Solutions cartridge2 Precision ID DL8 Reagents cartridge3 Ion AmpliSeq™ Tip Cartridge L84 Framed PCR Foil Seal5 Precision ID DL8 IonCode™ Barcode Adapters 96 Well PCR Plate6 Empty Tip Cartridge L87 Enrichment Cartridge
1. Open the instrument door:a. On the instrument touchscreen, touch (Open Door) then wait for the
latch to open.
b. Lift the instrument door to the top of the travel until the latch mechanismengages.
1
1 Hold here and lift
Chapter 3 Prepare libraries using the Ion Chef™ InstrumentLoad the Ion Chef™ Instrument for library preparation3
40 Precision ID Panels with the Ion S5™ System Application Guide

2. Load the Precision ID DL8 Solutions cartridge into the Solutions station.a. Gently tap the cartridge on the bench to force the reagents to the bottoms of
the tubes.
b. Load the cartridge into the Solutions station so that it snaps into place, andis level on the deck.
3. Load the Precision ID DL8 Reagents cartridge into the Reagents station.a. To force the reagents to the bottoms of the tubes, gently tap the cartridge on
the bench and verify that all the liquid is at the bottom, and not splashed onthe side of the tubes.
b. Load the cartridge into the Reagents station so that it snaps into place, and islevel on the deck.
IMPORTANT! Do not force the cartridge into place. Each cartridge fits onlyone location on the deck and in one orientation. If a cartridge does not fit,ensure that you are loading the correct cartridge in the correct orientation.
IMPORTANT! Ensure that 4 flagged tubes are uncapped, then loaded inPositions A–D of the Reagents cartridge, and Primer Pools are loaded inPositions A and B.
4. Load a new Ion AmpliSeq™ Tip Cartridge L8 into the New Pipette Tip station(left side of deck).
a. Unwrap the Ion AmpliSeq™ Tip Cartridge L8, then remove the cover toexpose the pipette tips.
b. Pull the tip station catch backwards to open the locking bracket. Load theIon AmpliSeq™ Tip Cartridge L8, then push the locking bracket closed.
IMPORTANT! If you do not close the locking bracket, the run will fail.
5. Load an empty tip cartridge from a previous run into the Used Tip station.
6. Load the Precision ID IonCode™ 96 Well PCR Plate containing gDNA onto thethermal cycler block and press down to seat it.
7. Slide a new Framed PCR Foil Seal underneath the automated heated cover.
IMPORTANT! When the Framed PCR Foil Seal is positioned correctly, its tabsproject upward and contact the heated cover.
8. Load the Enrichment Cartridge into the Enrichment station, then press down onthe cartridge to ensure that it is level with the instrument deck.
9. Close the instrument door by first lifting it up slightly to disengage the lockingmechanism, then pushing down on the door so that the lower locks engage.
IMPORTANT! After closing the door, confirm that both sides of the door arelocked down.
Chapter 3 Prepare libraries using the Ion Chef™ InstrumentLoad the Ion Chef™ Instrument for library preparation 3
Precision ID Panels with the Ion S5™ System Application Guide 41

Run the Ion Chef™ Instrument
Perform the following steps to start an Ion AmpliSeq™ run on the Ion Chef™
Instrument.
1. On the Ion Chef™ home touchscreen, touch Set up run.
2. Touch Step by step, then touch AmpliSeq on the Run Options screen.
Note: To bypass the step by step deck loading guide, touch Quick start.
3. Ensure that you have loaded the Ion Chef™ deck with Precision ID DL8 Kitconsumables by advancing through the Step by Step deck loading steps on theinstrument touch screen.
Chapter 3 Prepare libraries using the Ion Chef™ InstrumentRun the Ion Chef™ Instrument3
42 Precision ID Panels with the Ion S5™ System Application Guide

4. Touch Start check on the Close Door screen. The Ion Chef™ Instrument performsa Deck Scan.
Note: If the PCR plate is not recognized, select the appropriate plate whenprompted. Because no sample set was selected or planned in the Torrent Server,the following warning appears: "No sample Set detected. Do you want tocontinue?" Touch OK.
5. After Deck Scan completes (~3 minutes), touch Next.
6. In the Data Destination screen, verify the Server information, then touch Next.
Note: Sample set creation is not needed. Leave the Sample set blank.
Chapter 3 Prepare libraries using the Ion Chef™ InstrumentRun the Ion Chef™ Instrument 3
Precision ID Panels with the Ion S5™ System Application Guide 43

7. Enter the appropriate number of primer pools, target amplification cycles, and ananneal/extension time for your run.
Panel recommendations for AmpliSeq™ Workflow Options shown above.
PanelAmount ofinput gDNA
added
# of primerpools
Cyclenumber
Anneal &extension
time
Precision ID SNPpanels (Identity andAncestry)
1 ng(300 copies)
1 22 cycles 4
<1 ng(<300 copies)
1 22 cycles+ 1 to 5 cycles
4
Precision ID mtDNApanels
0.1 ng(~2900
copies)[1]
2 22 cycles 4
<0.1 ng 2 22 cycles+ 1 to 5 cycles
4
[1] gDNA quantifications were used to extrapolate the copy number of mtDNA. The actual number of mtDNA copies varies from sample source (for example; bone, blood, saliva, hair, etc.).
8. Touch Start Run.
9. After about 7 hours, return to the Ion Chef™ Instrument. On the Run Completescreen, touch Next to go to the unloading and cleaning steps.
Chapter 3 Prepare libraries using the Ion Chef™ InstrumentRun the Ion Chef™ Instrument3
44 Precision ID Panels with the Ion S5™ System Application Guide

IMPORTANT! After a run, the Ion Chef™ Instrument holds the barcoded librariesin the tube that is loaded in Position D of the Reagents cartridge. To avoid fluidloss due to evaporation, remove, then cap the tube of combined barcodedlibraries as soon as possible after run completion. Do not leave the tube in theinstrument longer than 24 hours after the start of the run. After 24 hours from thestart of the run, the instrument chiller will stop actively cooling, and the samplewill be held at 27°C.
Note: View the run information in the Run Details screen.
You can also monitor your run on the Torrent Browser by navigating toMonitor4Ion Chef and viewing the Library Prep Progress bar and LibraryPrep Status associated with your Sample Set.
Chapter 3 Prepare libraries using the Ion Chef™ InstrumentRun the Ion Chef™ Instrument 3
Precision ID Panels with the Ion S5™ System Application Guide 45
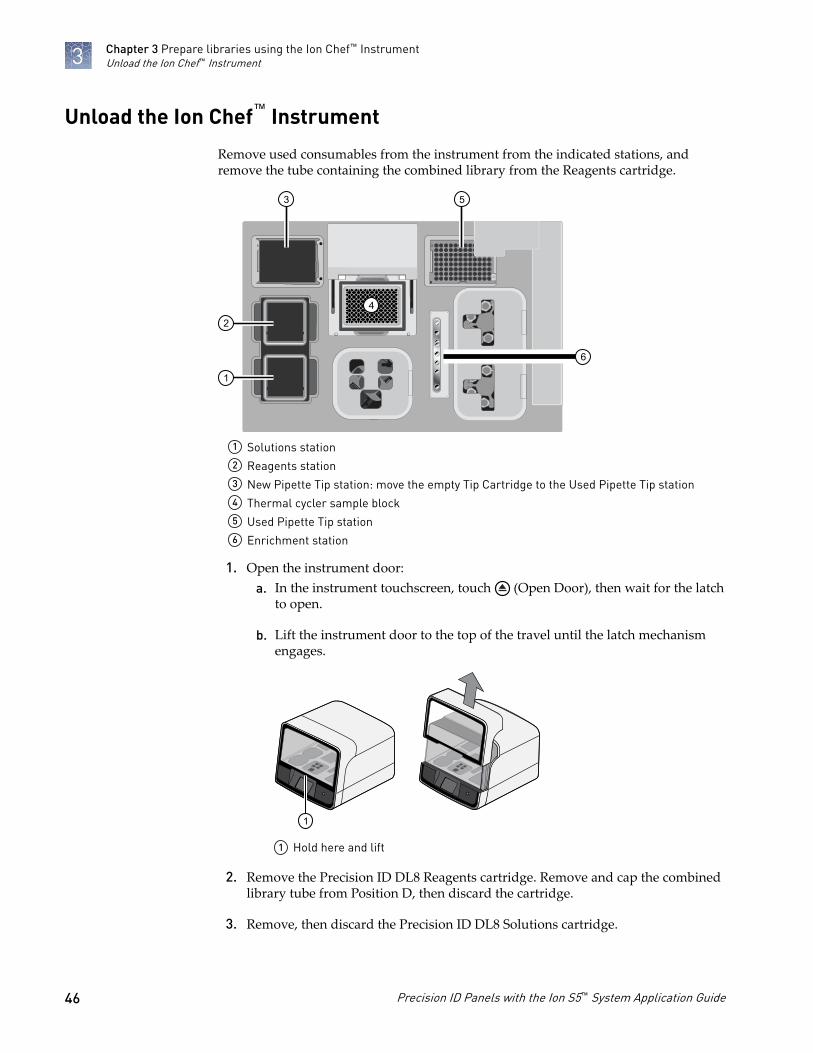
Unload the Ion Chef™ Instrument
Remove used consumables from the instrument from the indicated stations, andremove the tube containing the combined library from the Reagents cartridge.
1
4
3
2
5
6
1 Solutions station2 Reagents station3 New Pipette Tip station: move the empty Tip Cartridge to the Used Pipette Tip station4 Thermal cycler sample block5 Used Pipette Tip station6 Enrichment station
1. Open the instrument door:a. In the instrument touchscreen, touch (Open Door), then wait for the latch
to open.
b. Lift the instrument door to the top of the travel until the latch mechanismengages.
1
1 Hold here and lift
2. Remove the Precision ID DL8 Reagents cartridge. Remove and cap the combinedlibrary tube from Position D, then discard the cartridge.
3. Remove, then discard the Precision ID DL8 Solutions cartridge.
Chapter 3 Prepare libraries using the Ion Chef™ InstrumentUnload the Ion Chef™ Instrument3
46 Precision ID Panels with the Ion S5™ System Application Guide

4. Remove, then discard the Precision ID DL8 IonCode™ Barcode Adapters Plateand foil seal from the PCR sample block.
5. Remove, then discard the box of used pipette tips from the waste tip position.
IMPORTANT! Handle the disposable reservoir in the waste tip position withcare. During the run, liquid waste collects in the reservoir. Appropriately discardthe liquid waste by tipping the reservoir on one corner, then pouring the wasteinto a waste container:
IMPORTANT! Do not reuse the waste pipette tip rack. Always move the emptyTip Cartridge L8 from the new tip position to the waste tip position.
6. Move the empty Tip Cartridge L8 from the New Pipette Tip station to the UsedPipette Tip station.
IMPORTANT! Do not discard the empty Tip Cartridge L8.
7. Remove, then discard the Enrichment Cartridge.
Chapter 3 Prepare libraries using the Ion Chef™ InstrumentUnload the Ion Chef™ Instrument 3
Precision ID Panels with the Ion S5™ System Application Guide 47

Dilute the libraries
IMPORTANT! If input DNA used in library preparation was less than 1 ng, westrongly recommend that you quantify the library pool by qPCR before proceeding.Go to “Quantify the libraries by qPCR“ on page 28 for detailed instructions. Iflibraries are not quantified accurately, lower loading and read number can result.
Dilute the Ion library pool to the optimal input concentration before proceeding totemplating. The quality of sequencing data relies on achieving the correctconcentration of starting library.
Dilute libraries as described in the following table. Then use polyclonality and low-quality filter results from a sequencing run performed with ISPs templated at thestarting concentration to titrate up or down to achieve optimal concentrations, ifneeded.Recommended library dilutions based on template preparation, instrument, and panel
Template preparationinstrument Panel Dilute to Minimum volume
Templating size inPlanned Run
setup
Ion Chef™ System Precision ID SNP panels 30 pM 25 µL 200 bp
Precision ID mtDNA panels 30 pM 25 µL 200 bp
Ion OneTouch™ 2Instrument [1]
Precision ID SNP panels 30 pM 100 µL 200 bp
Precision ID mtDNA panels 30 pM 100 µL 200 bp
[1] When preparing template with the Ion OneTouch™ 2 Instrument, add the library at the concentration and volume specified in this table to the amplification solution (see the Ion 520™ & Ion 530™ Kit – OT2 User Guide (Pub. No. MAN0010844) without further dilution.
Chapter 3 Prepare libraries using the Ion Chef™ InstrumentDilute the libraries3
48 Precision ID Panels with the Ion S5™ System Application Guide

Clean the Ion Chef™ Instrument
The Ion Chef™ System includes an automated cleaning function that must beperformed following every run. The cleaning routine is initiated from the Ion Chef™
Instrument touchscreen and is designed to minimize potential contamination. Duringthe routine, the instrument irradiates the deck with ultraviolet light for 1 minute afterall consumables have been removed from the instrument.
IMPORTANT! Although the Ion Chef™ Instrument cleaning routine provides someprotection against contamination, it is not a substitute for good laboratory techniqueor precautions. When preparing DNA libraries for use or when preparing theIon Chef™ Instrument, make certain to observe sterile laboratory procedures at alltimes to ensure minimal contamination.
IMPORTANT! Clean the Ion Chef™ Instrument after every run. To preventcontamination, do not operate the instrument unless it has been recently cleaned.
1. Close the instrument door by first lifting it slightly to disengage the lockingmechanism, then pushing down on the door until the locks engage.
2. On the Ion Chef™ Instrument touchscreen that appears after run completion,touch Next.
Note: You can also clean the instrument at any time starting from the hometouchscreen. Touch Settings, then touch Clean Ion Chef.
About the cleaningprotocol
Clean theIon Chef™
Instrument
Chapter 3 Prepare libraries using the Ion Chef™ InstrumentClean the Ion Chef™ Instrument 3
Precision ID Panels with the Ion S5™ System Application Guide 49

3. Ensure that you have removed all consumables from the Ion Chef™ Instrument,then touch Next.
4. With the door closed, touch Start.
The instrument performs a Deck Scan before starting the cleaning routine. TheIon Chef™ Instrument stops ventilation and illuminates the ultraviolet (UV) lightin the instrument.
CAUTION! The Ion Chef™ Instrument emits UV light at 254 nm. Wearappropriate eye wear, protective clothing, and gloves when working near theinstrument. Do not look directly at the UV light while it is illuminated duringthe cleaning routine.
Chapter 3 Prepare libraries using the Ion Chef™ InstrumentClean the Ion Chef™ Instrument3
50 Precision ID Panels with the Ion S5™ System Application Guide

Prepare the template on theIon Chef™ Instrument
■ Software version requirements for template preparation . . . . . . . . . . . . . . . . . . 51
■ Required materials . . . . . . . . . . . . . . . . . . . . . . . . . . . . . . . . . . . . . . . . . . . . . . . . . . . 52
■ Workflow: Template preparation on the Ion Chef™ Instrument . . . . . . . . . . . . 53
■ Create a Planned Run . . . . . . . . . . . . . . . . . . . . . . . . . . . . . . . . . . . . . . . . . . . . . . . . . 54
■ Dilute the libraries for template preparation on the Ion Chef™ Instrument . . . 55
■ Prepare the libraries and consumables . . . . . . . . . . . . . . . . . . . . . . . . . . . . . . . . . . 56
■ Load the Ion Chef™ System . . . . . . . . . . . . . . . . . . . . . . . . . . . . . . . . . . . . . . . . . . . . 57
■ Start the Ion Chef™ run . . . . . . . . . . . . . . . . . . . . . . . . . . . . . . . . . . . . . . . . . . . . . . . 68
■ Unload the chips for sequencing . . . . . . . . . . . . . . . . . . . . . . . . . . . . . . . . . . . . . . . 72
■ Clean the Ion Chef™ System . . . . . . . . . . . . . . . . . . . . . . . . . . . . . . . . . . . . . . . . . . . 73
This chapter contains brief procedures for automated HID template preparation andchip loading on the Ion Chef™ Instrument. For complete instrument procedures,troubleshooting and maintenance information, see the Ion 520™ & Ion 530™ Kit – ChefUser Guide (Pub. No. MAN0010846).
Software version requirements for template preparation
Panel Software version required
Precision ID Ancestry Panel Torrent Suite™ Software5.2.2
Precision ID Identity Panel
Precision ID mtDNA Control Region Panel
Precision ID mtDNA Whole Genome Panel
4
Precision ID Panels with the Ion S5™ System Application Guide 51

Required materials
Component Part No.Quantity per kit
A33208 A35850
Ion S5™ Precision ID Chef Supplies A33209 4 boxes 4 boxes
Ion S5™ Precision ID Chef Reagents A32882 1 box 1 box
Ion S5™ Precision ID Chef Solutions A33210 1 box 1 box
Ion S5™ Precision ID Sequencing Reagents A32883 1 box 2 boxes
Ion S5™ Precision ID Sequencing Solutions A33211 1 box 2 boxes
Item Cat. No. Quantity Storage
Ion 530™ Chip Kit (2 × 4-pack) A27764 8 chips 15°C to 30°C
Ion S5™
Precision ID Chef& Sequencing Kitcomponents
Compatible IonChip Kits
Chapter 4 Prepare the template on the Ion Chef™ InstrumentRequired materials4
52 Precision ID Panels with the Ion S5™ System Application Guide

Workflow: Template preparation on the Ion Chef™ Instrument
“Create a Planned Run“ on page 54
▼
“Dilute the libraries for template preparation on the Ion Chef™
Instrument“ on page 55
▼
“Prepare the libraries and consumables“ on page 56
▼
“Load the Ion Chef™ System“ on page 57
▼
“Start the Ion Chef™ run“ on page 68
▼
“Unload the chips for sequencing“ on page 72
▼
“Clean the Ion Chef™ System“ on page 73
Chapter 4 Prepare the template on the Ion Chef™ InstrumentWorkflow: Template preparation on the Ion Chef™ Instrument 4
Precision ID Panels with the Ion S5™ System Application Guide 53

Create a Planned Run
Human Identification templates can be used to create Planned Runs for variousApplied Biosystems™ Precision ID panels. The templates pre-populate your PlannedRun with recommended parameters. You can then select additional settings to planyour run.
1. Sign in to the Torrent Server via the Torrent Browser.
2. Select Plan4Templates, then in the Favorites list, select Human Identification.
3. Select the Planned Run template appropriate to your panel and sequencer. Thewizard launches and displays the Plan page.
Note: All templates default to the Ion Chef™ Instrument.
4. On the Plan page, select the reference and BED files, enter the Sample names andSample Tube Label, confirm the default settings, then enter a plan name.
Chapter 4 Prepare the template on the Ion Chef™ InstrumentCreate a Planned Run4
54 Precision ID Panels with the Ion S5™ System Application Guide

5. To verify or change kit information, click the Kits tab. Specify the appropriatelibrary, template and sequencing kits, and flow number and Barcode Set.
1
1 For the Precision ID SNP panels and the Precision ID mtDNA panels, choose500 Flows.
6. When you have completed your selections, click Plan Run at the bottom right ofthe Plan screen to save the run. The run is listed on the Planned Runs page underthe name that you specified and is automatically used by the Ion Chef™ Systemwhen the associated sample is loaded.
Note: For more information, see the software user documentation, or see the Ion520™ & Ion 530™ Kit – Chef User Guide (Pub. No. MAN0010846) or the HID SNPGenotyper Plugin User Guide (Pub. No. MAN0010641).
Dilute the libraries for template preparation on the Ion Chef™
Instrument
Ensure that each sample library (or pooled sample libraries) has been previouslydiluted. If you prepared the libraries manually, see page 32. If you prepared thelibraries using the Ion Chef™ Instrument, see page 48.
Chapter 4 Prepare the template on the Ion Chef™ InstrumentDilute the libraries for template preparation on the Ion Chef™ Instrument 4
Precision ID Panels with the Ion S5™ System Application Guide 55

Prepare the libraries and consumables
1. Unpack the Ion S5™ Precision ID Chef Reagents cartridge 45 minutes before use,then allow it to warm to room temperature.
IMPORTANT! The Reagents cartridge must sit at room temperature for45 minutes before use.
2. Pipet 25 µL of diluted library pool (see "Dilute the libraries" on page 32 or page 48) to the bottom of the appropriate Ion Chef™ Library Sample Tube (flaggedtubes in the following figure).
A
B00012647
000122161
2
C 3
D 4
Figure 3 Ion S5™ Precision ID Chef Reagents cartridge
1 Position A (DNA library pool)2 Position B (DNA library pool)3 Position C (NaOH)4 Position D (Empty tube)
Note: If running the Human CEPH Control 200 Library from the Ion S5™
Controls Kit (Cat. No. A27760), prepare the control library for use by diluting1 µL of stock library into 52-µL Nuclease-free Water.
3. Cap, then store the two diluted DNA libraries on ice until you are ready to loadthem onto the Ion Chef™ Instrument.
4. Remove all cartridges and consumables from their packaging, then place themon the bench next to the Ion Chef™ Instrument.Prepare the following:
• Chip Adapter (2)• Enrichment Cartridge v2• Tip Cartridge v2• PCR Plate and Frame Seal v2• Recovery Station Disposable Lid v2 (2)• Recovery Tube v2 (12)
Chapter 4 Prepare the template on the Ion Chef™ InstrumentPrepare the libraries and consumables4
56 Precision ID Panels with the Ion S5™ System Application Guide

• Ion S5™ Chef Solutions cartridge• Ion S5™ Precision ID Chef Reagents cartridge (from Step 1)
IMPORTANT! Before use, gently tap the Solutions and Reagents cartridges onthe bench to force the reagents to the bottoms of the tubes.
Note: When stored under normal conditions, a precipitate can form in sometubes of the Ion S5™ Precision ID Chef Reagents cartridge. If present, load thecartridge as directed – the precipitate dissolves when the reagents are mixedduring instrument operation.
Load the Ion Chef™ System
IMPORTANT!· Rated centrifuge speeds are only intended for operation with the provided buckets
and approved consumable chips, tubes, and sample preparation reagents.· The Chip-loading centrifuge is rated to operate at the listed rotational frequencies
with the chip buckets, chips, and adapters. The centrifuge must be load-balanced.Proper care must be taken to load the buckets properly. If excessive vibrations arise,check that items are installed properly and rotors are load-balanced.
· Use only the materials supplied in the Ion S5™ Precision ID Chef & Sequencing Kitto run the centrifuges at the rated speeds. Do not remove or change the rotors.Inspect the buckets before each use to assure normal operation.
· Confirm that the instrument is powered ON and has been cleaned following thelast use.
· Ensure all components are clean and dry before loading them onto the Ion Chef™
Instrument.· Ensure the Reagents and Solutions station compartments are free of condensate
before loading components.
Chapter 4 Prepare the template on the Ion Chef™ InstrumentLoad the Ion Chef™ System 4
Precision ID Panels with the Ion S5™ System Application Guide 57

Follow the procedure below to load the Ion Chef™ Instrument. A completely loadedinstrument is shown in the following figure:
A
B
C
D
E
F
G
H
1 2 3 4 5 6 7 8 9 10 11 12
4
530
CCBD02226
530
CCBD02226
5
3
8
12
6
7
9
1 Empty tip rack (move from new Tip Cartridge position)2 Frame Seal v23 New Tip Cartridge v24 PCR plate5 Ion S5™ Precision ID Chef Reagents cartridge6 Ion S5™ Precision ID Chef Solutions cartridge7 Recovery Tubes and Recovery Station Disposable Lid v28 Enrichment Cartridge v29 Chip Adapter/Chip assemblies
Chapter 4 Prepare the template on the Ion Chef™ InstrumentLoad the Ion Chef™ System4
58 Precision ID Panels with the Ion S5™ System Application Guide

1. Touch (Open Door) in the instrument touchscreen to open the instrumentdoor, then wait for the latch to open.
2. Lift the instrument door to the top of the travel until the latch mechanismengages.
1
1 Hold here, then lift
3. Load an empty pipette tip rack in the Used (Waste) Pipette Tip Position, thenchange gloves.
11
1 Used Pipette Tip Position
IMPORTANT!· Confirm that the pipette tip rack in the Used (Waste) Pipette Tip Position does
not contain any tips. The instrument will abort the run if tips are present in theused position.
· To prevent contamination, change gloves immediately after moving the emptypipette tip rack to the Used (Waste) Pipette Tip Position.
Note: A small amount of dried residue may be present in the tub of the emptypipette tip rack after a run. This will not affect the next run in the Used PipetteTip Position.
4. Unwrap a new Tip Cartridge v2 and remove the cover to expose the pipette tips,then load it in the New Pipette Tip Position.
Note: Two Ion Chef™ Piercing Tips are pre-loaded into tip positions G7 and H7on the Tip Cartridge v2.
Load the pipettetip racks and PCRplate
Chapter 4 Prepare the template on the Ion Chef™ InstrumentLoad the Ion Chef™ System 4
Precision ID Panels with the Ion S5™ System Application Guide 59

5. Slide the catch forward to allow the locking bracket to pivot upward. Load theTip Cartridge v2 into the New Pipette Tip Position, pull the bracket downward,then push the catch backward to lock the bracket and cartridge in place.
21
3
4
1 New Pipette Tip Position2 Bracket
3 Catch4 New Tip Cartridge
6. Load a new PCR plate into the thermal cycler sample block, then slide a newFrame Seal v2 under the automated heated cover.
IMPORTANT! When the Frame Seal v2 is positioned correctly, its tabs projectupward and contact the heated cover.
A
B
C
D
E
F
G
H
1 2 3 4 5 6 7 8 9 10 11 12
1
2
3
4
1 Thermal cycler sample block2 Well A13 Cover4 Keyed corner
IMPORTANT! Thaw the Reagents cartridge at room temperature for 45 minutesbefore use.
1. Gently tap the Ion S5™ Precision ID Chef Reagents cartridge on the bench to forcethe reagents to the bottoms of the tubes.
2. If bubbles are present below the surface of the liquid, repeat step 1.
Load the Reagentsand Solutionscartridges
Chapter 4 Prepare the template on the Ion Chef™ InstrumentLoad the Ion Chef™ System4
60 Precision ID Panels with the Ion S5™ System Application Guide

3. Load the cartridge into the Reagents station so that it snaps into place and is levelon the deck.
IMPORTANT! Do not force the Ion Chef™ cartridges into place. Each cartridgefits only one location on the deck and in one orientation. If a cartridge does notfit, confirm that you are loading the correct cartridge in the correct orientation.
A
B
C
D
E
F
G
H
1 2 3 4 5 6 7 8 9 10 11 12
12
1 Reagents station (4°C)2 Ion S5™ Precision ID Chef Reagents cartridge
4. Uncap, then load the two Library Sample Tubes, each containing 25 µL of dilutedlibrary, into Positions A and B on the Reagents cartridge.
A
B00012647
000122161
2
C 3
D 4
1 Position A (Library)2 Position B (Library)3 Position C (NaOH)4 Position D (Empty tube)
IMPORTANT!· Make sure to orient the sample tubes so that the barcodes are visible and
oriented to the right.· Make sure to remove the caps to the Library Sample Tubes before proceeding.· Because 200- and 400-base-read libraries require different run lengths, do not
load a 200-base-read library and 400-base-read library in a single Ion Chef™
run. Both libraries loaded in a run must have a similar read length.
Chapter 4 Prepare the template on the Ion Chef™ InstrumentLoad the Ion Chef™ System 4
Precision ID Panels with the Ion S5™ System Application Guide 61

5. Uncap both the tube of NaOH in Position C and the empty tube in Position D onthe Reagents cartridge.
IMPORTANT! When the Reagents cartridge is loaded:
· Press down on the Library Sample Tubes to ensure that they are firmly seatedin the cartridge.
· Confirm that all tubes are uncapped, including the tube at Position D.
6. Gently tap the Ion S5™ Precision ID Chef Solutions cartridge on the bench toforce the reagents to the bottoms of the tubes.
7. Load the Solutions cartridge into the Solutions station until it snaps into placeand is level on the deck.
A
B
C
D
E
F
G
H
1 2 3 4 5 6 7 8 9 10 11 12
1
2
1 Solutions station (room temperature)2 Ion S5™ Precision ID Chef Solutions cartridge
1. Load six Recovery Tubes (v2) into each Recovery centrifuge.
A
B
C
D
E
F
G
H
1 2 3 4 5 6 7 8 9 10 11 12
21
1 Recovery centrifuges2 Recovery Tube
Before sealing each centrifuge, confirm that:• The centrifuge is load-balanced with all required consumables.
IMPORTANT! The centrifuge must be load-balanced.
• The buckets are securely seated in the centrifuge rotors.• The buckets are oriented correctly in the centrifuge so that they pivot
outwards.
Load the RecoveryTubes andEnrichmentCartridge v2
Chapter 4 Prepare the template on the Ion Chef™ InstrumentLoad the Ion Chef™ System4
62 Precision ID Panels with the Ion S5™ System Application Guide

2. Place a Recovery Station Disposable Lid v2 over each centrifuge by lining up thetab with the depression on the deck, then snap into place. Ensure that the lidssnap completely into place by applying firm downward pressure along the lidperimeter.
3. Close the hinged cover of the Recovery centrifuges. Confirm that the port of eachdisposable lid is positioned toward the rear of the instrument.
1 32
4
4
1 Recovery Tubes installed2 Recovery Station Disposable Lids installed3 Recovery centrifuge cover closed4 Port
IMPORTANT!· Do not obstruct or place any object on top of the Recovery centrifuge cover.· Use only the supplied materials, including buckets and disposables, to run the
centrifuges at the rated speeds. Do not remove or change the rotors. Inspectthe buckets to assure normal operation before each use.
4. Load the Enrichment Cartridge v2, then press down on the cartridge to ensurethat it is level with the instrument deck.
IMPORTANT! Confirm that the Enrichment Cartridge v2 is loaded so that thelettering on the cartridge is right-side-up.
A
B
C
D
E
F
G
H
1 2 3 4 5 6 7 8 9 10 11 12
2
1
3
1 Enrichment station2 Enrichment Cartridge v23 Lettering
Chapter 4 Prepare the template on the Ion Chef™ InstrumentLoad the Ion Chef™ System 4
Precision ID Panels with the Ion S5™ System Application Guide 63
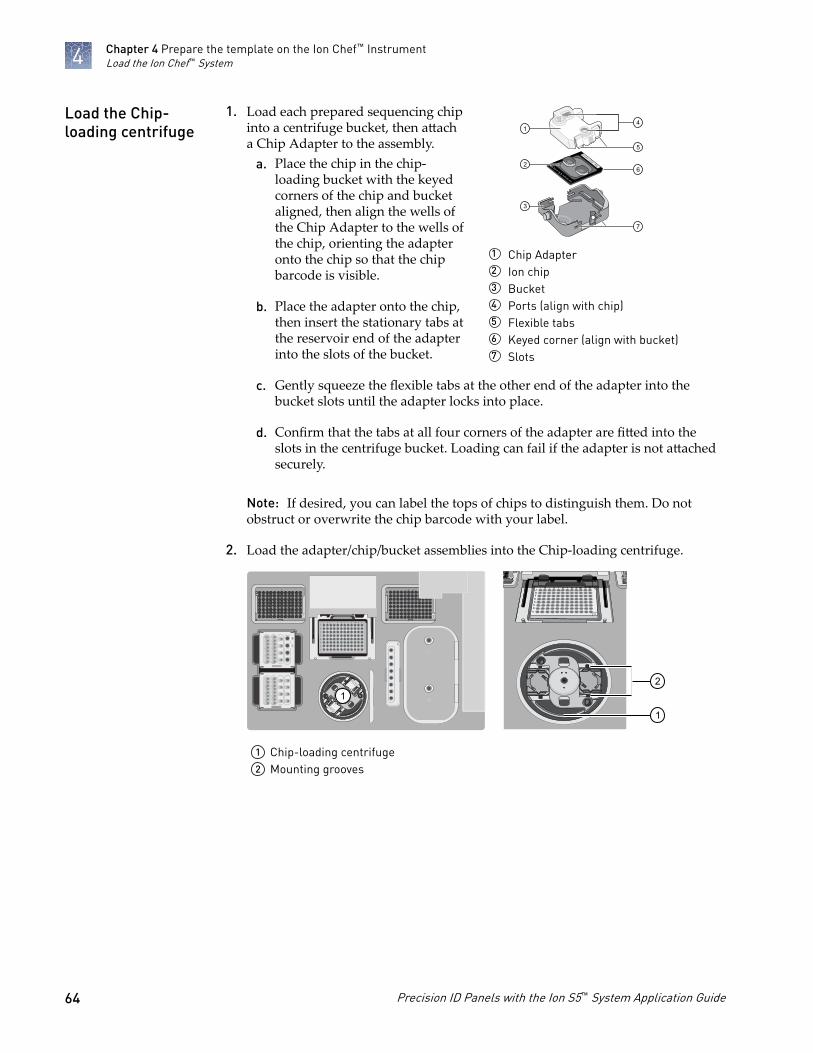
1. Load each prepared sequencing chipinto a centrifuge bucket, then attacha Chip Adapter to the assembly.
a. Place the chip in the chip-loading bucket with the keyedcorners of the chip and bucketaligned, then align the wells ofthe Chip Adapter to the wells ofthe chip, orienting the adapteronto the chip so that the chipbarcode is visible.
b. Place the adapter onto the chip,then insert the stationary tabs atthe reservoir end of the adapterinto the slots of the bucket.
c. Gently squeeze the flexible tabs at the other end of the adapter into thebucket slots until the adapter locks into place.
d. Confirm that the tabs at all four corners of the adapter are fitted into theslots in the centrifuge bucket. Loading can fail if the adapter is not attachedsecurely.
Note: If desired, you can label the tops of chips to distinguish them. Do notobstruct or overwrite the chip barcode with your label.
2. Load the adapter/chip/bucket assemblies into the Chip-loading centrifuge.
A
B
C
D
E
F
G
H
1 2 3 4 5 6 7 8 9 10 11 12
1
2530
CCBD02226
530
CCBD02226
1
1 Chip-loading centrifuge2 Mounting grooves
Load the Chip-loading centrifuge
530
CBDD
02226
1
2
3
6
5
7
4
1 Chip Adapter2 Ion chip3 Bucket4 Ports (align with chip)5 Flexible tabs6 Keyed corner (align with bucket)7 Slots
Chapter 4 Prepare the template on the Ion Chef™ InstrumentLoad the Ion Chef™ System4
64 Precision ID Panels with the Ion S5™ System Application Guide

IMPORTANT! When the Chip-loading centrifuge is loaded, confirm that eachChip Adapter is firmly attached to a bucket, and that the buckets are securelyseated in the centrifuge rotors.
530CCBD02226
530 CCBD02226
3
5
1
42
1
1 Chip barcode2 Chip position 13 Position 1 marker hole4 Chip position 25 Position 2 marker hole
Note: Position 1 of the Chip-loading centrifuge is the position 90° clockwisefrom the single hole in the rotor bucket cover at rest. The chip loaded inPosition 1 will be loaded with ISPs prepared from the DNA library in the LibrarySample Tube loaded in Position A of the Reagents cartridge. The chip loaded inPosition 2 of the centrifuge will be loaded with ISPs prepared from the DNAlibrary in the Library Sample Tube loaded in Position B of the Reagents cartridge.
3. Ensure the centrifuge is load-balanced, and the chip buckets are securely seatedand oriented correctly in the centrifuge so that they pivot 90° outwards whentouched. Then close the lid of the Chip-loading centrifuge.
IMPORTANT! Do not obstruct or place any object on top of the lid.
Chapter 4 Prepare the template on the Ion Chef™ InstrumentLoad the Ion Chef™ System 4
Precision ID Panels with the Ion S5™ System Application Guide 65

Before continuing:• Confirm that each cartridge is at the correct location and in the correct
orientation.• Press down on all cartridges to confirm that they are firmly pressed into place.• Confirm that all tubes in the Ion S5™ Precision ID Chef Reagents cartridge,
including the tube of NaOH in Position C, are uncapped and firmly pressed intoplace.
• Confirm that the centrifuge lids are installed correctly so that the port is orientedtoward the rear of the instrument.
• Confirm that the tube and chip buckets are seated securely in the rotor arms ofthe Chip-loading and Recovery centrifuges, and that the consumables theycontain are correctly installed.
CAUTION! To ensure correct and safe instrument operation, you must confirmthat all consumables are installed correctly to the deck before you start a run.The Ion Chef™ Instrument does not verify all aspects of the consumable setupprior to beginning each run.
You can set up an Ion Chef™ run to load asingle chip instead of two, using theIon Chef™ S5 Series Chip Balance loadedopposite to the sequencing chip in theChip-loading centrifuge. The Ion Chef™
S5 Series Chip Balance is provided in theIon S5™ Installation Kit.
Load the Ion Chef™ Instrument as youwould normally load the system. Forsingle chip loading, perform thefollowing steps:
1. Add the single diluted library to an Ion Chef™ Library Sample Tube, then loadthe tube into Position A of the Reagents cartridge.
2. Load an empty Ion Chef™ Library Sample Tube into Position B of the Reagentscartridge. Uncap both tubes.
3. Load the chip in Position 1 and the Ion Chef™ S5 Series Chip Balance in Position 2of the Chip-loading centrifuge.
IMPORTANT! Do not use Ion Chef™ 314, 316/318, or P-Series versions of the chipbalance with the Ion 520™ or Ion 530™ Chip. Each chip balance is weight-matchedto the chip (and corresponding chip adapter) specified on the chip balance label.
Confirm thatconsumables arecorrectly installed
Single chiploading workflow
Ion Chef™ S5 Series
Chip Balance
Ion Chef™ S5 Series Chip Balance
Chapter 4 Prepare the template on the Ion Chef™ InstrumentLoad the Ion Chef™ System4
66 Precision ID Panels with the Ion S5™ System Application Guide

Note: Position 1 of the Chip-loading centrifuge is the position 90° clockwisefrom the single hole in the rotor bucket cover at rest.
530DABD02226
Ion Chef™S5 Series
Chip Balance 1 3
4
2
1 Position 1 (chip)2 Position 2 marker holes3 Position 2 (Chip Balance)4 Position 1 marker holes
4. Resume the normal workflow in “Load the Chip-loading centrifuge“ at step 3.The Ion Chef™ Instrument detects the presence of the single chip during DeckScan before the run starts.
Chapter 4 Prepare the template on the Ion Chef™ InstrumentLoad the Ion Chef™ System 4
Precision ID Panels with the Ion S5™ System Application Guide 67

Start the Ion Chef™ run
1. Verify that you have loaded the instrument with all kits and consumables.
2. On the Ion Chef™ Instrument home touchscreen, touch Set up run.
3. Touch Step by Step to have the instrument lead you through the instrumentsetup, or touch Quick Start to skip the instrument setup screens.
Chapter 4 Prepare the template on the Ion Chef™ InstrumentStart the Ion Chef™ run4
68 Precision ID Panels with the Ion S5™ System Application Guide

4. Follow the on-screen instructions. When prompted, close the instrument door byfirst lifting it slightly to disengage the locking mechanism, then push down onthe door until the locks engage. After the door closes, the instrument visionsystem activates.
IMPORTANT! Do not close the door by pulling it straight down from the openposition. Lift the door slightly before you can close it. Verify that both sides of thedoor are locked after closing it.
12
3
1 Lift door first2 Lower3 Press down to lock
5. When prompted, touch Start check to start Deck Scan. Wait while the instrumentscans the barcodes of all consumables and reagents to verify their presence andcompatibility.During Deck Scan, the touchscreen can show warnings if the Ion Chef™
Instrument detects missing or incompatible consumables. Address all warningsbefore the run can start. After you address each condition, touch Yes to continue.
IMPORTANT! The Deck Scan function is not a substitute for manual inspectionof the reagents and consumables on the Ion Chef™ Instrument before starting arun. To ensure proper and safe instrument operation, verify that all consumablesare installed correctly before you continue.
6. When Deck Scan is complete, touch Next to display the Data Destination screen.
Chapter 4 Prepare the template on the Ion Chef™ InstrumentStart the Ion Chef™ run 4
Precision ID Panels with the Ion S5™ System Application Guide 69

7. Verify that the instrument displays the correct kit type, chip type, chip barcodes,and Planned Run. If the correct Planned Runs do not display, touch thedropdown list to select the Planned Run for each chip, then touch Next.
IMPORTANT! If the kit and chip type are not correct, verify that you are usingthe correct kit and chip. If you are using the correct kit and chip, and an incorrectkit or chip type appears on the screen, contact Technical Support.
8. On the Run Options screen, touch the appropriate option to complete the run,then enter the desired time of run completion, if needed.
The Ion Chef™ Instrument provides two options for obtaining quality control(QC) samples to evaluate templating efficiency.
By selecting You can obtain QC samples
Time immediately after the run ends, at the time you specify(13 hours, 8 minutes after run start).
Pause when the instrument pauses operation before the chiploading step (about 11 hours into the run).
Note: If you are unsure when you will sequence the loaded chip(s), select thePause option.
You can obtain unenriched samples from the corresponding Library SampleTubes at Positions A and B on the Reagents cartridge, or enriched samples fromPositions A and E on the Enrichment Cartridge v2.
Chapter 4 Prepare the template on the Ion Chef™ InstrumentStart the Ion Chef™ run4
70 Precision ID Panels with the Ion S5™ System Application Guide
9. On the Run Options screen, touch Start run to start the run.
Note: If you stop the run for any reason, touch Cancel, then touch Yes to verifythe cancelation.If the Ion Chef™ Instrument encounters a problem during the run, it aborts therun, then displays the error on the instrument touchscreen. If a run fails:
1. Remove the consumables from the deck, then clean the instrument. Ifpossible, retain the consumables for troubleshooting.
2. Reset, then reattempt the run. If the run fails again, contact TechnicalSupport to troubleshoot the problem.
10. Initialize the Ion S5™ or Ion S5™ XL Sequencer at least 40 minutes before theIon Chef™ System finishes chip loading.Initialization of the instrument can be performed up to 24 hours before starting asequencing run. If the intent is to perform two sequencing runs per initialization,the first run must be completed and the second run started in the 24-hour period.By initializing the sequencer before completion of chip loading, you ensure thatthe chips can be sequenced as soon as possible after loading is complete.
11. When the run is complete, unload the Ion Chef™ Instrument and sequence thechips immediately.
Note: If you cannot sequence a loaded chip immediately, place the chip into aseparate chip storage container, then store at 4°C until you are ready to sequenceit (up to 6–8 hours maximum).
Chapter 4 Prepare the template on the Ion Chef™ InstrumentStart the Ion Chef™ run 4
Precision ID Panels with the Ion S5™ System Application Guide 71

Unload the chips for sequencing
1. Open the instrument door:a. In the instrument touchscreen, touch (Open Door) then wait for the latch
to open.
b. Lift the instrument door to the top of the travel until the latch mechanismengages.
1
1 Hold here and lift
2. Remove the chip/bucket assemblies from the Chip-loading centrifuge. Removethe Chip Adapter from the chip, then discard the adapter. Carefully remove thechip from each bucket, then set the chips aside on a clean, static-free surface.Return the buckets to the Chip-loading centrifuge.
3. Close the instrument door by first lifting it slightly to disengage the lockingmechanism, then push down on the door until the locks engage.
IMPORTANT! Do not close the door by pulling it straight down from the openposition. Lift the door slightly before you can close it. Ensure that both sides ofthe door are locked after closing it.
12
3
1 Lift door first2 Lower3 Press down to lock
4. Load one or both chips into Ion S5™ Sequencers and promptly start thesequencing runs.
Note: Start sequencer initialization ahead of time so that the Ion S5™ Sequenceris ready to load when the Ion Chef™ Instrument run completes.
Chapter 4 Prepare the template on the Ion Chef™ InstrumentUnload the chips for sequencing4
72 Precision ID Panels with the Ion S5™ System Application Guide

Clean the Ion Chef™ System
The Ion Chef™ System includes an automated cleaning function that must beperformed following every run. The cleaning routine is initiated from the Ion Chef™
Instrument touchscreen and is designed to minimize potential contamination. Duringthe routine, the instrument irradiates the deck with ultraviolet light for 1 minute afterall consumables have been removed from the instrument.
IMPORTANT! Although the Ion Chef™ Instrument cleaning routine provides someprotection against contamination, it is not a substitute for good laboratory techniqueor precautions. When preparing DNA libraries for use or when preparing theIon Chef™ Instrument, make certain to observe sterile laboratory procedures at alltimes to ensure minimal contamination.
• Gloves, powder-free nitrile• Isopropanol, 70% solution• Wipes, lint-free
IMPORTANT! Clean the Ion Chef™ Instrument as described in the following pagesafter every run. To prevent contamination, do not operate the instrument unless it hasbeen recently cleaned.
4
5
3
2 1
8 7
6
Ion Chef™ Instrument stations1 Waste pipette tip position2 Empty Tip Cartridge v2: move to waste pipette tip station3 Thermal cycler sample block4 Reagents station5 Solutions station6 Recovery centrifuges7 Enrichment station8 Chip-loading centrifuge
About the cleaningprotocol
Materials required
Clean theIon Chef™
Instrument
Chapter 4 Prepare the template on the Ion Chef™ InstrumentClean the Ion Chef™ System 4
Precision ID Panels with the Ion S5™ System Application Guide 73

Remove and dispose of used consumables
IMPORTANT!· Do not discard the empty Tip Cartridge v2.· Make sure to transfer the QC samples before you remove and discard the Reagents
cartridge.
1. Touch (Open Door) in the instrument touchscreen, then wait for the latch toopen.
2. Lift the instrument door to the top of the travel until the latch mechanismengages.
1
1 Hold here, then lift
3. Remove, then discard the PCR plate from the thermal cycler sample block.
4. Remove, then discard the box of used pipette tips from the waste tip position.
IMPORTANT! Handle the disposable reservoir in the waste tip position withcare. During the run, liquid waste collects in the reservoir. Dispose of the liquidwaste by tipping the reservoir on one corner and pouring the waste into anappropriate waste container:
IMPORTANT! Do not reuse the waste pipette tip rack. Always move the emptyTip Cartridge v2 from the new tip position to the waste tip position.
5. Move the empty Tip Cartridge v2 to the waste tip position.
Chapter 4 Prepare the template on the Ion Chef™ InstrumentClean the Ion Chef™ System4
74 Precision ID Panels with the Ion S5™ System Application Guide

6. Remove, then discard the• Ion S5™ Precision ID Chef Reagents cartridge• Ion S5™ Precision ID Chef Solutions cartridge• Enrichment Cartridge v2
7. Remove, then discard the consumables from the Recovery centrifuges, includingthe:
• Recovery Station Disposable Lids v2• Recovery Tubes v2
8. Close the Chip-loading centrifuge cover.
Inspect and clean the Recovery centrifuges and buckets
1. Inspect the Recovery centrifuges, then clean the components if excess liquid ispresent.
Is liquidpresent? Action
No Go to “Start the cleaning“ on page 76.
Yes Clean the centrifuge bowl and buckets as described below.
IMPORTANT! Clean the Recovery centrifuges occasionally, onlywhen excess liquid is noticeable in the bowl and/or buckets. Youdo not need to clean the centrifuge after every run.
IMPORTANT! Wear powder-free, nitrile gloves when cleaning the Recoverycentrifuge.
2. Remove the buckets from the Recovery centrifuges. Clean the inside and outsideof each bucket using a lint-free wipe, then place the buckets on a clean, drysurface while you clean the centrifuge.
1
2
1 Bucket2 Lint-free wipe
Chapter 4 Prepare the template on the Ion Chef™ InstrumentClean the Ion Chef™ System 4
Precision ID Panels with the Ion S5™ System Application Guide 75

3. Use lint-free wipes to remove all fluid from inside the centrifuge bowl.
1
2
1 Inside rim of the centrifuge2 Bottom of the centrifuge bowls
4. Use lint-free wipes treated with 70% isopropanol to clean the:• Inside rim of the centrifuge.• Bottom of the centrifuge bowl.• Outside and inside of the centrifuge buckets.
5. Dry the centrifuge and buckets with lint-free wipes.
6. Install the centrifuge buckets, then close the Recovery centrifuge cover.
1
1 Buckets (cleaned and installed)
Start the cleaning
1. Close the instrument door by first lifting it up slightly to disengage the lockingmechanism, then pushing down on the door until the locks engage.
IMPORTANT! Before closing the door, ensure the covers of the Chip-loading andRecovery centrifuges are closed.
Chapter 4 Prepare the template on the Ion Chef™ InstrumentClean the Ion Chef™ System4
76 Precision ID Panels with the Ion S5™ System Application Guide

2. To start the cleaning, touch Next on the Ion Chef™ Instrument touchscreen thatappears after run completion.
Note: You can also clean the instrument at any time starting from the hometouchscreen. Touch Settings4Clean Ion Chef.
3. Confirm that you have removed all consumables from the Ion Chef™ Instrument,except the empty pipette tip rack in the waste tip position, then touch Next.
4. With the door closed, touch Start. The instrument performs a Deck Scan beforestarting the cleaning routine. The Ion Chef™ Instrument stops ventilation, thenilluminates the ultraviolet (UV) light in the instrument for ~1 minute.
CAUTION! The Ion Chef™ Instrument emits UV light at 254 nm. Wearappropriate eye wear, protective clothing, and gloves when working nearthe instrument. Do not look directly at the UV light while it is illuminatedduring the cleaning routine.
Chapter 4 Prepare the template on the Ion Chef™ InstrumentClean the Ion Chef™ System 4
Precision ID Panels with the Ion S5™ System Application Guide 77

Prepare the template on theIon OneTouch™ 2 Instrument
■ Software version requirements for template preparation . . . . . . . . . . . . . . . . . . . 78
■ Required materials from the Ion 520™ & Ion 530™ Kit – OT2 . . . . . . . . . . . . . . . 78
■ Create a Planned Run . . . . . . . . . . . . . . . . . . . . . . . . . . . . . . . . . . . . . . . . . . . . . . . . 79
■ Dilute the libraries for OT2 template preparation . . . . . . . . . . . . . . . . . . . . . . . . . 80
IMPORTANT! This chapter contains brief procedures for the HID workflow. Forcomplete instrument procedures, troubleshooting, and maintenance information, seethe Ion 520™ & Ion 530™ Kit – OT2 User Guide (Pub. No. MAN0010844), or the Ion S5™
and Ion S5™ XL Instrument User Guide (Pub. No. MAN0010811).
Software version requirements for template preparation
Panel Software version required
Precision ID Ancestry Panel Torrent Suite™ Software5.2.2
Precision ID Identity Panel
Precision ID mtDNA Control Region Panel
Precision ID mtDNA Whole Genome Panel
Required materials from the Ion 520™ & Ion 530™ Kit – OT2
The Ion 520™ & Ion 530™ Kit – OT2 (Cat. No. A27751) contains reagents for manuallypreparing templates for Precision ID SNP and mtDNA libraries with the Ion OneTouch™ 2Instrument.
Component Part No. Quantity per kit
Ion S5™ OT2 Supplies A27748 1 box
Ion 520™ & Ion 530™ OT2 Reagents A27749 1 box
Ion S5™ OT2 Solutions A27747 1 box
5
78 Precision ID Panels with the Ion S5™ System Application Guide

Create a Planned Run
Human Identification templates can be used to create Planned Runs for variousApplied Biosystems™ Precision ID panels. The templates pre-populate your PlannedRun with recommended parameters. You can then select additional settings to planyour run.
Note: It is not necessary to create a Planned Run before template preparation on theIon OneTouch™ 2 Instrument, however, you need to create a Planned Run beforestarting a sequencing run on the Ion S5™ or Ion S5™ XL Sequencer.
1. Sign in to the Torrent Server via the Torrent Browser.
2. Select Plan4Templates, then in the Favorites list, select Human Identification.
3. Select the Planned Run template appropriate to your panel and sequencer. Thewizard launches and displays the Plan page.
Note: All templates default to the Ion Chef™ Instrument.
4. Select the reference and BED files, enter the Sample names, confirm the defaultsettings, then enter a plan name.
Chapter 5 Prepare the template on the Ion OneTouch™ 2 InstrumentCreate a Planned Run 5
Precision ID Panels with the Ion S5™ System Application Guide 79

5. To verify or change kit information, click the Kits tab. Specify the appropriatelibrary, template and sequencing kits, and flow number and Barcode Set.
1
1 For the Precision ID SNP panels and the Precision ID mtDNA panels, choose500 Flows.
6. When you have completed your selections, click Plan Run at the bottom right ofthe Plan screen to save the run. The run is listed on the Planned Runs page underthe name that you specified.
Note: For more information, see the software user documentation, or see the Ion520™ & Ion 530™ Kit – OT2 User Guide (Pub. No. MAN0010844) or the HID SNPGenotyper Plugin User Guide (Pub. No. MAN0010641).
Dilute the libraries for OT2 template preparation
Ensure that sample library (or pooled sample libraries) has been previously diluted. Ifyou manually prepared the library, see page 32. If you prepared the library using theIon Chef™ Instrument, see page 48.To continue with the procedure, see the Ion 520™ & Ion 530™ Kit – OT2 User Guide(Pub. No. MAN0010844).
Chapter 5 Prepare the template on the Ion OneTouch™ 2 InstrumentDilute the libraries for OT2 template preparation5
80 Precision ID Panels with the Ion S5™ System Application Guide

Sequence on the Ion S5™ System
■ Software version requirements for sequencing . . . . . . . . . . . . . . . . . . . . . . . . . . . 81
■ Workflow: Sequencing on the Ion S5™ Sequencer . . . . . . . . . . . . . . . . . . . . . . . . 82
■ Ion S5™ System component positions . . . . . . . . . . . . . . . . . . . . . . . . . . . . . . . . . . . 82
■ Required sequencer cleanings . . . . . . . . . . . . . . . . . . . . . . . . . . . . . . . . . . . . . . . . . . 83
■ Before you begin . . . . . . . . . . . . . . . . . . . . . . . . . . . . . . . . . . . . . . . . . . . . . . . . . . . . . 83
■ Initialize the sequencer . . . . . . . . . . . . . . . . . . . . . . . . . . . . . . . . . . . . . . . . . . . . . . . . 84
■ Start the sequencing run . . . . . . . . . . . . . . . . . . . . . . . . . . . . . . . . . . . . . . . . . . . . . . . 86
This chapter contains brief procedures for sequencing HID libraries on the Ion S5™ orIon S5™ XL System. For complete instrument procedures, troubleshooting andmaintenance information, see Ion 520™ & Ion 530™ Kit – Chef User Guide(Pub. No. MAN0010846), and the Ion S5™ and Ion S5™ XL Instrument User Guide (Pub.No. MAN0010811).
IMPORTANT! The workflow for sequencing on the Ion S5™ Sequencer applies totemplates prepared manually or prepared on the Ion Chef™ Instrument. If youprepared your template using the Ion OneTouch™ 2 Instrument, see the Ion 520™ & Ion530™ Kit – OT2 User Guide (Pub. No. MAN0010844) for information regarding manualloading of Ion 520™ and Ion 530™ Chips with template-positive ISPs.
Software version requirements for sequencing
Panel Software version required
Precision ID Ancestry Panel Torrent Suite™ Software5.2.2
Precision ID Identity Panel
Precision ID mtDNA Control Region Panel
Precision ID mtDNA Whole Genome Panel
6
Precision ID Panels with the Ion S5™ System Application Guide 81
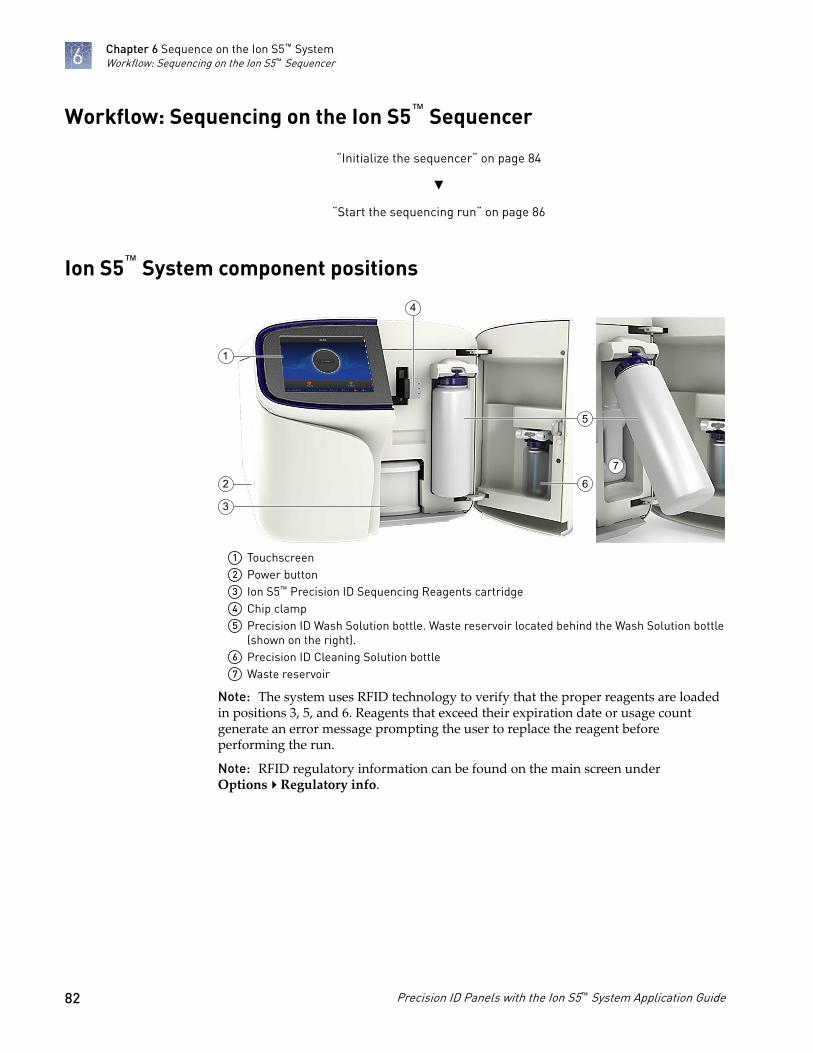
Workflow: Sequencing on the Ion S5™ Sequencer
“Initialize the sequencer“ on page 84
▼
“Start the sequencing run“ on page 86
Ion S5™ System component positions
7
2
3
5
6
4
1
1 Touchscreen2 Power button3 Ion S5™ Precision ID Sequencing Reagents cartridge4 Chip clamp5 Precision ID Wash Solution bottle. Waste reservoir located behind the Wash Solution bottle
(shown on the right).6 Precision ID Cleaning Solution bottle7 Waste reservoir
Note: The system uses RFID technology to verify that the proper reagents are loadedin positions 3, 5, and 6. Reagents that exceed their expiration date or usage countgenerate an error message prompting the user to replace the reagent beforeperforming the run.
Note: RFID regulatory information can be found on the main screen underOptions4Regulatory info.
Chapter 6 Sequence on the Ion S5™ SystemWorkflow: Sequencing on the Ion S5™ Sequencer6
82 Precision ID Panels with the Ion S5™ System Application Guide

Required sequencer cleanings
The Ion S5™ Sequencer and Ion S5™ XL Sequencer require cleaning beforeinitialization. Cleaning is normally performed automatically at the completion of theprevious sequencing run. When two sequencing runs are performed on a singleinitialization, the post-run cleaning is performed after the second sequencing run.However, if the "Enable post-run clean" checkbox is unchecked to allow a second run,and a second run is not performed, the instrument will not allow the subsequentinitialization to proceed until a manual cleaning has been performed. See “Perform amanual cleaning of the sequencer“ on page 93 for more information on how toperform a manual cleaning.
If an Ion S5™ Sequencer or an Ion S5™ XL Sequencer is initialized and a sequencingrun is not started within 24 hours, or a run is not started or completed due to a powerfailure or an abort, do not perform a manual cleaning. An instrument reset run isrequired before reinitialization. See “Perform an instrument reset run with aninitialized, unused Sequencing Reagents cartridge“ on page 94 for moreinformation.
Before you begin
The Ion S5™ and Ion S5™ XL Sequencers are equipped to verify the compatibility ofeach chip and consumable loaded during initialization and sequencing, and that thesecomponents do not exceed their expiration date. To avoid exceptions duringinitialization, inspect this information for each consumable before installing onto theinstrument.
• Unbox the Ion S5™ Precision ID Sequencing Reagents cartridge 45 minutes beforeuse, then allow it to equilibrate to room temperature.Do not remove the Ion S5™ Precision ID Sequencing Reagents cartridge from itsfoil packaging until immediately before loading, so that you can return theunused cartridge to storage if your sequencing run is delayed.
• Unbox the Precision ID Wash Solution bottle. Invert the bottle 5 times, then swirlat an angle to mix thoroughly.
• Remove the red cap from the Precision ID Wash Solution and Precision IDCleaning Solution bottles immediately before installing on the instrument.
Chapter 6 Sequence on the Ion S5™ SystemRequired sequencer cleanings 6
Precision ID Panels with the Ion S5™ System Application Guide 83

Initialize the sequencer
1. In the instrument touchscreen main menu, touch Initialize. The door, chip, andReagent cartridge clamps unlock.
2. When prompted, remove the Precision ID Wash Solution bottle to access thewaste reservoir, then remove and empty the waste reservoir.
3. Reinstall the empty waste reservoir.
4. Replace the expended Ion S5™ Precision ID Sequencing Reagents cartridge with anew cartridge equilibrated to room temperature.
Note: Dispose of used reagents appropriately.
Chapter 6 Sequence on the Ion S5™ SystemInitialize the sequencer6
84 Precision ID Panels with the Ion S5™ System Application Guide
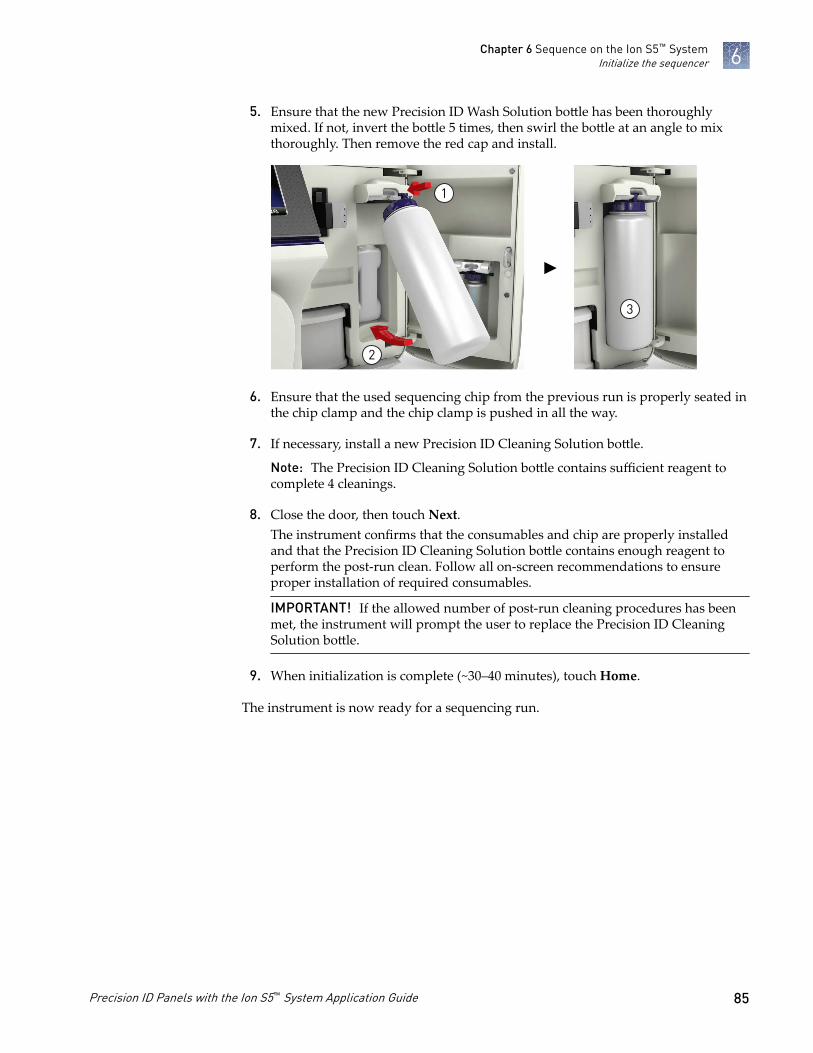
5. Ensure that the new Precision ID Wash Solution bottle has been thoroughlymixed. If not, invert the bottle 5 times, then swirl the bottle at an angle to mixthoroughly. Then remove the red cap and install.
1
2
3
6. Ensure that the used sequencing chip from the previous run is properly seated inthe chip clamp and the chip clamp is pushed in all the way.
7. If necessary, install a new Precision ID Cleaning Solution bottle.
Note: The Precision ID Cleaning Solution bottle contains sufficient reagent tocomplete 4 cleanings.
8. Close the door, then touch Next.The instrument confirms that the consumables and chip are properly installedand that the Precision ID Cleaning Solution bottle contains enough reagent toperform the post-run clean. Follow all on-screen recommendations to ensureproper installation of required consumables.
IMPORTANT! If the allowed number of post-run cleaning procedures has beenmet, the instrument will prompt the user to replace the Precision ID CleaningSolution bottle.
9. When initialization is complete (~30–40 minutes), touch Home.
The instrument is now ready for a sequencing run.
Chapter 6 Sequence on the Ion S5™ SystemInitialize the sequencer 6
Precision ID Panels with the Ion S5™ System Application Guide 85

Start the sequencing run
We recommend that you sequence loaded chips on the Ion S5™ or Ion S5™ XLSequencer as soon as possible after chip loading and instrument initialization arecomplete. However, successful sequencing runs can be started up to 24 hours afterinstrument initialization.
Note: Do not press the power button during a run. Interrupting power to theinstrument during a run may result in sequencing run failure and loss of sample.
1. After completion of initialization, press Run in the instrument touchscreen. Thedoor and chip clamp unlock.
2. Remove the used sequencing chip, then secure a chip loaded with template-positive Ion Sphere™ Particles in the chip clamp.
3. Push the chip clamp all the way in to engage, close the instrument door, thenpress Next.
4. Depending on your templating instrument, select or confirm your Planned Run.• Ion OneTouch™ 2 Instrument: In the dropdown list, select the Planned Run
that you created in the Torrent Suite™ Software, then press Review.
Note: You can also select Planned Run (none), then enter your runinformation on the following screen. We recommend selecting a predefinedPlanned Run.
• Ion Chef™ Instrument: Confirm that the correct Planned Run has auto-populated, then press Review.
5. (Optional) If this is to be the first of two sequencing runs on this initialization,deselect the Enable post-run clean checkbox, then press Review.
Note: When starting the second sequencing run on a single initialization, ensurethe Enable post-run clean checkbox is selected so that the post-run cleaning isperformed automatically.
Chapter 6 Sequence on the Ion S5™ SystemStart the sequencing run6
86 Precision ID Panels with the Ion S5™ System Application Guide

6. Confirm the pre-populated settings are correct, or make changes using thebuttons and dropdown lists if necessary.
7. Confirm that the instrument door is closed, then press Start run to begin thesequencing run.
IMPORTANT! During a run, do not open the instrument door, and avoidtouching the instrument. Touching the instrument during the sequencing runmay reduce the quality of the measurements.
When the sequencing run is complete, the instrument automatically performs thecleaning procedure unless the Enable post-run clean checkbox was deselected.After cleaning, the touchscreen returns to the main menu. Use the TorrentBrowser to review the results.
Chapter 6 Sequence on the Ion S5™ SystemStart the sequencing run 6
Precision ID Panels with the Ion S5™ System Application Guide 87

Analyze the sequencing results
Related documentation for data analysis
For information about how toanalyze See
Precision ID SNP panels HID SNP Genotyper Plugin User Guide(Pub. No. MAN0010641)
Precision ID mtDNA panels Precision ID mtDNA Panel Analysis User Guide(Pub. No. MAN0015910)
7
88 Precision ID Panels with the Ion S5™ System Application Guide

Troubleshooting
This appendix contains brief information for troubleshooting manual librarypreparation.
For complete troubleshootinginformation about See
Library preparation on theIon Chef™ Instrument
Ion AmpliSeq™ Library Preparation on the Ion Chef™
System User Guide (Pub. No. MAN0013432)
Template preparation on theIon Chef™ Instrument andsequencing on the Ion S5™
Sequencer
Ion 520™ & Ion 530™ Kit – Chef User Guide(Pub. No. MAN0010846)
Template preparation on theIon OneTouch™ 2 Instrument
Ion 520™ & Ion 530™ Kit – OT2 User Guide (Pub. No.MAN0010844 )
Ion OneTouch™ 2 System User Guide(Pub. No. MAN0014388)
Sequencing on the Ion S5™
InstrumentIon S5™ and Ion S5™ XL Instrument User Guide(Pub. No. MAN0010811)
Manual library preparation
Observation Possible cause Recommended action
The library concentration isless than recommended
Input DNA was inaccuratelyquantified.
Re-quantify input DNA using one of theQuantifiler™ kits. See “Genomic DNAquantification kits“ on page 18.
Residual ethanol in sampleDNA inhibited targetamplification.
Carefully remove all drops, using an additionalcentrifugation and removal step, if necessary.
Less than 1 ng of input DNAwas used.
Add more DNA or add up to 4 targetamplification cycles.
PCR, digestion, or ligation wasinefficient.
Ensure proper dispensing and mixing ofviscous components at each step.
AMPure™ XP Beads were over-dried.
Do not dry the AMPure™ XP Beads for morethan 10 minutes. If the bead surface appearscracked, then either continue with the protocol,and expect a higher percentage of low qualityDNA, or repeat the library preparation.
Amplicons are lost The library was poorly purified. Vortex the AMPure™ XP Reagent thoroughlybefore use, and dispense the full volume.
A
Precision ID Panels with the Ion S5™ System Application Guide 89

Observation Possible cause Recommended action
Amplicons are lost Increase the AMPure™ XP Reagent volumefrom 1.5X to 1.7X. See “Purify the libraries“ onpage 27.
Denaturation of the digestedamplicon occurred.
Verify the use of the 60°C/20-minutetemperature incubation during the primerdigestion step. See “Partially digestamplicons“ on page 25.
Barcoded libraryrepresentation is uneven
Library was inaccuratelyquantified.
Ensure that the sample library concentrationsare within the control library concentrationrange (within the standard curve) as measuredby qPCR.
Libraries were inaccuratelycombined. Dilute the libraries to the target concentration,
then combine equal volumes.
Uniformity is poor, AT-richamplicons are under-represented
PCR was inefficient. Double the anneal and extend time.
Low key signal (<60%)The key signal is thepercentage of live ISPs with akey signal that is identical tothe library key signal. Low keysignal indicates incorrect signalprocessing.
• An error occurred duringlibrary preparation and/orsequencing.
• Barcode adapters did notligate properly duringlibrary preparation, so nokey is available tosequence.
• Sequencing flow and rawsignal acquisition errorsoccurred.
Re-start procedure from library preparation.
Percentage of test fragmentISPs is low (significantly <<1%)
Test fragment was not added,or another error occurredduring Ion Chef™ templatepreparation.
Repeat Ion Chef™ template preparation.
Percentage of adapter dimerISPs is high (>1%)
Increased chip loadingobserved, but subsequentlylower total reads because theadapter dimers will be filteredout.
The unamplified library wasinefficiently purified.
Decrease the AMPure™ XP Reagent volumefrom 1.5X to 1.0X. See “Purify the libraries“ onpage 27.
Barcode adapter dimerformation occurred.
Do not combine Switch Solution, dilutedbarcode adapter mix, and DNA ligase beforeadding to the ligation reaction.
The barcode adapterconcentration was too high.
Ensure that barcode adapters are dilutedproperly.
High polyclonal ISPs (>40%) The library input for templatepreparation was too high.
Decrease the amount of sample library fortemplating preparation by 50%.
The library was inaccuratelyquantified.
Re-quantify library to ensure accuratequantification.
The TDF was incorrectlycalculated.
Ensure that the TDF is calculated correctly.
Appendix A TroubleshootingManual library preparationA
90 Precision ID Panels with the Ion S5™ System Application Guide

Observation Possible cause Recommended action
Low ISP loading (<50%) andhigh enrichment (>90%)
The liquid was not removedafter the chip check.
Use a pipette to remove as much liquid aspossible. Place the chip upside down in acentrifuge bucket, then perform a 5-secondcentrifugation with the chip tab pointinginward.
Too much liquid is remaining inthe chip after loading.
Perform a 5-second centrifugation with thechip tab pointing outward and remove anyliquid. If some liquid remains in the chip afterthe centrifugation, lightly and rapidly tap thepoint of the chip tab against the benchtop a fewtimes, then remove any liquid. Do NOTcentrifuge the chip upside-down.
Percentage of low quality ISPsis high (>40%)Increased chip loadingobserved, but low quality ISPsare filtered, resulting in lowertotal reads and lower coverage.
Library input was low. Double the volume of library used in templatepreparation.
Use a fresh dilution of library prepared in alow-bind tube.
Library quality was low. Re-prepare library starting from re-quantifiedDNA.
ISP loading is low (<40%), andpercentage of low quality ISPsis high (>60%)
Library input was low. Increase the amount of sample library intemplate preparation.
The library was inaccuratelyquantified.
Ensure that qPCR quantification is performedcorrectly.
The TDF was incorrectlycalculated.
Ensure that the TDF is calculated correctly.
Library quality was low. Re-prepare library starting from re-quantifiedDNA.
Extremely low ISP loading(<30%), then sequencing failure
The sequencing primer stepwas omitted.
If no template-positive, enriched ISPs weresaved, start over at template preparation.
The sequencing polymerasestep was omitted.
If no template-positive, enriched ISPs weresaved, start over at template preparation.
There was no recovery of ISPsafter enrichment.
Confirm OT2 and ES operated correctly. Verifythe quantity and quality of the library that wentinto the OT2 amplification solution. Ensure that~200 μL was present in the 0.2‑mL PCRcollection tube after the ES run completed.
Read histogram is atypicalSample results are atypical.
Quality of DNA used in librarypreparation was poor.
Re-isolate genomic DNA.
Proceed with analysis, but expect dropoutsand/or lower total coverage and imbalancedprofile if sample is known to be degraded or tocontain inhibitors.
Amount of library used intemplate preparation was low.
Double the library input used in templatepreparation.
Percentage of total alignedbases is low (<95%)Expect lower total reads andcoverage
Sample was contaminated withnon-human DNA or inhibitors.
Re-extract DNA to remove inhibitors.
Remove source of contaminating DNA.
Non-specific amplificationoccurred caused by excessivenumber of PCR cycles.
Reduce the number of PCR amplificationcycles used in library preparation.
Appendix A TroubleshootingManual library preparation A
Precision ID Panels with the Ion S5™ System Application Guide 91

Observation Possible cause Recommended action
Percentage of total alignedbases is low (<95%)Expect lower total reads andcoverage
Incorrect reference library wasused.
Use the correct reference library (hg19).
Mean raw accuracy is low(<95%)Extremely low accuracyindicates a sequencing issue.
Incorrect kits were used intemplate preparation, orsequencing reaction.
Use the correct kits, starting with templatepreparation, ensuring that correct Precision IDkits are used.
pH of buffers (determinedduring sequencer initialization)was incorrect.
Use the correct sequencing kit.
Do not store kit components near dry ice.
Incorrect reference library wasused.
Use the correct reference library (hg19).
Appendix A TroubleshootingManual library preparationA
92 Precision ID Panels with the Ion S5™ System Application Guide

Supplemental procedures
Perform a manual cleaning of the sequencer
A cleaning protocol is normally performed automatically at the completion of eachsequencing run. In the event that a cleaning is necessary, follow the listed steps:
1. On the home screen, select Settings4Clean Instrument.The instrument door unlocks allowing access to the consumables.
2. Remove the Precision ID Wash Solution bottle to access the waste reservoir, thenremove and empty the waste reservoir.
1
2
3
3. Reinstall the empty waste reservoir and a used Precision ID Wash Solution bottle.
4. Ensure the Ion S5™ Precision ID Sequencing Reagents cartridge and Precision IDWash Solution bottle are properly installed.
IMPORTANT! Perform the cleaning with a used reagent cartridge and washsolution bottle installed. The cleaning procedure pumps cleaning solution intothe wash solution bottle and reagent cartridge making them unsuitable forsequencing.
5. Place a used sequencing chip in the chip clamp, then push the chip clamp in allthe way to engage.
6. Close the instrument door, then press Next.Cleaning takes ~35 minutes to complete. Upon completion the instrument doorautomatically unlocks and the chip and cartridge clamps disengage.
7. Proceed to “Initialize the sequencer“ on page 84.
B
Precision ID Panels with the Ion S5™ System Application Guide 93

Perform an instrument reset run with an initialized, unusedSequencing Reagents cartridge
Cleaning is normally performed at completion of a sequencing run automatically. Ifan Ion S5™ Sequencer or an Ion S5™ XL Sequencer is initialized and
• a sequencing run is not started within 24 hours after initialization, or• a sequencing run is not completed due to a power failure or an abort, and <200flows occurred before the stoppage
an instrument reset run is required to ensure proper cleaning before reinitialization.Do NOT perform a manual cleaning with an unused, initialized Ion S5™ Precision IDSequencing Reagents cartridge.
Note:· If a power failure or abort occurs during the second of two runs started after a
single initialization, a manual cleaning (page 93) is sufficient.· If the number of flows that occurred before a power failure or abort is unknown,
perform an instrument reset run.
To perform an instrument reset run, use the following procedure beforereinitialization:
1. In the instrument touchscreen main menu, press Run.The instrument door and chip clamp unlocks.
2. Ensure that a used sequencing chip is in the chip clamp, then push the chipclamp in all the way to engage.
3. Close the instrument door, then press Next.
4. When prompted, select Planned Run (none). Ensure that the Enable post-runclean checkbox is selected, then press Review.
5. In the Select Run screen, press Edit, then in the Detail screen set the number offlows to 200 manually. Ensure that the Post-Run/Clean checkbox is selected, thenpress Close.
6. Press Start run, then press Accept to confirm that Post-Run Clean is enabled, andto start the run.
When the instrument reset run completes, the instrument automatically performs thecleaning procedure. After cleaning, the touchscreen returns to the main menu.
Appendix B Supplemental proceduresPerform an instrument reset run with an initialized, unused Sequencing Reagents cartridgeB
94 Precision ID Panels with the Ion S5™ System Application Guide
Safety
WARNING! GENERAL SAFETY. Using this product in a manner not specifiedin the user documentation may result in personal injury or damage to theinstrument or device. Ensure that anyone using this product has receivedinstructions in general safety practices for laboratories and the safetyinformation provided in this document.
· Before using an instrument or device, read and understand the safetyinformation provided in the user documentation provided by themanufacturer of the instrument or device.
· Before handling chemicals, read and understand all applicable Safety DataSheets (SDSs) and use appropriate personal protective equipment (gloves,gowns, eye protection, etc). To obtain SDSs, see the “Documentation andSupport” section in this document.
C
Precision ID Panels with the Ion S5™ System Application Guide 95

Chemical safety
WARNING! GENERAL CHEMICAL HANDLING. To minimize hazards,ensure laboratory personnel read and practice the general safety guidelines forchemical usage, storage, and waste provided below. Consult the relevant SDSfor specific precautions and instructions:
· Read and understand the Safety Data Sheets (SDSs) provided by thechemical manufacturer before you store, handle, or work with any chemicalsor hazardous materials. To obtain SDSs, see the “Documentation andSupport” section in this document.
· Minimize contact with chemicals. Wear appropriate personal protectiveequipment when handling chemicals (for example, safety glasses, gloves, orprotective clothing).
· Minimize the inhalation of chemicals. Do not leave chemical containers open.Use only with adequate ventilation (for example, fume hood).
· Check regularly for chemical leaks or spills. If a leak or spill occurs, followthe manufacturer's cleanup procedures as recommended in the SDS.
· Handle chemical wastes in a fume hood.· Ensure use of primary and secondary waste containers. (A primary waste
container holds the immediate waste. A secondary container contains spillsor leaks from the primary container. Both containers must be compatiblewith the waste material and meet federal, state, and local requirements forcontainer storage.)
· After emptying a waste container, seal it with the cap provided.· Characterize (by analysis if necessary) the waste generated by the particular
applications, reagents, and substrates used in your laboratory.· Ensure that the waste is stored, transferred, transported, and disposed of
according to all local, state/provincial, and/or national regulations.· IMPORTANT! Radioactive or biohazardous materials may require special
handling, and disposal limitations may apply.
Appendix C SafetyChemical safetyC
96 Precision ID Panels with the Ion S5™ System Application Guide

Biological hazard safety
WARNING! BIOHAZARD. Biological samples such as tissues, body fluids,infectious agents, and blood of humans and other animals have the potential totransmit infectious diseases. Conduct all work in properly equipped facilitieswith the appropriate safety equipment (for example, physical containmentdevices). Safety equipment can also include items for personal protection, suchas gloves, coats, gowns, shoe covers, boots, respirators, face shields, safetyglasses, or goggles. Individuals should be trained according to applicableregulatory and company/ institution requirements before working withpotentially biohazardous materials. Follow all applicable local, state/provincial,and/or national regulations. The following references provide generalguidelines when handling biological samples in laboratory environment.
· U.S. Department of Health and Human Services, Biosafety in Microbiologicaland Biomedical Laboratories (BMBL), 5th Edition, HHS Publication No. (CDC)21-1112, Revised December 2009; found at:www.cdc.gov/biosafety/publications/bmbl5/BMBL.pdf
· World Health Organization, Laboratory Biosafety Manual, 3rd Edition,WHO/CDS/CSR/LYO/2004.11; found at:www.who.int/csr/resources/publications/biosafety/Biosafety7.pdf
Appendix C SafetyBiological hazard safety C
Precision ID Panels with the Ion S5™ System Application Guide 97

Documentation and support
Related documentation
Document Publication number
Data analysis
HID SNP Genotyper Plugin User Guide MAN0010641
Precision ID mtDNA Panel Analysis User Guide MAN0015910
Manual library preparation
HID-Ion AmpliSeq™ Library Preparation Quick Reference MAN0010638
IonCode™ Barcode Adapters 1–384 Kit Product InformationSheet
MAN0014640
Automated library preparation on the Ion Chef™ System
Ion AmpliSeq™ Library Preparation on the Ion Chef™ SystemUser Guide
MAN0013432
Ion AmpliSeq™ Library Preparation on the Ion Chef™ SystemQuick Reference
MAN0013433
Template preparation on the Ion Chef™ System for S5
Ion 520™ & Ion 530™ Kit – Chef User Guide MAN0010846
Template preparation on the Ion OneTouch™ 2 Instrument for S5
Ion 520™ & Ion 530™ Kit – OT2 User Guide MAN0010844
98 Precision ID Panels with the Ion S5™ System Application Guide

Customer and technical support
For support:• In North America—Send an email to [email protected], or
call 888-821-4443 option 1.• Outside North America—Contact your local support office.• For latest services and support information for all locations, go to thermofisher.com/support.
Limited product warranty
Life Technologies Corporation and/or its affiliate(s) warrant their products as set forthin the Life Technologies' General Terms and Conditions of Sale found on LifeTechnologies' website at www.thermofisher.com/us/en/home/global/terms-and-conditions.html. If you have any questions, please contact LifeTechnologies at www.thermofisher.com/support.
Documentation and supportCustomer and technical support
Precision ID Panels with the Ion S5™ System Application Guide 99

thermofisher.com/support | thermofisher.com/askaquestion
thermofisher.com
19 July 2017