predathor vuoto predathor plus predathor … pneumatic air speargun... · manuale d’uso deve...
TRANSCRIPT
PREDATHOR VUOTO
PREDATHOR PLUS
PREDATHOR
VUOTO AIR
VINTAIR PLUS
VINTAIR
ISTRUZIONI - FUCILI SUBACQUEI AD ARIA COMPRESSAINSTRUCTIONS - PNEUMATIC AIR SPEARGUNS
INDEX
1 - INTRODUZIONE
2 - AVVERTENZE GENERALI
3 - PRINCIPI DI FUNZIONAMENTO DEI FUCILI AD ARIA COMPRESSA
4 - ISTRUZIONI FUCILI AD ARIA COMPRESSA GAMMA PREDATHOR
5 - ISTRUZIONI FUCILI AD ARIA COMPRESSA GAMMA VINTAIR
6 - IMPORTANTI RACCOMANDAZIONI UTILI A PREVENIRE E ALLONTANARE I RISCHI DI INCIDENTE NELL’USO DEL FUCILE PNEUMATICO
7 - CURA E MANUTENZIONE
8 - CERTIFICATO DI GARANZIA
9 - DISEGNI ED ILLUSTRAZIONI
5
5
5
6
8
10
10
11
20
IT
1 - INTRODUCTION
2 - GENERAL REMARKS
3 - PRINCIPLES OF OPERATING OF AIR SPEARGUNS
4 - INSTRUCTIONS - PNEUMATIC AIR SPEARGUNS PREDATHOR
5 - INSTRUCTIONS - PNEUMATIC AIR SPEARGUNS VINTAIR
6 - IMPORTANT RECOMMENDATIONS TO PREVENT THE RISKS OF ACCIDENTS USING AIR SPEARGUN
7 - CARE AND MAINTENANCE 8 - WARRANTY CERTIFICATE
9 - DRAWINGS AND ILLUSTRATIONS
13
13
13
14
16
18
18
19
20
EN
INDICE
3
IT
FUC
ILI S
UB
AC
QU
EI A
D A
RIA
CO
MP
RES
SA
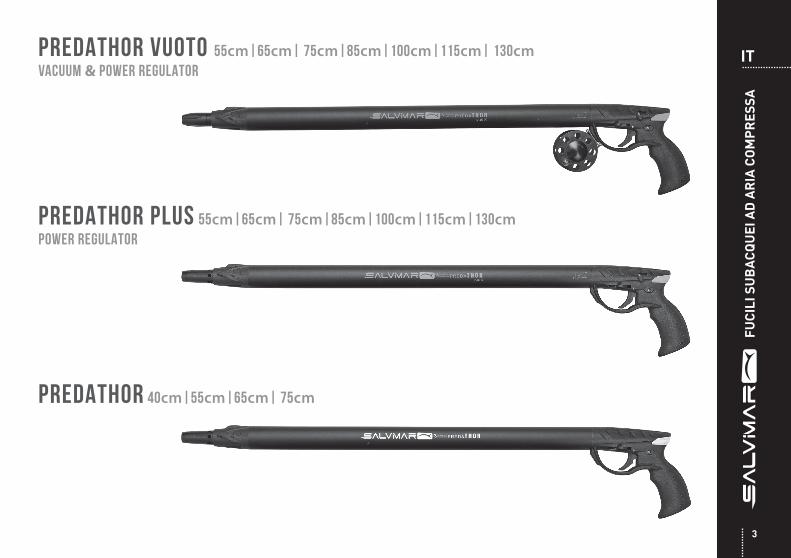
PREDAThOR VUOTO 55cm|65cm| 75cm|85cm|100cm|115cm| 130cmVACUUM & POWER REGULATOR
PREDAThOR PLUS 55cm|65cm| 75cm|85cm|100cm|115cm|130cmPOWER REGULATOR
PREDAThOR 40cm|55cm|65cm| 75cm

4
IT
FUC
ILI S
UB
AC
QU
EI A
D A
RIA
CO
MP
RES
SA
VUOTO AIR 50cm|65cm| 75cm|85cm|100cmVACUUM & POWER REGULATOR
VINTAIR PLUS 50cm|65cm| 75cm|85cm|100cmPOWER REGULATOR
VINTAIR 35cm | 50cm | 65cm | 75cm
5
IT
FUC
ILI S
UB
AC
QU
EI A
D A
RIA
CO
MP
RES
SA
1 - FUCILI SUBACQUEI AD ARIA COMPRESSA - SALVIMAR
ATTENZIONE - LEGGERE ATTENTAMENTE IL PRESENTE MANUALE DI ISTRUZIONI PRIMA DELL’USO E CONSERVARLO.
Grazie per aver preferito un prodotto completamente progettato e sviluppato in Italia.La Salvimar è impegnata da oltre 50 anni nella produzione di attrezzature per la pesca in apnea, ogni giorno i nostri responsabili del prodotto ed i membri del Team lavorano per testare i prodotti fino al limite e per migliorarli. Nell’intento di offrire sempre il miglior prodotto possibile, la Salvimar si riserva di apportare modifiche o migliorie al prodotto.
Leggere l’intero manuale d’uso prima di utilizzare questa attrezzatura! Il manuale d’uso deve essere conservato per tutta la vita del prodotto.
2 - AVVERTENZE GENERALI
- Prima di utilizzare il fucile subacqueo è necessario essere a conoscenza di ogni norma riguardo la sicurezza. Seguire con attenzione quanto riportato sul libretto istruzioni e attenersi scrupolosamente alle normative nazionali e locali vigenti in materia; nella fattispecie riguardo il limite d’età minimo Indicato per l’utilizzo, il comportamento durante l’uso e il trasporto, le zone permesse, i dispositivi di segnalazione etc... L’utilizzo improprio dell’ attrezzature subacquee e in particolar modo del fucile, può essere pericoloso e può causare gravi incidenti, anche mortali, per il subacqueo ed i suoi accompagnatori. - Durante l’assemblaggio e la messa a punto del fucile pneumatico, sono stati attuati tutti gli accorgimenti possibili per fornire un prodotto altamente affidabile nel tempo, - Tali accorgimenti possono essere resi inefficienti qualora l’utente non utilizzi iI fucile pneumatico, in maniera corretta e non provveda ad una adeguata manutenzione. - La SALVIMAR - declina ogni responsabilità per qualsiasi problema derivante dalla mancata osservanza delle raccomandazioni riportate nel presente manuale. - Per qualsiasi altro problema potete rivolgervi al vostro negoziante di fiducia o direttamente alla SALVIMAR- Per garantirvi la massima sicurezza ogni intervento di riparazione o manutenzione deve essere svolto unicamente da laboratori autorizzati dalla SALVIMAR.- La semplicità meccanica e di funzionamento permette una manutenzione estremamente semplice. - Se non siete esperti nell’uso di questo fucile pneumatico, vi consigliamo
di familiarizzare con il suo funzionamento durante immersioni di prova in bassa profondità e condizioni ambientali favorevoli.
2.1 - RICERCA E SVILUPPO FUCILI AD ARIA SALVIMAR
I fucili ad aria SALVIMAR sono il frutto di anni di ricerca sulle caratteristiche tecnico/costruttive di vari materiali quali le leghe leggere e le resine sintetiche e, grazie alla collaborazione con vari esperti del settore, quali tecnici aereonavali, esperti balistici, studiosi di ergonomie applicate, professionisti della pesca subacquea e designer, abbiamo realizzato un prodotto che riteniamo di alta qualità e adatto ad usi sportivo/competitivi. Ogni singolo componente è stato studiato nei particolari per offrire caratteristiche uniche nel suo genere, Abbiamo curato e tenuto in considerazione ogni aspetto e componente per realizzare un prodotto che sia in grado di stupirvi per maneggevolezza, precisione, affidabilità e robustezza.
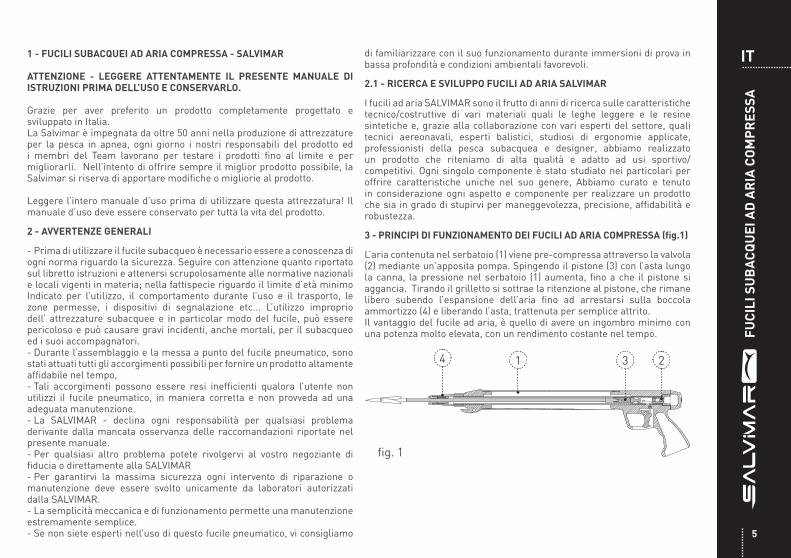
3 - PRINCIPI DI FUNZIONAMENTO DEI FUCILI AD ARIA COMPRESSA (fig.1)
L’aria contenuta nel serbatoio (1) viene pre-compressa attraverso la valvola (2) mediante un’apposita pompa. Spingendo il pistone (3) con l’asta lungo la canna, la pressione nel serbatoio (1) aumenta, fino a che il pistone si aggancia. Tirando il grilletto si sottrae la ritenzione al pistone, che rimane libero subendo l’espansione dell’aria fino ad arrestarsi sulla boccola ammortizzo (4) e liberando l’asta, trattenuta per semplice attrito. Il vantaggio del fucile ad aria, è quello di avere un ingombro minimo con una potenza molto elevata, con un rendimento costante nel tempo.
4 1 3 2
fig. 1
6
IT
FUC
ILI S
UB
AC
QU
EI A
D A
RIA
CO
MP
RES
SA
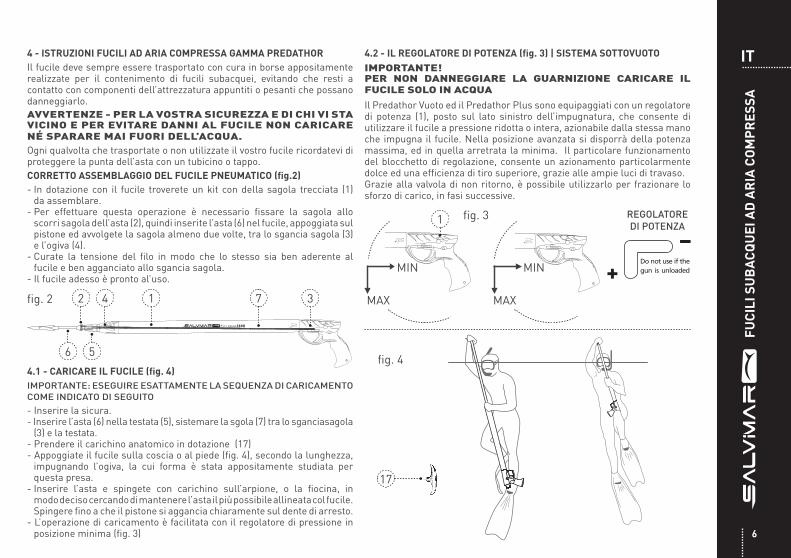
4 - ISTRUZIONI FUCILI AD ARIA COMPRESSA GAMMA PREDATHORIl fucile deve sempre essere trasportato con cura in borse appositamente realizzate per il contenimento di fucili subacquei, evitando che resti a contatto con componenti dell’attrezzatura appuntiti o pesanti che possano danneggiarlo. AVVERTENZE - PER LA VOSTRA SICUREZZA E DI CHI VI STA VICINO E PER EVITARE DANNI AL FUCILE NON CARICARE NÉ SPARARE MAI FUORI DELL’ACQUA.Ogni qualvolta che trasportate o non utilizzate il vostro fucile ricordatevi di proteggere la punta dell’asta con un tubicino o tappo.CORRETTO ASSEMBLAGGIO DEL FUCILE PNEUMATICO (fig.2)- In dotazione con il fucile troverete un kit con della sagola trecciata (1) da assemblare.- Per effettuare questa operazione è necessario fissare la sagola allo scorri sagola dell’asta (2), quindi inserite l’asta (6) nel fucile, appoggiata sul pistone ed avvolgete la sagola almeno due volte, tra lo sgancia sagola (3) e l’ogiva (4).- Curate la tensione del filo in modo che lo stesso sia ben aderente al fucile e ben agganciato allo sgancia sagola.- Il fucile adesso è pronto al’uso.
4.1 - CARICARE IL FUCILE (fig. 4)IMPORTANTE: ESEGUIRE ESATTAMENTE LA SEQUENZA DI CARICAMENTO COME INDICATO DI SEGUITO
- Inserire la sicura.- Inserire l’asta (6) nella testata (5), sistemare la sgola (7) tra lo sganciasagola (3) e la testata.- Prendere il carichino anatomico in dotazione (17) - Appoggiate il fucile sulla coscia o al piede (fig. 4), secondo la lunghezza, impugnando l’ogiva, la cui forma è stata appositamente studiata per questa presa.- Inserire l’asta e spingete con carichino sull’arpione, o la fiocina, in modo deciso cercando di mantenere l’asta il più possibile allineata col fucile. Spingere fino a che il pistone si aggancia chiaramente sul dente di arresto.- L’operazione di caricamento è facilitata con il regolatore di pressione in posizione minima (fig. 3)
4.2 - IL REGOLATORE DI POTENZA (fig. 3) | SISTEMA SOTTOVUOTOIMPORTANTE!PER NON DANNEGGIARE LA GUARNIZIONE CARICARE IL FUCILE SOLO IN ACQUA
Il Predathor Vuoto ed il Predathor Plus sono equipaggiati con un regolatore di potenza (1), posto sul lato sinistro dell’impugnatura, che consente di utilizzare il fucile a pressione ridotta o intera, azionabile dalla stessa mano che impugna il fucile. Nella posizione avanzata si disporrà della potenza massima, ed in quella arretrata la minima. Il particolare funzionamento del blocchetto di regolazione, consente un azionamento particolarmente dolce ed una efficienza di tiro superiore, grazie alle ampie luci di travaso.Grazie alla valvola di non ritorno, è possibile utilizzarlo per frazionare lo sforzo di carico, in fasi successive.
17
fig. 4
fig. 31
MIN
MAX
MIN
MAX1 32fig. 2 4
6 5
7
REGOLATORE DI POTENZA

7
IT
FUC
ILI S
UB
AC
QU
EI A
D A
RIA
CO
MP
RES
SA
LANCIO DELL’ASTA
Adesso il fucile pneumatico è pronto per il suo impiego, è necessario rimuovere la sicura precedentemente inserita per permettere al grilletto di effettuare la sua corsa e liberare l’asta.
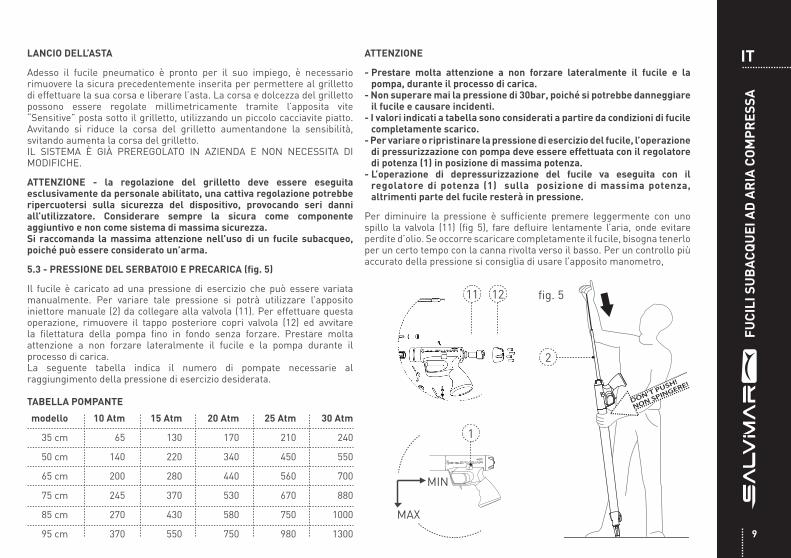
4.3 - PRESSIONE DEL SERBATOIO E PRECARICA (fig. 5)
Il fucile è caricato ad una pressione di esercizio che può essere variata manualmente. Per variare tale pressione si potrà utilizzare l’apposito iniettore manuale (2) da collegare alla valvola (11). Per effettuare questa operazione, rimuovere il tappo posteriore copri valvola (12) ed avvitare la filettatura della pompa fino in fondo senza forzare. Prestare molta attenzione a non forzare lateralmente il fucile e la pompa durante il processo di carica. La seguente tabella indica il numero di pompate necessarie al raggiungimento della pressione di esercizio desiderata.
TABELLA POMPANTE
ATTENZIONE
- Prestare molta attenzione a non forzare lateralmente il fucile e la pompa, durante il processo di carica.- Non superare mai la pressione di 30bar, poiché si potrebbe danneggiare il fucile e causare incidenti.- I valori indicati a tabella sono considerati a partire da condizioni di fucile completamente scarico.- Per variare o ripristinare la pressione di esercizio del fucile, l’operazione di pressurizzazione con pompa deve essere effettuata con il regolatore di potenza (1) in posizione di massima potenza.- L’operazione di depressurizzazione del fucile va eseguita con il regolatore di potenza (1) sulla posizione di massima potenza, altrimenti parte del fucile resterà in pressione.
Per diminuire la pressione è sufficiente premere leggermente con uno spillo la valvola (11) (fig 5), fare defluire lentamente l’aria, onde evitare perdite d’olio. Se occorre scaricare completamente il fucile, bisogna tenerlo per un certo tempo con la canna rivolta verso il basso. Per un controllo più accurato della pressione si consiglia di usare l’apposito manometro, modello
40 cm
55 cm
65 cm
75 cm
85 cm
100 cm
115 cm
130 cm
10 Atm
65
100
140
170
200
240
280
320
15 Atm
130
160
220
260
320
350
400
460
20 Atm
170
230
320
380
460
500
580
650
25 Atm
210
310
430
500
620
680
770
880
30 Atm
240
400
560
650
800
880
1000
1130
fig. 511 12
2
fig. 31
MIN
MAX
8
IT
FUC
ILI S
UB
AC
QU
EI A
D A
RIA
CO
MP
RES
SA
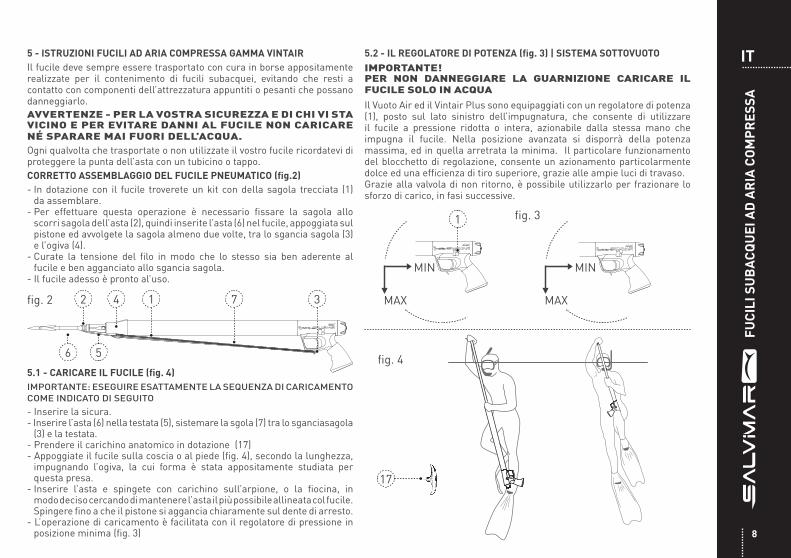
5 - ISTRUZIONI FUCILI AD ARIA COMPRESSA GAMMA VINTAIRIl fucile deve sempre essere trasportato con cura in borse appositamente realizzate per il contenimento di fucili subacquei, evitando che resti a contatto con componenti dell’attrezzatura appuntiti o pesanti che possano danneggiarlo. AVVERTENZE - PER LA VOSTRA SICUREZZA E DI CHI VI STA VICINO E PER EVITARE DANNI AL FUCILE NON CARICARE NÉ SPARARE MAI FUORI DELL’ACQUA.Ogni qualvolta che trasportate o non utilizzate il vostro fucile ricordatevi di proteggere la punta dell’asta con un tubicino o tappo.CORRETTO ASSEMBLAGGIO DEL FUCILE PNEUMATICO (fig.2)- In dotazione con il fucile troverete un kit con della sagola trecciata (1) da assemblare.- Per effettuare questa operazione è necessario fissare la sagola allo scorri sagola dell’asta (2), quindi inserite l’asta (6) nel fucile, appoggiata sul pistone ed avvolgete la sagola almeno due volte, tra lo sgancia sagola (3) e l’ogiva (4).- Curate la tensione del filo in modo che lo stesso sia ben aderente al fucile e ben agganciato allo sgancia sagola.- Il fucile adesso è pronto al’uso.
5.1 - CARICARE IL FUCILE (fig. 4)IMPORTANTE: ESEGUIRE ESATTAMENTE LA SEQUENZA DI CARICAMENTO COME INDICATO DI SEGUITO
- Inserire la sicura.- Inserire l’asta (6) nella testata (5), sistemare la sgola (7) tra lo sganciasagola (3) e la testata.- Prendere il carichino anatomico in dotazione (17) - Appoggiate il fucile sulla coscia o al piede (fig. 4), secondo la lunghezza, impugnando l’ogiva, la cui forma è stata appositamente studiata per questa presa.- Inserire l’asta e spingete con carichino sull’arpione, o la fiocina, in modo deciso cercando di mantenere l’asta il più possibile allineata col fucile. Spingere fino a che il pistone si aggancia chiaramente sul dente di arresto.- L’operazione di caricamento è facilitata con il regolatore di pressione in posizione minima (fig. 3)
5.2 - IL REGOLATORE DI POTENZA (fig. 3) | SISTEMA SOTTOVUOTOIMPORTANTE!PER NON DANNEGGIARE LA GUARNIZIONE CARICARE IL FUCILE SOLO IN ACQUA
Il Vuoto Air ed il Vintair Plus sono equipaggiati con un regolatore di potenza (1), posto sul lato sinistro dell’impugnatura, che consente di utilizzare il fucile a pressione ridotta o intera, azionabile dalla stessa mano che impugna il fucile. Nella posizione avanzata si disporrà della potenza massima, ed in quella arretrata la minima. Il particolare funzionamento del blocchetto di regolazione, consente un azionamento particolarmente dolce ed una efficienza di tiro superiore, grazie alle ampie luci di travaso.Grazie alla valvola di non ritorno, è possibile utilizzarlo per frazionare lo sforzo di carico, in fasi successive.
17
fig. 4
fig. 31
MIN
MAX
MIN
MAX1 32fig. 2 4
6 5
7
9
IT
FUC
ILI S
UB
AC
QU
EI A
D A
RIA
CO
MP
RES
SA
LANCIO DELL’ASTA
Adesso il fucile pneumatico è pronto per il suo impiego, è necessario rimuovere la sicura precedentemente inserita per permettere al grilletto di effettuare la sua corsa e liberare l’asta. La corsa e dolcezza del grilletto possono essere regolate millimetricamente tramite l’apposita vite “Sensitive” posta sotto il grilletto, utilizzando un piccolo cacciavite piatto. Avvitando si riduce la corsa del grilletto aumentandone la sensibilità, svitando aumenta la corsa del grilletto. IL SISTEMA È GIÀ PREREGOLATO IN AZIENDA E NON NECESSITA DI MODIFICHE.
ATTENZIONE - la regolazione del grilletto deve essere eseguita esclusivamente da personale abilitato, una cattiva regolazione potrebbe ripercuotersi sulla sicurezza del dispositivo, provocando seri danni all’utilizzatore. Considerare sempre la sicura come componente aggiuntivo e non come sistema di massima sicurezza.Si raccomanda la massima attenzione nell’uso di un fucile subacqueo, poiché può essere considerato un’arma.
5.3 - PRESSIONE DEL SERBATOIO E PRECARICA (fig. 5)
Il fucile è caricato ad una pressione di esercizio che può essere variata manualmente. Per variare tale pressione si potrà utilizzare l’apposito iniettore manuale (2) da collegare alla valvola (11). Per effettuare questa operazione, rimuovere il tappo posteriore copri valvola (12) ed avvitare la filettatura della pompa fino in fondo senza forzare. Prestare molta attenzione a non forzare lateralmente il fucile e la pompa durante il processo di carica. La seguente tabella indica il numero di pompate necessarie al raggiungimento della pressione di esercizio desiderata.
TABELLA POMPANTE
ATTENZIONE
- Prestare molta attenzione a non forzare lateralmente il fucile e la pompa, durante il processo di carica.- Non superare mai la pressione di 30bar, poiché si potrebbe danneggiare il fucile e causare incidenti.- I valori indicati a tabella sono considerati a partire da condizioni di fucile completamente scarico.- Per variare o ripristinare la pressione di esercizio del fucile, l’operazione di pressurizzazione con pompa deve essere effettuata con il regolatore di potenza (1) in posizione di massima potenza.- L’operazione di depressurizzazione del fucile va eseguita con il regolatore di potenza (1) sulla posizione di massima potenza, altrimenti parte del fucile resterà in pressione.
Per diminuire la pressione è sufficiente premere leggermente con uno spillo la valvola (11) (fig 5), fare defluire lentamente l’aria, onde evitare perdite d’olio. Se occorre scaricare completamente il fucile, bisogna tenerlo per un certo tempo con la canna rivolta verso il basso. Per un controllo più accurato della pressione si consiglia di usare l’apposito manometro,
modello
35 cm
50 cm
65 cm
75 cm
85 cm
95 cm
10 Atm
65
140
200
245
270
370
15 Atm
130
220
280
370
430
550
20 Atm
170
340
440
530
580
750
25 Atm
210
450
560
670
750
980
30 Atm
240
550
700
880
1000
1300
fig. 511 12
2
1
MIN
MAX
10
IT
FUC
ILI S
UB
AC
QU
EI A
D A
RIA
CO
MP
RES
SA
6 - IMPORTANTI RACCOMANDAZIOIMI UTILI A PREVENIRE E ALLONTANARE I RISCHI DI INCIDENTE NELL’USO DEL FUCILE PNEUMATICO
a - Rispettare le leggi nazionali e locali in termini di utilizzo e trasporto del fucile subacqueo.
b - Attenersi alle leggi locali in merito ai limiti d’età minimi consentiti per l’utilizzo del fucile subacqueo.
c - Caricare sempre ed esclusivamente IL FUCILE SUBACQUEO IN ACQUA, avendo cura di tenere eventuali persone e debita distanza. Il fucile dovrà restare in acqua per tutto il tempo in cui sarà mantenuto carico.
d - In luoghi affollati tipo spiagge, scogliere, imbarcazioni ed ove sia alta la presenza di bagnanti, prestare la massima attenzione e non armare il fucile fino al raggiungimento della necessaria distanza di sicurezza e non sparare per nessuna ragione, se siamo in presenza o nelle vicinanze in acqua di bagnanti o altri subacquei.
e - Non puntare mai e per nessuna ragione il fucile verso se stessi o altre persone, anche se disarmato o in posizione di sicura.
f - Accettarsi di posizionare correttamente e saldamente il fucile subacqueo prima di iniziare ogni operazione di caricamento.
g - Segnalare la vostra presenza in acqua con boa di segnalazione internazionale e localmente riconosciuta.
h - Non utilizzare il fucile subacqueo se presenta evidenti segni di usura su componenti importanti come canna, boccole di ammortizzo, volata, meccanismo di scatto. In caso di dubbio astenersi dall’uso e contattare immediatamente un centro di assistenza Salvimar autorizzato, per la manutenzione ed assistenza.
i - Non utilizzare mai e per nessuna ragione il fucile subacqueo fuori dall’acqua, in quanto, data la sua potenza, può sia danneggiarsi gravemente che diventare pericoloso per le persone, animali e cose nelle vicinanze.
j - il fucile subacqueo non deve essere né conservato né trasportato carico.
k - Al termine della battuta di pesca, è necessario scaricare il fucile prima di rientrare a terra o di salire in barca. Tale operazione va eseguita in acqua, prestando attenzione a persone o cose che si trovino nei paraggi.
ATTENZIONE - La Salvimar declina ogni responsabilità in merito all’eventuale utilizzo doloso o improprio del fucile subacqueo.
7 - CURA E MANUTENZIONE DEL FUCILE AD ARIA COMPRESSA
Per mantenere il vostro fucile in perfetta efficienza sono necessarie le seguenti precauzioni:
a - Dopo ciascuna immersione, comprese quelle in acque dolci tipo laghi o fiumi, il fucile deve essere risciacquato con acqua dolce corrente, l’eventuale uso d’acqua demineralizzata è consigliato. Lasciare asciugare all’ombra, in un luogo fresco e asciutto.
b - Assicurarsi inoltre di rimuovere eventuali residui d’acqua salata, sabbia o altre impurità, entrate nella canna durante l’immersione.
c - Non riporre mai il fucile insieme con altro equipaggiamento che possa in qualche modo provocare tagli, ammaccature o schiacciamenti dovuti a oggetti o attrezzatura pesante (per esempio la cintura dei pesi).
d - Evitate il contatto con qualsiasi tipo di olio, solventi, benzina ed idrocarburi in genere.
e - Al termine di una stagione particolarmente intensa o comunque dopo un lunga periodo di inattività, è buona norma affidare il fucile ad un laboratorio autorizzato Salvimar per una revisione completa Vi consigliamo quindi di rivolgervi al vostro negoziante di fiducia che saprà darvi le migliori informazioni sui sistemi più rapidi e sicuri per effettuare la revisione annuale.
f - Si consiglia inoltre di far eseguire una revisione completa del fucile, presso un centro autorizzato Salvimar, per verificare le condizioni di usura di ogni componente, e sostituzione degli o-ring e dell’olio, almeno una volta ogni due anni.
ATTENZIONE - Per la soddisfazione ed incolumità dell’utilizzatore, si raccomanda di utilizzare sempre i ricambi originali, poiché ogni singolo componente è stato espressamente studiato per quell’impiego specifico e per garantire il necessario margine di sicurezza. Eventuali modifiche o ricambi non originali, potrebbero compromettere la funzionalità e la sicurezza del prodotto.
11
IT
FUC
ILI S
UB
AC
QU
EI A
D A
RIA
CO
MP
RES
SA
8 - CERTIFICATO DI GARANZIA
La Salvimar s.r.l. garantisce il buon funzionamento del prodotto cui il presente documento è allagato, tuttavia potrebbe verificarsi un difetto di fabbricazione, comunque non imputabile alla negligenza dell’azienda.
La Salvimar quindi fornisce una garanzia della durata di 2 (due) anni, così come da disposizioni dalle attuali norme europee vigenti, sui propri prodotti.
La garanzia ivi rilasciata, può essere esercitata esclusivamente alle condizioni ed entro i limiti di seguito indicati:
a - La garanzia ha durata di anni 2 [due] a partire dal momento in cui il prodotto viene acquistato presso un rivenditore autorizzato SALVIMAR e non necessita di alcuna formalità di convalida. Farà fede lo scontrino fiscale emesso all’atto dell’acquisto.
b - La garanzia è riconosciuta esclusivamente al primo acquirente del prodotto, rivendicabile presso un rivenditore autorizzato Salvimar.
c - La garanzia è strettamente nominativa, non è cedibile a terzi se non previa espressa autorizzazione da parte della Salvimar.
d - La garanzia copre tutti e solo i difetti di funzionamento derivati da: - Vizi intrinseci derivanti da materiali ritenuti non idonei o difettosi. - Evidenti errori nella progettazione, fabbricazione o assemblaggio del prodotto o parti di esso.
e - La garanzia si estingue automaticamente, e con effetto immediato, a seguito di intervenute riparazioni, modifiche, trasformazioni, adattamenti, manomissioni in genere, effettuate sul prodotto finito o parti di esso, non preventivamente autorizzate dalla Salvimar e comunque effettuate da personale non qualificato o autorizzato.
f - La garanzia da diritto all’intervento e alla riparazione gratuita nel più breve tempo possibile, o alla completa sostituzione gratuita del prodotto o parti di esso, ove venga riconosciuto da parte della Salvimar, secondo il suo insindacabile giudizio, uno o più difetti di funzionamento indicati al precedente punto 4 che ne pregiudichino la funzionalità o la sicurezza d’uso del prodotto.
g - La garanzia può essere esercitata mediante inoltro presso la Salvimar del prodotto ritenuto difettoso, tramite il rivenditore Salvimar dove il prodotto è stato acquistato. Nel caso in cui non sia possibile attuare questa procedura, potrà essere concordato, ed eventualmente autorizzato, l’invio del prodotto tramite altro rivenditore Salvimar o direttamente in azienda.
h - L’articolo da riparare inviato in garanzia viaggia a cura, spese e rischio del cliente.
i - Condizione necessaria per l’esercizio della garanzia è che il prodotto sia accompagnato da copia dello scontrino fiscale o della fattura o di altro documento equipollente di registrazione fiscale cui risultino II nominativo del rivenditore autorizzato SALVIMAR presso cui il prodotto è stato acquistato e la relativa data di acquisto, nonché una breve descrizione della motivazione per la quale viene attivata la procedura di garanzia.
Nel caso in cui la Salvimar riceva un prodotto che:
- Non sia accompagnato dal documento di registrazione fiscale che ne comprovi l’acquisto,- Si siano verificate manomissioni di cui al precedente punto 5.- Presenti difetti derivanti da cause esterne ed ulteriori rispetto a quelle tassative indicate al precedente punto 4.- Sia stato utilizzato impropriamente e/o per usi e finalità diverse da quelle per cui il prodotto è stato progettato.
Al verificarsi di una o più delle summenzionate condizioni, la Salvimar si asterrà dall’effettuare qualsiasi intervento di riparazione, dandone immediata comunicazione al mittente e/o al rivenditore autorizzato di riferimento.
Qualora il mittente intenda far eseguire comunque l’intervento sul prodotto, trasmetterà alla Salvimar, nei quindici giorni lavorativi successivi, una richiesta in tal senso, ove dovrà espressamente dichiarare di voler sostenere tutti i costi relativi all’intervento di riparazione (mano d’opera, pezzi di ricambio, spedizione).In caso contrario la Salvimar provvederà alla restituzione del prodotto a spese e cura del destinatario.
Si raccomanda di conservare la presente documentazione, quale parte integrante del prodotto stesso, per tutta la vita del prodotto.
La Salvimar e tutto il suo staff, invitano al più profondo rispetto dell’ambiente, ad evitare atti di bracconaggio e distruzione dell’ambiente marino, nonchè di infrazione delle attuali norme vigenti in materia.
La Salvimar e tutto il suo staff esortano a porre in essere tutte precauzioni e raccomandazioni in materia di sicurezza, nell’utilizzo del fucile subacqueo.
La Salvimar e tutto il suo staff invitano ad un prelievo ittico responsabile ed etico, al fine di non compromettere le risorse del mare, autentica ricchezza per tutta la comunità.

13
EN
PN
EUM
ATIC
AIR
SP
EAR
GU
NS
1 - PNEUMATIC AIR SPEARGUNS - SALVIMAR
CAUTION - READ THIS MANUAL BEFORE USE AND STORE.
Thank you for purchasing a product completely designed and developed in Italy.The Salvimar has engaged over 50 years in the production of equipment for spearfishing, every day our product managers and team members works to test the products to the limit and to improve them. In order to offer the best product possible, the Salvimar reserves the right to make changes or improvements to the product.
Read the entire manual before using this equipment! The instruction manual must be kept for the lifetime of the product.
2 - GENERAL
- Before using the spear gun, you must be aware of any rule for safety. Carefully follow the instructions printed on the booklet and carefully follow the national and local regulations, in particular regarding the lower age limit suitable for use, the behavior during use and transportation, the allowed zones, the signaling devices, etc... .Improper use of diving equipment, especially speargun, can be dangerous and may cause serious injury or death to the diver and his companions.- During the assembly and the tuning of the pneumatic gun, were taken all precautions possible to provide a highly reliable over time.- These practices can be rendered ineffective if the user does not use pneumatic gun properly and do not provide to adequate maintenance.- The SALVIMAR is not responsible for any problems resulting from failure to follow the recommendations in this manual.- For any other problem, contact your local dealer or directly to SALVIMAR- To guarantee your security any repairs or maintenance should be performed only by approved laboratories by SALVIMAR.- The mechanical simplicity of operating makes maintenance easy.- If you are not experienced in the use of this air speargun, you should familiarize yourself with its functioning during test dives in shallow water and favorable environmental conditions.
2.1 - RESEARCH AND DEVELOPMENT SALVIMAR- AIR SPEARGUN
The air guns SALVIMAR are the result of years of research on the technical features of various construction materials such as lightweight alloys and synthetic resins and, by partnering with various industry experts such as aeronaval technicians, ballistic experts, scholars of applied ergonomics, professionals spearfisher and designers, we created a product that
we believe of high quality and suitable for use sports/competitive. Each individual component has been studied in detail in order to offer unique features of its kind, we have cared for and taking into consideration every aspect and component to create a product that is capable of surprising for handling, accuracy, reliability and robustness.
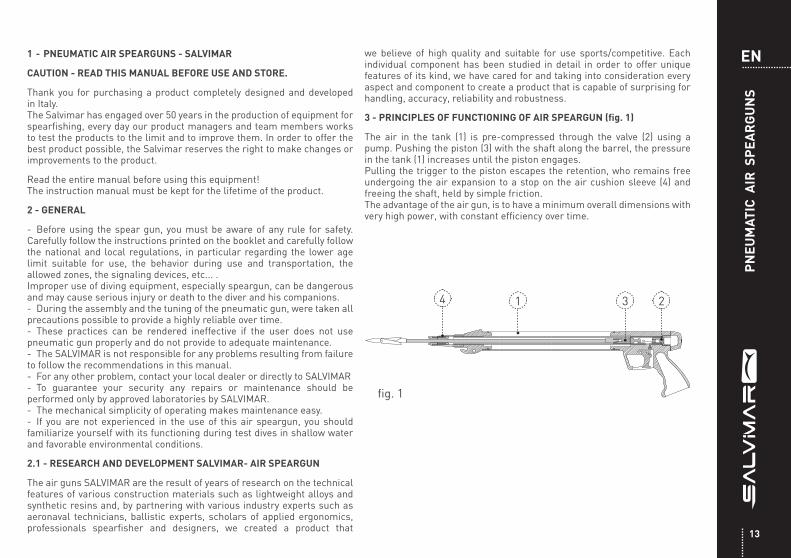
3 - PRINCIPLES OF FUNCTIONING OF AIR SPEARGUN (fig. 1)
The air in the tank (1) is pre-compressed through the valve (2) using a pump. Pushing the piston (3) with the shaft along the barrel, the pressure in the tank (1) increases until the piston engages. Pulling the trigger to the piston escapes the retention, who remains free undergoing the air expansion to a stop on the air cushion sleeve (4) and freeing the shaft, held by simple friction.The advantage of the air gun, is to have a minimum overall dimensions with very high power, with constant efficiency over time.
4 1 3 2
fig. 1

14
EN
PN
EUM
ATIC
AIR
SP
EAR
GU
NS
4 - INSTRUCTIONS PNEUMATIC AIR SPEARGUNS PREDATHOR
The air speargun should always be carefully transported in bags specially designed for the containment of spear guns, avoiding that it remains in contact with sharp or heavy equipment components that could damage them. WARNINGS - FOR YOUR SAFETY AND THOSE AROUND YOU AND TO AVOID DAMAGE THE GUN DO NOT LOAD OR FIRE IT OUT OF THE WATER.
Whenever you transport or do not use your air speargun, remember to protect the tip of the shaft a tube or cap.
CORRECT ASSEMBLY PROCEDURE (fig. 2)
- Included with the air speargun will find a kit with the braided line (1) to assemble.- To do this you must set the line to sliding line of the shaft (2), then insert the shaft (6) into the air speargun, supported on the piston and wrap the line at least twice, between the line release (3) the ogive (4). - Maintaining the tension of the wire so that it remains well attached to the gun and well hooked to the line release (3).- The air speargun is now ready to use.
4.1 - LOADING (fig. 4)WARNING: FOLLOW THE LOADING SEQUENCE AS BELOW
- Engage the safety system- Insert the shaft (6) in the muzzle (5), adjust the line (7) between the line release (3) and the muzzle.- Take the anatomical loader supplied (17)- Put the gun on your thigh or foot (Fig. 4), according to length, holding the ogive, whose shape has been specially designed for this positioning.- Insert the shaft and push with on the harpoon the loader , or the prongs, trying to keep the shaft aligned with the gun as much as possible. Push the piston until it engages on the trigger mechanism clearly..- The load operation is easy with the pressure regulator at the lowest position (fig. 3).
4.2 - POWER ADJUSTMENT (fig. 3) | VACUUM MUZZLEWARNING!DO NOT LOAD OUT OF THE WATER TO AVOID DAMAGE THE GASKET
The Predathor Vuoto and the Predathor Plus are equipped with a power controller (1) on the left side of the handle, which allows to use the gun under reduced pressure or full, actionable by the same hand holding the gun. In forward position you will have the maximum power, and the minimum is in backward. The particular operation of the pressure regulator, allows very sweet a drive and a top efficiency shooting due to the large transfer ports. Due to the non-return valve, you can to divide the stress load in following stages.
17
fig. 4
fig. 31
MIN
MAX
MIN
MAX1 32fig. 2 4
6 5
7
POWERADJUSTMENT
15
EN
PN
EUM
ATIC
AIR
SP
EAR
GU
NS
SHOT
Now the air gun is ready to use, it is necessary to remove the secure system previously inserted, to allow the trigger to make his run and release the shaft.
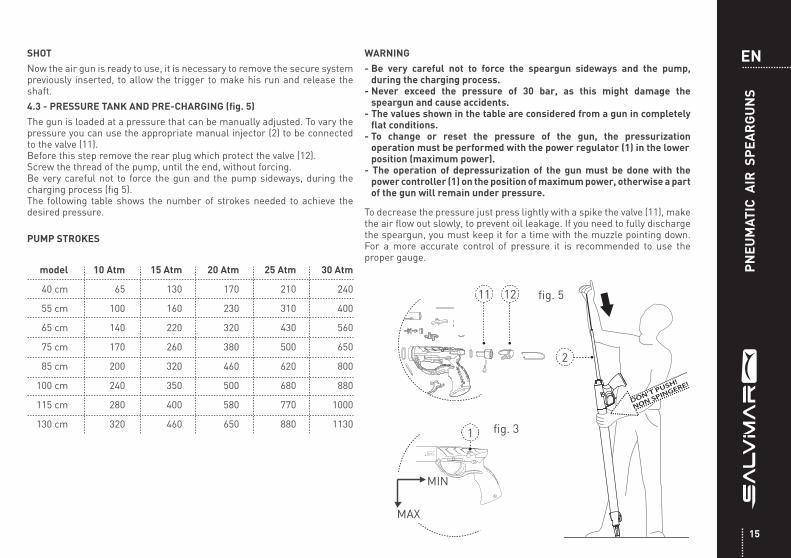
4.3 - PRESSURE TANK AND PRE-CHARGING (fig. 5)
The gun is loaded at a pressure that can be manually adjusted. To vary the pressure you can use the appropriate manual injector (2) to be connected to the valve (11).Before this step remove the rear plug which protect the valve (12).Screw the thread of the pump, until the end, without forcing.Be very careful not to force the gun and the pump sideways, during the charging process (fig 5).The following table shows the number of strokes needed to achieve the desired pressure.
PUMP STROKES
WARNING
- Be very careful not to force the speargun sideways and the pump, during the charging process.- Never exceed the pressure of 30 bar, as this might damage the speargun and cause accidents.- The values shown in the table are considered from a gun in completely flat conditions.- To change or reset the pressure of the gun, the pressurization operation must be performed with the power regulator (1) in the lower position (maximum power).- The operation of depressurization of the gun must be done with the power controller (1) on the position of maximum power, otherwise a part of the gun will remain under pressure.
To decrease the pressure just press lightly with a spike the valve (11), make the air flow out slowly, to prevent oil leakage. If you need to fully discharge the speargun, you must keep it for a time with the muzzle pointing down. For a more accurate control of pressure it is recommended to use the proper gauge.
fig. 511 12
2
fig. 31
MIN
MAX
model
40 cm
55 cm
65 cm
75 cm
85 cm
100 cm
115 cm
130 cm
10 Atm
65
100
140
170
200
240
280
320
15 Atm
130
160
220
260
320
350
400
460
20 Atm
170
230
320
380
460
500
580
650
25 Atm
210
310
430
500
620
680
770
880
30 Atm
240
400
560
650
800
880
1000
1130

16
EN
PN
EUM
ATIC
AIR
SP
EAR
GU
NS
5 - INSTRUCTIONS PNEUMATIC AIR SPEARGUNS VINTAIR
The air speargun should always be carefully transported in bags specially designed for the containment of spear guns, avoiding that it remains in contact with sharp or heavy equipment components that could damage them. WARNINGS - For your safety and those around you and to avoid damage the gun do not load or fire it out of the water.
Whenever you transport or do not use your air speargun, remember to protect the tip of the shaft a tube or cap.
CORRECT ASSEMBLY PROCEDURE (fig. 2)
- Included with the air speargun will find a kit with the braided line (1) to assemble.- To do this you must set the line to sliding line of the shaft (2), then insert the shaft into the air speargun, supported on the piston and wrap the line at least twice, between the line release (3) the ogive (4). - Maintaining the tension of the wire so that it remains well attached to the gun and well hooked to the line release (3).- The air speargun is now ready to use.
5.1 - POWER ADJUSTMENT (fig. 3)WARNING: FOLLW THE LOADING SEQUENCE AS BELOW
The VintAir plus is equipped with a power controller (1) on the left side of the handle, which allows to use the gun under reduced pressure or full, actionable by the same hand holding the gun.In forward position you will have the maximum power, and the minimum is in backward. The particular operation of the pressure regulator, allows very sweet a drive and a top efficiency shooting due to the large transfer ports.Due to the non-return valve, you can to divide the stress load in following stages.
5.2 - LOADING (fig. 4)
- Engage the safety system- Take the anatomical loader supplied (17)- Put the gun on your thigh or foot (Fig. 4), according to length, holding the ogive, whose shape has been specially designed for this positioning.- Insert the shaft and push with on the harpoon the loader , or the prongs, trying to keep the shaft aligned with the gun as much as possible. Push the piston until it engages on the trigger mechanism clearly.- The load operation is easy with the pressure regulator at the lowest position (fig. 3).
17
fig. 4
fig. 31
MIN
MAX
MIN
MAX
1 32fig. 2 4
6 5
7

17
EN
PN
EUM
ATIC
AIR
SP
EAR
GU
NS
SHOT
Now the air gun is ready to use, it is necessary to remove the secure system previously inserted, to allow the trigger to make his run and release the shaft. The race and sweetness of the trigger can be adjusted millimetrically through the “Sensitive screw” below the trigger, using a small screwdriver. Screwing the run of the trigger will be reduced increasing the sensitivity, unscrewing the run of the trigger will be improved.
THE SYSTEM IS PRESET INTO THE COMPANY AND DOES NOT NEED TO CHANGE.
WARNING - adjustment of the trigger should be performed only by authorized and skilled staff,a bad adjustment may affect the safety of the device, causing serious injuries to the user. Always consider safe systems as add-on and not as a top security system.Please be careful when using a spear gun, it could be considered a weapon.
5.3 - PRESSURE TANK AND PRE-CHARGING (fig. 5)
The gun is loaded at a pressure that can be manually adjusted. To vary the pressure you can use the appropriate manual injector (2) to be connected to the valve (11).To do this, unscrew the four screws that hold the rear orange cover (12).Screw the thread of the pump, until the end, without forcing.Be very careful not to force the gun and the pump sideways, during the charging process (fig 5).The following table shows the number of strokes needed to achieve the desired pressure.
PUMP STROKES
WARNING
- Be very careful not to force the speargun sideways and the pump, during the charging process.- Never exceed the pressure of 30 bar, as this might damage the speargun and cause accidents.- The values shown in the table are considered from a gun in completely flat conditions.- To change or reset the pressure of the gun, the pressurization operation must be performed with the power regulator (1) in the lower position (maximum power).- The operation of depressurization of the gun must be done with the power controller (1) on the position of maximum power, otherwise a part of the gun will remain under pressure.
To decrease the pressure just press lightly with a spike the valve (11), make the air flow out slowly, to prevent oil leakage. If you need to fully discharge the speargun, you must keep it for a time with the muzzle pointing down. For a more accurate control of pressure it is recommended to use the proper gauge.
model
35 cm
50 cm
65 cm
75 cm
85 cm
95 cm
10 Atm
65
140
200
245
270
370
15 Atm
130
220
280
370
430
550
20 Atm
170
340
440
530
580
750
25 Atm
210
450
560
670
750
980
30 Atm
240
550
700
880
1000
1300
fig. 511 12
2
1
MIN
MAX
18
EN
PN
EUM
ATIC
AIR
SP
EAR
GU
NS
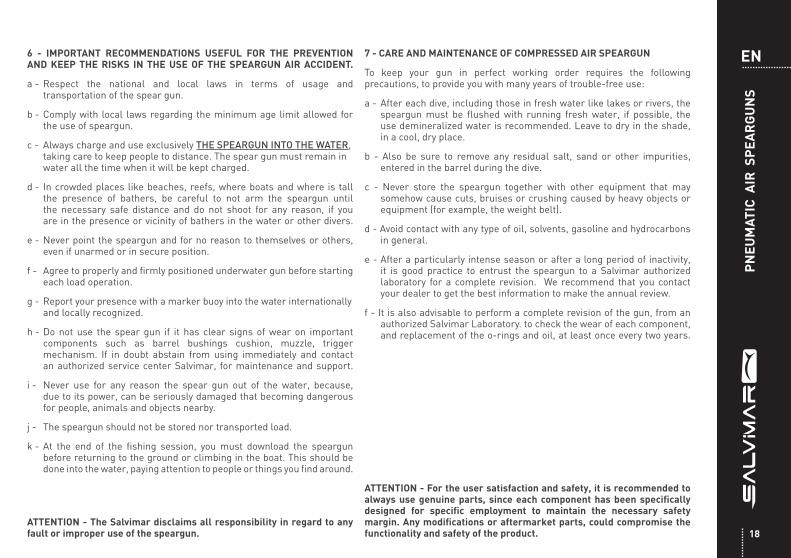
6 - IMPORTANT RECOMMENDATIONS USEFUL FOR THE PREVENTION AND KEEP THE RISKS IN THE USE OF THE SPEARGUN AIR ACCIDENT.
a - Respect the national and local laws in terms of usage and transportation of the spear gun.
b - Comply with local laws regarding the minimum age limit allowed for the use of speargun.
c - Always charge and use exclusively THE SPEARGUN INTO THE WATER, taking care to keep people to distance. The spear gun must remain in water all the time when it will be kept charged.
d - In crowded places like beaches, reefs, where boats and where is tall the presence of bathers, be careful to not arm the speargun until the necessary safe distance and do not shoot for any reason, if you are in the presence or vicinity of bathers in the water or other divers.
e - Never point the speargun and for no reason to themselves or others, even if unarmed or in secure position.
f - Agree to properly and firmly positioned underwater gun before starting each load operation.
g - Report your presence with a marker buoy into the water internationally and locally recognized.
h - Do not use the spear gun if it has clear signs of wear on important components such as barrel bushings cushion, muzzle, trigger mechanism. If in doubt abstain from using immediately and contact an authorized service center Salvimar, for maintenance and support.
i - Never use for any reason the spear gun out of the water, because, due to its power, can be seriously damaged that becoming dangerous for people, animals and objects nearby.
j - The speargun should not be stored nor transported load.
k - At the end of the fishing session, you must download the speargun before returning to the ground or climbing in the boat. This should be done into the water, paying attention to people or things you find around.
ATTENTION - The Salvimar disclaims all responsibility in regard to any fault or improper use of the speargun.
7 - CARE AND MAINTENANCE OF COMPRESSED AIR SPEARGUN
To keep your gun in perfect working order requires the following precautions, to provide you with many years of trouble-free use:
a - After each dive, including those in fresh water like lakes or rivers, the speargun must be flushed with running fresh water, if possible, the use demineralized water is recommended. Leave to dry in the shade, in a cool, dry place.
b - Also be sure to remove any residual salt, sand or other impurities, entered in the barrel during the dive.
c - Never store the speargun together with other equipment that may somehow cause cuts, bruises or crushing caused by heavy objects or equipment (for example, the weight belt).
d - Avoid contact with any type of oil, solvents, gasoline and hydrocarbons in general.
e - After a particularly intense season or after a long period of inactivity, it is good practice to entrust the speargun to a Salvimar authorized laboratory for a complete revision. We recommend that you contact your dealer to get the best information to make the annual review.
f - It is also advisable to perform a complete revision of the gun, from an authorized Salvimar Laboratory. to check the wear of each component, and replacement of the o-rings and oil, at least once every two years.
ATTENTION - For the user satisfaction and safety, it is recommended to always use genuine parts, since each component has been specifically designed for specific employment to maintain the necessary safety margin. Any modifications or aftermarket parts, could compromise the functionality and safety of the product.

19
EN
PN
EUM
ATIC
AIR
SP
EAR
GU
NS
8 - CERTIFICATE OF GUARANTEE
Salvimar Srl guarantees the correct functioning of the product delivered together with this document, but it may happen a manufacturing fault.
Following the current European regulations, Salvimar Srl guarantees its products for 2 (two) years.
The validity of this Certificate of Guarantee is subject to the following terms:
a - The guarantee covers claims of damage occurring within 2 (two) years starting from the purchase of the product in a Salvimar authorized shop and no additional certification of purchase is required.
b - The guarantee is valid only for the first purchaser of the product, taking place in a Salvimar authorized shop.
c - The guarantee is strictly nominal and cannot be remised to anyone else if not directly authorized by Salvimar.
d) The guarantee covers only the defects arising from: - intrinsic faults coming from defecting or unsuitable materials - clearly visible mistakes in planning, manufacturing or assembly of the product or its components.
E - The guarantee decades automatically and instantly if any repair, modification, transformation, arrangement or alteration occurs on the end product or unit part if not previously authorized by Salvimar and always arranged by qualified and authorized personnel.
f- The guarantee gives right to a free repair service as quickly as possible, or to the replacement free of charge of the whole product or product components, if Salvimar acknowledges one or more of the conditions listed at point 4, which may compromise the correct functioning and safety of the product in use.
g - The claiming party raising a warranty claim should send the defective product to Salvimar through the authorized shop where the product has been purchased. In case this is not possible, Salvimar may authorize the claiming party to send the product through another Salvimar authorized dealer or directly to the Company.
h - The product shipped by the customer for a repair, travels at the expense and risks of the shipper.
i - Our liability is limited to claims showing copy the till receipt or invoice or other fiscal document showing the Salvimar authorized dealer’s business name and the purchase date, together with a description of the reason why the warranty claim has been raised.
In case Salvimar receives a product that shows at least one of these conditions:
- Does not come with the correspondent purchase document - Shows alterations (see point 5) that void Salvimar’s liability- Shows defects due to external intervention different from those indicated at point 4- Has been improperly used or for other purposes than those it is deigned for.
Salvimar will not arrange any replacement or service repair, and will immediately inform the owner of the product or the authorized dealer about that.
In case the shipper decides to have the product repaired or replaced all the same, he should send to Salvimar, within the following 15 working days, a formal request declaring he will be in charge of all the costs connected to the repair service. On the contrary Salvimar will return the product and postage will be paid by recipient.
We recommend to keep this document for the whole life of the product as integral part of the product itself.
Salvimar and all its staff invite you to pay respect to environment and keep from any behaviour which may damage the seabed as well as infringe the current regulations.
Salvimar and all its staff invite you to pay attention to all recommendations and take all the precautions in order to use the speargun in complete safety.
Salvimar and all its staff recommend a responsible spearfishing, in order to respect the sea resources, treasure of mankind.

20REVISIONE TAB. 7- GEN - 2015
PREDATHOR VUOTO - PREDATHOR PLUS - PREDATHOR
modello
40 cm
55 cm
65 cm
75 cm
85 cm
100 cm
115 cm
130 cm
ml
15
20
25
30
35
45
55
65
QUANTITA’ OLIOOIL QUANTITIES
14a14b
14c14d
14e 14f 14g14
10
8a 8b
20a 20b 20b1 20c20
19 15 18 17 16 12
15
135
3a 3b 2 1
9a8
7
21 22
23
14h
14m 14l
14i
9b
3
6

21
0102030506070809a09b10121314151617181920212223
LFUCPR020LFUCPR003LFUCPR004LFUCPR005LFUCPNEUM90LFUCPR006LFUCPR008LFUCPR001LFUCPR001BLFUCPR009LFUC25LFUCPNEUMKIT101LFUCPRKIT03LFUCPNEUM04LFUCPNEUM30 LFUCPNEUM87LFUCPNEUM11LFUCPRKIT01LFUCPRKIT02 / /LFUCPNEUM100
Molletta estrazione tappo PredathorTappo coprivalvola PredathorValvola ricarica PredathorSicura PredathorDente di sgancioGrilletto PredathorKit vite/pistone/Oring per grilletto PredathorImpugnatura Predathor Plus (con regolazione)Impugnatura Predathor (senza regolazione)Sganciasagola PredathorPiastrina Inox supporto mulinelloPistone fucile Predathor / VintairKit blocchetto di regolazione Predathor completo di astinaOring, Ogiva e Impugnatura Predathor / VintairSeeger per canna Predathor / Vintair Distanziale per canna Predathor / VintairOring tenuta canna ogiva Predathor / VintairOgiva PredathorTestata completa PredathorCanna Predathor | 40 - 55 - 65 - 75 - 85 - 100 - 115 - 130 cmSerbatoio PredathorIniettore Predathor / Vintair
PR
EDAT
HO
R V
UO
TO P
RE
DAT
HO
R P
LUS
P
RE
DAT
HO
R
CODE

14a14b
14c14d
14e 14f 14g14
22
1a
2
1b 1c
3
4a 4b 4c
5 6 78a
8b
8c 9a
9c9b
10b10a
10c 11b 11a 12a 12b
13a13i
13b13h 13g
13f
13d13e
13c
1516
17 18a 18b 18c
19a 19b 19c19d
20
modello
35 cm
50 cm
65 cm
75 cm
85 cm
95 cm
ml
12
20
25
30
35
45
QUANTITA’ OLIOOIL QUANTITIES
REVISIONE TAB. 1-GIU-2011
1
19
18
4
8
13
VUOTO AIR - VINTAIR PLUS - VINTAIR
14h
14m 14l
14i

23
CODE0101a01b01c020304a04b04c050606060606070707070708a08b08c09a09b09c10a10b10c11a11b12a12b13a13b
LFUCPNEUM 103LFUCPNEUM 37LFUCPNEUM 27LFUCPNEUM 35LFUCPNEUM 36LFUCPNEUM 53LFUCPNEUM 11LFUCPNEUM 87LFUCPNEUM 30LFUCPNEUM 03LFUCPNEUM 80LFUCPNEUM 81LFUCPNEUM 82LFUCPNEUM 83LFUCPNEUM 84LFUCPNEUM 69LFUCPNEUM 70LFUCPNEUM 71LFUCPNEUM 72LFUCPNEUM 73LFUCPNEUM 64LFUCPNEUM 90LFUCPNEUM 91LFUCPNEUM 65LFUCPNEUM 58LFUCPNEUM 59LFUCPNEUM 51LFUCPNEUM 52LFUCPNEUM 93LFUCPNEUM 102LFUCPNEUM 01LFUCPNEUM 88LFUCPNEUM 31LFUCPNEUM 56LFUCPNEUM 54
Testata AIR arancione completoGhiera testata air anodizzata arancioneGommino boccola ammort. AIRBoccola ammortizzo delrin AIRCorpo testata air anodizzata arancioneOgiva testata AIR NERAOR 17x3 su canna tenuta testata ogivaDistanziale nylon per canna AIRSEEGER INOX per canna AIR 18mmOR 30x2 impugnatura,ogiva,blocchettoSerbatoio AIR 35 177mm anodizzata NeroSerbatoio AIR 50 327mm anodizzata NeroSerbatoio AIR 65 477mm anodizzata NeroSerbatoio AIR 75 577mm anodizzata NeroSerbatoio AIR 85 677mm anodizzata NeroCanna AIR 35 318mm anodizzata naturaleCanna AIR 50 468mm anodizzata naturaleCanna AIR 65 618mm anodizzata naturaleCanna AIR 75 718mm anodizzata naturaleCanna AIR 85 818mm anodizzata naturalePerno dente di sgancio / grilletto AIRDente di sgangio cementato AIRMolla per dente di sgangio AIRPerno sgancia sagola AIRSganciasagola AIR GRIGIOSganciasagola AIR NEROImpugnatura AIR con regolatore GRIGIAImpugnatura AIR senza regolatore NERAVite autofil. C 2.9x6.5 Philips Imp.reg.Valvola ricarica AIR completoOR 14x2.5 tenuta valvola ric.impugnaturaTappo in gomma AIR arancioneVite M3x10 appoggio gomma AIRSicura AIR GRIGIOGrilletto AIR grigio
13c13d13e13f13g13h13i14a14b14c14d14e14f14g14h14i14l14m151515151516171818a18b18c1919a19b19c19d20
LFUCPNEUM 64LFUCPNEUM 66LFUCPNEUM 05LFUCPNEUM 67LFUCPNEUM 68LFUCPNEUM 55LFUCPNEUM 57LFUCPNEUM 32LFUCPNEUM 92LFUCPNEUM 61LFUCPNEUM 22LFUCPNEUM 50LFUCPNEUM 60LFUCPNEUM 03LFUCPNEUM 49LFUCPNEUM 25LFUCPNEUM 09LFUCPNEUM 62AG 001AG 005AG 009AG 013AG 017AC 001AE 065AE 020AE 051AE 053AE 041LFUCPNEUM 101LFUCPNEUM 34LFUCPNEUM 15LFUCPNEUM 23LFUCPNEUM 33LFUCPNEUM 100
Perno grillettoPistone grilletto ø1,5mmOR 2007 cursore grillettovite forata OR pistone grillettoVite regolazione grilletto AIRGrilletto AIR NEROSicura AIR NERODado M3 Inox autobloccanti astina airMolla astina regolazione AIRLunetta blocchetto di regolazione AIRGuarnizione mezzaluna blocch 300100115Astina regolazione AIRBlocchetto di regolazione AIROR 30x2 impugnatura,ogiva,blocchettoSquadretta completa per astina reg. AIROR 2015 astina regolazione AIROR 15.1x1.6 gola su canna x regolatoreAnello elastico per canna AIRAsta Per Air 35Asta Per Air 50 Asta Per Air 65 Asta Per Air 75 Asta Per Air 85 Arpione Lazio zincatoCarichino per arpioniKit asta Ø 8 Scorrisagola Ø 8 Molla Ø 8 Rondella Ø 8 Pistone AIR completoFrontale delrin pistone fucile AIROR 10x1.5 per pistoneGuarnizione a tazza per pistoneRetro pistone fucile cementato AIRIniettore AIR completo
VUO
TO A
IRVI
NTA
IR P
LUS
VIN
TAIR

Via G. Farina 2 - 4 - 6 | 16030 Casarza Ligure | Genova - ITTel. +39 0185 469007 | Fax. +39 0185 469328
www.salvimar.com