prep-n-print™ with flex website support documentation
TRANSCRIPT

1
Prep-n-Print™ with Flex Website Support Documentation – Account Managers
Updated 11/24/2020
Table of Contents I. GENERAL ........................................................................................................................................... 2
II. ACCESS RIGHTS ................................................................................................................................... 2
A. Add, Edit or Delete an Account Manager – Website Access: ............................................................... 2
B. Add, Edit, or Delete a Location: ...................................................................................................... 3
C. Add, Edit, or Delete a Location Manager – Website Access: ................................................................ 5
D. Add, Edit, or Delete Location App Users – Mobile App Access: ............................................................ 6
III. FOOD CATEGORIES, LISTS, ITEMS, AND BATCHES ..................................................................................... 7
A. Categories – Add.......................................................................................................................... 8
B. Categories – Edit .......................................................................................................................... 9
D. Shelf Life Options ....................................................................................................................... 10
E. Corporate Food Lists – Add From “Scratch”.................................................................................... 10
F. Corporate Food Lists – Create a New List Using an Existing List ......................................................... 17
G. Corporate Food Lists – Edit an Existing Food List ............................................................................. 19
H. Corporate Food List – Deactivate.................................................................................................. 22
I. Local Foods – Create a Local List to Assign to a Specific Location ....................................................... 22
J. Local Food List – Add, Edit, or Delete Foods in the List ..................................................................... 24
K. Batches – Adding, Editing or Deleting ............................................................................................ 26
IV. LABEL TEMPLATES............................................................................................................................. 31
V. ACCOUNT / LOCATION DETAILS AND SETTINGS ..................................................................................... 31
A. Account Details.......................................................................................................................... 31

2
I. GENERAL
Your flex account manager status allows you to add, edit or delete website content
that impacts the entire account or individual locations. You can update:
• ACCESS RIGHTS 1. Manage website access
a. to corporate or location content by someone at the corporate level b. to location content by someone at that location
2. Manage app users at the location level
• FOOD CATEGORIES, LISTS, ITEMS, AND BATCHES 1. Manage corporate food lists and batches of corporate foods 2. Manage local food lists and batches of local foods
• LABEL TEMPLATES 1. Manage templates that locations can use to print labels
• ACCOUNT / LOCATION DETAILS AND SETTINGS
1. Manage address, language, and contact details 2. Manage settings that control your Flex setup and what location personnel can do
II. ACCESS RIGHTS A. Add, Edit or Delete an Account Manager – Website Access:
Grant access to those who need to manage content for all locations. Individuals
added as account managers will have the same access and rights as you.
Tap the Settings button in the top right corner. Select “Account Settings”.
1. To add an account manager, tap “Add Manager”, enter their details, and save.

3
The individual will receive an email inviting them to complete their set-up as a new account manager. Until they accept, their status will show as “Invited”.
2. To edit an account manager, tap on the Account Manager card, update details on the individual, and save.
3. To delete an account manager, tap on the options button within the Account
Manager card, and select the “Remove Manager” option.
B. Add, Edit, or Delete a Location: Control location access to the flex App for label printing. Tap “Locations” in the
main navigation.
1. To add a location, tap the “Add Location” button.

4
If you have a lot of locations to add, use the “Import” method; otherwise, choose “Enter Manually”. The “Next” button will activate upon selection.
a. With “Import”, download an empty location template and enter location details.
Then return to this page and tap “Browse” to import the spreadsheet.
b. With “Manual”, a 4-step process will support entry of location details, basic settings, app user information, and any location managers.
2. To edit a location, tap the location card or row and edit any details.

5
3. To delete a location, tap the trash can button in the location’s card or row.
A pop-up will ask you to confirm the action.
C. Add, Edit, or Delete a Location Manager – Website Access:
Grant access to the flex Website for those who need to manage location content
like local foods or local batches. They can only access their location’s data.
Tap “Locations” and select the manager’s location. Scroll down to “Personnel”.
1. To add a location manager, tap on “Add Location Manager”, fill in details on the
individual and save.

6
The individual will receive an email inviting them to complete their set-up as a new location manager. Until they accept, their status will show as “Invited”.
2. To edit a location manager, tap on the Location Manager card, update details on
the individual, and save.
3. To delete a location manager, tap on the options button within the Location Manager card, and tap “Remove Manager”.
D. Add, Edit, or Delete Location App Users – Mobile App Access: Grant location access to the flex mobile app to sign in and print labels.
Tap “Locations” in the navigation and select the location. Scroll down to Personnel.
1. To add an app user, tap the “App Users (#)” tab. Select “Add App User”. Fill in details and save. If one mobile device will be used by multiple individuals for labeling, consider creating a single global sign-in that is easy to remember and doesn’t require ongoing maintenance.

7
2. To edit an app user, tap on the App User card, update details, and save.
3. To delete an app user, tap on the options button in the App User card, and tap “Remove App User”.
III. FOOD CATEGORIES, LISTS, ITEMS, AND BATCHES
Foods are organized under lists in flex, with like foods further grouped under
categories and foods commonly prepped together under batches.
Account managers can create, edit, or delete
• categories, corporate food lists, corporate food items, and corporate batches.
• local food lists and local batches on behalf of locations.
Account managers control whether location managers can also create, edit or delete local
foods and/or local batches in the flex Website under Account Settings / Website.
ACCOUNT MANAGER LOCATION MANAGER
Categories X
Corporate Food Lists X
Corporate Food Items X

8
Corporate Batches X
Local Food Lists X X (if you permit)
Local Food Items X X (if you permit)
Local Batches X X (if you permit)
Local food lists are automatically assigned to the “Local” category. Local batches can be created using foods from assigned corporate and/or their local lists.
A. Categories – Add
Grouping foods by categories helps locate them in the flex App for label printing.
You can add categories when importing or manually adding a food list, picking from a
list of common categories already pre-assigned a color and an icon or creating your
own. See section “E: Corporate Food Lists – Add From Scratch” on page 10.
You can also create categories independently from food list management:
1. Tap “Foods”. Tap the “Categories” tab, then tap the “Add Category” button.
2. Enter a name for your category. Then tap “Edit” to select a “Category Color”.

9
3. Optionally, you can also select an icon for your category. Then tap “Submit”.
B. Categories – Edit 1. To edit a category’s name, color, or icon, tap on “Foods”. Then, tap on the
“Categories” tab, and tap directly on the category card.
2. You can edit the category name or color and add or edit an icon associated to the category. To remove an icon, tap on the blank tile in the left corner of the first row. When all changes have been made, tap the “Submit” button.
C. Categories – Delete
1. To delete a category, tap “Delete Category” in the options menu in the category card.

10
D. Shelf Life Options Food shelf life can be defined in Days/Hours/Minutes, by EOD (end of day), or by work shifts.
• Decimal values up to two digits are allowed for shelf life in Days/Hours/Minutes
• Days/Hours/Minutes calculates from prep completion date/time (Period 0). EOD and Shifts considers the current day or the current shift as Period 1.
• You can use all three bases in the same food list. For example, you can define shelf life for a vegetable using EOD while using Days/Hours/Minutes for dry goods and Shifts for foods to be discarded at the end of a shift.
• Note that work shifts must be defined under Account Settings / Website for shelf life by shift to function correctly. Refer to page 31 of this document for more information on shifts set up.
E. Corporate Food Lists – Add From “Scratch”
Follow these instructions if you want to create a food list from “scratch”.
1. Tap on “Foods”, then tap the “Add List” button
2. Enter a name. Choose your method of entry: import via a spreadsheet or manual entry of each food item. Following a selection, “Next” will activate.

11
If you chose “Enter Manually”, proceed to Step 4 on Page 13.
3. If you chose “Import List” a. On Step 1 of the “Import” screen, tap on the “Food List Template” link to
download a blank spreadsheet formatted to work with the flex Website.
NOTE: Tap the “Help Documentation” link to access detailed instructions on how to use the Food List Template. Missing required fields or improperly formatted entries will prevent successful import.
b. Complete the spreadsheet with all required and desired information for each food item. Save the file, then return to the page above.
c. Tap the “Browse” button, locate your completed food list template saved on your computer and select it. Tap the “Open” button.

12
The “Browse” button will be replaced by the file imported, and the “Import” button will be activated.
d. You can update the imported categories (name, color, and/or icon) and verify your food items. (You can only remove foods from the import here. To add more foods to the import or to edit details of a food, you must update your
spreadsheet and return to the previous flex Website page to re-import.
When satisfied with your list content, tap the “Done” button to create the list.
e. The confirmation message prompts you to assign locations to the food list so they can access it for labeling via the flex App.

13
1. If you haven’t set up locations yet or wish to assign them later, tap “Later”.
2. If you have already created locations and wish to assign them now to the food list, tap “Assign Locations” in the confirmation pop-up.
a. In the left panel, all your locations will display. You can:
• Scroll to select a subset of these locations.
• Use the Search feature to locate a specific location.
• Use “Select All” button to assign the food list to all your locations.
b. In the right panel, your selected locations will appear for review before saving. Tap the “Submit” button to complete the assignment.
4. If you chose “Enter Manually”
a. Any previously created categories for other food lists will pre-populate in the right panel under “Available Categories”.

14
b. If you need to add more categories to support this food list, you can 1. Tap the box “Pick from a list of standard categories” to display pre-created
categories with a color and icon already assigned.
Then, confirm your selection and tap “Add Category”. This will add your new category to the bottom of the list under “Available Categories”. Repeat as
required.
2. Create your own custom category name. Tap the box “Or, create your own” and enter a category name. Then, tap the Category Color “Edit” button to select a color.
If desired, scroll through the icons to assign one to the category. Confirm the category details and tap “Add Category”. This will add it to the bottom of the “Available Categories” in the right panel.

15
Repeat to add all the categories you need or tap “NEXT” when done.
c. Add your food items one at a time. Primary Description and Category are always required.
d. Tap into additional sections to enter more details about the food. Most often, you will be adding shelf life information, which can be found under the “Prepped” tab. See Section “D. Shelf Life Options” on page 10 for information.
Use the Grab ‘n Go section to enter details that should appear on your labels for off-premise consumption foods. Any entries made in this section require
entry of a Retail Product Name even if it will not appear on your labels.
Refer to the U.S. FDA Nutrition Labeling and Education Act for guidance on nutrition labeling requirements and use the “Nutrition” section to enter required
data for any applicable foods.

16
e. When done adding all details for a food, tap on “Save & Add Another” or on “Save & Continue” if you’re done adding food items.
f. Review the food items created so far. You can add more foods using the back arrow in the header or the “Add Another Food Items” button in the left panel, or
you may delete foods you don’t want to add to the food list.
Tap “Done” when you have completed entry of foods to the list.
g. The confirmation message prompts you to proceed with assigning locations to the food list so they can access it for labeling via the mobile app.
1. If you haven’t set up locations yet or wish to assign them later, tap “Later”.
2. If you have set up your locations and wish to assign the food list to them now,
tap “Assign Locations” in the confirmation pop-up.
a. In the left panel, all your locations will display. You can:

17
• Scroll to select a subset of these locations.
• Use the Search feature to locate a specific location.
• Use “Select All” button to assign the food list to all your locations.
b. In the right panel, your selected locations will appear for review before saving. Tap the “Submit” button to complete the assignment.
F. Corporate Food Lists – Create a New List Using an Existing List
1. Tap on “Foods” and select the existing food list that will be used as a basis for creating a new list.
2. Tap on the “Bulk Update” button.
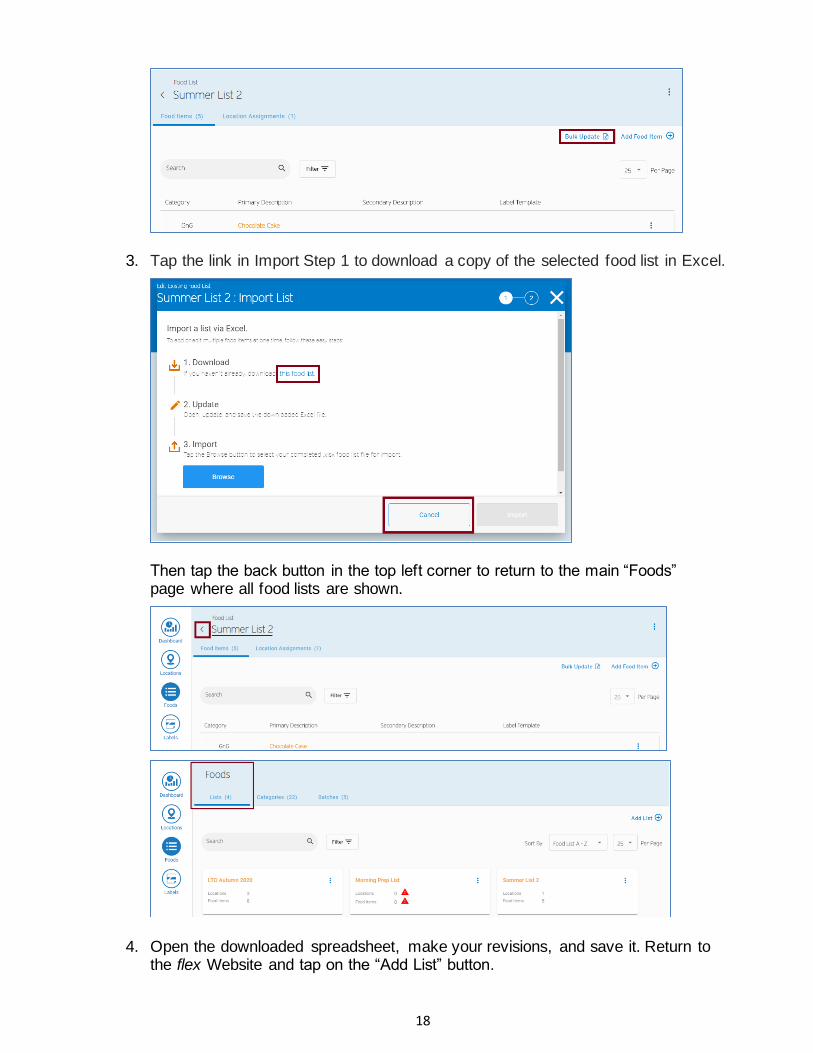
18
3. Tap the link in Import Step 1 to download a copy of the selected food list in Excel.
Then tap the back button in the top left corner to return to the main “Foods” page where all food lists are shown.
4. Open the downloaded spreadsheet, make your revisions, and save it. Return to the flex Website and tap on the “Add List” button.

19
5. Enter a name for your new list, then tap the “Import” option and “Next” button.
6. In step “3. Import”, tap the “Browse” button and locate the food list file you just
modified. Tap “Open”. Once the “Browse button” is replaced by the file name, tap the “Import” button.
7. The remainder of the process is the same as creating a food list from scratch: review your entries, save the list, and assign locations when ready.
G. Corporate Food Lists – Edit an Existing Food List If you have significant changes to make to an existing food list, proceed to #2
on page 21. Otherwise, access the edit functionality as follows:
20
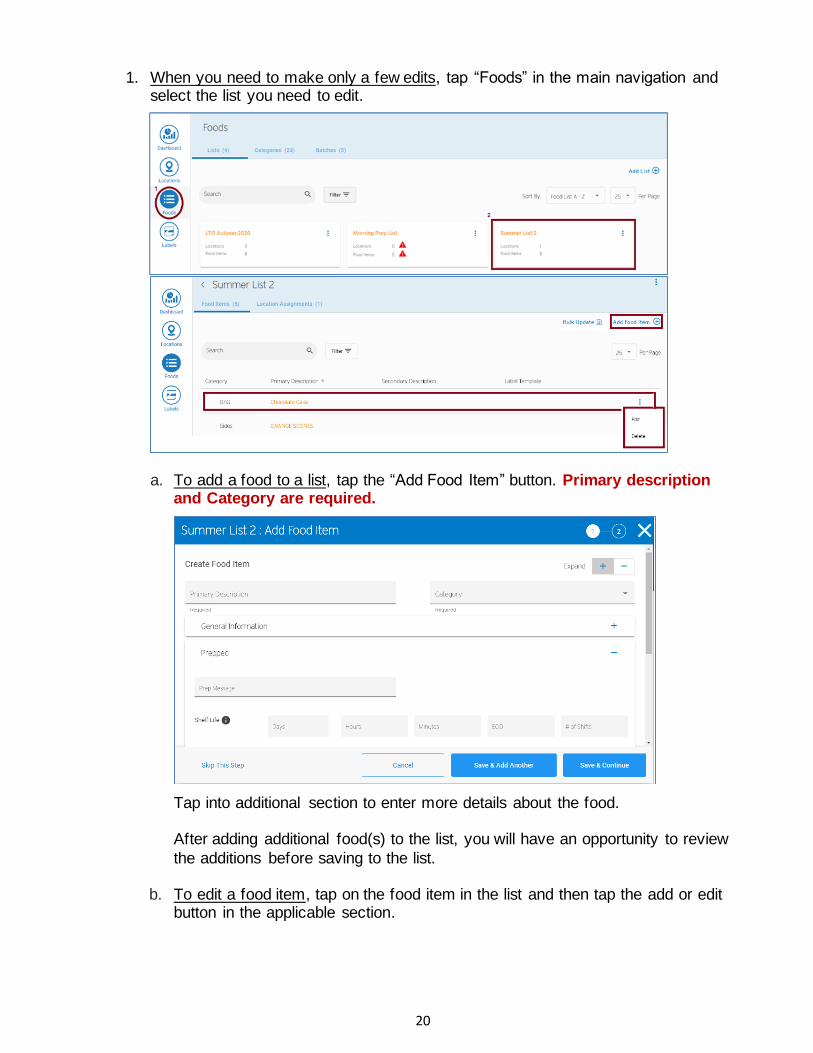
1. When you need to make only a few edits, tap “Foods” in the main navigation and select the list you need to edit.
a. To add a food to a list, tap the “Add Food Item” button. Primary description
and Category are required.
Tap into additional section to enter more details about the food. After adding additional food(s) to the list, you will have an opportunity to review
the additions before saving to the list.
b. To edit a food item, tap on the food item in the list and then tap the add or edit button in the applicable section.

21
c. To delete a food item, tap the options button for the food item and select
“Delete”. Alternatively, tap on the food item to display all current details then tap the options button in the light blue header and select “Delete”.
OR
2. When you have a lot of updates to make to a list, consider use of the “Bulk
Update” function. Tap this button to open an export/import screen.
a. If you don’t already have a copy of the food list saved on your computer, tap
the link in “1. Download”. Make your changes and save.
b. Import the updated file and perform a high-level review before saving.

22
H. Corporate Food List – Deactivate There are two ways to deactivate a food list so it is no longer available for use in the flex App for label printing:
1. Tap “Foods” in the main navigation and locate the food list card. Tap the options
button in the card, and select “Deactivate List”
2. Tap on a food list card to open the food list and inspect its contents. If this is the list you wish to delete, tap the options button in the light blue header.
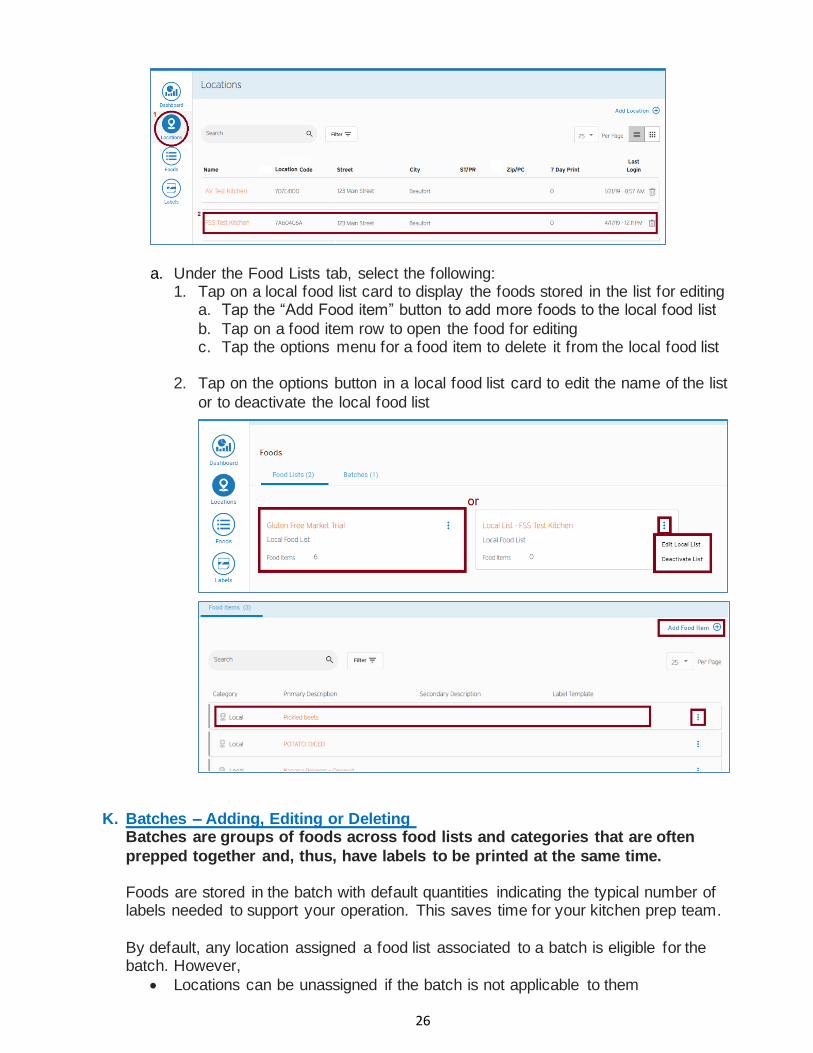
I. Local Foods – Create a Local List to Assign to a Specific Location 1. To manage foods for a specific location, tap on “Locations” in the main navigation.
Then locate and tap on the location to view the location details page.

23
2. Under the “Food Lists” tab, tap on the “Add Local Food List” button.
3. Enter a name for the list then proceed with entry of food items. The process is the same as manual entry of a corporate food list with these exceptions:
• All foods are placed in category “Local”
• Assignment to the location is automatic.
• When the local list is created, it is accessible to you not only from the location details page but also from the account-level Foods page: you must
use the “Filter” option to include “Local Lists” in your display results.
4. Primary Description and Category are always required. The “Category” drop-down will only offer “Local” for selection.
Tap into additional sections to enter more details about the food. Most commonly, you will be adding shelf life, which can be found under the “Prepped” tab.

24
Use the Grab ‘n Go section to enter details that should appear on your
labels for off-premise consumption foods. Any entries made in this section require that a Retail Product Name be entered, even if a Retail Product Name will not appear on your labels.
Refer to the U.S. FDA Nutrition Labeling and Education Act for guidance on nutrition labeling requirements, and use the “Nutrition” section to enter required data for any applicable foods.
When done adding all details for a food, tap on “Save & Add Another”, or on “Save & Continue” if done adding food items for now.
5. Review the food items created so far. You can add more foods using the back arrow
in the header or the “Add Another Food Items” button in the left column, or you may delete foods you don’t want to add to the food list.
Tap “Done” when you have completed entry of foods to the list.
J. Local Food List – Add, Edit, or Delete Foods in the List
You can access local food lists either at the account level or at the location level.
1. To access local food lists at the account level: Tap “Foods” in the main navigation. Tap on the “Filter” button and choose either “All” or “Local Food List”. Then, tap the “Apply button.

25
Locate the local food list you wish to work with and tap on its card.
Within the food list, select the following: a. The “Add Food Item” button to add more local foods to the local list b. The food item row to open the local food item for inspection and editing c. The food item option button to delete the local food item from the local list
2. To manage local foods at the location level: Tap “Locations” in the main
navigation. Locate and tap on the location associated to the local food list you wish to manage.
26
a. Under the Food Lists tab, select the following:
1. Tap on a local food list card to display the foods stored in the list for editing a. Tap the “Add Food item” button to add more foods to the local food list
b. Tap on a food item row to open the food for editing c. Tap the options menu for a food item to delete it from the local food list
2. Tap on the options button in a local food list card to edit the name of the list
or to deactivate the local food list
K. Batches – Adding, Editing or Deleting Batches are groups of foods across food lists and categories that are often
prepped together and, thus, have labels to be printed at the same time. Foods are stored in the batch with default quantities indicating the typical number of labels needed to support your operation. This saves time for your kitchen prep team.
By default, any location assigned a food list associated to a batch is eligible for the batch. However,
• Locations can be unassigned if the batch is not applicable to them

27
• Only those foods from food lists assigned to a location will be visible to them in the batch.
o For example, if a batch contains three foods from two different food
lists, a location assigned to only one of those food lists will see less than three foods in the batch. A location assigned to the two food lists will see all three foods in the batch.
• Locations can increase or decrease a food’s label print quantity within the flex
mobile app to match actual requirements for any given day. To manage batches, tap “Foods” in the main navigation. Then tap the “Batches” tab.
1. Tap the “Add Batch” button to create a new batch from scratch.
a. Enter a batch name and select one or more food lists that contain foods to add
to the batch. The “Next” button will activate.
28
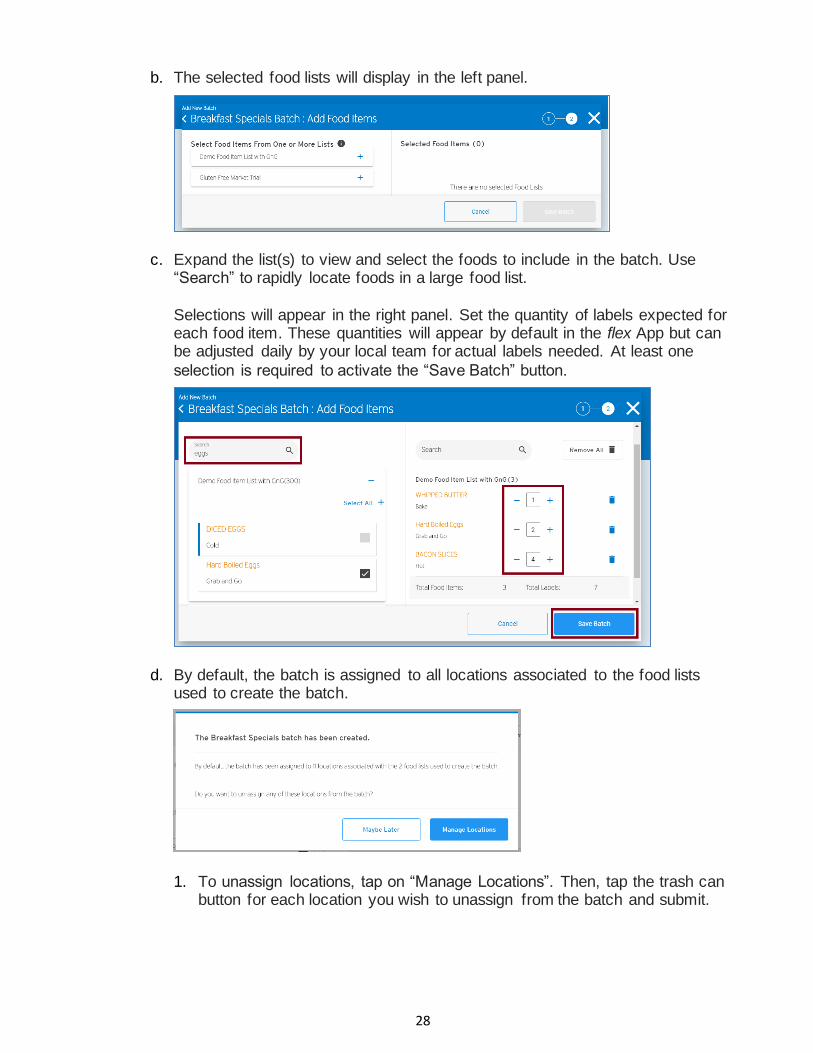
b. The selected food lists will display in the left panel.
c. Expand the list(s) to view and select the foods to include in the batch. Use “Search” to rapidly locate foods in a large food list.
Selections will appear in the right panel. Set the quantity of labels expected for each food item. These quantities will appear by default in the flex App but can be adjusted daily by your local team for actual labels needed. At least one
selection is required to activate the “Save Batch” button.
d. By default, the batch is assigned to all locations associated to the food lists used to create the batch.
1. To unassign locations, tap on “Manage Locations”. Then, tap the trash can
button for each location you wish to unassign from the batch and submit.

29
2. To rename, duplicate, or deactivate an existing batch: a. Locate the batch and tap on the options button for that batch. A drop-down
menu will display.
b. Alternatively, tap on a batch in the list to view its content before making changes. Tap on the options button in the light blue header, and a drop-down menu will display.
Tap “Edit Batch Details” to modify the name of the batch.
Tap “Duplicate Batch” to create a new batch using this existing batch as a basis. Then use the instructions below for editing a batch to modify it.
Tap “Deactivate Batch” to prevent its use by locations in the Flex mobile app.
3. To edit a batch

30
a. Tap on a batch in the list to view its content and make modifications
b. Adjust label quantities using the “-“ or “+” keys or tap into the field to enter a new default value. Entries are allowed between 0 and 999.
Be sure to tap the “Update” button at the bottom of the page to save changes.
4. To add or delete foods from the batch, tap on “Manage Food Items”.
A list of available food lists will display. You may keep current selections or:
• Tap on food lists with a check mark to remove them from the batch
• Tap on unselected food lists to use them in the batch.
Selected food lists will display in the left column and foods from any of those lists currently assigned to the batch in the right column.
• Selecting additional foods in the left column will move them to the right column.
• Tapping the trash can for a food in the right column will remove the food

31
from the batch and place it back in the left column.
• Tap “Save Changes” to save any modifications.
IV. LABEL TEMPLATES Label template options are primarily based on the size and the type of label you use (blank, yellow stripe, Day-of-the-Week). A wide variety of choices exist for food rotation, nutrition, and grab ‘n go labels.
Depending on the size label you use, food rotation label templates will most frequently support print out of the food’s primary description, prep date/time, shelf life information, calculated use by date, and initials for the individual who prepped the food. Some fields can be designated as mandatory entry before the label will print.
If you have a specific template need that is not currently supported by the template selection offered, please contact your corporate account manager or our Technical Support team.
V. ACCOUNT / LOCATION DETAILS AND SETTINGS A. Account Details
You can access your account settings by tapping on the settings button in the top right corner and choosing “Account Settings”
1. To edit basic account data, tap on the options button in the light blue header.
a. Tap “Edit Account” to modify your name, address, phone number or default language setting.
b. Tap “Deactivate Account” to block use of flex for labeling in the mobile app for
all your locations (NOT recommended)

32
2. To adjust settings that control use of the flex Website and flex App, tap on the
“Edit” button under the respective tab.
a. Website Settings:
1. “Daily Label Target” classifies locations on the website dashboard based upon your expectation of the number of labels to be printed daily at each
location. Those locations that label less than this target appear in the dashboard in the “Below Target” chart.
Tap “Edit” to increase or decrease the daily target value.
2. “Location Manager Permissions” settings impact anyone that you set up as a flex Website location manager. You can allow them to add local foods and/or batches for sole use by their location by turning on: a. “Create Local Foods” to create, edit, or delete local foods or local food
lists b. “Create Local Batches” to create, edit or delete local batches.
3. “Shifts for Shelf Life” supports definition of shelf life for your food items by
shift count. Any foods in your food lists that expire based upon elapsed

33
shifts will use the information stored here to calculate the “use by” date when printing labels via the flex App.
• You can use more than one shelf life basis in the same food
list (days/hours/minutes, EOD, and shifts).
• When shelf life is set by shift, the current shift is included in the shift count used to calculate the Use By information.
a. To set up your shifts, tap the “Edit” button on the Account Settings page. Then tap the button in the right column for “Define Shifts for Shelf Life Calculation”. A drop-down field will appear to select your total number of daily shifts (one to six).
b. Specify the start time of each shift by tapping into the time box and using the pop-up picker to select hours, minutes, and AM/PM. You may also add a shift message for label printout.

34
c. Below the last shift field is an option to “Treat Last Shift as Daily Close”.
Because a 24-hour period must be accounted for, the day’s last shift may span a calendar day even though your operation does not. This means that foods expiring in the day’s last shift could calculate a “Use By” date of the next day based on the 24-hour logic.
Turn on this option so that the “Use By” calculation results in displaying the day on which the shift ends because your locations physically close.
Example:
• Today is Nov 30
• Your restaurant physically closes at 11:00 PM
• You operate in three shifts, with Shift 1 starting at 4:00 AM and Shift 3 starting at 4:00 PM.
• For Shift 3, you’ve added a custom message “End of Shift 3”
• Based on the prep time of Food Item 1, suppose that the Use By calculation determines the food expires today at the end of Shift 3. If the “Treat Last Shift as Daily Close” setting o IS NOT ON, your label will print “Use By Sat 12/1 End of Shift
35
3” because Shift 3 ends at 4 AM the following morning o IS ON, your label will print “Use By Fri 11/30 End of Shift 3” to
match actual close
d. Tap the “SAVE” button to retain any website settings changes made on this page
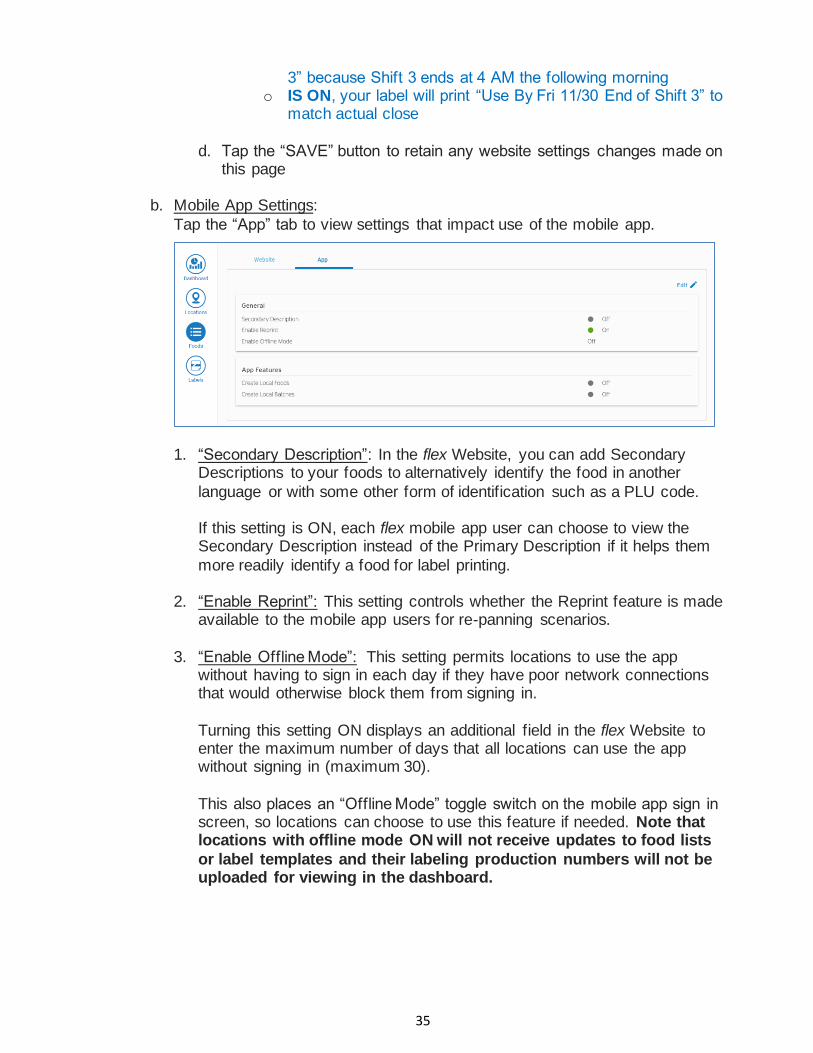
b. Mobile App Settings:
Tap the “App” tab to view settings that impact use of the mobile app.
1. “Secondary Description”: In the flex Website, you can add Secondary Descriptions to your foods to alternatively identify the food in another
language or with some other form of identification such as a PLU code.
If this setting is ON, each flex mobile app user can choose to view the Secondary Description instead of the Primary Description if it helps them
more readily identify a food for label printing.
2. “Enable Reprint”: This setting controls whether the Reprint feature is made available to the mobile app users for re-panning scenarios.
3. “Enable Offline Mode”: This setting permits locations to use the app
without having to sign in each day if they have poor network connections that would otherwise block them from signing in.
Turning this setting ON displays an additional field in the flex Website to enter the maximum number of days that all locations can use the app without signing in (maximum 30).
This also places an “Offline Mode” toggle switch on the mobile app sign in screen, so locations can choose to use this feature if needed. Note that locations with offline mode ON will not receive updates to food lists
or label templates and their labeling production numbers will not be uploaded for viewing in the dashboard.

36
Account Managers or Location Managers can adjust the maximum days
allowed at a location to a value less than the maximum set for the account.
• Example, Store A could set their offline mode to 10 days and Store B to 7 days, while all others use 30 days set at the account level.
4. “Create Local Foods”: COMING SOON a. Turning this setting on will allow location personnel to add local foods in
the flex mobile app.
5. “Create Local Batches”: COMING SOON a. Turning this setting on will allow location personnel to add local batches
in the flex mobile app.