preparing and managing exhibits -...
TRANSCRIPT

PREPARING AND
MANAGING EXHIBITS

i
Table of Contents
Native Files ..................................................................................................................................................... 1 Assigning Exhibit Numbers or Trial Exhibit Numbers ..................................................................................... 2 Working with Memos ..................................................................................................................................... 4 Working with Annotations/Markups ................................................................................................................ 7
To Open the Annotation Toolbar ................................................................................................................. 7 To Move and Resize the Annotation Toolbar ............................................................................................... 8 Using the Annotation Tools ......................................................................................................................... 9
The Selection Tool .................................................................................................................................. 9 Highlighting an Image ............................................................................................................................ 10 Drawing an Arrow ................................................................................................................................. 10 Drawing a Line ...................................................................................................................................... 11 Drawing a Rectangle ............................................................................................................................. 11 Drawing an Ellipse ................................................................................................................................. 11 Drawing Freehand ................................................................................................................................. 12 Redacting an Image .............................................................................................................................. 12 Adding Text .......................................................................................................................................... 13 Adding a Sticky Note ............................................................................................................................ 15 Applying a Stamp.................................................................................................................................. 16 Adding a Label ...................................................................................................................................... 17 Deskewing an Image ............................................................................................................................. 19 Saving Markups .................................................................................................................................... 21
Correcting Scanning Mistakes ...................................................................................................................... 22 Watermarks .................................................................................................................................................. 24 Applying a Footer to Images Using ImageBrander ........................................................................................ 26 Exporting Selected Items to Adobe PDF ...................................................................................................... 28 Printing Images ............................................................................................................................................ 29
Set Printer Properties................................................................................................................................ 30 Select Printer Output ................................................................................................................................ 30
Searching for Corrupt TIF Files Using ImageSleuth ....................................................................................... 37 Preparing Multimedia Files (Videos & Recordings) ........................................................................................ 38
The Multimedia Control Box ..................................................................................................................... 39 The Multimedia Toolbar ............................................................................................................................ 39
The following topics have been exported from the TrialDirector 6 Help System to enable easy printing. To access the most current information from the full Help system, open the Help menu in TrialDirector.


TrialDirector 6 Help - Preparing and Managing Exhibits
Copyright ©2010 inData Corporation. All Rights Reserved. 1
Native Files Native files are created in third-party programs outside of TrialDirector. For example, a document created in Microsoft Word has a file extension of .doc or .docx, depending on the Microsoft Office version. When a native file is loaded into TrialDirector, it retains is original format.
Native files can be viewed in TrialDirector and presented in Presentation mode utilizing a universal document viewer included in TrialDirector, but they cannot be annotated, redacted or zoomed using TrialDirector's tools. (Click here for more details about how to work with native files in Presentation mode.)
Note: Although Adobe PDF files are generally considered native files, they behave much more like image files in TrialDirector. For example, PDF files can be pre-annotated and redacted just like their TIF cousins. In Presentation mode, PDFs can be zoomed, paged through and annotated in the same way as TIF images. See Advanced PDF Support Features.
In the Case Explorer or Document Manager, click the Native tab to view a native file. If the tab is inactive (grayed out), native viewing is not supported for the file type or the required application is not installed. See Supported File Formats for more information.

TrialDirector 6 Help - Preparing and Managing Exhibits
2 Copyright ©2010 inData Corporation. All Rights Reserved.
Assigning Exhibit Numbers or Trial Exhibit Numbers TrialDirector enables you to enter Exhibit Numbers (typically your own numbering method as you organize your case) and the actual Trial Exhibit Numbers. You can assign an Exhibit Number or Trial Exhibit Number for a specific item, or you can select multiple items and have numbers assigned in sequence automatically. If you no longer want to associate numbers with items, you can remove them by reassigning a blank sequence.
To assign an Exhibit or Trial Exhibit Number to an item:
1. From Case Explorer or Document Manager, right-click on the item and click Properties. The Item Properties dialog box appears.
2. Type the number in the Exhibit # or Trial Exhibit # box.
3. Click Save, or click Next to go to the properties for the next item.
To assign Exhibit or Trial Exhibit Numbers to multiple items:
1. From Case Explorer or Document Manager, press and hold CTRL while you select all of the items, making sure to select them in the order you want numbers to be assigned. Then, right-click and select Assign Trial Exhibit Numbers to Selected Items or Assign Exhibit Numbers to Selected Items.
2. Follow the instructions in the dialog box to enter a starting number.
Caution: Any existing Exhibit or Trial Exhibit Numbers will be overwritten, and the numbers will be assigned in sequence regardless of whether a number is in use for another item in your case. Be sure to specify a unique starting number.
3. Under Choose Format, select one of the following:
• To assign numbers at the document level only, select Increment number for each document.
• If each page of a document should have its own Exhibit or Trial Exhibit Number, select Increment number for each page. After you select this option, select Retain default format to assign a number within the same series to each document and page, or Insert suffix per page to assign a number from a hyphenated sub-series to each of the document pages.
4. Click OK. TrialDirector assigns the numbers to each item.

TrialDirector 6 Help - Preparing and Managing Exhibits
Copyright ©2010 inData Corporation. All Rights Reserved. 3
To remove Exhibit or Trial Exhibit Numbers:
1. From Case Explorer or Document Manager, press and hold CTRL while you select all of the items.
2. Right-click and select Assign Trial Exhibit Numbers to Selected Items or Assign Exhibit Numbers to Selected Items.
3. In the dialog box, ensure nothing is entered as a starting number.
4. Under Choose Format, select the level at which the numbers are currently assigned. For example, if the items are currently marked with the exhibit numbers EX001-1, EX001-2, EX001-3, EX002-1, etc., be sure to select Increment number for each page and Insert suffix per page.
5. Click OK. TrialDirector removes the existing numbers.

TrialDirector 6 Help - Preparing and Managing Exhibits
4 Copyright ©2010 inData Corporation. All Rights Reserved.
Working with Memos Topics:
Attaching Memos
Opening Memos
Deleting Memos
Loading Memos from a Batch File
Re-Indexing Memos
Working in either the Case Explorer or the Document Manager, you can attach a memo to any item except a DVT clip. The Search tool helps you find memos based on searching the memo text. A small red or blue paperclip on the Item Type Icon and a yellow Memo Indicator in the status bar indicate that an item has a memo.
Attaching Memos
1. Select the desired image in the Case Explorer or Document Manager.
2. Select View Item Memo from the Documents menu.
3. The Memo window is a text editor, allowing you to type in your memo.
4. After typing the memo, select Save Changes from the Memo Window's File menu.
5. Close the window by clicking the X in the upper-right corner or selecting Close in the File menu.
Opening Memos
1. Select View Item Memo from the Documents menu or right-click the item and select View Item Memo from the shortcut menu.
2. The Memo window appears, allowing you to view or edit the memo.

TrialDirector 6 Help - Preparing and Managing Exhibits
Copyright ©2010 inData Corporation. All Rights Reserved. 5
3. If the memo is edited, it must be saved again by selecting Save Changes from the Memo Window's File menu.
Deleting Memos
1. Select the desired item in the Case Explorer or Document Manager and open the memo.
2. When the Memo window appears, choose Remove Memo from the Memo Window's File menu.
3. Close the Memo Window.
Loading Memos from a Batch File
If you have a memo field in a third party database, you can transfer the memo information into TrialDirector memos by loading memos from a batch file.
1. Open the Memo Window by selecting View Item Memo from the Documents menu.
2. Choose Load Memo Text From Batch File from the File menu.
3. Browse to the location of the memo batch file, select the file and click Open to begin loading the memos from the batch file.
4. If there are Item IDs in the memo batch file that cannot be found in the Case Explorer/Document Manager, a warning message will appear, asking you if you want to view a list of the memos that could not be added. Click Yes to view the list of memos that could not be added or No to return to the Case Explorer.
• If you click Yes, the following file opens in the default text viewer (i.e., Notepad):
• The memoadd.log file keeps track of all the memos that could not be added to the case due
to missing Item IDs. This file is saved in the TrialDirector folder (i.e., the folder where TrialDirector is installed). Any time Item IDs cannot be found during the memo loading process, TrialDirector will copy the associated lines from the batch file to the memoadd.log file.
Note: Memos cannot be attached to Digital Video Transcripts.

TrialDirector 6 Help - Preparing and Managing Exhibits
6 Copyright ©2010 inData Corporation. All Rights Reserved.
Re-Index Memos
If TrialDirector was closed without shutting down properly, you may need to re-index the memos to refresh the database so that you can view the memos properly.
1. Open the Memo window by selecting View Item Memo from the Documents menu.
2. When the Memo window appears, choose Re Index All Memos from the File menu.
3. When TrialDirector finishes refreshing the database, close the Memo window by clicking the X in the upper-right corner or choosing Close from the File menu.

TrialDirector 6 Help - Preparing and Managing Exhibits
Copyright ©2010 inData Corporation. All Rights Reserved. 7
Working with Annotations/Markups Use TrialDirector's extensive set of annotation tools to mark up images, PDF files, and photographs. Here are some of the things you can do with the annotation tools:
• Draw arrows, lines, circles and rectangles, selecting the color and line width, as well as the shape
• Redact confidential portions of an item before presenting it in court.
• Use the Label tool to apply a pre-defined or customized Exhibit Stamp to your images. The Label tool pulls exhibit numbers from the Trial Exhibit Number field, filling in each label appropriately.
• Stamp your images with a variety of "rubber stamps" (confidential, checks and x's, or create your own)
Annotating images in the Case Explorer or the Document Manager gives you a chance to fine-tune complicated annotations when you are not under as much pressure as you may be in the courtroom. This is often called "pre-treating" your exhibits. (Using annotations when you're in Presentation mode is usually referred to as annotating exhibits "on-the-fly.") You can call up your pre-treated exhibits in Presentation mode as easily as you can present any other item in the case.
An annotation is simply an overlay on the actual image file, so you are not doing anything to permanently place that markup on the image. When you save the marked up image, it is saved as a "build." You work with a build just like other items in the Case Explorer. Builds can be sent to a workbook, printed, displayed on your desktop or called up in Presentation mode. It is important, however, to pay attention to how you save the annotated image. See Saving Markups for details.
Caution: If you have used the Layers annotation tool in earlier versions of TrialDirector, you will notice that Layers are no longer available in TrialDirector 6. (You may use "builds" instead.) If you're moving a case from an earlier version of TrialDirector to TrialDirector 6 and you have used layers, you will want to check each of those items. Previously created layers will all be compressed now into the topmost layer of your document.
To Open the Annotation Toolbar
Click the Annotation Tool on the Toolbar -- OR --
Select Show Image Annotation Toolbar from the Documents menu
When the Annotation Tool is selected, a second row of tools specifically relating to annotations/markups appears on your screen. Hover the cursor over any annotation tool to see the tool description.

TrialDirector 6 Help - Preparing and Managing Exhibits
8 Copyright ©2010 inData Corporation. All Rights Reserved.
To Move and Resize the Annotation Toolbar
The annotation toolbar may be "torn off" so that it is floating on your desktop. When the toolbar is floating, it can be resized and moved to any location on your desktop.
1. Click on the vertical bar at the far left side of the annotation toolbar.
2. When the cursor becomes a double arrow you can move the toolbar anywhere on your desktop.
• To size the annotation toolbar, hover your cursor over any edge of the toolbar, hold down the left mouse button and drag until the toolbar is sized as you want it.
• To return the toolbar to its original location, drag it back to the left side of the screen, just under the main toolbar.
• To close the toolbar, click on the X in the upper right corner of the toolbar.

TrialDirector 6 Help - Preparing and Managing Exhibits
Copyright ©2010 inData Corporation. All Rights Reserved. 9
Using the Annotation Tools
Note: When an annotation tool is enabled, the tool button is outlined in blue. If no annotation tools are enabled, you are in rubber-band zoom mode.
The Selection Tool
Use the Selection tool to edit, resize, move or delete an annotation.
Click on the Selection Tool to enable it. (You'll know an annotation tool, including the Selection Tool, is selected because the tool button is outlined in blue.)

TrialDirector 6 Help - Preparing and Managing Exhibits
10 Copyright ©2010 inData Corporation. All Rights Reserved.
To select an existing markup:
Click anywhere on the markup -- OR --
Click and drag a box around one or more markups. All markups completely within the area of the box are selected.
Small squares ("handles") appear on an annotation indicating it is selected.
• Click on any handle to resize the selected annotation.
• Hit the Delete key on your keyboard to remove the selected annotation.
• To move an annotation, hover the cursor over the selected annotation, hold down the left mouse button and drag the annotation to the new position.
To resume normal rubber-band zoom mode:
• Disable the Selection Tool by clicking on it again.
Highlighting an Image
Use the Highlighter tool to highlight an area of an image you wish to draw attention to.
When you choose a color from the Color Selection Palette, the selected color appears in the Current Tool Color box. To draw the highlight, click and drag the cursor in a rectangle around the area you want to highlight.
It is not advisable to use a dark color for the highlight if you are highlighting text, since the text will be difficult to see. If you are attempting to hide text, use the Redaction tool.
Note: If you apply a solid white or solid black highlight to an image, it will appear as a white or black redaction in Presentation Preview and Presentation mode.
Drawing an Arrow
Use the Arrow tool to draw an arrow pointing to an important point on an image.
1. Select the color, line width and pointer size for the arrow.
2. Place the cursor where you want the point or head of the arrow to appear.
3. Click and drag the cursor away from the head in any direction to the desired length of the arrow.

TrialDirector 6 Help - Preparing and Managing Exhibits
Copyright ©2010 inData Corporation. All Rights Reserved. 11
Drawing a Line
Use the Line tool to underline an important point on an image, for example.
1. Choose the desired color and line width of the line.
2. Click and drag the cursor below what you want to underline.
Drawing a Rectangle
Use the Rectangle tool to place a box around an area of an image.
1. Choose the desired color and line width.
2. Click and drag the cursor in a rectangle around the area you want to encompass in the box.
Drawing an Ellipse
Use the Ellipse tool to place an ellipse or circle around an area of an image.
1. Choose the desired color and line width.
2. Click and drag the cursor around the area you want to encircle. The starting point will not be on the ellipse; it will be the maximum height and farthest left position of the ellipse as shown below.

TrialDirector 6 Help - Preparing and Managing Exhibits
12 Copyright ©2010 inData Corporation. All Rights Reserved.
Drawing Freehand
Use the Freehand tool to draw freehand on an image.
1. Choose the desired color and line width.
2. Click and hold the mouse button and drag the cursor to draw a line freehand.
Redacting an Image
Use the Redaction tool to redact or cover a portion of the image.
1. Select the Redaction tool.
2. Click and drag the cursor in a rectangle around the area you want to redact. (Sometimes, it is helpful to enlarge the image if you need to redact small portions of text.)
• A transparent gray box covers the selected area. The area inside the gray box will still be visible while you are in working in the Case Explorer or Document Manager.
• When the image is opened in the Presentation mode, the area within the redaction box will be invisible. The word "Redacted" will appear on the image when presented.
Redactions are temporary overlays on the image while in the program. There are three ways to make a redaction permanent:
Print the image with markups (see Print Images).
Export the image with markups (see Export Workbook Contents).
Perform a GrabScreen in Presentation Mode

TrialDirector 6 Help - Preparing and Managing Exhibits
Copyright ©2010 inData Corporation. All Rights Reserved. 13
Adding Text
Use the Text tool to add text to an image.
1. Choose the desired text color.
2. Click and drag the cursor in a rectangle around the area where you would like to place the text.
3. Type the text and click elsewhere on the image when you are done. The box disappears, leaving only the typed text.
To Edit the Text in a Text Box
1. Enable the Selection tool by clicking on it. (A blue box will appear around the Selection tool when it is enabled.)
2. Double-click on the text box to enter edit mode. The cursor appears on the left side of the text inside the box.
3. Position the cursor where you want to make the edit edit or add text and type your revision. The text box is always in insert mode.
4. Click elsewhere on the image when the changes are complete.
To Change the Font in a Text Box
1. Select the text box using the Selection tool.
2. Right-click on the box and select Choose Font from the drop-down menu.
3. Select the desired font, color and size for the text.
4. Click OK to save the changes or Cancel to abandon the changes.
To Adjust the Angle of Text in a Text Box
1. Select the text box using the Selection tool.
2. Right-click on the text box and select Adjust Angle from the drop-down menu.
3. Slide the slider bar to the left or right to change the angle at which the text is displayed inside the box.
4. Click OK to save the changes or Cancel to abandon the changes.
The text is rotated clockwise relative to the upper-left corner of the text box. The text may exceed the boundaries of the text box since the text box remains in the original position regardless of the position of the angled text. To remedy this, re-size the text box by dragging the handles.

TrialDirector 6 Help - Preparing and Managing Exhibits
14 Copyright ©2010 inData Corporation. All Rights Reserved.
To Set the Background Color of a Text Box
1. Select the text box using the Selection tool.
2. Right-click on the box and select Set Background Color from the drop-down menu.
3. Select a color.
4. Click OK to save the changes or Cancel to abandon the changes.
Note: The background mode must be tinted or opaque to display the color.
To Set the Background Mode of a Text Box
1. Select the text box using the Selection tool.
2. Right-click and select Set Background Mode from the drop-down menu.
3. Select the desired background mode. The following options are available:
Option Description
Opaque The background color is solid.
Tinted The background color is visible, but the image area behind the text box shows through.
Transparent The background color is invisible.
4. Click OK to save the changes or Cancel to abandon the changes.

TrialDirector 6 Help - Preparing and Managing Exhibits
Copyright ©2010 inData Corporation. All Rights Reserved. 15
Adding a Sticky Note
Use the Sticky Note tool to place a note on the item. Notes may be useful if you need to clarify illegible handwriting or text in another language.
1. Choose the desired color for the background of the sticky note.
2. Click and drag the cursor in a rectangle around the area where you want to place the note.
3. Type the text into the sticky note.
4. Click elsewhere on the image when you are done.
To Edit the Text in a Sticky Note
1. Select the sticky note using the Selection tool.
2. Double-click on the box to enter edit mode. The cursor will appear on the left side of the text inside the box.
3. Position the cursor where you would like to change or add text and begin typing. The note is always in an insert mode.
4. Click elsewhere on the image when your changes are complete.
To Change the Font in a Sticky Note
1. Select the note using the Selection tool.
2. Right-click on the sticky note box and select Choose Font from the drop-down menu.
3. Select the desired font, color and size for the text.
4. Click OK to save the changes or Cancel to abandon the changes.
To Set the Background Color of a Sticky Note
1. Select the sticky note using the Selection tool.
2. Right-click on the sticky note and select Set Background Color from the drop-down menu.
3. Select a color.
4. Click OK to save the changes or Cancel to abandon the changes.

TrialDirector 6 Help - Preparing and Managing Exhibits
16 Copyright ©2010 inData Corporation. All Rights Reserved.
Note: The background of a note is always opaque.
Applying a Stamp
Use the stamp tool to apply a "rubber stamp" bitmap to the image.
1. Click the drop-down arrow on the right side of the Stamp tool.
2. From the list, select which stamp you want to apply.
3. Click on the image where you want the stamp to appear.
4. To resize or move the stamp, enable the Selection tool and use the handles to resize the stamp.
The stamp remains active until another tool is selected. This means that each time you click the mouse, the stamp appears on the image.
• To Add a stamp to the palette, select Add Stamps from the Stamp tool menu
• To remove a stamp, select Delete Stamps from the Stamp tool menu
Note: Stamp objects are intended for use with bitmaps that use no more than the standard 20 Windows colors.

TrialDirector 6 Help - Preparing and Managing Exhibits
Copyright ©2010 inData Corporation. All Rights Reserved. 17
Adding a Label
Use the Label tool to place a Label on the item. You can select from several labels or create your own.
To Apply and Place a Label
1. Select the Label tool.
2. Move the cursor to the area on the exhibit where you wish to apply the exhibit and click the left mouse button to apply the label.
To move a label Press [Shift] + left click on the label and drag it to the new place.
To delete a label Press [Shift] + right click on the label.

TrialDirector 6 Help - Preparing and Managing Exhibits
18 Copyright ©2010 inData Corporation. All Rights Reserved.
To Select a Label
1. Click on the arrow to the right of the Label tool to open the Label menu.
2. Choose Select Label. On the Select tab, you can set the following options:
Edit/Delete a current label style
Set the label number using:
Existing Trial Exhibit Number
A sequence of your choice
Customized text
Label # Source Field
Page Id
Trial Exhibit No.
Exhibit No.

TrialDirector 6 Help - Preparing and Managing Exhibits
Copyright ©2010 inData Corporation. All Rights Reserved. 19
To Design a Label
1. To design your own label, click on the Design tab.
2. Set the following options:
Label Style
Color
Font style
Line captions
Exhibit #
Border and, if there is a border, whether it has square or rounded corners.
3. Use the Preview window to view the developing label. Edit the label as needed, based on the Preview.
4. Click the Create Label button to create a new label.
5. Click OK to close the design window. The newly created label will be added to the existing drop-down list of choices.
Deskewing an Image
When a document is scanned, a page may not feed into the scanner properly, resulting in a distorted or "skewed" image. Use the Document Aligner feature to improve the appearance and legibility of the image. Deskewing works at the page level, not the document level, so you need to select an individual page within a document. (For help with other scanning mistakes, such as missing pages, see Correcting Scanning Mistakes.)
Note: Deskewing is not supported for PDF documents or for multi-page TIF files. The original image is not impacted by deskewing. A copy of the deskewed version of the image is maintained within the case folders.
1. Click on the Annotation Tool to open the Annotation Toolbar.

TrialDirector 6 Help - Preparing and Managing Exhibits
20 Copyright ©2010 inData Corporation. All Rights Reserved.
2. Locate and display the page to be deskewed in the image viewer. (Be sure to select the page, not the document.)
3. Select the Deskewing Tool on the Annotation Toolbar and bring your cursor over the image. The cursor will look like the Deskewing tool (a small square with a red border).
Note: Be sure the Deskew tool is the only active Annotation Tool.
4. Hold the left mouse button down and draw a line that parallels the margin of the image. (It may be easier to draw this line closer to the right or left margin so you can use the margin as a guideline.) When the green line is aligned correctly, release the mouse button. You may notice the image shift as it is deskewed.
5. If you are satisfied with the change, select OK in the Save Change? dialog. If you need to make more adjustments, hit Cancel and return to step 3.

TrialDirector 6 Help - Preparing and Managing Exhibits
Copyright ©2010 inData Corporation. All Rights Reserved. 21
Saving Markups
For Markups to appear the when an image is displayed, you must save the markups you applied to the image. You have two choices: save the markups on the original image or save the markups on a separate copy of the image, preserving the original image without any annotations.
Click the Save Markups on Current Page to save the markups directly on the original image.
For example, if you choose not to create a new revision for Ex000293, the markups will be saved to the original image so that the next time you view Ex000293 in TrialDirector, the markups will appear.
Select Save Markups to a New Revision of This Page to create a marked up copy of the original.
For example, if you choose to create a new revision for Ex000293, the original image remains intact. A sub-item is created, appearing under the original item in the Case Explorer. This is called a "build." The build will have the same name as the original item followed by a suffix. For example Ex000293-001. Subsequent revisions will be automatically incremented, so that you would see Ex000293-002,Ex000294-003, and so on.
Note: If you create multiple revisions and then delete one, the other revisions are not renumbered.

TrialDirector 6 Help - Preparing and Managing Exhibits
22 Copyright ©2010 inData Corporation. All Rights Reserved.
Correcting Scanning Mistakes During the scanning process, mistakes sometimes happen. For example, multiple documents may be incorrectly scanned as a single document. The opposite problem may occur as well. What should have been treated as a single document was scanned as multiple documents. Or maybe a page is skipped during scanning. TrialDirector lets you correct these issues easily and quickly from the Case Explorer or the Document Manager.
You may also want to insert a color picture that was scanned separately from the black-and-white images of a document. This can easily be done with TrialDirector's Insert Page feature.
Note: You cannot correct scanning errors in PDFs or multi-page TIF files. You can use TrialDirector to split multi-page TIF files into single-page TIF files through an export process.
Inserting a Document Break
To separate one document into several documents, insert a document break:
1. In Case Explorer or Document Manager, select the page where you need the new document to begin.
2. Right-click and select Insert Document Break from the shortcut menu. The selected page is now the first page of the next document.
Removing a Document Break
To combine multiple documents into a single document, remove a document break:
1. In Case Explorer or Document Manager, select Page 1 of the document you wish to combine with the previous document.
2. Right-click and choose Remove Document Break from the shortcut menu. Both documents are now combined.
Inserting a Page
1. In Case Explorer or Document Manager, expand the document in order to see the individual pages.
2. Right-click on the page that should precede the page you are inserting. Select Insert Page from the shortcut menu.
3. In the Insert Page dialog box, the new page ID is displayed. The page ID should be the ID number of the page on which you right-clicked followed by a suffix (i.e., A, B, C, etc.). This number can be changed after the insertion process is completed.
4. Browse for the page to be inserted:
• If you have not yet scanned the page to be inserted, place the page in your scanner and click Get Page from Scanner. (For more information on scanning documents, click here.) (Select the checkbox to Show Controls When Scanning if you want to access your scanner settings.)

TrialDirector 6 Help - Preparing and Managing Exhibits
Copyright ©2010 inData Corporation. All Rights Reserved. 23
• If the page has been scanned, click Browse and locate the file.
• By default, TrialDirector displays in the Browse window files ending with the .TIF extension. If the file you are looking for ends in .JPG, .BMP or .PNG (typically color documents), then change the Files of Type to Pictures & Graphics in the Browse dialog.
5. Click OK. The new page now appears in Case Explorer and Document Manager.
To Change the Page ID After Page Insertion
1. Open the Documents menu.
2. Be sure Enable Item I.D. Field Editing is enabled.
3. Right-click on the item ID of the page you want to renumber and choose Edit from the menu.
4. Click on the number in the Doc ID field so that it is selected and make your change.
5. Hit the Enter key on your keyboard to save the change then hit the ESC key to close the edit box.

TrialDirector 6 Help - Preparing and Managing Exhibits
24 Copyright ©2010 inData Corporation. All Rights Reserved.
Watermarks Create a Watermark
1. Open the Annotation Toolbar and annotate an image with the annotation that you want to use as a watermark.
2. When you have created the desired annotation, click the [Save current image's markups as a
global markup] button from the toolbar.
3. Enter the Name for the Watermark in the resulting dialog box
5. Click [OK]. The watermark will be added to the list of available watermarks. Click [Cancel] to exit without saving.
Set the Global Watermark
When printing or exporting images, you can choose to apply a global watermark to all printed or exported images.
1. To set the global watermark for printed or exported images, click the [Pick] button.

TrialDirector 6 Help - Preparing and Managing Exhibits
Copyright ©2010 inData Corporation. All Rights Reserved. 25
2. A selection screen appears. Click on the desired watermark.
A preview of the selected watermark will appear in the window next to the watermarks list.
3. Click [Set].
Note: There will be no visible indication on the images in the Case Explorer that a watermark has been set.
The printed or exported images will have the selected watermark applied.

TrialDirector 6 Help - Preparing and Managing Exhibits
26 Copyright ©2010 inData Corporation. All Rights Reserved.
Applying a Footer to Images Using ImageBrander ImageBrander is used to permanently mark image files with an identifying footer. This is useful to identify the source of images, especially when sharing images with opposing counsel. It can also be used to mark all images used in your case, if desired.
1. From the Tools menu, select the ImageBrander... command. The ImageBrander Utility dialog opens.
2. Enter Source and Destination folders in the fields provided. A check box is provided if your Source folder is also your Destination folder.
Note: When adding a brand to a file, the branded files are duplicated in the Destination folder. If you set the Destination folder to be the same as the Source folder, the files in the Source folder will be branded. This process is not reversible!
3. In the Image Options box, select the image types to be branded, token formatting, and border option. If an incremented number will be included, enter the starting number in the field provided.
Tokens are codes that you can use to insert certain types of information in the brand. Click the Tokens button to display the list of available tokens.

TrialDirector 6 Help - Preparing and Managing Exhibits
Copyright ©2010 inData Corporation. All Rights Reserved. 27
4. In the Image Footer box, enter your desired brand using text or tokens. To add the brand to the images in your Source folder, click Brand.
Using the tokens shown in the Image Footer example above produced the brand shown below. Note that a period was added between the F & E tokens in the Left Align field to make the file name/file extension appear normal.

TrialDirector 6 Help - Preparing and Managing Exhibits
28 Copyright ©2010 inData Corporation. All Rights Reserved.
Exporting Selected Items to Adobe PDF You can use Document Manager to export documents directly to Adobe PDF.
Note: Before you use this feature, keep the following in mind:
• A printer driver must be installed on your computer. If you do not have a physical printer to connect to, install any of the printer drivers built in with Windows (Control Panel > Printers and Faxes), or install a virtual PDF printer application (such as CutePDTM
• Creating a PDF file from selected pages of different documents will result in creation of a single PDF file. This feature is not designed to create new PDF files at document boundaries.
).
• Order of the items in the new PDF file is determined by ID, not by the order in which you select the items. For example, if you select TREX005, TREX003, and TREX009, they will be listed in the following order in the PDF: TREX003, TREX005, TREX009.
• If you select a Microsoft PowerPoint, Excel, or Word native document to include, a print placeholder will appear in its place within the PDF file.
1. Hold down the CTRL key and click the ID (not the check box) for each item you want to include in the PDF document as shown in this example:
2. Right-click to open the menu and select Make PDF file from Selected Items.
3. In the dialog box that opens, either enter a file path and name, or click Browse to navigate to a location and specify a file name.
4. To include any annotations (markups) that you have added and saved to items in the workbook, select Apply All Markups Permanently to Exported Images.
5. If you selected the previous option, you can also select Convert all Highlight markups to redactions if needed. The images in the PDF file will include the "Redacted" box wherever you used the Highlighter tool on the original images.
6. When the confirmation box appears indicating the file name and location, click OK.

TrialDirector 6 Help - Preparing and Managing Exhibits
Copyright ©2010 inData Corporation. All Rights Reserved. 29
Printing Images
Topics:
Set Printer Properties
Select Printer Output
Select Print Range
Open the Print window by doing one of the following:
Choose Print from the File menu.
Click the [Print] button on the Toolbar.
Select Print Selected Item(s) from the Items menu.
Right-click on the record selector of any item and select Print Selected Item(s) from the drop-down menu.
This window allows you to select a printer, print output, print range, and number of copies. The print options are described in the sections that follow.
Once all print options have been set, click [Print] to begin printing. If the required volume is not mounted, a message will appear, asking you to mount the appropriate volume. Mount the volume and click OK to continue printing.

TrialDirector 6 Help - Preparing and Managing Exhibits
30 Copyright ©2010 inData Corporation. All Rights Reserved.
Set Printer Properties
The Printer section of the Print window allows you to select a destination printer and set the printer and page properties.
To select a printer, click the arrow in the Name field and select the desired printer from the list. The current properties for the selected printer appear beneath the printer name.
To change the page layout properties, click the [Print Setup...] button.
To change the printer properties, click the [Print Setup...] button then the [Properties] button on the subsequent window.
Note: For information on setting up printers, print properties or page layout, refer to your Microsoft Windows documentation.
Select Printer Output
The Print What? section of the Print window allows you to select the desired printer output, as well set the options for the selected output.
Topics:
Images/Pages
Images/Pages (Thumbnails)
Images/Pages (List Report)
Barcode Sheets
Images/Pages
Images/Pages can be printed for Document and Photo item types. This option prints one image per page.
To print images, select Images / Pages in the Print What? selection box.

TrialDirector 6 Help - Preparing and Managing Exhibits
Copyright ©2010 inData Corporation. All Rights Reserved. 31
Option Description
Print with Markups Prints the images with any markups (annotations) that may have been applied.
Note: The markup (annotation) layers that were visible when the item was saved will be the ones that are printed.
Print with Watermark
Applies the designated global watermark to all printed images.
The [Pick] button allows you to set the global watermark.
Main Paper Tray Determines which printer tray contains the paper that the images will be printed on.
Print Slipsheets Inserts a slipsheet before the first page of each document printed.
The field directly below this checkbox determines which printer tray contains the paper that will be used as slipsheets.
Note: TrialDirector will only print a slipsheet before items that are the first page of a document. If you have selected items from the middle of documents, the slipsheet feature may not be suitable for your printing job.
Print with Page Footers
Prints the images with either the default footer (Item ID, Document ID, and Page Number) or a custom footer, if one is selected
TrialDirector 6 Help - Preparing and Managing Exhibits
32 Copyright ©2010 inData Corporation. All Rights Reserved.
Add Barcode in Footer
Prints a barcode in the footer of the images when the Print with Page Footers option is selected.
Use Custom Footer Prints the images with a customized footer when the Print with Page Footers option is selected (see Custom Footer Commands).
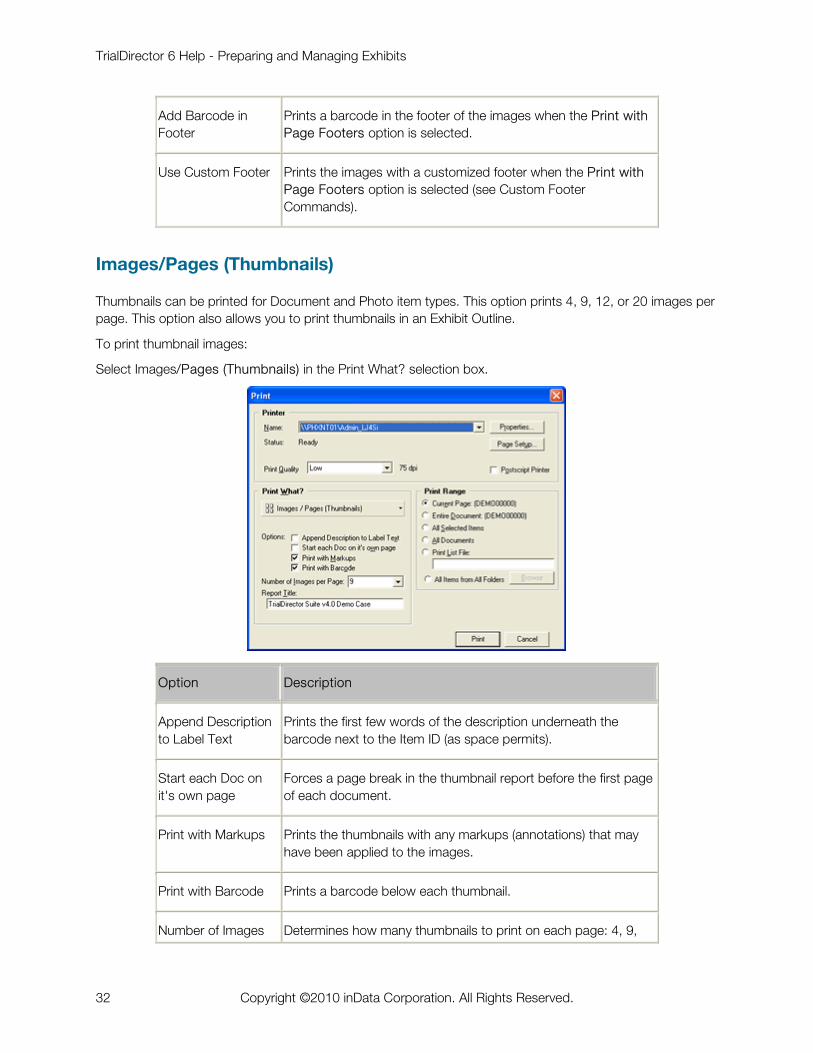
Images/Pages (Thumbnails)
Thumbnails can be printed for Document and Photo item types. This option prints 4, 9, 12, or 20 images per page. This option also allows you to print thumbnails in an Exhibit Outline.
To print thumbnail images:
Select Images/Pages (Thumbnails) in the Print What? selection box.
Option Description
Append Description to Label Text
Prints the first few words of the description underneath the barcode next to the Item ID (as space permits).
Start each Doc on it's own page
Forces a page break in the thumbnail report before the first page of each document.
Print with Markups Prints the thumbnails with any markups (annotations) that may have been applied to the images.
Print with Barcode Prints a barcode below each thumbnail.
Number of Images Determines how many thumbnails to print on each page: 4, 9,

TrialDirector 6 Help - Preparing and Managing Exhibits
Copyright ©2010 inData Corporation. All Rights Reserved. 33
Per Page 12 or 20. The outline option prints a report that includes the Item ID, description, memo, Exhibit Number, Trial Exhibit Number, thumbnail, and barcode.
Report Title Allows you to enter a report title, which will be printed in the upper-right corner.
Images/Pages (List Report)
List reports can be created for any item type, and can be used to organize exhibits in a trial notebook.
To print an exhibit report
Select Images/Pages (List Report) in the Print What? selection box.
Option Description
Include Memo Preview
Prints the first few words of the memo in the notes area of the report (as space permits).
Report Title Allows you to enter a report title, which will be printed in the upper-right corner.

TrialDirector 6 Help - Preparing and Managing Exhibits
34 Copyright ©2010 inData Corporation. All Rights Reserved.
Barcode Sheets
Barcode sheets can be printed for any item type and can be used to load items in the TrialDirector presentation module by scanning them with a barcode gun.
To print barcodes:
Select Barcode Sheets in the Print What? selection box.
Option Description
Append Description to Label Text
Prints the first few words of the description underneath the barcode next to the Item ID (as space permits).
Format Allows you to select which label form you are using.
There are two label size choices available. If you do not plan to apply the barcodes to the original exhibits, you can print the barcodes on a plain sheet of paper and use it to recall exhibits during trial.
Select Barcode Field Determines whether the barcodes will be based on the Page ID (Item ID), Exhibit Number, or Trial Exhibit Number.
2. To adjust the barcode positioning on the label sheet, click the [Advanced] button.

TrialDirector 6 Help - Preparing and Managing Exhibits
Copyright ©2010 inData Corporation. All Rights Reserved. 35
Option Description
Barcode Label Form Displays the label you selected in the Format field on the Print window.
Overall Vertical Adjustment
Shifts all the barcodes on the page up or down, relative to the top edge of the printable area.
Overall Horizontal Adjustment
Shifts all the barcodes on the page to the left or right, relative to the left edge of the printable area.
Row Offset Adjustment
Adjusts the space allowance between the rows of barcodes.
Column Offset Adjustment
Adjusts the space allowance between the columns of barcodes.
Barcode Height Determines the height of each barcode on the page.
Label Width Determines the width of the barcode. Not all barcode readers can read extremely thin barcodes.
All measurements are in inches. The first two fields may contain negative numbers if you want to exceed the edges of the printable area.
Note: If your barcodes are unreadable by your barcode reader, change the Label Width to a larger value (like 2). This spaces the bars in the barcode farther apart on high resolution printers. Your barcodes may also be unreadable if the Item IDs are not between 5 and 12 characters.
3. When the settings are as desired, click [Save] to save your changes or click [Cancel] to abandon the changes and return to the Print window.

TrialDirector 6 Help - Preparing and Managing Exhibits
36 Copyright ©2010 inData Corporation. All Rights Reserved.
Select Print Range
The Print Range section of the Print window allows you to select the range of items you would like to print, based on your current selections.
Option Description
Current Page This option prints the item that is currently selected in the Case Explorer.
Current Document This option prints the document that is currently active in the Case Explorer.
All Selected Items This option prints all items currently selected in the Case Explorer (see Select Items).
All Documents This option prints all items on the selected tab (documents, photos, or folder contents).
Note: The Print window will offer the option to print All Documents, All Photos, or Folder [folder name], depending on which item type tab is currently active.
Print List File This option prints all documents or page ranges listed in a previously generated print list file (see the sample Print List File).
Click the [Browse] button next to this option to select the list file from which you would like to print.

TrialDirector 6 Help - Preparing and Managing Exhibits
Copyright ©2010 inData Corporation. All Rights Reserved. 37
Searching for Corrupt TIF Files Using ImageSleuth ImageSleuth is used to search for corrupt or mislabeled .tif files.
1. From the Tools menu, select the ImageSleuth... command. The ImageSleuth Utility dialog opens.
2. In the Enter Starting Directory Path field, specify the file folder that you would like to verify. A default Error Log location will be specified for you, but you can change it if desired.
3. Click Analyze. The ImageSleuth utility will open each file in the specified directory to verify that it is a correctly formatted .tif file. Each file will briefly display in the document window during this process.
4. When the analysis is complete, a completion dialog will appear. If errors are detected, open the log file to identify the affected files.

TrialDirector 6 Help - Preparing and Managing Exhibits
38 Copyright ©2010 inData Corporation. All Rights Reserved.
Preparing Multimedia Files (Videos & Recordings) Topics:
The Multimedia Control Box
The Multimedia Toolbar
Play a Multimedia File
Pause a Multimedia File
Stop a Multimedia File
Change the Playback Speed
Seek in a Multimedia File
Turn Audio On or Off
Create a Clip
Edit an Existing Clip
Multimedia files are audio and/or video streams and can be found within the Multimedia folder in the Case Explorer. If a multimedia stream is associated with a synchronized digital video transcript, then they will appear in the Transcripts portion of the Case Explorer.

TrialDirector 6 Help - Preparing and Managing Exhibits
Copyright ©2010 inData Corporation. All Rights Reserved. 39
The Multimedia Control Box
The Multimedia Control Box appears just below the video window and functions similarly to a standard VCR or DVD player.
The Multimedia Toolbar
The multimedia toolbar appears at the top of the Transcript Manager. If you don't see the multimedia toolbar, open the View menu, choose Toolbars and select Multimedia.
Play a Multimedia File
To play a multimedia file, do one of the following:
Click the Play button on the Multimedia Control Box
Click the Play button on the Toolbar
Select Play from the Multimedia menu

TrialDirector 6 Help - Preparing and Managing Exhibits
40 Copyright ©2010 inData Corporation. All Rights Reserved.
Pause a Multimedia File
To pause a multimedia file, do one of the following:
Click the Pause button on the Multimedia Control Box
Click the Pause button on the Toolbar
Select Pause from the Multimedia menu
Stop a Multimedia File
To stop a multimedia file, do one of the following:
Click the Stop button on the Multimedia Control Box
Click the Stop button on the Toolbar
Select Stop from the Multimedia menu
Change Playback Speed
To change the multimedia playback speed, open the Multimedia menu, select Playback Speed and choose one of the following:
Super Slow Motion to play the multimedia at less than slow motion speed
Slow Motion to play the multimedia slower than normal speed
Normal to play the multimedia at regular speed
Double (2x) to play the multimedia at twice normal speed
The multimedia will continue playing at the selected speed until a different speed is selected.
Seek in a Multimedia File
The Seek commands allow you to move to different parts of a multimedia file.
To seek to the beginning of a multimedia file, do one of the following:
Click the Seek To Start of Video button on the Multimedia Control Box.
In the Multimedia menu, select Seek To and click on Beginning
To seek to the end of a multimedia file, do one of the following:
Click the Seek To End button on the Multimedia Control Box
In the Multimedia menu, select Seek To and click on Ending
To seek to a specific position in a multimedia file, open the Multimedia menu, select Seek To, and choose Specific Position. The Find Time Code dialog opens, where you can enter the position in the video in hours, minutes and seconds.
The multimedia file will seek to the designated position.

TrialDirector 6 Help - Preparing and Managing Exhibits
Copyright ©2010 inData Corporation. All Rights Reserved. 41
Turn Audio On or Off
To turn audio on or off, select Audio Mute from the Multimedia menu.
You will still be able to play the corresponding video.