presentation_2953_ci2953 - quantity takeoff using subassembly composer
DESCRIPTION
C3D2TRANSCRIPT
Autodesk® Civil 3D® 20
Quantity Takeoff u
Ravi Vaish – Flatiron
CI2953
This class will provide an introduction to creating custom Composer and then using these subassemblies for doing quantity takeoff for corridors using the various custom codes included in the subassembly.
Learning Objectives
At the end of this class, you will be able to:
• Describe custom subassemblies
• Create custom subassemblies
• Specify custom subassembly codes for points, links, and shapes
• Use custom codes for corridor quantity takeoff
About the Speaker
Ravi Vaish works as a civil engineer at Flatiron Construction Corp in
spent significant amount of time developing work procedures and policies for implementing BIM to
infrastructure projects, mainly roadways and bridges. Currently he is working on a data integration
project to link project information such as the estimate, schedule, documents, drawings, specifications,
3D model etc. together so that they can all be accessed through a common interface. He has also
implemented improvised quantity take
roads and bridges.
Autodesk® Civil 3D® 2013: An Introduction to
Quantity Takeoff using Subassembly Composer
This class will provide an introduction to creating custom subassemblies using the Subassembly Composer and then using these subassemblies for doing quantity takeoff for corridors using the various custom codes included in the subassembly.
At the end of this class, you will be able to:
custom subassemblies
Specify custom subassembly codes for points, links, and shapes
Use custom codes for corridor quantity takeoff
Ravi Vaish works as a civil engineer at Flatiron Construction Corp in San Francisco, California
spent significant amount of time developing work procedures and policies for implementing BIM to
infrastructure projects, mainly roadways and bridges. Currently he is working on a data integration
mation such as the estimate, schedule, documents, drawings, specifications,
3D model etc. together so that they can all be accessed through a common interface. He has also
implemented improvised quantity take-off procedures using Civil 3D and Revit Structure models for
13: An Introduction to
sing Subassembly Composer
subassemblies using the Subassembly Composer and then using these subassemblies for doing quantity takeoff for corridors using the various
Francisco, California. He has
spent significant amount of time developing work procedures and policies for implementing BIM to
infrastructure projects, mainly roadways and bridges. Currently he is working on a data integration
mation such as the estimate, schedule, documents, drawings, specifications,
3D model etc. together so that they can all be accessed through a common interface. He has also
re models for

Autodesk® Civil 3D® 2013: An Introduction to Quantity Takeoff using Subassembly Composer
2
1. Introduction
What is an Assembly?
A corridor in Autodesk Civil 3D® has at the least three basic components:
1. An Alignment or the Horizontal Curve
2. A Profile or the Vertical Curve
3. An Assembly or the Cross Section
In this session we will talk about the cross section component of the corridor model. The cross sections or
assemblies are inserted in conjunction with the alignment and the profile at regular intervals to define the
3 dimensional corridor models. An Assembly is an orderly arrangement of Subassemblies attached to the
Baseline Point on the Baseline. The Subassemblies are the basic building blocks of an Assembly and
usually represent various cross section components such as lanes, medians, shoulders, barriers, curbs,
sidewalks, and side slopes etc.
Figure 1: An Assembly and its’ components
The subassemblies are made up of points spread out in 2D space. These points can be joined to form
lines known as links. The space enclosed by a set of links can be defined as a shape. Figure 2 below
shows a lane subassembly built using points, links and shapes. One of the points in a subassembly is
used as an insertion point. The insertion point is used to attach the subassembly to the baseline point on
either the left or the right side and then subsequently to the points on the subassemblies attached
previously. Each subassembly can have multiple types of parameters such as offset parameters,
elevation parameters, surface parameters and input/output parameters. These parameters can be
modified to change the geometric configuration and behavior of the subassembly. Civil 3D provides a
library of the most common, generic subassemblies that one may encounter during a road design. These
may be found in the Tool Palette under Palettes Panel on the Home tab.
Figure 2: Subassembly Components
Baseline
Baseline Point
Subassembly
Link
Shape
Point
Autodesk® Civil 3D® 2013: An Introduction to Quantity Takeoff using Subassembly Composer
3
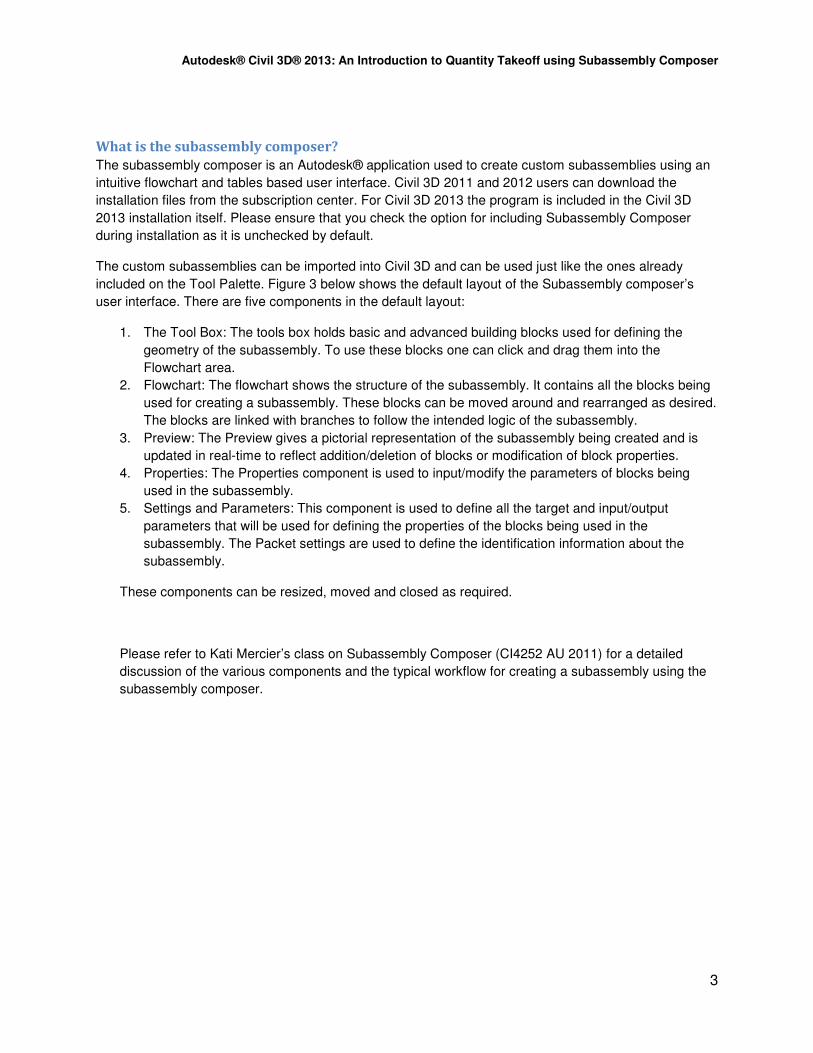
What is the subassembly composer?
The subassembly composer is an Autodesk® application used to create custom subassemblies using an
intuitive flowchart and tables based user interface. Civil 3D 2011 and 2012 users can download the
installation files from the subscription center. For Civil 3D 2013 the program is included in the Civil 3D
2013 installation itself. Please ensure that you check the option for including Subassembly Composer
during installation as it is unchecked by default.
The custom subassemblies can be imported into Civil 3D and can be used just like the ones already
included on the Tool Palette. Figure 3 below shows the default layout of the Subassembly composer’s
user interface. There are five components in the default layout:
1. The Tool Box: The tools box holds basic and advanced building blocks used for defining the
geometry of the subassembly. To use these blocks one can click and drag them into the
Flowchart area.
2. Flowchart: The flowchart shows the structure of the subassembly. It contains all the blocks being
used for creating a subassembly. These blocks can be moved around and rearranged as desired.
The blocks are linked with branches to follow the intended logic of the subassembly.
3. Preview: The Preview gives a pictorial representation of the subassembly being created and is
updated in real-time to reflect addition/deletion of blocks or modification of block properties.
4. Properties: The Properties component is used to input/modify the parameters of blocks being
used in the subassembly.
5. Settings and Parameters: This component is used to define all the target and input/output
parameters that will be used for defining the properties of the blocks being used in the
subassembly. The Packet settings are used to define the identification information about the
subassembly.
These components can be resized, moved and closed as required.
Please refer to Kati Mercier’s class on Subassembly Composer (CI4252 AU 2011) for a detailed
discussion of the various components and the typical workflow for creating a subassembly using the
subassembly composer.

Autodesk® Civil 3D® 2013: An Introduction to Quantity Takeoff using Subassembly Composer
4
Figure 3: Subassembly Composer User Interface
Why use the subassembly composer?
Sometimes the stock subassemblies included in Civil 3D cannot fulfill all the requirements of the intended
design. For example, we cannot add custom parameters to the stock subassemblies. Some
subassemblies also restrict modification of parameters such as codes for the various points, links and
shapes. As we will see further, it could be beneficial to have the ability of defining custom parameters
and codes based on the design to quantify different pavement materials. The stock subassemblies cannot
be modified without the knowledge and experience in programming. The subassembly composer as of
now can’t modify the stock subassemblies as well. So one will need to start from scratch in the
subassembly composer even if you find a stock subassembly that somewhat matches the design
requirements and will fit the purpose after some modification.
When the subassembly composer might not be useful?
The collection of the generic subassemblies already included with Civil 3D should be checked before
attempting to create any custom subassembly. In most cases you’ll find that there is already a generic
subassembly that can satisfy the design requirements, especially if you do not want to use the corridor
model for quantification.
In this session we will see an example of a custom subassembly creation that was necessitated by both
geometric and quantification requirements.
Example: Median with Shoulders
Often standard drawings require that the cross section for a divided roadway with a median be shown as
in figure 4 below.
Tool Box
Preview
Settings and Parameters Properties
Flowchart

Autodesk® Civil 3D® 2013: An Introduction to Quantity Takeoff using Subassembly Composer
5
Figure 4: Theoretical location of Grade Point
Note that there are two grade points shown on the above cross section on the either side of the center
line. However, often in Civil 3D a single profile may be designed with the grade point being on the center
line at the intersection of the extensions of the top surfaces of the lanes on the either side of the two
grade points along the lane slope as shown in figure 5 below.
Figure 5: Grade Point in Civil 3D
To ensure that Civil 3D inserts the cross section at the correct location, the stock link width and slope
subassembly is often added to form the median and is then moved down vertically after calculating the
distance AB mathematically. This process has to be repeated in case a parameter of the cross section
such as the lane/shoulder width or slope changes. Often there are multiple cross sections on a project
and calculating and updating AB for each one of them becomes tedious. This warrants creation of a
custom subassembly that will take care of this geometric requirement.
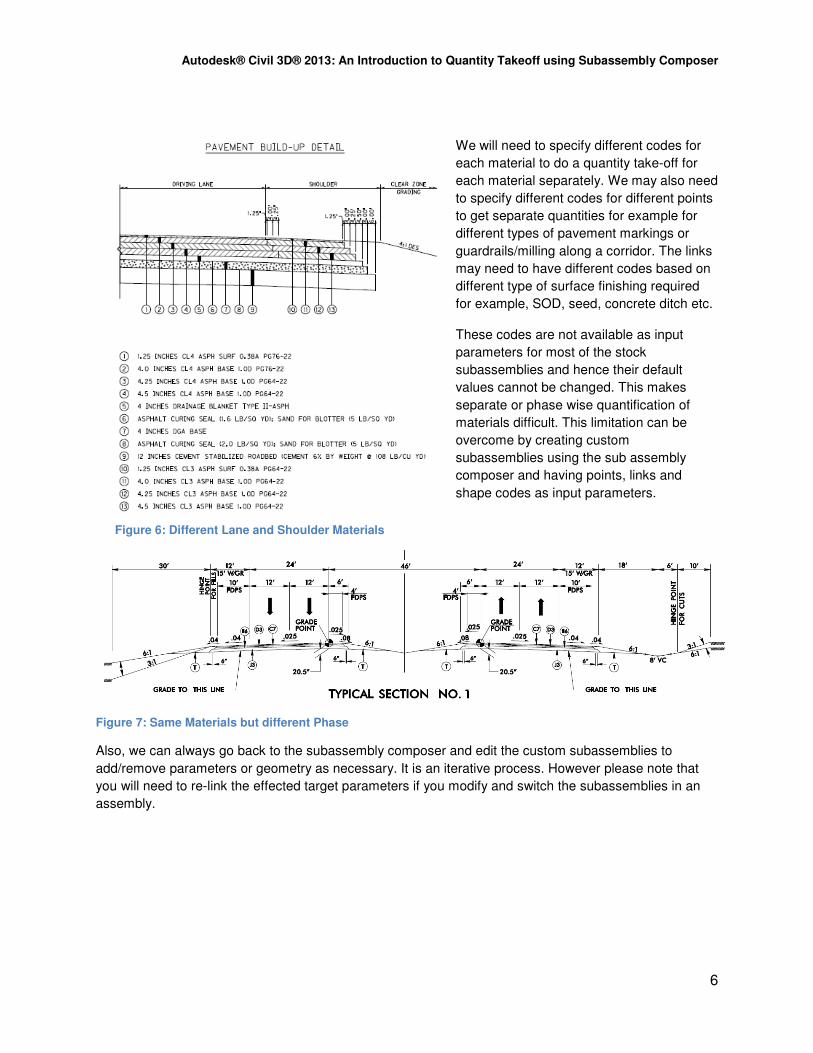
Often the pavement materials for the lanes and the shoulders are different or even if they are same we
need to break out the quantities required for lanes and shoulders separately due to construction phasing.
The figures below show examples of both. Figure 6 shows lanes and shoulders with different pavement
schedules and figure 7 shows same pavement schedule for the shoulders and the lanes.
Civil 3D Profile Grade Point Assembly Baseline
A
B
Autodesk® Civil 3D® 2013: An Introduction to Quantity Takeoff using Subassembly Composer
6
We will need to specify different codes for
each material to do a quantity take-off for
each material separately. We may also need
to specify different codes for different points
to get separate quantities for example for
different types of pavement markings or
guardrails/milling along a corridor. The links
may need to have different codes based on
different type of surface finishing required
for example, SOD, seed, concrete ditch etc.
These codes are not available as input
parameters for most of the stock
subassemblies and hence their default
values cannot be changed. This makes
separate or phase wise quantification of
materials difficult. This limitation can be
overcome by creating custom
subassemblies using the sub assembly
composer and having points, links and
shape codes as input parameters.
Figure 7: Same Materials but different Phase
Also, we can always go back to the subassembly composer and edit the custom subassemblies to
add/remove parameters or geometry as necessary. It is an iterative process. However please note that
you will need to re-link the effected target parameters if you modify and switch the subassemblies in an
assembly.
Figure 6: Different Lane and Shoulder Materials
Autodesk® Civil 3D® 2013: An Introduction to Quantity Takeoff using Subassembly Composer
7
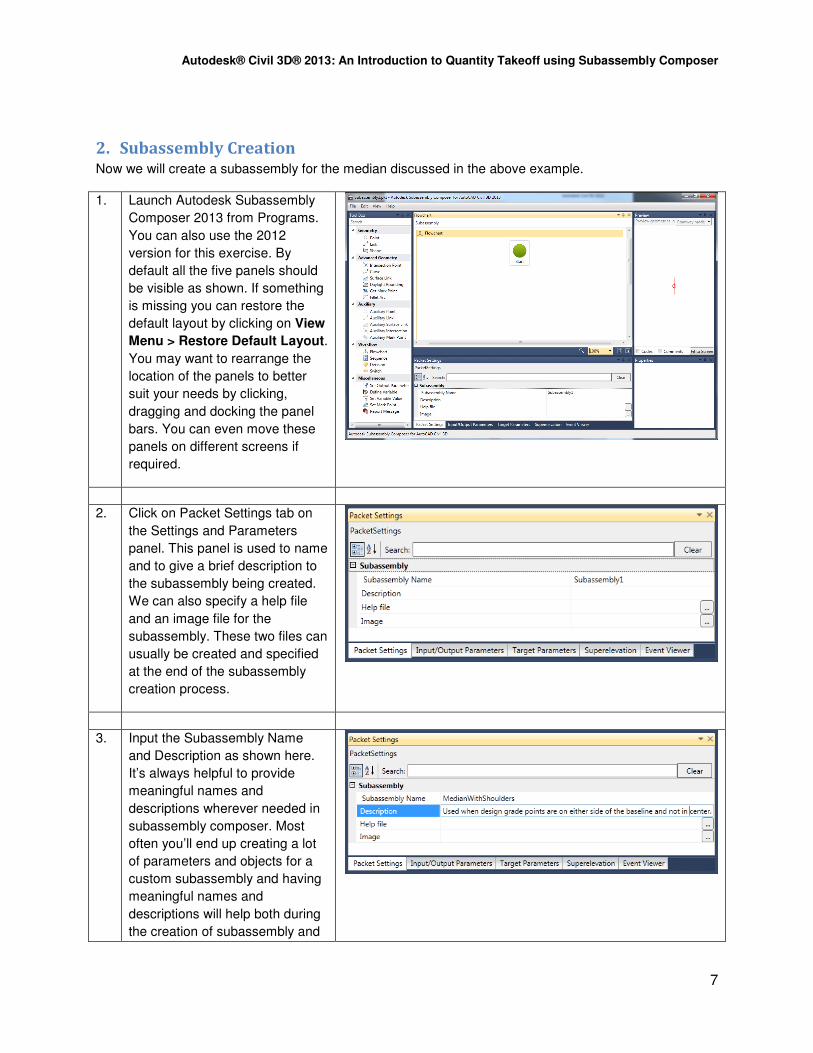
2. Subassembly Creation Now we will create a subassembly for the median discussed in the above example.
1. Launch Autodesk Subassembly
Composer 2013 from Programs.
You can also use the 2012
version for this exercise. By
default all the five panels should
be visible as shown. If something
is missing you can restore the
default layout by clicking on View
Menu > Restore Default Layout.
You may want to rearrange the
location of the panels to better
suit your needs by clicking,
dragging and docking the panel
bars. You can even move these
panels on different screens if
required.
2. Click on Packet Settings tab on
the Settings and Parameters
panel. This panel is used to name
and to give a brief description to
the subassembly being created.
We can also specify a help file
and an image file for the
subassembly. These two files can
usually be created and specified
at the end of the subassembly
creation process.
3. Input the Subassembly Name
and Description as shown here.
It’s always helpful to provide
meaningful names and
descriptions wherever needed in
subassembly composer. Most
often you’ll end up creating a lot
of parameters and objects for a
custom subassembly and having
meaningful names and
descriptions will help both during
the creation of subassembly and

Autodesk® Civil 3D® 2013: An Introduction to Quantity Takeoff using Subassembly Composer
8
its use in Civil 3D.
4. Click on Input/Output Parameters
tab on the Settings and
Parameters Panel. This panel is
used to specify the Input and
Output variables. These
parameters will appear under the
sub assembly properties in Civil
3D. The input parameters are
like variables and their values
can be changed through the
properties dialog box in Civil
3D. The output parameters are
for information purpose and show
their value in the properties bar.
These cannot be modified. Use
the figure to enter the input
parameters in the input/output
panel. These parameters will be
used to create and modify the
geometry of the subassembly. If
you need to delete an entry,
simply select it and press the
delete key.
5. Click on the Auxiliary Point in a
Tool Box and drag it to the
Flowchart to add it under the start
shape. This is how the various
components are added to the
subassembly. An arrow appears
showing the linkage between the
start shape and AP1. Auxiliary
components are not drawn in the
subassembly in Civil 3D.

Autodesk® Civil 3D® 2013: An Introduction to Quantity Takeoff using Subassembly Composer
9
6. Click on the AP1 button in the
Flowchart to select it. The
Properties panel will show
various options to define AP1. Fill
the properties panel as shown
here.
7. Also note that the Auxiliary point
AP1 also appears in the Preview
Panel. The preview panel will
update to reflect any changes
made to the subassembly. The
roadway mode takes into account
any overrides such as width and
elevation targets etc. when
showing the preview. The layout
mode only uses the default
values of the input parameters in
the subassembly preview.
8. Click on the Point in the toolbox
and drag it to the flowchart under
AP1. This will add point P1 and
create a link between AP1 and
P1.

Autodesk® Civil 3D® 2013: An Introduction to Quantity Takeoff using Subassembly Composer
10
9. Select P1 to see its properties in
the Properties panel. Point P1 is
the left side grade point. Modify
the properties as shown and
check the preview to confirm the
location. Note that Input
parameters have been used to
control the geometry of the Point
P1. Later we will also add Input
parameters for codes so that
custom codes can be assigned in
Civil 3D.
10 Similarly add P2 and P3 and
modify their properties as shown
here. Ensure that Add Link to
From Point is selected. This will
create links L1 and L2 along with
the points.
Autodesk® Civil 3D® 2013: An Introduction to Quantity Takeoff using Subassembly Composer
11
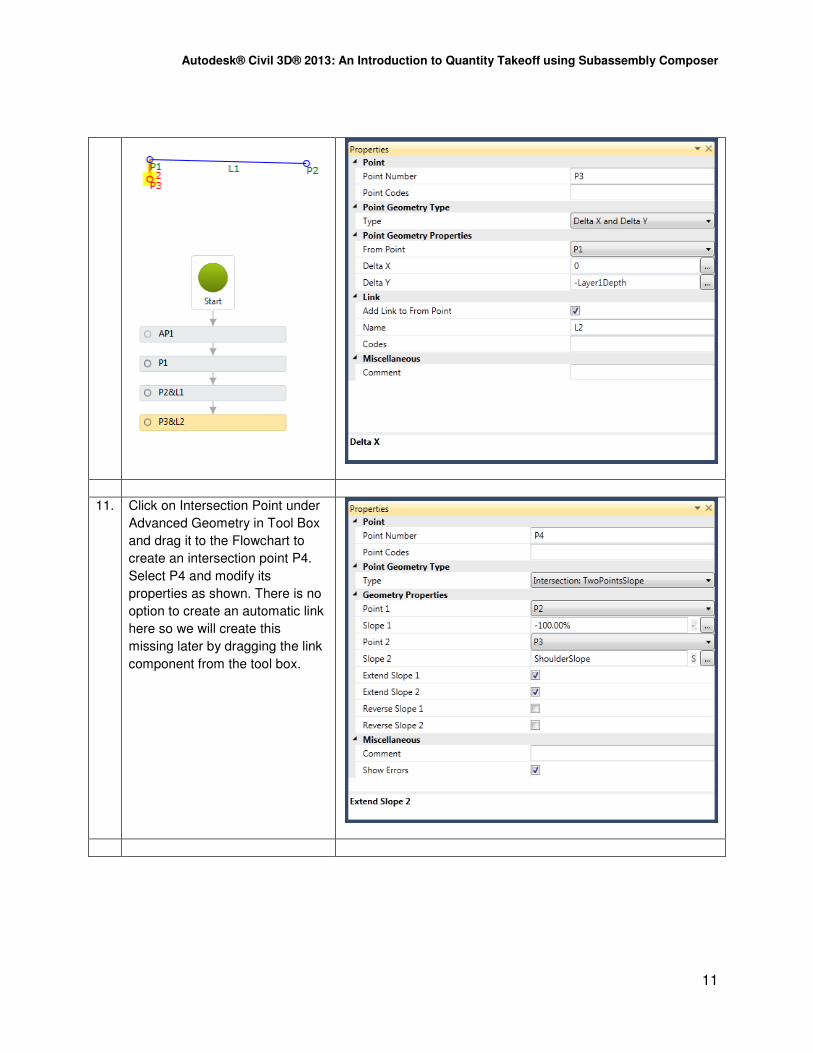
11. Click on Intersection Point under
Advanced Geometry in Tool Box
and drag it to the Flowchart to
create an intersection point P4.
Select P4 and modify its
properties as shown. There is no
option to create an automatic link
here so we will create this
missing later by dragging the link
component from the tool box.

Autodesk® Civil 3D® 2013: An Introduction to Quantity Takeoff using Subassembly Composer
12
12. Continue adding points and links
as shown in the following
properties panels.

Autodesk® Civil 3D® 2013: An Introduction to Quantity Takeoff using Subassembly Composer
13
This covers all points on the left side of the Centerline. We will
repeat the above steps and modify the properties accordingly to
get similar points on the right side of the subassembly.
Autodesk® Civil 3D® 2013: An Introduction to Quantity Takeoff using Subassembly Composer
14
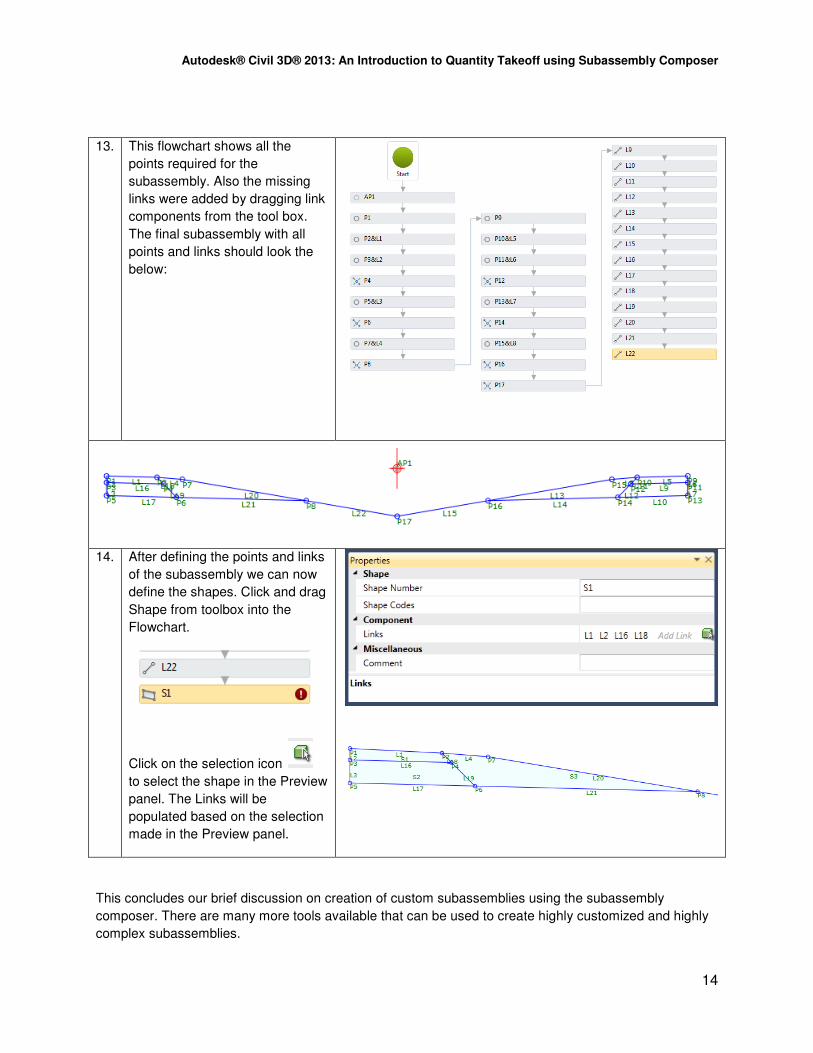
13. This flowchart shows all the
points required for the
subassembly. Also the missing
links were added by dragging link
components from the tool box.
The final subassembly with all
points and links should look the
below:
14. After defining the points and links
of the subassembly we can now
define the shapes. Click and drag
Shape from toolbox into the
Flowchart.
Click on the selection icon
to select the shape in the Preview
panel. The Links will be
populated based on the selection
made in the Preview panel.
This concludes our brief discussion on creation of custom subassemblies using the subassembly
composer. There are many more tools available that can be used to create highly customized and highly
complex subassemblies.

Autodesk® Civil 3D® 2013: An Introduction to Quantity Takeoff using Subassembly Composer
15
3. Custom codes for points, links and shapes in subassemblies In this section we will see how we can have the provision of specifying custom codes for points, links and
shapes for quantification purposes.
Subassemblies:
We are going to use the following custom subassemblies to build our corridor cross section (assembly).
Please note all the points(P), links(L) and shapes(S).
Figure 8: Median with Shoulder
Figure 9: Lane
Figure 10: Outside Shoulder
Please note that all the shapes are of the same color since no codes have been assigned to the shapes
as yet.
Autodesk® Civil 3D® 2013: An Introduction to Quantity Takeoff using Subassembly Composer
16
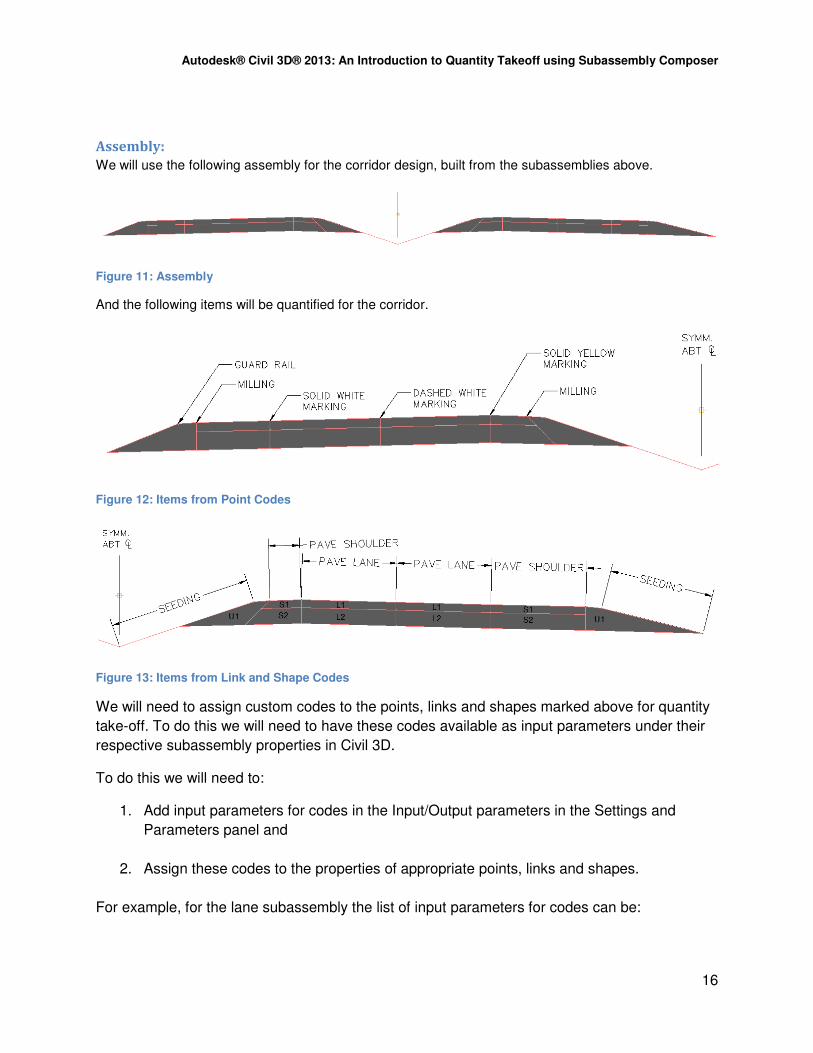
Assembly:
We will use the following assembly for the corridor design, built from the subassemblies above.
Figure 11: Assembly
And the following items will be quantified for the corridor.
Figure 12: Items from Point Codes
Figure 13: Items from Link and Shape Codes
We will need to assign custom codes to the points, links and shapes marked above for quantity
take-off. To do this we will need to have these codes available as input parameters under their
respective subassembly properties in Civil 3D.
To do this we will need to:
1. Add input parameters for codes in the Input/Output parameters in the Settings and
Parameters panel and
2. Assign these codes to the properties of appropriate points, links and shapes.
For example, for the lane subassembly the list of input parameters for codes can be:
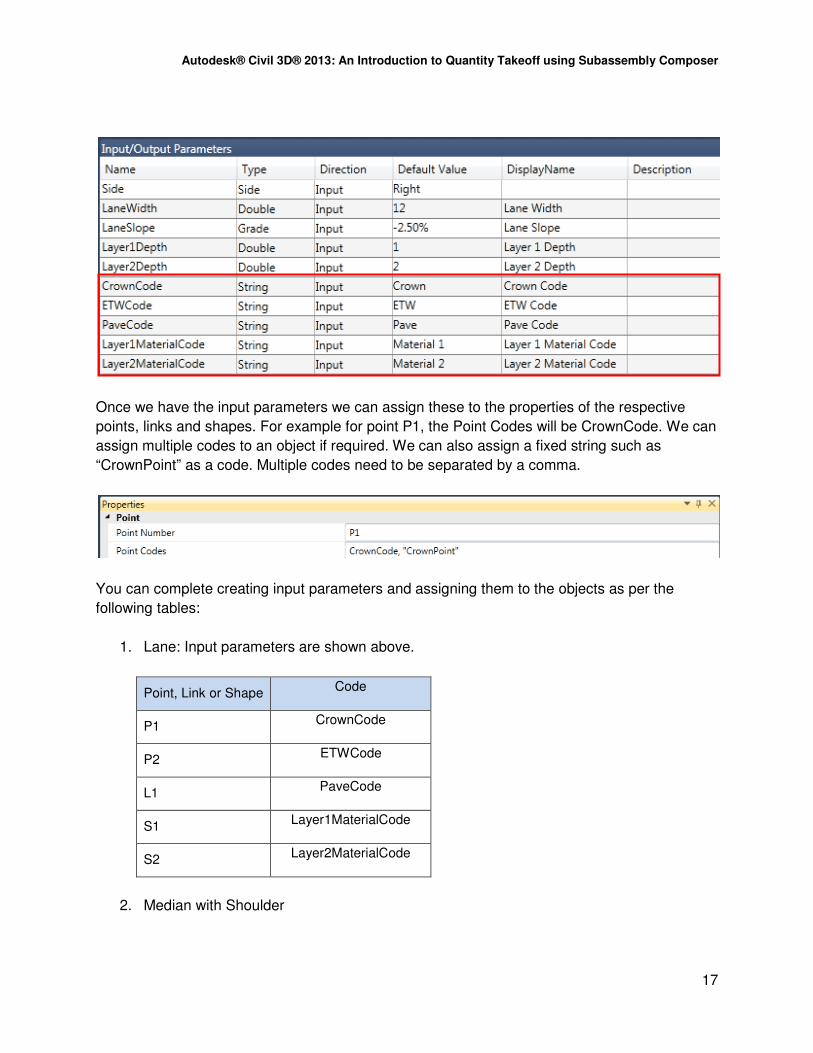
Autodesk® Civil 3D® 2013: An Introduction to Quantity Takeoff using Subassembly Composer
17
Once we have the input parameters we can assign these to the properties of the respective
points, links and shapes. For example for point P1, the Point Codes will be CrownCode. We can
assign multiple codes to an object if required. We can also assign a fixed string such as
“CrownPoint” as a code. Multiple codes need to be separated by a comma.
You can complete creating input parameters and assigning them to the objects as per the
following tables:
1. Lane: Input parameters are shown above.
Point, Link or Shape Code
P1 CrownCode
P2 ETWCode
L1 PaveCode
S1 Layer1MaterialCode
S2 Layer2MaterialCode
2. Median with Shoulder

Autodesk® Civil 3D® 2013: An Introduction to Quantity Takeoff using Subassembly Composer
18
Point, Link or Shape Code
P1, P9 CrownCode
P2, P10 ETWCode
L1, L5 PaveCode
L20, L13, L22, L15 MediaLinkCode
S1, S4 S1Material
S2, S5 S2Material
S3, S6 U1Material
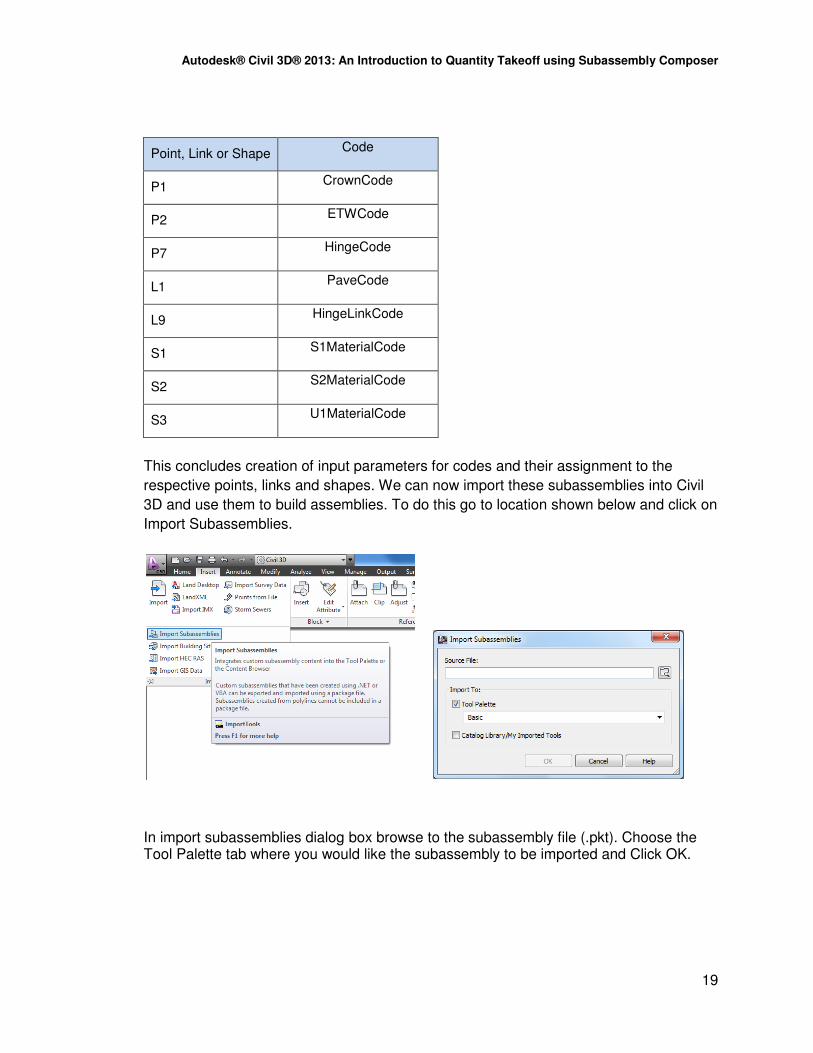
3. Outside Shoulder
Autodesk® Civil 3D® 2013: An Introduction to Quantity Takeoff using Subassembly Composer
19
Point, Link or Shape Code
P1 CrownCode
P2 ETWCode
P7 HingeCode
L1 PaveCode
L9 HingeLinkCode
S1 S1MaterialCode
S2 S2MaterialCode
S3 U1MaterialCode
This concludes creation of input parameters for codes and their assignment to the
respective points, links and shapes. We can now import these subassemblies into Civil
3D and use them to build assemblies. To do this go to location shown below and click on
Import Subassemblies.
In import subassemblies dialog box browse to the subassembly file (.pkt). Choose the Tool Palette tab where you would like the subassembly to be imported and Click OK.

Autodesk® Civil 3D® 2013: An Introduction to Quantity Takeoff using Subassembly Composer
20
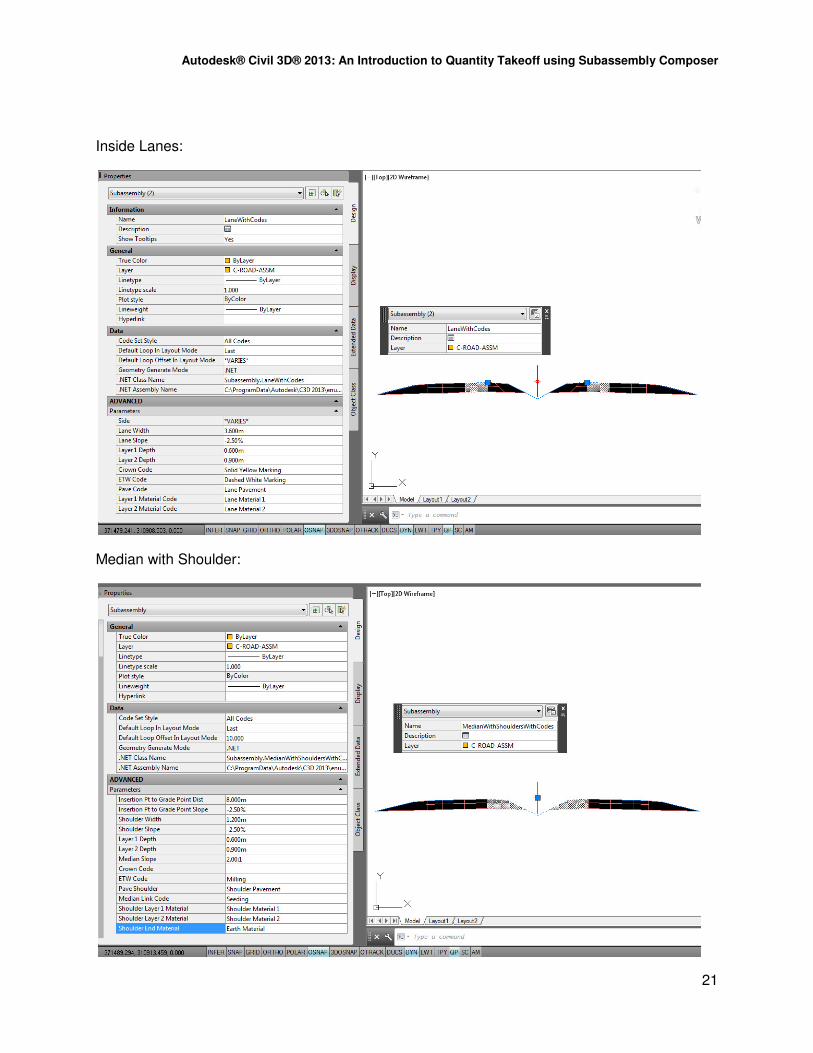
4. Using custom codes for quantity take-off Create an assembly using the subassemblies imported into Civil 3D in the previous section into the file
Roadway Example.dwg. Select each subassembly and change its codes under properties to reflect the
quantity/material that needs to be taken-off. See the images below:
Outside Shoulder:
Outside Lanes:
Autodesk® Civil 3D® 2013: An Introduction to Quantity Takeoff using Subassembly Composer
21
Inside Lanes:
Median with Shoulder:

Autodesk® Civil 3D® 2013: An Introduction to Quantity Takeoff using Subassembly Composer
22
Once the quantity codes are updated as per the above images, create a new Code Set Style
called Quantity take-off that has the codes only from this assembly. Right click on
Toolspace>Settings Tab>General>Multipurpose Styles>Code Set Styles to create a new code
set style. Click on Import Codes and select all the assembly created earlier in the drawing.
The code set style gets populated with all the materials that we want to take-off. You can assign
Render Materials and Styles to the codes for better appearance. The next step is to:
1. Assign payitems to the points and links codes and run a QTO report and
2. Assign shapecodes to materials and run a volume report.
For demonstration purpose we will only discuss the QTO report generation. Below is the
payitem list that can be used for points and links. You can also use the notepad file in dataset.
Payitem ID,Description,Units
100,Lane Pavement,SQYD
200,Seeding,SQYD
300,Shoulder Pavement,SQYD
400,Dashed White Marking,LF
500,Solid White Marking,LF
600,Solid Yellow Marking,LF
700,Milling,LF
Autodesk® Civil 3D® 2013: An Introduction to Quantity Takeoff using Subassembly Composer
23
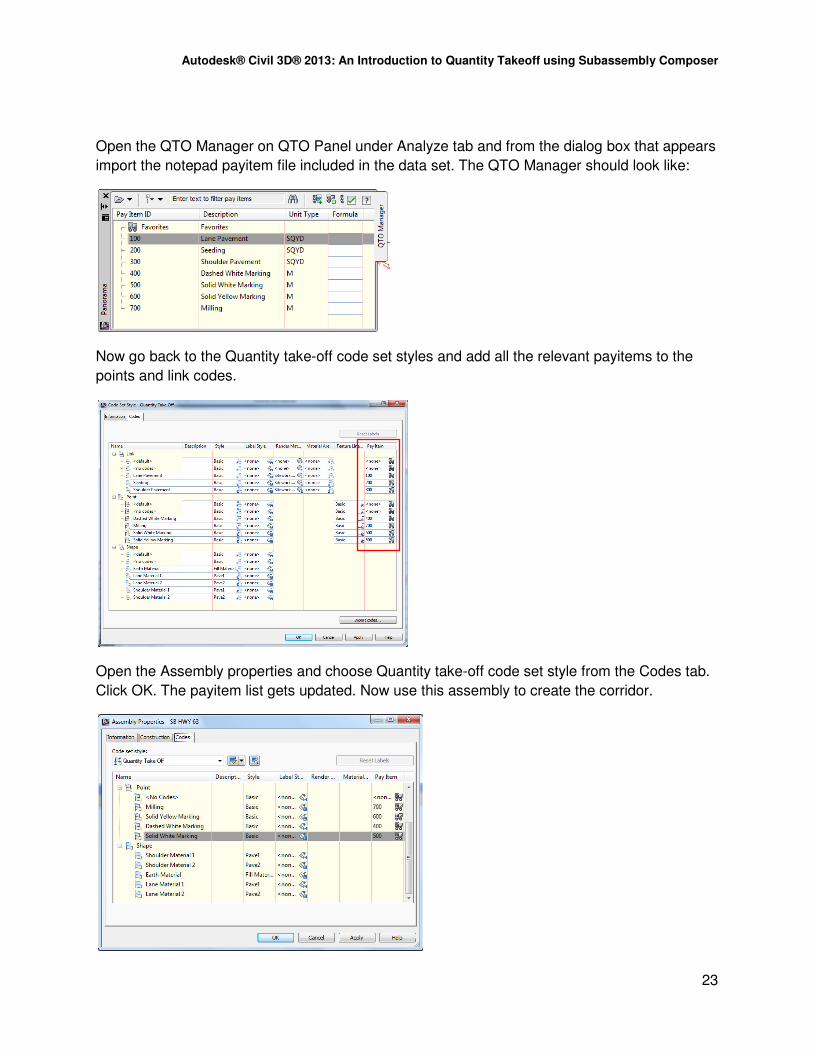
Open the QTO Manager on QTO Panel under Analyze tab and from the dialog box that appears
import the notepad payitem file included in the data set. The QTO Manager should look like:
Now go back to the Quantity take-off code set styles and add all the relevant payitems to the
points and link codes.
Open the Assembly properties and choose Quantity take-off code set style from the Codes tab.
Click OK. The payitem list gets updated. Now use this assembly to create the corridor.

Autodesk® Civil 3D® 2013: An Introduction to Quantity Takeoff using Subassembly Composer
24
Ensure that you choose Quantity take-off code set style when creating the corridor. Run Takeoff
Report on QTO Panel under Analyze tab. Click on compute.
Choose HTML option from the dialog box that opens to see the Report in tabular format.
This concludes the discussion on application of custom subassembly codes to extend the
capability of Civil 3D for doing take-offs for corridors. Subassemblies were always a powerful
tool in Civil 3D and the introduction of the SAC makes it even better. Happy Composing!!