primary - discovery
TRANSCRIPT

1Discovery Vitality |
Primaryschool
Grade 5
3Discovery Vitality | 2| Discovery Vitality
A CATHSSETA-accredited training provider. 613/P/000126/2008
Vitality HealthStyle (Pty) Ltd, registration number: 1999/007736/07, trading as Discovery Vitality. An authorised financial services provider.
Grade 5Grade 51. List of warm-up and cool-down exercises 3
2. Lesson 1: Target practice 4
3. Lesson 2: Dance dynamics 9
4. Lesson 3: Protecting the quality of food 12
5. Lesson 4: Protecting your food 15
6. Lesson 5: My wellness chart 19
3
Grade 5List of warm-up and cool-down exercisesWarm-up exercises Warm-up exercise 1 (5 minutes)Divide the learners into groups of 3 or 4.• Each time you call out a letter of the alphabet, the learners have to lie down
and position themselves to form that particular letter• In between calling out the letters, have the learners jog or march on the spot
for about 10 seconds. You can blow a whistle to indicate the start and end of the 10 seconds.
Warm-up exercise 2 (5 minutes)Play a CD and instruct the children to do movements such as dance, walk, jump, hop or skip while the music is playing. Each time the music stops, they must do a different movement when it starts up again.
Cool-down exercises Cool-down exercise 1 (3 minutes)Have the learners help you pack any equipment away. Then instruct the learners to do the stretches from cool-down exercise 2:
• Each time you call out a letter of the alphabet, the learners have to lie down and position themselves to form that particular letter.
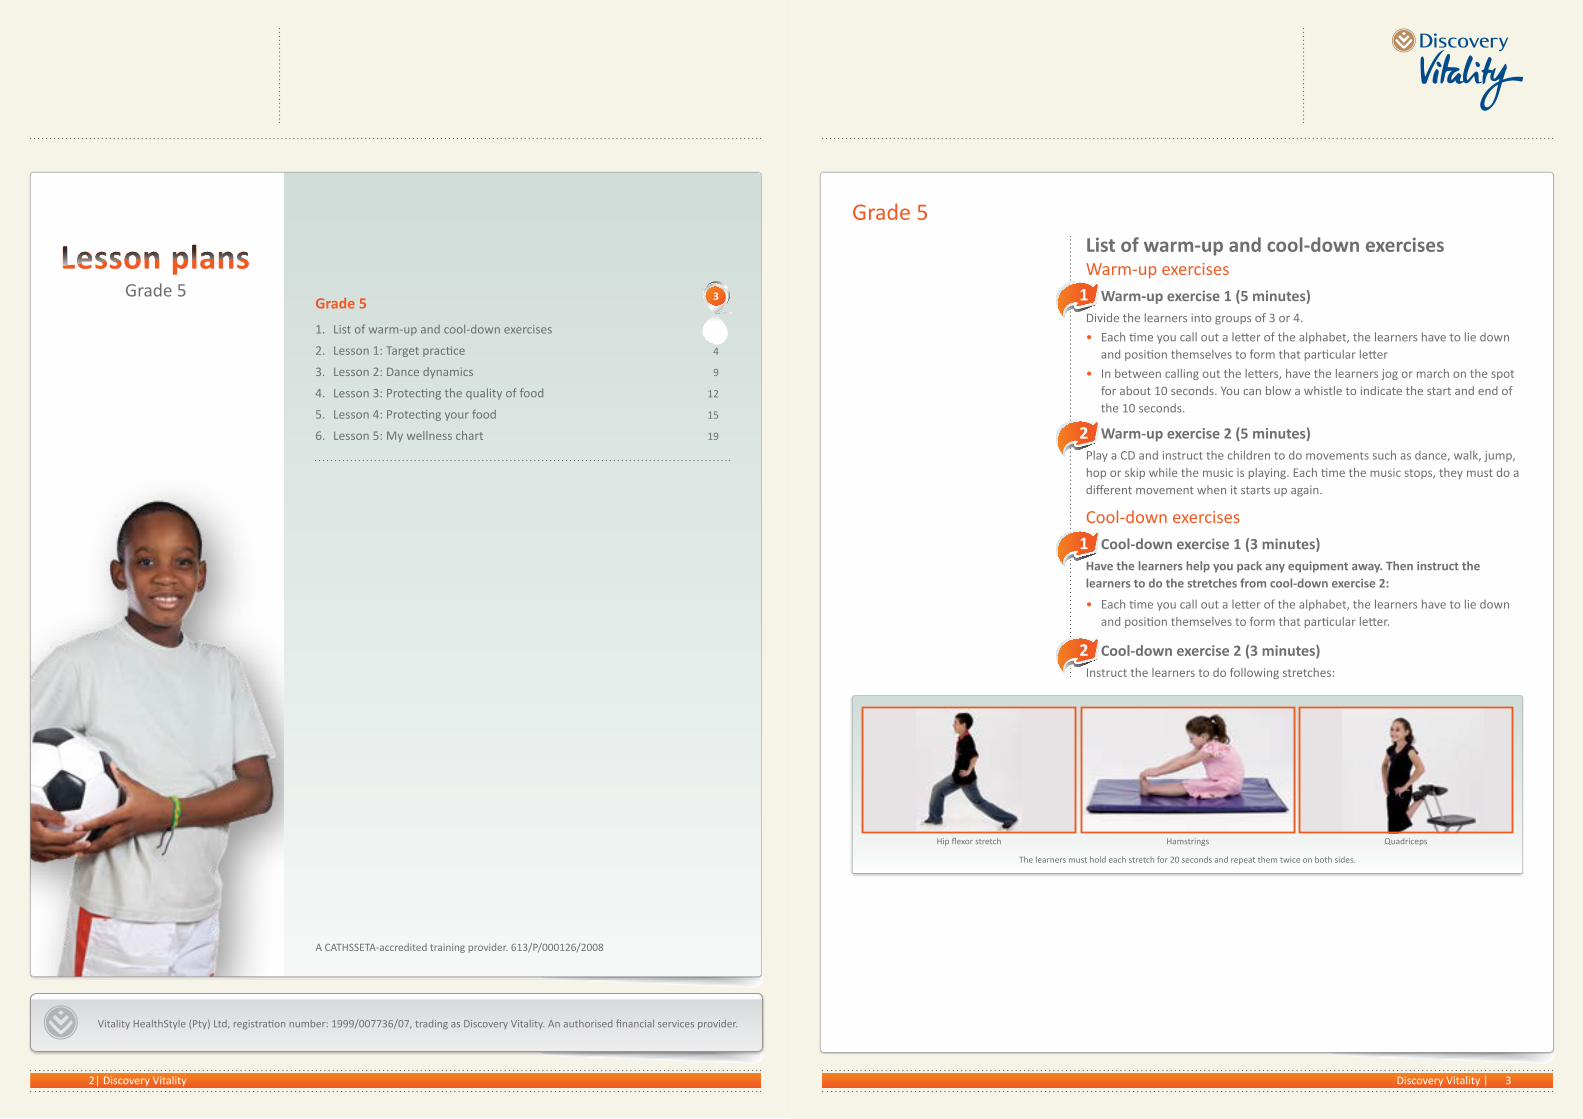
Cool-down exercise 2 (3 minutes)Instruct the learners to do following stretches:
1
2
1
2
Hip flexor stretch Hamstrings Quadriceps
The learners must hold each stretch for 20 seconds and repeat them twice on both sides.
5Discovery Vitality | 4| Discovery Vitality
OutcomesBy the end of this lesson the learners should be able to:• Participate in a target game where they are the target (lions and tigers)• Participate in a variety of target games using a ball or beanbag• Be able to design their own game, including developing rules and showing
their classmates (worksheet activity).
Teacher’s cornerThe aim of lesson 1 is to provide the learners with an opportunity to participate in 2 target games. In 1 game, a learner is the target (lions and tigers) and in the other, a hoop is the target.
The main aim of target games is to throw a ball or object into targets, using the least number of shots, or getting as many balls as possible closest to the target.
The second part of the lesson is part theory. Learners have to work in groups to make up their own game. Ideally, they should have an opportunity to teach their classmates their new game. These activities can take 2 lessons instead of 1.
ActivitiesFor lesson 1 you’ll need the following equipment:• Large, flat area, ideally the size of a netball court• Hula hoops• Tennis or soccer balls (4 to 8)• Beanbags• Wall with a target square marked out using masking tape or cardboard • 6 to 10 cones• Rope or chalk to mark the starting lines for the circuit.
Activity 1: Warm-up (5 minutes)Choose a warm-up exercise from the list of warm-up and cool-down exercises.
Activity 2: Lions and tigers (5 to 10 minutes)Divide the class into 2 groups, the lions and the tigers.
• Ideally, this game should be played on a basketball or similar court, but the area should have lines and boundaries marked
• Have the learners stand near the centre of the court with their backs to the opposing team, about 5 to 8 metres apart.
Flip a coin and call out who won the toss (heads is lions and tails is tigers).
If tigers win the toss, they must turn around and try to get to the end line on the opposite side of the court. At the same time, the lions will chase the tigers and try to touch their arms. If touched, the tiger has to join the opposing team of lions.
If a tiger reaches the end line, they are safe from being captured by the lions.
The winning team is the one with the most players at the end of the game.
Grade 5 Grade 5
Lesson planLesson theme Target practice Grade 5
Duration 30 to 40 minutes Date/week
Context
• Getting more physically active• Ways in which to improve health and wellness.
Linking with previous lesson Linking with next lesson
N/a. • Learning fun ways to get physically active.
Core knowledge
N/a.
Learning activities and assessment
Group work:• Warm-up• Learners participate in 2 target games. In 1 game, a learner is the target (lions and tigers), and in the other game a hoop is the target• Cool-down.
Individual work• Introduce the worksheet for lesson 1.
Forms of assessment Resources
• Observe learners while they play• Worksheet.
• Large, flat area, ideally the size of a netball court• Hula hoops• Tennis or soccer balls (4 to 8)• Beanbags• Wall with a target square marked out using masking tape or
cardboard• 6 to 10 cones• Rope or chalk to mark the starting lines for the circuit• Worksheets.
Expanded opportunities Teacher reflection
• Encourage learners to play these games at home and on the playground.
• The activities show learners the benefits of getting physically active and enhancing their physically abilities.
1
2
3
Lesson 1: Target practice (30 to 40 minutes)Lesson 1

6| Discovery Vitality 7Discovery Vitality |
Activity 3: Target circuit (15 minutes)Set up the circuit before the start of the class:
• Line 3 hoops up one behind the other with the third hoop at least 8 metres from the first hoop
• The learner has to aim to throw the beanbag into the furthest hoop without it touching the sides of the hoop
• Mark a target on a wall using cardboard: you can draw a smaller circle in the centre of your cardboard square. Make the starting line at least 8 metres away from the wall. The learner has to aim to hit the square. The more advanced learners can aim to hit the circle in the centre
• Basketball or netball hoop: each learner will have 3 opportunities to throw the ball in the basketball or netball hoop
• 10 cones: arrange 6 to 10 cones in a triangle with the base of the triangle furthest from the starting line
• The start line needs to be at least 10 metres from the cones. Roll a ball towards the cones, trying to knock as many down at a time as they can
• Each of the 4 target games outlined above must be set up at its own station.
Divide the class into groups of 4. Each group will start at a different station. You will blow the whistle each time the group has to move to the next station. The timing may be a bit tricky as you don’t want any groups having to wait before they can move to the next station. Therefore, you may need to be a bit creative to ensure that the learners are ready to move to the next station at more or less the same time.
Alternatively, they must keep marching on the spot at a station until you blow the whistle. If they don’t, they’ll be disqualified.
Tips for activity 3:Set out the circuit for activity 3 before the start of the game. Explain what to do at each of the stations. Use one of the learners to demonstrate the activity before allowing the groups to start the circuit.
Activity 4: Cool-down (3 minutes)Choose a cool-down exercise from the list of warm-up and cool-down exercises.
Wrap-up (2 minutes)Remind the learners of the benefits of the activities they have done and introduce the worksheet for lesson 1.
Grade 5 Grade 5
4
Worksheet: Grade 5, lesson 1Task 1: Target game
Design your own target game. Your game must involve throwing a ball at a target or rolling a ball at a target.
A: Write down the rules of the game in the space provided.
Consider:
• A name for the game
• How many people can play the game
• What age the players should be
• How long the game should take to play
• Whether the game can be played indoors, outdoors or both
Name: _______________________________

9Discovery Vitality | 8| Discovery Vitality
B: Can you draw how your game will be played?
Grade 5 Grade 5Name: _______________________________
C: What are the safety precautions you may need to consider when playing this new game?
You can teach members of your family your new game and play a few rounds.
Lesson planLesson theme Target practice Grade 5
Duration 30 to 40 minutes Date/week
Context
• Getting more physically active• Ways in which to improve health and wellness.
Linking with previous lesson Linking with next lesson
• Learning fun ways to get physically active. • Learning how to lead a healthier lifestyle.
Core knowledge
• Knowledge of how to choreograph a dance sequence• Understanding that different cultural groups have preferred ways of dancing.
Learning activities and assessment
Group work:• Warm-up• In groups, learners choreograph a dance according to a certain genre of music they have chosen. Learners demonstrate and teach other
learners their dances• Cool-down.Individual work• Introduce the worksheet for lesson 2.
Forms of assessment Resources
• Observe learners while they do the activities• Worksheet.
• Music system• CDs including a variety of music genres• TV (if you have footage of national dances being performed)• Worksheets.
Expanded opportunities Teacher reflection
• Encourage learners to choreograph dances with friends or on their own, at home or on the playground.
• Learners appreciate dancing not only as an art form for expressing their emotions, but also as a form of physical activity that provides excellent health benefits.
Lesson 2

10| Discovery Vitality 11Discovery Vitality |
OutcomesBy the end of this lesson the learners should be able to:• Perform a set dance sequence• Choreograph and teach a short dance sequence• Be able to explain 3 different cultural dances, 2 from South Africa and 1 from
another country.
Teacher’s cornerYou may not be a dancer yourself, but this lesson does not rely on your expertise, but on how enthusiastic the learners are. In addition, the quality of the lesson could be improved if you have access to a TV and a DVD of national dances from other countries.
ActivitiesFor lesson 2, you’ll need the following equipment:• Music system• CDs including a variety of music genres • TV (if you have footage of national dances being performed).
Activity 1: Warm-up (5 minutes)Choose a warm-up exercise form the list of warm-up and cool-down exercises.
Activity 2: Choreography (10 minutes)Divide the class into groups of about 6. It may be a good idea to group the boys separately from the girls. • Allocate a different genre of dance for each group. For example, hip-hop, jazz,
contemporary or ballet. This can be done by placing the name of each genre in a hat and letting a representative from each group choose 1
• Try to cover 6 genres of dancing in your class and probe the learners’ understanding of their dance
• Instruct each group to choreograph a dance according to the genre they have chosen.
Tips for activity 2:You may have some resistance from the boys, so get their interest by explaining that there are dances that only men participate in, such as the Haka or gumboot dancing. Alternatively, the boys may want to do hip-hop, which requires some strength and gives them an opportunity to show off a bit. They can even make up a rap song with words related to the lesson to match their dance moves.
Activity 3: Team teach (15 minutes)• Allow each group to demonstrate their dance to the class• Let the class vote on the best 2 dances and have the winning teams teach the
other learners their dance.
Activity 4: Cool-down (3 minutes)Choose a cool-down exercise from the list of warm-up and cool-down exercises.
Wrap-up (2 minutes)Tell the learners that different countries and cultures have different dances. Dancing is a form of physical activity and therefore provides excellent health benefits. In addition, dance is an art form and an outlet for expressing feelings and emotions. Introduce the worksheet for lesson 2.
Grade 5 Grade 51
2
3
4
1. What is worn when doing the dance?
2. When do they do the dance?
3. Why do they do the dance?
4. Is the dance for the whole cultural group or only for a few selected members?
5. Either draw or find a picture of someone from this culture doing a cultural dance.
Worksheet: Grade 5, lesson 2Task one: South African dances
Select a cultural group from South Africa that is not your own. Visit the library or search the internet for information on this cultural group’s preferred dance.
Answer the following questions
Name: _______________________________Lesson 2: Dance dynamics (30 to 40 minutes)

13Discovery Vitality | 12| Discovery Vitality
Lesson 3: Protecting the quality of food (30 to 40 minutes) OutcomesBy the end of this lesson the learners should be able to:• Explain what a food additive is and how it can protect the quality of food• List 3 different types of food additives and give an example of each.
Teacher’s cornerFood additives Food additives are added to food and drinks during processing. They may be added to food to enhance its flavour, taste, aroma, colour, texture or appearance, or to preserve the food or drink from becoming spoiled. In the past, food was preserved by adding vinegar, sugar or salt. Today, there are many other additives used to preserve food.
Lesson planLesson theme Protecting the quality of food Grade 5
Duration 30 to 40 minutes Date/week
Context
• Making healthier food choices• Ways in which to improve wellness.
Linking with previous lesson Linking with next lesson
• Learning how to lead a healthier lifestyle. • Learning ways to protect the quality of food.
Core knowledge
• Understanding the concept of ‘food additives’, and the 3 types of additives: ‘preservatives’, ‘flavourants’ and ‘colourants.’
Learning activities and assessment
Group work:• Learners analyse different food wrappers and packaging so to identify different food additives and why they were used.
Individual work• Introduce the worksheet for lesson 3.
Forms of assessment Resources
• Worksheet. • Ask the learners to bring along a wrapper of their favourite snack, such as dried fruit, a snack bar, biltong or chocolate
• Worksheets.
Expanded opportunities Teacher reflection
• Encourage learners to investigate what additives they can find in their foods at home.
• The activities make learners aware of food additives and their purpose, therefore making learners more aware of the quality of the foods they eat.
Grade 5 Grade 5Manufacturers are allowed to add certain substances, natural or synthetic, to food for the following specific purposes: • To improve nutritional value: nutrients, including antioxidants, particularly
those that may have been lost during processing, might be added to improve food’s nutritional value
• To preserve food (make it last longer): examples include preservatives, emulsifiers, stabilisers, anti-caking agents
• To enhance the colour, appearance and flavour of food: examples include colourants and flavourants. These don’t necessarily add any nutritional value to food.
Examples of food additives that you may see listed on food labels are:• Preservatives – Sulphites: sulphur dioxide, sodium sulphite and potassium metabisulphate.
They are added to food and drinks to prevent browning, control microbial growth and spoilage, modify texture and bleach certain foods
– Benzoates and parabens: sodium benzoate, benzoic acid and methylparaben. These are used to prevent spoilage of foods by yeasts, fungi, bacteria and other micro-organisms
– Nitrates: these are used to cure and preserve meats and give them an attractive red colour
• Flavourants – Monosodium glutamate (MSG): this is actually a flavour enhancer that
brings out the flavour in the food• Colourants – Tartrazine: this is a yellow colourant used as a dye in many foods, drinks
and pharmaceutical products.
ActivitiesFor lesson 3 you’ll need the following equipment:• Ask the learners to bring along a wrapper of their favourite snack, such as
dried fruit, a snack bar, biltong or chocolate• A copy of the worksheet to hand out to the learners for them to complete the
activity in class.
Activity 1: Know your additives (25 to 30 minutes)• Divide the learners into groups of 3 to 4 so that they can see each other’s
wrappers and be exposed to a wider variety of packaging• Tell the learners to identify the additives in each product and investigate
whether that additive was used to improve the nutritional value or to improve the quality of the food
• Hand out a worksheet to the learners for them to complete the activity in class.
Wrap-up (5 minutes)Remind the learners of the purpose of food additives, and encourage them to find out which additives the food that they have at home has.
1
2
3
4
Lesson 3

15Discovery Vitality | 14| Discovery Vitality
Worksheet: Grade 5, lesson 3Task 1: Protecting the quality of food
Answer the following questions
1. What are food additives?
2. Why are food additives added to food?
3. List 3 types of food additives.
4. Draw a line to link the examples of food additives in the right-hand column to the correct group of food additives in the left-hand column.
Grade 5 Name: _______________________________
Preservatives
MSG
Tatrazine
Flavourants
Benzoates
Nitrates
Colourants Sulphites
Lesson planLesson theme Protecting your food Grade 5
Duration 30 to 40 minutes Date/week
Context
• Making healthy food choices• Ways in which to improve wellness.
Linking with previous lesson Linking with next lesson
• Learning ways to protect the quality of food. • Learners reflect on different ways in which to improve their health and wellness.
Core knowledge
• Understanding the concept of ‘food spoilage,’ how it occurs and how to prevent it• Knowledge of the methods of preservation: canned, frozen, vacuum-packed and dried.
Learning activities and assessment
Group work:• Cut a piece of fruit in half and discuss with learners how you can preserve the fruit so the other half can be eaten the next day.
Also discuss what might happen if you left the fruit out. Introduce learners to the concept of ‘food spoilage,’ and allow them to compare the fruit that was stored in the fridge in plastic and the half that was left out
• Display the other items you have on the table and discuss the different ways to preserve foodsIndividual work:• Introduce the worksheet for lesson 4.
Forms of assessment Resources
• Discussion• Worksheet.
• A refrigerated half of a fruit and a half that has been left out• Another fruit of the same type • A can of food• A bag of frozen vegetables• Some vacuum-packed food• A bag of dried fruit• A knife• A plate• A display table• Worksheets.
Expanded opportunities Teacher reflection
• Encourage learners never to eat spoiled food, and to preserve any food they won’t be eating fresh.
• The discussions and activities give learners an understanding of the importance of preserving food and the dangers of eating foods that are spoiled.
Grade 5 Lesson 4

16| Discovery Vitality 17Discovery Vitality |
OutcomesBy the end of this lesson the learners should be able to:• Explain how food spoilage occurs• Describe ways to prevent food spoilage.
Teacher’s cornerThe learners should learn about food spoilage, how it occurs and how to prevent it. You should show the learners the difference between food that has been spoiled and food that has been preserved.
3 days before the lesson, cut a piece of fruit in half. Place one of the halves in plastic wrap in the refrigerator and leave the other half out on a plate at room temperature. Make sure the piece of fruit that is left out is in a safe place, out of the learners’ reach.
ActivitiesFor lesson 4 you’ll need the following equipment:• The refrigerated half of the fruit and the half that has been left out• Another fruit of the same type that you’re using• A can of food• A bag of frozen vegetables• Some vacuum-packed food• A bag of dried fruit• A knife• A plate• A display table.
Activity 1: Food preservation (30 minutes)To start activity 1, take out a piece of fruit (the same type of fruit as the one you halved 3 days before the lesson), a knife and a plate. Cut the fruit in half and put one half on the plate. Then eat the other half. Tell learners that you want to save the other half of the fruit for tomorrow.
• Ask them if there is anything you should do with the cut fruit if you want to eat it tomorrow
• Ask them why they made the suggestions they did• Once the learners confirm that you should wrap the fruit in plastic wrap and put it
in the fridge, ask them: – What does putting the piece of fruit in the fridge do for the fruit? – What happens when a piece of cut fruit is not put into the fridge and is left at
room temperature? – What might happen if you left the piece of fruit out of the fridge on the table
and ate it in a few days? • The learners will probably suggest that the fruit may become rotten when left at
room temperature
Grade 5 Grade 5• Explain that this is called spoilage. Eating spoiled food can cause a person to
become very ill, so it is not a good idea to leave fresh-cut fruit out for long periods of time
• Show the learners the piece of fruit you left at room temperature for 3 days• Then show them the piece of fruit that you put in the fridge for 3 days. Let the
learners compare the appearance and freshness of each • Explain that fresh foods spoil when left out of the fridge over time, while
keeping them in the fridge helps to keep them fresh for longer periods• Cooling food slows the spoilage process and keeps it fresh. This is why fridges
are used to store foods at factories, on ships and planes, in supermarkets and in our homes
• Inform the class that cooling is only one way to preserve food, and that they will now learn about other methods.
To move onto other ways of preserving food, discuss the following: • Besides fruit, what other foods need to be specially handled to avoid spoiling? • What are some of the ways these foods are specially handled? • Explain that there are other ways to slow spoilage and keep foods fresh for
longer • On a table, display the following items: – A can of food – A bag of frozen vegetables – A vacuum-packed food – A bag of dried fruit • Tell the learners they must decide which of the preservation groups each food
belongs to: canned, frozen, vacuum-packed and dried• Explain how these types of preserving and packaging help to make food
last longer• Let the learners taste the foods that have been preserved differently• Ask them to describe the differences in taste if there are any• Ask them which version they prefer and why.
Wrap-up (5 minutes)Remind the learners of the importance of preserving food and the dangers of eating spoiled food.
Introduce the worksheet for lesson 4.
4
1
2
3
Lesson 4: Protecting your food (30 to 40 minutes)

19Discovery Vitality | 18| Discovery Vitality
Worksheet: Grade 5, lesson 4Task 1: Food preservation
Fill in the table by listing:
• Method of preservation: how the food is preserved
• Food group: list the food group the food belongs to.
Grade 5 Grade 5Name: _______________________________
Sample of food Explain the method of preservation Food group
1. A can of peas
2. A bag of frozen vegetables
3. Vacuum-packed polony
4. A bag of dried fruit
Lesson planLesson theme My wellness chart Grade 5
Duration 30 to 40 minutes Date/week
Context
• Ways in which to improve health and wellness.
Linking with previous lesson Linking with next lesson
• Learners reflect on different ways in which to improve their health and wellness.
N/a.
Core knowledge
• Understanding the concept of ‘wellness’ and what steps learners can take to improve their wellness.
Learning activities and assessment
Individual work:• Learners reflect on what healthy activities they did that week that would improve their wellness. Each learner then completes their
own wellness chart.
Forms of assessment Resources
• Worksheet. • A copy of the lesson 5 worksheet for each learner• Coloured pens or crayons.
Expanded opportunities Teacher reflection
• Learners can keep their wellness charts in their portfolios so they can refer to it at a later stage and see how their wellness has improved.
• The wellness chart makes learners more aware of the importance of doing healthy activities that can improve their health and wellness.
Lesson 5

21Discovery Vitality | 20| Discovery Vitality
OutcomesBy the end of the lesson the learners should be able to:• Complete a wellness chart• Reflect on their wellness and plan steps to improve it• Explain why a healthy lifestyle involves both physical activity and making
healthy eating choices.
Teacher’s cornerIn 1981, the concept of wellness was new to many people. Today we are likely to encounter the topic everywhere through popular magazines, workshop topics or at the gym.
• Wellness is about appreciating yourself as a growing, changing person and allowing yourself to move towards a happier life and more positive health.
• Wellness is a personal, individual matter – there are no right or wrong answers. Learners should not, in any way, be judged on their wellness activity responses.
• Every wellness profile is different. Learners should be encouraged to reflect on their wellness and how they can take steps (however small) in the right direction along the path to wellness.
You need to show sensitivity and insight when dealing with each learner and his or her profile. Provide positive reinforcement for every step that is taken in the right direction. Do not allow any competition between learners regarding the wellness activity. Rather encourage learners to do ‘before and after’ type comparisons regarding their own wellness profiles.
The wellness chartThe wellness chart is a table with days of the week and healthy activities. The learners then need to indicate what they have done. See an example of a wellness chart below.
ActivitiesFor lesson 5 you’ll need the following equipment:• A copy of the lesson 5 worksheet for each learner• Coloured pens or crayons.
Activity 1 (30 minutes)Ask the learners to think about what physical activity and other healthy things they’ve done this week. • Hand out the wellness charts to each learner • Each learner must complete their own wellness chart. Emphasise that
every chart will look different and that there are no right or wrong wellness charts.
Tip for activity 1Encourage the learners to keep their wellness charts for later reference. This would be a useful activity to keep in the learner’s portfolio.
Wrap-up (5 minutes)Remind the learners about what wellness is and about the things they can do to improve their wellness.
Introduce the worksheet for lesson 5.
Healthy activities
Mon Tue Wed Thurs Fri Sat Sun
Morning Walked the dog
AfternoonPlayed soccer during break
at school
Went for a walk with the family
(1 hour)
Evening Played tennis
Grade 5 Grade 51
2
3
4
Lesson 5: My wellness chart (30 to 40 minutes)

23Discovery Vitality | 22| Discovery Vitality
Worksheet: Grade 5, lesson 5Task 1: Your wellness chartThink about the physical activity and other healthy things you have done this week. Try to fill in each block with a healthy activity that you have done. In the table, the example is if you went jogging on Saturday afternoon.
Examples of healthy activities
• Played a target game at school
• Played a target game at home
• Expressed yourself in dance
• Did housework to get your heart pumping
• Climbed stairs
• Started your day by stretching
• Did 10 star-jumps
• Did 10 sit-ups
• Did 10 push-ups
• Ran on the spot for a count of 20
• Added whole grains to your diet
• Chose fresh fruit and vegetables
• Chose water rather than a fizzy cold drink or a milkshake
• Did something relaxing
• Had enough sleep (at least 10 hours).
Grade 5 Name: _______________________________
Mon Tue Wed Thurs Fri Sat Sun
Mor
ning
After
noon
Jogging
Even
ing
Notes

25Discovery Vitality | 24| Discovery Vitality
Notes Notes

Discovery Vitality | 155 West Street | Sandton | 0860 109 939 | www.vitalityschools.co.za | [email protected]
GM_14660DHV_28/05/12