primavera p6 book excerpt
TRANSCRIPT
7/15/2019 Primavera p6 Book Excerpt
http://slidepdf.com/reader/full/primavera-p6-book-excerpt-563384634e897 1/46
PROJECT PLANNING & CONTROL USING PRIMAVERA®
P6TM
© Eastwood Harris Pty Ltd i
PROJECT PLANNING & SCHEDULING
USING
PRIMAVERA®
P6TM
For all industries including Versions 4 to 6
Planning and Progressing Project Schedules
With and Without Roles and Resources
in an
Established Enterprise Environment
BY
PAUL EASTWOOD HARRIS

7/15/2019 Primavera p6 Book Excerpt
http://slidepdf.com/reader/full/primavera-p6-book-excerpt-563384634e897 2/46
PROJECT PLANNING & CONTROL USING PRIMAVERA®
P6TM
© Eastwood Harris Pty Ltd ii
Copyright 2008 by Eastwood Harris Pty Ltd. No part of this publication may be
reproduced or used in any form or by any method without the written permission of the
author.
Primavera, the Primavera sundial logo, P3, P3e, P3e/c, Primavera Enterprise, Primavera
Expedition, Primavera Project Planner, Primavera TeamPlay, P6, Primavision,
PrimeContract, and SureTrak are either registered trademarks or trademarks of Primavera
Systems, Inc. in the United States and/or other countries.
Windows, Microsoft Office Project Standard 2007, Microsoft Office Project Professional
2007, Microsoft Project Standard 2003, Microsoft Project Professional 2003, Microsoft
Project Standard 2002, Microsoft Project Professional 2002, Microsoft Project 2000,
Microsoft Project 98 and Excel are registered trademarks of Microsoft Corporation.
Asta Powerproject is a registered trademark of Asta Developments plc.
Adobe and Acrobat are registered trademarks of Adobe Systems Incorporated.
All other company or product names may be trademarks of their respective owners.
Screen captures were reprinted with authorization from Primavera Systems Inc.
This publication was created by Eastwood Harris Pty Ltd and is not a product of Primavera
Systems Inc.
DISCLAIMER The information contained in this book is to the best of the author’s knowledge true and
correct. The author has made every effort to ensure accuracy of this publication, but may
not be held responsible for any loss or damage arising from any information in this book.
Furthermore Primavera Systems Inc reserve the right in their documentation to make
changes to any products to improve reliability, function, or design. Thus the application of
Service Packs or the use of upgraded software may operate differently to the descriptions inthis book.
AUTHOR AND PUBLISHER
Paul E Harris
Eastwood Harris Pty Ltd
PO Box 4032
Doncaster Heights 3109
Victoria, Australia
Email: [email protected]
Web: http://www.eh.com.au
Tel: +61 (0)4 1118 7701
Fax: +61 (0)3 9846 7700
Please send any comments on this publication to the author.
ISBN 978-1-921059-20-9 (1-921059-20-6) - B5 Paperback
ISBN 978-1-921059-21-6 (1-921059-21-4) - A4 Spiral
7 February 2008
7/15/2019 Primavera p6 Book Excerpt
http://slidepdf.com/reader/full/primavera-p6-book-excerpt-563384634e897 3/46
PROJECT PLANNING & CONTROL USING PRIMAVERA®
P6TM
© Eastwood Harris Pty Ltd iii
INTRODUCTIONThis book is an upgrade of the Project Planning & Scheduling Using Primavera Version
5.0 for Engineering & Construction and Maintenance & Turnover book and has been
written to enable new users to learn the planning and scheduling functions of Primavera
Versions 3.5 to 6.0. Version 6.1 was due to be released after this book was published but
the prerelease notes indicated that none of the functions outlined in this book were to
change and most changes were in the web access software and timesheeting.
Many users will have prior experience with SureTrak, P3, Asta Powerproject or Microsoft
Project and the author explains where there are differences in the products’ functionality.
The author would appreciate any constructive comments on how this book may be
improved.
SUMMARYThe book was written so it may be used as:
¾ A training manual for a three-day training course, or
¾ A self teach book, or
¾ A reference manual.
The screen shots for the book are taken from Primavera Version 6.0 but this book may be
used to learn Primavera Version 3.5, 4.1, 5.0 or 6.0.
The book has been written to be used as the basis for a three-day training course and
includes exercises for the students to complete at the end of each chapter. After the course
book may then be used by the students as a reference book.
This publication is ideal for people who would like to quickly gain an understanding of howthe software operates and explains how the software differs from Primavera P3, SureTrak
and Microsoft Project, thus making it ideal for people who wish to convert from these
products.
CUSTOMIZATION FOR TRAINING COURSESTraining organizations or companies that wish to conduct their own training may have this
book tailored to suit their requirements. This may be achieved removing, reordering or
adding content to the book and by writing their own exercises. Please contact the author to
discuss this service.
AUTHOR’S COMMENTAs a project controls consultant I have used a number of planning and scheduling software
packages for the management of a range of project types and sizes. The first books I
published were user guides/training manuals for Primavera SureTrak, P3 and Microsoft
Project users. These were well received by professional project managers and schedulers, so
I decided to turn my attention to Primavera Enterprise. This book follows the same proven
layout of my previous books. I trust this book will assist you in understanding how to use
Primavera Enterprise on your projects.
APPRECIATION
I would like thank my daughter Samantha Harris, Andrew Dick and editor Susan Aaron for their assistance in the production of this publication.
7/15/2019 Primavera p6 Book Excerpt
http://slidepdf.com/reader/full/primavera-p6-book-excerpt-563384634e897 4/46
PROJECT PLANNING & CONTROL USING PRIMAVERA®
P6TM
© Eastwood Harris Pty Ltd iv
CURRENT BOOKS PUBLISHED BY EASTWOOD HARRIS
99 Tricks and Traps for Microsoft® Office Project
Including Microsoft® Project 2000 to 2007, published May 2007
ISBN 978-1-921059-19-3 - A5 - Paperback
Planning and Scheduling Using Microsoft Office Project 2007
Including Microsoft Project 2000 to 2003, published March 2007ISBN 978-1-921059-15-5 - B5 Paperback, ISBN 978-1-921059-16-2 - A4 Spiral
PRINCE2 Planning & Control Using Microsoft Project
Updated for Microsoft Office Project 2007, published March 2007
ISBN978-1-921059-17-9 - B5 Paperback
Planning and Control Using Microsoft Project and PMBOK ® Guide Third Edition
Updated for Microsoft Office Project 2007, published March 2007
ISBN 978-1-921059-18-6 - B5 Paperback
Planning Using Primavera® Project Planner P3® Version 3.1Revised 2006, published March 2006
ISBN 1-921059-13-3 - A4 Spiral Bound
Planning Using Primavera® SureTrak Project Manager Version
3.0 Revised 2006, published June 2006
ISBN 1-921059-14-1 - A4 Spiral Bound
Project Planning and Scheduling Using Primavera® Contractor Version 4.1
For the Construction Industry, published January 2005
ISBN 1-921059-04-4 - A4 Paperback, ISBN 1-921059-05-2 A4 Spiral Bound
Project Planning and Control Using Primavera® Contractor Version 6.0
For the Construction Industry, planned early 2008
SUPERSEDED BOOKS BY THE AUTHOR Planning and Scheduling Using Microsoft® Project 2000
Planning and Scheduling Using Microsoft® Project 2002
Planning and Scheduling Using Microsoft® Project 2003
PRINCE2 TM Planning and Control Using Microsoft® Project
Planning and Control Using Microsoft® Project and PMBOK® Guide Third Edition
Project Planning and Scheduling Using Primavera Enterprise - Team Play Version 3.5Project Planning and Scheduling Using Primavera Enterprise - P3e & P3e/c Version 3.5
Project Planning and Scheduling Using Primavera® Version 4.1 for IT Project
Project Planning and Scheduling Using Primavera® Version 4.1 or E&C
Planning Using Primavera Project Planner P3 Version 2.0
Planning Using Primavera Project Planner P3 Version 3.0
Planning Using Primavera Project Planner P3 Version 3.1
Project Planning Using SureTrak for Windows Version 2.0
Planning Using Primavera SureTrak Project Manager Version 3.0
Planning and Scheduling Using Primavera® Version 5.0 For Engineering & Construction
Planning and Scheduling Using Primavera® Version 5.0 For IT Project Office
7/15/2019 Primavera p6 Book Excerpt
http://slidepdf.com/reader/full/primavera-p6-book-excerpt-563384634e897 5/46
PROJECT PLANNING & CONTROL USING PRIMAVERA®
P6TM
© Eastwood Harris Pty Ltd v
1 INTRODUCTION 1-1
1.1 Purpose 1-1
1.2 Required Background Knowledge 1-2
1.3 Purpose of Planning 1-2
1.4 Project Planning Metrics 1-3
1.5 Planning Cycle 1-4
1.6 Levels of Planning 1-5
1.7 Monitoring and Controlling a Project 1-7
2 CREATING A PROJECT PLAN 2-1
2.1 Understanding Planning and Scheduling Software 2-1
2.2 Enterprise Project Management 2-1
2.3 Understanding Your Project 2-2
2.4 Level 1 – Planning Without Resources 2-3
2.4.1 Creating Projects 2-3
2.4.2 Defining the Calendars 2-3
2.4.3 Defining the Project Breakdown Structures 2-3
2.4.4 Adding Activities 2-4
2.4.5 Adding the Logic Links 2-5
2.4.6 Constraints 2-6
2.4.7 Risk Analysis 2-6
2.4.8 Contingent Time 2-6 2.4.9 Scheduling the Project 2-6
2.4.10 Formatting the Display – Layouts and Filters 2-7
2.4.11 Printing and Reports 2-7
2.4.12 Issuing the Plan 2-7
2.5 Level 2 – Monitoring Progress Without Resources 2-8
2.5.1 Setting the Baseline 2-8
2.5.2 Tracking Progress 2-8
2.5.3 Corrective Action 2-9
2.6 Level 3 – Scheduling With Resources, Roles & Budgets 2-9
2.6.1 Estimating or Planning for Control 2-9
2.6.2 The Balance Between the Number of Activities and Resources 2-9
2.6.3 Creating and Using Resources 2-10
2.6.4 Creating and Using Roles 2-10
2.6.5 The Relationship Between Resources and Roles 2-10
2.6.6 Activity Type and Duration Type 2-10
2.6.7 Budgets 2-10
2.6.8 Resource Usage Profiles and Tables 2-11
2.6.9 Resource Optimization 2-11
7/15/2019 Primavera p6 Book Excerpt
http://slidepdf.com/reader/full/primavera-p6-book-excerpt-563384634e897 6/46
PROJECT PLANNING & CONTROL USING PRIMAVERA®
P6TM
© Eastwood Harris Pty Ltd vi
2.7 Level 4 – Monitoring and Controlling a Resourced Schedule 2-11
2.7.1 Monitoring Projects with Resources 2-11
2.7.2 Controlling a Project with resources 2-11
3 STARTING UP AND NAVIGATION 3-1
3.1 Logging In 3-1
3.2 Welcome Form 3-1
3.3 The Home Workspace 3-2
3.4 The Projects Workspace 3-2
3.4.1 Project Workspace Top Pane 3-2
3.4.2 Project Workspace Bottom Pane 3-3
3.5 Opening One or More Projects 3-3
3.6 Opening a Portfolio 3-4
3.7 Navigating Around a Project 3-4
3.7.1 Command Toolbar 3-4
3.7.2 Activities Toolbar 3-4
3.7.3 Navigation Toolbar 3-5
3.7.4 Directory Toolbar 3-5
3.7.5 Top and Bottom Panes of Workspaces 3-5
3.8 User Preferences - Date and Time Display 3-6
3.9 Right-clicking with the Mouse 3-6
3.10 Accessing Help 3-6
3.11 Application of Options within Forms 3-73.12 Closing Down 3-8
3.13 Terminology Differences between Industry Versions 3-8
4 CREATING A NEW PROJECT 4-1
4.1 File Types 4-1
4.2 Creating a Blank Project 4-2
4.3 Setting Up a New Project 4-2
4.4 Project Architect Wizard and Methodology Manager 4-3
4.5 Importing a Project 4-3
4.6 Copy an Existing Project 4-4
4.7 Project Dates 4-5
4.8 Saving Additional Project and EPS Information - Notebook Topics 4-6
5 DEFINING CALENDARS 5-1
5.1 Accessing Global and Project Calendars 5-2
5.2 Assigning the Project Default Project Calendar 5-2
5.3 Creating a New Calendar 5-3
5.4 Copying Calendars 5-3
5.5 Renaming a Calendar 5-3
5.6 Deleting a Calendar 5-3

7/15/2019 Primavera p6 Book Excerpt
http://slidepdf.com/reader/full/primavera-p6-book-excerpt-563384634e897 7/46
PROJECT PLANNING & CONTROL USING PRIMAVERA®
P6TM
© Eastwood Harris Pty Ltd vii
5.7 Resource Calendars 5-3
5.8 Editing Calendar Working Days of an Existing Calendar 5-4
5.9 Adjusting Working Hours 5-5
5.9.1 Editing Calendar Weekly Hours 5-5
5.9.2 Editing Selected Days Working Hours 5-5
5.9.3 Editing Detailed Work Hours/Day 5-6
5.10 Inherit Holidays and Exceptions from a Global Calendar 5-6
5.11 Calculation of Activity Summary Duration in Days 5-7
5.12 Database Default Calendar, WBS and Project Durations 5-8
6 CREATING A PRIMAVERA PROJECT WBS 6-1
6.1 Opening and Navigating the WBS Workspace 6-2
6.2 Creating and Deleting a WBS Node 6-3
6.3 WBS Node Separator 6-3
6.4 Work Breakdown Structure Lower Pane Details 6-4
6.5 WBS Categories 6-5
6.6 Why a Primavera WBS is Important 6-6
7 ADDING ACTIVITIES & ORGANIZING UNDER THE WBS 7-1
7.1 New Activity Defaults 7-2
7.1.1 Duration Type 7-2
7.1.2 Percent Complete Type 7-2
7.1.3 Activity Types and Milestones 7-4
7.1.4 Cost Account 7-5 7.1.5 Calendar 7-5
7.1.6 Auto-numbering Defaults 7-5
7.2 Adding New Activities 7-5
7.3 Default Activity Duration 7-5
7.4 Copying Activities in Primavera 7-6
7.5 Copying Activities from other Programs 7-6
7.6 Elapsed Durations 7-6
7.7 Finding the Bars in the Gantt Chart 7-6
7.8 Activity Information – Bottom Layout 7-7
7.9 Assigning Calendars to Activities 7-8
7.9.1 Assigning a Calendar Using General Tab of the Bottom Layout Form 7-8
7.9.2 Assigning a Calendar Using a Column 7-8
7.10 Undo 7-8
7.11 Assigning Activities to a WBS Node 7-9
7.12 Reordering or Sorting Activities 7-10
7.13 Summarizing Activities Using WBS 7-11
7.14 Spell Check 7-11
7/15/2019 Primavera p6 Book Excerpt
http://slidepdf.com/reader/full/primavera-p6-book-excerpt-563384634e897 8/46
PROJECT PLANNING & CONTROL USING PRIMAVERA®
P6TM
© Eastwood Harris Pty Ltd viii
8 FORMATTING THE DISPLAY 8-1
8.1 Formatting the Project Workspace 8-2
8.2 Understanding Forms 8-2
8.3 Formatting Columns 8-3
8.3.1 Selecting the Columns to be Displayed 8-3
8.3.2 Column Header Alignment 8-3
8.3.3 Adjusting the Width of Columns 8-4
8.3.4 Setting the Order of the Columns from Left to Right on the Screen 8-4
8.4 Formatting the Bars 8-4
8.4.1 Formatting Activity Bars 8-4
8.4.2 Bar Style Tab 8-6
8.4.3 Bar Settings Tab 8-6
8.4.4 Bar Labels Tab 8-7
8.4.5 Bar Chart Options Form 8-8 8.5 Row Height 8-9
8.6 Format Fonts and Font Colors 8-10
8.7 Format Colors 8-10
8.8 Format Timescale 8-11
8.8.1 Moving and Rescaling the Timescale 8-11
8.8.2 Format Timescale Command 8-11
8.8.3 Non Work Period Shading in Timescale 8-13
8.9 Inserting Attachments - Text Boxes and Curtain 8-138.9.1 Adding a Text Box 8-13
8.9.2 Adding a Curtain 8-14
9 ADDING RELATIONSHIPS 9-1
9.1 Understanding Relationships 9-2
9.2 Understanding Lags and Leads 9-3
9.3 Formatting the Relationships 9-4
9.4 Adding and Removing Relationships 9-4
9.4.1 Graphically Adding a Relationship 9-4
9.4.2 Graphically Deleting a Relationship 9-5
9.4.3 Adding and Deleting Relationships with the Activity Details Form 9-5
9.4.4 Chain Linking 9-6
9.5 Using the Command Toolbar Buttons to Assign Relationships 9-7
9.6 Dissolving Activities 9-7
9.7 Circular Relationships 9-7
9.8 Scheduling the Project 9-7
9.9 Critical Activities Definition 9-8
7/15/2019 Primavera p6 Book Excerpt
http://slidepdf.com/reader/full/primavera-p6-book-excerpt-563384634e897 9/46
PROJECT PLANNING & CONTROL USING PRIMAVERA®
P6TM
© Eastwood Harris Pty Ltd ix
10 ACTIVITY NETWORK VIEW 10-1
10.1 Viewing a Project Using the Activity Network View 10-2
10.2 Adding, Deleting and Dissolving Activities in the Activity Network View 10-2
10.3 Adding, Editing and Deleting Relationships 10-2
10.3.1 Graphically Adding a Relationship. 10-2
10.3.2 Using the Activity Details Form 10-2
10.4 Formatting the Activity Boxes 10-3
10.5 Reorganizing the Activity Network 10-3
10.6 Saving and Opening Activity network Positions 10-3
10.7 Early Date, Late Date and Float Calculations 10-4
11 CONSTRAINTS 11-1
11.1 Assigning Constraints 11-3
11.1.1 Number of Constraints per Activity 11-3
11.1.2 Setting a Primary Constraint Using the Activity Details Form 11-3 11.1.3 Setting a Secondary Constraint Using the Activity Details Form 11-3
11.1.4 Expected Finish Constraint 11-3
11.1.5 Setting Constraints Using Columns 11-4
11.1.6 Typing in a Start Date 11-4
11.1.7 Expected Finish Date 11-4
11.2 Project Must Finish By Date 11-5
11.3 Activity Notebook 11-6
11.3.1 Creating Notebook Topics 11-6 11.3.2 Adding Notes 11-6
12 FILTERS 12-1
12.1 Understanding Filters 12-1
12.2 Applying a Filter 12-2
12.2.1 Filters Form 12-2
12.2.2 Applying a Single Filter 12-2
12.2.3 Applying a Combination Filter 12-2
12.3 Creating a New Filter 12-3
12.4 Modifying a Filter 12-3
12.4.1 One Parameter Filter 12-3
12.4.2 Two Parameter Filter 12-4
12.4.3 Multiple Parameter Filter 12-4
12.4.4 Editing and Organizing Filter Parameters 12-5

7/15/2019 Primavera p6 Book Excerpt
http://slidepdf.com/reader/full/primavera-p6-book-excerpt-563384634e897 10/46
PROJECT PLANNING & CONTROL USING PRIMAVERA®
P6TM
© Eastwood Harris Pty Ltd x
13 GROUP, SORT AND LAYOUTS 13-1
13.1 Group and Sort Activities 13-2
13.1.1 Display Options 13-2
13.1.2 Group By 13-4
13.1.3 Group By Options 13-5
13.1.4 Sorting 13-6
13.1.5 Reorganize Automatically 13-6
13.1.6 Group and Sort Projects at Enterprise Level 13-7
13.2 Understanding Layouts 13-7
13.2.1 Applying an Existing Layout 13-8
13.2.2 Creating a New Layout 13-9
13.2.3 Layout Types 13-9
13.2.4 Changing Activity Layout Types in Panes 13-10
13.2.5 Activity Workspace Layout Panes 13-10 13.2.6 WBS and Projects Workspace Panes 13-12
13.3 Copying a Layout To and From Another Database 13-12
14 PRINTING AND REPORTS 14-1
14.1 Printing 14-1
14.2 Print Preview 14-2
14.3 Page Setup 14-3
14.3.1 Page Tab 14-3
14.3.2 Margins Tab 14-4 14.3.3 Header and Footer Tabs 14-4
14.4 Options Tab 14-5
14.5 Print Form 14-6
14.6 Print Setup Form 14-6
14.7 Reports 14-6
15 TRACKING PROGRESS 15-1
15.1 Understanding Date Fields 15-2
15.2 Setting the Baseline 15-4
15.2.1 Saving a Baseline 15-4
15.2.2 Deleting a Baseline 15-5
15.2.3 Restoring a Baseline to the Database as an Active Project 15-5
15.2.4 Setting the Baseline Project 15-5
15.2.5 Understanding the <Current Schedule> Baseline 15-6
15.2.6 Update Baselines 15-7
15.2.7 Copying a Project with Baselines 15-8
15.2.8 Displaying the Baseline Data 15-9
15.3 Practical Methods of Recording Progress 15-9
7/15/2019 Primavera p6 Book Excerpt
http://slidepdf.com/reader/full/primavera-p6-book-excerpt-563384634e897 11/46
PROJECT PLANNING & CONTROL USING PRIMAVERA®
P6TM
© Eastwood Harris Pty Ltd xi
15.4 Understanding the Concepts 15-11
15.4.1 Activity Lifecycle 15-11
15.4.2 Actual Start Date Assignment of an In-Progress Activity 15-11
15.4.3 Calculation of Durations of an In-Progress Activity 15-12
Percent Complete 15-12
15.4.4 Retained Logic and Progress Override 15-14
15.4.5 Actual Finish Date 15-15
15.4.6 Summary Bars Progress Calculation 15-15
15.4.7 Understanding the Current Data Date 15-15
15.5 Updating the Schedule 15-15
15.5.1 Updating Activities Using the Status Tab of the Details Form 15-16
15.5.2 Updating Activities Using Columns 15-16
15.6 Progress Spotlight 15-17
15.6.1 Highlighting Activities for Updating by Dragging the Data Date 15-18
15.6.2 Spotlighting Activities Using Spotlight Icon 15-18
15.6.3 Statusing Using Update Progress 15-18
15.7 Suspend and Resume 15-19
15.8 Scheduling the Project 15-20
15.9 Comparing Progress with Baseline 15-20
15.10 Corrective Action 15-21
16 USER AND ADMINISTRATION PREFERENCES AND ADVANCED
SCHEDULING OPTIONS 16-1 16.1 User Preferences 16-1
16.1.1 Time Units Tab 16-1
16.1.2 Dates Tab 16-2
16.1.3 Currency Tab 16-2
16.1.4 E-Mail Tab 16-2
16.1.5 Assistance Tab 16-3
16.1.6 Application Tab 16-3
16.1.7 Password Tab 16-4
16.1.8 Resource Analysis Tab 16-4
16.1.9 Calculations Tab 16-5
16.1.10 Setup Filters Tab 16-5
16.2 Admin Menu 16-6
16.2.1 Users 16-6
16.2.2 Security Profiles 16-7
16.2.3 Currencies 16-7
16.2.4 Financial Periods 16-7
16.2.5 Purge Deletes 16-8
16.2.6 Timesheet Dates 16-8
7/15/2019 Primavera p6 Book Excerpt
http://slidepdf.com/reader/full/primavera-p6-book-excerpt-563384634e897 12/46
PROJECT PLANNING & CONTROL USING PRIMAVERA®
P6TM
© Eastwood Harris Pty Ltd xii
16.3 Miscellaneous Defaults 16-8
16.3.1 Default Project 16-8
16.3.2 Set Language 16-8
16.4 Admin Preferences 16-9
16.4.1 General Tab 16-9
16.4.2 Timesheets Tab 16-9
16.4.3 Timesheet Privileges Tab 16-10
16.4.4 Data Limits Tab 16-10
16.4.5 ID Lengths Tab 16-10
16.4.6 Time Periods Tab 16-10
16.4.7 Earned Value Tab 16-11
16.4.8 Reports Tab 16-11
16.4.9 Options Tab 16-11
16.4.10 Rate Types Tab 16-12
16.5 Scheduling Options 16-12
16.5.1 General Tab 16-12
16.5.2 Advanced Tab 16-14
16.6 Admin Categories 16-14
17 CREATING ROLES AND RESOURCES 17-1
17.1 Understanding Resources 17-2
17.1.1 Individual Resources 17-2
17.1.2 Group Resources 17-2 17.1.3 Input and Output Resources 17-3
17.2 Creating Roles 17-4
17.3 Creating Resources and the Resources Workspace 17-6
17.3.1 Resource Breakdown Structure - RBS 17-6
17.3.2 Formatting the Resources Workspace 17-6
17.3.3 Adding Resources 17-7
17.3.4 General Tab 17-7
17.3.5 Codes Tab 17-7
17.3.6 Details Tab 17-8
17.3.7 Units and Prices Tab 17-10
17.3.8 Roles Tab 17-10
17.3.9 Notes Tab 17-10
17.3.10 Timesheets Tab 17-10
17.4 Editing Resource Calendars 17-11
7/15/2019 Primavera p6 Book Excerpt
http://slidepdf.com/reader/full/primavera-p6-book-excerpt-563384634e897 13/46
PROJECT PLANNING & CONTROL USING PRIMAVERA®
P6TM
© Eastwood Harris Pty Ltd xiii
18 ASSIGNING ROLES, RESOURCES AND EXPENSES 18-1
18.1 Understanding Resource Calculations and Terminology 18-2
18.2 Project Workspace Resource Preferences 18-3
18.2.1 Resources Tab 18-3
18.2.2 Understanding Resource Option to Drive Activity Dates 18-3
18.2.3 Calculations Tab 18-5
18.3 User Preferences Applicable to Assigning Resources 18-5
18.3.1 Units/Time Format 18-5
18.3.2 Resource Assignments 18-5
18.3.3 Assignment Staffing 18-6
18.4 Activity Workspace Resource Preferences and Defaults 18-6
18.4.1 Details Status Form 18-6
18.4.2 Activity Type 18-7
18.4.3 Duration Type 18-9 18.5 Assigning and Removing Roles 18-12
18.6 Assigning and Removing Resources 18-13
18.6.1 Assigning a Resource to an Assigned Role 18-13
18.6.2 Assigning a Resource to an Activity Without a Role 18-14
18.6.3 Removing a Resource 18-14
18.6.4 Assigning a Resource to an Activity More Than Once 18-14
18.6.5 Resource and Activity Duration Calculation & Resource Lags 18-15
18.6.6 Activity Duration 18-15 18.6.7 Resource Lag 18-15
18.7 Expenses 18-16
18.7.1 Expenses Workspace 18-16
18.7.2 Expenses Tab in the Activities Workspace 18-17
18.8 Suggested Setup for Creating a Resourced Schedule 18-18
19 RESOURCE OPTIMIZATION 19-1
19.1 Reviewing Resource Loading 19-1
19.1.1 Activity Usage Profile 19-1
19.1.2 Resource Usage Spreadsheet 19-1
19.1.3 Resource Usage Profile displaying a Resource Histogram 19-2
19.1.4 Resource Usage Profile displaying S-Curves 19-2
19.1.5 Activity Usage Spreadsheet 19-2
19.2 Methods of Resolving Resource Peaks and Conflicts 19-3
19.3 Resource Leveling 19-3
19.3.1 Methods of Resource Leveling 19-3

7/15/2019 Primavera p6 Book Excerpt
http://slidepdf.com/reader/full/primavera-p6-book-excerpt-563384634e897 14/46
PROJECT PLANNING & CONTROL USING PRIMAVERA®
P6TM
© Eastwood Harris Pty Ltd xiv
19.4 Resource Leveling Function 19-4
19.4.1 Level Resources Form 19-4
19.5 Leveling Examples 19-5
19.5.1 Leveling with Positive Float 19-6
19.5.2 Leveling without Positive Float 19-7
19.6 Resource Shifts 19-9
19.6.1 Creating Shifts: 19-10
19.6.2 Assigning Shifts to Resources 19-10
19.6.3 Leveling With Shifts 19-11
19.7 Guidelines for Leveling 19-14
19.8 What to Look For if Resources Are Not Leveling 19-15
19.9 Resource Curves 19-15
19.10 Editing the Resource Usage Spreadsheet – Bucket Planning 19-18
20 STATUSING A RESOURCED SCHEDULE 20-1
20.1 Understanding Budget Values and Baseline Projects 20-2
20.1.1 Cost and Units Budget Values 20-2
20.1.2 Baseline Project and Values 20-2
20.2 Understanding the Current Data Date 20-3
20.3 Information Required to Update a Resourced Schedule 20-3
20.4 Project Workspace Defaults for Statusing a Resourced Schedule 20-5
20.5 Activity Workspace - Percent Complete Types 20-6
20.5.1 Assigning the Project Default Percent Complete Type 20-6 20.5.2 Physical Percent Complete Type 20-7
20.5.3 Duration Percent Complete Type 20-8
20.5.4 Units Percent Complete Type 20-9
20.6 Using Steps to Calculate Activity Percent Complete 20-9
20.7 Updating the Schedule 20-10
20.7.1 Preferences, Defaults and Options for Statusing a Project 20-10
20.7.2 Updating Dates and Percentage Complete 20-12
20.8 Updating Resources 20-12
20.8.1 Resource Tab 20-12
20.8.2 Status Tab 20-12
20.8.3 Applying Actuals 20-13
20.9 Updating Expenses 20-13
20.10 Store Period Performance 20-14

7/15/2019 Primavera p6 Book Excerpt
http://slidepdf.com/reader/full/primavera-p6-book-excerpt-563384634e897 15/46
PROJECT PLANNING & CONTROL USING PRIMAVERA®
P6TM
© Eastwood Harris Pty Ltd xv
21 OTHER METHODS OF ORGANIZING PROJECT DATA 21-1
21.1 Understanding Project Breakdown Structures 21-1
21.2 Activity Codes 21-2
21.2.1 Creating Activity Codes 21-2
21.2.2 Defining an Activity Code 21-3
21.2.3 Assigning Activity Codes to Activities 21-3
21.2.4 Grouping, Sorting and Filtering with Activity Codes 21-3
21.2.5 Importing Activity Codes with Excel 21-3
21.3 User Defined Fields 21-4
21.4 Project Phase or WBS Category 21-6
21.5 Resource Codes 21-6
21.6 Cost Accounts 21-7
21.7 Owner Activity Attribute 21-7
21.8 EPS Level Activity Codes 21-821.8.1 Create an EPS Level Activity Code Dictionary 21-8
21.8.2 Create EPS Activity Codes 21-8
21.8.3 Assigning EPS Activity Codes to Activities 21-8
22 GLOBAL CHANGE 22-1
22.1 Introducing Global Change 22-1
22.2 The Basic Concepts of Global Change 22-2
22.3 Specifying the Change Statements 22-4
22.4 Examples of Simple Global Changes 22-522.5 Selecting the Activities for the Global Change 22-6
22.6 Temporary Values 22-8
22.7 Global Change Functions 22-8
22.8 More Advanced Examples of Global Change 22-9
23 MANAGING THE ENTERPRISE ENVIRONMENT 23-1
23.1 Multiple User Data Display Issues 23-2
23.2 Enterprise Project Structure (EPS) 23-3
23.3 Portfolios 23-3
23.4 Organizational Breakdown Structure – OBS 23-4
23.4.1 Creating an OBS Structure 23-4
23.4.2 General Tab 23-4
23.4.3 Users Tab 23-4
23.4.4 Responsibility Tab 23-4
23.5 Users, Security Profiles and Organizational Breakdown Structure 23-5
23.6 Project Codes 23-6
23.7 Filtering, Grouping and Sorting Projects in the Projects Workspace 23-6
23.8 Project Durations in the Project Workspace 23-7
23.9 Why Are Some Data Fields Gray and Cannot Be Edited? 23-7
7/15/2019 Primavera p6 Book Excerpt
http://slidepdf.com/reader/full/primavera-p6-book-excerpt-563384634e897 16/46
PROJECT PLANNING & CONTROL USING PRIMAVERA®
P6TM
© Eastwood Harris Pty Ltd xvi
23.10 Summarizing Projects 23-7
23.11 Job Services 23-8
23.12 Tracking Workspace 23-9
24 MULTIPLE PROJECT SCHEDULING 24-1
24.1 Multiple Projects in One Primavera Project 24-1
24.2 Multiple Primavera Projects Representing One Project 24-1
24.3 Setting Up Primavera Projects as Sub-projects 24-2
24.3.1 Opening One or More Projects 24-2
24.3.2 Default Project 24-3
24.3.3 Setting the Projects Data Dates 24-4
24.3.4 Total Float Calculation 24-4
24.4 Refresh Data 24-6
24.5 Who Has the Project Open? 24-6
24.6 Setting Baselines for Multiple Projects 24-7
25 UTILITIES 25-1
25.1 Reflection Projects 25-1
25.2 Advanced Scheduling Options 25-2
25.2.1 Calculating Multiple Paths 25-2
25.2.2 Displaying Multiple Paths 25-3
25.3 Audit Trail Columns 25-3
25.4 Excel Import and Export Tool 25-4
25.5 Project Import and Export 25-525.6 Check In & Check Out 25-5
27 WHAT IS NEW IN VERSION 6.0 27-1
27.1 XML File Format for Import and Export 27-1
27.2 Copy a Project with High Level Resource Assignments 27-1
27.3 Role Limits 27-1
27.4 Reflection Projects 27-1
27.5 Editing the Resource Usage Spreadsheet – Bucket Planning 27-2
27.6 Owner Activity Attribute 27-2
27.7 Resource Assignment Audit Trail 27-3
27.8 Project Layouts 27-3
27.9 Curtains and Spotlights 27-3
27.10 Group and Sort 27-3
27.11 Planning Resources 27-4
27.12 Copying a Project with Baselines 27-4
7/15/2019 Primavera p6 Book Excerpt
http://slidepdf.com/reader/full/primavera-p6-book-excerpt-563384634e897 17/46
PROJECT PLANNING & CONTROL USING PRIMAVERA®
P6TM
© Eastwood Harris Pty Ltd xvii
28 WHAT IS NEW IN VERSION 5.0 28-1
28.1 MSDE Database for Standalone Installations 28-1
28.2 Undo 28-1
28.3 WBS Summary Activity 28-1
28.4 EPS Level Activity Codes 28-2
28.4.1 Create an EPS Level Activity Code Dictionary 28-2
28.4.2 Create EPS Activity Codes 28-2
28.4.3 Assigning EPS Activity Codes to Activities 28-2
28.5 Activity Step Templates 28-3
28.6 Assignment Staffing 28-4
28.7 Resource Security 28-4
28.8 Baseline Functionality 28-5
28.8.1 Update Baselines 28-5 28.8.2 Assign Baselines 28-6
28.8.3 Baseline Used for Earned Value Calculations 28-6
28.9 Progress Spotlight 28-7
28.9.1 Highlighting Activities for Updating by Dragging the Data Date 28-8
28.9.2 Spotlighting Activities Using Spotlight Icon 28-8
28.9.3 Statusing Using Update Progress 28-8
28.10 Suspend and Resume 28-9
28.11 Store Period Performance 28-1028.12 Advanced Scheduling Options 28-11
28.13 Rates for Roles 28-13
28.14 Excel Import and Export Tool 28-14
28.15 P3 Subproject Import 28-15
28.16 Export to Primavera Contractor 28-15
28.17 Audit Trail Columns 28-15
28.18 Enhanced or New Graphics Functions 28-16
28.18.1 Bar Label Placement 28-16
28.18.2 Three Timescale Units 28-16
28.18.3 Vertical Sight Lines 28-17
28.18.4 Reorganize Automatically 28-17
28.18.5 Gantt Chart Curtains 28-18
28.19 Improved Report Wizard Functionality 28-18
7/15/2019 Primavera p6 Book Excerpt
http://slidepdf.com/reader/full/primavera-p6-book-excerpt-563384634e897 18/46
PROJECT PLANNING & CONTROL USING PRIMAVERA®
P6TM
© Eastwood Harris Pty Ltd xviii
29 WHAT IS NEW IN VERSION 4.1 29-1
29.1 Project Import & Export 29-1
29.2 Format Gridlines 29-1
29.3 Format Bars 29-2
29.3.1 Bar Necking 29-2
29.3.2 User Defined Bars Based on User Defined Dates 29-2
29.4 Material Resources 29-3
29.5 Close Out Period Actuals 29-3
29.6 Project Workspace Defaults for Statusing a Resourced Schedule 29-4
29.7 Printing 29-4
30 TOPICS NOT COVERED IN THIS BOOK 30-1
31 INDEX 31-1
7/15/2019 Primavera p6 Book Excerpt
http://slidepdf.com/reader/full/primavera-p6-book-excerpt-563384634e897 19/46
PROJECT PLANNING & CONTROL USING PRIMAVERA®
P6TM
© Eastwood Harris Pty Ltd 8-1
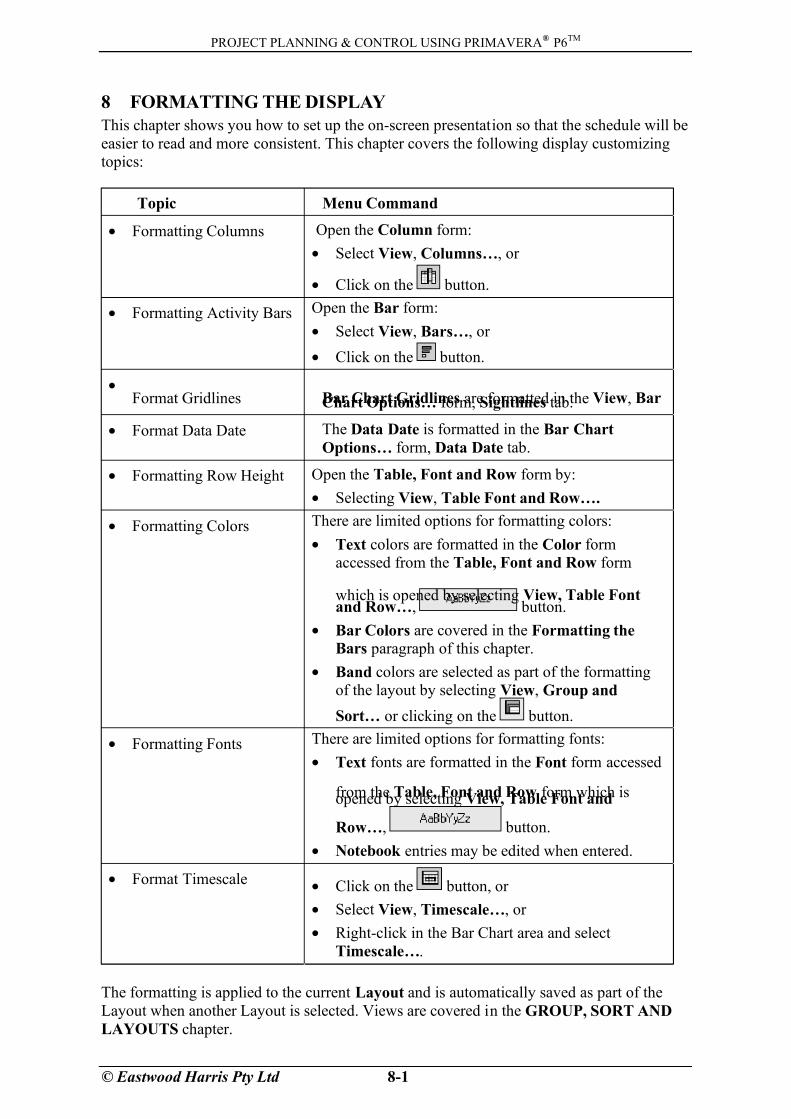
8 FORMATTING THE DISPLAY
This chapter shows you how to set up the on-screen presentation so that the schedule will be
easier to read and more consistent. This chapter covers the following display customizing
topics:
Topic Menu Command
• Formatting Columns Open the Column form:
• Select View, Columns…, or
• Click on the button.
• Formatting Activity Bars Open the Bar form:
• Select View, Bars…, or
• Click on the button.
• Format Gridlines Bar Chart Gridlines are formatted in the View, BarChart Options… form, Sightlines tab.
• Format Data Date The Data Date is formatted in the Bar Chart
Options… form, Data Date tab.
• Formatting Row Height Open the Table, Font and Row form by:
• Selecting View, Table Font and Row….
• Formatting Colors There are limited options for formatting colors:
• Text colors are formatted in the Color form
accessed from the Table, Font and Row form
which is opened by selecting View, Table Fontand Row…, button.
• Bar Colors are covered in the Formatting the
Bars paragraph of this chapter.
• Band colors are selected as part of the formatting
of the layout by selecting View, Group and
Sort… or clicking on the button.
• Formatting Fonts There are limited options for formatting fonts:
• Text fonts are formatted in the Font form accessed
from the Table, Font and Row form which isopened by selecting View, Table Font and
Row…, button.
• Notebook entries may be edited when entered.
• Format Timescale• Click on the button, or
• Select View, Timescale…, or
• Right-click in the Bar Chart area and select
Timescale….
The formatting is applied to the current Layout and is automatically saved as part of the
Layout when another Layout is selected. Views are covered in the GROUP, SORT AND
LAYOUTS chapter.
7/15/2019 Primavera p6 Book Excerpt
http://slidepdf.com/reader/full/primavera-p6-book-excerpt-563384634e897 20/46
PROJECT PLANNING & CONTROL USING PRIMAVERA®
P6TM
© Eastwood Harris Pty Ltd 8-2
8.1 Formatting the Project Workspace
The formatting of the Project Workspace is very similar to the formatting of the Activity
Workspace and will not be covered separately. Formatting, Filters and Layouts all work in
the same way, except one is dealing with projects and not activities.
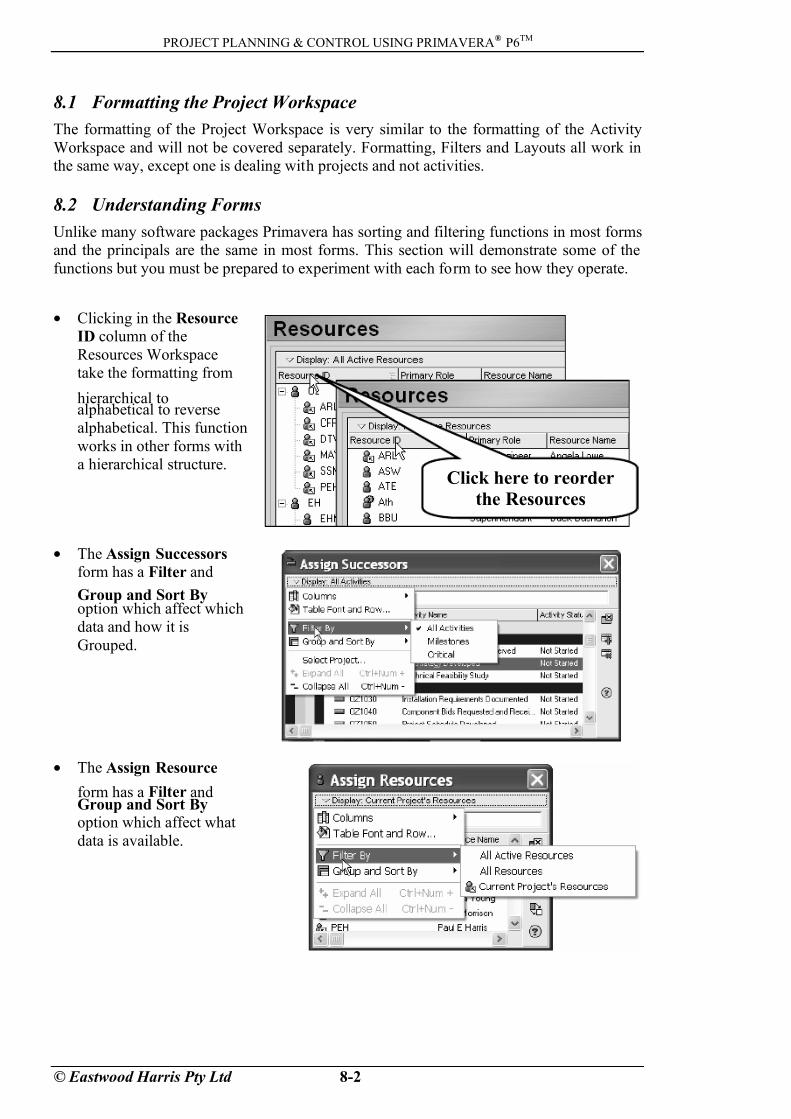
8.2 Understanding Forms
Unlike many software packages Primavera has sorting and filtering functions in most forms
and the principals are the same in most forms. This section will demonstrate some of the
functions but you must be prepared to experiment with each form to see how they operate.
• Clicking in the Resource
ID column of the
Resources Workspace
take the formatting from
hierarchical toalphabetical to reverse
alphabetical. This function
works in other forms with
a hierarchical structure.
• The Assign Successors form has a Filter and
Group and Sort By option which affect which
data and how it is
Grouped.
• The Assign Resource
form has a Filter andGroup and Sort By option which affect what
data is available.
Click here to reorder
the Resources
7/15/2019 Primavera p6 Book Excerpt
http://slidepdf.com/reader/full/primavera-p6-book-excerpt-563384634e897 21/46
PROJECT PLANNING & CONTROL USING PRIMAVERA®
P6TM
© Eastwood Harris Pty Ltd 8-3
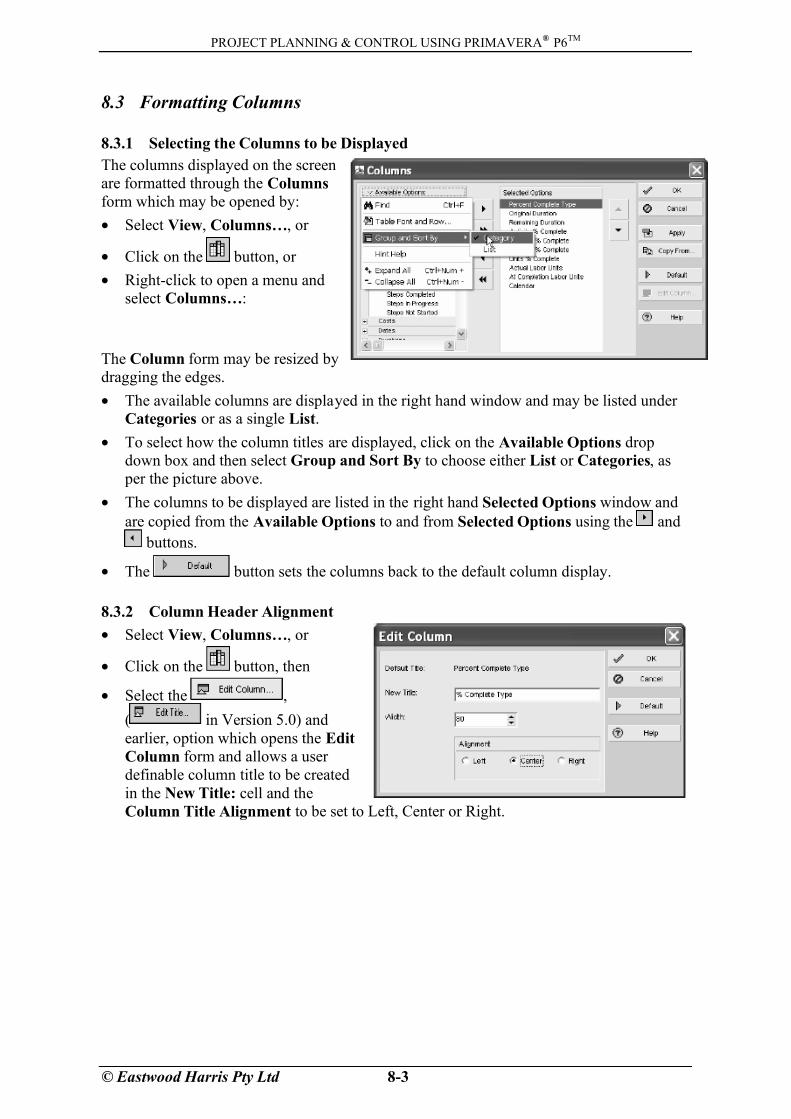
8.3 Formatting Columns
8.3.1 Selecting the Columns to be Displayed
The columns displayed on the screen
are formatted through the Columns
form which may be opened by:
• Select View, Columns…, or
• Click on the button, or
• Right-click to open a menu and
select Columns…:
The Column form may be resized by
dragging the edges.
• The available columns are displayed in the right hand window and may be listed under
Categories or as a single List.
• To select how the column titles are displayed, click on the Available Options drop
down box and then select Group and Sort By to choose either List or Categories, as
per the picture above.
• The columns to be displayed are listed in the right hand Selected Options window and
are copied from the Available Options to and from Selected Options using the and
buttons.
• The button sets the columns back to the default column display.
8.3.2 Column Header Alignment
• Select View, Columns…, or
• Click on the button, then
• Select the ,
( in Version 5.0) and
earlier, option which opens the Edit
Column form and allows a user
definable column title to be created
in the New Title: cell and the
Column Title Alignment to be set to Left, Center or Right.

7/15/2019 Primavera p6 Book Excerpt
http://slidepdf.com/reader/full/primavera-p6-book-excerpt-563384634e897 22/46
PROJECT PLANNING & CONTROL USING PRIMAVERA®
P6TM
© Eastwood Harris Pty Ltd 8-4
8.3.3 Adjusting the Width of Columns
You may adjust the width of the column in two ways:
• By dragging the column title separator;
move the mouse pointer to the nearest
vertical line of the column. A icon
will then appear and enable the columnto be adjusted by Right-clicking &
dragging.
• From the Column form select the , ( in Version 5.0) and
earlier, to open the Edit Column Title form and enter the width of the column in pixels.
8.3.4 Setting the Order of the Columns from Left to Right on the Screen
The order of the columns on the screen, from left to right, is the same as the order in the
Columns form Selected Options window from top to bottom. The order of the columns
may be altered:• Highlight the column in the Columns form Selected Options window and use the
and buttons, or
• Right-click on the column title in a Workspace and drag the column.
8.4 Formatting the Bars
The bars in the Gantt Chart may be formatted to suit your requirements for display.
Primavera does not have the option to format individual bars but is able to assign a filter to
a bar style so that a style is applied to activities that meet a filter definition.
8.4.1 Formatting Activity Bars
To format all the bars you must open the Bar form:
• Select View, Bars…, or
• Click on the button, or
• Right-click in the bars area and select Bars… from the menu.
7/15/2019 Primavera p6 Book Excerpt
http://slidepdf.com/reader/full/primavera-p6-book-excerpt-563384634e897 23/46
PROJECT PLANNING & CONTROL USING PRIMAVERA®
P6TM
© Eastwood Harris Pty Ltd 8-5
The following notes are the main points for using this function. Detailed information is
available in the help facility by searching for “Bar styles dialog box.”
• Each bar listed in the table may be displayed on the bar chart by checking the box in the
Display column.
• New bars may be added by clicking on the button and deleted by clicking on
the button.• The bar at the top of the list is placed on the screen and then the one below drawn over
the top of it, so it would be simple to hide one bar with a second. The and
buttons are used to move the bars up or down the list and therefore determine
which bar is drawn on top of the next.
• The Name is the title assigned to the bar and may be displayed in the printout legend.
• The Timescale option is similar to the Show For … Tasks option in the Microsoft
Project Bar Styles form or the Data Item in the SureTrak Format Bars form, and
allows the nomination of a predefined bar which is selected from the drop down box.
¾ Version 4.1 introduced User Defined Dates that may be used for formatting User
Defined Bars Styles, see the first line on the bars form above.
i
It is recommended that you use the Primavera default bar display options
displaying the Actual Work (this bar is displayed from the Start date to the Data
Date), Remaining Work and Critical Remaining Work bars (these bars are
displayed from the Data Date to the Finish date with the appropriate filter)
because the Early bar will not display actual progress as in other software
packages. Please read the Understanding Dates section in the TRACKING
PROGRESS chapter to understand how the dates are calculated that are used to
draw each bar.
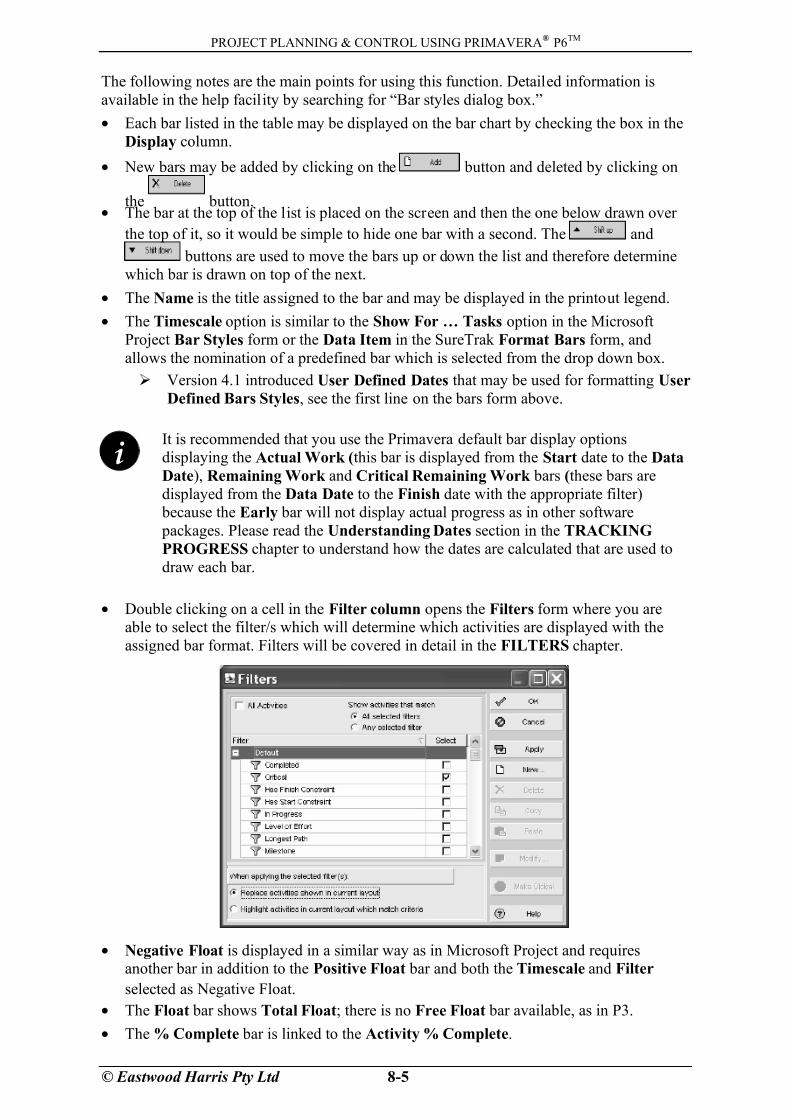
• Double clicking on a cell in the Filter column opens the Filters form where you are
able to select the filter/s which will determine which activities are displayed with the
assigned bar format. Filters will be covered in detail in the FILTERS chapter.
• Negative Float is displayed in a similar way as in Microsoft Project and requires
another bar in addition to the Positive Float bar and both the Timescale and Filter
selected as Negative Float.
• The Float bar shows Total Float; there is no Free Float bar available, as in P3.
• The % Complete bar is linked to the Activity % Complete.
7/15/2019 Primavera p6 Book Excerpt
http://slidepdf.com/reader/full/primavera-p6-book-excerpt-563384634e897 24/46
PROJECT PLANNING & CONTROL USING PRIMAVERA®
P6TM
© Eastwood Harris Pty Ltd 8-6
8.4.2 Bar Style Tab
The appearance of each bar is edited in the lower half of the form. The bar’s start, middle,
and end points may have their color, shape, pattern, etc., formatted.
The bars may be placed on one of three rows numbered from 1 to 3, from top to bottom one
bar above the other. If multiple bars are placed on the same row, the bar at the top of the list
will be drawn first and the ones lower down the list will be drawn over the top.
8.4.3 Bar Settings Tab
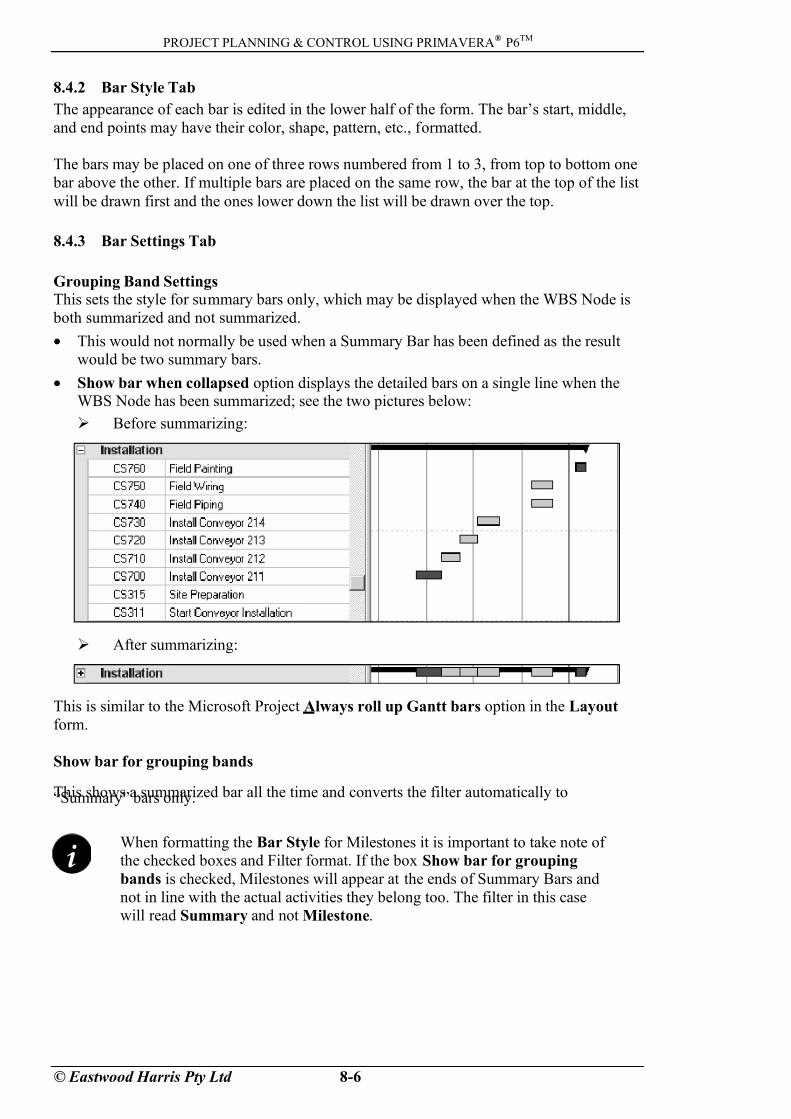
Grouping Band SettingsThis sets the style for summary bars only, which may be displayed when the WBS Node is
both summarized and not summarized.
• This would not normally be used when a Summary Bar has been defined as the result
would be two summary bars.
• Show bar when collapsed option displays the detailed bars on a single line when theWBS Node has been summarized; see the two pictures below:
¾ Before summarizing:
¾ After summarizing:
This is similar to the Microsoft Project Always roll up Gantt bars option in the Layout
form.
Show bar for grouping bands
This shows a summarized bar all the time and converts the filter automatically to“Summary” bars only.
i
When formatting the Bar Style for Milestones it is important to take note of
the checked boxes and Filter format. If the box Show bar for grouping
bands is checked, Milestones will appear at the ends of Summary Bars and
not in line with the actual activities they belong too. The filter in this case
will read Summary and not Milestone.
7/15/2019 Primavera p6 Book Excerpt
http://slidepdf.com/reader/full/primavera-p6-book-excerpt-563384634e897 25/46
PROJECT PLANNING & CONTROL USING PRIMAVERA®
P6TM
© Eastwood Harris Pty Ltd 8-7
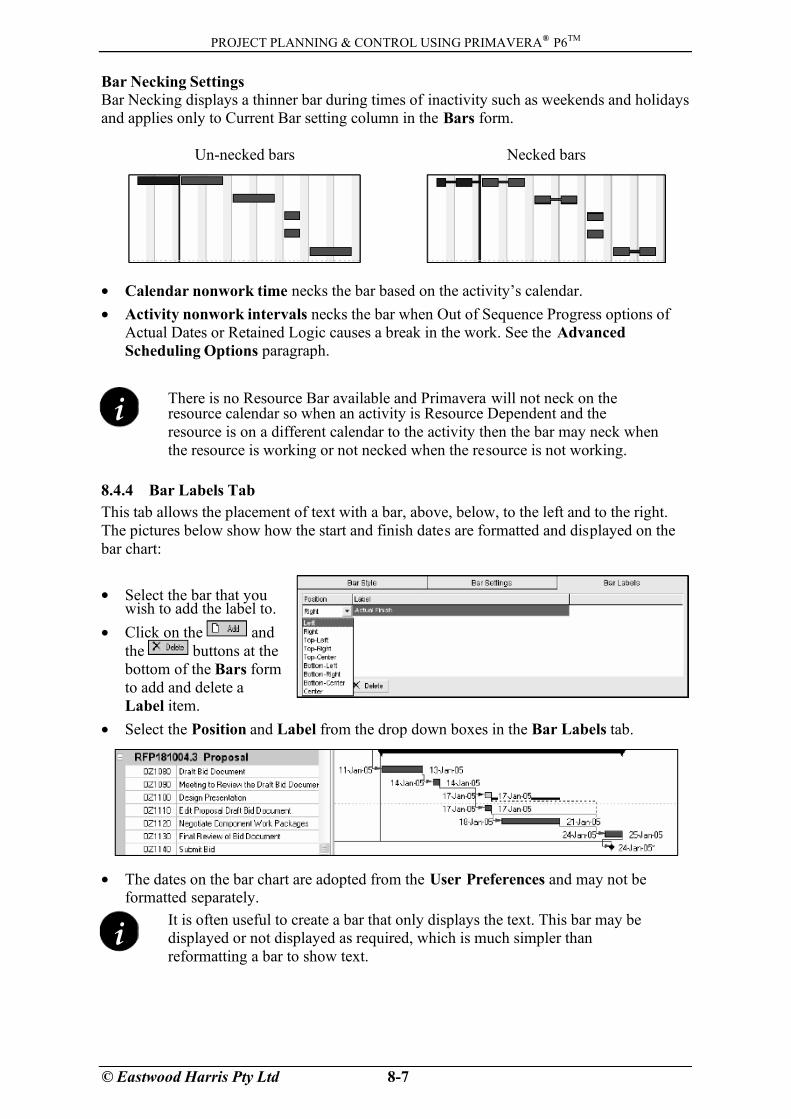
Bar Necking Settings
Bar Necking displays a thinner bar during times of inactivity such as weekends and holidays
and applies only to Current Bar setting column in the Bars form.
Un-necked bars Necked bars
• Calendar nonwork time necks the bar based on the activity’s calendar.
• Activity nonwork intervals necks the bar when Out of Sequence Progress options of
Actual Dates or Retained Logic causes a break in the work. See the Advanced
Scheduling Options paragraph.
i
There is no Resource Bar available and Primavera will not neck on theresource calendar so when an activity is Resource Dependent and the
resource is on a different calendar to the activity then the bar may neck when
the resource is working or not necked when the resource is not working.
8.4.4 Bar Labels Tab
This tab allows the placement of text with a bar, above, below, to the left and to the right.
The pictures below show how the start and finish dates are formatted and displayed on the
bar chart:
• Select the bar that youwish to add the label to.
• Click on the and
the buttons at the
bottom of the Bars form
to add and delete a
Label item.
• Select the Position and Label from the drop down boxes in the Bar Labels tab.
• The dates on the bar chart are adopted from the User Preferences and may not beformatted separately.
i
It is often useful to create a bar that only displays the text. This bar may be
displayed or not displayed as required, which is much simpler than
reformatting a bar to show text.
7/15/2019 Primavera p6 Book Excerpt
http://slidepdf.com/reader/full/primavera-p6-book-excerpt-563384634e897 26/46
PROJECT PLANNING & CONTROL USING PRIMAVERA®
P6TM
© Eastwood Harris Pty Ltd 8-8
• Each Notebook Topic may be displayed on a bar one at a time by selecting the topic in
the Bar Labels tab. After the box containing the label is displayed on the screen it may
be adjusted in size by dragging.
8.4.5 Bar Chart Options Form
The Bar Chart Options form is
displayed by clicking on the button from the Bars form or by selecting
View, Bar Chart Options….
• The General tab has a variety of
options for formatting the bar chart
which are mainly self explanatory.
¾ Show Relationships has the
same result as clicking on the
icon and displays the
relationships.
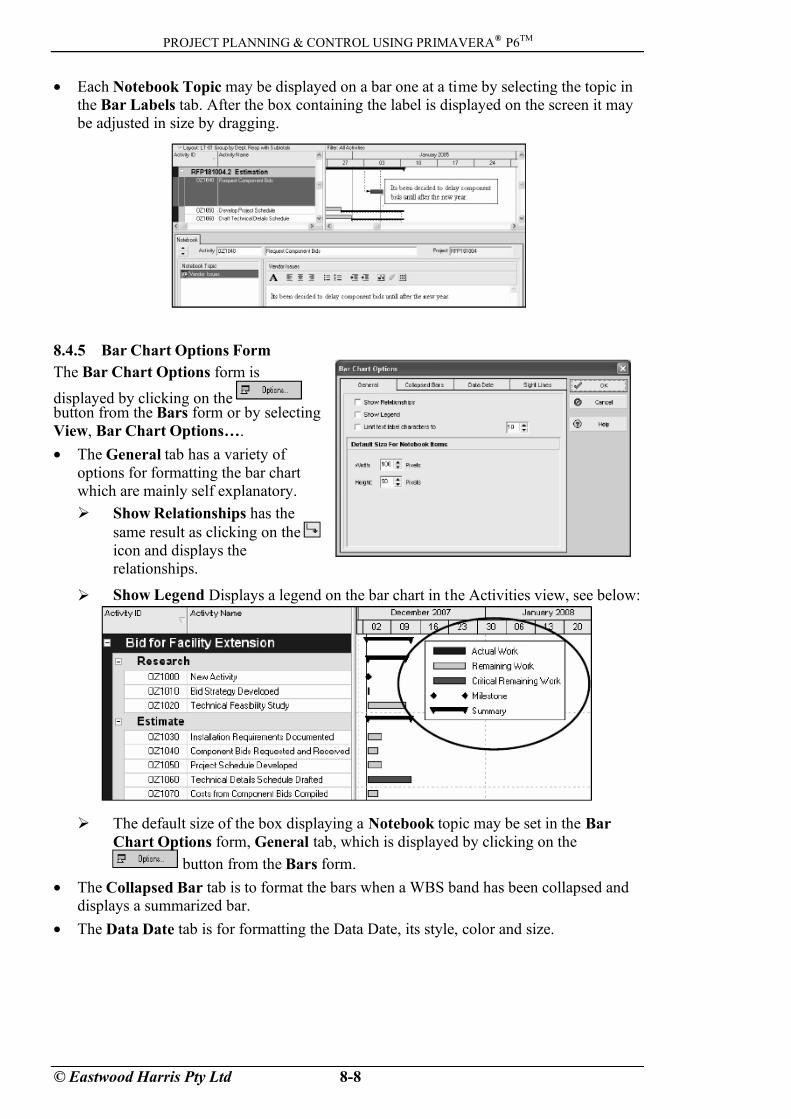
¾ Show Legend Displays a legend on the bar chart in the Activities view, see below:
¾ The default size of the box displaying a Notebook topic may be set in the Bar
Chart Options form, General tab, which is displayed by clicking on the
button from the Bars form.
• The Collapsed Bar tab is to format the bars when a WBS band has been collapsed and
displays a summarized bar.
• The Data Date tab is for formatting the Data Date, its style, color and size.

7/15/2019 Primavera p6 Book Excerpt
http://slidepdf.com/reader/full/primavera-p6-book-excerpt-563384634e897 27/46
PROJECT PLANNING & CONTROL USING PRIMAVERA®
P6TM
© Eastwood Harris Pty Ltd 8-9
• Primavera Version 5.0 introduced a new Sight Lines tab bar which now allows the
specification of both Major and Minor vertical and horizontal Sight Lines, which brings
this functionality up to match P3, SureTrak and Microsoft Project:
8.5 Row Height
Row heights may be adjusted to display text that would otherwise be truncated by a narrow
column.
• The height of all rows may be formatted by
selecting View, Table Font and Row… to
open the Table, Font and Row form. The
options in this form are self-explanatory.
• The Show Icons option will display a
different icon in front of the Activity and
WBS.
¾ In the Projects Workspace a
indicates a What-if project, a
Planned project and an Active
or Inactive project.
¾ In the Activity Workspace
indicates a WBS Node, a blue
a complete activity, a blue and
green an in-progress activity and
a green an un-started activity.
¾ In the Resources Workspace indicates a Resource, a resource assigned to
an open project, and an unassigned and assigned Nonlabor Resource
and and a unassigned and assigned Material Resource,
• The height of a single row may be manually adjusted in a similar way to adjusting row
heights in Excel, click on the row; the pointer will change to a double-headed arrow ;
then drag the row with the mouse. These manually adjusted rows are not saved with a
Layout.
7/15/2019 Primavera p6 Book Excerpt
http://slidepdf.com/reader/full/primavera-p6-book-excerpt-563384634e897 28/46
PROJECT PLANNING & CONTROL USING PRIMAVERA®
P6TM
© Eastwood Harris Pty Ltd 8-10
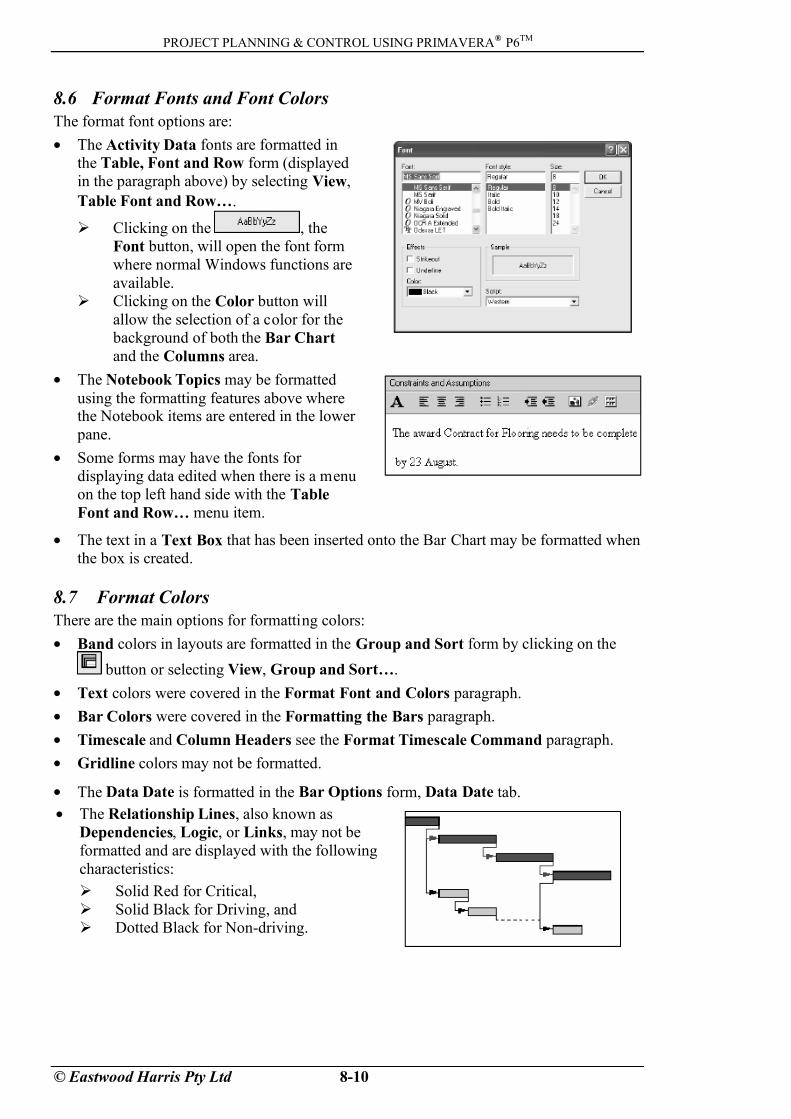
8.6 Format Fonts and Font Colors
The format font options are:
• The Activity Data fonts are formatted in
the Table, Font and Row form (displayed
in the paragraph above) by selecting View,
Table Font and Row….
¾ Clicking on the , the
Font button, will open the font form
where normal Windows functions are
available.
¾ Clicking on the Color button will
allow the selection of a color for the
background of both the Bar Chart
and the Columns area.
• The Notebook Topics may be formatted
using the formatting features above wherethe Notebook items are entered in the lower
pane.
• Some forms may have the fonts for
displaying data edited when there is a menu
on the top left hand side with the Table
Font and Row… menu item.
• The text in a Text Box that has been inserted onto the Bar Chart may be formatted when
the box is created.
8.7 Format Colors
There are the main options for formatting colors:
• Band colors in layouts are formatted in the Group and Sort form by clicking on the
button or selecting View, Group and Sort….
• Text colors were covered in the Format Font and Colors paragraph.
• Bar Colors were covered in the Formatting the Bars paragraph.
• Timescale and Column Headers see the Format Timescale Command paragraph.
• Gridline colors may not be formatted.
• The Data Date is formatted in the Bar Options form, Data Date tab.
• The Relationship Lines, also known as
Dependencies, Logic, or Links, may not be
formatted and are displayed with the following
characteristics:
¾ Solid Red for Critical,
¾ Solid Black for Driving, and
¾ Dotted Black for Non-driving.

7/15/2019 Primavera p6 Book Excerpt
http://slidepdf.com/reader/full/primavera-p6-book-excerpt-563384634e897 29/46
PROJECT PLANNING & CONTROL USING PRIMAVERA®
P6TM
© Eastwood Harris Pty Ltd 8-11
8.8 Format Timescale
8.8.1 Moving and Rescaling the Timescale
To display hidden parts of the schedule the timescale may be grabbed and moved by placing
the cursor in the top half of the Timescale, the cursor will turn into a , right-click and drag
left or right.
The timescale may be rescaled, therefore increasing or decreasing the length of the bars and
displaying more or less of the schedule by placing the cursor in the bottom half of the
Timescale, the cursor will turn into a , right-click, and drag left to make the bars shorter
and right to make the bars longer.
When there are no bars in view when you are viewing a time ahead or behind the activity
dates you may double-click in the Gantt Chart area to bring them back into view.
8.8.2 Format Timescale Command
The Timescale form provides a number
of options for the display of the
timescale, which is located above the Bar
Chart. To open the Timescale form:
• Click on the button, or
• Select View, Timescale…, or
• Right-click in the Bar Chart area and
select Timescale…
The options available in the Timescale
form are:
• Timescale Format in PrimaveraVersion 6.0 now allows in the
timescale
¾ Two Lines, or
¾ Three lines
• Font & Color
¾ The button opens the Edit Font and Color form which enables
the timescale and column headers font and color to be changed.
¾ By clicking on the button all changes will be reversed.

7/15/2019 Primavera p6 Book Excerpt
http://slidepdf.com/reader/full/primavera-p6-book-excerpt-563384634e897 30/46
PROJECT PLANNING & CONTROL USING PRIMAVERA®
P6TM
© Eastwood Harris Pty Ltd 8-12
• Date Interval sets the timescale and has the
options in the picture to the right:
¾ The Week/Day 1 displays the Days like
this:
¾ The Week/Day 2 displays the Days like
this:
¾ The Date Interval may also be adjusted by clicking on the or the which
moves the timescale setting up and down the list shown above.
• Shift Calendar breaks the day into time intervals to suit the shift intervals when the
Day/Shift option has been selected.
• Date Format
¾ Calendar displays a normal calendar.
¾ Fiscal Year displays the fiscal year in the year line. The Fiscal Year Start Month
is set in the Settings tab of the Project Details form in the Projects Workspace.
¾ Week of the Year displays the week of the year starting from “1” for the first
week in January and is often termed Manufacturing Week .
¾ Ordinal Dates displays the timescale to be counted by the unit selected in the
Date Interval. This is useful for displaying a schedule when the start of the
project is unknown. Ordinal dates display the time scale by counting in the
selected units starting from a user definable start date. This option works in a
similar way to the P3 function where the Ordinal start date may be selected. When
3 lines are displayed the ordinal dates and calendar dates may displayed
7/15/2019 Primavera p6 Book Excerpt
http://slidepdf.com/reader/full/primavera-p6-book-excerpt-563384634e897 31/46
PROJECT PLANNING & CONTROL USING PRIMAVERA®
P6TM
© Eastwood Harris Pty Ltd 8-13
i
Fiscal Year: When the scale was set to Month/Week on the author’s system
the Fiscal Year did not display in accordance with date formatting settings.
When the scale was set to Week and Days, the Date were displayed in US
format (MM/DD/YYYY) which is not correct for countries that use the
DD/MM/YYYY format.
8.8.3 Non Work Period Shading in Timescale
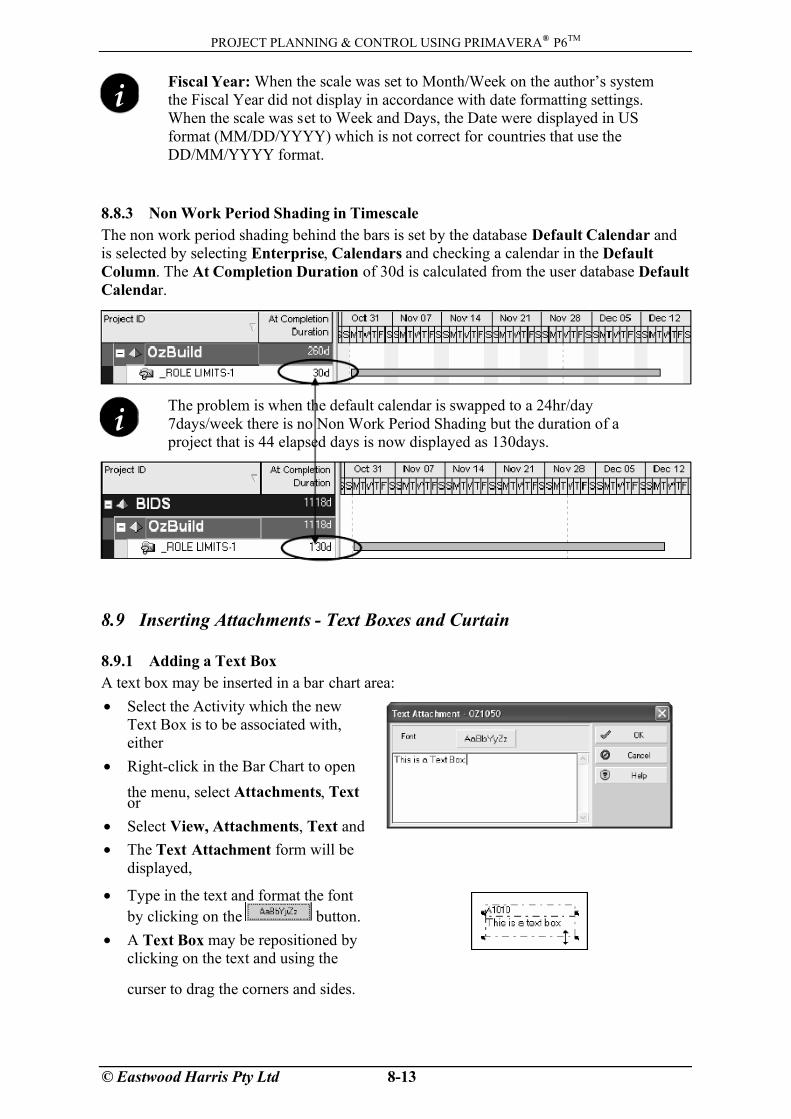
The non work period shading behind the bars is set by the database Default Calendar and
is selected by selecting Enterprise, Calendars and checking a calendar in the Default
Column. The At Completion Duration of 30d is calculated from the user database Default
Calendar.
i
The problem is when the default calendar is swapped to a 24hr/day
7days/week there is no Non Work Period Shading but the duration of a
project that is 44 elapsed days is now displayed as 130days.
8.9 Inserting Attachments - Text Boxes and Curtain
8.9.1 Adding a Text Box
A text box may be inserted in a bar chart area:
• Select the Activity which the new
Text Box is to be associated with,
either
• Right-click in the Bar Chart to open
the menu, select Attachments, Textor
• Select View, Attachments, Text and
• The Text Attachment form will be
displayed,
• Type in the text and format the font
by clicking on the button.
• A Text Box may be repositioned by
clicking on the text and using the
curser to drag the corners and sides.
7/15/2019 Primavera p6 Book Excerpt
http://slidepdf.com/reader/full/primavera-p6-book-excerpt-563384634e897 32/46
PROJECT PLANNING & CONTROL USING PRIMAVERA®
P6TM
© Eastwood Harris Pty Ltd 8-14
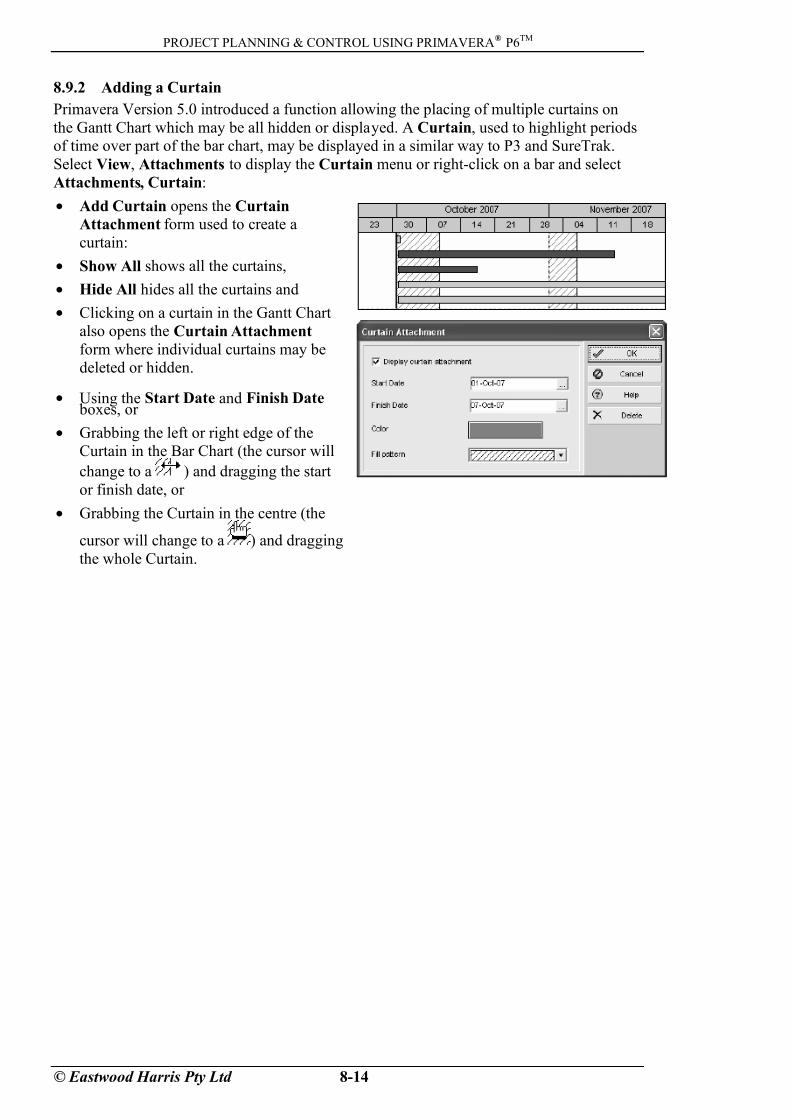
8.9.2 Adding a Curtain
Primavera Version 5.0 introduced a function allowing the placing of multiple curtains on
the Gantt Chart which may be all hidden or displayed. A Curtain, used to highlight periods
of time over part of the bar chart, may be displayed in a similar way to P3 and SureTrak.
Select View, Attachments to display the Curtain menu or right-click on a bar and select
Attachments, Curtain:
• Add Curtain opens the Curtain
Attachment form used to create a
curtain:
• Show All shows all the curtains,
• Hide All hides all the curtains and
• Clicking on a curtain in the Gantt Chart
also opens the Curtain Attachment
form where individual curtains may be
deleted or hidden.
• Using the Start Date and Finish Date boxes, or
• Grabbing the left or right edge of the
Curtain in the Bar Chart (the cursor will
change to a ) and dragging the start
or finish date, or
• Grabbing the Curtain in the centre (the
cursor will change to a ) and dragging
the whole Curtain.
7/15/2019 Primavera p6 Book Excerpt
http://slidepdf.com/reader/full/primavera-p6-book-excerpt-563384634e897 33/46
PROJECT PLANNING & CONTROL USING PRIMAVERA®
P6TM
© Eastwood Harris Pty Ltd 13-1
13 GROUP, SORT AND LAYOUTS
Group & Sort allows data such as activities in the Activity Workspace, WBS Nodes in the
WBS Workspace, projects in the Project Workspace and many other data items to be
sorted and organized under other parameters such as Dates and Resources or user-defined
Activity and Project Codes. This function is similar to Organize in P3 and SureTrak and
Grouping in Microsoft Project and Asta Powerproject.
Layouts is a function in which the formatting of parameters such as the Group & Sort,
Columns and Bars is saved and reapplied later. This function is similar to Layouts in P3
and SureTrak or Views in Asta Power Project and Microsoft Project. A Layout may be
edited, saved or reapplied at a later date and may have a Filter associated with it. Layouts
contain the formatting for all options of both the top and bottom pane.
Although Group and Sort is available in many forms, Layouts are only available in a few
places including the following Workspaces:
• Projects
• WBS
• Activities
• Resources
• Tracking
This chapter will concentrate on how Group & Sort and Layouts are applied in the Activity
Workspace but the same principals apply to the other Workspaces. This chapter covers the
following topics:
Topic Notes on the Function
• Reformat the Grouping andSorting of activities by opening
the Group and Sort form:
• Click on the button, or
• Select View, Group and Sort….
• Group and Sort Projects atEnterprise Level
Projects may be Grouped and Sorted at
Enterprise level in a similar method to activities
in a project.
• Create or edit a Layout Select either:
• From the menu View, Layout, Save As…,
or
• From the Layout bar Layout, Save As….
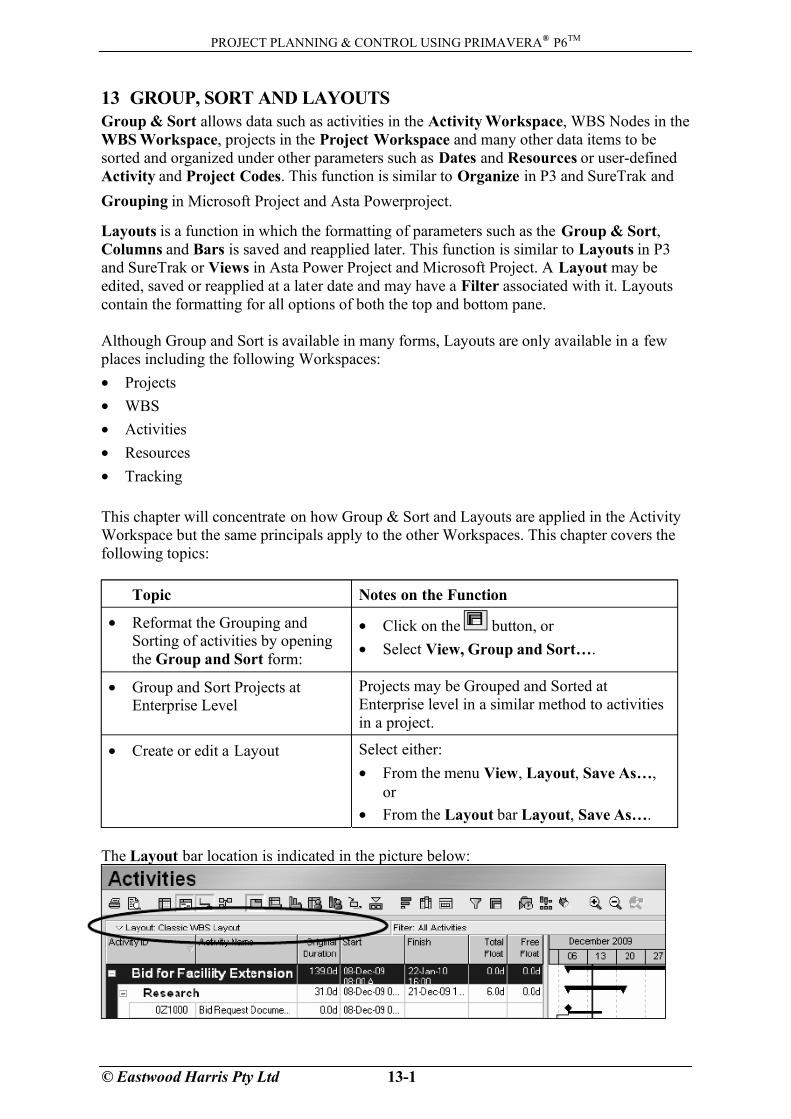
The Layout bar location is indicated in the picture below:
7/15/2019 Primavera p6 Book Excerpt
http://slidepdf.com/reader/full/primavera-p6-book-excerpt-563384634e897 34/46
PROJECT PLANNING & CONTROL USING PRIMAVERA®
P6TM
© Eastwood Harris Pty Ltd 13-2
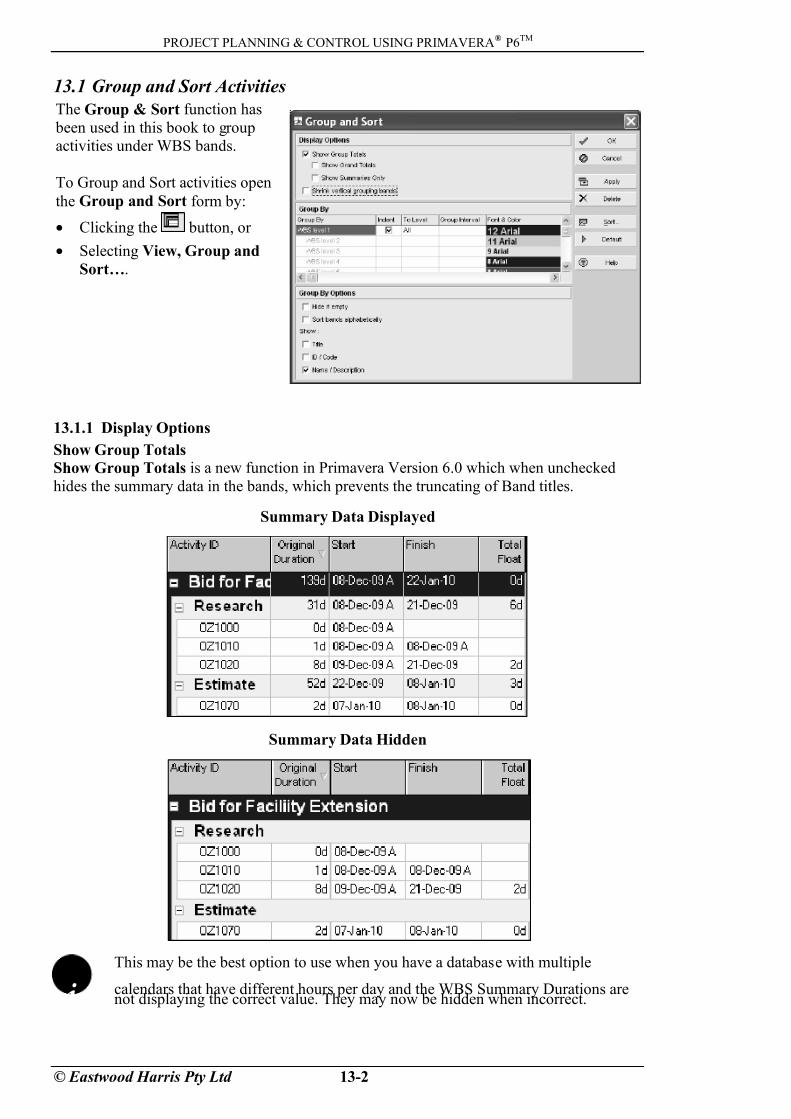
13.1 Group and Sort Activities
The Group & Sort function has
been used in this book to group
activities under WBS bands.
To Group and Sort activities open
the Group and Sort form by:
• Clicking the button, or
• Selecting View, Group and
Sort….
13.1.1 Display Options
Show Group Totals
Show Group Totals is a new function in Primavera Version 6.0 which when unchecked
hides the summary data in the bands, which prevents the truncating of Band titles.
Summary Data Displayed
Summary Data Hidden
i
This may be the best option to use when you have a database with multiple
calendars that have different hours per day and the WBS Summary Durations arenot displaying the correct value. They may now be hidden when incorrect.
7/15/2019 Primavera p6 Book Excerpt
http://slidepdf.com/reader/full/primavera-p6-book-excerpt-563384634e897 35/46
PROJECT PLANNING & CONTROL USING PRIMAVERA®
P6TM
© Eastwood Harris Pty Ltd 13-3
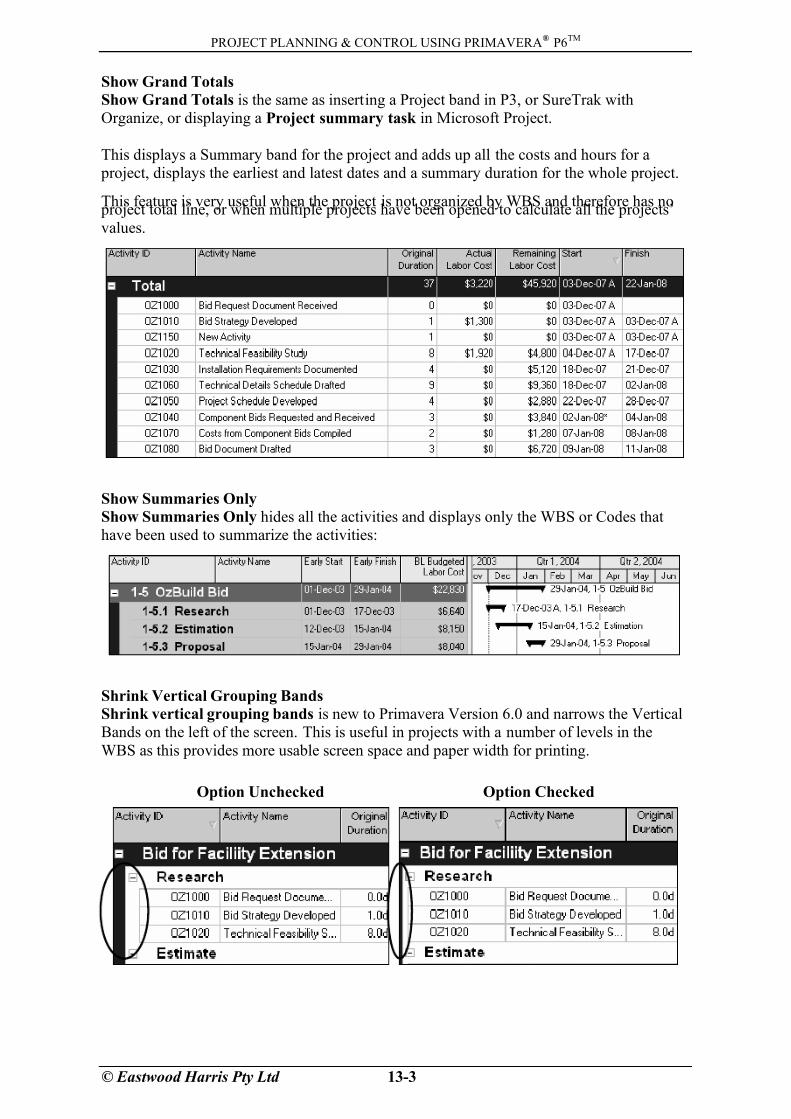
Show Grand Totals
Show Grand Totals is the same as inserting a Project band in P3, or SureTrak with
Organize, or displaying a Project summary task in Microsoft Project.
This displays a Summary band for the project and adds up all the costs and hours for a
project, displays the earliest and latest dates and a summary duration for the whole project.
This feature is very useful when the project is not organized by WBS and therefore has no project total line, or when multiple projects have been opened to calculate all the projects’
values.
Show Summaries Only
Show Summaries Only hides all the activities and displays only the WBS or Codes that
have been used to summarize the activities:
Shrink Vertical Grouping Bands
Shrink vertical grouping bands is new to Primavera Version 6.0 and narrows the Vertical
Bands on the left of the screen. This is useful in projects with a number of levels in the
WBS as this provides more usable screen space and paper width for printing.
Option Unchecked Option Checked
7/15/2019 Primavera p6 Book Excerpt
http://slidepdf.com/reader/full/primavera-p6-book-excerpt-563384634e897 36/46
PROJECT PLANNING & CONTROL USING PRIMAVERA®
P6TM
© Eastwood Harris Pty Ltd 13-4
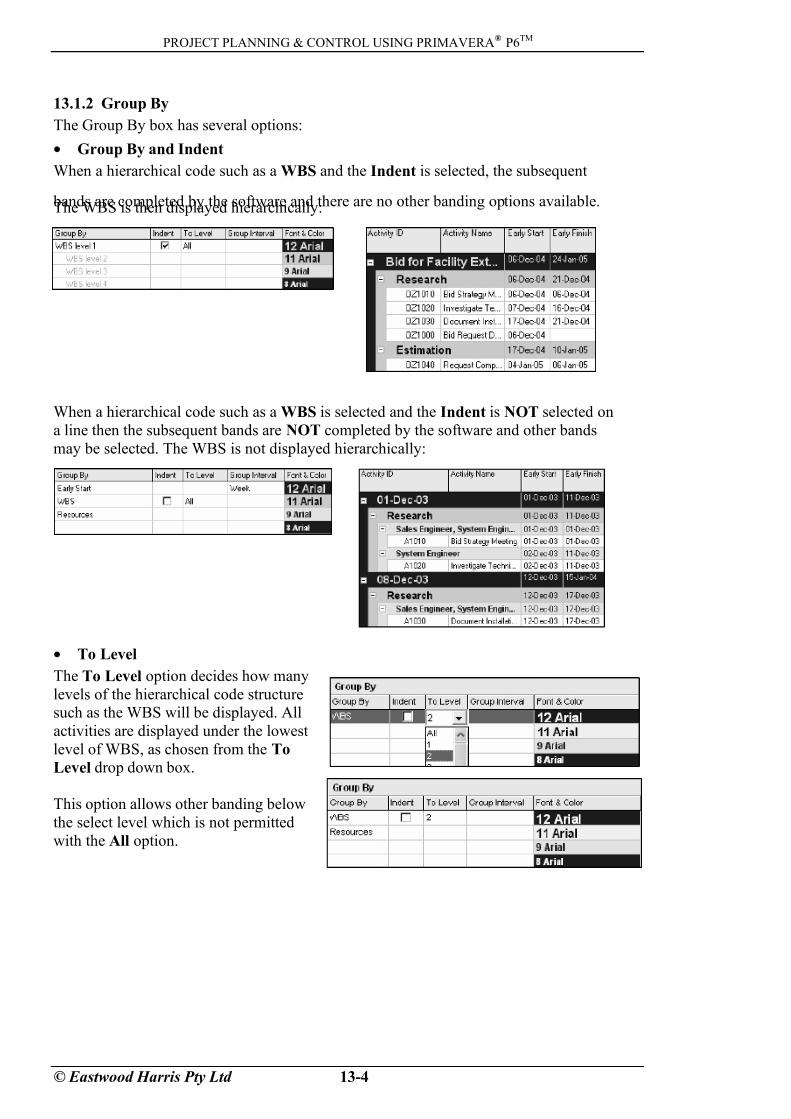
13.1.2 Group By
The Group By box has several options:
• Group By and Indent
When a hierarchical code such as a WBS and the Indent is selected, the subsequent
bands are completed by the software and there are no other banding options available.The WBS is then displayed hierarchically:
When a hierarchical code such as a WBS is selected and the Indent is NOT selected on
a line then the subsequent bands are NOT completed by the software and other bands
may be selected. The WBS is not displayed hierarchically:
• To Level
The To Level option decides how many
levels of the hierarchical code structure
such as the WBS will be displayed. All
activities are displayed under the lowest
level of WBS, as chosen from the To
Level drop down box.
This option allows other banding below
the select level which is not permitted
with the All option.

7/15/2019 Primavera p6 Book Excerpt
http://slidepdf.com/reader/full/primavera-p6-book-excerpt-563384634e897 37/46
PROJECT PLANNING & CONTROL USING PRIMAVERA®
P6TM
© Eastwood Harris Pty Ltd 13-5
• Group Interval
This option is available with some fields such as Total Float, where the interval may be
typed in, and Date fields, where a drop down box allows the selection of the time interval
used to group activities:
• Font and Color
Double-click on these boxes to open the Edit Font and Color form to change the font
and color of each band.
13.1.3 Group By Options
• Sort Banding Alphabetically
When a hierarchical code is selected, the bands are sorted by the Code Value. If this box
is checked, the bands will be sorted alphabetically by the Code Description.
• Hide if empty
Check this box is used to hide bands that:
¾ Have not been assigned an activity, or
¾ When activities have been filtered out and only the bands remains.
i
This function is useful when you have filtered on a couple of activities and the
screen is filled with blank bands. This will remove all the blank bands.
• Show Title, Show ID / Code and Show Name / Description
These options format the display of the band title. It is not possible to uncheck all the
options as there then would not be a title in the band. The options change depending on
the data displayed in the band:
With all options checked With only Description Checked
NOTE. These options are set for each band individually.

7/15/2019 Primavera p6 Book Excerpt
http://slidepdf.com/reader/full/primavera-p6-book-excerpt-563384634e897 38/46
PROJECT PLANNING & CONTROL USING PRIMAVERA®
P6TM
© Eastwood Harris Pty Ltd 13-6
13.1.4 Sorting
The button opens the Sort form
where the order of the activities in each
band may be specified.
NOTE: This order may be easily
overridden by clicking on the column titles
to reorder activities and therefore the use
of this option is problematic as clicking on
the column header is very simple and will
override options set here.
13.1.5 Reorganize Automatically
Primavera Version 4.1 introduced a function titled Reorganize Automatically, which is
similar to the P3 and SureTrak function but applies to all Layouts, not just the selected
Layout. Select Edit, User Preferences… to open the User Preferences form and click onthe Application tab.
When the Reorganize Automatically box is checked, all views will reorganize
automatically when data fields are changed that are used in the layout such as Grouping and
Sorting.
It is often better to disable Reorganize Automatically when data is being edited that is used
in the grouping of data in a Layout which will prevent the activities moving to their new
position in the Layout until all data has been edited.
To reorganize a view, select Tools, Reorganize Now or Shift+F2.
The other Group and Sort options in the Application tab apply to views that do not have aGroup and Sort form such as the predecessor and successor form.
7/15/2019 Primavera p6 Book Excerpt
http://slidepdf.com/reader/full/primavera-p6-book-excerpt-563384634e897 39/46
PROJECT PLANNING & CONTROL USING PRIMAVERA®
P6TM
© Eastwood Harris Pty Ltd 13-7
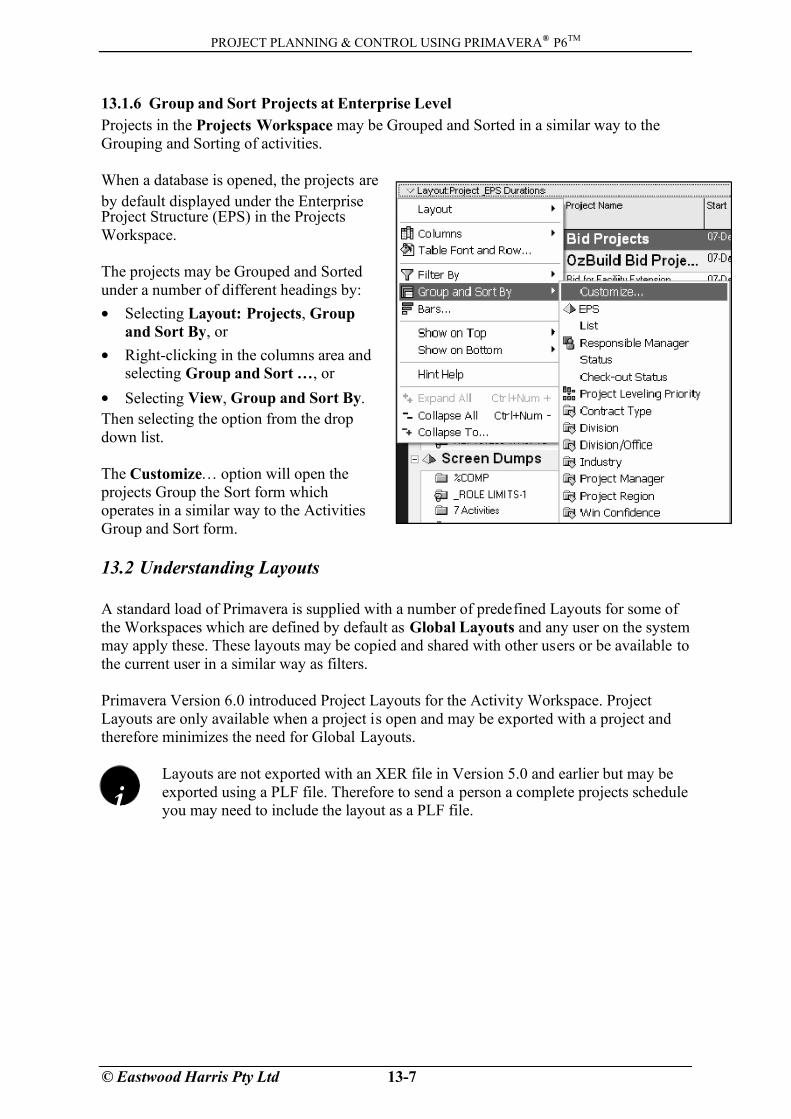
13.1.6 Group and Sort Projects at Enterprise Level
Projects in the Projects Workspace may be Grouped and Sorted in a similar way to the
Grouping and Sorting of activities.
When a database is opened, the projects are
by default displayed under the EnterpriseProject Structure (EPS) in the Projects
Workspace.
The projects may be Grouped and Sorted
under a number of different headings by:
• Selecting Layout: Projects, Group
and Sort By, or
• Right-clicking in the columns area andselecting Group and Sort …, or
• Selecting View, Group and Sort By.
Then selecting the option from the drop
down list.
The Customize… option will open the
projects Group the Sort form which
operates in a similar way to the Activities
Group and Sort form.
13.2 Understanding Layouts
A standard load of Primavera is supplied with a number of predefined Layouts for some of
the Workspaces which are defined by default as Global Layouts and any user on the system
may apply these. These layouts may be copied and shared with other users or be available to
the current user in a similar way as filters.
Primavera Version 6.0 introduced Project Layouts for the Activity Workspace. Project
Layouts are only available when a project is open and may be exported with a project and
therefore minimizes the need for Global Layouts.
i
Layouts are not exported with an XER file in Version 5.0 and earlier but may be
exported using a PLF file. Therefore to send a person a complete projects schedule
you may need to include the layout as a PLF file.
7/15/2019 Primavera p6 Book Excerpt
http://slidepdf.com/reader/full/primavera-p6-book-excerpt-563384634e897 40/46
PROJECT PLANNING & CONTROL USING PRIMAVERA®
P6TM
© Eastwood Harris Pty Ltd 13-8
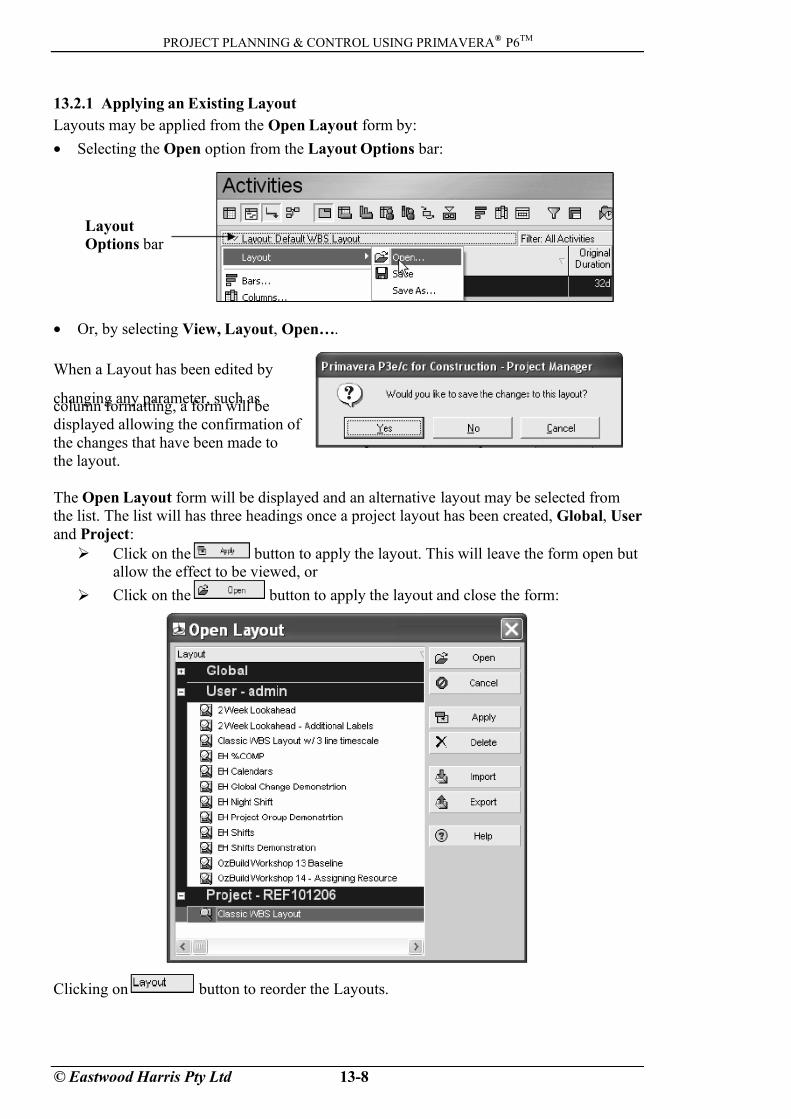
13.2.1 Applying an Existing Layout
Layouts may be applied from the Open Layout form by:
• Selecting the Open option from the Layout Options bar:
Layout
Options bar
• Or, by selecting View, Layout, Open….
When a Layout has been edited by
changing any parameter, such ascolumn formatting, a form will be
displayed allowing the confirmation of
the changes that have been made to
the layout.
The Open Layout form will be displayed and an alternative layout may be selected from
the list. The list will has three headings once a project layout has been created, Global, User
and Project:
¾ Click on the button to apply the layout. This will leave the form open butallow the effect to be viewed, or
¾ Click on the button to apply the layout and close the form:
Clicking on button to reorder the Layouts.
7/15/2019 Primavera p6 Book Excerpt
http://slidepdf.com/reader/full/primavera-p6-book-excerpt-563384634e897 41/46
PROJECT PLANNING & CONTROL USING PRIMAVERA®
P6TM
© Eastwood Harris Pty Ltd 13-9
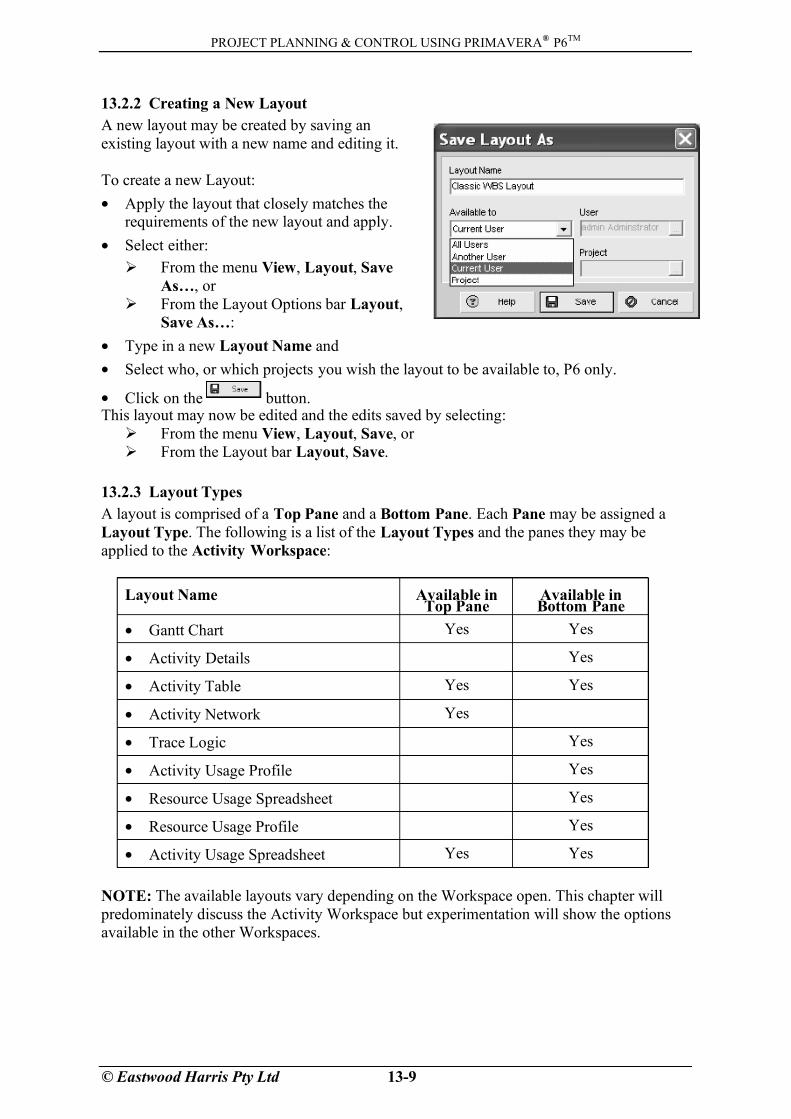
13.2.2 Creating a New Layout
A new layout may be created by saving an
existing layout with a new name and editing it.
To create a new Layout:
• Apply the layout that closely matches therequirements of the new layout and apply.
• Select either:
¾ From the menu View, Layout, Save
As…, or
¾ From the Layout Options bar Layout,
Save As…:
• Type in a new Layout Name and
• Select who, or which projects you wish the layout to be available to, P6 only.
• Click on the button.This layout may now be edited and the edits saved by selecting:
¾ From the menu View, Layout, Save, or
¾ From the Layout bar Layout, Save.
13.2.3 Layout Types
A layout is comprised of a Top Pane and a Bottom Pane. Each Pane may be assigned a
Layout Type. The following is a list of the Layout Types and the panes they may be
applied to the Activity Workspace:
Layout Name Available inTop Pane
Available inBottom Pane
• Gantt Chart Yes Yes
• Activity Details Yes
• Activity Table Yes Yes
• Activity Network Yes
• Trace Logic Yes
• Activity Usage Profile Yes
• Resource Usage Spreadsheet Yes
• Resource Usage Profile Yes
• Activity Usage Spreadsheet Yes Yes
NOTE: The available layouts vary depending on the Workspace open. This chapter will
predominately discuss the Activity Workspace but experimentation will show the options
available in the other Workspaces.
7/15/2019 Primavera p6 Book Excerpt
http://slidepdf.com/reader/full/primavera-p6-book-excerpt-563384634e897 42/46
PROJECT PLANNING & CONTROL USING PRIMAVERA®
P6TM
© Eastwood Harris Pty Ltd 13-10
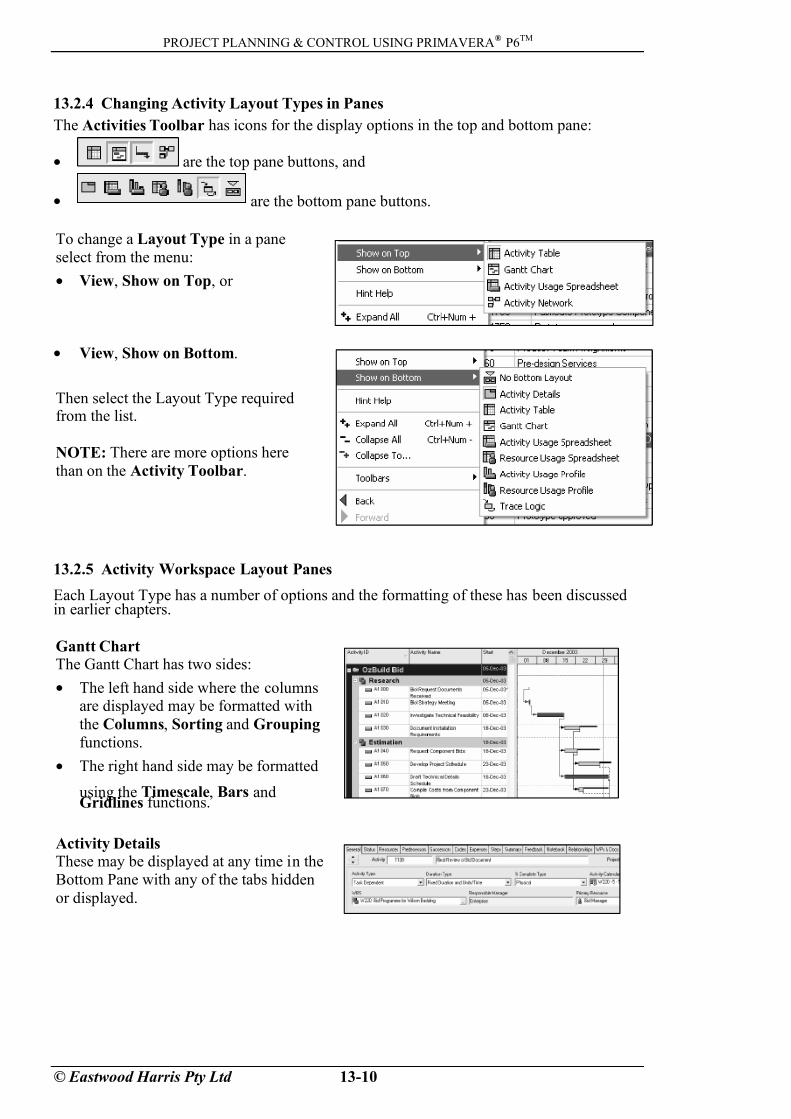
13.2.4 Changing Activity Layout Types in Panes
The Activities Toolbar has icons for the display options in the top and bottom pane:
• are the top pane buttons, and
• are the bottom pane buttons.
To change a Layout Type in a pane
select from the menu:
• View, Show on Top, or
• View, Show on Bottom.
Then select the Layout Type requiredfrom the list.
NOTE: There are more options here
than on the Activity Toolbar.
13.2.5 Activity Workspace Layout Panes
Each Layout Type has a number of options and the formatting of these has been discussedin earlier chapters.
Gantt ChartThe Gantt Chart has two sides:
• The left hand side where the columnsare displayed may be formatted with
the Columns, Sorting and Grouping
functions.
• The right hand side may be formatted
using the Timescale, Bars andGridlines functions.
Activity DetailsThese may be displayed at any time in the
Bottom Pane with any of the tabs hidden
or displayed.

7/15/2019 Primavera p6 Book Excerpt
http://slidepdf.com/reader/full/primavera-p6-book-excerpt-563384634e897 43/46
PROJECT PLANNING & CONTROL USING PRIMAVERA®
P6TM
© Eastwood Harris Pty Ltd 13-11
Activity TableThis layout is the same as the left hand
side of the Gantt Chart and has no Bars
and Timescale on the right hand side.
Activity Network Like the Gantt Chart it has two panes:
• The left hand pane displays the WBS:
¾ This side may not be formatted
except by adjusting the width of
the columns.
¾ The selection of a WBS Node acts like a filter and will only display activities
that are associated with the selected WBS Node and lower level member WBS Nodes. This allows the relationships between activities within one WBS Node
to be checked.
• The right hand pane displays the activity data in boxes and is organized under
headings:
¾ The Activity Boxes may be formatted as described in the NETWORK VIEW
chapter.
¾ The activities may be Grouped which is covered in the Grouping section of
this chapter.
Trace Logic
The Trace Logic options allow the selectionof the number of predecessor and successor
levels.
This is achieved by displaying the Activity
Table in the top view and selecting View,
Show on Bottom, Trace Logic.
To select the number of levels of
predecessors to be displayed you are
required to open the Trace Logic Options
form. The form is then opened by either:
• Right-clicking in the lower pane andselecting Trace Logic Options.... or
• Selecting View, Bottom Layout
Options….
Formatting Trace Logic and Activity Network Formatting of these boxes in both of these panes is linked to the formatting in the Activity
Network . The boxes are formatted by right-clicking in the right hand screen of the Activity
Network form and selecting
Activity Network Options….
7/15/2019 Primavera p6 Book Excerpt
http://slidepdf.com/reader/full/primavera-p6-book-excerpt-563384634e897 44/46
PROJECT PLANNING & CONTROL USING PRIMAVERA®
P6TM
© Eastwood Harris Pty Ltd 13-12
Resource Analysis Panes
The Activity Usage Profile, Resource Usage Spreadsheet, Resource Usage Profile,
Activity Usage Spreadsheet views display resource information and will be discussed in
the RESOURCE OPTIMIZATION chapters.
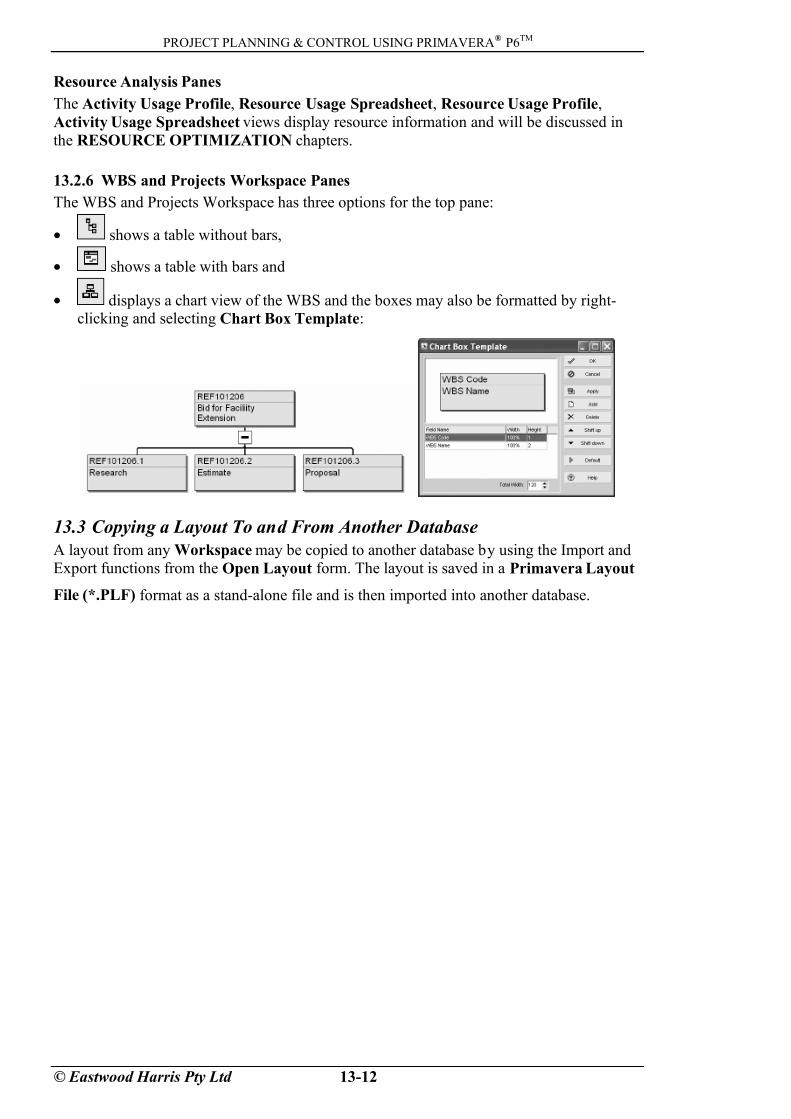
13.2.6 WBS and Projects Workspace Panes
The WBS and Projects Workspace has three options for the top pane:
• shows a table without bars,
• shows a table with bars and
• displays a chart view of the WBS and the boxes may also be formatted by right-clicking and selecting Chart Box Template:
13.3 Copying a Layout To and From Another Database
A layout from any Workspace may be copied to another database by using the Import and
Export functions from the Open Layout form. The layout is saved in a Primavera Layout
File (*.PLF) format as a stand-alone file and is then imported into another database.
7/15/2019 Primavera p6 Book Excerpt
http://slidepdf.com/reader/full/primavera-p6-book-excerpt-563384634e897 45/46
PROJECT PLANNING & CONTROL USING PRIMAVERA®
P6TM
© Eastwood Harris Pty Ltd 13-13
WORKSHOP 11
Organizing Your Data
Background
Having completed the schedule, you may report the information with different Layouts.
Assignment
Display your project in the following formats, noting the different ways you may represent
the same data.
1. Ensure you have applied the all Activity Filter, use the button to open the Filter
form.
2. Hide and display the relationships, use the button.
3. Display the Activity Network , use the button.
4. Zoom in, out and best fit using the buttons.
5. Scroll up and down or click on the WBS Nodes on the left hand side of the screen.
You will notice that only the Activities associated with the highlighted WBS aredisplayed.
6. Display the Activity Table by clicking on the button.
7. Hide and display the Bottom pane by clicking on the button.
8. With the bottom pane displayed click on the to show the Trace Logic form;
experiment with the form.
9. Right-click in the Trace Logic form, select Trace Logic Options… and change the
number of Predecessor and Successor Levels displaying 1, 2 and 3 levels and note
the change in the layout. Click on the predecessors and successors in each option.
10. Click on the button to display the Activity Details form.
Continued……
7/15/2019 Primavera p6 Book Excerpt
http://slidepdf.com/reader/full/primavera-p6-book-excerpt-563384634e897 46/46
PROJECT PLANNING & CONTROL USING PRIMAVERA®
P6TM
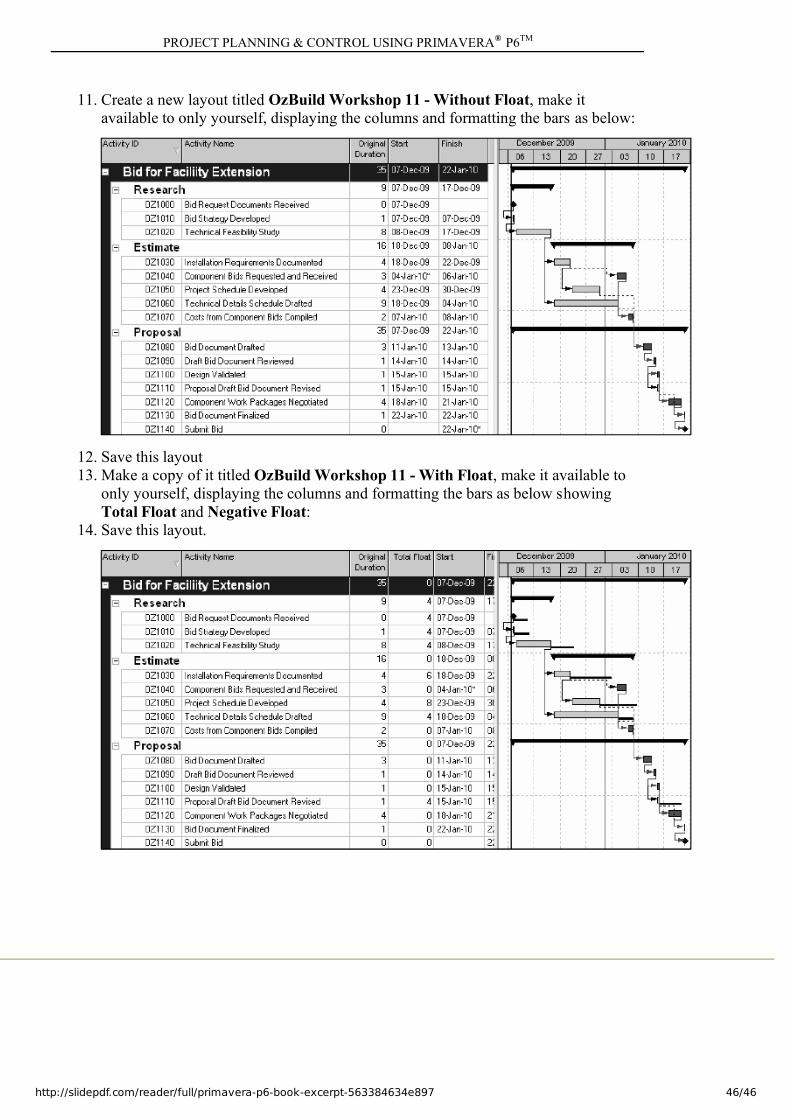
11. Create a new layout titled OzBuild Workshop 11 - Without Float, make it
available to only yourself, displaying the columns and formatting the bars as below:
12. Save this layout
13. Make a copy of it titled OzBuild Workshop 11 - With Float, make it available to
only yourself, displaying the columns and formatting the bars as below showing
Total Float and Negative Float:
14. Save this layout.