primavera p6 - ten six consulting · it is very important to make sure a supported java version is...
TRANSCRIPT
Primavera P6
Exercise Worksheet
Primavera P6 Video Training Exercise Worksheet. Copyright© Ten Six Consulting, LLC. 2013. All rights reserved. 1
P6 Exercise Worksheet
Preparing for the Exercises
Ten Six Consulting recommends that you download and install your own standalone copy of Primavera P6 Professional for use with this course.
The following instructions will assist you in obtaining and installing your own Primavera P6 Professional system:
Hardware Requirements
Intel compatible CPU, 1 GHz or better 4GB Memory or greater Microsoft Windows 7 Home, Professional or Ultimate
Software Requirements
Java 6 Update 27 runtime environment (JRE) or Software Developer Kit (JDK) Oracle Primavera P6 Professional for EPPM R8.2 installation Media zip file – V29692-01.zip Microsoft .NET Framework 4 (x86 and x64) – may already be installed on your system
Overview
Primavera P6 Professional R8.2 stand-alone is installed from a single media package that can be downloaded from Oracle e-delivery software cloud at https://edelivery.oracle.com/.
Follow these instructions to install a stand-alone copy of Primavera P6 Professional Release 8.2 on your PC or Laptop.
If Primavera P6 is already installed on your system, please skip to page 11 for the Exercises.
Primavera P6 Video Training Exercise Worksheet. Copyright© Ten Six Consulting, LLC. 2013. All rights reserved. 2
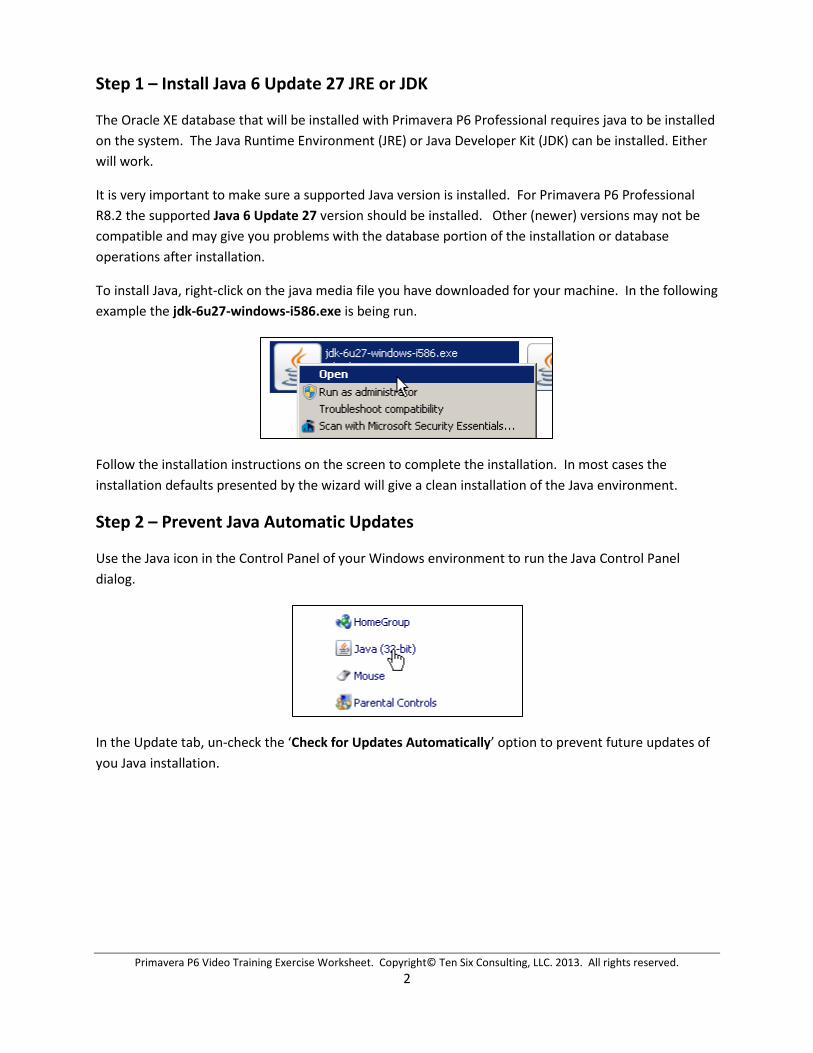
Step 1 – Install Java 6 Update 27 JRE or JDK
The Oracle XE database that will be installed with Primavera P6 Professional requires java to be installed on the system. The Java Runtime Environment (JRE) or Java Developer Kit (JDK) can be installed. Either will work.
It is very important to make sure a supported Java version is installed. For Primavera P6 Professional R8.2 the supported Java 6 Update 27 version should be installed. Other (newer) versions may not be compatible and may give you problems with the database portion of the installation or database operations after installation.
To install Java, right-click on the java media file you have downloaded for your machine. In the following example the jdk-6u27-windows-i586.exe is being run.
Follow the installation instructions on the screen to complete the installation. In most cases the installation defaults presented by the wizard will give a clean installation of the Java environment.
Step 2 – Prevent Java Automatic Updates
Use the Java icon in the Control Panel of your Windows environment to run the Java Control Panel dialog.
In the Update tab, un-check the ‘Check for Updates Automatically’ option to prevent future updates of you Java installation.

Primavera P6 Video Training Exercise Worksheet. Copyright© Ten Six Consulting, LLC. 2013. All rights reserved. 3
When prompted, click on the ‘Never Check’ button.
Click the OK button in the Java Control Panel dialog to save and close.
Step 3 – Install Primavera P6 Professional R8.2
Unzip the V29692-01.zip media delivery file to your Downloads or other convenient folder on the computer. The installation media image will create the following folder structure:
C:\Downloads\Primavera P6 Professional for EPPM R8.2\P6_R82_Professional_Client
Locate the Setup.exe file in the P6_R82_Professional_Client folder and right-click on it.
Select the Open option from the menu. You can also double-click to start the installer.

Primavera P6 Video Training Exercise Worksheet. Copyright© Ten Six Consulting, LLC. 2013. All rights reserved. 4
The installer may prompt you to install certain prerequisite programs on your machine. These include the DHTML Editing Component and Microsoft .NET Framework 4 (x86 and x64). If prompted, allow the installer to proceed with these installations.
Once the prerequisites are installed, the main Primavera P6 Professional R8.2 Setup dialog will appear.
Click Next.
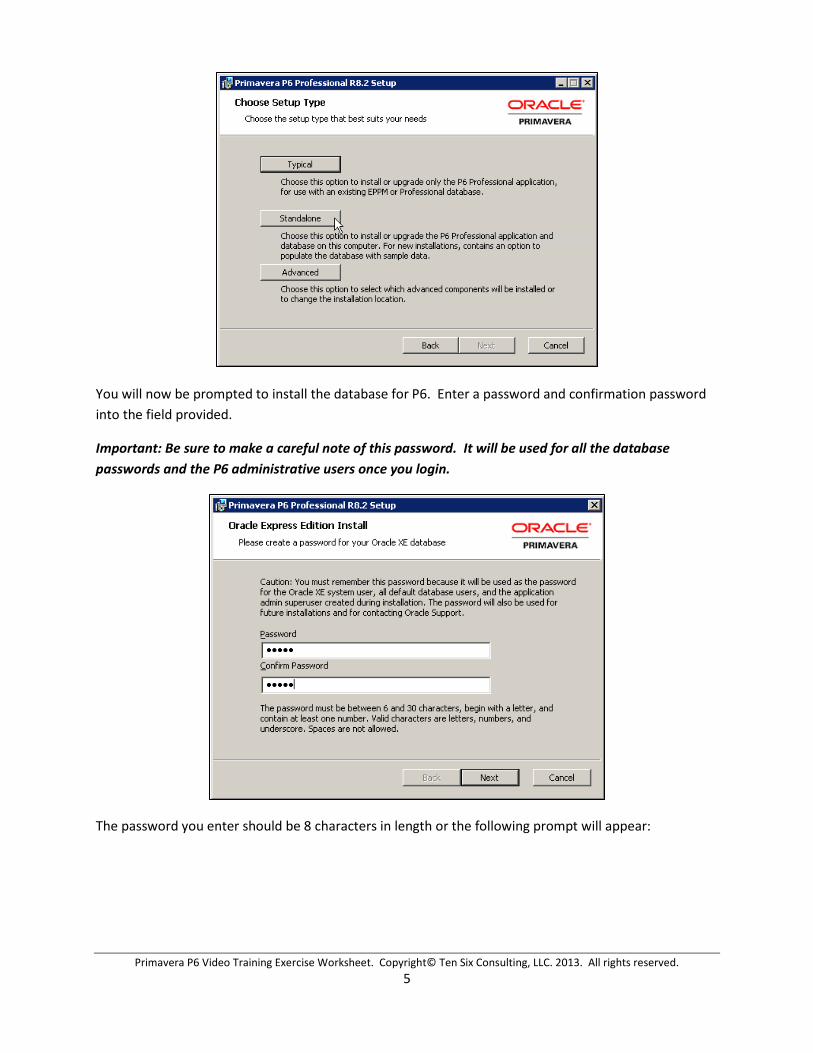
In the Choose Setup Type dialog, click on the ‘Standalone’ button.
Primavera P6 Video Training Exercise Worksheet. Copyright© Ten Six Consulting, LLC. 2013. All rights reserved. 5
You will now be prompted to install the database for P6. Enter a password and confirmation password into the field provided.
Important: Be sure to make a careful note of this password. It will be used for all the database passwords and the P6 administrative users once you login.
The password you enter should be 8 characters in length or the following prompt will appear:
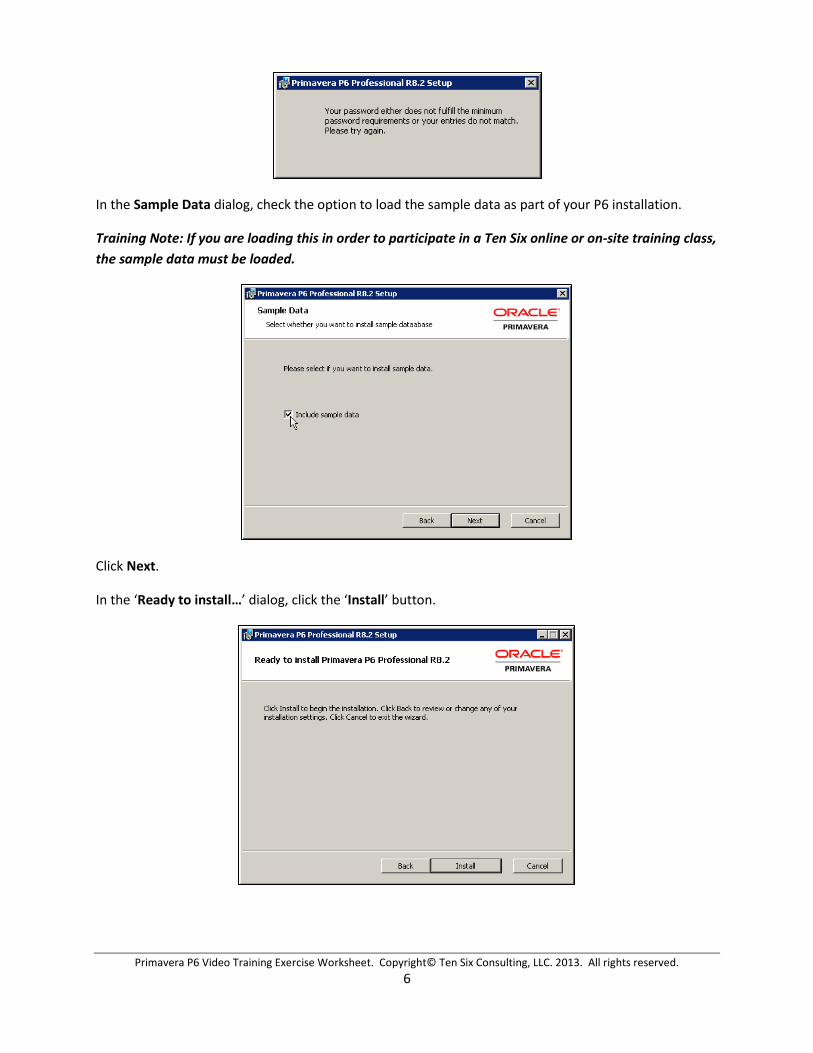
Primavera P6 Video Training Exercise Worksheet. Copyright© Ten Six Consulting, LLC. 2013. All rights reserved. 6
In the Sample Data dialog, check the option to load the sample data as part of your P6 installation.
Training Note: If you are loading this in order to participate in a Ten Six online or on-site training class, the sample data must be loaded.
Click Next.
In the ‘Ready to install…’ dialog, click the ‘Install’ button.
Primavera P6 Video Training Exercise Worksheet. Copyright© Ten Six Consulting, LLC. 2013. All rights reserved. 7
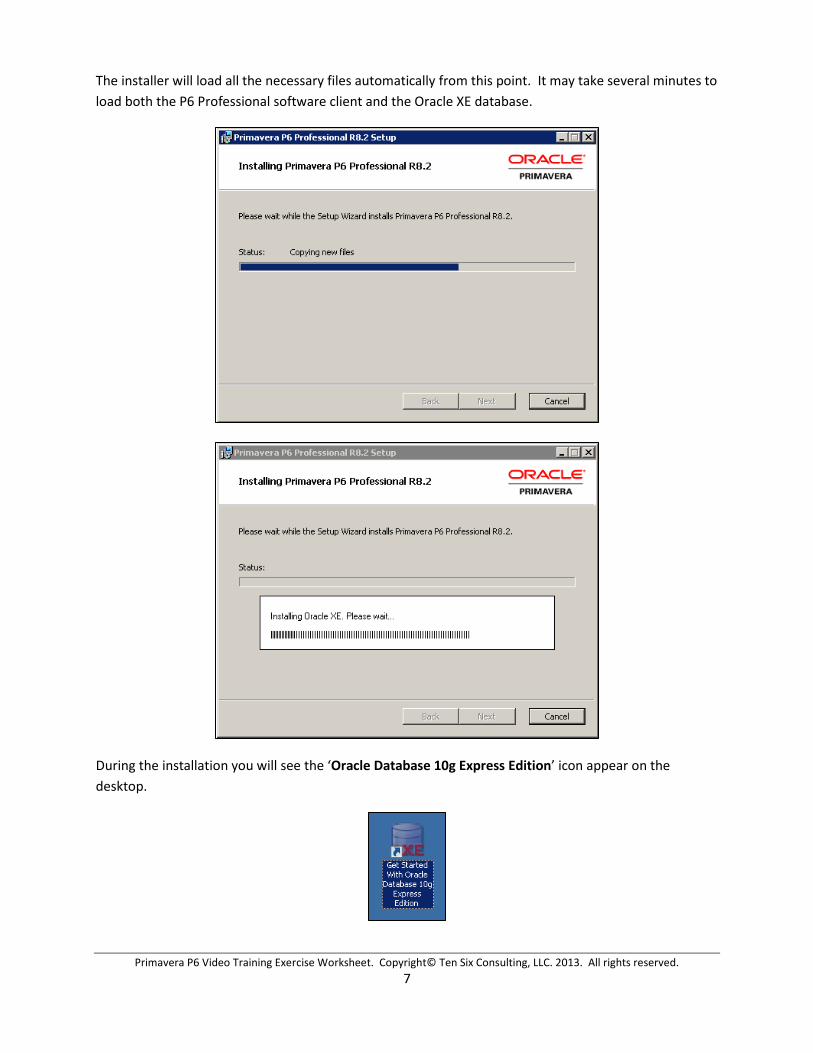
The installer will load all the necessary files automatically from this point. It may take several minutes to load both the P6 Professional software client and the Oracle XE database.
During the installation you will see the ‘Oracle Database 10g Express Edition’ icon appear on the desktop.
Primavera P6 Video Training Exercise Worksheet. Copyright© Ten Six Consulting, LLC. 2013. All rights reserved. 8
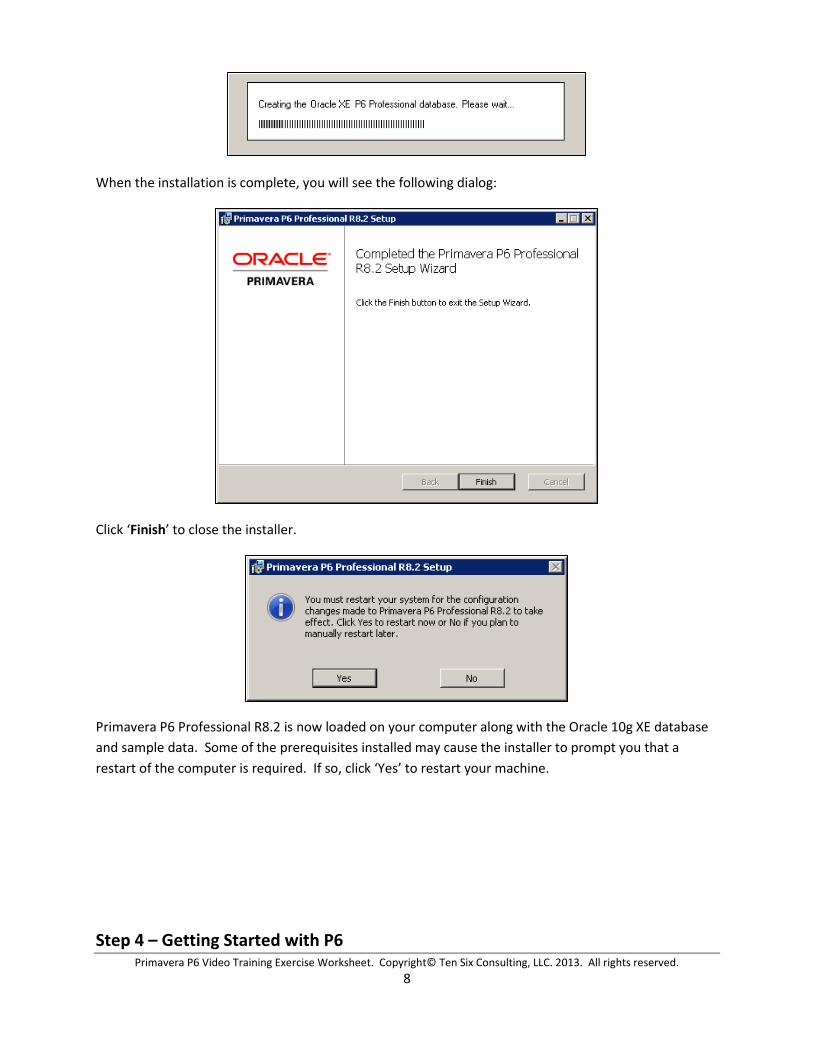
When the installation is complete, you will see the following dialog:
Click ‘Finish’ to close the installer.
Primavera P6 Professional R8.2 is now loaded on your computer along with the Oracle 10g XE database and sample data. Some of the prerequisites installed may cause the installer to prompt you that a restart of the computer is required. If so, click ‘Yes’ to restart your machine.
Step 4 – Getting Started with P6

Primavera P6 Video Training Exercise Worksheet. Copyright© Ten Six Consulting, LLC. 2013. All rights reserved. 9
Primavera P6 Professional can now be started using the ‘Primavera P6 R8.2’ option in the Programs section of the Windows Start menu.
To login to P6, enter a Login Name of ‘admin’ and then enter the password you provided the installer earlier.
The first time you login, you will see the following prompt:
Primavera P6 Video Training Exercise Worksheet. Copyright© Ten Six Consulting, LLC. 2013. All rights reserved. 10
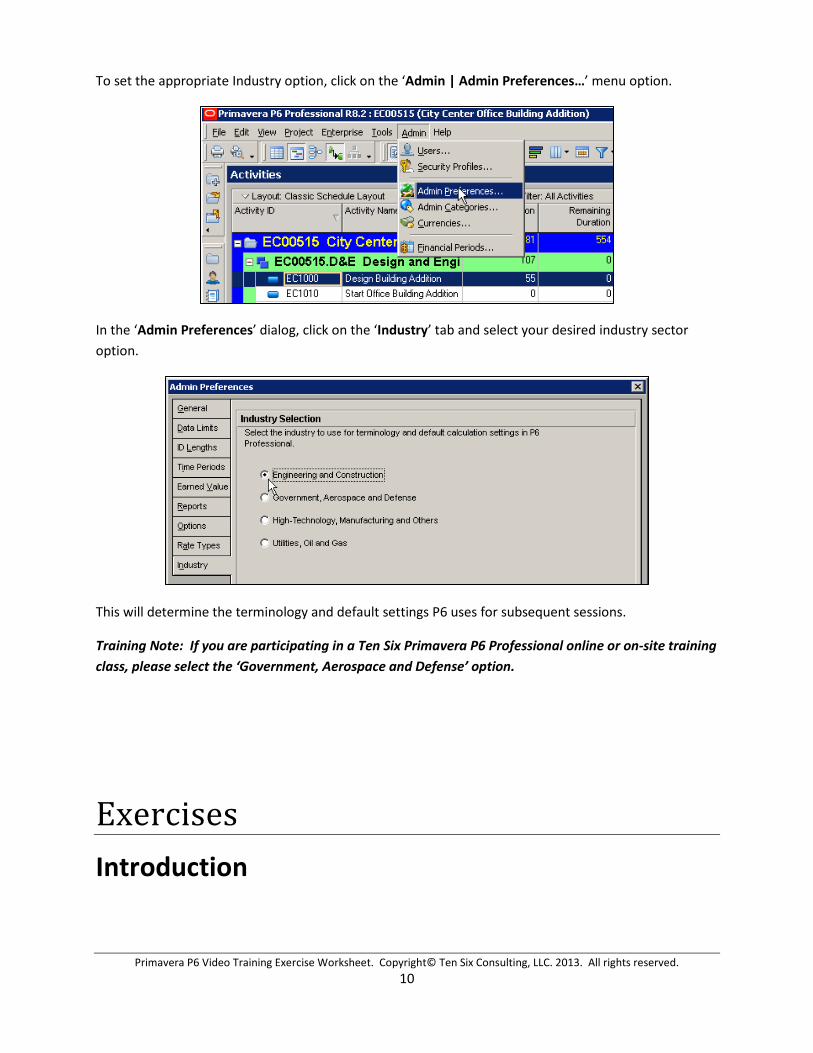
To set the appropriate Industry option, click on the ‘Admin | Admin Preferences…’ menu option.
In the ‘Admin Preferences’ dialog, click on the ‘Industry’ tab and select your desired industry sector option.
This will determine the terminology and default settings P6 uses for subsequent sessions.
Training Note: If you are participating in a Ten Six Primavera P6 Professional online or on-site training class, please select the ‘Government, Aerospace and Defense’ option.
Exercises Introduction
Primavera P6 Video Training Exercise Worksheet. Copyright© Ten Six Consulting, LLC. 2013. All rights reserved. 11
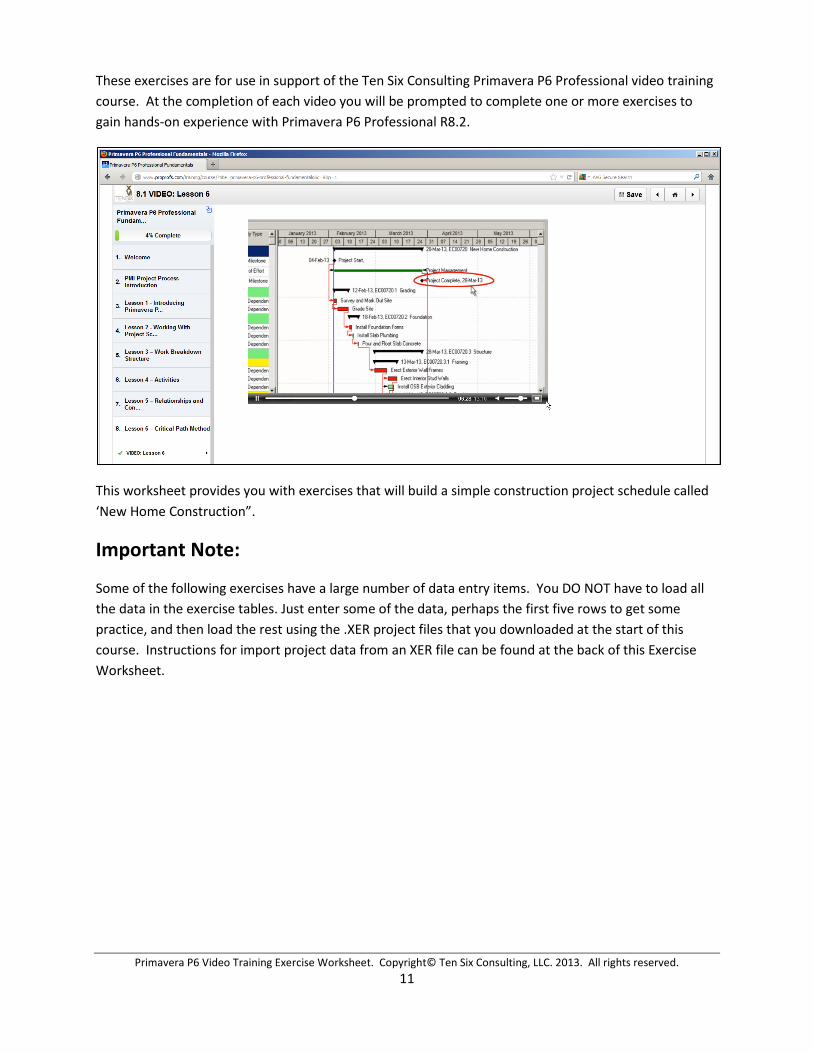
These exercises are for use in support of the Ten Six Consulting Primavera P6 Professional video training course. At the completion of each video you will be prompted to complete one or more exercises to gain hands-on experience with Primavera P6 Professional R8.2.
This worksheet provides you with exercises that will build a simple construction project schedule called ‘New Home Construction”.
Important Note:
Some of the following exercises have a large number of data entry items. You DO NOT have to load all the data in the exercise tables. Just enter some of the data, perhaps the first five rows to get some practice, and then load the rest using the .XER project files that you downloaded at the start of this course. Instructions for import project data from an XER file can be found at the back of this Exercise Worksheet.
Primavera P6 Video Training Exercise Worksheet. Copyright© Ten Six Consulting, LLC. 2013. All rights reserved. 12
1 Introduction to P6
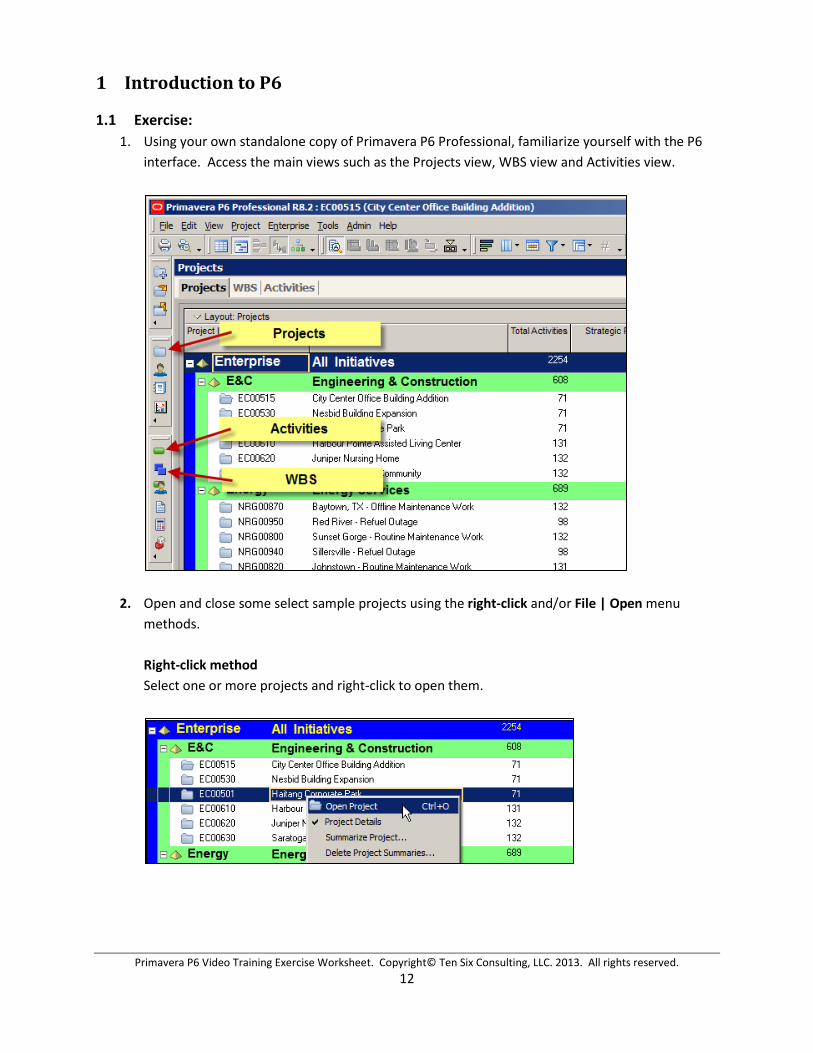
1.1 Exercise: 1. Using your own standalone copy of Primavera P6 Professional, familiarize yourself with the P6
interface. Access the main views such as the Projects view, WBS view and Activities view.
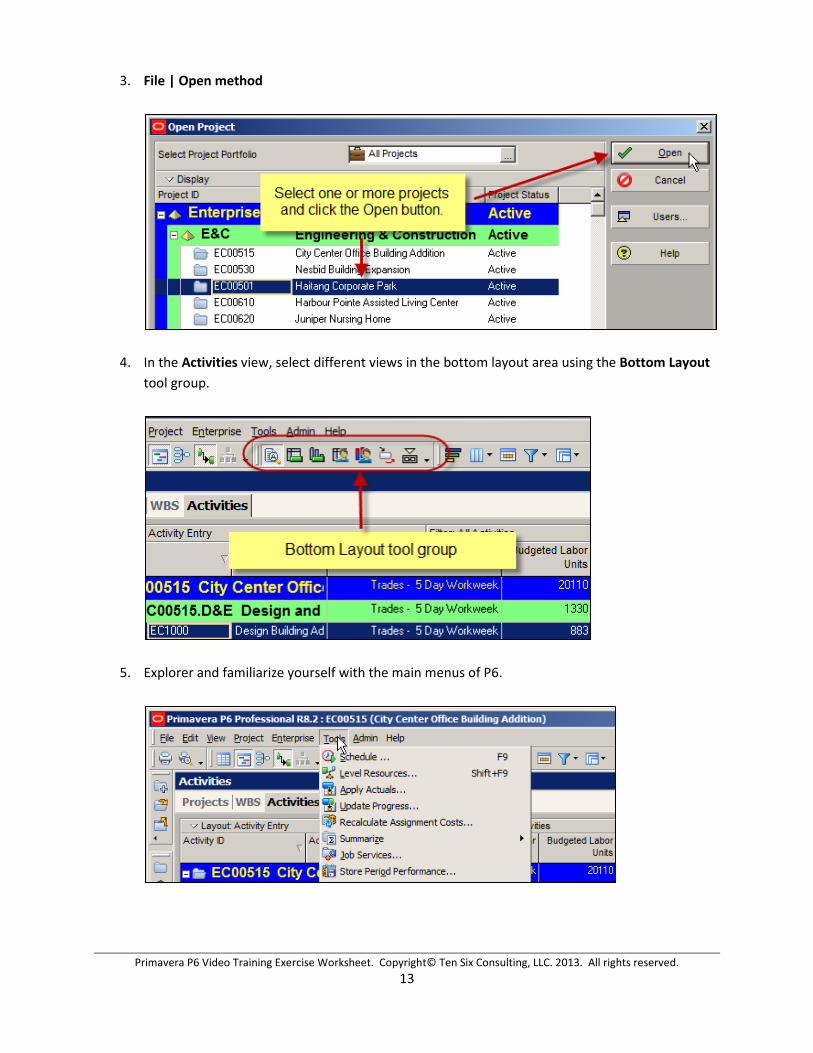
2. Open and close some select sample projects using the right-click and/or File | Open menu methods. Right-click method Select one or more projects and right-click to open them.
Primavera P6 Video Training Exercise Worksheet. Copyright© Ten Six Consulting, LLC. 2013. All rights reserved. 13
3. File | Open method
4. In the Activities view, select different views in the bottom layout area using the Bottom Layout tool group.
5. Explorer and familiarize yourself with the main menus of P6.
Primavera P6 Video Training Exercise Worksheet. Copyright© Ten Six Consulting, LLC. 2013. All rights reserved. 14
2 Lesson 2 – Working with Project Schedules
2.1 Exercise:
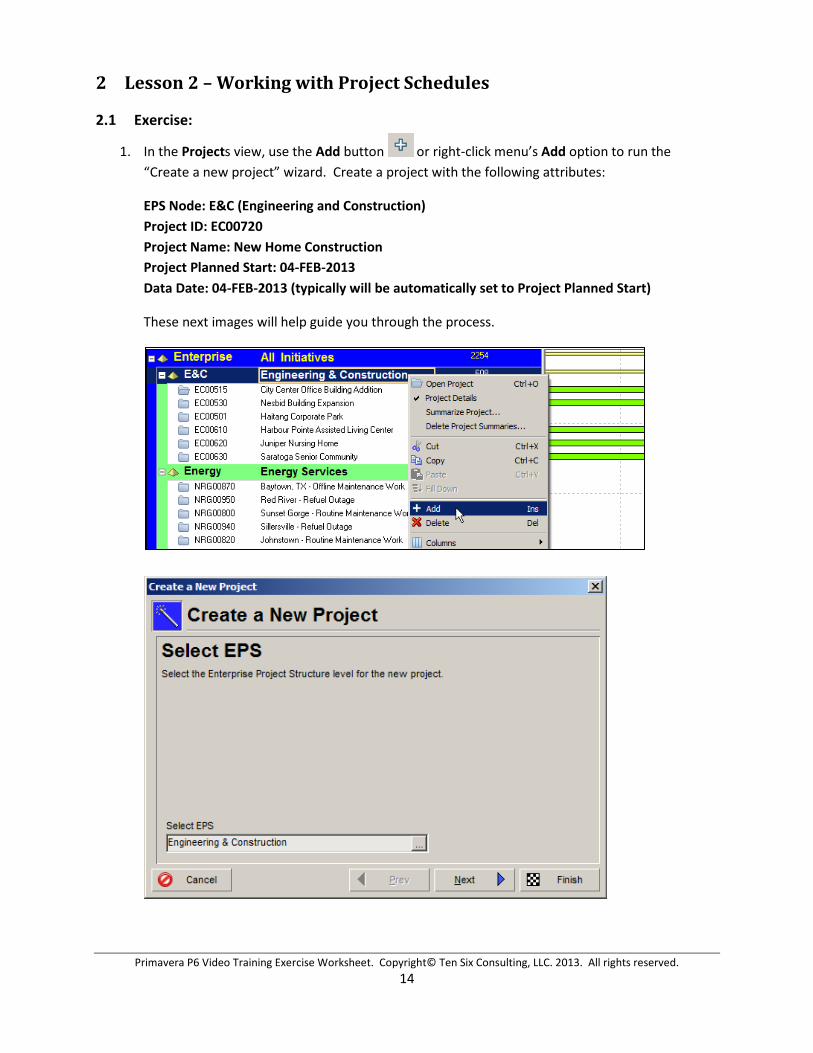
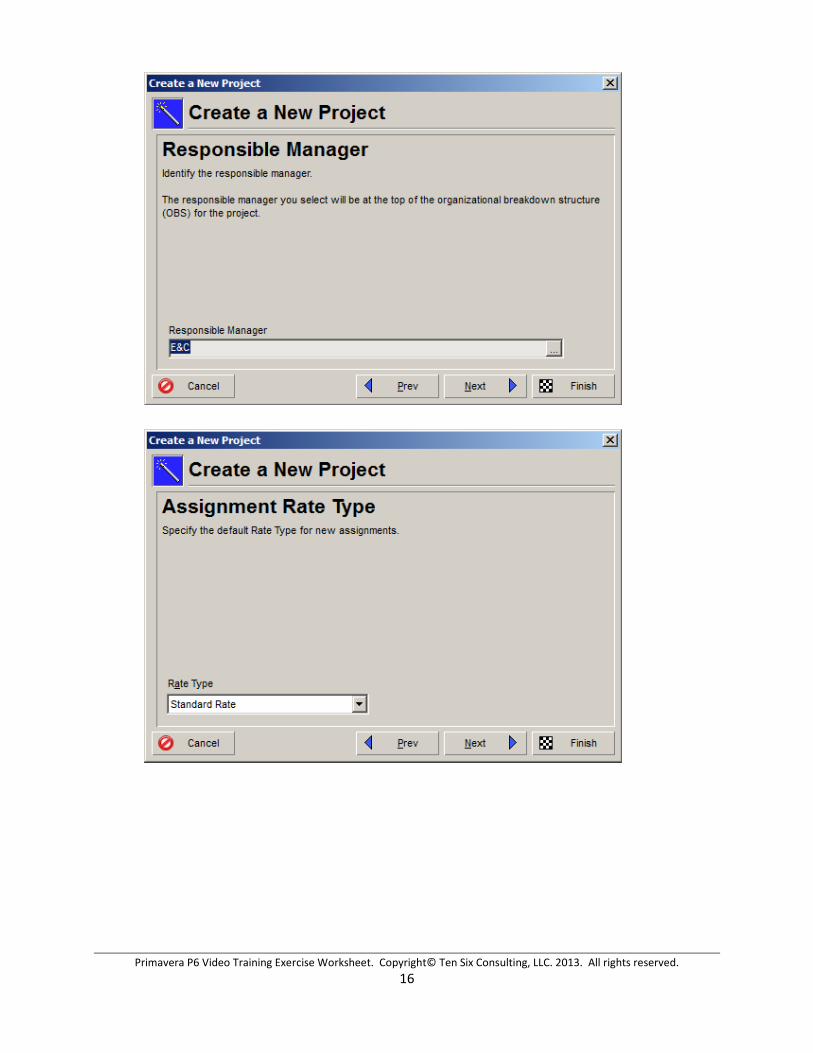
1. In the Projects view, use the Add button or right-click menu’s Add option to run the “Create a new project” wizard. Create a project with the following attributes:
EPS Node: E&C (Engineering and Construction) Project ID: EC00720 Project Name: New Home Construction Project Planned Start: 04-FEB-2013 Data Date: 04-FEB-2013 (typically will be automatically set to Project Planned Start)
These next images will help guide you through the process.
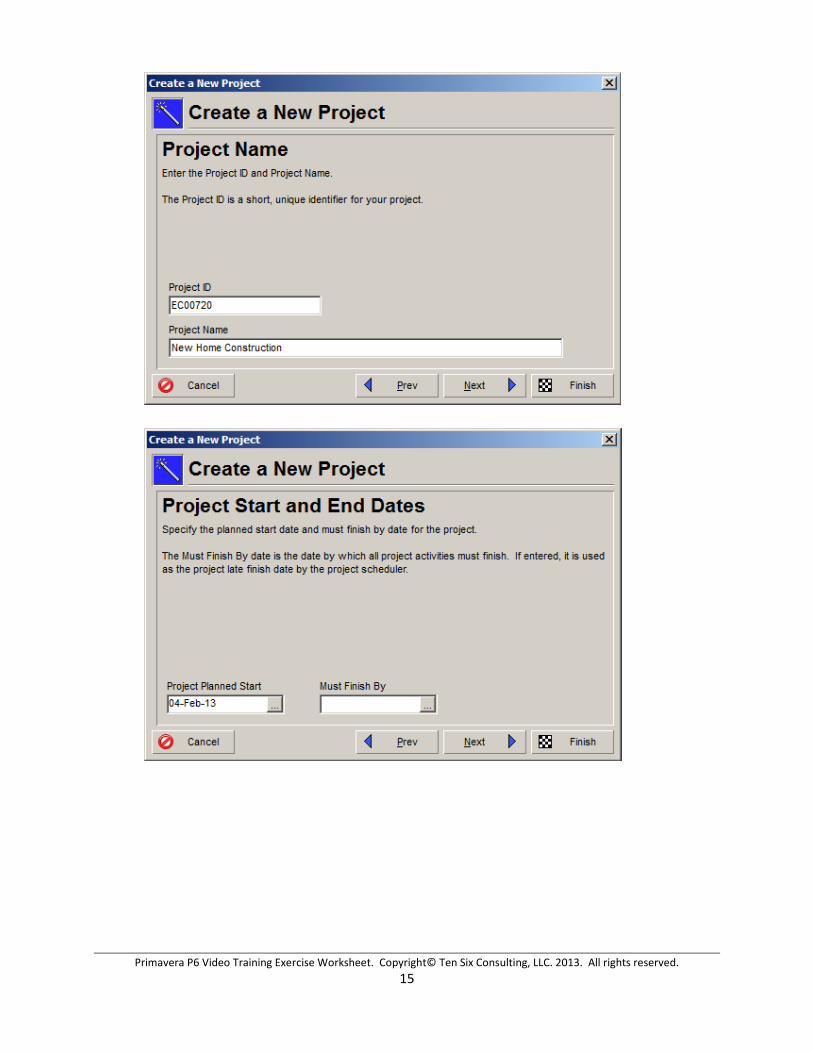
Primavera P6 Video Training Exercise Worksheet. Copyright© Ten Six Consulting, LLC. 2013. All rights reserved. 15
Primavera P6 Video Training Exercise Worksheet. Copyright© Ten Six Consulting, LLC. 2013. All rights reserved. 16

Primavera P6 Video Training Exercise Worksheet. Copyright© Ten Six Consulting, LLC. 2013. All rights reserved. 17
The final project should appear as follows in the Projects view:

Primavera P6 Video Training Exercise Worksheet. Copyright© Ten Six Consulting, LLC. 2013. All rights reserved. 18
3 Lesson 3 – Work Breakdown Structure
3.1 Exercise: 1. Using the techniques described in the training video, create the following Work Breakdown
Structure for your New Home Construction project:
To create a child WBS element:
1. Right-click on the parent WBS element 2. Select Add from the drop-down menu 3. Enter a description for the WBS element in the WBS Name column
To create a sibling WBS element: (recommended method)
1. Right-click on the parent WBS element 2. Select Add from the drop-down menu 3. Enter a description for the WBS element in the WBS Name column
4. Use the “Move Left” button to outdent the child WBS element and make it a sibling of the original parent element.
Note: This exercise data can be imported from the Lesson 03 – New Home Construction Project.xer file that is included in your training data package. See last page for import instructions.
Primavera P6 Video Training Exercise Worksheet. Copyright© Ten Six Consulting, LLC. 2013. All rights reserved. 19
4 Lesson 4 – Activities
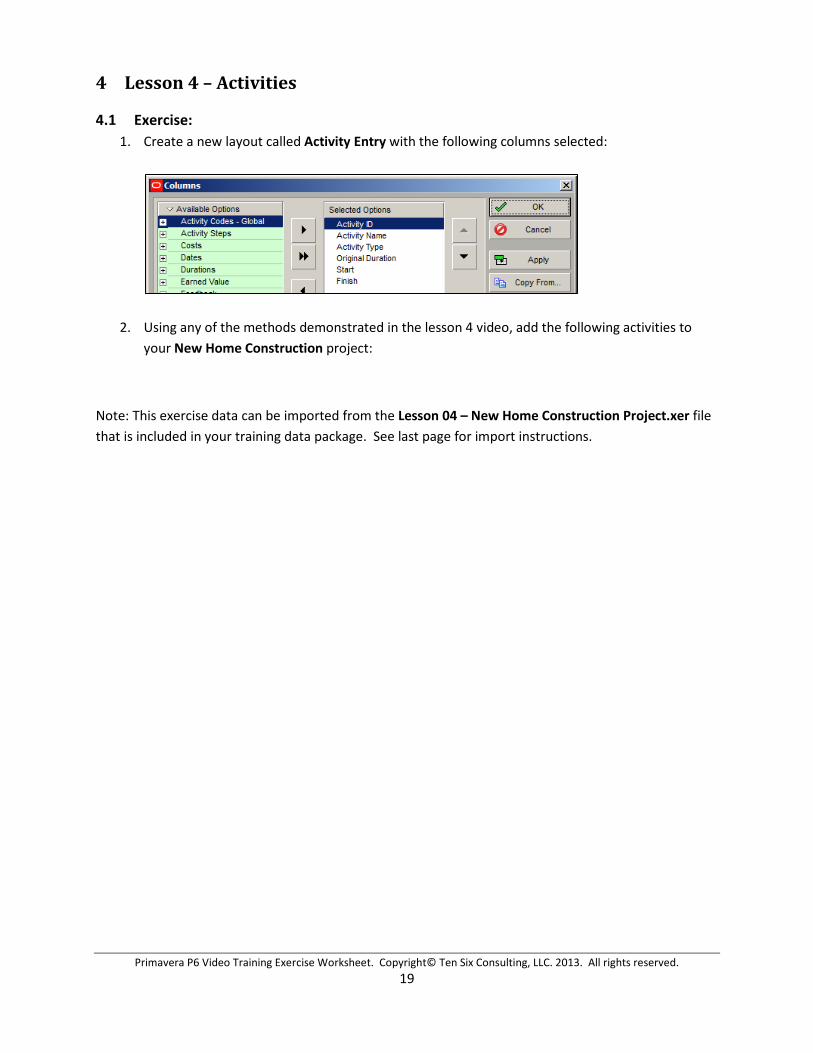
4.1 Exercise: 1. Create a new layout called Activity Entry with the following columns selected:
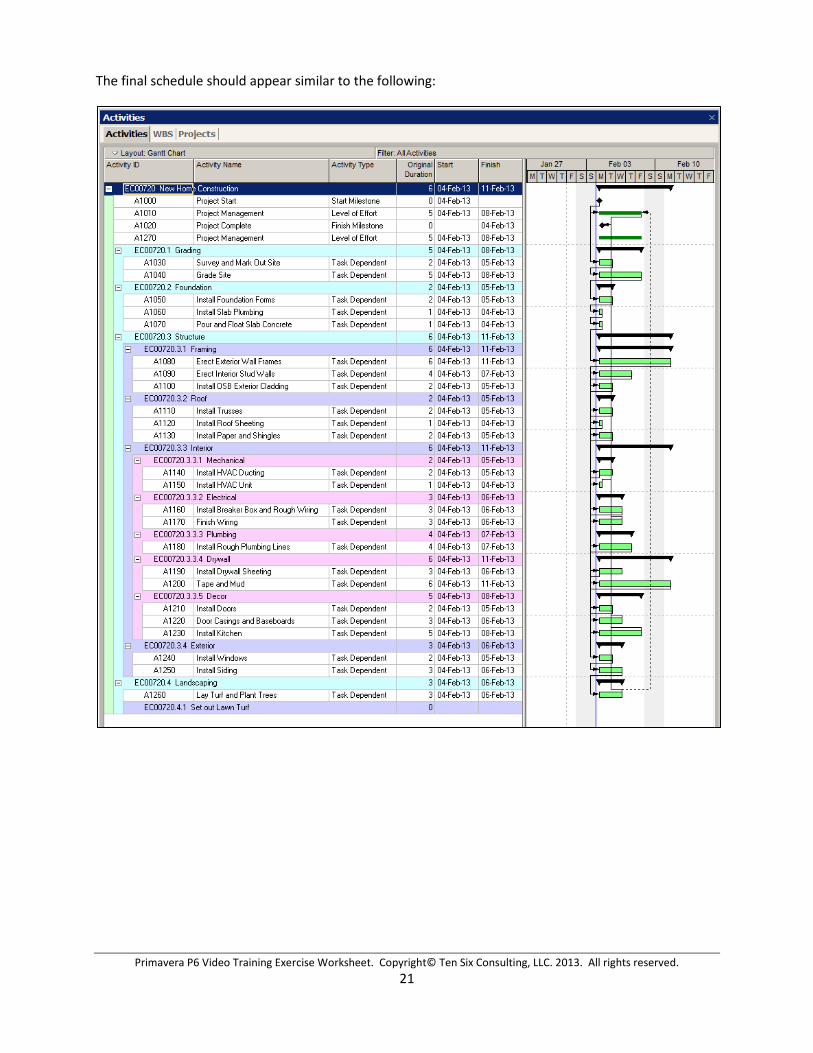
2. Using any of the methods demonstrated in the lesson 4 video, add the following activities to your New Home Construction project:
Note: This exercise data can be imported from the Lesson 04 – New Home Construction Project.xer file that is included in your training data package. See last page for import instructions.

Primavera P6 Video Training Exercise Worksheet. Copyright© Ten Six Consulting, LLC. 2013. All rights reserved. 20
Primavera P6 Video Training Exercise Worksheet. Copyright© Ten Six Consulting, LLC. 2013. All rights reserved. 21
The final schedule should appear similar to the following:
Primavera P6 Video Training Exercise Worksheet. Copyright© Ten Six Consulting, LLC. 2013. All rights reserved. 22
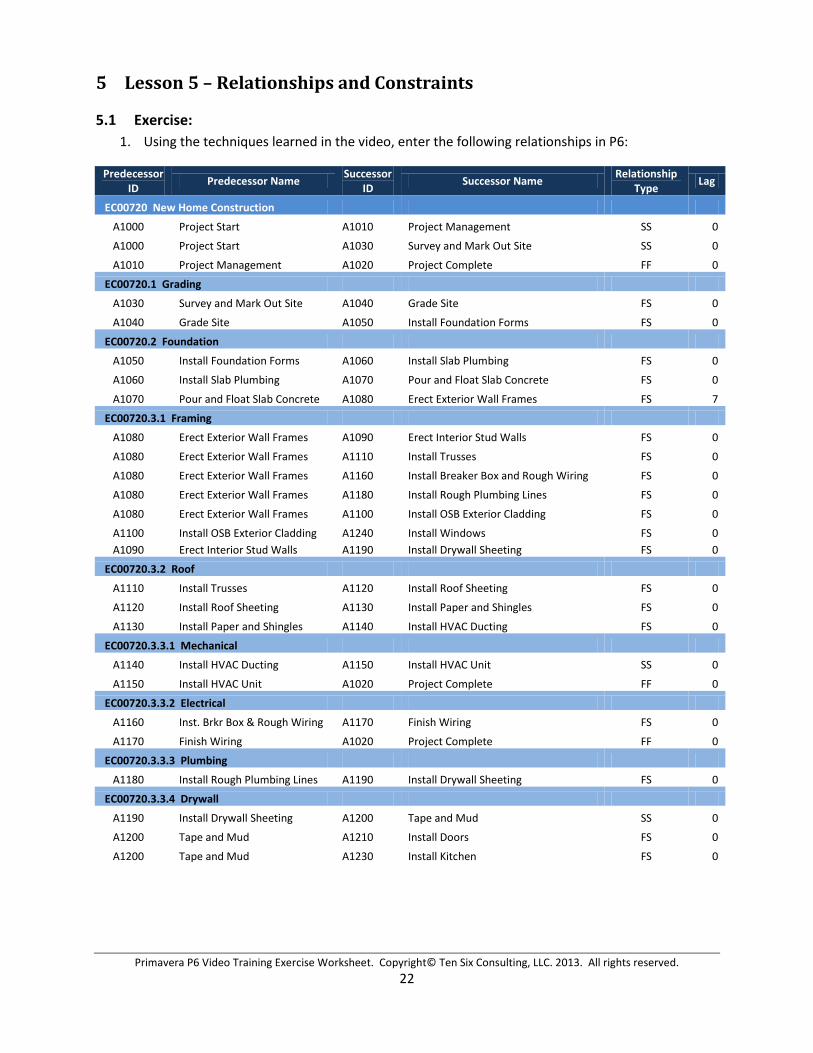
5 Lesson 5 – Relationships and Constraints
5.1 Exercise: 1. Using the techniques learned in the video, enter the following relationships in P6:
Predecessor ID Predecessor Name Successor
ID Successor Name Relationship Type Lag
EC00720 New Home Construction
A1000 Project Start A1010 Project Management SS 0
A1000 Project Start A1030 Survey and Mark Out Site SS 0
A1010 Project Management A1020 Project Complete FF 0
EC00720.1 Grading
A1030 Survey and Mark Out Site A1040 Grade Site FS 0
A1040 Grade Site A1050 Install Foundation Forms FS 0
EC00720.2 Foundation
A1050 Install Foundation Forms A1060 Install Slab Plumbing FS 0
A1060 Install Slab Plumbing A1070 Pour and Float Slab Concrete FS 0
A1070 Pour and Float Slab Concrete A1080 Erect Exterior Wall Frames FS 7
EC00720.3.1 Framing
A1080 Erect Exterior Wall Frames A1090 Erect Interior Stud Walls FS 0
A1080 Erect Exterior Wall Frames A1110 Install Trusses FS 0
A1080 Erect Exterior Wall Frames A1160 Install Breaker Box and Rough Wiring FS 0
A1080 Erect Exterior Wall Frames A1180 Install Rough Plumbing Lines FS 0
A1080 Erect Exterior Wall Frames A1100 Install OSB Exterior Cladding FS 0
A1100 Install OSB Exterior Cladding A1240 Install Windows FS 0 A1090 Erect Interior Stud Walls A1190 Install Drywall Sheeting FS 0
EC00720.3.2 Roof
A1110 Install Trusses A1120 Install Roof Sheeting FS 0
A1120 Install Roof Sheeting A1130 Install Paper and Shingles FS 0
A1130 Install Paper and Shingles A1140 Install HVAC Ducting FS 0
EC00720.3.3.1 Mechanical
A1140 Install HVAC Ducting A1150 Install HVAC Unit SS 0
A1150 Install HVAC Unit A1020 Project Complete FF 0
EC00720.3.3.2 Electrical
A1160 Inst. Brkr Box & Rough Wiring A1170 Finish Wiring FS 0
A1170 Finish Wiring A1020 Project Complete FF 0
EC00720.3.3.3 Plumbing
A1180 Install Rough Plumbing Lines A1190 Install Drywall Sheeting FS 0
EC00720.3.3.4 Drywall
A1190 Install Drywall Sheeting A1200 Tape and Mud SS 0
A1200 Tape and Mud A1210 Install Doors FS 0
A1200 Tape and Mud A1230 Install Kitchen FS 0
Primavera P6 Video Training Exercise Worksheet. Copyright© Ten Six Consulting, LLC. 2013. All rights reserved. 23
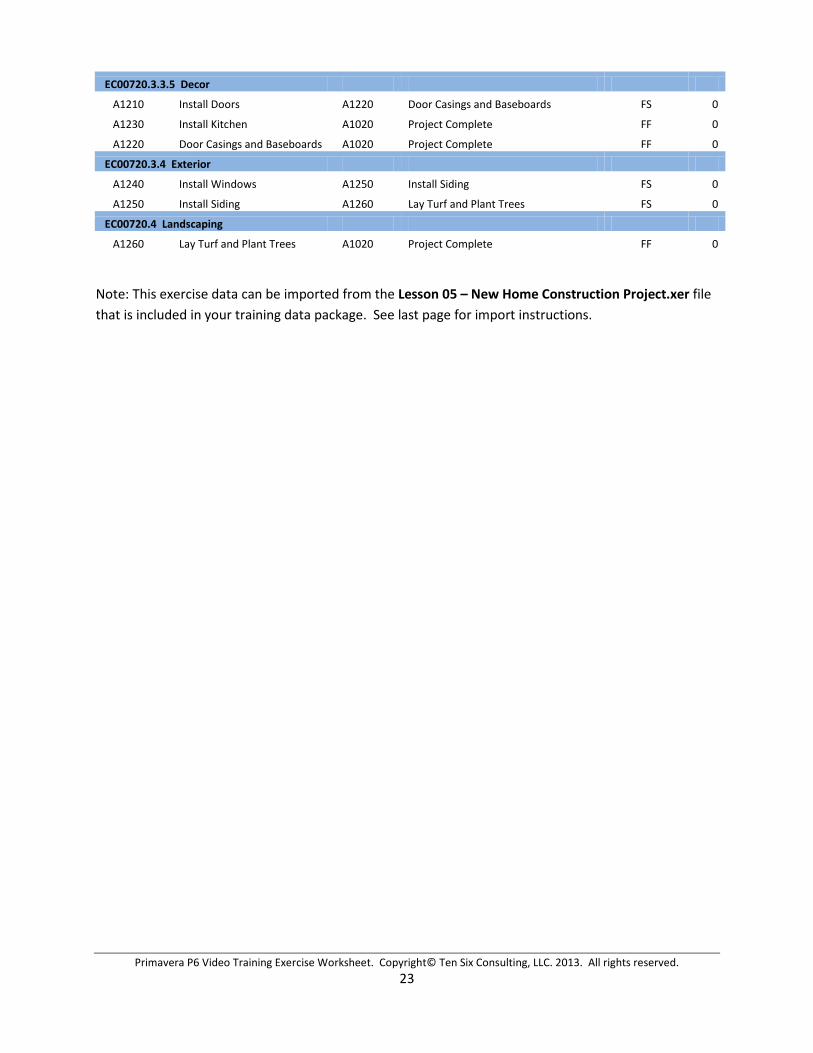
EC00720.3.3.5 Decor
A1210 Install Doors A1220 Door Casings and Baseboards FS 0
A1230 Install Kitchen A1020 Project Complete FF 0
A1220 Door Casings and Baseboards A1020 Project Complete FF 0
EC00720.3.4 Exterior
A1240 Install Windows A1250 Install Siding FS 0
A1250 Install Siding A1260 Lay Turf and Plant Trees FS 0
EC00720.4 Landscaping
A1260 Lay Turf and Plant Trees A1020 Project Complete FF 0
Note: This exercise data can be imported from the Lesson 05 – New Home Construction Project.xer file that is included in your training data package. See last page for import instructions.
Primavera P6 Video Training Exercise Worksheet. Copyright© Ten Six Consulting, LLC. 2013. All rights reserved. 24
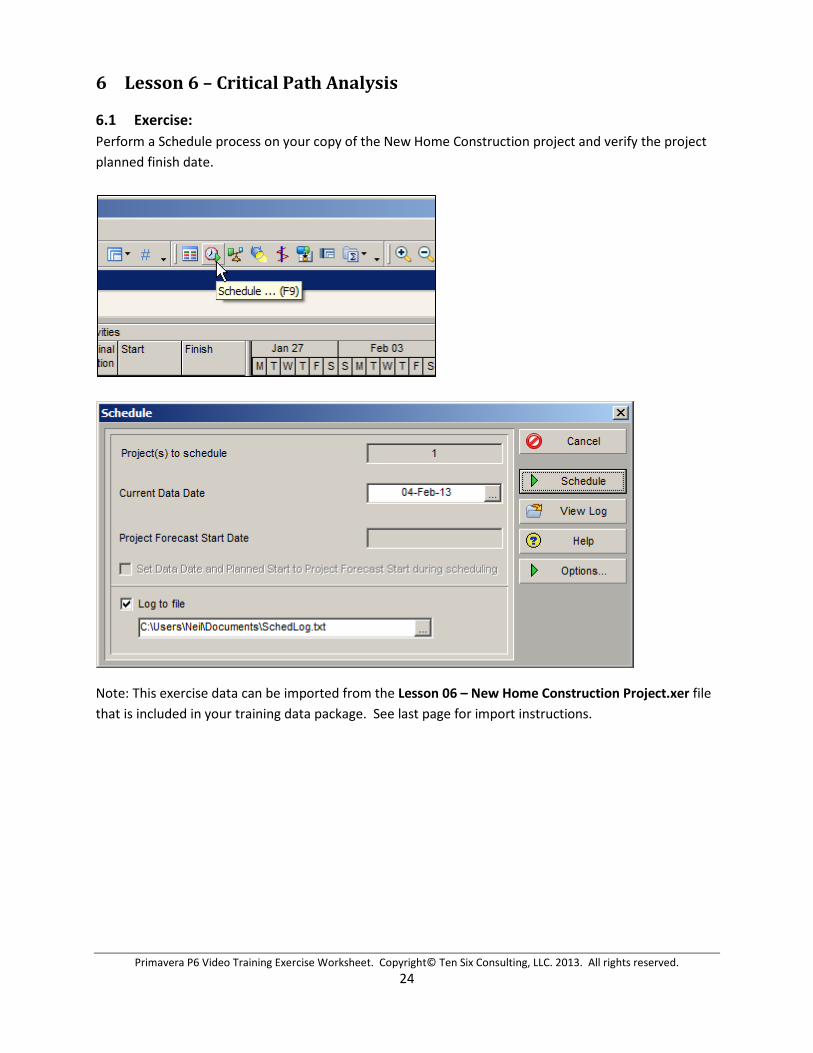
6 Lesson 6 – Critical Path Analysis
6.1 Exercise: Perform a Schedule process on your copy of the New Home Construction project and verify the project planned finish date.
Note: This exercise data can be imported from the Lesson 06 – New Home Construction Project.xer file that is included in your training data package. See last page for import instructions.
Primavera P6 Video Training Exercise Worksheet. Copyright© Ten Six Consulting, LLC. 2013. All rights reserved. 25
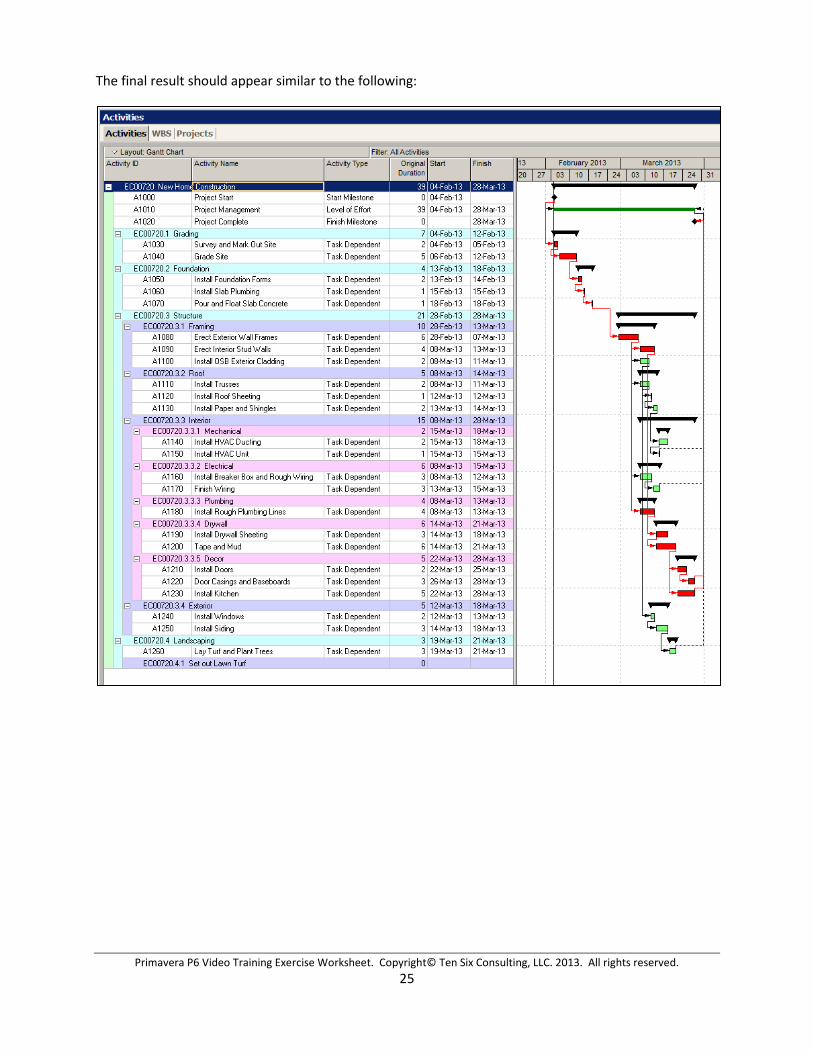
The final result should appear similar to the following:

Primavera P6 Video Training Exercise Worksheet. Copyright© Ten Six Consulting, LLC. 2013. All rights reserved. 26
7 Lesson 7 – Resources - Part I
7.1 Exercise: 1. In the Resources view, add the following resources to the E&C Trades resource:
Resource ID Resource Name Max Units/Time Standard Rate Resource Type Foreman Site Forman 8/d $55.00/h Labor HVACEng HVAC Engineer 8/d $40.00/h Labor Surveyor Land Surveyor 8/d $65.00/h Labor Siding Siding Contractor 8/d $47.00/h Labor Concrete Concrete 0/d $115.00 Per CY Material
7.2 Exercise: 1. In the Resources tab of the Activity Details area, make the following resource assignments for
the New Home Construction schedule:
Activity ID Activity Name Resource ID Budgeted Units / Time
Budgeted Units
A1010 Project Management Foreman 8.0h/d 272.0h A1030 Survey and Mark Out Site Surveyor 8.0h/d 16.0h A1040 Grade Site Operator 8.0h/d 40.0h A1050 Install Foundation Forms RCarp 8.0h/d 16.0h A1050 Install Foundation Forms GenLabor 8.0h/d 16.0h A1060 Install Slab Plumbing Plumb 8.0h/d 8.0h A1070 Pour and Float Slab Concrete GenLabor 32.0h/d 32.0h A1080 Erect Exterior Wall Frames RCarp 24.0h/d 144.0h A1090 Erect Interior Stud Walls RCarp 16.0h/d 64.0h A1100 Install OSB Exterior Cladding RCarp 24.0h/d 48.0h A1110 Install Trusses RCarp 24.0h/d 48.0h A1120 Install Roof Sheeting RCarp 24.0h/d 24.0h A1130 Install Paper and Shingles Roofing 24.0h/d 48.0h A1140 Install HVAC Ducting HVACEng 8.0h/d 16.0h A1150 Install HVAC Unit HVACEng 8.0h/d 8.0h A1160 Install Breaker Box and Rough Wiring Elec 8.0h/d 24.0h A1170 Finish Wiring Elec 8.0h/d 24.0h A1180 Install Rough Plumbing Lines Plumb 8.0h/d 32.0h A1190 Install Drywall Sheeting Drywall 16.0h/d 48.0h A1200 Tape and Mud Drywall 16.0h/d 96.0h A1210 Install Doors FCarp 8.0h/d 16.0h A1220 Door Casings and Baseboards FCarp 8.0h/d 24.0h A1230 Install Kitchen FCarp 16.0h/d 80.0h A1240 Install Windows FCarp 8.0h/d 16.0h A1250 Install Siding Siding 16.0h/d 48.0h A1260 Lay Turf and Plant Trees GenLabor 24.0h/d 24.0h
Note: This exercise data can be imported from the Lesson 07 – New Home Construction Project.xer file that is included in your training data package. See last page for import instructions.

Primavera P6 Video Training Exercise Worksheet. Copyright© Ten Six Consulting, LLC. 2013. All rights reserved. 27
7 Lesson 7 – Resources – Part II
7.3 Exercise: 1. Using the techniques described in the video, select the Pour and Float Slab Concrete activity
and increase the number of General Laborers to 6 by setting the Budgeted Units field in the Resources tab to 48.0h.
2. Use the Add Resource button to add two Concrete Finishers to the Pour and Float Slab Concrete activity. Note: you can either add the resource twice and seen in the Video, with a Budgeted Units of 8.0h, or you can add just one Concrete Finisher, but set the Budgeted Units/Time field to 16.0h.
OR
Primavera P6 Video Training Exercise Worksheet. Copyright© Ten Six Consulting, LLC. 2013. All rights reserved. 28
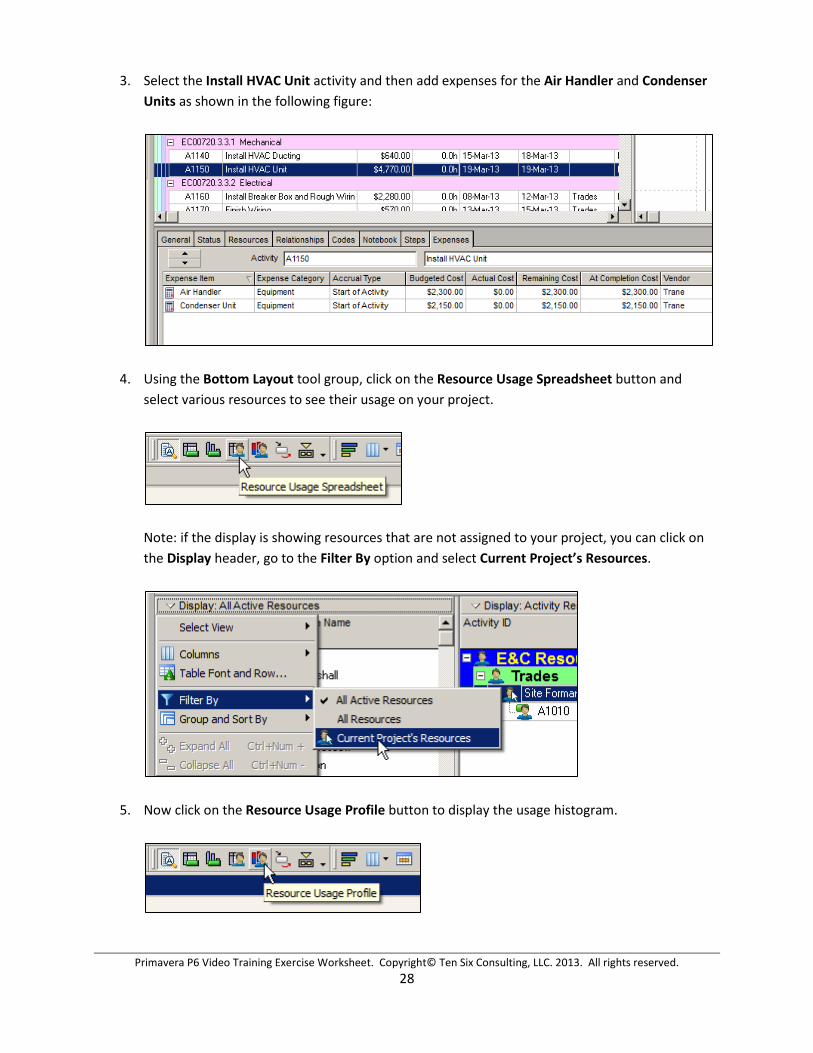
3. Select the Install HVAC Unit activity and then add expenses for the Air Handler and Condenser Units as shown in the following figure:
4. Using the Bottom Layout tool group, click on the Resource Usage Spreadsheet button and select various resources to see their usage on your project.
Note: if the display is showing resources that are not assigned to your project, you can click on the Display header, go to the Filter By option and select Current Project’s Resources.
5. Now click on the Resource Usage Profile button to display the usage histogram.

Primavera P6 Video Training Exercise Worksheet. Copyright© Ten Six Consulting, LLC. 2013. All rights reserved. 29
6. Change the Timescale settings to see how the Histogram bars and Limit line changes as different timescale periods are selected.
7. Click on the Resource Assignments button in the Project tool group to open the Resource Assignments view.
Primavera P6 Video Training Exercise Worksheet. Copyright© Ten Six Consulting, LLC. 2013. All rights reserved. 30
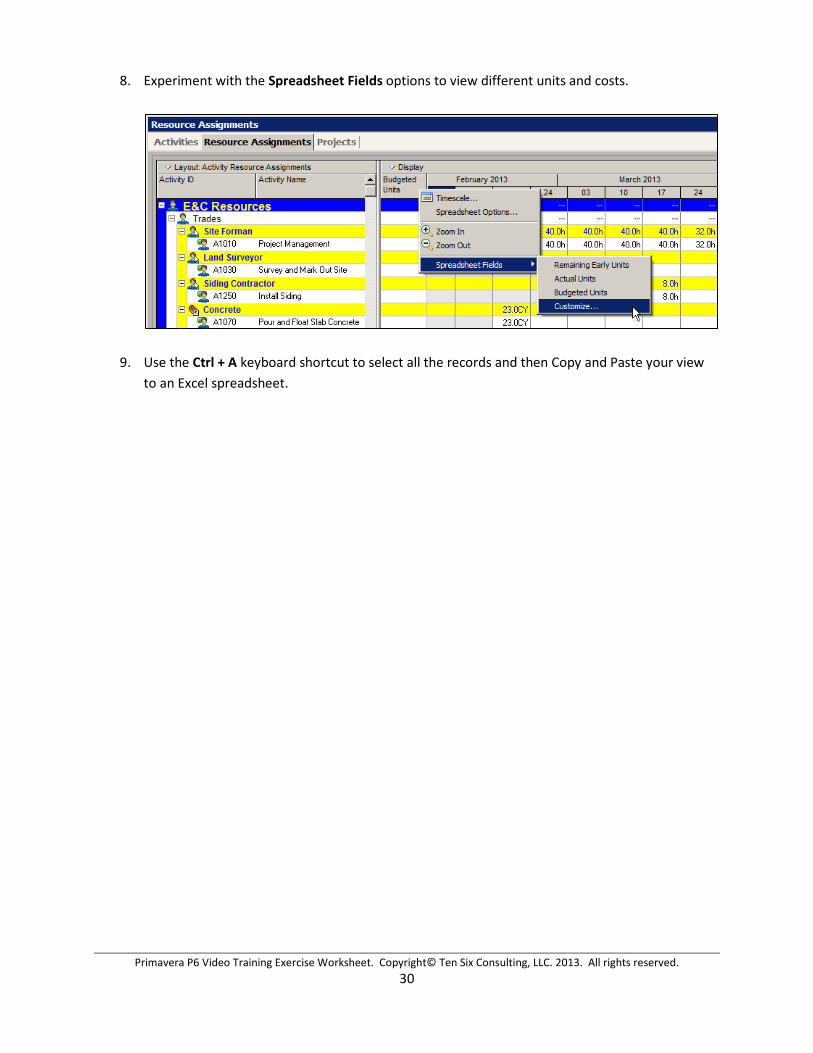
8. Experiment with the Spreadsheet Fields options to view different units and costs.
9. Use the Ctrl + A keyboard shortcut to select all the records and then Copy and Paste your view to an Excel spreadsheet.

Primavera P6 Video Training Exercise Worksheet. Copyright© Ten Six Consulting, LLC. 2013. All rights reserved. 31
8 Lesson 8 – Baselines
8.1 Exercise: 1. Go to the Project menu and use the Maintain Baselines dialog to create a baseline of your New
Home Construction project.
2. Assign your new baseline to the Project Baseline and Primary Baseline fields.
Primavera P6 Video Training Exercise Worksheet. Copyright© Ten Six Consulting, LLC. 2013. All rights reserved. 32
9 Lesson 9 – Project Status
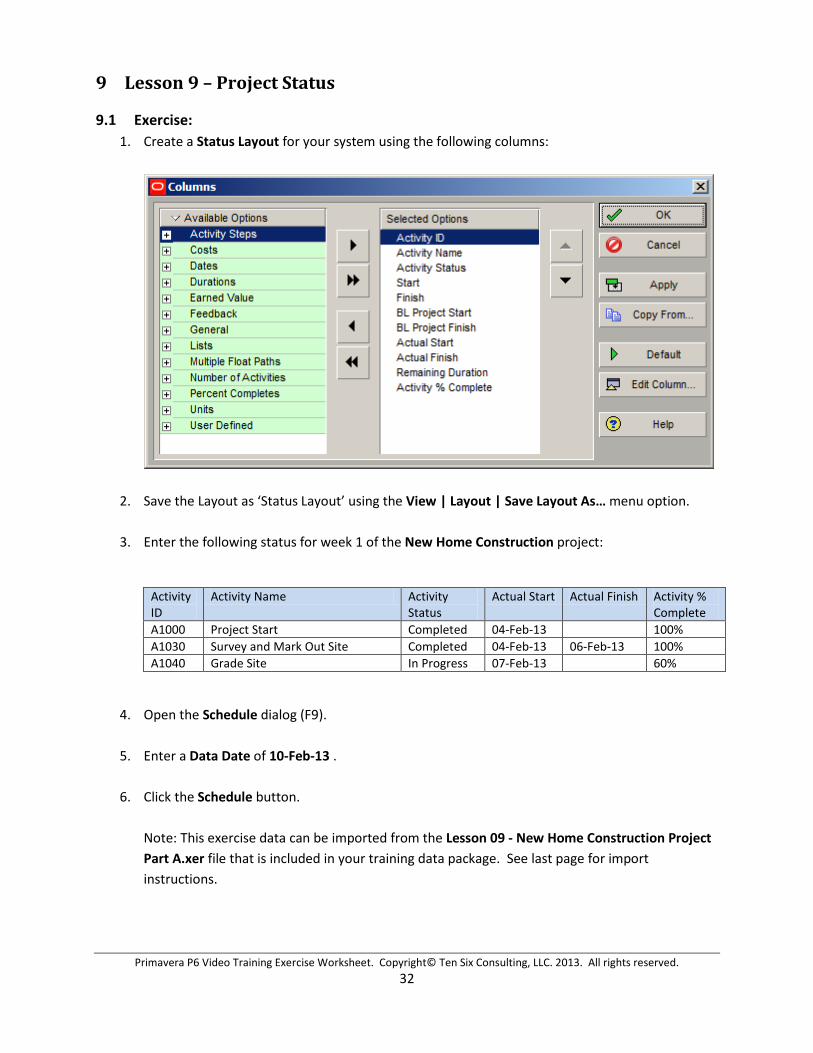
9.1 Exercise: 1. Create a Status Layout for your system using the following columns:
2. Save the Layout as ‘Status Layout’ using the View | Layout | Save Layout As… menu option.
3. Enter the following status for week 1 of the New Home Construction project:
Activity ID
Activity Name Activity Status
Actual Start Actual Finish Activity % Complete
A1000 Project Start Completed 04-Feb-13 100% A1030 Survey and Mark Out Site Completed 04-Feb-13 06-Feb-13 100% A1040 Grade Site In Progress 07-Feb-13 60%
4. Open the Schedule dialog (F9).
5. Enter a Data Date of 10-Feb-13 .
6. Click the Schedule button. Note: This exercise data can be imported from the Lesson 09 - New Home Construction Project Part A.xer file that is included in your training data package. See last page for import instructions.

Primavera P6 Video Training Exercise Worksheet. Copyright© Ten Six Consulting, LLC. 2013. All rights reserved. 33
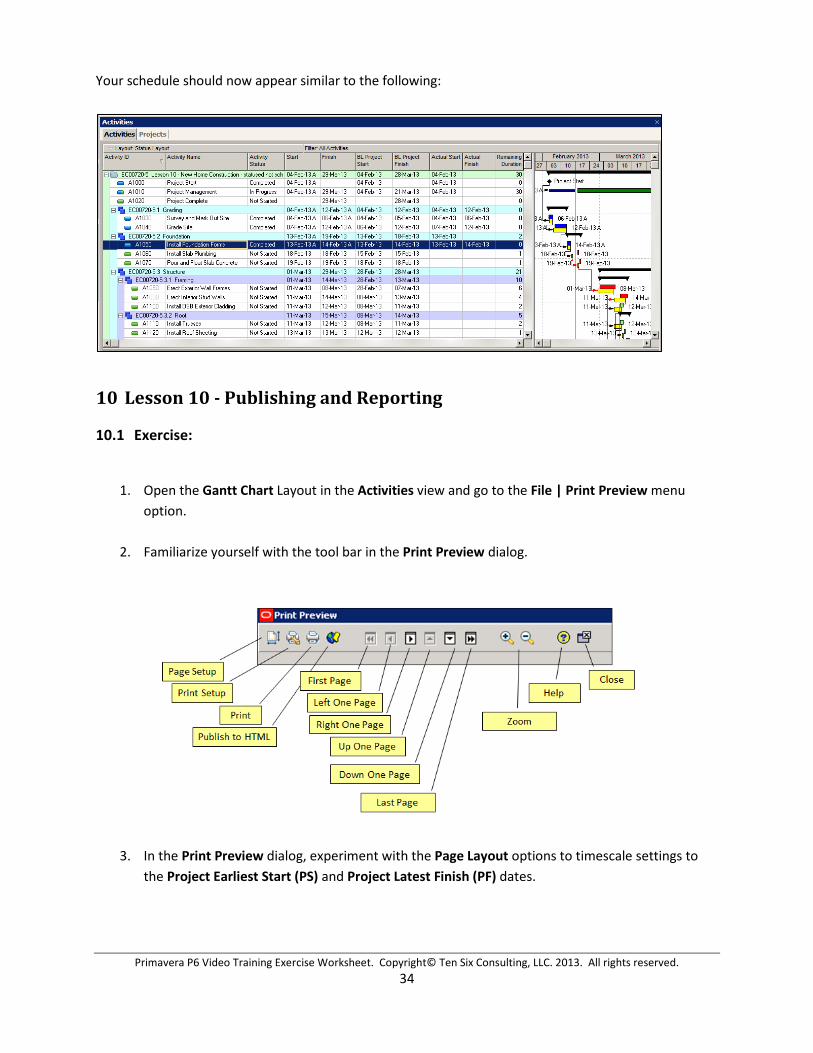
Your schedule should appear similar to the following:
7. Now enter the following status data for week 2 of the New Home Construction project:
Activity ID
Activity Name Activity Status
Actual Start Actual Finish Activity % Complete
A1040 Grade Site Completed 07-Feb-13 12-Feb-13 100% A1050 Install Foundation Forms Completed 13-Feb-13 14-Feb-13 100%
8. Open the Schedule dialog (F9).
9. Enter a Data Date of 17-Feb-13.
10. Click the Schedule button.
Note: This exercise data can be imported from the Lesson 09 - New Home Construction Project Part B.xer file that is included in your training data package. See last page for import instructions.
Primavera P6 Video Training Exercise Worksheet. Copyright© Ten Six Consulting, LLC. 2013. All rights reserved. 34
Your schedule should now appear similar to the following:
10 Lesson 10 - Publishing and Reporting
10.1 Exercise:
1. Open the Gantt Chart Layout in the Activities view and go to the File | Print Preview menu option.
2. Familiarize yourself with the tool bar in the Print Preview dialog.
3. In the Print Preview dialog, experiment with the Page Layout options to timescale settings to the Project Earliest Start (PS) and Project Latest Finish (PF) dates.

Primavera P6 Video Training Exercise Worksheet. Copyright© Ten Six Consulting, LLC. 2013. All rights reserved. 35
4. Now experiment with the Activity Table, All Columns, Grid Lines and Gantt Chart options to see their effect on the output.
5. Close the Print Preview dialog.
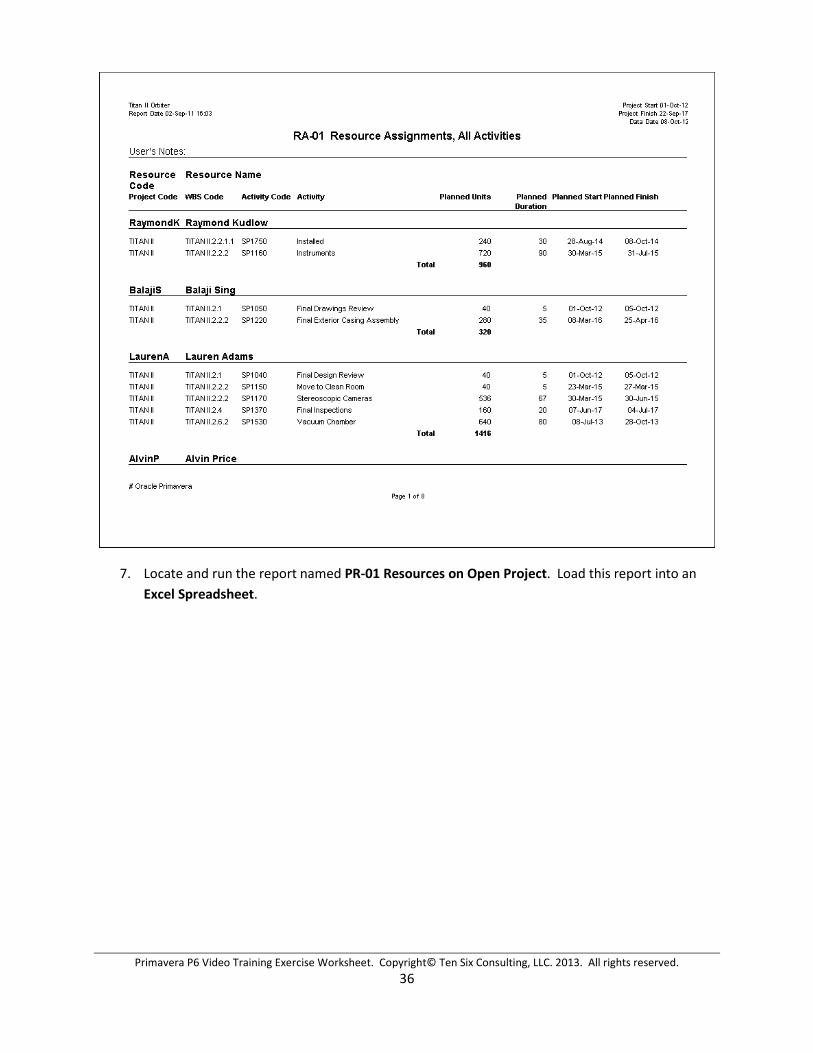
6. Locate and run the standard report named RA-01 Resources Assignments, All Activities. Run this report in the Print Preview window.
The result should appear as follows below:
Primavera P6 Video Training Exercise Worksheet. Copyright© Ten Six Consulting, LLC. 2013. All rights reserved. 36
7. Locate and run the report named PR-01 Resources on Open Project. Load this report into an Excel Spreadsheet.

Primavera P6 Video Training Exercise Worksheet. Copyright© Ten Six Consulting, LLC. 2013. All rights reserved. 37
The results should appear as shown in the following figure:
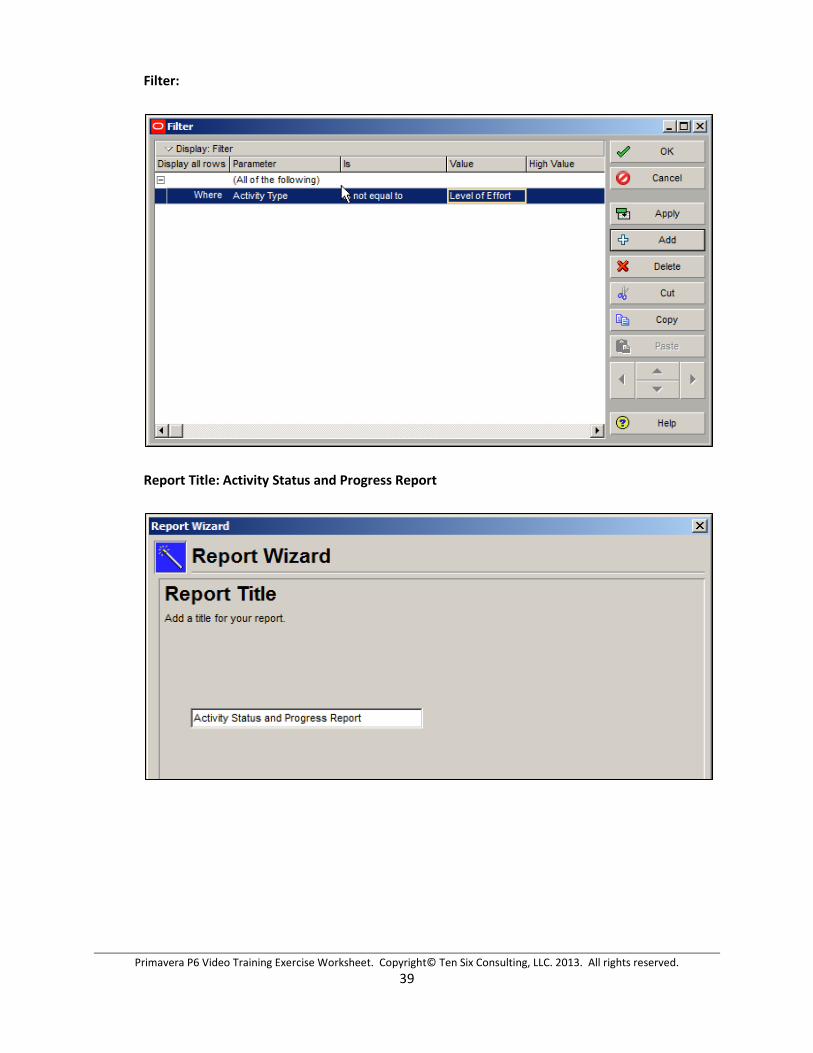
8. Create an activity status report using the Report Wizard with the following columns, grouping and filter option: Subject Area: Activities

Primavera P6 Video Training Exercise Worksheet. Copyright© Ten Six Consulting, LLC. 2013. All rights reserved. 38
Columns:
Group and Sort:
Primavera P6 Video Training Exercise Worksheet. Copyright© Ten Six Consulting, LLC. 2013. All rights reserved. 39
Filter:
Report Title: Activity Status and Progress Report
Primavera P6 Video Training Exercise Worksheet. Copyright© Ten Six Consulting, LLC. 2013. All rights reserved. 40
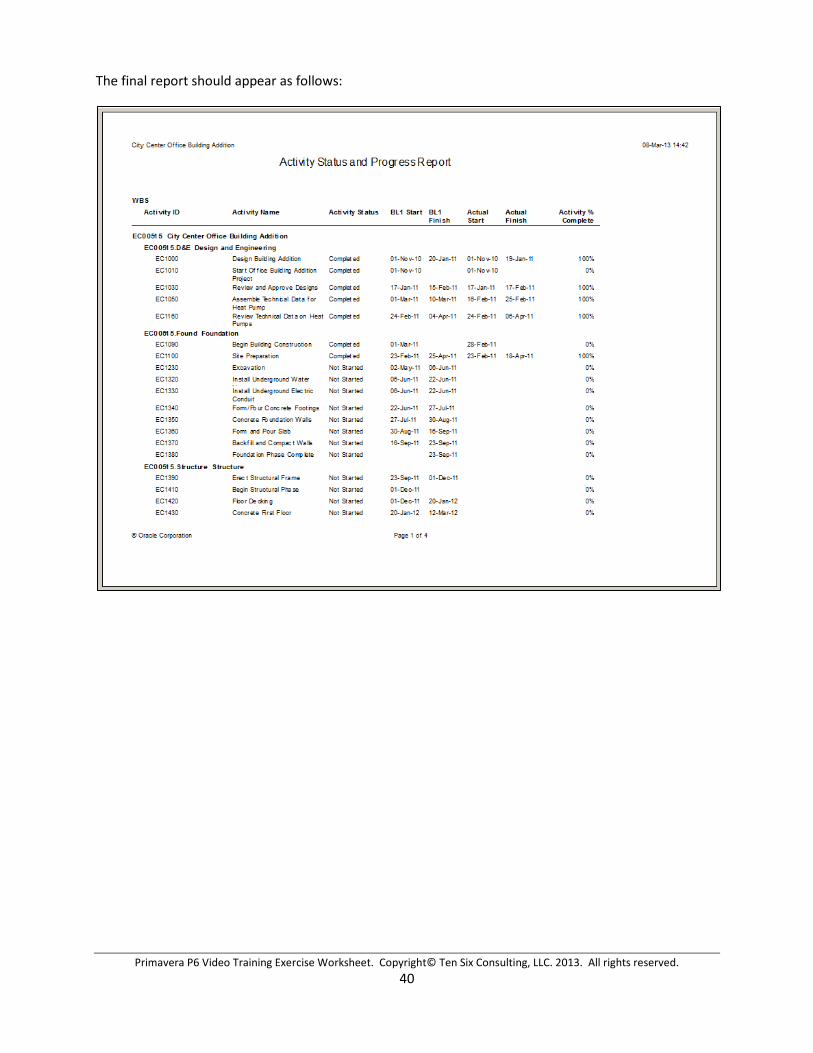
The final report should appear as follows:

Primavera P6 Video Training Exercise Worksheet. Copyright© Ten Six Consulting, LLC. 2013. All rights reserved. 41
11 Lesson 11 – Exporting and Importing Project Data
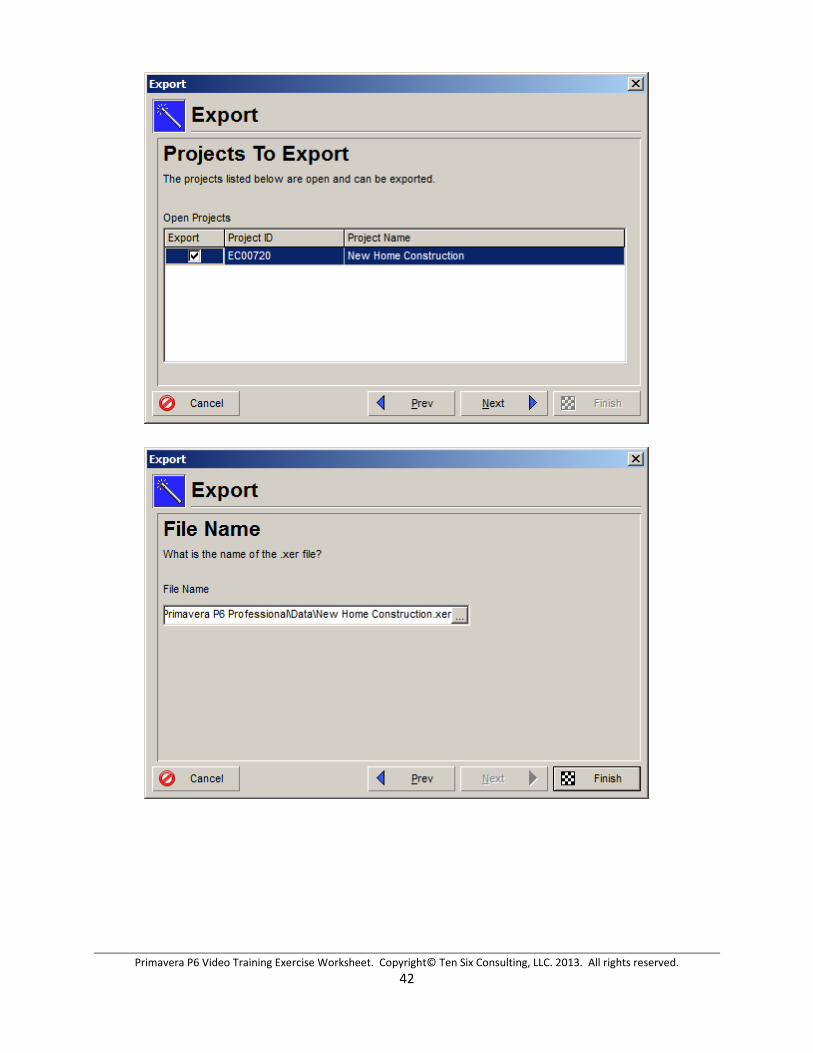
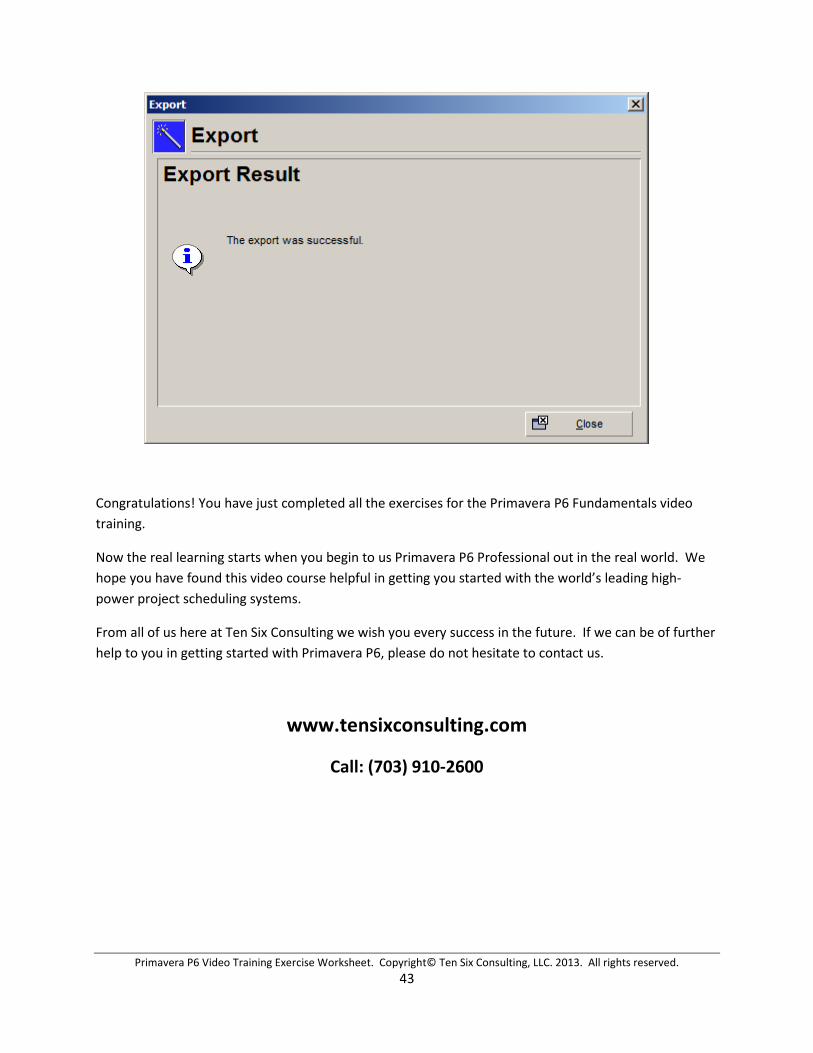
11.1 Exercise: 1. Click on the File | Export menu option.
2. Export your New Home Construction project to an XER file in P6 R6.2 format using the Export
Wizard.
Primavera P6 Video Training Exercise Worksheet. Copyright© Ten Six Consulting, LLC. 2013. All rights reserved. 42
Primavera P6 Video Training Exercise Worksheet. Copyright© Ten Six Consulting, LLC. 2013. All rights reserved. 43
Congratulations! You have just completed all the exercises for the Primavera P6 Fundamentals video training.
Now the real learning starts when you begin to us Primavera P6 Professional out in the real world. We hope you have found this video course helpful in getting you started with the world’s leading high-power project scheduling systems.
From all of us here at Ten Six Consulting we wish you every success in the future. If we can be of further help to you in getting started with Primavera P6, please do not hesitate to contact us.
www.tensixconsulting.com
Call: (703) 910-2600
Primavera P6 Video Training Exercise Worksheet. Copyright© Ten Six Consulting, LLC. 2013. All rights reserved. 44
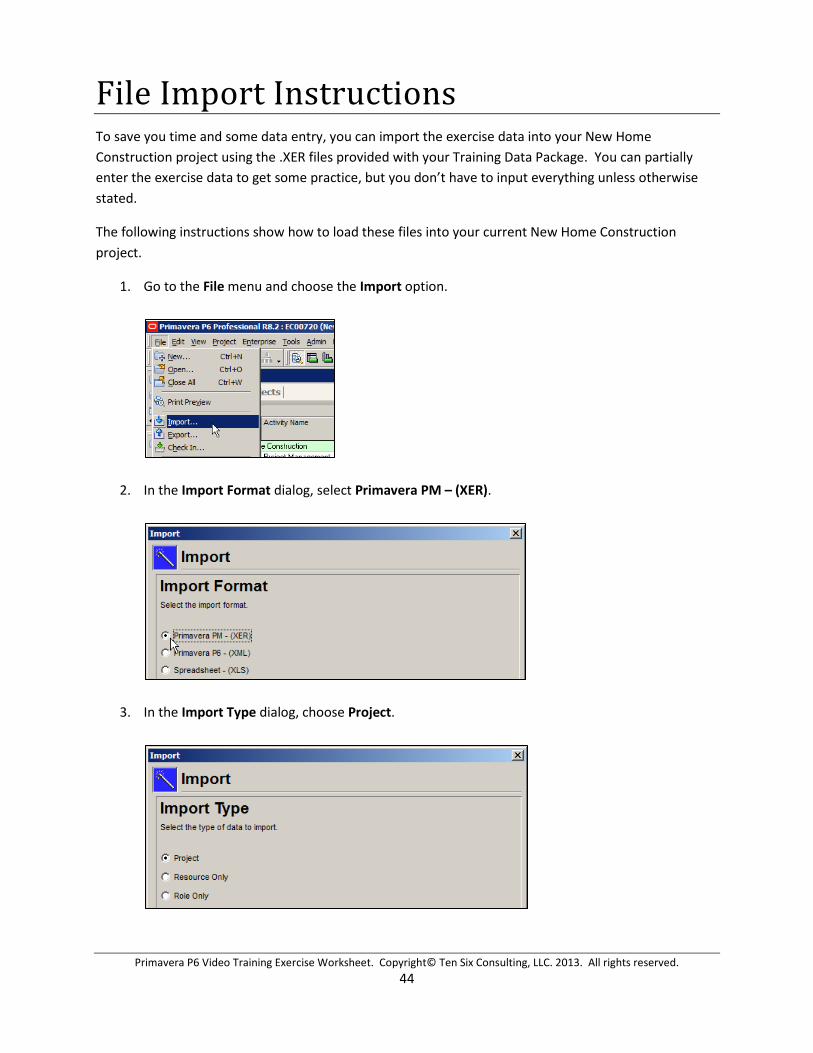
File Import Instructions To save you time and some data entry, you can import the exercise data into your New Home Construction project using the .XER files provided with your Training Data Package. You can partially enter the exercise data to get some practice, but you don’t have to input everything unless otherwise stated.
The following instructions show how to load these files into your current New Home Construction project.
1. Go to the File menu and choose the Import option.
2. In the Import Format dialog, select Primavera PM – (XER).
3. In the Import Type dialog, choose Project.
Primavera P6 Video Training Exercise Worksheet. Copyright© Ten Six Consulting, LLC. 2013. All rights reserved. 45
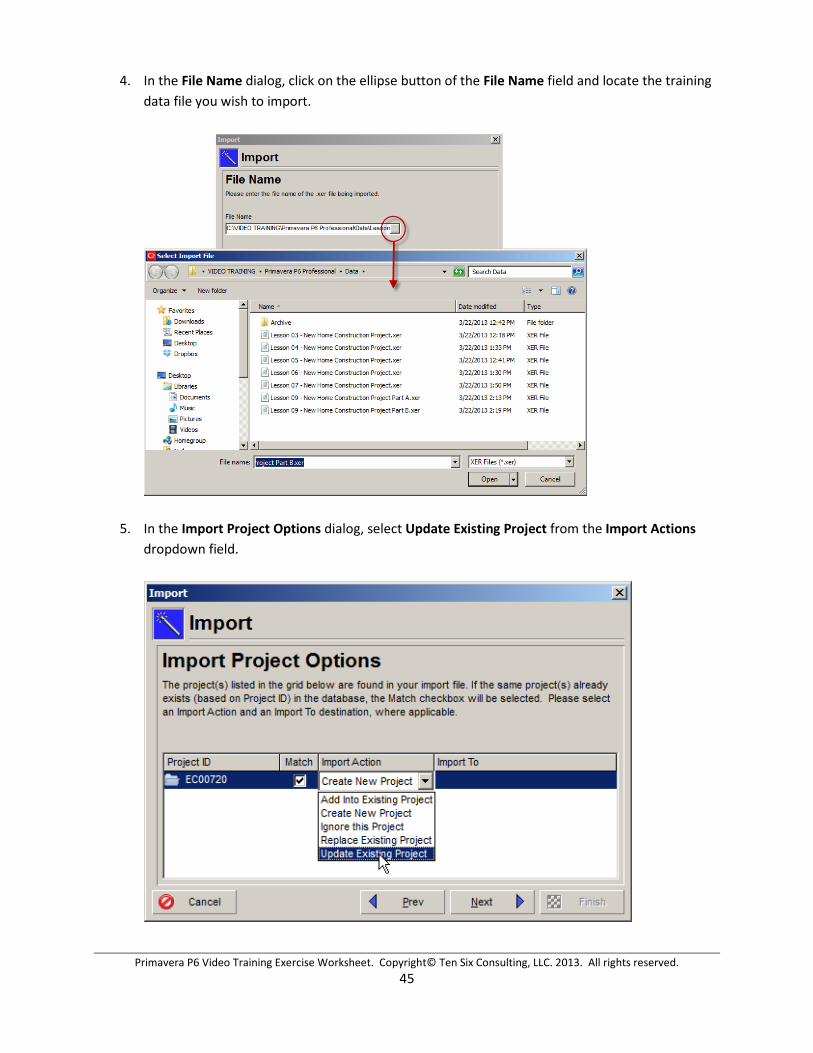
4. In the File Name dialog, click on the ellipse button of the File Name field and locate the training data file you wish to import.
5. In the Import Project Options dialog, select Update Existing Project from the Import Actions dropdown field.

Primavera P6 Video Training Exercise Worksheet. Copyright© Ten Six Consulting, LLC. 2013. All rights reserved. 46
6. Now click in the Import To field and select the project to which to import the data.
7. In the Update Project Options dialog, click Next >.
Primavera P6 Video Training Exercise Worksheet. Copyright© Ten Six Consulting, LLC. 2013. All rights reserved. 47
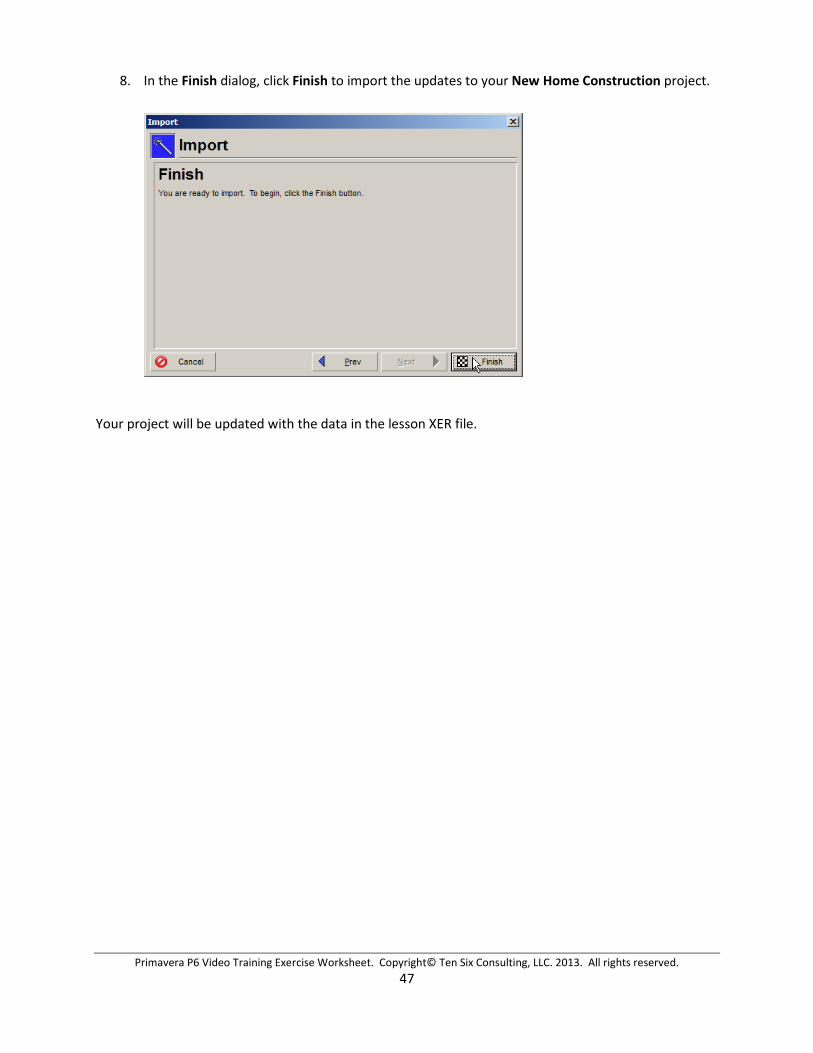
8. In the Finish dialog, click Finish to import the updates to your New Home Construction project.
Your project will be updated with the data in the lesson XER file.