primetest primetest 50 - rs components
TRANSCRIPT

PRIMETEST 50
Operating Instructions
PRIMETEST 250+
Operating Instructions
PRIMETEST


Part Number 403A556 Revision 2© 2014 Seaward Electronic Ltd
PrimeTest 250+ Operating Instructions
1
Operating Instructions
PRIMETEST 250+
Bracken HillSouth West Industrial EstatePeterleeCo DurhamSR8 2SWENGLANDTel: +44(0)191 [email protected]@seaward.co.uk
PrimeTest 250+ Operating Instructions
2
Limited Warranty & Limitation of Liability
SEAWARD Electronic Limited guarantees this product to be free from defects in material and workmanship under normal use and service for a period of 1 year. The period of warranty will be effective from the day of delivery.
24 Month Warranty Statement
Seaward provides a standard 12-month manufacturer’s warranty against breakdown during normal use. This warranty can be upgraded to a 24-month warranty by registering your product with Seaward within 30 days of purchase and having it calibrated at an authorised service centre within 13 months of purchase.
For full terms and conditions or to register your product, please visit our website:www.seaward.co.uk/warranty24
© Copyright 2014All rights reserved. Nothing from this edition may be multiplied, or made public in any form or manner, either electronically, mechanically, by photocopying, recording, or in any manner, without prior written consent from SEAWARD Electronic Limited. This also applies to accompanying drawings and diagrams.
Due to a policy of continuous development SEAWARD Electronic Limited reserves the right to alter the equipment specifi cation and description outlined in this publication without prior notice and no part of this publication shall be deemed to be part of any contract for the equipment unless specifi cally referred to as an inclusion within such contract.
PrimeTest 250+ Operating Instructions
3
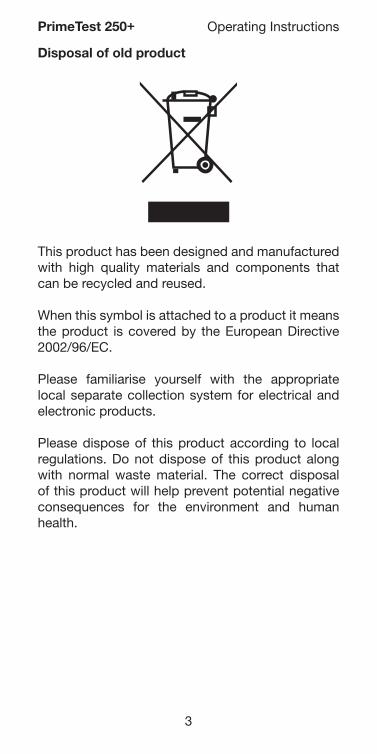
Disposal of old product
This product has been designed and manufactured with high quality materials and components that can be recycled and reused.
When this symbol is attached to a product it means the product is covered by the European Directive 2002/96/EC.
Please familiarise yourself with the appropriate local separate collection system for electrical and electronic products.
Please dispose of this product according to local regulations. Do not dispose of this product along with normal waste material. The correct disposal of this product will help prevent potential negative consequences for the environment and human health.

DECLARATION OF CONFORMITY
As the manufacturer of the apparatus listed, declare under our sole responsibility that the product:
SEAWARD PrimeTest 250+
To which this declaration relates are in conformity with the relevant clauses of the following standard:
EN 61010-1:2010 Safety requirements for electrical equipment for measurement, control, and laboratory use –Part 1: General requirements.
EN 61010-2-030:2010 Safety requirements for electrical equipment for measurement, control, and laboratory use –Part 2-030: Particular requirements for testing and measuring circuits
IEC 61326:2013Electrical equipment for measurement, control and laboratory user-EMC Requirements
Performance: The instrument operates within specifi cation when used under the conditions in the above standards EMC and Safety Standards.
The product identifi ed above conforms to the requirements of Council Directive 2004/108/EC and 2006/95/EC.
This Conformity is indicated by the symbol , i.e.“Conformité Européenne”
Seaward Electronic Ltd is registered under BS EN ISO9001:2000 Certifi cate No: Q05356.
PrimeTest 250+ Operating Instructions
4

PrimeTest 250+ Operating Instructions
5
Contents
1 Important Information ........................................... 6
2 Introduction ............................................................. 17
3 Performing Tests ................................................... 19
3.1 Checking a mains power outlet ............. 19
3.2 Testing a Class I Appliance ...................... 20
3.3 Testing a Class II Appliance ...................... 25
3.4 Testing a mains cord ................................... 28
3.5 Testing an extension lead ......................... 29
3.6 Changing the Insulation Test Voltage .. 30
3.7 Changing the CLI Leakage limit ............. 30
3.8 Performing an RCD test on an installation RCD ......................................... 31
3.9 Performing an RCD test on a Plug top RCD ........................................................ 32
3.10 Performing a 3-Phase Sequence ........ 33
4 Memory & Print Functions ................................ 35
4.1 Saving Test Results ................................... 35
4.2 Viewing Test Results ................................. 35
4.3 Deleting Test Results ................................ 35
4.4 Transferring Test Results ........................ 36
4.5 Printing Test Results ................................. 36
4.6 Setting the Real Time Clock ................... 37
5 Specifi cation .......................................................... 38
6 Maintenance .......................................................... 40
7 Battery Check ....................................................... 40
7.1 Battery Replacement ............................... 41
8 Fuse Replacement .............................................. 42
9 Service and Calibration ..................................... 43

1 Important Information
These operating instructions are intended for the use of adequately trained personnel.
The following symbols are used in these operating instructions and on the PrimeTest 250+.
Caution, risk of electric shock. Indicates instructions must be followed to avoid danger to persons.
Caution, risk of danger. The operating instructions must be adhered to in order to avoid danger.
Before use, ensure unit is clean and dry; visually inspect all leads, connectors, and case. Any damage or wear must be rectifi ed prior to use.
If the PrimeTest 250+ is used in a manner not specifi ed by these operating instructions then the protection provided may be impaired.
Always ensure that the circuit or appliance under test is electrically isolated.
The PrimeTest 250+ and all associated cables and leads must be checked for signs of damage before equipment is operated. Do not use if there are signs of damage. Only use the correct leads supplied with the PrimeTest 250+.
Do not touch test probes beyond the hand barrier on the test probe.
PrimeTest 250+ Operating Instructions
6
The PrimeTest 250+ may apply high voltage or mains power to the appliance under test. Do not touch conductive parts of the appliance while tests are active.
If the PrimeTest 250+ is being used to determine the presence or absence of hazardous voltages, always prove the operation of voltage measurement function before and after use by means of a known voltage source or proving unit.
Do not operate the PrimeTest 250+ in an explosive gas or dust environment.
The PrimeTest 250+ has been designed to make measurements in a dry environment.
Do not open the PrimeTest 250+, no user serviceable parts.
Note: Data may be lost or altered in virtually any electronic memory under certain circumstances. Therefore Seaward Electronic assumes no responsibility for fi nancial losses or claims due to data lost or otherwise rendered unusable whether as a result of abuse, improper use, defects, disregard of operating instructions or procedures, or any allied causes.
PrimeTest 250+ Operating Instructions
7

PrimeTest 250+ Operating Instructions
8
Standard Accessories
Optional Accessories
Part Number403A91071G082305A950300A002396A972403A759403A556
Seaward PrimeTest 250+ unitCarry CaseBlack Test Lead 1mIEC mains cord 0.5mUSB download leadSupport CDOperating Instructions
Part Number
400A917400A912400A910339A945339A933
91B03891B311998A223387A910270A076209A911209A913209A910209A912391A920391A910339A950
Test n Tag Pro Printer (serial)Test n Tag label roll (400 labels)PATGuard 3 Elite software 1 yrPATGuard 3 Elite software 3 yrPATGuard 3 Elite software infi nitePass Labels (1000 labels)Fail Labels (1000 labels) PAT Log BookPATGuard Elements software v1230-110V adapter3 Phase Adaptor 5/163 Phase Adaptor 5/323 Phase Adaptor 4/163 Phase Adaptor 4/323 Phase Leakage Adapter 5/163 Phase Leakage Adapter 5/32NiMH Batteries and charger
PATGuard 3 Elite software can also be trialled and purchased online from the below web address:
www.seaward.co.uk/pg3trial
PrimeTest 250+ Operating Instructions
9
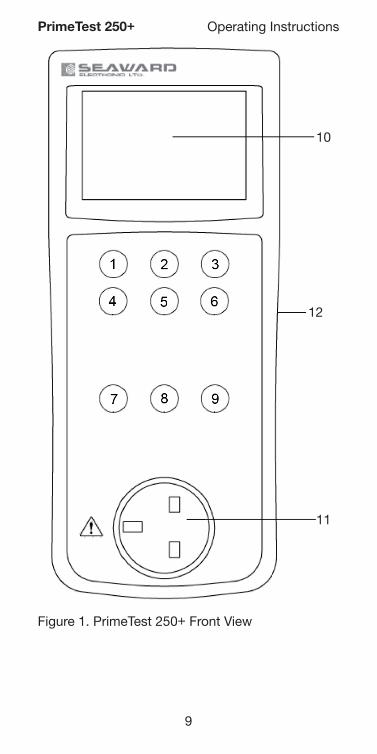
Figure 1. PrimeTest 250+ Front View
11
12
10

PrimeTest 250+ Operating Instructions
10
14
1516
13
Figure 2. PrimeTest 250+ End View
Figure 3. Testing CLI appliances, no mains leakage

PrimeTest 250+ Operating Instructions
11
Figure 4. Testing CLII appliances, no mains leakage

PrimeTest 250+ Operating Instructions
12
Figure 5. Testing CLI appliances, mains leakage

PrimeTest 250+ Operating Instructions
13
Figure 6. Testing CLII appliances, mains leakage

PrimeTest 250+ Operating Instructions
14
Figure 7. Testing IEC Leads

PrimeTest 250+ Operating Instructions
15
Figure 8. Testing Installation RCD

PrimeTest 250+ Operating Instructions
16
Figure 9. Testing Plug Top RCD
PrimeTest 250+ Operating Instructions
17
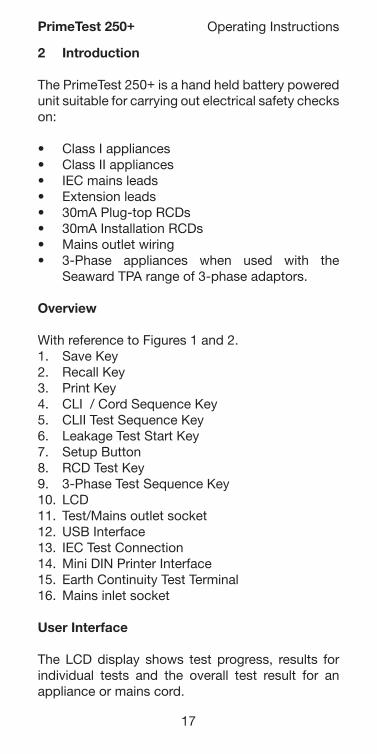
2 Introduction
The PrimeTest 250+ is a hand held battery powered unit suitable for carrying out electrical safety checks on:
• Class I appliances • Class II appliances• IEC mains leads• Extension leads• 30mA Plug-top RCDs• 30mA Installation RCDs• Mains outlet wiring• 3-Phase appliances when used with the Seaward TPA range of 3-phase adaptors. Overview
With reference to Figures 1 and 2.1. Save Key2. Recall Key3. Print Key4. CLI / Cord Sequence Key5. CLII Test Sequence Key6. Leakage Test Start Key7. Setup Button8. RCD Test Key9. 3-Phase Test Sequence Key10. LCD 11. Test/Mains outlet socket12. USB Interface13. IEC Test Connection14. Mini DIN Printer Interface15. Earth Continuity Test Terminal16. Mains inlet socket
User Interface
The LCD display shows test progress, results for individual tests and the overall test result for an appliance or mains cord.

PrimeTest 250+ Operating Instructions
18
Power ON/OFF = press and hold CLI and CLII simultaneously
Class I appliance test = press the CLI key
Class II appliance test = press the CLII key
Cord / extension lead test = press the CLI key
Enter Setup Mode = press the SETUP keyOnce in the setup mode the CLII button can be used to the change the Insulation voltage while the LKGE button can be used to change the ILEAK pass/fail limit. To leave the setup mode press the SETUP button.
30mA RCD test = press the 30mA RCD key
3 phase appliance test = press the 3 phase key
Note: The PrimeTest 250+ will automatically switch OFF after approximately 1 minute if no keys are pressed.
Note: When a key is pressed to initiate a test sequence, the PrimeTest 250+ will compare the type of appliance connected with the test sequence that has been selected, and where possible, will prompt the user if an inappropriate test has been selected.
For example, if an IEC lead is connected between the front panel mains socket and the IEC socket on the end panel and a CLI appliance test is selected, the PrimeTest 250+ will fl ash the Cord test enunciator to indicate that the Cord test is the most appropriate test.

3 Performing Tests
Press CLI and CLII keys simultaneously to switch on the PrimeTest 250+. When the unit is ready the display will be as shown below.
3.1 Checking a mains power outlet
Connect PrimeTest 250+ mains lead to the mains inlet socket and to the power outlet to be tested.
Each time mains voltage is detected, the line-neutral,line-earth and neutral-earth voltages will be displayed for 2s as shown below.
If the voltages are within the acceptable limits shown below, a tick is shown next to the enunciator.
PrimeTest 250+ Operating Instructions
19
195V-253V195V-253V
<30V
LNLENE

PrimeTest 250+ Operating Instructions
20
After 2s the display will return to the start up screen.
If the mains voltage is incorrect then the PrimeTest 250+ will remain in voltage mode until the voltage is corrected or removed.
3.2 Testing a Class I Appliance
• Visually inspect the appliance and mains cord for signs of damage.• If the appliance passes a visual inspection proceed with the electrical tests. • Plug the earth test lead into the Earth Continuity Test Terminal on the PrimeTest 250+ end panel.• Plug the appliance into the PrimeTest 250+ front panel test/mains outlet socket.• Connect the earth test probe to an exposed metal part on the appliance.• If the appliance under test has an ON/OFF switch, make sure it is in the ON position.• Press the CLI test key• The PrimeTest 250+ will now perform a measurement of the protective earth continuity, reverse the test current and repeat the measurement. The highest measured value that occurred during the two tests is displayed. • If the measured value is higher than the factory set pass/fail threshold, the measured value is displayed and the unit indicates a fail result as shown below and the test sequence is halted.

• If the measured value is less than the factory set pass/fail threshold, the measured value is displayed and the unit indicates a pass result, as shown below.
Note: The PrimeTest 250+ can perform a continuous RPE measurement (max 3 minutes). Press and hold the CLI key for approximately 5s until the unit emits a beep and the symbol appears on the display. The PrimeTest 250+ continuously displays the current measured value on the display and stores the maximum value in the memory. By pressing the CLI key again, the measurement is repeated with reversed polarity. Press the key again to terminate the RPE test and display the maximum value of RPE on the display.
• The insulation test voltage is shown momentarily next to the Riso enunciator.
• The unit will proceed with the Insulation and Leakage tests.
Note: The power switch on the appliance under test must be in the ON position to perform an insulation test. If no appliance is detected the PrimeTest 250+ will display the following.
PrimeTest 250+ Operating Instructions
21
PrimeTest 250+ Operating Instructions
22
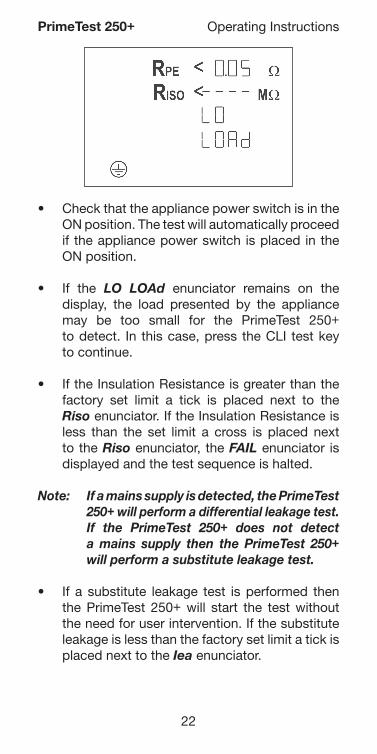
• Check that the appliance power switch is in the ON position. The test will automatically proceed if the appliance power switch is placed in the ON position.
• If the LO LOAd enunciator remains on the display, the load presented by the appliance may be too small for the PrimeTest 250+ to detect. In this case, press the CLI test key to continue.
• If the Insulation Resistance is greater than the factory set limit a tick is placed next to the Riso enunciator. If the Insulation Resistance is less than the set limit a cross is placed next to the Riso enunciator, the FAIL enunciator is displayed and the test sequence is halted.
Note: If a mains supply is detected, the PrimeTest 250+ will perform a differential leakage test. If the PrimeTest 250+ does not detect a mains supply then the PrimeTest 250+ will perform a substitute leakage test.
• If a substitute leakage test is performed then the PrimeTest 250+ will start the test without the need for user intervention. If the substitute leakage is less than the factory set limit a tick is placed next to the Iea enunciator.

• If a differential leakage test is performed then the test PrimeTest 250+ will prompt the user to start the Leakage test by fl ashing the Ileak icon. If no key is pressed the PrimeTest 250+ will timeout and return to the start screen.
Note: If the LKGE key is pressed momentarily the differential test duration is 5s. If the LKGE key is pressed and held for 2s the differential test duration is 2 minutes.
When the duration is set to 2 minutes, the test can be terminated at any time by pressing the LKGE key.
• When the LKGE key is pressed to start the differential leakage test the PrimeTest 250+ will check the incoming mains supply to ensure that the voltages are correct. The enunciators are displayed if there is an error with the connected mains supply:
• If the mains voltage is correct, the PrimeTest 250+ will proceed with the differential leakage test.
PrimeTest 250+ Operating Instructions
23
Mains statusNo mainsEarth fault or Liveand Neutral reverse
LN LE NEFlash Flash OFFOFF Flash Flash

PrimeTest 250+ Operating Instructions
24
• If the Differential Leakage is less than the factory set limit a tick is placed next to the Ileak enunciator.• If all of the tests within the sequence have passed then the PASS enunciator is illuminated.
PrimeTest 250+ Operating Instructions
25
Note: The power switch on the appliance under test must be in the ON position to perform an insulation test. If no appliance is detected the PrimeTest 250+ will display the following.
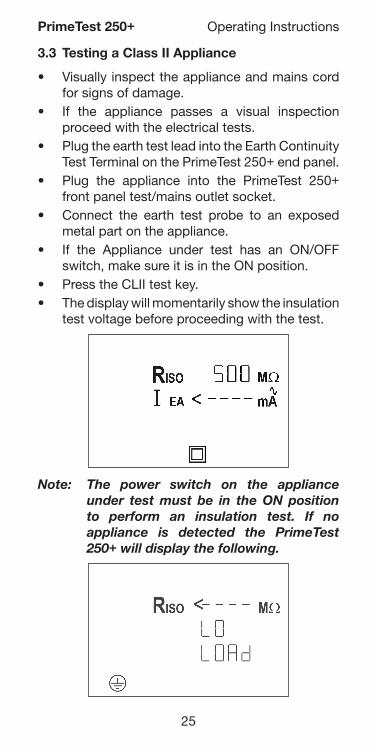
3.3 Testing a Class II Appliance
• Visually inspect the appliance and mains cord for signs of damage.• If the appliance passes a visual inspection proceed with the electrical tests. • Plug the earth test lead into the Earth Continuity Test Terminal on the PrimeTest 250+ end panel.• Plug the appliance into the PrimeTest 250+ front panel test/mains outlet socket.• Connect the earth test probe to an exposed metal part on the appliance.• If the Appliance under test has an ON/OFF switch, make sure it is in the ON position.• Press the CLII test key.• The display will momentarily show the insulation test voltage before proceeding with the test.

PrimeTest 250+ Operating Instructions
26
• Check that the appliance power switch is in the ON position. The test will automatically proceed if the appliance power switch is placed in the ON position.
• If the LO LOAd enunciator remains on the display, the load presented by the appliance may be too small for the PrimeTest 250+ to detect. In this case, press the CLII test key to continue.
• The PrimeTest 250+ will perform an Insulation test. If the Insulation Resistance is greater than the factory set limit a tick is placed next to the Riso enunciator. If the Insulation Resistance is less than the set limit a cross is placed next to the Riso enunciator, the FAIL enunciator is displayed and the test sequence is halted.
Note: If a mains supply is detected, the PrimeTest 250+ will perform a touch leakage test. If the PrimeTest 250+ does not detect a mains supply then the PrimeTest 250+ will perform a substitute leakage test.
• If a Substitute Leakage test is performed then the PrimeTest 250+ will start the test without the need for user intervention. If the Substitute Leakage is less than the factory set limit a tick is placed next to the Iea enunciator.

• If a touch leakage test is performed then the PrimeTest 250+ will prompt the user to start the Leakage test by fl ashing the Ileak icon. If no key is pressed the PrimeTest 250+ will timeout and return to the start screen.
Note: If the LKGE key is pressed momentarily the touch leakage test duration is 5s. If the LKGE key is pressed and held for 2s the touch leakage test duration is 2 minutes.
When the duration is set to 2 minutes, the test can be terminated at any time by pressing the LKGE key.
• When the LKGE key is pressed to start the touch leakage test the PrimeTest 250+ will check the incoming mains supply to ensure that the voltages are correct. The enunciators are displayed if there is an error with the connected mains supply:
• If the mains voltage is correct, the PrimeTest 250+ will proceed with the touch leakage test.
• If the touch leakage is less than the factory set limit a tick is placed next to the Ileak enunciator.
• If all of the tests within the sequence have passed then the PASS enunciator is illuminated.
PrimeTest 250+ Operating Instructions
27
Mains statusNo mainsEarth fault or Liveand Neutral reverse
LN LE NEFlash Flash OFFOFF Flash Flash

PrimeTest 250+ Operating Instructions
28
3.4 Testing a mains cord
• Visually inspect the mains cord and plug for signs of damage.
• Check that the correct fuse is fi tted.
• If the cord passes a visual inspection proceed with the electrical tests.
• Plug the mains cord under test into the IEC socket and the front panel test/mains socket on the PrimeTest 250+.
• Press the CLI test key.
• The PrimeTest 250+ will fi rst test the continuity of the protective earth.
• If the measured value is greater than the factory set limit a cross is placed next to the RPE
enunciator, a FAIL is indicated and the test sequence will be halted.
• If the measured value is less than the factory set limit a tick is placed next the RPE enunciator.
• The unit will proceed with the Insulation test.
• If the Insulation Resistance is lower than the factory set limit a cross is placed next to the Riso enunciator and the test sequence is halted.
• If the Insulation Resistance is greater than the factory set limit a tick is placed next to the Riso enunciator. If the Insulation Resistance is less than the set limit a cross is placed next to the Riso enunciator, the FAIL enunciator is displayed and the test sequence is halted.
• The unit will proceed with the wiring test, checking the live and neutral conductors for short or open circuit and reverse connections
• If the wiring is correct a tick is placed next to the cord enunciator, the GOOd enunciator is illuminated and a PASS is indicated for the sequence.

PrimeTest 250+ Operating Instructions
29
Note: If the tested cord has a wiring fault, one of the following enunciators will be illuminated in place of GOOd
• OPEn indicates that either the live or neutral conductor is broken (open circuit)
• Shor indicates that the live and neutral conductors are shorted together
• CrOS indicates that the live and neutral conductors are reversed
3.5 Testing an extension lead
• Visually inspect the mains cord and plug for signs of damage.
• Check that the correct fuse is fi tted.
• If the cord passes a visual inspection proceed with the electrical tests.
• Plug the supplied 0.5m IEC lead into the IEC socket and into a mains outlet on the extension lead. Plug the mains plug of the extension lead into the front panel mains socket on the PrimeTest 250+.
• The extension lead can now be tested in the same manner as an IEC as described above.

PrimeTest 250+ Operating Instructions
30
3.6 Changing the Insulation Test Voltage
The Insulation test performed in the CLI and CLII test sequences can be changed to 250V for appliances with MOVs which would fail an Insulation test performed at 500V.In order to change the Insulation voltage press theSETUP button to enter setup mode. Once in setup mode press the CLII button, the selected insulation voltage will be displayed next to the Riso enunciator.To leave setup mode press the SETUP button.
3.7 Changing the CLI Leakage limit
The CLI Leakage pass/fail limit can be changed between 0.75mA and 3.5mA. In order to change the Leakage limit press the SETUP button to enter setup mode. Once in setup mode press the LKGE button, the selected pass/fail limit will be displayed next to the Ileak enunciator.To leave setup mode press the SETUP button.
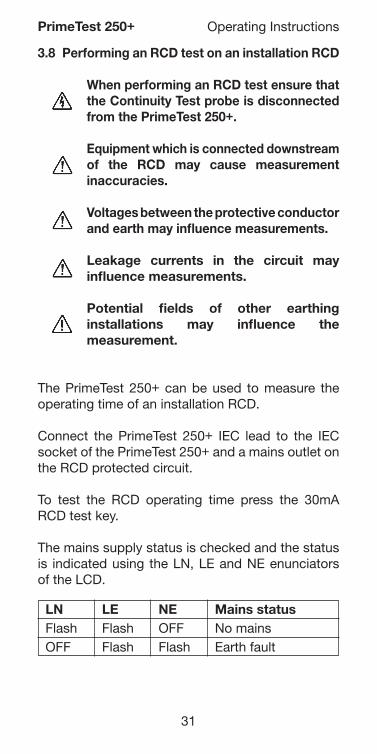
3.8 Performing an RCD test on an installation RCD
When performing an RCD test ensure that the Continuity Test probe is disconnected from the PrimeTest 250+.
Equipment which is connected downstream of the RCD may cause measurement inaccuracies.
Voltages between the protective conductor and earth may infl uence measurements.
Leakage currents in the circuit may infl uence measurements.
Potential fi elds of other earthing installations may infl uence the measurement.
The PrimeTest 250+ can be used to measure the operating time of an installation RCD.
Connect the PrimeTest 250+ IEC lead to the IEC socket of the PrimeTest 250+ and a mains outlet on the RCD protected circuit.
To test the RCD operating time press the 30mA RCD test key.
The mains supply status is checked and the status is indicated using the LN, LE and NE enunciators of the LCD.
PrimeTest 250+ Operating Instructions
31
Mains statusNo mainsEarth fault
LN LE NEFlash Flash OFFOFF Flash Flash

Whenever reSet is displayed on the LCD press the reset button on the RCD.
The PrimeTest 250+ will perform a IΔn (30mA) 0° test, the operating time of the RCD will be shown on the PrimeTest 250+ LCD. If the test passes then the PrimeTest 250+ will perform a IΔn (30mA) 180° test. Aslong as the tests continue to pass the PrimeTest 250+ will continue to test both 0° and 180° at IΔn (30mA).
3.9 Performing an RCD test on a Plug top RCD
The PrimeTest 250+ can be used to measure the operating time of a plug top RCD.
When plugging the mains lead into the PrimeTest 250+ plus ensure that the polarity orientation of the connector is correct. DO NOT FORCE THE PLUG INTO THE CONNECTOR. Doing so may damage the PrimeTest 250+.
When performing an RCD test ensure that the Continuity Test probe is disconnected from the Primetest 250+.
Connect the PrimeTest 250+ mains lead to the mains inlet socket of the PrimeTest 250+ and a mains outlet.
Plug the RCD into the PrimeTest 250+. Plug the supplied IEC lead into the RCD and the PrimeTest 250+ IEC socket.
To test the RCD operating time press the 30mA RCD test key.
The mains supply status is checked and the status is indicated using the LN, LE and NE enunciators of the LCD.
PrimeTest 250+ Operating Instructions
32

PrimeTest 250+ Operating Instructions
33
Mains statusNo mainsEarth fault
LN LE NEFlash Flash OFFOFF Flash Flash
Whenever reSet is displayed on the LCD press the reset button on the RCD.
The PrimeTest 250+ will perform a IΔn (30mA) 0° test, the operating time of the RCD will be shown on the PrimeTest 250+ LCD. If the test passes then the PrimeTest 250+ will perform a IΔn (30mA) 180° test. As long as the tests continue to pass the PrimeTest 250+ will continue to test both 0° and 180° at IΔn (30mA).
3.10 Performing a 3-Phase Sequence
The PrimeTest 250+ can be used to measure RPE
and earth leakage current on 3 phase equipment when used with the optional 3 phase adaptor accessory.
• Visually inspect the appliance and mains cord for signs of damage.
• If the appliance passes a visual inspection proceed with the electrical tests.
• Refer to the documentation supplied with the 3 phase adaptor and connect the adaptor in line with the 3 phase equipment under test.
• Connect the 3 phase adaptor test lead to the mains input socket 9 (refer to fi gure 2) on the PrimeTest 250+.
• Connect the RPE test probe to an exposed conductive part on the 3 phase equipment.
• Press the 3 phase key on the PrimeTest 250+ to being the test.
• If there is a contact voltage present on the conductive parts of the equipment under test, the test is terminated and a Volt on test Probe warning message is shown on the display.

PrimeTest 250+ Operating Instructions
34
• Otherwise, the PrimeTest 250+ will proceed with the RPE measurement, reverse the test current and then repeat the measurement. The highest measured value that occurred during the two tests is displayed for approximately 2s.
Note: There is no factory programmed test limit for the 3 phase RPE measurement and so no tick or cross is displayed.
• The PrimeTest 250+ will then display the current fl owing in the protective conductor of the 3 phase supply.
• The 3-Phase leakage test will run for 30 seconds but can be stopped earlier by pressing the 3-Phase button.
Note: If the 3-Phase key is pressed while no adaptor is connected to the PrimeTest 250+ then a warning message PLUG IN 3 PH ADPTR will be displayed.

PrimeTest 250+ Operating Instructions
35
4 Memory & Print Functions
The PrimeTest 250+ can store the results for a maximum of 999 appliances.
4.1 Saving Test Results
In order to store a test result press the STORE Key when the test sequence has been completed. The results displayed on the LCD will be recorded in memory. Once the results for a test sequence have been recorded the STORE Key is disabled until another test sequence has been performed.
4.2 Viewing Test Results
When the PrimeTest 250+ is waiting to start a new test sequence press the RECALL Key, this will display the last recorded results. Other results can be displayed by scrolling through the memory. To scroll through the memory use the RECALL and STORE Keys. Pressing any other Key or waitingfor 10 seconds will return the PrimeTest 250+ into test mode.
4.3 Deleting Test Results
To delete all of the results in memory press and hold the STORE and RECALL keys together while displaying the recalled results until the counter reaches zero.

PrimeTest 250+ Operating Instructions
36
4.4 Transferring Test Results
Test data can be transferred to a PC using the Datalogger on the provided PT250+ Support CD. Insert the CD into your disc drive and then view the InstallationInstructions.txt fi le for information on how to install. Once the USB drivers and Datalogger are installed you can open the Datalogger program from your desktop. Connect your device to the PC using a USB connector. (The very fi rst time you do this, your PC will automatically install a COM port driver). You can check which COM port is being used by looking in the Device manager. E.g.: Silicon Labs CP210x USB to UART Bridge(COM14)Select the correct COM port.Click on Download. A progress bar will appear.On the PrimeTest 250+ in order to transfer the entire test storage area to PC press and hold the RECALL key for 5 seconds. The data will be transmitted using the USB interface.When all data has been captured and stored the progress bar will disappear and you will be asked where to save the data.Once the fi le is saved you may click the “Open” button to open the document with default application.For example, if you saved the fi le in .csv format (the default) then it may open using a spreadsheet application.
4.5 Printing Test Results
In order to print a test label press the PRINT Key when the test sequence has been completed or when the test result is being reviewed. The printer must be attached before the PRINT Key is pressed.In order to save power the PrimeTest 250+ will turn the printer on and off when required.

PrimeTest 250+ Operating Instructions
37
4.6 Setting the Real Time Clock
Setting time and date: Ensure that the PrimeTest 250+ is powered off. Press and hold the RECALL key and then press simultaneously the class I and class II keys to power on the tester.The date format and time format is shown as follows: MM.DD = month (1-12). Day (1-31) YYYY = year HH.mm = hours (0-23).minutes (0-59) SS = seconds (0-59)Press the class I key to select a date fi eld and time fi eld.A fl ashing digit shows that this fi eld can be set.The save key and recall key are used to increase or decrease the value in each fi eld, the second fi eld is set to zero.Turn off the device to save the setting.

PrimeTest 250+ Operating Instructions
38
5 Specifi cation
Earth Continuity Display Range 0.01ohms to 19.99ohms Measuring Range 0.05ohms to 19.99ohms Accuracy ± (5% + 2 digits) Test current 200mA minimum Test voltage 6V nominal
Insulation resistance Display Range 0.01Mohms to 19.99Mohms Measuring Range 0.10Mohms to 19.99Mohms Accuracy ± (5% + 2 digits) Test voltage 250V / 500V Test current >1mA Test current <2mA into 2k
Substitute Leakage Current Display Range 0.10mA to 19.99mA Measuring Range 0.25mA to 19mA Accuracy ± (5% + 2 digits) Test voltage 40V rms, 50Hz AC Test current <10mA into 2k
Differential Leakage Current Display Range 0.15mA to 19.99mA Measuring Range 0.25mA to 19mA Accuracy ± (5% + 2 digits) Test voltage mains voltage, 50Hz AC
Touch Leakage Current Display Range 0.10mA to 3.5mA Measuring Range 0.10mA to 1.99mA Accuracy ± (5% + 2 digits) Test voltage mains voltage, 50Hz AC
3-Phase Leakage Current Display Range 0.10mA to 9.99mA Measuring Range 0.25mA to 9.99mA Accuracy ± (5% + 2 digits) Test voltage mains voltage, 50Hz AC

PrimeTest 250+ Operating Instructions
39
EarthContinuity
Insulation Resistance Leakage
Class IClass IICord3-Phase
0.2 ohmsn/a0.2 ohms0.2 ohms
1.0Mohm2.0Mohm1.0Mohm1.0Mohm
0.75 / 3.50.25mAn/a3.5mA
Cord Test Earth continuity, insulation resistance as above. Check for Live and Neutral open circuit, short circuit or reversed polarity.
RCD Test Display Range IΔn - 0ms to 500ms 5IΔn – 0ms to 40ms Measuring Range IΔn - 10ms to 500ms 5IΔn – 10ms to 40ms Accuracy ± 2ms Test Current IΔn – 30mA 5IΔn – 150mA Current Accuracy -0, +10%
Factory Set Pass/Fail limits
Environmental rating IP Rating IP40Operating temperature range 0°C to 40°C, without moisture condensation.Storage temperature range –25° to 65°. Note: Batteries should be removed prior to storage.Overvoltage category 300V CAT II

PrimeTest 250+ Operating Instructions
40
6 Maintenance
Clean only with a dry cloth; do not use solvents.Before use, ensure unit is clean and dry; visually inspect all leads, connectors, and case. Any damage or wear must be rectifi ed to preserve user safety.
Check the battery contacts and compartment are free of electrolytic contamination.Any contamination of the battery contacts or compartment should be cleaned with a dry cloth.
Note: The PrimeTest 250+ contains no user serviceable parts. If an Error warning should appear on the display please contact the manufacturer or an authorised Seaward Service Agent for advise.
7 Battery Check
The PrimeTest 250+ is powered from 6 AA cells which are checked before a test is performed. Whenthe battery voltage is low the enunciatoris illuminated. The unit will continue to perform within specifi cation for a limited number of tests, dependent upon the type of the batteries fi tted.
When the battery voltage reaches a level where theperformance is affected the enunciator willfl ash and all test keys are disabled. The batteries must be replaced.
PrimeTest 250+ Operating Instructions
41
7.1 Battery Replacement
Before opening the PrimeTest 250+ ensure that all test leads are disconnected.
• Switch off the unit by pressing and holding the CLI and CLII keys.
• Disconnect all leads from the PrimeTest 250+.
• Place the PrimeTest 250+ face down and release the captive screw in the battery compartment cover.
• Remove the battery compartment cover and remove the discharged batteries.
• Insert the replacement batteries into the battery compartment ensuring that the battery polarity matches the marking on the inside of the battery compartment.
• Relocate the battery cover over the battery compartment and fasten in position with the battery cover captive screw.

PrimeTest 250+ Operating Instructions
42
Part Number27B114Replacement F16A 250V Fuse
8 Fuse Replacement
Before opening the PrimeTest 250+ ensure that all test leads are disconnected.
• Switch off the unit by pressing and holding the CLI and CLII keys.
• Disconnect all leads from the PrimeTest 250+.
• Place the PrimeTest 250+ face down and release the captive screw in the battery compartment cover.
• Remove the battery compartment cover and remove the discharged batteries.
• Insert the replacement fuse into the fuse compartment ensuring that the fuse snaps into place.
• Relocate the battery cover over the battery compartment and fasten in position with the battery cover captive screw.

PrimeTest 250+ Operating Instructions
43
9 Service and Calibration
To maintain the specifi ed accuracy of the measurement results, the instrument must be recalibrated at regular intervals by either the manufacturer or an authorised service agent. We recommend a recalibration period of one year. For help or advice on Service and Calibration contact:
Service DepartmentSeaward Electronic Ltd11 Bracken HillSouth West Industrial EstatePeterleeCo. DurhamSR8 2LSUnited Kingdom
Email: [email protected]: +44 (0) 191 587 8739Fax: +44 (0) 191 518 4666

PrimeTest 250+ Operating Instructions
44


PRIMETEST 50
Operating Instructions
PRIMETEST 250+
Operating Instructions
PRIMETEST