prince of persia forgotten sand - بازی سنتر · prince of persia: the forgotten sands...
TRANSCRIPT

Prince of Persia: The Forgotten Sands Guide
by Thomas Hindmarch
The Prince is back. We've got a complete walkthrough for his adventure packed with video clips to demonstrate how to complete the game's myriad daunting platforming challenges. Defeat every boss and find all hidden sarcophagi (sarcophaguses?). Like a prince.
Prince of Persia: The Forgotten Sands Guide Contents
Game Walkthrough
Sarcophagi Locations
Achievements / Trophies Guide
© 2010, IGN Entertainment, Inc. May not be sold, distributed, transmitted, displayed, published or broadcast, in whole or part, without IGN's express permission. You
may not alter or remove any trademark, copyright or other notice from copies of the content. All rights reserved.
»
Page 1 of 34© 2010 IGN Entertainment, Inc.
Prince of Persia: The Forgotten Sands Guide Contents
Introduction
Walkthrough
Sarcophagi Locations
Achievements / Trophies Tips
Prince of Persia: The Forgotten Sands Walkthrough
The Forgotten Sands has a lot of relatively seamless in-game tutorials, so an introductory portion of this walkthrough is a bit redundant. It teaches you just about anything you need to know.
If you change the difficulty during the game from Normal to Easy, you earn a bronze trophy/five-point Achievement, Our Little Secret. On Easy mode, all traps and enemies do substantially less damage, and the timing is a bit more forgiving on some of the obstacles throughout the game. It takes a lot of work to die in combat on Easy mode, but the platforming is just about the same.
The Ramparts walkthrough
The Fortress walkthrough
The Treasure Vaults walkthrough
The Stables walkthrough
The Works walkthrough
The Fortress Courtyard walkthrough
The Fortress Gates walkthrough
The Prison walkthrough
The Sewer walkthrough
The Baths walkthrough
The Royal Chambers walkthrough
The Observatory walkthrough
The Throne Room walkthrough
The Terrace walkthrough
The Rooftop Gardens walkthrough
»
»
»
»
= The Ramparts The Fortress The Treasure Vaults The Stables The Works »
Page 2 of 34© 2010 IGN Entertainment, Inc.
The Aqueducts walkthrough
King Solomon's Tomb walkthrough
Ruins of Rekem walkthrough
Throne Room of Rekem walkthrough
The Sacred Fountain walkthrough
Rekem Reservoir walkthrough
Solomon's Hall walkthrough
King's Tower walkthrough
The Palace walkthrough
The Final Climb walkthrough
The Ramparts
For the most part, this is a self-explanatory tutorial mode. It's difficult, albeit possible, to die, and serves to introduce you to the game's mechanics. Take the time to get used to how the controls work.
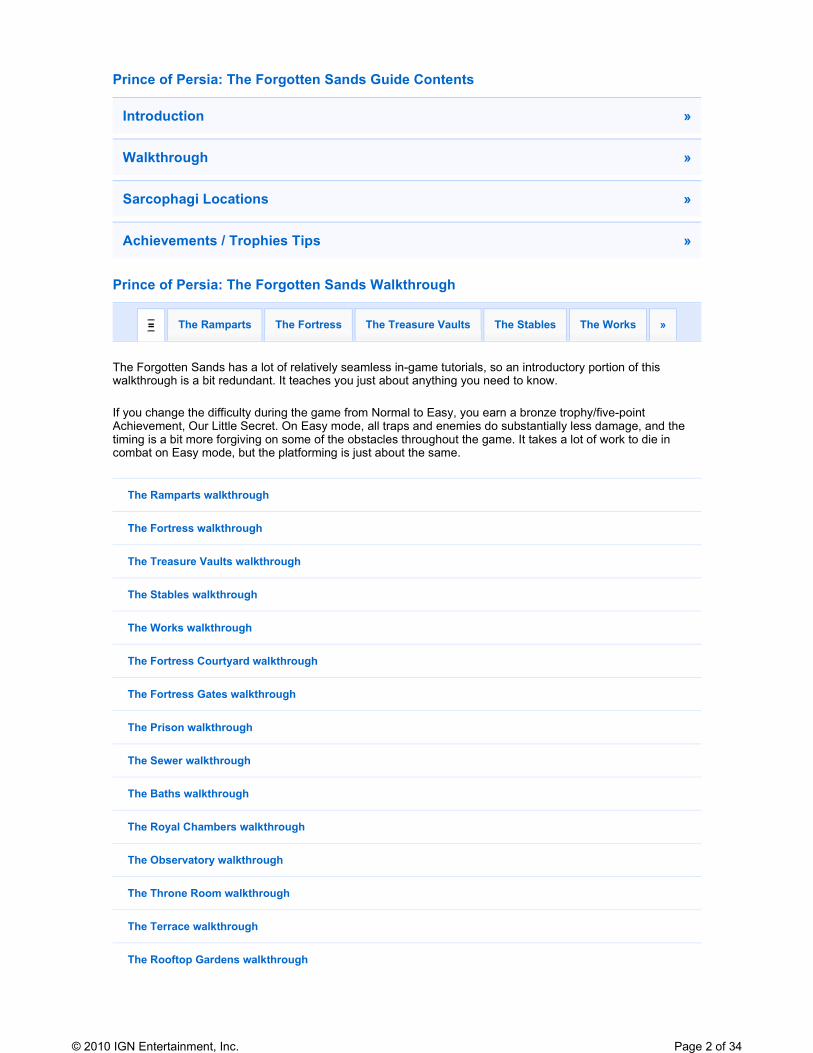
Run forward, ignoring the artillery strike, and jump the gap. Defeat the two soldiers, and starting here, adopt a policy of thorough vandalism. Any urn, barrel, crate, or vase you see may hold life or energy power-ups, so destroy it as a matter of course.
Climb up the nearby wall and follow the path, defeating a mob of soldiers and using the ledge to work your way around the edge of the courtyard. Wall-run off the ledge at the end and defeat another mob of soldiers, using your kick and dodge abilities to keep yourself safe. You'll be vastly outnumbered in the majority of the fights you get into for the rest of the game, so get used to it now.
Wall-run across the gap in the battlement, then smash the vases that are blocking the doorway. Use the indicated ledges to climb up the wall, then leap from ledge to ledge and shimmy across the wall to the next area.
Use the ledge and the banner to descend down a floor, then wall-run to the next set of ledges and slide down the banner. Finally, wall-run and leap to the ledge across the room, and leap to the banner to descend to
= The Ramparts The Fortress The Treasure Vaults The Stables The Works »
Page 3 of 34© 2010 IGN Entertainment, Inc.
ground level. Step on the switch to let a bunch of soldiers into the room, then either defeat them or simply roll underneath the door as it closes.
Wall-run to the next ledge and jump off to the next area. Wall-run to the right-hand ledge and leap across the wall, then shimmy forward and wall-run to the next landing. Finally, wall-run to the switch on the left-hand wall and leap once you've hit it to open the next gate. Run underneath it before it closes.
The Fortress
Walk across the balance beams, then use the banner to descend. Defeat the soldiers, then use the ledges to reach the overhead beam. Walk along it to the wrought-iron gate and climb up to its top, then leap from beam to beam to reach the gate on the other side of the courtyard. Descend via banner and defeat another group of soldiers.
Climb the wall as indicated and wall-run over the switch to raise a gate. This is only here to give you a surface you can run on, allowing you to cross the gap to the next landing. Wall-run to the beam and leap up to the ledge, shimmying around it to reach the climbing stones atop the archway. Cross to the other side via wall-run, then drop down to the top of the gate and run across to the climbing stones. Descend to the ground floor, then roll through the drainage hole.
Defeat the soldiers and climb up to the balcony overlooking the area. Run up the wall to the ledges, then use a series of climbing stones and wall-runs to ascend back up to the floor above you. Once there, wall-run and leap to the beam, then cross to the climbing stones and scale down the wall to the next landing.
Leap across the beams to the other side of the courtyard, ignoring the shower of arrows and general aura of imminent destruction going on. Wall-run to the next beam and climb the wall to the next ledge. You've finally caught up to Malik, and have earned the Achievement/trophy A Warm Welcome (Bronze/20G).
As Malik requested, hit the three switches to open the gate's locking mechanism. The first two are easy enough to hit; simply run along the nearby beams and wall-run up to bounce off the switch. Activate the first two to raise the cage that protects the third, then run and leap from beam to beam to reach it.
After the cutscene, run towards the camera and turn left - your left, not the Prince's left - to find a beam that projects towards a ledge. Shimmy along that ledge to reach some climbing stones, then descend to the next landing and wall-run to the next. Move into the building and wall-run, then leap to some climbing stones. Wall-run and leap again to reach the next landing, where a couple of soldiers with shields are waiting for you; kick them to make them drop their guard, then finish them off with normal attacks.
Run up the wall and hit the switch to temporarily open a nearby gate. Run through to face a bunch of soldiers, two of whom are using shields. Defeat them, then hit the lone switch on the wall to open the next gate. Run quickly to get underneath it before it closes again, then use wall-running and the patch of climbing stones on the right wall to navigate the next hallway.
Now you get to meet another old friend: pillars. Climb the closest one and leap to the next to reach the balcony, where a cutscene plays.
Use the pillars to cross the room to the balcony across the way, where you'll fight another group of soldiers. Once they're dispatched, leap from pillar to pillar until you reach a banner you can slide down to safely reach the floor with. Take out the soldiers on the staircase ahead of you, then scale the climbing rocks to the left of the vault door.
From your position on the wall, leap to the nearest pillar, then jump from one to another to reach the balcony. From here, you can use the flagpoles to reach the hole in the wall.
= The Ramparts The Fortress The Treasure Vaults The Stables The Works »
Page 4 of 34© 2010 IGN Entertainment, Inc.
The Treasure Vaults
As the Prince narrates, leap off the end of the broken beam and hold R2/RT in midair to run up the wall as you reach it. Drop off the ledge, then run up the wall opposite the flagpoles and swing from one to the next to reach the hole in the gate.
Leap to the next flagpole and press R2/RT in midair again to wall-run to the edge of the platform, then triangle-jump up the walls. Using R2/RT in this game will make the Prince run up the wall for a short distance every time he touches it, which makes triangle-jumping a lot less difficult than it was in Sands of Time. (This move tends to baffle a lot of returning Sands of Time players, but it makes a lot of otherwise difficult vertical climbs much easier than they'd be otherwise.)
Use the same technique to wall-run, jump, and scale the wall to the next ledge. Inside the vault, defeat a group of soldiers, then use the pillars and flagpoles to scale the room to the gate well overhead. You've reached the inner treasure vault, and unlocked the Solomon's Army trophy/Achievement (Bronze/20).
Use a series of jumps and wall-runs to get down the hallway as it collapses, then enter the strange gate. Here is where you'll meet Queen Razia and receive your first ability, the Power of Time.
(There are also several vases you can break scattered around Razia's realm, but they do not regenerate between visits. Go ahead and smash them if you're low on health, but don't just break them for the sake of breaking them. You may wind up needing the life later on.)
When you return to the castle, be very careful as you cross the next hall; a lot of the obstacles are there specifically to "teach" you how to use the Power of Time. Parts of the floor will drop away as you cross them, in a manner that could best be described as "cheap." Fortunately, the rest of the game doesn't make a habit of this.
The Stables
Here's when you get to make your first acquaintance with the skeletons, the basic-issue troops of King Solomon's army, as well as Forgotten Sands's experience system. This guide strongly recommends that you fully max out your health and energy meters before doing much else, then grabbing Whirlwind and crossing over to get Battle Rage.
Skeletons have a habit of holding up their swords very slowly before actually attacking with them, but they only show up in groups of a dozen or more. Dodge out of the center of the group before attacking, then plow into them with power attacks.
Use the side of the stable gate to leap to the flagpoles along the side of the room, then leap up onto the balcony with the closed gate. Wall-run from ledge to ledge, then jump from pillar to pillar until you can reach the overhead switch. Pull it to permanently open the exit gate. From there, just drop back down to the floor and head back the way you came.
Roll underneath the gate to find a couple of the swinging traps. Depending on your individual skills, you can get past these by either running in as they swing back and rolling underneath them, or jumping over them as they swing towards you and rolling past them. Either way, they're the trickiest traps in the game, so don't be surprised if you take a hit or two before you get the hang of them.
Smash the urns for any health you might need, then dispatch another mob of skeletons. Once they're done,
= The Ramparts The Fortress The Treasure Vaults The Stables The Works »
= The Ramparts The Fortress The Treasure Vaults The Stables The Works »
Page 5 of 34© 2010 IGN Entertainment, Inc.
use the nearby wall to reach the flagpole by the wall, which is actually a switch that activates the next series of obstacles.
Wall-run up to the flagpole you just activated, then turn around and flip up to the ledge overhead. Shimmy over to the right a bit, then run up and jump to the next flagpole, and then the three beyond that, to get to the ledges above the door.
Run off the last ledge to the brickwork and climb up, then jump to the broken beams in the ceiling. Use the beams and overhead flagpoles to cross the room, then use either of the banners to reach the balcony safely.
The next hallway marks the first appearance of the time-honored swinging axe trap, which is dealt with here in the same way it's always been dealt with: run like hell.
In the next room, crank the lever 270 degrees clockwise from its starting position to rotate in a vertical platform close to the entry door, then use the nearby flagpole to swing to and run up to its top. Leap to the switch and pull it to reveal a large column, then descend using the nearby banner.
Crank the lever back about 180 degrees to get another vertical platform in place, this one on the opposite side of the latticework. Triangle-jump up between the new platform and the wall to reach the beam overhead, then leap to the switch and drop down with the banner. Skeletons will punch their way in about now. Destroy them, then triangle-jump up to the next ledge using the two columns you just caused to appear.
The next room holds the first sarcophagus in the game, which is practically given to you. Destroy it, then outwit a series of axe traps.
After you speak to Malik, drop down via the banner, then wall-run and jump to the flagpole to activate a pillar. Use it to cross the gap and pull another flagpole, raising another pillar. Wall-run to the switch, leap off, and quick-jump back across both pillars to reach the gate before it closes.
The Works
This is a fairly simple series of jumps and climbs, complicated by the gears and moving parts of the walls. Wait for the first wall to retract, then wall-run to the next landing. Wait for the counterweight to descend, then wall-run across it and jump. From here, leap to the ledge and wall-run through the gear, then run across the two descending counterweights and climb up the wall.
Grab the ledge, then shimmy right and wall-run through the two gears as they spin to an open position. Shimmy across the ledge to its end, then wait for the wall to retract and wall-run to the ledge. When the wall pushes back out, use it to reach the column and leap to the ledge on the other side of the room. Use the series of flagpoles to swing over to and through the rotating gear, then flip onto the banner and slide down it to the balcony.
Use the broken beam in the next area to reach the center platform. Rotate the lever ninety degrees, so its broken beam points to the beam attached to the side balcony. Wall-run past the moving sawblade, then jump over the rotating blade trap and climb up to the ledge on the wall. Wait for the spikes to rotate away, then wall-run up the flat side of the tower and jump to the next ledge. Run past another sawblade, then run up the closed door and leap to pull the switch. This raises the center platform.
Flip to the center platform and rotate it 180 degrees to reach the next leg of the trip. Leap over the broken beam and wall-run past another sawblade, then leap over the blade trap to the next landing. Run up the wall from ledge to ledge as the spikes rotate away, then jump across the gap to the next ledge and evade another sawblade. Wall-run and jump to the next switch.
Flip onto the center platform once again and point the broken beam at the wall switch. Use the beam to reach it, then run up the wall to the switch and jump back to the center platform. Quickly rotate the center platform so the beam points at the gate you just opened, then run through it before it closes.
= The Ramparts The Fortress The Treasure Vaults The Stables The Works »
Page 6 of 34© 2010 IGN Entertainment, Inc.
The next room involves a giant gear. Turn the lever nearest you ninety degrees to rotate a flagpole into position, then leap from it to the beam on the gear to the next flagpole. This allows you to reach a switch on the far side of the room, which raises a platform back the way you came.
Use the poles and beams to reach the next lever, and rotate it ninety degrees to raise what looks like a drill bit in the center of the room. Use the nearby flagpoles and banner to return to your starting position, then rotate the first lever ninety degrees to lower a column that attaches to the drill bit. Now, using the platform you lowered with the switch earlier, return to the platform with the second lever and use the flagpole to reach the beam, from which you can jump to the column. Jump from it to the beam on the right-hand gear, then swing onto the balcony and defeat the skeletons.
From here, evade a series of rotating blade traps and you're home free.
The Fortress Courtyard
Your first challenge is a mob of skeletons, backed up by several stronger members of Solomon's Army. A Power Attack will knock the larger soldiers off-balance for a second, allowing you to quickly finish them off.
Once they're done, wall-run and jump to reach the flagpole overhead, then jump from flagpole to flagpole to reach the ledge. Evade the sawblades and use the columns and flagpoles to reach the balcony well above.
Run past the sawblades and leap to the columns, then defeat the enemies and roll underneath the rolling blade trap. Wall-run past another pair of sawblades, then wall-run past the sawblade and leap to the beam. Use the banner to reach the floor safely, then look to your left; the second sacophagus is in plain sight, right underneath the switch you need to hit.
Destroy the sarcophagus and hit the switch, then backtrack to the balcony and wall-run to the next landing. From there, wall-run to the switch and jump to the flagpole. Quickly flip over to the balcony and roll underneath the gate before it closes.
In the next area, the Titan below you will cause a number of the walkways to collapse. Fortunately, you can rewind time, and you may need to several times. Either way, preemptively wall-run to avoid the collapsing floor, then defeat the group of enemies by the closed gate. Bounce off the wall to pull the switch and open it, then wall-run over another collapsing floor and evade a couple of sawblade traps. Run to the switch on the wall and jump off of it, then roll as you hit the ground and run through the gate before it shuts.
A collapsing balcony in the next room serves as your formal introduction to the Titan, which is essentially a giant demon bull. Let it charge and take out the skeletons that spawn alongside it, then dodge out of the way. When it hits a wall and stuns itself, come in from behind with a Power Attack and a series of slashes to whittle away at its health.
When the Titan dies, it shatters a gate that was covering a wall switch. Run up the wall to hit the switch, then press jump at the last moment to leap to the next wall. Keep holding the wall-run button and the Prince will run up the wall upon making contact, allowing you to do a higher triangle jump and reach the next ledge.
From here, wall-run and jump to one of the broken pillars, then leap from pillar to pillar to the broken beam. Jump and wall-run up to the balcony, then wall-run and jump to the overhead switch. From it, flip from flagpole to flagpole to reach the next balcony.
Another old-school Prince of Persia trap manifests here, as the next hall is lined with pressure-sensitive spikes. Simply run straight across them to get through without injury, as you'll take a hit if you hesitate for even a second. Defeat a group of sand warriors halfway through, then run through the next set of traps. While you're at it, though, keep an eye out below you for the third sarcophagus, which you can reach by dropping down from one of the ledges near the end.
In the next area, turn the lever ninety degrees, then activate the switch to rotate the gear, moving a platform
« The Fortress Courtyard The Fortress Gates The Prison The Sewer »
Page 7 of 34© 2010 IGN Entertainment, Inc.

towards your position. Leap onto the platform and let it carry you across the room, then wall-run up to the next balcony.
Here, the left lever rotates the L-shaped piece on the wall, while the right lever moves the topmost gear along its track. Rotate the L-shaped piece twice, moving it out of the track entirely, then move the gear to the end of the track. Rotate the L-shaped piece again so it blocks the track, then move the right-hand lever to spin the mobile gear. This removes the blockage from the largest gear, allowing you to press the switch on the floor.
Now leap to the climbing stones across the gap and wall-run left. Leap onto the platform, and the Prince's weight will rotate the gear, propelling you towards the next ledge. Jump and wall-run up to the exit.
The Fortress Gates
To close the drawbridge, you must solve a puzzle involving the bridge's locking mechanism.
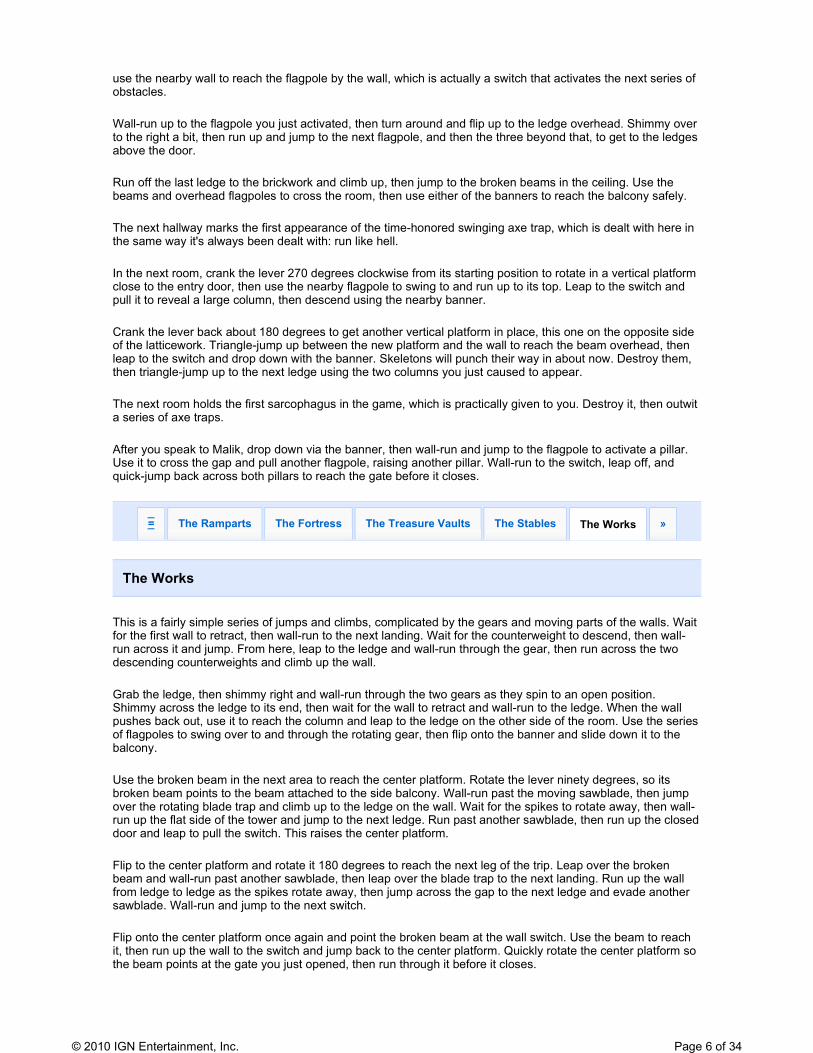
The left-hand lever spins the gear all the way on the bottom right, moving it along its track. The middle lever spins the left and middle L-shaped pieces ninety degrees. The right-hand lever spins the middle and right L-shaped pieces ninety degrees.
You must get the gear all the way to the other end of the track to close the fortress's drawbridge. The trick to this puzzle is that what may look like the obvious solution - using the right lever to adjust the middle L-shaped piece's rotation so you can rotate all three of them out of the way at once - doesn't work. You can't solve this all at once, and must instead take it one step at a time.
1. Turn the right lever ninety degrees clockwise, rotating the right L-shaped piece off the track.
2. Now send the gear along the track as far as it'll go with the left lever
3. Turn the right lever another ninety degrees clockwise.
4. Push the gear along the track again.
5. Pull the right lever ninety degrees counterclockwise
6. Push the gear again, as far as it'll go.
« The Fortress Courtyard The Fortress Gates The Prison The Sewer »
Page 8 of 34© 2010 IGN Entertainment, Inc.
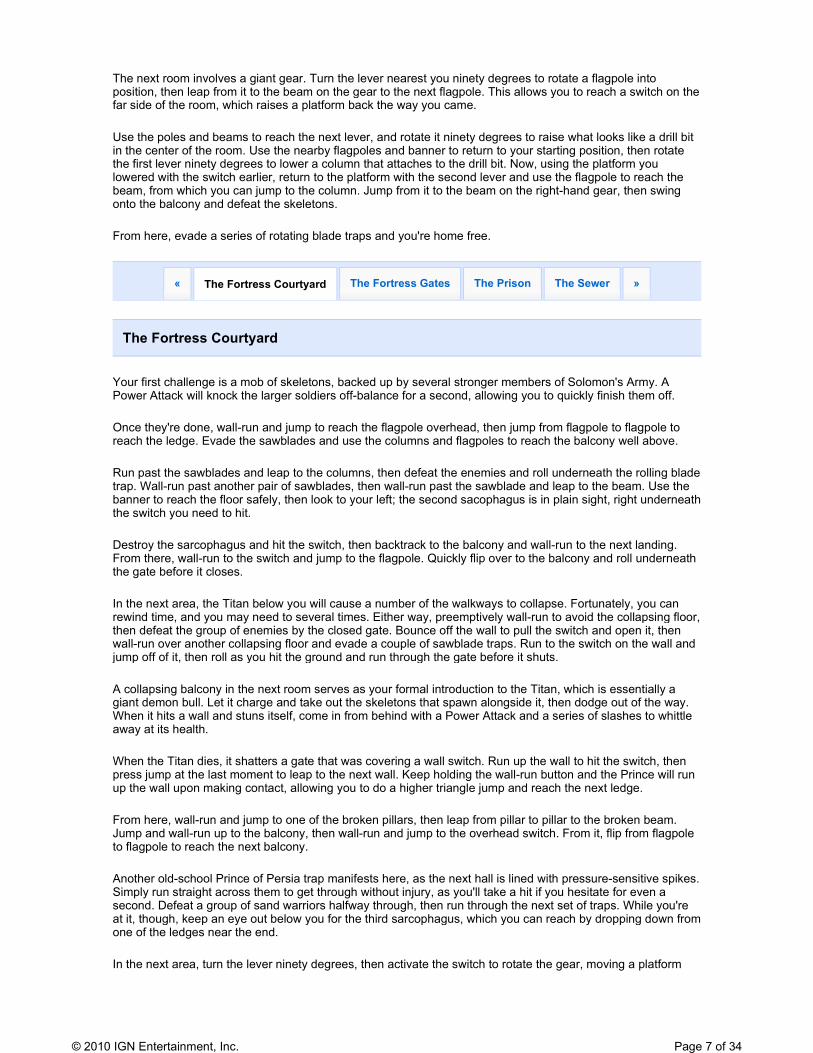
7. Pull the middle lever ninety degrees counterclockwise.
8. Push the right lever ninety degrees clockwise.
9. Push the middle lever ninety degrees counterclockwise. This should rotate both L-shaped levers on the top track into the center of the device, clearing the gear's path on the track.
10. Turn the left lever as far as it'll go.
12. Turn the middle lever another ninety degrees counterclockwise to clear the rest of the gear's path down the track.
13. Another turn of the left lever should complete this puzzle.
Leap to the platform on the gear, then jump onto the wall next to it. Scale the wall until you can wall-run to the switch, then bounce off the switch to grab the flagpole and flip onto the platform. As before, your impact rotates the large gear, spurring a cutscene. This also unlocks the "Just us and them" trophy/Achievement.
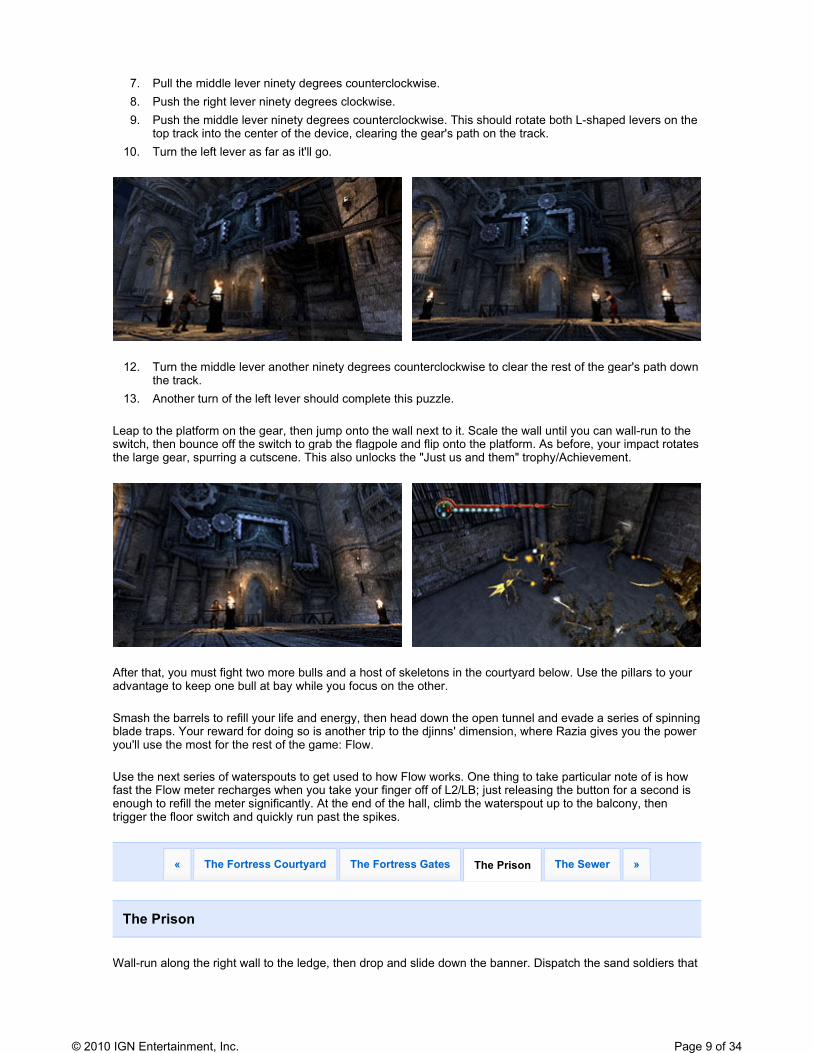
After that, you must fight two more bulls and a host of skeletons in the courtyard below. Use the pillars to your advantage to keep one bull at bay while you focus on the other.
Smash the barrels to refill your life and energy, then head down the open tunnel and evade a series of spinning blade traps. Your reward for doing so is another trip to the djinns' dimension, where Razia gives you the power you'll use the most for the rest of the game: Flow.
Use the next series of waterspouts to get used to how Flow works. One thing to take particular note of is how fast the Flow meter recharges when you take your finger off of L2/LB; just releasing the button for a second is enough to refill the meter significantly. At the end of the hall, climb the waterspout up to the balcony, then trigger the floor switch and quickly run past the spikes.
The Prison
Wall-run along the right wall to the ledge, then drop and slide down the banner. Dispatch the sand soldiers that
« The Fortress Courtyard The Fortress Gates The Prison The Sewer »
Page 9 of 34© 2010 IGN Entertainment, Inc.
ambush you, then use the lone column to climb up and jump to the nearby ledge.
Wall-run right and leap to the flagpole, then freeze the water jet and swing over to the broken beam. From there, cross the room by leaping from column to column to the beam, then freeze the water jet and swing across the beams to the ledge.
Wall-run off the ledge to the next flagpole, swing onto the water jet, and run up the wall to the balcony. You're halfway home.
Climb up to the ledge and shimmy over to the climbing stones, then leap off to pull the overhead switch. Flip off the switch onto the ledge and follow it around the edge of the room, then wall-run and leap off onto the column. Use it and the water columns you activated just now to reach the suspended cells, but hurry; you only have a limited time before each cell collapses under the Prince's weight.
Leap from cell to cell, using them and the water columns to cross the room before using the banner to slide down to ground level. Overcome another pack of sand creatures, then use the wall switch next to the banner to activate a nearby platform.
That platform stays in existence just long enough to allow you to reach a nearby switch, which activates a water jet. That's enough to get you to the two switches on the room's central support column, which summons a few monsters and starts up a series of water jets on the other side of the room.
Use the water jet to propel yourself far enough up the wall to reach the ledges above the door, then leap from beam to pole to column until you can pull the second switch on the support column. This turns on most of the rest of the water jets in the room, which allows you to reach the Prison's exit.
Before you leave, though, there's a sarcophagus hidden just past the timed gate, up a climbable wall. Be sure to grab it while you're here.
Get through another gauntlet of various traps and you've escaped the Prison.
The Sewer
...one could argue that this is not an improvement.
Freeze the two waterfalls with the Flow and triangle-jump up to the overhead waterway. Grab the ledge, then wall-run past the sawblade traps and freeze the waterfall to get across the mouths of the sewer tunnel. A final water jet lets you flip onto the broken beam and exit the area.
This next chamber is your introduction to a frequent headache for the rest of the game. Some of the water columns reduce their flow at predictable intervals, to the point where they're not thick enough for you to grab onto them.
Use the columns to cross the room to the balance beam, but take a look above you. There's a very well-hidden sarcophagus above you. Climb the next column as high up as you can and take a blind leap towards the camera. When the Prince lands on a hidden beam, you'll be face-to-face with the sarcophagus.
Drop back down to the lower beam, then continue along the tunnel. In the next large room, you'll have your first encounter with the wizards, who are a frequent pain in the neck for the rest of the game. They themselves can throw fireballs or unleash a short-ranged force wave to knock you flying, and can actually punt the Prince over a ledge if you don't watch your positioning.
The wizard's more dangerous power, however, is the ability to summon a theoretically infinite number of other enemies. While they aren't hard to beat, and can easily be dispatched by kicking them over and stabbing them while they're prone, they're very good at hiding behind a bunch of cannon-fodder monsters. The monsters they summon are never worth any experience, but they count as enemies for various Achievements (i.e. Sand
« The Fortress Courtyard The Fortress Gates The Prison The Sewer »
Page 10 of 34© 2010 IGN Entertainment, Inc.
Nemesis, Death from Above).
With them defeated, triangle-jump up to the indicated lever and turn it counterclockwise, activating a bunch of water jets on the far wall. Use them as parallel bars to reach and pull the switch that opens the gate.
Return to the lever and turn it clockwise to activate a pair of water columns in the middle of the room; freeze them and use them to reach the open gate.
Use the rough stones on the sides of the tunnel to reach its end, then leap down into the next room for another fight with a sand wizard and its posse. Run up the closed door and leap to grab the overhead switch, which activates another pair of water columns. Run up one of the walls and leap to grab them, then use them to reach the lever in the alcove. Turn it ninety degrees to rotate the mechanism that the water columns are emerging from, then leap from column to column to leave the room.
Turn left and freeze a couple of water jets to reach the next sarcophagus, then turn right to leave the Sewer. You'll need to use the Flow to wall-run across a couple of waterfalls, then leap right at the end of the run and deactivate the Flow in mid-air, allowing the Prince to sail through the waterfall instead of slamming into it. Get used to this gimmick, as it shows up a lot for the rest of the game.
The Baths
Activate the switch on the floor, then use the Flow to freeze the water in place. Use it as a wall, then run up it and jump off to grab the overhead switch.
This opens the next door, but lets an army of sand creatures into the room with you. Take them out any way you can, focusing on the wizards first, before you continue onward.
Take them out, then use the two overhead switches in the room they came from to activate a pair of parallel waterfalls, perfect for triangle-jumping with the Flow. Follow the upper balcony around, then go back downstairs and freeze the water jets before they disappear. Swing across the room to catch back up with Malik.
Freeze the water jets on the wall before they disappear, then swing across them to reach the landing in the opposite corner of the room. From the landing, wall-run and jump to the overhead switch, which turns on a series of water columns throughout the room. This lets you reach and activate a second overhead switch, which turns on more water columns. Use them to reach the exit.
Once you're through there, jump to the parallel bar ahead of you, then activate the Flow and run up the frozen waterfall, using it to bounce to the bar overhead. Deactivate the Flow, then leap through the waterfall to the ledge just behind it.
Evade a series of rotating-blade traps, then use the banners and flagpoles to descend to the floor below.
The Royal Chambers
Use the wall switch to activate a pair of water jets, then activate the Flow and use the jets and the waterfall to reach the overhead balcony. Push the switch up there and use the frozen jets to swing up to the ledge across the room, where you can reach a beam. Jump off, grab the flagpole, and activate the Flow just after you pass through the waterfall, right in time to catch the water jet as it solidifies. It's just a few jumps from there to reach the balcony.
« The Baths The Royal Chambers The Observatory The Throne Room »
« The Baths The Royal Chambers The Observatory The Throne Room »
Page 11 of 34© 2010 IGN Entertainment, Inc.

Of course, you may wish you hadn't.
As Ratash blasts the palace apart around you, wall-run to the water jet and swing off it to the beam below you. Grab the water column and slide down it, then jump to the floor.
After the next explosion, wall-run and jump to the column, then freeze the various water jets and use them to get back inside.
Drop down into the palace's bedroom via the banners and dispatch the sand creatures that appear, then check out the water column in the background. It's easy to miss, but you can use the column to hit a pair of wall switches and open a secret door. Behind it, you'll find another sarcophagus.
Leave the bedroom, and freeze the first water jet. As before, you have to let the Flow go long enough to swing through the waterfall, then immediately hit L2/LT again to freeze the second water jet. As you hit the floor, Ratash will reappear, and once again, hilarity ensues.
Run along the right-hand wall and grab the water jet. Swing over to the surviving chunk of the balcony, then freeze the left-hand waterfall so you can run along it. Jump off to the columns and use them to get back to solid ground.
Wall-run to the beam, then jump and wall-run up to the next landing. As before, swing from water jet to water jet, letting the Flow button go in mid-air so the waterfall stops being solid for a second, then hit Flow again to grab the last jet and swing to safety.
Take out the enemies haunting the royal bath, then freeze the waterfalls on the far side of the room and use them to climb up. Along the way, snag the eighth sarcophagus from a hidden landing behind the right waterfall.
At the top, follow the balcony around and bounce off the wall to the overhead flagpole. Use it and the one next to it to cross over to the next balcony. From here, you can wall-jump up to the overhead switch, opening the next gate.
You're outside again, of course, with Ratash firing at you from the distance. Fortunately, this is our last run-in with him for now.
Run along the wall and leap to the water column, using it and the jets to reach the landing. Triangle-jump up the wall and waterfall to climb up to the level above you, then jump off the beam to the water column. Hop from there to the banner on the wall and slide straight down into a cutscene.
Run past a few swinging axes and pressure plates, and take out a few sand creatures at the base of the waterwheel. Freezing the water with the Flow also stops the water wheel in place, allowing you to wall-run between its spokes to the next area, but you can also climb up the wall next to it to find a hidden sarcophagus.
The Observatory
Turn right at the entrance and jump onto the flagpole. Flip onto the ledge, then shimmy left and use the water jets to flip onto the next landing. Run up the door and jump to grab the overhead switch, which temporarily deactivates the astrolabe.
Use the water jets to reach the lever you just activated, and turn the lever 180 degrees to move the astrolabe into position. Head back the way you came and jump onto the astrolabe, then make a tricky leap from there onto a water column. From here, you can use a series of water jets firing from the side of the astrolabe to reach and grab onto a broken wall.
Freeze and run across the nearby waterfall, then follow the ledge around to a flagpole. Swing over to the nearest ledge and climb the stones up to another circular platform. Wall-run from here to another locked door, then run up it and jump to grab the next overhead switch.
« The Baths The Royal Chambers The Observatory The Throne Room »
Page 12 of 34© 2010 IGN Entertainment, Inc.
Wall-run to the left to find the lever you just activated, and turn it ninety degrees to slide part of the astrolabe into position. Go back the way you came, and this time, wall-run in the other direction to find and pull a second lever. Turn it ninety degrees to put a second platform into position next to the first one.
Jump across the platforms on the astrolabe and pull the lever in the center of the mechanism. This arranges two more platforms on the other side of the room. Run, jump, grab, shimmy, and flip until you reach a third overhead switch. Pull it to activate two more levers.
Turn both levers 180 degrees to spin the astrolabe's platforms into position. This has the unfortunate side-effect of resetting the astrolabe entirely, which means you won't have the time to get across the platforms before they spin and dump you off. Fortunately, the entire damn thing runs on water, so you can freeze the astrolabe in place with the Flow. Once the platforms have spun back into a position that you can use, freeze it.
It's a difficult jump from the first platform to the short water column extending from the next part of the astrolabe, but you can make it unaided. From the column, jump to the next column and let go of the Flow, letting the astrolabe rotate ninety degrees. Jump to the next platform and ride it 180 degrees, until another platform spins into place next to you, and jump to it, then wait for the red platform to spin in next to you. Ride that final platform all the way to the observatory's exit.
As you emerge onto the balcony, use the gouge in the wall to the Prince's right to reach the banner, then slide down it to the next level. Wall-run to the next gouge and climb up into the hole in the wall.
Here, wall-run over to the torn banner and jump off the wall, then activate the Flow in mid-air to grab the waterspout. Jump from frozen column to frozen column and slide down the banners to the floor, where you'll wind up in a fight with a new kind of heavily-armored "bull" and its retinue of skeletons. Let it charge you, then dodge so it smashes into the wall. Only Power Attacks can breach its armor, so you may want to take out the lesser skeletons before you focus on the bull.
When it dies, it smashes a balcony, giving you your next destination. Climb to it and evade a series of traps in the hallway beyond.
The Throne Room
Right as you enter, turn left and climb the stones to the right of the door, then wall-run left and jump to find two water jets. Freeze them and flip over to a platform where a sarcophagus is hidden, then slide down the banner.
For your next trick, freeze the water jets on the left side of the room, and keep your finger on the Flow so you can run up the waterfall at the end and perch on the beam. Leap across the gap to the other side of the hall, then climb up to the ledge and wall-run right to the banner. Slide down it to the crack in the wall, then wall-run left to the water jet and swing to the next beam.
Leap off the beam to the column, then jump over to the next column. From there, grab onto the stones at the base of the throne room's stairs.
Ratash is big, slow, and hits like a train. At range, he'll toss hard-hitting fireballs to knock off large amounts of your health. Close up, he'll try to stomp you or crush you with his sword. Either way, dodge with the circle/B button and counterattack, but don't mash the button so hard that you aren't able to get out of the way of his inevitable counter.
There is an Achievement/trophy, Untouchable, available here if you manage to beat Ratash without getting hit. Mostly, this will involve abusing your dodge roll and hitting him only sporadically. You'll do better if you wait until you've filled out most of your upgrade grid, including Battle Rage, or if you use the Power of Ice to do extra damage.
Once Ratash's health is at about 50%, he drops to one knee and starts regenerating health. This is your cue to jump on his back and land an aerial attack, which disarms Ratash and starts the next phase of the fight.
« The Baths The Royal Chambers The Observatory The Throne Room »
Page 13 of 34© 2010 IGN Entertainment, Inc.
Ratash jumps to a distant ledge at this point and starts harrassing you with fireballs. Keep moving at all times, and climb up the stones near the throne to reach the overhead landing. Swing on the water jet to get over the hole Ratash blasts in the walkway, then climb up the stonework and wall-run right to get some more height. Once you're here, jump onto the switch and flip onto the slope, then leap onto Ratash's platform.
The second verse is much the same as the first, except that this time, Ratash creates a bunch of skeletons to get in your way. Either beat them or trick him into crushing them for you, then take him on the same way you did before. Defeating Ratash earns you the Achievement/trophy "Not what it looks like."
Leave the throne room via the doorway behind the throne, where you'll find a few spinning blade traps and swinging axes to deal with. After running the newest gauntlet, you'll find another gate into Razia's realm, where she'll reward you with a new power: Flight. This is the ability to basically shoot yourself like a bullet at distant enemies.
The Terrace
Fly across the gap and take out the group of skeletal soldiers, then wall-run across the switch to trigger a platform. Fly off the platform and take out the enemies on the next landing.
Run up the wall in the recessed alcove to trigger the switch, then leap off the switch to grab the nearby flagpole. Before the wall retracts again, turn around and jump back onto the wall, run up, and jump to the stones on the opposite column, then jump from the stones onto the ledge.
Wall-run to the next ledge, then leap across the gap and shimmy around to the other side of the wall. From here, jump from column to column and use the flagpoles to get close enough to the sand creatures in the distance that you can lock onto them with Flight and take them out.
As the dust settles, run up the wall in the alcove again to trigger the wall. Jump onto the flagpole, turn around, jump, run up the wall before it retracts, and leap to the overhead beam. Jump off the end and use the flagpole to leap towards the skeleton on the tower, then Fly over and take him out. Turn the nearby lever to descend a level.
Fly over and dismantle the skeletons across the gap, then run up and grab the gouge to the right of the door. This next part gets a little tricky.
The basic idea is to keep doing a blind wall-run across the switches on the side of the tower, because hitting the switch activates a plate on the tower and gives you something to grab onto. Move quickly from plate to plate and column to column, then use the climbing stones to get up into the tower. This involves a close-quarters fight with a pair of armored bulls and their posse of skeletons, which is likely to be bloody.
Victory opens the exit door. Leap across the chasm and Fly over to the soldiers waiting on the other side, then jump off the edge and grab the flagpole. Swing over to the ledge and run up to hit the switch, then drop down and run over to the sliding plate before it retracts. Once it does, carrying you along with it, drop down and shimmy around the corner.
Triangle-jump up to the switch, then leap off and immediately follow the ledge around to the right before the plate slides back. Once it moves, wall-up up and jump to hit the switch, then immediately wall-run up again and jump to the other side of the tunnel to grab the plate. Ride it up and leap off to grab the gouge in the wall, and follow it around.
Wall-run up off the ledge to hit the switch and immediately jump off. You have to jump from flagpole to flagpole as quickly as possible here before the timer runs out, or the poles fold back up into the wall. Just hammer jump the moment you safely grab the next pole in line, and don't wait to swing around a pole a couple of times. After the last jump, Fly over and smash the skeletons that are waiting for you at the end.
Slide down the banner, then jump off at the end and use the flagpole to reach the next banner. Repeat the
« The Terrace The Rooftop Gardens The Aqueducts King Solomon's Tomb »
Page 14 of 34© 2010 IGN Entertainment, Inc.
process until you hit the last banner, then jump off near the end and Fly to the enemies on the landing. Before you head down the next tunnel, be sure to climb the ledges to the right and grab the sarcophagus that's hidden there.
Evade a last few traps and you've made it out of the Terrace.
The Rooftop Gardens
Hit the switch on the floor and activate the Flow. That should keep the waterfalls going long enough for you to triangle-jump between them. Release it again once you're back on solid ground, then freeze the waterfall and run across it to the first water jet. Swing off of it and bounce off the wall to the jet directly overhead, then turn back around, jump, and wall-run up to the top.
Slide down the next tunnel, and jump across the gap to avoid getting stuck by the pressure plates. When you get back out to open air, slide down the slope ahead of you and jump at the last second, using Flight to tag the distant sniper.
Jump across the gap and run up to the overhead switch, activating the waterworks all throughout the Rooftop Gardens. Swing to the ledge directly ahead of you, then freeze the water jets throughout the area. Swing off the jets and Fly to the next sniper.
Freeze the waterfall and run along it, then leap off and Fly to tag the sniper. The next jump is a bit trickier, simply because it's just a jump; there's no hidden mechanic to make the jump easier, strangely enough. Just take a running start and Fly to the sniper.
You should catch up to Malik right about now. Swing over to where you spotted him to find a sarcophagus barely hidden behind a palm tree.
Try to chase Malik, for all the good it'll do. Jump down onto the incline and slide down it, jumping off at the last second so you can Fly to the sniper. Jump from its perch to the overhead switch to activate the local waterworks, then swing over to the next platform and Fly to the sniper.
Freeze the waterfall and run along it to the first water jet, then drop the Flow in midair so the next water jet activates, right in time for you to grab it. Swing off onto the column, then slide down the ramp and veer left, allowing you to wall-run on the frozen waterfall and leap to the water jet. You'll need to time your use of the Flow so the first water jet is on at the time, then release it in mid-air again so the next one's available. The timing's tricky, so don't be surprised if it takes you a couple of tries.
Leap across the next gap by flying to the sniper, then wall-run and jump to the water jet. Fly to the next sniper, then use the wall and the water jets to climb up to the ledge overhead. Quickly shimmy left and don't stand still, as the sniper on the distant platform can knock you off the wall with a lucky fireball. Freeze the waterfall and swing across both jets, then Fly to the sniper.
Slide down the ramp, jumping across the gap, and slide down the banner. On this slope, veer left and freeze the waterfall, then wall-run and triangle-jump up to the top.
The next tunnel is full of flagpoles and swinging axes. The trick to getting through this area in one piece is to avoid swinging on the flagpole as much as possible, allowing the Prince to make each jump with minimal lead-up. This makes it much easier to time a jump past the axes.
Once you're back outside, move as quickly as possible to avoid getting pegged by the snipers' fireballs. Defeat the sand creatures ahead of you, then use a simple wall-run and jump to get over the first gap. Fly to the first sniper, then either defeat or avoid its backup and Fly across the gap to hit the second sniper. Here, take out the soldiers, then freeze the water column and climb up it so you can reach the water jets. Flip onto the second water column, quick-jump off of it, and Fly to the next sniper.
« The Terrace The Rooftop Gardens The Aqueducts King Solomon's Tomb »
Page 15 of 34© 2010 IGN Entertainment, Inc.
Once again, use the water jets to get close enough to the sniper that you can Fly the rest of the way, then run through the waterfall. Jump over to the parallel wall, run up it, freeze the waterfall, and use it to get the rest of the way up to the next level.
Use the water columns to reach the central dias, where you'll wind up in one of the largest battles yet. Take out the wizards first, or this can last literally forever, and make liberal use of any powers you've gained via the upgrades menu. Whirlwind is particularly useful here, allowing you to knock down most of the soldiers and get a clear shot at the wizards.
Before you leave, though, be sure to jump across the gap to the waterfall. There's a sarcophagus hidden behind it.
After you grab that, ace the sniper that's been shooting at you the whole time with Flight, then use the water jets above his platform to swing across the wall to the exit.
The Aqueducts
Use the water columns to move forward, then jump off the last one and Fly to the sniper. Swing off the first water jet, run up the nearby wall, and bounce off it to grab the second, higher water jet. That allows you to reach another, higher series of jets, and cross them to get to the aqueduct wall. Freeze and run across the waterfall, then wait for the sawblade to get out of the way before climbing up the ledge to the wall.
Freeze the waterfall, then run across it to the jet to reach the balcony. Freeze and climb the column, then quick-jump off of it to fly into the sniper.
Slide down the incline and veer right, then run off the edge of the slope and leap to the water columns. Use them to get to the overhead walkway, where you'll finally catch up with Malik. As is becoming a habit, it won't end well.
Get past a few axe traps and pressure plates to move further into the Aqueducts. It's time to learn another new trick: the vulture jump.
The sand vultures don't actually attack. Instead, they're sort of like grapple points, which you lock onto using Flight. Any vulture the Prince flies into is about to get stabbed to death, so once you grab it, you should jump away as quickly as possible.
The next part of the Aqueducts is a sort of vulture-jumping tutorial, and should be fairly self-explanatory. Use the vultures to navigate through the area, and get used to the timing.
Your next stop is a large semi-circular dias where you must fight another detachment of Solomon's army. Again, go after the wizards first, using powers or aerial strikes to evade their meatshields.
Once they're all gone, a couple of vultures will spawn nearby, giving you a way to progress. Before you do, however, drop down off the edge of the platform and use the water jets to get down to the ground. There's a sarcophagus down here, hidden in an alcove.
The trick to this next sequence mostly has to do with timing, as you need to use the buckets on the Aqueducts' water wheel as handholds, and there's a relatively narrow window in which you can jump away safely. Use the sand vultures to reach the flagpoles overhead, then grab the ledge and wait for the first bucket to get in range. Jump onto it quickly, then leap onto the first suspended cage as soon as you're high enough to reach it.
Leap onto the second cage once you have enough height, then grab the second bucket. The moment you have hold, inch around to the side and leap off onto the wall, then wall-run to the water jet and swing off. Fly to the soldier on the balcony, then defeat its confederates.
Grab the vulture from the balcony, then grab the next one and leap onto the wall. Run up it and Fly to the next
« The Terrace The Rooftop Gardens The Aqueducts King Solomon's Tomb »
Page 16 of 34© 2010 IGN Entertainment, Inc.
vulture, then follow the trail of birds all the way around the building until you can Fly to relative safety.
Wall-run over and climb the frozen waterfall, then take out the soldiers on the landing. Break all the urns to refill your health and energy, then use the nearby vultures to climb onto the roof of Solomon's Tomb.
King Solomon's Tomb
This is essentially a rematch with Ratash. He does more damage now, and if Ratash begins to levitate, he's warming up for a powerful blast of fire that can only be evaded by running behind one of the stone planks on the edge of the platform.
As in the throne room, use your dodge roll to avoid his sword strikes and pummel his shins with rapid sword strikes. His slow but powerful stomp does a great deal of damage, so if you see his foot go up, stop what you're doing and run away. Ignore any soldiers he summons, as Ratash will take most of them out himself, either with his sword or when he uses his explosion.
When Ratash goes below 50% health, he blows up the platform entirely. Use the sand vultures and flagpoles to move from platform to platform, taking out the soldiers that spawn on each one, and climb back to the top of the Tomb. This time, there isn't enough of the platform left for you to avoid Ratash's explosions, but fortunately, that won't play a role. Ratash will end the fight for you when he gets below 25% health.
Surviving the rematch with Ratash unlocks the "No longer human" Trophy/Achievement.
Move further into the tomb and run past a couple of slopes. Your next challenge is the single most dangerous, longest wall-run in the game, followed by a narrow hallway full of pressure plates and sawblades. Neither is a walk in the park, but they're both mainly based around timing and good reflexes.
The central area of the tomb hides the entrance to Rekem, which is guarded by a new enemy: sand roaches. Even without Battle Rage/Fury, one sword swing is enough to take a single roach out, but they tend to show up in massive swarms. Power Attacks work well to buy yourself some room, or using Whirlwind to knock them away from you.
Once you've dealt with them, turn the lever by the statue until the broken part of the statue's staff moves into place. This raises a staircase and activates a water pipe in the statue directly overhead.
As with the first statue, solving the puzzle of the second statue involves making the staff whole again. Unlike the first statue, there are multiple parts to this statue. That said, you can solidify the water with the Flow, which forces the parts of the statue to revolve independently. Using the Flow, it's not hard to rotate the lever so the two parts of the statue's staff are on the same track.
Solving this puzzle activates a series of water columns along the chamber's ceiling, which allow you to reach the third statue. It's slightly more complex, but the basic idea's the same, and you shouldn't have too much trouble putting the pieces of the staff in place. Doing so retracts the staircase, opening the road to Rekem.
Keep close to the wall as you slide down the staircase, and keep an eye on what's about to happen. This is another series of reflex tests, with a hallway full of swinging spike traps and pressure plates at the end.
After all of that, you get to return to Razia's realm to learn the power of Recall, which returns parts of Rekem to their original undamaged state. You can only recall one part of your surroundings at a time, and if there's more than one recallable object in range, the game tends to default to whichever one the Prince is currently facing towards.
The next few obstacles are there to teach you more about how Recall works. As you make your way deeper into the ruins, take out a mixed force of sand roaches and shieldmen.
« The Terrace The Rooftop Gardens The Aqueducts King Solomon's Tomb »
Page 17 of 34© 2010 IGN Entertainment, Inc.
Ruins of Rekem
Getting here in the first place unlocks the Welcome to Rekem trophy/Achievement.
After you speak with Razia, recall the cliff to the left and triangle-jump up to its top. In the statue room, you'll meet your first titan, a miniboss that fights a lot like Ratash does. It doesn't have any fireballs, but it usually shows up with a batch of lesser sand creatures. You can deal with it the same way you fought Ratash. Once you've gotten half its life down, it often drops to its knees; jump onto its back and press the attack button to finish it off, or simply keep attacking.
Recall the stonework in the corner, then wall-run and jump to the flagpoles. As you land on the beam, recall the flagpole ahead of you and use it to climb to the landing. Recall the next flagpole, swing to the beam, and recall the next flagpole to reach the next platform.
Wall-run and jump to the column, then use the row of columns to cross over to the other side of the room. Wall-run to the platform, then recall the wall ahead of you and triangle-jump to the overhead ledge.
From the ledge, wall-run and jump to the broken column, and recall the parallel bar ahead of you. Recall each object in your path as you go, then leap to the beam. The platform to your left leads to a sarcophagus, while the platform to the right leads out of the statue room.
Slide down the banner, then recall the platform and triangle-jump to the top. Wall-run across the switch and slide down the banner to open the exit door.
Run past a few sawblade traps, then climb the wall up to reach the throne room.
Throne Room of Rekem
After you take out the roaches and soldiers that are attempting to stop you, your goal is to find a way to open the throne room's secret escape hatch.
Step one: climb up the wall near the throne and recall the parallel bar nearby. Use the bars to swing over to the recallable beam near the entrance, then use the beam and the overhead bar to reach the ledge. Recall the next ledge, then wall-run over to the landing.
Climb up the wall to the topmost ledge, then run and jump to the ledge opposite the wall. Shimmy along it to the recallable platform in front of the gate, then drop down and, um, "un-recall" it to find a sarcophagus.
From the sarcophagus platform, jump to the broken beam jutting off one of the support columns, and jump across the gap to the beam opposite it. Climb onto the landing and roll under the stuck gate, where you'll find a pair of ledges next to it. Recall part of the ceiling and shimmy across the room to reach the landing behind the closed gate, where you'll find an overhead switch. Pull it to open the secret door.
From the landing, use the ledges to reach either of the banners behind the throne, and slide down them to get back to the floor. Use the stonework in the escape tunnel to climb down.
The escape tunnel's seen better days, frankly. Activate the gate switch and roll underneath the arrow trap before it closes, then defeat a pack of roaches while dodging fireballs from a distant sniper. Once you have a clear shot, KO the sniper with Flight, then swing across the water jets to another landing.
« Ruins of Rekem Throne Room of Rekem The Sacred Fountain »
« Ruins of Rekem Throne Room of Rekem The Sacred Fountain »
Page 18 of 34© 2010 IGN Entertainment, Inc.
Freeze the waterfall long enough to triangle-jump most of the way up, then let go of the Flow and Fly through the waterfall to knock out the enemy on the next landing. Fly to the next landing, then freeze the waterfall so you can run along it and jump off to the next one. Finally, freeze the water jets and swing across them, then unfreeze them so you can Fly through the waterfall towards the enemy on the other side.
Take out a titan and its roach posse, and Razia will open the next door for you.
The Sacred Fountain
As Razia explains the history of the area to you, some sand soldiers will arrive to offer their opinion. Retort via stabbing.
Once Razia opens the next door, recall the nearby chunk of the wall and freeze the waterfall. Run along it and jump to the landing, then take out the roaches that are lying in wait.
Recall the second waterfall and freeze it, allowing you to triangle-jump off of it and the archway to reach the landing above you.
Rekem Reservoir
Recall the nearby waterfall and freeze it so you have something to run on, then leap off onto the nearby columns. Recall the next ledge right before you land, then recall the two water pipes as you make your way across the room. Use the banner on the wall to slide down to ground level, where you'll fight another group of sand creatures with a titan as backup. Let the titan take out as many of them as you can while you target and eliminate the wizards.
Instead of immediately leaving the area via the vulture that just appeared, run through the waterfall to the left of the recallable wall to find a sarcophagus.
With that done, recall the wall and use it to get enough height so you can grab the vulture. Use it to reach the columns, which should bridge the gap between you and the lion statue you saw earlier.
While you're here, drop off the edge of the platform and shimmy over to the right side, where you can find a very well-hidden climbable wall. Wall-run over to the ledge and follow it all the way to its end to find a sarcophagus.
Get back up to the statue, then recall the nearby wall and triangle-jump to the overhead ledges. Recall each water jet or ledge in turn as you make your way around the upper half of the room, then triangle-jump up a level using the recalled wall at the end. Repeat the process - recall, jump, recall the next platform or object before you land - to get back across the room.
Roll through the hole in the wall to refill your health or energy, if necessary, then recall the water pipes to create a series of columns. Quick-jump across the room, then run past a couple of swinging-spike traps.
At the end of the path, you get another taste of Rekem's national sport: sliding down a broken spiral staircase with death on the line. Freeze the first waterfall and run along it to reach the beginning of the slope, then veer right and either freeze or recall any of the obstacles in your way. At the end, jump and grab the banner.
« Ruins of Rekem Throne Room of Rekem The Sacred Fountain »
« Rekem Reservoir Solomon's Hall King's Tower The Palace The Final Climb
Page 19 of 34© 2010 IGN Entertainment, Inc.

Solomon's Hall
After you take out the opposition, recall the structure in front of you to open up a water pipe. Climb up the column and use it to get enough height to Fly to the shieldman on the nearby landing. From there, take the vulture express across the room and Fly to the sniper.
Recall the water jet and use it to swing over to Flight range of the second sniper, then Fly to the last enemy to get into the Hall proper. Dismantle the roaches and soldiers guarding the place however you like.
Before you climb up, there's a sarcophagus in plain sight in front of you, but opening the gate can be a little tricky. Hit the wall switch to the right of the gate to activate the water jets nearby, then use them to reach the crack in the wall. Shimmy along it and wall-run across the switch above the entryway, then jump off the switch, roll when you hit the ground, and run like hell to get to the gate before it closes.
As for the reason you're actually here, get back outside the gate and recall the walls on either side as you triangle-jump up to the stairs. As indicated, run up the wall by the tomb door and use the columns to reach the ledge above the doorway.
Turn the lever to aim the statue of Solomon at the door, as Razia instructed. Stepping on the switch opens the door, but as you may be able to tell, the mechanism is powered by water. Use the Flow to hold the door open long enough for you to swing back across the columns and enter the tomb.
Pass through another hallway filled with traps to find the final gate to Razia's realm. Inside, she gives you the last power-up in the game, which dramatically increases the power of your basic sword attacks. For the rest of the game, you can drop normal sand creatures in one hit, while larger creatures die after three or four slashes. You are now a wrecking machine.
After you plow through a few hallways filled with monsters, run up the rune-covered part of the wall and flip onto the flagpole. Leap off of it and go vulture-hopping again, then take out the sand creatures that spawn when you land.
Recall the nearby ledge, then recall and jump to the nearby column. Vulture-jump to and recall the doorway, then take the vulture/column express to the next landing. Hop down to the circular area for a fight with a Titan, among other things.
King's Tower
Start your climb by recalling the nearby wall. Run along it and jump to the flagpole, then swing and run up the wall to grab the ledge. Wall-run right and triangle-jump up to the columns overhead, then run through the doorway.
Recall the wall ahead of you so you can start a triangle jump, then recall the wall you just came through to finish it and reach the ledge above you.
Use the vultures to reach the columns, then recall them in mid-air and get to the distant ledge. From there, swing across the flagpoles on the side of the tower to reach the stones, then scale the wall.
At the top of this spire, recall the nearby platform and go back inside. Wall-run and grab the nearby column, then recall the archway so you can use it to triangle-jump up to the next level. Grab the flagpole and recall the
« Rekem Reservoir Solomon's Hall King's Tower The Palace The Final Climb
« Rekem Reservoir Solomon's Hall King's Tower The Palace The Final Climb
Page 20 of 34© 2010 IGN Entertainment, Inc.
closest wall, so you can bounce off of it to get to the column. Recall the exterior platform as you're sailing towards it, then jump across the gap and recall the next ledge right before you reach it.
Use the vultures hovering above you to reach the next flagpoles, then sail from vulture to vulture to reach the top of the King's Tower. You'll see a sarcophagus in the background as you're bird-hopping. Instead of climbing up the closest wall when you reach the end of the gauntlet, jump across the gap and use the vulture in the background to climb up to the tower's roof. Once there, destroy the final sarcophagus in the game, then use the switch to open the gate.
With that done, climb up the recalled gate and jump across the gap. Now, all that's between you and the Palace are a series of rotating pillar traps. You're officially in the home stretch.
The Palace
As you get into the Palace proper, a trio of wizards on a balcony above you attack with an army of respawning soldiers. This may look bad at first, but considering your normal attack cuts them in half instantly, it's just not that big of a deal. Once the first wave is dead, you can quite easily murder the soldiers one by one as they respawn, which makes this the best room in the game for working on various combat-related trophies/Achievements. For example, this is the single easiest area for getting Sand Nemesis, since the soldiers appear one at a time and can be killed with one hit each.
When you're done messing around with these guys, wall-run to activate the two switches on either end of the room, then wall-run to pull the overhead switch and open the gate. Kill or simply outrun the wizards, then duck through the gate before it closes.
Climb up to the ledge above you and fight through the horde of soldiers that come to get in the way. At the end of the hall, Fly across the gap to the lone soldier waiting there, then bounce off the wall switch and run through the gate.
At the dead end, wall-run and jump to grab the first beam, then jump across the gap and wall-run up across the switch. Leap off at the end to grab the overhead beams, then leap across them quickly before the door shuts.
Jump to the chandelier, just before a couple of the armored bulls knock it down. Fight through the ensuing ambush; with your new sword, the bulls are a bad memory in two swings tops.
Wall-run to grab a flagpole, then bounce off the flagpole to the wall to hit the exit switch. Jump from the switch to the beam, then leap onto the balcony and run through the gate.
Next up: wall-run to hit the switch, then jump off the switch to the ledges across the hall. Drop down twice, then wall-run and grab the edge of the platform. Pull yourself up and run before the gate shuts. (A certain odd trend has developed here.)
In the next area, take out a group of sand soldiers and their titan buddy. (If you're looking for the David and Goliath Achievement/trophy, be sure to kill the titan with an overhead slash rather than just cutting it to ribbons.)
On either side of the room, stand on the floor switch to activate a nearby waterfall. Freeze it with the Flow and use it to run up to the nearby water jet, then bounce off the waterfall to reach the flagpole. Swing off the flagpole and use the vulture to reach and turn the lever, then slide down the banner to get back to the floor without breaking your neck.
Go through the formerly-barred door and wall-run to the crack. Shimmy along it and jump to the ledge across the hall, then scale to the hole in the wall using the ledges.
Run past the traps in the next hallway to reach the ground floor of your last and greatest challenge.
« Rekem Reservoir Solomon's Hall King's Tower The Palace The Final Climb
Page 21 of 34© 2010 IGN Entertainment, Inc.
The Final Climb
There are a number of vases on the ground floor, and if you're low on energy, be sure to smash them all. You're likely to need to rewind time quite a bit before you reach the top of the Climb.
To begin your trip, use the switch on the center of the ground to activate two waterfalls on the dias in front of you. Freeze the waterfalls and triangle-jump upwards, using the left waterfall first, and as you approach the top, leap off the right-hand wall and unfreeze time. You want to sail right through the left waterfall and grab the flagpole.
Leap from the pole to the beam. Your next challenge is the first in a series of difficult horizontal triangle jumps, where you need to repeatedly and quickly change the waterfalls ahead of you from solid to liquid. The trick is to release L2/LT as the Prince begins his jump animation, so he's just moving away from the wall by the time the water becomes a liquid again. It's very difficult and requires extremely precise timing, moreso than anything you've done in the game so far.
Use the column next to the landing to make a series of easy jumps, then do another horizontal triangle jump to reach a beam. Grab the water jet and swing onto the waterfall, freezing it first, and run up the waterfall to jump and grab the flagpole. Repeat the process again to gain even more height, then flip onto the last water jet to reach a much-needed checkpoint. Shatter the urns to recoup any of the energy you spent on rewinds.
The next leg of the trip adds a number of extra waterfalls to the horizontal triangle-jumping you've been doing so far. If you play your cards right, you can "cheat" on the last leg by jumping straight to the broken beam, but you can't depend on having enough height to reach it. Either way, once you're through, climb the column to get enough height that you can jump to the next flagpole.
Use the next waterfall and the vertical row of water jets and flagpoles to climb up to the next level, with a well-deserved checkpoint. Destroy the urns, then stand on the switch on the ground to open the exit gate.
This adds a time limit to the last and hardest of the horizontal jumps. Fortunately, if you weren't doing this quickly, you weren't going to be able to do it at all. Once you reach the balcony, you get a cutscene and another checkpoint, and frankly, you've earned both.
There's a small army of skeletons waiting to stop you on the exterior walkway, and even though you've got your new sword, there are enough of them that this can be tricky. This is a good area to work on the Acrobat Achievement/trophy, as there are dozens of enemies and they're very densely packed.
Once you make it back inside the tower, it's time for a bit more platforming, although nothing is quite as punishing as those waterfall jumps were. Use the vultures to move between the platforms and further into the tower, culminating in a triangle jump between waterfalls.
As the tower begins to shake itself apart, use a fresh wave of vultures to keep climbing it, then Fly off the last flagpole to wreck a nearby skeleton. From there, keep climbing, mostly going from bird to bird, until you wind up clinging to the wall.
The camera angle's the big killer here, as the waterfalls' position doesn't quite look right until you're actually in the middle of them. Run left off of your handhold, then jump off and do another horizontal triangle jump between the waterfalls. Grab a vulture in mid-air, and ricochet from bird to bird until you've reached relative safety.
That, of course, doesn't last.
Apparently, somebody at Ubisoft played Bayonetta.
Jump from platform to platform within the heart of the storm, using vultures to propel yourself whenever you have nothing better to grab onto. With your new sword, the intermittent ambushes from skeletons shouldn't be
« Rekem Reservoir Solomon's Hall King's Tower The Palace The Final Climb
Page 22 of 34© 2010 IGN Entertainment, Inc.
a serious problem. Mostly, you'll have your hands full just staying alive.
At the end of this sequence, you're up against Ratash in his final, most powerful form, and you've unlocked the Eye of the Storm trophy/Achievement just for making it here in one piece. This is a multi-stage fight that's mostly about staying alive, and Ratash's first move is to drain some of Razia's magic. You can still use your earth, fire, ice, and wind powers, but you cannot rewind time during this fight.
Ratash initially summons a bunch of normal soldiers to harrass you, which can be mowed down readily just like everything else you've been fighting. Ratash himself tends to try to claw at you, either with just one hand or one right after the other, which you can avoid with a well-timed dodge roll. It looks like you can evade the claw swipes by sticking to the bottom of the platform, but sadly such is not the case.
Ratash also likes to go for a heavily-telegraphed overhand punch. When he throws this out, he also brings the medallion on his chest close enough to the platform that you can get a couple of hits in. Activate the Power of Ice to get a little extra damage, then run in as quickly as you can and slash at the medallion. Once you have a feel for the timing on this fight, you can start moving preemptively once you see Ratash's fist go back, so you're in position to knock off some of his health right as the fist lands.
When Ratash reaches 75% health, he begins firing bolts of energy at the platform, which home in on your current position and explode shortly thereafter. He also summons another wave of goons, and harrasses you with the energy bolts while you're dealing with them. The goons allow you to quickly refill your health and energy during the fight, but don't let them get too many hits in.
At 50% health, Ratash begins using a heavy axehandle punch that will knock you into next week if it connects, as well as all of the other moves in his repetoire. He also occasionally drops both hands onto the platform and begins rearing back for a big wave of flame, but you can preempt that with a series of hits to the medallion.
At 25% health, Ratash summons a titan and withdraws from the fight completely. Take it out, the same way you've been fighting titans for most of the game so far, and live through another wave of sand soldiers. If you play your cards right, you can let Ratash claw them all to death for you, then go back to dodging his punches and claws until he leaves himself open.
At roughly 5% health, Ratash rears back entirely, but a pair of sand vultures give you the opportunity to reach him and land a final, killing slash. At this point, it's all over bar the screaming. Congratulations on beating The Forgotten Sands.
Page 23 of 34© 2010 IGN Entertainment, Inc.
Prince of Persia: The Forgotten Sands Sarcophagi Locations
Each sarcophagus you destroy is worth about 20 XP, in addition to some health and energy orbs. You must Power Attack a sarcophagus to break it. (Video links will pop up in a new window.)
This is the sarcophagus that's pointed out to you as part of the in-game tutorial. Run up a wall and jump to reach the beam, then leap to the climbing stones and wall-run up to the sarcophagus's ledge.
In the Fortress Courtyard, the second sarcophagus is on a ledge directly below the first wall switch. It's difficult but not impossible to miss.
When you reach the spike-trapped floors in the Fortress Courtyard, the Prince will mention that there aren't any statues in the courtyard. This is your cue to pay attention to the ledges below you, where you'll notice a sarcophagus. Run through the gauntlet of spike traps, then drop
down and cling to the ledge with the circle/B button. Shimmy along the edge until you reach a ledge you can drop down to, then run along the wall to the right, moving from ledge to ledge, until you can climb to the area where the sarcophagus is kept.
Once you manage to make it through the Prison, there's a sequence where you have to activate a floor switch, then run past some arrow and spike traps to get under a gate before it closes. Having done so, there's a wall on the right just past the gate that you can climb,
allowing you to do some simple platforming and reach the sarcophagus. Use the banner underneath it to drop down, and you'll be back at the switch.
Near the beginning of the Sewer, after you escape the first room, look above you as you leap onto the horizontal beam. There's a second beam overhead that you can barely see under ordinary circumstances. Climb all the way up the next column, then make a blind jump towards
the screen. The Prince will land on the higher beam, and the camera will swing around to face this well-hidden sarcophagus.
Right before you leave the Sewer, turn left to find the sarcophagus across a lengthy gap, with two water jets in the way. The trick is that they turn off and on at irregular intervals, so you need to use very careful timing. Freeze the first one, then leap and deactivate the Flow in midair,
allowing the jet to appear right in time for you to grab it.
After you avoid Ratash's first attack in the Royal Chambers and run back inside, you get ambushed by a small legion of sand creatures in a bedroom. Deal with them, then hit the two wall switches in the back of the room by climbing up the water column. When both are pushed,
it opens a secret door.
1
2
3
4
5
6
7
Page 24 of 34© 2010 IGN Entertainment, Inc.
After your second run-in with Ratash in the Royal Chambers, you're asked to climb two parallel waterfalls, using a pair of water jets between them to gain extra height. Swing off the top water jet and deactivate the Flow in mid-air, passing through the right waterfall and landing on a
hidden ledge with the sarcophagus.
Instead of running through the spokes of the water wheel at the end of the Royal Chambers, climb up the wall to the climbing stones, which you should be barely able to see above you. From there, you can leap to a flagpole and swing to the ledge where this sarcophagus is
hidden.
Right as you enter the Throne Room, turn left and climb the stones to the left of the door. Wall-run left at the top of the wall and make a blind jump to a couple of water jets you can't see, swinging off of them to reach the hidden sarcophagus.
After sliding down the long vertical shaft in the Terrace, using the banners and flagpoles, you'll propel yourself via Flight over to a ledge with a few enemies. Dispatch them, then climb the ledges to the right of the door.
In the Rooftop Gardens, when you reach the area where you saw Malik fighting, check behind the tree.
After the big fight scene in the Rooftop Gardens, leap to the ledge underneath the nearby waterfall and climb up. The waterfall is hiding a secret area, where you can climb up a wall to reach this sarcophagus.
After the big fight scene near the end of the Aqueducts, instead of using the vultures to leave the area, drop down off the edge. You can safely drop down to a hidden balcony, where you'll find a sarcophagus in an alcove.
In the statue room in the Ruins of Rekem, just before you have the chance to escape, you'll find yourself standing on a balance beam with recallable platforms to your left and right. The right path leads to the exit; the left leads to a short corridor full of swinging axes, with this
sarcophagus at its end.
8
9
10
11
12
13
14
15
Page 25 of 34© 2010 IGN Entertainment, Inc.
Right after you find the last sarcophagus, look for this one behind a waterfall right before you go through the next gate.
You pretty much trip over this sarcophagus while you're trying to unlock the secret passage in the throne room of Rekem.
In the Reservoir, after defeating the Titan near the beginning of the area, jump through the waterfall to the left of the recallable area. Roll through the gap in the wall to find this sarcophagus.
There's a lion-headed statue in the Rekem Reservoir, which Razia is standing in front of when she activates all of the waterspouts in the area. When you reach that statue, drop down off the edge of the platform next to it and shimmy right until you find some rocks you can climb down.
Slide down them, then wall-run left onto the ledge and follow it around until you find this sarcophagus.
This sarcophagus is in plain sight behind a closed door in Solomon's Hall. Reaching it is the trick. Run up the wall and hit the switch to the right of the gate, activating the water jets, and jump off the switch to grab the jet. Swing on both jets to the wall and run up it to the ledge, then
shimmy all the way to the right of the ledge and wall-run to the switch above the entry door. Leap off the switch and run like hell to the gate before it closes to claim this sarcophagus.
You'll notice this sarcophagus in the background as you're getting close to the top of the King's Tower, while you're leaping from vulture to vulture. When you reach the end of the second vulture sequence, jump to the recalled ledge and stay there. Instead of climbing the wall to your
left, go fly over to the vulture in the background and kill some more birds to propel yourself around to the sarcophagus's resting place.
16
17
18
19
20
21
Page 26 of 34© 2010 IGN Entertainment, Inc.
Prince of Persia: The Forgotten Sands Achievements / Trophies
A Warm Welcome
Catch up to Malik.
THOMAS SAYS...
Unlocked via normal progression through the game.
Acrobat
Jump on enemies 30 times in a row without falling or using the Power of Time.
THOMAS SAYS...
This is a platforming challenge more than anything else. The best place to do it seems to be the external walkway on the tower at the end of the Final Climb.
Air Time
Perform 20 aerial slash attacks.
And King of Blades
Kill 500 enemies with the sword.
THOMAS SAYS...
This is not a difficult proposition unless you are unnaturally fond of throwing enemies off of cliffs. In fact, it'd be a challenge to complete the game without getting this Achievement.
And Stay Down!
Use the finishing lunge 20 times.
THOMAS SAYS...
Knock down an enemy, using either kicks or the Power of Wind, then run over to it and attack to stab it to death while it's prone. Do this fifteen times.
↓20G / BRONZE
↓30G / BRONZE
↓15G / BRONZE
↓20G / BRONZE
↓15G / BRONZE
Page 27 of 34© 2010 IGN Entertainment, Inc.
Anger Management
Break 100 vases and sarcophagi.
Attack from All Angles
Knock down 15 enemies using the aerial kick.
THOMAS SAYS...
The trick to this Achievement is that the game never actually tells you that you have an aerial kick. It's done by leaping on an enemy and pressing the kick button, causing the Prince to backflip off its chest and knock it down.
Big Finish
Defeat an enemy by doing a power attack on the fifth hit in a combo.
THOMAS SAYS...
Attack an enemy a few times with the sword, then hold down the attack button to charge and release a Power Attack. You probably don't want to do this when you're surrounded, but it's not difficult to pull off against some of the larger standard enemies, particularly early in the game.
Close Call
Save the Prince's life by using the Power of Time.
Completist
Purchase every item in the upgrade menu.
THOMAS SAYS...
This will require a couple of playthroughs, or grinding the Enemy Tides challenge.
↓15G / BRONZE
↓15G / BRONZE
↓10G / BRONZE
↓15G / BRONZE
↓50G / GOLD
Page 28 of 34© 2010 IGN Entertainment, Inc.
David and Goliath
Finish 5 titans with the aerial slash.
THOMAS SAYS...
In order to earn this Achievement, you have to finish off five titans with the aerial slash, as opposed to simply running them out of health. This isn't a difficult proposition, because the first few titans you face have a lot of damage resistance, so you'll need the aerial slash to finish them off. The trick to earning the trophy, however, is that you'll fight the last couple of titans in the game while you're equipped with a considerably more powerful sword, which takes them out in three or four hits. You'll need to watch their health and deliberately go for the aerial finisher when they're low on life, as opposed to simply mashing the attack button.
Death from Above
Finish off 10 enemies in a row using only the aerial slash.
THOMAS SAYS...
Kill 10 enemies in a row by jumping on them, then attacking with an aerial slash. This is a one-hit kill on the skeletons.
Ding! Level Up!
Purchase your first upgrade.
Elemental Control
Upgrade one power to level 4.
End of the Army (Secret)
Complete the game.
THOMAS SAYS...
Unlocked via normal progression through the game.
Eye of the Storm
Reach the final fight.
↓15G / BRONZE
↓30G / BRONZE
↓15G / BRONZE
↓20G / SILVER
↓50G / BRONZE
↓30G / SILVER
Page 29 of 34© 2010 IGN Entertainment, Inc.
THOMAS SAYS...
Unlocked via normal progression through the game.
Floors Are for Losers
Wall run for a total of 1/2 mile (805 meters).
THOMAS SAYS...
You should get this naturally over the course of your first playthrough.
Got Walkthrough?
Find and break every sarcophagus.
THOMAS SAYS...
You cannot backtrack to find any sarcophagi that you missed, and most of them are sufficiently well-hidden that you won't just stumble across them over the course of the game. Over the course of your second playthrough, all sarcophagi will reappear, but you do not have to find and destroy all twenty-one sarcophagi over the course of the same game in order to get this Achievement. If you play through once and miss, say, the sixteenth one, you will get the Achievement upon finding and breaking the sixteenth sarcophagus on a second run.
Invincible
Finish the final battle against Ratash without taking any damage.
THOMAS SAYS...
Good luck with that. It will involve a lot of practice and luck.
Just Us and Them
Close the fortress gates.
THOMAS SAYS...
Unlocked via normal progression through the game.
Like Dominoes
Knock down 5 enemies with one kick.
↓15G / BRONZE
↓50G / GOLD
↓20G / SILVER
↓50G / SILVER
↓15G / BRONZE
Page 30 of 34© 2010 IGN Entertainment, Inc.
THOMAS SAYS...
This is easily done in some of the later fights, when you're up against dozens of skeletons at once. Run into the middle of them and kick somebody in the face, and odds are pretty good that you'll get this Achievement.
Memories of Azad
Reach the thick of the battle.
THOMAS SAYS...
Unlocked via normal progression through the game.
No Longer Human (Secret)
Suffered defeat at Malik's hands.
THOMAS SAYS...
Unlocked via normal progression through the game.
Not How it Happened
Use the Power of Time 20 times.
THOMAS SAYS...
Unless you are some kind of gaming robot, this will not be a problem for you.
Not What it Looks Like
Defeat Ratash.
THOMAS SAYS...
Unlocked via normal progression through the game.
Our Little Secret (Secret)
Don't worry. We won't tell if you don't.
↓20G / BRONZE
↓50G / BRONZE
↓15G / BRONZE
↓50G / GOLD
↓5G / BRONZE
Page 31 of 34© 2010 IGN Entertainment, Inc.
Power Boost
Find and break a sarcophagus.
THOMAS SAYS...
Since you're automatically pointed towards one as you play through the game, this is almost automatic.
Power of the Djinn (Secret)
Razia becomes part of sword.
THOMAS SAYS...
Unlocked via normal progression through the game.
Prince of Earth
Defeat 50 enemies while using the Stone Armor.
THOMAS SAYS...
Defeat fifty enemies using the power in question. For Prince of Earth, you must defeat fifty enemies while you're under the influence of Earth Armor. Respawning skeletons count towards the Achievement.
Prince of Fire
Defeat 50 enemies using the Flame Trail.
THOMAS SAYS...
Defeat fifty enemies using the power in question. Respawning skeletons count towards the Achievement.
↓20G / BRONZE
↓30G / BRONZE
↓15G / BRONZE
↓15G / BRONZE
Page 32 of 34© 2010 IGN Entertainment, Inc.
Prince of Tides
Complete the Enemy Tides challenge.
THOMAS SAYS...
After beating the game, you unlock the Enemy Tides challenge, which is available from the main menu. You must beat eight waves of enemies, which are identical to the sand demons you fight in the main game. They even drop experience orbs, which means you can grind experience on Enemy Tides if you like.
Prince of Water
Defeat 50 enemies using the ice blast.
THOMAS SAYS...
Defeat fifty enemies using the power in question. Respawning skeletons count towards the Achievement.
Prince of Wind
Defeat 50 enemies using the whirlwind.
THOMAS SAYS...
Defeat fifty enemies using the power in question. Respawning skeletons count towards the Achievement.
Sand Nemesis
Kill 50 enemies in a row without being hit and without using upgrade powers or the Power of Time.
Solomon's Army
Release Solomon's army.
THOMAS SAYS...
Unlocked via normal progression through the game.
↓50G / SILVER
↓15G / BRONZE
↓15G / BRONZE
↓30G / BRONZE
↓30G / SILVER
Page 33 of 34© 2010 IGN Entertainment, Inc.
Stay Dry
Move on solidified water for 1 minute without using the Power of Time.
Swift as the Wind
Defeat 30 enemies using the Power of Flight.
THOMAS SAYS...
Since the Flight power depends on using distant enemies as a target, you should get this without really trying.
This is Persia!
Kick 20 enemies off of ledges.
THOMAS SAYS...
Any method you use to toss an opponent over the edge works, whether it's simply kicking them, pushing them backward as part of a combo, or using the finisher where the Prince bodily chucks them off a cliff.
Untouchable
Defeat Ratash in the Throne Room wihout taking any damage.
THOMAS SAYS...
This is probably best done on a second or third playthrough with all upgrades.
Welcome to Rekem (Secret)
Arrived in Razia's city.
THOMAS SAYS...
Unlocked via normal progression through the game.
↓30G / SILVER
↓15G / BRONZE
↓20G / SILVER
↓30G / SILVER
↓30G / BRONZE
Page 34 of 34© 2010 IGN Entertainment, Inc.