print manual
DESCRIPTION
Print Manual, printing processTRANSCRIPT

INTRODUCTION
This book looks at the key principle areas of print production. It has been designed to enable you to
make the most of production techniques, such as stock choice, colour management and numerous print
production methods.
Preparing for print is something that needs to be carefully considered before the designing process takes place,
there are many different techniques and methods
available which can have very different effects on the
outcome of the design. Over the course of the book we will be looking at ways in which to
make the most of the print process.

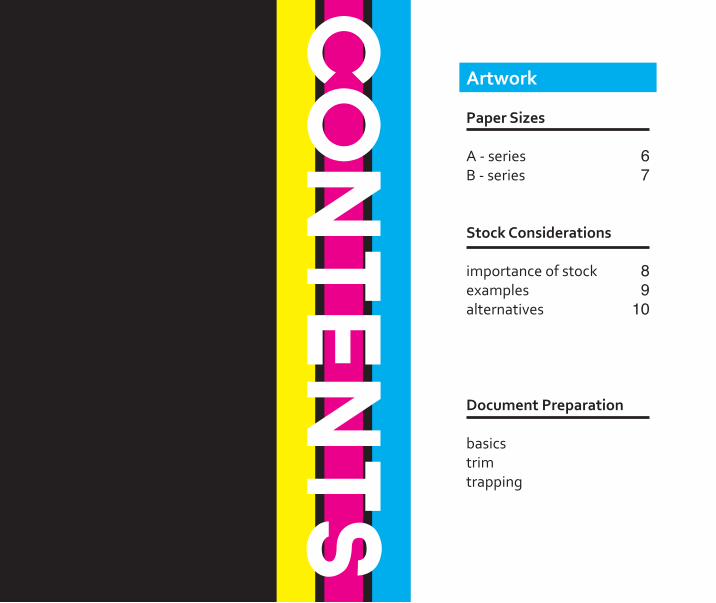
CONTENTS
Paper Sizes
A - seriesB - series
Stock Considerations
importance of stockexamplesalternatives
Document Preparation
basicstrimtrapping
Artwork
67
89
10
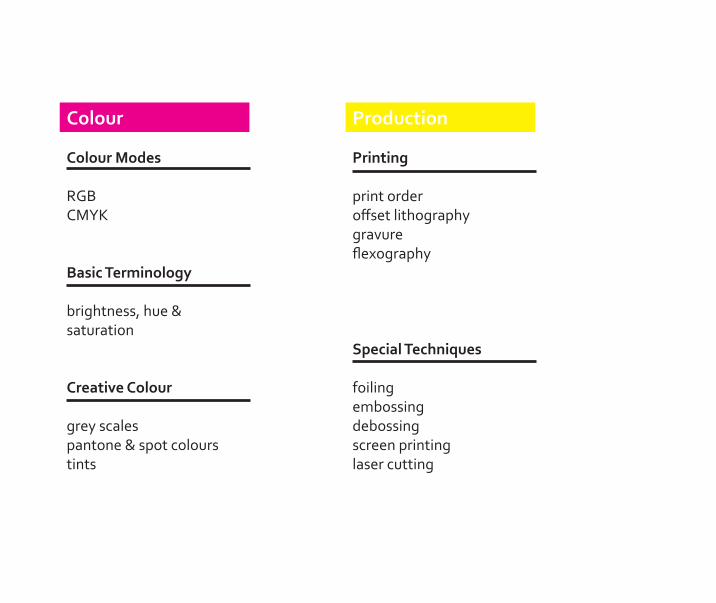
Colour Modes
RGBCMYK
Basic Terminology
brightness, hue & saturation
Creative Colour
grey scalespantone & spot colourstints
Colour
Printing
print orderoffset lithographygravureflexography
Special Techniques
foilingembossingdebossingscreen printinglaser cutting
Production

1
Artw
ork
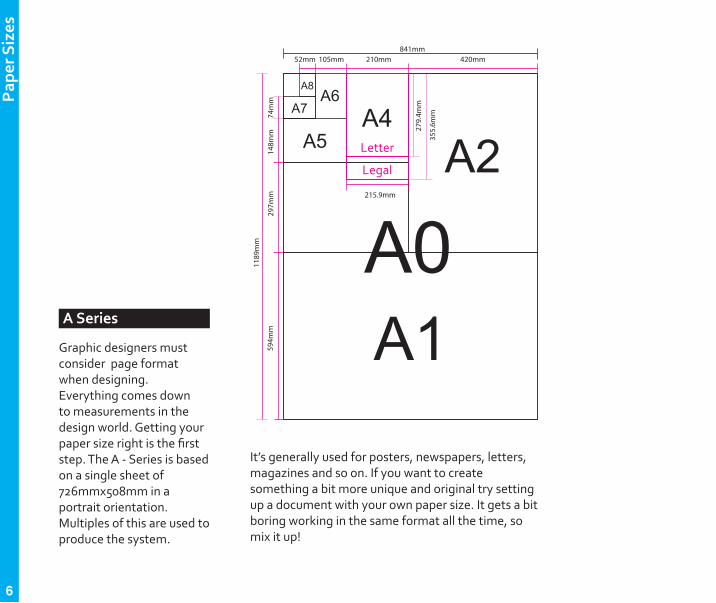
A Series
420mm210mm105mm52mm841mm
74mm
148m
m29
7mm
279.4m
m
355.6m
m
215.9mm
594m
m
A8
A7A6
A5A4
A2
A1A0
Letter
Legal
1189
mm
Graphic designers must consider page format when designing. Everything comes down to measurements in the design world. Getting your paper size right is the first step. The A - Series is based on a single sheet of 726mmx508mm in a portrait orientation. Multiples of this are used to produce the system.
It’s generally used for posters, newspapers, letters, magazines and so on. If you want to create something a bit more unique and original try setting up a document with your own paper size. It gets a bit boring working in the same format all the time, so mix it up!
Pap
er S
izes
6
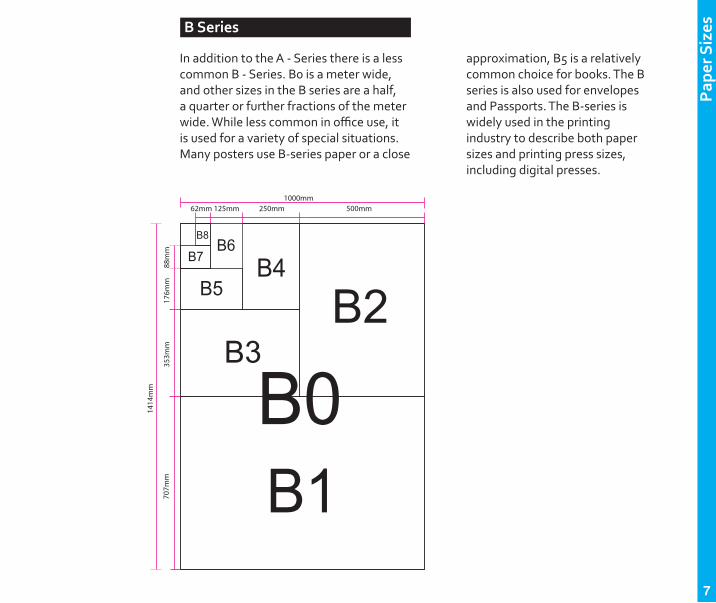
B Series
In addition to the A - Series there is a less common B - Series. B0 is a meter wide, and other sizes in the B series are a half, a quarter or further fractions of the meter wide. While less common in office use, it is used for a variety of special situations. Many posters use B-series paper or a close
approximation, B5 is a relatively common choice for books. The B series is also used for envelopes and Passports. The B-series is widely used in the printing industry to describe both paper sizes and printing press sizes, including digital presses.
Pap
er S
izes
500mm250mm125mm62mm1000mm
88mm
176m
m35
3mm
707m
m
B8
B7B6
B5B4
B2
B1B0
B3
1414
mm
7

The importance
of choosing the right stock
When it comes to choosing the right stock there are many different options to choose from. Stocks differ in size, colour, composition, texture, printability and various other factors that should be considered. Inks will have different effects on each stock.
The next few pages show some examples of the different stocks available from Fedrigoni. Its important to take into consideration how the texture or surface of the paper will effect the final printed outcome.
Stoc
k Co
nsid
erat
ions
8

GSM
GSM (grams per square meter) is a weight mea-surement that is part of a specification based on the weight of the square meter of the stock. The higher the GSM value, the more weighty a stock feels. An AO page is equal to one meter square, meaning that grams per square meter equates to the weight of a single AO sheet.
Paper Grain
Paper produced on a paper machine has a grain because the fibers from which it is made line up during the stages of manufacturing, in the direction that it passes through the paper making machine. The grain is the direction in which most of the fi-bers lay. This makes the paper easier to bend, fold or tear along its direction
Direction
The direction of the fibres in the paper for laser printers, such as those found in offices, typically has a grain that runs parallel to the long side of the paper to allow it to pass more easily through the printer.
Example Stock’s
Next
Stoc
k Co
nsid
erat
ions
9
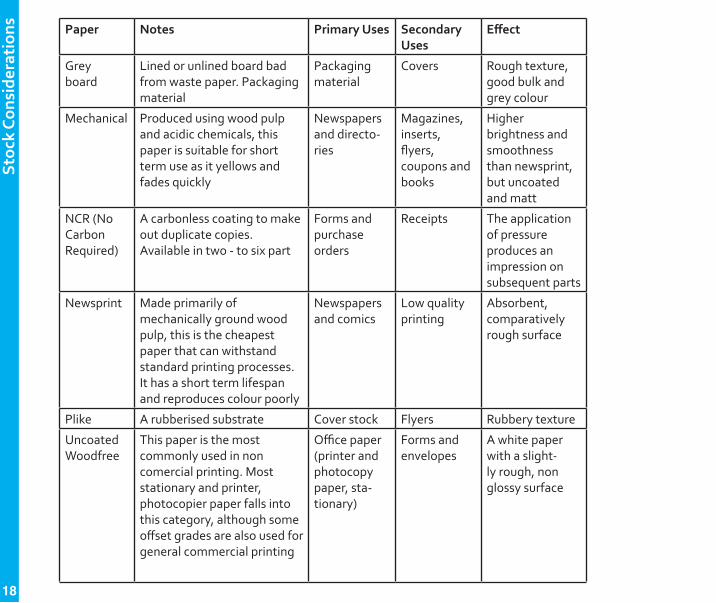
Paper Notes Primary Uses Secondary Uses
Effect
Greyboard
Lined or unlined board bad from waste paper. Packaging material
Packaging material
Covers Rough texture, good bulk and grey colour
Mechanical Produced using wood pulp and acidic chemicals, this paper is suitable for short term use as it yellows and fades quickly
Newspapers and directo-ries
Magazines, inserts, flyers, coupons and books
Higher brightness and smoothness than newsprint, but uncoated and matt
NCR (No Carbon Required)
A carbonless coating to make out duplicate copies. Available in two - to six part
Forms and purchase orders
Receipts The application of pressure produces an impression on subsequent parts
Newsprint Made primarily of mechanically ground wood pulp, this is the cheapest paper that can withstand standard printing processes. It has a short term lifespan and reproduces colour poorly
Newspapers and comics
Low quality printing
Absorbent, comparatively rough surface
Plike A rubberised substrate Cover stock Flyers Rubbery texture
Uncoated Woodfree
This paper is the most commonly used in non comercial printing. Most stationary and printer, photocopier paper falls into this category, although some offset grades are also used for general commercial printing
Office paper (printer and photocopy paper, sta-tionary)
Forms and envelopes
A white paper with a slight-ly rough, non glossy surface
Stoc
k Co
nsid
erat
ions
18

Paper Notes Primary Uses Secondary Uses
Effect
Antique A high-quality paper with a clay coating on both sides to give a good printing surface, especially for half tones, where definition and detail are important
To add texture to publications such as annual reports
Stationary and flyer’s
A textured stock with a rough or matt surface
Art A high-quality paper with a clay coating on both sides to give a good printing surface, especially for half tones, where definition and detail are important
Colour printing and magazines
Flyers, cal-enders and brochures
A glossy high brightness surface that is smooth to the touch
Artboard Uncoated board Cover stock Flyer’s and packaging
A stiff stock
Cartridge A thick white paper. Ink and pencil drawings are particularly well produced
Stationary and annual reports
Mail shots A stiff feel, available in several colours
Cast Coated
Wet-coated paper is pressed (cast) against a hot, polished metal drum to obtain a high gloss
Magazines and brochures
Promotional material
A smooth, glossy surface
Chromo A waterproof coating is applied to one side of the paper to allow for the embossing and varnishing processes
Labels, wrappings and covers
Applications where only one side has to be printed
Clay coated on one side; can be glossy or matt
Flock Paper coated with flock; very fine woolen surface. Used for decorative covers.
Decorative colours
Packaging A textured decorative service
Stoc
k Co
nsid
erat
ions
19

Safe Area
Resolution
When setting up a document you need to take into account the resolution of the file. When designing for print you should be working at 300dpi.
The resolution of a digital image is determined buy the amount of information it has. Images with more information.
Resolution is determined on pixel depth : the number of bits available to generate a colour for each pixel. Greater bit depth means that more colours are available and more accurate colour reproduction is possible in the digital image.
Resolution
The difference between bleed, trim and registration
Bleed - The printing of a design over and beyond its trim marksTrim - The process of cutting away the waste stock around a design to form the final outcome.Registration - The exact alignment of two or more printed images with each other on the same stock.
Safe Area
Bleed - The image will be printed up to hereTrim - This area will be trimmed down to the right sizeSafe Area -for text and image
Doc
umen
t Co
nsid
erat
ions
20

Doc
umen
t Co
nsid
erat
ions
When printing a job, the intention is always to obtain good colour regis-tration. However, this is not always possible; gaps can always appear when two inks that are to be printed as solid colours are placed next to each other. This is a problem that can be foreseen, however, and isresolvable through the use of ink trapping.
Trapping
Different inks that print as solid colours can relate to each other in different ways and ink-trapping describes a process whereby one printed ink is surrounded by another that effectively traps it.
mis-registered spread
choke centering
In this example, the yellow shape is misaligned with the cyan square, leaving a white space. The ink trapping techniques of choke and spread are used to prevent this.
This is an example of spread. The diameter of the yellow shape is slightly larger than the cyan aperture in which it sits.
This is an example of choke. The cyan aperture is slightly smaller than the diameter of the yellow shape that it sits within it.
This example has centered trapping whereby the shape is enlarged and the aperture reduced by the same amount.
21

2
colour
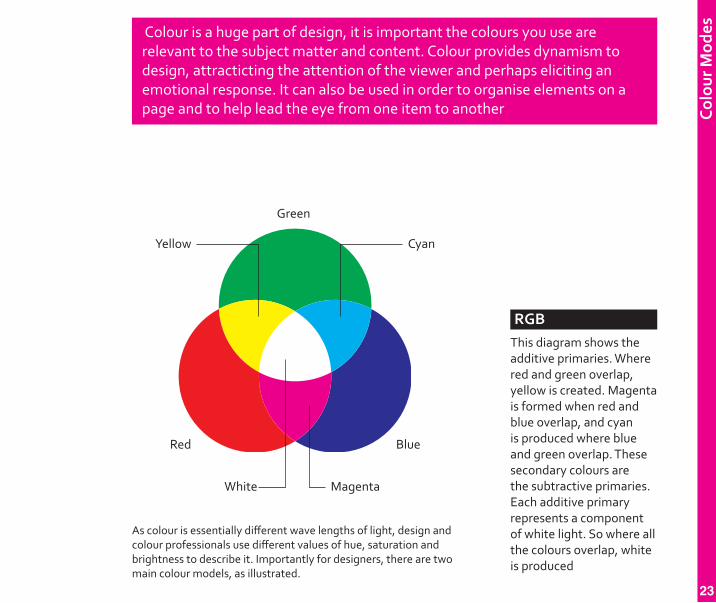
Colour is a huge part of design, it is important the colours you use are relevant to the subject matter and content. Colour provides dynamism to design, attracticting the attention of the viewer and perhaps eliciting an emotional response. It can also be used in order to organise elements on a page and to help lead the eye from one item to another
RGBThis diagram shows the additive primaries. Where red and green overlap, yellow is created. Magenta is formed when red and blue overlap, and cyan is produced where blue and green overlap. These secondary colours are the subtractive primaries. Each additive primary represents a component of white light. So where all the colours overlap, white is produced
As colour is essentially different wave lengths of light, design and colour professionals use different values of hue, saturation and brightness to describe it. Importantly for designers, there are two main colour models, as illustrated.
Red Blue
Green
Yellow Cyan
White Magenta
Colo
ur M
odes
23

Cyan Yellow
Magenta
Blue Red
Black Green
CMYKThis diagram shows the subtractive primary colours. Each of these has one of the additive primary colours missing. Where two subtractive colours overlap, only one additive primary is visible. Blue is formed where cyan and magenta
overlap. Cyan and yellow overlap to produce green. Magenta and yellow combine to form red. Where all three of the subtractive colours overlap, black is produced because no light escapes
Colo
ur M
odes
24

Hue, or colour refers to the
unique characteristic of a
colour that helps us visually
distinguish one colour from
another. Hues or colours
are formed by different
wavelengths of light
Brightness or value refers
to how light or dark colour
is. Changes in the
brightness value can be
achieved by mixing a
colour with black or white.
Saturation or chroma
refers to the purity of a
colour and the saturation
levels describe a colours
tendancy to move towards
or away from grey.
These terms help a designer to
specify and communicate colour
information and help overcome the
potential vagaries of computer
screens and printing presses where
a colour is not always what it
seems. Acurate colour description
in terms of hue, saturation and
brightness helps a designer and
print meet the expectations of the
client.
Brightness, Hue & Saturation
Bas
ic T
erm
inol
ogy
25

Greyscale
Designers can make graphic interventions to images in order to make them appear to have been shot in greyscale.
Crea
tive
Col
our
Blue ChannelGreen ChannelRed Channel
Original
The image on the left can be converted to greyscale. The image contains three RGB channels that are shown underneath. RGB channels represent sensitivity towards different coloured light. Each channel has a bias towards the type of light prevalent at different types of day.
During the early morning, blue light is dominant while red dominates in the evening and green at midday. Externally shot images are generally affected by the sun and so splitting the channels result in the three greyscale images with each one being a record of the red, green or blue light.
This may give the designer the option, particularly with exterior images, to create an impression of the time of day at which a photograph was shot.
26

Crea
tive
Col
our
Pantone253C
C=0 M=70 Y=0 K=0
Graphic Designers use spot colours to ensure that a particular colour in a design will print. This may be necessary if the colour is outside the range or gamut of possibilities of the four colour CMYK printing process, or because there is a pressing need for a specific colour, such as for a corporate logo. Special colours have greater intensity and vibrancy as they print as a solid colour rather than one that is made up of half tone dots.
Pantone & Spot Colours
The top square is printed as a solid coated Pantone 253C spot colour and its nearest CMYK version is printed below. The process colour square is much duller than the spot colour version as it is made with half-tone dots of colour, whereas the special colour is applied as a flat colour.
27
Crea
tive
Col
our
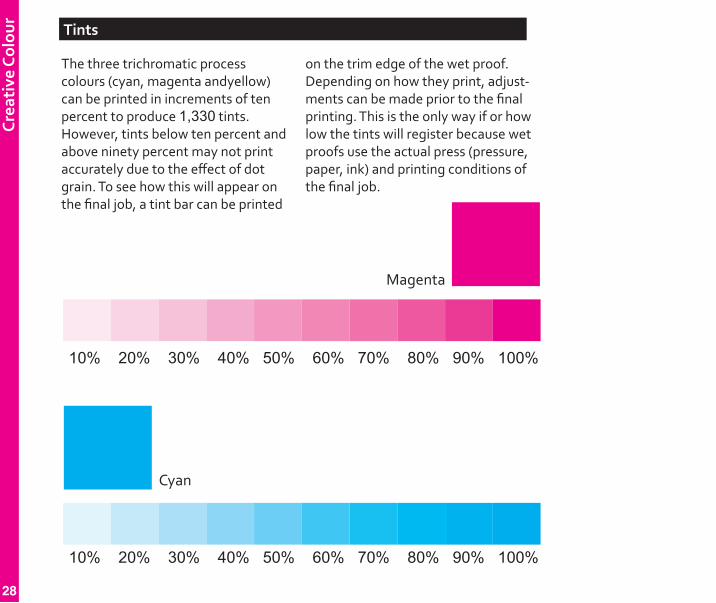
Tints
The three trichromatic process colours (cyan, magenta andyellow) can be printed in increments of ten percent to produce 1,330 tints. However, tints below ten percent and above ninety percent may not print accurately due to the effect of dot grain. To see how this will appear on the final job, a tint bar can be printed
10% 20% 30% 40% 50% 60% 70% 80% 90% 100%
10% 20% 30% 40% 50% 60% 70% 80% 90% 100%
Magenta
Cyan
on the trim edge of the wet proof. Depending on how they print, adjust-ments can be made prior to the final printing. This is the only way if or how low the tints will register because wet proofs use the actual press (pressure, paper, ink) and printing conditions of the final job.
28
3
Productio
n

Pri
ntin
g Printing Tints
Printing is a process by which the ink in the form of a design is applied under pressure to a substrate to leave an impression.
Printing and Print Order
A designer communicates in printing requirements for a job through a print order. This includes the printing pro-cess to be used, the stock, the print run and any special requirements.
Print order is the sequence in which different colours used in a job are laid down during the printing process. For four colour print process, the order is cyan, magenta, yellow then black. It is often thought that black is labelled as K so as not to be confused with the blue. The K actually stands for key, as this is the colour that all other colours ‘key’ to when registering.
30
Pri
ntin
g
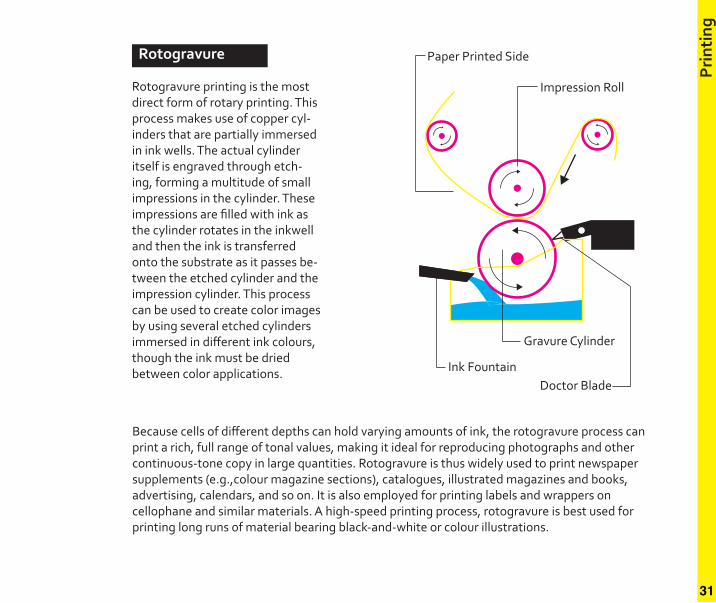
Rotogravure
Rotogravure printing is the most direct form of rotary printing. This process makes use of copper cyl-inders that are partially immersed in ink wells. The actual cylinder itself is engraved through etch-ing, forming a multitude of small impressions in the cylinder. These impressions are filled with ink as the cylinder rotates in the inkwell and then the ink is transferred onto the substrate as it passes be-tween the etched cylinder and the impression cylinder. This process can be used to create color images by using several etched cylinders immersed in different ink colours, though the ink must be dried between color applications.
Because cells of different depths can hold varying amounts of ink, the rotogravure process can print a rich, full range of tonal values, making it ideal for reproducing photographs and other continuous-tone copy in large quantities. Rotogravure is thus widely used to print newspaper supplements (e.g.,colour magazine sections), catalogues, illustrated magazines and books, advertising, calendars, and so on. It is also employed for printing labels and wrappers on cellophane and similar materials. A high-speed printing process, rotogravure is best used for printing long runs of material bearing black-and-white or colour illustrations.
Doctor BladeInk Fountain
Gravure Cylinder
Impression Roll
Paper Printed Side
31

Pri
ntin
g
Flexography
Flexography, also referred to as flexo, typically uses flexographic plates to accomplish the image transfer onto the substrate. The plates are created using a number of methods, but the end result is the same: a plastic or rubber plate, with the desired image in a mirrored, raised relief.
The flexography process employs a three-roller system rather than a two-roller system. One roller is partially immersed in the inkwell. This transfers ink to the raised surfaces of the plate, which is wrapped around its own cylinder. The plate is scraped by the doc-tor blade. The substrate is then passed between the plate cylin-der and the impression cylinder, effecting the ink transfer from the plate to the substrate.
Publication flexography is used mainly in the production of newspaper, comics, directories, newspaper inserts, and catalogs. Packaging flexography is used for the production of folding
cartons, labels, and packaging materials. Large quantities of inks are used during normal runs on flexographic presses; however, some printers are able to recycle a majority of their spent inks and wash waters. Major chemicals used in flexography include plate-making solution, water and solvent based inks, and blanket/roller cleaning solvents.
Anilox Roller
Ink Fountain
Plate Cylinder
Impression Cylinder
Doctor Blade
32

Pri
ntin
g
Offset Lithography
Offset Lithography utilizes the principle that water and grease do not mix. The image area of the palte is treated with a greasy medium. Then the plate is dampened with by rollers then inked. The ink adheres to the greasy image but not the dampened areas. The paper is moved into position over the plate and then the plate and paper are run through the press.
Lithographic has a planographic (flat). The whole surface has both ink and water with the addition of alcohol to aid dispersion.to get a printing surface and this method is still used today for limited editions of fine art prints. The next development in printing came with metal plates which could be curved around metal cylinders to allow the use of rotary press. Finally the “offset” principle was developed.
Where Lithography is used, it is nearly always as Offset. Meaning the inked image on the metal plate is offset (printed) onto a rubber blanket wrapped around a rotating metal cylinder. The image is then transferred from that blanket onto the paper. The reason for the rubber plate is because it is less abrasive to the plate then paper. Lithography is good for cheap and fast printing, and the rubber blanket enables the use of a wide range of papers. However its not suitable for small runs and dampening can cause the paper to stretch or warp after binding.
Ink RollersWater Rollers
Plate Cylinder
OffsetCylinder
Paper
Water
ImpressionCylinder
33

Spec
ial T
echn
ique
s
Foil Blocking
Foil stamping, typically a
commercial print process, is
the application of pigment or
metallic foil, often gold or silver ,
but can also be various patterns
or what is known as pastel foil
which is a flat opaque color or
white special film-backed
material, to paper where a
heated die is stamped onto the
foil, making it adhere to the
surface leaving the design of the
die on the paper. Foil stamping
can be combined with
embossing to create a more
striking 3D image.
Foil stamping machines, also known
as hot foil stampers, use heat to
transfer metallic foil to a solid
surface. Examples of items that are
foil stamped include pencils,
napkins, matchbooks, photographs
and books. The foil stamp is a
permanent process. These machines
are popular with wedding
businesses, photography studios
and other businesses that need to
brand or mark products.
The example on the
right has been foiled
by hand.
34

Spec
ial T
echn
ique
s
Embossing
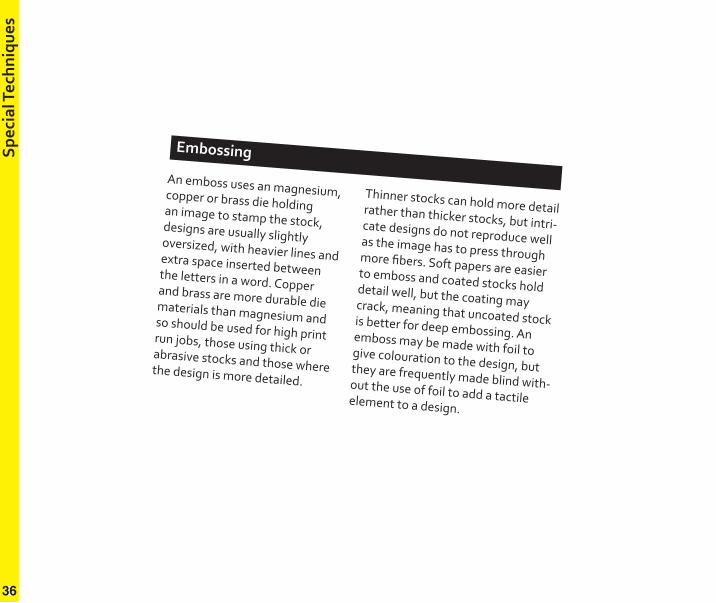
An emboss uses an magnesium, copper or brass die holding an image to stamp the stock, designs are usually slightly oversized, with heavier lines and extra space inserted between the letters in a word. Copper and brass are more durable die materials than magnesium and so should be used for high print run jobs, those using thick or abrasive stocks and those where the design is more detailed.
Thinner stocks can hold more detail rather than thicker stocks, but intri-cate designs do not reproduce well as the image has to press through more fibers. Soft papers are easier to emboss and coated stocks hold detail well, but the coating may crack, meaning that uncoated stock is better for deep embossing. An emboss may be made with foil to give colouration to the design, but they are frequently made blind with-out the use of foil to add a tactile element to a design.
636


Spec
ial T
echn
ique
s
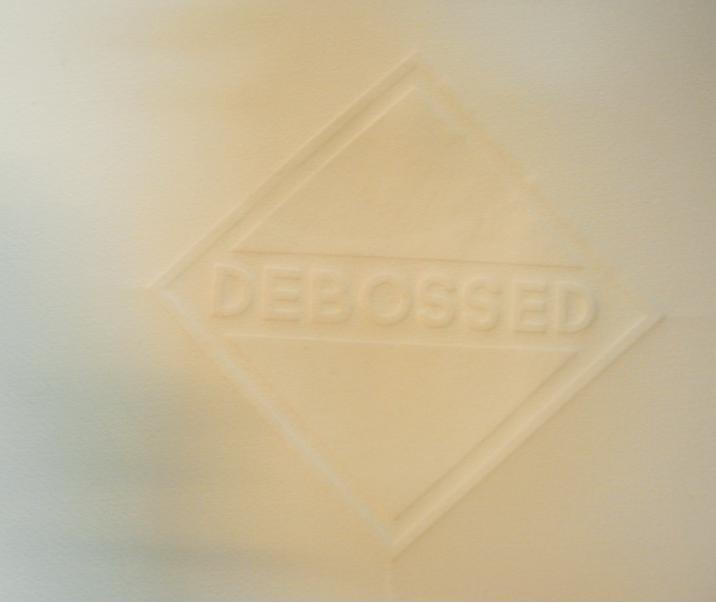
Debossing
A Deboss uses a metal dye
containing a design, which is
stamped from above on to the
stock to leave an indentation.
Debossing also produces better
results on thicker stock because a
deeper indentation is achieved.
The ability of an emboss or de-
boss to leave a good impression
is a function of the fineness of
the design and the stock calliper.
Thinner stocks can hold finer
lines, but there is a danger of
puncturing the stock. Thicker stocks
are more robust, but lose fine detail
as the design presses through more
paper fibers.
38

Spec
ial T
echn
ique
s
Screen PrintingScreen printing is a printing technique that uses a woven mesh to support an ink-block-ing stencil. The attached stencil forms open areas of mesh that transfer ink or other printable materials which can be pressed through the mesh as a sharp-edged image onto a substrate. A fill blade or squeegee is moved across the screen stencil, forcing or pumping ink into the mesh openings for transfer by capil-lary action during the squeegee stroke. Basically, it is the process of using a stencil to apply ink onto another material.
Screen printing is also a stencil method of print making in which a design is imposed on a screen of polyester or other fine mesh, with blank areas coated with an impermeable substance. Ink is forced into the mesh openings by the fill blade or squeegee and onto the printing surface during the squeegee stroke. It is also known as silkscreen, serigraphy, and serigraph printing. A number of screens can be used to produce a multicoloured image.
40

Spec
ial T
echn
ique
s
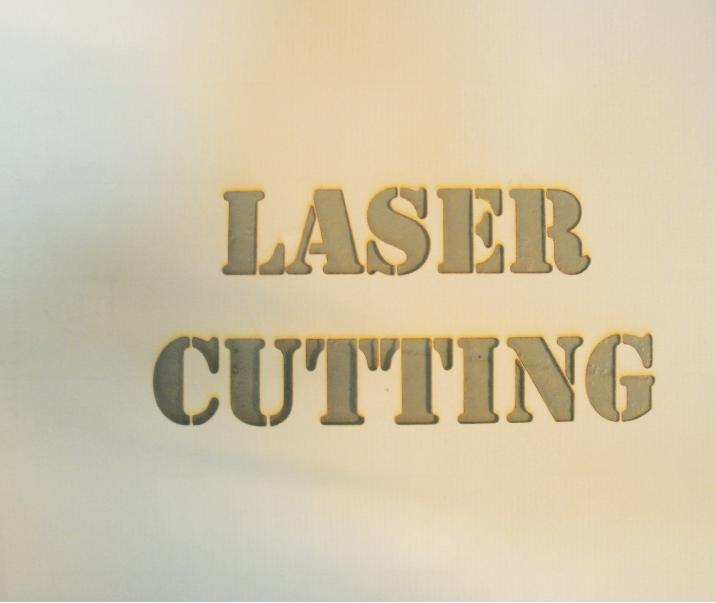
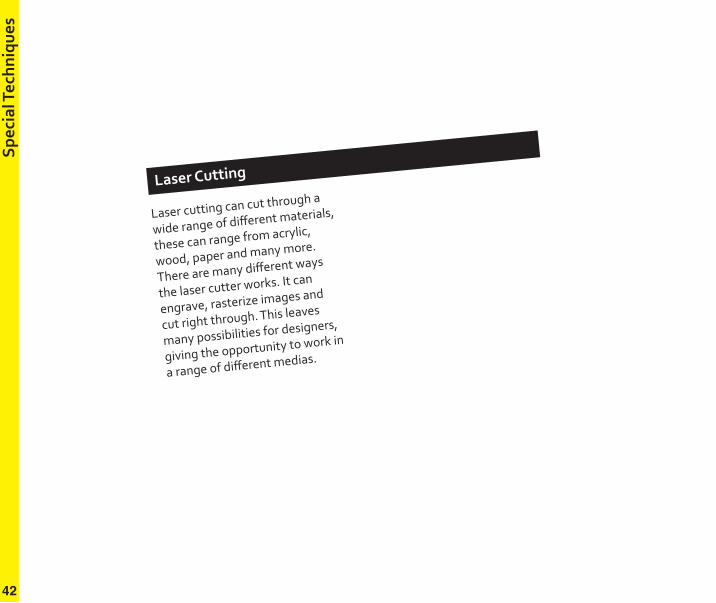
Laser Cutting
Laser cutting can cut through a
wide range of different materials,
these can range from acrylic,
wood, paper and many more.
There are many different ways
the laser cutter works. It can
engrave, rasterize images and
cut right through. This leaves
many possibilities for designers,
giving the opportunity to work in
a range of different medias.
42