printing from undefined - · pdf file2. on disc brake models, remove rotor and caliper....
TRANSCRIPT

1999-2000 SUSPENSION
Rear - Front Wheel Drive
DESCRIPTION
On Avalon, Camry, Camry Solara, Celica and Corolla models, rear suspension components are strut assemblies or shock absorbers with coil springs, connected between rear axle carrier or lower suspension arm, and vehicle body. Wheel bearings and the axle hub is a one piece assembly, bolted to rear axle carrier. See Fig. 1 or Fig. 2 .
1999 Toyota RAV4
1999-2000 SUSPENSION Rear - Front Wheel Drive
1999 Toyota RAV4
1999-2000 SUSPENSION Rear - Front Wheel Drive
Microsoft
Sunday, November 22, 2009 10:37:21 AM Page 1 © 2005 Mitchell Repair Information Company, LLC.
Microsoft
Sunday, November 22, 2009 10:37:26 AM Page 1 © 2005 Mitchell Repair Information Company, LLC.

Fig. 1: Exploded View Of Rear Suspension Components (Avalon Shown; Camry, Camry Solara, 1999 Celica & Corolla Are Similar) Courtesy of TOYOTA MOTOR SALES, U.S.A., INC.
Fig. 2: Exploded View Of Rear Suspension Components (2000 Celica) Courtesy of TOYOTA MOTOR SALES, U.S.A., INC.
1999 Toyota RAV4
1999-2000 SUSPENSION Rear - Front Wheel Drive
Microsoft
Sunday, November 22, 2009 10:37:21 AM Page 2 © 2005 Mitchell Repair Information Company, LLC.
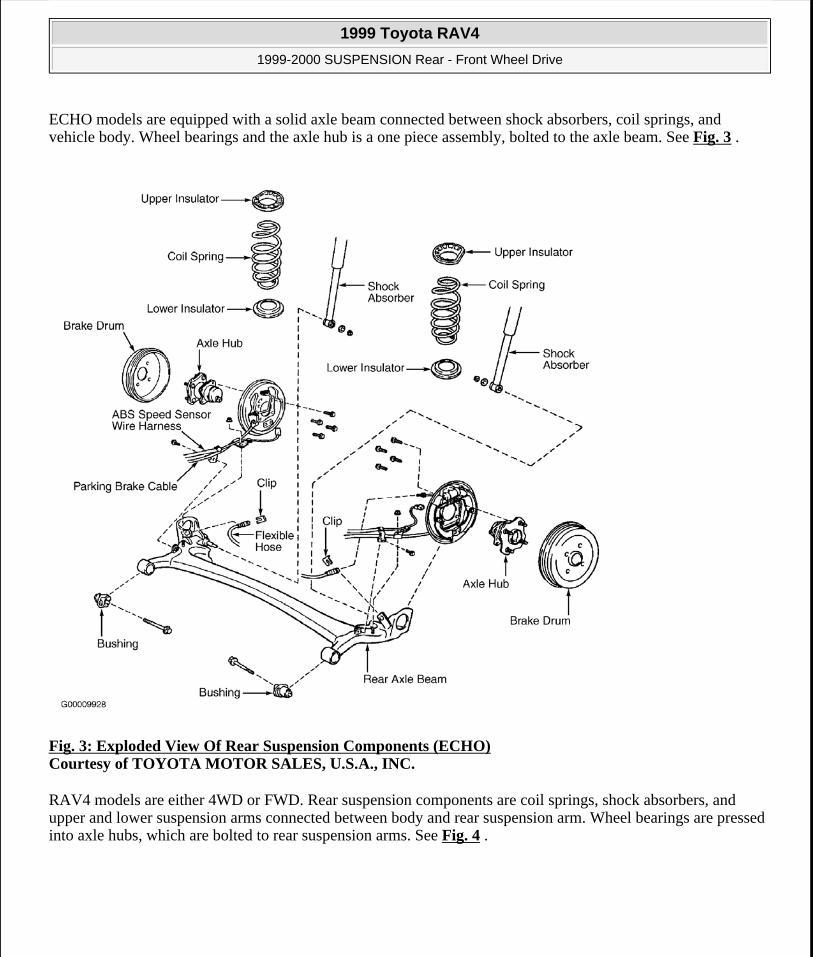
ECHO models are equipped with a solid axle beam connected between shock absorbers, coil springs, and vehicle body. Wheel bearings and the axle hub is a one piece assembly, bolted to the axle beam. See Fig. 3 .
Fig. 3: Exploded View Of Rear Suspension Components (ECHO) Courtesy of TOYOTA MOTOR SALES, U.S.A., INC.
RAV4 models are either 4WD or FWD. Rear suspension components are coil springs, shock absorbers, and upper and lower suspension arms connected between body and rear suspension arm. Wheel bearings are pressed into axle hubs, which are bolted to rear suspension arms. See Fig. 4 .
1999 Toyota RAV4
1999-2000 SUSPENSION Rear - Front Wheel Drive
Microsoft
Sunday, November 22, 2009 10:37:21 AM Page 3 © 2005 Mitchell Repair Information Company, LLC.

Fig. 4: Exploded View Of Rear Suspension Components (RAV4) Courtesy of TOYOTA MOTOR SALES, U.S.A., INC.
ADJUSTMENTS & INSPECTION
WHEEL ALIGNMENT SPECIFICATIONS & PROCEDURES
1999 Toyota RAV4
1999-2000 SUSPENSION Rear - Front Wheel Drive
Microsoft
Sunday, November 22, 2009 10:37:21 AM Page 4 © 2005 Mitchell Repair Information Company, LLC.
WHEEL BEARING INSPECTION
Raise and support vehicle. Remove wheel and brake drum, or rotor (if equipped). Position dial indicator with stem against center of axle hub. Move axle hub in and out while observing dial indicator. Replace hub if axial play exceeds .002" (.05 mm). Measure hub axial runout. Replace hub if runout exceeds .0028" (.07 mm).
WHEEL BEARING ADJUSTMENT
Hubs must be replaced if axle end play or runout are not within specification. No adjustment is available. See WHEEL BEARINGS (HUBS) under REMOVAL & INSTALLATION
REMOVAL & INSTALLATION
AXLE BEAM
Removal (ECHO)
1. Raise and support vehicle. Remove rear wheels and brake drums. Disconnect brakelines from flex hoses, remove retaining clips from shock absorbers and plug openings. Disconnect ABS sensor and remove harness clamp from axle beam. Disconnect parking brake cable from backing plate and remove cable clamp from axle beam. Remove axle hub assemblies. Remove backing plate assemblies, with brake shoes still attached.
2. Remove high-mounted stop light from rear package tray. Remove 2 clips and remove package tray. Remove rear seat. Remove door scuff plate and door opening trim. See Fig. 5 . Remove rear seat outer seat belts and remove quarter trim panels. On 2 door models, remove outer anchor for front seat shoulder belt and remove roof side inner garnish. On all models, remove room partition board.
3. Using 2 floor jacks, support rear axle beam under each coil spring. While holding shock absorber shaft, remove the 2 upper nuts, disconnecting lower suspension supports from body. Lower jacks slowly. Remove coil springs and insulators. Remove axle beam-to-body bolts. Remove axle beam.
NOTE: See SPECIFICATIONS & PROCEDURES in WHEEL ALIGNMENT article.
1999 Toyota RAV4
1999-2000 SUSPENSION Rear - Front Wheel Drive
Microsoft
Sunday, November 22, 2009 10:37:21 AM Page 5 © 2005 Mitchell Repair Information Company, LLC.

Fig. 5: Exploded View Of Rear Seat Components (ECHO) Courtesy of TOYOTA MOTOR SALES, U.S.A., INC.
Installation (ECHO)
1. Install coil spring insulators and coil springs to rear axle beam. Install shock absorbers and lower suspension supports to axle beam, if removed. Raise axle beam with floor jacks and install axle beam-to-body bolts. Install lower suspension supports and shock absorbers to body. Leaving axle beam-to-body bolts, lower suspension supports and shock absorber bolts loose, lower vehicle.
2. Bounce vehicle several times to settle suspension. Tighten all nuts and bolts to specification. See TORQUE SPECIFICATIONS . To complete installation, reverse removal procedure. Fill and bleed brake system.
AXLE HUB & CARRIER
Removal (Avalon, Camry, Camry Solara, Celica & Corolla)
1. Raise and support vehicle. Remove rear wheels. On models with ABS, disconnect rear speed sensor. On drum brake models, disconnect brakeline from flex hose, and plug openings. Remove brake drum.
1999 Toyota RAV4
1999-2000 SUSPENSION Rear - Front Wheel Drive
Microsoft
Sunday, November 22, 2009 10:37:21 AM Page 6 © 2005 Mitchell Repair Information Company, LLC.

2. On disc brake models, remove rotor and caliper. Leaving flex hose attached, suspend caliper aside. On all models, remove 4 axle hub-to-axle carrier bolts, axle hub and "O" ring.
3. Note position of nuts on suspension arms and strut rods for installation reference. Disconnect strut rod from axle carrier. Disconnect No. 1 and No. 2 lower suspension arms from axle carrier. Remove 2 bolts and nuts, and remove axle carrier.
Installation (Avalon, Camry, Camry Solara, Celica & Corolla)
To install, reverse removal procedure. Coat NEW "O" ring with grease and install hub. Tighten all fasteners to specification. See TORQUE SPECIFICATIONS . Bleed brake system. Check rear wheel alignment.
Removal (RAV4)
1. Raise and support vehicle. Remove rear wheel and brake drum. On 4WD models, remove drive axle. Remove ABS speed sensor (if equipped). Remove drive axle lock nut. Place matchmarks on drive axle and differential gear shaft. Remove the 4 nuts and remove drive axle from differential side gear. On FWD models, disconnect ABS sensor and remove harness clamp (if equipped). On all models, remove 2 brakeline clamps from rear No. 1 suspension arm. Remove parking brake cable clamp. See Fig. 4 .
2. Remove 4 bolts and remove axle hub and backing plate, leaving brake shoes attached. Disconnect lower end of shock absorber. Using Ball Joint Puller (09628-62011), disconnect upper and lower suspension arms from rear No. 1 suspension arm. Place matchmarks on camber adjusting cam and suspension member and remove bolt. See Fig. 6 . Place matchmarks on toe adjusting cam and body and loosen bolt. See Fig. 7 . Remove coil spring and upper insulator. Remove loosened toe adjusting cam bolt. Remove rear No. 1 suspension arm.
NOTE: Bounce vehicle several times to stabilize suspension. Tighten axle carrier-to-shock absorber assembly and suspension arm bolts to specification with vehicle at normal operating height.
1999 Toyota RAV4
1999-2000 SUSPENSION Rear - Front Wheel Drive
Microsoft
Sunday, November 22, 2009 10:37:21 AM Page 7 © 2005 Mitchell Repair Information Company, LLC.

Fig. 6: Placing Matchmarks On Camber Cam (RAV4) Courtesy of TOYOTA MOTOR SALES, U.S.A. INC.
1999 Toyota RAV4
1999-2000 SUSPENSION Rear - Front Wheel Drive
Microsoft
Sunday, November 22, 2009 10:37:21 AM Page 8 © 2005 Mitchell Repair Information Company, LLC.

Fig. 7: Placing Matchmarks On Toe Cam (RAV4) Courtesy of TOYOTA MOTOR SALES, U.S.A. INC.
Installation (RAV4)
To install, reverse removal procedure. Install suspension arms and adjusting cam bolts, but DO NOT tighten. Lower vehicle and bounce several times to settle suspension. Tighten all nuts and bolts to specification, with vehicle weight on suspension. See TORQUE SPECIFICATIONS .
STABILIZER BAR
Removal (Avalon, Camry, Camry Solara, Celica & Corolla)
1. Raise and support vehicle. Remove rear wheels. On Camry models, remove rear muffler heat shield. On Celica models, remove rear muffler, and heat shield, if equipped.
2. On 1999 Celica models, using a jack and wooden block, support fuel tank and disconnect right side fuel tank mounting band.
3. On Corolla models, disconnect flexible brake hoses mounted on shock absorbers. Remove the clips and plug openings. Disconnect shock absorbers from rear axle carrier. Using a jack and wooden block, support fuel tank and disconnect both fuel tank mounting bands. Lower fuel tank.
4. On all models, disconnect left and right stabilizer bar links from stabilizer bar. Remove stabilizer bar brackets and bushings. Remove stabilizer bar.
1999 Toyota RAV4
1999-2000 SUSPENSION Rear - Front Wheel Drive
Microsoft
Sunday, November 22, 2009 10:37:21 AM Page 9 © 2005 Mitchell Repair Information Company, LLC.

Installation
To install, reverse removal procedure. On Avalon, Camry and 2000 Celica models, install stabilizer bar bushings to the outside of the bushing stoppers on stabilizer bar. See Fig. 8 . On Corolla & 1999 Celica models, install stabilizer bar bushings to the outside of the paint line on stabilizer bar. See Fig. 9 . Tighten all nuts and bolts to specification. See TORQUE SPECIFICATIONS .
Fig. 8: Installing Stabilizer Bar Bushings (Camry Shown; Avalon, Camry Solara & 2000 Celica Are Similar) Courtesy of TOYOTA MOTOR SALES, U.S.A., INC.
1999 Toyota RAV4
1999-2000 SUSPENSION Rear - Front Wheel Drive
Microsoft
Sunday, November 22, 2009 10:37:21 AM Page 10 © 2005 Mitchell Repair Information Company, LLC.
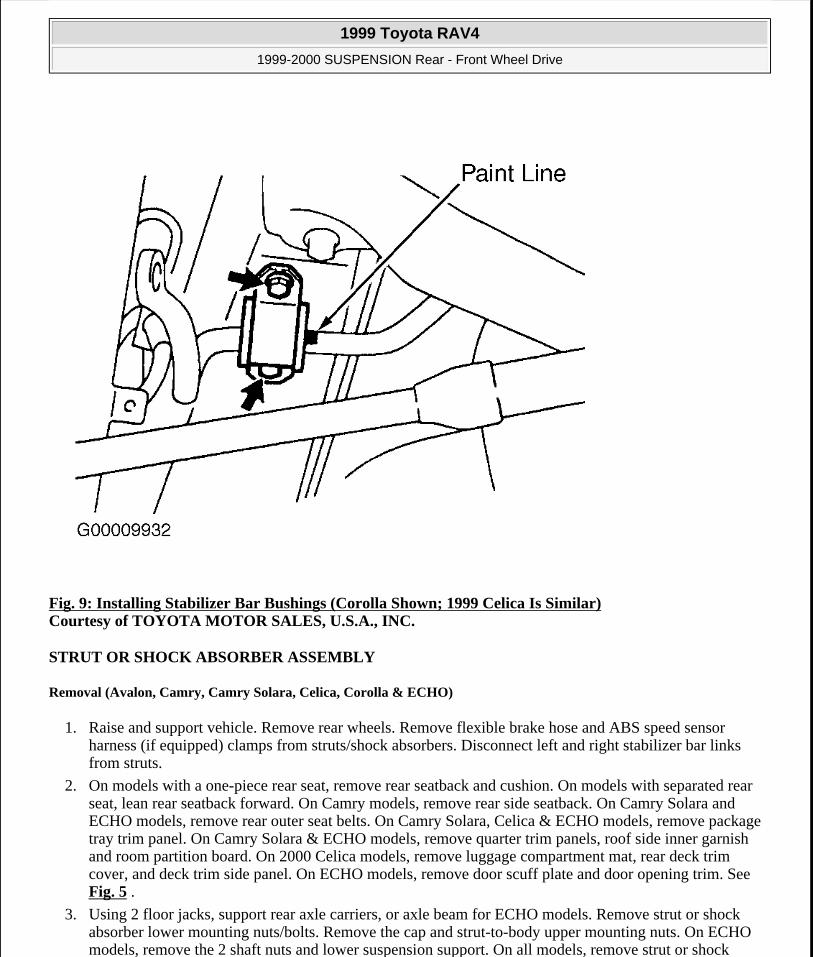
Fig. 9: Installing Stabilizer Bar Bushings (Corolla Shown; 1999 Celica Is Similar) Courtesy of TOYOTA MOTOR SALES, U.S.A., INC.
STRUT OR SHOCK ABSORBER ASSEMBLY
Removal (Avalon, Camry, Camry Solara, Celica, Corolla & ECHO)
1. Raise and support vehicle. Remove rear wheels. Remove flexible brake hose and ABS speed sensor harness (if equipped) clamps from struts/shock absorbers. Disconnect left and right stabilizer bar links from struts.
2. On models with a one-piece rear seat, remove rear seatback and cushion. On models with separated rear seat, lean rear seatback forward. On Camry models, remove rear side seatback. On Camry Solara and ECHO models, remove rear outer seat belts. On Camry Solara, Celica & ECHO models, remove package tray trim panel. On Camry Solara & ECHO models, remove quarter trim panels, roof side inner garnish and room partition board. On 2000 Celica models, remove luggage compartment mat, rear deck trim cover, and deck trim side panel. On ECHO models, remove door scuff plate and door opening trim. See Fig. 5 .
3. Using 2 floor jacks, support rear axle carriers, or axle beam for ECHO models. Remove strut or shock absorber lower mounting nuts/bolts. Remove the cap and strut-to-body upper mounting nuts. On ECHO models, remove the 2 shaft nuts and lower suspension support. On all models, remove strut or shock
1999 Toyota RAV4
1999-2000 SUSPENSION Rear - Front Wheel Drive
Microsoft
Sunday, November 22, 2009 10:37:21 AM Page 11 © 2005 Mitchell Repair Information Company, LLC.
absorber.
Inspection
Compress and extend shock/strut shaft to check for abnormal resistance or noise. Push shaft in fully, and release. Shaft should return at a constant speed throughout its travel. If shock/strut is defective, replace as an assembly.
Installation
To install, reverse removal procedure. Tighten all fasteners to specification. See TORQUE SPECIFICATIONS .
Removal & Installation (RAV4)
Raise and support vehicle. Remove rear wheels. Using a jack and wooden block, support rear suspension arm. Remove upper suspension cap. See Fig. 4 . Remove 2 shaft nuts, retainers and cushion. Remove shock absorber. To install, reverse removal procedure. Tighten all nuts and bolts to specification. See TORQUE SPECIFICATIONS .
STRUT ROD
Removal & Installation (Avalon, Camry, Camry Solara, 1999 Celica & Corolla)
1. Raise and support vehicle. Remove rear wheels. On all models except 1999 Celica, remove center exhaust pipe. On all models, remove nuts and bolts holding strut rod to axle carrier, and body. Remove strut rod.
2. Install strut rod, leaving nuts and bolts loose. Lower vehicle. Bounce vehicle several times to settle suspension. With vehicle weight on suspension, tighten all nuts and bolts to specification. See TORQUE SPECIFICATIONS .
SUSPENSION ARMS
Removal (Avalon, Camry, Camry Solara, Celica & Corolla)
1. Raise and support vehicle. Remove rear wheels. Remove the 2 nuts and suspension arm washer. See Fig. 1 . Remove No. 2 suspension arm from axle carrier. Remove stabilizer bar brackets from suspension member.
NOTE: If strut is to be disassembled, loosen, but do not remove strut shaft nut before removing strut.
CAUTION: To prevent personal injury, discharge gas from old shock absorber prior to disposal. Carefully drill a hole 0.08-0.12" (2-3 mm) in diameter above lower mounting bracket on cylinder.
NOTE: Note orientation of suspension arm installation for reassembly reference.
1999 Toyota RAV4
1999-2000 SUSPENSION Rear - Front Wheel Drive
Microsoft
Sunday, November 22, 2009 10:37:21 AM Page 12 © 2005 Mitchell Repair Information Company, LLC.
2. Using a floor jack, support suspension member. Remove suspension member nuts, bolts and stoppers. Lower suspension member. Remove No. 1 lower suspension arm.
Installation
1. To install, reverse removal procedure. Be sure to install components in their original locations. On all models except Corolla, suspension arms are marked with paint. Install suspension arms with paint marks facing rearward. On Corolla models, suspension arms have left hand threads on one side. Install suspension arms with left hand threads to the axle carrier side.
2. Install all nuts and bolts, but DO NOT tighten. Install wheels. Lower vehicle. Bounce vehicle several times to stabilize suspension. Tighten all nuts and bolts to specification, with vehicle weight on suspension. See TORQUE SPECIFICATIONS . Check rear wheel alignment. See SPECIFICATIONS & PROCEDURES article in WHEEL ALIGNMENT.
WHEEL BEARINGS (HUBS)
Removal (Avalon, Camry, Camry Solara, Celica, Corolla & RAV4 FWD)
1. Raise and support vehicle. Remove rear wheels. On drum brake models, remove brake drum. On disc brake models, remove rotor. Remove caliper, leaving flex hose attached, suspend aside. Disconnect ABS sensor (if equipped).
2. On all models, check wheel hub axial play and runout. See WHEEL BEARING INSPECTION under ADJUSTMENTS & INSPECTION. Remove 4 bolts and remove axle hub and "O" ring.
Installation
Coat NEW "O" ring with grease and install hub. To complete installation, reverse removal procedure. Tighten all nuts and bolts to specification. See TORQUE SPECIFICATIONS .
Removal (RAV4 4WD)
1. Raise and support vehicle. Remove rear wheel and brake drum. Using a dial indicator, check wheel bearing end play and runout. End play should not exceed .002" (.05 mm). Runout should not exceed .0028" (.07 mm). If axle hub end play or runout exceed specification, replace hub with bearing.
2. Remove bolt and ABS sensor. Remove drive axle. Remove drive axle lock nut. Place matchmarks on drive axle and differential side gear shaft. Remove 4 nuts and remove drive axle. Disassemble rear brake shoes. Disconnect brakeline from wheel cylinder. Remove parking brake cable. Remove 4 bolts and remove axle hub with bearing and backing plate. See Fig. 10 .
3. Using Puller (09950-40011) and Replacer Set (09950-60011), remove bearing from axle hub. Remove bearing race from axle hub. See Fig. 11 .
NOTE: Wheel bearings and wheel hub, is a one piece assembly and must be replaced as a single unit.
1999 Toyota RAV4
1999-2000 SUSPENSION Rear - Front Wheel Drive
Microsoft
Sunday, November 22, 2009 10:37:21 AM Page 13 © 2005 Mitchell Repair Information Company, LLC.

Fig. 10: Exploded View Of Rear Suspension Components (RAV4 4WD) Courtesy of TOYOTA MOTOR SALES, U.S.A., INC.
1999 Toyota RAV4
1999-2000 SUSPENSION Rear - Front Wheel Drive
Microsoft
Sunday, November 22, 2009 10:37:21 AM Page 14 © 2005 Mitchell Repair Information Company, LLC.

Fig. 11: Removing Axle Bearing Race (RAV4 4WD) Courtesy of TOYOTA MOTOR SALES, U.S.A., INC.
Installation
1. With backing plate on axle hub, install NEW bearing and race to axle hub using a press and Adaptors (09527-17011) and (09950-60010). Install axle hub with backing plate to rear No. 1 suspension arm. See Fig. 10 .
2. To complete installation, reverse removal procedure. Tighten all nuts and bolts to specification. See TORQUE SPECIFICATIONS .
TORQUE SPECIFICATIONS
TORQUE SPECIFICATIONS Application Ft. Lbs. (N.m)Avalon, Camry, Camry Solara, 1999 Celica & Corolla
Axle Hub-To-Axle Carrier Bolts 59 (80)Brake Caliper-To-Backing Plate Bolts 35 (47)Stabilizer Bar Link Nuts
Avalon, Camry & Camry Solara 29 (39)
1999 Toyota RAV4
1999-2000 SUSPENSION Rear - Front Wheel Drive
Microsoft
Sunday, November 22, 2009 10:37:21 AM Page 15 © 2005 Mitchell Repair Information Company, LLC.
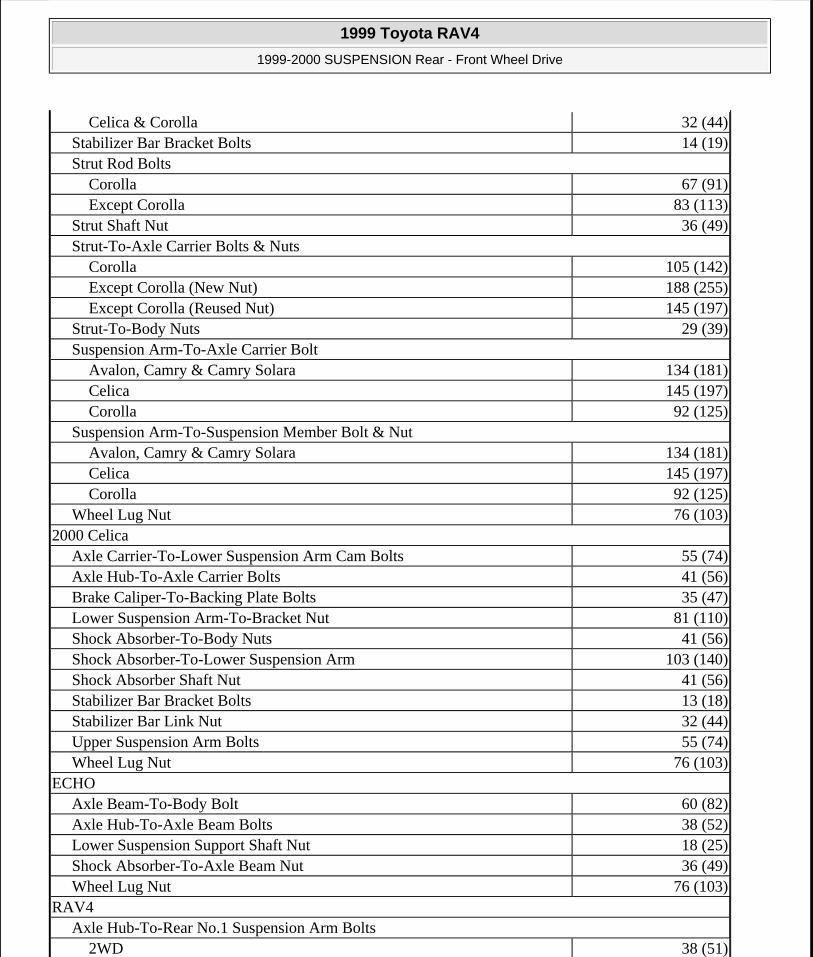
Celica & Corolla 32 (44)Stabilizer Bar Bracket Bolts 14 (19)Strut Rod Bolts
Corolla 67 (91)Except Corolla 83 (113)
Strut Shaft Nut 36 (49)Strut-To-Axle Carrier Bolts & Nuts
Corolla 105 (142)Except Corolla (New Nut) 188 (255)Except Corolla (Reused Nut) 145 (197)
Strut-To-Body Nuts 29 (39)Suspension Arm-To-Axle Carrier Bolt
Avalon, Camry & Camry Solara 134 (181)Celica 145 (197)Corolla 92 (125)
Suspension Arm-To-Suspension Member Bolt & NutAvalon, Camry & Camry Solara 134 (181)Celica 145 (197)Corolla 92 (125)
Wheel Lug Nut 76 (103)2000 Celica
Axle Carrier-To-Lower Suspension Arm Cam Bolts 55 (74)Axle Hub-To-Axle Carrier Bolts 41 (56)Brake Caliper-To-Backing Plate Bolts 35 (47)Lower Suspension Arm-To-Bracket Nut 81 (110)Shock Absorber-To-Body Nuts 41 (56)Shock Absorber-To-Lower Suspension Arm 103 (140)Shock Absorber Shaft Nut 41 (56)Stabilizer Bar Bracket Bolts 13 (18)Stabilizer Bar Link Nut 32 (44)Upper Suspension Arm Bolts 55 (74)Wheel Lug Nut 76 (103)
ECHOAxle Beam-To-Body Bolt 60 (82)Axle Hub-To-Axle Beam Bolts 38 (52)Lower Suspension Support Shaft Nut 18 (25)Shock Absorber-To-Axle Beam Nut 36 (49)Wheel Lug Nut 76 (103)
RAV4Axle Hub-To-Rear No.1 Suspension Arm Bolts
2WD 38 (51)
1999 Toyota RAV4
1999-2000 SUSPENSION Rear - Front Wheel Drive
Microsoft
Sunday, November 22, 2009 10:37:21 AM Page 16 © 2005 Mitchell Repair Information Company, LLC.

59 (80)Camber Adjust Cam Bolt 83 (113)Drive Axle Lock Nut 159 (216)Drive Axle-To-Differential Side Gear 41 (56)Rear No.1 Suspension Arm Toe Adjust Cam Bolt 97 (132)Shock Absorber Shaft Nut 11 (15)Shock Absorber Lower Mounting Bolt 27 (37)Upper & Lower Suspension Arm Nuts 76 (103)
INCH Lbs. (N.m)ABS Speed Sensor Bolt
Avalon, Camry, Camry Solara, Celica & Corolla 71 (8.0)ECHO 48 (5.4)RAV4 69 (7.8)
1999 Toyota RAV4
1999-2000 SUSPENSION Rear - Front Wheel Drive
Microsoft
Sunday, November 22, 2009 10:37:21 AM Page 17 © 2005 Mitchell Repair Information Company, LLC.