problem solving through flowcharts 2 4-5... · 2018-07-26 · computer programming 1 problem...
TRANSCRIPT

Computer Programming 1 Problem Solving through Flowcharts 2
1
Course Module
Module 003 Problem Solving through Flowcharts 2
“Knowledge is a process of piling up facts; wisdom lies in their simplification.”
–Martin H. Fisher.
Now that you are equipped with the necessary knowledge revolving around Flowcharts and Pseudocodes, how about taking them to the next level by writing your own flowcharts and pseudocodes, and applying to them technical skills you will soon use in writing your very first computer programs.
At the end of this module, you will be able to:
1. Generalize word problems into technical work items necessary to write workable solutions
2. Convert work items into workable solutions and interpret solution by steps
3. Write flowcharts and pseudocode equivalents of the solutions and explain the design flow
4. Argue whether a provided flowchart and/or pseudocode is appropriate for the given problems and their underlying solutions
Again, researching beyond the coverage of this module is highly encouraged to supplement your understanding of the topics covered. And as always, think and see beyond the box.
So, what are we waiting for? Let us continue our exploration of the world of Computer Programming.

Recall
In the previous module, we talked about the problem solving in general and how flowcharts and pseudocodes come into play. We enumerated that Problem Solving in Computer Programming should satisfy several characteristics, namely:
a) Solvable b) Goal-oriented c) Verifiable d) Quantifiable e) Doable in finite steps f) Doable in current technological limitations
We also enumerated the symbols used in composing flowcharts, namely:
a) Terminator b) Process c) Preparation d) Data e) Decision f) On-page Connectors g) Off-page Connectors
Lastly, we enumerated various keywords that we will be using throughout the course when writing pseudocodes.
Introduction
Understanding the logic applied to flowcharts is easy, but writing one that complies to all the standards, and have a sound and efficient design does not come as easy as any would think. It often requires a low-level understanding of the problem and all relevant implications surrounding it.Given that we understand the problem, we will still need to generalize the identified solution to cover all iterations of the problem in such a way that our solution will always return our expected result back to the user – whether in form of visual stimulior a readable error. The flowchart design should also consider all possible inputs based on the scope of the problem regardless if the scenario implied was covered in the initial given. These considerations will be made clear throughout the module.
Understanding the Problem
Understanding the problem is the first step in composing an efficient and working flowchart design. Before considering to solve the problem-at-hand, the problem should satisfy the characteristics covered in the previous topic,

Computer Programming 1 Problem Solving through Flowcharts 2
3
Course Module
Problem Solving through Flowcharts 1. Always keep in mind those characteristics before understanding the problem.
To understand a given problem in Computer Programming perspective, it is essential to identify keywords and categorize them into steps as technical work items. Technical work items are short keyword-driven phrases which summarizes all the essential parts of the problem we put into consideration. They are guided using the following characteristics:
a) Concise b) Unambiguous c) Classifiable as either INPUT, PROCESS or OUTPUT d) Specific
Technical work items should be concise. Having a shortly written work item help us identify exactly what needs to be accomplished. This will enable us to not only work directly on the solution, but it will also discourage us not to divert from our identified solution.
Technical work items should also be unambiguous. Though as obvious as it seems, this characteristic emphasizes on one important thing – the simplicity of how the work item was written. The work item should guide you to complete your identified solution without compromising on too many variables such as the number of steps for the solution. In addition, the work items should be, like being concise, direct to the solution itself.
Technical work items should also classifiable in one of the three, namely: INPUT, PROCESS and OUTPUT. INPUT work items are those that require user intervention and asks for some actions from the user. PROCESS work items are those that the computer itself will do like perform some series of computations. OUTPUT work items are those that requires the user to recognize a result coming from our program. OUTPUT work items could also be a computer-interpretable result on which the computer will read it, and not the user.
Lastly, the technical work items should also be specific. Each work item should point to only one thing that needs to be accomplished, may it be to ask the user for his firstname or lastname but not both. In case there is the need to ask for the two information, there should be one of each; one for the firstname and one for the lastname. There should not be more than one task for one work item.

Sample Problems
Let us take this simple problem as our initial example:
“Write a program that displays ‘Hello World’.”
Figure1. Problem 1 – Hello World
The above problem is simply asking us to display a series of specified text to the user. It does not include any requests for the user to enter values to our program. The solution to this problem lies on outputting the text “Hello World” to the user then our program ends.
Not much of a challenge yet. The next problem will cover asking the user to enter values for our program to execute.
“Write a program that adds two numbers from the user.”
Figure 2. Problem 2 – Addition
This second problem is more complicated compared to the first one. Let us dissect first what the problem is all about. The phrase “add” suggests that we will be needing to ask the computer to perform some calculations. These calculation, however, is limited to addition and nothing more.
This is supplemented by the phrase “two numbers” which suggests that we are only to perform the said calculations on two specific numbers. In addition to this, we are assured that the inputs are all numerical values.
Though, the problem is vague in one thing – the kind of number that we are to deal with. Do we need to accept only integers? Do we need to accept only floating points? Since the problem is vague, we should interpret it as if the problem requires all kinds of numerical inputs – integers and floating points.
Lastly, the phrase “from the user” suggests that the two numerical values will be coming from the user. We do not need to concern ourselves with inputs using parameters (which will be discussed in future modules), and file inputs.
Let us have another more complicated example.

Computer Programming 1 Problem Solving through Flowcharts 2
5
Course Module
“Write a program that reverses a string input from the user.”
Figure3. Problem 3 – String Manipulation
This problem does not look to much complicated in functional sense. However, in the computer’s perspective, this requires a lot of work. This is because of how the computer processes strings. Computers do not read strings like how we read them. Computers see them as a series of precise characters and nothing more. That is why, to reverse a string, the computer needs to read each character of the string starting from the last character until the first character and storing them to display to the user.
Not yet making sense? Let us look at an analogy of this. Let us image you have a purse hidden in your pocket containing various denomination of coins. You need to categorize them by denomination. How do you do this? You take the purse out of your pocket and start to take one coin at a time. Upon each take, you check the value of the coin and categorize them accordingly. Notice how you need to take one coin at a time to accurately categorize them? That is like how the computers treat strings.
Now back to the problem. Our main objective is to reverse a given string as suggested by the phrase “reverse a string”. And as discussed previously, reversing a string means we read each character from the end to the beginning of the string.
And, as suggested by the phrase “string input from the user”, the string will be coming from the user. We need to support user inputs. Like the previous problem, the input will be solely governed by user inputs and not file inputs.
Sample Technical Work Items
Now that we have our set of problems with accompanying discussion on how to interpret the problem, we now need to work out our technical work items we will follow to accomplish our identified solution. Do note that this process can become purely a mental procedure without the need of outlining the work items. However, to guide you on how to correctly formulate your work items and in doing so we are avoiding compromises on the limitations of the computer, we will need to outline them point-by-point.

Let us begin using Problem 1. We argued that Problem 1 is solely about displaying the string “Hello World” to the user. Hence, we have a simple work item:
1. To display “Hello World”
Figure4. Technical Work Items 1 – Hello World
Simple, is not it? Since we do not need any input coming from the user, we do not place any work item for inputs. Since we do not have anything to process computationally, we do not place any work item for process. We only allotted one work item and that is for displaying a fixed string ”Hello World”.
Let us look at Problem 2. We argued that we will need to ask the user to enter some values; two number to be exact. In addition to asking inputs, we need to perform a simple calculation over the two entered numbers. We need to add the two entered numbers and display them back to the user. Take note that since we are displaying a simple calculation back to the user, we can combine the two as one single process.
Creating the work items for Problem 2 will result into something like this:
1. To ask user for the first number 2. To ask user for the second number 3. To display the sum of the two numbers
Figure5. Technical Work Items 2 – Addition
As you can notice, we dissected the request for user input into two since our solution will need two numbers from the user. The third and last work item will display the sum of the two numbers. Since the output does not require any complex operations, we have combined the actual displaying with the summation of the two numbers.
Familiarizing yourself with the limitations of computers will warrant you to create a more fluid and efficient program in the future.
This gets more complicated as we tackle Problem 3. In Problem 3, we argued that we will look at each character of the entered string of the user. This is how we can take each character and reverse them by displaying the characters of the string using the last character first.
Computer Programming 1 Problem Solving through Flowcharts 2
7
Course Module
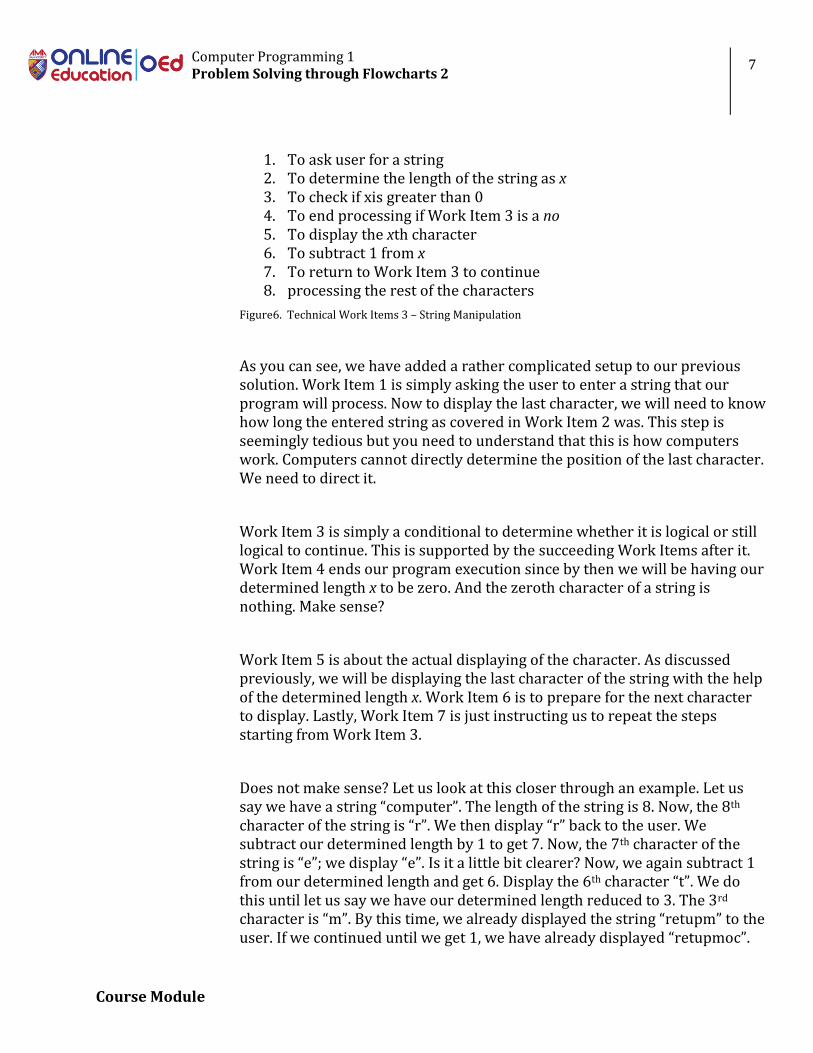
1. To ask user for a string 2. To determine the length of the string as x 3. To check if xis greater than 0 4. To end processing if Work Item 3 is a no 5. To display the xth character 6. To subtract 1 from x 7. To return to Work Item 3 to continue 8. processing the rest of the characters
Figure6. Technical Work Items 3 – String Manipulation
As you can see, we have added a rather complicated setup to our previous solution. Work Item 1 is simply asking the user to enter a string that our program will process. Now to display the last character, we will need to know how long the entered string as covered in Work Item 2 was. This step is seemingly tedious but you need to understand that this is how computers work. Computers cannot directly determine the position of the last character. We need to direct it.
Work Item 3 is simply a conditional to determine whether it is logical or still logical to continue. This is supported by the succeeding Work Items after it. Work Item 4 ends our program execution since by then we will be having our determined length x to be zero. And the zeroth character of a string is nothing. Make sense?
Work Item 5 is about the actual displaying of the character. As discussed previously, we will be displaying the last character of the string with the help of the determined length x. Work Item 6 is to prepare for the next character to display. Lastly, Work Item 7 is just instructing us to repeat the steps starting from Work Item 3.
Does not make sense? Let us look at this closer through an example. Let us say we have a string “computer”. The length of the string is 8. Now, the 8th character of the string is “r”. We then display “r” back to the user. We subtract our determined length by 1 to get 7. Now, the 7th character of the string is “e”; we display “e”. Is it a little bit clearer? Now, we again subtract 1 from our determined length and get 6. Display the 6th character “t”. We do this until let us say we have our determined length reduced to 3. The 3rd character is “m”. By this time, we already displayed the string “retupm” to the user. If we continued until we get 1, we have already displayed “retupmoc”.

As you will see, since our determined length is reduced to 1. Because of Work Item 6, we reduce it again, so we now have 0. Work Item 7 instructs us to repeat Work Item 3 which checks if our determined length is 0. Since it is already 0, Work Item 4 takes over and end our execution.
Beginning from Work Item 3 until Work Item 7, we repeatedly executed the work items until our condition in Work Item 3 is not anymore satisfied. This in computer programming is called an “iteration”. One pass through the sets of Work Items 3 to 7 is called “one iteration”.
Flowcharting
After identifying a set of Technical Work Items that we need to do for every problem that we are given, we can now create our flowcharts. Flowcharts are our way to visualize the solution that we come up through the technical work items. In comparison to the technical work items as the written logical side of our solution, we can look at flowcharts as the visual side. We focus on diagrams and symbols to represent our logic.
Let us take our Problem 1 as our primary example. Figure 1 shows one version of our Technical Work Items 1 if visualized as a flowchart.
Figure 7. Displaying “Hello World”
Remember that we begin and end our flowchart with the START and END terminator. In between the two is our actual logic by utilizing the different symbols used in flowcharting. Following the START terminator, we have a display symbol which we used to materialize Work Item 1 “To display ‘Hello

Computer Programming 1 Problem Solving through Flowcharts 2
9
Course Module
World’”. We do not have any other symbols in between since Problem 1 does not ask for any other things for us to do.
Our Technical Work Items 2 contain 3 work items within. Let us look at Figure 2, a version of a flowchart for the Problem 2 solution.
Figure 8. Displaying the Sum of Two Numbers
After our START terminator, we ask our user to enter a number and we store it as num1. Remember that when we ask a user for an input, we immediately store it to a temporary container we call variable. Variables will be further discussed in the future modules, but for now just think of variables as a temporary container for values; whether entered by the user or added by ourselves.

Following that is we again ask the user for another number. We then stored it again to another variable named num2. We used a separate variable to avoid overwriting our previously created variable num1. Think of it this way, we have two different drinks. Let us say a water and a soda. We need to pour those drinks to a cup. However, it is illogical to use only one cup for both drinks. We can place the soda in the same cup if we empty it first. But by emptying the cup, we lose the previous drink. And we do not want that in our program. We need to keep the value until the end of our program. Therefore, we use two different variables, num1 and num2.
Lastly, we have a display symbol which contains the sum of num1 and num2. Notice here that we did not anymore create a third variable num3. This is because we do not need the sum anymore after displaying its value. We only use variables if we intend to keep them for future use. In this instance, we do not need num3 because as soon as we displayed the sum, we terminate the program through the END terminator of flowchart.
There is a special kind of variable called “arrays”. Arrays contain “vector values” hence they can store more than one value. Typically, they are used as a one-dimension figure. However, there are cases when two-dimension and three-dimension arrays are more applicable. Arrays will be discussed in the future modules.
This is getting interesting!
Let us get to the last problem. The last problem covers reversing an input string. And as we have previously argued, this is not as simple as we read it. Figure 3 shows a version flowchart version of our Technical Work Item 3.

Computer Programming 1 Problem Solving through Flowcharts 2
11
Course Module
Figure 9. Displaying the Reverse of a String
Figure 3 starts with accepting input from the user. Like Figure 2, we store the string input to a variable named str1. After which, we determine the length of str1 and store it to another variable named x. By this time, we have two different variables; a string variable str1 and a numerical variable x.
The fourth symbol, the conditional, tests our variable x of its value. Since we will retrieve only the existent characters of the string, we will proceed to END terminator if the length is now zero. While it is yet to be zero, we will retrieve the xth character of the string str1. Once we have retrieved the character, we display it to the user then proceed to the next operations.
The next symbol is a process symbol. Since we are only to perform Mathematical computation against the variable x, we use process symbol. We subtract one from the value of x to get the next character. After this, we return to the fourth symbol and repeat the entire iteration again.

You may think of sample problems and have them posted at the course forum to challenge yourself and your peers. This could also help you verify your solution through the advice of the course instructor.
Pseudocodes
Now that we have a flowchart at hand, we can also create its equivalent pseudocode representation. The pseudocode will be your closest tool to writing the actual codes itself.Let us get started!
Pseudocode for Flowchart 1
Flowchart 1 is devised to display the string “Hello World”. So, we will only use the OUTPUT keyword of our pseudocode convention.
OUTPUT “Hello World”
Figure 10. Pseudocode for Hello World
Noticed how we enclosed the string “Hello World” in quotation marks? This is to convey that the Hello World is a string literal and not anything else (i.e. variable). This practice is prevalent to all programming languages and hence we also adopted this practice even in writing our pseudocodes.
Pseudocode for Flowchart 2
Flowchart 2 is devised to display the sum of two numbers from the users. For this we will use an additional keyword INPUT.
DECLAREnum1, num2
INPUT num1
INPUT num2
OUTPUT num1 + num2
Figure 11. Pseudocode for Addition

Computer Programming 1 Problem Solving through Flowcharts 2
13
Course Module
In this translation, we used the keyword DECLARE to define our variables. This is a necessity when we use variables. It is advised to declare all variables as our first line in our pseudocode. You might argue why we did not anymore separate the two variables in two distinct DECLARE codes. This is because of our convention. We defined earlier that we can declare more than one variable in one line. This practice is almost like actual programming. The only difference is that this practice is applicable only for variables of the same types which will be discussed in the future modules.
The next two INPUT keywords are expected. We ask the user for values, which is limited by the problem to be numerical in nature, and store them to their corresponding variables. The last keyword is solely to display the sum of num1 and num2.
Pseudocode for Flowchart 3
Flowchart 3 is devised to reverse a given string and display it back to the user. We are taken aback by the number of operations we need to do for this problem. Good thing we already have a flowchart to guide us. Flowchart 3 would have an equivalent pseudocode as follow:
DECLARE str1, x
INPUT str1
SET xTO GetLength(str)
WHILEx > 0DO
OUTPUT str[x - 1]
SETxTOx - 1
LOOP
Figure 12. Pseudocode for String Manipulation
In this pseudocode, we have used to WHILE … DO … LOOP keyword which is used for iterations. As discussed before, the behavior of the Technical Work Items and Flowchart for Problem 3 which return to a specific point in the design is called an iteration. This is ahead of the coverage of this module. However, for the sake of argument, we used the WHILE … DO … LOOP keyword since that section is an iteration.

The pseudocode started with the declaration of the variables str1 and x. We then populate the variable str1 with the value from the user. Then we populate the variable x with the value from GetLength() which retrieves the length of str1. After which, we proceed with the iteration where we check first if the value of x is greater than zero. Since initially that statement is true, we proceed to the OUTPUT keyword which displays to the user the last character of the string.
Notice we used str[x – 1] and not str[x]. This is because the computer counts characters from 0 and not 1, wherein the 0th character is the first character of the series.
Lastly we deduct 1 from the value of x and store the difference back to x. Here, we are recycling the variable x since we are only tracking the changing character of the string str1. The iteration repeats to the WHILE … DO … LOOP keyword until after the first character of str1 has been displayed.
Glossary
Floating Point: A number that does include the use of a decimal points; they are usually precise only to a specific number of decimal places.
Iteration: A series of repetitions wherein each set is usually provided with different inputs compared to the previous sets.
Integer: A number that does not include the use of decimal points; commonly referred to as “whole numbers”.
Low-level [Understanding]: Understanding the technical aspects of a specific topic or focus point.
Scalar [Value]: A single value (e.g. 1, 123, “a” or “abc”).
String: Any number of characters enclosed by quotation marks that is treated as a single value.
Technical Work Items: A set of short keyword-driven phrases which summarizes the things to consider in each problem.
Variable: A temporary storage of a scalar value.
Computer Programming 1 Problem Solving through Flowcharts 2
15
Course Module
References and Supplementary Materials
Books and Journals
Simon Withers; 2017; Pseudocode; United States of America
Mary Colson; 2017; Light (Flowchart Science); United States of America
Online Supplementary Reading Materials
Introduction to Pseudocode; https://www.slideshare.net/DamianGordon1/pseudocode-10373156; April 16, 2017
Online Instructional Videos
Planning with Pseudo-code; https://www.khanacademy.org/computing/computer-programming/programming/good-practices/p/planning-with-pseudo-code; April 16, 2017