procedure of animation in 3d autodesk maya: tools &...
TRANSCRIPT
International Journal of Computer Graphics & Animation (IJCGA) Vol.5, No.4, October 2015
DOI : 10.5121/ijcga.2015.5402 15
PROCEDURE OF ANIMATION IN 3D
AUTODESK MAYA: TOOLS & TECHNIQUES
Rahul Kushwaha
Amity School of Communication, Amity University Haryana – India
ABSTRACT
At present time a new technique to approaches for producing computer animation by using
software. It is introduced at university level as a text for under graduates and post graduates. It is
also useful for those who want to become computer graphics programmers or animation
professionals. It is newly introduced techniques in which anyone can create animation for game,
education or for entertainment. It addresses the issue of computer-based animation which
primarily deals with multiple 2 dimensional planes. This document concentrates on full 3D
computer animation by using Autodesk Maya software which is latest for animation and identifies
the useful methods and techniques to move objects in interesting ways.
In present time many film makers uses it for creating cartoon character for characterize their
visualization on screen. A lot of softwares are available in market which helps to create such kind
of animation and effect with help of computer graphics.
KEY WORDS
Computer graphics, 2D Animation, 3D Animation, Autodesk Maya, Animated film
1. INTRODUCTION
Computer animation is the process used for generating an animated sequence using many still
images or snapshot of images. In general we can say it a computer generated imagery which
shows static images in the form of dynamic scenes and it only refers to moving images.
For 3D animations, objects (models) are built on the computer monitor and 3D figures are rigged
with a virtual skeleton. For 2D figure animations, separate objects (illustrations) and separate
transparent layers are used with or without a virtual skeleton. Then the limbs, eyes, mouth,
clothes, etc. of the figure are moved by the animator on key frames. The differences in
appearance between key frames are automatically calculated by the computer in a process known
as tweening or morphing. Finally, the animation is rendered. [1]
2. AUTODESK MAYA
Autodesk Maya commonly shortened to Maya, is a 3D computer graphics software that runs on
Windows, OS X and Linux, originally developed by Alias Systems Corporation (formerly Alias
Wave front) and currently owned and developed by Autodesk, Inc. It is used to create interactive
3D applications, including video games, animated film, TV series, or visual effects. [2]

International Journal of Computer Graphics & Animation (IJCGA) Vol.5, No.4, October 2015
16
Maya is an application used to generate 3D assets for use in film, television, game development
and architecture. The software was initially released for the IRIX operating system. However, this
support was discontinued in August 2006 after the release of version 6.5. Maya was available in
both "Complete" and "Unlimited" editions until August 2008, when it was turned into a single
suite. [3]
2.1TOOLS USED IN MAYA FOR ANIMATION
Here we will discuss about 3D Animation where you work on Autodesk MAYA software. We
will also discuss those tools which are used in animation.
In Maya software selects Animation from status line (see in pic 1) and then go to animate (see in
pic. 2) menu in menu bar. You will get there more option, which is used for animating an object
or character.
Fig. 1 Autodesk Maya animation panel
Fig.2 Animation menu drop down

International Journal of Computer Graphics & Animation (IJCGA) Vol.5, No.4, October 2015
17
Here you will get details for all those option of animate menu, which are shown in pic 2. But after
these menus some other tools are there who are helping you to animate a character or object,
which is Deformers. We will discuss here these topics-
Set key
Set Breakdown
Hold current keys
Set driven Key
Set Transform Keys
Create Clip
Create pose
Ghost selected
Unghost selected
Unghost All
Create Motion trail
Create Animation Snapshot
Update motion trail/Snapshot
Create animated sweep
Motion Paths
Turn table
2.1.1SET KEY
Select Animate -> Set key
When you insert any key in time line to fix a position for any character or object, then you used
this set key tool. By using set key tool, you will set the given value for translate, rotate and scale.
IF you open option box window of set key, Animate -> Set Key -> , you will get some more
options. (See in fig. 3)
International Journal of Computer Graphics & Animation (IJCGA) Vol.5, No.4, October 2015
18
(Pic 2 – Set key options)
Set keys on shows what attributes you want to set on.
All manipulator handles and keyable attributes show that you are going to set a key for selected
manipulator or object or character.
All keyable attributes show that you are going to set all attributes of all selected objects.
All manipulator handles show that you sets key on only those attribute which are affected by
selected manipulator.
For Example, if you select scale manipulator, then set the keys only on scale x, scale y and scale z
attributes.
Current manipulator handle show that you sets key only on selected manipulator handle attributes
only.
For Example, if you select scale X manipulator handle, then you set the keys only on scale x
attribute.
Set keys at shows that at what time you want to set keys on selected object/character.
Current time shows that you are set the key at current time.
Prompt shows that Maya prompts for the times when setting keys.
2.1.2SET IK/FK KEYS
When you set a key for an IK handle control or joint chain, then Set IK/FK Keys adds keys for all
attributes of selected controls for IK handle and joints. Set IK/FK keys make a smooth animation.
This option is available only when “All Keyable Attributes” is on in your set key option box
window.
2.1.3SET BREAKDOWN
Breakdown is also same like set key but there are a little bit difference that Breakdowns do not
have any adjacent keys is unbounded. Set breakdown always work like regular keys when it
applied on any object. It also behaves like regular key when you edit like cut, copy, paste and
move it.
2.1.4 HOLD CURRENT KEYS
When you applying hold Current Keys, it sets the keys for all animated attributes of a selected
object or character at the current time. This option is most useful when you work with auto key
mode because Auto Key sets keys only for those attributes where attributes value changed.
International Journal of Computer Graphics & Animation (IJCGA) Vol.5, No.4, October 2015
19
2.1.5 GENERAL ANIMATION TOOLS
Non-destructive animation layering system works with attributes. The Set Driven Key tool
enables you to key-frame complex relationships between animated parameters. Graph and Dope
sheet Editors control how animated attributes change over time. Fine-tune animation in the
viewport with editable motion trails. Block out and mark up animation directly in the 3D scene
with the Grease Pencil. [4]
2.1.6 SET DRIVEN KEY
Set driven key are a special key that connect an attributes of an object to another attributes of
another object. In other words, set driven key make a relationship between two different objects
through their internal attributes. When you create a driven key then you introduce an object as
driver and another object as a driven object. After then you connect attributes of driver to
attributes of driven object. In this connection the value of the driven attribute is locked to a
corresponding value of the driver attribute.
When we animate an object by using set driven keys, Time Slider is not involved in relationship
and no any red key display on time line.
For example,
You connect a sphere with a cube by using set driven key
Select Animate -> Set Driven Key ->Set -> ,
Create a sphere and load it as a driver in set driven key option window.
Then you create a cube and load it as a driven in set driven key option window.
Then select any attribute (translate Z) of driver (sphere) and then select attributes (Scale X, Y, Z)
of driven (cube).
Then press key button in Set driven key window.
Again repeat above process with changing the all attributes (translate z of sphere and scale X, Y,
Z of cube).
Then again press key button in Set driven key window.
Now you can check your animation has been done.
You move you sphere in Z direction, cube will automatically change his shape either increase or
decrease in global scale mode. (See in fig. 4)

International Journal of Computer Graphics & Animation (IJCGA) Vol.5, No.4, October 2015
20
Fig. 4 – Set driven key connections
2.1.7 SET TRANSFORM KEY
Animate -> Set Transform Key -> Translate/rotate/Scale mean you are (can) keying only for a
single attribute like at a time you can set key either for translate or for rotate or for scale.
You can use Shift + W for set transform key for Translate in X, Y and Z attributes.
You can use Shift + E for set transform key for Rotate in X, Y and Z attributes.
You can use Shift + R for set transform key for Scale in X, Y and Z attributes.
2.1.8 ANIMATING CAMERA MOVES
In Maya, the camera can be animated. You can set key frames for the camera moves the same as
for other objects in your scene. In the next steps, you set keys to do a simple animation of the
camera’s movement.
2.1.9 TO ANIMATE THE CAMERA
Go to the start of the playback range.
Dolly, tumble, and track my Camera to create a view similar to this:
With my Camera selected, set a key for the camera’s current view at the first frame. To set a key,
select Animation menu set, and then select Animate > Set Key. (For details on setting keys and
animation technique, Go to frame 150.
Set another key.
Play the animation to see the camera dolly toward the table for the first 150 frames.
At this point, feel free to experiment with keying changes in the view resulting from tumbling and
tracking the camera. Excessive animation of tumbling and tracking creates a dizzying effect that
is a common mistake of inexperienced artists. In general, it’s best to keep camera animation
simple except when you are striving for an unusual effect. [5]
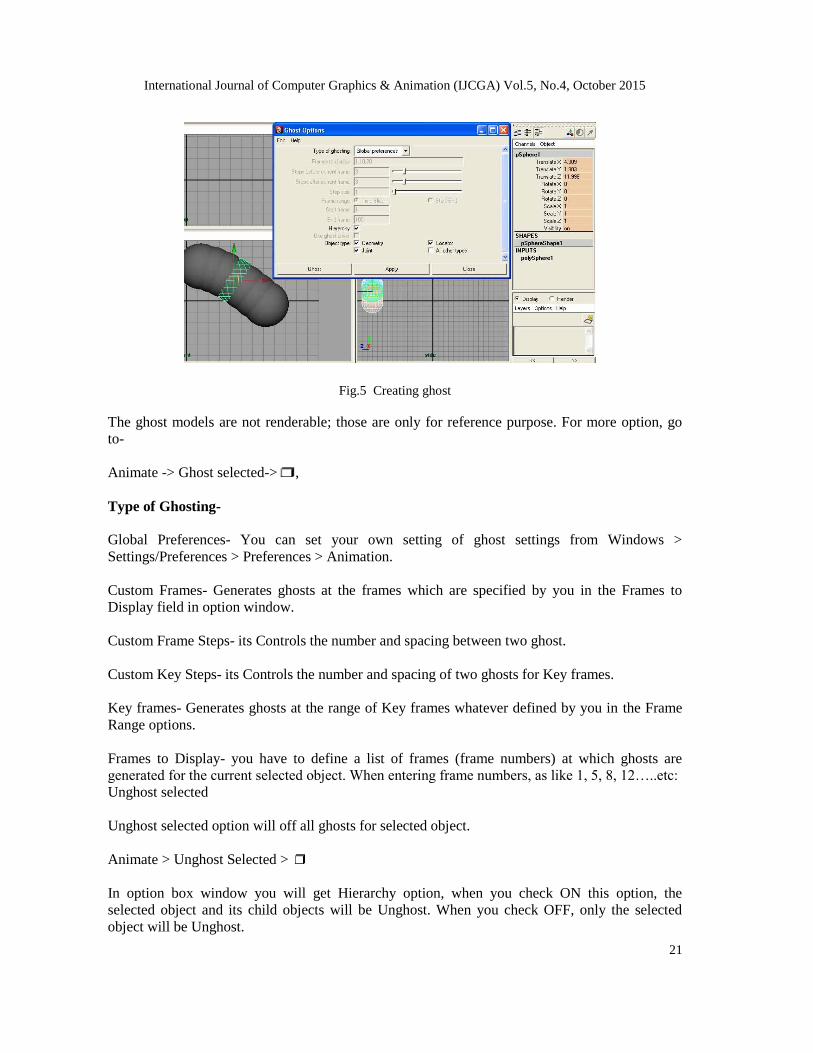
Ghost selected- when you animate an object, it Generates ghost for that object. How many and
where it will, it’s depends on setting of its attributes. (See in fig. 5)
International Journal of Computer Graphics & Animation (IJCGA) Vol.5, No.4, October 2015
21
Fig.5 Creating ghost
The ghost models are not renderable; those are only for reference purpose. For more option, go
to-
Animate -> Ghost selected-> ,
Type of Ghosting-
Global Preferences- You can set your own setting of ghost settings from Windows >
Settings/Preferences > Preferences > Animation.
Custom Frames- Generates ghosts at the frames which are specified by you in the Frames to
Display field in option window.
Custom Frame Steps- its Controls the number and spacing between two ghost.
Custom Key Steps- its Controls the number and spacing of two ghosts for Key frames.
Key frames- Generates ghosts at the range of Key frames whatever defined by you in the Frame
Range options.
Frames to Display- you have to define a list of frames (frame numbers) at which ghosts are
generated for the current selected object. When entering frame numbers, as like 1, 5, 8, 12…..etc:
Unghost selected
Unghost selected option will off all ghosts for selected object.
Animate > Unghost Selected >
In option box window you will get Hierarchy option, when you check ON this option, the
selected object and its child objects will be Unghost. When you check OFF, only the selected
object will be Unghost.
International Journal of Computer Graphics & Animation (IJCGA) Vol.5, No.4, October 2015
22
Unghost all will Unghost all object or hierarchies, which are placed in your scene.
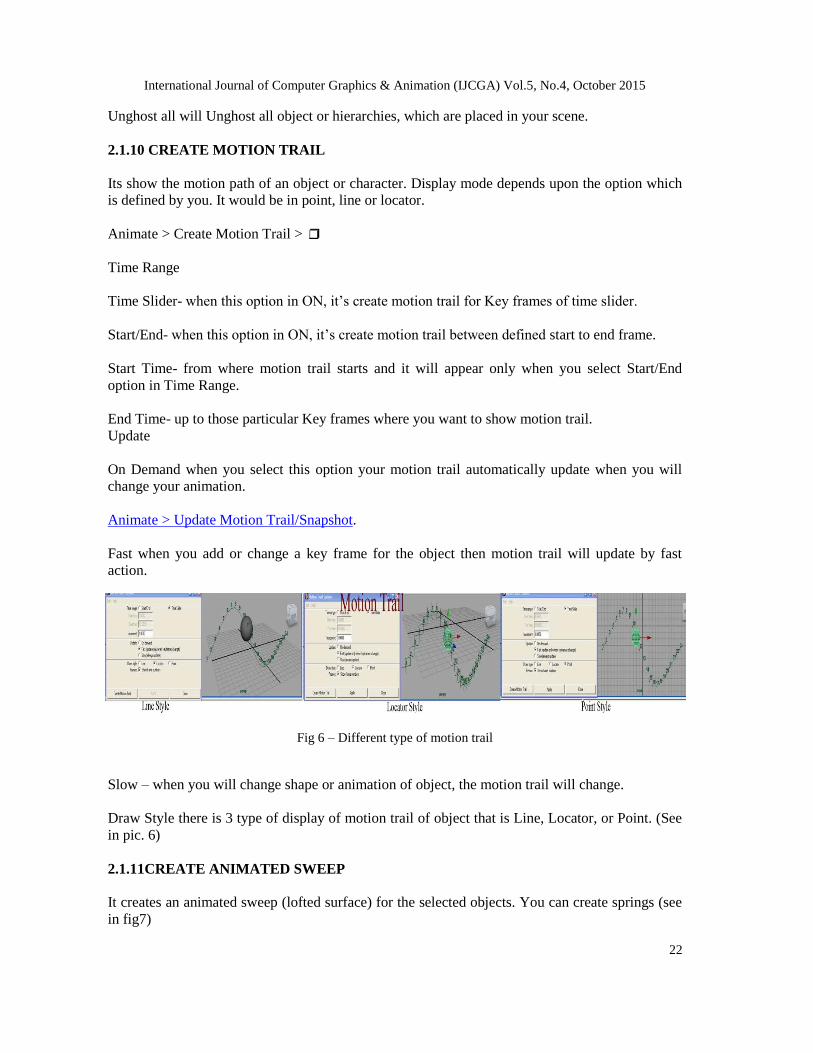
2.1.10 CREATE MOTION TRAIL
Its show the motion path of an object or character. Display mode depends upon the option which
is defined by you. It would be in point, line or locator.
Animate > Create Motion Trail >
Time Range
Time Slider- when this option in ON, it’s create motion trail for Key frames of time slider.
Start/End- when this option in ON, it’s create motion trail between defined start to end frame.
Start Time- from where motion trail starts and it will appear only when you select Start/End
option in Time Range.
End Time- up to those particular Key frames where you want to show motion trail.
Update
On Demand when you select this option your motion trail automatically update when you will
change your animation.
Animate > Update Motion Trail/Snapshot.
Fast when you add or change a key frame for the object then motion trail will update by fast
action.
Fig 6 – Different type of motion trail
Slow – when you will change shape or animation of object, the motion trail will change.
Draw Style there is 3 type of display of motion trail of object that is Line, Locator, or Point. (See
in pic. 6)
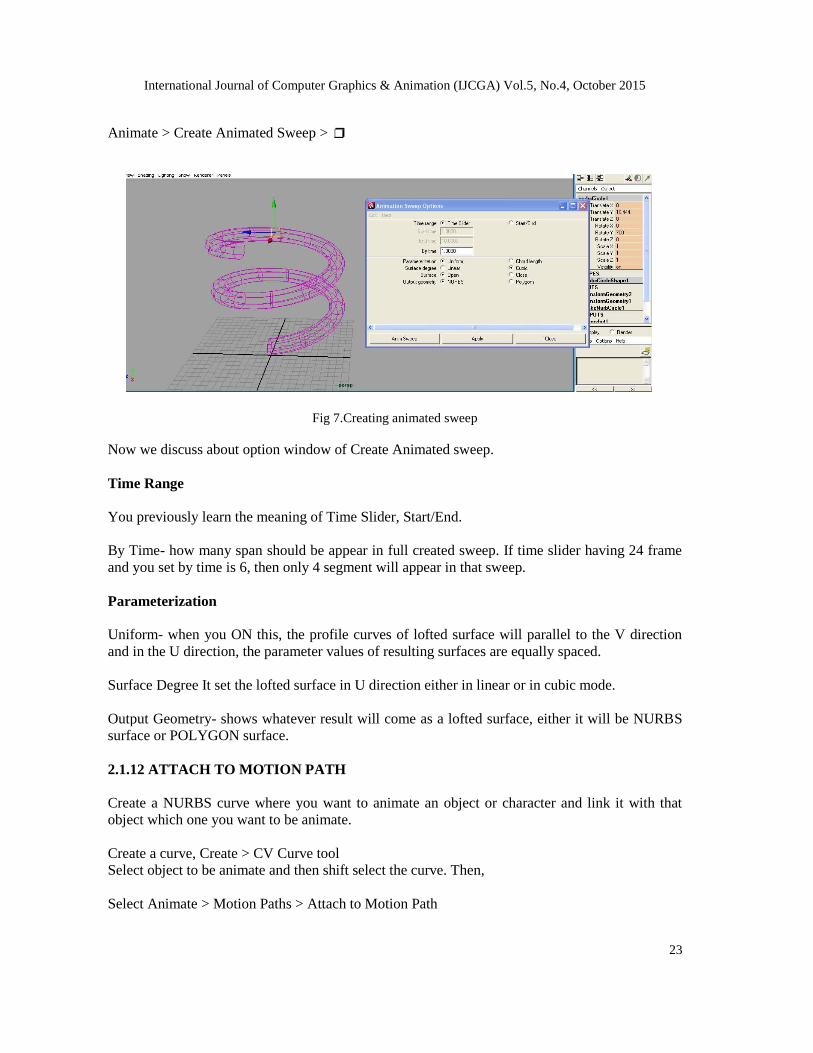
2.1.11CREATE ANIMATED SWEEP
It creates an animated sweep (lofted surface) for the selected objects. You can create springs (see
in fig7)
International Journal of Computer Graphics & Animation (IJCGA) Vol.5, No.4, October 2015
23
Animate > Create Animated Sweep >
Fig 7.Creating animated sweep
Now we discuss about option window of Create Animated sweep.
Time Range
You previously learn the meaning of Time Slider, Start/End.
By Time- how many span should be appear in full created sweep. If time slider having 24 frame
and you set by time is 6, then only 4 segment will appear in that sweep.
Parameterization
Uniform- when you ON this, the profile curves of lofted surface will parallel to the V direction
and in the U direction, the parameter values of resulting surfaces are equally spaced.
Surface Degree It set the lofted surface in U direction either in linear or in cubic mode.
Output Geometry- shows whatever result will come as a lofted surface, either it will be NURBS
surface or POLYGON surface.
2.1.12 ATTACH TO MOTION PATH
Create a NURBS curve where you want to animate an object or character and link it with that
object which one you want to be animate.
Create a curve, Create > CV Curve tool
Select object to be animate and then shift select the curve. Then,
Select Animate > Motion Paths > Attach to Motion Path
International Journal of Computer Graphics & Animation (IJCGA) Vol.5, No.4, October 2015
24
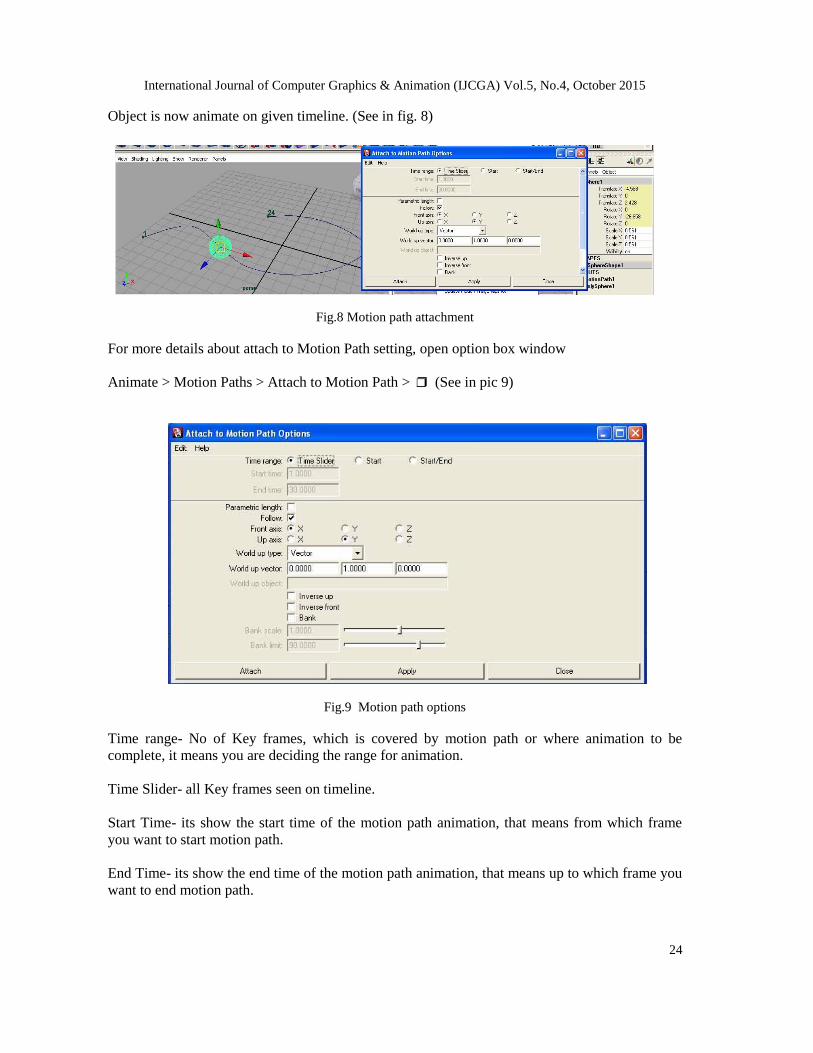
Object is now animate on given timeline. (See in fig. 8)
Fig.8 Motion path attachment
For more details about attach to Motion Path setting, open option box window
Animate > Motion Paths > Attach to Motion Path > (See in pic 9)
Fig.9 Motion path options
Time range- No of Key frames, which is covered by motion path or where animation to be
complete, it means you are deciding the range for animation.
Time Slider- all Key frames seen on timeline.
Start Time- its show the start time of the motion path animation, that means from which frame
you want to start motion path.
End Time- its show the end time of the motion path animation, that means up to which frame you
want to end motion path.
International Journal of Computer Graphics & Animation (IJCGA) Vol.5, No.4, October 2015
25
Follow- If on, then the object orientation will be change as you changes their orientation. It is on
by default.
Front Axis, Up Axis, World up Type, Scene Up, Object Up, Object Rotation Up, Vector, Normal,
World up Vector, World up Object, Inverse Up, Inverse Front, Bank, Bank Scale shows the
orientation where object will animate throughout the specified motion path.
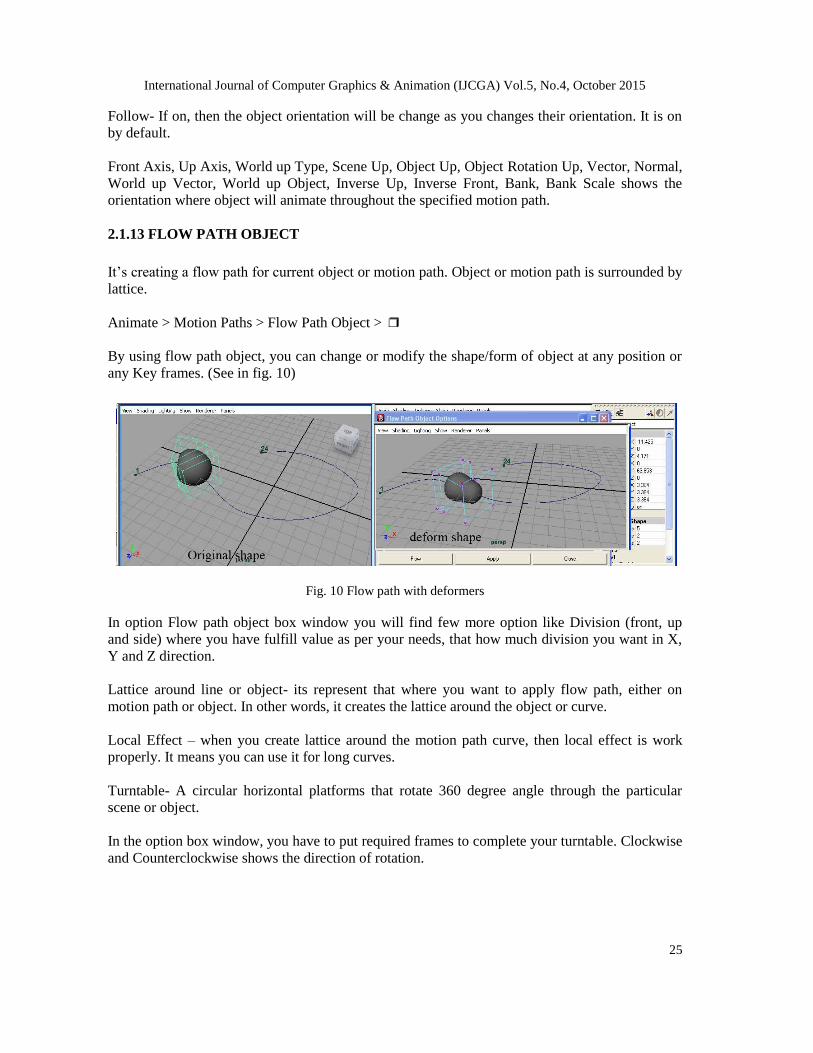
2.1.13 FLOW PATH OBJECT
It’s creating a flow path for current object or motion path. Object or motion path is surrounded by
lattice.
Animate > Motion Paths > Flow Path Object >
By using flow path object, you can change or modify the shape/form of object at any position or
any Key frames. (See in fig. 10)
Fig. 10 Flow path with deformers
In option Flow path object box window you will find few more option like Division (front, up
and side) where you have fulfill value as per your needs, that how much division you want in X,
Y and Z direction.
Lattice around line or object- its represent that where you want to apply flow path, either on
motion path or object. In other words, it creates the lattice around the object or curve.
Local Effect – when you create lattice around the motion path curve, then local effect is work
properly. It means you can use it for long curves.
Turntable- A circular horizontal platforms that rotate 360 degree angle through the particular
scene or object.
In the option box window, you have to put required frames to complete your turntable. Clockwise
and Counterclockwise shows the direction of rotation.

International Journal of Computer Graphics & Animation (IJCGA) Vol.5, No.4, October 2015
26
2.1.14 Graph Editor
Graph editor contains multiple tools and other many function who manipulating the animation
curve. You can edit, modify your animation from graph editor.
In general, you can say that graph editor is very powerful tool (group of tools), which help us to
animate a character or object very smoothly.
After learning the basics of using the timeline and keyframing in Maya, the next step is to learn
how to "spline". Splining is basically modifying the way in which key frames transition between
each other. Maya's primary splining tool is the Graph Editor. Before moving on, download and
open ball_animation.ma. It contains the same ball from the Simple Animation Exercise, however
with a set of basic mid-air and ground key frames. The goal of this exercise is to use the Graph
Editor on these existing keys to produce a smooth bouncing ball animation. [6]
In modification of animation curve, you can modify the tangent of key like spline, linear,
clamped, lock the key, unify it, break tangent, free tangent. You can also add new key from graph
editor, you can delete any exiting key or you can insert a new key between two adjacent keys.
(See in fig. 11)
Fig. 11 Graph editor
3. CONCLUSION
Finally we find here many tools which help us to animate any object in Autodesk Maya software.
We have many processes adopt to do these things but we can’t make it in practice. Here you have
seen that how many tools are used for animation a single object and the process used for the same
is too complex but it is a sample for that. There are no limitations for using tools for making
films, videos, game or making a walkthrough we have to go through the whole process. At the
time of giving final touch to our animation, we uses graph editor and dope sheet which is also a
big challenge for any artist or animator.

International Journal of Computer Graphics & Animation (IJCGA) Vol.5, No.4, October 2015
27
REFERENCES
1. https://en.wikipedia.org/wiki/Computer_animation
2. https://en.wikipedia.org/wiki/Autodesk_Maya
3. Autodesk Maya, Features – compares from https://en.wikipedia.org/wiki/Autodesk_Maya
4. http://www.autodesk.in/products/maya/features/3d-animation/list-view
5. http://download.autodesk.com/us/maya/2009help/index.html?url=Lights_shadows_and_cameras_
Animating_camera_moves.htm,topicNumber=d0e26994
6. https://courses.cs.washington.edu/courses/cse458/09au/content/html/exercises/graph_editor_exerci
se.html
AUTHORS
Rahul Kushwaha, have 12+ year experience in 3D animation industry. After completing
his M.Sc. In Multimedia he is pursuing Ph.D. in New Media from Amity University
Gurgaon, India. He is working since 2003, for various national/international animation
production studios. He has worked as 3D Team Lead/Supervisor for studios like UTV
motion Pictures, DQ Entertainment ltd, MAAC and Color chips on Big Budget
national/International animation movies like The Legend Of Dragon (2D), Arjun-The
Warrior Prince, Barbie Diaries and Series DVD projects like Disney's Mickey Mouse
Clubhouse, Big Idea' 3-2-1-Penguins, Cosmic Quantum Ray, Bratz, Donkey Ollie, Miki-Do, Tak'' the
Power Of Juju'', Sony picture ''GEO-TRAX'' etc.. At present he is engaged with Amity University Gurgaon,
Haryana (India), as Assistant Professor - Graphics & Multimedia sharing his production experience and
knowledge with students.