product information manager pim 9.1...how to create an item - webui . 8 . primary product ship point...
TRANSCRIPT

Supplier Guide for PIM How to Create an Item
Product Information Manager PIM

Table of Content
2
Initiate Item………………………………………………………..7 Add Ship Point….…………………………………………………8 Add GPC Brick…………………………………………………….11 Complete item…………………………………………….…17-20 Submission Failures………………………………………..22-23

How To Create An Item - WebUI
3
Supplier Login Page: http://pim.aafes.com/webui/supplierwebui

How To Create An Item - WebUI
4
A. Supplier Homepage consist of the Vendor Workflow widget
B. The single person icon allows you to see items assigned to you and the multiple person icon allows you to see items assigned to you and supplier group you are a member of.
C. Vendor Maintenance Workflow
D. Welcome Widget displays your username
E. Upload Assets such as thumbnails image and product information sheets
F. Clicking on the Exchange logo will bring you back to the homepage

How To Create An Item - WebUI
5
Homepage F
E
B C
D
A

How To Create An Item - WebUI Vendor Workflow widget:
Initiate New Items Next to arrow -> Initiate New Item Box will appear select Initiate New Item
4
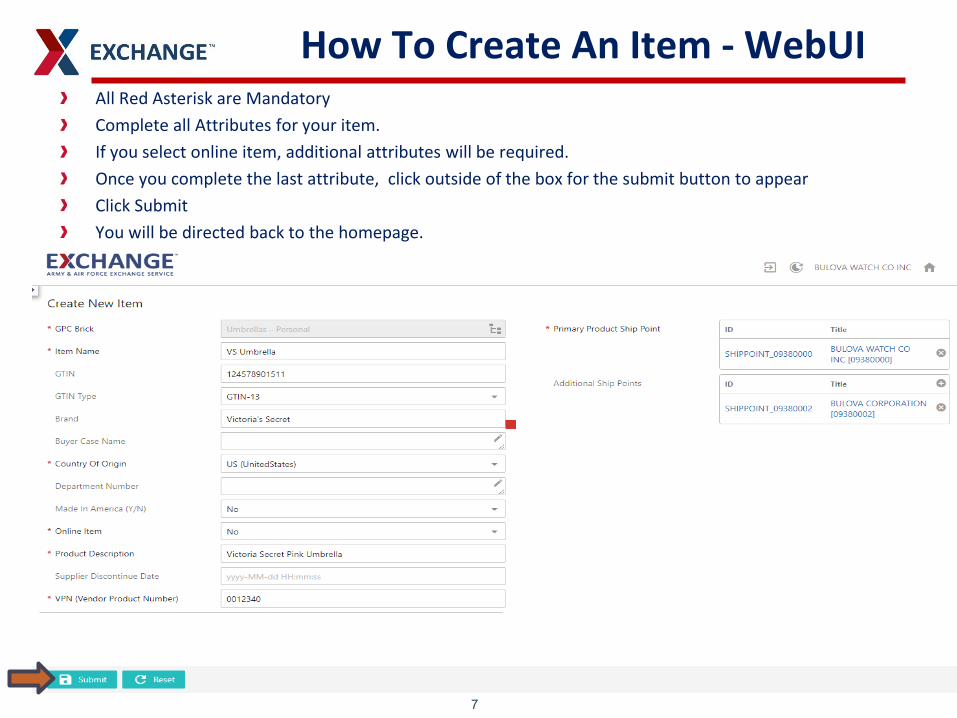
How To Create An Item - WebUI All Red Asterisk are Mandatory Complete all Attributes for your item. If you select online item, additional attributes will be required. Once you complete the last attribute, click outside of the box for the submit button to appear Click Submit You will be directed back to the homepage.
Terisk
7

How To Create An Item - WebUI
8
Primary Product Ship Point Next to Primary Product Ship point (Vendor Code), click on + indicator You can search two ways to attach your ship point (Vendor Code)
1. Click on Search tab, type supplier name, click search then highlight to click Okay 2. Click on Browse tab Click on supplier root, search by alpha drill down to Ship Point, highlight
your vendor number, Click okay

How To Create An Item - WebUI
9
Adding Additional Ship Point Click on Additional Ship Point click on + indicator Follow the same steps to add additional ship points (Vendor Codes)
=

How To Create An Item - WebUI
10
You cannot add Two Different Company Vendor Codes they must be the same supplier If two Companies are added you will receive this error If you are assigned to several vendors make sure in the upper right hand corner you have selected the correct vendor before creating your item.

How To Create An Item - WebUI GPC Brick icon– click on products, Browse to find your product brick. Click on the arrows to drop down as shown below to the brick level.
If you do not arrow down to the brick level, you will not be able to save any data you enter.
Highlight your item then click OK.
11

How To Create An Item - WebUI
Item Review will show the number of new items created. Under the Normal column click on the number. Any item not completed within allotted time frame will escalate to high priority column.
12

How To Create An Item - WebUI Check Box Under “Assigned To Me”
If you do not check the box to assign the item to yourself you will not be able to save any information you enter, and the action buttons will not be available.
Click on name link to complete tabs.
13

17
How To Create An Item - WebUI Filter Item by clicking on the attribute…. Click on name use search box to select items You can mass assign up to 300 items at a time

How To Create An Item - WebUI
Assign will pop up, Once you click a drop down will appear Click on Assign to me to mass assign items to yourself (you can mass assign 300 items at a time) Release Task will un-assign the items Click the file name to complete Items that you have completed you can also mass submit to the next state in the workflow
15
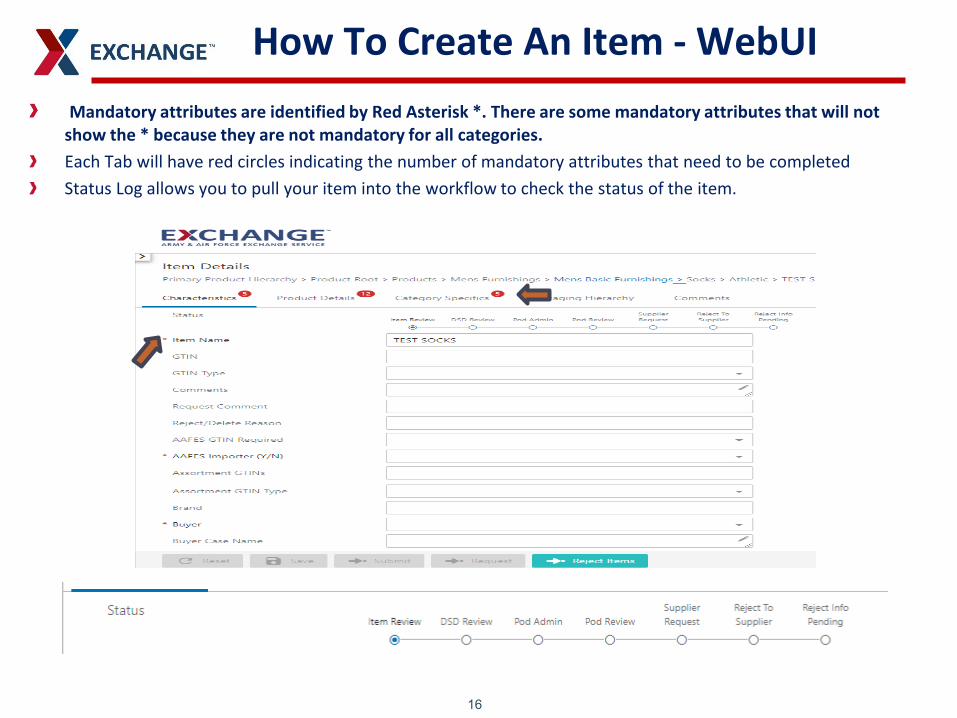
How To Create An Item - WebUI Mandatory attributes are identified by Red Asterisk *. There are some mandatory attributes that will not show the * because they are not mandatory for all categories. Each Tab will have red circles indicating the number of mandatory attributes that need to be completed Status Log allows you to pull your item into the workflow to check the status of the item.
16

Characteristics Color Names need to be entered in Camel Case (i.e. Passion Red, Sunshine Yellow, Perfect Pink)
If you select NRF Color 000, your color name must be No Color Status Log displays on the Characteristics Tab this will allow you to check the status of your item by pulling your item into the workflow using the search by item widget Save each tab before moving to the next tab
17
Product Details
18
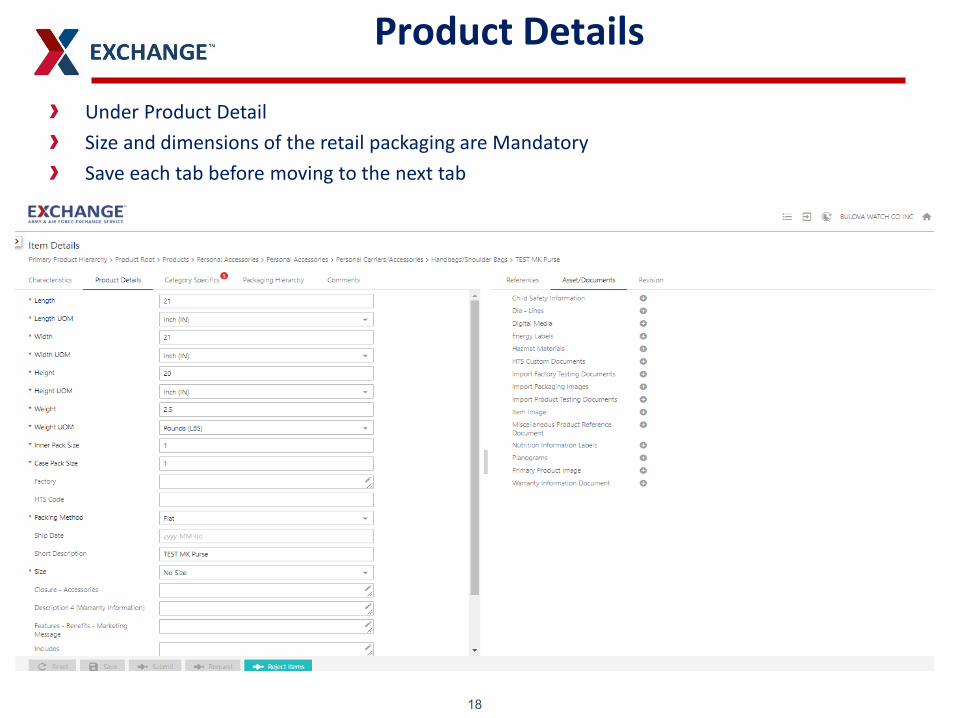
Under Product Detail Size and dimensions of the retail packaging are Mandatory Save each tab before moving to the next tab

Category Specifics
19
Category Specifics are Mandatory fields for ECOM Consumer dimensions is the actual size of the item on this screen Save each tab before moving to the next tab

Packaging Hierarchy
20
Click Add Higher use the drop down under New Pack Type to select your pack, Click OK a column will be added If you need to unlink your packaging you can right click to unlink the box

Packaging Hierarchy
21
Adding dimensions for Inner, Case and QTY Of Next Lower packaging Tare and Pallet you need to enter the number of cases for each, and QTY Of Next Lower Packaging

22
Submit to Next Workflow
Once item is ready to submit to next workflow Click Save/ Submit to take you back to the home page

23
Submission Failures
GTIN Error Message Existing GTIN with the same supplier will cause an error in PIM
GTIN is present in RMS. Follow up with buying team to have item migrated into PIM Remove the item by rejecting out of your workflow.

24
Submission Failures
Common warning messages Missing attributes that aren’t identified as mandatory will create an error
Click on Details in blue to view missing attributes
Error messages you direct you on what actions to take, once completed submit again


Thank You!