product installation guide - bow-group.com · product installation guide bow superpex january 2008...
TRANSCRIPT

PRODUCT INSTALLAT ION GU IDE
BOW SUPERPEX JANUARY 2008
POTABLE PIPINGSYSTEM
Designed Especially forContractors


1
PRODUCT INSTALLATION GUIDE
IMPORTANT NOTICE
The information in this manual was gathered from publicly available sources, including reports of tests conducted by various independent entities under the test conditions specified in the standards listed.
The contents of this manual are informational only. BOW has no responsibility for the design, administration, results, or evaluation of any test. BOW makes no warranties or representations, expressed or implied, as to: the fitness of any product or system for any particular purpose; the suitability of any product or system for any specific application; or the performance of any product or system in actual construction.
No product or system should be used or installed without first reviewing all applicable plumbing or building code provisions and the manufacturer’s installation instructions. Local code authorities and the product or system manufacturer should be consulted with respect to unresolved questions or uncertainties.
TAblE Of CONTENTs
Limitations on Pipe Use . . . . . . . . . . . . . . . . . 2
Flexible Pipe Installation Practices . . . . . . . . . 3
General Installation . . . . . . . . . . . . . . . . . . . . . 3
Bending the Pipe . . . . . . . . . . . . . . . . . . . . . . 4
Handling and Storing the Pipe . . . . . . . . . . . . 4
Pipe Supports . . . . . . . . . . . . . . . . . . . . . . . . . 4
Selection and Inspection . . . . . . . . . . . . . . . . . 4
Support Spacing . . . . . . . . . . . . . . . . . . . . . . . 4
Pipe Expansion and Contraction . . . . . . . . . . . 5
Connection to Other Piping Materials . . . . . . . 5
Hydrostatic Testing and Inspection of System . . . . . . . . . . . . . . . . . . . 5
Freezing and Thawing Pipe Systems . . . . . . . . 5
Insert Fitting System with Crimp Rings . . . . . . 6
Manifold Plumbing System . . . . . . . . . . . . . . . 7
Technical Data . . . . . . . . . . . . . . . . . . . . . . . . 8
Pipe Dimensions and Weights . . . . . . . . . . . . . 8
Hydraulic Performance & Friction Losses . . . . 8
Pressure Ratings . . . . . . . . . . . . . . . . . . . . . . 9
Miscellaneous Data . . . . . . . . . . . . . . . . . . . . 9
Appendix “A” . . . . . . . . . . . . . . . . . . . . . . . . 10
2
PRODUCT INSTALLATION GUIDE
lIMITATIONs ON PIPE UsE• Do not use in any application where pipe will be
exposed to direct sunlight. Store pipe under cover prior to installation where it will not be exposed to direct sunlight.
• Do not allow the tubing or fittings to come into contact with materials that could affect the integrity of the SUPERPEX or fitting materials. This would include at least:
* Pipe thread sealing compounds
* Firewall penetration compounds (exception: water soluble gypsum based caulking)
* Petroleum-based materials or sealants such as:
Kerosene Benzene
Gasoline Solvents
Fuel Oils Cutting Oils
Acetone Asphaltic Paint
Asphaltic Road Materials
Toluene Xylene
* Strong chlorine solutions
* Nitric and sulphuric acids
* Ammonia
* Surfactants
A product absence from this list does not imply or insure chemical compatibility. Always check the product manufacturers recommendation in this regard.
Use Only Copper or Brass Insert Fittings and Copper Crimp Rings (Coated Black)
designed and identified as suitable for PEX
• Do not allow direct contact between high concentrations of termiticides or insecticides with PEX pipe. Backfill and cover underground tubing prior to spraying termiticide or insecticide.
• Do not place PEX pipe in contaminated soils or other contaminated environments. Situations calling for special scrutiny on a case-by-case basis would include (but not be limited to):
* Tank farms or industrial sites containing chemical or petroleum storage tanks and pipelines where a malfunction or leak would contaminate the surrounding soil.
* Storage ponds or land disposal sites for industrial process water or waste water containing toxic chemicals.
* Solid waste disposal sites.
* An area that has been known to be contaminated by the long-term presence of toxic chemical substances.
SUPERPEX jANUARy 2008
3
flExIblE PIPE INsTAllATION PRACTICEs
General Installation• Review all limitations on the SUPERPEX pipe
and fittings system you have selected to use before proceeding.
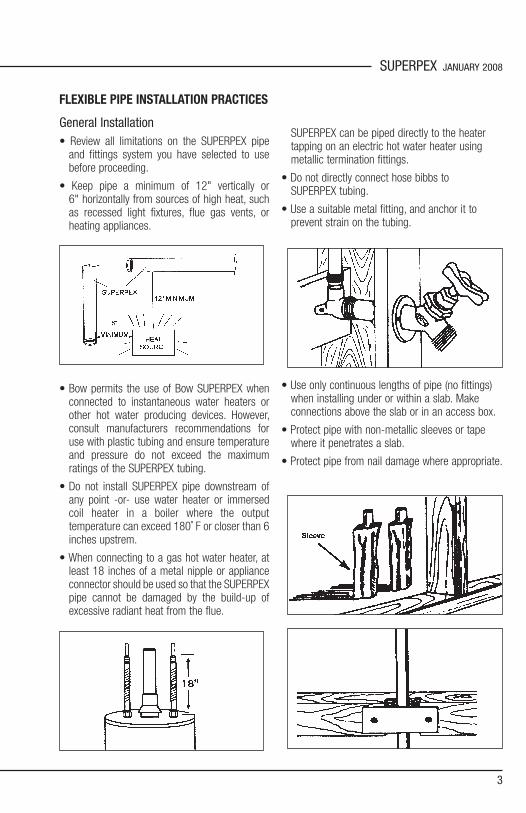
• Keep pipe a minimum of 12" vertically or 6" horizontally from sources of high heat, such as recessed light fixtures, flue gas vents, or heating appliances.
• Bow permits the use of Bow SUPERPEX when connected to instantaneous water heaters or other hot water producing devices. However, consult manufacturers recommendations for use with plastic tubing and ensure temperature and pressure do not exceed the maximum ratings of the SUPERPEX tubing.
• Do not install SUPERPEX pipe downstream of any point -or- use water heater or immersed coil heater in a boiler where the output temperature can exceed 180˚ F or closer than 6 inches upstrem.
• When connecting to a gas hot water heater, at least 18 inches of a metal nipple or appliance connector should be used so that the SUPERPEX pipe cannot be damaged by the build-up of excessive radiant heat from the flue.
SUPERPEX can be piped directly to the heater tapping on an electric hot water heater using metallic termination fittings.
• Do not directly connect hose bibbs to SUPERPEX tubing.
• Use a suitable metal fitting, and anchor it to prevent strain on the tubing.
• Use only continuous lengths of pipe (no fittings) when installing under or within a slab. Make connections above the slab or in an access box.
• Protect pipe with non-metallic sleeves or tape where it penetrates a slab.
• Protect pipe from nail damage where appropriate.

4
PRODUCT INSTALLATION GUIDE
bENdINg ThE PIPE
SUPERPEX pipe may be bent to a maximum of 6 times the O.D. of the pipe, as shown in the table below.
Pipe Size (CTS) Min. Bending Radius
3/8" 3.00"
1/2" 3.75"
3/4" 5.25"
1" 6.75"
Note: If using pipe in coils and bending against the coil direction, the minimum bending radius is 3 times the radius given above,
(e.g., 3/8 CTS pipe = 3 x 3" = 9")
When joining, piping must be installed without placing stress on the joint. See illustrations that follow for appropriate methods of stress relieving.
hANdlINg ANd sTORINg ThE PIPE• Do not drag the pipe over rough terrain, rocks, or
any surface which can cut, puncture, or excessively abrade the pipe wall.
• Do not install kinked pipe.
• Inspect all pipe before and after installation. Cut out and replace all damaged sections.
• Store pipe under cover prior to installation where it will not be exposed to sunlight.
• Do not use fittings unless designed specially for SUPERPEX and BOW OXYPEX tubing. Look for “PEX” marking on all fittings and rings.
PIPE sUPPORTssElECTION ANd INsPECTION• Plastic hangers and straps are recommended,
but metal supports which are designed for use with plastic pipe can be used.
• Supports must not pinch or cut into the pipe, and should allow lateral movement.
• Supports must not have sharp edges that would result in abrasion during lateral movement.
• Inspect all supports prior to installation to ensure that sharp edges do not exist that can damage the pipe.
• Never use defective or damaged supports. Replace them.
sUPPORT sPACINg• Spacing between supports is the same up to
1" CTS. Maximum spacing is as follows:
Horizontal: 32"
Vertical: 48"
Additional Support
• Use protective sleeves or bushings on pipe:
* When penetrating floors.
* At beginning and end of straight runs of piping which penetrate studs or joists.
* At significant changes in direction.
SUPERPEX jANUARy 2008
5
PIPE ExPANsION ANd CONTRACTION
• SUPERPEX pipe expands approximately 7.9 x 10⁻⁵ in/in°F or about 1" per 100 feet of length for every 10°F temperature rise. Therefore do not pull SUPERPEX pipe tight during installation so as to prohibit pipe movement, as this will result in unnecessary stress being placed on fittings and connections when pipe cools and contracts. Allow about 1/8" slack per foot of installed pipe.
• Expansion can usually be accommodated by pipe’s flexibility for sizes up to and including 1" diameter pipe. For long lengths, a four- elbow expansion loop of continuous pipe loop will accommodate large expansion within a small space.
CONNECTION (TRANsITION) TO OThER PIPINg MATERIAls
• Using lead free solder, join copper piping transition fittings onto the copper pipe and allow to cool before connecting to PEX pipe. Otherwise the heat may damage the PEX pipe.
• When making connection to CPVC pipe or fittings, use only approved mechanical joints.
• Do not apply lubricants, pipe dope, or any chemical to an insert fitting.
hydROsTATIC TEsTINg ANd INsPECTION Of ThE COMPlETEd sysTEM
• Test all installations with ambient temperature potable water.
• A test pressure should be at least 100 psi, but not greater than 225 psi.
• A test duration of 2 hours is recommended.
• Do not use soap or detergent solutions for leak detection.
• Air testing shall be permitted only when water is not available or when cold weather could freeze the system. Under this circumstance, test the system to a maximum of 100 psi for 2 hours without a drop in air pressure. Air tests shall include appropriate safety precautions such as:
* Conduct test overnight or on eekends, when job attendance is minimized.
* Personnel should wear eye protection.
* Warning Signs.
* Protect pipe in areas where impact could occur while an air-test is in progress.
fREEzINg ANd ThAwINg PIPE sysTEMs
• SUPERPEX pipe systems should never be intentionally subjected to freezing. Freeze protection is a basic element for good plumbing and is a code requirement.
• Do not use open flame or excessive heat to thaw SUPERPEX pipe. Pipe failure or damage are likely results.
• Several suitable methods exist to thaw SUPERPEX pipe. They are listed below.
* Commercial system which pumps heated water through a tube to the ice blockage, and returns the cooled water for reheating
* Wet hot towels
* Hot water
* Hand-held hair dryer
* Low wattage electrical heating tape

6
PRODUCT INSTALLATION GUIDE
INsERT fITTINg sysTEM wIThCRIMP RINgs
Making a Connection• Insure that fittings and rings to be used are
identified as being for use with PEX tubing.
• Cut tubing squarely, remove burrs, and slip the crimp ring on the tube.
• Insert a PEX fitting into tube up to the fitting shoulder and position the crimp ring 1/8" to 1/4" from end of pipe. To prevent ring from moving, squeeze the ring slightly with your fingers or a pair of pliers. Fit must be snug.
• Center the crimping tool exactly over the ring, and keeping both the ring and the tool square with the tube, close the tool completely.
• Check each crimped ring with the proper gauge. Slip gauge squarely over the crimped ring. Check in at least two positions. The “GO” portion of the gauge should slip over the ring. If not, the ring is under crimped. For gauges with “NO-GO” dimensions, the “NO-GO” gauge should not slip over the ring.
Joints that do not pass the gauge check must be cut out and replaced. DO NOT RECRIMP (Double Crimp) THE SAME FITTING.
Incorrect Connection
The following are some examples of improper connections that may result in improper sealing and potential for leaks. 1) Ring crimped over the end of tube.
2) Tool not fully closed - ring not fully crimped.
3) Tool not centered on ring.
4) Tube not cut squarely.
5) Ring too far from tube end.
TOOls ANd RINgs• Use tools available from BOW. All tools must
make a full-circle crimp.
• Check tool adjustment daily, and readjust as necessary.
• Use only copper crimp rings intended for PEX.
SUPERPEX jANUARy 2008
7
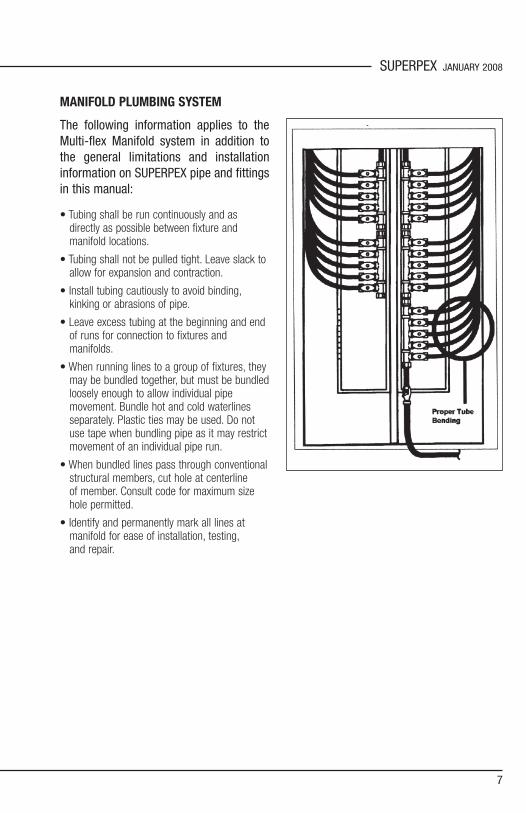
MANIfOld PlUMbINg sysTEM
The following information applies to the Multi-flex Manifold system in addition to the general limitations and installation information on SUPERPEX pipe and fittings in this manual:
• Tubing shall be run continuously and as directly as possible between fixture and manifold locations.
• Tubing shall not be pulled tight. Leave slack to allow for expansion and contraction.
• Install tubing cautiously to avoid binding, kinking or abrasions of pipe.
• Leave excess tubing at the beginning and end of runs for connection to fixtures and manifolds.
• When running lines to a group of fixtures, they may be bundled together, but must be bundled loosely enough to allow individual pipe movement. Bundle hot and cold waterlines separately. Plastic ties may be used. Do not use tape when bundling pipe as it may restrict movement of an individual pipe run.
• When bundled lines pass through conventional structural members, cut hole at centerline of member. Consult code for maximum size hole permitted.
• Identify and permanently mark all lines at manifold for ease of installation, testing, and repair.

8
PRODUCT INSTALLATION GUIDE
hydRAUlIC PERfORMANCE & fRICTION lOssEsTubing
Flow Rate (USGPM)
3/8 1/2" 3/4" 1" 1-1/4"Velocity
(ft/s)F. Loss
(psi/100 ft)Velocity
(ft/s)F. Loss
(psi/100 ft)Velocity
(ft/s)F. Loss
(psi/100 ft)Velocity
(ft/s)F. Loss
(psi/100 ft)Velocity
(ft/s)F. Loss
(psi/100 ft)
1 3.33 7.0 1.81 1.6 0.96 0.3 0.55 0.12 6.67 25.4 3.62 5.8 1.81 1.1 1.10 0.33 10.00 53.9 5.43 12.2 2.72 2.3 1.65 0.7 1.10 0.34 7.24 20.8 3.63 3.9 2.19 1.1 1.47 0.45 9.05 31.4 4.54 5.9 2.74 1.7 1.84 0.76 10.86 44.0 5.44 8.2 3.29 2.4 2.21 0.97 6.35 10.9 3.84 3.2 2.57 1.28 7.26 14.0 4.39 4.1 2.94 1.59 8.17 17.4 4.94 5.1 3.31 1.910 9.07 21.1 5.48 6.2 3.68 2.311 9.98 25.2 6.03 7.4 4.05 2.812 10.89 29.6 6.58 8.7 4.41 3.313 7.13 10.1 4.78 3.814 7.68 11.6 5.15 4.415 8.23 13.2 5.52 5.016 8.78 14.8 5.88 5.617 6.25 6.218 6.62 6.919 6.99 7.720 7.36 8.421 7.72 9.222 8.09 10.0
PEX SDR 9 TUBING
TEChNICAl dATA
dIMENsIONs Of PEx sdR 9 PlUMbINg PIPE
Size (Nom.) O.D. (in.) I.D. (in.) Wall Thickness (in.)
1/4 0.375 0.225 0.070
3/8 0.500 0.350 0.070
1/2 0.625 0.475 0.070
3/4 0.875 0.671 0.097
1 1.125 0.853 0.125
1-1/4 1.375 1.054 0.153
wEIghTs ANd CAPACITIEs Of PlUMbINg PIPE (PER 100 fEET)
Size (Nom.) Wt. empty (lbs.) Wt. full (lbs.) Capacity (U.S. gal)
1/4 2.93 4.7 0.21 3/8 4.20 8.4 0.50 1/2 5.35 13.0 0.92 3/4 10.23 25.6 1.84 1 16.89 42.2 3.04
1-1/4 25.13 63 4.53
METAl INsERT fITTINgs EqUIvAlENT lENgThs
Fitting Equivalent Length of Pipe (ft.) Type of Fitting 3/8" Size 1/2" Size 3/4" Size 1" Size
Coupling 2.9 2.0 0.6 1.3
Adapter 2.0 2.0 1.0 1.0
Elbow 90 9.2 9.4 9.4 10.0
Tee-Branch 9.4 10.4 8.9 11.0
Tee-Run 2.9 2.4 1.9 2.3
PlAsTIC INsERT fITTINgs EqUIvAlENT lENgThs
Fitting Equivalent Length of Pipe (ft.)
Type of Fitting 1/2" Size 3/4" Size
Coupling 7.1 4.8
Elbow 90 16.5 17.4
Tee-Branch 17.9 17.7
Tee-Run 7.2 6.6
SUPERPEX jANUARy 2008
9
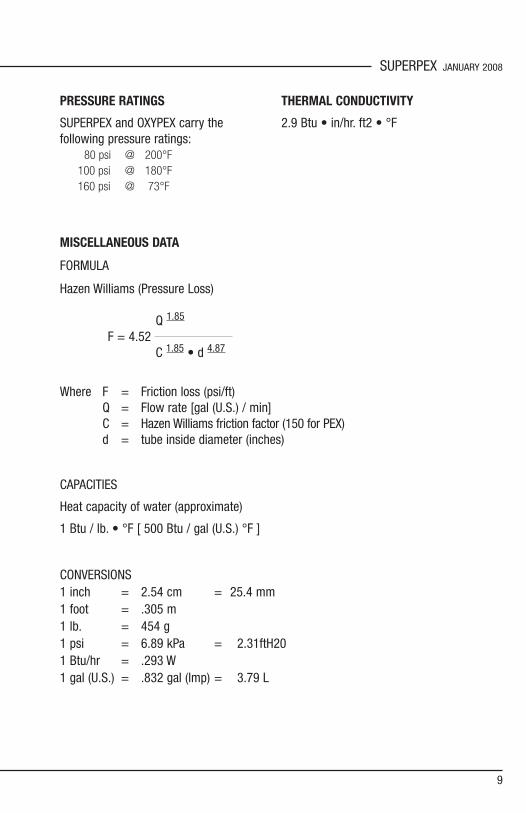
PREssURE RATINgs
SUPERPEX and OXyPEX carry the following pressure ratings: 80 psi @ 200°F 100 psi @ 180°F 160 psi @ 73°F
MIsCEllANEOUs dATA
FORMULA
Hazen Williams (Pressure Loss) Q 1.85
F = 4.52 C 1.85 • d 4.87
Where F = Friction loss (psi/ft) Q = Flow rate [gal (U.S.) / min] C = Hazen Williams friction factor (150 for PEX) d = tube inside diameter (inches)
CAPACITIES
Heat capacity of water (approximate)
1 Btu / lb. • °F [ 500 Btu / gal (U.S.) °F ]
CONvERSIONS1 inch = 2.54 cm = 25.4 mm1 foot = .305 m1 lb. = 454 g1 psi = 6.89 kPa = 2.31ftH201 Btu/hr = .293 W1 gal (U.S.) = .832 gal (lmp) = 3.79 L
ThERMAl CONdUCTIvITy
2.9 Btu • in/hr. ft2 • °F

10
PRODUCT INSTALLATION GUIDE
APPENdIx “A”
bOw sUPERPEx sysTEMs CONfORM TO ThE fOllOwINg:
BOCA BOCA National Plumbing Code
ICC International Plumbing Code
IAPMO Uniform Plumbing Code
SBCCI Standard Plumbing Code
CABO 1 & 2-Family Dwelling Code
ASTM American Society for Testing & Materials, STD F876, F877, F1807, F2159, F2023
NSF NSF International (SUPERPEX Tubing bears the NSF-pw, cNSF-pw and the NSF CL-R marks)
CSA Canadian Standards Association (CSA B 137.5)

SUPERPEX jANUARy 2008
11
N O T E s
____________________________________________________________
____________________________________________________________
____________________________________________________________
____________________________________________________________
____________________________________________________________
____________________________________________________________
____________________________________________________________
____________________________________________________________
____________________________________________________________
____________________________________________________________
____________________________________________________________
____________________________________________________________
____________________________________________________________
____________________________________________________________
____________________________________________________________
____________________________________________________________
____________________________________________________________
____________________________________________________________
____________________________________________________________
____________________________________________________________

12
PRODUCT INSTALLATION GUIDE
N O T E s
____________________________________________________________
____________________________________________________________
____________________________________________________________
____________________________________________________________
____________________________________________________________
____________________________________________________________
____________________________________________________________
____________________________________________________________
____________________________________________________________
____________________________________________________________
____________________________________________________________
____________________________________________________________
____________________________________________________________
____________________________________________________________
____________________________________________________________
____________________________________________________________
____________________________________________________________
____________________________________________________________
____________________________________________________________
____________________________________________________________


MONTRÉAL, QUÉBEC Tel.: (514) 735-5671 Fax: (514) 735-8636
CHAMPLAIN, NYTel.: (800) 852-8527Fax: (800) 526-5668E-mail: [email protected]
WWW.BOW-GROUP.COMPEX INST-E
jANUARy 2008