product use manual - elaunch.rubbermaidcommercial.com · 4 5 rubbermaid hygen ™ color-coded...
TRANSCRIPT
PRODUCT USE MANUAL
32
RUBBERMAID HYGEN™
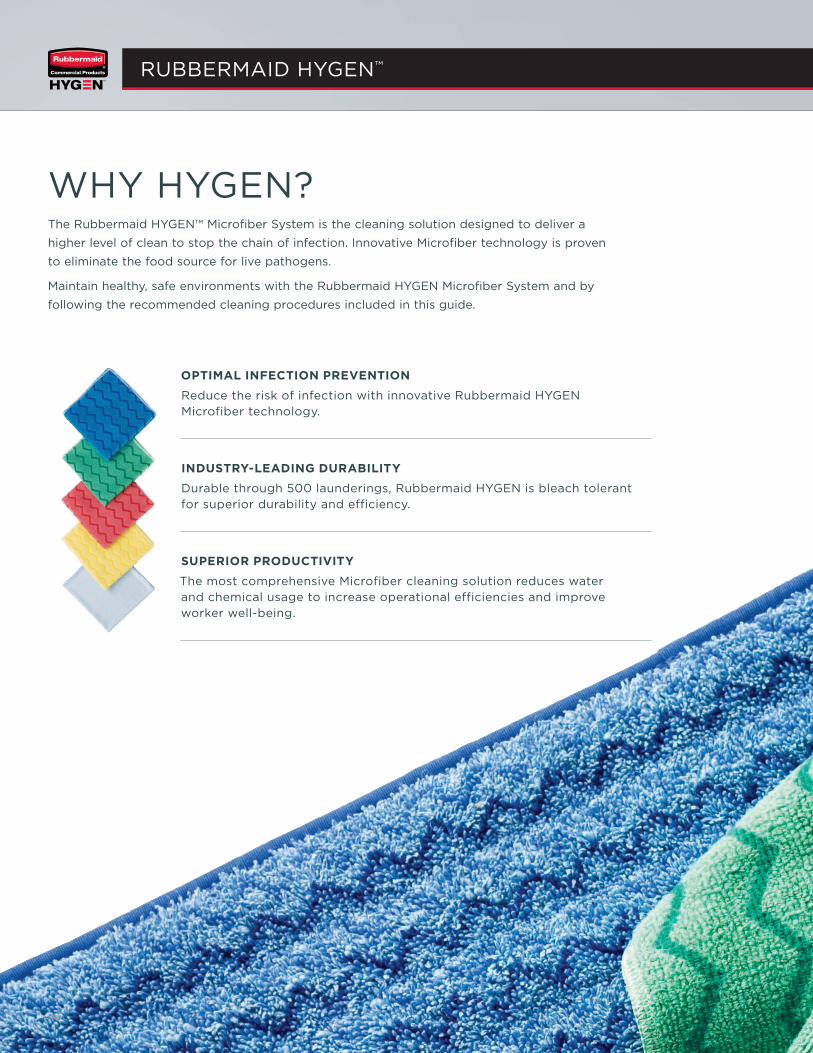
WHY HYGEN?The Rubbermaid HYGEN™ Microfiber System is the cleaning solution designed to deliver a
higher level of clean to stop the chain of infection. Innovative Microfiber technology is proven
to eliminate the food source for live pathogens.
Maintain healthy, safe environments with the Rubbermaid HYGEN Microfiber System and by
following the recommended cleaning procedures included in this guide.
OPTIMAL INFECTION PREVENTION
Reduce the risk of infection with innovative Rubbermaid HYGEN Microfiber technology.
INDUSTRY-LEADING DURABILITY
Durable through 500 launderings, Rubbermaid HYGEN is bleach tolerant for superior durability and efficiency.
SUPERIOR PRODUCTIVITY
The most comprehensive Microfiber cleaning solution reduces water and chemical usage to increase operational efficiencies and improve worker well-being.
32
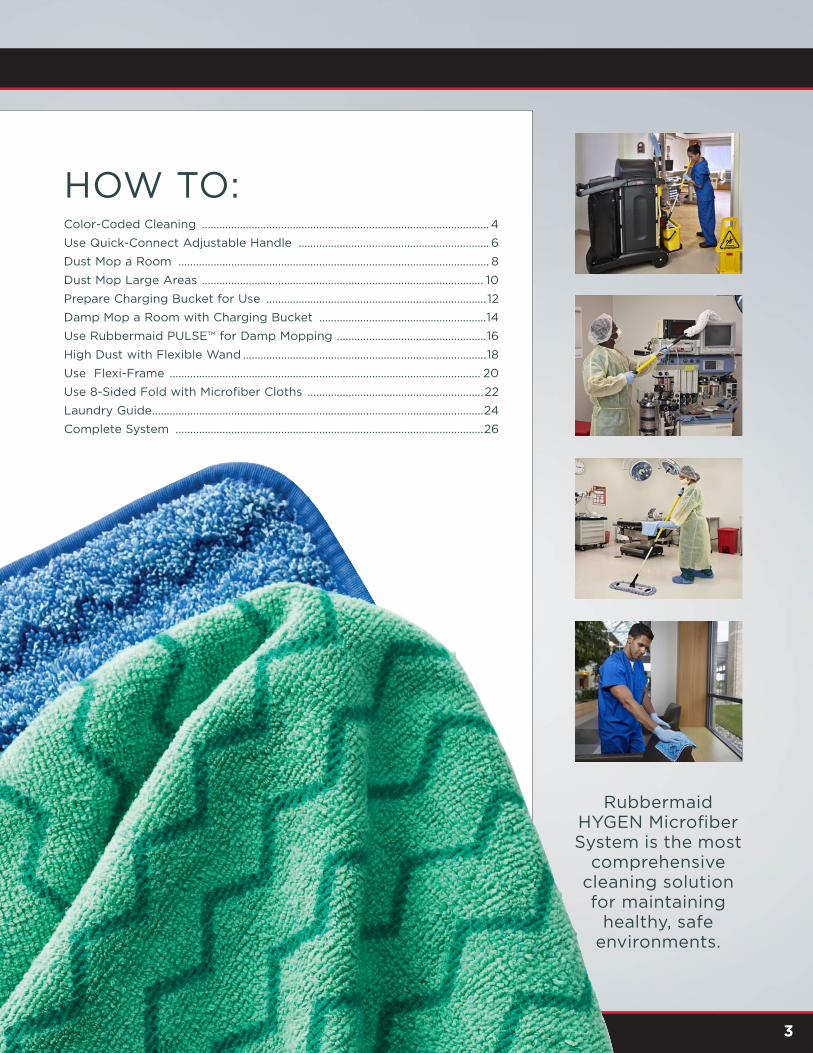
HOW TO:Color-Coded Cleaning .................................................................................................. 4
Use Quick-Connect Adjustable Handle ................................................................. 6
Dust Mop a Room .......................................................................................................... 8
Dust Mop Large Areas ................................................................................................ 10
Prepare Charging Bucket for Use ........................................................................... 12
Damp Mop a Room with Charging Bucket .........................................................14
Use Rubbermaid PULSE™ for Damp Mopping ...................................................16
High Dust with Flexible Wand ...................................................................................18
Use Flexi-Frame .......................................................................................................... 20
Use 8-Sided Fold with Microfiber Cloths ............................................................22
Laundry Guide .................................................................................................................24
Complete System .........................................................................................................26
Rubbermaid HYGEN Microfiber System is the most
comprehensive cleaning solution for maintaining
healthy, safe environments.
54
RUBBERMAID HYGEN™
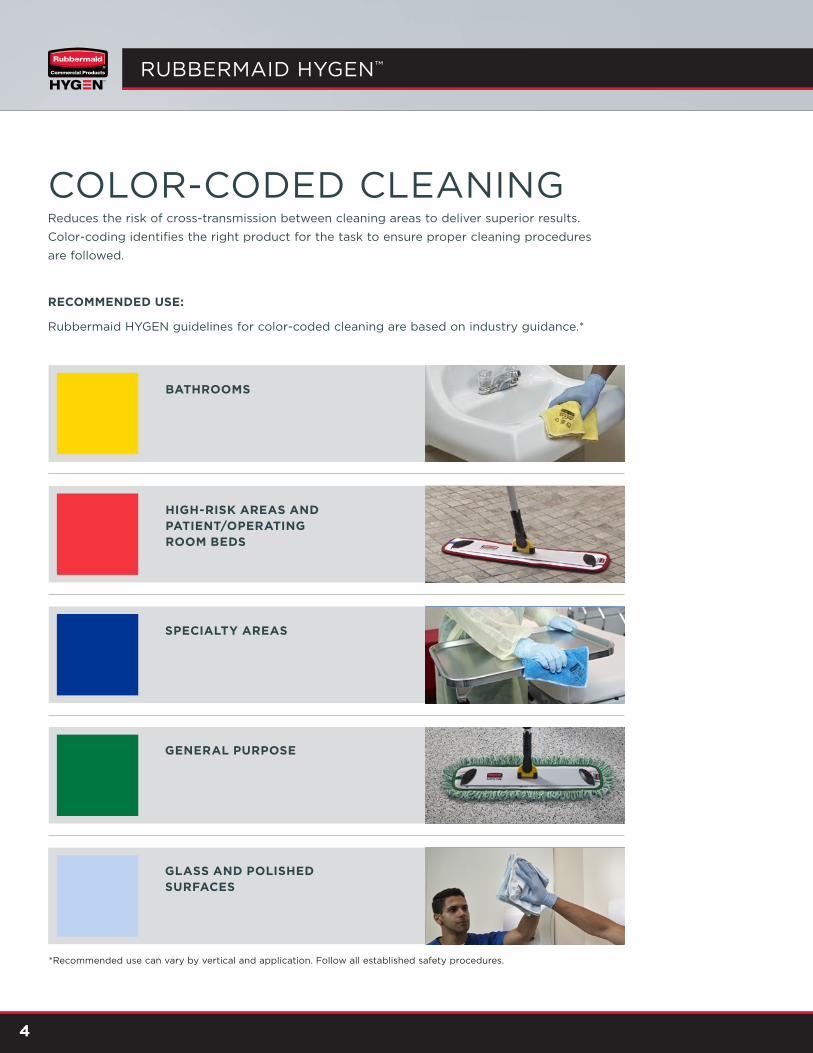
COLOR-CODED CLEANINGReduces the risk of cross-transmission between cleaning areas to deliver superior results.
Color-coding identifies the right product for the task to ensure proper cleaning procedures
are followed.
RECOMMENDED USE:
Rubbermaid HYGEN guidelines for color-coded cleaning are based on industry guidance.*
MICROFIBER ¢ DAMP MOPS
CHARGING ¢ BUCKET
HIGH-RISK AREAS AND PATIENT/OPERATING ROOM BEDS
GENERAL CLEANING
SPECIALTY AREAS
GENERAL PURPOSE
BATHROOMS
GLASS AND POLISHED SURFACES
*Recommended use can vary by vertical and application. Follow all established safety procedures.
54
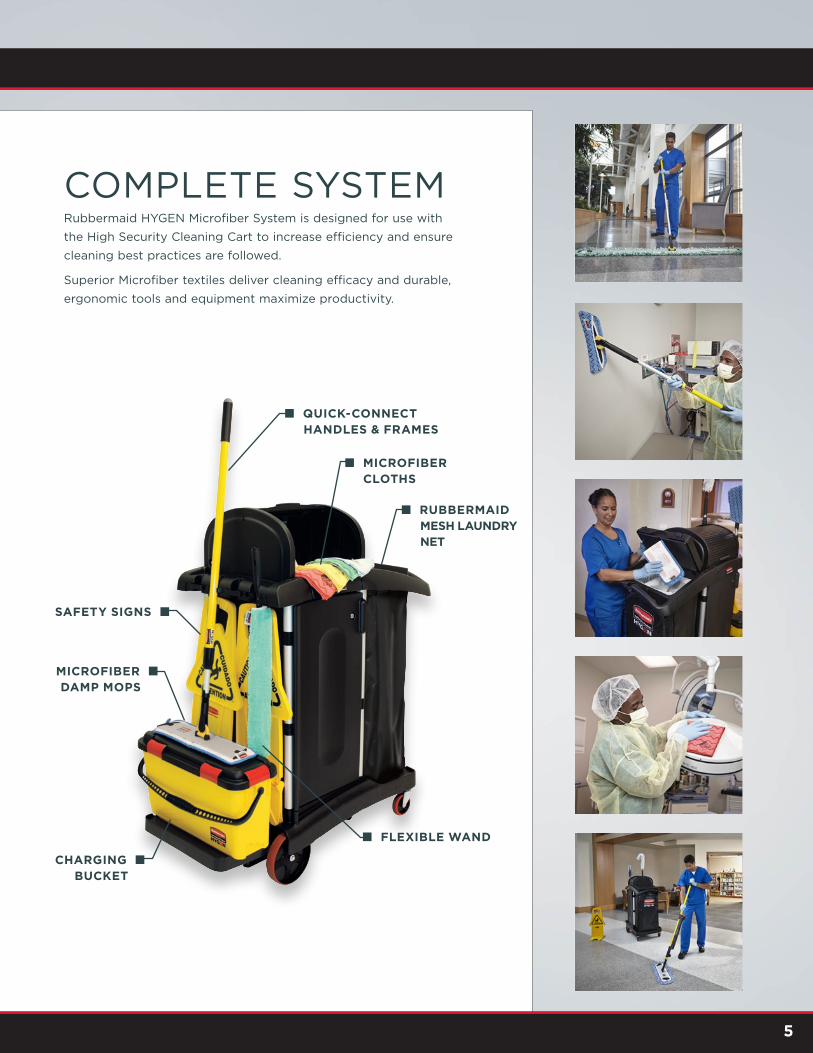
COMPLETE SYSTEMRubbermaid HYGEN Microfiber System is designed for use with
the High Security Cleaning Cart to increase efficiency and ensure
cleaning best practices are followed.
Superior Microfiber textiles deliver cleaning efficacy and durable,
ergonomic tools and equipment maximize productivity.
SAFETY SIGNS ¢
MICROFIBER ¢ DAMP MOPS
CHARGING ¢ BUCKET
¢ MICROFIBER CLOTHS
¢ RUBBERMAID MESH LAUNDRY NET
¢ FLEXIBLE WAND
¢ QUICK-CONNECT HANDLES & FRAMES

76
HOW TO: USE QUICK-CONNECT ADJUSTABLE HANDLE
TOOLS
QUICK-CONNECT ADJUSTABLE HANDLES
MICROFIBER DAMP MOPS
NOTES
2
PLACE clean damp mop or dust mop on floor with logo-imprinted backing facing upward.
4
ADJUST handle length by loosening the black locking ring and extending or collapsing the handle.
ATTACH the Quick-Connect Handle to the Quick-Connect Frame by clicking into place.
3
QUICK-CONNECT FRAMES
CONNECT the Quick-Connect Adjustable Handle to the Quick-Connect Frame by clicking into place.
1
MICROFIBER FRINGED DUST MOPS
MICROFIBER DRY ROOM MOPS
• Always dust mop prior to damp mopping to reduce floor hazing.
• Follow all established safety procedures.
• Don all appropriate Personal Protective Equipment (PPE) (glasses, gloves, etc.).
76
USER PREFERENCE USER PREFERENCE
ALIGN the tip of the handle with chin for ideal length. Tighten locking ring before use.
5
FIGURE 8 CLEANING Clean floor using Figure 8 strokes. For most cleaning, work with the handle pointed upward for ideal positioning.
6A
TO REMOVE a mop from the Quick-Connect Frame, grasp the fabric loop and peel the mop away.
7A
PUSH-AND-PULL CLEANING Point the handle downward.
6B
OR TO REMOVE a mop, step on an exposed edge of the mop, and with the other foot on the opposite edge of the Quick-Connect Frame, lift the handle, peeling the mop away.
7B

98
48" - 72" QUICK-CONNECT STRAIGHT EXTENSION HANDLE
48" - 72" QUICK-CONNECT ERGO EXTENSION HANDLE
HOW TO: DUST MOP A ROOM
NOTES• Dust mop each room with a clean mop to
help prevent cross-transmission.
• Dust mopping helps reduce floor hazing.
• Follow all established safety procedures.
• Don all appropriate Personal Protective Equipment (PPE) (glasses, gloves, etc.).
2
PLACE a clean dust mop on floor with logo-imprinted backing facing upward.
4
BEGIN dust mopping at the far corner of the room, using overlapping Figure 8 strokes, while moving backward toward the doorway.
ATTACH the Quick-Connect Handle to the Quick-Connect Frame by clicking into place.
3
REMOVElarge debris from floor, clean any wet spots, and affix the Quick-Connect Handle to the 18" Quick-Connect Frame by clicking into place.
1
18" QUICK-CONNECT FRAME
18" MICROFIBER FRINGED DUST MOP
TOOLS
98
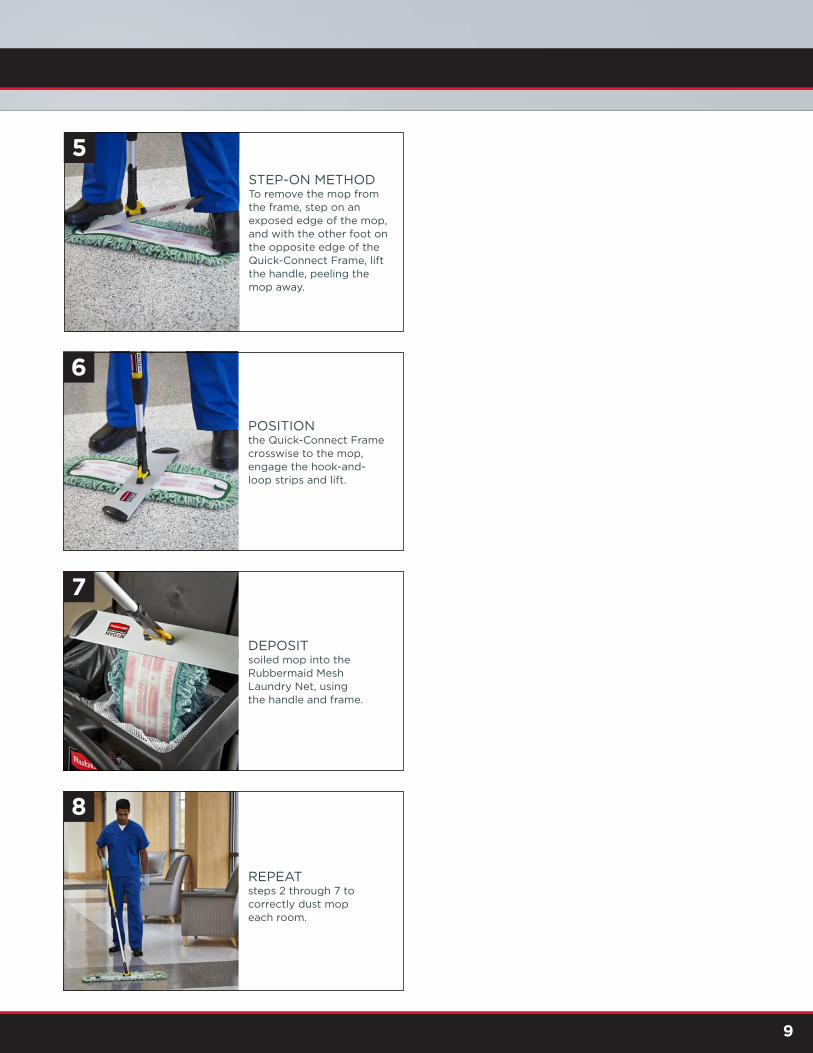
7
DEPOSIT soiled mop into the Rubbermaid Mesh Laundry Net, using the handle and frame.
8
REPEAT steps 2 through 7 to correctly dust mop each room.
STEP-ON METHOD To remove the mop from the frame, step on an exposed edge of the mop, and with the other foot on the opposite edge of the Quick-Connect Frame, lift the handle, peeling the mop away.
5
POSITION the Quick-Connect Frame crosswise to the mop, engage the hook-and- loop strips and lift.
6

1110
HOW TO: DUST MOP LARGE AREAS
2
SELECT a mop size that will complete the job in the least number of passes.
NOTE: If a hallway is 60" wide, a 36" mop will clean it in two passes; however a 24" mop will require three passes, taking more time to clean the space.
4
PLACE a clean Microfiber fringed dust mop on the floor with the logo-imprinted side facing up and press the Quick-Connect Frame onto the mop to attach.
ATTACH the Quick-Connect Handle to the Quick-Connect Frame by clicking into place.
3
REMOVElarge debris from floor and make certain any wet spots are dried before dusting with Microfiber mops, as the dense microfiber fibers are very absorbent and will "stick" to wet spots, making the mop difficult to push.
1
NOTES• Rubbermaid HYGEN™ Microfiber Dust Mops
trap and lock dust and dirt away with more surface contact, thoroughly dusting floors.
• Follow all established safety procedures.
• Don all appropriate Personal Protective Equipment (PPE) (glasses, gloves, etc.).
48" - 72" QUICK-CONNECT STRAIGHT EXTENSION HANDLE
48" - 72" QUICK-CONNECT ERGO EXTENSION HANDLE
24" - 60" MICROFIBER FRINGED DUST MOPS
24" - 60" QUICK- CONNECT FRAMES
RUBBERMAID MESH LAUNDRY NET
TOOLS
1110
7
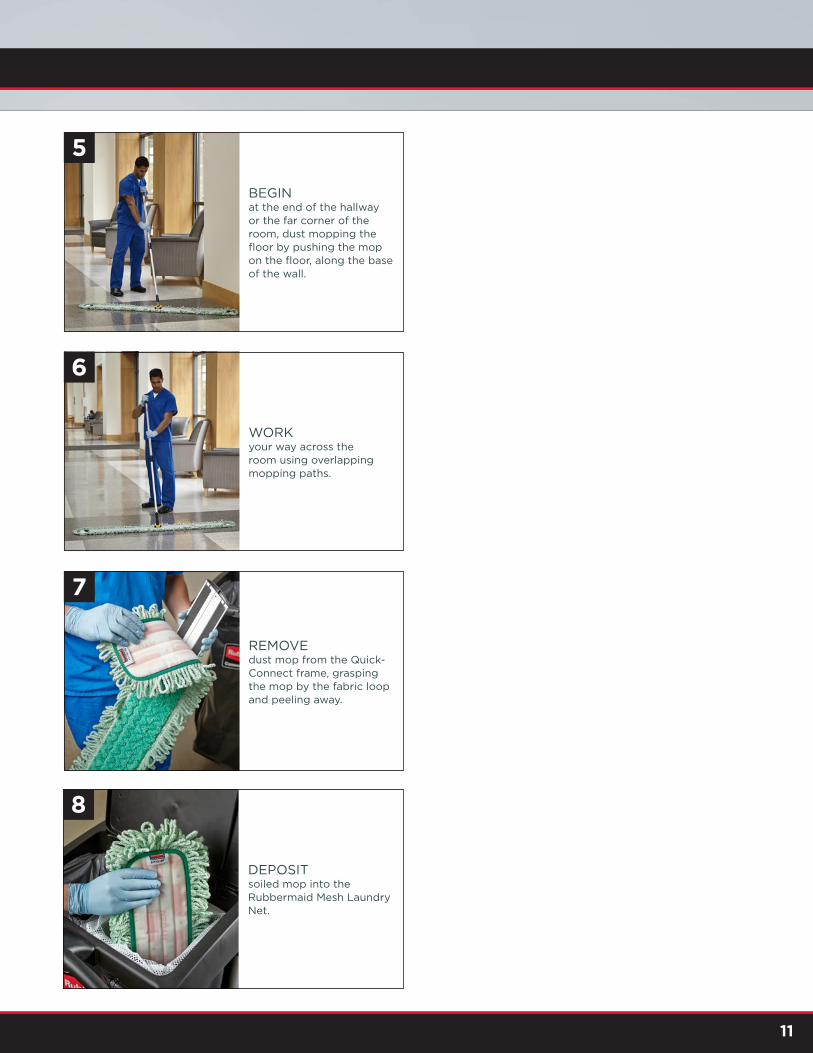
REMOVE dust mop from the Quick-Connect frame, grasping the mop by the fabric loop and peeling away.
DEPOSIT soiled mop into the Rubbermaid Mesh Laundry Net.
8
BEGIN at the end of the hallway or the far corner of the room, dust mopping the floor by pushing the mop on the floor, along the base of the wall.
5
WORK your way across the room using overlapping mopping paths.
6

1312
HOW TO: PREPARE CHARGING BUCKET FOR USE
2
PLACE damp mops in the Charging Bucket with the logo-imprinted side of the mops facing upward.
4
FLIP the Charging Bucket upside down for 5-10 minutes, allowing the cleaning solution to saturate all of the mops. The mops are now ready to use.
SECURE leak-proof lid to the Charging Bucket by snapping the end tabs into place first, then the side tabs.
3
ADD water and/or cleaning solution to the Charging Bucket. Each graduated step inside the Charging Bucket represents one quart, the ideal fluid level for five mops.
1
NOTES• Each Charging Bucket holds up to 20
damp mops; enough for 20 rooms at one mop per room.
• The underside of the Charging Bucket lid has recommended cleaning solution amounts for use with quantities of 10, 15, and 20 mops.
• Do not overfill.
• Follow all established safety procedures.
• Don all appropriate Personal Protective Equipment (PPE) (glasses, gloves, etc.).
CHARGING BUCKET PLUS CLEANING SOLUTION OF CHOICE
18" MICROFIBER DAMP ROOM MOP
TOOLS

1312

1514
18" MICROFIBER DAMP ROOM MOP
HOW TO: DAMP MOP A ROOM WITH CHARGING BUCKET
3
OPEN the Charging Bucket.
AFFIX Quick-Connect Handle to the 18" Quick-Connect Frame.
2
PLACEStable Safety Sign at the entrance to the room being cleaned.
1
CENTER Quick-Connect Frame over the Charging Bucket and push down to attach the mop via hook-and-loop connection. Close the lid.
4
18" QUICK-CONNECT FRAME
CHARGING BUCKET PLUS CLEANING SOLUTION OF CHOICE
NOTES• Dust mop before damp mopping for optimal
infection prevention and floor maintentance.
• Damp mopping each room with a clean mop helps prevent cross-transmission.
• The Charging Bucket is safe for use with all types of floor cleaning chemicals, including bleach, hydrogen peroxide, and d-Limonene based solutions.
• Properly charged mops hold enough solution to clean a standard-sized room - approximately 250 square feet.
• Follow all established safety procedures.
• Don all appropriate Personal Protective Equipment (PPE) (glasses, gloves, etc.).
STABLE SAFETY SIGN
RUBBERMAID MESH LAUNDRY NET
TOOLS
QUICK-CONNECT ADJUSTABLE HANDLES
1514
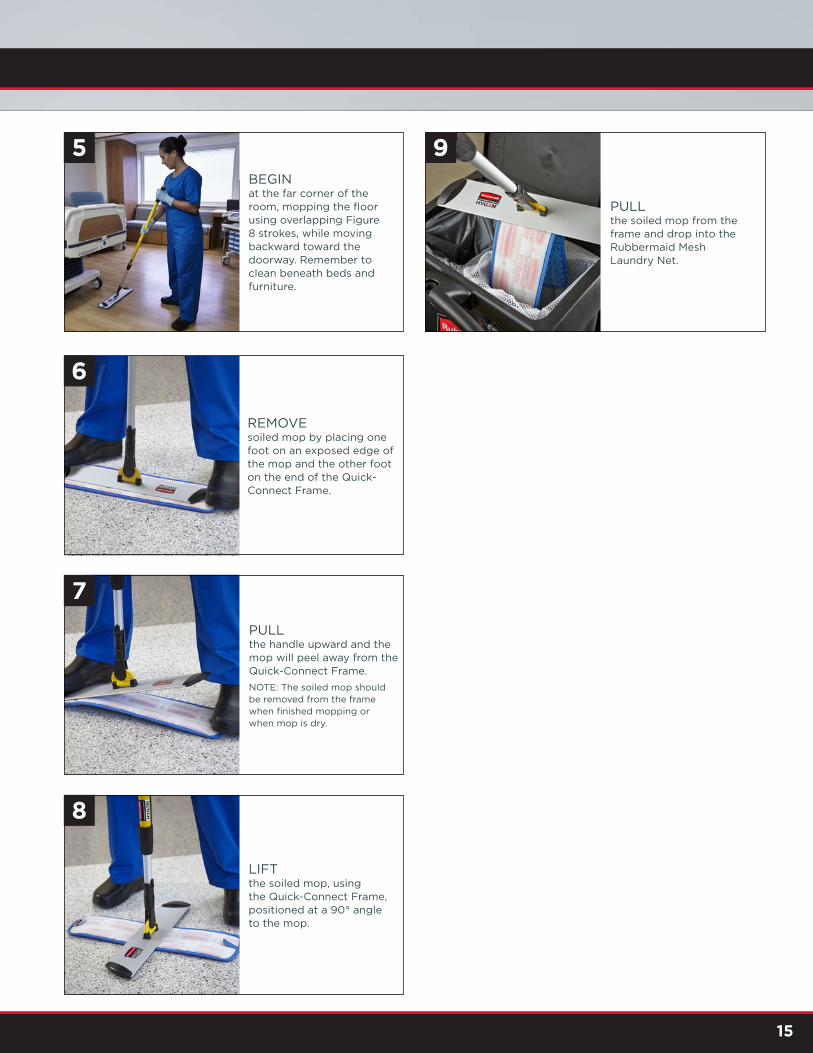
5BEGIN at the far corner of the room, mopping the floor using overlapping Figure 8 strokes, while moving backward toward the doorway. Remember to clean beneath beds and furniture.
6
REMOVE soiled mop by placing one foot on an exposed edge of the mop and the other foot on the end of the Quick-Connect Frame.
8
LIFT the soiled mop, using the Quick-Connect Frame, positioned at a 90° angle to the mop.
PULL the handle upward and the mop will peel away from the Quick-Connect Frame.
NOTE: The soiled mop should be removed from the frame when finished mopping or when mop is dry.
7
PULL the soiled mop from the frame and drop into the Rubbermaid Mesh Laundry Net.
9

1716
RUBBERMAID PULSE™ CADDY
RUBBERMAID PULSE™ MOPPING KIT WITH SINGLE-SIDED FRAME
18" MICROFIBER DAMP ROOM MOP
18" MICROFIBER SCRUBBER MOP
18" MICROFIBER HIGH ABSORBENCY MOP
HOW TO: USE RUBBERMAID PULSE™ FOR DAMP MOPPING
2
PLACE Rubbermaid PULSE Caddy in the Rubbermaid High Security Cleaning Cart.
FILL Rubbermaid PULSE Caddy with cleaning solution.
1
NOTES• Use High Absorbency Mop to clean larger
areas. Replace the pad every time the Rubbermaid PULSE needs to be refilled.
• Use the Scrubber Mop on tile or stone floors.
• Dust mop before damp mopping for optimal infection prevention and floor maintenance.
• Follow all established safety procedures.
• Don all appropriate Personal Protective Equipment (PPE) (glasses, gloves, etc.).
HIGH SECURITY CLEANING CART
STABLE SAFETY SIGN
PLUG the Rubbermaid PULSE Caddy Clean Connect™ hose into the cap fitting to fill the reservoir. Cleaning solution will automatically stop filling when full. Disconnect Clean Connect hose when finished.
NOTE: If air in the Rubbermaid PULSE reservoir impedes the flow of liquid, loosen the cap and perform a manual fill.
3A
FOR MANUAL FILLING, open the red cap at the top of the Rubbermaid PULSE reservoir, fill the reservoir, and replace the cap.
3B
TOOLS
1716
5
AFFIX the damp mop to the Quick-Connect Frame.
4
PLACE Stable Safety Sign to alert pedestrians of the potential slip-and-fall hazard.
6
START in the far corner of the room, pressing the red trigger button on the handle of the Rubbermaid PULSE, dispensing enough cleaning solution onto floor to moisten the damp mop.
9
LIFT the soiled mop, using the Quick-Connect Frame, positioned at a 90° angle to the mop.
10
PULL the soiled mop from the frame and drop into the Rubbermaid Mesh Laundry Net.
MOP, moving backwards, using Figure 8 strokes. As the mop becomes dry, press the trigger to dispense more cleaning solution.
7
REMOVE soiled mop by placing one foot on an exposed edge of the mop and the other foot on the end of the Quick-Connect Frame. Pull the handle upward and the mop will peel away from the Quick-Connect Frame.
NOTE: the soiled mop should be removed from the frame when finished mopping or
when mop is dry.
8
1918
FLEXIBLE DUSTING WAND WITH MICROFIBER SLEEVE
HOW TO: HIGH DUST WITH FLEXIBLE WAND
2
SELECT the right dusting sleeve for the task. High Performance dust sleeves are ideal for dusting or wet cleaning.
3
BEND the Flexible Wand to the shape of surface being cleaned.
SELECT the appropriate length Quick-Connect Adjustable Handle or Pole for the task. Remember, the longer the handle, the heavier it will be.
1
NOTES • To use traditional threaded tools, use the
Quick-Connect Adaptor.
• Do not move locations with poles fully extended.
• Follow all established safety procedures; do not use near electrical wiring.
• Don all appropriate Personal Protective Equipment (PPE).
20" - 18' QUICK- CONNECT STRAIGHT EXTENSION HANDLES AND POLES
AFFIX Flexible Wand to Quick-Connect Extension Handle or Pole.
4
TOOLS

1918
6
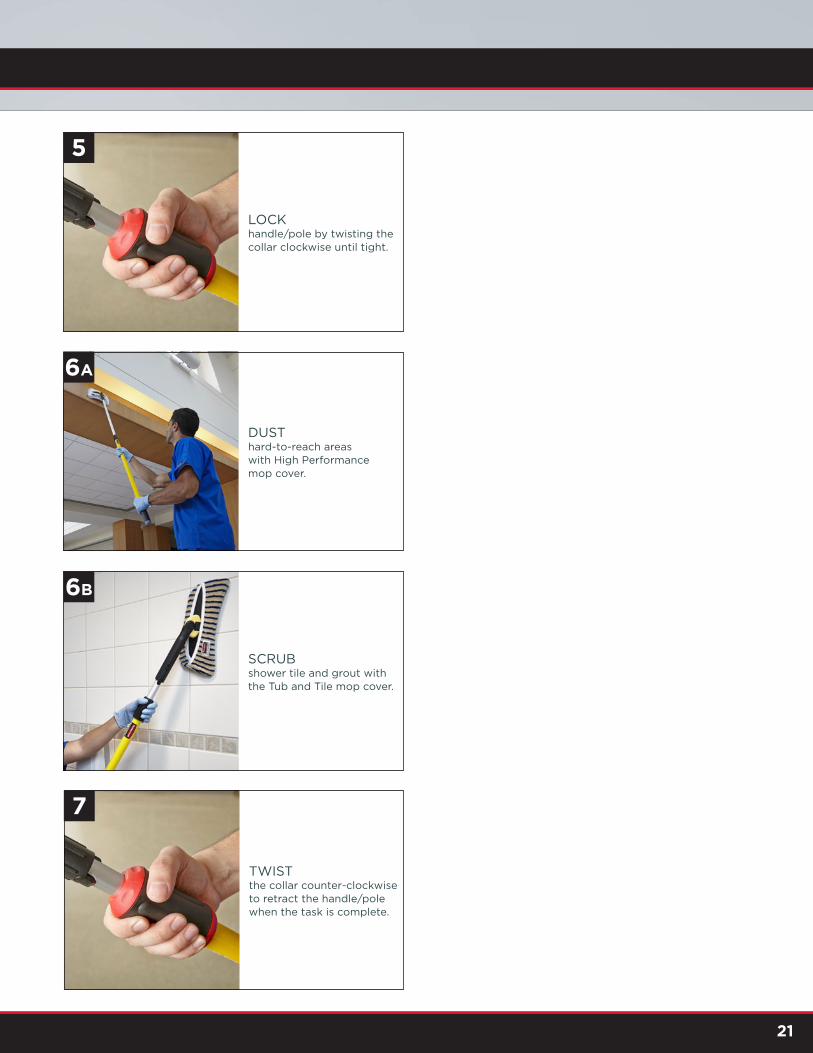
LOCK handle/pole by twisting the collar clockwise until tight.
7
DUST surface, keeping both hands on the handle/pole and both feet securely on the ground.
TWIST the collar counter-clockwise to retract the handle/pole when the task is complete.
8
EXTEND handle/pole to the desired length.
5
2120
11" MICROFIBER FLEXI-FRAME
MICROFIBER FLEXI-FRAME COVERS
HOW TO: USE FLEXI-FRAME
SELECT the right mop cover. High Performance mop cover is ideal for dusting or wet cleaning. Tub and Tile cover is best for shower cleaning.
2
SELECT the appropriate length Quick-Connect Adjustable Handle or Pole for the task. Remember, the longer the handle, the heavier it will be.
1
NOTES • To use traditional threaded tools, use the
Quick-Connect Adaptor.
• Do not move locations with poles fully extended.
• Specialized mop covers for all cleaning occasions:
- Damp: General damp cleaning
- High Performance: Damp or dry dusting
- Glass: Glass and polished surfaces
- Tub and Tile: Tile, grout, and rough surfaces
- Duster: Dry dusting
• Follow all established safety procedures; do not use near electrical wiring.
• Don all appropriate Personal Protective Equipment (PPE).
AFFIX Flexi-Frame to Quick-Connect Extension Handle or Pole.
3
EXTEND handle/pole to the desired length.
4
TOOLS
20" - 18' QUICK- CONNECT STRAIGHT EXTENSION HANDLES AND POLES
2120
5
LOCK handle/pole by twisting the collar clockwise until tight.
6A
DUST hard-to-reach areas with High Performance mop cover.
6B
SCRUB shower tile and grout with the Tub and Tile mop cover.
TWIST the collar counter-clockwise to retract the handle/pole when the task is complete.
7
2322
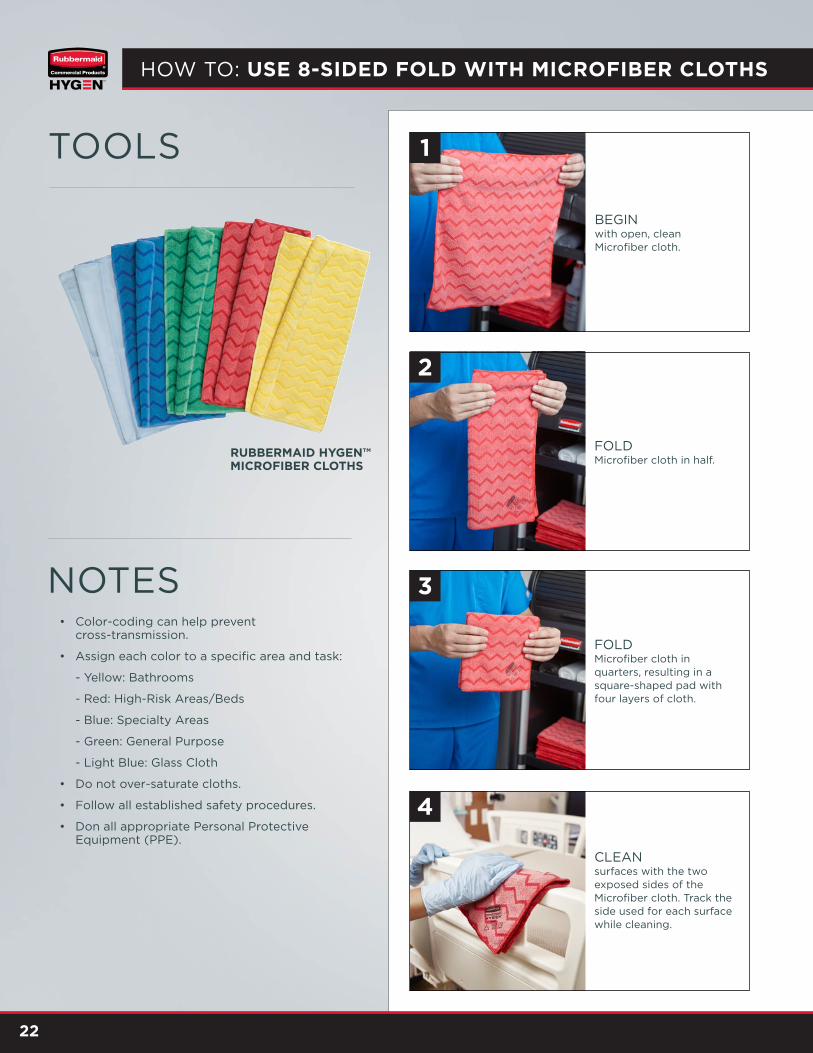
RUBBERMAID HYGEN™ MICROFIBER CLOTHS
HOW TO: USE 8-SIDED FOLD WITH MICROFIBER CLOTHS
3
FOLD Microfiber cloth in quarters, resulting in a square-shaped pad with four layers of cloth.
BEGIN with open, clean Microfiber cloth.
1
FOLD Microfiber cloth in half.
2
NOTES• Color-coding can help prevent
cross-transmission.
• Assign each color to a specific area and task:
- Yellow: Bathrooms
- Red: High-Risk Areas/Beds
- Blue: Specialty Areas
- Green: General Purpose
- Light Blue: Glass Cloth
• Do not over-saturate cloths.
• Follow all established safety procedures.
• Don all appropriate Personal Protective Equipment (PPE).
4
CLEAN surfaces with the two exposed sides of the Microfiber cloth. Track the side used for each surface while cleaning.
TOOLS
2322
6
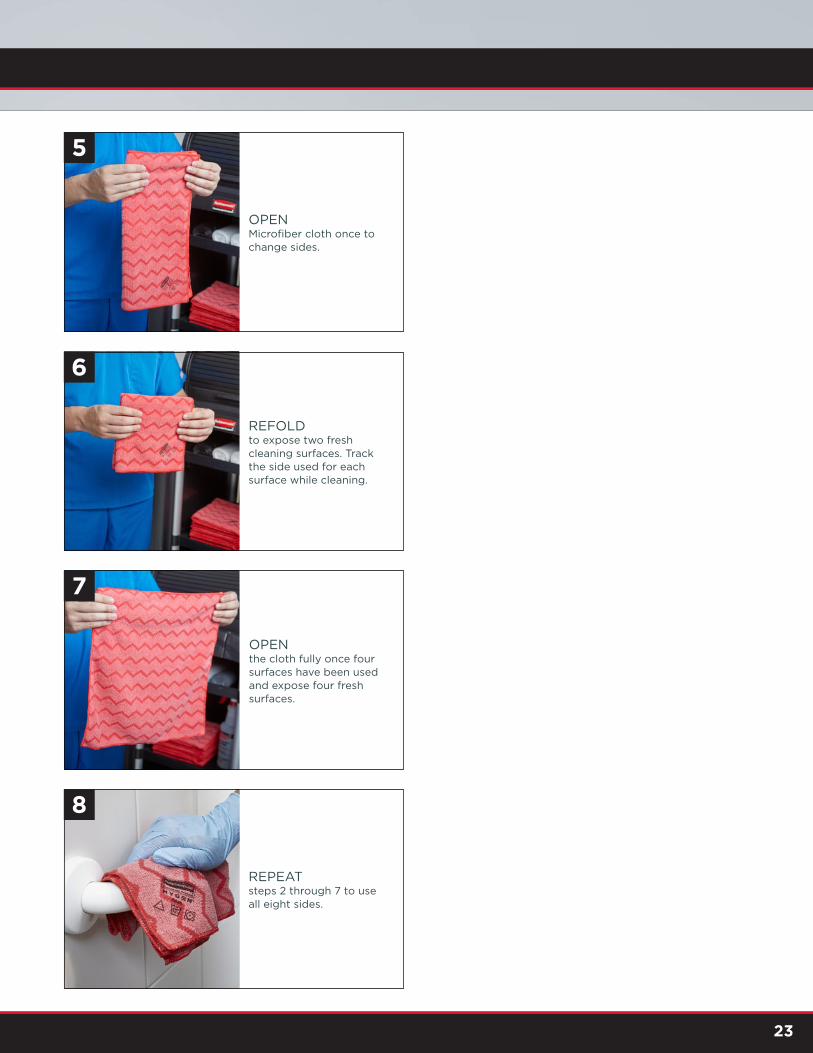
REFOLD to expose two fresh cleaning surfaces. Track the side used for each surface while cleaning.
OPEN the cloth fully once four surfaces have been used and expose four fresh surfaces.
7
OPEN Microfiber cloth once to change sides.
5
REPEAT steps 2 through 7 to use all eight sides.
8
2524 2524
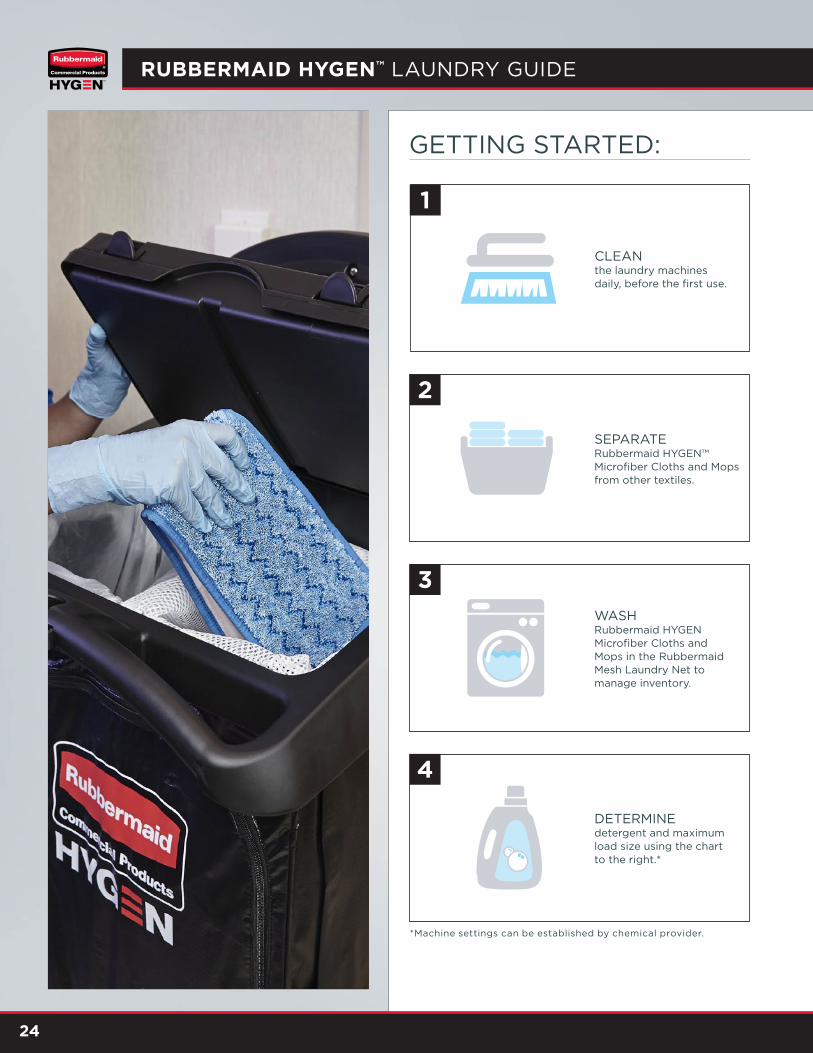
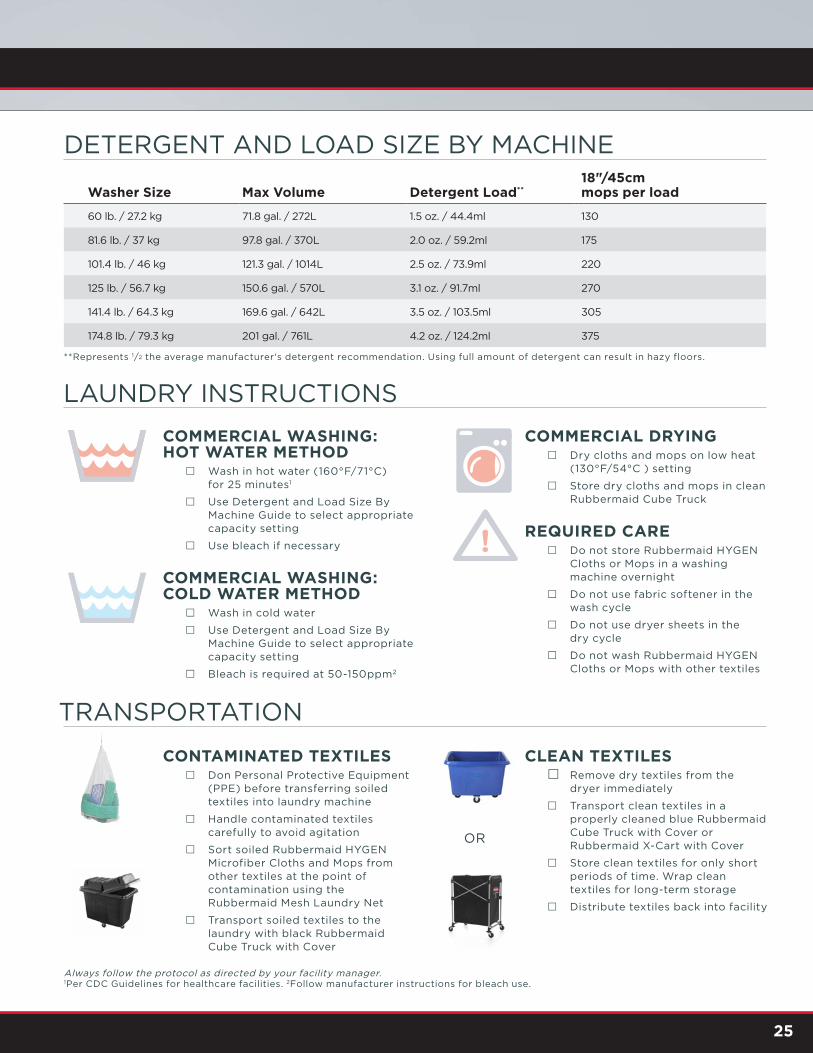
RUBBERMAID HYGEN™ LAUNDRY GUIDE
CLEAN the laundry machines daily, before the first use.
1
SEPARATE Rubbermaid HYGEN™ Microfiber Cloths and Mops from other textiles.
2
WASH Rubbermaid HYGEN Microfiber Cloths and Mops in the Rubbermaid Mesh Laundry Net to manage inventory.
3
DETERMINE detergent and maximum load size using the chart to the right.*
4
GETTING STARTED:
*Machine settings can be established by chemical provider.
2524 2524
LAUNDRY INSTRUCTIONS
COMMERCIAL WASHING: HOT WATER METHOD
£ Wash in hot water (160°F/71°C) for 25 minutes1
£ Use Detergent and Load Size By Machine Guide to select appropriate capacity setting
£ Use bleach if necessary
COMMERCIAL WASHING: COLD WATER METHOD
£ Wash in cold water
£ Use Detergent and Load Size By Machine Guide to select appropriate capacity setting
£ Bleach is required at 50-150ppm2
COMMERCIAL DRYING £ Dry cloths and mops on low heat
(130°F/54°C ) setting
£ Store dry cloths and mops in clean Rubbermaid Cube Truck
REQUIRED CARE £ Do not store Rubbermaid HYGEN
Cloths or Mops in a washing machine overnight
£ Do not use fabric softener in the wash cycle
£ Do not use dryer sheets in the dry cycle
£ Do not wash Rubbermaid HYGEN Cloths or Mops with other textiles
TRANSPORTATION
CONTAMINATED TEXTILES £ Don Personal Protective Equipment
(PPE) before transferring soiled textiles into laundry machine
£ Handle contaminated textiles carefully to avoid agitation
£ Sort soiled Rubbermaid HYGEN Microfiber Cloths and Mops from other textiles at the point of contamination using the Rubbermaid Mesh Laundry Net
£ Transport soiled textiles to the laundry with black Rubbermaid Cube Truck with Cover
CLEAN TEXTILES £ Remove dry textiles from the
dryer immediately
£ Transport clean textiles in a properly cleaned blue Rubbermaid Cube Truck with Cover or Rubbermaid X-Cart with Cover
£ Store clean textiles for only short periods of time. Wrap clean textiles for long-term storage
£ Distribute textiles back into facility
OR
Always follow the protocol as directed by your facility manager. 1Per CDC Guidelines for healthcare facilities. 2Follow manufacturer instructions for bleach use.
DETERGENT AND LOAD SIZE BY MACHINE
Washer Size Max Volume Detergent Load**18"/45cm mops per load
60 lb. / 27.2 kg 71.8 gal. / 272L 1.5 oz. / 44.4ml 130
81.6 lb. / 37 kg 97.8 gal. / 370L 2.0 oz. / 59.2ml 175
101.4 lb. / 46 kg 121.3 gal. / 1014L 2.5 oz. / 73.9ml 220
125 lb. / 56.7 kg 150.6 gal. / 570L 3.1 oz. / 91.7ml 270
141.4 lb. / 64.3 kg 169.6 gal. / 642L 3.5 oz. / 103.5ml 305
174.8 lb. / 79.3 kg 201 gal. / 761L 4.2 oz. / 124.2ml 375
** Represents 1/2 the average manufacturer's detergent recommendation. Using full amount of detergent can result in hazy floors.

2726
ROOM AND HALL DUST MOPSAvailable in 18" to 48". FGQ41200GR00, FGQ41200WH00, FGQ42400GR00, FGQ43600GR00, FGQ44800GR00
FRINGED DUST MOPSAvailable in 18" to 60".FGQ41800GR00, FGQ42600GR00, FGQ43800GR00, FGQ44900GR00, FGQ46000GR00
DAMP MOP WITH SCRUBBER FGQ41500BL00
COLOR-CODED DAMP MOPS (FGQ410)Available in blue, green, and red.
HIGH ABSORBENCY MOP FGQ41600BL00
SCRUBBER MOP FGQ81000YL00
RUBBERMAID HYGEN™ COMPLETE SYSTEM
26 QUICK-CONNECT HANDLES AND FRAMES
DAMP MOPS
FGQ74500YL00
FGQ76500YL00
FGQ77000YL00
FGQ77500YL00
FGQ75500YL00
DUST MOPS
QUICK-CONNECT FRAMESAvailable in 11" to 60".
NON-SLIP TIPSPrevent the handles from sliding and falling (standard on all Quick-Connect handles and poles).
FGQ59500YL00
FGQ59000YL00
FGQ58000YL00
FGQ57000YL00
FGQ56000YL00
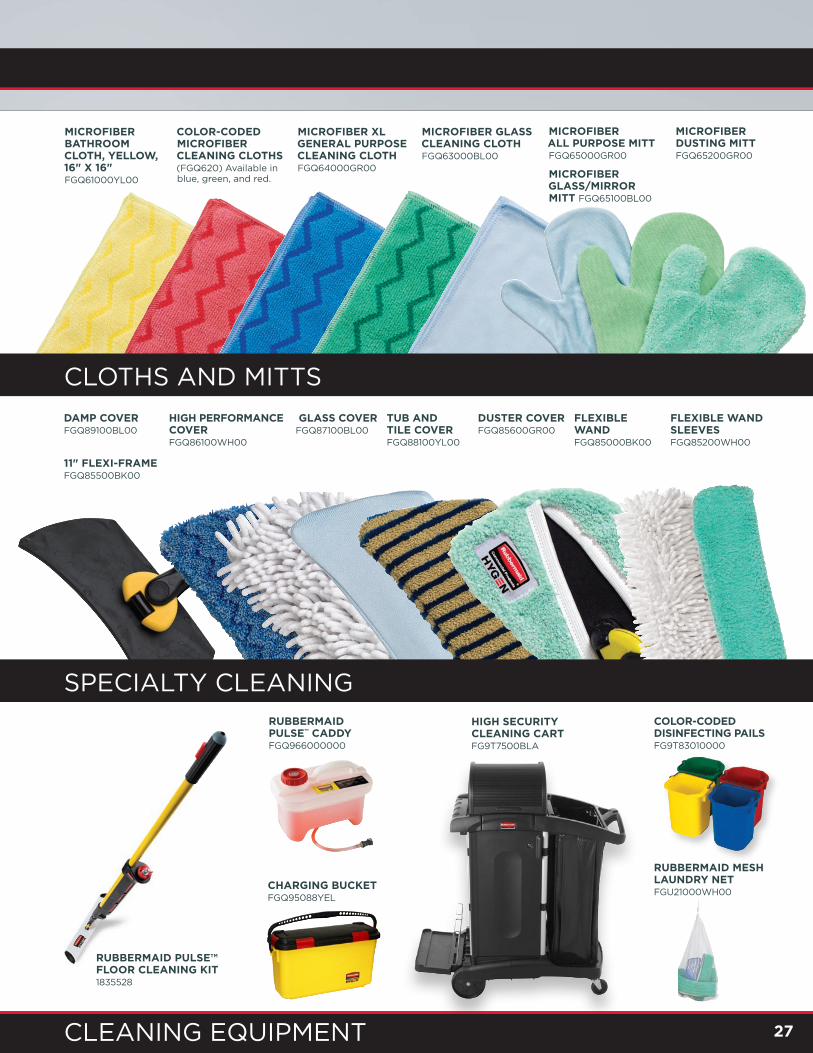
2726
FLEXIBLE WAND SLEEVES FGQ85200WH00
FLEXIBLE WAND FGQ85000BK00
COLOR-CODED MICROFIBER CLEANING CLOTHS (FGQ620) Available in blue, green, and red.
MICROFIBER XL GENERAL PURPOSE CLEANING CLOTH FGQ64000GR00
MICROFIBER BATHROOM CLOTH, YELLOW, 16" X 16" FGQ61000YL00
MICROFIBER GLASS CLEANING CLOTHFGQ63000BL00
MICROFIBER GLASS/MIRROR MITT FGQ65100BL00
MICROFIBER ALL PURPOSE MITT FGQ65000GR00
MICROFIBER DUSTING MITT FGQ65200GR00
27
CLOTHS AND MITTS
GLASS COVER FGQ87100BL00
DUSTER COVERFGQ85600GR00
TUB AND TILE COVER FGQ88100YL00
HIGH PERFORMANCE COVER FGQ86100WH00
DAMP COVER FGQ89100BL00
11" FLEXI-FRAME FGQ85500BK00
CLEANING EQUIPMENT
SPECIALTY CLEANING
RUBBERMAID PULSE™ FLOOR CLEANING KIT 1835528
CHARGING BUCKET FGQ95088YEL
RUBBERMAID PULSE™ CADDY FGQ966000000
HIGH SECURITY CLEANING CART FG9T7500BLA
RUBBERMAID MESH LAUNDRY NET FGU21000WH00
COLOR-CODED DISINFECTING PAILSFG9T83010000

©2014 by Rubbermaid Commercial Products LLC 8900 Northpointe Executive Drive, Huntersville, NC 28078
RCP-325 10/14