programmer's guide - honeywell productivity and...
TRANSCRIPT
Native Terminal Emulation
Programmer's Guide

ii Native Terminal Emulation Programmer’s Guide
Intermec Technologies Corporation
Corporate Headquarters Technical Communications Department6001 36th Ave. W. 550 Second Street SEEverett, WA 98203 Cedar Rapids, IA 52401U.S.A. U.S.A.
www.intermec.com
The information contained herein is proprietary and is provided solely for the purpose of allowing customersto operate and service Intermec-manufactured equipment and is not to be released, reproduced, or used forany other purpose without written permission of Intermec.
Information and specifications contained in this document are subject to change without prior notice and donot represent a commitment on the part of Intermec Technologies Corporation.
E 1995-2005 by Intermec Technologies Corporation. All rights reserved.
The word Intermec, the Intermec logo, Norand, ArciTech, CrossBar, Data Collection Browser, dcBrowser,Duratherm, EasyCoder, EasyLAN, Enterprise Wireless LAN, EZBuilder, Fingerprint, i-gistics, INCA (underlicense), InterDriver, Intermec Printer Network Manager, IRL, JANUS, LabelShop, Mobile Framework,MobileLAN, Nor*Ware, Pen*Key, Precision Print, PrintSet, RoutePower, TE 2000, Trakker Antares, UAP,Universal Access Point, and Virtual Wedge are either trademarks or registered trademarks of IntermecTechnologies Corporation.
Throughout this manual, trademarked names may be used. Rather than put a trademark (™ or ®) symbol inevery occurrence of a trademarked name, we state that we are using the names only in an editorial fashion,and to the benefit of the trademark owner, with no intention of infringement.
There are U.S. and foreign patents pending.
Microsoft, Windows, and the Windows logo are registered trademarks of Microsoft Corporation in theUnited States and/or other countries.
Bluetooth is a trademark of Bluetooth SIG, Inc., U.S.A.
iiiNative Terminal Emulation Programmer’s Guide
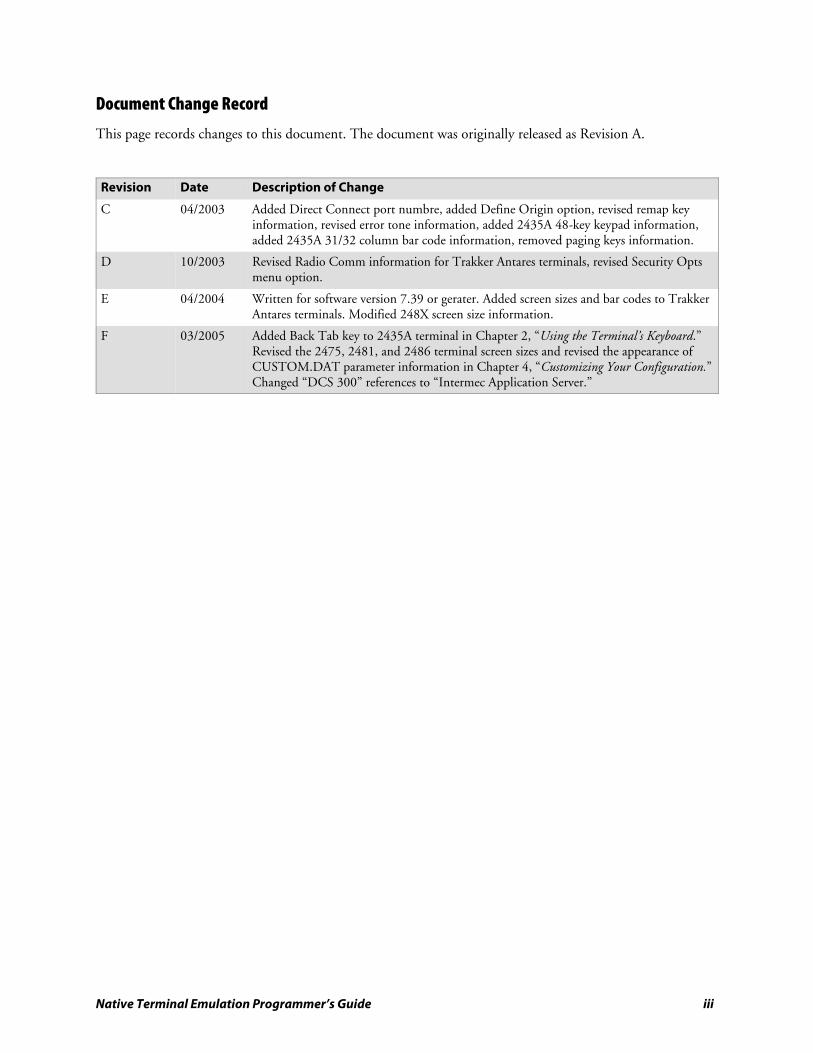
Document Change Record
This page records changes to this document. The document was originally released as Revision A.
Revision Date Description of Change
C 04/2003 Added Direct Connect port numbre, added Define Origin option, revised remap keyinformation, revised error tone information, added 2435A 48-key keypad information,added 2435A 31/32 column bar code information, removed paging keys information.
D 10/2003 Revised Radio Comm information for Trakker Antares terminals, revised Security Optsmenu option.
E 04/2004 Written for software version 7.39 or gerater. Added screen sizes and bar codes to TrakkerAntares terminals. Modified 248X screen size information.
F 03/2005 Added Back Tab key to 2435A terminal in Chapter 2, “Using the Terminal’s Keyboard.”Revised the 2475, 2481, and 2486 terminal screen sizes and revised the appearance ofCUSTOM.DAT parameter information in Chapter 4, “Customizing Your Configuration.”Changed “DCS 300” references to “Intermec Application Server.”

iv Native Terminal Emulation Programmer’s Guide
Contents
vNative Terminal Emulation Programmer’s Guide
Contents
Before You Begin xvii. . . . . . . . . . . . . . . . . . . . . . . . . . . . . . . . . . . . . . . . . . . . . . . . . . . . . . . . . . . .Safety Summary xvii. . . . . . . . . . . . . . . . . . . . . . . . . . . . . . . . . . . . . . . . . . . . . . . . . . . . . .
Do not repair or adjust alone xvii. . . . . . . . . . . . . . . . . . . . . . . . . . . . . . . . . . . . . .First aid xvii. . . . . . . . . . . . . . . . . . . . . . . . . . . . . . . . . . . . . . . . . . . . . . . . . . . . . .Resuscitation xvii. . . . . . . . . . . . . . . . . . . . . . . . . . . . . . . . . . . . . . . . . . . . . . . . . .Energized equipment xvii. . . . . . . . . . . . . . . . . . . . . . . . . . . . . . . . . . . . . . . . . . . .
Safety Icons xviii. . . . . . . . . . . . . . . . . . . . . . . . . . . . . . . . . . . . . . . . . . . . . . . . . . . . . . . . . .Global Services and Support xix. . . . . . . . . . . . . . . . . . . . . . . . . . . . . . . . . . . . . . . . . . . . . .
Warranty Information xix. . . . . . . . . . . . . . . . . . . . . . . . . . . . . . . . . . . . . . . . . . . .Web Support xix. . . . . . . . . . . . . . . . . . . . . . . . . . . . . . . . . . . . . . . . . . . . . . . . . . .Telephone Support xix. . . . . . . . . . . . . . . . . . . . . . . . . . . . . . . . . . . . . . . . . . . . . . .
Who Should Read this Guide? xx. . . . . . . . . . . . . . . . . . . . . . . . . . . . . . . . . . . . . . . . . . . .Related Documents xx. . . . . . . . . . . . . . . . . . . . . . . . . . . . . . . . . . . . . . . . . . . . . . . . . . . . .
Getting Started 1. . . . . . . . . . . . . . . . . . . . . . . . . . . . . . . . . . . . . . . . . . . . . . . . . . . . . . . . . . . .
Understanding Network Protocol Options 2. . . . . . . . . . . . . . . . . . . . . . . . . . . . . . . . . . . . . . . . . . .
Setting Up the Terminal and the Network 2. . . . . . . . . . . . . . . . . . . . . . . . . . . . . . . . . . . . . . . . . . .
Starting the Native Terminal Emulation Application 3. . . . . . . . . . . . . . . . . . . . . . . . . . . . . . . . . . .
Becoming Familiar With Native Terminal Emulation 3. . . . . . . . . . . . . . . . . . . . . . . . . . . . . . . . . .
Performing a Quick Configuration 4. . . . . . . . . . . . . . . . . . . . . . . . . . . . . . . . . . . . . . . . . . . . . . . .
Configuring the Native Application 5. . . . . . . . . . . . . . . . . . . . . . . . . . . . . . . . . . . . . . . . . . . . . . . .
Using Advanced Features 5. . . . . . . . . . . . . . . . . . . . . . . . . . . . . . . . . . . . . . . . . . . . . . . . . . . . . . . .
Unsupported Commands and Functions 5. . . . . . . . . . . . . . . . . . . . . . . . . . . . . . . . . . . . . . . . . . . .
Program Names 6. . . . . . . . . . . . . . . . . . . . . . . . . . . . . . . . . . . . . . . . . . . . . . . . . . . . . . . . . . . . . . .
Using the Terminal’s Keyboard 7. . . . . . . . . . . . . . . . . . . . . . . . . . . . . . . . . . . . . . . . . . .
2415 Terminal 8. . . . . . . . . . . . . . . . . . . . . . . . . . . . . . . . . . . . . . . . . . . . . . . . . . . . . . . . . . . . . . . .2415 Cursor Keys 8. . . . . . . . . . . . . . . . . . . . . . . . . . . . . . . . . . . . . . . . . . . . . . . . . . . . . . .2415 Tab Keys 8. . . . . . . . . . . . . . . . . . . . . . . . . . . . . . . . . . . . . . . . . . . . . . . . . . . . . . . . .2415 AID-Generating Keys 9. . . . . . . . . . . . . . . . . . . . . . . . . . . . . . . . . . . . . . . . . . . . . . .2415 Auto-Login Restart 9. . . . . . . . . . . . . . . . . . . . . . . . . . . . . . . . . . . . . . . . . . . . . . . . .
1
2
Contents
vi Native Terminal Emulation Programmer’s Guide
2425 Terminal 10. . . . . . . . . . . . . . . . . . . . . . . . . . . . . . . . . . . . . . . . . . . . . . . . . . . . . . . . . . . . . . .2425 Cursor Keys 10. . . . . . . . . . . . . . . . . . . . . . . . . . . . . . . . . . . . . . . . . . . . . . . . . . . . . .2425 Tab Keys 10. . . . . . . . . . . . . . . . . . . . . . . . . . . . . . . . . . . . . . . . . . . . . . . . . . . . . . . .2425 AID-Generating Keys 11. . . . . . . . . . . . . . . . . . . . . . . . . . . . . . . . . . . . . . . . . . . . . .2425 Auto-Login Restart 11. . . . . . . . . . . . . . . . . . . . . . . . . . . . . . . . . . . . . . . . . . . . . . . .
2435A Terminal 12. . . . . . . . . . . . . . . . . . . . . . . . . . . . . . . . . . . . . . . . . . . . . . . . . . . . . . . . . . . . . .Characters on the Keyboards 12. . . . . . . . . . . . . . . . . . . . . . . . . . . . . . . . . . . . . . . . . . . . . .2435A Cursor Keys 12. . . . . . . . . . . . . . . . . . . . . . . . . . . . . . . . . . . . . . . . . . . . . . . . . . . . .2435A Tab Keys 13. . . . . . . . . . . . . . . . . . . . . . . . . . . . . . . . . . . . . . . . . . . . . . . . . . . . . . .2435A Standard Keys 13. . . . . . . . . . . . . . . . . . . . . . . . . . . . . . . . . . . . . . . . . . . . . . . . . . .2435A Function Keys 13. . . . . . . . . . . . . . . . . . . . . . . . . . . . . . . . . . . . . . . . . . . . . . . . . . .2435A AID-Generating Keys 14. . . . . . . . . . . . . . . . . . . . . . . . . . . . . . . . . . . . . . . . . . . . .2435A Auto-Login Restart 14. . . . . . . . . . . . . . . . . . . . . . . . . . . . . . . . . . . . . . . . . . . . . . .2435A 3270 Additional Functions 15. . . . . . . . . . . . . . . . . . . . . . . . . . . . . . . . . . . . . . . . .
2455 Terminal 16. . . . . . . . . . . . . . . . . . . . . . . . . . . . . . . . . . . . . . . . . . . . . . . . . . . . . . . . . . . . . . .2455 Cursor Keys 16. . . . . . . . . . . . . . . . . . . . . . . . . . . . . . . . . . . . . . . . . . . . . . . . . . . . . .2455 Tab Keys 16. . . . . . . . . . . . . . . . . . . . . . . . . . . . . . . . . . . . . . . . . . . . . . . . . . . . . . . .2455 AID-Generating Keys 17. . . . . . . . . . . . . . . . . . . . . . . . . . . . . . . . . . . . . . . . . . . . . .2455 Auto-Login Restart 17. . . . . . . . . . . . . . . . . . . . . . . . . . . . . . . . . . . . . . . . . . . . . . . .
2475 and 248X Terminals 18. . . . . . . . . . . . . . . . . . . . . . . . . . . . . . . . . . . . . . . . . . . . . . . . . . . . . .2475 and 248X Cursor Keys 18. . . . . . . . . . . . . . . . . . . . . . . . . . . . . . . . . . . . . . . . . . . . . .2475 and 248X Tab Keys 18. . . . . . . . . . . . . . . . . . . . . . . . . . . . . . . . . . . . . . . . . . . . . . . .2475 and 248X AID-Generating Keys 19. . . . . . . . . . . . . . . . . . . . . . . . . . . . . . . . . . . . . .2475 and 248X Auto-Login Restart 19. . . . . . . . . . . . . . . . . . . . . . . . . . . . . . . . . . . . . . . .
6400 Computer 20. . . . . . . . . . . . . . . . . . . . . . . . . . . . . . . . . . . . . . . . . . . . . . . . . . . . . . . . . . . . . .Characters on the Keyboards 20. . . . . . . . . . . . . . . . . . . . . . . . . . . . . . . . . . . . . . . . . . . . . .Using the 41-Key Keyboard 21. . . . . . . . . . . . . . . . . . . . . . . . . . . . . . . . . . . . . . . . . . . . . .6400 Tab Keys 21. . . . . . . . . . . . . . . . . . . . . . . . . . . . . . . . . . . . . . . . . . . . . . . . . . . . . . . .6400 Function Keys 22. . . . . . . . . . . . . . . . . . . . . . . . . . . . . . . . . . . . . . . . . . . . . . . . . . . .6400 Auto-Login Restart 23. . . . . . . . . . . . . . . . . . . . . . . . . . . . . . . . . . . . . . . . . . . . . . . .
5055 Data Collection PC 24. . . . . . . . . . . . . . . . . . . . . . . . . . . . . . . . . . . . . . . . . . . . . . . . . . . . . . .Characters on the Keyboard 24. . . . . . . . . . . . . . . . . . . . . . . . . . . . . . . . . . . . . . . . . . . . . .5055 Tab Keys 24. . . . . . . . . . . . . . . . . . . . . . . . . . . . . . . . . . . . . . . . . . . . . . . . . . . . . . . .5055 Function Keys 25. . . . . . . . . . . . . . . . . . . . . . . . . . . . . . . . . . . . . . . . . . . . . . . . . . . .5055 Auto-Login Restart 25. . . . . . . . . . . . . . . . . . . . . . . . . . . . . . . . . . . . . . . . . . . . . . . .
59XX Terminal 26. . . . . . . . . . . . . . . . . . . . . . . . . . . . . . . . . . . . . . . . . . . . . . . . . . . . . . . . . . . . . .Characters on the Keyboard 26. . . . . . . . . . . . . . . . . . . . . . . . . . . . . . . . . . . . . . . . . . . . . .59XX Function Keys 27. . . . . . . . . . . . . . . . . . . . . . . . . . . . . . . . . . . . . . . . . . . . . . . . . . . .59XX Auto-Login Restart 27. . . . . . . . . . . . . . . . . . . . . . . . . . . . . . . . . . . . . . . . . . . . . . . .

Contents
viiNative Terminal Emulation Programmer’s Guide
17XX Terminal 28. . . . . . . . . . . . . . . . . . . . . . . . . . . . . . . . . . . . . . . . . . . . . . . . . . . . . . . . . . . . . .Characters on the Keyboards 28. . . . . . . . . . . . . . . . . . . . . . . . . . . . . . . . . . . . . . . . . . . . . .37-Key Keyboard 29. . . . . . . . . . . . . . . . . . . . . . . . . . . . . . . . . . . . . . . . . . . . . . . . . . . . . .17XX Tab Keys 30. . . . . . . . . . . . . . . . . . . . . . . . . . . . . . . . . . . . . . . . . . . . . . . . . . . . . . . .17XX Function Keys 31. . . . . . . . . . . . . . . . . . . . . . . . . . . . . . . . . . . . . . . . . . . . . . . . . . . .17XX Auto-Login Restart 31. . . . . . . . . . . . . . . . . . . . . . . . . . . . . . . . . . . . . . . . . . . . . . . .
11XX Terminal 32. . . . . . . . . . . . . . . . . . . . . . . . . . . . . . . . . . . . . . . . . . . . . . . . . . . . . . . . . . . . . .Characters on the Keyboard 32. . . . . . . . . . . . . . . . . . . . . . . . . . . . . . . . . . . . . . . . . . . . . .11XX Tab Keys 33. . . . . . . . . . . . . . . . . . . . . . . . . . . . . . . . . . . . . . . . . . . . . . . . . . . . . . . .11XX Function Keys 33. . . . . . . . . . . . . . . . . . . . . . . . . . . . . . . . . . . . . . . . . . . . . . . . . . . .11XX Auto-Login Restart 33. . . . . . . . . . . . . . . . . . . . . . . . . . . . . . . . . . . . . . . . . . . . . . . .
Using the Terminal Emulation Menus 35. . . . . . . . . . . . . . . . . . . . . . . . . . . . . . . . . . .
Function Keys 36. . . . . . . . . . . . . . . . . . . . . . . . . . . . . . . . . . . . . . . . . . . . . . . . . . . . . . . . . . . . . . .Enter Key 36. . . . . . . . . . . . . . . . . . . . . . . . . . . . . . . . . . . . . . . . . . . . . . . . . . . . . . . . . . . .Shift Keys 36. . . . . . . . . . . . . . . . . . . . . . . . . . . . . . . . . . . . . . . . . . . . . . . . . . . . . . . . . . . .Y (“Yes”) Key 36. . . . . . . . . . . . . . . . . . . . . . . . . . . . . . . . . . . . . . . . . . . . . . . . . . . . . . . . .Up and Down Arrows 37. . . . . . . . . . . . . . . . . . . . . . . . . . . . . . . . . . . . . . . . . . . . . . . . . . .Number Keys [0] through [9] 37. . . . . . . . . . . . . . . . . . . . . . . . . . . . . . . . . . . . . . . . . . . . .Display Annunciators 38. . . . . . . . . . . . . . . . . . . . . . . . . . . . . . . . . . . . . . . . . . . . . . . . . . .
Display Position 0 38. . . . . . . . . . . . . . . . . . . . . . . . . . . . . . . . . . . . . . . . . . . . . . .Display Position 1 38. . . . . . . . . . . . . . . . . . . . . . . . . . . . . . . . . . . . . . . . . . . . . . .Display Position 2 39. . . . . . . . . . . . . . . . . . . . . . . . . . . . . . . . . . . . . . . . . . . . . . .Display Position 3 39. . . . . . . . . . . . . . . . . . . . . . . . . . . . . . . . . . . . . . . . . . . . . . .Display Position 4 39. . . . . . . . . . . . . . . . . . . . . . . . . . . . . . . . . . . . . . . . . . . . . . .Display Position 5 39. . . . . . . . . . . . . . . . . . . . . . . . . . . . . . . . . . . . . . . . . . . . . . .Display Position 6 39. . . . . . . . . . . . . . . . . . . . . . . . . . . . . . . . . . . . . . . . . . . . . . .Display Positions 1 through 3 39. . . . . . . . . . . . . . . . . . . . . . . . . . . . . . . . . . . . . .Display Positions 4 and 5 40. . . . . . . . . . . . . . . . . . . . . . . . . . . . . . . . . . . . . . . . . .Display Positions 4 through 6 40. . . . . . . . . . . . . . . . . . . . . . . . . . . . . . . . . . . . . .Display Positions 4 through 8 40. . . . . . . . . . . . . . . . . . . . . . . . . . . . . . . . . . . . . .Display Positions 5 through 8 40. . . . . . . . . . . . . . . . . . . . . . . . . . . . . . . . . . . . . .
Configuring TE Parameters 41. . . . . . . . . . . . . . . . . . . . . . . . . . . . . . . . . . . . . . . . . . . . . . . . . . . . .Key Sequence to Open Main Menu 41. . . . . . . . . . . . . . . . . . . . . . . . . . . . . . . . . . . . . . . .Opening the Main Menu 42. . . . . . . . . . . . . . . . . . . . . . . . . . . . . . . . . . . . . . . . . . . . . . . .
2415, 2425, 2435A, 2455, 2475, 248X Menus 42. . . . . . . . . . . . . . . . . . . . . . . . .6400, 5055, 59XX, 17XX, 11XX Menus 44. . . . . . . . . . . . . . . . . . . . . . . . . . . . . .
1) Set Up Parameters 46. . . . . . . . . . . . . . . . . . . . . . . . . . . . . . . . . . . . . . . . . . . . . . . . . . . .1) Communication 46. . . . . . . . . . . . . . . . . . . . . . . . . . . . . . . . . . . . . . . . . . . . . . .2) Barcode Parms (2415, 2425, 2435A, 2455, 2475, 248X) 51. . . . . . . . . . . . . . .2) Barcode Parms (6400, 5055, 59XX, 17XX, 11XX) 52. . . . . . . . . . . . . . . . . . . .3) Protocol Opts 57. . . . . . . . . . . . . . . . . . . . . . . . . . . . . . . . . . . . . . . . . . . . . . . .4) Display Opts 71. . . . . . . . . . . . . . . . . . . . . . . . . . . . . . . . . . . . . . . . . . . . . . . . .5) Radio Comm (Blank for 2415, 2425, 2435A, 2455, 2475, 248X Terminals
without an 802.1x Supplicant Radio Driver) 73. . . . . . . . . . . . . . . . . . . .6) Cold Start 74. . . . . . . . . . . . . . . . . . . . . . . . . . . . . . . . . . . . . . . . . . . . . . . . . . .7) More 74. . . . . . . . . . . . . . . . . . . . . . . . . . . . . . . . . . . . . . . . . . . . . . . . . . . . . . .
3

Contents
viii Native Terminal Emulation Programmer’s Guide
2) LCD Parms (Parameters) 75. . . . . . . . . . . . . . . . . . . . . . . . . . . . . . . . . . . . . . . . . . . . . .1) LCD Contrast (59XX, 17XX) 75. . . . . . . . . . . . . . . . . . . . . . . . . . . . . . . . . . . .2) Screen Size (blank for 2480, 2485) 76. . . . . . . . . . . . . . . . . . . . . . . . . . . . . . . .3) Screen Mode 82. . . . . . . . . . . . . . . . . . . . . . . . . . . . . . . . . . . . . . . . . . . . . . . . .4) Annunciators (Blank for 17XX, 11XX) 84. . . . . . . . . . . . . . . . . . . . . . . . . . . . .5) Backlight (59XX, 17XX) 84. . . . . . . . . . . . . . . . . . . . . . . . . . . . . . . . . . . . . . . .6) Key Uppercase 85. . . . . . . . . . . . . . . . . . . . . . . . . . . . . . . . . . . . . . . . . . . . . . . .7) Scroll Window 85. . . . . . . . . . . . . . . . . . . . . . . . . . . . . . . . . . . . . . . . . . . . . . . .
3) Beeper Setup (6400, 5055, 59XX, 17XX, 11XX) 86. . . . . . . . . . . . . . . . . . . . . . . . . . . .1) Key Click (6400, 5055, 59XX, 17XX, 11XX) 86. . . . . . . . . . . . . . . . . . . . . . . .2) Error Tone 87. . . . . . . . . . . . . . . . . . . . . . . . . . . . . . . . . . . . . . . . . . . . . . . . . . .3) Beeper Select (6400, 5055, 17XX, 11XX) 87. . . . . . . . . . . . . . . . . . . . . . . . . . .
4) Tests 88. . . . . . . . . . . . . . . . . . . . . . . . . . . . . . . . . . . . . . . . . . . . . . . . . . . . . . . . . . . . . .1) Peripherals 88. . . . . . . . . . . . . . . . . . . . . . . . . . . . . . . . . . . . . . . . . . . . . . . . . . .2) Converters (59XX) 91. . . . . . . . . . . . . . . . . . . . . . . . . . . . . . . . . . . . . . . . . . . . .3) Memory View (6400, 5055, 17XX, 11XX) 91. . . . . . . . . . . . . . . . . . . . . . . . . .4) Packet Driver (6400, 5055, 59XX, 17XX, 11XX) 92. . . . . . . . . . . . . . . . . . . . .5) Numbers 93. . . . . . . . . . . . . . . . . . . . . . . . . . . . . . . . . . . . . . . . . . . . . . . . . . . .6) Timed Numbers 93. . . . . . . . . . . . . . . . . . . . . . . . . . . . . . . . . . . . . . . . . . . . . .
5) Version Info (Information) 93. . . . . . . . . . . . . . . . . . . . . . . . . . . . . . . . . . . . . . . . . . . . .6) Exit Menus 94. . . . . . . . . . . . . . . . . . . . . . . . . . . . . . . . . . . . . . . . . . . . . . . . . . . . . . . . .7) More (Main Menu 2) 95. . . . . . . . . . . . . . . . . . . . . . . . . . . . . . . . . . . . . . . . . . . . . . . . .
1) Keyboard Opts 95. . . . . . . . . . . . . . . . . . . . . . . . . . . . . . . . . . . . . . . . . . . . . . . .2) Save Parms (Parameters) 95. . . . . . . . . . . . . . . . . . . . . . . . . . . . . . . . . . . . . . . .3) Cloning Opts (59XX, 17XX, 11XX) 96. . . . . . . . . . . . . . . . . . . . . . . . . . . . . . .4) Session Menu (2415, 2425, 2435A, 2455, 2475, 248X with WTP, 6400, 5055,
59XX, 17XX, 11XX) 98. . . . . . . . . . . . . . . . . . . . . . . . . . . . . . . . . . . . . .
Restarting Terminal Emulation 98. . . . . . . . . . . . . . . . . . . . . . . . . . . . . . . . . . . . . . . . . . . . . . . . . .
2415, 2425, 2435A, 2455, 2475, 248X Terminals 100. . . . . . . . . . . . . . . . . . . . . . . . . . . . . . . . . .
6400 Computer 100. . . . . . . . . . . . . . . . . . . . . . . . . . . . . . . . . . . . . . . . . . . . . . . . . . . . . . . . . . . . .Opening the Main Menu 100. . . . . . . . . . . . . . . . . . . . . . . . . . . . . . . . . . . . . . . . . . . . . . .To Exit Emulation Mode and Return to DOS 101. . . . . . . . . . . . . . . . . . . . . . . . . . . . . . .
5055 Data Collection PC 101. . . . . . . . . . . . . . . . . . . . . . . . . . . . . . . . . . . . . . . . . . . . . . . . . . . . . .Programs to Create Terminal Emulation Menus 102. . . . . . . . . . . . . . . . . . . . . . . . . . . . . .Opening the Main Menu 103. . . . . . . . . . . . . . . . . . . . . . . . . . . . . . . . . . . . . . . . . . . . . . .To Exit Emulation Mode and Return to DOS 103. . . . . . . . . . . . . . . . . . . . . . . . . . . . . . .
Customizing Your Configuration 105. . . . . . . . . . . . . . . . . . . . . . . . . . . . . . . . . . . . . . .
Using the Auto-Login Feature 106. . . . . . . . . . . . . . . . . . . . . . . . . . . . . . . . . . . . . . . . . . . . . . . . . .Developing Auto-Login Script Files 106. . . . . . . . . . . . . . . . . . . . . . . . . . . . . . . . . . . . . . .
Commands 106. . . . . . . . . . . . . . . . . . . . . . . . . . . . . . . . . . . . . . . . . . . . . . . . . . . .Search Strings 107. . . . . . . . . . . . . . . . . . . . . . . . . . . . . . . . . . . . . . . . . . . . . . . . . .Control Characters 108. . . . . . . . . . . . . . . . . . . . . . . . . . . . . . . . . . . . . . . . . . . . . .
4
Contents
ixNative Terminal Emulation Programmer’s Guide
Loading the Auto-Login Script File 108. . . . . . . . . . . . . . . . . . . . . . . . . . . . . . . . . . . . . . . .2415, 2425, 2435A, 2455, 2475, 248X Terminals 108. . . . . . . . . . . . . . . . . . . . .6400, 5055 Terminals 109. . . . . . . . . . . . . . . . . . . . . . . . . . . . . . . . . . . . . . . . . . .59XX, 17XX, 11XX Terminals 109. . . . . . . . . . . . . . . . . . . . . . . . . . . . . . . . . . . .
Disabling the Auto-Login Feature 110. . . . . . . . . . . . . . . . . . . . . . . . . . . . . . . . . . . . . . . . .2415, 2425, 2435A, 2455, 2475, 248X Terminals 110. . . . . . . . . . . . . . . . . . . . .6400, 5055 Terminals 110. . . . . . . . . . . . . . . . . . . . . . . . . . . . . . . . . . . . . . . . . . .59XX, 17XX, 11XX Terminals 110. . . . . . . . . . . . . . . . . . . . . . . . . . . . . . . . . . . .
Sample Auto-Login Script Files 111. . . . . . . . . . . . . . . . . . . . . . . . . . . . . . . . . . . . . . . . . . .Auto-Login Restart 113. . . . . . . . . . . . . . . . . . . . . . . . . . . . . . . . . . . . . . . . . . . . . . . . . . . .
Creating a Custom Parameter Set-Up File 114. . . . . . . . . . . . . . . . . . . . . . . . . . . . . . . . . . . . . . . . .CONFIG.DAT Settings 114. . . . . . . . . . . . . . . . . . . . . . . . . . . . . . . . . . . . . . . . . . . . . . . .
CONFIG.DAT Syntax 114. . . . . . . . . . . . . . . . . . . . . . . . . . . . . . . . . . . . . . . . . .CONFIG.DAT Parameter Formats 115. . . . . . . . . . . . . . . . . . . . . . . . . . . . . . . . .Verifying Your CONFIG.DAT Configuration 116. . . . . . . . . . . . . . . . . . . . . . . .CONFIG.DAT Parameters and Qualifiers 116. . . . . . . . . . . . . . . . . . . . . . . . . . . .
Changing Text 133. . . . . . . . . . . . . . . . . . . . . . . . . . . . . . . . . . . . . . . . . . . . . . . . . . . . . . . . . . . . . .
Preinitializing the Native TE Program 134. . . . . . . . . . . . . . . . . . . . . . . . . . . . . . . . . . . . . . . . . . . .
Remapping the Terminal’s Keys 135. . . . . . . . . . . . . . . . . . . . . . . . . . . . . . . . . . . . . . . . . . . . . . . . .Remapping a Key or Two-Key Sequence 135. . . . . . . . . . . . . . . . . . . . . . . . . . . . . . . . . . . .Creating a Macro 136. . . . . . . . . . . . . . . . . . . . . . . . . . . . . . . . . . . . . . . . . . . . . . . . . . . . .Nesting 137. . . . . . . . . . . . . . . . . . . . . . . . . . . . . . . . . . . . . . . . . . . . . . . . . . . . . . . . . . . . .Remapping Keys for Each Session 137. . . . . . . . . . . . . . . . . . . . . . . . . . . . . . . . . . . . . . . . .Key Code Table 137. . . . . . . . . . . . . . . . . . . . . . . . . . . . . . . . . . . . . . . . . . . . . . . . . . . . . .
Remapping Characters 140. . . . . . . . . . . . . . . . . . . . . . . . . . . . . . . . . . . . . . . . . . . . . . . . . . . . . . . .
Substituting National Characters 141. . . . . . . . . . . . . . . . . . . . . . . . . . . . . . . . . . . . . . . . . . . . . . . .Creating the File 141. . . . . . . . . . . . . . . . . . . . . . . . . . . . . . . . . . . . . . . . . . . . . . . . . . . . . .National Replacement Character Sets 142. . . . . . . . . . . . . . . . . . . . . . . . . . . . . . . . . . . . . .Example 143. . . . . . . . . . . . . . . . . . . . . . . . . . . . . . . . . . . . . . . . . . . . . . . . . . . . . . . . . . . .
Downloading Files 144. . . . . . . . . . . . . . . . . . . . . . . . . . . . . . . . . . . . . . . . . . . . . . . . . . . . . . . . . . .2415, 2425, 2435A, 2455, 2475, 248X Terminals 144. . . . . . . . . . . . . . . . . . . . . . . . . . . .6400, 5055 Terminals 144. . . . . . . . . . . . . . . . . . . . . . . . . . . . . . . . . . . . . . . . . . . . . . . . . .
Reprogramming Flash Memory 145. . . . . . . . . . . . . . . . . . . . . . . . . . . . . . . . . . . .Prerequisites for INTERLNK Flash Update 145. . . . . . . . . . . . . . . . . . . . . . . . . . .INTERLNK Installation 145. . . . . . . . . . . . . . . . . . . . . . . . . . . . . . . . . . . . . . . . .INTERLNK and INTERSVR 146. . . . . . . . . . . . . . . . . . . . . . . . . . . . . . . . . . . . .
59XX, 17XX, 11XX Terminals 146. . . . . . . . . . . . . . . . . . . . . . . . . . . . . . . . . . . . . . . . . . .

Contents
x Native Terminal Emulation Programmer’s Guide
Using CHECKCFG to Compile and Decompile Custom Configurations 146. . . . . . . . . .Converting Files from ASCII to Binary 146. . . . . . . . . . . . . . . . . . . . . . . . . . . . . .Converting Files from Binary to ASCII 147. . . . . . . . . . . . . . . . . . . . . . . . . . . . . .Listing Parameters and Values 147. . . . . . . . . . . . . . . . . . . . . . . . . . . . . . . . . . . . .Using FLSHCONV.EXE to Build Customized HEX Files 147. . . . . . . . . . . . . . .Locating and Appending .EXE Files 148. . . . . . . . . . . . . . . . . . . . . . . . . . . . . . . . .Appending Data Files To Intel-Hex Files 148. . . . . . . . . . . . . . . . . . . . . . . . . . . . .Downloading a Hex File 149. . . . . . . . . . . . . . . . . . . . . . . . . . . . . . . . . . . . . . . . .
Intermec Application Server and Gateway Commands 151. . . . . . . . . . . . . . . .
CMT (Return Parameter Values) 152. . . . . . . . . . . . . . . . . . . . . . . . . . . . . . . . . . . . . . . . . . . . . . . .
CMT, (Set All Parameters) 153. . . . . . . . . . . . . . . . . . . . . . . . . . . . . . . . . . . . . . . . . . . . . . . . . . . . .
CMT0 (Set Response Delay) 155. . . . . . . . . . . . . . . . . . . . . . . . . . . . . . . . . . . . . . . . . . . . . . . . . . .
CMT1 (Set Data Time-Out) 156. . . . . . . . . . . . . . . . . . . . . . . . . . . . . . . . . . . . . . . . . . . . . . . . . . .
CMT2 (Interactive Mode) 157. . . . . . . . . . . . . . . . . . . . . . . . . . . . . . . . . . . . . . . . . . . . . . . . . . . . .
CMT4 (Add Line Feed to Responses) 158. . . . . . . . . . . . . . . . . . . . . . . . . . . . . . . . . . . . . . . . . . . .
CMT5 (Set Gap Time-Out) 159. . . . . . . . . . . . . . . . . . . . . . . . . . . . . . . . . . . . . . . . . . . . . . . . . . .
CMT8 (Set Data Error Checking) 160. . . . . . . . . . . . . . . . . . . . . . . . . . . . . . . . . . . . . . . . . . . . . . .
CMT10 (Enable Extended Response Mode) 161. . . . . . . . . . . . . . . . . . . . . . . . . . . . . . . . . . . . . . .
CMT13 (Automatically Enable Terminal) 162. . . . . . . . . . . . . . . . . . . . . . . . . . . . . . . . . . . . . . . . .
CMT21 (One-Character Address Mode) 163. . . . . . . . . . . . . . . . . . . . . . . . . . . . . . . . . . . . . . . . . .
CMT22 (Multiple Buffering Mode) 164. . . . . . . . . . . . . . . . . . . . . . . . . . . . . . . . . . . . . . . . . . . . . .
CMT27 (6910 IGAP Operating Mode) 166. . . . . . . . . . . . . . . . . . . . . . . . . . . . . . . . . . . . . . . . . . .
CMTI (Restore Default Parameters) 167. . . . . . . . . . . . . . . . . . . . . . . . . . . . . . . . . . . . . . . . . . . . .
? (Get Transmit Message Status) 168. . . . . . . . . . . . . . . . . . . . . . . . . . . . . . . . . . . . . . . . . . . . . . . .
E (Enable Terminals) 169. . . . . . . . . . . . . . . . . . . . . . . . . . . . . . . . . . . . . . . . . . . . . . . . . . . . . . . . .
R (Read) 170. . . . . . . . . . . . . . . . . . . . . . . . . . . . . . . . . . . . . . . . . . . . . . . . . . . . . . . . . . . . . . . . . .
5
Contents
xiNative Terminal Emulation Programmer’s Guide
T (Repeat Response) 172. . . . . . . . . . . . . . . . . . . . . . . . . . . . . . . . . . . . . . . . . . . . . . . . . . . . . . . . .
F (Return Terminal Power-Up Type) 173. . . . . . . . . . . . . . . . . . . . . . . . . . . . . . . . . . . . . . . . . . . . .
DME (Echo-Back Diagnostics) 174. . . . . . . . . . . . . . . . . . . . . . . . . . . . . . . . . . . . . . . . . . . . . . . . .
DMP (Reset) 175. . . . . . . . . . . . . . . . . . . . . . . . . . . . . . . . . . . . . . . . . . . . . . . . . . . . . . . . . . . . . . .
DMV (Send Software Version) 176. . . . . . . . . . . . . . . . . . . . . . . . . . . . . . . . . . . . . . . . . . . . . . . . . .
Normal Communication Flow 177. . . . . . . . . . . . . . . . . . . . . . . . . . . . . . . . . . . . . . . . . . . . . . . . . .
Compatibility With Legacy Systems 178. . . . . . . . . . . . . . . . . . . . . . . . . . . . . . . . . . . . . . . . . . . . . .
Write Display Errors 179. . . . . . . . . . . . . . . . . . . . . . . . . . . . . . . . . . . . . . . . . . . . . . . . . . . . . . . . .
Terminal Commands 181. . . . . . . . . . . . . . . . . . . . . . . . . . . . . . . . . . . . . . . . . . . . . . . . . . . .
G (Reset Terminal) 182. . . . . . . . . . . . . . . . . . . . . . . . . . . . . . . . . . . . . . . . . . . . . . . . . . . . . . . . . .
StD/ (Set Terminal Parameters) 183. . . . . . . . . . . . . . . . . . . . . . . . . . . . . . . . . . . . . . . . . . . . . . . . .
WtB (Audio Annunciator) 187. . . . . . . . . . . . . . . . . . . . . . . . . . . . . . . . . . . . . . . . . . . . . . . . . . . . .
WtD/ (Write Display) 188. . . . . . . . . . . . . . . . . . . . . . . . . . . . . . . . . . . . . . . . . . . . . . . . . . . . . . . .
Command Extensions 190. . . . . . . . . . . . . . . . . . . . . . . . . . . . . . . . . . . . . . . . . . . . . . . . . . . . . . . .
WtD// (Extended Write Display) 192. . . . . . . . . . . . . . . . . . . . . . . . . . . . . . . . . . . . . . . . . . . . . . . .
WtD/ \yS (Download Table) 194. . . . . . . . . . . . . . . . . . . . . . . . . . . . . . . . . . . . . . . . . . . . . . . . . . .Input Field Control Byte 195. . . . . . . . . . . . . . . . . . . . . . . . . . . . . . . . . . . . . . . . . . . . . . . .Rules for Designing Tables 196. . . . . . . . . . . . . . . . . . . . . . . . . . . . . . . . . . . . . . . . . . . . . .
WtD/ \y (Display Table) 197. . . . . . . . . . . . . . . . . . . . . . . . . . . . . . . . . . . . . . . . . . . . . . . . . . . . . .
WtD/ \yT (Download and Display Table) 199. . . . . . . . . . . . . . . . . . . . . . . . . . . . . . . . . . . . . . . . .
WtD/ \yU (Update Table) 201. . . . . . . . . . . . . . . . . . . . . . . . . . . . . . . . . . . . . . . . . . . . . . . . . . . . .Replacing Pairs Together 203. . . . . . . . . . . . . . . . . . . . . . . . . . . . . . . . . . . . . . . . . . . . . . . .Restrictions 203. . . . . . . . . . . . . . . . . . . . . . . . . . . . . . . . . . . . . . . . . . . . . . . . . . . . . . . . . .Replacing the Prompt Field 203. . . . . . . . . . . . . . . . . . . . . . . . . . . . . . . . . . . . . . . . . . . . . .Replacing the Field Only 204. . . . . . . . . . . . . . . . . . . . . . . . . . . . . . . . . . . . . . . . . . . . . . .
WtD/ \yV (Update and Display Table) 205. . . . . . . . . . . . . . . . . . . . . . . . . . . . . . . . . . . . . . . . . . .
6
Contents
xii Native Terminal Emulation Programmer’s Guide
WtD/ \F (Set Terminal Function Keys) 208. . . . . . . . . . . . . . . . . . . . . . . . . . . . . . . . . . . . . . . . . . .
WtD/ \B (Set Bank) 209. . . . . . . . . . . . . . . . . . . . . . . . . . . . . . . . . . . . . . . . . . . . . . . . . . . . . . . . . .
WtD/ \BU (Update Bank) 210. . . . . . . . . . . . . . . . . . . . . . . . . . . . . . . . . . . . . . . . . . . . . . . . . . . . .
WtD/ \BE (Erase Bank) 211. . . . . . . . . . . . . . . . . . . . . . . . . . . . . . . . . . . . . . . . . . . . . . . . . . . . . . .
WtD/ \C (Set Screen Mode) 212. . . . . . . . . . . . . . . . . . . . . . . . . . . . . . . . . . . . . . . . . . . . . . . . . . .
WtD/ \P (Print) 213. . . . . . . . . . . . . . . . . . . . . . . . . . . . . . . . . . . . . . . . . . . . . . . . . . . . . . . . . . . . .
WtD/ \PM (Port in Use Message) 215. . . . . . . . . . . . . . . . . . . . . . . . . . . . . . . . . . . . . . . . . . . . . . .
WtD/ \PS (RS-232 Port Options) 217. . . . . . . . . . . . . . . . . . . . . . . . . . . . . . . . . . . . . . . . . . . . . . .
WtD/ \PG (Get Data from an External Device) 218. . . . . . . . . . . . . . . . . . . . . . . . . . . . . . . . . . . . .
WtD/ \PF (Send and Get Data from an External Device) 221. . . . . . . . . . . . . . . . . . . . . . . . . . . . .
WtD/ \yP (Print Table) 223. . . . . . . . . . . . . . . . . . . . . . . . . . . . . . . . . . . . . . . . . . . . . . . . . . . . . . .
WtD/ \yR (Update and Print Table) 224. . . . . . . . . . . . . . . . . . . . . . . . . . . . . . . . . . . . . . . . . . . . .
WtD/ \yQ (Update, Display, and Print Table) 226. . . . . . . . . . . . . . . . . . . . . . . . . . . . . . . . . . . . .
WtD/ \T (Tone) 228. . . . . . . . . . . . . . . . . . . . . . . . . . . . . . . . . . . . . . . . . . . . . . . . . . . . . . . . . . . .
DtV (Terminal Emulation Version) 229. . . . . . . . . . . . . . . . . . . . . . . . . . . . . . . . . . . . . . . . . . . . . .
DtE (Echo-Back Diagnostic) 230. . . . . . . . . . . . . . . . . . . . . . . . . . . . . . . . . . . . . . . . . . . . . . . . . . .
Bar Code Scanning 231. . . . . . . . . . . . . . . . . . . . . . . . . . . . . . . . . . . . . . . . . . . . . . . . . . . . . . .
DK, Display Column Spacing 232. . . . . . . . . . . . . . . . . . . . . . . . . . . . . . . . . . . . . . . . . . . . . . . . . .2415 and 2425 Terminal Displays 232. . . . . . . . . . . . . . . . . . . . . . . . . . . . . . . . . . . . . . . .
10 Columns 232. . . . . . . . . . . . . . . . . . . . . . . . . . . . . . . . . . . . . . . . . . . . . . . . . . .12 Columns 232. . . . . . . . . . . . . . . . . . . . . . . . . . . . . . . . . . . . . . . . . . . . . . . . . . .17 Columns 233. . . . . . . . . . . . . . . . . . . . . . . . . . . . . . . . . . . . . . . . . . . . . . . . . . .20 Columns 234. . . . . . . . . . . . . . . . . . . . . . . . . . . . . . . . . . . . . . . . . . . . . . . . . . .22 Columns 234. . . . . . . . . . . . . . . . . . . . . . . . . . . . . . . . . . . . . . . . . . . . . . . . . . .26 Columns 235. . . . . . . . . . . . . . . . . . . . . . . . . . . . . . . . . . . . . . . . . . . . . . . . . . .32 Columns 236. . . . . . . . . . . . . . . . . . . . . . . . . . . . . . . . . . . . . . . . . . . . . . . . . . .
A
Contents
xiiiNative Terminal Emulation Programmer’s Guide
2435A Terminal Display 236. . . . . . . . . . . . . . . . . . . . . . . . . . . . . . . . . . . . . . . . . . . . . . . .9 or 10 Columns 236. . . . . . . . . . . . . . . . . . . . . . . . . . . . . . . . . . . . . . . . . . . . . . .12 Columns 237. . . . . . . . . . . . . . . . . . . . . . . . . . . . . . . . . . . . . . . . . . . . . . . . . . .17 Columns 238. . . . . . . . . . . . . . . . . . . . . . . . . . . . . . . . . . . . . . . . . . . . . . . . . . .19 or 20 Columns 239. . . . . . . . . . . . . . . . . . . . . . . . . . . . . . . . . . . . . . . . . . . . . .22 Columns 240. . . . . . . . . . . . . . . . . . . . . . . . . . . . . . . . . . . . . . . . . . . . . . . . . . .26 Columns 241. . . . . . . . . . . . . . . . . . . . . . . . . . . . . . . . . . . . . . . . . . . . . . . . . . .31 or 32 Columns 242. . . . . . . . . . . . . . . . . . . . . . . . . . . . . . . . . . . . . . . . . . . . . .
2455 Terminal Display 243. . . . . . . . . . . . . . . . . . . . . . . . . . . . . . . . . . . . . . . . . . . . . . . . .20 Columns 243. . . . . . . . . . . . . . . . . . . . . . . . . . . . . . . . . . . . . . . . . . . . . . . . . . .33 Columns 243. . . . . . . . . . . . . . . . . . . . . . . . . . . . . . . . . . . . . . . . . . . . . . . . . . .40 Columns 244. . . . . . . . . . . . . . . . . . . . . . . . . . . . . . . . . . . . . . . . . . . . . . . . . . .53 Columns 244. . . . . . . . . . . . . . . . . . . . . . . . . . . . . . . . . . . . . . . . . . . . . . . . . . .80 Columns 244. . . . . . . . . . . . . . . . . . . . . . . . . . . . . . . . . . . . . . . . . . . . . . . . . . .
2475 and 248X Terminal Displays 245. . . . . . . . . . . . . . . . . . . . . . . . . . . . . . . . . . . . . . . .10 Columns 245. . . . . . . . . . . . . . . . . . . . . . . . . . . . . . . . . . . . . . . . . . . . . . . . . . .12 Columns 245. . . . . . . . . . . . . . . . . . . . . . . . . . . . . . . . . . . . . . . . . . . . . . . . . . .17 Columns 246. . . . . . . . . . . . . . . . . . . . . . . . . . . . . . . . . . . . . . . . . . . . . . . . . . .20 Columns 247. . . . . . . . . . . . . . . . . . . . . . . . . . . . . . . . . . . . . . . . . . . . . . . . . . .22 Columns 247. . . . . . . . . . . . . . . . . . . . . . . . . . . . . . . . . . . . . . . . . . . . . . . . . . .26 Columns 248. . . . . . . . . . . . . . . . . . . . . . . . . . . . . . . . . . . . . . . . . . . . . . . . . . .32 Columns 249. . . . . . . . . . . . . . . . . . . . . . . . . . . . . . . . . . . . . . . . . . . . . . . . . . .40 Columns 249. . . . . . . . . . . . . . . . . . . . . . . . . . . . . . . . . . . . . . . . . . . . . . . . . . .53 Columns 249. . . . . . . . . . . . . . . . . . . . . . . . . . . . . . . . . . . . . . . . . . . . . . . . . . .64 Columns 249. . . . . . . . . . . . . . . . . . . . . . . . . . . . . . . . . . . . . . . . . . . . . . . . . . .
Cursor Keys 250. . . . . . . . . . . . . . . . . . . . . . . . . . . . . . . . . . . . . . . . . . . . . . . . . . . . . . . . . . . . . . . .
Tab Keys 250. . . . . . . . . . . . . . . . . . . . . . . . . . . . . . . . . . . . . . . . . . . . . . . . . . . . . . . . . . . . . . . . . .
AID-Generating Keys 250. . . . . . . . . . . . . . . . . . . . . . . . . . . . . . . . . . . . . . . . . . . . . . . . . . . . . . . . .
Auto-Login Restart 253. . . . . . . . . . . . . . . . . . . . . . . . . . . . . . . . . . . . . . . . . . . . . . . . . . . . . . . . . . .
Native Additional Functions 254. . . . . . . . . . . . . . . . . . . . . . . . . . . . . . . . . . . . . . . . . . . . . . . . . . .
Encoded Code 39 254. . . . . . . . . . . . . . . . . . . . . . . . . . . . . . . . . . . . . . . . . . . . . . . . . . . . . . . . . . . .Terminating Keys 256. . . . . . . . . . . . . . . . . . . . . . . . . . . . . . . . . . . . . . . . . . . . . . . . . . . . .Escape Characters 256. . . . . . . . . . . . . . . . . . . . . . . . . . . . . . . . . . . . . . . . . . . . . . . . . . . . .Overriding Auto Tab Scan and Auto Enter Scan 257. . . . . . . . . . . . . . . . . . . . . . . . . . . . . .
Bar Code Symbologies 259. . . . . . . . . . . . . . . . . . . . . . . . . . . . . . . . . . . . . . . . . . . . . . . . . .
Bar Code Algorithms 260. . . . . . . . . . . . . . . . . . . . . . . . . . . . . . . . . . . . . . . . . . . . . . . . . . . . . . . . .
UPC 261. . . . . . . . . . . . . . . . . . . . . . . . . . . . . . . . . . . . . . . . . . . . . . . . . . . . . . . . . . . . . . . . . . . . . .
EAN 262. . . . . . . . . . . . . . . . . . . . . . . . . . . . . . . . . . . . . . . . . . . . . . . . . . . . . . . . . . . . . . . . . . . . . .
B
Contents
xiv Native Terminal Emulation Programmer’s Guide
Codabar 262. . . . . . . . . . . . . . . . . . . . . . . . . . . . . . . . . . . . . . . . . . . . . . . . . . . . . . . . . . . . . . . . . . .
Code 11 262. . . . . . . . . . . . . . . . . . . . . . . . . . . . . . . . . . . . . . . . . . . . . . . . . . . . . . . . . . . . . . . . . . .
Code 39 263. . . . . . . . . . . . . . . . . . . . . . . . . . . . . . . . . . . . . . . . . . . . . . . . . . . . . . . . . . . . . . . . . . .
Encoded Code 39 (Concatenation) 263. . . . . . . . . . . . . . . . . . . . . . . . . . . . . . . . . . . . . . . . . . . . . .
Encoded Code 39 (Full ASCII) 263. . . . . . . . . . . . . . . . . . . . . . . . . . . . . . . . . . . . . . . . . . . . . . . . .
Code 93 264. . . . . . . . . . . . . . . . . . . . . . . . . . . . . . . . . . . . . . . . . . . . . . . . . . . . . . . . . . . . . . . . . . .
Code 128 264. . . . . . . . . . . . . . . . . . . . . . . . . . . . . . . . . . . . . . . . . . . . . . . . . . . . . . . . . . . . . . . . . .
I 2 of 5 (Interleaved) 266. . . . . . . . . . . . . . . . . . . . . . . . . . . . . . . . . . . . . . . . . . . . . . . . . . . . . . . . .
S 2 of 5 (Standard 2 of 5) 266. . . . . . . . . . . . . . . . . . . . . . . . . . . . . . . . . . . . . . . . . . . . . . . . . . . . . .
Plessey 267. . . . . . . . . . . . . . . . . . . . . . . . . . . . . . . . . . . . . . . . . . . . . . . . . . . . . . . . . . . . . . . . . . . .
MSI Code (Variant of Plessey) 267. . . . . . . . . . . . . . . . . . . . . . . . . . . . . . . . . . . . . . . . . . . . . . . . . .
Terminal Font Set Table 269. . . . . . . . . . . . . . . . . . . . . . . . . . . . . . . . . . . . . . . . . . . . . . . . .
Native Sockets 279. . . . . . . . . . . . . . . . . . . . . . . . . . . . . . . . . . . . . . . . . . . . . . . . . . . . . . . . . . .
Communication Basics 280. . . . . . . . . . . . . . . . . . . . . . . . . . . . . . . . . . . . . . . . . . . . . . . . . . . . . . . .
Host Programming 281. . . . . . . . . . . . . . . . . . . . . . . . . . . . . . . . . . . . . . . . . . . . . . . . . . . . . . . . . .Coding the Application 281. . . . . . . . . . . . . . . . . . . . . . . . . . . . . . . . . . . . . . . . . . . . . . . . .Response Formats 282. . . . . . . . . . . . . . . . . . . . . . . . . . . . . . . . . . . . . . . . . . . . . . . . . . . . .Error Messages 282. . . . . . . . . . . . . . . . . . . . . . . . . . . . . . . . . . . . . . . . . . . . . . . . . . . . . . .
Normal Communication 283. . . . . . . . . . . . . . . . . . . . . . . . . . . . . . . . . . . . . . . . . . . . . . . . . . . . . .Coding the Application 283. . . . . . . . . . . . . . . . . . . . . . . . . . . . . . . . . . . . . . . . . . . . . . . . .Syntax for Terminals 283. . . . . . . . . . . . . . . . . . . . . . . . . . . . . . . . . . . . . . . . . . . . . . . . . . .
WtD/ (Write Display) Command 283. . . . . . . . . . . . . . . . . . . . . . . . . . . . . . . . . .Native Mode Responses 284. . . . . . . . . . . . . . . . . . . . . . . . . . . . . . . . . . . . . . . . . .
Configuration 284. . . . . . . . . . . . . . . . . . . . . . . . . . . . . . . . . . . . . . . . . . . . . . . . . . . . . . . . . . . . . .
Demonstration Program 285. . . . . . . . . . . . . . . . . . . . . . . . . . . . . . . . . . . . . . . . . . . . . . . . . . . . . . .
C
D
Contents
xvNative Terminal Emulation Programmer’s Guide
Index
General Index 294. . . . . . . . . . . . . . . . . . . . . . . . . . . . . . . . . . . . . . . . . . . . . . . . . . . . . . . . . . . . . . .
Files Index 310. . . . . . . . . . . . . . . . . . . . . . . . . . . . . . . . . . . . . . . . . . . . . . . . . . . . . . . . . . . . . . . . .
I

Contents
xvi Native Terminal Emulation Programmer’s Guide

Before You Begin
xviiNative Terminal Emulation Programmer’s Guide
Before You BeginThis section provides you with safety information, technical supportinformation, and sources for additional product information.
Safety SummaryYour safety is extremely important. Read and follow all warnings andcautions in this document before handling and operating Intermecequipment. You can be seriously injured, and equipment and data can bedamaged if you do not follow the safety warnings and cautions.
Do not repair or adjust aloneDo not repair or adjust energized equipment alone under anycircumstances. Someone capable of providing first aid must always bepresent for your safety.
First aidAlways obtain first aid or medical attention immediately after an injury.Never neglect an injury, no matter how slight it seems.
ResuscitationBegin resuscitation immediately if someone is injured and stops breathing.Any delay could result in death. To work on or near high voltage, youshould be familiar with approved industrial first aid methods.
Energized equipmentNever work on energized equipment unless authorized by a responsibleauthority. Energized electrical equipment is dangerous. Electrical shockfrom energized equipment can cause death. If you must performauthorized emergency work on energized equipment, be sure that youcomply strictly with approved safety regulations.

Before You Begin
xviii Native Terminal Emulation Programmer’s Guide
Safety IconsThis section explains how to identify and understand dangers, warnings,cautions, and notes that are in this manual. You may also see icons that tellyou when to follow ESD procedures and when to take special precautionsfor handling optical parts.
A warning alerts you of an operating procedure, practice, condition,or statement that must be strictly observed to avoid death or seriousinjury to the persons working on the equipment.
Avertissement: Un avertissement vous avertit d’une procédure defonctionnement, d’une méthode, d’un état ou d’un rapport qui doitêtre strictement respecté pour éviter l’occurrence de mort ou deblessures graves aux personnes manupulant l’équipement.
A caution alerts you to an operating procedure, practice, condition, orstatement that must be strictly observed to prevent equipment damageor destruction, or corruption or loss of data.
Attention: Une précaution vous avertit d’une procédure defonctionnement, d’une méthode, d’un état ou d’un rapport qui doitêtre strictement respecté pour empêcher l’endommagement ou ladestruction de l’équipement, ou l’altération ou la perte de données.
Note: Notes either provide extra information about a topic or containspecial instructions for handling a particular condition or set ofcircumstances.
Before You Begin
xixNative Terminal Emulation Programmer’s Guide
Global Services and Support
Warranty InformationTo understand the warranty for your Intermec product, visit the Intermecweb site at www.intermec.com and click Service & Support. The IntermecGlobal Sales & Service page appears. From the Service & Support menu,move your pointer over Support, and then click Warranty.
Disclaimer of warranties: The sample code included in this document ispresented for reference only. The code does not necessarily representcomplete, tested programs. The code is provided “as is with all faults.” Allwarranties are expressly disclaimed, including the implied warranties ofmerchantability and fitness for a particular purpose.
Web SupportVisit the Intermec web site at www.intermec.com to download our currentmanuals in PDF format. To order printed versions of the Intermecmanuals, contact your local Intermec representative or distributor.
Visit the Intermec technical knowledge base (Knowledge Central) atintermec.custhelp.com to review technical information or to requesttechnical support for your Intermec product.
Telephone SupportThese services are available from Intermec Technologies Corporation.
Service Description
In the U.S.A. and Canadacall 1-800-755-5505and choose this option
Factory Repair andOn-site Repair
Request a return authorizationnumber for authorized servicecenter repair, or request anon-site repair technician.
1
Technical Support Get technical support on yourIntermec product.
2
Service ContractStatus
Inquire about an existingcontract, renew a contract, or askinvoicing questions.
3
Schedule Site Surveysor Installations
Schedule a site survey, or requesta product or system installation.
4
Ordering Products Talk to sales administration,place an order, or check thestatus of your order.
5
Outside the U.S.A. and Canada, contact your local Intermecrepresentative. To search for your local representative, from the Intermecweb site, click Contact.

Before You Begin
xx Native Terminal Emulation Programmer’s Guide
Who Should Read this Guide?This guide provides you with information about the Native terminalemulation application, and how to install, configure, operate, maintain,and troubleshoot the application.
Related DocumentsThis table contains a list of related Intermec documents and part numbers.
Manual Part #
1100 Series Data Terminal User’s Guide 961-047-069
5020 Data Collection PC User’s Manual 068975-002
5055 Data Collection PC User’s Guide 961-054-017
5900 Series User’s Guide 961-047-121
The Bar Code Book 051241
EZBuilder Getting Started Guide 066450
EZBuilder Tutorial 066449
Intermec Application Server User’s Guide 072242
MobileLANtaccess 21xx System Manual 067150
PEN*KEY Model 6400 User’s Guide 961-047-098
RT1700 Radio Terminal User’s Guide 961-047-068
TE 2000 3270 Terminal Emulation Programmer’s Guide 977-055-003
TE 2000 5250 Terminal Emulation Programmer’s Guide 977-055-004
TE 2000 VT/ANSI Terminal Emulation Programmer’s Guide 977-055-005
TRAKKER Antares 241X Hand-Held Terminal User’s Manual 069538
TRAKKER Antares 2420 and 2425 Hand-Held Terminal User’s Manual 064024
TRAKKER Antares 243X Hand-Held Terminal User’s Manual 071791-001
TRAKKER Antares 2455 Vehicle Mount Terminal User’s Manual 067358
TRAKKER Antares 2475 Vehicle-Mount Terminal User’s Manual 072383
TRAKKER Antares 248X Stationary Terminal User’s Manual 066960
TRAKKER Antares Application Development Tools System Manual 064433
TRAKKER Antares Optical Link Adapter Quick Reference Guide 065826
TRAKKER Antares TD2400 Communications Dock Quick Reference Guide 065555
TRAKKER Antares TD2410 Communications Dock Quick Reference Guide 069552
The Intermec web site at www.intermec.com contains our documents thatyou can download in PDF format.
To order printed versions of the Intermec manuals, contact your localIntermec representative or distributor.
1Native Terminal Emulation Programmer’s Guide
Getting Started1
This chapter introduces the Native terminal emulation application.

Getting StartedChapter —1
2 Native Terminal Emulation Programmer’s Guide
Understanding Network Protocol OptionsNative Terminal Emulation applications for the Enterprise WirelessLANt system use one of the following network protocol options:
S TCP/IPThe terminal communicates through an IntermecR access point, whichis directly connected to the host computer on an Ethernet or a tokenring network.
S WTPThe terminal communicates with the host computer through the Inter-mec Application Server, Intermec access point, or other Intermec gate-ways.
For network configuration options, refer to your terminal’s user manual.
Setting Up the Terminal and the NetworkBefore you can start using the Native Terminal Emulation application onyour terminal, you need to do the following:
1 Set up your terminal.Set-up includes charging and installing the battery pack and turning onthe terminal for the first time. For instructions, refer to your terminal’suser manual.
Note: Battery packs do not apply to all terminals. Vehicle mount andstationary terminals are powered via an external source.
2 Configure your terminal and the network.To use RF communications on the terminal, you need to:
a Configure the Intermec Application Server (WTP), other Intermecgateways (WTP), or host (TCP/IP).
b Configure the access point. This does not apply to the 2480/2481 Ter-minal, which contains an Ethernet NIC instead of a radio.
c Configure the network parameters on the terminal.
For instructions, refer to your terminal’s user manual.
3 Verify that your terminal is communicating correctly with the accesspoint, gateway, or host.To verify that your terminal is communicating correctly, refer to theterminal’s user manual for instructions.
Getting Started—Chapter 1
3Native Terminal Emulation Programmer’s Guide
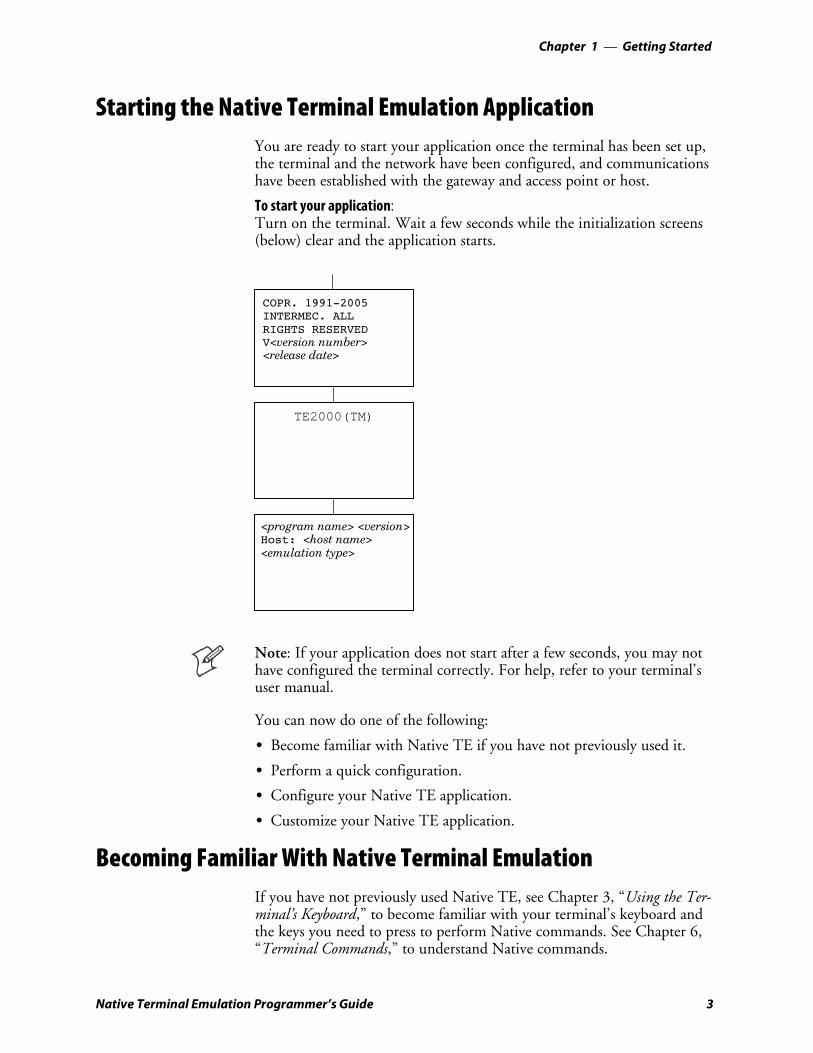
Starting the Native Terminal Emulation ApplicationYou are ready to start your application once the terminal has been set up,the terminal and the network have been configured, and communicationshave been established with the gateway and access point or host.
To start your application:Turn on the terminal. Wait a few seconds while the initialization screens(below) clear and the application starts.
COPR. 1991-2005INTERMEC. ALLRIGHTS RESERVEDV<version number><release date>
<program name> <version>Host: <host name><emulation type>
TE2000(TM)
Note: If your application does not start after a few seconds, you may nothave configured the terminal correctly. For help, refer to your terminal’suser manual.
You can now do one of the following:
S Become familiar with Native TE if you have not previously used it.
S Perform a quick configuration.
S Configure your Native TE application.
S Customize your Native TE application.
Becoming Familiar With Native Terminal EmulationIf you have not previously used Native TE, see Chapter 3, “Using the Ter-minal’s Keyboard,” to become familiar with your terminal’s keyboard andthe keys you need to press to perform Native commands. See Chapter 6,“Terminal Commands,” to understand Native commands.
Getting StartedChapter —1
4 Native Terminal Emulation Programmer’s Guide
Performing a Quick ConfigurationNote: For Terminal Emulation Version 6.60 or greater, the default datastream is “VT/ANSI.”
1 Change the data stream to Native. The default data stream is “Native”for the 6400 (WTP), 5055 (WTP), 11XX, 17XX, and 59XX Terminals.The default data stream for 2415, 2425, 2435A, 2455, 2475, 248X,and IP terminals is “3270.”
a Access the terminal emulation configuration menus by pressing thefollowing keys, then choose 1) Set-up Parms from the Main Menu.
Terminal Key Sequence
2415 ) ! (55-key keyboard)( 5 (37-key keyboard)
2425 ( !
2435A r l (57-key keyboard)[Green] > [Orange] > (48-key keyboard)r l (39-key function numeric keyboard)
2455, 2475, 248X ( ¡
6400 [Gold] [Blue]
5055 [Blue] [M] or [ALT] [M]
59XX [Brown] [Space]
17XX, 11XX [Gold] [Black]
Note: Press a number to select a menu option, then press [Enter] toreturn to a previous menu.
b At the Enter Password prompt, enter cr52401.On 17XX (37-key) Terminals, the password is: F12 F11 5 2 4 0 1
c From the Set-up Parms menu, select 3) Protocol Opts,2) Data Stream, then 7) Native.
2 From the Main Menu, select 7) More, then 2) Save Parms.
3 At the Enter Password prompt, type cr52401, then press enter.On 17XX (37-key) Terminals, the password is: F12 F11 5 2 4 0 1
4 From the Main Menu, select 6) Exit Menus.
Note: For WTP devices, you should also set a terminal number.
5 Log in to a TE session, then use the terminal to collect/transmit data.
Getting Started—Chapter 1
5Native Terminal Emulation Programmer’s Guide
Configuring the Native ApplicationYou can use the terminal’s TE configuration menus to configure site-spe-cific operational parameters, including WTP or TCP/IP communications,terminal emulation options, and the Main Menu password. For informa-tion about configuring the terminal, see Chapter 3, “Using the TerminalEmulation Menus.”
Using Advanced FeaturesYou can customize the standard Native TE program to do the following:For more information, see Chapter 4, “Customizing Your Configuration.”
S Use the auto-login feature to send the same login information each timeyou login to the host.
S Create a custom parameter set-up file.
S Change the text of TE configuration menus or system messages.
S Preinitialize the Native TE program
Unsupported Commands and FunctionsNative TE for the 2415, 2425, 2435A, 2455, 2475, and 248X Terminalsdoes not support the following commands and functions, which were sup-ported in previous versions.
S End (viewport)Moved the window/viewport to the end of the last line displayed on theTE screen.
S Erase FieldErased all characters in the field where the cursor was positioned.
S Erase Last WordErased all characters from the cursor back to the start of a word or aspace on the screen.
S Fast Cursor Right or LeftMoved the cursor two positions to the right or left rather than one.
S Home (viewport)Moved the window or viewport to the top left corner of the TE screen.
S ReshowResent a screen image from the locally maintained host buffer to refreshthe terminal screen.
S StatusToggled the terminal’s screen between the status line display and thenormal field input display.
S Status line messagesReported the operating status of the terminal and host system.

Getting StartedChapter —1
6 Native Terminal Emulation Programmer’s Guide
S Dual sessionsNot supported in Trakker Antares TCP terminals.
If you scan the bar code for an unsupported command, the bar code datais read into the terminal. If you press the key sequence for the command,the sequence is ignored.
Program NamesThe following chart lists TE options and program names.
Note: Native TE does not support SST (Spread Spectrum Transmission)or regular UHF. “S-UHF” is synthesized UHF.
Model Option Program Name
2415, 2425, 2435A, 2455, 2475, 248X TE/WTP/2.4 GHz OpenAirTE/WTP/802.11TE/IP/2.4 GHz OpenAirTE/IP/802.11
FWP240H0
6400 TE/WTP/2.4 GHz OpenAirTE/WTP/802.11TE/WTP/900 MHz FalconTE/IP/2.4 GHz OpenAirTE/IP/802.11
51-key keyboard 41-key keyboardFWP640H0 FWP640H4FWP640H0 FWP640H4FWP640H0 FWP640H4FWP64TH0 FWP64TH4FWP64TH0 FWP64TH4
5055 TE/WTP/2.4 GHz OpenAirTE/WTP/802.11TE/IP/2.4 GHz OpenAirTE/IP/802.11
FWP650H0FWP650H0FWP65TH0FWP65TH0
59XX TE/WTPTE/WTPTE/WTP/2.4 GHz OpenAirTE/WTP/900 MHz FalconTE/WTP/S-UHF
FWP592H0FWP594H0FWP598H0FWP596H0FWP591H1
17XX TE/WTPTE/WTPTE/WTP/2.4 GHz OpenAirTE/WTP/900 MHz FalconTE/WTP/S-UHF
57-key keyboard 37-key keyboardFWP170H0 FWP170H3FWP174H0 FWP174H3FWP178H0 FWP178H3FWP176H0 FWP176H3FWP171H0 FWP171H3
11XX TE/WTPTE/WTPTE/WTP/2.4 GHz OpenAirTE/WTP/900 MHz FalconTE/WTP/S-UHF
FWP110H0FWP114H0FWP118H0FWP116H0FWP111H0

7Native Terminal Emulation Programmer’s Guide
Using the Terminal’sKeyboard2
Your terminal has a special keyboard that contains most of the keys avail-able on your Native terminal keyboard. Use the keyboard to Enter data inthe TE screens.
The keys on the keyboard have their main character or operation markeddirectly on the key itself. To access that character or operation, just pressthe key.
You can access TE commands and functions printed above the keys bypressing key combinations.

Using the Terminal’s KeyboardChapter —2
8 Native Terminal Emulation Programmer’s Guide
2415 TerminalFor help with using the keyboard, refer to the TRAKKER Antares 241XHand-Held Terminal User’s Manual (P/N 069538).
55-Key Keyboard37-Key Keyboard
FunctionLeft Key
Control KeyShift Key
FunctionRight Key
FunctionRight Key
FunctionLeft Key
Control KeyShift Key
Your 2415 Terminal has either a 55-key (left) or a 37-key (right) keyboard as shown in this illustration.
2415 Cursor Keys
To Enter Press the Keys
Window/viewport up =
Window/viewport down >
Window/viewport right ( >
Window/viewport left ( =
2415 Tab Keys
To Enter Press the Keys
Back Tab ( ;
Forward Tab ;

Using the Terminal’s Keyboard—Chapter 2
9Native Terminal Emulation Programmer’s Guide
2415 AID-Generating KeysPress the Keys
To Enter 55-Key Keyboard 37-Key Keyboard
Clear ) 9 ? =
F1 ! !
F2 @ @
F3 # #
F4 $ $
F5 ( ! b
F6 ( @ c
F7 ( # d
F8 ( $ e
F9 ) A f
F10 ) B g
F11 ) C h
F12 ) D i
F13 ) E ? !
F14 ) F ? @
F15 ) G ? #
F16 ) H ? $
F17 ) I ? b
F18 ) J ? c
F19 ) K ? d
F20 ) L ? e
F21 ) M ? f
F22 ) N ? g
F23 ) O ? h
F24 ) P ? i
2415 Auto-Login RestartTo Enter Auto-Login Restart, scan the following bar code (also in Appen-dix A, “Bar Code Scanning”).
Auto-Login Restart
*/EALRS**%ALRS*
Using the Terminal’s KeyboardChapter —2
10 Native Terminal Emulation Programmer’s Guide
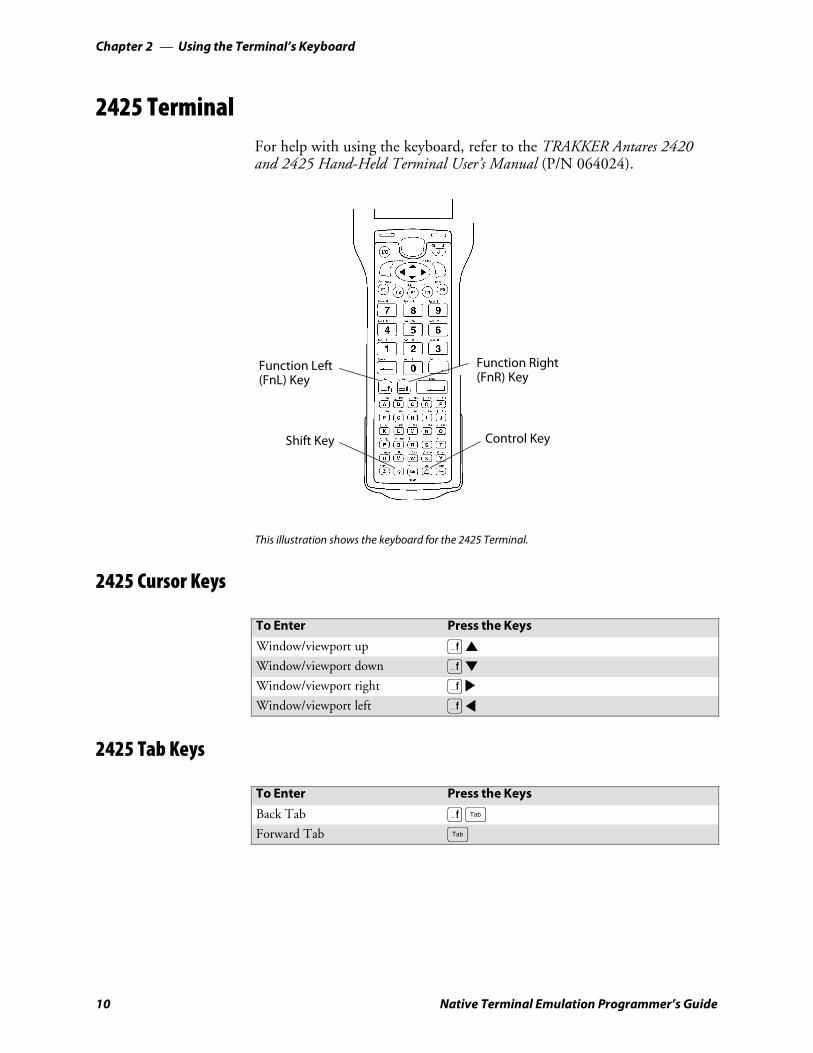
2425 TerminalFor help with using the keyboard, refer to the TRAKKER Antares 2420and 2425 Hand-Held Terminal User’s Manual (P/N 064024).
Function Right(FnR) Key
Function Left(FnL) Key
Control KeyShift Key
This illustration shows the keyboard for the 2425 Terminal.
2425 Cursor Keys
To Enter Press the Keys
Window/viewport up )[
Window/viewport down )
Window/viewport right )
Window/viewport left )]
2425 Tab Keys
To Enter Press the Keys
Back Tab )<
Forward Tab <
Using the Terminal’s Keyboard—Chapter 2
11Native Terminal Emulation Programmer’s Guide
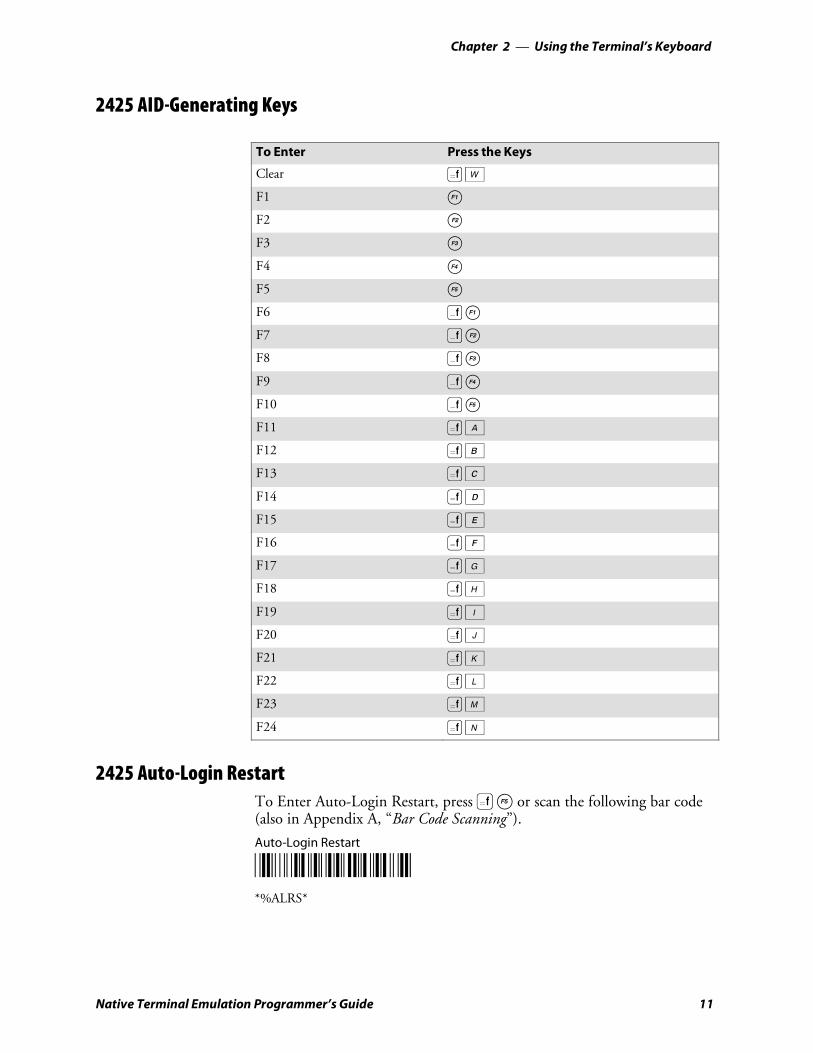
2425 AID-Generating Keys
To Enter Press the Keys
Clear (W
F1 !
F2 @
F3 #
F4 $
F5 %
F6 )!
F7 )@
F8 )#
F9 )$
F10 )%
F11 (A
F12 (B
F13 (C
F14 (D
F15 (E
F16 (F
F17 (G
F18 (H
F19 (I
F20 (J
F21 (K
F22 (L
F23 (M
F24 (N
2425 Auto-Login RestartTo Enter Auto-Login Restart, press ( % or scan the following bar code(also in Appendix A, “Bar Code Scanning”).
Auto-Login Restart
*/EALRS**%ALRS*
Using the Terminal’s KeyboardChapter —2
12 Native Terminal Emulation Programmer’s Guide
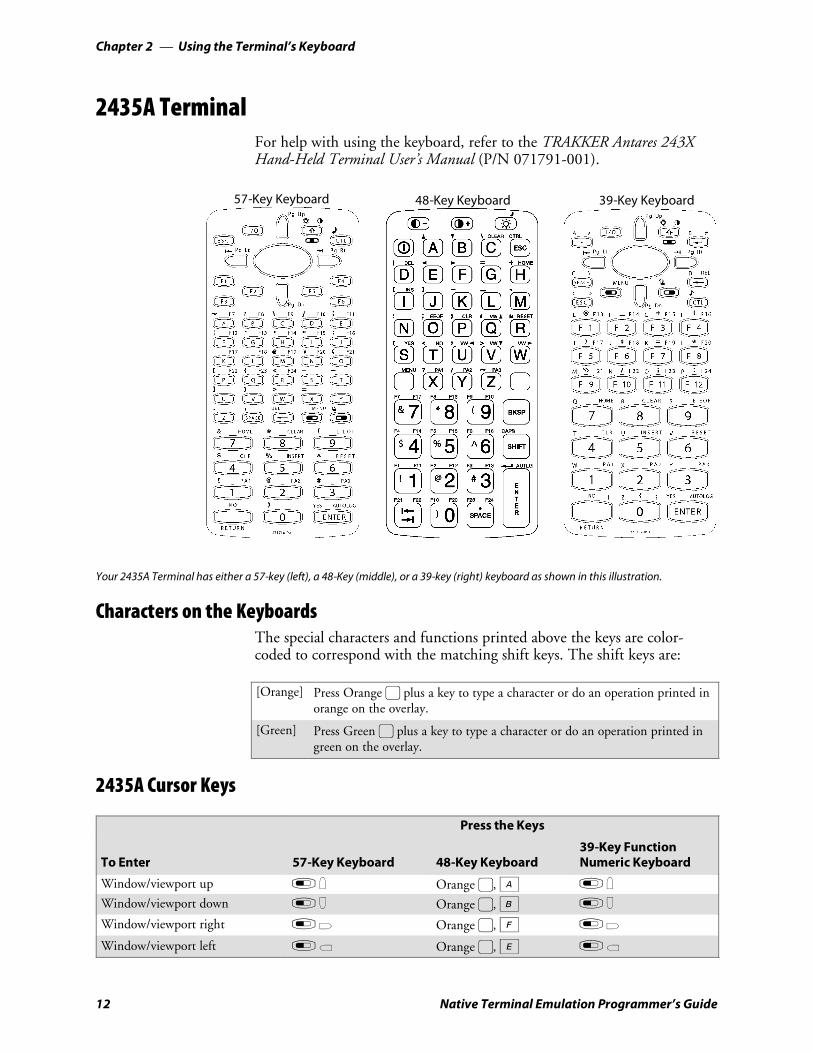
2435A TerminalFor help with using the keyboard, refer to the TRAKKER Antares 243XHand-Held Terminal User’s Manual (P/N 071791-001).
39-Key Keyboard57-Key Keyboard 48-Key Keyboard
Your 2435A Terminal has either a 57-key (left), a 48-Key (middle), or a 39-key (right) keyboard as shown in this illustration.
Characters on the KeyboardsThe special characters and functions printed above the keys are color-coded to correspond with the matching shift keys. The shift keys are:
[Orange] Press Orange > plus a key to type a character or do an operation printed inorange on the overlay.
[Green] Press Green > plus a key to type a character or do an operation printed ingreen on the overlay.
2435A Cursor Keys
Press the Keys
To Enter 57-Key Keyboard 48-Key Keyboard39-Key FunctionNumeric Keyboard
Window/viewport up l u Orange >, A l u
Window/viewport down l d Orange >, B l d
Window/viewport right l b Orange >, F l b
Window/viewport left l a Orange >, E l a

Using the Terminal’s Keyboard—Chapter 2
13Native Terminal Emulation Programmer’s Guide
2435A Tab Keys
Press the Keys
To Enter 57-Key Keyboard 48-Key Keyboard39-Key FunctionNumeric Keyboard
Forward Tab l b : l b
Back Tab Not applicable ^ : Not applicable
2435A Standard Keys
Press the Keys
To Enter 57-Key Keyboard 48-Key Keyboard39-Key FunctionNumeric Keyboard
0–9 0 – 9 0 – 9 0 – 9
Symbols w plus corresponding key ? plus corresponding key w plus corresponding key
2435A Function Keys
Press the Keys
To Enter 57-Key Keyboard 48-Key Keyboard39-Key FunctionNumeric Keyboard
Backspace n \ n
Caps Lock l r Orange >, ^ l r
Ctrl c Not supported. c
Return v ; v
Shift w ^ w
Space bar s _ s

Using the Terminal’s KeyboardChapter —2
14 Native Terminal Emulation Programmer’s Guide
2435A AID-Generating Keys
Press the Keys
To Enter 57-Key Keyboard 48-Key Keyboard39-Key FunctionNumeric Keyboard
F1 g Orange >, 1 g
F2 h Orange >, 2 h
F3 i Orange >, 3 i
F4 j Orange >, 4 j
F5 k Orange >, 5 k
F6 o Orange >, 6 o
F7 r A Orange >, 7 m
F8 r B Orange >, 8 p
F9 r C Orange >, 9 q
F10 r D Orange >, 0 [
F11 r E Green >, 1 \
F12 r F Green >, 2 ]
F13 r G Green >, 3 r g
F14 r H Green >, 4 r h
F15 r I Green >, 5 r i
F16 r J Green >, 6 r j
F17 r K Green >, 7 r k
F18 r L Green >, 8 r o
F19 r M Green >, 9 r m
F20 r N Green >, 0 r p
F21 r O Orange >, : r q
F22 r P Green >, : r [
F23 r Q Orange >, _ r \
F24 r R Green >, _ r ]
Clear r 8 Green >, P r 8
2435A Auto-Login RestartTo Enter Auto-Login Restart, press r v on the 57-key keyboard and39-key function numeric keyboards; press Green >, ; on the 48-keykeyboard, or scan the following bar code (also in Appendix A, “Bar CodeScanning”).Auto-Login Restart
*/EALRS**%ALRS*

Using the Terminal’s Keyboard—Chapter 2
15Native Terminal Emulation Programmer’s Guide
2435A 3270 Additional FunctionsTo access the TE configuration menus, press r l on the 57-key key-board and 39-key function numeric keyboards, or press Green >,Orange > on the 48-key keyboard.
Using the Terminal’s KeyboardChapter —2
16 Native Terminal Emulation Programmer’s Guide
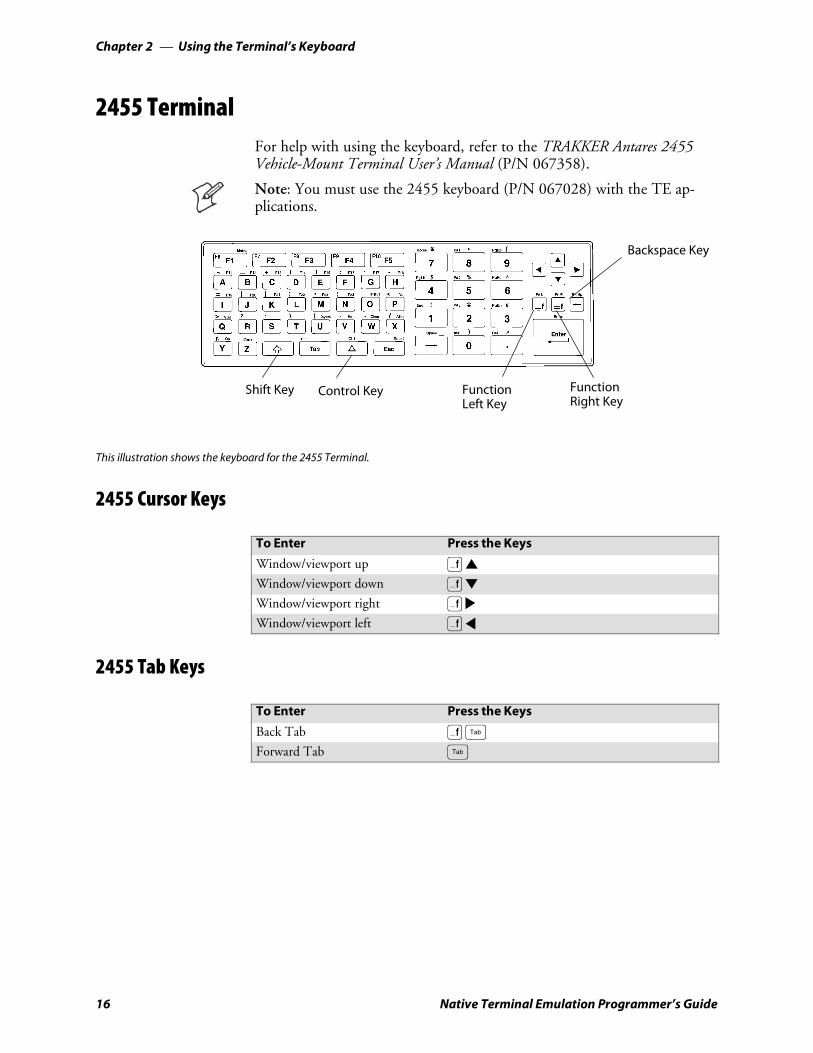
2455 TerminalFor help with using the keyboard, refer to the TRAKKER Antares 2455Vehicle-Mount Terminal User’s Manual (P/N 067358).
Note: You must use the 2455 keyboard (P/N 067028) with the TE ap-plications.
Backspace Key
FunctionRight Key
FunctionLeft Key
Control KeyShift Key
This illustration shows the keyboard for the 2455 Terminal.
2455 Cursor Keys
To Enter Press the Keys
Window/viewport up )[
Window/viewport down )
Window/viewport right )
Window/viewport left )]
2455 Tab Keys
To Enter Press the Keys
Back Tab )<
Forward Tab <

Using the Terminal’s Keyboard—Chapter 2
17Native Terminal Emulation Programmer’s Guide
2455 AID-Generating Keys
To Enter Press the Keys
Clear (W
F1 ¡
F2 ¢
F3 £
F4 §
F5 ¶
F6 )¡
F7 )¢
F8 )£
F9 )§
F10 )¶
F11 (A
F12 (B
F13 (C
F14 (D
F15 (E
F16 (F
F17 (G
F18 (H
F19 (I
F20 (J
F21 (K
F22 (L
F23 (M
F24 (N
2455 Auto-Login RestartTo Enter Auto-Login Restart, press ( ¶ or scan the following bar code(also in Appendix A, “Bar Code Scanning”).
Auto-Login Restart
*/EALRS**%ALRS*
Using the Terminal’s KeyboardChapter —2
18 Native Terminal Emulation Programmer’s Guide
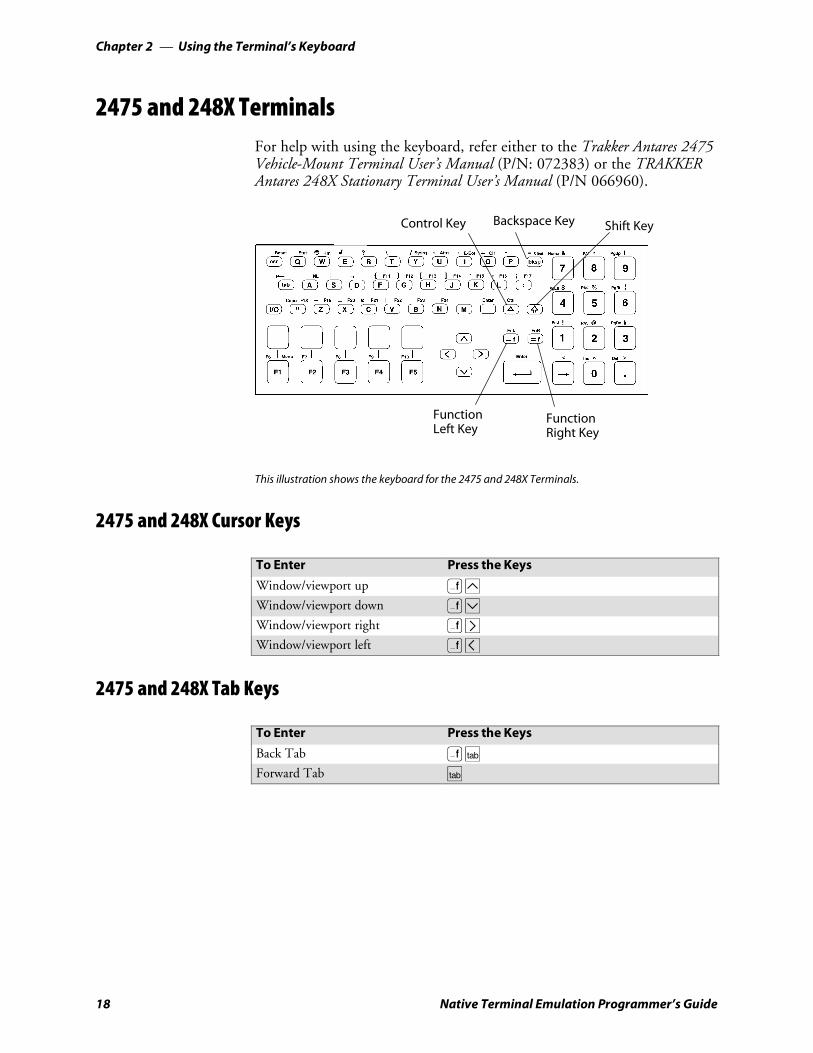
2475 and 248X TerminalsFor help with using the keyboard, refer either to the Trakker Antares 2475Vehicle-Mount Terminal User’s Manual (P/N: 072383) or the TRAKKERAntares 248X Stationary Terminal User’s Manual (P/N 066960).
Control Key
FunctionRight Key
FunctionLeft Key
Shift KeyBackspace Key
This illustration shows the keyboard for the 2475 and 248X Terminals.
2475 and 248X Cursor Keys
To Enter Press the Keys
Window/viewport up )¥
Window/viewport down )†
Window/viewport right )ª
Window/viewport left )–
2475 and 248X Tab Keys
To Enter Press the Keys
Back Tab )ø
Forward Tab ø

Using the Terminal’s Keyboard—Chapter 2
19Native Terminal Emulation Programmer’s Guide
2475 and 248X AID-Generating Keys
To Enter Press the Keys
Clear )b
F1 ¡
F2 ¢
F3 £
F4 §
F5 ¶
F6 )¡
F7 )¢
F8 )£
F9 )§
F10 )¶
F11 (F
F12 (G
F13 (H
F14 (J
F15 (K
F16 (L
F17 (r
F18 ( [quotation mark]
F19 (Z
F20 (X
F21 (C
F22 (V
F23 (B
F24 (N
2475 and 248X Auto-Login RestartTo Enter Auto-Login Restart, press ( ¶ or scan the following bar code(also in Appendix A, “Bar Code Scanning”).
Auto-Login Restart
*/EALRS**%ALRS*
Using the Terminal’s KeyboardChapter —2
20 Native Terminal Emulation Programmer’s Guide
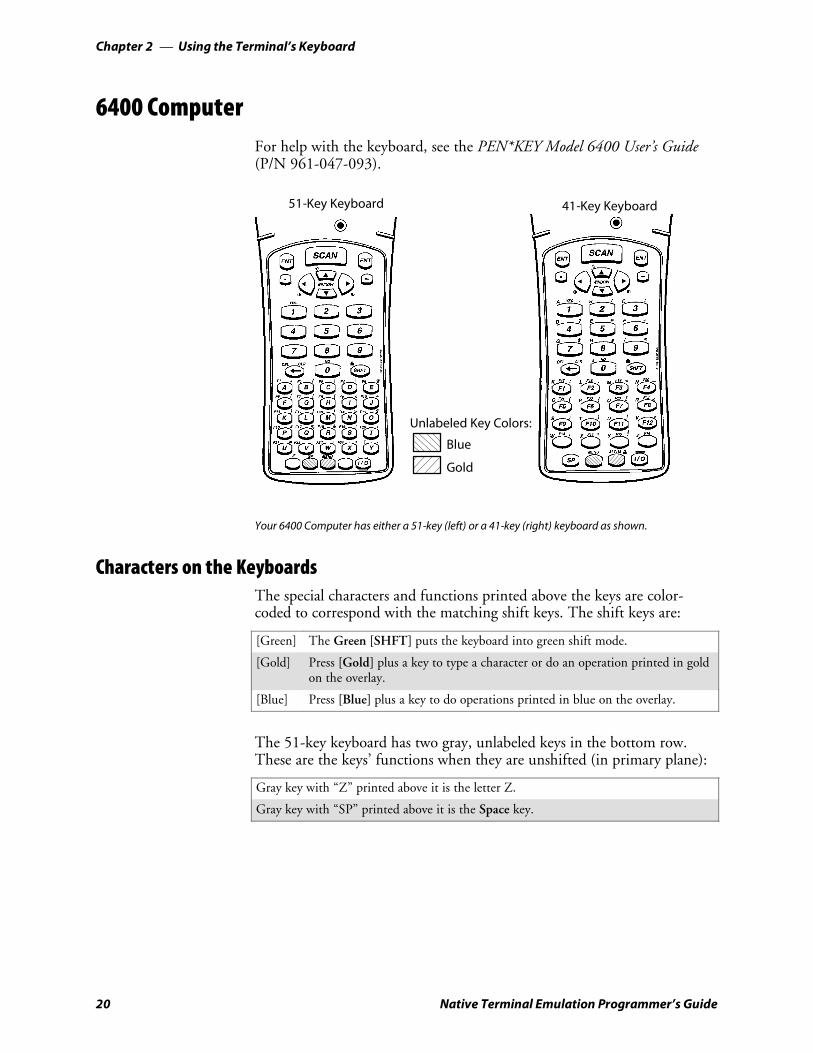
6400 ComputerFor help with the keyboard, see the PEN*KEY Model 6400 User’s Guide(P/N 961-047-093).
41-Key Keyboard
Blue
Gold
Unlabeled Key Colors:
51-Key Keyboard
Your 6400 Computer has either a 51-key (left) or a 41-key (right) keyboard as shown.
Characters on the KeyboardsThe special characters and functions printed above the keys are color-coded to correspond with the matching shift keys. The shift keys are:
[Green] The Green [SHFT] puts the keyboard into green shift mode.
[Gold] Press [Gold] plus a key to type a character or do an operation printed in goldon the overlay.
[Blue] Press [Blue] plus a key to do operations printed in blue on the overlay.
The 51-key keyboard has two gray, unlabeled keys in the bottom row.These are the keys’ functions when they are unshifted (in primary plane):
Gray key with “Z” printed above it is the letter Z.
Gray key with “SP” printed above it is the Space key.
Using the Terminal’s Keyboard—Chapter 2
21Native Terminal Emulation Programmer’s Guide
Using the 41-Key KeyboardThe 41-key keyboard has numeric keys in its primary plane. It has alpha-betic keys, special characters, and function keys in its secondary plane.
Because a 6400 Computer with a 41-key keyboard does not have alpha-betic keys, follow these procedures to change passwords and cold-start thecomputer:
S Press [Blue] [3] or [F12] [3] to enter a “C,” [Blue] [F8] or [F11] [3] toenter an “R,” then press “52401” to enter the password for the Set-upParms in the terminal emulations menu. Note that these are not case-sen-sitive.
You can use one of two methods to type letters on the 41-key keyboard:standard mode or alpha lock mode. When engaged, alpha lock modeswitches the alphabetic keys with the function keys. That is, it moveslowercase alphabetic keys from their normal Blue plane to the primaryplane. It moves uppercase alphabetic keys from their standard SHFT, Blueplane to the SHFT plane. Alpha lock provides a faster way to type a seriesof letters because it reduces the number of key combinations. Alpha lockmode moves only the alpha keys to the primary plane.
To engage alpha lock mode press [Blue] [Gold]. Then, to type a series ofletters, press the correct key combination. The keyboard stays in alpha lockmode until you press [Blue] [Gold] to unlock it.
6400 Tab Keys
To Enter Press the Keys
Back Tab [Gold] [A]Forward Tab [Gold] ["]
Using the Terminal’s KeyboardChapter —2
22 Native Terminal Emulation Programmer’s Guide
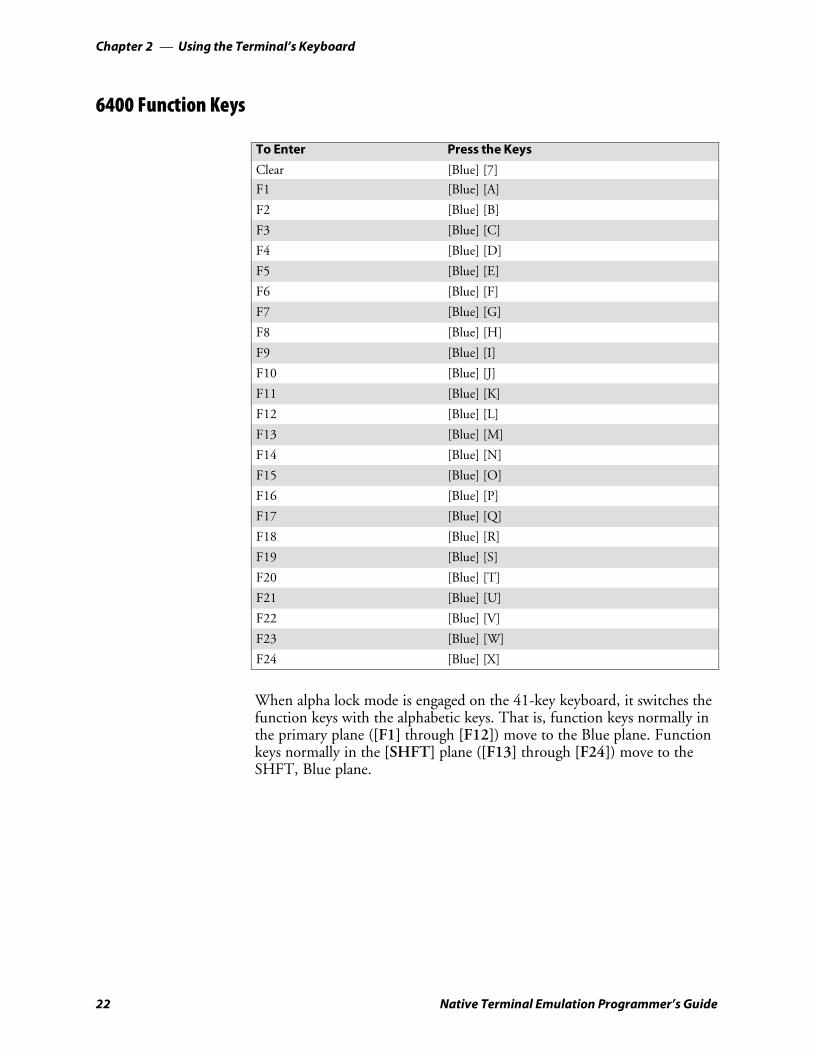
6400 Function Keys
To Enter Press the Keys
Clear [Blue] [7]
F1 [Blue] [A]
F2 [Blue] [B]
F3 [Blue] [C]
F4 [Blue] [D]
F5 [Blue] [E]
F6 [Blue] [F]
F7 [Blue] [G]
F8 [Blue] [H]
F9 [Blue] [I]
F10 [Blue] [J]
F11 [Blue] [K]
F12 [Blue] [L]
F13 [Blue] [M]
F14 [Blue] [N]
F15 [Blue] [O]
F16 [Blue] [P]
F17 [Blue] [Q]
F18 [Blue] [R]
F19 [Blue] [S]
F20 [Blue] [T]
F21 [Blue] [U]
F22 [Blue] [V]
F23 [Blue] [W]
F24 [Blue] [X]
When alpha lock mode is engaged on the 41-key keyboard, it switches thefunction keys with the alphabetic keys. That is, function keys normally inthe primary plane ([F1] through [F12]) move to the Blue plane. Functionkeys normally in the [SHFT] plane ([F13] through [F24]) move to theSHFT, Blue plane.

Using the Terminal’s Keyboard—Chapter 2
23Native Terminal Emulation Programmer’s Guide
The following chart describes how to do function operations when the41-key keyboard is in standard mode or alpha lock mode.
Note: [F13] through [F16] are the four gray keys in the second row fromthe bottom of the overlay.
Press the Keys (41-Key)
To Enter Standard Mode Alpha Lock Mode
F1 [F1] [Blue] [F1]
F2 [F2] [Blue] [F2]
F3 [F3] [Blue] [F3]
F4 [F4] [Blue] [F4]
F5 [F5] [Blue] [F5]
F6 [F6] [Blue] [F6]
F7 [F7] [Blue] [F7]
F8 [F8] [Blue] [F8]
F9 [F9] [Blue] [F9]
F10 [F10] [Blue] [F10]
F11 [F11] [Blue] [F11]
F12 [F12] [Blue] [F12]
F13 [SHFT] Gray key with “F13” printed above [SHFT] [Gold] “F13” key
F14 [SHFT] Gray key with “F14” printed above [SHFT] [Gold] “F14” key
F15 [SHFT] Gray key with “F15” printed above [SHFT] [Gold] “F15” key
F16 [SHFT] Gray key with “F16” printed above [SHFT] [Gold] “F16” key
F17 [SHFT] [F1] [SHFT] [Blue] [F1]
F18 [SHFT] [F2] [SHFT] [Blue] [F2]
F19 [SHFT] [F3] [SHFT] [Blue] [F3]
F20 [SHFT] [F4] [SHFT] [Blue] [F4]
F21 [SHFT] [F5] [SHFT] [Blue] [F5]
F22 [SHFT] [F6] [SHFT] [Blue] [F6]
F23 [SHFT] [F7] [SHFT] [Blue] [F7]
F24 [SHFT] [F8] [SHFT] [Blue] [F8]
To engage alpha lock mode, press [Blue] [Gold]. Then press the correctkey combinations in the chart. The keyboard stays in alpha lock modeuntil you press [Blue] [Gold] again to unlock it.
6400 Auto-Login RestartTo Enter Auto-Login Restart, scan the following bar code (also in Appen-dix A, “Bar Code Scanning”).
Auto-Login Restart
*/EALRS**%ALRS*
Using the Terminal’s KeyboardChapter —2
24 Native Terminal Emulation Programmer’s Guide
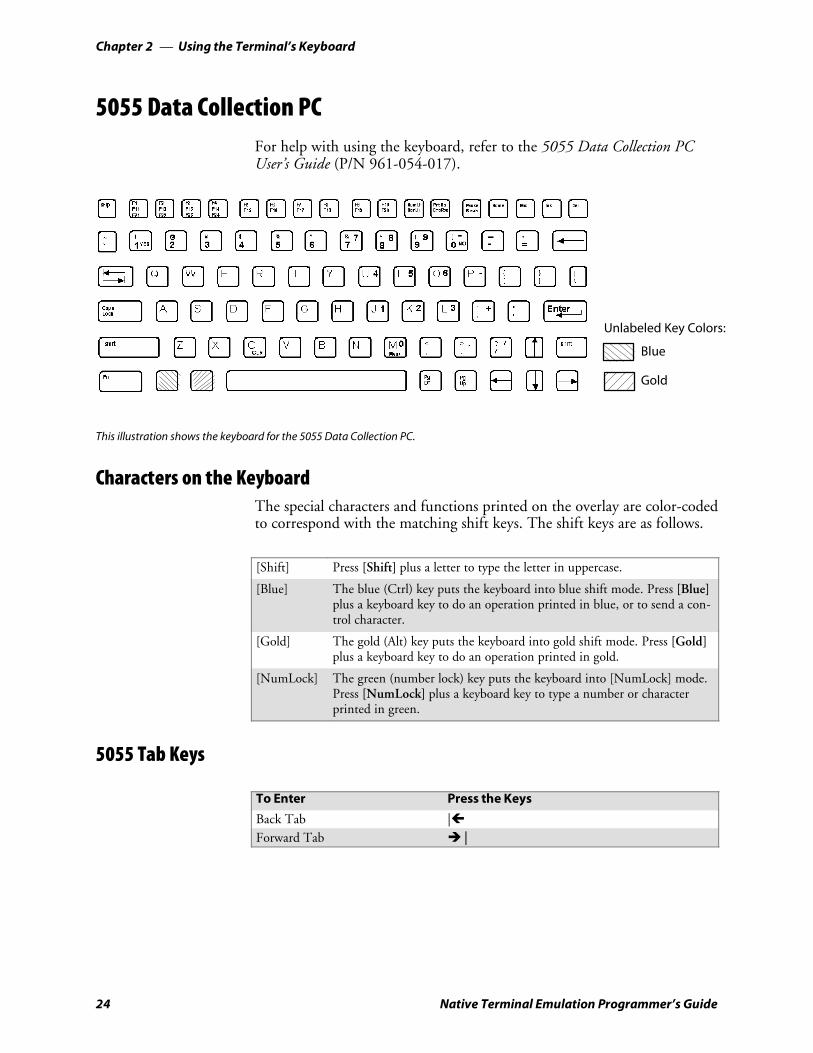
5055 Data Collection PCFor help with using the keyboard, refer to the 5055 Data Collection PCUser’s Guide (P/N 961-054-017).
Unlabeled Key Colors:
Blue
Gold
This illustration shows the keyboard for the 5055 Data Collection PC.
Characters on the KeyboardThe special characters and functions printed on the overlay are color-codedto correspond with the matching shift keys. The shift keys are as follows.
[Shift] Press [Shift] plus a letter to type the letter in uppercase.
[Blue] The blue (Ctrl) key puts the keyboard into blue shift mode. Press [Blue]plus a keyboard key to do an operation printed in blue, or to send a con-trol character.
[Gold] The gold (Alt) key puts the keyboard into gold shift mode. Press [Gold]plus a keyboard key to do an operation printed in gold.
[NumLock] The green (number lock) key puts the keyboard into [NumLock] mode.Press [NumLock] plus a keyboard key to type a number or characterprinted in green.
5055 Tab Keys
To Enter Press the Keys
Back Tab |Forward Tab |

Using the Terminal’s Keyboard—Chapter 2
25Native Terminal Emulation Programmer’s Guide
5055 Function Keys
To Enter Press the Keys
Clear [Gold] [C]
F1 [F1]
F2 [F2]
F3 [F3]
F4 [F4]
F5 [F5]
F6 [F6]
F7 [F7]
F8 [F8]
F9 [F9]
F10 [F10]
F11 [Blue] [F1]
F12 [Blue] [F2]
F13 [Blue] [F3]
F14 [Blue] [F4]
F15 [Blue] [F5]
F16 [Blue] [F6]
F17 [Blue] [F7]
F18 [Blue] [F8]
F19 [Blue] [F9]
F20 [Blue] [F10]
F21 [Gold] [F1]
F22 [Gold] [F2]
F23 [Gold] [F3]
F24 [Gold] [F4]
5055 Auto-Login RestartTo Enter Auto-Login Restart, scan the following bar code (also in Appen-dix A, “Bar Code Scanning”).
Auto-Login Restart
*/EALRS**%ALRS*

Using the Terminal’s KeyboardChapter —2
26 Native Terminal Emulation Programmer’s Guide
59XX TerminalFor help with using the keyboard, refer to the 5900 Series User’s Guide(P/N 961-047-121).
Unlabeled Key Colors:
Brown
Gold
FUNC
SKIP
CLR
CLR
NOFA @ FB ! FC + FD [ FE $ ]
# * % / & ; ,
: ? = SHIFT
This illustration shows the keyboard for the 59XX Terminal.
Characters on the KeyboardThe special characters and functions printed on the overlay are color-codedto correspond with the matching shift keys. The shift keys are as follows.
[Shift] Press [Shift] plus a letter to type the letter in uppercase.
[Brown] The brown key puts the keyboard into brown shift mode. Press [Brown] plusa keyboard key to type a special character or do operations printed in brown.
[Gold] The gold key puts the keyboard into gold shift mode.
The [Insert], [CLR], and [Shift] keys have their operations printed to theright of them. Operations printed to the right are the unshifted values.Operations printed above the keys are the shifted values.
Using the Terminal’s Keyboard—Chapter 2
27Native Terminal Emulation Programmer’s Guide
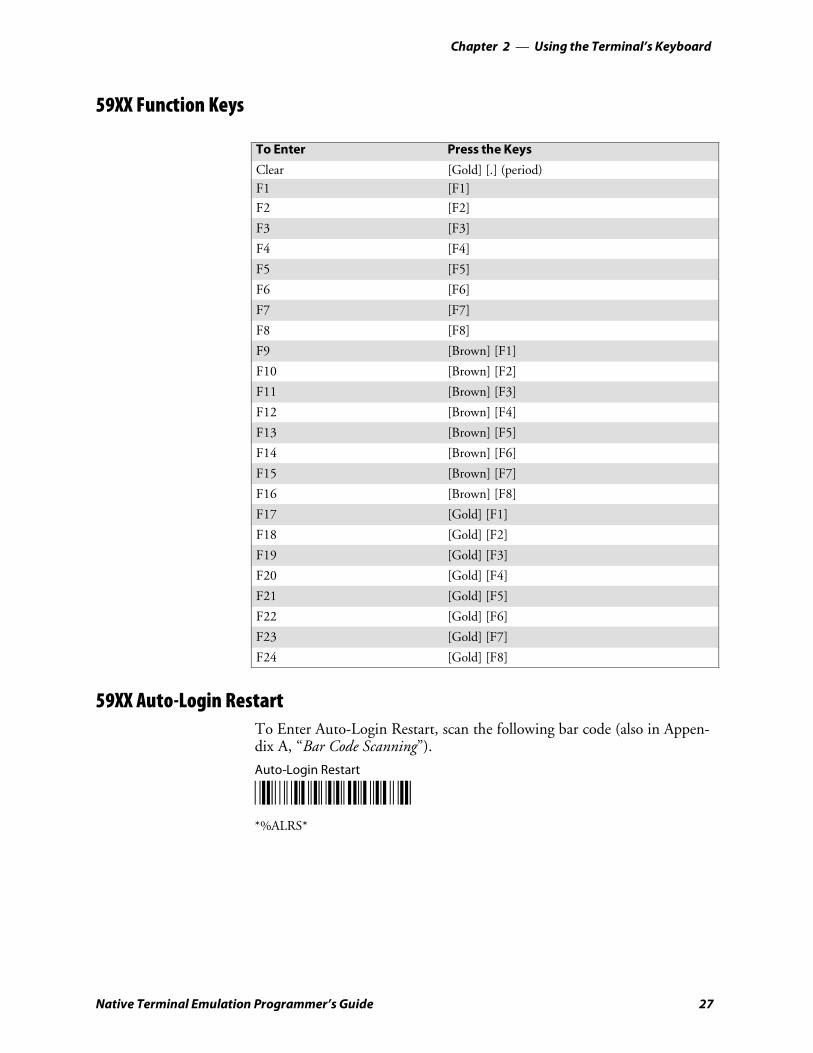
59XX Function Keys
To Enter Press the Keys
Clear [Gold] [.] (period)F1 [F1]
F2 [F2]
F3 [F3]
F4 [F4]
F5 [F5]
F6 [F6]
F7 [F7]
F8 [F8]
F9 [Brown] [F1]
F10 [Brown] [F2]
F11 [Brown] [F3]
F12 [Brown] [F4]
F13 [Brown] [F5]
F14 [Brown] [F6]
F15 [Brown] [F7]
F16 [Brown] [F8]
F17 [Gold] [F1]
F18 [Gold] [F2]
F19 [Gold] [F3]
F20 [Gold] [F4]
F21 [Gold] [F5]
F22 [Gold] [F6]
F23 [Gold] [F7]
F24 [Gold] [F8]
59XX Auto-Login RestartTo Enter Auto-Login Restart, scan the following bar code (also in Appen-dix A, “Bar Code Scanning”).
Auto-Login Restart
*/EALRS**%ALRS*

Using the Terminal’s KeyboardChapter —2
28 Native Terminal Emulation Programmer’s Guide
17XX TerminalFor help with using the keyboard, refer to the RT17XX Radio Data Termi-nal User’s Guide (P/N: 961-047-068).
Black
Gold
Brown
Unlabeled Key Colors:
57-Key Keyboard 37-Key Keyboard
F1 F2 F3 F4
F5 F6 F7 F8
@ ! + [
] # * %$
& ; ’ :/
= –?
YES
NO
NO
Your 17XX Terminal has either a 57-key (left) or a 37-key (right) keyboard as shown in this illustration.
Characters on the KeyboardsThe special characters and functions printed on the overlay are color-codedto correspond with the matching shift keys. The shift keys are as follows.
[Shift] Press [Shift] plus a letter to type the letter in uppercase. The [Shift] key islocated near the top of the keyboard.
[Gold] The gold key puts the keyboard into gold shift mode. Press [Gold] plus akeyboard key to type a special character or do an operation printed in gold onthe overlay.
[Black] The black key puts the keyboard into black shift mode. Press [Black] plus akeyboard key to type a special character or do an operation printed in blackon the overlay.
Using the Terminal’s Keyboard—Chapter 2
29Native Terminal Emulation Programmer’s Guide
37-Key KeyboardThe 37-key keyboard has standard numeric keys, an [Enter] key, anduser-defined function keys in its primary plane. It has alphabetic keys andspecial characters in its secondary plane.
Because a terminal with a 37-key keyboard does not have alphabetic keysin its primary plane, follow these procedures when using its firmware anddownloading software to it. The following chart describes how to typeletters on the 37-key keyboard.
S To access password-protected menus, press [Gold], [Black], [F12],[F11], then type “52401” for the password; or press [Black], [F3],[Black], then type “52401” for the password.
S To initiate the COLD START? menu option, press [F10] to answer“yes.”
S To download software, hold down the [F1] key as you power up theterminal to go into download mode. This is similar to holding down the[I] key on the standard 57-key keyboard.
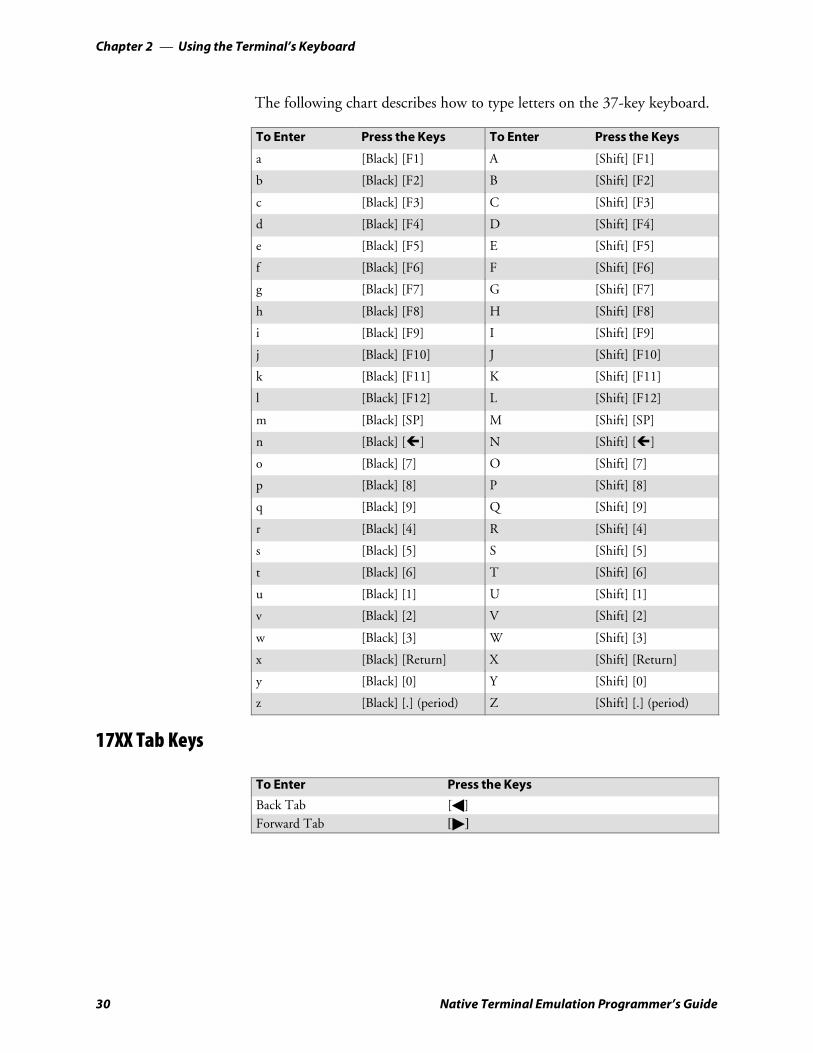
Using the Terminal’s KeyboardChapter —2
30 Native Terminal Emulation Programmer’s Guide
The following chart describes how to type letters on the 37-key keyboard.
To Enter Press the Keys To Enter Press the Keys
a [Black] [F1] A [Shift] [F1]
b [Black] [F2] B [Shift] [F2]
c [Black] [F3] C [Shift] [F3]
d [Black] [F4] D [Shift] [F4]
e [Black] [F5] E [Shift] [F5]
f [Black] [F6] F [Shift] [F6]
g [Black] [F7] G [Shift] [F7]
h [Black] [F8] H [Shift] [F8]
i [Black] [F9] I [Shift] [F9]
j [Black] [F10] J [Shift] [F10]
k [Black] [F11] K [Shift] [F11]
l [Black] [F12] L [Shift] [F12]
m [Black] [SP] M [Shift] [SP]
n [Black] [ ] N [Shift] [ ]
o [Black] [7] O [Shift] [7]
p [Black] [8] P [Shift] [8]
q [Black] [9] Q [Shift] [9]
r [Black] [4] R [Shift] [4]
s [Black] [5] S [Shift] [5]
t [Black] [6] T [Shift] [6]
u [Black] [1] U [Shift] [1]
v [Black] [2] V [Shift] [2]
w [Black] [3] W [Shift] [3]
x [Black] [Return] X [Shift] [Return]
y [Black] [0] Y [Shift] [0]
z [Black] [.] (period) Z [Shift] [.] (period)
17XX Tab Keys
To Enter Press the Keys
Back Tab [A]Forward Tab ["]
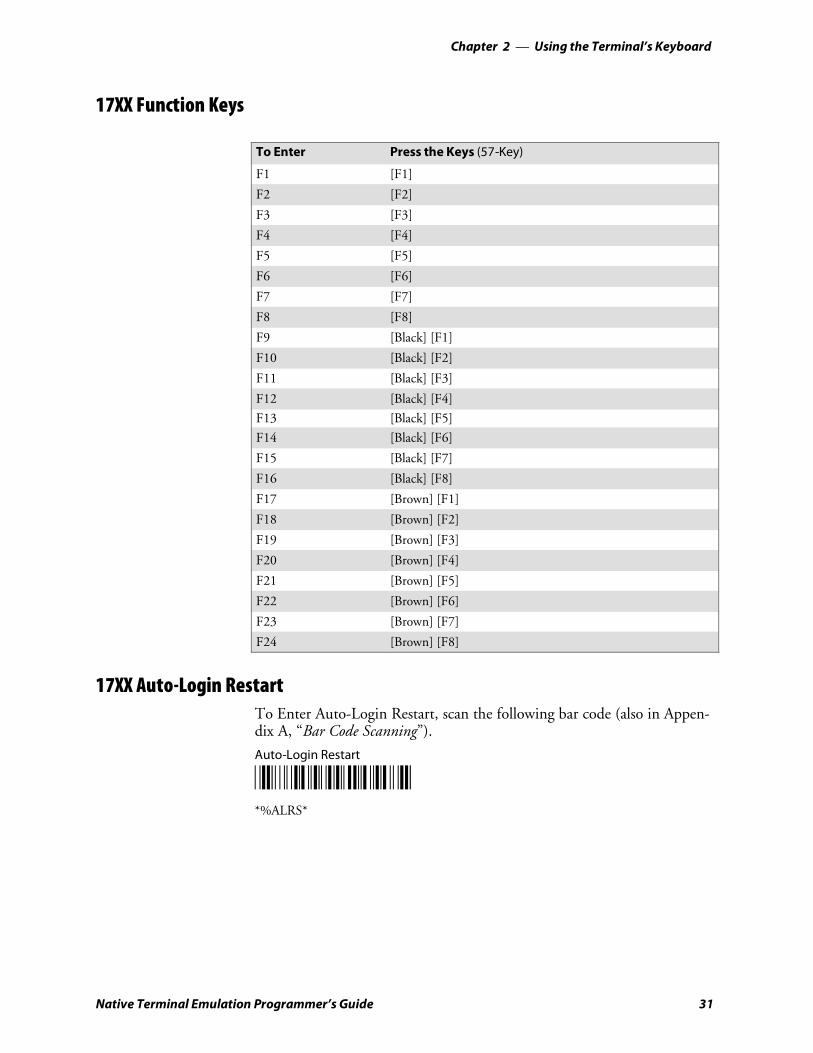
Using the Terminal’s Keyboard—Chapter 2
31Native Terminal Emulation Programmer’s Guide
17XX Function Keys
To Enter Press the Keys (57-Key)
F1 [F1]
F2 [F2]
F3 [F3]
F4 [F4]
F5 [F5]
F6 [F6]
F7 [F7]
F8 [F8]
F9 [Black] [F1]
F10 [Black] [F2]
F11 [Black] [F3]
F12 [Black] [F4]
F13 [Black] [F5]
F14 [Black] [F6]
F15 [Black] [F7]
F16 [Black] [F8]
F17 [Brown] [F1]
F18 [Brown] [F2]
F19 [Brown] [F3]
F20 [Brown] [F4]
F21 [Brown] [F5]
F22 [Brown] [F6]
F23 [Brown] [F7]
F24 [Brown] [F8]
17XX Auto-Login RestartTo Enter Auto-Login Restart, scan the following bar code (also in Appen-dix A, “Bar Code Scanning”).
Auto-Login Restart
*/EALRS**%ALRS*
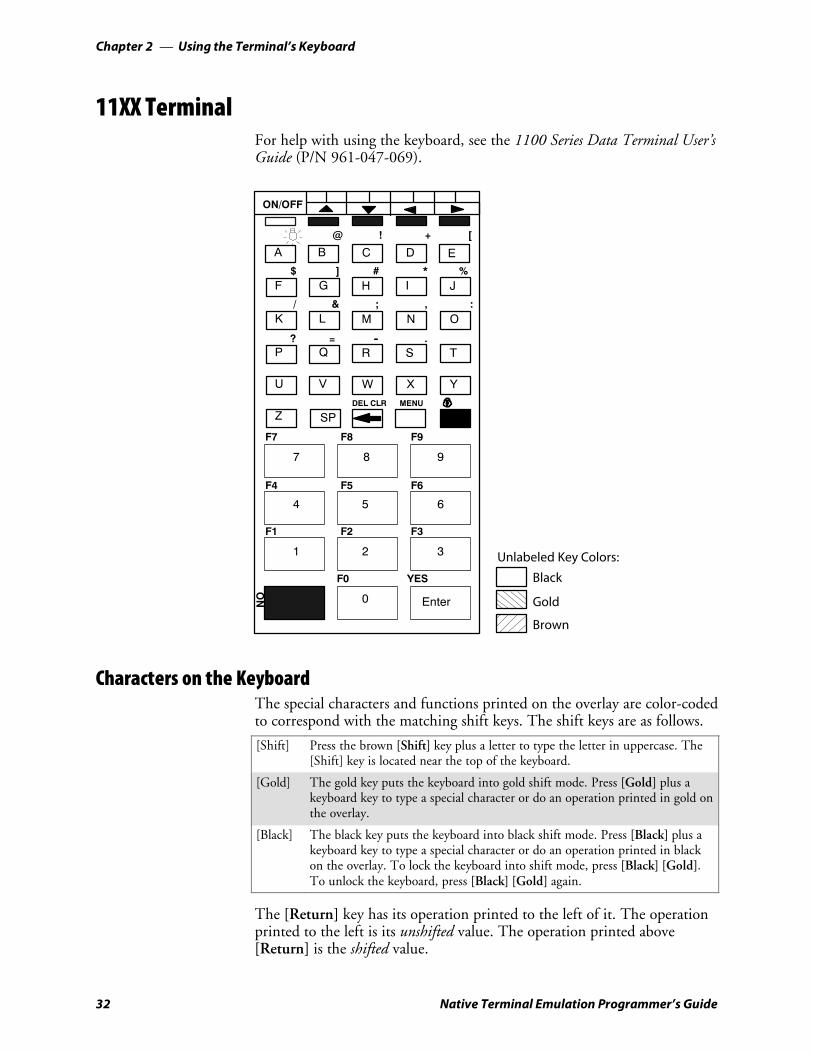
Using the Terminal’s KeyboardChapter —2
32 Native Terminal Emulation Programmer’s Guide
11XX TerminalFor help with using the keyboard, see the 1100 Series Data Terminal User’sGuide (P/N 961-047-069).
A B C D
F G H J
K L M N O
P Q R T
U V W X Y
Z SP
7
4 5 6
1 2 3
0 Enter
8 9
ON/OFF
F1 F2 F3
F4 F5 F6
F7 F8 F9
DEL CLR MENU
@ ! + [
$ ] # * %
/ & ; , :
? = -- .
YESF0
NO
I
S
E
Black
Gold
Brown
Unlabeled Key Colors:
Characters on the KeyboardThe special characters and functions printed on the overlay are color-codedto correspond with the matching shift keys. The shift keys are as follows.
[Shift] Press the brown [Shift] key plus a letter to type the letter in uppercase. The[Shift] key is located near the top of the keyboard.
[Gold] The gold key puts the keyboard into gold shift mode. Press [Gold] plus akeyboard key to type a special character or do an operation printed in gold onthe overlay.
[Black] The black key puts the keyboard into black shift mode. Press [Black] plus akeyboard key to type a special character or do an operation printed in blackon the overlay. To lock the keyboard into shift mode, press [Black] [Gold].To unlock the keyboard, press [Black] [Gold] again.
The [Return] key has its operation printed to the left of it. The operationprinted to the left is its unshifted value. The operation printed above[Return] is the shifted value.
Using the Terminal’s Keyboard—Chapter 2
33Native Terminal Emulation Programmer’s Guide
11XX Tab Keys
To Enter Press the Keys
Back Tab |Forward Tab |
11XX Function Keys
To Enter Press the Keys
F0 [Black] [0]
F1 [Black] [1]
F2 [Black] [2]
F3 [Black] [3]
F4 [Black] [4]
F5 [Black] [5]
F6 [Black] [6]
F7 [Black] [7]
F8 [Black] [8]
F9 [Black] [9]
F10 [Brown] [0]
F11 [Brown] [1]
F12 [Brown] [2]
F13 [Brown] [3]
F14 [Brown] [4]
F15 [Brown] [5]
F16 [Brown] [6]
F17 [Brown] [7]
F18 [Brown] [8]
F19 [Brown] [9]
F20 [Brown] [U]
F21 [Brown] [V]
F22 [Brown] [W]
F23 [Brown] [X]
F24 [Brown] [Y]
11XX Auto-Login RestartTo Enter Auto-Login Restart, scan the following bar code (also in Appen-dix A, “Bar Code Scanning”).Auto-Login Restart
*/EALRS**%ALRS*

Using the Terminal’s KeyboardChapter —2
34 Native Terminal Emulation Programmer’s Guide
35Native Terminal Emulation Programmer’s Guide
Using the Terminal EmulationMenus3
This chapter lists ALL TE parameters. If a certain parameter does not ap-ply to your terminal, the parameter will not appear in the TE configurationmenus.
The CFGLIT.DAT file specifies the text of the TE configuration menus.This chapter assumes you are using the default settings in CFGLIT.DAT.To customize CFGLIT.DAT, see Chapter 4, “Customizing Your Configu-ration.”
Using the Terminal Emulation MenusChapter —3
36 Native Terminal Emulation Programmer’s Guide
Function KeysThese paragraphs describe how to navigate through the TE configurationmenus.
Enter KeyPress the terminal’s [Enter] key to return to a previous TE configurationmenu. Press [Enter] several times to return to the Main Menu from a sub-menu. This key also accepts the displayed or keyed input.
Terminals Related [Enter] Keys
2415, 2425, 2455, 2475, 248X [ or \ keys
2435A v key (57-key keyboard)e key (48-key keyboard)v key (39-key function numeric keyboard)
6400 [ENT] keys
5055 <Enter> via external keyboard
59XX [ENTER] key
17XX, 11XX [ENTER] keys
Shift KeysUse shift keys to put the keyboard in the desired shift mode. These shiftedkey functions are shown on the keyboard overlays in Chapter 2, “Using theTerminal’s Keyboard.”
S For 6400, 5055[Yellow] and [Blue] shift keys are required. For the 5055 PC, the[Yellow] shift key substitutes the <Alt> key and the [Blue] shift keysubstitutes the <Ctrl> key on the external keyboard.
S For 17XX, 11XX[Gold] and [Black] shift keys are required.
Y (“Yes”) KeySeveral displays provide a warning that a certain action can cause your ter-minal to lose data stored in memory. Press the Y (“yes”) key to proceed asinstructed. Press another key to exit the menu without executing youroriginal choice.
Using the Terminal Emulation Menus—Chapter 3
37Native Terminal Emulation Programmer’s Guide
Up and Down ArrowsFor 6400, 5055, 11XX, the up and down arrow keys are defined by thehost computer.
For 59XX, the up and down arrow keys can be made to function more effi-ciently, in many cases, by pressing the FUNC or ALT key, then pressingthe desired arrow key.
Use these keys to:
S Adjust the length and frequency of the audible buzzer, key click, anderror tone.
S Set the display screen size (the number of rows displayed and charactersper row) and contrast.
Number Keys [0] through [9]Many menus have numbered options. Press the corresponding numerickey to make a selection.
Once you make a selection and you remain at that menu screen, the op-tion is highlighted, but you can select additional options. To deselect anenabled option, press the number corresponding to that option.
Pressing a number may bring up a submenu. Use the submenu to furthermodify the choice you made in the parent menu. After the modifications,you may return to the parent menu to make additional selections. (Thisdepends on the menu and function.) Also, you may press a numeric key toexit a menu or cold start the terminal. These situations are covered later inthis chapter.
Various menus require entering a number, but do not necessarily havesimple choices such as 1, 2, 3, 4, etc. Instead, you may have to enter anumber from a range of numbers, such as 0–32.
These instances are detailed in the text that applies to those menus, or inthe menu displays.
Note: There are situations where pressing [6] causes the terminal to exitfrom a submenu or to reboot.

Using the Terminal Emulation MenusChapter —3
38 Native Terminal Emulation Programmer’s Guide
Display AnnunciatorsFor 6400, 5055, 59XX, 17XX, 11XX, annunciators show the current statusor operation in progress. Some of the more common annunciators are asfollows:
Note: The following symbols appear larger than actual size on your termi-nal display. All individual letter annunciators are five pixels in height, ex-cept T (temperature) and B (bad battery) which are seven pixels.
Display Position 0Radio (6400, 5055)The radio is transmitting data to the base station.
Display Position 1If the radio icon is displayed in position 0, then position 1 shows the statusof the radio transmission (either receiving, sending, communication loss,or message waiting). If there is no radio icon shown in position 0, thenthis position is blank and position 1 shows the active session number 1 or2.
MessageA message is received and has not been read.
Specific for 6400, 5055, 59XX TerminalsSendingRadio is sending data to the base station.
ReceivingRadio is receiving data from the base station. This annunciator appearsonly when the information is for this particular computer’s address.
Communication LossNo communication with the host computer has occurred for at least 60seconds. The radio computer may be out of radio range, the base stationmay not have power, or communications from the host computer to thebase station may not be properly set up.
Specific for 17XX, 11XX TerminalsTransmitting dataThe terminal is transmitting data to the host computer.
Receiving dataThe terminal is receiving data.
Communication LossThe terminal cannot communicate with the host computer. The terminalmay be out of radio range, the base radio may not have power, or commu-nication from the host to the base may not be properly set up.
TX
RX
CL
X
^
Y
A
"
A
c
E
B
T
Using the Terminal Emulation Menus—Chapter 3
39Native Terminal Emulation Programmer’s Guide
Display Position 2Input InhibitedThe keyboard has accepted enough information for the current input field.If the “key ahead” feature is on, the terminal stores the keystrokes madeafter “input inhibited” appears. The host may also inhibit (lockout) thekeyboard upon certain errors or when sending additional information toyour computer.
Insert ModeCharacters are inserted, not overwritten.
Display Position 3Alphabet Character Shift Mode (59XX, 17XX, 11XX,Green for 6400, 5055)The keyboard is in the alphabet character shift mode — any alphabetcharacter keystrokes are entered as uppercase characters.
Shift Mode (Blue for 6400, 5055; Black for 11XX, 17XX; varies for 59XX)The keyboard is in a colored shift mode — keystrokes enter the symbol orperform the function shown on the overlay to the upper left of the key.
Shift Mode (Yellow or Gold for 6400, 5055, 11XX, 17XX; varies for 59XX)The keyboard is in a colored shift mode — keystrokes enter the symbol orperform the function shown on the overlay to the upper right of the key.
Display Position 4Alpha Lock (6400)This symbol is used only for the 6400 Computer 41-key keyboard model.
Battery is charging (17XX, 11XX)The terminal is connected to a charging source. This does not necessarilymean the terminal is charging since this is dependent on battery state, tem-perature, and other conditions.
Display Position 5Error (17XX)The terminal is connected to a charging source, but charging is not pos-sible.
Display Position 6Bad Battery (17XX)The battery pack you are currently using is bad.
Temperature (17XX)The terminal is currently out of the battery charging temperature range,which is 5° to 40° C.
Display Positions 1 through 3Laser scanner in use (17XX, 11XX)Observe caution labels on laser scanners.
SCAN
CL
NL
XX/YY
Using the Terminal Emulation MenusChapter —3
40 Native Terminal Emulation Programmer’s Guide
Display Positions 4 and 5Caps Lock (5055)If [Caps Lock] is pressed (activated) on the 5055 external keyboard, theterminal will type all capital letters regardless of how the text is entered.
Num Lock (5055)If [Num Lock] is activated on the 5055 external keyboard, the terminalwill enter numbers as pressed via the right-hand pad on the keyboard.
Display Positions 4 through 6Low battery condition (17XX, 11XX)A Low Battery indication is very important to the operation of the termi-nal, letting you know that your terminal will stop operating shortly. Yourterminal should continue to operate 30 minutes to 2 hours depending onhow you use it. Data stored in RAM will be saved for approximately 30days. However, you should avoid testing this limit.
Your terminal will retain its RAM data storage for up to 5 minutes withthe battery pack removed. It is always a good idea to replace the batterypack with a fresh recharged pack immediately after removing the dis-charged pack. Without battery power your terminal will not operate, andyour display will be blank.
Display Positions 4 through 8Current Row/Column Position (59XX)Shows the current location of the cursor, with “XX” as the row positionand “YY” as the column position. For example, if the cursor is at row 5,column 12, the annunciators will show “05/12” in positions 4–8.
Display Positions 5 through 8Battery Pack Gas Gauge Icons (6400)These battery icons represent the charge level in your main battery pack.
S Four icons (positions 5–8) indicates more than 76% charge level
S Three icons (positions 5, 6, and 7) indicates between 51–75%
S Two icons (positions 5 and 6) indicates between 26–50%
S One icon (position 5) indicates between 21–25%
When the terminal gets below 20%, the icons are replaced by Ls and afterthe charge level is less than 10% your terminal emits a series of beeps.
S Four Ls indicates 16–20% charge level
S Three Ls indicates 11–15%. At the 15% charge level, your terminalbeeps once. The sound duration and frequency are at levels you have setfor your terminal.
S Two Ls indicates 6–10%. At the 10% and 7% charge levels, your termi-nal beeps once. The sound duration and frequency are at levels you haveset for your terminal.
S One L indicates 0–5%. At this charge level, your terminal beeps threetimes at its current setting level for both duration and frequency.
+
--
Using the Terminal Emulation Menus—Chapter 3
41Native Terminal Emulation Programmer’s Guide
Note: If you have the beeper turned off, you will not hear any of the lowbattery beep warnings.
The battery pack icons on your terminal display reflect the same status asthe LEDs on the battery pack. However, there may be a one minute delayfor updating the icons on the display when the battery pack is replaced.
Configuring TE ParametersThis chapter contains the TE configuration menus for the following termi-nals: 2415, 2425, 2435A, 2455, 2475, 248X, 6400, 5055, 59XX, 17XX,and 11XX Terminals unless otherwise noted.
Additional information is available for each of the following:
S Trakker Antares (2415, 2425, 2435A, 2455, 2475, 248X) page 100
S 6400 Computer page 100
S 5055 Data Collection PC page 101
Note: Screens are shown with all of the available options.S If an option is not assigned to a specific terminal, then that option is
available for all of the terminals addressed in this publication.S If an option is specific towards a terminal, this option does not appear
on the display, or is blank, for all other terminals.
Key Sequence to Open Main MenuTo configure TE parameters on your respective terminal, at the initializa-tion screens or anywhere in a TE session, access the Main Menu by press-ing the following key sequence:
Terminal Key Sequence
2415 ) ! (55-key keyboard)( 5 (37-key keyboard)
2425 ( !
2435A r l (57-key keyboard/39-key function numeric keyboard)Green >, Orange > (48-key keyboard)
2455, 2475, 248X ( ¡
6400 [Gold] [Blue]
5055 [Blue] [M] or [ALT] [M]
59XX [Brown] [Black]
17XX, 11XX [Gold] [Black]
Note: You can also scan this bar code label to access the Main Menu.
TE configuration menus
*/ETECFG**%TECFG*
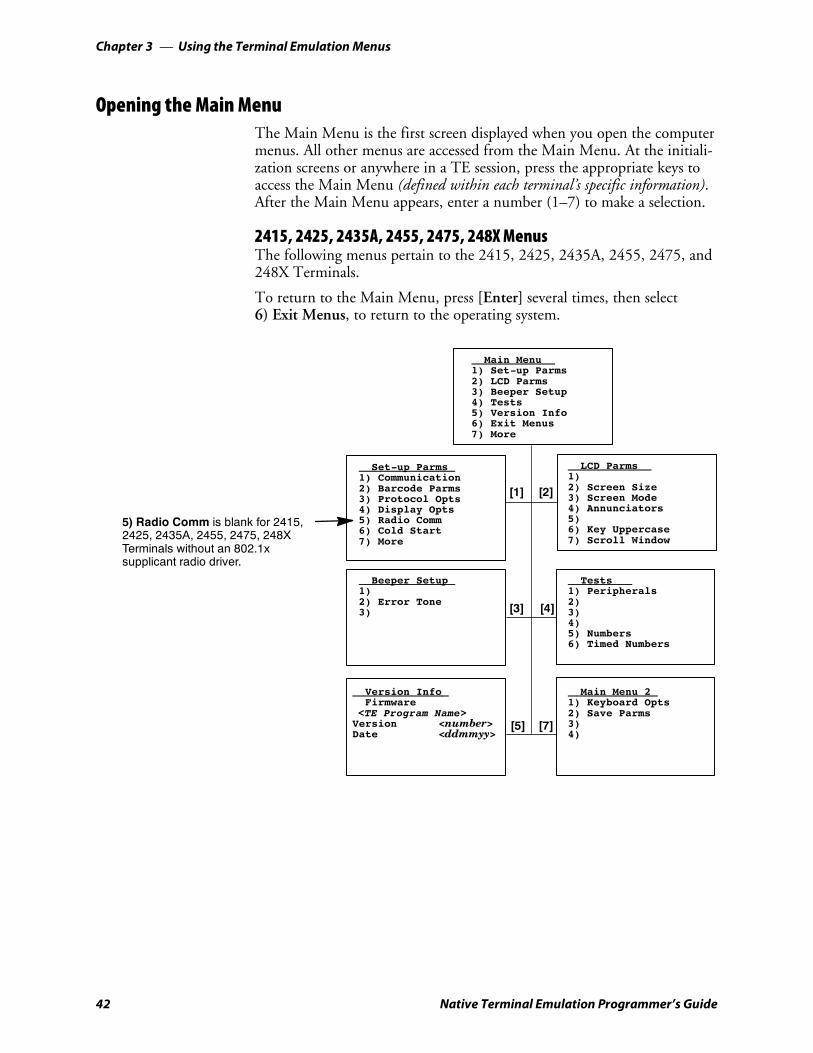
Using the Terminal Emulation MenusChapter —3
42 Native Terminal Emulation Programmer’s Guide
Opening the Main MenuThe Main Menu is the first screen displayed when you open the computermenus. All other menus are accessed from the Main Menu. At the initiali-zation screens or anywhere in a TE session, press the appropriate keys toaccess the Main Menu (defined within each terminal’s specific information).After the Main Menu appears, enter a number (1–7) to make a selection.
2415, 2425, 2435A, 2455, 2475, 248X MenusThe following menus pertain to the 2415, 2425, 2435A, 2455, 2475, and248X Terminals.
To return to the Main Menu, press [Enter] several times, then select6) Exit Menus, to return to the operating system.
LCD Parms1)2) Screen Size3) Screen Mode4) Annunciators5)6) Key Uppercase7) Scroll Window
Main Menu 21) Keyboard Opts2) Save Parms3)4)
Tests1) Peripherals2)3)4)5) Numbers6) Timed Numbers
Set-up Parms1) Communication2) Barcode Parms3) Protocol Opts4) Display Opts5) Radio Comm6) Cold Start7) More
[1] [2]
[4]
[5] [7]
Version InfoFirmware
<TE Program Name>Version <number>Date <ddmmyy>
Beeper Setup1)2) Error Tone3) [3]
Main Menu1) Set-up Parms2) LCD Parms3) Beeper Setup4) Tests5) Version Info6) Exit Menus7) More
5) Radio Comm is blank for 2415,2425, 2435A, 2455, 2475, 248XTerminals without an 802.1xsupplicant radio driver.

Using the Terminal Emulation Menus—Chapter 3
43Native Terminal Emulation Programmer’s Guide
1) Set-Up Parms (2415, 2425, 2435A, 2455, 2475, 248X)This is password-protected to prevent unauthorized users from changingparameters. You can customize the parameter’s CONFIG.DAT set up fileto change the password. See Chapter 5, “Customizing Your Configuration.”
Changed parameters apply to the current session. If more than one sessionis available, use the 7) More > 2) Save Parms > 4) Session Menu to verifyor change the current session before going to the next session. To open the1) Set-up Parms menu, press [1], [Enter], then type “cr52401” at theprompt to access the following menus.
Controller Type1)2) RTC/WTP3)
Protocol Opts1) Host View Sze2) Data Stream3) Extended Cmds4) 52505) 32706) VT2207) Native
Protocol1) SST2) SST-Diag Mode3) Security ID
Display Opts1) Backlight2) Cursor Mode3)
Cold Start
Enter “Y”To Cold Startterminal:
Set-up Parms1) Menu Password2)3) COM Select
[1]
[3]
[2]
[5]
[4]
[7]
[6]
7) Native is blankif TCP/IP
3) Security ID isfor Proxim radios
3) COM Select is for248X
Set-up Parms1) Communication2) Barcode Parms3) Protocol Opts4) Display Opts5) Radio Comm6) Cold Start7) More
2) RTC/WTPis for 2415, 2425,2435A, 2455, 2475,248X with RTC
Barcode Parms1) Code 39 Encoded2)3) Concatenate4) RS232 Stream5) Stream Scan6) Scan All Flds
5) Radio Comm is blank for 2415,2425, 2435A, 2455, 2475, 248XTerminals without an 802.1xsupplicant radio driver.

Using the Terminal Emulation MenusChapter —3
44 Native Terminal Emulation Programmer’s Guide
6400, 5055, 59XX, 17XX, 11XX MenusThe following menus pertain to the 6400, 5055, 59XX, 17XX, and 11XXTerminals.
To return to the Main Menu, press [Enter] several times, then select6) Exit Menus, to return to the operating system.
LCD Parms1) LCD Contrast2) Screen Size3) Screen Mode4) Annunciators5) Backlight6) Key Uppercase7) Scroll Window
Main Menu 21) Keyboard Opts2) Save Parms3) Cloning Opts4) Session Menu
Tests1) Peripherals2) Converters3) Memory View4) Packet Driver5) Numbers6) Timed Numbers
Set-up Parms1) Communication2) Barcode Parms3) Protocol Opts4) Display Opts5) Radio Comm6) Cold Start7) More
[1] [2]
[4]
[5] [7]
Version InfoFirmware
<TE Program Name>Version <number>Date <ddmmyy>MLID Name ZZZZZZMLID ver xx.xx(mac address)
Beeper Setup1) Key Click2) Error Tone3) Beeper Select [3]
Main Menu1) Set-up Parms2) LCD Parms3) Beeper Setup4) Tests5) Version Info6) Exit Menus7) More
MLID Nameand MLID verare for 6400,5055
4) Annunciatorsis blank for17XX, 11XX
3) Cloning Optsis for 59XX, 17XX,11XX
1) LCD Contrast and5) Backlightis for 59XX, 17XX
3) Beeper Selectis for 6400, 5055,17XX, 11XX
2) Convertersis for 59XX
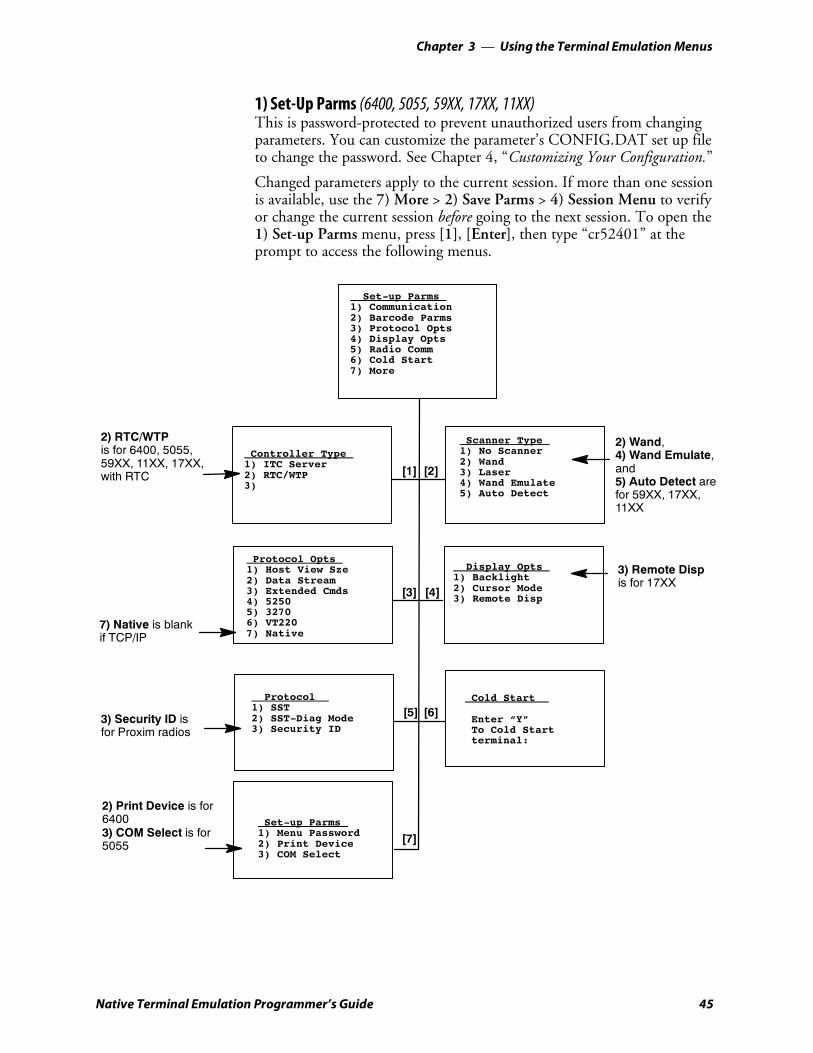
Using the Terminal Emulation Menus—Chapter 3
45Native Terminal Emulation Programmer’s Guide
1) Set-Up Parms (6400, 5055, 59XX, 17XX, 11XX)This is password-protected to prevent unauthorized users from changingparameters. You can customize the parameter’s CONFIG.DAT set up fileto change the password. See Chapter 4, “Customizing Your Configuration.”
Changed parameters apply to the current session. If more than one sessionis available, use the 7) More > 2) Save Parms > 4) Session Menu to verifyor change the current session before going to the next session. To open the1) Set-up Parms menu, press [1], [Enter], then type “cr52401” at theprompt to access the following menus.
Controller Type1) ITC Server2) RTC/WTP3)
Protocol Opts1) Host View Sze2) Data Stream3) Extended Cmds4) 52505) 32706) VT2207) Native
Protocol1) SST2) SST-Diag Mode3) Security ID
Scanner Type1) No Scanner2) Wand3) Laser4) Wand Emulate5) Auto Detect
Display Opts1) Backlight2) Cursor Mode3) Remote Disp
Cold Start
Enter “Y”To Cold Startterminal:
Set-up Parms1) Menu Password2) Print Device3) COM Select
[1]
[3]
[2]
[5]
[4]
[7]
[6]
7) Native is blankif TCP/IP
3) Security ID isfor Proxim radios
2) Print Device is for64003) COM Select is for5055
Set-up Parms1) Communication2) Barcode Parms3) Protocol Opts4) Display Opts5) Radio Comm6) Cold Start7) More
2) Wand,4) Wand Emulate,and5) Auto Detect arefor 59XX, 17XX,11XX
3) Remote Dispis for 17XX
2) RTC/WTPis for 6400, 5055,59XX, 11XX, 17XX,with RTC
Using the Terminal Emulation MenusChapter —3
46 Native Terminal Emulation Programmer’s Guide
1) Set Up ParametersThe following setup parameter information pertains to all terminals unlessotherwise noted.
1) CommunicationThe communication option for the terminals are broken down as follows:
S 2415, 2425, 2435A, 2455, 2475, 248X Terminals with RTC2) RTC/WTP below.
S 6400, 5055, 59XX, 17XX, 11XX Terminals with RTC2) RTC/WTP on page 48.
2) RTC/WTP (2415, 2425, 2435A, 2455, 2475, 248X)Use 2) RTC/WTP to set, view, or change the terminal ID. This numberallows the host computer to identify individual terminals in the radio datanetwork. Each terminal must have a unique number in the same network.Use the numeric keys on the terminal keyboard to modify its ID. Enter anumber between 0–126, then press [Enter] to go to the 2) Host/Cntl me-nus.
The 1) Radio Setup and 2) Host/Cntl menus are shown on the followingpages. Pending on which option you are exercising you will either advanceto the WTP Stack settings or the TCP/IP Stack settings. 1) Radio Setup isdone in the firmware with the RTC stack.
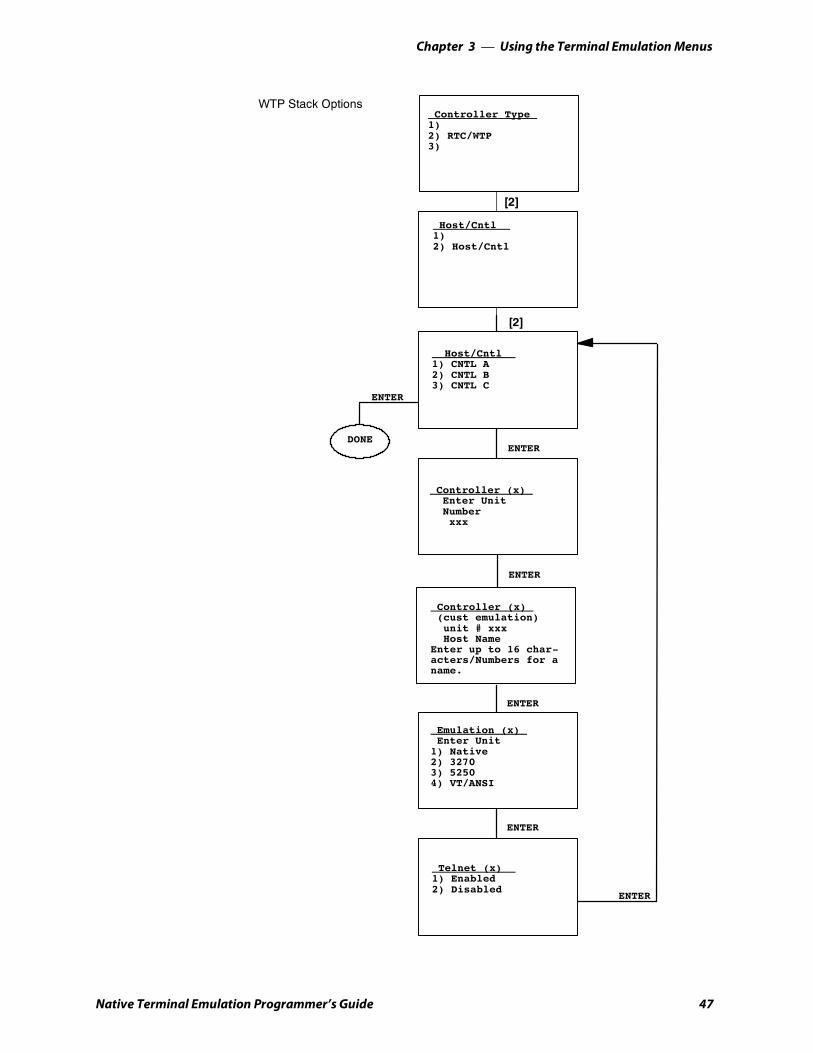
Using the Terminal Emulation Menus—Chapter 3
47Native Terminal Emulation Programmer’s Guide
Host/Cntl1)2) Host/Cntl
[2]
[2]
Controller Type1)2) RTC/WTP3)
WTP Stack Options
Host/Cntl1) CNTL A2) CNTL B3) CNTL C
Controller (x)(cust emulation)unit # xxxHost Name
Enter up to 16 char-acters/Numbers for aname.
Emulation (x)Enter Unit
1) Native2) 32703) 52504) VT/ANSI
Telnet (x)1) Enabled2) Disabled
ENTER
ENTER
ENTER
ENTER
ENTER
DONE
ENTER
Controller (x)Enter UnitNumberxxx

Using the Terminal Emulation MenusChapter —3
48 Native Terminal Emulation Programmer’s Guide
2) RTC/WTP (6400, 5055, 59XX, 17XX, 11XX)Use 2) RTC/WTP to set, view, or change the terminal ID. This numberallows the host computer to identify individual terminals in the radio datanetwork. Each terminal must have a unique number in the same network.
The 1) Radio Setup and 2) Host/Cntl menus are shown on the followingpages. Pending on which option you are exercising you will either advanceto the WTP Stack settings or the TCP/IP Stack settings.
WTP SettingsUse the numeric keys on the terminal keyboard or 5055 external keyboardto modify its ID. Enter a number between 0–126, then press [Enter] to goto the 2) Host/Cntl menus.
The LAN ID number can be 0–255 depending on the radio being used.With the RM60/70 radio, the number can be 0–255; with the RM80/90radio, the range is 0–15. Your terminal only communicates with equip-ment using the same ID number that you assigned to your LAN.
If you enter a LAN ID number different from what is configured in theNET.CFG file you get the following message. If this happens, the systemmodifies NET.CFG, which is used by WTPPKT.EXE on initializing theterminal.
LAN ID changedNeed to rebootto take effect.

Using the Terminal Emulation Menus—Chapter 3
49Native Terminal Emulation Programmer’s Guide
For 802.11 Radios Only
Host/Cntl1) Radio Setup2) Host/Cntl
Radio SetupNetwork Name
xxxx
Enter up to 34 char-acters for a name
Radio SetupLAN
xx
Radio SetupRadio Config#
Set Mode/ChannelUse Cursor Upand Down KeysTo AdjustDS xxxx
channel xx
ENTER
ENTER (5055 -- continue to Host/Cntl setups)
For Non 802.11 Radios
Set FrequencyUse Cursor Upand Down KeysTo Adjust
xxxxxxxxx
ENTER (continue to Host/Cntl setups)
Go to Host/Cntl on thenext page
Only if a “radio cfg“ file is present on the terminal.
[1] [2]
[2]
Controller Type1)2) RTC/WTP3)
Set Frequency is forSynthesized UHF radios
WTP Stack Options
Set Mode/Channelis for RM60(902 MHz) radios
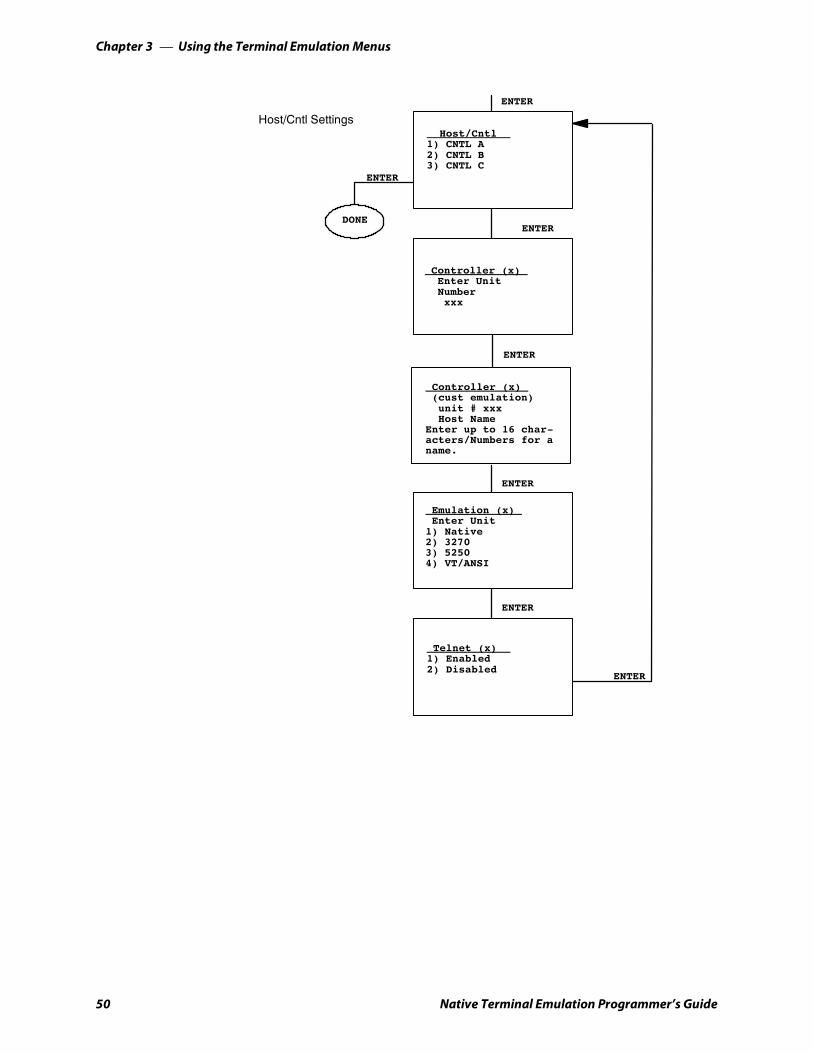
Using the Terminal Emulation MenusChapter —3
50 Native Terminal Emulation Programmer’s Guide
Host/Cntl1) CNTL A2) CNTL B3) CNTL C
Controller (x)(cust emulation)unit # xxxHost Name
Enter up to 16 char-acters/Numbers for aname.
Emulation (x)Enter Unit
1) Native2) 32703) 52504) VT/ANSI
Telnet (x)1) Enabled2) Disabled
ENTER
ENTER
ENTER
ENTER
ENTER
ENTER
DONE
ENTER
Controller (x)Enter UnitNumberxxx
Host/Cntl Settings

Using the Terminal Emulation Menus—Chapter 3
51Native Terminal Emulation Programmer’s Guide
2) Barcode Parms (2415, 2425, 2435A, 2455, 2475, 248X)The 2) Barcode Parms (parameters) menus designate whether you are us-ing a bar code scanner and scan options.
Barcode Parms1) Code 39 Encoded2)3) Concatenate4) RS232 Stream5) Stream Scan6) Scan All Flds
1) Code 39 EncodedBy default, 1) Code39 Encoded is disabled. When you enable this option,the key press sequences for Encoded Code 39 are used. For more informa-tion, see Appendix A, “Bar Code Scanning.”
3) ConcatenateEach bar code read is added to the end of the previous bar code read untilthe 2415, 2425, 2435A, 2455, 2475, or 248X Terminal meets a conditionforcing transmission to the host.
When this option is OFF, each bar code read is placed at the beginning ofthe current input field. After a bar code is placed in a field, any subsequentread replaces the first read.
Note: If you access the TE configuration menus when 4) RS232 Stream isenabled, all RS-232 data received during this time is lost. Only the dataarriving from the COM1 port on the hand-held terminal is received.
4) RS232 StreamIf this option is enabled, the terminal watches the RS-232 port for activityin which the terminal reads in the RS-232 data and sends it to the host.This enables support for fixed-station scanners or scales that send onlyRS-232 data without having the host send an extended command to en-able the RS-232 port. Default for 4) RS232 Stream is disabled.
5) Stream ScanIf the scanned bar code is too big for the input field, the overflow informa-tion appears in the next field and continues until the entire bar code is en-tered. When this option is OFF, and the scanned bar code is too big forthe input field, the overflow information is dropped.
6) Scan All Flds (Fields)When this option is selected, the scanner is enabled when the cursor is inan input field. When this option is OFF, the host computer must enablethe scanner for each input field that requires scanned data.

Using the Terminal Emulation MenusChapter —3
52 Native Terminal Emulation Programmer’s Guide
2) Barcode Parms (6400, 5055, 59XX, 17XX, 11XX)Selecting 2) Barcode Parms (parameters) displays the Scanner Typemenu.
Scanner TypeUse the Scanner Type menu to designate the type of bar code scanner. Tomake a selection, press the numeric key corresponding to the desired op-tion, then press [Enter] to access the Scan Options menu.
Note: If 1) No Scanner is chosen, the remaining scanner and bar code op-tions can be set. Then, if a scanner is used at a later time, only the scannertype needs to be designated. Selected options are highlighted on the dis-play. Press a key corresponding to that option to deselect a selected option.
Scanner Type1) No Scanner2) Wand3) Laser4) Wand Emulate5) Auto Detect
2) Wand,4) Wand Emulate, and5) Auto Detectare for 59XX, 17XX, 11XX
Scan OptionsUse the Scan Options menu to assign scan options, enable bar codesymbologies to use (the terminal can only decode the enabled symbologies),and set options for each enabled bar code symbology, such as the bar codelengths. Press [Enter] to advance to the Scan Options 2 menus.
Scan Options1) Redundancy2) MOD 10 Check3) Concatenate4) BC Type Char5) Stream Scan6) Scan All Flds7) More
1) Redundancy and4) BC Type Charare for 6400, 59XX, 17XX, 11XX3) Concatenate is for 6400, 5055
1) Redundancy (6400, 59XX, 17XX, 11XX)This option requires two identical scans of a bar code, one right afteranother, before the terminal accepts the scan as valid.
2) Mod 10 CheckWhen you select this option, a check digit is added at the end of the barcode after a good read for transmission to the host. The host can then vali-date the transmission data using the check. This feature is not needed withmodem transmission protocols.
The bar code number is divided by 10, until the number (or modulus) isless than 10. If the modulus subtracted from 10 (remainder) is equal tozero, then the bar code number is valid.
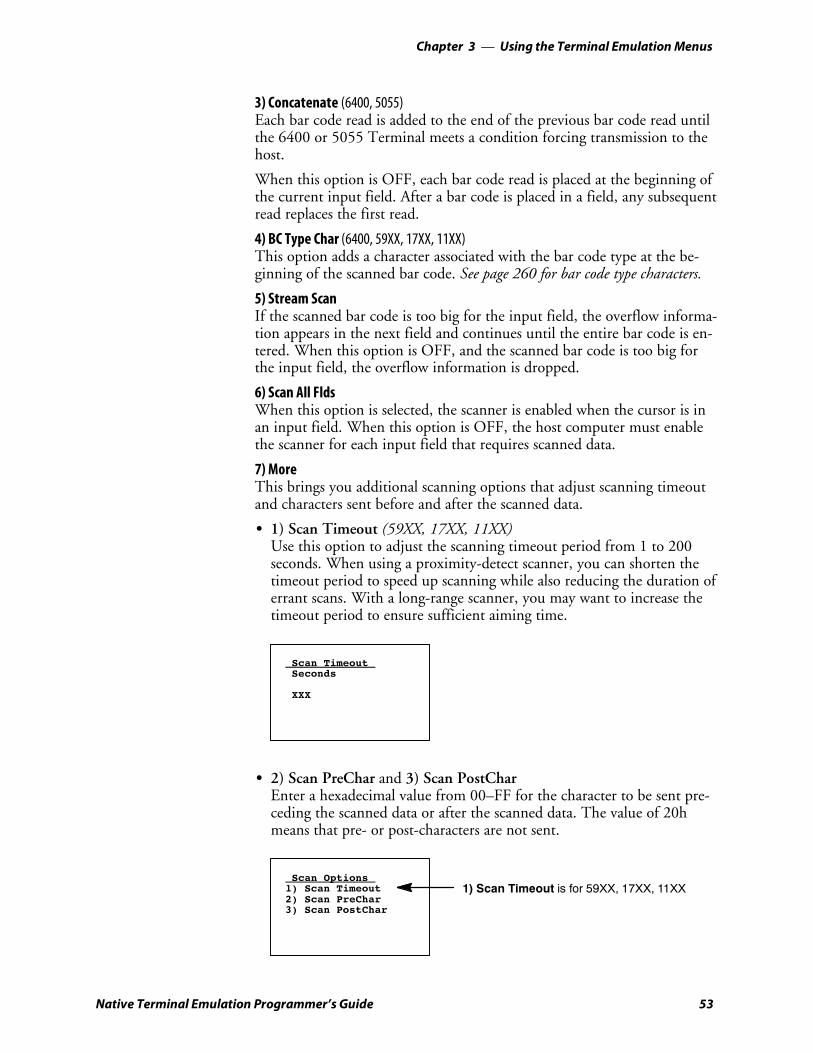
Using the Terminal Emulation Menus—Chapter 3
53Native Terminal Emulation Programmer’s Guide
3) Concatenate (6400, 5055)Each bar code read is added to the end of the previous bar code read untilthe 6400 or 5055 Terminal meets a condition forcing transmission to thehost.
When this option is OFF, each bar code read is placed at the beginning ofthe current input field. After a bar code is placed in a field, any subsequentread replaces the first read.
4) BC Type Char (6400, 59XX, 17XX, 11XX)This option adds a character associated with the bar code type at the be-ginning of the scanned bar code. See page 260 for bar code type characters.
5) Stream ScanIf the scanned bar code is too big for the input field, the overflow informa-tion appears in the next field and continues until the entire bar code is en-tered. When this option is OFF, and the scanned bar code is too big forthe input field, the overflow information is dropped.
6) Scan All FldsWhen this option is selected, the scanner is enabled when the cursor is inan input field. When this option is OFF, the host computer must enablethe scanner for each input field that requires scanned data.
7) MoreThis brings you additional scanning options that adjust scanning timeoutand characters sent before and after the scanned data.
S 1) Scan Timeout (59XX, 17XX, 11XX)Use this option to adjust the scanning timeout period from 1 to 200seconds. When using a proximity-detect scanner, you can shorten thetimeout period to speed up scanning while also reducing the duration oferrant scans. With a long-range scanner, you may want to increase thetimeout period to ensure sufficient aiming time.
Scan TimeoutSeconds
XXX
S 2) Scan PreChar and 3) Scan PostCharEnter a hexadecimal value from 00–FF for the character to be sent pre-ceding the scanned data or after the scanned data. The value of 20hmeans that pre- or post-characters are not sent.
Scan Options1) Scan Timeout2) Scan PreChar3) Scan PostChar
1) Scan Timeout is for 59XX, 17XX, 11XX
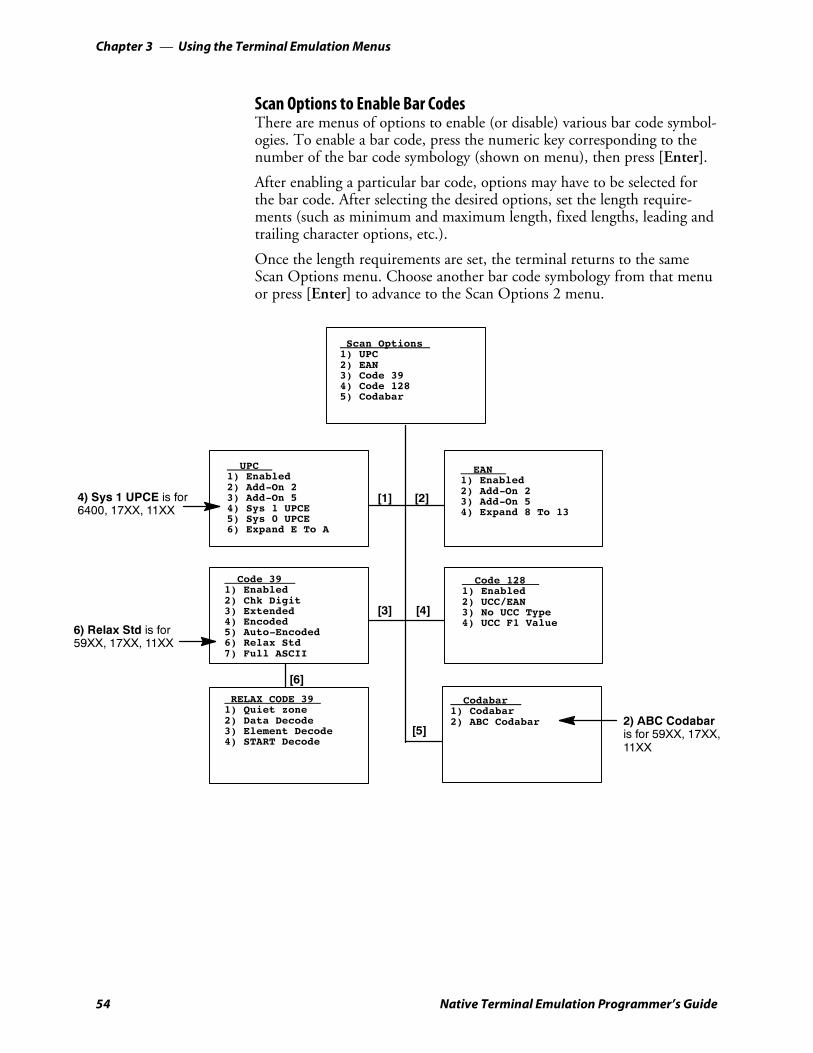
Using the Terminal Emulation MenusChapter —3
54 Native Terminal Emulation Programmer’s Guide
Scan Options to Enable Bar CodesThere are menus of options to enable (or disable) various bar code symbol-ogies. To enable a bar code, press the numeric key corresponding to thenumber of the bar code symbology (shown on menu), then press [Enter].
After enabling a particular bar code, options may have to be selected forthe bar code. After selecting the desired options, set the length require-ments (such as minimum and maximum length, fixed lengths, leading andtrailing character options, etc.).
Once the length requirements are set, the terminal returns to the sameScan Options menu. Choose another bar code symbology from that menuor press [Enter] to advance to the Scan Options 2 menu.
Scan Options1) UPC2) EAN3) Code 394) Code 1285) Codabar
UPC1) Enabled2) Add-On 23) Add-On 54) Sys 1 UPCE5) Sys 0 UPCE6) Expand E To A
Code 391) Enabled2) Chk Digit3) Extended4) Encoded5) Auto-Encoded6) Relax Std7) Full ASCII
Codabar1) Codabar2) ABC Codabar
EAN1) Enabled2) Add-On 23) Add-On 54) Expand 8 To 13
Code 1281) Enabled2) UCC/EAN3) No UCC Type4) UCC F1 Value
[1] [2]
[3] [4]
[5]
4) Sys 1 UPCE is for6400, 17XX, 11XX
6) Relax Std is for59XX, 17XX, 11XX
RELAX CODE 391) Quiet zone2) Data Decode3) Element Decode4) START Decode
[6]
2) ABC Codabaris for 59XX, 17XX,11XX
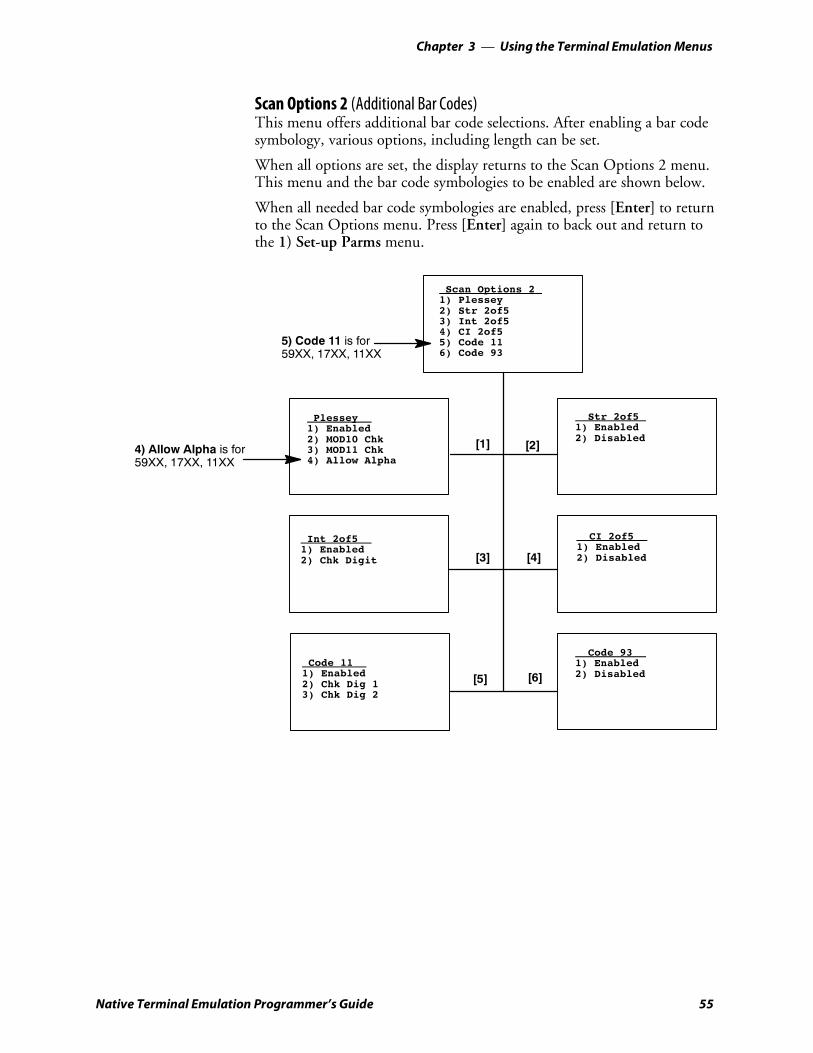
Using the Terminal Emulation Menus—Chapter 3
55Native Terminal Emulation Programmer’s Guide
Scan Options 2 (Additional Bar Codes)This menu offers additional bar code selections. After enabling a bar codesymbology, various options, including length can be set.
When all options are set, the display returns to the Scan Options 2 menu.This menu and the bar code symbologies to be enabled are shown below.
When all needed bar code symbologies are enabled, press [Enter] to returnto the Scan Options menu. Press [Enter] again to back out and return tothe 1) Set-up Parms menu.
Scan Options 21) Plessey2) Str 2of53) Int 2of54) CI 2of55) Code 116) Code 93
Plessey1) Enabled2) MOD10 Chk3) MOD11 Chk4) Allow Alpha
Int 2of51) Enabled2) Chk Digit
Str 2of51) Enabled2) Disabled
CI 2of51) Enabled2) Disabled
Code 931) Enabled2) Disabled
[1] [2]
[3] [4]
[6]
5) Code 11 is for59XX, 17XX, 11XX
[5]Code 11
1) Enabled2) Chk Dig 13) Chk Dig 2
4) Allow Alpha is for59XX, 17XX, 11XX
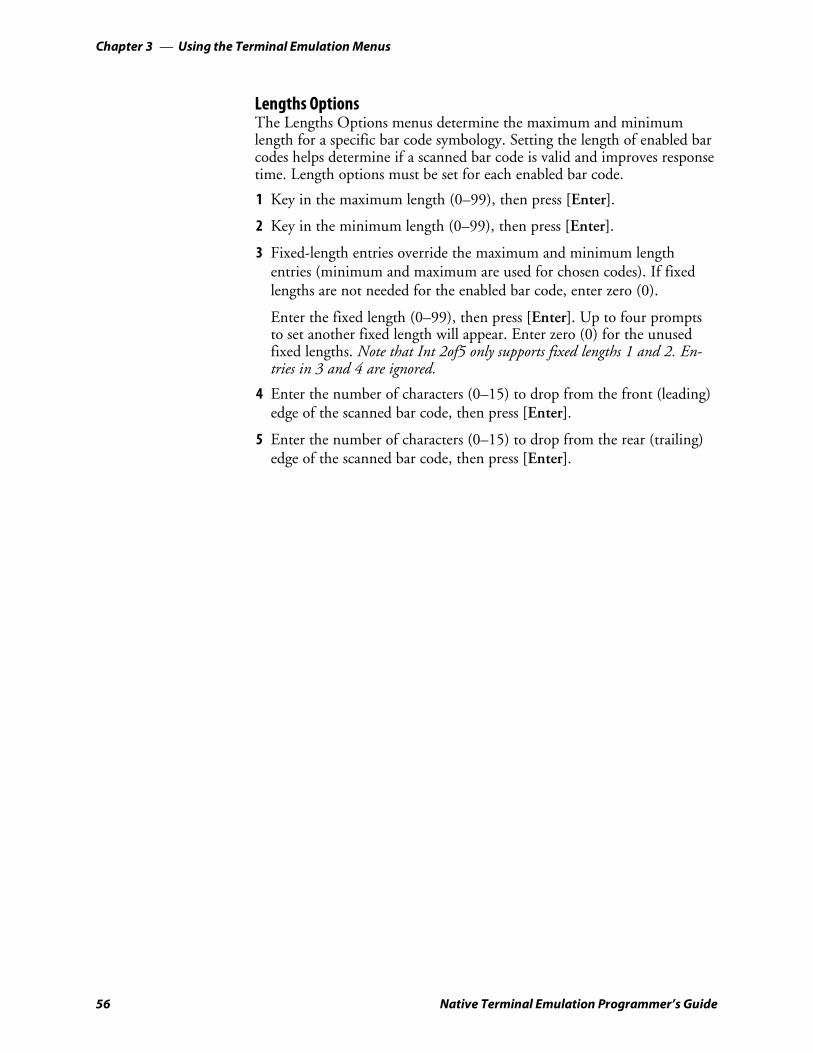
Using the Terminal Emulation MenusChapter —3
56 Native Terminal Emulation Programmer’s Guide
Lengths OptionsThe Lengths Options menus determine the maximum and minimumlength for a specific bar code symbology. Setting the length of enabled barcodes helps determine if a scanned bar code is valid and improves responsetime. Length options must be set for each enabled bar code.
1 Key in the maximum length (0–99), then press [Enter].
2 Key in the minimum length (0–99), then press [Enter].
3 Fixed-length entries override the maximum and minimum lengthentries (minimum and maximum are used for chosen codes). If fixedlengths are not needed for the enabled bar code, enter zero (0).
Enter the fixed length (0–99), then press [Enter]. Up to four promptsto set another fixed length will appear. Enter zero (0) for the unusedfixed lengths. Note that Int 2of5 only supports fixed lengths 1 and 2. En-tries in 3 and 4 are ignored.
4 Enter the number of characters (0–15) to drop from the front (leading)edge of the scanned bar code, then press [Enter].
5 Enter the number of characters (0–15) to drop from the rear (trailing)edge of the scanned bar code, then press [Enter].
Using the Terminal Emulation Menus—Chapter 3
57Native Terminal Emulation Programmer’s Guide
After all of the length options are set for the enabled bar code, the displayreturns to either the Scan Options menu or the Scan Options 2 menu(pending on from which menu the bar code was enabled).
(bar code type)Max Length xx
(bar code type)Max Length xxMin Length xx
(bar code type)Max Length xxMin Length xxFix Length 1 xxFix Length 2 xxFix Length 3 xx
(bar code type)Drop Leading xx
(bar code type)Drop Leading xxDrop Trailing xx
(bar code type)Max Length xxMin Length xxFix Length 1 xx
(bar code type)Max Length xxMin Length xxFix Length 1 xxFix Length 2 xx
(bar code type)Max Length xxMin Length xxFix Length 1 xxFix Length 2 xxFix Length 3 xxFix Length 4 xx
3) Protocol OptsUse the 3) Protocol Opts menu to designate the type of terminal emula-tion the host supports. You can also use it to designate additional com-mands and command sets.
Protocol Opts1) Host View Sze2) Data Stream3) Extended Cmds4) 52505) 32706) VT/ANSI7) Native 7) Native is blank if TCP/IP

Using the Terminal Emulation MenusChapter —3
58 Native Terminal Emulation Programmer’s Guide
1) Host View SzeThe 1) Host View Sze option tells the terminal the format of display in-formation sent from the host. The display viewing size equals 1920 (thenumber of rows times the number of columns). The exception is with5250 Terminal Emulation which has an additional row for error messagesand therefore has 2000 characters.
The default setting for Native Terminal Emulation is 120 columns by 16rows (equals 1920). The default for VT/ANSI Terminal Emulation is 80columns by 24 rows (equals 1920). The default for 5250 Terminal Emula-tion is 80 columns by 24 rows (25 with error messages).
The default for 3270 Terminal Emulation depends on what the originalsetting was before changing to the 3270 Terminal Emulation. Rememberthat the total characters must equal 1920 (number of rows by the numberof columns) unless using 5250 Terminal Emulation with error messages.
Enter a number between 1–80 to change the width. Press [Enter] to returnto the 3) Protocol Opts menu. “xx” is the width.
Host View Sze
Width
xx
2) Data StreamEnter the number corresponding to the type of host computer to specifythe data stream used. Press [Enter] to return to the 3) Protocol Optsmenu.
Data Stream1) Native2) 32703) 52504) VT/ANSI
1) Native is blank if TCP/IP
Note: For 2415, 2425, 2435A, 2455, 2475, and 248X Terminals, you canalso set the emulation type through the 1) ITC Server option.

Using the Terminal Emulation Menus—Chapter 3
59Native Terminal Emulation Programmer’s Guide
For information about 3270, 5250, or VT/ANSI TE, see the followingmanuals:
S TE 2000 3270 Terminal Emulation Programmer’s Guide(P/N: 977-055-003)
S TE 2000 5250 Terminal Emulation Programmer’s Guide(P/N 977-055-004)
S TE 2000 VT/ANSI Terminal Emulation Programmer’s Guide(P/N 977-055-005)
3) Extended Cmds (Commands)Use 3) Extended Cmds to enable or disable extended commands. By de-fault, extended commands are disabled. When this option is enabled, thehost computer can change or use RS-232 communications (such as print-ers), bar code options, display screen and font size, and error tone featuresof the unit. Press [1] to enable or press [2] to disable the extended com-mand list. Press [Enter] to return to the 3) Protocol Opts menu.
Extended Cmds 1)Enabled2) Disabled
4) 5250 (Options)The 4) 5250 menu enables the following features if the 5250 communica-tion protocol is used. Press the appropriate number to enable an option,then press [Enter] to return to the 3) Protocol Opts menu.
1) Beep On ErrorCauses the buzzer to emit when an error condition occurs; does not lockup the keyboard.
2) Auto Tab ScanCauses the cursor to automatically tab forward to the next input fieldwhen a good scan is obtained.
3) TelnetHandles the Telnet option negotiations to establish a session with an ap-propriate Telnet server.
Note: 3) Telnet is not changeable if TCP/IP is used.
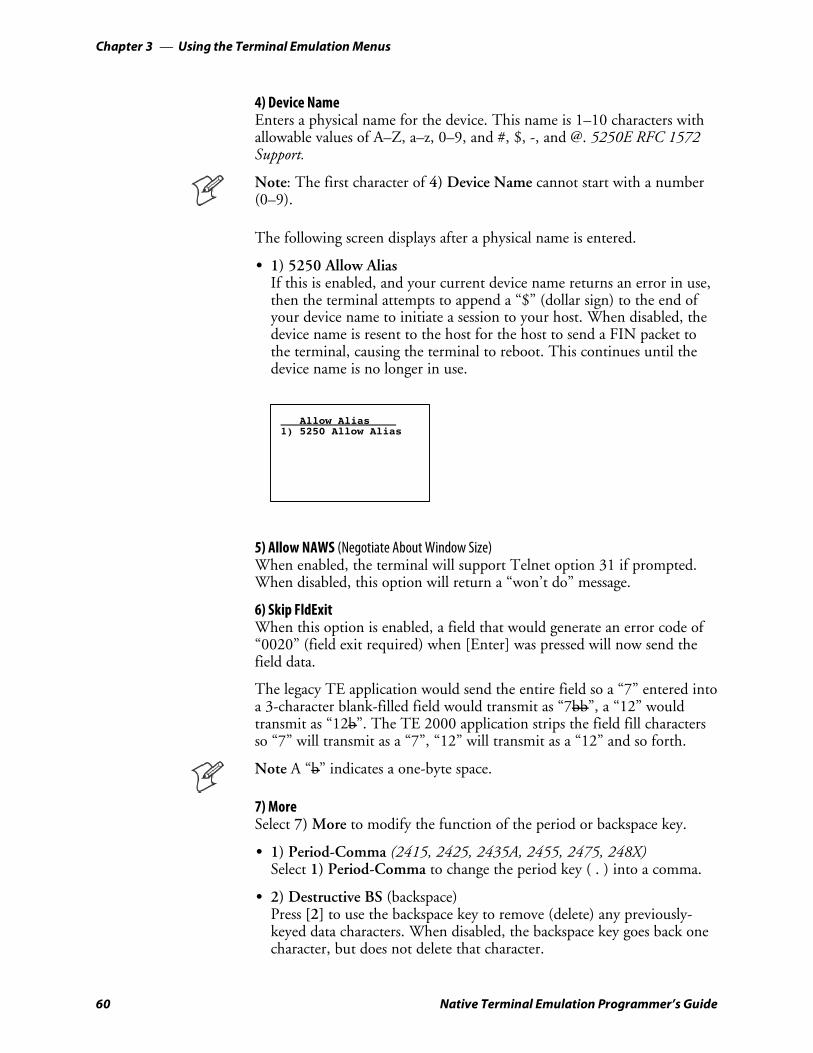
Using the Terminal Emulation MenusChapter —3
60 Native Terminal Emulation Programmer’s Guide
4) Device NameEnters a physical name for the device. This name is 1–10 characters withallowable values of A–Z, a–z, 0–9, and #, $, -, and @. 5250E RFC 1572Support.
Note: The first character of 4) Device Name cannot start with a number(0–9).
The following screen displays after a physical name is entered.
S 1) 5250 Allow AliasIf this is enabled, and your current device name returns an error in use,then the terminal attempts to append a “$” (dollar sign) to the end ofyour device name to initiate a session to your host. When disabled, thedevice name is resent to the host for the host to send a FIN packet tothe terminal, causing the terminal to reboot. This continues until thedevice name is no longer in use.
Allow Alias1) 5250 Allow Alias
5) Allow NAWS (Negotiate About Window Size)When enabled, the terminal will support Telnet option 31 if prompted.When disabled, this option will return a “won’t do” message.
6) Skip FldExitWhen this option is enabled, a field that would generate an error code of“0020” (field exit required) when [Enter] was pressed will now send thefield data.
The legacy TE application would send the entire field so a “7” entered intoa 3-character blank-filled field would transmit as “7bb”, a “12” wouldtransmit as “12b”. The TE 2000 application strips the field fill charactersso “7” will transmit as a “7”, “12” will transmit as a “12” and so forth.
Note A “b” indicates a one-byte space.
7) MoreSelect 7) More to modify the function of the period or backspace key.
S 1) Period-Comma (2415, 2425, 2435A, 2455, 2475, 248X)Select 1) Period-Comma to change the period key ( . ) into a comma.
S 2) Destructive BS (backspace)Press [2] to use the backspace key to remove (delete) any previously-keyed data characters. When disabled, the backspace key goes back onecharacter, but does not delete that character.

Using the Terminal Emulation Menus—Chapter 3
61Native Terminal Emulation Programmer’s Guide
S 3) Lock Error MsgThe TE 2000 cursor modes ensure that the cursor location of the screenand its surrounding data is visible. The 5250 error message line is typi-cally not visible because the error message line 24 is too far away fromthe cursor location. Enabling this option causes a 5250 Write ErrorCode command error message to be visible by placing the cursor on theerror message line. When the RESET key is pressed, the cursor is re-stored to where it would have been if this option was not enabled (thelocation specified by a 5250 Insert Cursor command) and the cursormode option then causes that area of the screen to be visible.
Disabling this option causes normal behaviour for the 5250 Write ErrorCode command error message. The Write Error Code command errormessage is displayed on the error message line of the screen and the cur-sor is placed at the location specified by the host Insert Cursor com-mand. The cursor mode then causes the cursor area of the screen to bevisible.
52501) Beep On Error2) Auto Tab Scan3) Telnet4) Device Name5) Allow NAWS6) Skip FldExit7) More
52501) Period-Comma2) Destructive BS3) Lock Error Msg
1) Period-Comma is for2415, 2425, 2435A, 2455,2475, 248X
[7]
5) 3270 (Options)The 5) 3270 menu enables the following features if the 3270 communica-tion protocol is used. Press the appropriate number to enable an option,then press [Enter] to return to the 3) Protocol Opts menu.
1) Keybrd UnlockUnlocks the keyboard after the [PA1], [PA2], or [CLEAR] keys arepressed. (Normally the keyboard remains locked, until unlocked or theterminal is reset by the host, after any of these keys are pressed.) Whenusing Token Ring on your host, the tab key also unlocks the keyboard.
2) Auto Tab ScanCauses the cursor to tab forward to the next input field when a good scanis obtained.
Note: 2) Auto Tab Scan cannot be enabled at the same time as 3) AutoEntr Scan.
Using the Terminal Emulation MenusChapter —3
62 Native Terminal Emulation Programmer’s Guide
3) Auto Entr ScanActuates the <Enter> function when a good scan is obtained.
Note: 3) Auto Entr Scan cannot be enabled at the same time as 2) AutoTab Scan.
4) Emulate 3210 (6400, 5055, 59XX, 17XX, 11XX)The IntermecR 3210 emulation option allows the 3270 keyboard to emu-late an RT3210 Hand-Held Computer, performing the same functions.For full 3210 compatibility, disable buffering the keyboard, set cursor tolazy mode, and set the LCD Parms to Key Uppercase.
5) TelnetHandles Telnet option negotiations to establish a session with an appropri-ate Telnet server.
Note: 5) Telnet cannot be changed if you are using TCP/IP.
6) Origin SetWhen enabled, this option resets the screen origin when an exclamationmark is found in the data stream.
7) MoreSelect 7) More for additional features.
S 1) Device NameEnters a physical name for the device. This name is 1–10 characterswith allowable values of A–Z, a–z, 0–9, and #, $, -, and @. 3270E RFC2355 Support.
Note: The first character of 1) Device Name cannot start with a num-ber (0–9).
S 2) Allow NAWS (Negotiate About Window Size)When enabled, the terminal will support Telnet option 31 if prompted.When disabled, this option will return a “won’t do” message.
S 3) BRT Auto EnterWhen enabled, if the last field on a screen has the reverse video attributeset, then when that field is exactly filled, the terminal will automaticallysend the data for this screen back to the host with an “Enter AID” code.If disabled, the screen will wait for the user to hit the AID key prior tosending data back to the host. Default is disabled.
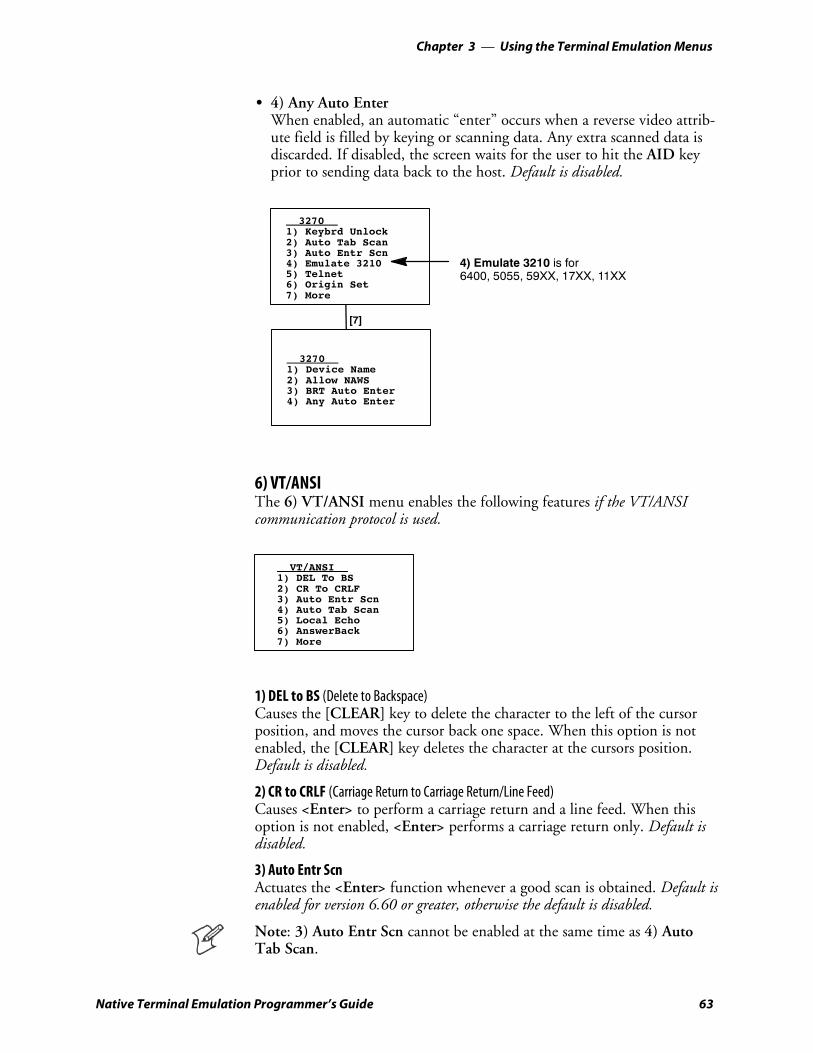
Using the Terminal Emulation Menus—Chapter 3
63Native Terminal Emulation Programmer’s Guide
S 4) Any Auto EnterWhen enabled, an automatic “enter” occurs when a reverse video attrib-ute field is filled by keying or scanning data. Any extra scanned data isdiscarded. If disabled, the screen waits for the user to hit the AID keyprior to sending data back to the host. Default is disabled.
32701) Device Name2) Allow NAWS3) BRT Auto Enter4) Any Auto Enter
32701) Keybrd Unlock2) Auto Tab Scan3) Auto Entr Scn4) Emulate 32105) Telnet6) Origin Set7) More
[7]
4) Emulate 3210 is for6400, 5055, 59XX, 17XX, 11XX
6) VT/ANSIThe 6) VT/ANSI menu enables the following features if the VT/ANSIcommunication protocol is used.
VT/ANSI1) DEL To BS2) CR To CRLF3) Auto Entr Scn4) Auto Tab Scan5) Local Echo6) AnswerBack7) More
1) DEL to BS (Delete to Backspace)Causes the [CLEAR] key to delete the character to the left of the cursorposition, and moves the cursor back one space. When this option is notenabled, the [CLEAR] key deletes the character at the cursors position.Default is disabled.
2) CR to CRLF (Carriage Return to Carriage Return/Line Feed)Causes <Enter> to perform a carriage return and a line feed. When thisoption is not enabled, <Enter> performs a carriage return only. Default isdisabled.
3) Auto Entr ScnActuates the <Enter> function whenever a good scan is obtained. Default isenabled for version 6.60 or greater, otherwise the default is disabled.
Note: 3) Auto Entr Scn cannot be enabled at the same time as 4) AutoTab Scan.

Using the Terminal Emulation MenusChapter —3
64 Native Terminal Emulation Programmer’s Guide
4) Auto Tab ScanCauses the terminal to automatically tab to the next input field when agood scan is obtained. Default is disabled.Note: 4) Auto Tab Scan cannot be enabled at the same time as 3) AutoEntr Scan.
5) Local EchoAllows characters to be displayed from terminal memory but not from hostmemory. Default is disabled.6) AnswerBackEnables you to enter a character string that is sent to the host in responseto an inquiry (hexadecimal 05). The range is 0–30. Default is null string for2415, 2425, 2435A, 2455, 2475, 248X, 6400, 5055, 59XX, 17XX, 11XXTerminals.
AnswerBack
Message
If you enter any of the following control characters, it is sent out. Note thatcontrol strings count as one character.<ACK> <DC2> <EOT> <GS> <SI> <US><BEL> <DC3> <ESC> <HT> <SO> <VT><BS> <DC4> <ETB> <LF> <SOH><CAN> <DLE> <ETC> <NAK> <STX><CR> <EM> <FF> <NUL> <SUB><DC1> <ENQ> <FS> <RS> <SYN>7) MoreCalls up the following VT/ANSI More Options screen.
VT/ANSI More Options1) Screen Lock2) DiscreteBells3) UserKey Locked4) RS232 Setup5) VT220 Mode6) Lock Mode7) More
2) DiscreteBells and4) RS232 Setupare for 6400, 5055, 59XX, 17XX,11XX
S 1) Screen LockSets and locks the screen to a specified size. Any characters outside thisscreen size are ignored by the hand-held unit. Default is disabled.
S 2) DiscreteBells (6400, 5055, 59XX, 17XX, 11XX)If enabled, the terminal beeps for each bell character the host sends. Ifdisabled, the unit ignores the bell characters if it is already beeping. De-fault is disabled.

Using the Terminal Emulation Menus—Chapter 3
65Native Terminal Emulation Programmer’s Guide
S 3) UserKey LockedIf set, the host ignores a host command defining the Function keys. De-fault is disabled.
S 4) RS232 Setup (6400, 5055, 59XX, 17XX, 11XX)When using the media copy command, use this option to set up thecommunications port, then press [Enter] to return to 3) Protocol Opts.
S 1) RS232 Baud RateSelect 1200, 2400, 4800, 9600, 19200, or 38400. Default is 9600.
S 2) RS232 ParitySelect from Odd, Even, or None. Default is None.
S 3) RS232 Stop BitsSelect either 1- or 2-bits. Default is 1.
S 4) RS232 Data BitsSelect either 7- or 8-bit. Default is 8.
S 5) RS232 FlowSelect from None, DTR, or XON/XOFF. Default is None.
RS232 Setup1) RS232 Baud Rate2) RS232 Parity3) RS232 Stop Bits4) RS232 Data Bits5) RS232 Flow
RS232 Baud Rate1) 12002) 24003) 48004) 96005) 192006) 384007)8)
RS232 Stop Bits1) 12) 2
RS232 Parity1) Odd2) Even3) None
RS232 Data Bits1) 72) 8
[1] [2]
[3] [4]
[5]RS232 Flow
1) None2) DTR3) XON/XOFF
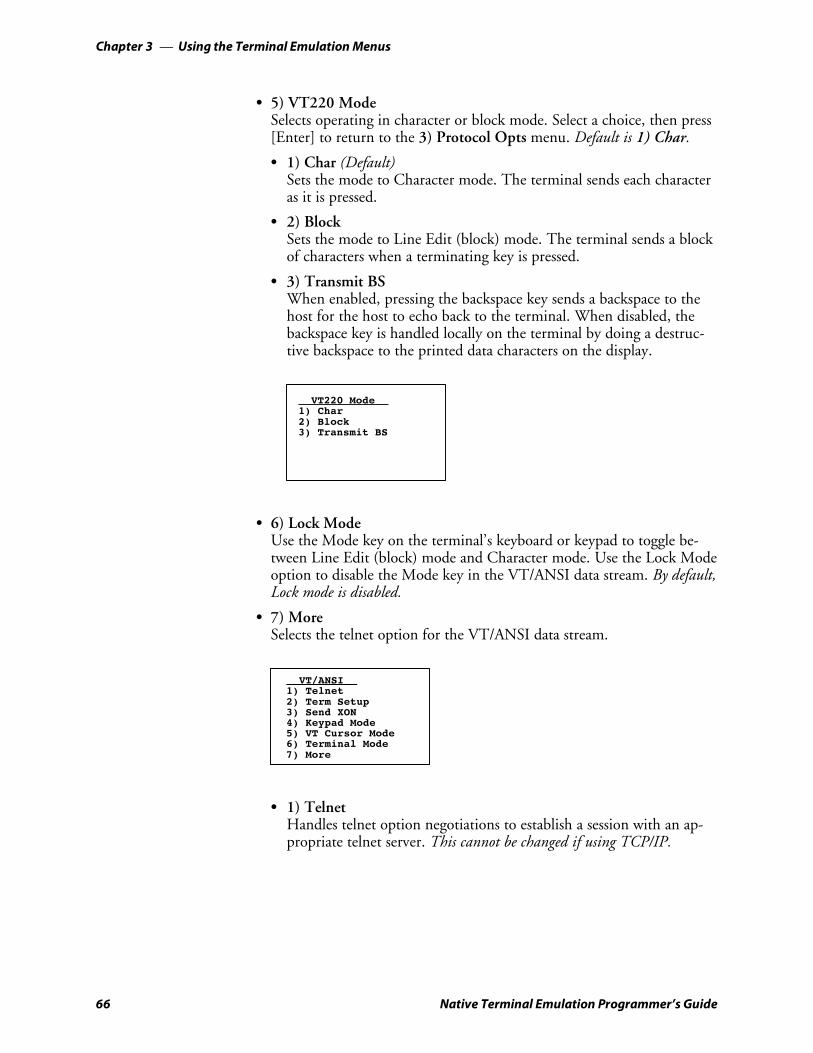
Using the Terminal Emulation MenusChapter —3
66 Native Terminal Emulation Programmer’s Guide
S 5) VT220 ModeSelects operating in character or block mode. Select a choice, then press[Enter] to return to the 3) Protocol Opts menu. Default is 1) Char.
S 1) Char (Default)Sets the mode to Character mode. The terminal sends each characteras it is pressed.
S 2) BlockSets the mode to Line Edit (block) mode. The terminal sends a blockof characters when a terminating key is pressed.
S 3) Transmit BSWhen enabled, pressing the backspace key sends a backspace to thehost for the host to echo back to the terminal. When disabled, thebackspace key is handled locally on the terminal by doing a destruc-tive backspace to the printed data characters on the display.
VT220 Mode1) Char2) Block3) Transmit BS
S 6) Lock ModeUse the Mode key on the terminal’s keyboard or keypad to toggle be-tween Line Edit (block) mode and Character mode. Use the Lock Modeoption to disable the Mode key in the VT/ANSI data stream. By default,Lock mode is disabled.
S 7) MoreSelects the telnet option for the VT/ANSI data stream.
VT/ANSI1) Telnet2) Term Setup3) Send XON4) Keypad Mode5) VT Cursor Mode6) Terminal Mode7) More
S 1) TelnetHandles telnet option negotiations to establish a session with an ap-propriate telnet server. This cannot be changed if using TCP/IP.

Using the Terminal Emulation Menus—Chapter 3
67Native Terminal Emulation Programmer’s Guide
S 2) Term SetupSelects the compliance level of the terminal being emulated. Default isVT340 to support all commands. Make a selection, then press [Enter]to return to the 3) Protocol Opts menu.
Term Setup1) ANSI2) VT1003) VT2204) VT3205) VT3406) IBM 330X
S 3) Send XONDefault is enabled which indicates that when an RIS is received fromthe host, the XON character is returned after compliance of thiscommand. Default is enabled.
S 4) Keypad ModeDetermines what is returned to the host when keys are pressed. De-fault is 2) Numeric.
S 1) ApplicationGenerates application ESC sequences for the key code. For help,refer to your VT manual.
S 2) NumericGenerates ANSI cursor control ESC sequences that correspond towhat appears on the face of the keys.
Keypad Mode1) Application2) Numeric

Using the Terminal Emulation MenusChapter —3
68 Native Terminal Emulation Programmer’s Guide
S 5) VT Cursor ModeDetermines what is returned to the host when cursor keys are hit.Default is 2) Cursor.
S 1) ApplicationGenerates application ESC sequences for the key code. For help,refer to your VT manual.
S 2) CursorGenerates ANSI cursor control ESC sequences that correspond towhat appears on the face of the cursor key.
VT Cursor Mode1) Application2) Cursor
S 6) Terminal Mode (VT220/320 only)Sets the terminal mode to 7-bit or 8-bit. This option sets the modeVT-series terminals used to exchange escape sequences, control com-mands, and status reports with an application. Default is 1) 7-Bit.
Terminal Mode1) 7-Bit2) 8-Bit
S 7) MoreBelow are additional options:
VT/ANSI1) Use PC Char Set2) Allow NAWS3) Terminal ID4) Auto Wrap
S 1) Use PC Char SetSelect this option to default the font character to the terminal’s char-acter set instead of a DEC terminal character set.
S 2) Allow NAWS (Negotiate About Window Size)When enabled, the terminal supports Telnet option 31 if prompted.When disabled, this option returns a “won’t do” message.
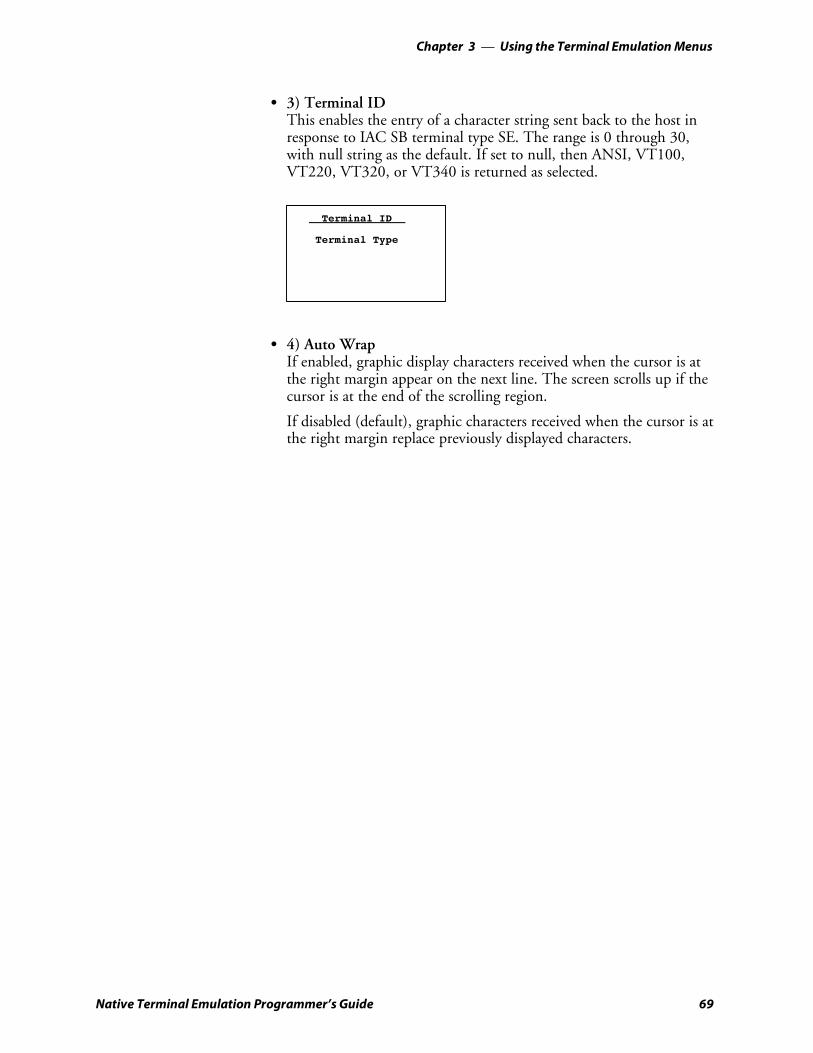
Using the Terminal Emulation Menus—Chapter 3
69Native Terminal Emulation Programmer’s Guide
S 3) Terminal IDThis enables the entry of a character string sent back to the host inresponse to IAC SB terminal type SE. The range is 0 through 30,with null string as the default. If set to null, then ANSI, VT100,VT220, VT320, or VT340 is returned as selected.
Terminal ID
Terminal Type
S 4) Auto WrapIf enabled, graphic display characters received when the cursor is atthe right margin appear on the next line. The screen scrolls up if thecursor is at the end of the scrolling region.
If disabled (default), graphic characters received when the cursor is atthe right margin replace previously displayed characters.

Using the Terminal Emulation MenusChapter —3
70 Native Terminal Emulation Programmer’s Guide
Note: 7) Native is enabled by default to preserve backwards compatibility.
7) Native (2415, 2425, 2435A, 2455, 2475, 248X, 6400, and 5055 with WTP,59XX, 17XX, 11XX)S For 2415, 2425, 2435A, 2455, 2475, 248X Terminals with WTP:
When enabled, pressing [F1] is equivalent to pressing [FnL] [7](Home), while pressing [F2] is equivalent to pressing [F1], etc. Whendisabled, [F1] is equivalent to [F1], [F2] is equivalent to [F2], etc.
S For 2435A Terminals with 48-key keyboards:When enabled, pressing [F1] is equivalent to pressing Green >,H.(Home), while pressing [F2] is equivalent to pressing Orange >,1, etc. When disabled, [F1] is equivalent to pressing Orange >, 1,[F2] is equivalent to pressing Orange >, 2, etc.
S For 6400 Computers with WTP on a 51-key keyboard:When enabled, pressing [F1] is equivalent to pressing [Blue] [0], whilepressing [F2] is equivalent to pressing [Blue] [1], etc. When disabled,[F1] is equivalent to [Blue] [1], [F2] is equivalent to [Blue] [2], etc.
S For 6400 Computers with WTP on a 41-key keyboard:When enabled, pressing [F1] is equivalent to pressing [Blue] [Space].
S For 5055 Terminals with WTP:When enabled, pressing [F1] is equivalent to pressing [Blue] [0], whilepressing [F2] is equivalent to pressing [Blue] [1], etc. When disabled,[F1] is equivalent to [Blue] [1], [F2] is equivalent to [Blue] [2], etc.
S For 59XX, 17XX, 11XX,When enabled, pressing [F1] is equal to [Black] [0] and [F2] is equal to[Black] [1], etc. When disabled, [F1] is equal to [Black] [1], [F2] isequal to [Black] [2], etc.
Native Mode1) F1 is FUNC-0

Using the Terminal Emulation Menus—Chapter 3
71Native Terminal Emulation Programmer’s Guide
4) Display Opts4) Display Opts adjusts the backlight timer, the cursor appearance on thedisplay, or the remote display.
Display Opts1) Backlight2) Cursor Mode3) Remote Disp
1) Backlight is for 2415, 2425, 2435A, 2455,2475, 248X, 6400, 17XX, 11XX
3) Remote Disp is for 17XX
1) Backlight (2415, 2425, 2435A, 2455, 2475, 248X, 6400, 17XX, 11XX)Use the up and down arrows to select “Off” or a number from “1–60” for2415, 2425, 2435A, 2455, 2475, and 248X Terminals or from “1–255”for 6400, 17XX, and 11XX Terminals. This would dictate the number ofseconds that the backlight stays on after a key is pressed.
Backlight TimerUse Cursor UpAnd Down KeysTo Adjust
xxx
2) Cursor ModeSelects the cursor style. After making a selection, press [Enter] to return tothe 4) Display Opts menu. The cursor shape is shown between “>” and“<”.
1) Underline BlinkCauses the underline character to appear and disappear in its current loca-tion.
2) Block BlinkCauses the block (J) character cursor to appear and disappear in its cur-rent location.
3) Underline (6400, 59XX, 17XX, 11XX)This option provides a solid underline character to display the cursor’s cur-rent location.

Using the Terminal Emulation MenusChapter —3
72 Native Terminal Emulation Programmer’s Guide
4) Block (6400, 59XX, 17XX, 11XX)This provides a reverse or highlighted block (J) character displaying thecursor’s current location.
Cursor Mode1) Underline Blink2) Block Blink3) Underline4) Block
> <
3) Underline and4) Blockare for 6400, 59XX, 17XX,11XX
3) Remote Disp (17XX)This menu allows communication to a remote display.
1) EnabledPress this option to enable the remote display function.
2) Screen SizeUse this option to set the screen size of the remote display.
3) Remote BaudSelect the appropriate baud rate for the remote display: 9600, 19200, or38400.
4) Remote TypeUse this option to identify the remote terminal: VT100, VT220, or ANSI.
Remote Display1) Enabled2) Screen Size3) Remote Baud4) Remote Type
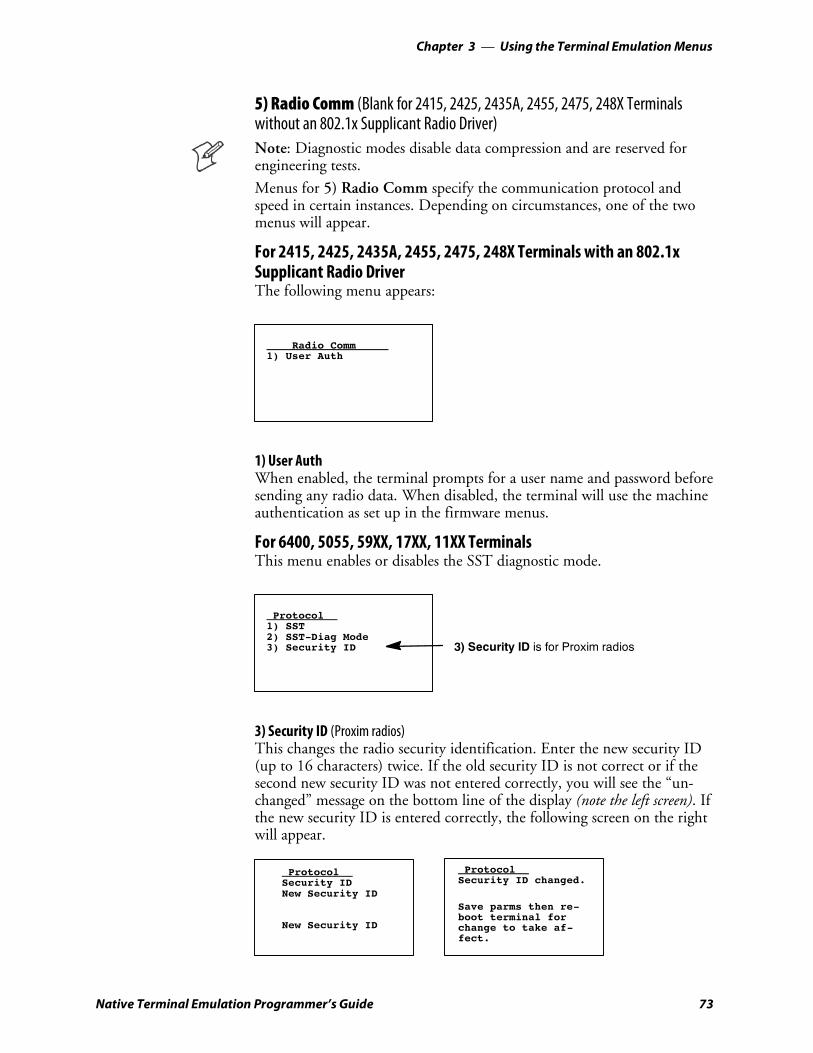
Using the Terminal Emulation Menus—Chapter 3
73Native Terminal Emulation Programmer’s Guide
5) Radio Comm (Blank for 2415, 2425, 2435A, 2455, 2475, 248X Terminalswithout an 802.1x Supplicant Radio Driver)Note: Diagnostic modes disable data compression and are reserved forengineering tests.
Menus for 5) Radio Comm specify the communication protocol andspeed in certain instances. Depending on circumstances, one of the twomenus will appear.
For 2415, 2425, 2435A, 2455, 2475, 248X Terminals with an 802.1xSupplicant Radio DriverThe following menu appears:
Radio Comm1) User Auth
1) User AuthWhen enabled, the terminal prompts for a user name and password beforesending any radio data. When disabled, the terminal will use the machineauthentication as set up in the firmware menus.
For 6400, 5055, 59XX, 17XX, 11XX TerminalsThis menu enables or disables the SST diagnostic mode.
Protocol1) SST2) SST-Diag Mode3) Security ID 3) Security ID is for Proxim radios
3) Security ID (Proxim radios)This changes the radio security identification. Enter the new security ID(up to 16 characters) twice. If the old security ID is not correct or if thesecond new security ID was not entered correctly, you will see the “un-changed” message on the bottom line of the display (note the left screen). Ifthe new security ID is entered correctly, the following screen on the rightwill appear.
ProtocolSecurity IDNew Security ID
New Security ID
ProtocolSecurity ID changed.
Save parms then re-boot terminal forchange to take af-fect.

Using the Terminal Emulation MenusChapter —3
74 Native Terminal Emulation Programmer’s Guide
6) Cold StartThis resets all TE values to the stored configuration in CONFIG.DATand performs a cold-start on the terminal. Press [Y] to reboot the terminal,or press any other key to return to the 1) Set-up Parms menu.
Depending on the setting in the firmware menu of the terminal, after reboot-ing, the terminal opens to the TRAKKER Antares 2400 Menu System.
Cold Start Enter‘Y’to Cold Startterminal:
7) More7) More provides the following additional setup parameters:
Set-UP Parms1) Menu Password2) Print Device3) COM Select
2) Print Device is for 64003) COM Select is for 248X, 5055
1) Menu PasswordThis parameter enables menu password protection for the TE configura-tion menus. This provides added protection because once enabled, thepassword must be entered before any further activity can occur within theterminal emulation menu screens. The default is to have this option dis-abled.
To enable the password, press [1], then type “3193693” for the fixed pass-word set by Intermec Technologies Corporation. The “1)” will change toreverse video to indicate it is enabled. With this enabled, enter this passwordwhen you access the terminal emulation menu screens. Press [Enter] untilyou reach the Main Menu, then press 6) Exit Menus to return to themain terminal screen.
To disable the password, press [1] to display in normal viewing text. Youdo not need to enter a password to disable this function. Note that themenu password can be set via a custom configuration. See Chapter 4, “Cus-tomizing Your Configuration,” for help on creating a custom configuration file.

Using the Terminal Emulation Menus—Chapter 3
75Native Terminal Emulation Programmer’s Guide
2) Print Device (6400)Establishes extended commands for the RS-232, IrDA, or RF printer driv-ers. Press [1] for the RS-232 driver (default) or [2] for the IrDA driver.
Print Device1) RS232 Print2) IRDA Print3)4)
3) COM Select (248X, 5055)Selects which communications port to use for extended commands,RS-232 communications, or media copy commands.
COM Select1) COM 12) COM 2
2) LCD Parms (Parameters)2) LCD Parms adjusts these Liquid Crystal Display (LCD) features: thescreen size (number of rows displayed, and the number of characters dis-played on each row), the screen mode (how the cursor positions itself onthe display), making all alphabetic character keystrokes uppercase charac-ters, and scrolling window parameters.
LCD Parms1) LCD Contrast2) Screen Size3) Screen Mode4) Annunciators5) Backlight6) Key Uppercase7) Scroll Window
1) LCD Contrast is for 59XX, 17XX2) Screen Size is blank for 2480, 24854) Annunciators is blank for 17XX5) Backlight is for 59XX, 17XX
1) LCD Contrast (59XX, 17XX)Use this option to adjust the contrast of the display to a more readable lev-el (range 0–255). The terminal uses this setting as a baseline, automaticallyreadjusting contrast as necessary, based on temperature changes. Use theup and down arrow keys to adjust the contrast, then press [Enter] to re-turn to the LCD Parms screen.
LCD ContrastUse Cursor Upand Down KeysTo Adjust
xxx
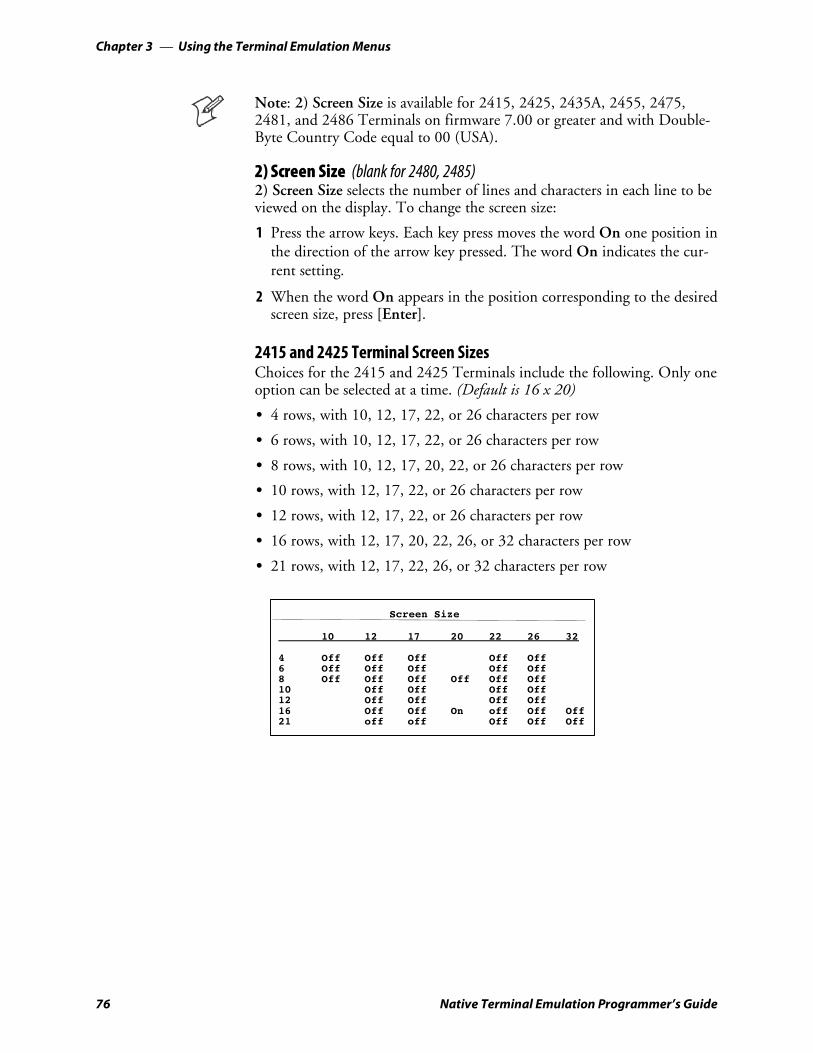
Using the Terminal Emulation MenusChapter —3
76 Native Terminal Emulation Programmer’s Guide
Note: 2) Screen Size is available for 2415, 2425, 2435A, 2455, 2475,2481, and 2486 Terminals on firmware 7.00 or greater and with Double-Byte Country Code equal to 00 (USA).
2) Screen Size (blank for 2480, 2485)2) Screen Size selects the number of lines and characters in each line to beviewed on the display. To change the screen size:
1 Press the arrow keys. Each key press moves the word On one position inthe direction of the arrow key pressed. The word On indicates the cur-rent setting.
2 When the word On appears in the position corresponding to the desiredscreen size, press [Enter].
2415 and 2425 Terminal Screen SizesChoices for the 2415 and 2425 Terminals include the following. Only oneoption can be selected at a time. (Default is 16 x 20)
S 4 rows, with 10, 12, 17, 22, or 26 characters per row
S 6 rows, with 10, 12, 17, 22, or 26 characters per row
S 8 rows, with 10, 12, 17, 20, 22, or 26 characters per row
S 10 rows, with 12, 17, 22, or 26 characters per row
S 12 rows, with 12, 17, 22, or 26 characters per row
S 16 rows, with 12, 17, 20, 22, 26, or 32 characters per row
S 21 rows, with 12, 17, 22, 26, or 32 characters per row
10 12 17 20 22 26 32
4 Off Off Off Off Off6 Off Off Off Off Off8 Off Off Off Off Off Off10 Off Off Off Off12 Off Off Off Off16 Off Off On off Off Off21 off off Off Off Off
Screen Size

Using the Terminal Emulation Menus—Chapter 3
77Native Terminal Emulation Programmer’s Guide
2435A Terminal Screen SizesFor 2435A Terminals with Terminal Emulation version 6.60 or greater andfirmware version 7.10 or greater, if icons are enabled in the firmware, thenthe 2435A Terminal uses the following screen sizes.
If the icons are disabled in the firmware (default), then the 2435A Termi-nal uses the screen sizes as shown on page 76 for the 2415 and 2425 Ter-minals. Only one option can be selected at a time. (Default is 16 x 19)
S 4 rows, with 9, 12, 17, 22, or 26 characters per row
S 6 rows, with 9, 12, 17, 22, or 26 characters per row
S 8 rows, with 9, 12, 17, 19, 22, or 26 characters per row
S 10 rows, with 12, 17, 22, or 26 characters per row
S 12 rows, with 12, 17, 22, or 26 characters per row
S 16 rows, with 12, 17, 19, 22, 26, or 31 characters per row
S 21 rows, with 12, 17, 22, 26, or 31 characters per row
9 12 17 19 22 26 31
4 Off Off Off Off Off6 Off Off Off Off Off8 Off Off Off Off Off Off10 Off Off Off Off12 Off Off Off Off16 Off Off On off Off Off21 off off Off Off Off
Screen Size
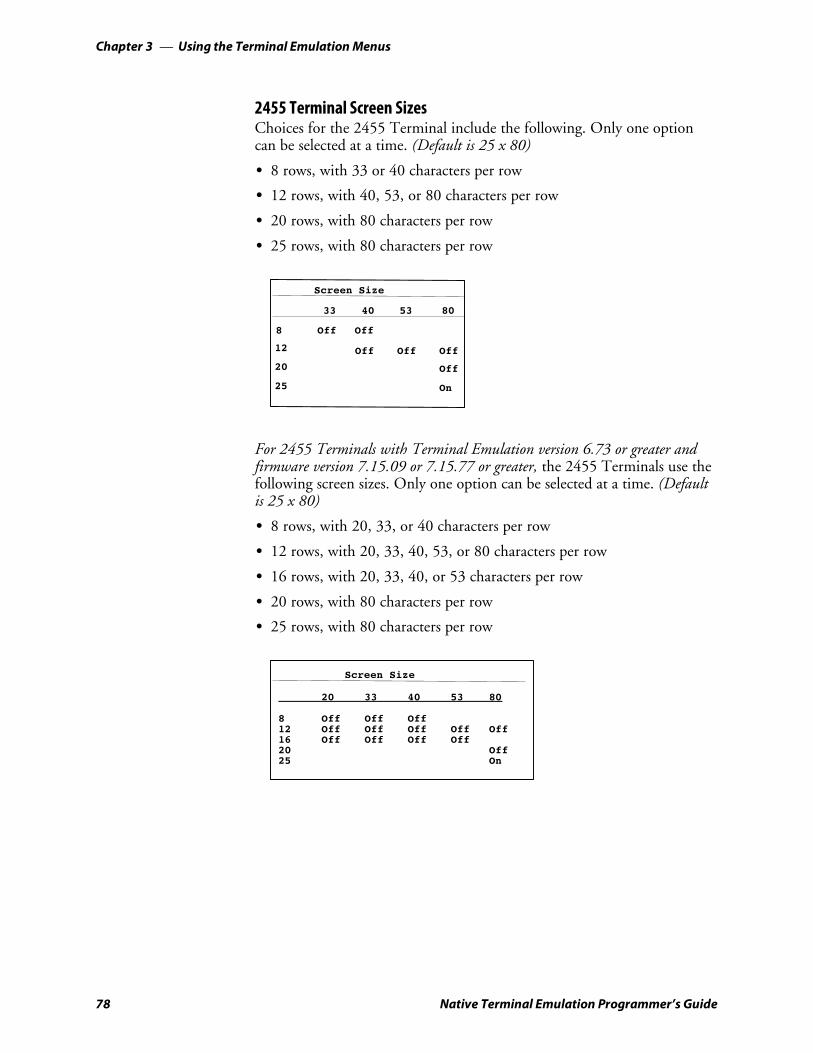
Using the Terminal Emulation MenusChapter —3
78 Native Terminal Emulation Programmer’s Guide
2455 Terminal Screen SizesChoices for the 2455 Terminal include the following. Only one optioncan be selected at a time. (Default is 25 x 80)
S 8 rows, with 33 or 40 characters per row
S 12 rows, with 40, 53, or 80 characters per row
S 20 rows, with 80 characters per row
S 25 rows, with 80 characters per row
Off Off
Screen Size
33 40 53
8
12
20
Off
80
Off
Off
Off
25 On
For 2455 Terminals with Terminal Emulation version 6.73 or greater andfirmware version 7.15.09 or 7.15.77 or greater, the 2455 Terminals use thefollowing screen sizes. Only one option can be selected at a time. (Defaultis 25 x 80)
S 8 rows, with 20, 33, or 40 characters per row
S 12 rows, with 20, 33, 40, 53, or 80 characters per row
S 16 rows, with 20, 33, 40, or 53 characters per row
S 20 rows, with 80 characters per row
S 25 rows, with 80 characters per row
20 33 40 53 80
8 Off Off Off12 Off Off Off Off Off16 Off Off Off Off20 Off25 On
Screen Size

Using the Terminal Emulation Menus—Chapter 3
79Native Terminal Emulation Programmer’s Guide
2475, 2481, and 2486 Terminal Screen Sizes
Note: This information does not apply to the 2480 and 2485 Terminals.
Choices for the 2475, 2481, and 2486 Terminals include the following.Only one option can be selected at a time. (Default is 25 x 64)
S 12 rows, with 20, 26, 40, 53, or 64 characters per row
S 20 rows, with 40 characters per row
S 25 rows, with 40, 55, or 64 characters per row
20 26 40 53 64
12 Off Off Off20 Off25 off off On
Screen Size
For 2475, 2481, and 2486 Terminals with Terminal Emulation version6.73 or greater and firmware version 7.15.09 or 7.15.77 or greater, the2475, 2481, and 2486 Terminals use the following screen sizes. Only oneoption can be selected at a time. (Default is 25 x 64)
S 12 rows, with 20, 26, or 40 characters per row
S 16 rows, with 20 or 26 characters per row
S 20 rows, with 40 characters per row
S 25 rows, with 40, 53, or 64 characters per row
20 26 40 53 64
12 Off Off Off16 Off Off20 Off25 Off Off On
Screen Size
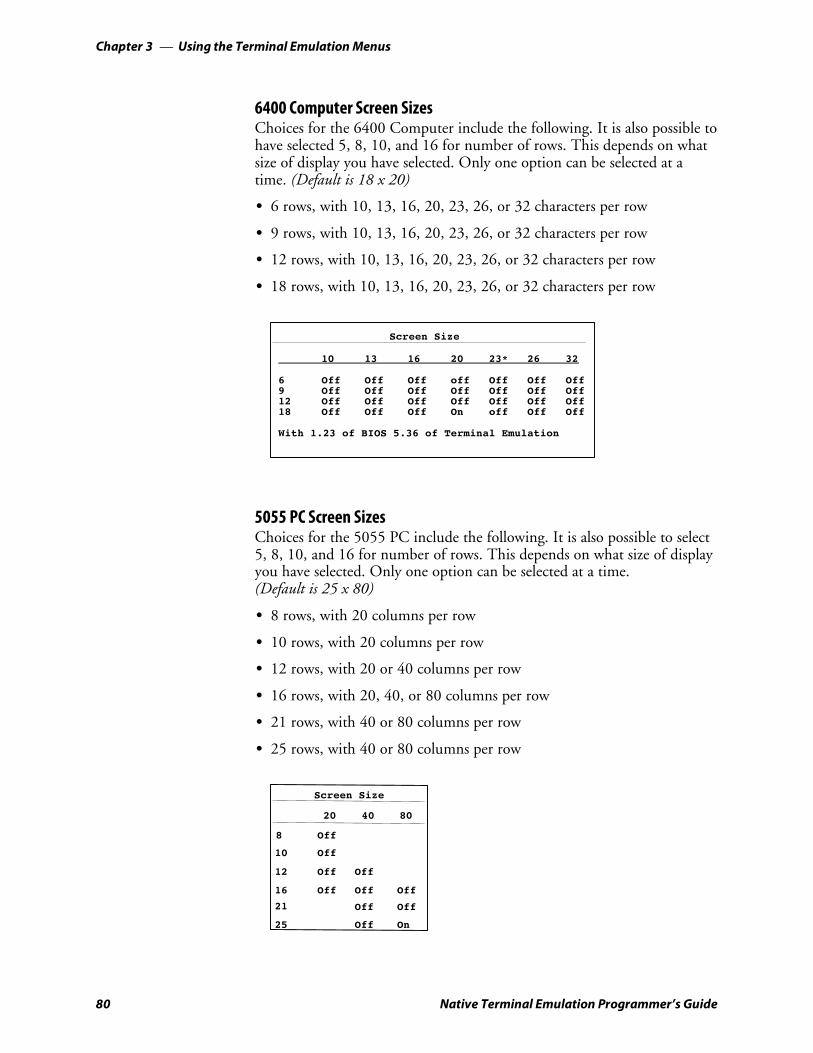
Using the Terminal Emulation MenusChapter —3
80 Native Terminal Emulation Programmer’s Guide
6400 Computer Screen SizesChoices for the 6400 Computer include the following. It is also possible tohave selected 5, 8, 10, and 16 for number of rows. This depends on whatsize of display you have selected. Only one option can be selected at atime. (Default is 18 x 20)
S 6 rows, with 10, 13, 16, 20, 23, 26, or 32 characters per row
S 9 rows, with 10, 13, 16, 20, 23, 26, or 32 characters per row
S 12 rows, with 10, 13, 16, 20, 23, 26, or 32 characters per row
S 18 rows, with 10, 13, 16, 20, 23, 26, or 32 characters per row
10 13 16 20 23* 26 32
6 Off Off Off off Off Off Off9 Off Off Off Off Off Off Off12 Off Off Off Off Off Off Off18 Off Off Off On off Off Off
With 1.23 of BIOS 5.36 of Terminal Emulation
Screen Size
5055 PC Screen SizesChoices for the 5055 PC include the following. It is also possible to select5, 8, 10, and 16 for number of rows. This depends on what size of displayyou have selected. Only one option can be selected at a time.(Default is 25 x 80)
S 8 rows, with 20 columns per row
S 10 rows, with 20 columns per row
S 12 rows, with 20 or 40 columns per row
S 16 rows, with 20, 40, or 80 columns per row
S 21 rows, with 40 or 80 columns per row
S 25 rows, with 40 or 80 columns per row
Screen Size
20 40 80
8
10
12
16
Off
Off
Off Off
Off Off Off
21
25
Off Off
Off On

Using the Terminal Emulation Menus—Chapter 3
81Native Terminal Emulation Programmer’s Guide
59XX Terminal Screen SizesChoices for the 59XX Terminal includes the following. Only one optioncan be selected at a time. (Default is 12 x 40)
S 8 rows, with 40, 60, or 80 columns per row
S 10 rows, with 40, 60, or 80 columns per row
S 12 rows, with 40, 60, or 80 columns per row
S 16 rows, with 40, 60, or 80 columns per row
S 21 rows, with 80 columns per row
S 25 rows, with 80 columns per row
Screen Size
40 60 80
8
10
12
16
Off
Off
On Off
Off Off Off
21
25
Off
Off
Off Off
Off Off
Off
17XX Terminal Screen SizesChoices for the 17XX Terminal include the following. Only one optioncan be selected at a time. (Default is 8 x 22)
S 4 lines, with 12, 17, 22, or 26 characters per line
S 6 lines, with 12, 17, 22, or 26 characters per line
S 8 lines, with 12, 17, 22, or 26 characters per line
S 10 lines, with 12, 17, 22, or 26 characters per line
S 12 lines, with 12, 17, 22, or 26 characters per line
S 16 lines, with 12, 17, 22, 26, or 31 characters per line
S 21 lines, with 12, 17, 22, or 26 characters per line
12 17 22 26 31
4 Off Off Off off6 Off Off Off off8 Off Off On off10 Off Off Off off12 Off Off Off off16 Off Off Off off off21 off off off off
Screen Size
12

Using the Terminal Emulation MenusChapter —3
82 Native Terminal Emulation Programmer’s Guide
11XX Terminal Screen SizesChoices for the 11XX Terminal include the following. Only one optioncan be selected at a time. (Default is 9 x 16)
S 4 rows, with 12 or 16 characters per row
S 6 rows, with 12 or 16 characters per row
S 8 rows, with 12 or 16 characters per row
S 9 rows, with 12 or 16 characters per row
Select Size12 164 Off Off6 Off Off8 Off Off9 Off On
3) Screen Mode3) Screen Mode selects the cursor position and movement as you scrollthrough data in the display buffer. This buffer stores data in a standardCRT format (as sent from the host computer). Since the terminal displayis smaller than a CRT, these 3) Screen Mode options optimize your viewof information (data) on the display. Default is 2) Corner Mode.
Use arrow keys to scroll (or “move”) the view port of the screen on the dis-play.
Screen Mode1) Center Cursor2) Corner Mode3) Page Mode4) Lazy Mode5) Locked Mode6) Define Origin
1) Center CursorIn this mode, the cursor begins near the center of the display and attemptsto remain there as you scroll through the data. Upon reaching an outsideboundary of the full CRT screen, the display stops advancing while thecursor moves beyond the center of the screen. When the cursor reaches theboundary of the CRT screen, an error tone sounds, such as a “beep.” Thecursor does not wrap to the next line in the display.

Using the Terminal Emulation Menus—Chapter 3
83Native Terminal Emulation Programmer’s Guide
2) Corner ModeStarts the display at the upper-left corner of the full CRT screen and keepsthe cursor in the lower-right corner of the display. As you scroll, the cursorremains there as data advances in the scrolled direction (up, down, right,or left) until an outside boundary of the full CRT screen is reached. Thenthe screen stops moving in relation to the display and the cursor moves inthe scrolled direction (the cursor no longer remains in the corner of thedisplay). When the cursor reaches the CRT screen boundary it stops mo-ving. The cursor does not wrap to the next line in the display. An errortone sounds if you try to move the cursor beyond the boundary.
This option is recommended when your application uses only the upper-left corner of the full CRT screen.
3) Page ModeDivides the full CRT screen into predefined “pages,” and starts the termi-nal display on page 1. The cursor first appears in the upper-right corner ofthe display. As you scroll, only the cursor moves (the data on the screendoes not appear to move). When you scroll off the edge of the displayedpage, the display snaps to the next (or previous) page. Upon reaching theboundary of the CRT screen, the cursor stops moving and an error tonesounds each time you attempt to move beyond the boundary.
Some “pages” in 3) Page Mode overlap each other (the same informationis shown on both pages). This overlap occurs because the 24-row by80-column CRT screen cannot be divided equally.
4) Lazy ModeStarts the cursor in the upper left corner of the terminal display. The cur-sor moves across the display in the scrolled direction. When the cursorgoes beyond the edge of the display, the data begins to move in the oppo-site direction that the cursor is moving in and the cursor remains at theedge of the display. When you reach an outside boundary of the full CRTdisplay, an error tone sounds each time you try to move beyond theboundary.
5) Locked ModeWhen this is selected the screen view is locked to the upper left-hand cor-ner of the display. Any characters selected outside of the display windowsize are written to the screen but are not visible. The windowing keys donot move the visible window.
Note: In 5250 emulation, the err_row is mapped to the last row of thescreen size selected.
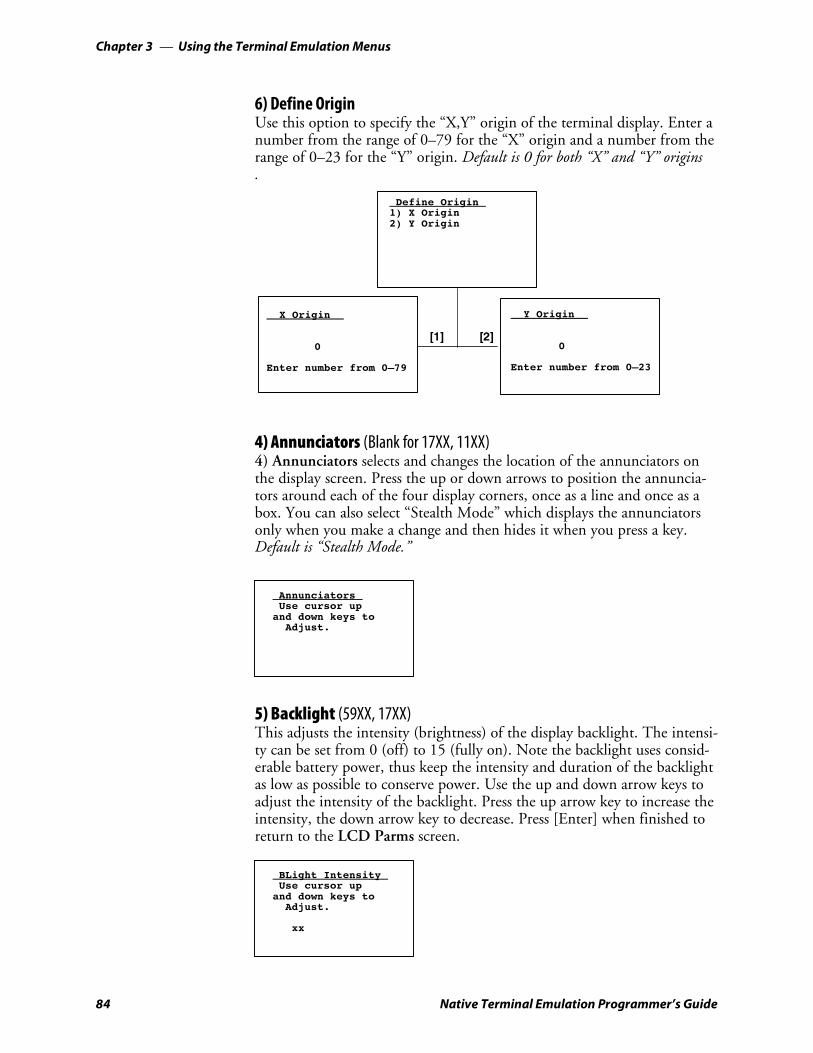
Using the Terminal Emulation MenusChapter —3
84 Native Terminal Emulation Programmer’s Guide
6) Define OriginUse this option to specify the “X,Y” origin of the terminal display. Enter anumber from the range of 0–79 for the “X” origin and a number from therange of 0–23 for the “Y” origin. Default is 0 for both “X” and “Y” origins.
Define Origin1) X Origin2) Y Origin
X Origin
0
Enter number from 0–79
[1]
Y Origin
0
Enter number from 0–23
[2]
4) Annunciators (Blank for 17XX, 11XX)4) Annunciators selects and changes the location of the annunciators onthe display screen. Press the up or down arrows to position the annuncia-tors around each of the four display corners, once as a line and once as abox. You can also select “Stealth Mode” which displays the annunciatorsonly when you make a change and then hides it when you press a key.Default is “Stealth Mode.”
AnnunciatorsUse cursor up
and down keys toAdjust.
5) Backlight (59XX, 17XX)This adjusts the intensity (brightness) of the display backlight. The intensi-ty can be set from 0 (off) to 15 (fully on). Note the backlight uses consid-erable battery power, thus keep the intensity and duration of the backlightas low as possible to conserve power. Use the up and down arrow keys toadjust the intensity of the backlight. Press the up arrow key to increase theintensity, the down arrow key to decrease. Press [Enter] when finished toreturn to the LCD Parms screen.
BLight IntensityUse cursor up
and down keys toAdjust.
xx

Using the Terminal Emulation Menus—Chapter 3
85Native Terminal Emulation Programmer’s Guide
6) Key UppercaseWhen enabled, this causes the alphabetic keys (A–Z) to display as upper-case characters regardless of the shift or caps lock mode settings.
7) Scroll Window7) Scroll Window defines the cursor movement, just how far it moveswith each press of the arrow keys. Default is 1) Tab Size.
1) Tab SizeMoves the cursor by the amount configured for 3) Define Width and4) Define Height.
2) Screen SizeCauses the cursor to move by the virtual screen size selected in2) LCD Parms under the Main Menu.
3) Define Width and 4) Define HeightThese options customize the x-axis and y-axis (up and down) movement ofthe cursor when 1) Tab Size is selected. Default is 8.
Scroll Window1) Tab Size2) Screen size3) Define Width4) Define Height
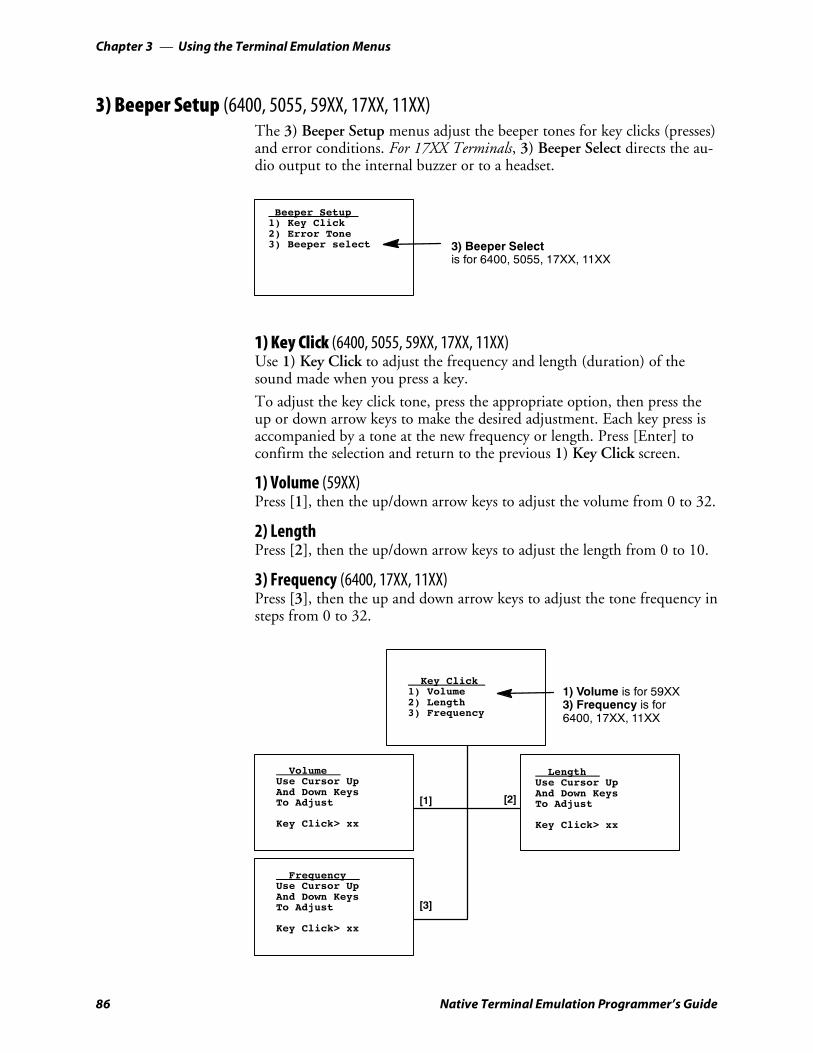
Using the Terminal Emulation MenusChapter —3
86 Native Terminal Emulation Programmer’s Guide
3) Beeper Setup (6400, 5055, 59XX, 17XX, 11XX)The 3) Beeper Setup menus adjust the beeper tones for key clicks (presses)and error conditions. For 17XX Terminals, 3) Beeper Select directs the au-dio output to the internal buzzer or to a headset.
Beeper Setup1) Key Click2) Error Tone3) Beeper select 3) Beeper Select
is for 6400, 5055, 17XX, 11XX
1) Key Click (6400, 5055, 59XX, 17XX, 11XX)Use 1) Key Click to adjust the frequency and length (duration) of thesound made when you press a key.
To adjust the key click tone, press the appropriate option, then press theup or down arrow keys to make the desired adjustment. Each key press isaccompanied by a tone at the new frequency or length. Press [Enter] toconfirm the selection and return to the previous 1) Key Click screen.
1) Volume (59XX)Press [1], then the up/down arrow keys to adjust the volume from 0 to 32.
2) LengthPress [2], then the up/down arrow keys to adjust the length from 0 to 10.
3) Frequency (6400, 17XX, 11XX)Press [3], then the up and down arrow keys to adjust the tone frequency insteps from 0 to 32.
LengthUse Cursor UpAnd Down KeysTo Adjust
Key Click> xx
VolumeUse Cursor UpAnd Down KeysTo Adjust
Key Click> xx
Key Click1) Volume2) Length3) Frequency
[1] [2]
1) Volume is for 59XX3) Frequency is for6400, 17XX, 11XX
FrequencyUse Cursor UpAnd Down KeysTo Adjust
Key Click> xx
[3]

Using the Terminal Emulation Menus—Chapter 3
87Native Terminal Emulation Programmer’s Guide
2) Error Tone2) Error Tone adjusts the length and frequency of the tone made when anerror occurs (for example, pressing an invalid key). The 2) Error Toneadjustments, and the procedures for making them are identical to the1) Key Click adjustments. Press 2) Length to set the length. The range is1 through 10, which equates to a 500 to 5000 ms beep for all errors. De-fault error tone length is 3 (or 1500 ms).
For version 6.73 or greater, the range is 1 through 10, but now equates to a50 to 500 ms beep for all errors. The default error tone length is still 3(but for 150 ms).
Error Tone1) Volume2) Length3)
1) Volume is for59XX
LengthUse Cursor UpAnd Down KeysTo Adjust
Error Tone> xx
VolumeUse Cursor UpAnd Down KeysTo Adjust
Error Tone> xx
[1] [2]
3) Beeper Select (6400, 5055, 17XX, 11XX)For 17XX, 11XX, both buzzers are not allowed to beep simultaneouslywhen using a headset. If both options are enabled, the head set buzzer willbeep first before the internal buzzer. If you are using the RS-232 port forcommunications, enable 1) Beep Internal and disable 2) Beep Head Set.
1) Beep InternalPress [1] to direct the audio to the internal beeper. Default is enabled.
2) Beep Head Set (17XX, 11XX)Press [2] to direct sound to the headset.
Beeper Setup1) Beep Internal2) Beep Head Set 2) Beep Head Set is for 17XX,
11XX

Using the Terminal Emulation MenusChapter —3
88 Native Terminal Emulation Programmer’s Guide
4) TestsIntermec Systems Engineers use the 4) Tests menus to verify terminal op-eration during environmental stress tests, peripherals, the display, RF com-munications, and memory.
Tests1) Peripherals2) Converters3) Memory View4) Packet Driver5) Numbers6) Timed Numbers
3) Memory View and4) Packet Driverare for 6400, 5055, 59XX, 17XX,11XX
2) Converters is for 59XX
1) PeripheralsSelect 1) Peripherals to test terminal peripheral devices, such as radio,RS-232, display, keyboard, and scanner. Detailed descriptions of each pe-ripheral test follows.
Peripherals1) Radio Test2) RS232 Test3) Display Test4) Keyboard Test5) Scanner Test
1) Radio Test is for6400, 5055 802.11 (Lucent) radios
2) RS232 Test,3) Display Test, and4) Keyboard Test are for6400, 5055, 59XX, 17XX, 11XX
1) Radio Test (802.11 (Lucent) Radios — 6400, 5055)Several factors influence the rate at which a frame is transmitted. First, theradio’s transmission rate is configured in the net.cfg file. The keyword“Transmit_Rate” in net.cfg holds a numeric value for the transmissionrate.
The transmission rate is also affected by the characteristics of the RF link.If the radio encounters problems sending a higher transmission rate be-cause the RF link is weak, busy, or noisy, the radio may retry the transmis-sion at a lower data rate. Thus, the TxRate reported may be lower than theconfigured transmission rate. Only the transmission rate of the most recentand successful transmission is reported.
Transmit_Rate values and their respective supported transmission ratesavailable in the high speed Lucent radios are as follows:
1 Fixed Low (1 Mb/s) 5 Fixed High (11 Mb/s)
2 Fixed Standard (2 Mb/s) 4 ARS Standard (2 Mb/s)
3 ARS High (11 Mb/s default) 4 ARS Medium (5.5 Mb/s)
4 Fixed Medium (5.5 Mb/s)
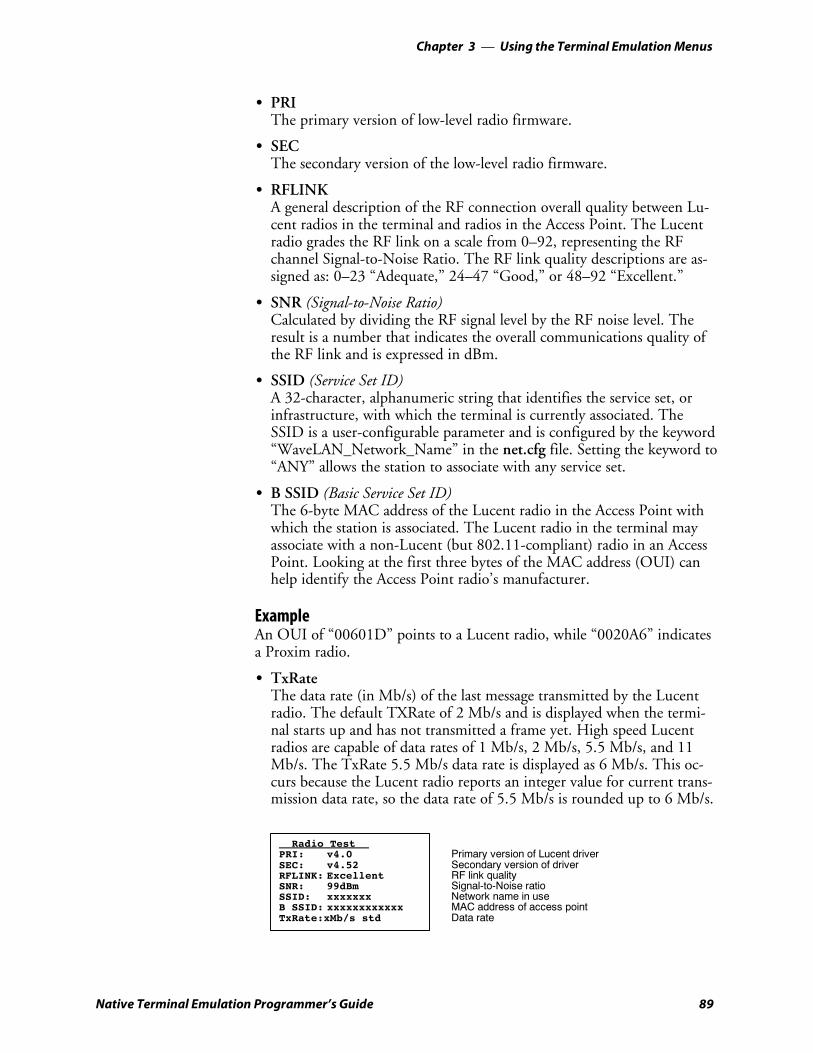
Using the Terminal Emulation Menus—Chapter 3
89Native Terminal Emulation Programmer’s Guide
S PRIThe primary version of low-level radio firmware.
S SECThe secondary version of the low-level radio firmware.
S RFLINKA general description of the RF connection overall quality between Lu-cent radios in the terminal and radios in the Access Point. The Lucentradio grades the RF link on a scale from 0–92, representing the RFchannel Signal-to-Noise Ratio. The RF link quality descriptions are as-signed as: 0–23 “Adequate,” 24–47 “Good,” or 48–92 “Excellent.”
S SNR (Signal-to-Noise Ratio)Calculated by dividing the RF signal level by the RF noise level. Theresult is a number that indicates the overall communications quality ofthe RF link and is expressed in dBm.
S SSID (Service Set ID)A 32-character, alphanumeric string that identifies the service set, orinfrastructure, with which the terminal is currently associated. TheSSID is a user-configurable parameter and is configured by the keyword“WaveLAN_Network_Name” in the net.cfg file. Setting the keyword to“ANY” allows the station to associate with any service set.
S B SSID (Basic Service Set ID)The 6-byte MAC address of the Lucent radio in the Access Point withwhich the station is associated. The Lucent radio in the terminal mayassociate with a non-Lucent (but 802.11-compliant) radio in an AccessPoint. Looking at the first three bytes of the MAC address (OUI) canhelp identify the Access Point radio’s manufacturer.
ExampleAn OUI of “00601D” points to a Lucent radio, while “0020A6” indicatesa Proxim radio.
S TxRateThe data rate (in Mb/s) of the last message transmitted by the Lucentradio. The default TXRate of 2 Mb/s and is displayed when the termi-nal starts up and has not transmitted a frame yet. High speed Lucentradios are capable of data rates of 1 Mb/s, 2 Mb/s, 5.5 Mb/s, and 11Mb/s. The TxRate 5.5 Mb/s data rate is displayed as 6 Mb/s. This oc-curs because the Lucent radio reports an integer value for current trans-mission data rate, so the data rate of 5.5 Mb/s is rounded up to 6 Mb/s.
Radio TestPRI: v4.0 Primary version of Lucent driverSEC: v4.52 Secondary version of driverRFLINK: Excellent RF link qualitySNR: 99dBm Signal-to-Noise ratioSSID: xxxxxxx Network name in useB SSID: xxxxxxxxxxxx MAC address of access pointTxRate:xMb/s std Data rate

Using the Terminal Emulation MenusChapter —3
90 Native Terminal Emulation Programmer’s Guide
2) RS232 Test (6400, 5055, 59XX, 17XX, 11XX)Tests the data communication port on the terminal, requiring a specialloop-back connector that links the following input and output pins on thedata connector:S TX output to the RX inputS DTR output to the DSR inputS CTS output to the RTS inputTo run the test, select 2) RS232 Test, attach the loop-back connector tothe port connector on the terminal, then press [Enter]. The displaychanges to the second RS232 Test menu shown below. The condition ofeach line-pair displays as passing or failing the test. If any test fails, returnthe terminal for service.
RS232 TestAttach RS232LoopbackConnector
Press Enter
RS232 Test
RTS-CTS: PASSDTR–DSR: PASSTX-RX: PASS
Any Key To Stop
3) Display Test (6400, 5055, 59XX, 17XX, 11XX)3) Display Test tests the operation of and activates each element in theterminal LCD panel. If a line appears broken, or there are gaps in the dis-play, replace the LCD panel.1 From the Display Test menu, press [Enter] to start the test. The display
screen is painted with a series of vertical lines. Visually inspect the lines.All lines should appear clear and complete (no broken segments).
2 Press [Enter] to move to a screen drawn with horizontal lines. Visuallyinspect the lines using the same criteria.
3 Press [Enter] to move to the final screen. Visually inspect the paintedblack lines which should be uniformly black for monochrome displaysand uniformly white for color displays.
4 Press [Enter] to return to the 1) Peripherals menu.
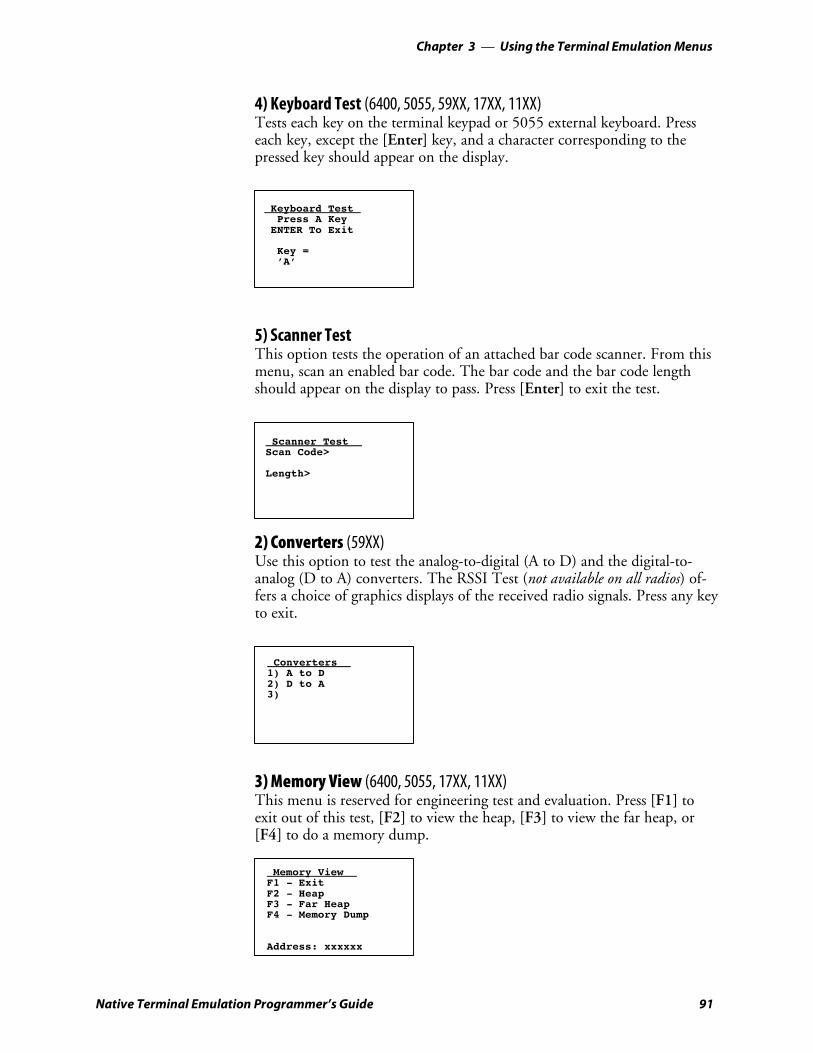
Using the Terminal Emulation Menus—Chapter 3
91Native Terminal Emulation Programmer’s Guide
4) Keyboard Test (6400, 5055, 59XX, 17XX, 11XX)Tests each key on the terminal keypad or 5055 external keyboard. Presseach key, except the [Enter] key, and a character corresponding to thepressed key should appear on the display.
Keyboard TestPress A Key
ENTER To Exit
Key =’A’
5) Scanner TestThis option tests the operation of an attached bar code scanner. From thismenu, scan an enabled bar code. The bar code and the bar code lengthshould appear on the display to pass. Press [Enter] to exit the test.
Scanner TestScan Code>
Length>
2) Converters (59XX)Use this option to test the analog-to-digital (A to D) and the digital-to-analog (D to A) converters. The RSSI Test (not available on all radios) of-fers a choice of graphics displays of the received radio signals. Press any keyto exit.
Converters1) A to D2) D to A3)
3) Memory View (6400, 5055, 17XX, 11XX)This menu is reserved for engineering test and evaluation. Press [F1] toexit out of this test, [F2] to view the heap, [F3] to view the far heap, or[F4] to do a memory dump.
Memory ViewF1 - ExitF2 - HeapF3 - Far HeapF4 - Memory Dump
Address: xxxxxx
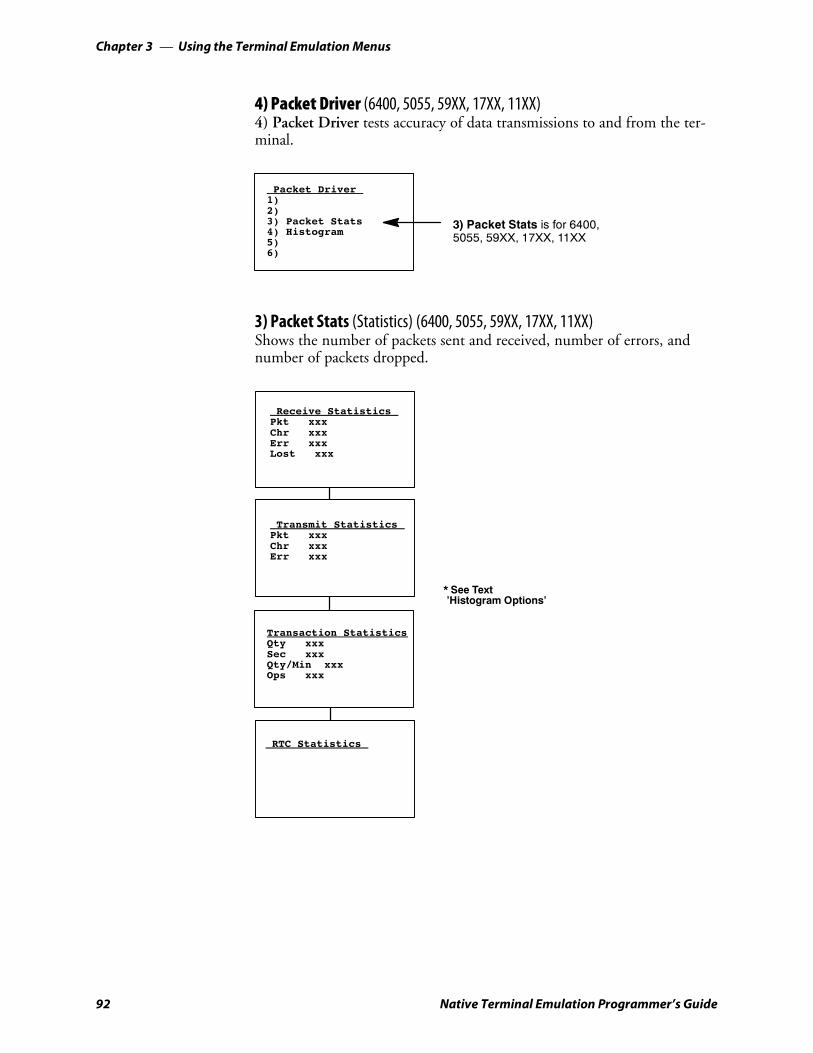
Using the Terminal Emulation MenusChapter —3
92 Native Terminal Emulation Programmer’s Guide
4) Packet Driver (6400, 5055, 59XX, 17XX, 11XX)4) Packet Driver tests accuracy of data transmissions to and from the ter-minal.
Packet Driver1)2)3) Packet Stats4) Histogram5)6)
3) Packet Stats is for 6400,5055, 59XX, 17XX, 11XX
3) Packet Stats (Statistics) (6400, 5055, 59XX, 17XX, 11XX)Shows the number of packets sent and received, number of errors, andnumber of packets dropped.
Receive StatisticsPkt xxxChr xxxErr xxxLost xxx
Transmit StatisticsPkt xxxChr xxxErr xxx
Transaction StatisticsQty xxxSec xxxQty/Min xxxOps xxx
RTC Statistics
* See Text’Histogram Options’

Using the Terminal Emulation Menus—Chapter 3
93Native Terminal Emulation Programmer’s Guide
4) HistogramAn Intermec engineer may ask you to access this menu if your terminal hasproblems. From this menu you can provide the Intermec system engineerwith vital information about your unit.The actual menus are not shown in this manual, however some of the gen-eral terminology is shown below. Several of the menu options, such as“Clear. . ., ” are password-protected and are only accessible if the engineerprovides you with the correct password. An Intermec system engineer willwork with you on these selections. Terminology you might see:S avg tx time S send retriesS avg trans time S rcv retriesS ptt (push-to-talk) count S reset countS addrs on list S interval timeS poll no data S time bucket #
Histogram1) Start2) Stop3) View
5) Numbers5) Numbers checks the operation of the terminal microprocessor. Duringthe test, the terminal display is filled with hexadecimal numbers that moveacross the screen horizontally and scroll vertically. Character movementindicates that the processor is still running. To stop the test, press any key.This test is helpful in detecting lockups during severe operating condi-tions.
6) Timed Numbers6) Timed Numbers does the same thing as 5) Numbers except that itkeeps track of the time in seconds that it took to run the test. The test ter-minates when a key is pressed or when 65,536 numbers are displayed.
5) Version Info (Information)5) Version Info shows the name, version, and release date of the programyou are using, the version of the radio driver, and the MAC address of the6400, 5055, or 11XX Terminal. See Chapter 1, “Getting Started,” for TEprogram names.
Version InfoFirmware
<TE Program Name>Version <number>Date <ddmmyy>MLID Name ZZZZZZMLID ver xx.xx(mac address)
MLID Name and MLIDver are for 6400, 5055
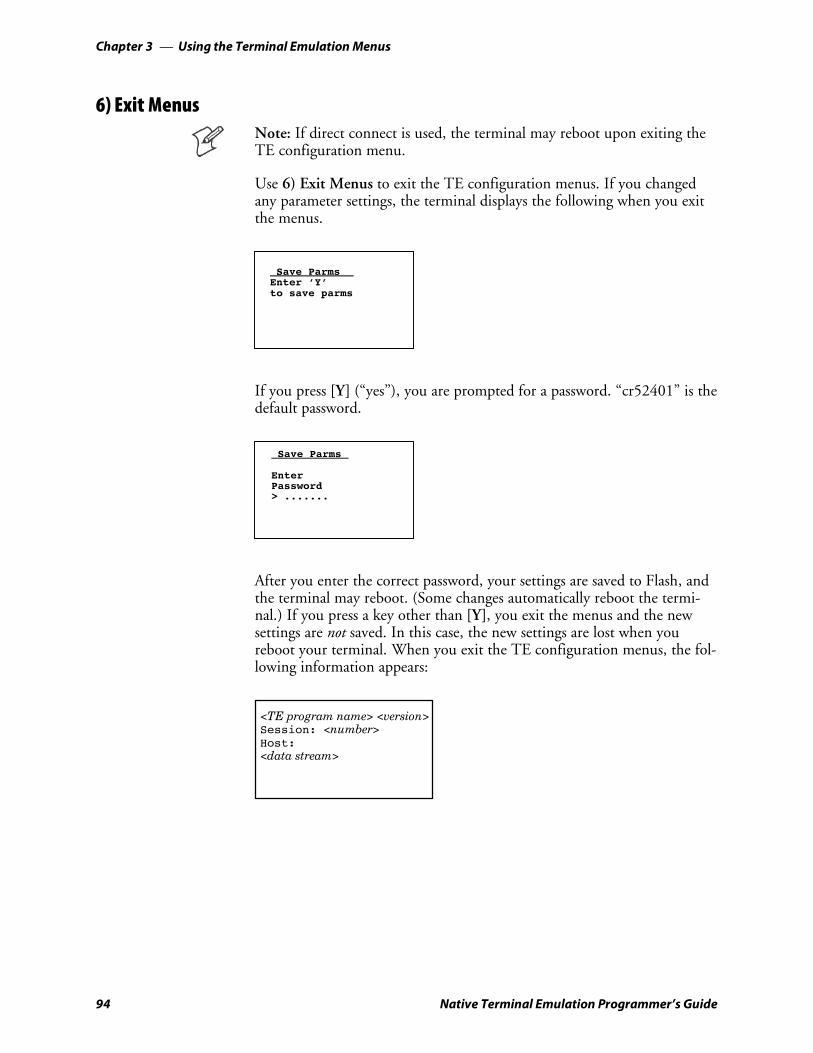
Using the Terminal Emulation MenusChapter —3
94 Native Terminal Emulation Programmer’s Guide
6) Exit MenusNote: If direct connect is used, the terminal may reboot upon exiting theTE configuration menu.
Use 6) Exit Menus to exit the TE configuration menus. If you changedany parameter settings, the terminal displays the following when you exitthe menus.
Save ParmsEnter ’Y’to save parms
If you press [Y] (“yes”), you are prompted for a password. “cr52401” is thedefault password.
Save Parms
EnterPassword> .......
After you enter the correct password, your settings are saved to Flash, andthe terminal may reboot. (Some changes automatically reboot the termi-nal.) If you press a key other than [Y], you exit the menus and the newsettings are not saved. In this case, the new settings are lost when youreboot your terminal. When you exit the TE configuration menus, the fol-lowing information appears:
<TE program name> <version>Session: <number>Host:<data stream>
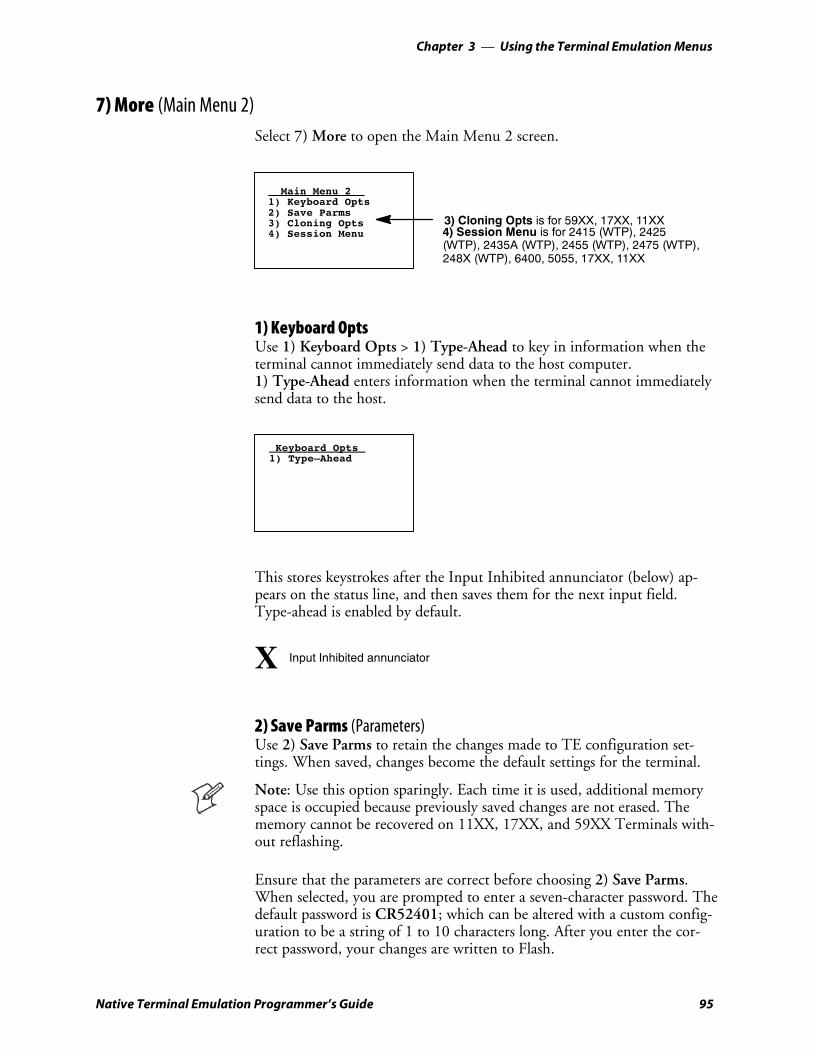
Using the Terminal Emulation Menus—Chapter 3
95Native Terminal Emulation Programmer’s Guide
7) More (Main Menu 2)Select 7) More to open the Main Menu 2 screen.
Main Menu 21) Keyboard Opts2) Save Parms3) Cloning Opts4) Session Menu 4) Session Menu is for 2415 (WTP), 2425
(WTP), 2435A (WTP), 2455 (WTP), 2475 (WTP),248X (WTP), 6400, 5055, 17XX, 11XX
3) Cloning Opts is for 59XX, 17XX, 11XX
1) Keyboard OptsUse 1) Keyboard Opts > 1) Type-Ahead to key in information when theterminal cannot immediately send data to the host computer.1) Type-Ahead enters information when the terminal cannot immediatelysend data to the host.
Keyboard Opts1) Type—Ahead
This stores keystrokes after the Input Inhibited annunciator (below) ap-pears on the status line, and then saves them for the next input field.Type-ahead is enabled by default.
X Input Inhibited annunciator
2) Save Parms (Parameters)Use 2) Save Parms to retain the changes made to TE configuration set-tings. When saved, changes become the default settings for the terminal.
Note: Use this option sparingly. Each time it is used, additional memoryspace is occupied because previously saved changes are not erased. Thememory cannot be recovered on 11XX, 17XX, and 59XX Terminals with-out reflashing.
Ensure that the parameters are correct before choosing 2) Save Parms.When selected, you are prompted to enter a seven-character password. Thedefault password is CR52401; which can be altered with a custom config-uration to be a string of 1 to 10 characters long. After you enter the cor-rect password, your changes are written to Flash.
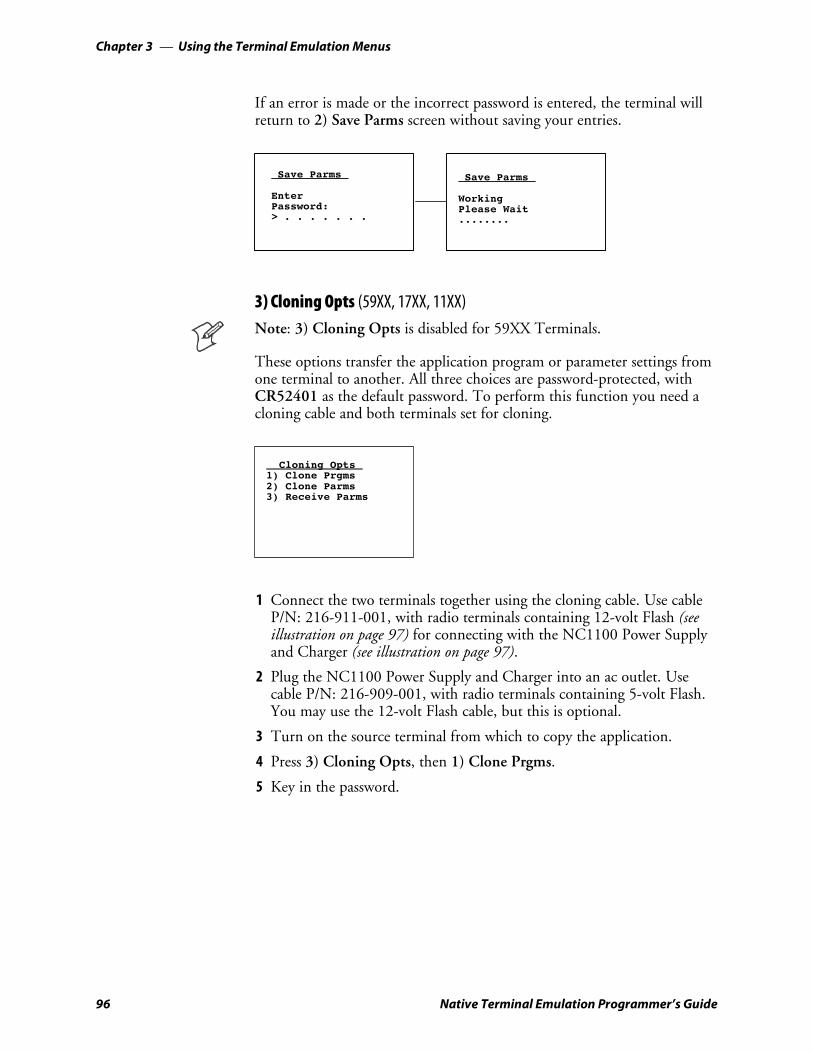
Using the Terminal Emulation MenusChapter —3
96 Native Terminal Emulation Programmer’s Guide
If an error is made or the incorrect password is entered, the terminal willreturn to 2) Save Parms screen without saving your entries.
Save Parms
EnterPassword:> . . . . . . .
Save Parms
WorkingPlease Wait........
3) Cloning Opts (59XX, 17XX, 11XX)Note: 3) Cloning Opts is disabled for 59XX Terminals.
These options transfer the application program or parameter settings fromone terminal to another. All three choices are password-protected, withCR52401 as the default password. To perform this function you need acloning cable and both terminals set for cloning.
Cloning Opts1) Clone Prgms2) Clone Parms3) Receive Parms
1 Connect the two terminals together using the cloning cable. Use cableP/N: 216-911-001, with radio terminals containing 12-volt Flash (seeillustration on page 97) for connecting with the NC1100 Power Supplyand Charger (see illustration on page 97).
2 Plug the NC1100 Power Supply and Charger into an ac outlet. Usecable P/N: 216-909-001, with radio terminals containing 5-volt Flash.You may use the 12-volt Flash cable, but this is optional.
3 Turn on the source terminal from which to copy the application.
4 Press 3) Cloning Opts, then 1) Clone Prgms.
5 Key in the password.
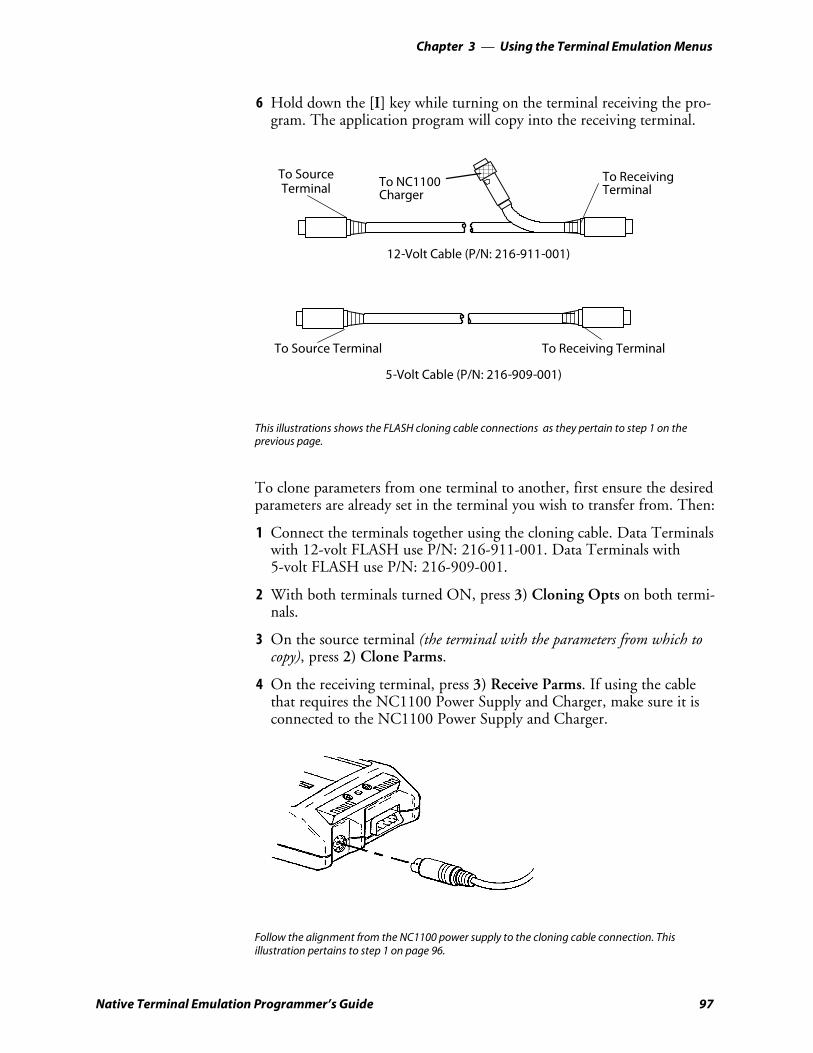
Using the Terminal Emulation Menus—Chapter 3
97Native Terminal Emulation Programmer’s Guide
6 Hold down the [I] key while turning on the terminal receiving the pro-gram. The application program will copy into the receiving terminal.
To NC1100Charger
To ReceivingTerminal
To SourceTerminal
To Source Terminal To Receiving Terminal
12-Volt Cable (P/N: 216-911-001)
5-Volt Cable (P/N: 216-909-001)
This illustrations shows the FLASH cloning cable connections as they pertain to step 1 on theprevious page.
To clone parameters from one terminal to another, first ensure the desiredparameters are already set in the terminal you wish to transfer from. Then:
1 Connect the terminals together using the cloning cable. Data Terminalswith 12-volt FLASH use P/N: 216-911-001. Data Terminals with5-volt FLASH use P/N: 216-909-001.
2 With both terminals turned ON, press 3) Cloning Opts on both termi-nals.
3 On the source terminal (the terminal with the parameters from which tocopy), press 2) Clone Parms.
4 On the receiving terminal, press 3) Receive Parms. If using the cablethat requires the NC1100 Power Supply and Charger, make sure it isconnected to the NC1100 Power Supply and Charger.
Follow the alignment from the NC1100 power supply to the cloning cable connection. Thisillustration pertains to step 1 on page 96.

Using the Terminal Emulation MenusChapter —3
98 Native Terminal Emulation Programmer’s Guide
4) Session Menu (2415, 2425, 2435A, 2455, 2475, 248X with WTP, 6400, 5055,59XX, 17XX, 11XX)4) Session Menu defines different host communication sessions and desig-nates a “hot key” that allows switching quickly between the different ses-sions.
1) SwitchUse this option to change the current session. The current (or intended)session must be identified (or designated) before setting Parameters.
2) Set Hot Key (available on units supporting session-switching)Displays the current hot key. Use the up and down keys to view the avail-able choices. Press [Enter] to designate a key for the hot key.
3) Copy Setup (password-protected)This copies parameters from the background session to the current session.
Set Hot KeyUse Cursor UpAnd Down KeysTo Adjust
< xx >
Select SessionUse Cursor UpAnd Down KeysTo Adjust
Session: xHost: xxxx<Datastream>.....xxx
Session Menu1) Switch2) Set Hot Key3) Copy Setup4)
[1] [2]
Restarting Terminal EmulationNote: The reset firmware bar code is not supported on the 59XX, 17XX,or 11XX Terminals. Instead, do the cold-start function to exit the TE ap-plication and return to the Windows CE main menu.
You need to restart your TE application if you are having problems or ifyou want to reconnect to the host with a new configuration. Restartingyour TE application also clears the auto-login information, preventinganother user from establishing a TE session using your login information.
You can restart your TE application by either scanning the following ResetFirmware bar code or by using the 6) Cold Start option in the TE config-uration Main Menu. Both methods reset all terminal firmware and theapplication and run the application in a new session.Reset Firmware
*/M.**-.*

Using the Terminal Emulation Menus—Chapter 3
99Native Terminal Emulation Programmer’s Guide
The terminal restarts your TE application using the configuration saved inCONFIG.DAT, or follow this procedure:
1 At the third initialization screen or anywhere in a TE session, access theMain Menu by pressing the appropriate key combination (see page 4).
COPR. 1991-2005INTERMEC. ALLRIGHTS RESERVEDV<version number><release date>
<program name> <version>Host: <host name><emulation type>
TE2000(TM)
Note: If you are not connected to the Intermec Application Server or host,or have problems accessing the Main Menu, reset your terminal to go tothe initialization screens.
2 Select 1) Setup Parms, then enter the “cr52401” password. Do not pressEnter.
3 Select 6) Cold Start, press [Y] when prompted to restart, then startusing the application or change the TE configuration.
See the terminal’s user guide or manual for information on how to recoverfrom a lock-up condition.

Using the Terminal Emulation MenusChapter —3
100 Native Terminal Emulation Programmer’s Guide
2415, 2425, 2435A, 2455, 2475, 248X Terminals
The following instructions are specific for 2415, 2425, 2435A, 2455,2475, and 248X Terminals.
You can configure several options for 3270 TE on your Trakker AntaresR
Terminal, including:
S TCP/IP communications
S Native options
S Main Menu password
You can access the TE configuration menus when the initialization screensappear or once you establish a TE session. The TE initialization screensappear each time you reboot the terminal or restart your application.
Note: Some parameters for 2415, 2425, 2435A, 2455, 2475, and 248XTerminals are available through the TRAKKER Antares 2400 Menu Sys-tem. They are not reproduced in the TE configuration menus. See the ter-minal’s user manual for information about the menu system.
6400 Computer
The terminal emulation screens support terminals running Intermec Ter-minal Emulation or 6400 TCP/IP software. This describes the menus usedto set operating and scanning parameters for the hand-held computer.Additional information can be found in the technical overview for youremulation program.
Note: Ensure there is a fully-charged battery pack in the 6400 Computerbefore setting parameters.
Opening the Main MenuThe Main Menu is the first screen displayed when you open the computermenus. All other menus are accessed from the Main Menu. To open theMain Menu, press [Yellow], then [Blue]. Briefly, these keys generally op-erate as:
S [Blue] for functions labeled by blue legends above the keys.
S [Green] for functions labeled by green legends above the keys.
S [Yellow] for functions labeled by yellow legends above the keys.
S [Blue], then [Green] is CAPS LOCK.
S [Blue], then [Yellow] is Alphabetic Lock (6400 Computer 41-key units).
S [Yellow], then [Blue] is Terminal Emulation menus; your particularemulation software probably treat the keys for contrast control, back-lighting and other functions differently.

Using the Terminal Emulation Menus—Chapter 3
101Native Terminal Emulation Programmer’s Guide
To Exit Emulation Mode and Return to DOSDo a cold-restart to exit the current emulation program and return back tothe DOS keyboard layout. Press [Y], press [Enter] several times to put youat the DOS C:\ prompt. To exit to the beginning of the current emula-tion, press and hold [Blue] and [Yellow], and both [ENT] keys to do thehard reset.
5055 Data Collection PCIf you are running terminal emulations and ever update the DOS loadon the internal SanDisk IDE drive on the 5055 PC, be aware thatwhen updating 50DS1000, avoid copying the CONFIG.SYS andAUTOEXEC.BAT files. The new versions of these two files mayinterfere with existing applications, such as Terminal Emulations. Ifaffected, Terminal Emulations will automatically run on boot up.
In all other situations, do copy the CONFIG.SYS andAUTOEXEC.BAT files.
This contains information about the terminal emulations with keyboardssupported for the IntermecR 5055 Data Collection PC.
The 5055 PC supports terminal emulations with rugged keyboards.FWP650H0 is DOS-based and is not compatible with Windows DOSprompts.
An external PS/2-compatible keyboard is required for configuring and us-ing terminal emulations.
Terminal emulation font files are needed to generate the various characterfonts. See the related terminal emulation programmer’s reference guide foradditional information.
Using the Terminal Emulation MenusChapter —3
102 Native Terminal Emulation Programmer’s Guide
Programs to Create Terminal Emulation MenusThe Terminal Emulation Menu Screens are provided to support terminalsrunning Intermec Terminal Emulation software. This describes the menusthat set operating and scanning parameters for the 5055 PC. Additionalinformation can be found in the programmer’s guide or technical overviewfor your emulation program.
When you power on the 5055 PC, the AUTOEXEC.BAT file executesthe following programs, in sequential order, to create the terminal emula-tion menus. Listed are their descriptions.
S LSLCreates the link layer for the protocol stack.
S rl2pcmIncludes the Proxim radio driver for the Proxim RangeLAN2 radio, orwvlan43Includes the WaveLAN/IEEE radio driver for the 802.11b HR radio.
S 6500ikpsInstalls multitasking, beeper, and key remapping TSRs.
S wtppktIncludes the WTP Packet driver program if a WTP link accesses thehost computer, orethdrv and odipktIncludes the Ethernet and ODI Packer driver programs if a TCP/IP linkand a controller are used to gain access to the host computer.
S 65scn7b -c1Activates the scanner driver.
S 6500dbcsIntercepts INT10 and display characters on the display.
S fwp650h0Activates the terminal emulation program.
Press <Alt>, then [M] on the external keyboard to access the setup menus.
Note: On terminal emulation keyboards, use the [Yellow] key in place ofthe <Alt> key. For example, to access the Setup Menus, press [Yellow],then [M].

Using the Terminal Emulation Menus—Chapter 3
103Native Terminal Emulation Programmer’s Guide
Opening the Main MenuThe Main Menu is the first screen displayed when you open the computermenus. All other menus are accessed from the Main Menu.
To open the Main Menu, press [Yellow], then [Blue] (MENU). Briefly,these keys generally operate as:
S [Blue] for functions labeled by blue legends above the keys.
S [Green] for functions labeled by green legends above the keys.
S [Yellow] for functions labeled by yellow legends above the keys.
S [Blue], then [Green] is CAPS LOCK.
S [Yellow], then [Blue] is Terminal Emulation menus; your particularemulation software probably treat the keys for contrast control, back-lighting and other functions differently.
To Exit Emulation Mode and Return to DOSDo a cold-restart to exit the current emulation program and return back tothe DOS keyboard layout. Press [Y], then press [Enter] several times toarrive at the DOS C:\ prompt. To exit to the beginning of the currentemulation, press and hold [Blue] and [Yellow], and both [ENT] keys todo the hard reset.

Using the Terminal Emulation MenusChapter —3
104 Native Terminal Emulation Programmer’s Guide
105Native Terminal Emulation Programmer’s Guide
Customizing YourConfiguration4
This chapter describes the procedures you can use to customize the stan-dard Native TE program by Intermec Technologies Corporation. You cus-tomize the TE program by creating or modifying configuration files, andthen downloading them to your terminal to do the following:
S Use the auto-login feature to send the same login information each timeyou login to the host (page 106).
S Create a custom parameter set-up file to download a customized file toall terminals so they have the same setup information (page 114).
S Change the text of TE configuration menus or system messages (page133).
S Preinitialize the Native TE program (page 134).
S Remap national characters (page 140).
S Substitute national characters (page 141).
Customizing Your ConfigurationChapter —4
106 Native Terminal Emulation Programmer’s Guide
Using the Auto-Login FeatureUse the auto-login feature to send the same login information each timeyou login to the host. When you start the TE application, the terminalchecks for an auto-login script file. If a script file exists, the terminal runsthe login commands from the auto-login script file before the TE programstarts.
To use the auto-login feature, you need to develop an auto-login script fileand load the auto-login script file on the terminal. These steps are coveredon the following pages along with a list of the necessary control charactersand the procedure for disabling the auto-login feature.
Developing Auto-Login Script FilesA typical auto-login script file consists of Input and InputHidden com-mands followed by a HostName command, followed by a series of Wait-For and Send commands. A very simple script file may not have any inputcommands if all of the terminals are using the same account.
Note: The auto-login script must be an ASCII text file withAUTOLOG.SCR as the required file name or the file is not processed.
CommandsYou can use several commands to create auto-login script files. All com-mands are case-sensitive. For example, WaitFor is a command, butWaitfor is not a valid command. For examples of script files, see “SampleAuto-Login Script Files” on page 111.
S InputThis is called with two parameters. The first one is a character stringenclosed in quotes used as a prompt to the user. The second one is astring variable name indicating where the text string will be stored.
S InputHiddenSame as the Input script command except that user input is echoed as astring of asterisks.
S HostNameThis command is case-sensitive and must be presented as mixed-caseletters. HostName is followed by a character string enclosed in quotes.The character string can be a host name or an asterisk. The HostNamecommand acts as an IF clause. If the host name matches, the followingsection of the script file is executed up to the next HostName com-mand. If an asterisk is used, it matches any host name.
S WaitForWait for a list of up to ten strings. The strings must be enclosed inquotes and must be separated by a comma. The strings cannot exceed20 characters in length.
S SendThis command sends a character string enclosed in quotes or a stringvariable to the host. The character string enclosed in quotes can haveembedded IBM mnemonics in Native TE.
Customizing Your Configuration—Chapter 4
107Native Terminal Emulation Programmer’s Guide
S Pause “xxxxx”Delays the terminal for x milliseconds, halts terminal operation fromreceiving and processing for the duration specified.
S PromptSessionStartThis command is a predefined variable. If this variable is defined and setto any value other than 0, the application prompts the user to press [En-ter] before starting a Telnet session with the host. Do not put quotesaround the variable.
S Restart “x”Restarts the autologin script file. The “x” is a dummy argument.
S Keyboard “0”Disables the keyboard. Key presses are ignored. For additional informa-tion, see Note below.
S Keyboard “1”Enables the keyboard. Key presses are processed. The keyboard is en-abled by default. For additional information, see Note below.
S # (pound symbol)Documents the script file. Text following a # (pound) symbol is consid-ered a comment unless the # symbol is in a quoted string.
Note: Input the Keyboard “0” or Keyboard “1” command into the auto-login script file after the PromptSessionStart command (if present) andthe HostName command (if present). Also turn on the keyboard com-mand before another HostName command is found in the file.
Search StringsSome auto-login search string limitations are as follows. You can use linewrapping to look for unique strings.
S The searches are case sensitive.
S The maximum search string length is 20 characters.
S Each WaitFor command searches the entire screen from the top.
If a screen from the host has multiples of the word you are looking for,you can use the preceding spaces to identify a unique string.
ExampleIf the screen sent to the terminal is:
Linux rlogin 2.4.6login
The autologin script would be:PromptSessionStart=1HostName “*”#wait for host login screen and send login and passwordWaitFor “login”Send “billy<ENTER>”WaitFor “password”Send “letmein<ENTER>”
In this example, you can search for the three leading spaces from the endof the previous line to make a unique search string.
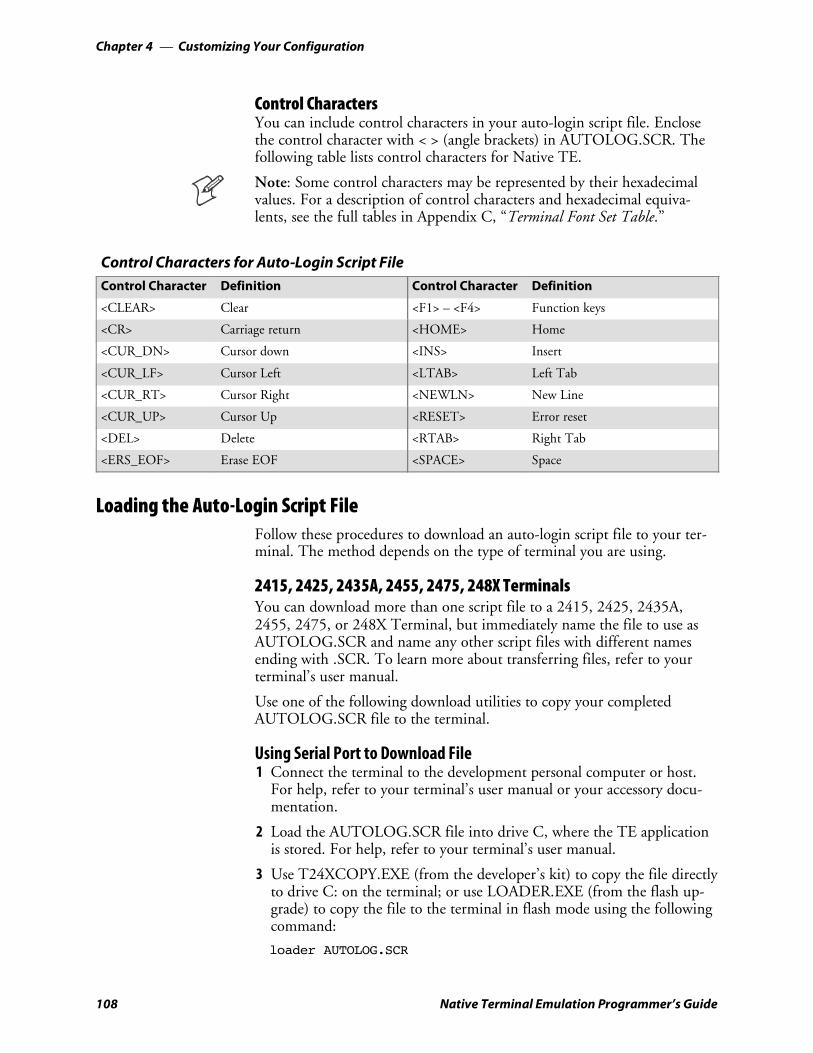
Customizing Your ConfigurationChapter —4
108 Native Terminal Emulation Programmer’s Guide
Control CharactersYou can include control characters in your auto-login script file. Enclosethe control character with < > (angle brackets) in AUTOLOG.SCR. Thefollowing table lists control characters for Native TE.
Note: Some control characters may be represented by their hexadecimalvalues. For a description of control characters and hexadecimal equiva-lents, see the full tables in Appendix C, “Terminal Font Set Table.”
Control Characters for Auto-Login Script FileControl Character Definition Control Character Definition
<CLEAR> Clear <F1> – <F4> Function keys
<CR> Carriage return <HOME> Home
<CUR_DN> Cursor down <INS> Insert
<CUR_LF> Cursor Left <LTAB> Left Tab
<CUR_RT> Cursor Right <NEWLN> New Line
<CUR_UP> Cursor Up <RESET> Error reset
<DEL> Delete <RTAB> Right Tab
<ERS_EOF> Erase EOF <SPACE> Space
Loading the Auto-Login Script FileFollow these procedures to download an auto-login script file to your ter-minal. The method depends on the type of terminal you are using.
2415, 2425, 2435A, 2455, 2475, 248X TerminalsYou can download more than one script file to a 2415, 2425, 2435A,2455, 2475, or 248X Terminal, but immediately name the file to use asAUTOLOG.SCR and name any other script files with different namesending with .SCR. To learn more about transferring files, refer to yourterminal’s user manual.
Use one of the following download utilities to copy your completedAUTOLOG.SCR file to the terminal.
Using Serial Port to Download File1 Connect the terminal to the development personal computer or host.
For help, refer to your terminal’s user manual or your accessory docu-mentation.
2 Load the AUTOLOG.SCR file into drive C, where the TE applicationis stored. For help, refer to your terminal’s user manual.
3 Use T24XCOPY.EXE (from the developer’s kit) to copy the file directlyto drive C: on the terminal; or use LOADER.EXE (from the flash up-grade) to copy the file to the terminal in flash mode using the followingcommand:
loader AUTOLOG.SCR
Customizing Your Configuration—Chapter 4
109Native Terminal Emulation Programmer’s Guide
Using RF Communications to Download FileNote: Loading the AUTOLOG.SCR file from the Intermec ApplicationServer is supported.
1 Copy the AUTOLOG.SCR file to the Intermec Application Server.
2 Configure the download server on the Intermec Application Server tosend AUTOLOG.SCR to the terminals in groups of 10 or less.
3 Start the download.When you reset your terminal, it clears the auto-login information, suchas the password and user’s name. You can cancel the auto-login processby pressing any key during the auto-login sequence. When a host ses-sion is broken, you can restart the auto-login sequence by rebootingyour terminal.
6400, 5055 TerminalsUse INTERLNK/INTERSVR communications to connect your terminalto a personal computer. For help, see “Downloading Files” on page 144.
You must load AUTOLOG.SCR into drive C, where the TE applicationis stored.
59XX, 17XX, 11XX TerminalsThe download process requires flash and utility files.
1 Using FLSHCONV.EXE from the TOOLS.EXE file from the flashprogram, append the AUTOLOG.SCR file to the end of the .HEX pro-gram. Below are sample command lines for each terminal type:
S 11XX Terminal with 256K flash (this uses 1180, but applies to all radio types):
flshconv –eC000 –a fwp118c0.hex AUTOLOG.scr–oNEW1180.HEX
S 11XX Terminal with 512K flash (this uses 1180, but applies to all radio types):
flshconv –eFFC0 –a fwp118h0.hex AUTOLOG.scr–oNEW1180.HEX
S 17XX Terminal (example uses 1780, but applies to all radio types);
flshconv –eFFC0 –a fwp178h0.hex AUTOLOG.scr–oNEW1780.HEX
S 59XX Terminal (example uses 5980, but applies to all radio types):
flshconv –eE000 –a fwp598h0.hex AUTOLOG.scr–oNEW5980.HEX
2 Using PROGDUX.EXE from the flash files, load the NEW.HEX fileonto the terminal. Below is a sample command line using the 1780Terminal:
PROGDUX –e NEW178H0.HEX

Customizing Your ConfigurationChapter —4
110 Native Terminal Emulation Programmer’s Guide
Disabling the Auto-Login FeatureTo disable auto-login, you may rename or delete the AUTOLOG.SCRfile. Renaming the file ensures that you can use the same auto-login scriptfile later by changing the name back to AUTOLOG.SCR. If you want toenable a new script file, you can use the instructions in this section torename a different script file to AUTOLOG.SCR.
Follow these procedures to disable (or delete) the auto-login script file.The method depends on the type of terminal you are using.
2415, 2425, 2435A, 2455, 2475, 248X Terminals1 Press the appropriate key sequence or scan the following bar code to ac-
cess the TRAKKER AntaresR 2400 Menu System’s Main Menu:
Enter Test and Service Mode
*../M.**..-.*
2 Choose System Menu and then choose File Manager.
3 Select drive C. Press Y or B to highlight AUTOLOG.SCR.
4 Press [FnL .] to delete the file or press [F7] to rename the file.
5 Exit the TRAKKER Antares 2400 Menu System to return to your cur-rent TE session. Restart the TE application to use TE without the auto-login.
You can also rename the auto-login script file from your host. For help,refer to your terminal’s user manual.
6400, 5055 Terminals1 Reboot the terminal to a DOS prompt.
S For the 6400 Computer:press and hold the yellow, blue, and both green enter keys until theterminal resets. Watch the screen as the terminal boots and press 0(zero) when the prompt appears.
S For the 5055 Data Collection PC:power-cycle the terminal and select the minimum DOS prompt fromthe boot menu.
2 Rename or delete the AUTOLOG.SCR file.
3 Reboot the terminal again and allow it to complete the boot into termi-nal emulation.
59XX, 17XX, 11XX TerminalsTo disable auto-login on a 59XX, 17XX, or 11XX Terminal, reload theterminal with unmodified flash, then perform a cold start to flush the me-mory. The flash file does not allow selective erasing; files can be added, butnot removed without removing all files.

Customizing Your Configuration—Chapter 4
111Native Terminal Emulation Programmer’s Guide
Sample Auto-Login Script FilesYou can use these sample script files as they are or as the starting point forcreating your own auto-login script files.
Example 1Auto-Login With All Terminals Using the Same AccountHostName “*” #Use this to log into any hostWaitFor “login:” #Wait for the login promptSend “username<NEWLN>” #Send the user nameWaitFor “Password:” #Wait for the password promptSend “letmein<ENTER>” #Send the password
S The HostName command matches the host the user accesses.S The WaitFor command waits for a string to be displayed by the host. WaitFor takes up to 10strings, 20 characters long. The strings must be enclosed in quotes and separated by a comma.S The first Send command sends a fixed user name. The second Send command sends a fixedpassword.S Angle brackets < and > can enclose uppercase mnemonics or hexadecimal values.
Example 2Auto-Login With Different User Names and PasswordsInput “Enter user name”, username #Prompt for user nameInputHidden “Enter password”, password #Prompt for passwordHostName “*”WaitFor “login:” #Wait for login promptSend username #Send the user nameSend “<NEWLN>” #Send a carriage returnWaitFor “Password:” #Wait for passwordpromptSend password #Send the users passwordSend “<ENTER>” #Send a carriage return
S The Input and Send commands use input variables. Input commands require a prompt stringfollowed by a comma and a variable name in which to store the string.S The InputHidden command will display “*” in place of any characters the user types. All Inputcommands must be before the first HostName command.S The Send command only accepts a single argument, so you need two Send commands to send theuser name and a carriage return.

Customizing Your ConfigurationChapter —4
112 Native Terminal Emulation Programmer’s Guide
Example 3Auto-Login to an ApplicationInput “Enter user name”, username #Prompt for user nameInputHidden ”Enter Password”, password #Prompt for passwordHostName “*”WaitFor “login:” #Wait for login promptSend username #Send the user nameSend “<NEWLN>” #Send a carriage returnWaitFor “Password:” #Wait for password promptSend password #Send the users passwordSend “<ENTER>” #Send a carriage returnWaitFor “Main Menu” #Wait for the main menuSend “3”Send “<ENTER>” #Pick option 3 from menuWaitFor “Wip Menu” #Await work-in-process menuSend “1”Send “<ENTER>” #Pick option 1 from menu
S Example 3 modifies the script file in Example 2. The additional modification (which starts withWaitFor “Main Menu”) allows you to move automatically to an application after logging in.
Example 4Auto-Login With Variable ProcessingInput “Enter user name”, username #Prompt for user nameInputHidden “Enter Password”, password #Prompt for passwordHostName “BigHost” #Use script portion for BigHostWaitFor “User:” #Wait for the user promptSend username #Send the user nameSend “<NEWLN>” #Send a carriage returnWaitFor “Password:” #Wait for password promptSend password #Send the users passwordSend “<ENTER>” #Send a carriage returnHostName “*” #Match any host nameWaitFor “login:” #Wait for login promptSend username #Send the user nameSend “<NEWLN>” #Send a carriage returnWaitFor “Password:” #Wait for password promptSend password #Send the users passwordSend “<ENTER>” #Send a carriage returnWaitFor “Main Menu” #Wait for the main menuSend “3”Send “<ENTER>” #Pick option 3 from menuWaitFor “Wip Menu” #Await work-in-process menuSend “1”Send “<ENTER>” #Pick option 1 from menu
S A section for the host name BigHost is added to the beginning of the script file. If you log into anyhost other than BigHost, the script file starts at the HostName “*” line. This allows for differentprocessing on each host.
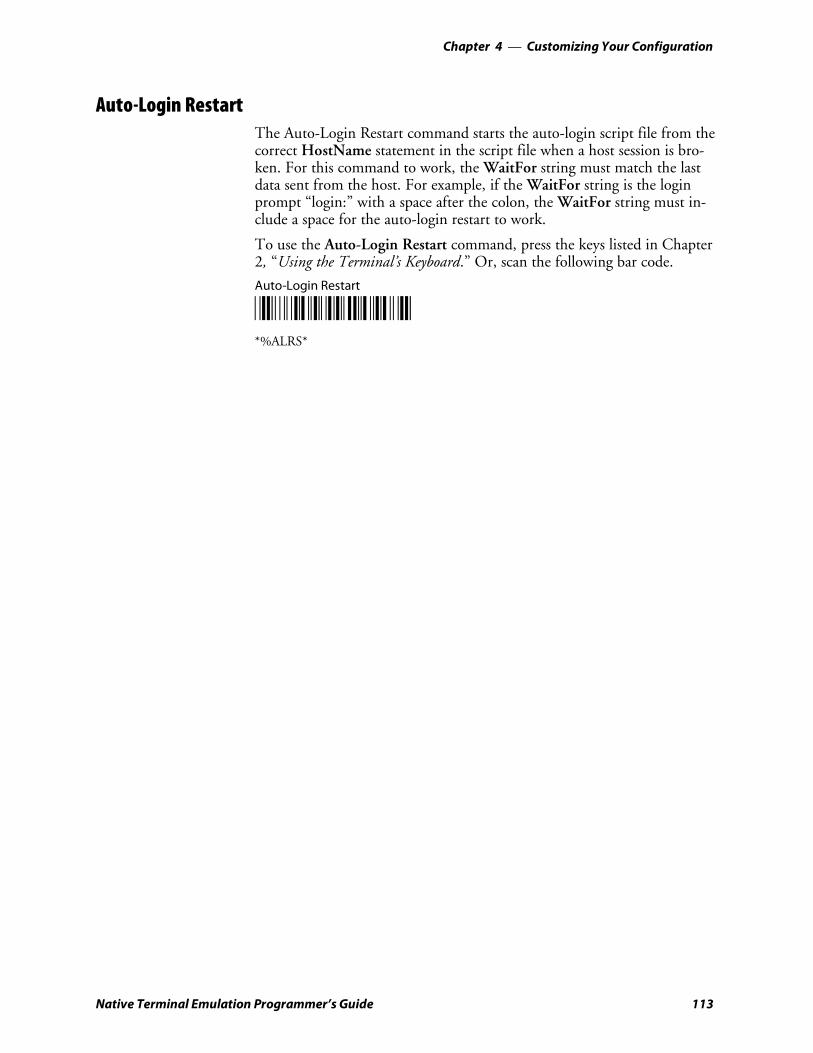
Customizing Your Configuration—Chapter 4
113Native Terminal Emulation Programmer’s Guide
Auto-Login RestartThe Auto-Login Restart command starts the auto-login script file from thecorrect HostName statement in the script file when a host session is bro-ken. For this command to work, the WaitFor string must match the lastdata sent from the host. For example, if the WaitFor string is the loginprompt “login:” with a space after the colon, the WaitFor string must in-clude a space for the auto-login restart to work.
To use the Auto-Login Restart command, press the keys listed in Chapter2, “Using the Terminal’s Keyboard.” Or, scan the following bar code.
Auto-Login Restart
*/EALRS**%ALRS*
Customizing Your ConfigurationChapter —4
114 Native Terminal Emulation Programmer’s Guide
Creating a Custom Parameter Set-Up FileYou can create a custom Native TE set-up file to preset almost any param-eter you can set from the TE configuration menus. These parameter set-tings become the default (cold start) configuration for the terminal.
CONFIG.DAT SettingsNote: CHECKCFG.EXE is no longer used except for Trakker AntaresTerminals 2415, 2425, 2435A, 2455, 2475, or 248X. This information isincluded for Trakker Antares users.
CONFIG.DAT SyntaxThe parameter setup file is an ASCII text file that you create which getsconverted to a binary file by the CHECKCFG.EXE utility. New terminalsdo not come with this utility but it is available by request from the systemengineer; or, if you ordered the upgrade version, it is included in theTOOLS.EXE self-extracting file.
You can name the input file as you choose. When you use theCHECKCFG utility later to verify the file, you must change the outputfile name to CONFIG.DAT. A field may have zero or more qualifiers.
The syntax of a line is FieldName = Value; orQualifier.FieldName = Value;
S FieldName is the name of the parameter you want to modify.
S Value is the new value for the field.
S Qualifier and FieldName must be ASCII strings that match one of theconfiguration parameters.
S Value can be an ASCII string or a numeric value, depending on the typeof the parameter FieldName specifies. The parameters along with theirtypes and allowable values are listed under “Parameters and Qualifiers”later in this chapter.
CHECKCFG.EXE ignores blank lines, leading white space (spaces andtabs), and white space on either side of any delimiter (period, equal sign,or semicolon).
In addition, the set-up file converts consecutive white space characterswithin strings to one space. For example, this line:
Screen Mode = Page Mode ;
is the same as: Screen Mode=Page Mode;
You can set the Value field of any configuration parameter to “?”, whichindicates that the TE configuration program should prompt the user forthe appropriate value. For example, this parameter causes the terminal toprompt the user to select a screen mode from the list of values.

Customizing Your Configuration—Chapter 4
115Native Terminal Emulation Programmer’s Guide
Following is a sample setup file:
Screen Mode = ?;
Program Name = MYCUSTOM;
Screen Mode = Page Mode;
Host A.Port Number = 1;
Data Stream = Native;Code 39.Encoded = Enabled;Extended Cmds = Enabled;
CONFIG.DAT Parameter FormatsYou can direct the complete parameter list with value definitions to a fileusing this command: CHECKCFG –P CFGLIT.DAT > parms.txt
Each parameter in the setup file is followed by one of three different for-mats that indicates the type of parameter and the values it can contain.
S Literal strings. List of fixed values to choose from. Session 1 or 2 mayqualify Screen Mode. It may take the value Center Cursor, CornerMode, Page Mode, Lazy Mode, or Locked Mode. Session 1 is the de-fault qualifier. These configuration lines are valid:
Screen Mode = Lazy Mode;Session 1.Screen Mode = Lazy Mode;Session 2.Screen Mode = Lazy Mode;
S Numeric parameters. Numeric parameters have minimum and maxi-mum values. Parameters can be either decimal or hexadecimal:
S Decimal parameters consist of digits 0 through 9.
S Hexadecimal parameters consist of 0x or 0X, followed by 1 to 4 digitsof 0 through 9, a through f, or A through F. These are equivalent:160, 0xA0, and 0Xa0.
Port Number is a variable with a minimum value of 0 and a maximumof 65535. These lines are valid:
Port Number = 1;Session 1.Host A.Port Number = 1;Session 2.Host A.Port Number = 1;
S String parameters. String parameters are variables with minimum andmaximum lengths.
Program Name is unqualified. It must have eight characters. These con-figuration lines are valid:
Program Name = ABCDEFGH;Program Name = FWP248H0;
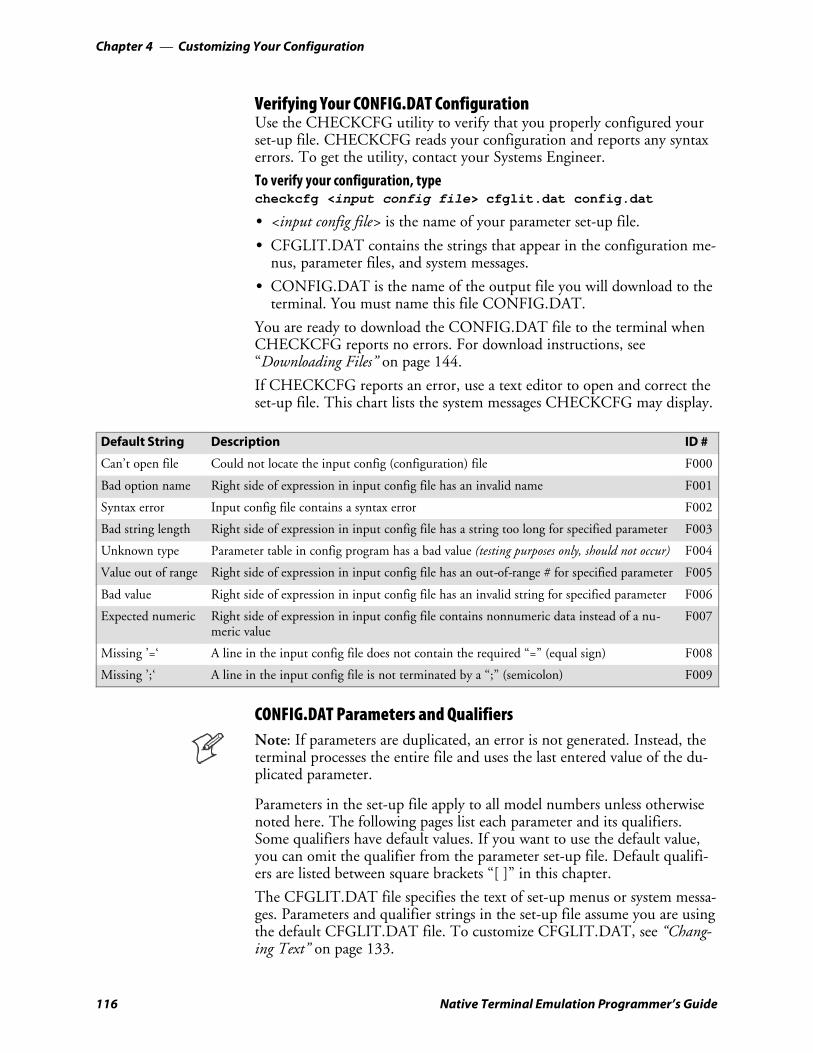
Customizing Your ConfigurationChapter —4
116 Native Terminal Emulation Programmer’s Guide
Verifying Your CONFIG.DAT ConfigurationUse the CHECKCFG utility to verify that you properly configured yourset-up file. CHECKCFG reads your configuration and reports any syntaxerrors. To get the utility, contact your Systems Engineer.
To verify your configuration, typecheckcfg <input config file> cfglit.dat config.dat
S <input config file> is the name of your parameter set-up file.
S CFGLIT.DAT contains the strings that appear in the configuration me-nus, parameter files, and system messages.
S CONFIG.DAT is the name of the output file you will download to theterminal. You must name this file CONFIG.DAT.
You are ready to download the CONFIG.DAT file to the terminal whenCHECKCFG reports no errors. For download instructions, see“Downloading Files” on page 144.
If CHECKCFG reports an error, use a text editor to open and correct theset-up file. This chart lists the system messages CHECKCFG may display.
Default String Description ID #
Can’t open file Could not locate the input config (configuration) file F000
Bad option name Right side of expression in input config file has an invalid name F001
Syntax error Input config file contains a syntax error F002
Bad string length Right side of expression in input config file has a string too long for specified parameter F003
Unknown type Parameter table in config program has a bad value (testing purposes only, should not occur) F004
Value out of range Right side of expression in input config file has an out-of-range # for specified parameter F005
Bad value Right side of expression in input config file has an invalid string for specified parameter F006
Expected numeric Right side of expression in input config file contains nonnumeric data instead of a nu-meric value
F007
Missing ’=‘ A line in the input config file does not contain the required “=” (equal sign) F008
Missing ’;‘ A line in the input config file is not terminated by a “;” (semicolon) F009
CONFIG.DAT Parameters and QualifiersNote: If parameters are duplicated, an error is not generated. Instead, theterminal processes the entire file and uses the last entered value of the du-plicated parameter.
Parameters in the set-up file apply to all model numbers unless otherwisenoted here. The following pages list each parameter and its qualifiers.Some qualifiers have default values. If you want to use the default value,you can omit the qualifier from the parameter set-up file. Default qualifi-ers are listed between square brackets “[ ]” in this chapter.
The CFGLIT.DAT file specifies the text of set-up menus or system messa-ges. Parameters and qualifier strings in the set-up file assume you are usingthe default CFGLIT.DAT file. To customize CFGLIT.DAT, see “Chang-ing Text” on page 133.
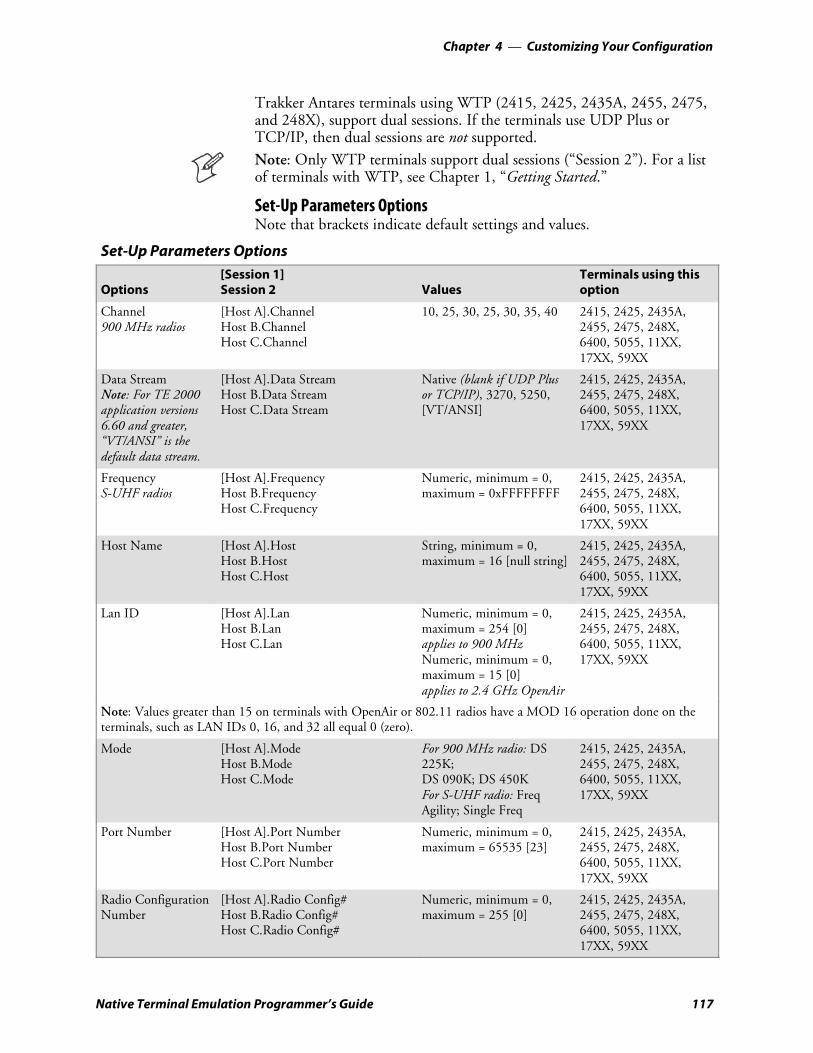
Customizing Your Configuration—Chapter 4
117Native Terminal Emulation Programmer’s Guide
Trakker Antares terminals using WTP (2415, 2425, 2435A, 2455, 2475,and 248X), support dual sessions. If the terminals use UDP Plus orTCP/IP, then dual sessions are not supported.Note: Only WTP terminals support dual sessions (“Session 2”). For a listof terminals with WTP, see Chapter 1, “Getting Started.”
Set-Up Parameters OptionsNote that brackets indicate default settings and values.
Set-Up Parameters Options
Options[Session 1]Session 2 Values
Terminals using thisoption
Channel900 MHz radios
[Host A].ChannelHost B.ChannelHost C.Channel
10, 25, 30, 25, 30, 35, 40 2415, 2425, 2435A,2455, 2475, 248X,6400, 5055, 11XX,17XX, 59XX
Data StreamNote: For TE 2000application versions6.60 and greater,“VT/ANSI” is thedefault data stream.
[Host A].Data StreamHost B.Data StreamHost C.Data Stream
Native (blank if UDP Plusor TCP/IP), 3270, 5250,[VT/ANSI]
2415, 2425, 2435A,2455, 2475, 248X,6400, 5055, 11XX,17XX, 59XX
FrequencyS-UHF radios
[Host A].FrequencyHost B.FrequencyHost C.Frequency
Numeric, minimum = 0,maximum = 0xFFFFFFFF
2415, 2425, 2435A,2455, 2475, 248X,6400, 5055, 11XX,17XX, 59XX
Host Name [Host A].HostHost B.HostHost C.Host
String, minimum = 0,maximum = 16 [null string]
2415, 2425, 2435A,2455, 2475, 248X,6400, 5055, 11XX,17XX, 59XX
Lan ID [Host A].LanHost B.LanHost C.Lan
Numeric, minimum = 0,maximum = 254 [0]applies to 900 MHzNumeric, minimum = 0,maximum = 15 [0]applies to 2.4 GHz OpenAir
2415, 2425, 2435A,2455, 2475, 248X,6400, 5055, 11XX,17XX, 59XX
Note: Values greater than 15 on terminals with OpenAir or 802.11 radios have a MOD 16 operation done on theterminals, such as LAN IDs 0, 16, and 32 all equal 0 (zero).
Mode [Host A].ModeHost B.ModeHost C.Mode
For 900 MHz radio: DS225K;DS 090K; DS 450KFor S-UHF radio: FreqAgility; Single Freq
2415, 2425, 2435A,2455, 2475, 248X,6400, 5055, 11XX,17XX, 59XX
Port Number [Host A].Port NumberHost B.Port NumberHost C.Port Number
Numeric, minimum = 0,maximum = 65535 [23]
2415, 2425, 2435A,2455, 2475, 248X,6400, 5055, 11XX,17XX, 59XX
Radio ConfigurationNumber
[Host A].Radio Config#Host B.Radio Config#Host C.Radio Config#
Numeric, minimum = 0,maximum = 255 [0]
2415, 2425, 2435A,2455, 2475, 248X,6400, 5055, 11XX,17XX, 59XX
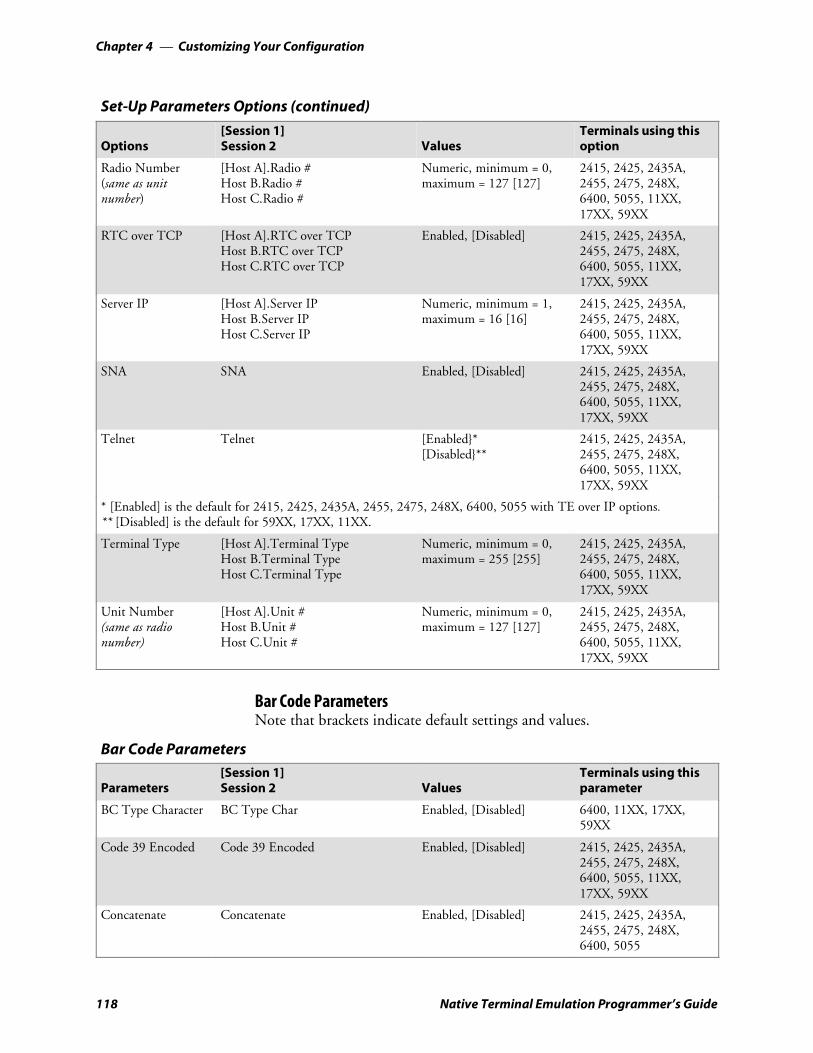
Customizing Your ConfigurationChapter —4
118 Native Terminal Emulation Programmer’s Guide
Set-Up Parameters Options (continued)
Terminals using thisoptionValues
[Session 1]Session 2Options
Radio Number(same as unitnumber)
[Host A].Radio #Host B.Radio #Host C.Radio #
Numeric, minimum = 0,maximum = 127 [127]
2415, 2425, 2435A,2455, 2475, 248X,6400, 5055, 11XX,17XX, 59XX
RTC over TCP [Host A].RTC over TCPHost B.RTC over TCPHost C.RTC over TCP
Enabled, [Disabled] 2415, 2425, 2435A,2455, 2475, 248X,6400, 5055, 11XX,17XX, 59XX
Server IP [Host A].Server IPHost B.Server IPHost C.Server IP
Numeric, minimum = 1,maximum = 16 [16]
2415, 2425, 2435A,2455, 2475, 248X,6400, 5055, 11XX,17XX, 59XX
SNA SNA Enabled, [Disabled] 2415, 2425, 2435A,2455, 2475, 248X,6400, 5055, 11XX,17XX, 59XX
Telnet Telnet [Enabled*[Disabled**
2415, 2425, 2435A,2455, 2475, 248X,6400, 5055, 11XX,17XX, 59XX
* [Enabled] is the default for 2415, 2425, 2435A, 2455, 2475, 248X, 6400, 5055 with TE over IP options.** [Disabled] is the default for 59XX, 17XX, 11XX.
Terminal Type [Host A].Terminal TypeHost B.Terminal TypeHost C.Terminal Type
Numeric, minimum = 0,maximum = 255 [255]
2415, 2425, 2435A,2455, 2475, 248X,6400, 5055, 11XX,17XX, 59XX
Unit Number(same as radionumber)
[Host A].Unit #Host B.Unit #Host C.Unit #
Numeric, minimum = 0,maximum = 127 [127]
2415, 2425, 2435A,2455, 2475, 248X,6400, 5055, 11XX,17XX, 59XX
Bar Code ParametersNote that brackets indicate default settings and values.
Bar Code Parameters
Parameters[Session 1]Session 2 Values
Terminals using thisparameter
BC Type Character BC Type Char Enabled, [Disabled] 6400, 11XX, 17XX,59XX
Code 39 Encoded Code 39 Encoded Enabled, [Disabled] 2415, 2425, 2435A,2455, 2475, 248X,6400, 5055, 11XX,17XX, 59XX
Concatenate Concatenate Enabled, [Disabled] 2415, 2425, 2435A,2455, 2475, 248X,6400, 5055
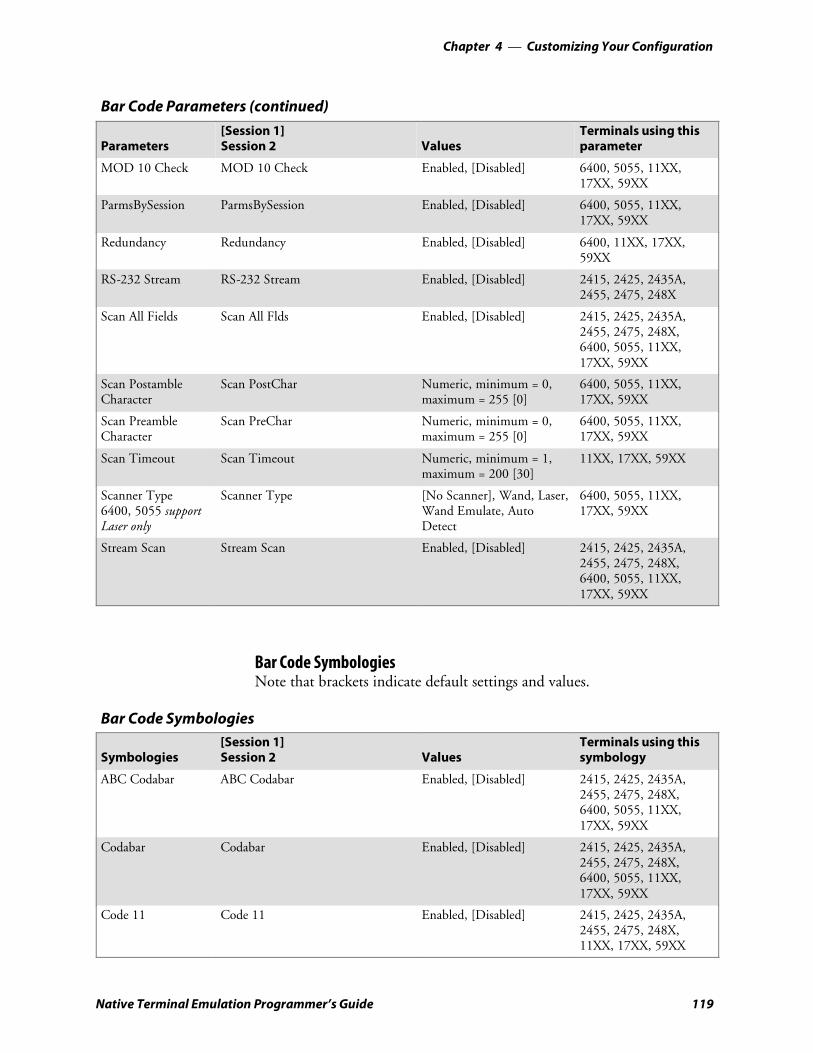
Customizing Your Configuration—Chapter 4
119Native Terminal Emulation Programmer’s Guide
Bar Code Parameters (continued)
Terminals using thisparameterValues
[Session 1]Session 2Parameters
MOD 10 Check MOD 10 Check Enabled, [Disabled] 6400, 5055, 11XX,17XX, 59XX
ParmsBySession ParmsBySession Enabled, [Disabled] 6400, 5055, 11XX,17XX, 59XX
Redundancy Redundancy Enabled, [Disabled] 6400, 11XX, 17XX,59XX
RS-232 Stream RS-232 Stream Enabled, [Disabled] 2415, 2425, 2435A,2455, 2475, 248X
Scan All Fields Scan All Flds Enabled, [Disabled] 2415, 2425, 2435A,2455, 2475, 248X,6400, 5055, 11XX,17XX, 59XX
Scan PostambleCharacter
Scan PostChar Numeric, minimum = 0,maximum = 255 [0]
6400, 5055, 11XX,17XX, 59XX
Scan PreambleCharacter
Scan PreChar Numeric, minimum = 0,maximum = 255 [0]
6400, 5055, 11XX,17XX, 59XX
Scan Timeout Scan Timeout Numeric, minimum = 1,maximum = 200 [30]
11XX, 17XX, 59XX
Scanner Type6400, 5055 supportLaser only
Scanner Type [No Scanner], Wand, Laser,Wand Emulate, AutoDetect
6400, 5055, 11XX,17XX, 59XX
Stream Scan Stream Scan Enabled, [Disabled] 2415, 2425, 2435A,2455, 2475, 248X,6400, 5055, 11XX,17XX, 59XX
Bar Code SymbologiesNote that brackets indicate default settings and values.
Bar Code Symbologies
Symbologies[Session 1]Session 2 Values
Terminals using thissymbology
ABC Codabar ABC Codabar Enabled, [Disabled] 2415, 2425, 2435A,2455, 2475, 248X,6400, 5055, 11XX,17XX, 59XX
Codabar Codabar Enabled, [Disabled] 2415, 2425, 2435A,2455, 2475, 248X,6400, 5055, 11XX,17XX, 59XX
Code 11 Code 11 Enabled, [Disabled] 2415, 2425, 2435A,2455, 2475, 248X,11XX, 17XX, 59XX
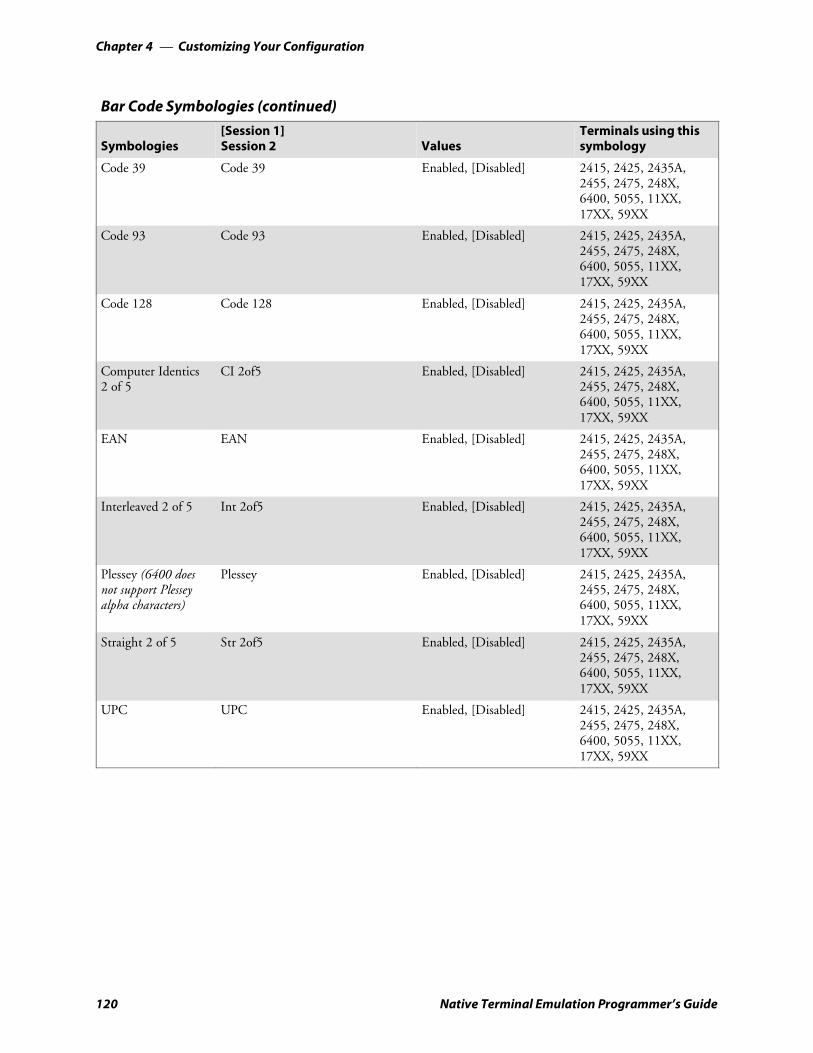
Customizing Your ConfigurationChapter —4
120 Native Terminal Emulation Programmer’s Guide
Bar Code Symbologies (continued)
Terminals using thissymbologyValues
[Session 1]Session 2Symbologies
Code 39 Code 39 Enabled, [Disabled] 2415, 2425, 2435A,2455, 2475, 248X,6400, 5055, 11XX,17XX, 59XX
Code 93 Code 93 Enabled, [Disabled] 2415, 2425, 2435A,2455, 2475, 248X,6400, 5055, 11XX,17XX, 59XX
Code 128 Code 128 Enabled, [Disabled] 2415, 2425, 2435A,2455, 2475, 248X,6400, 5055, 11XX,17XX, 59XX
Computer Identics2 of 5
CI 2of5 Enabled, [Disabled] 2415, 2425, 2435A,2455, 2475, 248X,6400, 5055, 11XX,17XX, 59XX
EAN EAN Enabled, [Disabled] 2415, 2425, 2435A,2455, 2475, 248X,6400, 5055, 11XX,17XX, 59XX
Interleaved 2 of 5 Int 2of5 Enabled, [Disabled] 2415, 2425, 2435A,2455, 2475, 248X,6400, 5055, 11XX,17XX, 59XX
Plessey (6400 doesnot support Plesseyalpha characters)
Plessey Enabled, [Disabled] 2415, 2425, 2435A,2455, 2475, 248X,6400, 5055, 11XX,17XX, 59XX
Straight 2 of 5 Str 2of5 Enabled, [Disabled] 2415, 2425, 2435A,2455, 2475, 248X,6400, 5055, 11XX,17XX, 59XX
UPC UPC Enabled, [Disabled] 2415, 2425, 2435A,2455, 2475, 248X,6400, 5055, 11XX,17XX, 59XX
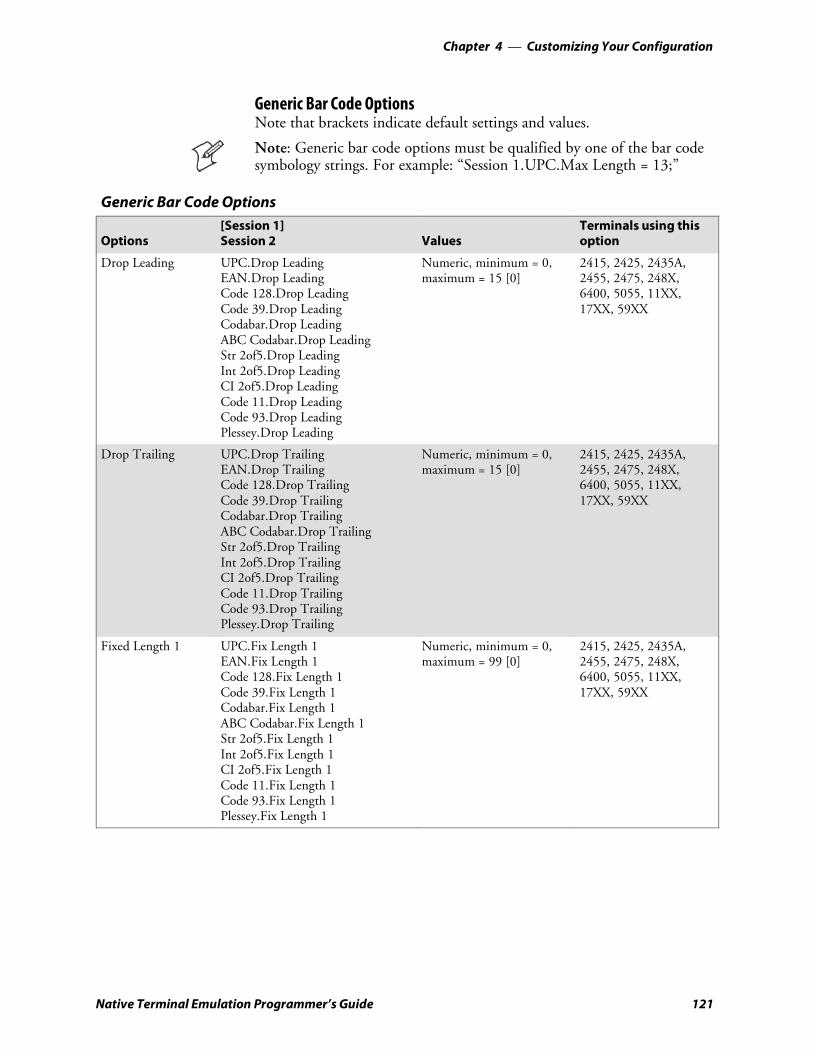
Customizing Your Configuration—Chapter 4
121Native Terminal Emulation Programmer’s Guide
Generic Bar Code OptionsNote that brackets indicate default settings and values.
Note: Generic bar code options must be qualified by one of the bar codesymbology strings. For example: “Session 1.UPC.Max Length = 13;”
Generic Bar Code Options
Options[Session 1]Session 2 Values
Terminals using thisoption
Drop Leading UPC.Drop LeadingEAN.Drop LeadingCode 128.Drop LeadingCode 39.Drop LeadingCodabar.Drop LeadingABC Codabar.Drop LeadingStr 2of5.Drop LeadingInt 2of5.Drop LeadingCI 2of5.Drop LeadingCode 11.Drop LeadingCode 93.Drop LeadingPlessey.Drop Leading
Numeric, minimum = 0,maximum = 15 [0]
2415, 2425, 2435A,2455, 2475, 248X,6400, 5055, 11XX,17XX, 59XX
Drop Trailing UPC.Drop TrailingEAN.Drop TrailingCode 128.Drop TrailingCode 39.Drop TrailingCodabar.Drop TrailingABC Codabar.Drop TrailingStr 2of5.Drop TrailingInt 2of5.Drop TrailingCI 2of5.Drop TrailingCode 11.Drop TrailingCode 93.Drop TrailingPlessey.Drop Trailing
Numeric, minimum = 0,maximum = 15 [0]
2415, 2425, 2435A,2455, 2475, 248X,6400, 5055, 11XX,17XX, 59XX
Fixed Length 1 UPC.Fix Length 1EAN.Fix Length 1Code 128.Fix Length 1Code 39.Fix Length 1Codabar.Fix Length 1ABC Codabar.Fix Length 1Str 2of5.Fix Length 1Int 2of5.Fix Length 1CI 2of5.Fix Length 1Code 11.Fix Length 1Code 93.Fix Length 1Plessey.Fix Length 1
Numeric, minimum = 0,maximum = 99 [0]
2415, 2425, 2435A,2455, 2475, 248X,6400, 5055, 11XX,17XX, 59XX
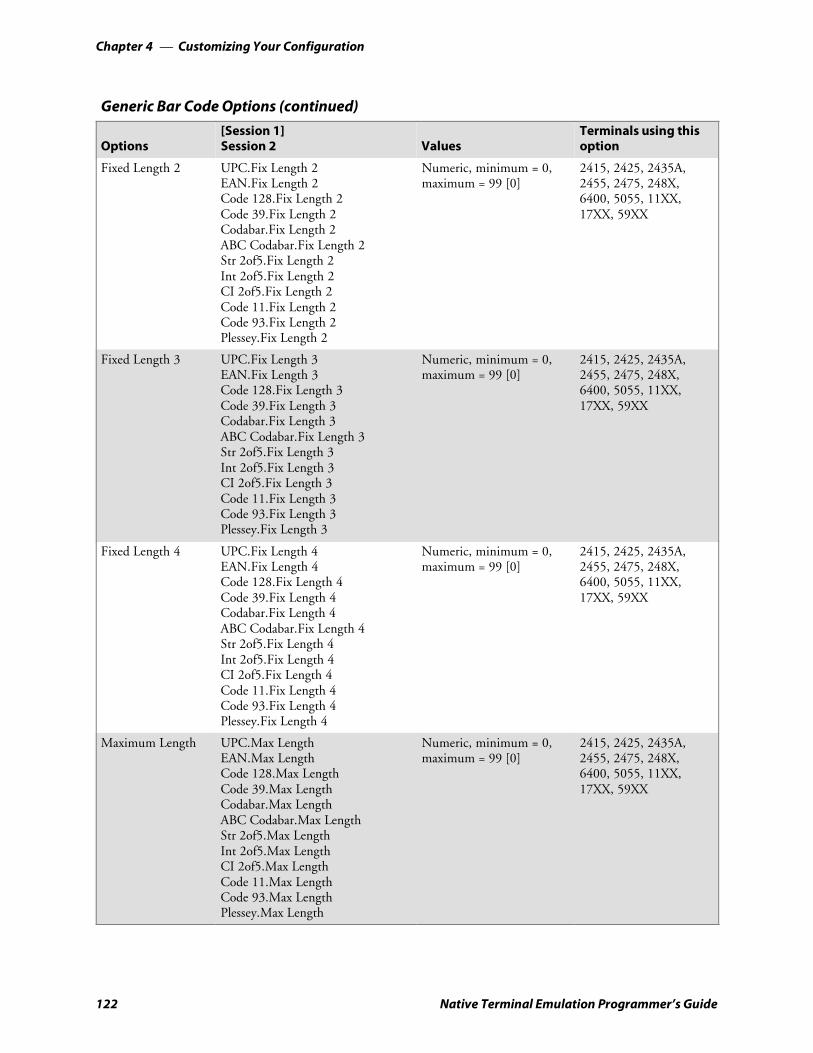
Customizing Your ConfigurationChapter —4
122 Native Terminal Emulation Programmer’s Guide
Generic Bar Code Options (continued)
Terminals using thisoptionValues
[Session 1]Session 2Options
Fixed Length 2 UPC.Fix Length 2EAN.Fix Length 2Code 128.Fix Length 2Code 39.Fix Length 2Codabar.Fix Length 2ABC Codabar.Fix Length 2Str 2of5.Fix Length 2Int 2of5.Fix Length 2CI 2of5.Fix Length 2Code 11.Fix Length 2Code 93.Fix Length 2Plessey.Fix Length 2
Numeric, minimum = 0,maximum = 99 [0]
2415, 2425, 2435A,2455, 2475, 248X,6400, 5055, 11XX,17XX, 59XX
Fixed Length 3 UPC.Fix Length 3EAN.Fix Length 3Code 128.Fix Length 3Code 39.Fix Length 3Codabar.Fix Length 3ABC Codabar.Fix Length 3Str 2of5.Fix Length 3Int 2of5.Fix Length 3CI 2of5.Fix Length 3Code 11.Fix Length 3Code 93.Fix Length 3Plessey.Fix Length 3
Numeric, minimum = 0,maximum = 99 [0]
2415, 2425, 2435A,2455, 2475, 248X,6400, 5055, 11XX,17XX, 59XX
Fixed Length 4 UPC.Fix Length 4EAN.Fix Length 4Code 128.Fix Length 4Code 39.Fix Length 4Codabar.Fix Length 4ABC Codabar.Fix Length 4Str 2of5.Fix Length 4Int 2of5.Fix Length 4CI 2of5.Fix Length 4Code 11.Fix Length 4Code 93.Fix Length 4Plessey.Fix Length 4
Numeric, minimum = 0,maximum = 99 [0]
2415, 2425, 2435A,2455, 2475, 248X,6400, 5055, 11XX,17XX, 59XX
Maximum Length UPC.Max LengthEAN.Max LengthCode 128.Max LengthCode 39.Max LengthCodabar.Max LengthABC Codabar.Max LengthStr 2of5.Max LengthInt 2of5.Max LengthCI 2of5.Max LengthCode 11.Max LengthCode 93.Max LengthPlessey.Max Length
Numeric, minimum = 0,maximum = 99 [0]
2415, 2425, 2435A,2455, 2475, 248X,6400, 5055, 11XX,17XX, 59XX

Customizing Your Configuration—Chapter 4
123Native Terminal Emulation Programmer’s Guide
Generic Bar Code Options (continued)
Terminals using thisoptionValues
[Session 1]Session 2Options
Minimum Length UPC.Min LengthEAN.Min LengthCode 128.Min LengthCode 39.Min LengthCodabar.Min LengthABC Codabar.Min LengthStr 2of5.Min LengthInt 2of5.Min LengthCI 2of5.Min LengthCode 11.Min LengthCode 93.Min LengthPlessey.Min Length
Numeric, minimum = 0,maximum = 99 [0]
2415, 2425, 2435A,2455, 2475, 248X,6400, 5055, 11XX,17XX, 59XX
UPC OptionsNote that brackets indicate default settings and values.
UPC Options
Options[Session 1]Session 2 Values
Terminals using thisoption
Add-On 2 UPC.Add-On 2 Enabled, [Disabled] 2415, 2425, 2435A,2455, 2475, 248X,6400, 5055, 11XX,17XX, 59XX
Add-On 5 UPC.Add-On 5 Enabled, [Disabled] 2415, 2425, 2435A,2455, 2475, 248X,6400, 5055, 11XX,17XX, 59XX
Expand E to A UPC.Expand E to A Enabled, [Disabled] 2415, 2425, 2435A,2455, 2475, 248X,6400, 5055, 11XX,17XX, 59XX
System 0 UPCE UPC.Sys 0 UPCE Enabled, [Disabled] 2415, 2425, 2435A,2455, 2475, 248X,6400, 5055, 11XX,17XX, 59XX
System 1 UPCE UPC.Sys 1 UPCE Enabled, [Disabled] 2415, 2425, 2435A,2455, 2475, 248X,5055, 11XX, 17XX,59XX
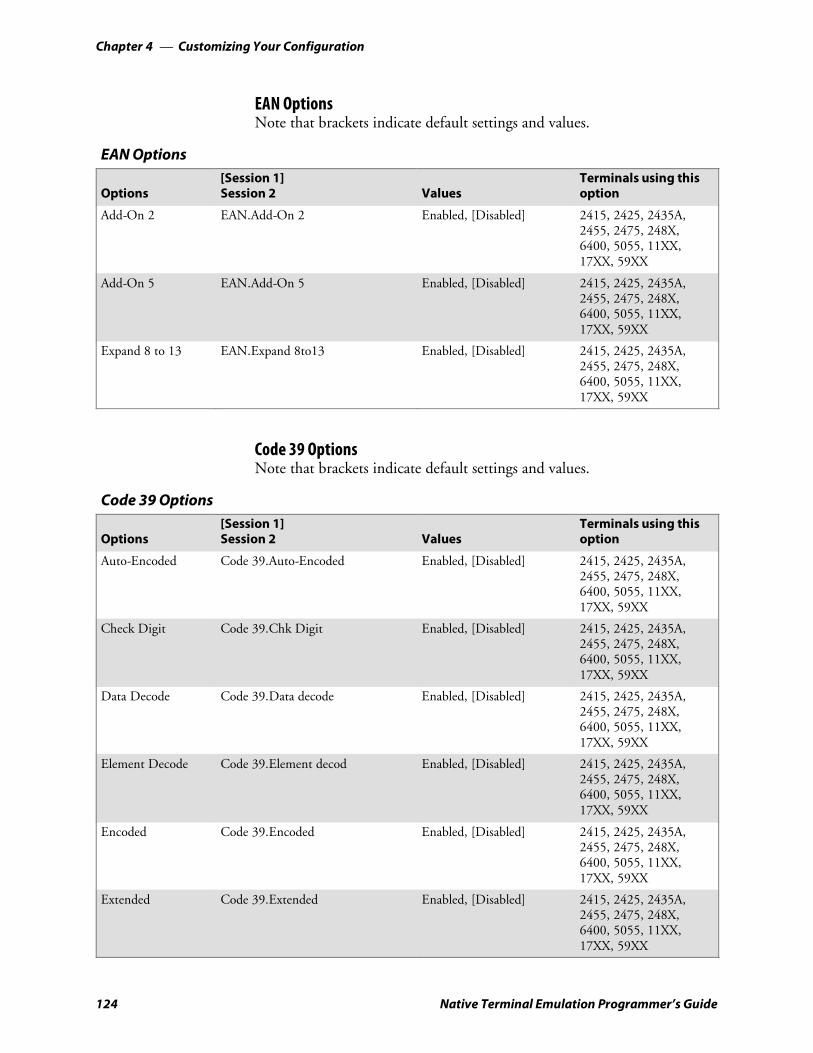
Customizing Your ConfigurationChapter —4
124 Native Terminal Emulation Programmer’s Guide
EAN OptionsNote that brackets indicate default settings and values.
EAN Options
Options[Session 1]Session 2 Values
Terminals using thisoption
Add-On 2 EAN.Add-On 2 Enabled, [Disabled] 2415, 2425, 2435A,2455, 2475, 248X,6400, 5055, 11XX,17XX, 59XX
Add-On 5 EAN.Add-On 5 Enabled, [Disabled] 2415, 2425, 2435A,2455, 2475, 248X,6400, 5055, 11XX,17XX, 59XX
Expand 8 to 13 EAN.Expand 8to13 Enabled, [Disabled] 2415, 2425, 2435A,2455, 2475, 248X,6400, 5055, 11XX,17XX, 59XX
Code 39 OptionsNote that brackets indicate default settings and values.
Code 39 Options
Options[Session 1]Session 2 Values
Terminals using thisoption
Auto-Encoded Code 39.Auto-Encoded Enabled, [Disabled] 2415, 2425, 2435A,2455, 2475, 248X,6400, 5055, 11XX,17XX, 59XX
Check Digit Code 39.Chk Digit Enabled, [Disabled] 2415, 2425, 2435A,2455, 2475, 248X,6400, 5055, 11XX,17XX, 59XX
Data Decode Code 39.Data decode Enabled, [Disabled] 2415, 2425, 2435A,2455, 2475, 248X,6400, 5055, 11XX,17XX, 59XX
Element Decode Code 39.Element decod Enabled, [Disabled] 2415, 2425, 2435A,2455, 2475, 248X,6400, 5055, 11XX,17XX, 59XX
Encoded Code 39.Encoded Enabled, [Disabled] 2415, 2425, 2435A,2455, 2475, 248X,6400, 5055, 11XX,17XX, 59XX
Extended Code 39.Extended Enabled, [Disabled] 2415, 2425, 2435A,2455, 2475, 248X,6400, 5055, 11XX,17XX, 59XX
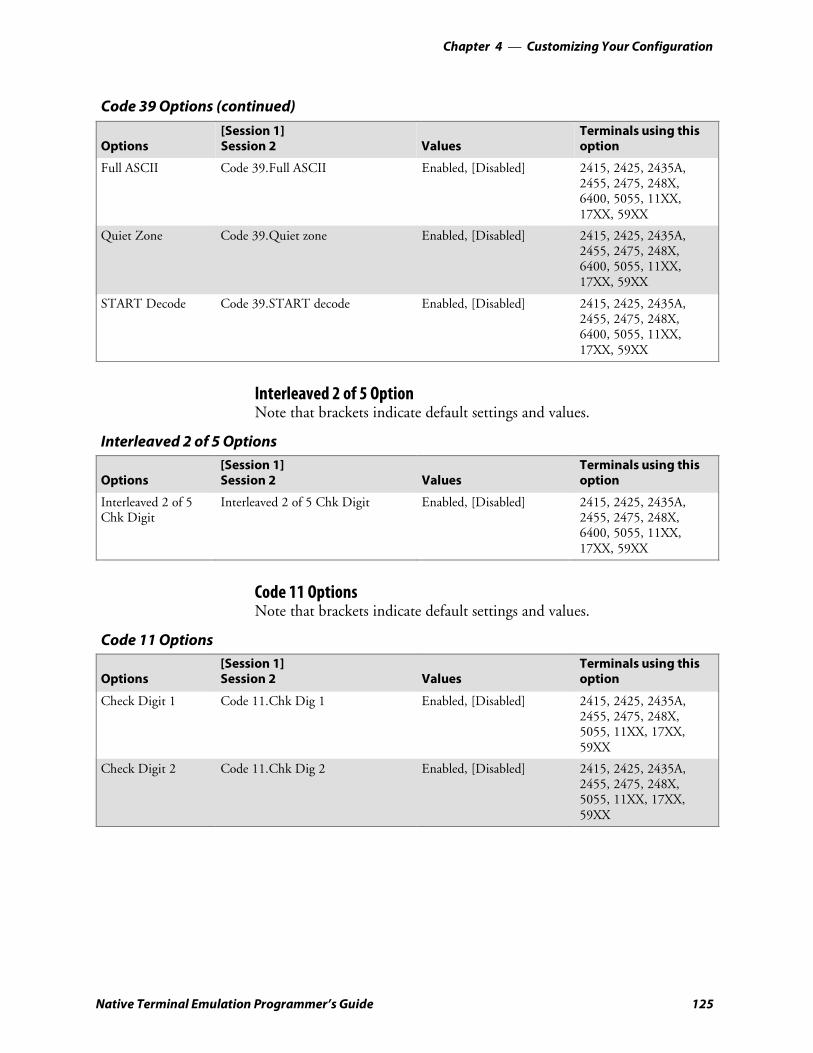
Customizing Your Configuration—Chapter 4
125Native Terminal Emulation Programmer’s Guide
Code 39 Options (continued)
Terminals using thisoptionValues
[Session 1]Session 2Options
Full ASCII Code 39.Full ASCII Enabled, [Disabled] 2415, 2425, 2435A,2455, 2475, 248X,6400, 5055, 11XX,17XX, 59XX
Quiet Zone Code 39.Quiet zone Enabled, [Disabled] 2415, 2425, 2435A,2455, 2475, 248X,6400, 5055, 11XX,17XX, 59XX
START Decode Code 39.START decode Enabled, [Disabled] 2415, 2425, 2435A,2455, 2475, 248X,6400, 5055, 11XX,17XX, 59XX
Interleaved 2 of 5 OptionNote that brackets indicate default settings and values.
Interleaved 2 of 5 Options
Options[Session 1]Session 2 Values
Terminals using thisoption
Interleaved 2 of 5Chk Digit
Interleaved 2 of 5 Chk Digit Enabled, [Disabled] 2415, 2425, 2435A,2455, 2475, 248X,6400, 5055, 11XX,17XX, 59XX
Code 11 OptionsNote that brackets indicate default settings and values.
Code 11 Options
Options[Session 1]Session 2 Values
Terminals using thisoption
Check Digit 1 Code 11.Chk Dig 1 Enabled, [Disabled] 2415, 2425, 2435A,2455, 2475, 248X,5055, 11XX, 17XX,59XX
Check Digit 2 Code 11.Chk Dig 2 Enabled, [Disabled] 2415, 2425, 2435A,2455, 2475, 248X,5055, 11XX, 17XX,59XX
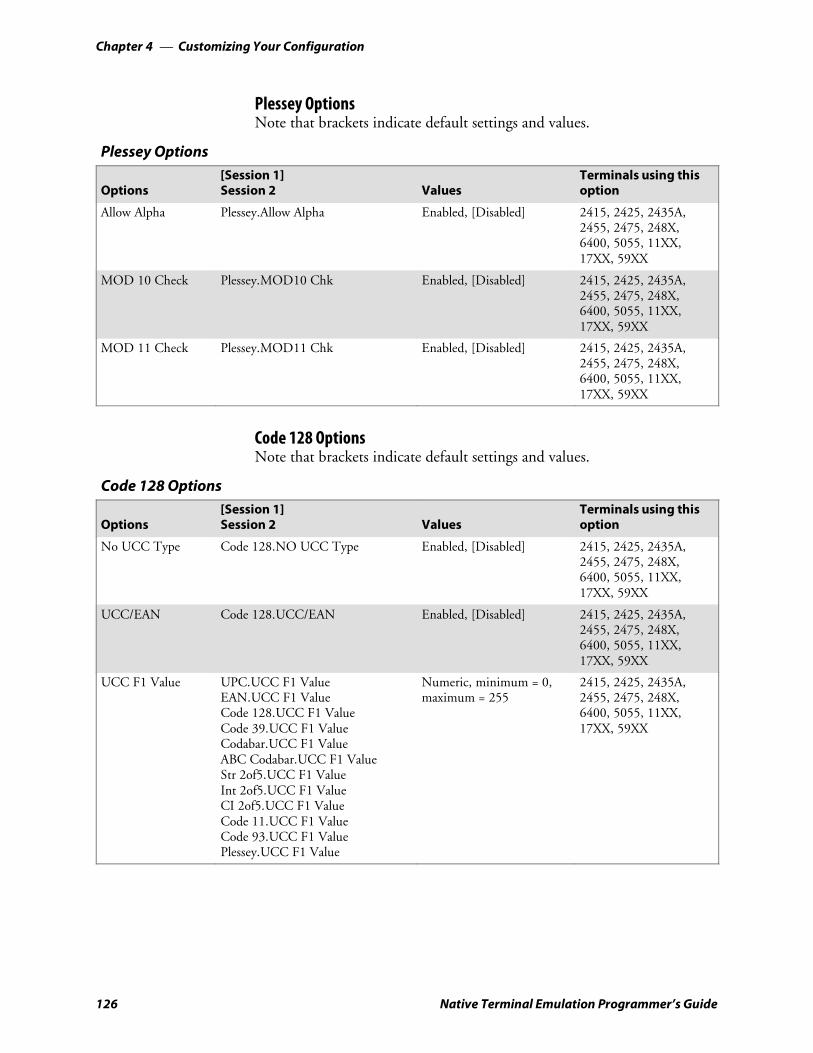
Customizing Your ConfigurationChapter —4
126 Native Terminal Emulation Programmer’s Guide
Plessey OptionsNote that brackets indicate default settings and values.
Plessey Options
Options[Session 1]Session 2 Values
Terminals using thisoption
Allow Alpha Plessey.Allow Alpha Enabled, [Disabled] 2415, 2425, 2435A,2455, 2475, 248X,6400, 5055, 11XX,17XX, 59XX
MOD 10 Check Plessey.MOD10 Chk Enabled, [Disabled] 2415, 2425, 2435A,2455, 2475, 248X,6400, 5055, 11XX,17XX, 59XX
MOD 11 Check Plessey.MOD11 Chk Enabled, [Disabled] 2415, 2425, 2435A,2455, 2475, 248X,6400, 5055, 11XX,17XX, 59XX
Code 128 OptionsNote that brackets indicate default settings and values.
Code 128 Options
Options[Session 1]Session 2 Values
Terminals using thisoption
No UCC Type Code 128.NO UCC Type Enabled, [Disabled] 2415, 2425, 2435A,2455, 2475, 248X,6400, 5055, 11XX,17XX, 59XX
UCC/EAN Code 128.UCC/EAN Enabled, [Disabled] 2415, 2425, 2435A,2455, 2475, 248X,6400, 5055, 11XX,17XX, 59XX
UCC F1 Value UPC.UCC F1 ValueEAN.UCC F1 ValueCode 128.UCC F1 ValueCode 39.UCC F1 ValueCodabar.UCC F1 ValueABC Codabar.UCC F1 ValueStr 2of5.UCC F1 ValueInt 2of5.UCC F1 ValueCI 2of5.UCC F1 ValueCode 11.UCC F1 ValueCode 93.UCC F1 ValuePlessey.UCC F1 Value
Numeric, minimum = 0,maximum = 255
2415, 2425, 2435A,2455, 2475, 248X,6400, 5055, 11XX,17XX, 59XX

Customizing Your Configuration—Chapter 4
127Native Terminal Emulation Programmer’s Guide
Native Protocol OptionsNote that brackets indicate default settings and values.
Native Protocol Options
Options[Session 1]Session 2 Values
Terminals using thisoption
F1 is Function –0 F1 is FUNC–0 Enabled, [Disabled] 2415, 2425, 2435A,2455, 2475, 248X,6400, 5055, 11XX,17XX, 59XX
Display OptionsNote that brackets indicate default settings and values.
Display Options
Options[Session 1]Session 2 Values
Terminals using thisoption
Backlight State Backlight State [Enabled], Disabled 2415, 2425, 2435A,2455, 2475, 248X,6400, 5055, 11XX,17XX, 59XX
Backlight Timer Backlight Timer Numeric, minimum = [0],maximum = 60 (2415,2425, 2435A, 2455, 2475,248X)Numeric, minimum = [0],maximum = 255 (6400,17XX, 11XX)
2415, 2425, 2435A,2455, 2475, 248X,6400, 11XX, 17XX,59XX
Contrast Mode Contrast Mode [Compensated], Absolute 11XX, 17XX, 59XX
Cursor Mode Cursor Mode [Underln Blink]*Block BlinkUnderline (6400, 5055,59XX, 17XX, 11XX)[Block]** (6400, 5055,59XX, 17XX, 11XX)
2415, 2425, 2435A,2455, 2475, 248X,6400, 5055, 11XX,17XX, 59XX
* [Underln Blink] is the default for 2415, 2425, 2435A, 2455, 2475, 248X. ** [Block] is the default for 6400, 5055,59XX, 17XX, 11XX.
Remote Baud Remote Baud 9600, 19200, [38400] 11XX, 17XX
Remote Display Remote Disp Enabled, [Disabled] 11XX, 17XX
Remote DisplayRemote Columns
Remote Cols Numeric, minimum = 1,maximum = 255 [80]
11XX, 17XX
Remote DisplayRemote Rows
Remote Rows Numeric, minimum = 1,maximum = 255 [24]
11XX, 17XX
Remote DisplayRemote Type
Remote Type VT100, VT220, [ANSI] 11XX, 17XX
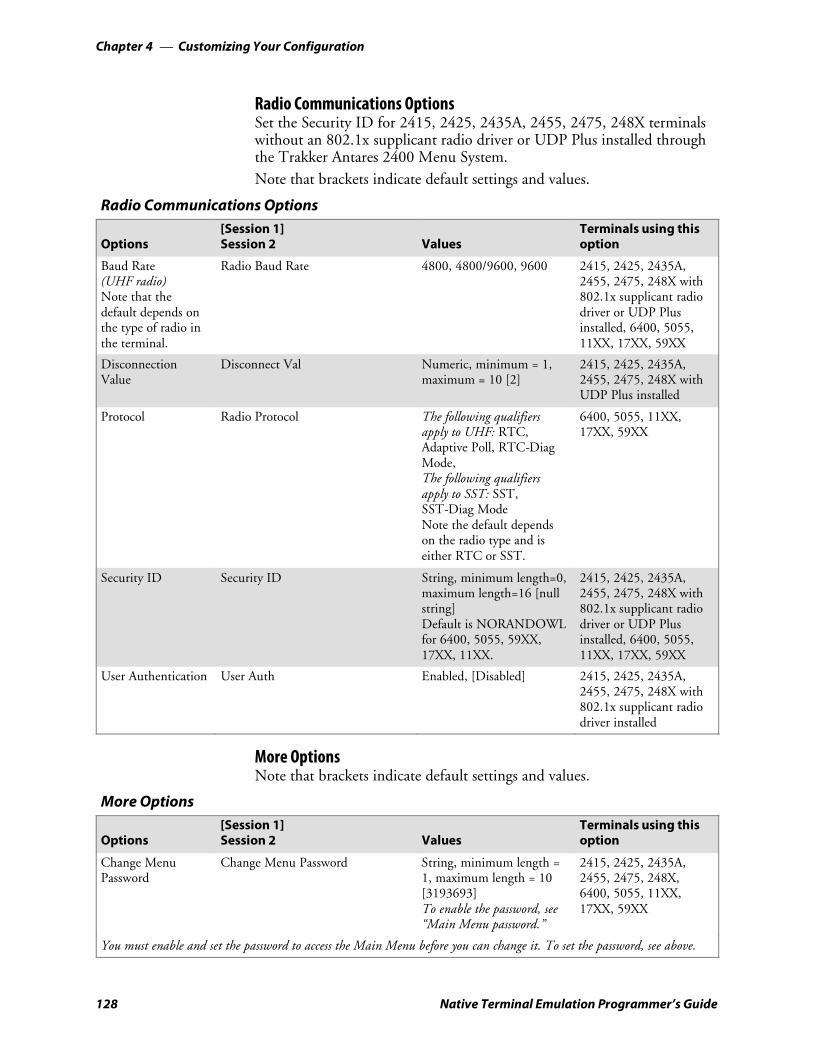
Customizing Your ConfigurationChapter —4
128 Native Terminal Emulation Programmer’s Guide
Radio Communications OptionsSet the Security ID for 2415, 2425, 2435A, 2455, 2475, 248X terminalswithout an 802.1x supplicant radio driver or UDP Plus installed throughthe Trakker Antares 2400 Menu System.Note that brackets indicate default settings and values.
Radio Communications Options
Options[Session 1]Session 2 Values
Terminals using thisoption
Baud Rate(UHF radio)Note that thedefault depends onthe type of radio inthe terminal.
Radio Baud Rate 4800, 4800/9600, 9600 2415, 2425, 2435A,2455, 2475, 248X with802.1x supplicant radiodriver or UDP Plusinstalled, 6400, 5055,11XX, 17XX, 59XX
DisconnectionValue
Disconnect Val Numeric, minimum = 1,maximum = 10 [2]
2415, 2425, 2435A,2455, 2475, 248X withUDP Plus installed
Protocol Radio Protocol The following qualifiersapply to UHF: RTC,Adaptive Poll, RTC-DiagMode,The following qualifiersapply to SST: SST,SST-Diag ModeNote the default dependson the radio type and iseither RTC or SST.
6400, 5055, 11XX,17XX, 59XX
Security ID Security ID String, minimum length=0,maximum length=16 [nullstring]Default is NORANDOWLfor 6400, 5055, 59XX,17XX, 11XX.
2415, 2425, 2435A,2455, 2475, 248X with802.1x supplicant radiodriver or UDP Plusinstalled, 6400, 5055,11XX, 17XX, 59XX
User Authentication User Auth Enabled, [Disabled] 2415, 2425, 2435A,2455, 2475, 248X with802.1x supplicant radiodriver installed
More OptionsNote that brackets indicate default settings and values.
More Options
Options[Session 1]Session 2 Values
Terminals using thisoption
Change MenuPassword
Change Menu Password String, minimum length =1, maximum length = 10[3193693]To enable the password, see“Main Menu password.”
2415, 2425, 2435A,2455, 2475, 248X,6400, 5055, 11XX,17XX, 59XX
You must enable and set the password to access the Main Menu before you can change it. To set the password, see above.
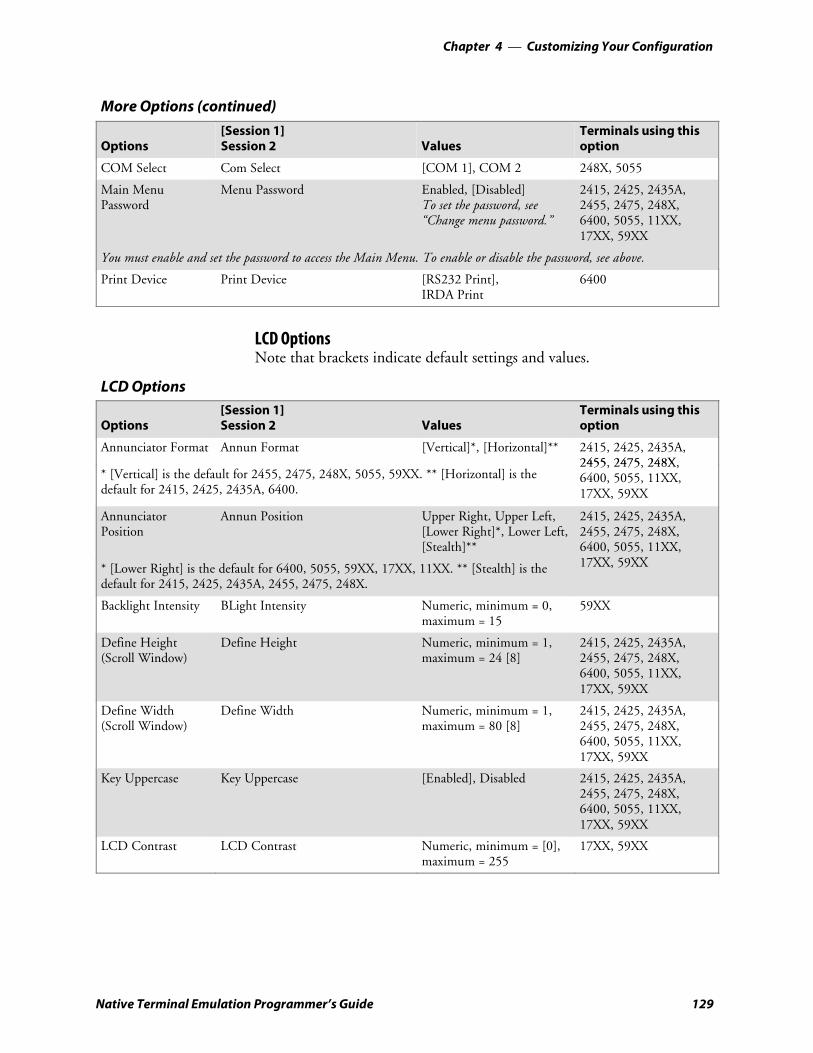
Customizing Your Configuration—Chapter 4
129Native Terminal Emulation Programmer’s Guide
More Options (continued)
Terminals using thisoptionValues
[Session 1]Session 2Options
COM Select Com Select [COM 1], COM 2 248X, 5055
Main MenuPassword
Menu Password Enabled, [Disabled]To set the password, see“Change menu password.”
2415, 2425, 2435A,2455, 2475, 248X,6400, 5055, 11XX,17XX, 59XX
You must enable and set the password to access the Main Menu. To enable or disable the password, see above.
Print Device Print Device [RS232 Print],IRDA Print
6400
LCD OptionsNote that brackets indicate default settings and values.
LCD Options
Options[Session 1]Session 2 Values
Terminals using thisoption
Annunciator Format Annun Format [Vertical]*, [Horizontal]** 2415, 2425, 2435A,2455 2475 248X
* [Vertical] is the default for 2455, 2475, 248X, 5055, 59XX. ** [Horizontal] is thedefault for 2415, 2425, 2435A, 6400.
2455, 2475, 248X,6400, 5055, 11XX,17XX, 59XX
AnnunciatorPosition
Annun Position Upper Right, Upper Left,[Lower Right]*, Lower Left,[Stealth]**
2415, 2425, 2435A,2455, 2475, 248X,6400, 5055, 11XX,17XX 59XX* [Lower Right] is the default for 6400, 5055, 59XX, 17XX, 11XX. ** [Stealth] is the
default for 2415, 2425, 2435A, 2455, 2475, 248X.
17XX, 59XX
Backlight Intensity BLight Intensity Numeric, minimum = 0,maximum = 15
59XX
Define Height(Scroll Window)
Define Height Numeric, minimum = 1,maximum = 24 [8]
2415, 2425, 2435A,2455, 2475, 248X,6400, 5055, 11XX,17XX, 59XX
Define Width(Scroll Window)
Define Width Numeric, minimum = 1,maximum = 80 [8]
2415, 2425, 2435A,2455, 2475, 248X,6400, 5055, 11XX,17XX, 59XX
Key Uppercase Key Uppercase [Enabled], Disabled 2415, 2425, 2435A,2455, 2475, 248X,6400, 5055, 11XX,17XX, 59XX
LCD Contrast LCD Contrast Numeric, minimum = [0],maximum = 255
17XX, 59XX
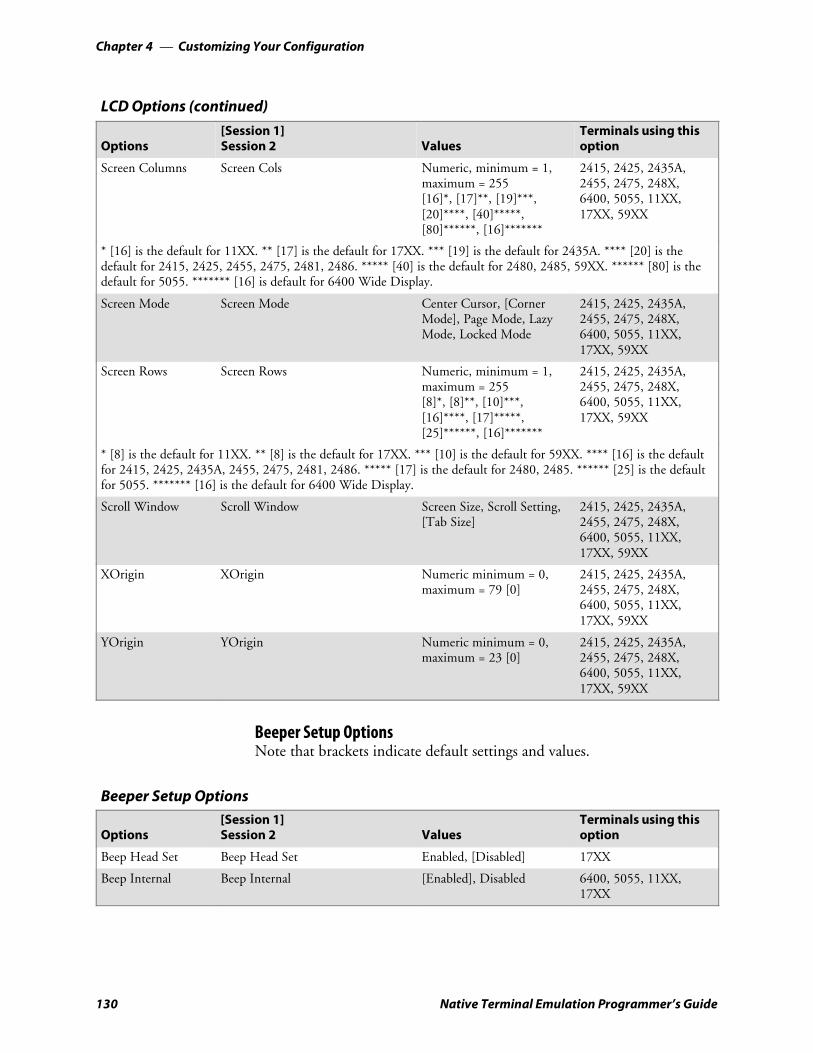
Customizing Your ConfigurationChapter —4
130 Native Terminal Emulation Programmer’s Guide
LCD Options (continued)
Terminals using thisoptionValues
[Session 1]Session 2Options
Screen Columns Screen Cols Numeric, minimum = 1,maximum = 255[16]*, [17]**, [19]***,[20]****, [40]*****,[80]******, [16]*******
2415, 2425, 2435A,2455, 2475, 248X,6400, 5055, 11XX,17XX, 59XX
* [16] is the default for 11XX. ** [17] is the default for 17XX. *** [19] is the default for 2435A. **** [20] is thedefault for 2415, 2425, 2455, 2475, 2481, 2486. ***** [40] is the default for 2480, 2485, 59XX. ****** [80] is thedefault for 5055. ******* [16] is default for 6400 Wide Display.
Screen Mode Screen Mode Center Cursor, [CornerMode], Page Mode, LazyMode, Locked Mode
2415, 2425, 2435A,2455, 2475, 248X,6400, 5055, 11XX,17XX, 59XX
Screen Rows Screen Rows Numeric, minimum = 1,maximum = 255[8]*, [8]**, [10]***,[16]****, [17]*****,[25]******, [16]*******
2415, 2425, 2435A,2455, 2475, 248X,6400, 5055, 11XX,17XX, 59XX
* [8] is the default for 11XX. ** [8] is the default for 17XX. *** [10] is the default for 59XX. **** [16] is the defaultfor 2415, 2425, 2435A, 2455, 2475, 2481, 2486. ***** [17] is the default for 2480, 2485. ****** [25] is the defaultfor 5055. ******* [16] is the default for 6400 Wide Display.
Scroll Window Scroll Window Screen Size, Scroll Setting,[Tab Size]
2415, 2425, 2435A,2455, 2475, 248X,6400, 5055, 11XX,17XX, 59XX
XOrigin XOrigin Numeric minimum = 0,maximum = 79 [0]
2415, 2425, 2435A,2455, 2475, 248X,6400, 5055, 11XX,17XX, 59XX
YOrigin YOrigin Numeric minimum = 0,maximum = 23 [0]
2415, 2425, 2435A,2455, 2475, 248X,6400, 5055, 11XX,17XX, 59XX
Beeper Setup OptionsNote that brackets indicate default settings and values.
Beeper Setup Options
Options[Session 1]Session 2 Values
Terminals using thisoption
Beep Head Set Beep Head Set Enabled, [Disabled] 17XX
Beep Internal Beep Internal [Enabled], Disabled 6400, 5055, 11XX,17XX

Customizing Your Configuration—Chapter 4
131Native Terminal Emulation Programmer’s Guide
Beeper Setup Options (continued)
Terminals using thisoptionValues
[Session 1]Session 2Options
Beeper (Error Tone)Frequency
Beep Frequency Numeric, minimum = 0,maximum = 30[13]*, [6]**
6400, 5055, 11XX,17XX
* [13] is the default for 17XX, 11XX. ** [6] is the default for 6400.
Beeper (Error Tone)Length
Beep Length Numeric, minimum= 1 ,maximum= 10 [3]
6400, 5055, 11XX,17XX, 59XX
Beeper (Error Tone)Volume
Beep Volume Numeric, minimum = 0,maximum = 255 [95]
59XX
Key ClickFrequency
KeyClick Freq Numeric, minimum = 0,maximum = 30[13]*, [6]**
6400, 5055, 11XX,17XX
* [13] is the default for 17XX, 11XX. ** [6] is the default for 6400.
Key Click Length KeyClick Length Numeric, minimum = 1,maximum = 10[1]*, [6]**
6400, 5055, 11XX,17XX, 59XX
* [1] is the default for 59XX, 17XX, 11XX. ** [6] is the default for 6400, 5055.
Key Click Volume KeyClick Volume Numeric, minimum = 0,maximum = 255 [95]
59XX
More (Main Menu 2) OptionNote that brackets indicate default settings and values.
More (Main Menu 2) Options
Options[Session 1]Session 2 Values
Terminals using thisoption
Foreground Session Foreground Sess None 2415, 2425, 2435A,2455, 2475, 248X withWTP protocol stack,6400, 5055, 11XX,17XX, 59XX
Set Hot Key Set Hot Key F1 through F24, [Disabled] 2415, 2425, 2435A,2455, 2475, 248X withWTP protocol stack,6400, 5055, 11XX,17XX, 59XX
Type-Ahead Type-Ahead [Enabled], Disabled 2415, 2425, 2435A,2455, 2475, 248X,6400, 5055, 11XX,17XX, 59XX
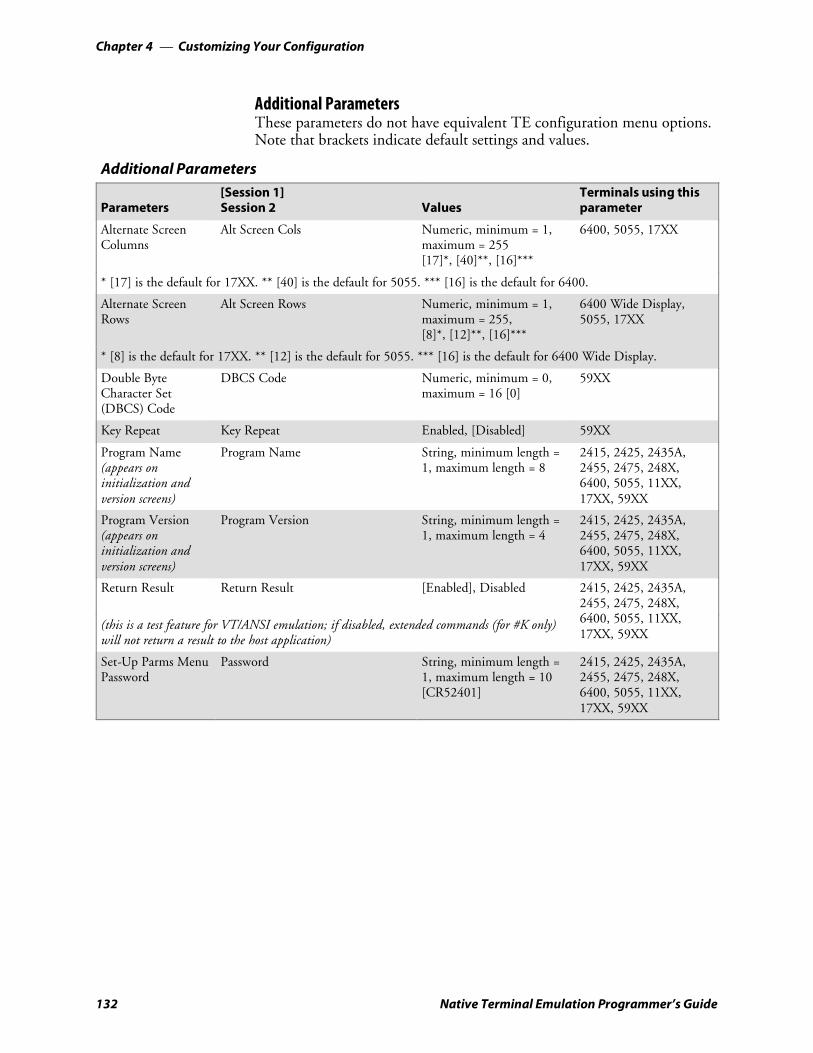
Customizing Your ConfigurationChapter —4
132 Native Terminal Emulation Programmer’s Guide
Additional ParametersThese parameters do not have equivalent TE configuration menu options.Note that brackets indicate default settings and values.
Additional Parameters
Parameters[Session 1]Session 2 Values
Terminals using thisparameter
Alternate ScreenColumns
Alt Screen Cols Numeric, minimum = 1,maximum = 255[17]*, [40]**, [16]***
6400, 5055, 17XX
* [17] is the default for 17XX. ** [40] is the default for 5055. *** [16] is the default for 6400.
Alternate ScreenRows
Alt Screen Rows Numeric, minimum = 1,maximum = 255,[8]*, [12]**, [16]***
6400 Wide Display,5055, 17XX
* [8] is the default for 17XX. ** [12] is the default for 5055. *** [16] is the default for 6400 Wide Display.
Double ByteCharacter Set(DBCS) Code
DBCS Code Numeric, minimum = 0,maximum = 16 [0]
59XX
Key Repeat Key Repeat Enabled, [Disabled] 59XX
Program Name(appears oninitialization andversion screens)
Program Name String, minimum length =1, maximum length = 8
2415, 2425, 2435A,2455, 2475, 248X,6400, 5055, 11XX,17XX, 59XX
Program Version(appears oninitialization andversion screens)
Program Version String, minimum length =1, maximum length = 4
2415, 2425, 2435A,2455, 2475, 248X,6400, 5055, 11XX,17XX, 59XX
Return Result Return Result [Enabled], Disabled 2415, 2425, 2435A,2455, 2475, 248X,6400 5055 11XX(this is a test feature for VT/ANSI emulation; if disabled, extended commands (for #K only)
will not return a result to the host application)
6400, 5055, 11XX,17XX, 59XX
Set-Up Parms MenuPassword
Password String, minimum length =1, maximum length = 10[CR52401]
2415, 2425, 2435A,2455, 2475, 248X,6400, 5055, 11XX,17XX, 59XX

Customizing Your Configuration—Chapter 4
133Native Terminal Emulation Programmer’s Guide
Changing TextModify CFGLIT.DAT to change the text of TE configuration menus,configuration parameters, or system messages. This file contains the stringsthat appear in these items.
An identification (ID) number identifies each literal string. To create yourown literal file, you create a text file that associates these numbers with theactual literal strings. You then use MAKELIT.EXE to convert the text fileto a format the configuration program can use.
Each line in the literal text file begins with the literal ID number. After theID number, you type the quoted string that is used when that ID numberis referenced. If you omit an ID number, its string appears as “Bad LiteralFile” when you run the program in the terminal. Literal ID numbers areavailable upon request from Intermec. Contact your Intermec representative formore information about ID numbers.
You can create a sample file containing the default literal strings usingMAKELIT.EXE to “reverse engineer” the standard CFGLIT.DAT file. Todo this, type the following command line to unpack CFGLIT.DAT into aCFGLIT.TXT text file: makelit -r cfglit.dat cfglit.txt
The CFGLIT.TXT file this command creates contains all the defaultstrings the configuration program uses. One line in CFGLIT.TXT lookslike this: 0x2f10 “RS232 PORT\nIN USE\n\nPLEASE WAIT!”
“0x2f10” is the literal ID number for the RS-232 port-in-use message thatappears when a personal computer sends an RS-232 command to the TEprogram. The message text follows the ID number in a quoted string. Theembedded “\n” sequence within the quoted string indicates a “new line”character and outputs a carriage return/line feed. To change the text of themessage that appears, change the quoted string. For example, change theabove line to look like this: 0x2f10 “Printing\nPlease Wait!”
When you have a text file with one line for every ID number, useMAKELIT.EXE to convert the file to an indexed literal file. If your textfile is named CFGLIT.TXT, you would type the command:makelit cfglit.txt cfglit.datwhich creates the new literal CFGLIT.DAT file. For instructions on howto download the file, see “Downloading Files” on page 144.

Customizing Your ConfigurationChapter —4
134 Native Terminal Emulation Programmer’s Guide
Preinitializing the Native TE ProgramYou can preinitialize the Native TE program. You must name the Nativeinitialization file as NATIVE.INI. The file is processed when you reset orwarm start the terminal. The file is processed as if the radio had receivedthe data, and must be in the “on-air” format. For instructions on how todownload the file, see “Downloading Files” on page 144.Data is encoded in binary format. To create NATIVE.INI, you may needa HEX editor or other special program.NATIVE.INI contains Native data stream commands and orders. It con-tains ASCII data because Intermec controllers perform EBCDIC to ASCIItranslation for the data stream.Following is the format for the Native data stream. The information as-sumes you have a working knowledge of the data stream command formatsor escape sequences, or both.The following Native commands are supported:S 0x31 WriteS 0x32 Read bufferS 0x34 Toggle SSCP command modeS 0x35 Erase writeS 0x36 Read modifiedS 0x3d Erase write alternateS 0x3e Read modified allS 0x3f Erase all unprotectedThe following Native orders are supported:S 0x07 Beep (Intermec extension)S 0x09 Program tabS 0x11 Set buffer addressS 0x12 Erase unprotected to addressS 0x13 Insert cursorS 0x14 Repeat to addressS 0x1d Start of fieldS 0x1f Scanner (Intermec extension)The following example shows how to display “HELLO WORLD” andbeep the beeper from within a data stream initialization file. The line ofhexadecimal digits represent the binary values that must be stored in init-ialization files.
35 04 48 45 4c 4c 4f 20 57 4f 52 4c 44
Write control character with alarm bitNative erase/write command
H E L L O W O R L D
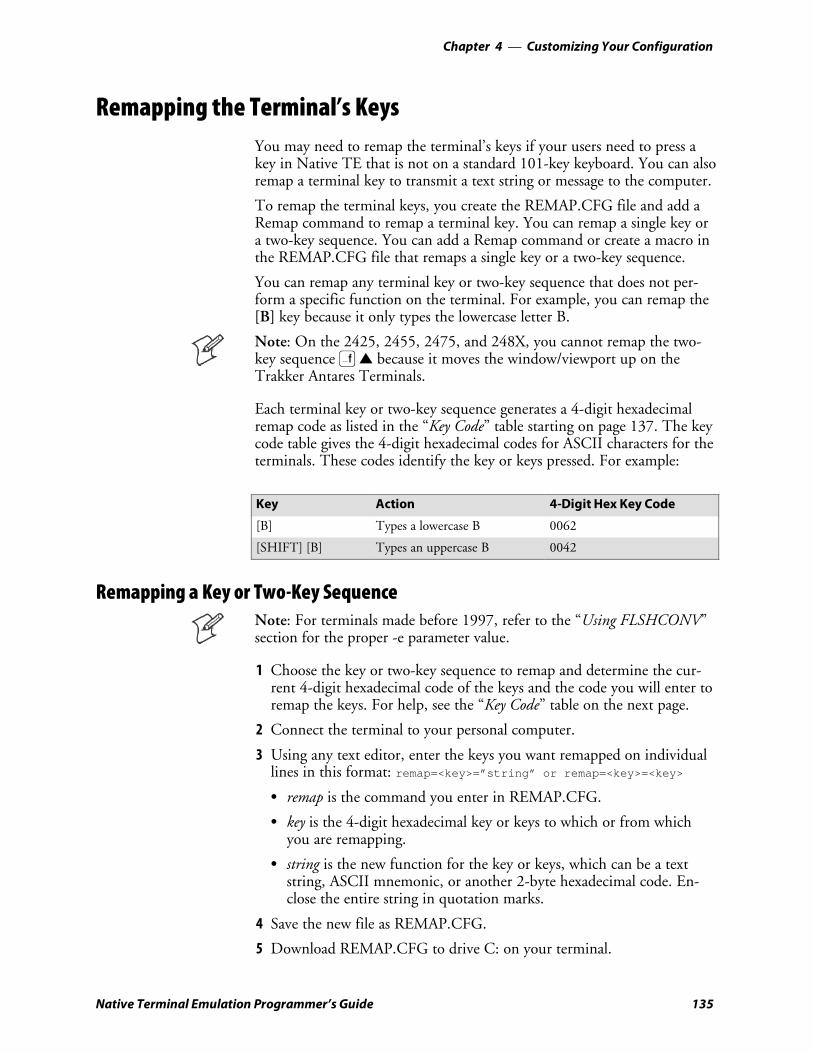
Customizing Your Configuration—Chapter 4
135Native Terminal Emulation Programmer’s Guide
Remapping the Terminal’s KeysYou may need to remap the terminal’s keys if your users need to press akey in Native TE that is not on a standard 101-key keyboard. You can alsoremap a terminal key to transmit a text string or message to the computer.
To remap the terminal keys, you create the REMAP.CFG file and add aRemap command to remap a terminal key. You can remap a single key ora two-key sequence. You can add a Remap command or create a macro inthe REMAP.CFG file that remaps a single key or a two-key sequence.
You can remap any terminal key or two-key sequence that does not per-form a specific function on the terminal. For example, you can remap the[B] key because it only types the lowercase letter B.
Note: On the 2425, 2455, 2475, and 248X, you cannot remap the two-key sequence ) [ because it moves the window/viewport up on theTrakker Antares Terminals.
Each terminal key or two-key sequence generates a 4-digit hexadecimalremap code as listed in the “Key Code” table starting on page 137. The keycode table gives the 4-digit hexadecimal codes for ASCII characters for theterminals. These codes identify the key or keys pressed. For example:
Key Action 4-Digit Hex Key Code
[B] Types a lowercase B 0062
[SHIFT] [B] Types an uppercase B 0042
Remapping a Key or Two-Key SequenceNote: For terminals made before 1997, refer to the “Using FLSHCONV”section for the proper -e parameter value.
1 Choose the key or two-key sequence to remap and determine the cur-rent 4-digit hexadecimal code of the keys and the code you will enter toremap the keys. For help, see the “Key Code” table on the next page.
2 Connect the terminal to your personal computer.
3 Using any text editor, enter the keys you want remapped on individuallines in this format: remap=<key>=”string” or remap=<key>=<key>
S remap is the command you enter in REMAP.CFG.
S key is the 4-digit hexadecimal key or keys to which or from whichyou are remapping.
S string is the new function for the key or keys, which can be a textstring, ASCII mnemonic, or another 2-byte hexadecimal code. En-close the entire string in quotation marks.
4 Save the new file as REMAP.CFG.
5 Download REMAP.CFG to drive C: on your terminal.
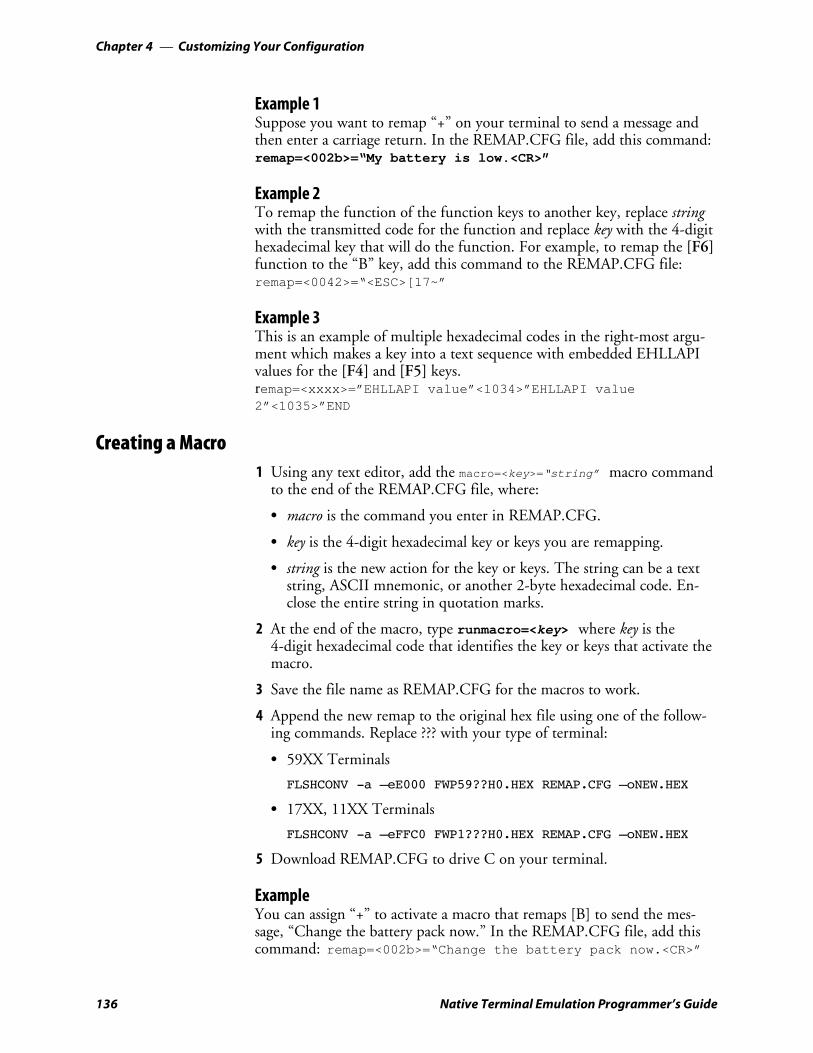
Customizing Your ConfigurationChapter —4
136 Native Terminal Emulation Programmer’s Guide
Example 1Suppose you want to remap “+” on your terminal to send a message andthen enter a carriage return. In the REMAP.CFG file, add this command:remap=<002b>=“My battery is low.<CR>”
Example 2To remap the function of the function keys to another key, replace stringwith the transmitted code for the function and replace key with the 4-digithexadecimal key that will do the function. For example, to remap the [F6]function to the “B” key, add this command to the REMAP.CFG file:remap=<0042>=“<ESC>[17~”
Example 3This is an example of multiple hexadecimal codes in the right-most argu-ment which makes a key into a text sequence with embedded EHLLAPIvalues for the [F4] and [F5] keys.remap=<xxxx>=”EHLLAPI value”<1034>”EHLLAPI value2”<1035>”END
Creating a Macro1 Using any text editor, add the macro=<key>=“string” macro command
to the end of the REMAP.CFG file, where:
S macro is the command you enter in REMAP.CFG.
S key is the 4-digit hexadecimal key or keys you are remapping.
S string is the new action for the key or keys. The string can be a textstring, ASCII mnemonic, or another 2-byte hexadecimal code. En-close the entire string in quotation marks.
2 At the end of the macro, type runmacro=<key> where key is the4-digit hexadecimal code that identifies the key or keys that activate themacro.
3 Save the file name as REMAP.CFG for the macros to work.
4 Append the new remap to the original hex file using one of the follow-ing commands. Replace ??? with your type of terminal:
S 59XX Terminals
FLSHCONV -a –eE000 FWP59??H0.HEX REMAP.CFG –oNEW.HEX
S 17XX, 11XX Terminals
FLSHCONV -a –eFFC0 FWP1???H0.HEX REMAP.CFG –oNEW.HEX
5 Download REMAP.CFG to drive C on your terminal.
ExampleYou can assign “+” to activate a macro that remaps [B] to send the mes-sage, “Change the battery pack now.” In the REMAP.CFG file, add thiscommand: remap=<002b>=“Change the battery pack now.<CR>”
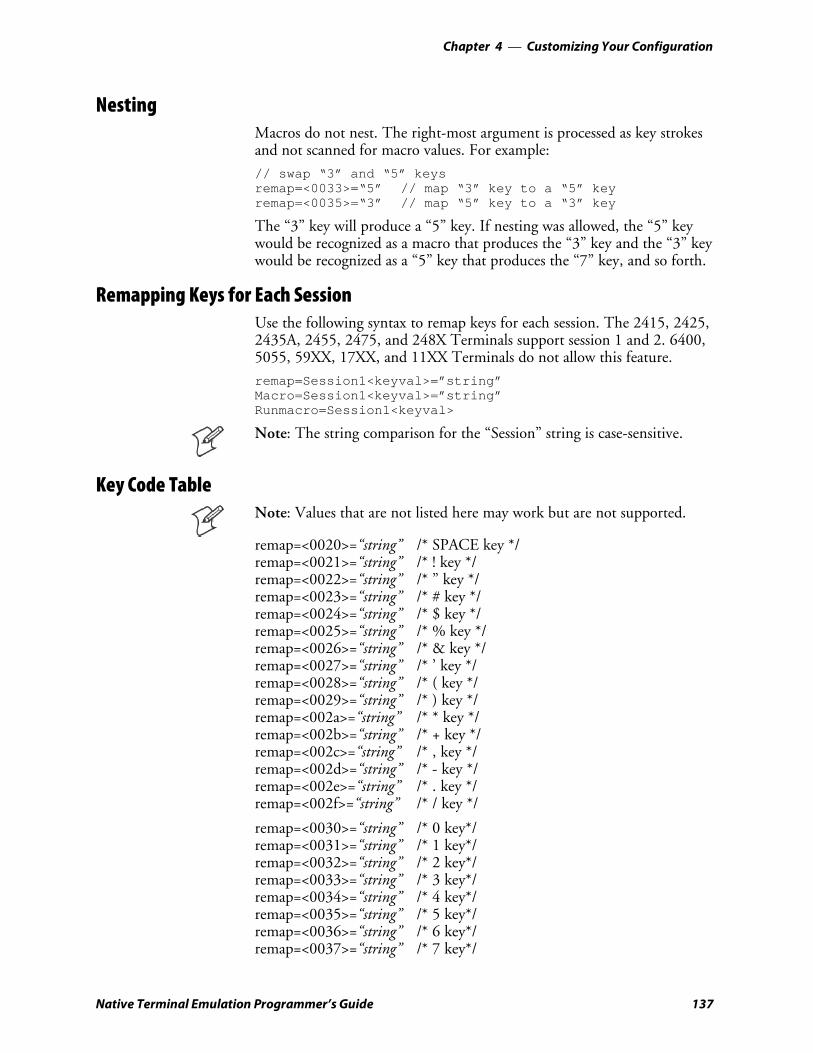
Customizing Your Configuration—Chapter 4
137Native Terminal Emulation Programmer’s Guide
NestingMacros do not nest. The right-most argument is processed as key strokesand not scanned for macro values. For example:
// swap “3” and “5” keysremap=<0033>=“5” // map “3” key to a “5” keyremap=<0035>=“3” // map “5” key to a “3” key
The “3” key will produce a “5” key. If nesting was allowed, the “5” keywould be recognized as a macro that produces the “3” key and the “3” keywould be recognized as a “5” key that produces the “7” key, and so forth.
Remapping Keys for Each SessionUse the following syntax to remap keys for each session. The 2415, 2425,2435A, 2455, 2475, and 248X Terminals support session 1 and 2. 6400,5055, 59XX, 17XX, and 11XX Terminals do not allow this feature.
remap=Session1<keyval>=”string”Macro=Session1<keyval>=”string”Runmacro=Session1<keyval>
Note: The string comparison for the “Session” string is case-sensitive.
Key Code TableNote: Values that are not listed here may work but are not supported.
remap=<0020>=“string” /* SPACE key */remap=<0021>=“string” /* ! key */remap=<0022>=“string” /* ” key */remap=<0023>=“string” /* # key */remap=<0024>=“string” /* $ key */remap=<0025>=“string” /* % key */remap=<0026>=“string” /* & key */remap=<0027>=“string” /* ’ key */remap=<0028>=“string” /* ( key */remap=<0029>=“string” /* ) key */remap=<002a>=“string” /* * key */remap=<002b>=“string” /* + key */remap=<002c>=“string” /* , key */remap=<002d>=“string” /* - key */remap=<002e>=“string” /* . key */remap=<002f>=“string” /* / key */
remap=<0030>=“string” /* 0 key*/remap=<0031>=“string” /* 1 key*/remap=<0032>=“string” /* 2 key*/remap=<0033>=“string” /* 3 key*/remap=<0034>=“string” /* 4 key*/remap=<0035>=“string” /* 5 key*/remap=<0036>=“string” /* 6 key*/remap=<0037>=“string” /* 7 key*/

Customizing Your ConfigurationChapter —4
138 Native Terminal Emulation Programmer’s Guide
remap=<0038>=“string” /* 8 key*/remap=<0039>=“string” /* 9 key*/remap=<003a>=“string” /* : key */remap=<003b>=“string” /* ; key */remap=<003c>=“string” /* < key */remap=<003d>=“string” /* = key */remap=<003e>=“string” /* > key */remap=<003f>=“string” /* ? key */remap=<0040>=“string” /* @ key */remap=<0041>=“string” /* A key*/remap=<0042>=“string” /* B key*/remap=<0043>=“string” /* C key*/remap=<0044>=“string” /* D key*/remap=<0045>=“string” /* E key*/remap=<0046>=“string” /* F key*/remap=<0047>=“string” /* G key*/remap=<0048>=“string” /* H key*/remap=<0049>=“string” /* I key*/remap=<004a>=“string” /* J key*/remap=<004b>=“string” /* K key*/remap=<004c>=“string” /* L key*/remap=<004d>=“string” /* M key*/remap=<004e>=“string” /* N key*/remap=<004f>=“string” /* O key*/remap=<0050>=“string” /* P key*/remap=<0051>=“string” /* Q key*/remap=<0052>=“string” /* R key*/remap=<0053>=“string” /* S key*/remap=<0054>=“string” /* T key*/remap=<0055>=“string” /* U key*/remap=<0056>=“string” /* V key*/remap=<0057>=“string” /* W key*/remap=<0058>=“string” /* X key*/remap=<0059>=“string” /* Y key*/remap=<005a>=“string” /* Z key*/remap=<005b>=“string” /* [ key */remap=<005c>=“string” /* \ key */remap=<005d>=“string” /* ] key */remap=<005e>=“string” /* ^ key */remap=<005f>=“string” /* _ key */remap=<0060>=“string” /* ‘ key */remap=<0061>=“string” /* a key*/remap=<0062>=“string” /* b key*/remap=<0063>=“string” /* c key*/remap=<0064>=“string” /* d key*/remap=<0065>=“string” /* e key*/remap=<0066>=“string” /* f key*/remap=<0067>=“string” /* g key*/remap=<0068>=“string” /* h key*/

Customizing Your Configuration—Chapter 4
139Native Terminal Emulation Programmer’s Guide
remap=<0069>=“string” /* i key*/remap=<006a>=“string” /* j key*/remap=<006b>=“string” /* k key*/remap=<006c>=“string” /* l key*/remap=<006d>=“string” /* m key*/remap=<006e>=“string” /* n key*/remap=<006f>=“string” /* o key*/remap=<0070>=“string” /* p key*/remap=<0071>=“string” /* q key*/remap=<0072>=“string” /* r key*/remap=<0073>=“string” /* s key*/remap=<0074>=“string” /* t key*/remap=<0075>=“string” /* u key*/remap=<0076>=“string” /* v key*/remap=<0077>=“string” /* w key*/remap=<0078>=“string” /* x key*/remap=<0079>=“string” /* y key*/remap=<007a>=“string” /* z key*/
remap=<007b>=“string” /* key */remap=<007c>=“string” /* | key */remap=<007d>=“string” /* key */remap=<007e>=“string” /* ~ key */remap=<007f>=“string” /* Del key */
remap=<1030>=“string” /* Home key */remap=<1031>=“string” /* F1 key */remap=<1032>=“string” /* F2 key */remap=<1033>=“string” /* F3 key */remap=<1034>=“string” /* F4 key */remap=<1035>=“string” /* F5 key */remap=<1036>=“string” /* F6 key */remap=<1037>=“string” /* F7 key */remap=<1038>=“string” /* F8 key */remap=<1039>=“string” /* F9 key */remap=<103c>=“string” /* Backspace key */
remap=<1042>=“string” /* Back Tab key */remap=<1043>=“string” /* Clear key */remap=<1044>=“string” /* Del key */remap=<1045>=“string” /* Enter key */remap=<1046>=“string” /* Erase End of Field (EOF) */remap=<1049>=“string” /* Insert key */
remap=<104e>=“string” /* New line */remap=<1052>=“string” /* Reset key */remap=<105a>=“string” /* Tab key */
remap=<1061>=“string” /* F10 key */remap=<1062>=“string” /* F11 key */remap=<1063>=“string” /* F12 key */remap=<1064>=“string” /* F13 key */remap=<1065>=“string” /* F15 key */

Customizing Your ConfigurationChapter —4
140 Native Terminal Emulation Programmer’s Guide
remap=<1066>=“string” /* F16 key */remap=<1067>=“string” /* F17 key */remap=<1068>=“string” /* F18 key */remap=<1069>=“string” /* F19 key */remap=<106a>=“string” /* F20 key */remap=<106b>=“string” /* F21 key */remap=<106c>=“string” /* F22 key */remap=<106d>=“string” /* F23 key */remap=<106e>=“string” /* F24 key */
remap=<2041>=“string” /* Auto-Login Restart key */remap=<206c>=“string” /* Menu key */
Remapping CharactersYou can use display character translation files to remap characters as theyare written to the display. The translation file name for Native TE must beNATIVE.XLT. For instructions on how to download the file to theterminal, see “Downloading Files” on page 144.
Display character translation files are binary files consisting of orderedpairs of eight bit values. Each pair of values remaps a displayable characterto a different displayable character.
S The first byte of a pair is the ASCII value of the character to be re-placed.
S The second byte of a pair is the ASCII value that replaces the first.
These translations are only made when a character is written to a displaydevice. If the character is sent to the host (such as keystroke or scan data)or sent to an external device (such as a printer), it is sent as the original,untranslated value.
Suppose you want a terminal running Native emulation to replace the up-percase B with the Greek letter beta, and replace the uppercase Z with theGreek letter omega. Create a file named Native.XLT that is four byteslong (two ordered pairs of two bytes each). The file should contain the0x42, 0xE1, 0x5A, and 0xEA bytes in this order. These represent theASCII display character set values for B, beta, Z, and omega, respectively.
Customizing Your Configuration—Chapter 4
141Native Terminal Emulation Programmer’s Guide
Substituting National CharactersThis topic tells how to create a file that remaps one character in the termi-nal’s Terminal Font Set for another character in the set. Use this informa-tion to provide characters on the terminal in the local language.
Intermec provides a table for converting from characters used in English(U.S.) to German, Danish, Finnish, Italian, Spanish, French, Belgian, andEnglish (UK). The procedure for converting the characters appears first.Then two slightly longer procedures show how to remap any character toanother. One procedure describes the steps with the symbol’s EBCDICvalue. The other one describes the steps without a value. Finally, examplesshow the remap files for German characters and a few English symbols.
For all procedures, you need the terminal’s Terminal Font Set table. Thetable lists characters and their decimal and hexadecimal values. For the2415, 2425, 2435A, 2455, 2475, and 248X Terminals, refer to the termi-nal’s user manual. For the 5055, 6400, 59XX, 17XX, or 11XX Terminal,see Appendix C, “Terminal Font Set Table.”
Creating the FileFollow these steps to create a table that substitutes characters in the locallanguage for characters normally used in U.S. English.
1 Find the character to replace in the “National Replacement Character Set”table on page 142.
2 Locate the character needed from the terminal’s font set.
3 Create the NATIVE.XLT file.
4 Put the default value of the font character (found in step 1) as the firstbyte in the file.
5 Put the replacement value (found in step 2) as the second byte in thefile.
6 Repeat steps 1 through 5 until all replacement characters are complete.
7 Download NATIVE.XLT to your terminal and restart the terminalemulation program for the changes to take effect. For downloading in-formation, see “Downloading Files” on page 144.
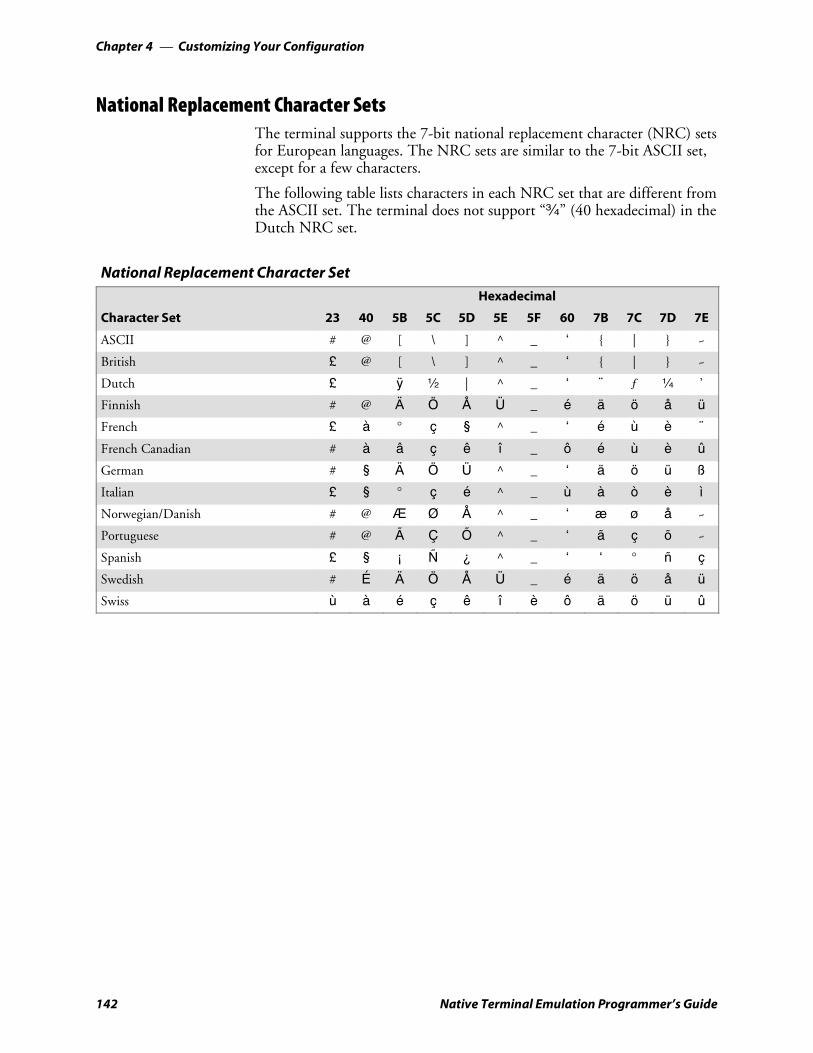
Customizing Your ConfigurationChapter —4
142 Native Terminal Emulation Programmer’s Guide
National Replacement Character SetsThe terminal supports the 7-bit national replacement character (NRC) setsfor European languages. The NRC sets are similar to the 7-bit ASCII set,except for a few characters.
The following table lists characters in each NRC set that are different fromthe ASCII set. The terminal does not support “¾” (40 hexadecimal) in theDutch NRC set.
National Replacement Character SetHexadecimal
Character Set 23 40 5B 5C 5D 5E 5F 60 7B 7C 7D 7E
ASCII # @ [ \ ] ^ _ ‘ | ~
British £ @ [ \ ] ^ _ ‘ | ~
Dutch £ ÿ ½ | ^ _ ‘ ¨ ƒ ¼ ’
Finnish # @ Ä Ö Å Ü _ é ä ö å ü
French £ à _ ç § ^ _ ‘ é ù è ¨
French Canadian # à â ç ê î _ ô é ù è û
German # § Ä Ö Ü ^ _ ‘ ä ö ü ß
Italian £ § _ ç é ^ _ ù à ò è ì
Norwegian/Danish # @ Æ Ø Å ^ _ ‘ æ ø å ~
Portuguese # @ Ã Ç Õ ^ _ ‘ ã ç õ ~
Spanish £ § ¡ Ñ ¿ ^ _ ‘ ‘ _ ñ ç
Swedish # É Ä Ö Å Ü _ é ä ö å ü
Swiss ù à é ç ê î è ô ä ö ü û

Customizing Your Configuration—Chapter 4
143Native Terminal Emulation Programmer’s Guide
Greek National Replacement Character Set(6400, 5055, 59XX, 17XX, 11XX, Terminals)
row column 0 1 2 3 4 5 6 7
b8 bitsb7b6
0 0 0 0 1 1 1 1b6b5
b4 b3 b2 b1
000
001
010
011
100
101
110
111
0 0 0 0 0 00 10 20 D 30 ΐ 40 Π 50 à 60 Π 70
1 0 0 0 1 01 11 ‘ 21 ± 31 Α 41 Ρ 51 α 61 ρ 71
2 0 0 1 0 02 12 ’ 22 2 32 Β 42 52 β 62 j 72
3 0 0 1 1 03 13 £ 23 β 33 Γ 43 Σ 53 Υ 63 σ 73
4 0 1 0 0 04 14 24 ′ 34 ∆ 44 Τ 54 δ 64 τ 74
5 0 1 0 1 05 15 25 µ 35 Ε 45 Υ 55 ε 65 υ 75
6 0 1 1 0 06 16 ¦ 26 ¶ 36 Ζ 46 Φ 56 j 66 φ 76
7 0 1 1 1 07 17 § 27 · 37 Η 47 Χ 57 η 67 χ 77
8 1 0 0 0 08 18 ¨ 28 ¸ 38 Θ 48 Ψ 58 θ 68 Ψ 78
9 1 0 0 1 09 19 E 29 ¹ 39 Ι 49 Ω 59 ι 69 ω 79
A 1 0 1 0 0A 1A 2A º 3A Κ 4A Ϊ 5A κ 6A ϊ 7A
B 1 0 1 1 0B 1B « 2B » 3B Λ 4B Ϋ 5B λ 6B ϋ 7B
C 1 1 0 0 0C 1C ¬ 2C ¼ 3C Μ 4C Ü 5C m 6C ü 7C
D 1 1 0 1 0D 1D SHΥ 2D ½ 3D Ν 4D Ý 5D ν 6D ý 7D
E 1 1 1 0 0E 1E 2E ¾ 3E Ξ 4E Þ 5E ξ 6E þ 7E
F 1 1 1 1 0F 1F — 2F ¿ 3F Ο 4F ι 5F ο 6F 7F
ExampleThis example remaps three characters. It applies only to the 2415, 2425,2435A, 2455, 2475, or 248X Terminal. It does not apply to the 6400,5055, 59XX, 17XX, or 11XX Terminal because U.S. English values arecorrect in these terminals.
ExampleASCII hexadecimal file NATIVE.XLT remaps 3 characters0x23 0x9C0x40 0xA00x4B 0xF8
ASCII Hex Value Original to be Replaced Replacement for Display
23 # £
40 @ Ê
5B [ ∞
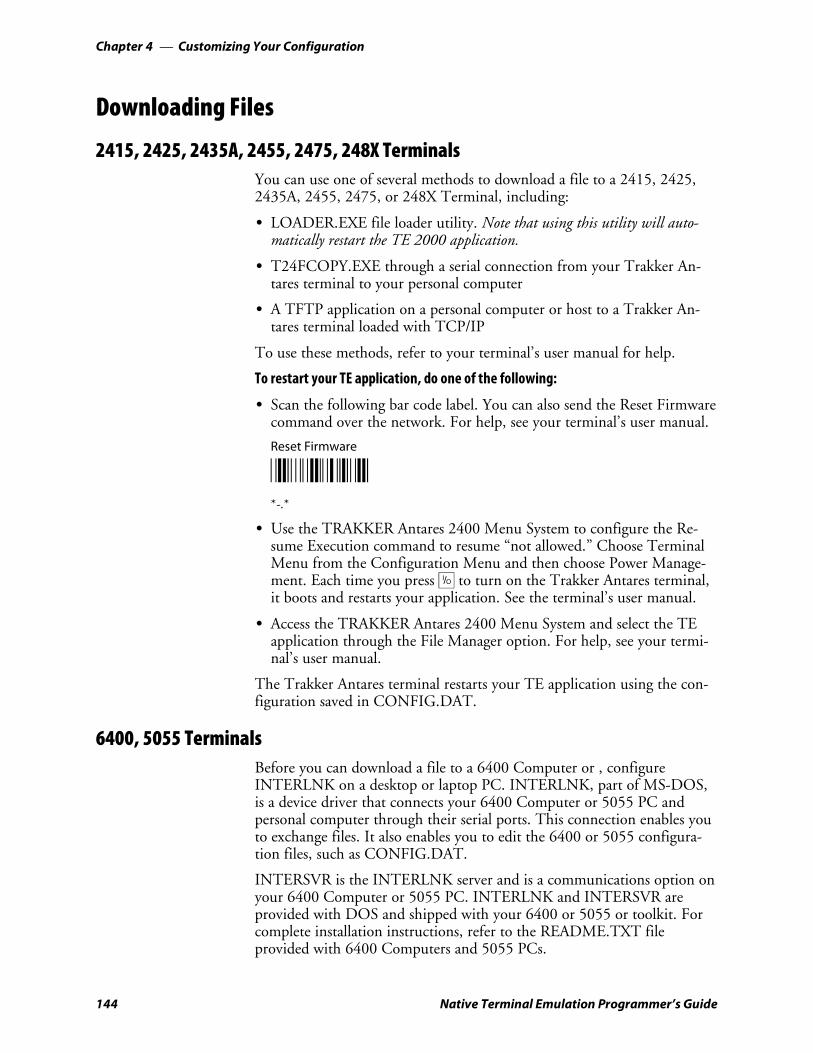
Customizing Your ConfigurationChapter —4
144 Native Terminal Emulation Programmer’s Guide
Downloading Files
2415, 2425, 2435A, 2455, 2475, 248X TerminalsYou can use one of several methods to download a file to a 2415, 2425,2435A, 2455, 2475, or 248X Terminal, including:
S LOADER.EXE file loader utility. Note that using this utility will auto-matically restart the TE 2000 application.
S T24FCOPY.EXE through a serial connection from your Trakker An-tares terminal to your personal computer
S A TFTP application on a personal computer or host to a Trakker An-tares terminal loaded with TCP/IP
To use these methods, refer to your terminal’s user manual for help.
To restart your TE application, do one of the following:
S Scan the following bar code label. You can also send the Reset Firmwarecommand over the network. For help, see your terminal’s user manual.
Reset Firmware
*/M.**-.*
S Use the TRAKKER Antares 2400 Menu System to configure the Re-sume Execution command to resume “not allowed.” Choose TerminalMenu from the Configuration Menu and then choose Power Manage-ment. Each time you press œ to turn on the Trakker Antares terminal,it boots and restarts your application. See the terminal’s user manual.
S Access the TRAKKER Antares 2400 Menu System and select the TEapplication through the File Manager option. For help, see your termi-nal’s user manual.
The Trakker Antares terminal restarts your TE application using the con-figuration saved in CONFIG.DAT.
6400, 5055 TerminalsBefore you can download a file to a 6400 Computer or , configureINTERLNK on a desktop or laptop PC. INTERLNK, part of MS-DOS,is a device driver that connects your 6400 Computer or 5055 PC andpersonal computer through their serial ports. This connection enables youto exchange files. It also enables you to edit the 6400 or 5055 configura-tion files, such as CONFIG.DAT.
INTERSVR is the INTERLNK server and is a communications option onyour 6400 Computer or 5055 PC. INTERLNK and INTERSVR areprovided with DOS and shipped with your 6400 or 5055 or toolkit. Forcomplete installation instructions, refer to the README.TXT fileprovided with 6400 Computers and 5055 PCs.

Customizing Your Configuration—Chapter 4
145Native Terminal Emulation Programmer’s Guide
Reprogramming Flash MemoryFlash upgrades can be ordered on diskette from Intermec (contact arepresentative), or downloaded from the Intermec Knowledge Central (seeBefore You Begin). Read all instructions before proceeding.
Note: Keep terminals on charge when setting up, reprogramming, or re-flashing.
Prerequisites for INTERLNK Flash UpdateS A working 6400 Computer or 5055 PC to do this procedure(if the flash
is corrupted, perform a serial master mode boot).
S A RAM drive (D:) of at least 960 KB.
S A disk file contains the flash archive, 50BDXXXX.EXE. The last fournumbers indicate the flash version (0129 indicates flash version 1.29).
S A standard host PC for connecting to the 6400 Computer or 5055 PC.INTERLNK.EXE must be loaded by the CONFIG.SYS file. For moredetailed information on running INTERLNK, refer to a DOS manual.
S A NULL modem cable to connect the host PC’s communications portto the 6400 Computer or 5055 PC with a single dock or communica-tion adapter.
INTERLNK InstallationUse the following instructions if you have a version of flash that includesINTERSVR as a possible Comm option on your 6400 Computer or 5055PC. If you do not have INTERSVR, you must update the flash using aserial master mode boot.
The following instructions assume that you have placed all files from theself-extracting archive in a directory (on your host personal computer)called C:\PENKEY\FLASH. If you choose to place these files in a differentlocation, adjust the instructions accordingly.
Note: Delete the self-extracting file from this directory once the files areextracted.
Your host personal computer must be running INTERLNK, which is partof MS-DOS. Load INTERLNK as a device driver in your CONFIG.SYSfile, using the following statement, at the end of the CONFIG.SYS file(after any other statement that creates a drive letter):
DEVICE=C:\DOS\INTERLNK.EXE /DRIVES:3
The previous statement assumes that MS-DOS is located in the host PCC:\DOS directory. The /DRIVES: 3 parameter allows mapping of threedrives from the 6400 Computer or 5055 PC.
Customizing Your ConfigurationChapter —4
146 Native Terminal Emulation Programmer’s Guide
INTERLNK and INTERSVRINTERLNK is a device driver that interconnects a 6400 Computer or5055 PC and a host personal computer through serial ports. INTERSVRis the INTERLNK server, a communication option in the NorandUtilities program. These two resources are provided with ROM DOS 6.22and are shipped with the 6400 Computer or 5055 PC toolkit. A standardnull modem cable connects the personal computer to the 6400 Computeror 5055 PC. A TTY TCOM cable also works. A dock is needed for the6400 Computer or 5055 PC or a communication adapter that plugs ontothe bottom end of the terminal.
INTERLNK causes the 6400 Computer or 5055 PC drives to appear asvirtual drives on the host personal computer, with drive lettersimmediately beyond the highest drive letter currently used on the hostpersonal computer. Typing “INTERLNK” from the host personalcomputer command line displays the designations of the redirected drives.For details of INTERLNK and INTERSVR topics, refer to the DOSon-line help text.
INTERLNK is installed on a host PC, using the following statement inthe CONFIG.SYS file:
device=c:\dos\interlnk.exe /drives:4
After installation, you can copy the application files to the 6400 Computeror 5055 PC. To terminate INTERSVR, press [ALT] + [F4].
59XX, 17XX, 11XX TerminalsFor a 59XX, 17XX, or 11XX Terminal, use utility programCHECKCFG.EXE to verify the correctness of your configuration.
Using CHECKCFG to Compile and Decompile Custom ConfigurationsCHECKCFG reads your configuration and literal files, and reports anysyntax errors. It also converts your data files to the proper format for theTE program.
The ASCII text of the configuration file converts to a compressed binaryformat to save space in the terminal. CHECKCFG can reverse theoperation by converting a binary file into its ASCII source. CHECKCFGcan also list set-up parameters, their types, and their allowable values.
To display the program version number and a short message that lists thedifferent command line formats for the program, type checkcfg
Converting Files from ASCII to BinaryTo convert an ASCII parameter file into binary format before download-ing it to a terminal, use the following command line:
checkcfg <input config file>cfglit.dat<output config file>
S <input config file> is the name of your ASCII text parameter file
S <output config file> is the name of the file that you must append to yourTE hex file. The output file must be named CONFIG.DAT.

Customizing Your Configuration—Chapter 4
147Native Terminal Emulation Programmer’s Guide
Converting Files from Binary to ASCIITo convert a binary parameter file back into its ASCII equivalent, use thefollowing command line:checkcfg -r <config file> cfglit.dat <output file>
S <config file> is the name of your binary parameter file
S CFGLIT.DAT is the name of your terminal literal file
S <output file> is the name of the file that will contain the convertedASCII output
Listing Parameters and ValuesTo display a list of all possible set up parameters and their values, use thefollowing command line: checkcfg -p cfglit.dat
Note: The output from this command is about seven hundred lines long.You may want to redirect it into another file for viewing.
Using FLSHCONV.EXE to Build Customized HEX FilesFLSHCONV.EXE is a utility program that creates Intel-hex files in theproper format for downloading to an 11XX, 17XX, or 59XX Terminal.FLSHCONV can do the following:
S Locate and append .EXE programs for download in an Intel-hex file
S Append data and configuration files to an existing Intel-hex file(FLSHCONV cannot locate and append .EXE programs to an existinghex file)
To display the program version number and a short message that listscommand line formats, type: flshconv
The following lists FLSHCONV command line options, where <hexnum>represents a hexadecimal segment address and <number> represents adecimal number.
S –f<hexnum><hexnum> is the starting address of Flash memory for the terminal. De-fault: 8000 (absolute address 0x80000).
S –e<hexnum><hexnum> is the ending address of Flash. If you omit this parameter,FLSHCONV does not report an error if your Flash image is too big.
S –d<hexnum><hexnum> is the starting address of memory space for .EXE programs.Default: 200 (absolute address 0x2000). You should ordinarily use 60(absolute address 0x600).
S –o<filename><filename> is the Intel-hex output file name.
S –v<number><number> indicates “verbosity.” Default: 0, meaning no information ap-pears on the standard output device. Intermec recommends a value of 1 togenerate a report of where each file is located. You can use higher val-ues, but they may not produce useful information for the end user.
Customizing Your ConfigurationChapter —4
148 Native Terminal Emulation Programmer’s Guide
S –aThis option tells FLSNCONV to append data files to an existing Intel-hex file. The hex file must be the first file name on the command line.
The following chart lists FLSHCONV command line arguments.
Terminal -f<hexnum> -e<hexnum> -d<hexnum>
11XX, 256K Flash -f8000 -eC000 -d60
11XX, 512K Flash -f8000 -eFFC0 -d60
17XX, 512K Flash -f8000 -eFFC0 -d60
5928-5948, 384K Flash -f9000 -eE000 -d60
Locating and Appending .EXE FilesAs an example, suppose you are building a customized version of the17XX Flash program FWP170H0.HEX. As a minimum, you must havethe following files:
S 1700BIOS.EXE 17XX BIOS program
S KERNEL.EXE Intermec multitasking services
S FWP170H0.EXE 17XX VT/ANSI TE program
S NORAND.FNT Display character font file. This may be thestandard font file or a customized userreplacement.
S CFGLIT.DAT Terminal literal file. This may be the standardliteral file or a customized user replacement.
To bind these files into an Intel-hex file ready for download to a 17XX,use the following single command line to build a file called NEW.HEX:flshconv -f8000 -effcO -d60 1700bios.exe kernel.exefwp170h0.exe norand.fnt cfglit.dat -onew.hex
Or, you can create a file that contains each file name on a separate line.Assuming that file was named 1700FILE.LST, use this command line forthe same results: flshconv -f8000 -effc0 -d60 @1700file.lst
Appending Data Files To Intel-Hex FilesIn the above example, you could have bound the .EXE files together bytyping the following (single) command line:
flshconv -f8000 -effc0 -d60 1700bios.exe kernel.exefwp170h0.exe -o1700exe s.hex
You can then customize the 1700EXES.HEX file with different font filesand literal files by typing the following (single) command line:flshconv -effc0 -a 1700exes.hex norand.fntcfglit.dat–onewlang.hex
You can provide keyboard translation file pairs to change the default keyvalues. The (single) command line is:flshconv -effc0 -a newlang.hex vt220eml.key vt220eml.xlt-onewkeys.hex
Customizing Your Configuration—Chapter 4
149Native Terminal Emulation Programmer’s Guide
You can specify more than one file pair. For example, you could provideall four file pairs (eight files) to modify the keyboard for each of the fourdata streams.
Downloading a Hex FileUse these to download a .HEX file to 59XX, 17XX, 11XX Terminals:
S PROGDUX.EXE (provided with the terminal’s Flash)
S Personal computer
S INTERMECr cable P/N: 216-806-001, which is a powered Flash cablethat plugs into the personal computer’s COM port (note that power isnot required for download)
To download a .HEX file:
1 Ensure the terminal is powered ON and PROGDUX.EXE is loaded onthe personal computer.
2 Use cable P/N: 216-806-001 to connect the 11XX or 17XX Terminalto the PC. Use cable P/N: 216-831-001 to connect the 59XX Terminalto the personal computer. Power the terminal off. For help, refer to theterminal’s user manual. Power is not required for download.
3 To receive the .HEX file, the terminal must be in download mode. Toenter this mode, press and hold down the terminal’s [I] key as you pow-er up the terminal. For the 17XX 37-key keyboard, press and holddown the [F1] key as you power up the terminal.
4 At the DOS prompt, type: progdux -? to display a list of commandline options.
5 Erase the terminal’s original Flash and download the new .HEX file bytyping: progdux -e <newfile> where <newfile> is the name of the.HEX file.
A successful download will boot the terminal into the TE application. Ifcommunications is interrupted, PROGDUX.EXE will send out a negativeacknowledgement (NAK) and reset itself to try sending again. No interac-tion is required except to restore communications.
Customizing Your ConfigurationChapter —4
150 Native Terminal Emulation Programmer’s Guide

151Native Terminal Emulation Programmer’s Guide
IntermecR Application Serverand Gateway Commands5
An Intermec Application Server or gateway command is either a “parame-ter” or a “diagnostic.” This chapter contains detailed information abouteach command.
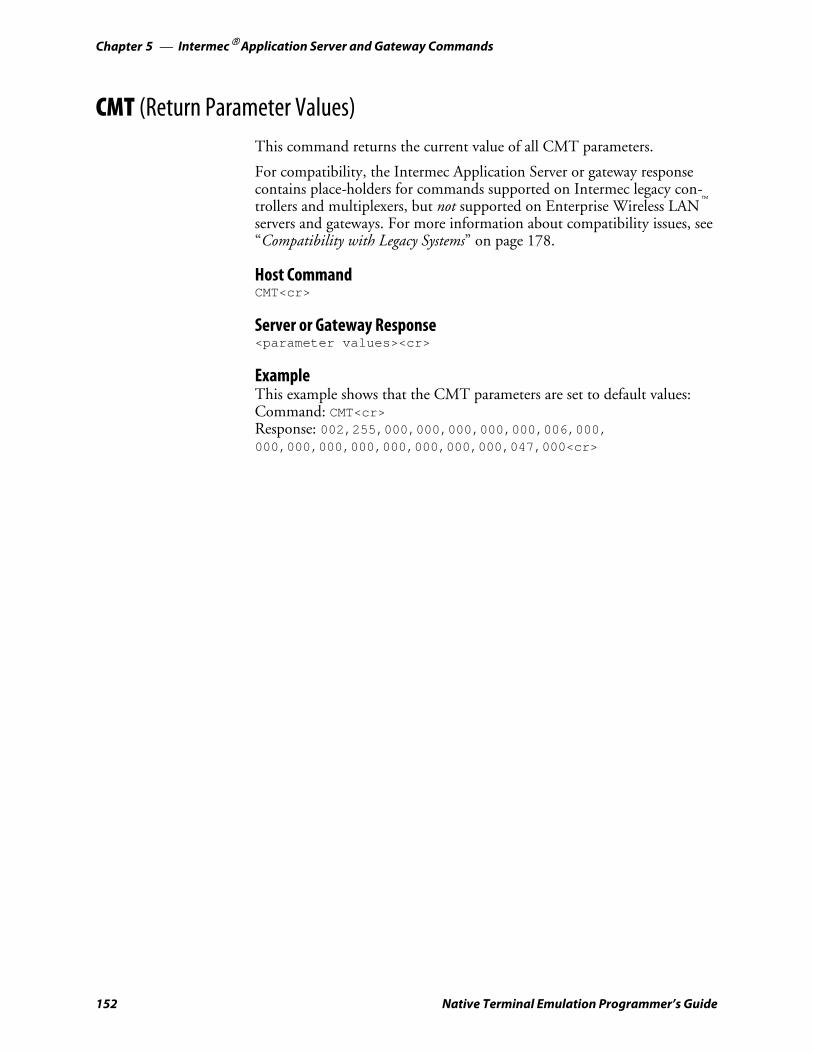
IntermecRApplication Server and Gateway CommandsChapter —5
152 Native Terminal Emulation Programmer’s Guide
CMT (Return Parameter Values)This command returns the current value of all CMT parameters.
For compatibility, the Intermec Application Server or gateway responsecontains place-holders for commands supported on Intermec legacy con-trollers and multiplexers, but not supported on Enterprise Wireless LANt
servers and gateways. For more information about compatibility issues, see“Compatibility with Legacy Systems” on page 178.
Host CommandCMT<cr>
Server or Gateway Response<parameter values><cr>
ExampleThis example shows that the CMT parameters are set to default values:Command: CMT<cr>Response: 002,255,000,000,000,000,000,006,000,000,000,000,000,000,000,000,000,047,000<cr>
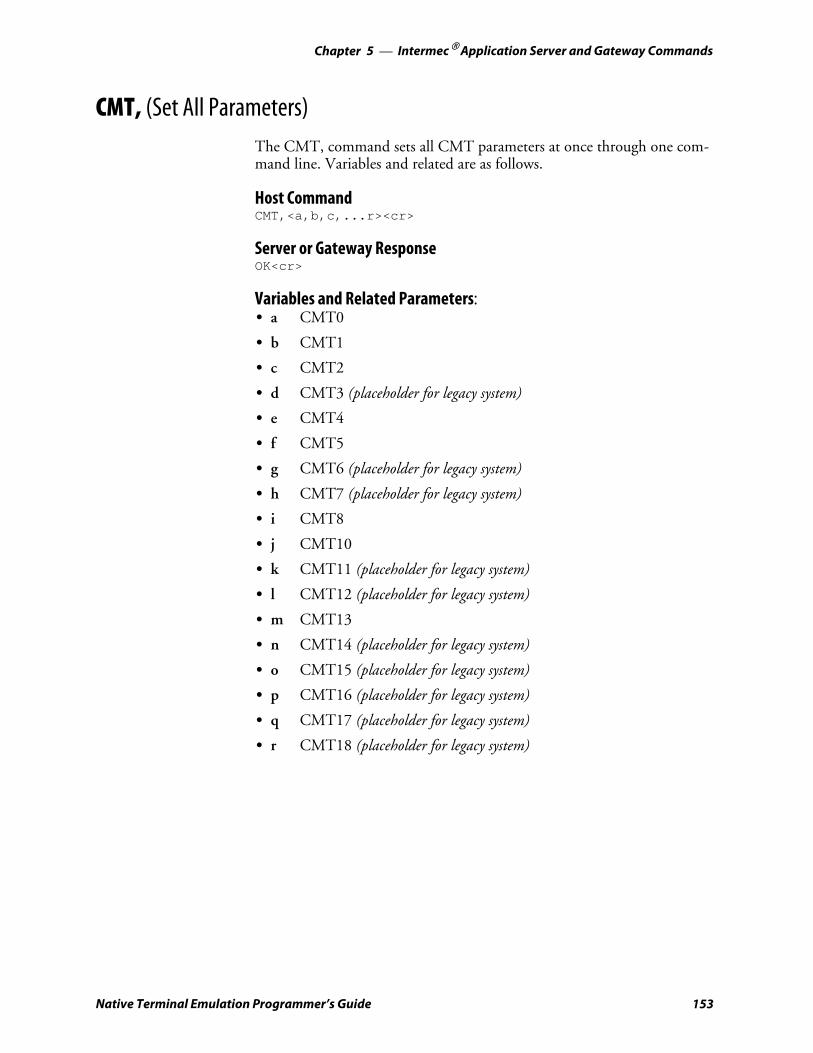
IntermecRApplication Server and Gateway Commands—Chapter 5
153Native Terminal Emulation Programmer’s Guide
CMT, (Set All Parameters)The CMT, command sets all CMT parameters at once through one com-mand line. Variables and related are as follows.
Host CommandCMT,<a,b,c,...r><cr>
Server or Gateway ResponseOK<cr>
Variables and Related Parameters:S a CMT0
S b CMT1
S c CMT2
S d CMT3 (placeholder for legacy system)
S e CMT4
S f CMT5
S g CMT6 (placeholder for legacy system)
S h CMT7 (placeholder for legacy system)
S i CMT8
S j CMT10
S k CMT11 (placeholder for legacy system)
S l CMT12 (placeholder for legacy system)
S m CMT13
S n CMT14 (placeholder for legacy system)
S o CMT15 (placeholder for legacy system)
S p CMT16 (placeholder for legacy system)
S q CMT17 (placeholder for legacy system)
S r CMT18 (placeholder for legacy system)
IntermecRApplication Server and Gateway CommandsChapter —5
154 Native Terminal Emulation Programmer’s Guide
Maintain the default settings by omitting a parameter and including thecomma, as in Example 1. Parameters following an incomplete series re-main unchanged, like in Example 2.
Example 1Command: CMT,2,2,1,,,,,<cr>Response: OK<cr>
This example does the following. The remaining values apply to legacy sys-tems and do not change.
Sets CMT0 to 2Sets CMT1 to 2Sets CMT2 to 1Sets CMT4, CMT5, CMT8, CMT10, and CMT13 to default values.
Example 2Command: CMT,1,1,<cr>Response: OK<cr>
This example does the following. The remaining values apply to legacy sys-tems and do not change.
Sets CMT0 to 1Sets CMT1 to 1Leaves the parameters for CMT4, CMT5, CMT8, CMT10, and
CMT13 set at the values in Example 1 (assuming that Example 1 pre-cedes Example 2).
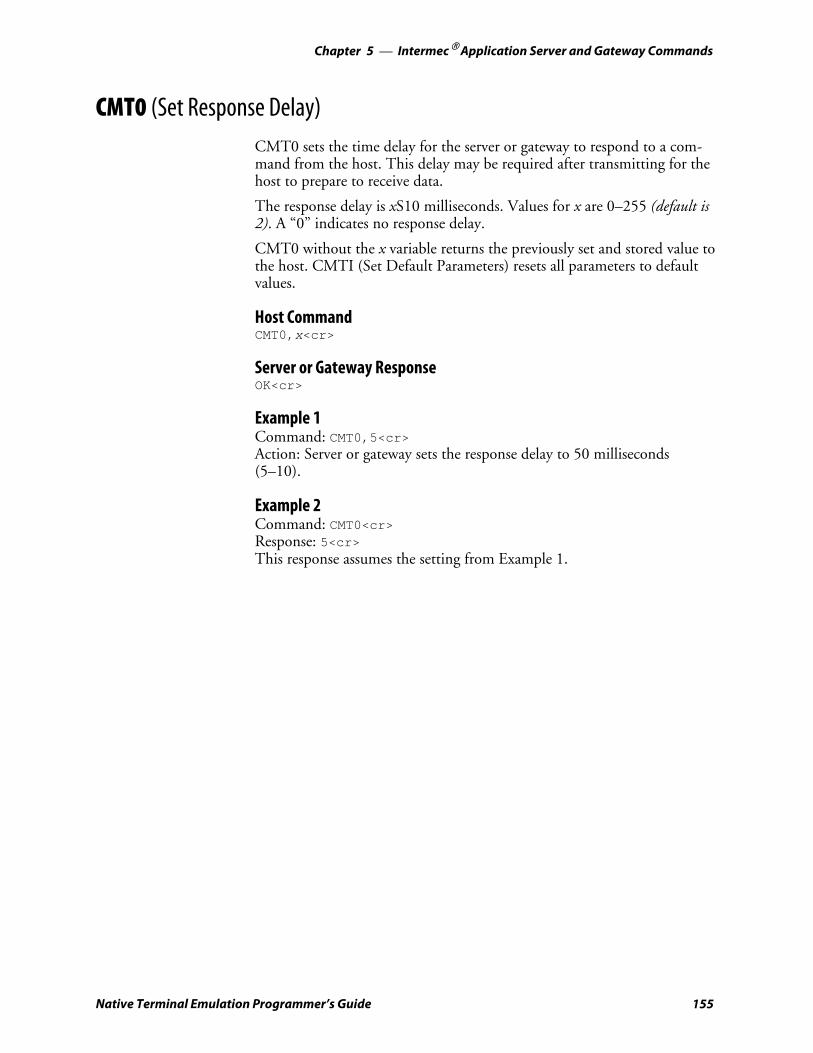
IntermecRApplication Server and Gateway Commands—Chapter 5
155Native Terminal Emulation Programmer’s Guide
CMT0 (Set Response Delay)CMT0 sets the time delay for the server or gateway to respond to a com-mand from the host. This delay may be required after transmitting for thehost to prepare to receive data.
The response delay is xS10 milliseconds. Values for x are 0–255 (default is2). A “0” indicates no response delay.
CMT0 without the x variable returns the previously set and stored value tothe host. CMTI (Set Default Parameters) resets all parameters to defaultvalues.
Host CommandCMT0,x<cr>
Server or Gateway ResponseOK<cr>
Example 1Command: CMT0,5<cr>Action: Server or gateway sets the response delay to 50 milliseconds(5–10).
Example 2Command: CMT0<cr>Response: 5<cr>This response assumes the setting from Example 1.
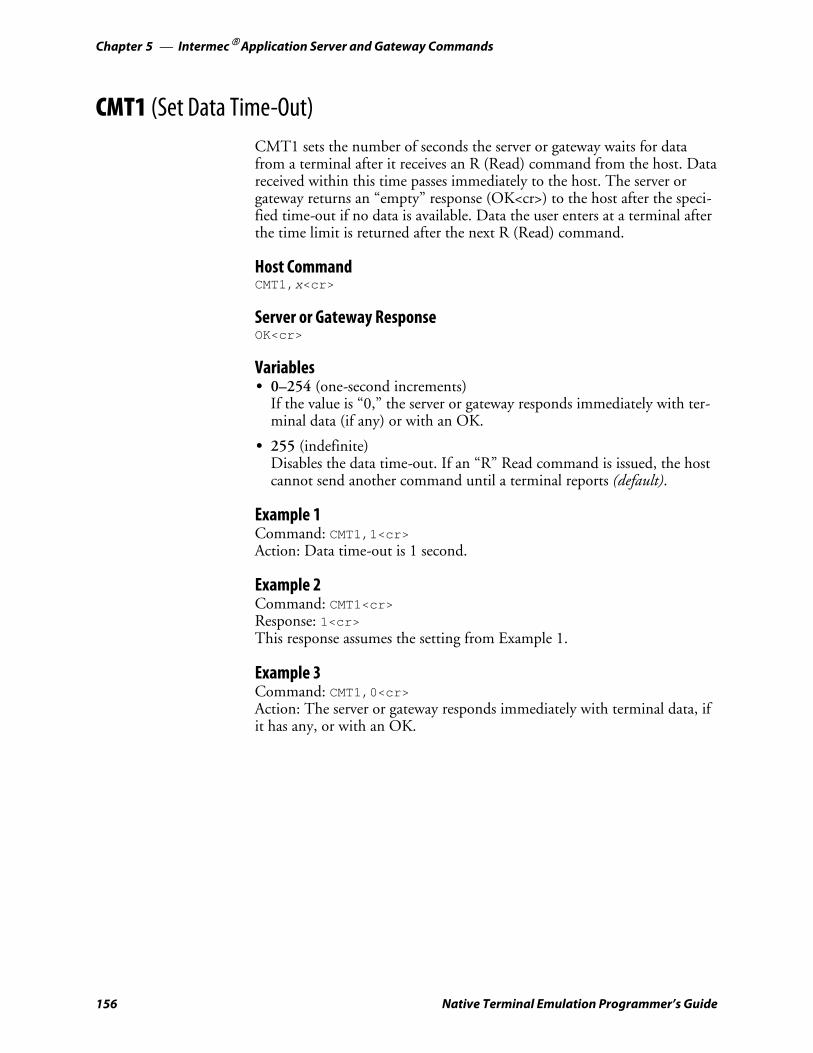
IntermecRApplication Server and Gateway CommandsChapter —5
156 Native Terminal Emulation Programmer’s Guide
CMT1 (Set Data Time-Out)CMT1 sets the number of seconds the server or gateway waits for datafrom a terminal after it receives an R (Read) command from the host. Datareceived within this time passes immediately to the host. The server orgateway returns an “empty” response (OK<cr>) to the host after the speci-fied time-out if no data is available. Data the user enters at a terminal afterthe time limit is returned after the next R (Read) command.
Host CommandCMT1,x<cr>
Server or Gateway ResponseOK<cr>
VariablesS 0–254 (one-second increments)
If the value is “0,” the server or gateway responds immediately with ter-minal data (if any) or with an OK.
S 255 (indefinite)Disables the data time-out. If an “R” Read command is issued, the hostcannot send another command until a terminal reports (default).
Example 1Command: CMT1,1<cr>Action: Data time-out is 1 second.
Example 2Command: CMT1<cr>Response: 1<cr>This response assumes the setting from Example 1.
Example 3Command: CMT1,0<cr>Action: The server or gateway responds immediately with terminal data, ifit has any, or with an OK.

IntermecRApplication Server and Gateway Commands—Chapter 5
157Native Terminal Emulation Programmer’s Guide
CMT2 (Interactive Mode)Use CMT2 to enable or disable interactive mode.
Host CommandCMT2,x<cr>
Server or Gateway ResponseOK<cr>
X Variable ValuesS 0
Disables interactive mode. The server or gateway never sends an OK.The host sends commands to the server or gateway, which does not re-spond unless the command has an error. The server or gateway sendsterminal responses as it receives them (default).
S 1Enables interactive mode. The server or gateway responds to every hostcommand whether or not data is requested. If it has no terminal re-sponses queued up, it responds with “OK<cr>.”
Example 1Command: CMT2,1<cr>Response: OK<cr>
Example 2Command: CMT2<cr>Response: 1<cr>This response assumes the setting from Example 1.

IntermecRApplication Server and Gateway CommandsChapter —5
158 Native Terminal Emulation Programmer’s Guide
CMT4 (Add Line Feed to Responses)Use CMT4 to enable (or disable) the automatic addition of an ASCII linefeed character to the end of each data string from the server or gateway tothe host.
Host CommandCMT4,x<cr>
Server or Gateway ResponseOK<cr>
X Variable ValuesS 0
Disables automatic line feed character (default).
S 1Enables automatic line feed character.
Example 1Command: CMT4,1<cr>Response: OK<cr><lf>The server or gateway adds an ASCII line feed character to each data stringsent to the host.
Example 2Command: CMT4<cr>Response: 1<cr><lf>This response assumes the setting from Example 1.

IntermecRApplication Server and Gateway Commands—Chapter 5
159Native Terminal Emulation Programmer’s Guide
CMT5 (Set Gap Time-Out)CMT5 sets the time the server or gateway waits between characters beforeterminating a message to xS30 msec. You can only use CMT5 in interac-tive mode (CMT2,1).
Note: Intercharacter gap timeout for the Intermec Application Server is 10seconds, regardless of the CMT5 setting.
Values for variable x are 0-255 (default: 0). “255” disables gap time-out(the server or gateway waits indefinitely for a carriage return).
When you enable CMT5, the server or gateway expects a carriage return toterminate messages from the host. Without the carriage return, it automat-ically terminates a message after a time interval equal to the gap time-outsetting.
Host CommandCMT5,x<cr>
Server or Gateway ResponseOK<cr>
Example 1Command: CMT5,3<cr>Action: Server or gateway sets gap time-out to 90 milliseconds (3S30).
Example 2Command: CMT5<cr>Response: 3<cr>This response assumes the setting from Example 1.
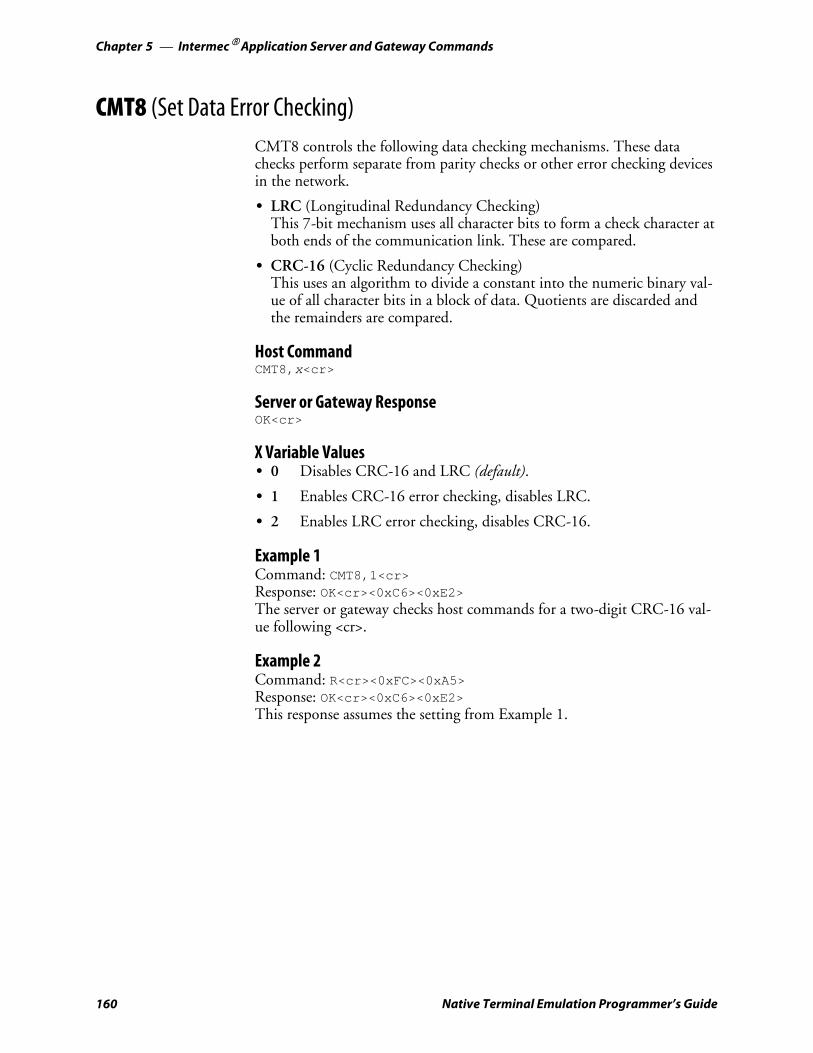
IntermecRApplication Server and Gateway CommandsChapter —5
160 Native Terminal Emulation Programmer’s Guide
CMT8 (Set Data Error Checking)CMT8 controls the following data checking mechanisms. These datachecks perform separate from parity checks or other error checking devicesin the network.
S LRC (Longitudinal Redundancy Checking)This 7-bit mechanism uses all character bits to form a check character atboth ends of the communication link. These are compared.
S CRC-16 (Cyclic Redundancy Checking)This uses an algorithm to divide a constant into the numeric binary val-ue of all character bits in a block of data. Quotients are discarded andthe remainders are compared.
Host CommandCMT8,x<cr>
Server or Gateway ResponseOK<cr>
X Variable ValuesS 0 Disables CRC-16 and LRC (default).
S 1 Enables CRC-16 error checking, disables LRC.
S 2 Enables LRC error checking, disables CRC-16.
Example 1Command: CMT8,1<cr>Response: OK<cr><0xC6><0xE2>The server or gateway checks host commands for a two-digit CRC-16 val-ue following <cr>.
Example 2Command: R<cr><0xFC><0xA5>Response: OK<cr><0xC6><0xE2>This response assumes the setting from Example 1.
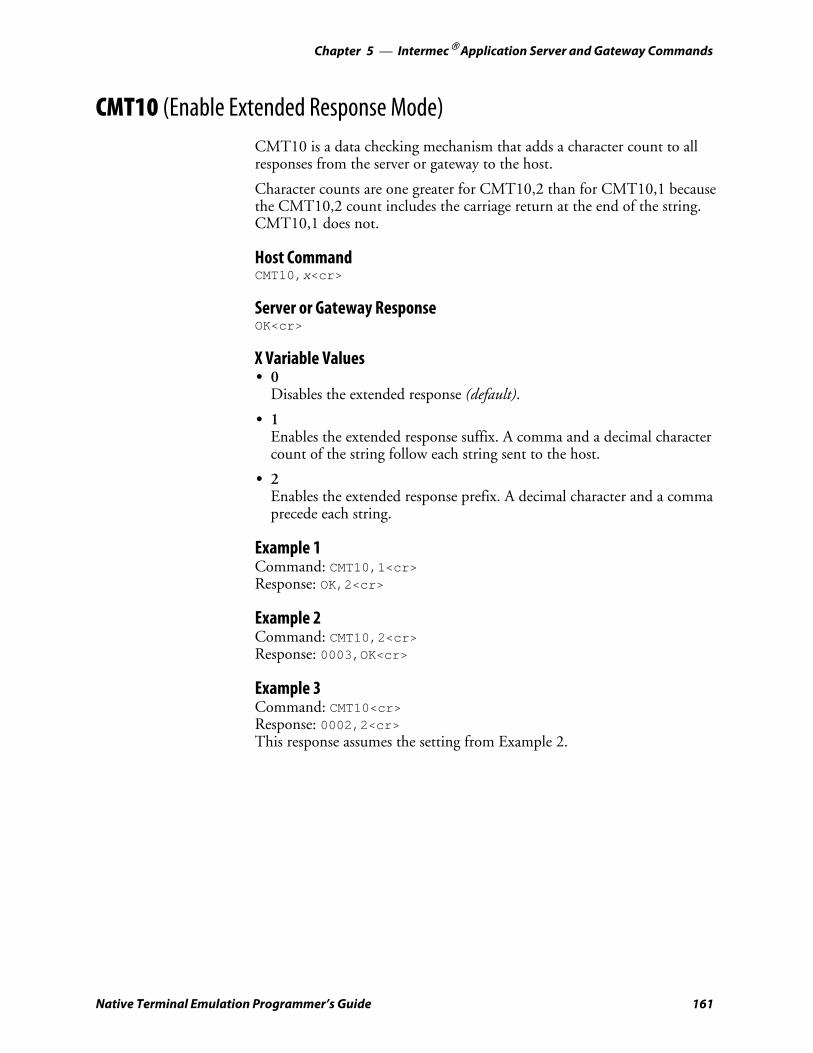
IntermecRApplication Server and Gateway Commands—Chapter 5
161Native Terminal Emulation Programmer’s Guide
CMT10 (Enable Extended Response Mode)CMT10 is a data checking mechanism that adds a character count to allresponses from the server or gateway to the host.
Character counts are one greater for CMT10,2 than for CMT10,1 becausethe CMT10,2 count includes the carriage return at the end of the string.CMT10,1 does not.
Host CommandCMT10,x<cr>
Server or Gateway ResponseOK<cr>
X Variable ValuesS 0
Disables the extended response (default).
S 1Enables the extended response suffix. A comma and a decimal charactercount of the string follow each string sent to the host.
S 2Enables the extended response prefix. A decimal character and a commaprecede each string.
Example 1Command: CMT10,1<cr>Response: OK,2<cr>
Example 2Command: CMT10,2<cr>Response: 0003,OK<cr>
Example 3Command: CMT10<cr>Response: 0002,2<cr>This response assumes the setting from Example 2.
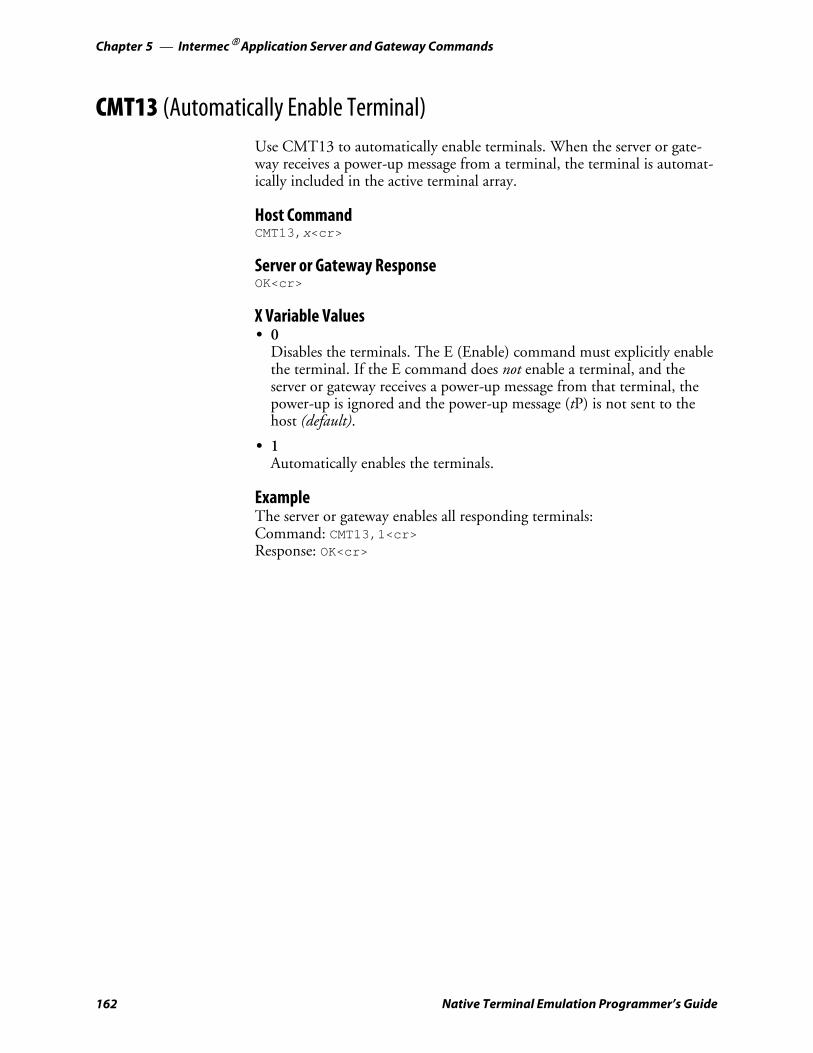
IntermecRApplication Server and Gateway CommandsChapter —5
162 Native Terminal Emulation Programmer’s Guide
CMT13 (Automatically Enable Terminal)Use CMT13 to automatically enable terminals. When the server or gate-way receives a power-up message from a terminal, the terminal is automat-ically included in the active terminal array.
Host CommandCMT13,x<cr>
Server or Gateway ResponseOK<cr>
X Variable ValuesS 0
Disables the terminals. The E (Enable) command must explicitly enablethe terminal. If the E command does not enable a terminal, and theserver or gateway receives a power-up message from that terminal, thepower-up is ignored and the power-up message (tP) is not sent to thehost (default).
S 1Automatically enables the terminals.
ExampleThe server or gateway enables all responding terminals:Command: CMT13,1<cr>Response: OK<cr>
IntermecRApplication Server and Gateway Commands—Chapter 5
163Native Terminal Emulation Programmer’s Guide
CMT21 (One-Character Address Mode)If the server or gateway is configured for one-byte addressing (also“RM2216” or “old” mode), it powers up and behaves like an RM2216Multiplexer. Terminal power-up messages have the form “1P”, where “1”is the one-character address.
If the x variable for CMT21 is set to “1,” and the server or gateway is con-figured for one-byte addressing, terminal power-up messages have the form“1P,060” where “1” is the one-byte address and “,060” is the terminalpower-up type. The terminal power-up type resembles the standard three-byte power-up because of the terminal type, but the one-byte address ap-pears.
The default setting is “0,” which disables one-byte addressing. If the serveror gateway is configured for three-character (“normal”) addressing, theCMT21 command does nothing.
Host CommandCMT21,x<cr>
Server or Gateway ResponseOK<cr>
Example 1Command CMT21,1<cr>Response: OK<cr>Sets one-character addressing, Real Time Control (RTC) mode if hostmode is RM2216.
Example 2Command CMT21<cr>Response: 1,<cr>This response reports the setting from Example 1.
IntermecRApplication Server and Gateway CommandsChapter —5
164 Native Terminal Emulation Programmer’s Guide
CMT22 (Multiple Buffering Mode)Note: Multiple buffering is always enabled on the Intermec ApplicationServer.
Multiple Buffering Mode enables the server or gateway to buffer com-mands the host sends. Up to 25 commands per terminal may be bufferedbefore the server or gateway rejects the host command with a “?10” (out-of-buffers) response. This may happen if the host program issues com-mands to a terminal that is not powered up or is out of range. The termi-nal must act on the commands before the server or gateway allows the hostto send more commands. See “Write Display Errors” on page 179 for moreinformation.
If CMT22 is disabled, the server or gateway handles commands in a trans-action-based order. The device expects the host to wait until the responseto the command is sent back to the host before the host sends the nextcommand. If the host program violates this protocol by sending severalcommands to the server or gateway in succession without the device fullyacting on the command, the commands may be overwritten and lost.
Host CommandCMT22,x<cr>
Server or Gateway ResponseOK<cr>
X Variable ValuesS 0
Disables the multiple buffering mode (default).
S 1Enables the multiple buffering mode.
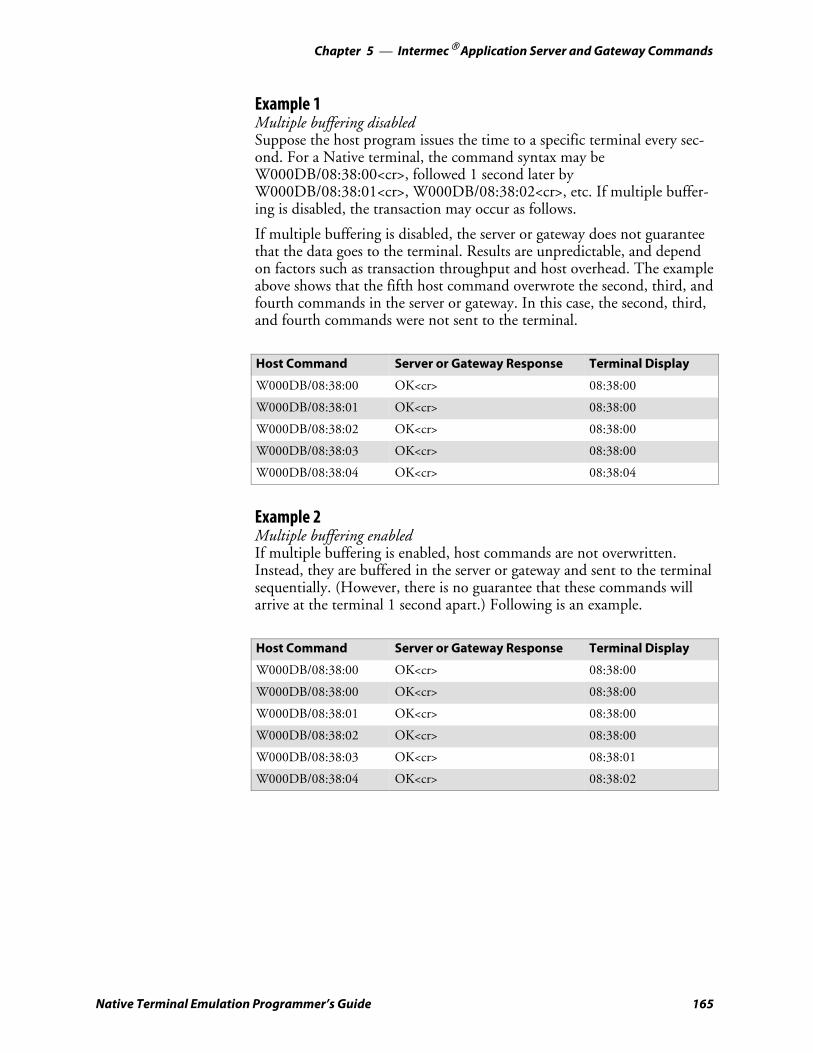
IntermecRApplication Server and Gateway Commands—Chapter 5
165Native Terminal Emulation Programmer’s Guide
Example 1Multiple buffering disabledSuppose the host program issues the time to a specific terminal every sec-ond. For a Native terminal, the command syntax may beW000DB/08:38:00<cr>, followed 1 second later byW000DB/08:38:01<cr>, W000DB/08:38:02<cr>, etc. If multiple buffer-ing is disabled, the transaction may occur as follows.
If multiple buffering is disabled, the server or gateway does not guaranteethat the data goes to the terminal. Results are unpredictable, and dependon factors such as transaction throughput and host overhead. The exampleabove shows that the fifth host command overwrote the second, third, andfourth commands in the server or gateway. In this case, the second, third,and fourth commands were not sent to the terminal.
Host Command Server or Gateway Response Terminal Display
W000DB/08:38:00 OK<cr> 08:38:00
W000DB/08:38:01 OK<cr> 08:38:00
W000DB/08:38:02 OK<cr> 08:38:00
W000DB/08:38:03 OK<cr> 08:38:00
W000DB/08:38:04 OK<cr> 08:38:04
Example 2Multiple buffering enabledIf multiple buffering is enabled, host commands are not overwritten.Instead, they are buffered in the server or gateway and sent to the terminalsequentially. (However, there is no guarantee that these commands willarrive at the terminal 1 second apart.) Following is an example.
Host Command Server or Gateway Response Terminal Display
W000DB/08:38:00 OK<cr> 08:38:00
W000DB/08:38:00 OK<cr> 08:38:00
W000DB/08:38:01 OK<cr> 08:38:00
W000DB/08:38:02 OK<cr> 08:38:00
W000DB/08:38:03 OK<cr> 08:38:01
W000DB/08:38:04 OK<cr> 08:38:02

IntermecRApplication Server and Gateway CommandsChapter —5
166 Native Terminal Emulation Programmer’s Guide
CMT27 (6910 IGAP Operating Mode)CMT27 is a mode-switching command that changes the operating modeon the 6910 Integrated Gateway/Access Point (IGAP). You must changethe operating mode before you can configure the device parameters.
To configure the 6910 IGAP, you establish a local session with it througha VT100 terminal emulation program (such as PROCOMM PLUS)installed on a personal computer. When the program is running, you issuecommand “CMT27,2” to switch the 6910 IGAP DIAG port from hostmode to configuration mode. When entering the command, follow theseguidelines:
S Type CMT in uppercase and do not enter spaces between characters.
S There is a 1-second timeout period between characters. If you wait morethan 1 second to type the next character, the command is not recog-nized.
S If you type the wrong character, you cannot use the backspace key tocorrect it. You must wait 1 second or press [Enter] before you can tryagain.
When you exit the 6910 IGAP configuration menus, the port automatical-ly switches to host mode.
For complete information about configuring the 6910 IGAP, refer to the6910 Integrated and 6910 Telnet Gateway/Access Points User’s Guide (P/N961-047-122).
Host CommandCMT27,2<cr>
6910 IGAP ResponseOK<cr>
ExampleCommand: CMT27,2<cr>Response: OK<cr>The 6910 IGAP DIAG port is in configuration mode.
IntermecRApplication Server and Gateway Commands—Chapter 5
167Native Terminal Emulation Programmer’s Guide
CMTI (Restore Default Parameters)CMTI restores all parameter commands to their default values.
Host CommandCMTI<cr>
Server or Gateway ResponseNot applicable
Parameter Commands and Default ValuesS CMT0 2
S CMT1 255
S CMT2 0
S CMT4 0
S CMT5 0
S CMT8 0
S CMT9 0
S CMT10 0
S CMT13 0
S CMT21 0
S CMT22 0
S CMT27 Host mode
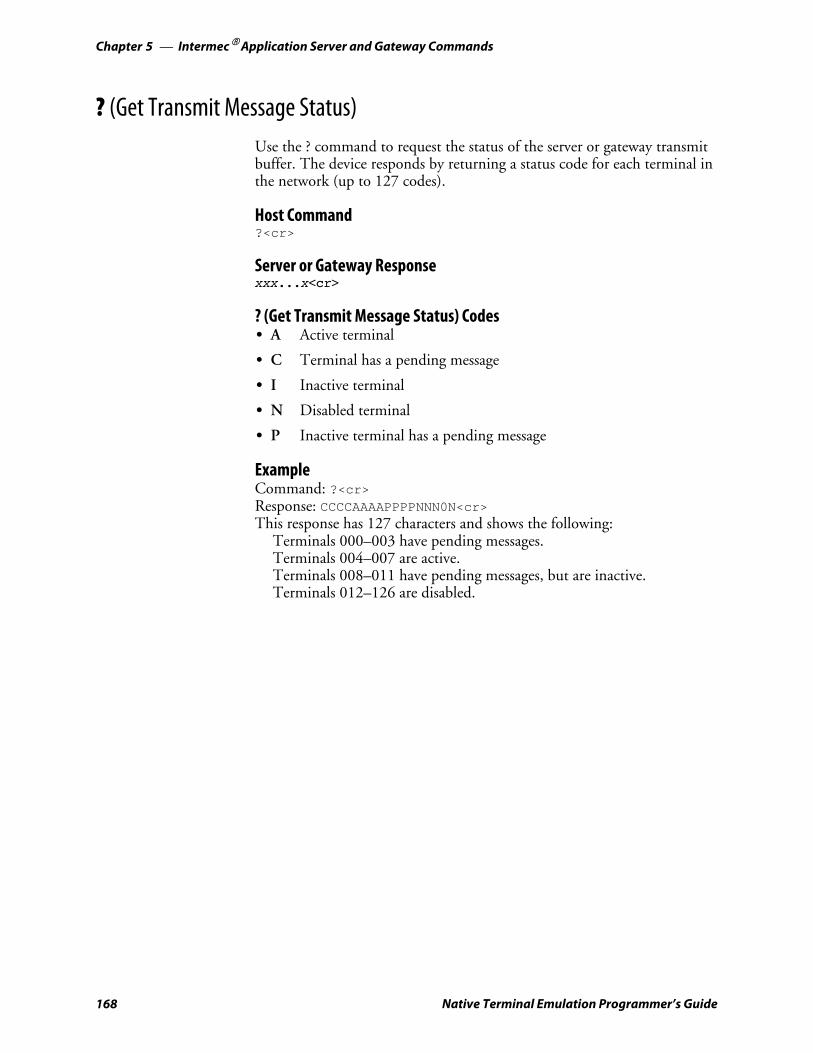
IntermecRApplication Server and Gateway CommandsChapter —5
168 Native Terminal Emulation Programmer’s Guide
? (Get Transmit Message Status)Use the ? command to request the status of the server or gateway transmitbuffer. The device responds by returning a status code for each terminal inthe network (up to 127 codes).
Host Command?<cr>
Server or Gateway Responsexxx...x<cr>
? (Get Transmit Message Status) CodesS A Active terminal
S C Terminal has a pending message
S I Inactive terminal
S N Disabled terminal
S P Inactive terminal has a pending message
ExampleCommand: ?<cr>Response: CCCCAAAAPPPPNNN0N<cr>This response has 127 characters and shows the following:
Terminals 000–003 have pending messages.Terminals 004–007 are active.Terminals 008–011 have pending messages, but are inactive.Terminals 012–126 are disabled.
IntermecRApplication Server and Gateway Commands—Chapter 5
169Native Terminal Emulation Programmer’s Guide
E (Enable Terminals)The E command enables the terminals (communication channels) in a net-work. You can either enable all terminals with one command, or a specificterminal.
Host CommandEs0s<cr> (enables terminals 000-126)Ets (enables a specific terminal)
Server or Gateway ResponseOK<cr>
VariablesS s
N = No (disables terminal)Y = Yes (enables terminal)X = “Do not care” (retains current status)
S tTerminal number (000–126)
The first Y, N, or X setting applies to terminal 000, the second applies toterminal 001, the third to terminal 002, etc. You do not need to list all theterminals.
Before a terminal can be polled or sent a message, it must be enabled bythe host or allowed to enable and identify itself to the server or gateway.Enabling a terminal opens a channel to that terminal.
Example 1Command: EYYYYYXNNNNNNYYYYYYYYYY<cr>Action: Enables terminals 000–004 and 012–021. Does not change termi-nal 005. Disables terminals 006–011. Does not change terminals022–126.
Example 2Command: E001Y<cr>Action: Enables terminal 001.

IntermecRApplication Server and Gateway CommandsChapter —5
170 Native Terminal Emulation Programmer’s Guide
R (Read)The R command is the idle, polling command. Use it to enable the serveror gateway to transmit terminal data to the host. This is the only com-mand where the device can send the terminal responses. If the server orgateway has a terminal response queued for transmission to the host, itcannot send it in response to a Write Display (WtD) command. It canonly send it in response to an R command.
Host CommandR<cr>
Server or Gateway ResponsetK<cr>tS<cr>tP,x<cr>tDOK<cr>
VariablesS t Terminal number (000–126)
S K Keyboard data
S S Scanned data
S P Terminal has reset or powered-up
S x Terminal power-up type
S D Echo data
In general, an R command must follow the commands the host sends tothe server or gateway. This enables the server or gateway to respond to orforward any data it received from a terminal and stored.
The server or gateway sends an OK<cr> to the host when interactive modeis enabled, and the CMT1 time-out value was exceeded and the device hasno data to send to the host.
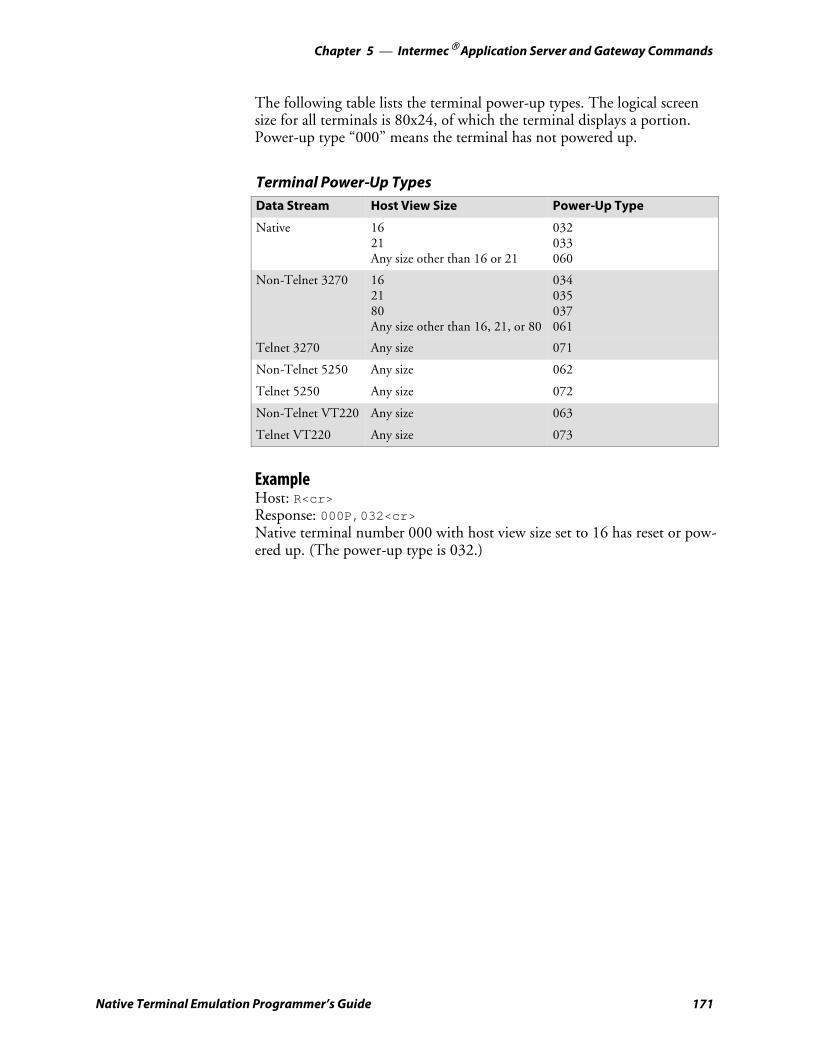
IntermecRApplication Server and Gateway Commands—Chapter 5
171Native Terminal Emulation Programmer’s Guide
The following table lists the terminal power-up types. The logical screensize for all terminals is 80x24, of which the terminal displays a portion.Power-up type “000” means the terminal has not powered up.
Terminal Power-Up TypesData Stream Host View Size Power-Up Type
Native 1621Any size other than 16 or 21
032033060
Non-Telnet 3270 162180Any size other than 16, 21, or 80
034035037061
Telnet 3270 Any size 071
Non-Telnet 5250 Any size 062
Telnet 5250 Any size 072
Non-Telnet VT220 Any size 063
Telnet VT220 Any size 073
ExampleHost: R<cr>Response: 000P,032<cr>Native terminal number 000 with host view size set to 16 has reset or pow-ered up. (The power-up type is 032.)
IntermecRApplication Server and Gateway CommandsChapter —5
172 Native Terminal Emulation Programmer’s Guide
T (Repeat Response)The T command requires the server or gateway to retransmit its last mes-sage to the host. Use it in case of a partially missed or corrupted message asindicated by a parity, framing, or length error the host received.
Host CommandT<cr>
Server or Gateway Response<cr>
ExampleCommand: T<cr>Action: The server or gateway repeats the last message sent to the host, andadds a carriage return.
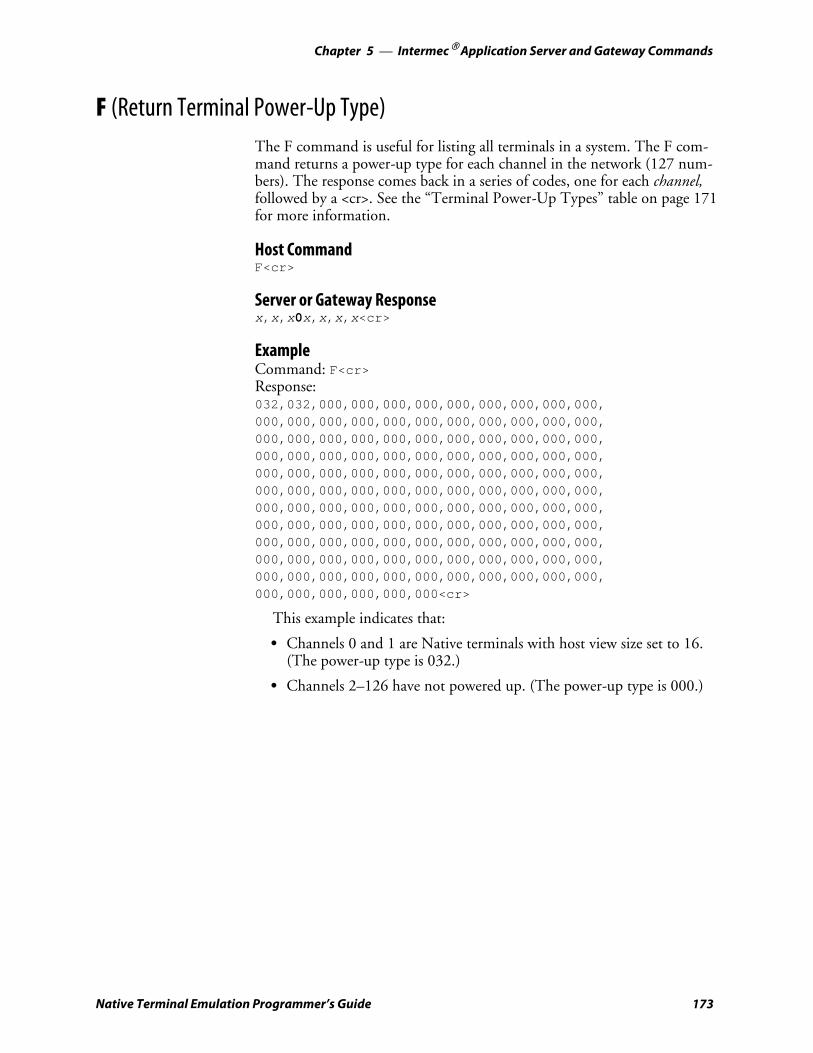
IntermecRApplication Server and Gateway Commands—Chapter 5
173Native Terminal Emulation Programmer’s Guide
F (Return Terminal Power-Up Type)The F command is useful for listing all terminals in a system. The F com-mand returns a power-up type for each channel in the network (127 num-bers). The response comes back in a series of codes, one for each channel,followed by a <cr>. See the “Terminal Power-Up Types” table on page 171for more information.
Host CommandF<cr>
Server or Gateway Responsex,x,x0x,x,x,x<cr>
ExampleCommand: F<cr>Response:032,032,000,000,000,000,000,000,000,000,000,000,000,000,000,000,000,000,000,000,000,000,000,000,000,000,000,000,000,000,000,000,000,000,000,000,000,000,000,000,000,000,000,000,000,000,000,000,000,000,000,000,000,000,000,000,000,000,000,000,000,000,000,000,000,000,000,000,000,000,000,000,000,000,000,000,000,000,000,000,000,000,000,000,000,000,000,000,000,000,000,000,000,000,000,000,000,000,000,000,000,000,000,000,000,000,000,000,000,000,000,000,000,000,000,000,000,000,000,000,000,000,000,000,000,000,000<cr>
This example indicates that:
S Channels 0 and 1 are Native terminals with host view size set to 16.(The power-up type is 032.)
S Channels 2–126 have not powered up. (The power-up type is 000.)
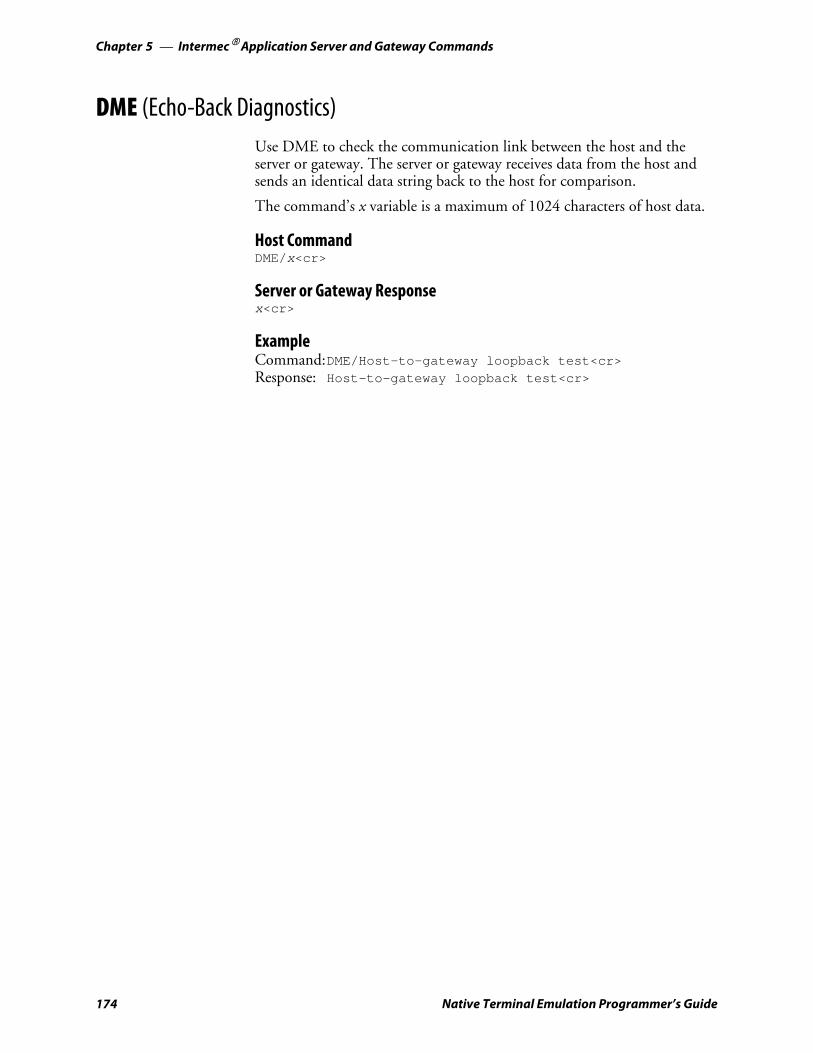
IntermecRApplication Server and Gateway CommandsChapter —5
174 Native Terminal Emulation Programmer’s Guide
DME (Echo-Back Diagnostics)Use DME to check the communication link between the host and theserver or gateway. The server or gateway receives data from the host andsends an identical data string back to the host for comparison.
The command’s x variable is a maximum of 1024 characters of host data.
Host CommandDME/x<cr>
Server or Gateway Responsex<cr>
ExampleCommand:DME/Host-to-gateway loopback test<cr>Response: Host-to-gateway loopback test<cr>
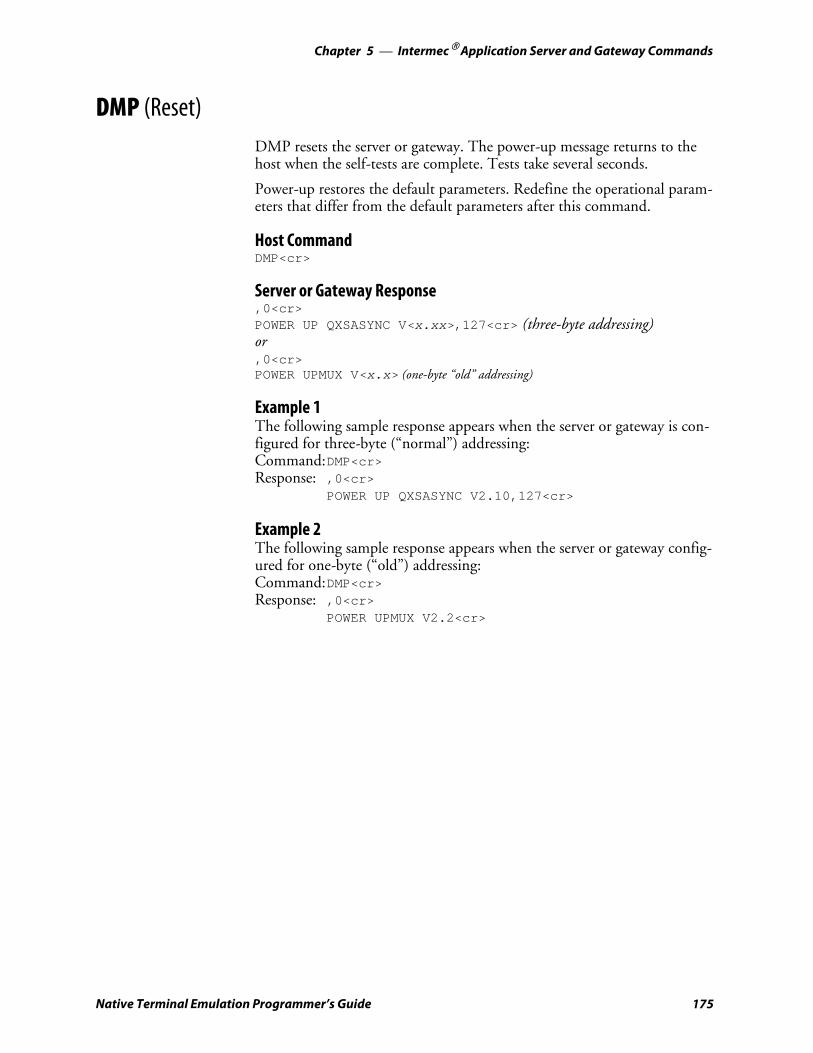
IntermecRApplication Server and Gateway Commands—Chapter 5
175Native Terminal Emulation Programmer’s Guide
DMP (Reset)DMP resets the server or gateway. The power-up message returns to thehost when the self-tests are complete. Tests take several seconds.
Power-up restores the default parameters. Redefine the operational param-eters that differ from the default parameters after this command.
Host CommandDMP<cr>
Server or Gateway Response,0<cr>POWER UP QXSASYNC V<x.xx>,127<cr> (three-byte addressing)or,0<cr>POWER UPMUX V<x.x> (one-byte “old” addressing)
Example 1The following sample response appears when the server or gateway is con-figured for three-byte (“normal”) addressing:Command:DMP<cr>Response: ,0<cr>
POWER UP QXSASYNC V2.10,127<cr>
Example 2The following sample response appears when the server or gateway config-ured for one-byte (“old”) addressing:Command:DMP<cr>Response: ,0<cr>
POWER UPMUX V2.2<cr>

IntermecRApplication Server and Gateway CommandsChapter —5
176 Native Terminal Emulation Programmer’s Guide
DMV (Send Software Version)DMV sends the server or gateway’s software version number to the host.The value for variable x.xx is the version number.
Host CommandDMV<cr>
Server or Gateway ResponseQXSASYNC V<x.xx><cr>
Example 1The following sample response appears when the server or gateway is con-figured for three-byte (“normal”) addressing:Command: DMV<cr>Response: QXSASYNC V2.10<cr>
Example 2The following sample response appears when the server or gateway is con-figured for one-byte (“old“) addressing:Command: DMV<cr>Response: FWMUXB8 V2.2<cr>
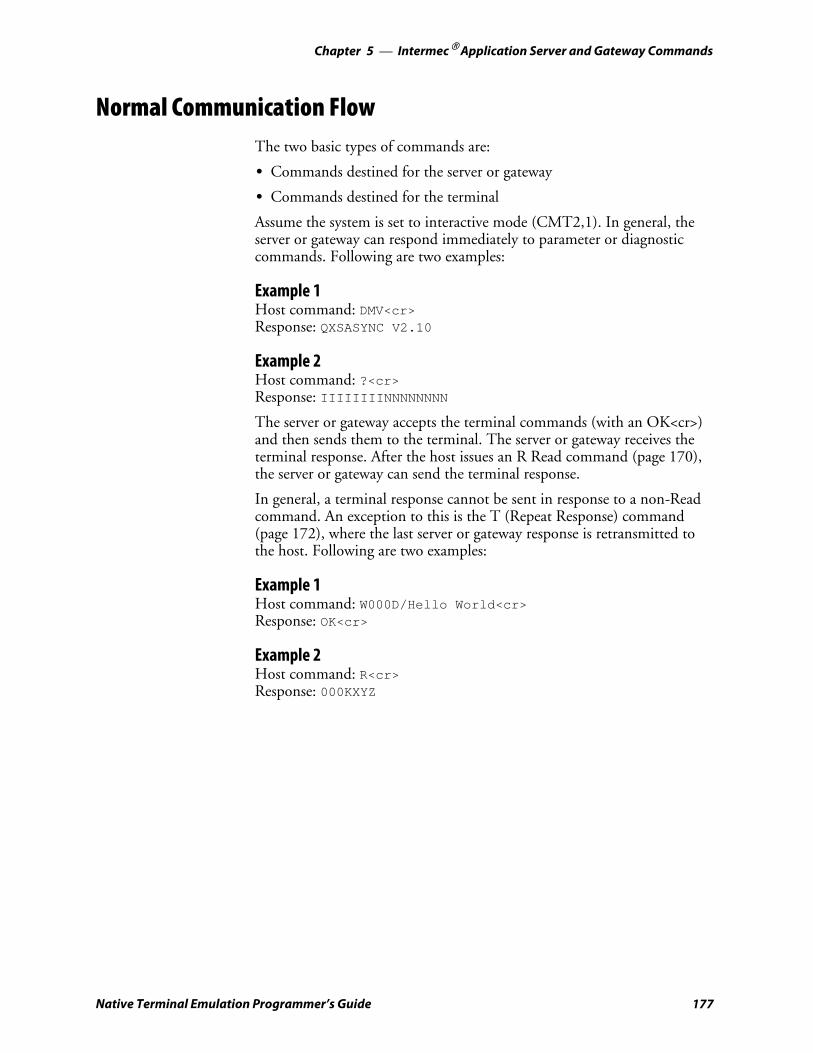
IntermecRApplication Server and Gateway Commands—Chapter 5
177Native Terminal Emulation Programmer’s Guide
Normal Communication FlowThe two basic types of commands are:
S Commands destined for the server or gateway
S Commands destined for the terminal
Assume the system is set to interactive mode (CMT2,1). In general, theserver or gateway can respond immediately to parameter or diagnosticcommands. Following are two examples:
Example 1Host command: DMV<cr>Response: QXSASYNC V2.10
Example 2Host command: ?<cr>Response: IIIIIIIINNNNNNNN
The server or gateway accepts the terminal commands (with an OK<cr>)and then sends them to the terminal. The server or gateway receives theterminal response. After the host issues an R Read command (page 170),the server or gateway can send the terminal response.
In general, a terminal response cannot be sent in response to a non-Readcommand. An exception to this is the T (Repeat Response) command(page 172), where the last server or gateway response is retransmitted tothe host. Following are two examples:
Example 1Host command: W000D/Hello World<cr>Response: OK<cr>
Example 2Host command: R<cr>Response: 000KXYZ
IntermecRApplication Server and Gateway CommandsChapter —5
178 Native Terminal Emulation Programmer’s Guide
Compatibility With Legacy SystemsLegacy (pre-Enterprise Wireless LAN) systems with INTERMEC multi-plexers and controllers include the PC1000 PCMUX, RM2216, RM3216,RM3242, RM1202, RM1204, RC2250, RC3250, RCB4000, andRCB4030. They support various commands in this manual, and some orall of these commands.
Most of the commands listed below are specific for crystal-UHF or SST(Spread Spectrum Transmission) systems. If you are replacing a legacy sys-tem with an Intermec Application Server, a 6910 IGAP, a 6950 EnterpriseGateway Server, or a Wireless Network Access Server, your server or gate-way should accept the command and return an “OK” response (if interac-tive mode [CMT2] is enabled).
S CMT3
S CMT6
S CMT7
S CMT11
S CMT12
S CMT14
S CMT15
S CMT16
S CMT17
S CMT18
S CMT20
S CMT23
S CMT24
S CMT25
S CMT26
S CCS
S DMS
S DMC

IntermecRApplication Server and Gateway Commands—Chapter 5
179Native Terminal Emulation Programmer’s Guide
Write Display ErrorsError responses from the server or gateway take the form “?x”<cr>, where xis the numeric error code listed in the following table.
Error Code Name Description
0 Communications Error Low level, asynchronous driver detected a parity, stop, or other data error.
1 Syntax Error Error in the parameter, diagnostic, or terminal command. For the WtD(Write Display) terminal command, syntax checking stops at the ‘/’.
4 Length Error Host message is too long. If the server or gateway is configured for three-byteaddressing, the maximum length is 1000 bytes. For one-byte addressing, themaximum length is 128 bytes.
5 Disabled Error Host is trying to send data to a disabled or inactive terminal (has not receiveda power-up message from it).
6 Gap Error Intercharacter gap time exceeded (timeout between start of message and car-riage return). CMT5 Gap Time-Out (page 159) sets the time.
8 Check Error Occurs when CMT8 Set Data Error Checking (page 160) is set for CRCchecking, and the CRC did not compute on a received host frame.
10 Buffer Error Multiple buffering is enabled, and a terminal exceeded its allocation of 25buffers. Corrective action is to wait for the buffers to be freed.
11 Sequence Error R (Read) commands were issued before CMT commands were sent to initial-ize the server or gateway.

IntermecRApplication Server and Gateway CommandsChapter —5
180 Native Terminal Emulation Programmer’s Guide
181Native Terminal Emulation Programmer’s Guide
Terminal Commands6
This chapter describes each terminal command with detailed information.

Terminal CommandsChapter —6
182 Native Terminal Emulation Programmer’s Guide
G (Reset Terminal)The G command returns the terminal to its first “state,” a known condi-tion. All terminals reset when variable t (terminal number) is omitted. Ter-minals respond to a poll with their power-up message.
In the command, the range of t is 000–126. If the server or gateway isconfigured for three-byte addressing, t is three digits. For one-byte ad-dressing used by some Intermec® legacy systems, t is a character from 0–9or A–F.
CommandGt<cr> (reset specific terminal)G<cr> (reset all terminals)
Server or Gateway ResponseOK<cr>
R ResponsetP,x<cr>
R Response VariablesS t Terminal number (000–126)
S P Terminal has reset or powered-up
S x Terminal power-up type (See the “Terminal Power-Up Types” tableon page 171.)
ExampleCommand: G002<cr>Action: Server or gateway resets terminal 002.R Response: 002P,032<cr>
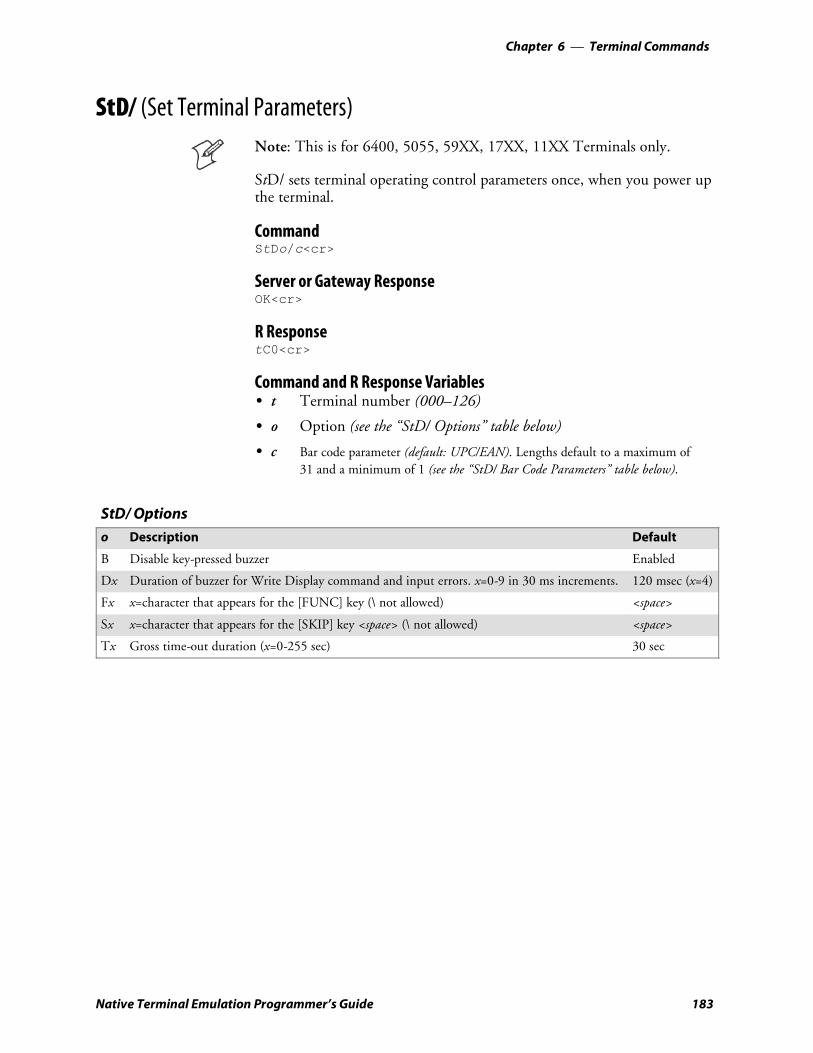
Terminal Commands—Chapter 6
183Native Terminal Emulation Programmer’s Guide
StD/ (Set Terminal Parameters)Note: This is for 6400, 5055, 59XX, 17XX, 11XX Terminals only.
StD/ sets terminal operating control parameters once, when you power upthe terminal.
CommandStDo/c<cr>
Server or Gateway ResponseOK<cr>
R ResponsetC0<cr>
Command and R Response VariablesS t Terminal number (000–126)
S o Option (see the “StD/ Options” table below)
S c Bar code parameter (default: UPC/EAN). Lengths default to a maximum of31 and a minimum of 1 (see the “StD/ Bar Code Parameters” table below).
StD/ Optionso Description Default
B Disable key-pressed buzzer Enabled
Dx Duration of buzzer for Write Display command and input errors. x=0-9 in 30 ms increments. 120 msec (x=4)
Fx x=character that appears for the [FUNC] key (\ not allowed) <space>
Sx x=character that appears for the [SKIP] key <space> (\ not allowed) <space>
Tx Gross time-out duration (x=0-255 sec) 30 sec

Terminal CommandsChapter —6
184 Native Terminal Emulation Programmer’s Guide
StD/ Bar Code ParametersByte Position Description Bit Position
1 Bar code block number (reserved). 01000000
2 Bit 4=Enable scannerBit 3=CCD selectBit 2=Wand selectBit 1=CCD redundancy bitBit 0=Laser scanner redundancy bit
001XXXXX
3 Bit 4=Disable bar code type characterBit 3=UnusedBit 2=UnusedBit 1=Must be 0Bit 0=Enable MOD 10 check digit
001X00XX
4 Maximum bar code length.Bits 0-4=Length
010XXXXX
5 Minimum bar code length.Bits 0-4=Length
010XXXXX
6 Bit 4=Decode UPCBit 3=Decode UPC with add-onsBit 2=Expand UPC E to UPCABit 1=Enable UPC E type 1 only
001XXXX0
7 Bit 4=Decode EANBit 3=Decode EAN with add-ons
001XX000
8 Bit 4=Decode Code 39Bit 3=Decode extended Code 39
001XX000
9 Plessey control algorithms:Bit 4=Decode PlesseyBit 3=0 (Discard 2nd check digit)Bit 3=1 (Keep 2nd check digit)Bit 2=0 (Validate 1st check digit)Bit 2=1 (Do not validate)Bit 1=0 (Discard 1st check digit)Bit 1=1 (Keep 1st check digit)Bit 0=0 (MOD 11 — 1st check digit)Bit 0=1 (MOD 10 — 1st check digit)
001XXXXX
10 Enable Codabar algorithms.Bit 4=Decode ABC CodabarBit 3=Decode Codabar
001XX000
11 Enable Code 11 algorithm.Bit 4=Decode Code 11
001X0000
12 Enable Code 93 algorithm.Bit 4=Decode Code 93
001X0000
13 Enable Code 128 algorithm.Bit 4=Decode Code 128
001X0000
14 Enable Straight 2 of 5 and ComputerIdentics 2 of 5 algorithms.Bit 4=Decode Straight 2 of 5Bit 3=Decode C-Identics 2 of 5
001XX000

Terminal Commands—Chapter 6
185Native Terminal Emulation Programmer’s Guide
StD/ Bar Code Parameters (continued)
Bit PositionDescriptionByte Position
15 Maximum bar code length for Straight and Computer Identics 2 of 5.Bits 0-4=Length
010XXXXX
16 Minimum bar code length for Straight and Computer Identics 2 of 5.Bits 0-4=Length
010XXXXX
17 1st fixed bar code length for Straight and Computer Identics 2 of 5.Bits 0-4=Length
010XXXXX
18 2nd fixed bar code length for Straight and Computer Identics 2 of 5.Bits 0-4=Length
010XXXXX
19 Enable Interleaved 2 of 5 algorithm.Bit 4=Decode Interleaved 2 of 5
001X0000
20 Maximum bar code length for Interleaved 2 of 5.Bits 0-4=Length
010XXXXX
21 Minimum bar code length for Interleaved 2 of 5.Bits 0-4=Length
010XXXXX
22 1st fixed bar code length for Interleaved 2 of 5.Bits 0-4=Length
010XXXXX
23 2nd fixed bar code length for Interleaved 2 of 5.Bits 0-4=Length
010XXXXX
Enable a bar code by giving the parameters at least as many bytes as theposition of the desired control byte. For example, to enable Plessey, pa-rameters must have at least nine bytes. When bit positions have been de-termined, ASCII equivalents integrate into the following character.
01011101=5D (hex)=“]” (ASCII)
Disable buzzer
Set comm. losstimer to 5 seconds
Reserved control byte
Enable scanner, do not select wand,CCD or Redundancy (defaults tolaser in use)
Do not send bar codetype as first character
4FH=01 001111Maximum bar code length=15
48H=01 001000=810Minimum length=8
Enable UPCExpand UPCE to UPCA
Enable EANEAN with add-ons
Enable Code 39
<space> Disable Plessey
StD/ (Set TerminalParameters) command Enable ABC Codabar
StD B T5 / @ 0 0 O H 4 8 0 8 <cr>
This illustration shows an example of an expanded StD/ command code.
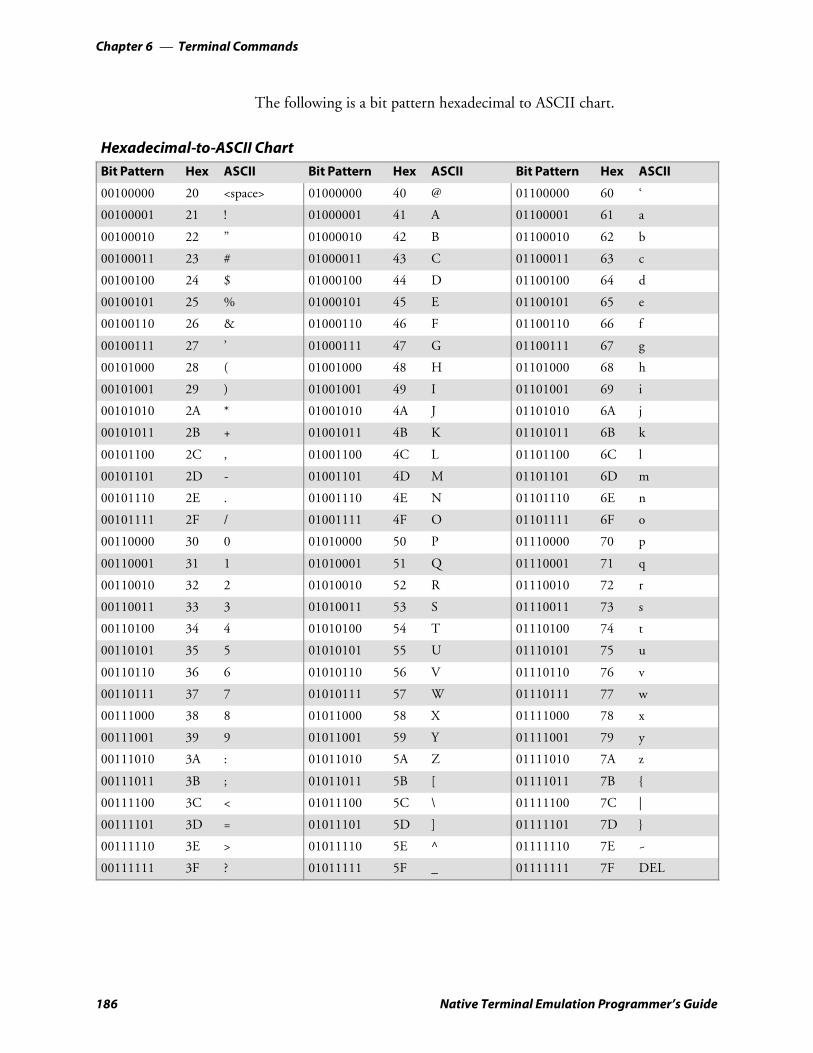
Terminal CommandsChapter —6
186 Native Terminal Emulation Programmer’s Guide
The following is a bit pattern hexadecimal to ASCII chart.
Hexadecimal-to-ASCII ChartBit Pattern Hex ASCII Bit Pattern Hex ASCII Bit Pattern Hex ASCII
00100000 20 <space> 01000000 40 @ 01100000 60 ‘
00100001 21 ! 01000001 41 A 01100001 61 a
00100010 22 ” 01000010 42 B 01100010 62 b
00100011 23 # 01000011 43 C 01100011 63 c
00100100 24 $ 01000100 44 D 01100100 64 d
00100101 25 % 01000101 45 E 01100101 65 e
00100110 26 & 01000110 46 F 01100110 66 f
00100111 27 ’ 01000111 47 G 01100111 67 g
00101000 28 ( 01001000 48 H 01101000 68 h
00101001 29 ) 01001001 49 I 01101001 69 i
00101010 2A * 01001010 4A J 01101010 6A j
00101011 2B + 01001011 4B K 01101011 6B k
00101100 2C , 01001100 4C L 01101100 6C l
00101101 2D - 01001101 4D M 01101101 6D m
00101110 2E . 01001110 4E N 01101110 6E n
00101111 2F / 01001111 4F O 01101111 6F o
00110000 30 0 01010000 50 P 01110000 70 p
00110001 31 1 01010001 51 Q 01110001 71 q
00110010 32 2 01010010 52 R 01110010 72 r
00110011 33 3 01010011 53 S 01110011 73 s
00110100 34 4 01010100 54 T 01110100 74 t
00110101 35 5 01010101 55 U 01110101 75 u
00110110 36 6 01010110 56 V 01110110 76 v
00110111 37 7 01010111 57 W 01110111 77 w
00111000 38 8 01011000 58 X 01111000 78 x
00111001 39 9 01011001 59 Y 01111001 79 y
00111010 3A : 01011010 5A Z 01111010 7A z
00111011 3B ; 01011011 5B [ 01111011 7B
00111100 3C < 01011100 5C \ 01111100 7C |
00111101 3D = 01011101 5D ] 01111101 7D
00111110 3E > 01011110 5E ^ 01111110 7E ~
00111111 3F ? 01011111 5F _ 01111111 7F DEL

Terminal Commands—Chapter 6
187Native Terminal Emulation Programmer’s Guide
WtB (Audio Annunciator)WtB turns on the terminal audio tone for a specified time, in incrementsof 1/4 second up to 2.25 seconds.
CommandWtBd<cr>
Server or Gateway ResponseOK<cr>
R ResponsetC0<cr>
Command and R Response VariablesS t Terminal number (000–126)
S d Audio tone duration times 250 milliseconds (1–9 seconds)
ExampleCommand: W010B8<cr>Action: Terminal 010 sounds tone for 2 seconds.

Terminal CommandsChapter —6
188 Native Terminal Emulation Programmer’s Guide
WtD/ (Write Display)WtD/ sends data to a terminal and enables its response. WtD/ downloadsthe prompt, which appears on the terminal, and sets up input parameters.The single input field is returned to the host.
CommandWtDo/x<cr>
Server or Gateway ResponseOK<cr>
R ResponsetKrd<cr>tSrbcm<cr>
Data returns to the host when:
1 You press the [ENTER] key.
2 The field is filled and the [ENTER] option is disabled.
3 The display scrolls to the top or bottom with the wrap disabled.
4 The scanner reads a valid bar code.
Command VariablesS t Terminal number (000–126)
S o Options (see the “Write Display Options” table on the next page)
S x Data|(0x7C) Allows all command extensions
(see “Command Extensions” on page 190)
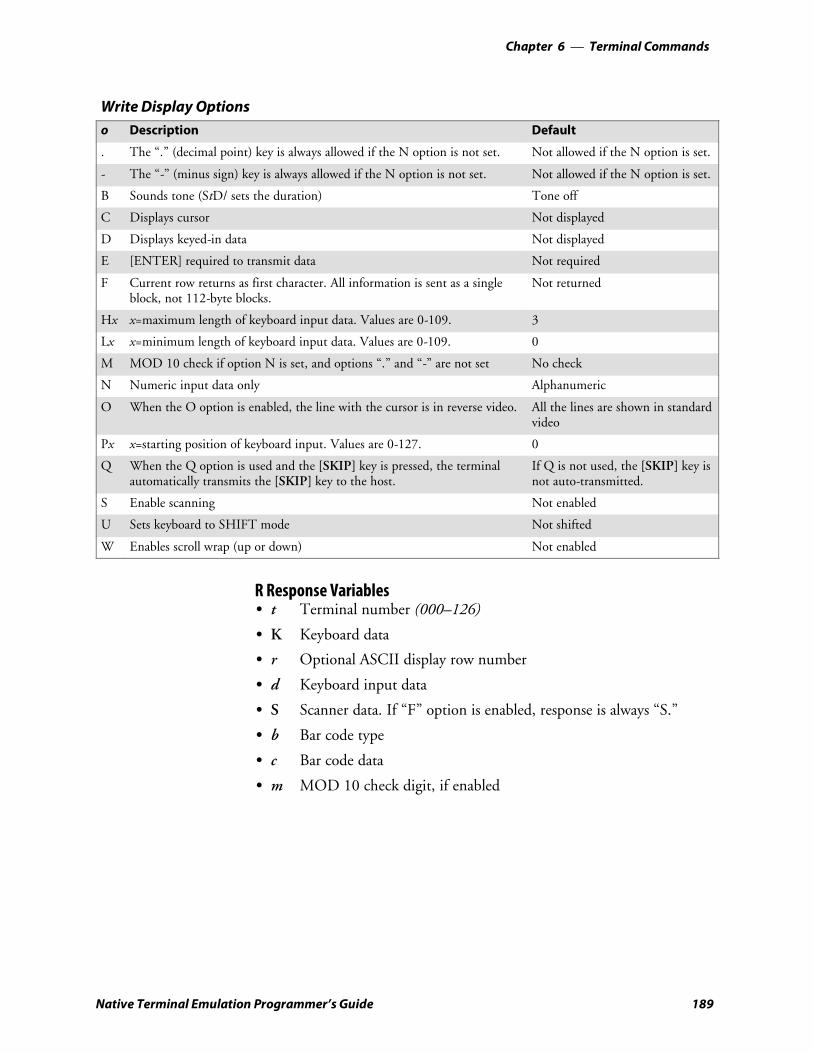
Terminal Commands—Chapter 6
189Native Terminal Emulation Programmer’s Guide
Write Display Optionso Description Default
. The “.” (decimal point) key is always allowed if the N option is not set. Not allowed if the N option is set.
- The “-” (minus sign) key is always allowed if the N option is not set. Not allowed if the N option is set.
B Sounds tone (StD/ sets the duration) Tone off
C Displays cursor Not displayed
D Displays keyed-in data Not displayed
E [ENTER] required to transmit data Not required
F Current row returns as first character. All information is sent as a singleblock, not 112-byte blocks.
Not returned
Hx x=maximum length of keyboard input data. Values are 0-109. 3
Lx x=minimum length of keyboard input data. Values are 0-109. 0
M MOD 10 check if option N is set, and options “.” and “-” are not set No check
N Numeric input data only Alphanumeric
O When the O option is enabled, the line with the cursor is in reverse video. All the lines are shown in standardvideo
Px x=starting position of keyboard input. Values are 0-127. 0
Q When the Q option is used and the [SKIP] key is pressed, the terminalautomatically transmits the [SKIP] key to the host.
If Q is not used, the [SKIP] key isnot auto-transmitted.
S Enable scanning Not enabled
U Sets keyboard to SHIFT mode Not shifted
W Enables scroll wrap (up or down) Not enabled
R Response VariablesS t Terminal number (000–126)
S K Keyboard data
S r Optional ASCII display row number
S d Keyboard input data
S S Scanner data. If “F” option is enabled, response is always “S.”
S b Bar code type
S c Bar code data
S m MOD 10 check digit, if enabled
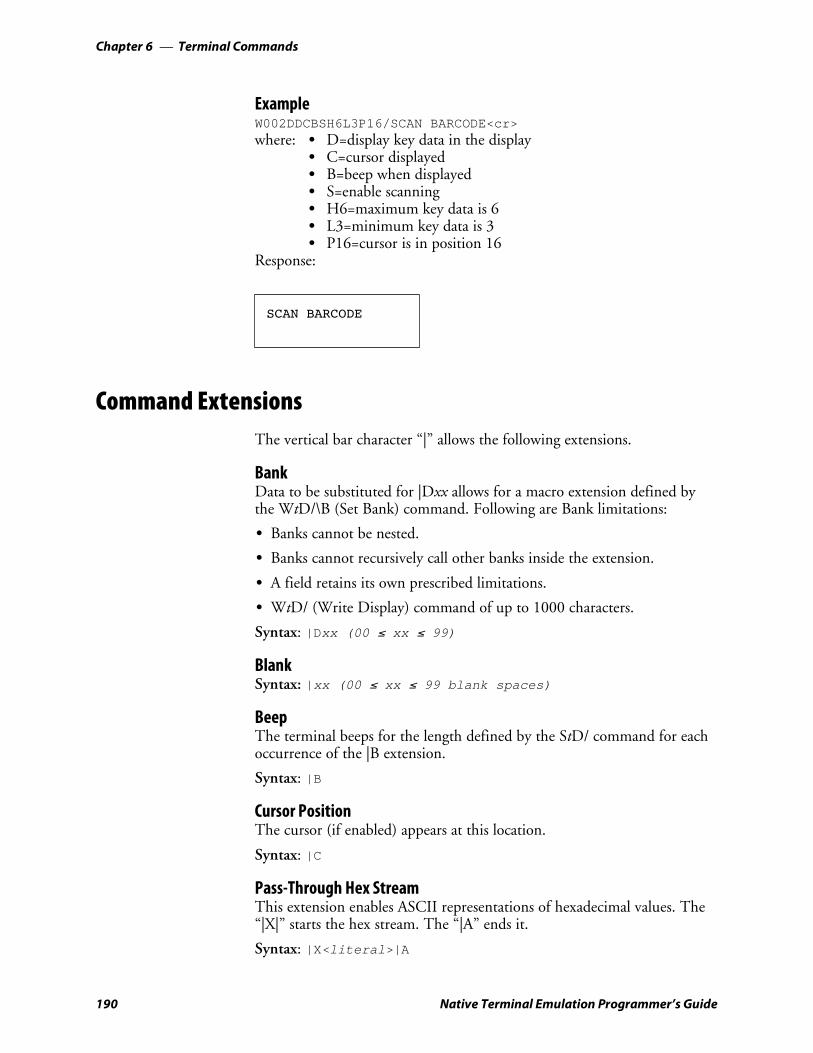
Terminal CommandsChapter —6
190 Native Terminal Emulation Programmer’s Guide
ExampleW002DDCBSH6L3P16/SCAN BARCODE<cr>where: S D=display key data in the display
S C=cursor displayedS B=beep when displayedS S=enable scanningS H6=maximum key data is 6S L3=minimum key data is 3S P16=cursor is in position 16
Response:
SCAN BARCODE
Command ExtensionsThe vertical bar character “|” allows the following extensions.
BankData to be substituted for |Dxx allows for a macro extension defined bythe WtD/\B (Set Bank) command. Following are Bank limitations:
S Banks cannot be nested.
S Banks cannot recursively call other banks inside the extension.
S A field retains its own prescribed limitations.
S WtD/ (Write Display) command of up to 1000 characters.
Syntax: |Dxx (00 ≤ xx ≤ 99)
BlankSyntax: |xx (00 ≤ xx ≤ 99 blank spaces)
BeepThe terminal beeps for the length defined by the StD/ command for eachoccurrence of the |B extension.
Syntax: |B
Cursor PositionThe cursor (if enabled) appears at this location.
Syntax: |C
Pass-Through Hex StreamThis extension enables ASCII representations of hexadecimal values. The“|X|” starts the hex stream. The “|A” ends it.
Syntax: |X<literal>|A

Terminal Commands—Chapter 6
191Native Terminal Emulation Programmer’s Guide
Example“|XDAC4B3|A” translates the literal “DAC4B3” to hex values 0xDA,0xC4, and 0xB3 and displays the following:
Pass-Through Hex CharacterThis extension sends hexadecimal characters to the terminal. It is a pass-through mode that bypasses the server or gateway’s handling of this char-acter.
For example, if you want to send a carriage return to a printer attached toa terminal, and if the host program sent the <cr> character, the server orgateway would terminate the command. By sending a ^0D, the host sendsthese three characters through the server or gateway to the terminal. Theterminal converts the three characters into one byte.
Syntax: ^xx
Example 1This command sends the string “Hello World<cr><lf>” out the terminal’sRS-232 port:
W000D/\P\Hello World^0D^0A<cr>
Example 2This command displays “ABCD” on the terminal’s screen. This commandis equivalent to command W000DDBC/ABCD.
W000DDBC/^41^42^43^44<cr>
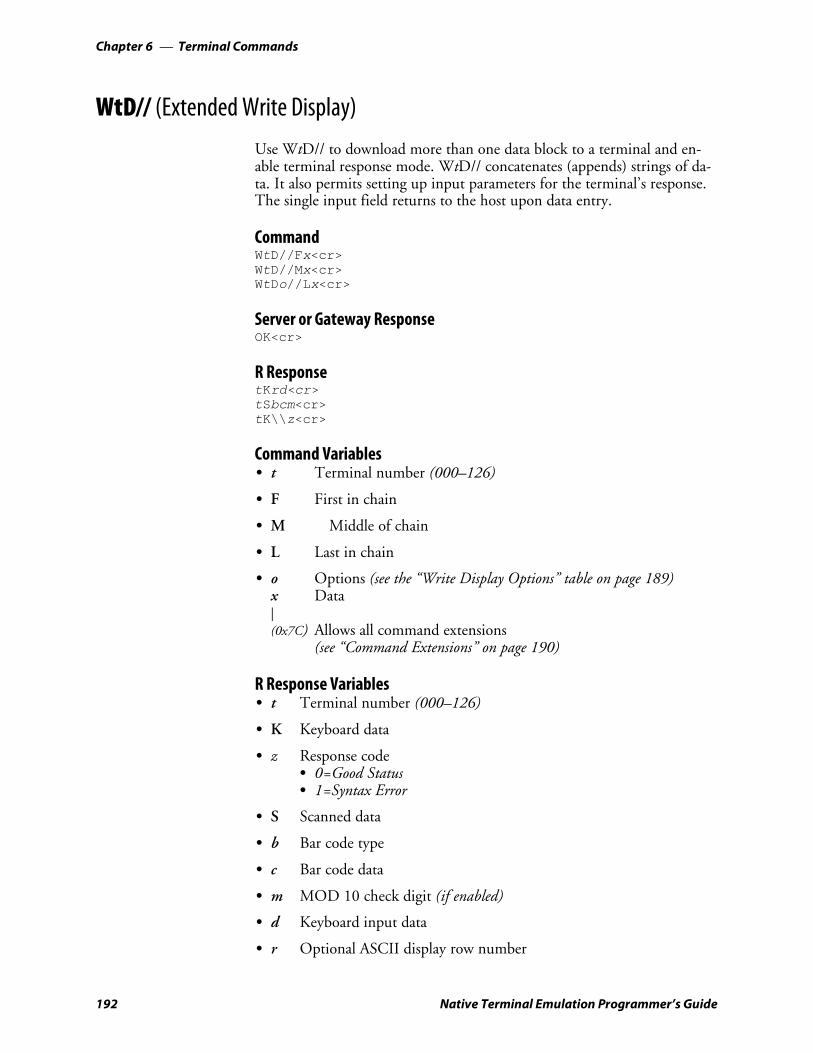
Terminal CommandsChapter —6
192 Native Terminal Emulation Programmer’s Guide
WtD// (Extended Write Display)
Use WtD// to download more than one data block to a terminal and en-able terminal response mode. WtD// concatenates (appends) strings of da-ta. It also permits setting up input parameters for the terminal’s response.The single input field returns to the host upon data entry.
CommandWtD//Fx<cr>WtD//Mx<cr>WtDo//Lx<cr>
Server or Gateway ResponseOK<cr>
R ResponsetKrd<cr>tSbcm<cr>tK\\z<cr>
Command VariablesS t Terminal number (000–126)
S F First in chain
S M Middle of chain
S L Last in chain
S o Options (see the “Write Display Options” table on page 189)x Data|(0x7C) Allows all command extensions
(see “Command Extensions” on page 190)
R Response VariablesS t Terminal number (000–126)
S K Keyboard data
S z Response codeS 0=Good StatusS 1=Syntax Error
S S Scanned data
S b Bar code type
S c Bar code data
S m MOD 10 check digit (if enabled)
S d Keyboard input data
S r Optional ASCII display row number

Terminal Commands—Chapter 6
193Native Terminal Emulation Programmer’s Guide
When using the WtD// command, designate the first, middle, and last seg-ments of a chain as follows:
S /F=(first in chain) — The terminal clears all chained data and replaces itwith new data starting with the marked sequence.
S /L=(last in chain) — The terminal attaches the current field, andexecutes the Write Display command using options set for the /L com-mand.
S /M=(middle of chain) — The terminal attaches the sequence to what isstored.
Example 1Command: W003D//FFIRST IN CHAIN <cr>Response: OK<cr>
Example 2Command: R<cr>Response: 003K\\0<cr>
Example 3Command: W003D//MMIDDLE IN CHAIN <cr>Response: OK<cr>
Example 4Command: R<cr>Response: 003K\\0<cr>
Example 5Command: W003DBS//LLAST IN CHAIN<cr>Action: Terminal 003 sounds its tone and enables its scanner.
FIRST IN CHAINMIDDLE IN CHAINLAST IN CHAIN
This illustrates a sample terminal display for this command.
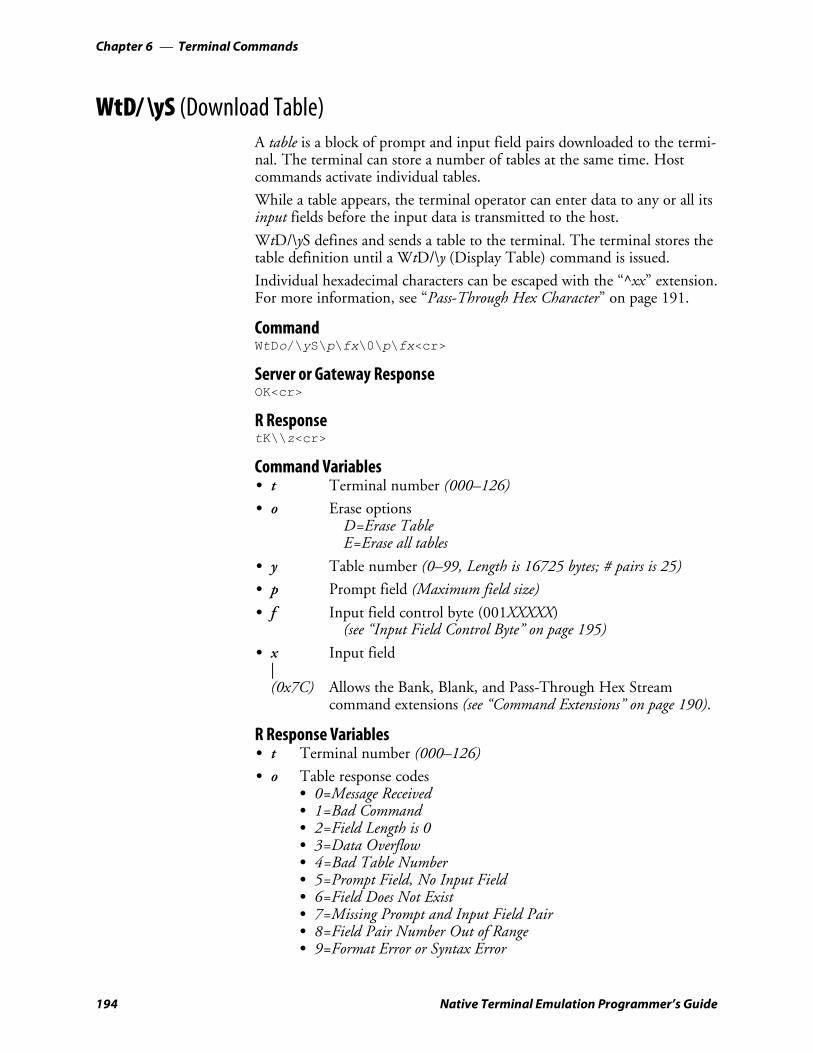
Terminal CommandsChapter —6
194 Native Terminal Emulation Programmer’s Guide
WtD/ \yS (Download Table)A table is a block of prompt and input field pairs downloaded to the termi-nal. The terminal can store a number of tables at the same time. Hostcommands activate individual tables.
While a table appears, the terminal operator can enter data to any or all itsinput fields before the input data is transmitted to the host.
WtD/\yS defines and sends a table to the terminal. The terminal stores thetable definition until a WtD/\y (Display Table) command is issued.
Individual hexadecimal characters can be escaped with the “^xx” extension.For more information, see “Pass-Through Hex Character” on page 191.
CommandWtDo/\yS\p\fx\0\p\fx<cr>
Server or Gateway ResponseOK<cr>
R ResponsetK\\z<cr>
Command VariablesS t Terminal number (000–126)
S o Erase optionsD=Erase TableE=Erase all tables
S y Table number (0–99, Length is 16725 bytes; # pairs is 25)
S p Prompt field (Maximum field size)
S f Input field control byte (001XXXXX)(see “Input Field Control Byte” on page 195)
S x Input field|(0x7C) Allows the Bank, Blank, and Pass-Through Hex Stream
command extensions (see “Command Extensions” on page 190).
R Response VariablesS t Terminal number (000–126)
S o Table response codesS 0=Message ReceivedS 1=Bad CommandS 2=Field Length is 0S 3=Data OverflowS 4=Bad Table NumberS 5=Prompt Field, No Input FieldS 6=Field Does Not ExistS 7=Missing Prompt and Input Field PairS 8=Field Pair Number Out of RangeS 9=Format Error or Syntax Error
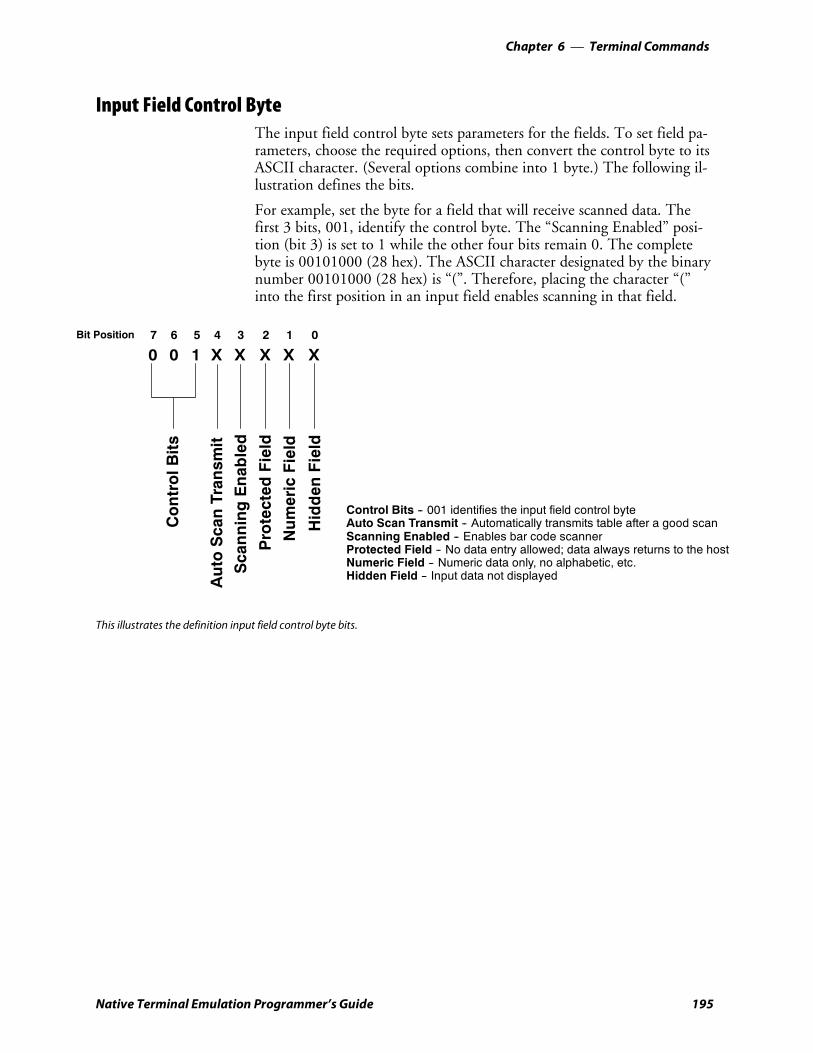
Terminal Commands—Chapter 6
195Native Terminal Emulation Programmer’s Guide
Input Field Control ByteThe input field control byte sets parameters for the fields. To set field pa-rameters, choose the required options, then convert the control byte to itsASCII character. (Several options combine into 1 byte.) The following il-lustration defines the bits.
For example, set the byte for a field that will receive scanned data. Thefirst 3 bits, 001, identify the control byte. The “Scanning Enabled” posi-tion (bit 3) is set to 1 while the other four bits remain 0. The completebyte is 00101000 (28 hex). The ASCII character designated by the binarynumber 00101000 (28 hex) is “(”. Therefore, placing the character “(”into the first position in an input field enables scanning in that field.
Bit Position
Control Bits -- 001 identifies the input field control byteAuto Scan Transmit -- Automatically transmits table after a good scanScanning Enabled -- Enables bar code scannerProtected Field -- No data entry allowed; data always returns to the hostNumeric Field -- Numeric data only, no alphabetic, etc.Hidden Field -- Input data not displayedA
uto
ScanTransm
it
Protected
Field
Hidden
Field
ControlB
its
ScanningEnabled
NumericField
0 1 X07 6 5 4 3 2 1 0
X X X X
This illustrates the definition input field control byte bits.

Terminal CommandsChapter —6
196 Native Terminal Emulation Programmer’s Guide
Rules for Designing TablesThe following rules apply to tables:
S A table can consist of up to 25 prompt and input field pairs.
S A prompt field must be followed by an input field.
S A prompt and input field pair must be smaller than the terminal’sscreen.
S Table length=(characters)+(field characters)+ 2S(input pairs)
Note: The total number of prompt field characters in tablesplus
the total number of input field characters in all pairsplus
two times the number of pairsmust be
less than 1600 for tables 0 through 4and be
less than 400 for tables 5 through 99
The maximum length of the command is 1020 bytes. For longer tables,you can use more than one WtD/\yS (Download Table) command. The D(erase table) or E (erase all tables) option is required before overwrite.
ExampleHost:W010DD/\0S\1ST BARCODE:|04\(|16\QTY? \”|11<cr>Response: OK<cr>
Table 0 in terminal 010 erases and a new set of prompt and input fieldpairs loads.
The first prompt is “1ST BARCODE:” followed by a blank extension of 4spaces. This moves the input field to the next line on a 16-character dis-play.
The first character in the input field is the input field control byte. A “(”(28 hex) enables bar code scanning.
A blank extension of 16 characters follows the input field control byte.This defines the length of the input field.
The second prompt is “QTY?”. The control byte is the ASCII character ”(22 hex), which enables numeric keyboard data only. This field contains11 spaces after the ASCII control byte character, setting the input fieldlength to 11.
FIRST BARCODE:
QTY?
This is a sample terminal display.
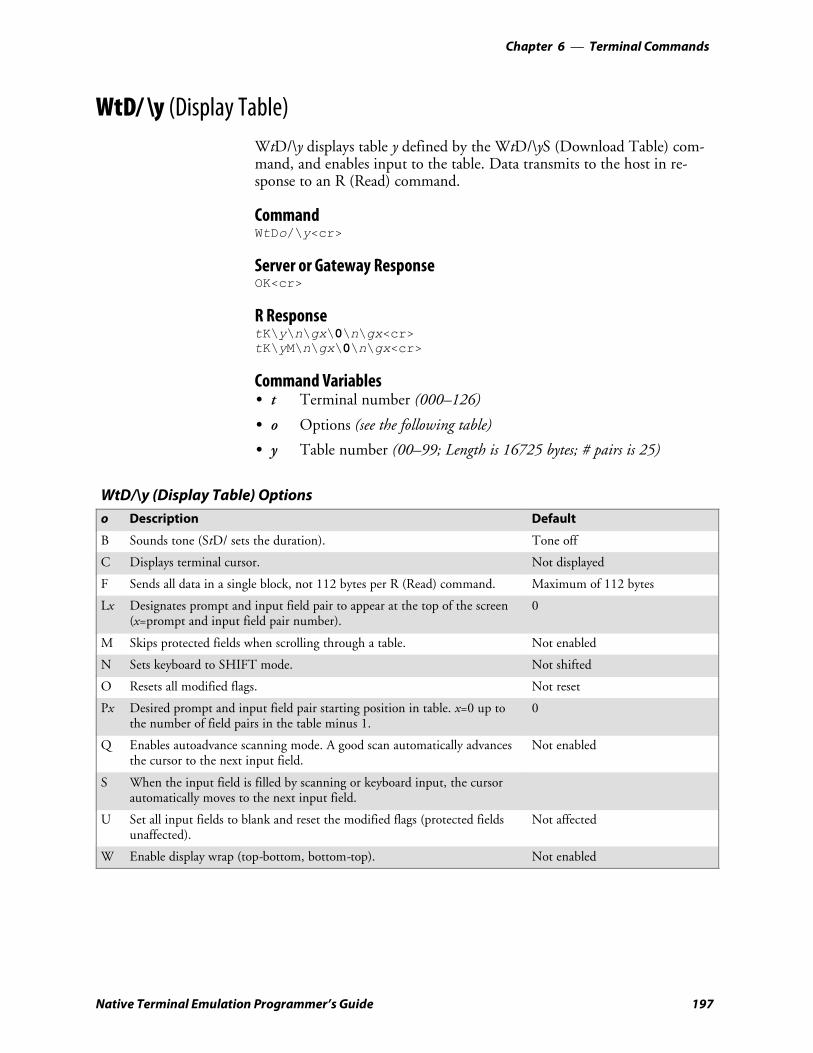
Terminal Commands—Chapter 6
197Native Terminal Emulation Programmer’s Guide
WtD/ \y (Display Table)WtD/\y displays table y defined by the WtD/\yS (Download Table) com-mand, and enables input to the table. Data transmits to the host in re-sponse to an R (Read) command.
CommandWtDo/\y<cr>
Server or Gateway ResponseOK<cr>
R ResponsetK\y\n\gx\0\n\gx<cr>tK\yM\n\gx\0\n\gx<cr>
Command VariablesS t Terminal number (000–126)
S o Options (see the following table)
S y Table number (00–99; Length is 16725 bytes; # pairs is 25)
WtD/\y (Display Table) Optionso Description Default
B Sounds tone (StD/ sets the duration). Tone off
C Displays terminal cursor. Not displayed
F Sends all data in a single block, not 112 bytes per R (Read) command. Maximum of 112 bytes
Lx Designates prompt and input field pair to appear at the top of the screen(x=prompt and input field pair number).
0
M Skips protected fields when scrolling through a table. Not enabled
N Sets keyboard to SHIFT mode. Not shifted
O Resets all modified flags. Not reset
Px Desired prompt and input field pair starting position in table. x=0 up tothe number of field pairs in the table minus 1.
0
Q Enables autoadvance scanning mode. A good scan automatically advancesthe cursor to the next input field.
Not enabled
S When the input field is filled by scanning or keyboard input, the cursorautomatically moves to the next input field.
U Set all input fields to blank and reset the modified flags (protected fieldsunaffected).
Not affected
W Enable display wrap (top-bottom, bottom-top). Not enabled
Terminal CommandsChapter —6
198 Native Terminal Emulation Programmer’s Guide
R Response VariablesS t Terminal number (000–126)
S y Table number (0–99; Length is 16725 bytes; # pairs is 25)
S n Input field number (0–99)
S g Input data type. If g=S and x=bar code typeS K=KeyboardS S=Scanner
S x Data
S M Indicates more data to come. Host continues to send an R (Read)command until it receives a response without the “more data”flag. (The R response without M means all data has been sent.)
ExampleUsing the table from the WtD/\yS (Download Table) command:
Host command: W010DQ/\0<cr>Response: OK<cr>
Terminal allows the operator to enter data in table 0 of terminal 010.
Scanning autoadvance is enabled. The terminal automatically advances tothe next input field after getting a valid scan.
After the user presses [ENTER], the terminal responds to an R (Read)command from the host by uploading the stored input field data.

Terminal Commands—Chapter 6
199Native Terminal Emulation Programmer’s Guide
WtD/ \yT (Download and Display Table)WtD/\yT combines the WtD/\yS (Download Table) and WtD/\y (DisplayTable) commands. It downloads prompts and input fields into a buffermemory of the terminal for processing, displays the table, and enables datainput.
Individual hexadecimal characters can be escaped with the “^xx” extension.For more information, see “Pass-Through Hex Character” on page 191.
CommandWtDo/\yT\p\fx\p\fx\p\fx\0\p\fx<cr>
Server or Gateway ResponseOK<cr>
R ResponsetK\y\n\gx\0\n\gx<cr>tK\yM\n\gx\0\n\gx<cr>tK\\z<cr>
Command VariablesS t Terminal number (000–126)
S o Erase optionsS D=Erase TableS E=Erase All Tables
S y Table number (0–99; Length is 16725 bytes; # pairs is 25)
S p Prompt field (Maximum field size)
S f Input field control byte (001XXXXX)(see “Input Field Control Byte” on page 195)
S x Input field|(0x7C) Allows the Bank, Blank, and Pass-Through Hex Stream
command extensions (see “Command Extensions” on page 190).
Note: See “Rules for Designing Tables” on page 196 for information about:S Replacing the prompt and input fields together.S Restrictions.S Replacing the prompt field only.S Replacing the input field only.

Terminal CommandsChapter —6
200 Native Terminal Emulation Programmer’s Guide
R Response VariablesS t Terminal number (000–126)
S y Table number (0–99)
S n Input field number (0–99)
S g Input data type. If g=S and x=bar code typeS K=KeyboardS S=Scanner
S x Input field
S M Indicates more data to come. Host continues to send an R (Read)command until it receives a response without the “more data”flag. (The R response without M means all data has been sent.)
S z Response codeS 0=Message ReceivedS 1=Bad CommandS 2=Field Length is 0S 3=Data OverflowS 4=Bad Table NumberS 5=Prompt Field, No Input FieldS 6=Field Does Not ExistS 7=Missing Prompt and Input Field PairS 8=Field Pair Number Out of RangeS 9=Format Error or Syntax Error
ExampleCommand:W000DBCUWQS/\0T\DATE:|03\$02-01-00\TIME:|03\$13:48.00\PROMPT ONE|05\8|16\ PROMPT TWO|05\8|16<cr>
R Response: OK<cr>:
DATE: 02-01-00TIME: 13:48.00PROMPT ONE
PROMPT TWO
This is a sample terminal display.

Terminal Commands—Chapter 6
201Native Terminal Emulation Programmer’s Guide
WtD/ \yU (Update Table)WtD/\yU allows the operator to change a portion of a table without down-loading an entire table. You can accomplish this by one the followingmethods:S Replace the prompt and input fields pair together.S Replace only the prompt field.S Replace only the input portion of the prompt and input field pair.Individual hexadecimal characters can be escaped with the “^xx” extension.For more information, see “Pass-Through Hex Character” on page 191.
CommandWtDo/\yU\i\Fp\fxorPporIfx0<cr>
Server or Gateway ResponseOK<cr>
R ResponsetK\\z<cr>
Note: Alternative replacements are in braces . The “...” indicates thatyou may use this command multiple times.
Command VariablesS t Terminal number (000–126)S o Erase options
S D=Erase TableS E=Erase All Tables
S y Table number (0–99; Length is 16725 bytes; # pairs is 25)S i Input field number (0–99)S F Update the prompt and input fields togetherS p Prompt field (Maximum field size)S f Input field control byte (001XXXXX)
(see “Input Field Control Byte” on page 195)S x Input fieldS P Update prompt field onlyS I Update input field only
|(0x7C) Allows the Bank, Blank, and Pass-Through Hex Stream
command extensions (see “Command Extensions” on page 190).Note: See “Rules for Designing Tables” on page 196 for information about:S Replacing the prompt and input fields together.S Restrictions.S Replacing the prompt field only.S Replacing the input field only.
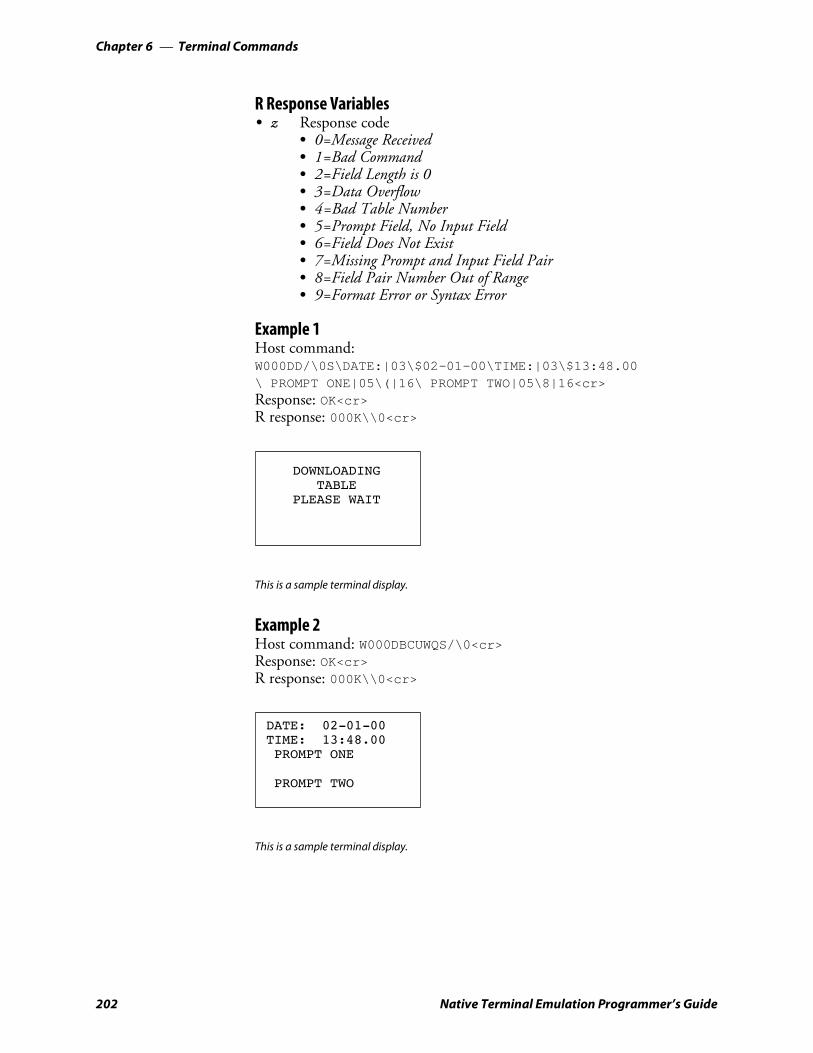
Terminal CommandsChapter —6
202 Native Terminal Emulation Programmer’s Guide
R Response VariablesS z Response code
S 0=Message ReceivedS 1=Bad CommandS 2=Field Length is 0S 3=Data OverflowS 4=Bad Table NumberS 5=Prompt Field, No Input FieldS 6=Field Does Not ExistS 7=Missing Prompt and Input Field PairS 8=Field Pair Number Out of RangeS 9=Format Error or Syntax Error
Example 1Host command:W000DD/\0S\DATE:|03\$02-01-00\TIME:|03\$13:48.00\ PROMPT ONE|05\(|16\ PROMPT TWO|05\8|16<cr>Response: OK<cr>R response: 000K\\0<cr>
DOWNLOADINGTABLE
PLEASE WAIT
This is a sample terminal display.
Example 2Host command: W000DBCUWQS/\0<cr>Response: OK<cr>R response: 000K\\0<cr>
DATE: 02-01-00TIME: 13:48.00PROMPT ONE
PROMPT TWO
This is a sample terminal display.
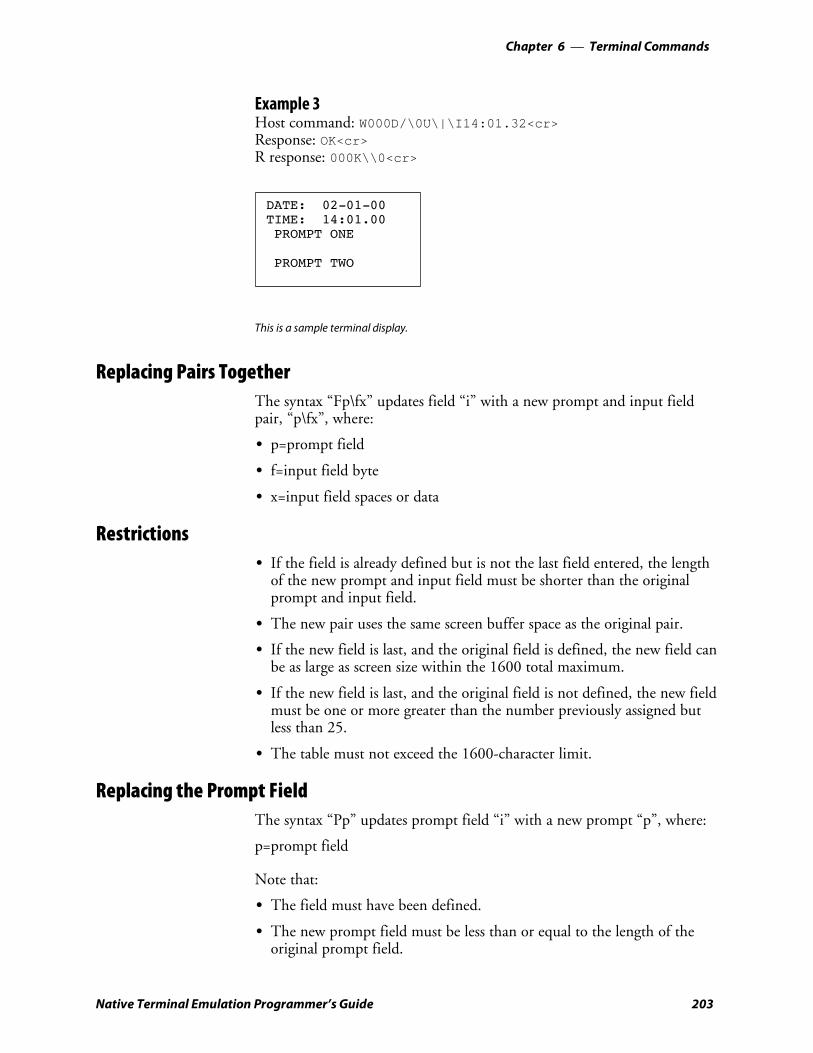
Terminal Commands—Chapter 6
203Native Terminal Emulation Programmer’s Guide
Example 3Host command: W000D/\0U\|\I14:01.32<cr>Response: OK<cr>R response: 000K\\0<cr>
DATE: 02-01-00TIME: 14:01.00PROMPT ONE
PROMPT TWO
This is a sample terminal display.
Replacing Pairs TogetherThe syntax “Fp\fx” updates field “i” with a new prompt and input fieldpair, “p\fx”, where:
S p=prompt field
S f=input field byte
S x=input field spaces or data
RestrictionsS If the field is already defined but is not the last field entered, the length
of the new prompt and input field must be shorter than the originalprompt and input field.
S The new pair uses the same screen buffer space as the original pair.
S If the new field is last, and the original field is defined, the new field canbe as large as screen size within the 1600 total maximum.
S If the new field is last, and the original field is not defined, the new fieldmust be one or more greater than the number previously assigned butless than 25.
S The table must not exceed the 1600-character limit.
Replacing the Prompt FieldThe syntax “Pp” updates prompt field “i” with a new prompt “p”, where:
p=prompt field
Note that:
S The field must have been defined.
S The new prompt field must be less than or equal to the length of theoriginal prompt field.

Terminal CommandsChapter —6
204 Native Terminal Emulation Programmer’s Guide
Replacing the Field OnlyThe syntax “Ifx” updates input field “i” with a new field, “fx,” where:
S f=field input byte
S x=input field spaces or data
Note that:
S The field must have been defined.
S The new input must be less than or equal to the length of the originalinput field.
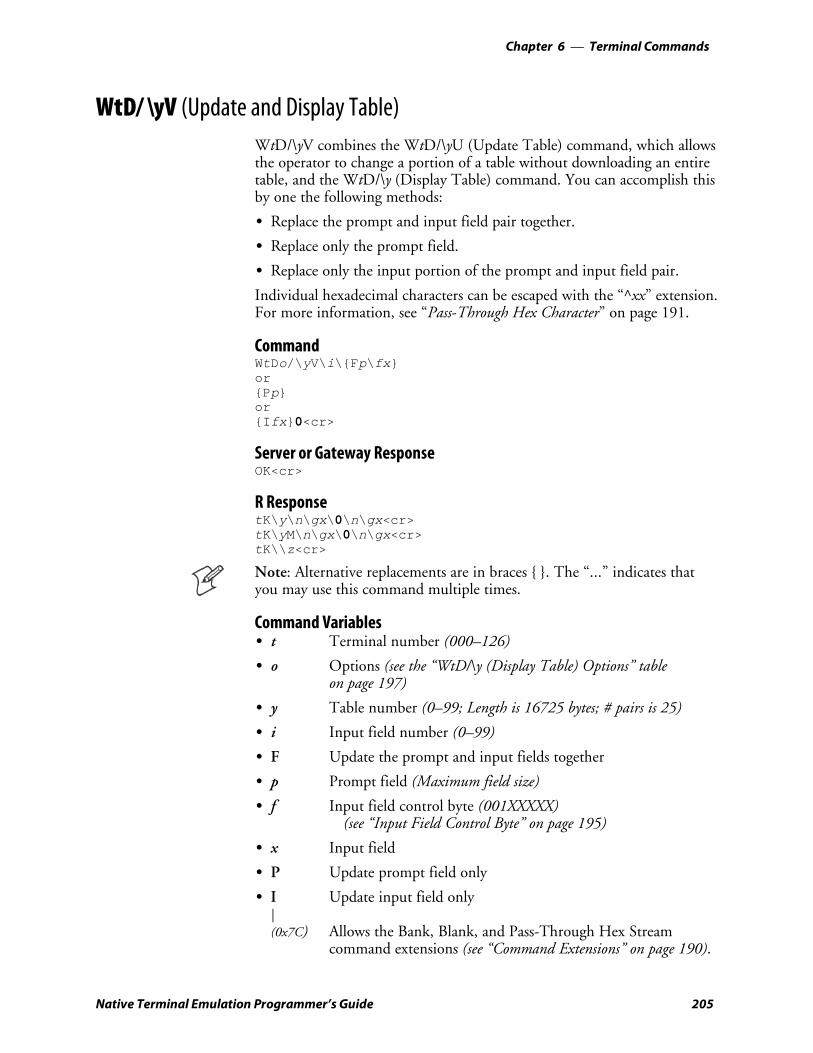
Terminal Commands—Chapter 6
205Native Terminal Emulation Programmer’s Guide
WtD/ \yV (Update and Display Table)WtD/\yV combines the WtD/\yU (Update Table) command, which allowsthe operator to change a portion of a table without downloading an entiretable, and the WtD/\y (Display Table) command. You can accomplish thisby one the following methods:
S Replace the prompt and input field pair together.
S Replace only the prompt field.
S Replace only the input portion of the prompt and input field pair.
Individual hexadecimal characters can be escaped with the “^xx” extension.For more information, see “Pass-Through Hex Character” on page 191.
CommandWtDo/\yV\i\Fp\fxorPporIfx0<cr>
Server or Gateway ResponseOK<cr>
R ResponsetK\y\n\gx\0\n\gx<cr>tK\yM\n\gx\0\n\gx<cr>tK\\z<cr>
Note: Alternative replacements are in braces . The “...” indicates thatyou may use this command multiple times.
Command VariablesS t Terminal number (000–126)
S o Options (see the “WtD/\y (Display Table) Options” tableon page 197)
S y Table number (0–99; Length is 16725 bytes; # pairs is 25)
S i Input field number (0–99)
S F Update the prompt and input fields together
S p Prompt field (Maximum field size)
S f Input field control byte (001XXXXX)(see “Input Field Control Byte” on page 195)
S x Input field
S P Update prompt field only
S I Update input field only|(0x7C) Allows the Bank, Blank, and Pass-Through Hex Stream
command extensions (see “Command Extensions” on page 190).
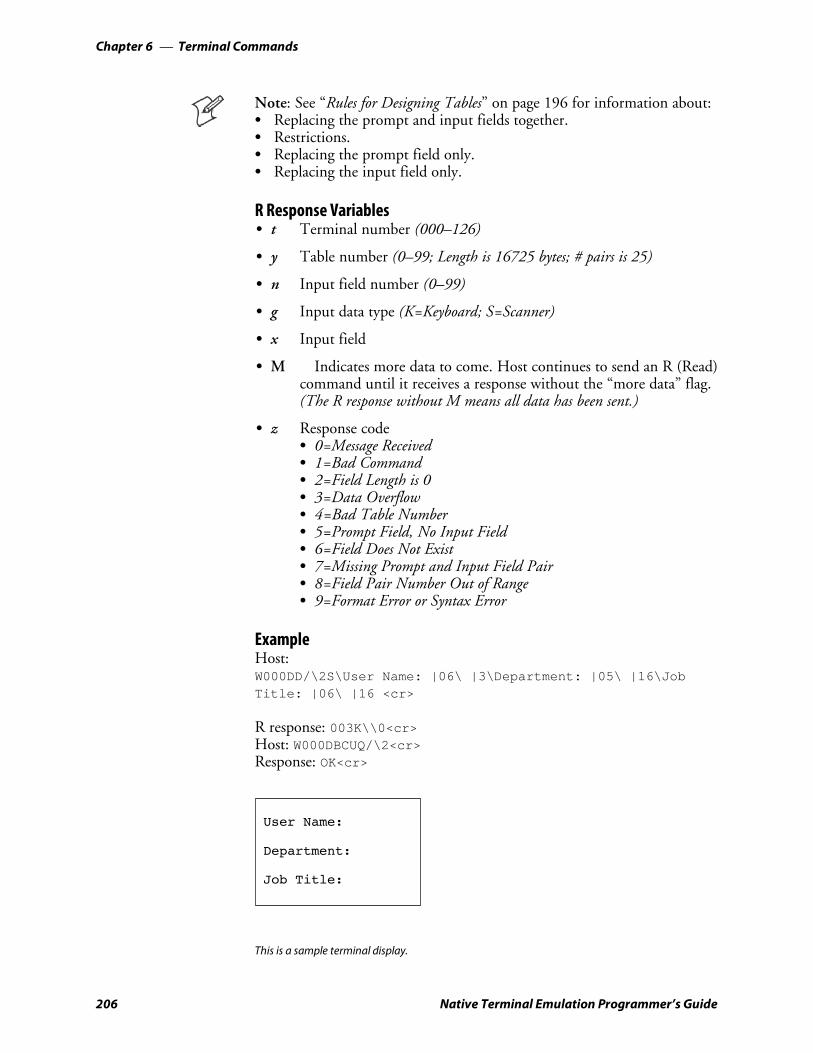
Terminal CommandsChapter —6
206 Native Terminal Emulation Programmer’s Guide
Note: See “Rules for Designing Tables” on page 196 for information about:S Replacing the prompt and input fields together.S Restrictions.S Replacing the prompt field only.S Replacing the input field only.
R Response VariablesS t Terminal number (000–126)
S y Table number (0–99; Length is 16725 bytes; # pairs is 25)
S n Input field number (0–99)
S g Input data type (K=Keyboard; S=Scanner)
S x Input field
S M Indicates more data to come. Host continues to send an R (Read)command until it receives a response without the “more data” flag.(The R response without M means all data has been sent.)
S z Response codeS 0=Message ReceivedS 1=Bad CommandS 2=Field Length is 0S 3=Data OverflowS 4=Bad Table NumberS 5=Prompt Field, No Input FieldS 6=Field Does Not ExistS 7=Missing Prompt and Input Field PairS 8=Field Pair Number Out of RangeS 9=Format Error or Syntax Error
ExampleHost:W000DD/\2S\User Name: |06\ |3\Department: |05\ |16\JobTitle: |06\ |16 <cr>
R response: 003K\\0<cr>Host: W000DBCUQ/\2<cr>Response: OK<cr>
User Name:
Department:
Job Title:
This is a sample terminal display.
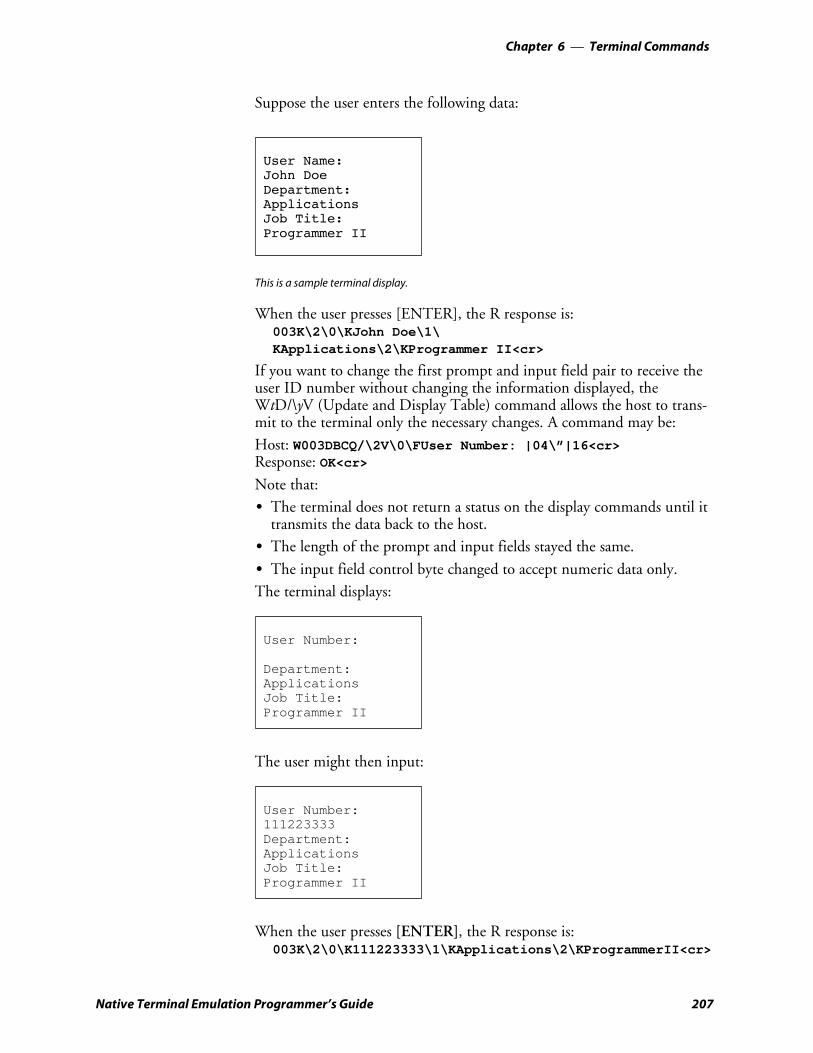
Terminal Commands—Chapter 6
207Native Terminal Emulation Programmer’s Guide
Suppose the user enters the following data:
User Name:John DoeDepartment:ApplicationsJob Title:Programmer II
This is a sample terminal display.
When the user presses [ENTER], the R response is:003K\2\0\KJohn Doe\1\KApplications\2\KProgrammer II<cr>
If you want to change the first prompt and input field pair to receive theuser ID number without changing the information displayed, theWtD/\yV (Update and Display Table) command allows the host to trans-mit to the terminal only the necessary changes. A command may be:Host: W003DBCQ/\2V\0\FUser Number: |04\”|16<cr>Response: OK<cr>
Note that:S The terminal does not return a status on the display commands until it
transmits the data back to the host.S The length of the prompt and input fields stayed the same.
S The input field control byte changed to accept numeric data only.The terminal displays:
User Number:
Department:ApplicationsJob Title:Programmer II
The user might then input:
User Number:111223333Department:ApplicationsJob Title:Programmer II
When the user presses [ENTER], the R response is:003K\2\0\K111223333\1\KApplications\2\KProgrammerII<cr>
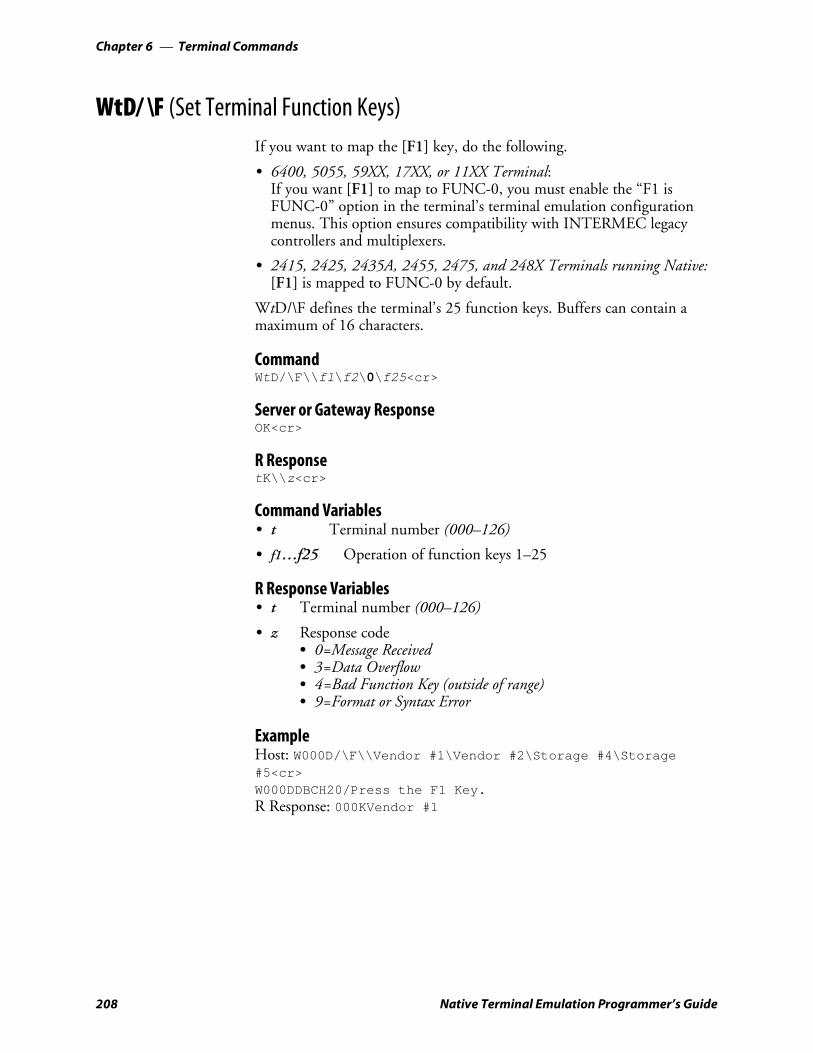
Terminal CommandsChapter —6
208 Native Terminal Emulation Programmer’s Guide
WtD/ \F (Set Terminal Function Keys)If you want to map the [F1] key, do the following.
S 6400, 5055, 59XX, 17XX, or 11XX Terminal:If you want [F1] to map to FUNC-0, you must enable the “F1 isFUNC-0” option in the terminal’s terminal emulation configurationmenus. This option ensures compatibility with INTERMEC legacycontrollers and multiplexers.
S 2415, 2425, 2435A, 2455, 2475, and 248X Terminals running Native:[F1] is mapped to FUNC-0 by default.
WtD/\F defines the terminal’s 25 function keys. Buffers can contain amaximum of 16 characters.
CommandWtD/\F\\f1\f2\0\f25<cr>
Server or Gateway ResponseOK<cr>
R ResponsetK\\z<cr>
Command VariablesS t Terminal number (000–126)
S f1…f25 Operation of function keys 1–25
R Response VariablesS t Terminal number (000–126)
S z Response codeS 0=Message ReceivedS 3=Data OverflowS 4=Bad Function Key (outside of range)S 9=Format or Syntax Error
ExampleHost: W000D/\F\\Vendor #1\Vendor #2\Storage #4\Storage#5<cr>W000DDBCH20/Press the F1 Key.R Response: 000KVendor #1
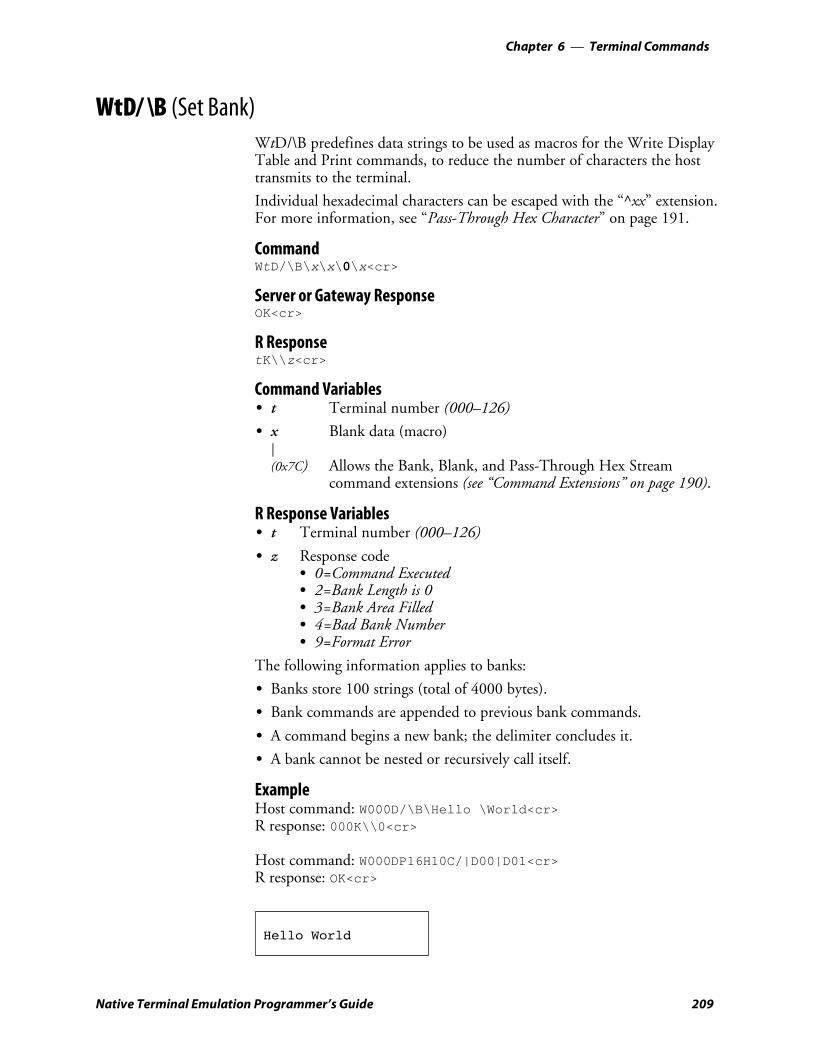
Terminal Commands—Chapter 6
209Native Terminal Emulation Programmer’s Guide
WtD/ \B (Set Bank)WtD/\B predefines data strings to be used as macros for the Write DisplayTable and Print commands, to reduce the number of characters the hosttransmits to the terminal.
Individual hexadecimal characters can be escaped with the “^xx” extension.For more information, see “Pass-Through Hex Character” on page 191.
CommandWtD/\B\x\x\0\x<cr>
Server or Gateway ResponseOK<cr>
R ResponsetK\\z<cr>
Command VariablesS t Terminal number (000–126)
S x Blank data (macro)|(0x7C) Allows the Bank, Blank, and Pass-Through Hex Stream
command extensions (see “Command Extensions” on page 190).
R Response VariablesS t Terminal number (000–126)
S z Response codeS 0=Command ExecutedS 2=Bank Length is 0S 3=Bank Area FilledS 4=Bad Bank NumberS 9=Format Error
The following information applies to banks:
S Banks store 100 strings (total of 4000 bytes).
S Bank commands are appended to previous bank commands.
S A command begins a new bank; the delimiter concludes it.
S A bank cannot be nested or recursively call itself.
ExampleHost command: W000D/\B\Hello \World<cr>R response: 000K\\0<cr>
Host command: W000DP16H10C/|D00|D01<cr>R response: OK<cr>
Hello World
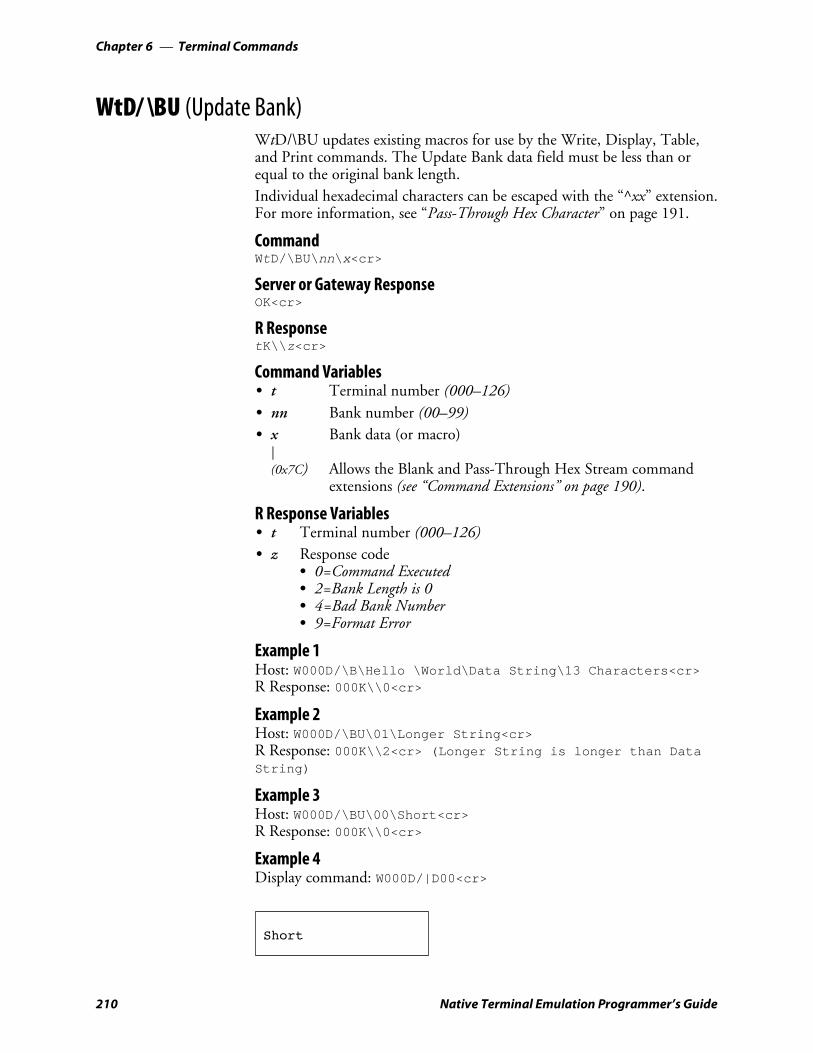
Terminal CommandsChapter —6
210 Native Terminal Emulation Programmer’s Guide
WtD/ \BU (Update Bank)WtD/\BU updates existing macros for use by the Write, Display, Table,and Print commands. The Update Bank data field must be less than orequal to the original bank length.Individual hexadecimal characters can be escaped with the “^xx” extension.For more information, see “Pass-Through Hex Character” on page 191.
CommandWtD/\BU\nn\x<cr>
Server or Gateway ResponseOK<cr>
R ResponsetK\\z<cr>
Command VariablesS t Terminal number (000–126)S nn Bank number (00–99)S x Bank data (or macro)
|(0x7C) Allows the Blank and Pass-Through Hex Stream command
extensions (see “Command Extensions” on page 190).
R Response VariablesS t Terminal number (000–126)S z Response code
S 0=Command ExecutedS 2=Bank Length is 0S 4=Bad Bank NumberS 9=Format Error
Example 1Host: W000D/\B\Hello \World\Data String\13 Characters<cr>R Response: 000K\\0<cr>
Example 2Host: W000D/\BU\01\Longer String<cr>R Response: 000K\\2<cr> (Longer String is longer than DataString)
Example 3Host: W000D/\BU\00\Short<cr>R Response: 000K\\0<cr>
Example 4Display command: W000D/|D00<cr>
Short

Terminal Commands—Chapter 6
211Native Terminal Emulation Programmer’s Guide
WtD/ \BE (Erase Bank)WtD/\BE removes all banks, or bank numbers nn to the last bank stored.Banks from 00 to nn-1 remain in bank storage after the command exe-cutes.
CommandWtD/\BEnn<cr>
Server or Gateway ResponseOK<cr>
R ResponsetK\\z<cr>
Command VariablesS t Terminal number (000–126)
S nn Bank number (00–99)
R Response VariablesS t Terminal number (000–126)
S z Response codeS 0=Command ExecutedS 4=Bad Bank NumberS 9=Format Error
Example 1W000D/\B\Hello World\Data String\13 Characters\Bank Field#3<cr>R Response: 000K\\0<cr>
Example 2W000D/\BE01<cr>R Response: 000K\\0<cr>Bank data including and following “Data String” is erased.
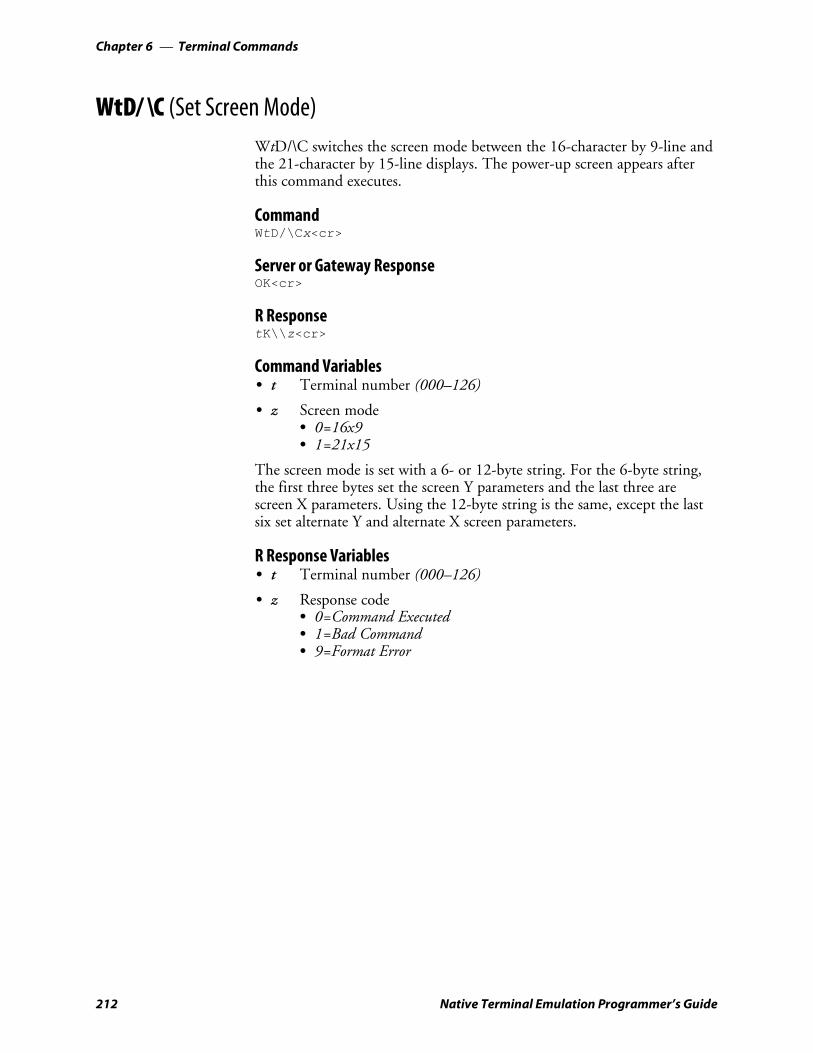
Terminal CommandsChapter —6
212 Native Terminal Emulation Programmer’s Guide
WtD/ \C (Set Screen Mode)WtD/\C switches the screen mode between the 16-character by 9-line andthe 21-character by 15-line displays. The power-up screen appears afterthis command executes.
CommandWtD/\Cx<cr>
Server or Gateway ResponseOK<cr>
R ResponsetK\\z<cr>
Command VariablesS t Terminal number (000–126)
S z Screen modeS 0=16x9S 1=21x15
The screen mode is set with a 6- or 12-byte string. For the 6-byte string,the first three bytes set the screen Y parameters and the last three arescreen X parameters. Using the 12-byte string is the same, except the lastsix set alternate Y and alternate X screen parameters.
R Response VariablesS t Terminal number (000–126)
S z Response codeS 0=Command ExecutedS 1=Bad CommandS 9=Format Error

Terminal Commands—Chapter 6
213Native Terminal Emulation Programmer’s Guide
WtD/ \P (Print)WtD/\P transmits data via the terminal’s RS-232 serial port to an externaldevice (for example, a printer). This command can control the port setupoptions o, consisting of P, L, H, W, D, and C variables. The WtD/\PS(Set RS-232 Port Options) command can also preset parameters.
Individual hexadecimal characters can be escaped with the “^xx” extension.For more information, see “Pass-Through Hex Character” on page 191.
CommandWtDo/\P\x<cr>
Server or Gateway ResponseOK<cr>
R ResponsetK\\z<cr>
Command VariablesS t Terminal number (000–126)
S o RS-232 port options (see the following table)
S x Data|(0x7C) Allows the Bank, Blank, and Pass-Through Hex Stream
command extensions (see “Command Extensions” on page 190).
RS-232 Port Optionso Alternative Default
C XON/XOFF control No flow control
D DTR-DSR No flow control
Hx Time-out; RS-232 port ready in x sec 3 sec
Lx x=speed:S 0=9600 bpsS 1=4800 bpsS 2=2400 bpsS 3=1200 bpsS 4=300 bpsS 5=19200 bpsS 6=38400 bps
0 (9600 bps)
P Sum of “P value” choices. For values, see the“P Values” table on the next page.
0 (1 stop bit, 8 data bits, even parity, parity disabled)
W CTS busy No wait for CTS

Terminal CommandsChapter —6
214 Native Terminal Emulation Programmer’s Guide
R Response VariablesS t Terminal number (000–126)
S z Response codeS 0=Data Printed CorrectlyS 9=Format ErrorS A=CTS time-outS B=DSR time-outS C=XON/XOFF time-out
Use the following table to find a “P value” for data bits, stop bits, parity,and baud rate. Add the assigned values to produce a unique sum (for help,see the example below). No combination of values produces the same sumas any other.
P ValuesP Value Alternatives
1 1=2 stop bits; 0=1 stop bit (default)
2 2=7 data bits; 0=8 data bits (default)
4 4=odd parity; 0=even parity (default)
8 8=parity enabled; 0=parity disabled (default)
ExampleInitialize the RS-232 port of terminal 004, and transmit the message“DATA.” Set RS-232 controls to:S 7 data bitsS Even parityS Parity enabledS 1 stop bitS 4800 bpsS XON flow control enabled
P value:7 data bits = 2Even parity = 0Parity enabled = 81 stop bit = 0P value = 10 (P10)
L value: 4800 bps=1 (L1)C value: XON Flow Control enabled=C (C)The command is: W004DP10L1C/\P\DATA<cr>
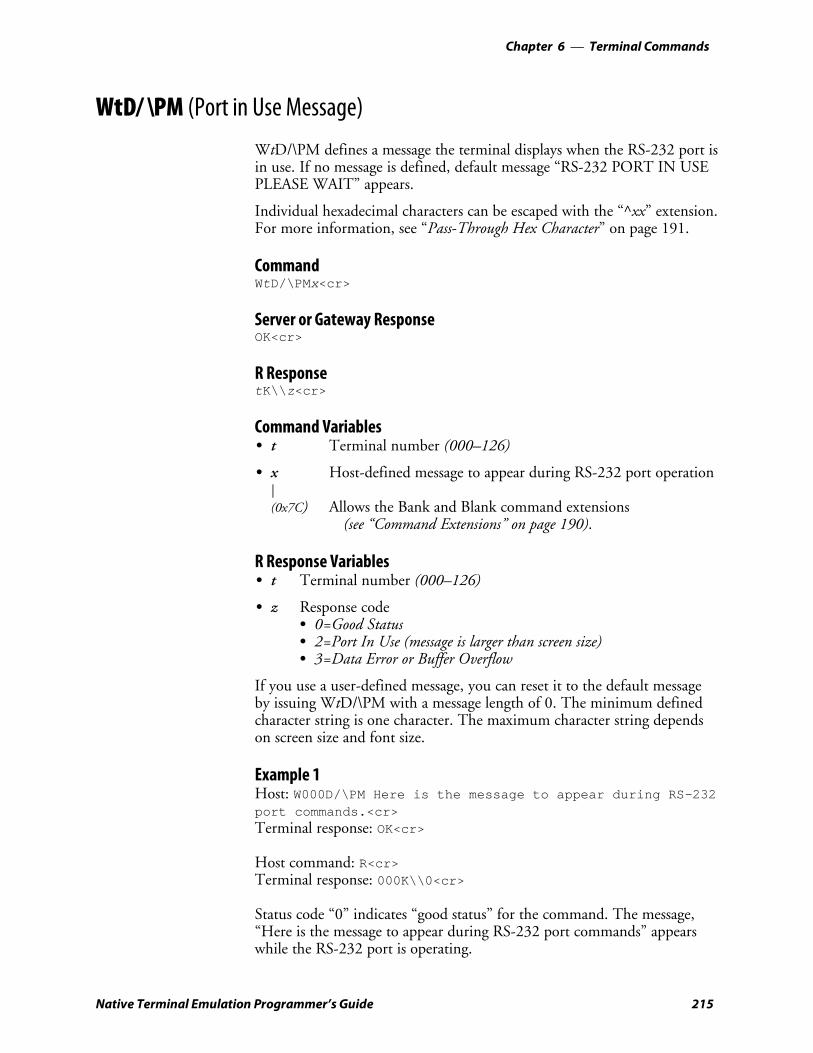
Terminal Commands—Chapter 6
215Native Terminal Emulation Programmer’s Guide
WtD/ \PM (Port in Use Message)
WtD/\PM defines a message the terminal displays when the RS-232 port isin use. If no message is defined, default message “RS-232 PORT IN USEPLEASE WAIT” appears.
Individual hexadecimal characters can be escaped with the “^xx” extension.For more information, see “Pass-Through Hex Character” on page 191.
CommandWtD/\PMx<cr>
Server or Gateway ResponseOK<cr>
R ResponsetK\\z<cr>
Command VariablesS t Terminal number (000–126)
S x Host-defined message to appear during RS-232 port operation|(0x7C) Allows the Bank and Blank command extensions
(see “Command Extensions” on page 190).
R Response VariablesS t Terminal number (000–126)
S z Response codeS 0=Good StatusS 2=Port In Use (message is larger than screen size)S 3=Data Error or Buffer Overflow
If you use a user-defined message, you can reset it to the default messageby issuing WtD/\PM with a message length of 0. The minimum definedcharacter string is one character. The maximum character string dependson screen size and font size.
Example 1Host: W000D/\PM Here is the message to appear during RS-232port commands.<cr>Terminal response: OK<cr>
Host command: R<cr>Terminal response: 000K\\0<cr>
Status code “0” indicates “good status” for the command. The message,“Here is the message to appear during RS-232 port commands” appearswhile the RS-232 port is operating.

Terminal CommandsChapter —6
216 Native Terminal Emulation Programmer’s Guide
Example 2(For use with 144-character screen)Host: W000D/\PMWaiting for Data|16|16|16|16|16|16|16Pleasebe patient<cr>Terminal response: OK<cr>
Host command: R<cr>Terminal response: 000K\\2<cr>
Status code “2” is returned because the message string is one characterlonger than the large character screen can handle. Switch to the 315-char-acter screen and send the same command:
Host: W000D/\PMWaiting for Data|16|16|16|16|16|16|16Pleasebe patient<cr>Terminal response: OK<cr>
Host command: R<cr>Terminal response: 000K\\0<cr>
Status code “0” indicates good status. The message “Waiting for Data” ap-pears when the RS-232 port is operating.
Example 3Host: W000D/\PM|991|992|993|16<cr>Terminal response: OK<cr>
Host command: R<cr>Terminal response: 000K\\3<cr>
Status code “3” is returned because the blank extension caused the messageto exceed the screen length. Note that although the host sent only 15 char-acters to the terminal, the total expanded character count is 316, whichexceeds the screen size.
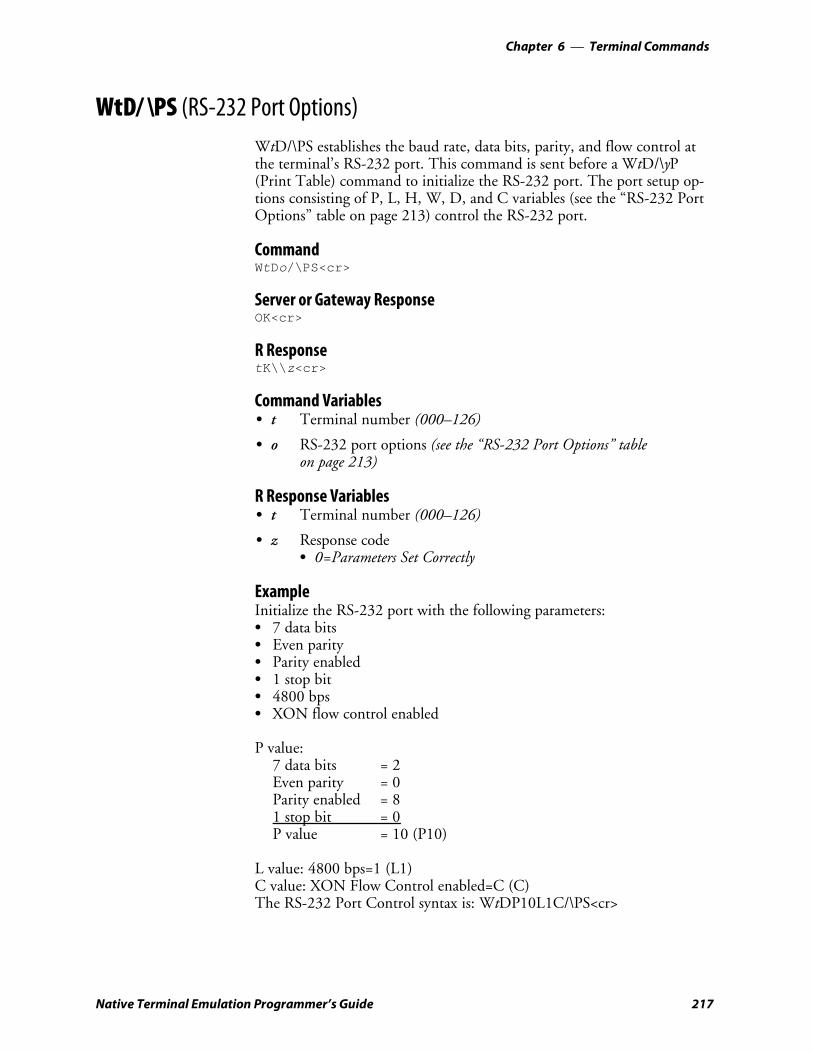
Terminal Commands—Chapter 6
217Native Terminal Emulation Programmer’s Guide
WtD/ \PS (RS-232 Port Options)WtD/\PS establishes the baud rate, data bits, parity, and flow control atthe terminal’s RS-232 port. This command is sent before a WtD/\yP(Print Table) command to initialize the RS-232 port. The port setup op-tions consisting of P, L, H, W, D, and C variables (see the “RS-232 PortOptions” table on page 213) control the RS-232 port.
CommandWtDo/\PS<cr>
Server or Gateway ResponseOK<cr>
R ResponsetK\\z<cr>
Command VariablesS t Terminal number (000–126)
S o RS-232 port options (see the “RS-232 Port Options” tableon page 213)
R Response VariablesS t Terminal number (000–126)
S z Response codeS 0=Parameters Set Correctly
ExampleInitialize the RS-232 port with the following parameters:S 7 data bitsS Even parityS Parity enabledS 1 stop bitS 4800 bpsS XON flow control enabled
P value:7 data bits = 2Even parity = 0Parity enabled = 81 stop bit = 0P value = 10 (P10)
L value: 4800 bps=1 (L1)C value: XON Flow Control enabled=C (C)The RS-232 Port Control syntax is: WtDP10L1C/\PS<cr>
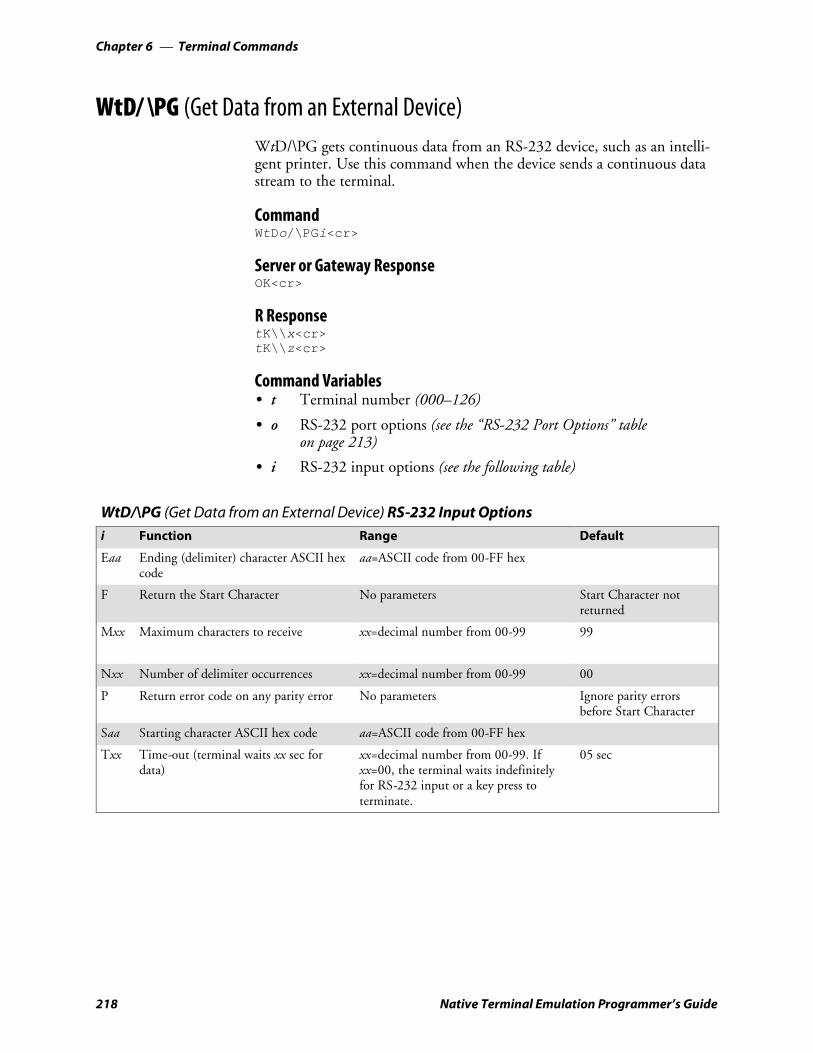
Terminal CommandsChapter —6
218 Native Terminal Emulation Programmer’s Guide
WtD/ \PG (Get Data from an External Device)WtD/\PG gets continuous data from an RS-232 device, such as an intelli-gent printer. Use this command when the device sends a continuous datastream to the terminal.
CommandWtDo/\PGi<cr>
Server or Gateway ResponseOK<cr>
R ResponsetK\\x<cr>tK\\z<cr>
Command VariablesS t Terminal number (000–126)
S o RS-232 port options (see the “RS-232 Port Options” tableon page 213)
S i RS-232 input options (see the following table)
WtD/\PG (Get Data from an External Device) RS-232 Input Optionsi Function Range Default
Eaa Ending (delimiter) character ASCII hexcode
aa=ASCII code from 00-FF hex
F Return the Start Character No parameters Start Character notreturned
Mxx Maximum characters to receive xx=decimal number from 00-99 99
Nxx Number of delimiter occurrences xx=decimal number from 00-99 00
P Return error code on any parity error No parameters Ignore parity errorsbefore Start Character
Saa Starting character ASCII hex code aa=ASCII code from 00-FF hex
Txx Time-out (terminal waits xx sec fordata)
xx=decimal number from 00-99. Ifxx=00, the terminal waits indefinitelyfor RS-232 input or a key press toterminate.
05 sec
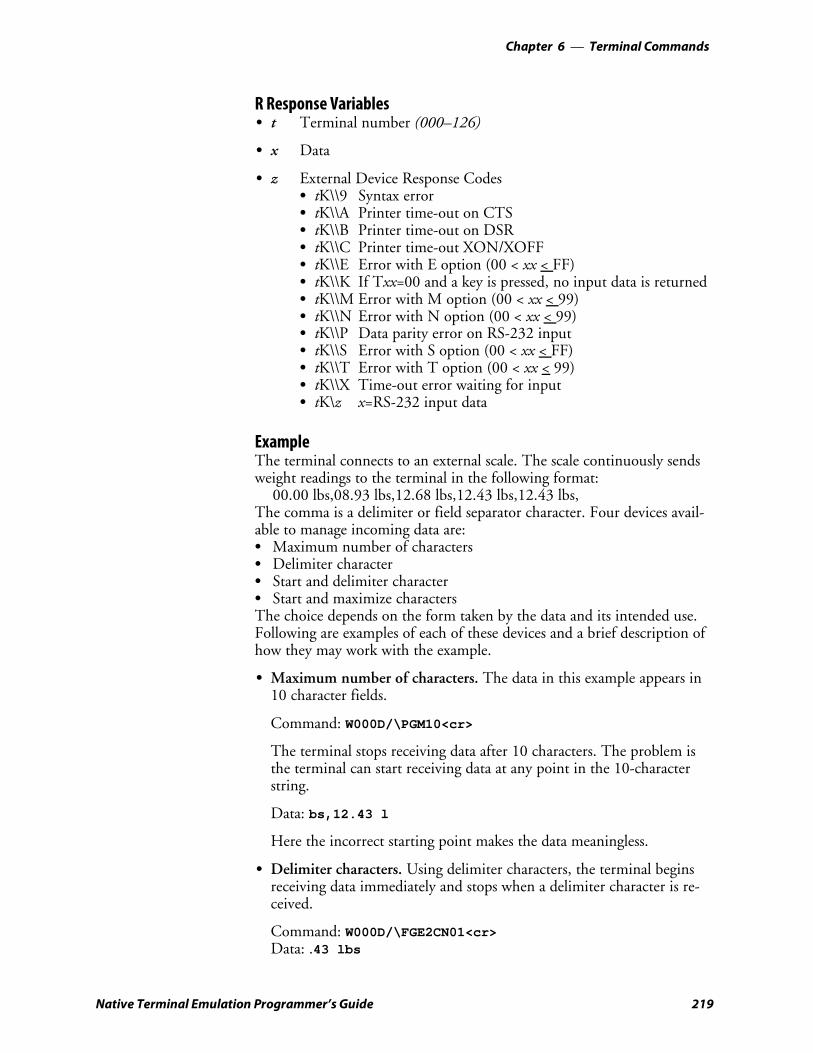
Terminal Commands—Chapter 6
219Native Terminal Emulation Programmer’s Guide
R Response VariablesS t Terminal number (000–126)
S x Data
S z External Device Response CodesS tK\\9 Syntax errorS tK\\A Printer time-out on CTSS tK\\B Printer time-out on DSRS tK\\C Printer time-out XON/XOFFS tK\\E Error with E option (00 < xx < FF)S tK\\K If Txx=00 and a key is pressed, no input data is returnedS tK\\M Error with M option (00 < xx < 99)S tK\\N Error with N option (00 < xx < 99)S tK\\P Data parity error on RS-232 inputS tK\\S Error with S option (00 < xx < FF)S tK\\T Error with T option (00 < xx < 99)S tK\\X Time-out error waiting for inputS tK\z x=RS-232 input data
ExampleThe terminal connects to an external scale. The scale continuously sendsweight readings to the terminal in the following format:
00.00 lbs,08.93 lbs,12.68 lbs,12.43 lbs,12.43 lbs,The comma is a delimiter or field separator character. Four devices avail-able to manage incoming data are:S Maximum number of charactersS Delimiter characterS Start and delimiter characterS Start and maximize charactersThe choice depends on the form taken by the data and its intended use.Following are examples of each of these devices and a brief description ofhow they may work with the example.
S Maximum number of characters. The data in this example appears in10 character fields.
Command: W000D/\PGM10<cr>
The terminal stops receiving data after 10 characters. The problem isthe terminal can start receiving data at any point in the 10-characterstring.
Data: bs,12.43 l
Here the incorrect starting point makes the data meaningless.
S Delimiter characters. Using delimiter characters, the terminal beginsreceiving data immediately and stops when a delimiter character is re-ceived.
Command: W000D/\FGE2CN01<cr>Data: .43 lbs

Terminal CommandsChapter —6
220 Native Terminal Emulation Programmer’s Guide
S Start and Delimiter characters. Using Start and Delimiter characters,the terminal starts saving data once the start character is encounteredand stops when the delimiter is read.
Use the F option if the start character should be part of the response. Inthe example, the first character in the record is unknown because it de-pends on the weight reading. However, the previous character (the com-ma) is known and could be a start character.
Command: W000D/\PGS2CE2CN01<cr>Data: 12.43 lbs,
Using the F option:
Command: W000D/\PGS2CE2CFN01<cr>Data: ,12.43 lbs,
The start character in this example is not significant and need not bereturned.
S Start and Max Characters. Using Start and Max Characters, the termi-nal starts saving data once the start character is encountered, and stopsafter the maximum number of characters has been reached.
Command: W000D/\PGS2CM10<cr>
Data: 12.43 lbs,
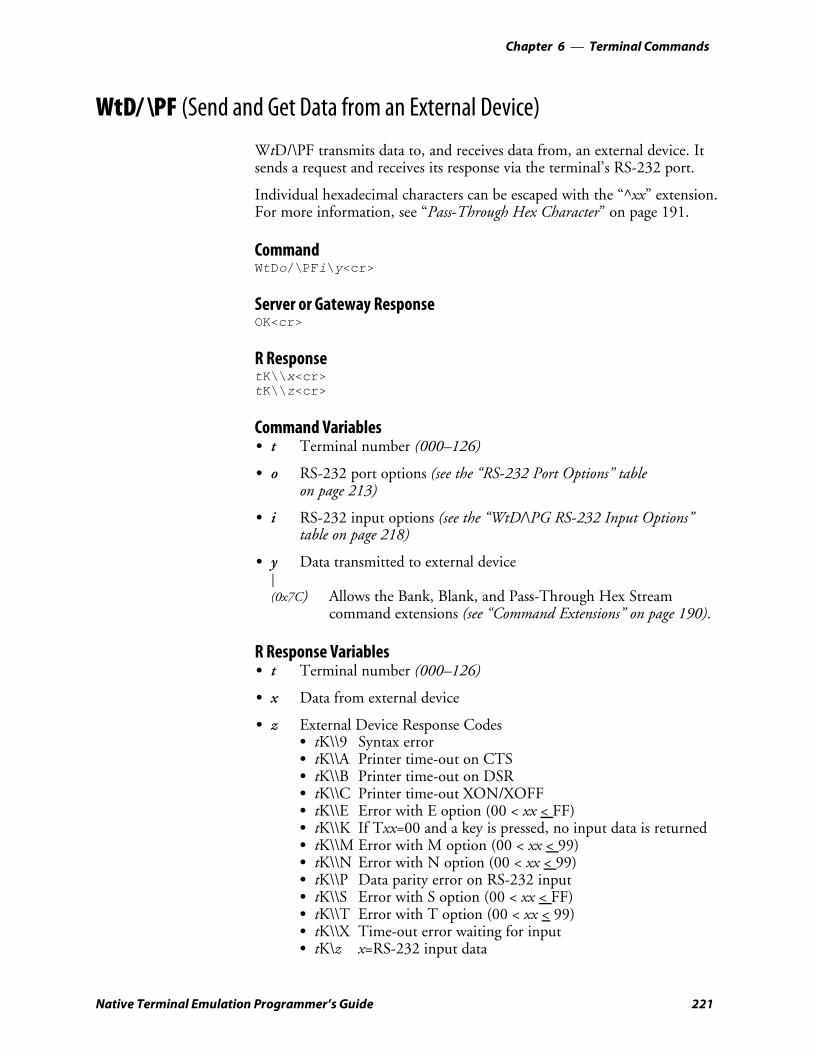
Terminal Commands—Chapter 6
221Native Terminal Emulation Programmer’s Guide
WtD/ \PF (Send and Get Data from an External Device)
WtD/\PF transmits data to, and receives data from, an external device. Itsends a request and receives its response via the terminal’s RS-232 port.
Individual hexadecimal characters can be escaped with the “^xx” extension.For more information, see “Pass-Through Hex Character” on page 191.
CommandWtDo/\PFi\y<cr>
Server or Gateway ResponseOK<cr>
R ResponsetK\\x<cr>tK\\z<cr>
Command VariablesS t Terminal number (000–126)
S o RS-232 port options (see the “RS-232 Port Options” tableon page 213)
S i RS-232 input options (see the “WtD/\PG RS-232 Input Options”table on page 218)
S y Data transmitted to external device|(0x7C) Allows the Bank, Blank, and Pass-Through Hex Stream
command extensions (see “Command Extensions” on page 190).
R Response VariablesS t Terminal number (000–126)
S x Data from external device
S z External Device Response CodesS tK\\9 Syntax errorS tK\\A Printer time-out on CTSS tK\\B Printer time-out on DSRS tK\\C Printer time-out XON/XOFFS tK\\E Error with E option (00 < xx < FF)S tK\\K If Txx=00 and a key is pressed, no input data is returnedS tK\\M Error with M option (00 < xx < 99)S tK\\N Error with N option (00 < xx < 99)S tK\\P Data parity error on RS-232 inputS tK\\S Error with S option (00 < xx < FF)S tK\\T Error with T option (00 < xx < 99)S tK\\X Time-out error waiting for inputS tK\z x=RS-232 input data
Terminal CommandsChapter —6
222 Native Terminal Emulation Programmer’s Guide
ExampleW000P10L1/\PFS0AE0AFN01M50T20\DATE: 02-23-00^0D^0AThis example sets the following response options:S P10 7 data bits, 1 stop bit, even parityS L1 4800 bpsS PF Write “DATE: 02-23-00<cr><lf>” before receiving data inputS S0A Start character is<If>S E0A End character is <If>S F Return the start characterS N01 End data inputS M50 Get 50 characters maximumS T20 Wait for 20 seconds maximum for data input before time-out

Terminal Commands—Chapter 6
223Native Terminal Emulation Programmer’s Guide
WtD/ \yP (Print Table)WtD/\yP prints data in a table to the RS-232 port. The RS-232 port setupparameters are set by the WtD/\PS (Set RS-232 Port Options) command.
CommandWtD/\yP<cr>
Server or Gateway ResponseOK<cr>
R ResponsetK\\z<cr>
Command VariablesS t Terminal number (000–126)
S y Table and data to print
R Response VariablesS t Terminal number (000–126)
S z Response CodeS 0 Data Printed CorrectlyS 9 Syntax ErrorS A CTS Time-outS B DSR Time-outS C XON/XOFF Time-out
Data in a table can encode characters with hexadecimal values by using^xx, where xx is the two-digit hexadecimal number for the data. A <cr>must be sent this way. (The carriage return “<cr>” character is sent as^0D.)
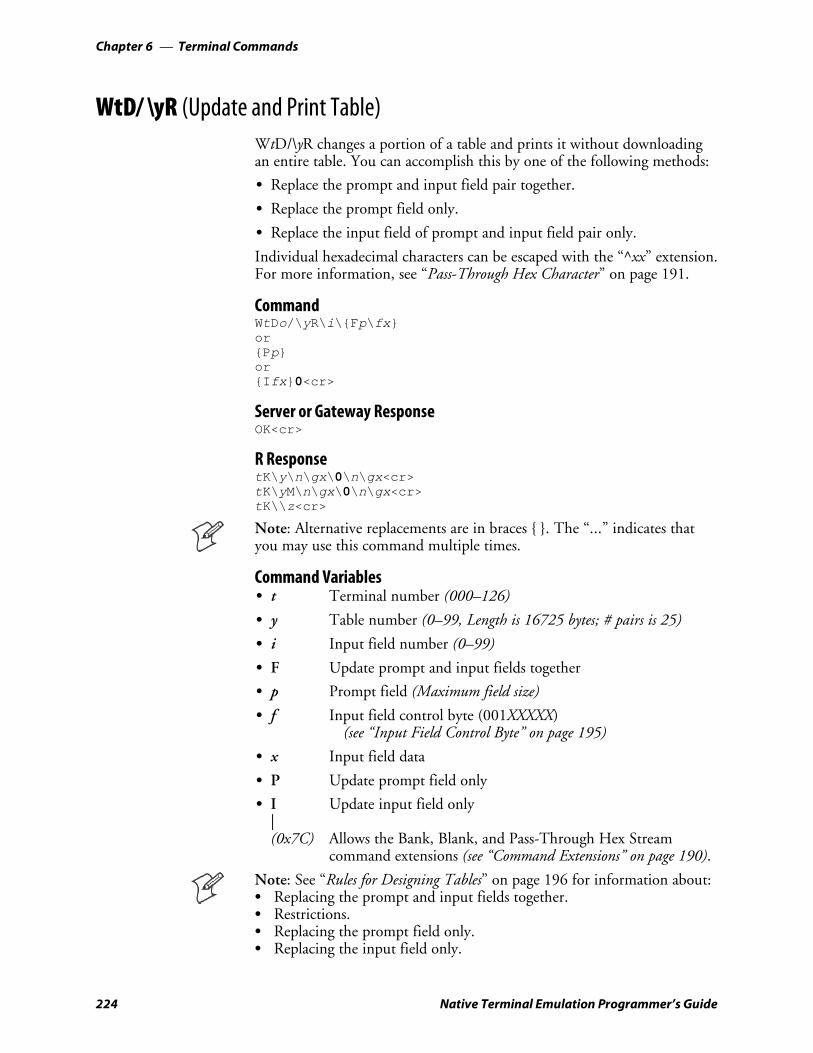
Terminal CommandsChapter —6
224 Native Terminal Emulation Programmer’s Guide
WtD/ \yR (Update and Print Table)WtD/\yR changes a portion of a table and prints it without downloadingan entire table. You can accomplish this by one of the following methods:
S Replace the prompt and input field pair together.
S Replace the prompt field only.
S Replace the input field of prompt and input field pair only.
Individual hexadecimal characters can be escaped with the “^xx” extension.For more information, see “Pass-Through Hex Character” on page 191.
CommandWtDo/\yR\i\Fp\fxorPporIfx0<cr>
Server or Gateway ResponseOK<cr>
R ResponsetK\y\n\gx\0\n\gx<cr>tK\yM\n\gx\0\n\gx<cr>tK\\z<cr>
Note: Alternative replacements are in braces . The “...” indicates thatyou may use this command multiple times.
Command VariablesS t Terminal number (000–126)
S y Table number (0–99, Length is 16725 bytes; # pairs is 25)
S i Input field number (0–99)
S F Update prompt and input fields together
S p Prompt field (Maximum field size)
S f Input field control byte (001XXXXX)(see “Input Field Control Byte” on page 195)
S x Input field data
S P Update prompt field only
S I Update input field only|(0x7C) Allows the Bank, Blank, and Pass-Through Hex Stream
command extensions (see “Command Extensions” on page 190).
Note: See “Rules for Designing Tables” on page 196 for information about:S Replacing the prompt and input fields together.S Restrictions.S Replacing the prompt field only.S Replacing the input field only.
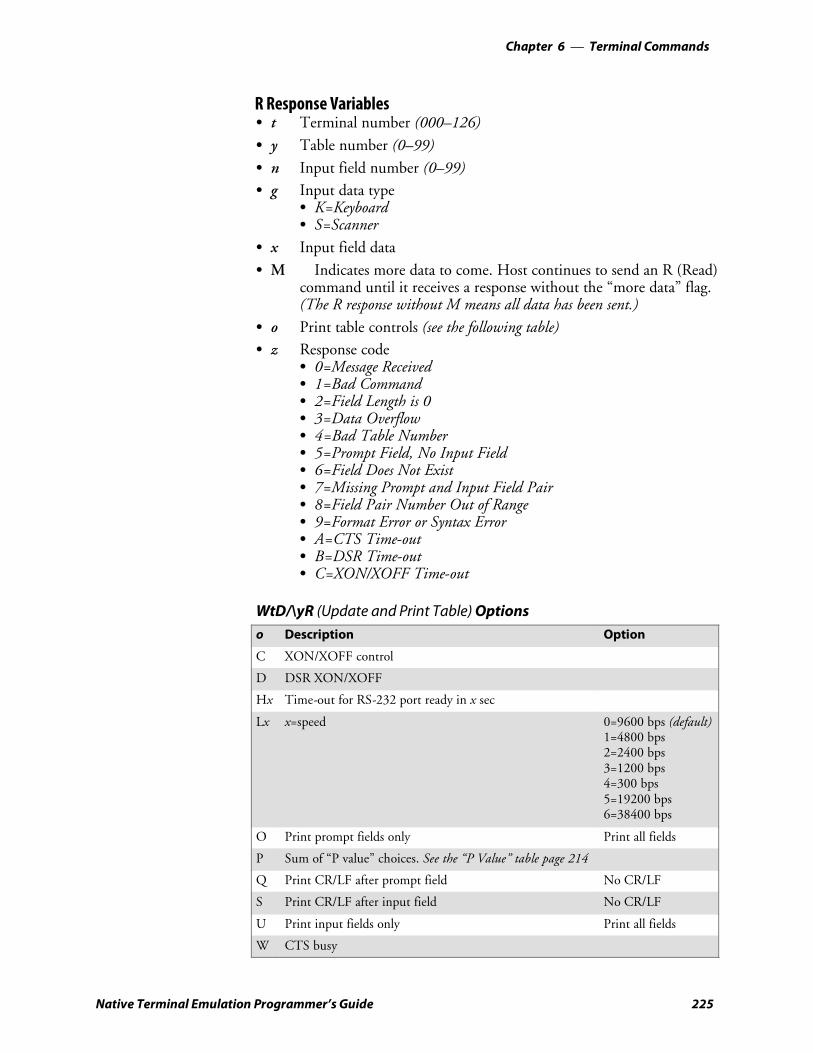
Terminal Commands—Chapter 6
225Native Terminal Emulation Programmer’s Guide
R Response VariablesS t Terminal number (000–126)S y Table number (0–99)S n Input field number (0–99)S g Input data type
S K=KeyboardS S=Scanner
S x Input field data
S M Indicates more data to come. Host continues to send an R (Read)command until it receives a response without the “more data” flag.(The R response without M means all data has been sent.)
S o Print table controls (see the following table)S z Response code
S 0=Message ReceivedS 1=Bad CommandS 2=Field Length is 0S 3=Data OverflowS 4=Bad Table NumberS 5=Prompt Field, No Input FieldS 6=Field Does Not ExistS 7=Missing Prompt and Input Field PairS 8=Field Pair Number Out of RangeS 9=Format Error or Syntax ErrorS A=CTS Time-outS B=DSR Time-outS C=XON/XOFF Time-out
WtD/\yR (Update and Print Table) Optionso Description Option
C XON/XOFF control
D DSR XON/XOFF
Hx Time-out for RS-232 port ready in x sec
Lx x=speed 0=9600 bps (default)1=4800 bps2=2400 bps3=1200 bps4=300 bps5=19200 bps6=38400 bps
O Print prompt fields only Print all fields
P Sum of “P value” choices. See the “P Value” table page 214
Q Print CR/LF after prompt field No CR/LF
S Print CR/LF after input field No CR/LF
U Print input fields only Print all fields
W CTS busy
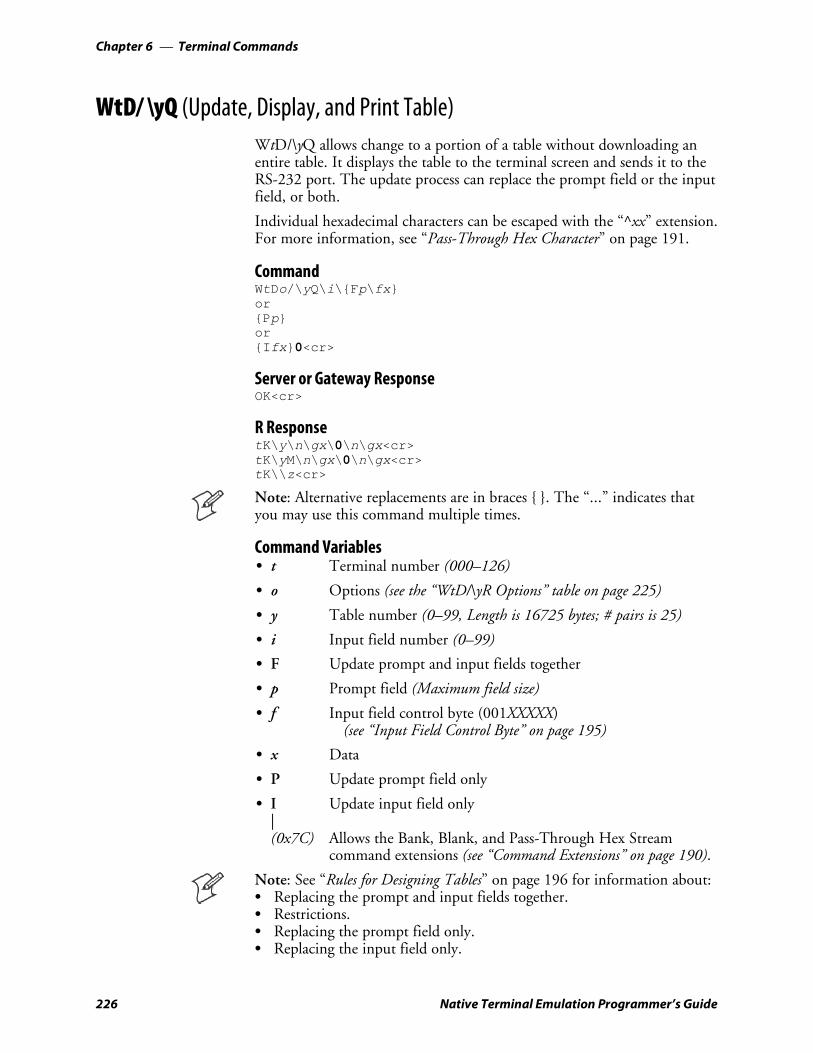
Terminal CommandsChapter —6
226 Native Terminal Emulation Programmer’s Guide
WtD/ \yQ (Update, Display, and Print Table)WtD/\yQ allows change to a portion of a table without downloading anentire table. It displays the table to the terminal screen and sends it to theRS-232 port. The update process can replace the prompt field or the inputfield, or both.
Individual hexadecimal characters can be escaped with the “^xx” extension.For more information, see “Pass-Through Hex Character” on page 191.
CommandWtDo/\yQ\i\Fp\fxorPporIfx0<cr>
Server or Gateway ResponseOK<cr>
R ResponsetK\y\n\gx\0\n\gx<cr>tK\yM\n\gx\0\n\gx<cr>tK\\z<cr>
Note: Alternative replacements are in braces . The “...” indicates thatyou may use this command multiple times.
Command VariablesS t Terminal number (000–126)
S o Options (see the “WtD/\yR Options” table on page 225)
S y Table number (0–99, Length is 16725 bytes; # pairs is 25)
S i Input field number (0–99)
S F Update prompt and input fields together
S p Prompt field (Maximum field size)
S f Input field control byte (001XXXXX)(see “Input Field Control Byte” on page 195)
S x Data
S P Update prompt field only
S I Update input field only|(0x7C) Allows the Bank, Blank, and Pass-Through Hex Stream
command extensions (see “Command Extensions” on page 190).
Note: See “Rules for Designing Tables” on page 196 for information about:S Replacing the prompt and input fields together.S Restrictions.S Replacing the prompt field only.S Replacing the input field only.
Terminal Commands—Chapter 6
227Native Terminal Emulation Programmer’s Guide
R Response VariablesS t Terminal number (000–126)
S y Table number (0–99)
S n Input field number (0–99)
S g Input data typeS K=KeyboardS S=Scanner
S x Data
S M Indicates more data to come. Host continues to send an R (Read)command until it receives a response without the “more data” flag.(The R response without M means all data has been sent.)
S z Response codeS 0=Message ReceivedS 1=Bad CommandS 2=Field Length is 0S 3=Data OverflowS 4=Bad Table NumberS 5=Prompt Field, No Input FieldS 6=Field Does Not ExistS 7=Missing Prompt and Input Field PairS 8=Field Pair Number Out of RangeS 9=Format Error or Syntax ErrorS A=CTS Time-outS B=DSR Time-outS C=XON/XOFF Time-out

Terminal CommandsChapter —6
228 Native Terminal Emulation Programmer’s Guide
WtD/ \T (Tone)WtD/\T sets the volume, frequency (pitch), and length (duration) of thetone.
CommandWtD/\Tvvvffflll
Server or Gateway ResponseOK<cr>
R ResponsetK\\z
Command VariablesS t Terminal number (000–126)
S v Volume (000–255)
S f Frequency or pitch (000–030)
S l Length or duration (001–010)
R Response VariablesS t Terminal number (000–126)
S z Response codeS 0=Parameters Set CorrectlyS V=Volume Out of RangeS F=Frequency Out of RangeS L=Length Out of Range
ExampleThis example indicates that the length of “011” is outside the acceptablerange of 001-010:Command: W000D/\T255030011<cr>R Response: 000K\\L<cr>

Terminal Commands—Chapter 6
229Native Terminal Emulation Programmer’s Guide
DtV (Terminal Emulation Version)Use DtV to return the terminal emulation version running in the terminal.The command variable is t, the terminal number (000-126). Following areR response variables and characters.
CommandDtV<cr>
Server or Gateway ResponseOK<cr>
R ResponsetDFWP<ab0H0> V<v.vv><cr>
Command and R Response VariablesS t Terminal number (000–126)
S D Diagnostic command or response
S FWP Terminal emulation program
S ab First two numbers in the terminal model name:S 24=2415, 2425, 2435A, 2455, 2475, or 248X TerminalsS 64=6400 Hand-Held ComputerS 65=5055 Data Collection PCS 59=59XX TerminalS 17=17XX TerminalS 11=11XX Terminal
S H Represents the combined Native, 3270, 5250, and VT/ANSIterminal emulation programs. The 2415, 2425, 2435A, 2455,2475, and 248X Terminals do not support the “FWP” program’sNative option.
S v Terminal emulation program’s version number
ExampleCommand: D003V<cr>R Response: 003DFWP240H0 V6.17<cr>
Terminal 003 is a 2415, 2425, 2455, 2475, or 248X running terminalemulation program FWP240H0, version 6.17.

Terminal CommandsChapter —6
230 Native Terminal Emulation Programmer’s Guide
DtE (Echo-Back Diagnostic)DtE tests the communication cycle. The host sends a data string to a ter-minal, which it immediately returns for comparison. The “D” in the Rresponse indicates “diagnostic command or response.”
CommandDtE/x<cr>
Server or Gateway ResponseOK<cr>
R ResponsetDx<cr>
Command and R Response VariablesS t Terminal number (000–126)
S x Data (1–112 characters)
ExampleCommand: D002E/ABCD1234<cr>Terminal response: 002DABCD1234<cr>Terminal 002 returns the same data in response to the next R (Read) com-mand.
231Native Terminal Emulation Programmer’s Guide
Bar Code ScanningA
This appendix lists bar code labels for Native TE commands and function-s. It also contains Encoded Code 39 key press sequences.
Note: To scan the bar code labels, configure the terminal to use Code 39in Full ASCII mode.
Note: For the 2415, 2425, 2435A, 2455, 2475, or 248X Terminal, con-figure the mode through the TRAKKER Antares® 2400 Menu System.See the terminal’s user manual for help.
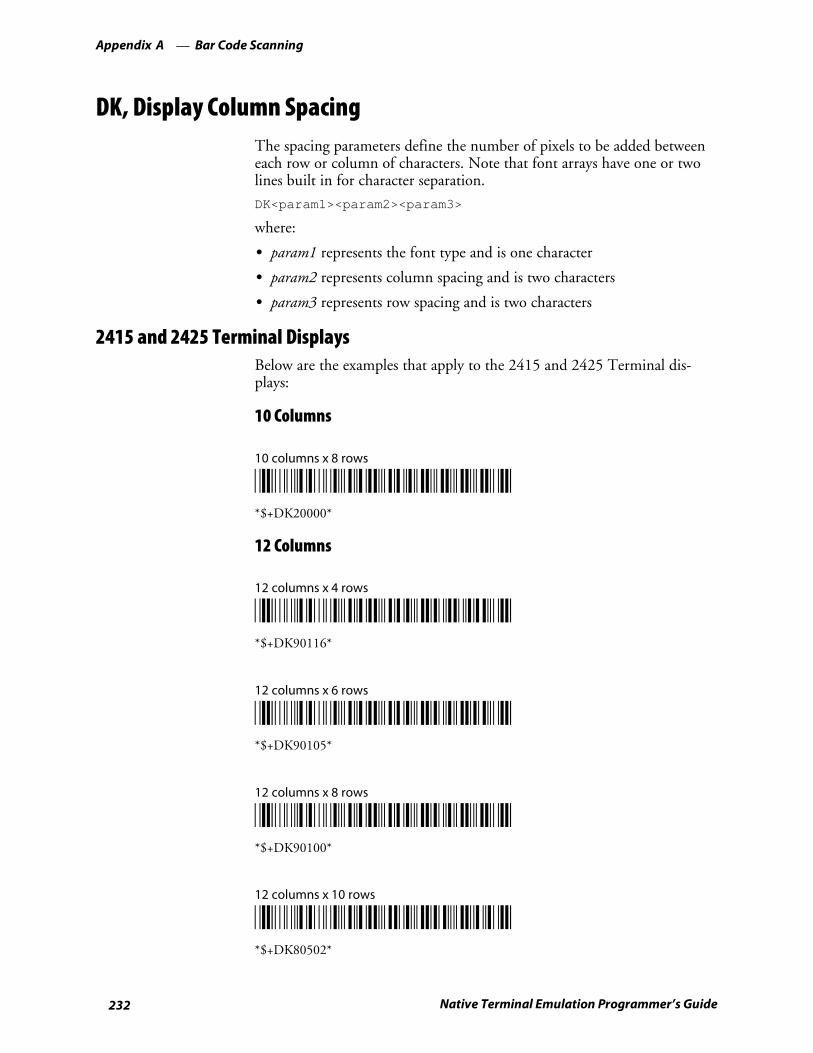
Bar Code ScanningAppendix —A
232 Native Terminal Emulation Programmer’s Guide
DK, Display Column SpacingThe spacing parameters define the number of pixels to be added betweeneach row or column of characters. Note that font arrays have one or twolines built in for character separation.
DK<param1><param2><param3>
where:
S param1 represents the font type and is one character
S param2 represents column spacing and is two characters
S param3 represents row spacing and is two characters
2415 and 2425 Terminal DisplaysBelow are the examples that apply to the 2415 and 2425 Terminal dis-plays:
10 Columns
10 columns x 8 rows
*/D/KDK20000**$+DK20000*
12 Columns
12 columns x 4 rows
*/D/KDK90116**$+DK90116*
12 columns x 6 rows
*/D/KDK90105**$+DK90105*
12 columns x 8 rows
*/D/KDK90100**$+DK90100*
12 columns x 10 rows
*/D/KDK80502**$+DK80502*
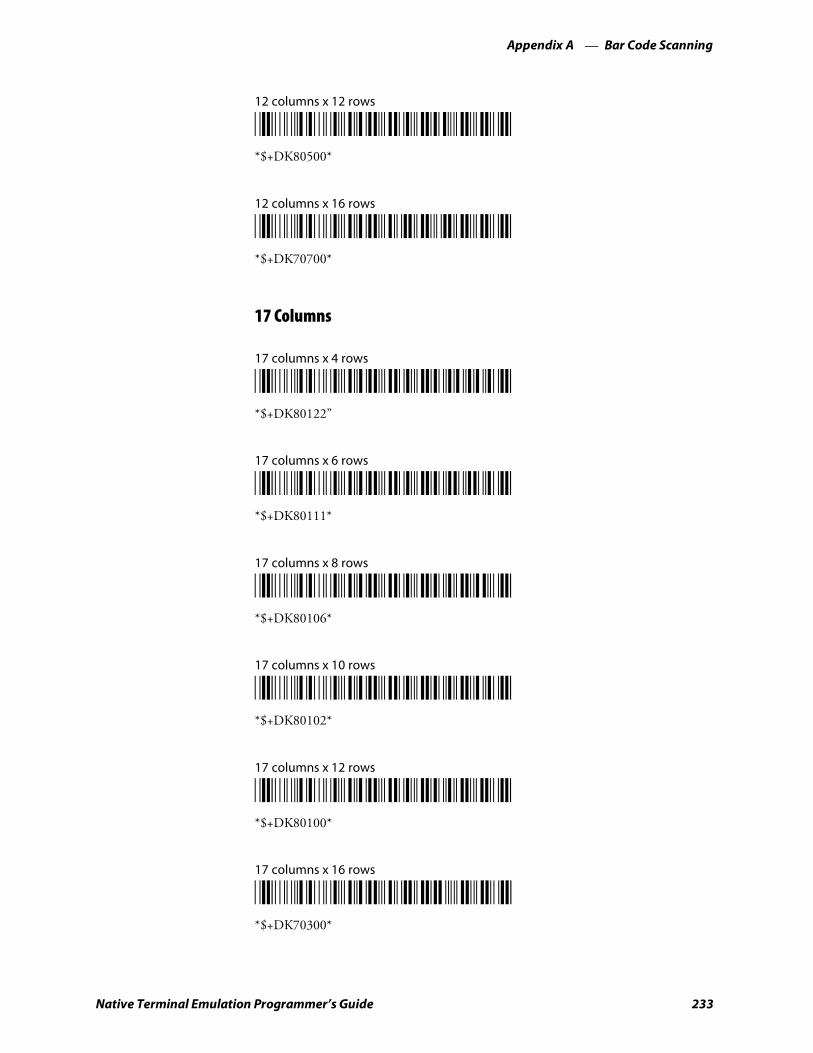
Bar Code ScanningAppendix —A
233Native Terminal Emulation Programmer’s Guide
12 columns x 12 rows
*/D/KDK80500**$+DK80500*
12 columns x 16 rows
*/D/KDK70700**$+DK70700*
17 Columns
17 columns x 4 rows
*/D/KDK80122**$+DK80122”
17 columns x 6 rows
*/D/KDK80111**$+DK80111*
17 columns x 8 rows
*/D/KDK80106**$+DK80106*
17 columns x 10 rows
*/D/KDK80102**$+DK80102*
17 columns x 12 rows
*/D/KDK80100**$+DK80100*
17 columns x 16 rows
*/D/KDK70300**$+DK70300*
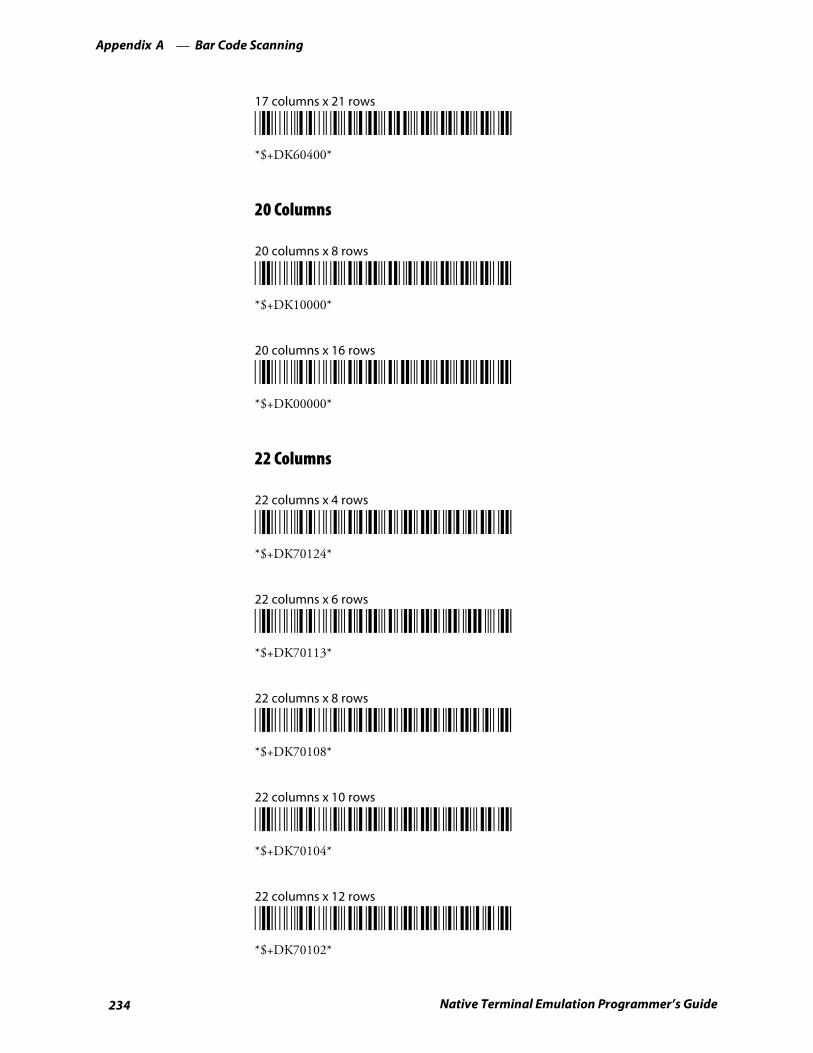
Bar Code ScanningAppendix —A
234 Native Terminal Emulation Programmer’s Guide
17 columns x 21 rows
*/D/KDK60400**$+DK60400*
20 Columns
20 columns x 8 rows
*/D/KDK10000**$+DK10000*
20 columns x 16 rows
*/D/KDK00000**$+DK00000*
22 Columns
22 columns x 4 rows
*/D/KDK70124**$+DK70124*
22 columns x 6 rows
*/D/KDK70113**$+DK70113*
22 columns x 8 rows
*/D/KDK70108**$+DK70108*
22 columns x 10 rows
*/D/KDK70104**$+DK70104*
22 columns x 12 rows
*/D/KDK70102**$+DK70102*

Bar Code ScanningAppendix —A
235Native Terminal Emulation Programmer’s Guide
22 columns x 16 rows
*/D/KDK70100**$+DK70100*
22 columns x 21 rows
*/D/KDK60200**$+DK60200*
26 Columns
26 columns x 4 rows
*/D/KDK70024**$+DK70024*
26 columns x 6 rows
*/D/KDK70013**$+DK70013*
26 columns x 8 rows
*/D/KDK70008**$+DK70008*
26 columns x 10 rows
*/D/KDK70004**$+DK70004*
26 columns x 12 rows
*/D/KDK70002**$+DK70002*
26 columns x 16 rows
*/D/KDK70000**$+DK70000*
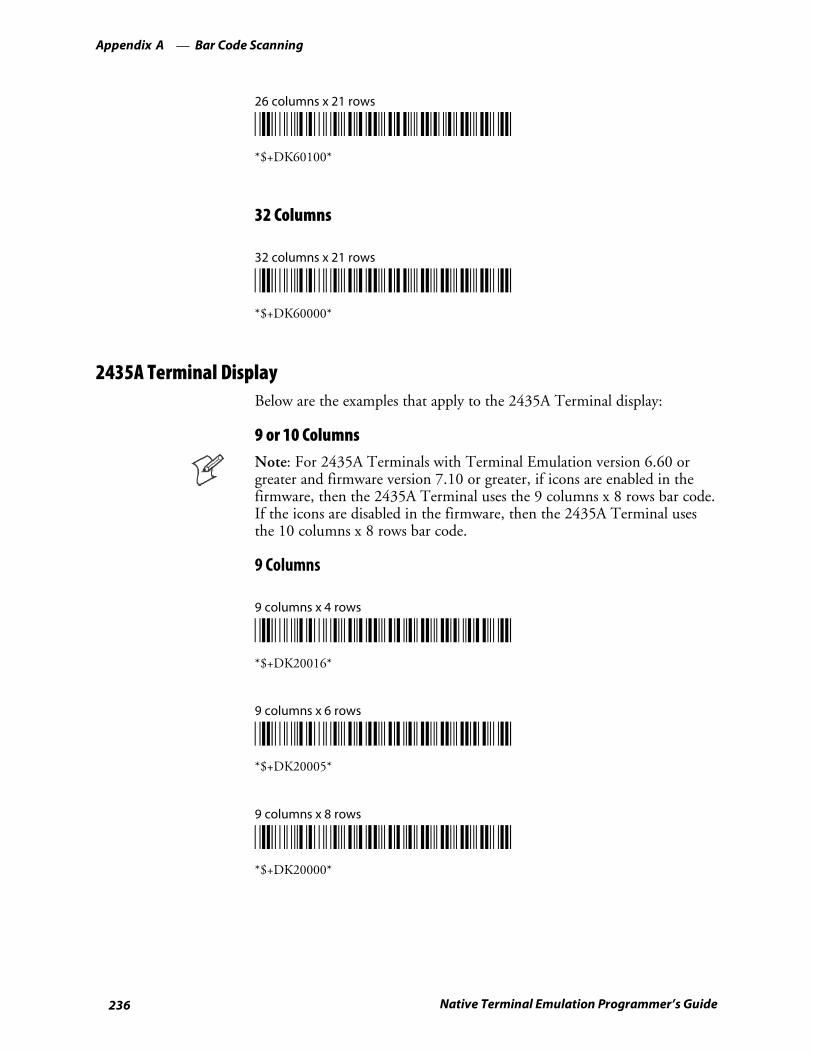
Bar Code ScanningAppendix —A
236 Native Terminal Emulation Programmer’s Guide
26 columns x 21 rows
*/D/KDK60100**$+DK60100*
32 Columns
32 columns x 21 rows
*/D/KDK60000**$+DK60000*
2435A Terminal DisplayBelow are the examples that apply to the 2435A Terminal display:
9 or 10 ColumnsNote: For 2435A Terminals with Terminal Emulation version 6.60 orgreater and firmware version 7.10 or greater, if icons are enabled in thefirmware, then the 2435A Terminal uses the 9 columns x 8 rows bar code.If the icons are disabled in the firmware, then the 2435A Terminal usesthe 10 columns x 8 rows bar code.
9 Columns
9 columns x 4 rows
*/D/KDK20016**$+DK20016*
9 columns x 6 rows
*/D/KDK20005**$+DK20005*
9 columns x 8 rows
*/D/KDK20000**$+DK20000*

Bar Code ScanningAppendix —A
237Native Terminal Emulation Programmer’s Guide
10 Columns
10 columns x 4 rows
*/D/KDK20016**$+DK20016*
10 columns x 6 rows
*/D/KDK20005**$+DK20005*
10 columns x 8 rows
*/D/KDK20000**$+DK20000*
12 Columns
12 columns x 4 rows
*/D/KDK90116**$+DK90116*
12 columns x 6 rows
*/D/KDK90105**$+DK90105*
12 columns x 8 rows
*/D/KDK90100**$+DK90100*
12 columns x 10 rows
*/D/KDK80502**$+DK80502*

Bar Code ScanningAppendix —A
238 Native Terminal Emulation Programmer’s Guide
12 columns x 12 rows
*/D/KDK80500**$+DK80500*
12 columns x 16 rows
*/D/KDK70700**$+DK70700*
17 Columns
17 columns x 4 rows
*/D/KDK80122**$+DK80122*
17 columns x 6 rows
*/D/KDK80111**$+DK80111*
17 columns x 8 rows
*/D/KDK80106**$+DK80106*
17 columns x 10 rows
*/D/KDK80102**$+DK80102*
17 columns x 12 rows
*/D/KDK80100**$+DK80100*
17 columns x 16 rows
*/D/KDK70300**$+DK70300*
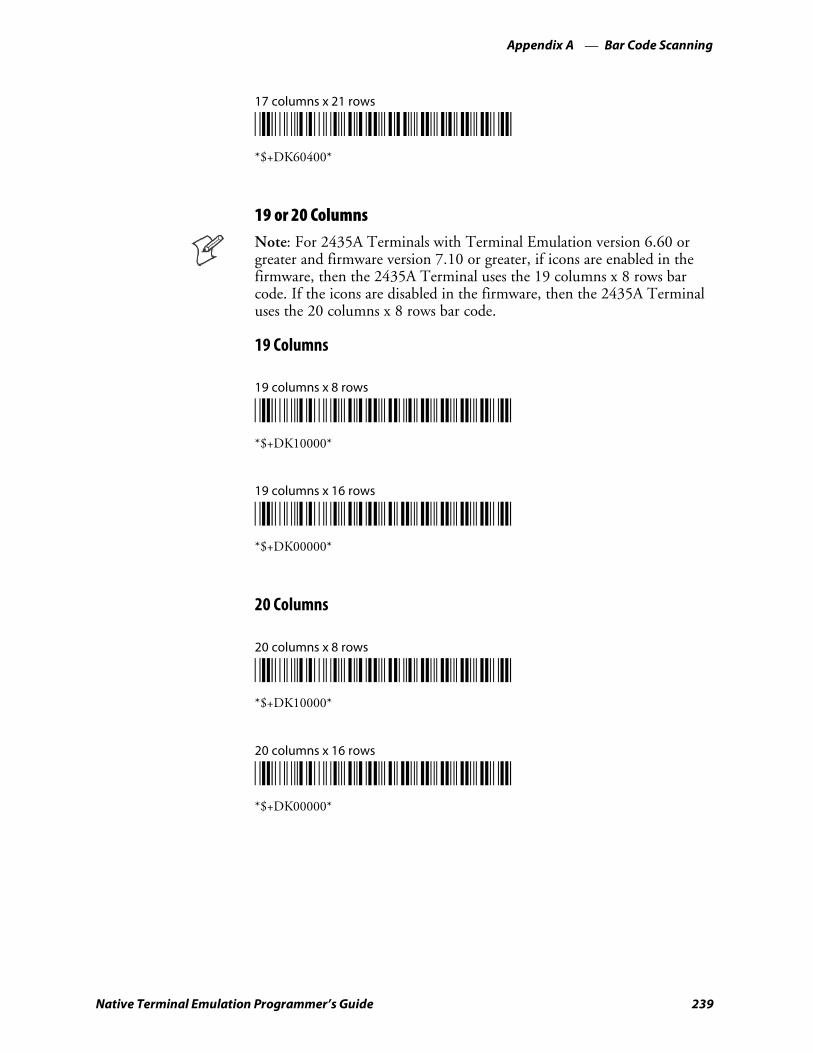
Bar Code ScanningAppendix —A
239Native Terminal Emulation Programmer’s Guide
17 columns x 21 rows
*/D/KDK60400**$+DK60400*
19 or 20 ColumnsNote: For 2435A Terminals with Terminal Emulation version 6.60 orgreater and firmware version 7.10 or greater, if icons are enabled in thefirmware, then the 2435A Terminal uses the 19 columns x 8 rows barcode. If the icons are disabled in the firmware, then the 2435A Terminaluses the 20 columns x 8 rows bar code.
19 Columns
19 columns x 8 rows
*/D/KDK10000**$+DK10000*
19 columns x 16 rows
*/D/KDK00000**$+DK00000*
20 Columns
20 columns x 8 rows
*/D/KDK10000**$+DK10000*
20 columns x 16 rows
*/D/KDK00000**$+DK00000*
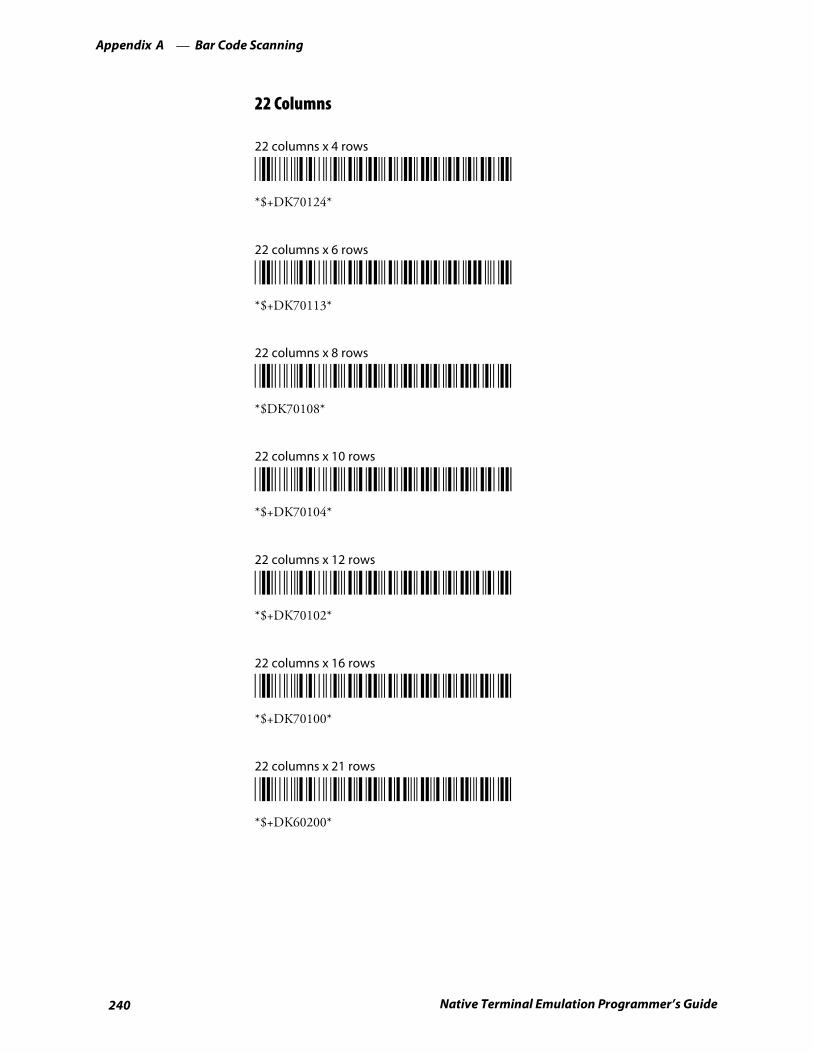
Bar Code ScanningAppendix —A
240 Native Terminal Emulation Programmer’s Guide
22 Columns
22 columns x 4 rows
*/D/KDK70124**$+DK70124*
22 columns x 6 rows
*/D/KDK70113**$+DK70113*
22 columns x 8 rows
*/D/KDK70108**$DK70108*
22 columns x 10 rows
*/D/KDK70104**$+DK70104*
22 columns x 12 rows
*/D/KDK70102**$+DK70102*
22 columns x 16 rows
*/D/KDK70100**$+DK70100*
22 columns x 21 rows
*/D/KDK60200**$+DK60200*
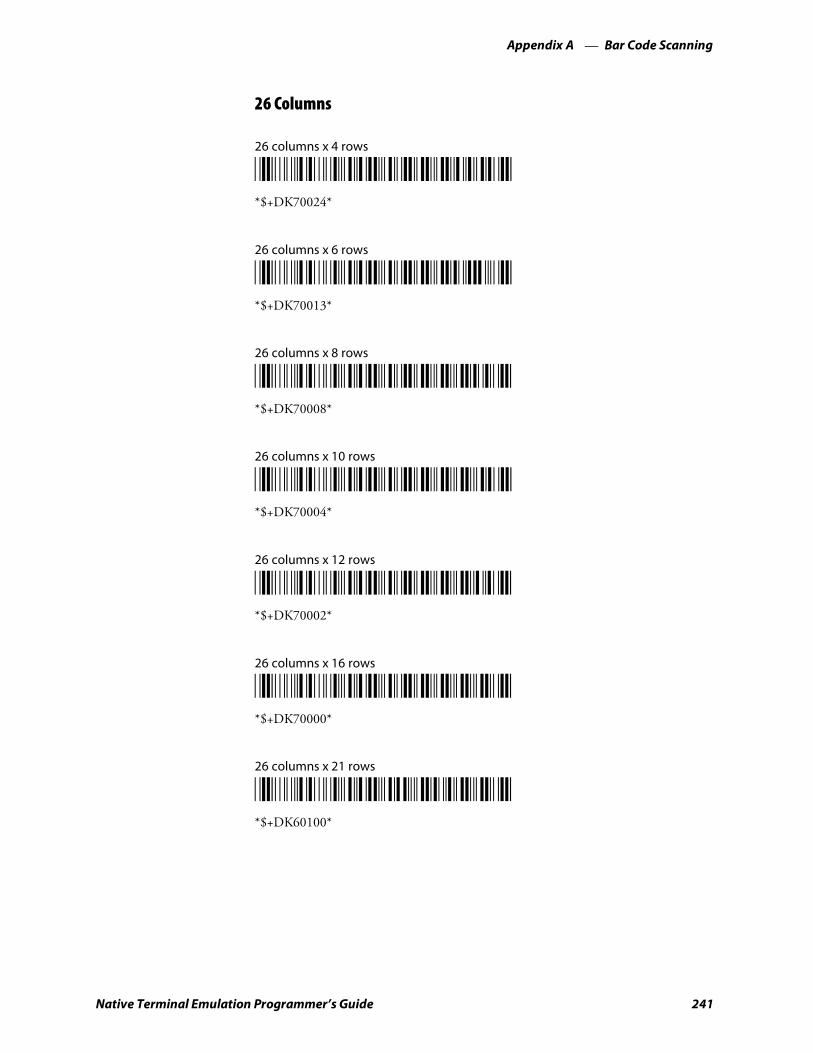
Bar Code ScanningAppendix —A
241Native Terminal Emulation Programmer’s Guide
26 Columns
26 columns x 4 rows
*/D/KDK70024**$+DK70024*
26 columns x 6 rows
*/D/KDK70013**$+DK70013*
26 columns x 8 rows
*/D/KDK70008**$+DK70008*
26 columns x 10 rows
*/D/KDK70004**$+DK70004*
26 columns x 12 rows
*/D/KDK70002**$+DK70002*
26 columns x 16 rows
*/D/KDK70000**$+DK70000*
26 columns x 21 rows
*/D/KDK60100**$+DK60100*
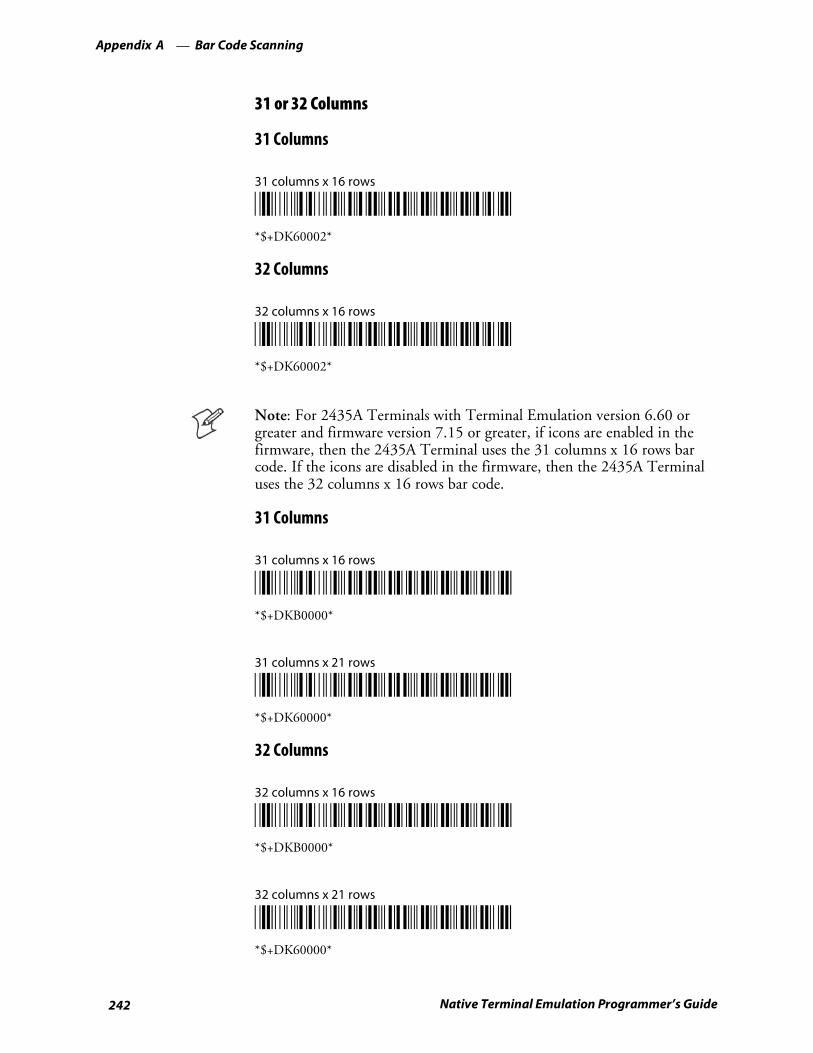
Bar Code ScanningAppendix —A
242 Native Terminal Emulation Programmer’s Guide
31 or 32 Columns
31 Columns
31 columns x 16 rows
*/D/KDK60002**$+DK60002*
32 Columns
32 columns x 16 rows
*/D/KDK60002**$+DK60002*
Note: For 2435A Terminals with Terminal Emulation version 6.60 orgreater and firmware version 7.15 or greater, if icons are enabled in thefirmware, then the 2435A Terminal uses the 31 columns x 16 rows barcode. If the icons are disabled in the firmware, then the 2435A Terminaluses the 32 columns x 16 rows bar code.
31 Columns
31 columns x 16 rows
*/D/KDKB0000**$+DKB0000*
31 columns x 21 rows
*/D/KDK60000**$+DK60000*
32 Columns
32 columns x 16 rows
*/D/KDKB0000**$+DKB0000*
32 columns x 21 rows
*/D/KDK60000**$+DK60000*
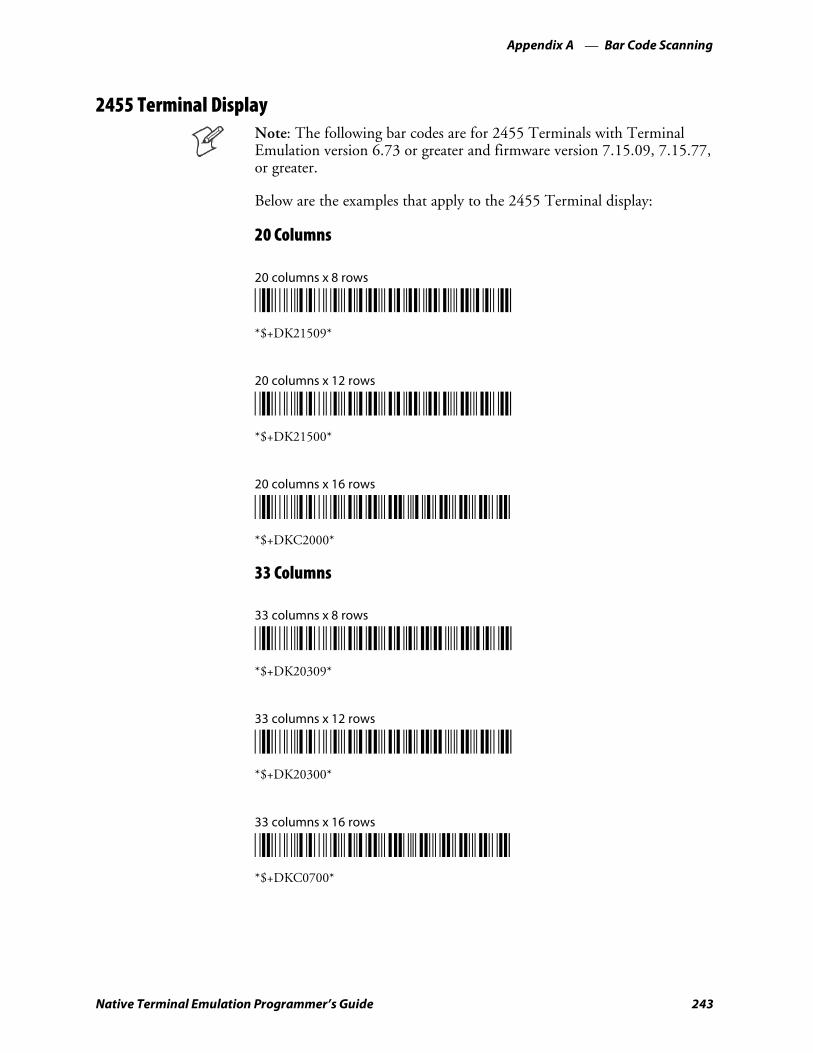
Bar Code ScanningAppendix —A
243Native Terminal Emulation Programmer’s Guide
2455 Terminal DisplayNote: The following bar codes are for 2455 Terminals with TerminalEmulation version 6.73 or greater and firmware version 7.15.09, 7.15.77,or greater.
Below are the examples that apply to the 2455 Terminal display:
20 Columns
20 columns x 8 rows
*/D/KDK21509**$+DK21509*
20 columns x 12 rows
*/D/KDK21500**$+DK21500*
20 columns x 16 rows
*/D/KDKC2000**$+DKC2000*
33 Columns
33 columns x 8 rows
*/D/KDK20309**$+DK20309*
33 columns x 12 rows
*/D/KDK20300**$+DK20300*
33 columns x 16 rows
*/D/KDKC0700**$+DKC0700*
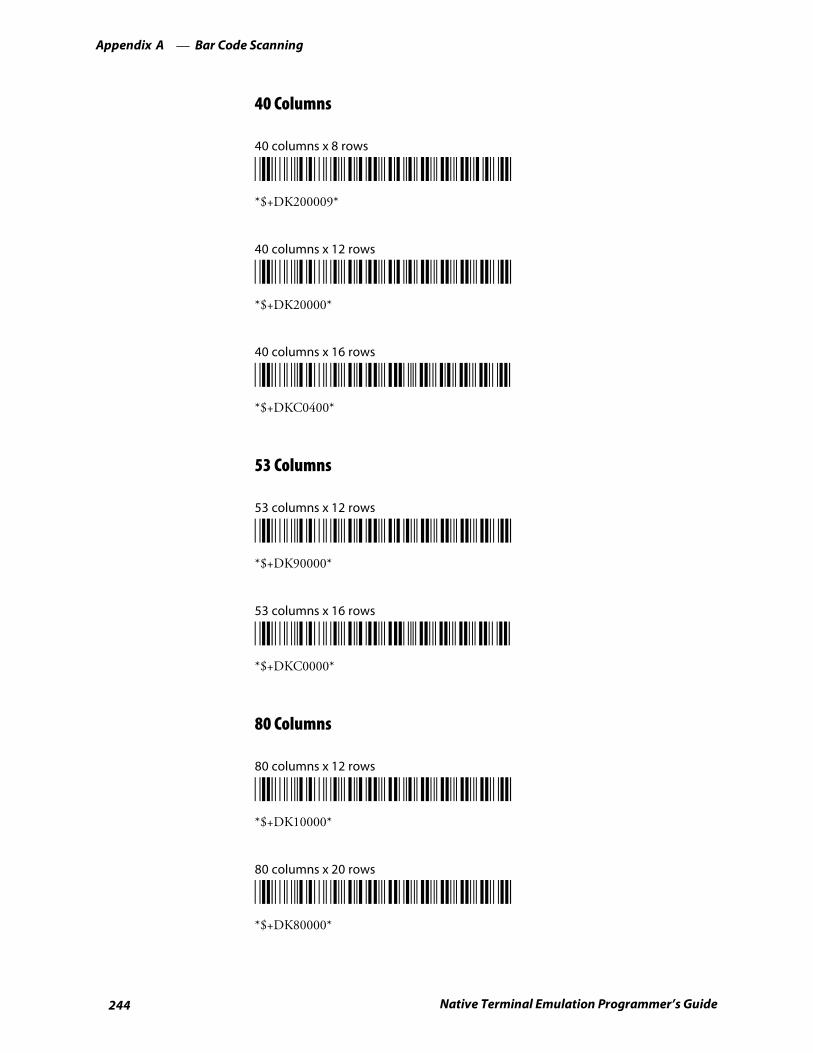
Bar Code ScanningAppendix —A
244 Native Terminal Emulation Programmer’s Guide
40 Columns
40 columns x 8 rows
*/D/KDK20009**$+DK200009*
40 columns x 12 rows
*/D/KDK20000**$+DK20000*
40 columns x 16 rows
*/D/KDKC0400**$+DKC0400*
53 Columns
53 columns x 12 rows
*/D/KDK90000**$+DK90000*
53 columns x 16 rows
*/D/KDKC0000**$+DKC0000*
80 Columns
80 columns x 12 rows
*/D/KDK10000**$+DK10000*
80 columns x 20 rows
*/D/KDK80000**$+DK80000*
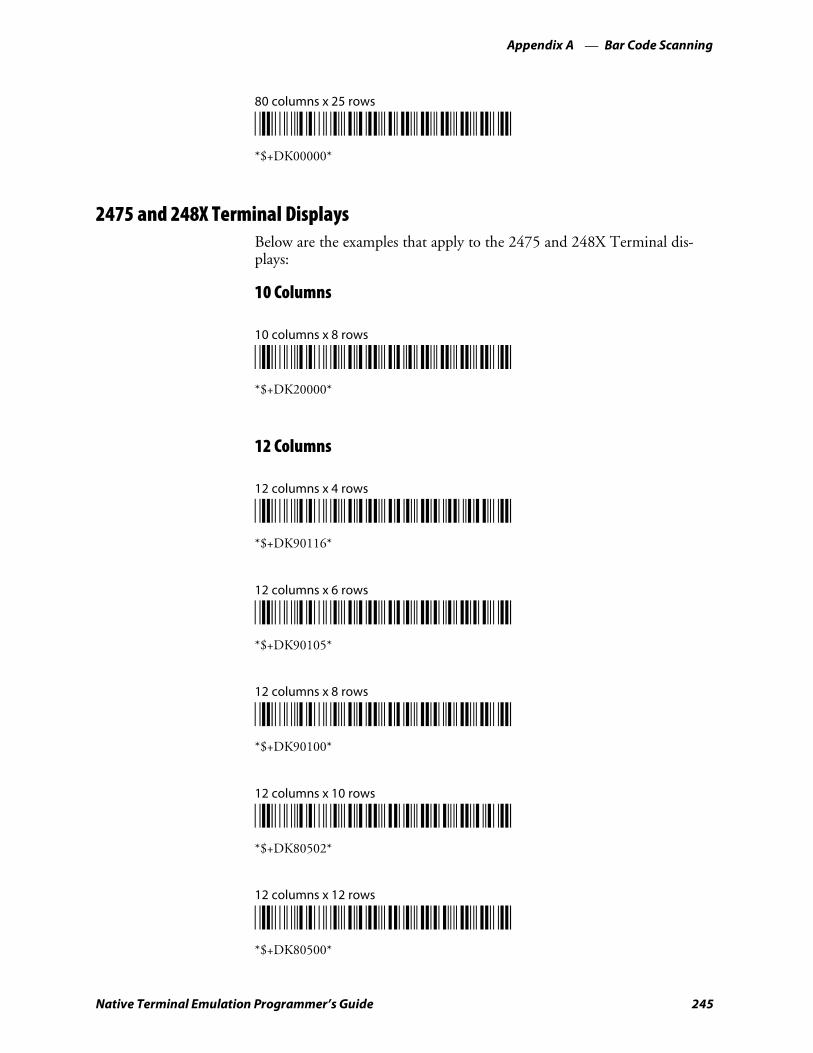
Bar Code ScanningAppendix —A
245Native Terminal Emulation Programmer’s Guide
80 columns x 25 rows
*/D/KDK00000**$+DK00000*
2475 and 248X Terminal DisplaysBelow are the examples that apply to the 2475 and 248X Terminal dis-plays:
10 Columns
10 columns x 8 rows
*/D/KDK20000**$+DK20000*
12 Columns
12 columns x 4 rows
*/D/KDK90116**$+DK90116*
12 columns x 6 rows
*/D/KDK90105**$+DK90105*
12 columns x 8 rows
*/D/KDK90100**$+DK90100*
12 columns x 10 rows
*/D/KDK80502**$+DK80502*
12 columns x 12 rows
*/D/KDK80500**$+DK80500*
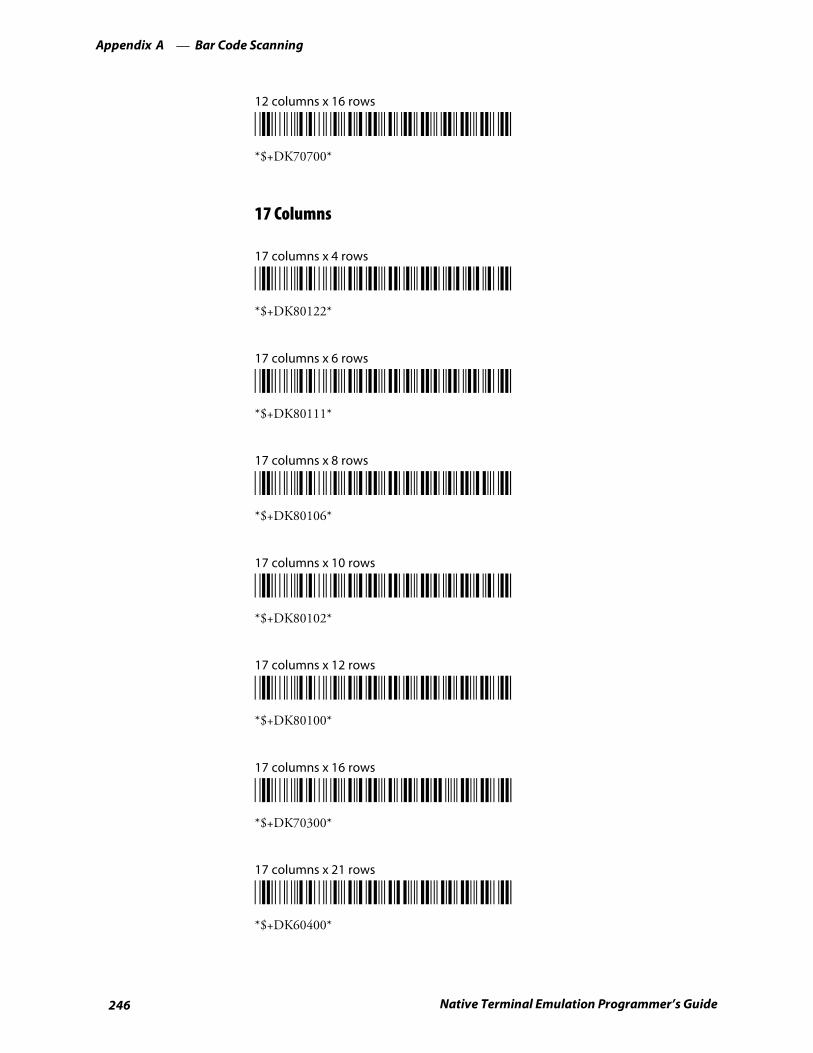
Bar Code ScanningAppendix —A
246 Native Terminal Emulation Programmer’s Guide
12 columns x 16 rows
*/D/KDK70700**$+DK70700*
17 Columns
17 columns x 4 rows
*/D/KDK80122**$+DK80122*
17 columns x 6 rows
*/D/KDK80111**$+DK80111*
17 columns x 8 rows
*/D/KDK80106**$+DK80106*
17 columns x 10 rows
*/D/KDK80102**$+DK80102*
17 columns x 12 rows
*/D/KDK80100**$+DK80100*
17 columns x 16 rows
*/D/KDK70300**$+DK70300*
17 columns x 21 rows
*/D/KDK60400**$+DK60400*
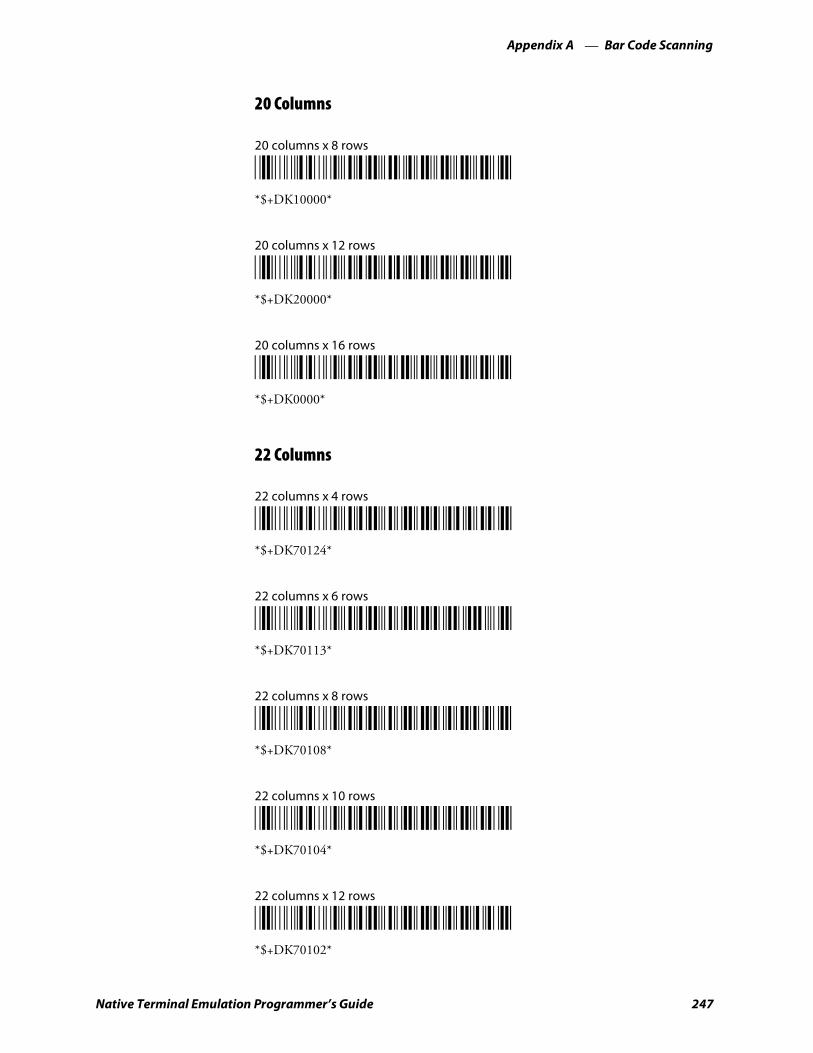
Bar Code ScanningAppendix —A
247Native Terminal Emulation Programmer’s Guide
20 Columns
20 columns x 8 rows
*/D/KDK10000**$+DK10000*
20 columns x 12 rows
*/D/KDK20000**$+DK20000*
20 columns x 16 rows
*/D/KDK00000**$+DK0000*
22 Columns
22 columns x 4 rows
*/D/KDK70124**$+DK70124*
22 columns x 6 rows
*/D/KDK70113**$+DK70113*
22 columns x 8 rows
*/D/KDK70108**$+DK70108*
22 columns x 10 rows
*/D/KDK70104**$+DK70104*
22 columns x 12 rows
*/D/KDK70102**$+DK70102*
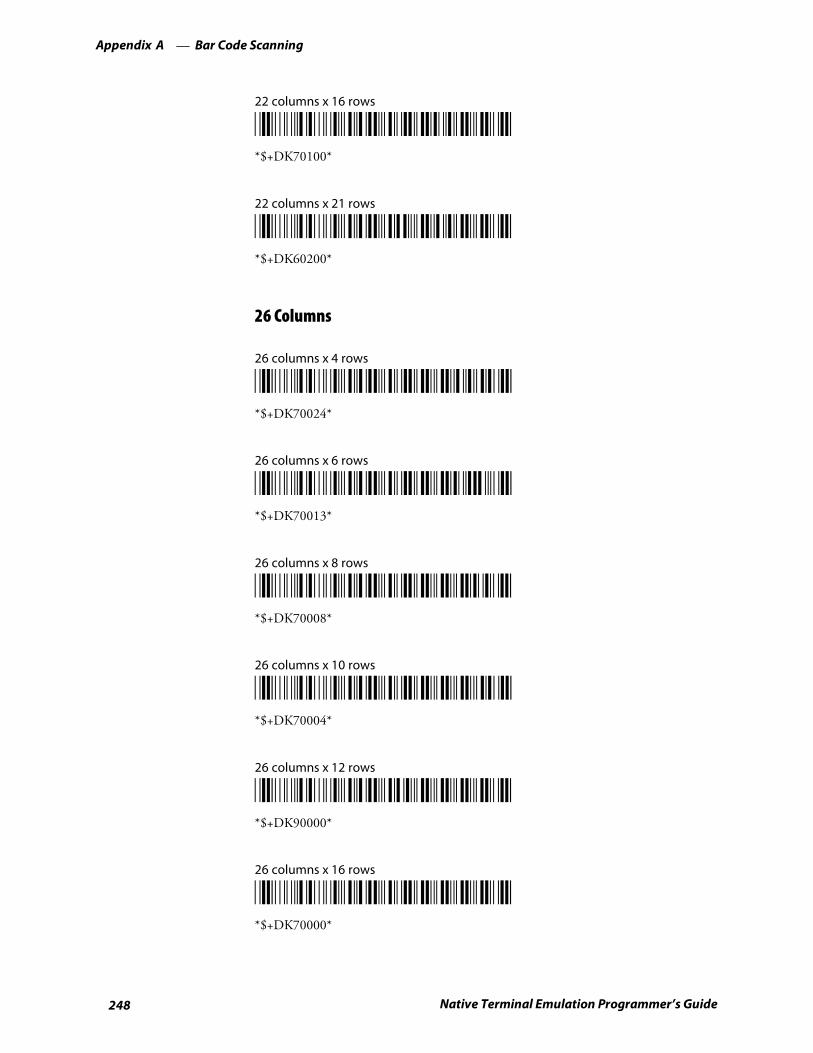
Bar Code ScanningAppendix —A
248 Native Terminal Emulation Programmer’s Guide
22 columns x 16 rows
*/D/KDK70100**$+DK70100*
22 columns x 21 rows
*/D/KDK60200**$+DK60200*
26 Columns
26 columns x 4 rows
*/D/KDK70024**$+DK70024*
26 columns x 6 rows
*/D/KDK70013**$+DK70013*
26 columns x 8 rows
*/D/KDK70008**$+DK70008*
26 columns x 10 rows
*/D/KDK70004**$+DK70004*
26 columns x 12 rows
*/D/KDK90000**$+DK90000*
26 columns x 16 rows
*/D/KDK70000**$+DK70000*
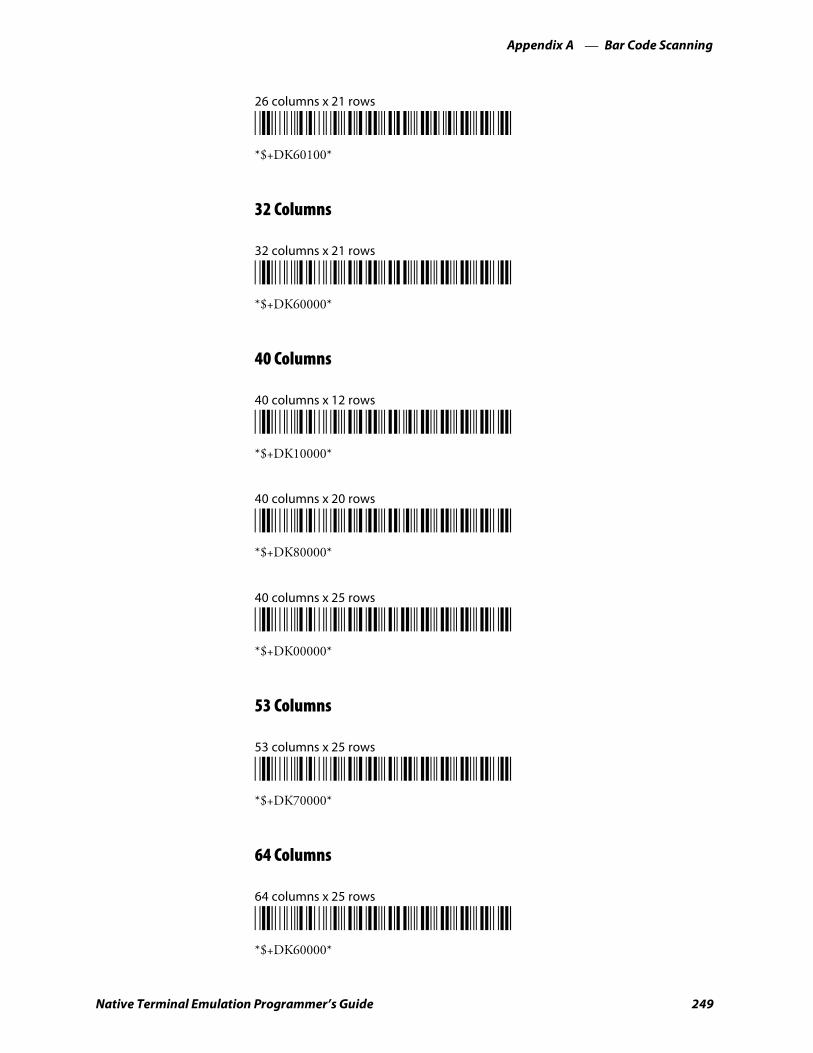
Bar Code ScanningAppendix —A
249Native Terminal Emulation Programmer’s Guide
26 columns x 21 rows
*/D/KDK60100**$+DK60100*
32 Columns
32 columns x 21 rows
*/D/KDK60000**$+DK60000*
40 Columns
40 columns x 12 rows
*/D/KDK10000**$+DK10000*
40 columns x 20 rows
*/D/KDK80000**$+DK80000*
40 columns x 25 rows
*/D/KDK00000**$+DK00000*
53 Columns
53 columns x 25 rows
*/D/KDK70000**$+DK70000*
64 Columns
64 columns x 25 rows
*/D/KDK60000**$+DK60000*

Bar Code ScanningAppendix —A
250 Native Terminal Emulation Programmer’s Guide
Cursor KeysWindow/Viewport up (up one line)
*/EUP**%UP*
Window/Viewport down (down one line)
*/EDN**%DN*
Window/Viewport right (right one character)
*/ERT**%RT*
Window/Viewport left (left one character)
*/ELF**%LF*
Tab KeysBack Tab
*/EBTAB**%BTAB*
Forward Tab
*%TAB*
AID-Generating KeysClear
*/ECLR**%CLR*
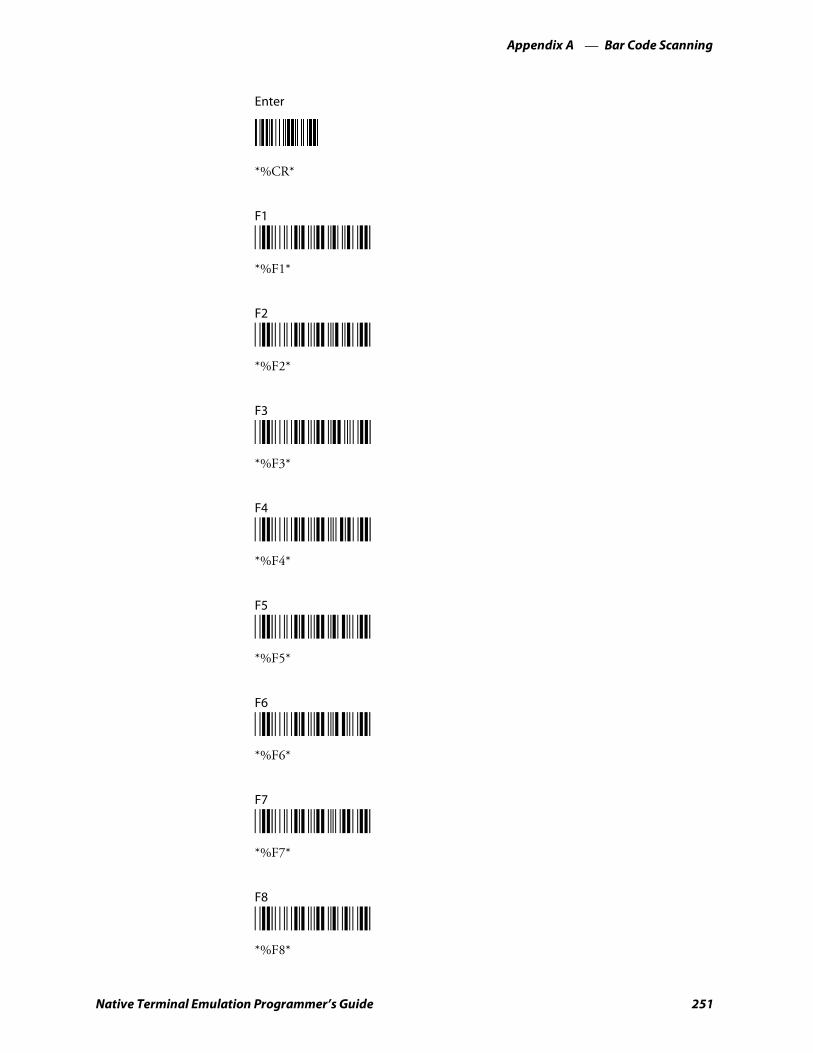
Bar Code ScanningAppendix —A
251Native Terminal Emulation Programmer’s Guide
Enter
*%CR*
F1
*/EF1**%F1*
F2
*/EF2**%F2*
F3
*/EF3**%F3*
F4
*/EF4**%F4*
F5
*/EF5**%F5*
F6
*/EF6**%F6*
F7
*/EF7**%F7*
F8
*/EF8**%F8*

Bar Code ScanningAppendix —A
252 Native Terminal Emulation Programmer’s Guide
F9
*/EF9**%F9*
F10
*/EF10**%F10*
F11
*/EF11**%F11*
F12
*/EF12**%F12*
F13
*/EF13**%F13*
F14
*/EF14**%F14*
F15
*/EF15**%F15*
F16
*/EF16**%F16*
F17
*/EF17**%F17*
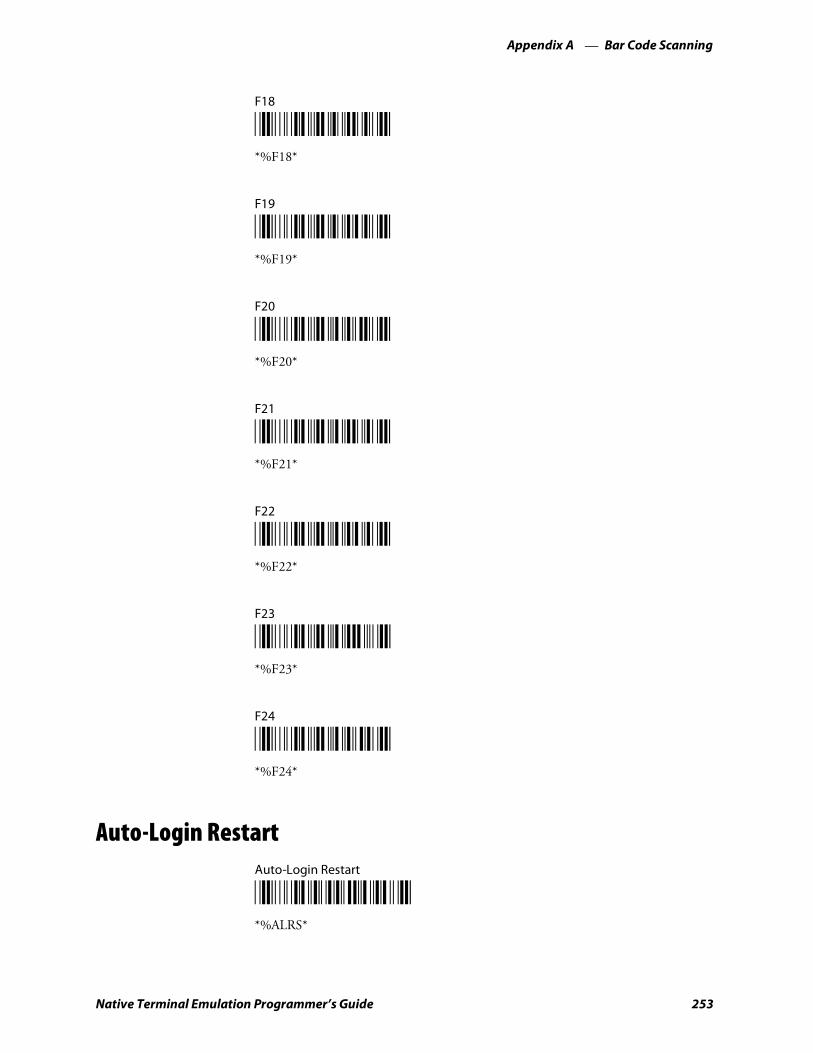
Bar Code ScanningAppendix —A
253Native Terminal Emulation Programmer’s Guide
F18
*/EF18**%F18*
F19
*/EF19**%F19*
F20
*/EF20**%F20*
F21
*/EF21**%F21*
F22
*/EF22**%F22*
F23
*/EF23**%F23*
F24
*/EF24**%F24*
Auto-Login RestartAuto-Login Restart
*/EALRS**%ALRS*

Bar Code ScanningAppendix —A
254 Native Terminal Emulation Programmer’s Guide
Native Additional FunctionsTE configuration menus
*/ETECFG**%TECFG*
Encoded Code 39The following table lists escape characters and key press sequences for En-coded Code 39. The “(t)” in the table indicates a terminating key. Any barcode data following this key code is ignored. The “t” sequences, therefore,should be located only at the end of the bar code. If you attempt to use aninvalid sequence (termed “reserved” in the table) the terminal beeps andthe data stream is flushed.
Key Press Sequences for Encoded Code 39Sequence Key Sequence Key
$A Reserved +A a
$B Del +B b
$C Forward Tab +C c
$D Forward Tab +D d
$E Back Tab +E e
$F Reserved +F f
$G Reserved +G g
$H Backspace +H h
$I Reserved +I i
$J Reserved +J j
$K Insert +K k
$L Home +L l
$M Enter (t) +M m
$N End of Field +N n
$O Clear +O o
$P Reserved +P p
$Q PF1 (t) +Q q
$R PF2 (t) +R r
$S PF3 (t) +S s
$T PF4 (t) +T t
$U PF5 (t) +U u
$V PF6 (t) +V v
$W PF7 (t) +W w
$X PF8 (t) +X x
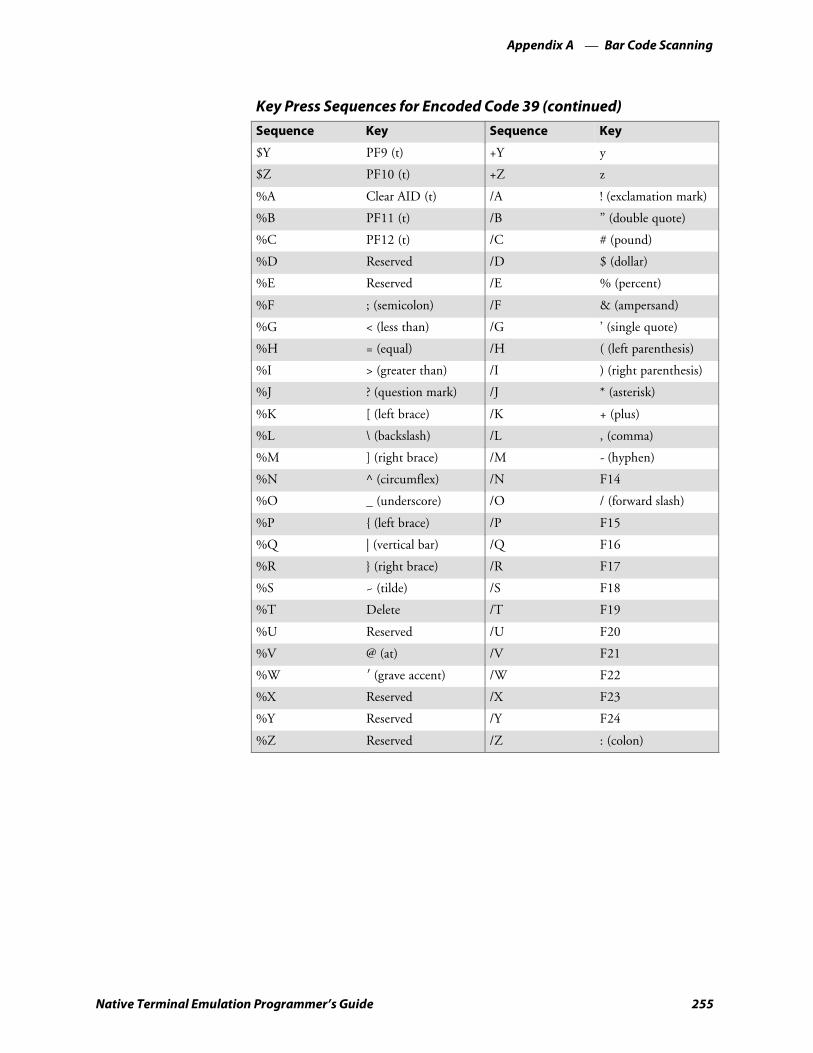
Bar Code ScanningAppendix —A
255Native Terminal Emulation Programmer’s Guide
Key Press Sequences for Encoded Code 39 (continued)
KeySequenceKeySequence
$Y PF9 (t) +Y y
$Z PF10 (t) +Z z
%A Clear AID (t) /A ! (exclamation mark)
%B PF11 (t) /B ” (double quote)
%C PF12 (t) /C # (pound)
%D Reserved /D $ (dollar)
%E Reserved /E % (percent)
%F ; (semicolon) /F & (ampersand)
%G < (less than) /G ’ (single quote)
%H = (equal) /H ( (left parenthesis)
%I > (greater than) /I ) (right parenthesis)
%J ? (question mark) /J * (asterisk)
%K [ (left brace) /K + (plus)
%L \ (backslash) /L , (comma)
%M ] (right brace) /M - (hyphen)
%N ^ (circumflex) /N F14
%O _ (underscore) /O / (forward slash)
%P (left brace) /P F15
%Q | (vertical bar) /Q F16
%R (right brace) /R F17
%S ~ (tilde) /S F18
%T Delete /T F19
%U Reserved /U F20
%V @ (at) /V F21
%W i (grave accent) /W F22
%X Reserved /X F23
%Y Reserved /Y F24
%Z Reserved /Z : (colon)
Bar Code ScanningAppendix —A
256 Native Terminal Emulation Programmer’s Guide
Terminating KeysTerminating keys are the nonprintable ASCII sequences and action keys.When the terminal encounters them in a bar code, an action is taken, andthe terminal sends the data in the buffer to the host computer. Terminat-ing keys should appear only at the end of the bar code. If they are locatedin the middle of a bar code, they are executed normally, but the data fol-lowing them in the bar code is ignored. Terminating keys cause a termi-nal-to-base station transmission. The terminal ignores data in the bar codebuffer following these keys once a transmission takes place.
For example, the terminal interprets the following sequence:123$V456
as123F6
The terminal will not send “456” to the host computer, because it followsterminating key F6.
ASCII sequences can be used any time before a terminating key. For ex-ample, the terminal interprets
+H+E+L+L+O$M
ashello<Enter>
Escape CharactersThe four escape characters in the previous table yield a 3270 data streamkey press equivalent when followed by another character. The escape char-acters are: $ (dollar sign)
% (percent)+ (plus)/ (forward slash)
For example:
S If a bar code contains the sequence “%U” somewhere within it, the ter-minal converts this sequence to an [ENTER] key and processes it assoon as encountered in the scanning buffer.
S “+B” is converted to the lower case “b.”
S “%B” is converted to an F11 key press.
If you want the Encoded Code 39 option but the bar codes to be scannedalready contain the “$,” “%,” “+,” or “/,” character, then each place wherethese characters occur must be expanded to a special “/” sequence:
S Every bar code where the “$” is maintained must be expanded to a “/D”sequence.
S Percent signs (%) must be expanded to “/E”.
S Forward slashes (/) must be expanded to the letter “/O”.
S Plus signs (+) must be expanded to “/K”.
Bar Code ScanningAppendix —A
257Native Terminal Emulation Programmer’s Guide
Overriding Auto Tab Scan and Auto Enter ScanWhen the terminal is in Auto Entr Scan or Auto Tab Scan mode, eightEncoded Code 39 functions will override these modes when they are scan-ned. They are:
S Forward Tab
S Back Tab
S Home
S Clear
S End of Field
S Backspace
S Insert
S Delete
These codes are all of the screen editing type, where an automatic [Enter]would not be desired. The encoded operations listed will never allow anAuto Entr Scan to occur. For example, suppose Auto Entr Scan was en-abled (through the TE configuration menus) and a “$C” (Forward Tab) isscanned. The terminal will forward tab to the next field but not cause an[Enter] operation, even though the Auto Entr Scan feature was enabled.The encoded forward tab overrides the Auto Entr Scan mode in this case.However, if a “+D” (d) is scanned, the terminal places a “d” at the currentcursor location. The Auto Entr Scan mode then causes an [Enter] to beexecuted.

Bar Code ScanningAppendix —A
258 Native Terminal Emulation Programmer’s Guide
259Native Terminal Emulation Programmer’s Guide
Bar Code SymbologiesB
This appendix contains a brief explanation of each bar code symbologythat the Native Terminal Emulation application decodes. It explains someof the general characteristics and uses of these bar code types.
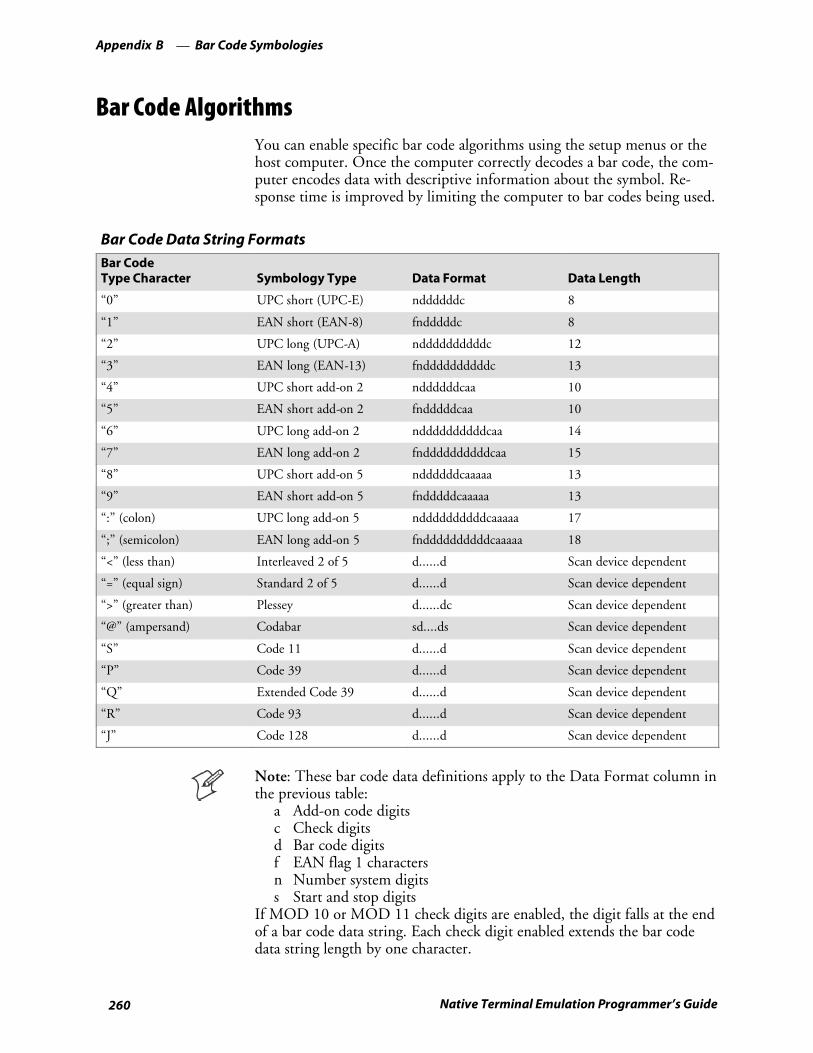
Bar Code SymbologiesAppendix —B
260 Native Terminal Emulation Programmer’s Guide
Bar Code AlgorithmsYou can enable specific bar code algorithms using the setup menus or thehost computer. Once the computer correctly decodes a bar code, the com-puter encodes data with descriptive information about the symbol. Re-sponse time is improved by limiting the computer to bar codes being used.
Bar Code Data String FormatsBar CodeType Character Symbology Type Data Format Data Length
“0” UPC short (UPC-E) nddddddc 8
“1” EAN short (EAN-8) fndddddc 8
“2” UPC long (UPC-A) nddddddddddc 12
“3” EAN long (EAN-13) fnddddddddddc 13
“4” UPC short add-on 2 nddddddcaa 10
“5” EAN short add-on 2 fndddddcaa 10
“6” UPC long add-on 2 nddddddddddcaa 14
“7” EAN long add-on 2 fnddddddddddcaa 15
“8” UPC short add-on 5 nddddddcaaaaa 13
“9” EAN short add-on 5 fndddddcaaaaa 13
“:” (colon) UPC long add-on 5 nddddddddddcaaaaa 17
“;” (semicolon) EAN long add-on 5 fnddddddddddcaaaaa 18
“<” (less than) Interleaved 2 of 5 d......d Scan device dependent
“=” (equal sign) Standard 2 of 5 d......d Scan device dependent
“>” (greater than) Plessey d......dc Scan device dependent
“@” (ampersand) Codabar sd....ds Scan device dependent
“S” Code 11 d......d Scan device dependent
“P” Code 39 d......d Scan device dependent
“Q” Extended Code 39 d......d Scan device dependent
“R” Code 93 d......d Scan device dependent
“J” Code 128 d......d Scan device dependent
Note: These bar code data definitions apply to the Data Format column inthe previous table:
a Add-on code digitsc Check digitsd Bar code digitsf EAN flag 1 charactersn Number system digitss Start and stop digits
If MOD 10 or MOD 11 check digits are enabled, the digit falls at the endof a bar code data string. Each check digit enabled extends the bar codedata string length by one character.
Bar Code SymbologiesAppendix —B
261Native Terminal Emulation Programmer’s Guide
The Native Terminal Emulation application recognizes eleven of the mostwidely used bar code symbologies. With bar code symbologies, like lan-guages, there are many different types. A bar code symbology provides therequired flexibility for a particular inventory tracking system.
A symbology may be for particular industries, such as food and beverage,automotive, railroad, or aircraft. Some of these industries have establishedtheir own bar code symbology because other symbologies did not meettheir needs.
Without going into great detail on the bar code structure, note that no twoproducts use the same bar code. Each product gets a unique bar code.
Industries that use a particular type of bar code symbology have formedregulating committees or are members of national institutes that issue andkeep track of bar codes. This ensures that each organization that contrib-utes to a particular industry conforms to its standard. Without some formof governing body, bar coding would not work.
S UPC (Universal Product Code) with/without add-ons
S EAN (European Article Numbering Code) with/without add-ons
S Codabar
S C11 (Code 11)
S C39 (Code 39)
S C93 (Code 93)
S C128 (Code 128)
S I 2 of 5 (Interleaved 2 of 5 Code)
S S 2 of 5 (Standard 2 of 5)
S Plessey
S MSI (a variant of Plessey)
UPCThe UPC (Universal Product Code) is the symbology used throughout thegrocery and retail industries. This bar code symbology contains two piecesof numerical information encoded on the bar code, producer identifica-tion, and product identification information.
The UPC symbol is 12 characters long. The first character of the UPCsymbol is a number system character, such as “0” for grocery items and “3”for drug- and health-related items.
The UPC symbology is for retail environments such as grocery stores, con-venience stores, and general merchandise stores.
Some retail items are so small that a standard UPC bar code cannot fit onthe packaging. When this occurs there is a permitted shorter version of theUPC symbology, referred to as UPC-E. UPC-E is six characters long(eight including number system and check digit), approximately half thesize of a standard UPC bar code.
Bar Code SymbologiesAppendix —B
262 Native Terminal Emulation Programmer’s Guide
EANEAN (European Article Numbering) symbology is similar to UPC symbol-ogy, except that it contains 13 characters and uses the first two to identifycountries.
The EAN symbology is used throughout most of Europe in the retail envi-ronment. Although similar to UPC symbology, the two are not interchan-geable.
CodabarCodabar was for retail price-labeling systems. Today it is widely acceptedby libraries, medical industries, and photo finishing services.
Codabar is a discrete, self-checking code with each character representedby a stand-alone group of four bars and three intervening spaces.
Four different start or stop characters get defined and designated “a”, “b”,“c”, and “d”. These start and stop characters are constructed using onewide bar and two wide spaces. A complete Codabar symbol begins withone of the start or stop characters followed by some number of data char-acters and ending in one of the start or stop characters.
Any of the start or stop characters may be used on either end of the sym-bol. It is possible to use the 16 unique start or stop combinations to identi-fy label type or other information.
Since Codabar is variable-length, discrete, and self-checking, it is a versa-tile symbology. The width of space between characters is not critical andmay vary significantly within the same symbol. The character set consistsof “0” through “9”, “-”, “$”, “:”, “/”, “.”, and “+”.
The specific dimensions for bars and spaces in Codabar optimize perfor-mance of certain early printing and reading equipment. Codabar has 18different dimensions for bar and space widths. So many different dimen-sions often result in labels printed out of specification and cause Codabarprinting equipment to be more expensive.
Code 11Code 11 satisfies the requirements for a very high density, discrete numer-ic bar code. The name Code 11 derives from 11 different data charactersthat can be represented, in addition to a start or stop character.
The character set includes the 10 digits and the dash symbol. Each charac-ter is represented by a stand-alone group of three bars and two interveningspaces. Although Code 11 is discrete, it is not self-checking. A single print-ing defect can transpose one character into another valid character. One ortwo check digits obtain data security.
The specifications for Code 11 suggest that this code should have a narrowelement width of 7.5 mils. This results in an information density of 15characters per inch.

Bar Code SymbologiesAppendix —B
263Native Terminal Emulation Programmer’s Guide
Code 39Code 39 (C39) is the most widely used symbology among the industrialbar codes. Most major companies, trade associations, and the federal gov-ernment find this code to fit their needs. The main feature of this symbol-ogy is the ability to encode messages using the full alphanumeric characterset, seven special characters, and ASCII characters.
Programming for this symbology can be for any length that the applicationrequires. The application program handles symbology that is at least onecharacter but no more than 32 characters in length.
When programming the computer for Code 39, it is important to set thesymbology limit as close as possible (minimum and maximum bar codelengths being scanned). Doing so keeps the computer bar code processingtime to a minimum and conserves battery power.
Bar code readers can respond to Uniform Symbology Specification sym-bols in non-standard ways for particular applications. These methods arenot for general applications, because of the extra programming required.Code 39 Full ASCII is one example of non-standard code.
Encoded Code 39 (Concatenation)If the first data character of a symbol is a space, the reader may be pro-grammed to append the information contained in the remainder of thesymbol to a storage buffer. This operation continues for all successive sym-bols that contain a leading space, with messages being added to the end ofpreviously stored ones. When a message is read which does not contain aleading space, the contents are appended to the buffer, the entire buffer istransmitted, and the buffer is cleared.
Encoded Code 39 (Full ASCII)If the bar code reader is programmed for the task, the entire ASCII charac-ter set (128 characters) could be coded. This is done using two charactersequences made up of one of the symbols (“$”,“.”,“%”,“/”) followed byone of the 26 letters.

Bar Code SymbologiesAppendix —B
264 Native Terminal Emulation Programmer’s Guide
Code 93The introduction of Code 93 provided a higher density alphanumericsymbology designed to supplement Code 39. The set of data characters inCode 93 is identical with that offered with Code 39. Each character con-sists of nine modules arranged into three bars and three spaces.Code 93 uses 48 of the 56 possible combinations. One of these characters,represented by a square, is reserved for a start or stop character, four areused for control characters, and the remaining 43 data characters coincidewith the Code 39 character set. An additional single module terminationbar after the stop character concludes the final space.Code 93 is a variable length, continuous code that is not self-checking. Barand spaces widths may be one, two, three, or four modules wide. Its struc-ture uses edge-to-similar-edge decoding. This makes the bar code immuneto uniform ink spread, which allows liberal bar width tolerances.Code 93 uses two check characters. Its supporters believes this makes it thehighest density alphanumeric bar code. The dual check digit scheme pro-vides for high data integrity. All substitution errors in a single character aredetected for any message length.
Code 128Code 128 (C128) is one of the newest symbologies used by the retail andmanufacturing industries. It responds to the need for a compact alphanu-meric bar code symbol that could encode complex product identification.The fundamental requirement called for a symbology capable of beingprinted by existing data processing printers (primarily dot-matrix printers)that produce daily, work-in-progress, job, and product traceability docu-ments. The ability to print identification messages between 10 and 32characters long, on existing forms and labels deemed an important require-ment.Code 128 uniquely addresses this need as the most compact, complete,alphanumeric symbology available.Additionally, the Code 128 design with geometric features, improves scan-ner read performance, does self-checking, and provides data message man-agement function codes.Code 128 encodes the complete set of 128 ASCII characters without ad-ding extra symbol elements. Code 128 contains a variable-length symbolo-gy and the ability to link one message to another for composite messagetransmission. Code 128, being a double-density field, provides two numer-ic values in a single character.Code 128 follows the general bar code format of start zone, data, checkdigit, stop code, and quiet zone. An absolute minimum bar or space di-mension of nine mils (0.010 inch minimum nominal ± 0.001 inch toler-ance) must be maintained.Characters in Code 128 consist of three bars and three spaces so that thetotal character set includes three different start characters and a stop char-acter.
Bar Code SymbologiesAppendix —B
265Native Terminal Emulation Programmer’s Guide
UCC/EAN-128 Shipping Container Labeling is a versatile tool that canease movement of products and information. The Shipping Container La-beling bar code can take any form and usually has meaning only within thecompany or facility where applied.
Because this random data can get mistaken later for an industry standardcode format, the UCC and EAN chose a symbology uniquely identifiedfrom these other bar codes. This standard is for maximum flexibility, tohandle the diversity of distribution in global markets by cost efficiency.
The UCC/EAN-128 Container Labeling specification calls for a FUNC1to immediately follow the bar code’s start character. FUNC1 also followsany variable-length application field. The specification also calls for thecomputer to send “]C1” for the first FUNC1. The specification requiresthat the computer send a “<GS>” (hex 1D) for subsequent FUNC1 codesin the bar code.
Because “<GS>” is not compatible with computer emulation data streams,the Uniform Code Council has been asked to change the specification.This change is made to send the same three character sequence “]C1” toidentify the embedded FUNC1 codes.
This implementation should provide for clean application coding by iden-tifying the same sequences for the same scanned codes. If the communica-tion of Norand bar code types is enabled, the Shipping Container Labelcodes precede with a “J”. These strings will appear on the computer dis-play. The application may have to allow for strings longer than 48 charac-ters (maximum length indicated in the specification). Actual length vari-ance depends on the number of variable-length data fields. Allowing for 60characters should be sufficient. Within the Code 128 specification, thecomputer can link bar codes together. If this is to happen, allow for morecharacters (computer limit is 100 characters).
The Application Identifier Standard, that is part of the UCC/EAN Ship-ping Label concept, complements, rather than replaces, other UCC/EANstandards. Most UCC/EAN standards primarily identify products.
Several industries expressed the need to standardize more than productidentification. The UCC/EAN Code 128 Application Identifier Standardsupplies this tool. The standard adds versatility for inter-enterprise ex-changes of perishability dating, lot and batch identification, units of usemeasure, location codes, and several other information attributes.
For more detailed information on Code 128 UCC/EAN Shipping Labelbar code and Application Identifier Standard, refer to the UCC/EAN-128Application Identifier Standard specification.
Bar Code SymbologiesAppendix —B
266 Native Terminal Emulation Programmer’s Guide
I 2 of 5 (Interleaved)I 2 of 5 (Interleaved 2 of 5 Code) is an all-numeric symbology, widelyused for warehouse and heavy industrial applications. Its use has been par-ticularly prevalent in the automobile industry. The I 2 of 5 symbology canbe placed on smaller labels than what the standard UPC symbology re-quires.
I 2 of 5 also provides a little more flexibility on the type of material it canprint on. Interleaved 2 of 5 Code has its name because of the way the barcode is configured.
I 2 of 5 bars and spaces both carry information. The bars represent theodd number position digits, while spaces represent the even number posi-tion digits. The two characters are interleaved as one. Messages encodedwith this symbology have to use an even number of characters since twonumeric characters always get interleaved together.
S 2 of 5 (Standard 2 of 5)The code S 2 of 5 (Standard 2 of 5 Code) is designed primarily for:
S Warehouse inventory handling
S Identification of photo finishing envelopes
S Airline tickets
S Baggage and cargo handling
The code S 2 of 5 is simple and straightforward. All information is con-tained in the widths of the bars, with the spaces serving only to separatethe individual bars.
Bars can either be wide or narrow, and the wide bars are usually threetimes the widths of the narrow bars. Spaces may be any reasonable widthbut are typically equal to the narrow bars. Narrow bars are identified aszero bits and wide bars as one bits.
Remember the code structure by associating the bar positions from left toright with weighting factors 1, 2, 4, 7, and parity. Exceptions to this ruleare zero, start, and stop. This code is a discrete code, since the white spacesbetween the characters are not part of the code. Because the white spacescarry no information, their dimensions are not critical.
The S 2 of 5 code is self-checking, meaning a scanner passing through aprinting void would detect the proper ratio of wide bars to total bars.When the scanner spots an error, a non-read will occur.
Bar Code SymbologiesAppendix —B
267Native Terminal Emulation Programmer’s Guide
PlesseyPlessey finds its origin in the pulse width modulated (PWM) code devel-oped in England. It is widely used for shelf markings in grocery stores.Pulse width modulated codes represent each bit of information by a barand space pair. A zero bit consists of a narrow bar followed by a widespace, while a one bit consists of a wide bar followed by a narrow space. Itis mainly a numeric symbology (0–9) with six extra characters available forassigning any symbol or letter desired.
Plessey codes are not self-checking and employ a variety of check charac-ters. Plessey employs a polynomial-based Cyclic Redundancy Check(CRC). For start and stop characters, Plessey employs a 1101 and pre-viously used a 0101.
This symbology is very limited about what information can be encoded. Itis not considered for new applications.
MSI Code (Variant of Plessey)In addition to Plessey characteristics, the MSI Code employs a Modulus10 Check. For start and stop checks, MSI employs a single bit pair of 1 asa start symbol and a single bit pair of 0 as a stop symbol. MSI reverses the1-2-4-8 BCD pattern for bit pair weighting to 8-6-2-1.

Bar Code SymbologiesAppendix —B
268 Native Terminal Emulation Programmer’s Guide

269Native Terminal Emulation Programmer’s Guide
Terminal Font Set TableC
Note: The Terminal Font Set table in this appendix applies to 6400,5055, 59XX, 17XX, and 11XX. For the Terminal Font Set table for the2415, 2425, 2435A, 2455, 2475, or 248X Terminals, refer to the termi-nal’s user manual.
6400, 5055, 59XX, 17XX, and 11XX Terminals use a font set that sup-ports English and Western European languages, such as French, German,Italian, Portuguese, Spanish, and others. You can develop applications thatdisplay any character in the terminal font set. Depending on the type ofkeyboard, you can also enter many of the characters. For help, see Chapter2, “Using the Terminal’s Keyboard.”
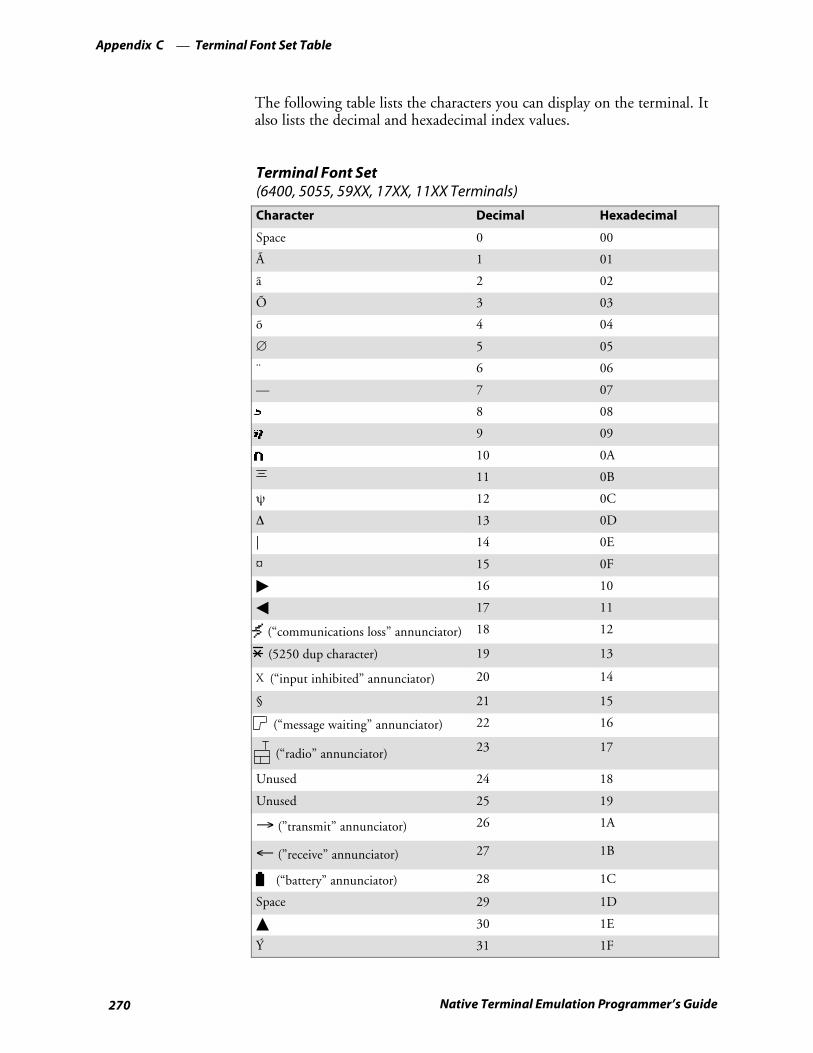
Terminal Font Set TableAppendix —C
270 Native Terminal Emulation Programmer’s Guide
The following table lists the characters you can display on the terminal. Italso lists the decimal and hexadecimal index values.
Terminal Font Set(6400, 5055, 59XX, 17XX, 11XX Terminals)
Character Decimal Hexadecimal
Space 0 00
à 1 01
ã 2 02
Õ 3 03
õ 4 04
∅ 5 05
¨ 6 06
— 7 07
8 08
9 09
10 0A
11 0B
ψ 12 0C
∆ 13 0D
| 14 0E
¤ 15 0F
" 16 10
A 17 11
(“communications loss” annunciator) 18 12
(5250 dup character) 19 13
X (“input inhibited” annunciator) 20 14
§ 21 15
(“message waiting” annunciator) 22 16
(“radio” annunciator) 23 17
Unused 24 18
Unused 25 19
→ (”transmit” annunciator) 26 1A
← (”receive” annunciator) 27 1B
(“battery” annunciator) 28 1C
Space 29 1D
Y 30 1E
Ý 31 1F

Terminal Font Set TableAppendix —C
271Native Terminal Emulation Programmer’s Guide
Terminal Font Set (continued)(6400, 5055, 59XX, 17XX, 11XX Terminals)
HexadecimalDecimalCharacter
Space 32 20
! 33 21
34 22
# 35 23
$ 36 24
% 37 25
& 38 26
’ 39 27
( 40 28
) 41 29
* 42 2A
+ 43 2B
, (comma) 44 2C
- (dash) 44 2D
. (period) 46 2E
/ 47 2F
0 48 30
1 49 31
2 50 32
3 51 33
4 52 34
5 53 35
6 54 36
7 55 37
8 56 38
9 57 39
: (colon) 58 3A
; (semicolon) 59 3B
< (less than) 60 3C
= (equal sign) 61 3D
> (greater than) 62 3E
? (question mark) 63 3F
@ (ampersand) 64 40
A 65 41
B 66 42
C 67 43
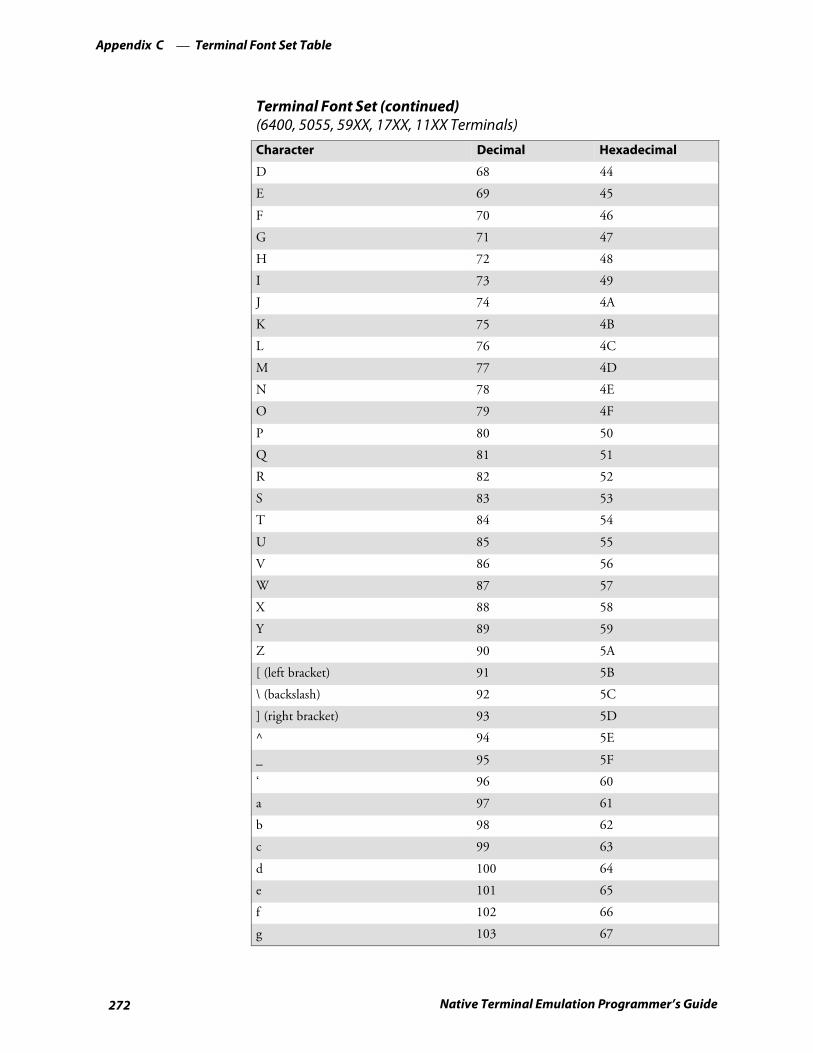
Terminal Font Set TableAppendix —C
272 Native Terminal Emulation Programmer’s Guide
Terminal Font Set (continued)(6400, 5055, 59XX, 17XX, 11XX Terminals)
HexadecimalDecimalCharacter
D 68 44
E 69 45
F 70 46
G 71 47
H 72 48
I 73 49
J 74 4A
K 75 4B
L 76 4C
M 77 4D
N 78 4E
O 79 4F
P 80 50
Q 81 51
R 82 52
S 83 53
T 84 54
U 85 55
V 86 56
W 87 57
X 88 58
Y 89 59
Z 90 5A
[ (left bracket) 91 5B
\ (backslash) 92 5C
] (right bracket) 93 5D
^ 94 5E
_ 95 5F
‘ 96 60
a 97 61
b 98 62
c 99 63
d 100 64
e 101 65
f 102 66
g 103 67

Terminal Font Set TableAppendix —C
273Native Terminal Emulation Programmer’s Guide
Terminal Font Set (continued)(6400, 5055, 59XX, 17XX, 11XX Terminals)
HexadecimalDecimalCharacter
h 104 68
i 105 69
j 106 6A
k 107 6B
l 108 6C
m 109 6D
n 110 6E
o 111 6F
p 112 70
q 113 71
r 114 72
s 115 73
t 116 74
u 117 75
v 118 76
w 119 77
x 120 78
y 121 79
z 122 7A
(left curly bracket) 123 7B
¦ 124 7C
(right curly bracket) 125 7D
~ 126 7E
127 7F
Ç 128 80
ü 129 81
é 130 82
â 131 83
ä 132 84
à 133 85
å 134 86
ç 135 87
ê 136 88
ë 137 89
è 138 8A
ï 139 8B

Terminal Font Set TableAppendix —C
274 Native Terminal Emulation Programmer’s Guide
Terminal Font Set (continued)(6400, 5055, 59XX, 17XX, 11XX Terminals)
HexadecimalDecimalCharacter
î 140 8C
ì 141 8D
Ä 142 8E
Å 143 8F
É 144 90
æ 145 91
Æ 146 92
ô 147 93
ö 148 94
ò 149 95
û 150 96
ù 151 97
ÿ 152 98
Ö 153 99
Ü 154 9A
¢ 155 9B
£ 156 9C
¥ 157 9D
158 9E
ƒ 159 9F
á 160 A0
í 161 A1
ó 162 A2
ú 163 A3
ñ 164 A4
Ñ 165 A5
ª 166 A6
º 167 A7
¿ 168 A8
(not symbol) 169 A9
¬ 170 AA
½ 171 AB
¼ 172 AC
¡ 173 AD
« 174 AE
» 175 AF

Terminal Font Set TableAppendix —C
275Native Terminal Emulation Programmer’s Guide
Terminal Font Set (continued)(6400, 5055, 59XX, 17XX, 11XX Terminals)
HexadecimalDecimalCharacter
176 B0
177 B1
178 B2
| 179 B3
180 B4
⊧
181 B5
⊩
182 B6
183 B7
184 B8
185 B9
186 BA
187 BB
188 BC
189 BD
190 BE
e 191 BF
192 C0
193 C1
194 C2
⊦ 195 C3
— 196 C4
† 197 C5
⊧ 198 C6
‖ 199 C7
200 C8
210 C9
⊫ 202 CA
203 CB
204 CC
= 205 CD
206 CE
⊩ 207 CF
⊧ 208 D0
⊩ 209 D1

Terminal Font Set TableAppendix —C
276 Native Terminal Emulation Programmer’s Guide
Terminal Font Set (continued)(6400, 5055, 59XX, 17XX, 11XX Terminals)
HexadecimalDecimalCharacter
⊧ 210 D2
211 D3
212 D4
213 D5
214 D6
215 D7
‡ 216 D8
⎦ 217 D9
218 DA
J 219 DB
220 DC
221 DD
222 DE
223 DF
∝ 224 E0
β 225 E1
¬ 226 E2
Π 227 E3
∑ 228 E4
σ 229 E5
µ 230 E6
γ 231 E7
σ 232 E8
θ 233 E9
Ω 234 EA
235 EB
∞ 236 EC
ø 237 ED
238 EE
239 EF
≡ 240 F0
± 241 F1
≥ 242 F2
≤ 243 F3
⎧ 244 F4
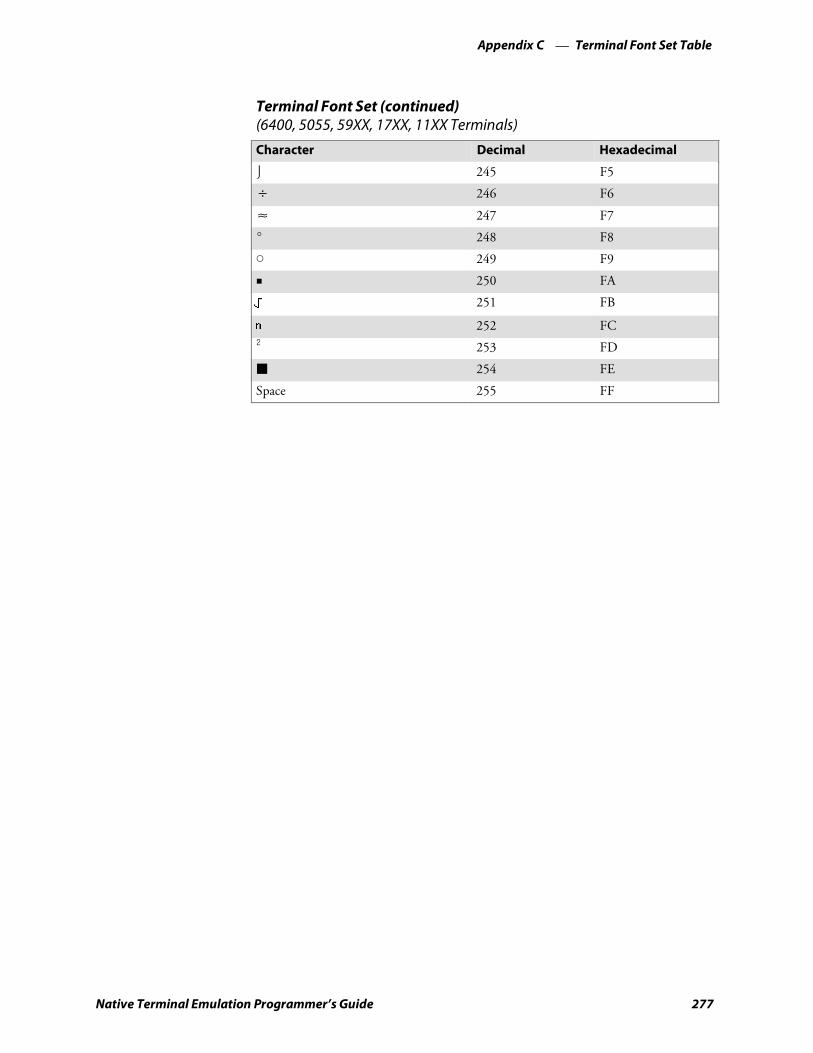
Terminal Font Set TableAppendix —C
277Native Terminal Emulation Programmer’s Guide
Terminal Font Set (continued)(6400, 5055, 59XX, 17XX, 11XX Terminals)
HexadecimalDecimalCharacter
⎭ 245 F5
÷ 246 F6
≈ 247 F7
_ 248 F8
d 249 F9
H 250 FA
251 FB
252 FC@ 253 FD
J 254 FE
Space 255 FF

Terminal Font Set TableAppendix —C
278 Native Terminal Emulation Programmer’s Guide

279Native Terminal Emulation Programmer’s Guide
Native SocketsD
The IntermecR Application Server or gateway provides two-way messageservices for the wireless network but it does not generate the messages.These come from a host program running independently of the server orgateway. In fact, the host application runs on a separate physical host.
NorandR Native is a simple command language for controlling terminalsfrom a host application. Native sockets enables a host computer running aNative application to communicate with Native terminals through theserver or gateway via a TCP/IP socket connection.
The server or gateway supports Native sockets applications for EnterpriseWireless LANt systems. Contact your Intermec Representative for infor-mation about the version that provides Native sockets support.
If you are converting to the Intermec Application Server from the 6950Enterprise Gateway Server, the Wireless Network Access Server, or a serialcontroller, refer to the Intermec Application Server User’s Guide (P/N072242). The manual contains information about modifying your hostapplication to use a socket interface on the Intermec Application Server.
Native SocketsAppendix —D
280 Native Terminal Emulation Programmer’s Guide
Communication BasicsYou can write Native sockets programs for any host or workstation sup-porting Ethernet and TCP/IP. Initiate communication between the hostand the server or gateway by configuring both with a common port num-ber. The server or gateway uses the designated TCP port number to com-municate with the host.
You must meet two requirements to set up communication:
1 Configure the terminals and the server or gateway with a common hostname, which defines the communication sessions.
2 Configure each terminal for the Native data stream and assign it aunique terminal number.
As each terminal powers on, the host application opens a unique socketbetween the server or gateway and the host for the terminal. The server orgateway keeps an internal table mapping terminals to socket numbers.However, terminal numbers are not available to the application. It mustuse socket numbers to identify each terminal session.
Sockets remain open until the host application closes the session or some-one powers the terminal off and then on again, initiating a new session.
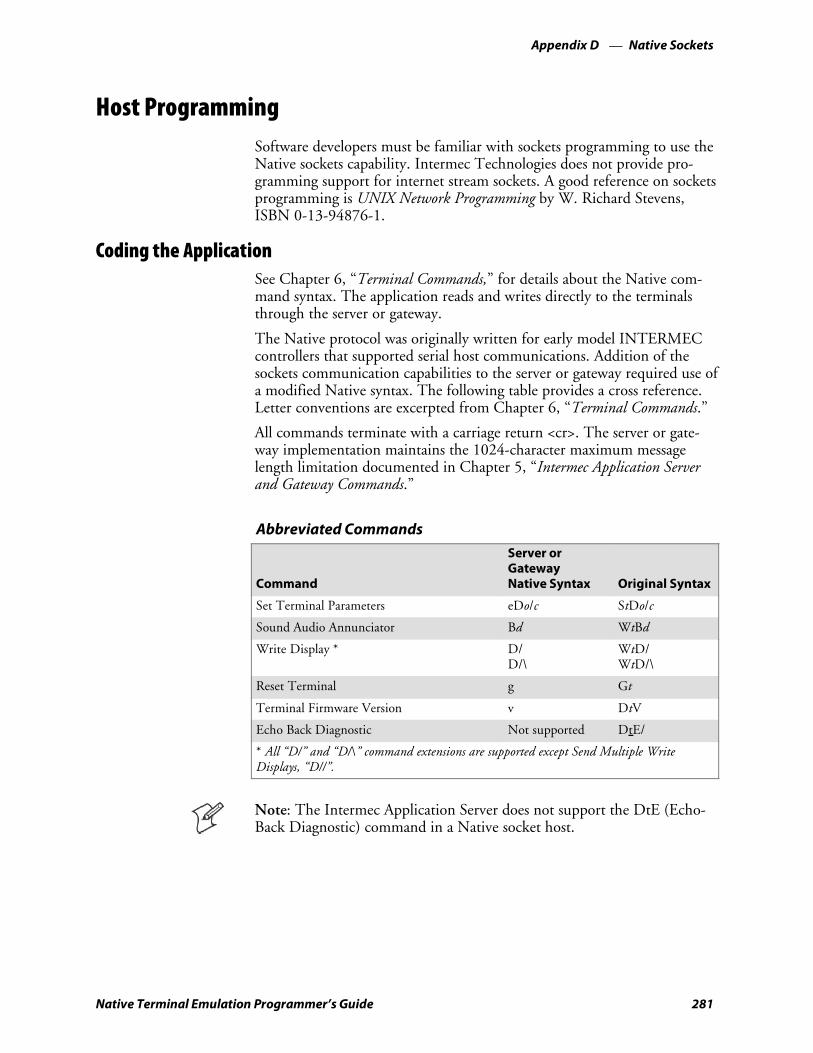
Native SocketsAppendix —D
281Native Terminal Emulation Programmer’s Guide
Host ProgrammingSoftware developers must be familiar with sockets programming to use theNative sockets capability. Intermec Technologies does not provide pro-gramming support for internet stream sockets. A good reference on socketsprogramming is UNIX Network Programming by W. Richard Stevens,ISBN 0-13-94876-1.
Coding the ApplicationSee Chapter 6, “Terminal Commands,” for details about the Native com-mand syntax. The application reads and writes directly to the terminalsthrough the server or gateway.
The Native protocol was originally written for early model INTERMECcontrollers that supported serial host communications. Addition of thesockets communication capabilities to the server or gateway required use ofa modified Native syntax. The following table provides a cross reference.Letter conventions are excerpted from Chapter 6, “Terminal Commands.”
All commands terminate with a carriage return <cr>. The server or gate-way implementation maintains the 1024-character maximum messagelength limitation documented in Chapter 5, “Intermec Application Serverand Gateway Commands.”
Abbreviated Commands
Command
Server orGatewayNative Syntax Original Syntax
Set Terminal Parameters eDo/c StDo/c
Sound Audio Annunciator Bd WtBd
Write Display * D/D/\
WtD/WtD/\
Reset Terminal g Gt
Terminal Firmware Version v DtV
Echo Back Diagnostic Not supported DtE/
* All “D/” and “D/\” command extensions are supported except Send Multiple WriteDisplays, “D//”.
Note: The Intermec Application Server does not support the DtE (Echo-Back Diagnostic) command in a Native socket host.
Native SocketsAppendix —D
282 Native Terminal Emulation Programmer’s Guide
Response FormatsChapter 6, “Terminal Commands,” lists response formats for each com-mand. However, with Native sockets, the terminal numbers are not re-turned in the response string.
For example, a keyboard response to a “Do/x”<cr> command is not in theform “tKrd<cr>”. A response with data from a bar code scanner is“Srbcm<cr>”. See the WtD/ (Write Display) command in Chapter 6.“Terminal Commands,” for descriptions of the parameters.
Error MessagesNative command syntax is processed partly by the server or gateway, andpartly by the terminal. For example, the WtD/ (Write Display) commandhas an options list o and message content x in the form “Do/x<cr>”. Theserver or gateway processes content preceding the forward slash, and theterminal processes content after the slash.
Error responses from the server or gateway take the form “?x<cr>”, where xis a numeric error code from 0 to 11. For more information, see “WriteDisplay Errors” on page 179.
The terminal’s error responses depend on the specific command. SeeChapter 6, “Terminal Commands,” for the command that produced theerror.
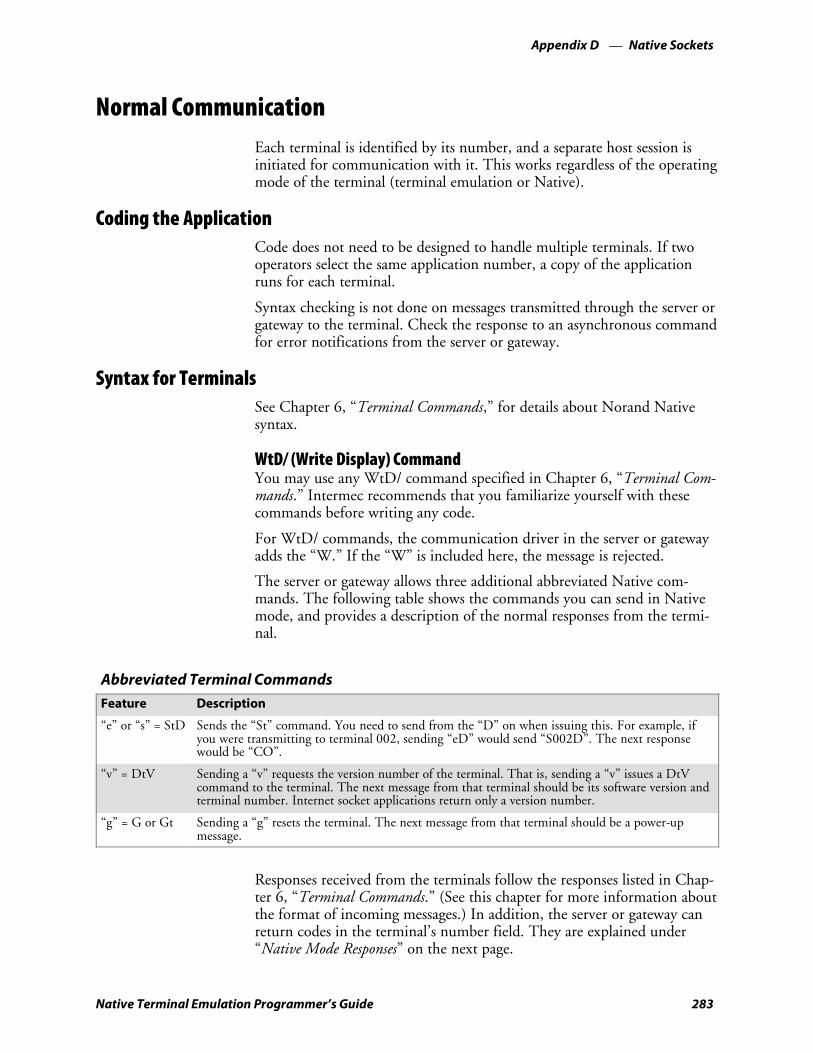
Native SocketsAppendix —D
283Native Terminal Emulation Programmer’s Guide
Normal CommunicationEach terminal is identified by its number, and a separate host session isinitiated for communication with it. This works regardless of the operatingmode of the terminal (terminal emulation or Native).
Coding the ApplicationCode does not need to be designed to handle multiple terminals. If twooperators select the same application number, a copy of the applicationruns for each terminal.
Syntax checking is not done on messages transmitted through the server orgateway to the terminal. Check the response to an asynchronous commandfor error notifications from the server or gateway.
Syntax for TerminalsSee Chapter 6, “Terminal Commands,” for details about Norand Nativesyntax.
WtD/ (Write Display) CommandYou may use any WtD/ command specified in Chapter 6, “Terminal Com-mands.” Intermec recommends that you familiarize yourself with thesecommands before writing any code.
For WtD/ commands, the communication driver in the server or gatewayadds the “W.” If the “W” is included here, the message is rejected.
The server or gateway allows three additional abbreviated Native com-mands. The following table shows the commands you can send in Nativemode, and provides a description of the normal responses from the termi-nal.
Abbreviated Terminal Commands
Feature Description
“e” or “s” = StD Sends the “St” command. You need to send from the “D” on when issuing this. For example, ifyou were transmitting to terminal 002, sending “eD” would send “S002D”. The next responsewould be “CO”.
“v” = DtV Sending a “v” requests the version number of the terminal. That is, sending a “v” issues a DtVcommand to the terminal. The next message from that terminal should be its software version andterminal number. Internet socket applications return only a version number.
“g” = G or Gt Sending a “g” resets the terminal. The next message from that terminal should be a power-upmessage.
Responses received from the terminals follow the responses listed in Chap-ter 6, “Terminal Commands.” (See this chapter for more information aboutthe format of incoming messages.) In addition, the server or gateway canreturn codes in the terminal’s number field. They are explained under“Native Mode Responses” on the next page.

Native SocketsAppendix —D
284 Native Terminal Emulation Programmer’s Guide
Native Mode ResponsesThe server or gateway sends the following codes in the terminal numberfield returned to the application.
Codes in Terminal Number Field
CommandServer or GatewayNative Syntax
800 No messages are available for the application. The application can perform housekeeping tasks orgo back to waiting for a message (same as NUI_TIMEOUT).
998 The terminal has not passed a message for a predetermined length of time. The application caneither ignore the message or act on it. For example, this code could be returned if the terminal isleft unattended with the application running (same as NUI_DEAD).
999 The server or gateway wants it to terminate. If the application does not terminate within 15seconds, it is terminated automatically. The application receives this message when the server orgateway shuts down or is reset, or if the server or gateway detects an error (same as NUI_STOP).
NUI_OK The server or gateway completion was normal.
NUI_STOP The server or gateway wants to terminate (same as 999 code).
NUI_DEAD The associated terminal has not been passed a message for a predetermined length of time (sameas 998 code).
NUI_TIMEOUT No data available from the application to be read from the server or gateway (same as 800 code).
NUI_BAD A fatal error occurred, which prevents continued execution.
NUI_BOOT The associated terminal is powered on and can be used to reload data into the terminal. Or, itcan be ignored.
Program interfaces return the terminal number and the server, gateway, orterminal response. If one of these codes is not set, the field contains thenumber of the terminal.
ConfigurationTo use Native sockets, you must configure IP, RF communication, andterminal parameters for the server, gateway, and terminal. To configurethese parameters, refer to the device’s user manual for instructions.
When everything is configured correctly and the terminal is powered on, aunique connection (socket) is established between the terminal and yoursockets-based Native emulation program.
Commands to the terminals must be in the appropriate syntax for theirNative mode (see Chapter 6, “Terminal Commands”). The parameter anddiagnostic commands in Chapter 5, “Intermec Application Server and Gate-way Commands,” should be ignored.
The following WtD/ (Write Display) command is a sample startup menufor a terminal with viewing screen size set to 16.
DBCDNL1H2P15/01 - STDIO TEST 02 - DIRECT TEST
Note that this message does not have the “W” at the beginning, nor does itcontain the terminal number. The communication driver in the server orgateway adds the “W” and the terminal number.
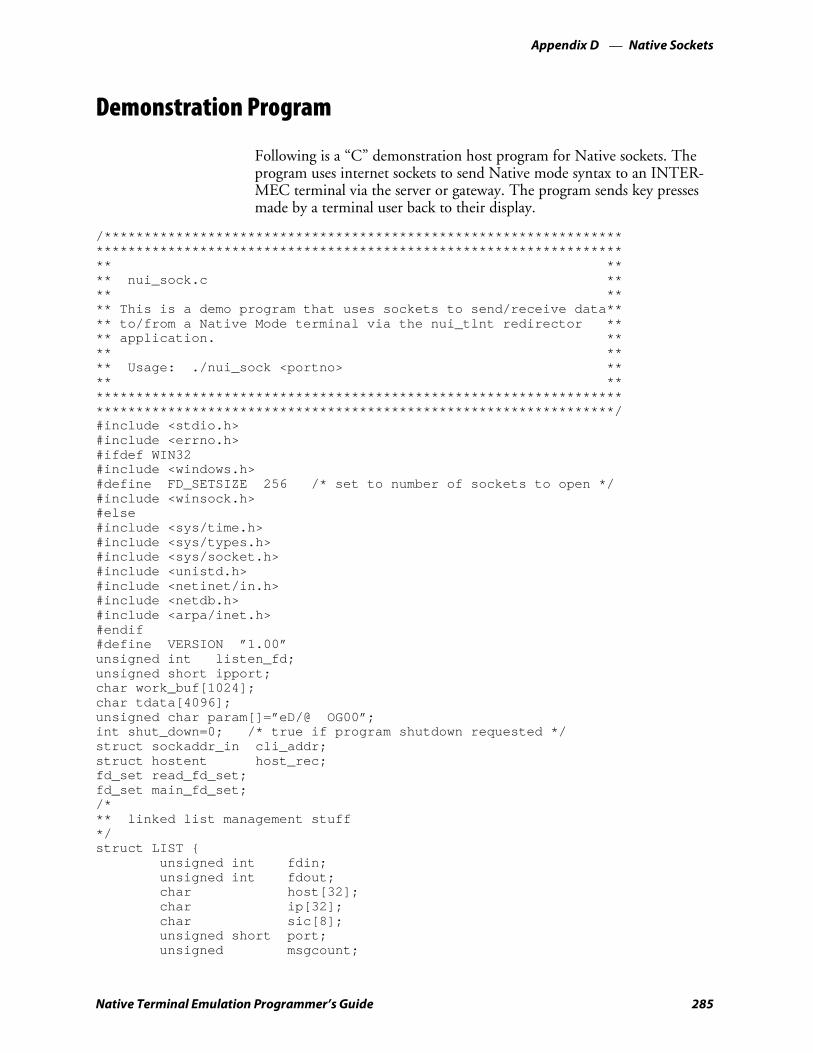
Native SocketsAppendix —D
285Native Terminal Emulation Programmer’s Guide
Demonstration Program
Following is a “C” demonstration host program for Native sockets. Theprogram uses internet sockets to send Native mode syntax to an INTER-MEC terminal via the server or gateway. The program sends key pressesmade by a terminal user back to their display.
/************************************************************************************************************************************* **** nui_sock.c **** **** This is a demo program that uses sockets to send/receive data**** to/from a Native Mode terminal via the nui_tlnt redirector **** application. **** **** Usage: ./nui_sock <portno> **** *************************************************************************************************************************************/#include <stdio.h>#include <errno.h>#ifdef WIN32#include <windows.h>#define FD_SETSIZE 256 /* set to number of sockets to open */#include <winsock.h>#else#include <sys/time.h>#include <sys/types.h>#include <sys/socket.h>#include <unistd.h>#include <netinet/in.h>#include <netdb.h>#include <arpa/inet.h>#endif#define VERSION ”1.00”unsigned int listen_fd;unsigned short ipport;char work_buf[1024];char tdata[4096];unsigned char param[]=”eD/@ OG00”;int shut_down=0; /* true if program shutdown requested */struct sockaddr_in cli_addr;struct hostent host_rec;fd_set read_fd_set;fd_set main_fd_set;/*** linked list management stuff*/struct LIST
unsigned int fdin;unsigned int fdout;char host[32];char ip[32];char sic[8];unsigned short port;unsigned msgcount;
Native SocketsAppendix —D
286 Native Terminal Emulation Programmer’s Guide
struct LIST *next;;struct LIST *head; /* first pointer in linked list */struct LIST *tail; /* last pointer in linked list */struct LIST *curr; /* always points to current socket pointer */int main(int argc,char **argv );int process_port(void);int process_socket(void);int add_fd(unsigned int fd,char *host,char *ip);int delete_fd(unsigned int fd);/*****/main(argc, argv)int argc;char *argv[];
struct sockaddr_in serv_addr;int x=0;
#ifdef WIN32WSADATA WsaData;
#endif/*** check the command line arguments*/
if(argc < 2)printf(”\nnui_sock: Wrong number of arguments.”);printf(”\nnui_sock: Usage: nui_sock <portno>\n\n”);fflush(stdout);exit(1);
/*** get the port number*/
strcpy(work_buf,argv[1]);if(strlen(work_buf) < 1)
printf(”\nnui_sock: Invalid portno! Must be numeric and > 0.”);printf(”\nnui_sock: Usage: nui_sock <portno>\n\n”);fflush(stdout);exit(1);
ipport=atoi(work_buf);/*** set up curses*/
for(x=0;x<53;x++)printf(”\n”);
fflush(stdout);printf(”\nnui_sock: Native Socket Demo - Version %s ”,VERSION);fflush(stdout);
/*** startup sockets*/#ifdef WIN32
x = WSAStartup (0x0101, &WsaData);if(x==SOCKET_ERROR)

Native SocketsAppendix —D
287Native Terminal Emulation Programmer’s Guide
printf(”\nnui_sock: can’t init winsock interface %d.”,errno);fflush(stdout);exit(1);
#endif/** Open a TCP socket (an Internet stream socket).*/
FD_ZERO(&main_fd_set);if((listen_fd = socket(AF_INET, SOCK_STREAM, 0)) < 0)
perror(”\nnui_sock: can’t open local socket”);exit(1);
/** Fill in the structure ”serv_addr” with the address of the* server that we want to connect with.*/
memset(&serv_addr,0x00,sizeof(serv_addr));serv_addr.sin_family = AF_INET;serv_addr.sin_addr.s_addr = htonl(INADDR_ANY);serv_addr.sin_port = htons(ipport);if (bind(listen_fd, (struct sockaddr *) &serv_addr, sizeof(serv_addr)) <
0)perror(”\nnui_sock: can’t bind to local socket”);exit(1);
listen(listen_fd, 5);/*** add this fd to our work list so we know when clients connect*/
FD_SET(listen_fd, &main_fd_set);/*** we are connected, lets see if this thing can work*/
printf(”\nnui_sock: Listen on Port %d\n”,ipport);fflush(stdout);process_port();
/*** shut down the system** (traverse the ”connected” list to shutdown each terminal)*/
curr = head;while(curr != NULL)
/* this will shutdown and reset the terminal */delete_fd(curr->fdin);curr = curr->next;
shutdown(listen_fd,2);close(listen_fd);printf(”\nnui_sock: System Shutdown.”);fflush(stdout);exit(0);
/*****//*** main function loop for handling the socket calls from the

Native SocketsAppendix —D
288 Native Terminal Emulation Programmer’s Guide
** cradle server*/int process_port()
int hdrcnt=0;int x=0;int clilen=0;struct timeval seltime;int gotdata=0;struct hostent *host_rec;char host[32];char *ip;int sockfd;int incount=0;
/*** use the select to see if anything is waiting*/
for(;;)if (shut_down)
break; /* user requested shutdown, so goodbye */
memcpy((void *)&read_fd_set, (void *)&main_fd_set, sizeof(fd_set));seltime.tv_usec = 0;seltime.tv_sec = 15; /* 15 second timeout */gotdata=select(FD_SETSIZE,&read_fd_set,0,0,&seltime);if(gotdata > 0)
/*** it is a new connection, connect it*/
if(FD_ISSET(listen_fd,&read_fd_set))clilen = sizeof(cli_addr);sockfd = accept(listen_fd,(struct sockaddr
*)&cli_addr,&clilen);if(sockfd < 0)
printf(”\nnui_sock: Accept error. Port=%d
(%d)”,ipport,errno);fflush(stdout);
ip=inet_ntoa(cli_addr.sin_addr);host_rec=gethostbyaddr((char *) &cli_addr.sin_addr,4,AF_INET);strcpy(host,host_rec->h_name);
printf(”\nnui_sock: HEARD <%s:%s>”,host,ip);fflush(stdout);FD_CLR(listen_fd,&read_fd_set);add_fd(sockfd,host,ip); /* add the connection to our fd list
*//* send terminal control parameters */strcpy(tdata,param);write(sockfd,tdata,strlen(tdata));sleep(1); /* Wait, don’t send the next one too fast *//* send first entry prompt */sprintf(work_buf,”DBSCQDEL0H16P16/%-16.16s%-16.16s”,”Enter
data now:”,” ”);
Native SocketsAppendix —D
289Native Terminal Emulation Programmer’s Guide
strcpy(tdata,work_buf);write(sockfd,tdata,strlen(tdata));
else
/*** look for an active descriptor and process accordingly*/
curr = head;while(curr != NULL)
if(FD_ISSET(curr->fdin, &read_fd_set))
if(!process_socket())
/* this will shutdown/reset the terminal */delete_fd(curr->fdin);curr = NULL;break;
curr = curr->next;
return(1);
/*** This function reads data from the socket (response from the** terminal) and writes to the socket (sends commands to the** terminal).*/int process_socket()
int datacnt=0;
/*** read the data from the socket*/
memset(tdata,0x00,sizeof(tdata));datacnt=read(curr->fdin,tdata,sizeof(tdata));if (datacnt < 1)
printf(”\nnui_sock: Bad message. fd=%d,
datacnt=%d”,curr->fdin,datacnt);fflush(stdout);return(0);
/*** we have a data message, process it*/
if(tdata[0]==’K’ && tdata[1]==’Q’) /* stop and reset this terminal */printf(”\nnui_sock: Terminal requested stop.”);fflush(stdout);return(0);
if(tdata[0]==’K’ && tdata[1]==’X’)
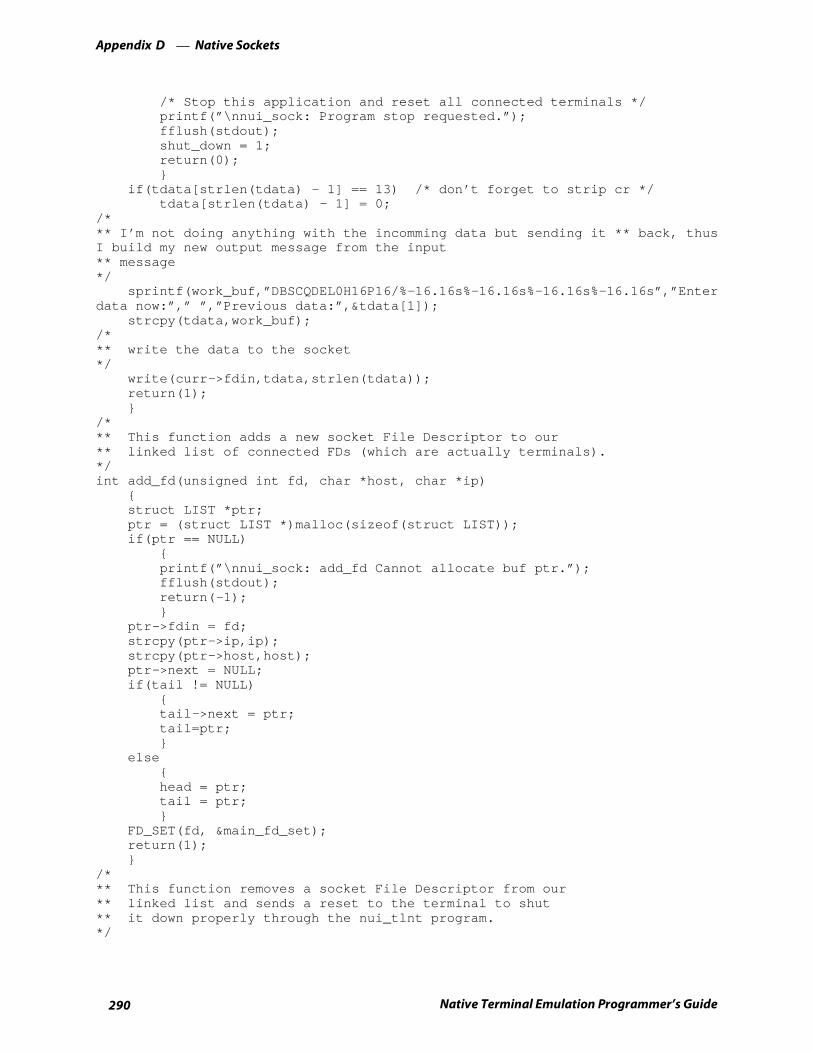
Native SocketsAppendix —D
290 Native Terminal Emulation Programmer’s Guide
/* Stop this application and reset all connected terminals */printf(”\nnui_sock: Program stop requested.”);fflush(stdout);shut_down = 1;return(0);
if(tdata[strlen(tdata) - 1] == 13) /* don’t forget to strip cr */tdata[strlen(tdata) - 1] = 0;
/*** I’m not doing anything with the incomming data but sending it ** back, thusI build my new output message from the input** message*/
sprintf(work_buf,”DBSCQDEL0H16P16/%-16.16s%-16.16s%-16.16s%-16.16s”,”Enterdata now:”,” ”,”Previous data:”,&tdata[1]);
strcpy(tdata,work_buf);/*** write the data to the socket*/
write(curr->fdin,tdata,strlen(tdata));return(1);
/*** This function adds a new socket File Descriptor to our** linked list of connected FDs (which are actually terminals).*/int add_fd(unsigned int fd, char *host, char *ip)
struct LIST *ptr;ptr = (struct LIST *)malloc(sizeof(struct LIST));if(ptr == NULL)
printf(”\nnui_sock: add_fd Cannot allocate buf ptr.”);fflush(stdout);return(-1);
ptr->fdin = fd;strcpy(ptr->ip,ip);strcpy(ptr->host,host);ptr->next = NULL;if(tail != NULL)
tail->next = ptr;tail=ptr;
elsehead = ptr;tail = ptr;
FD_SET(fd, &main_fd_set);return(1);
/*** This function removes a socket File Descriptor from our** linked list and sends a reset to the terminal to shut** it down properly through the nui_tlnt program.*/
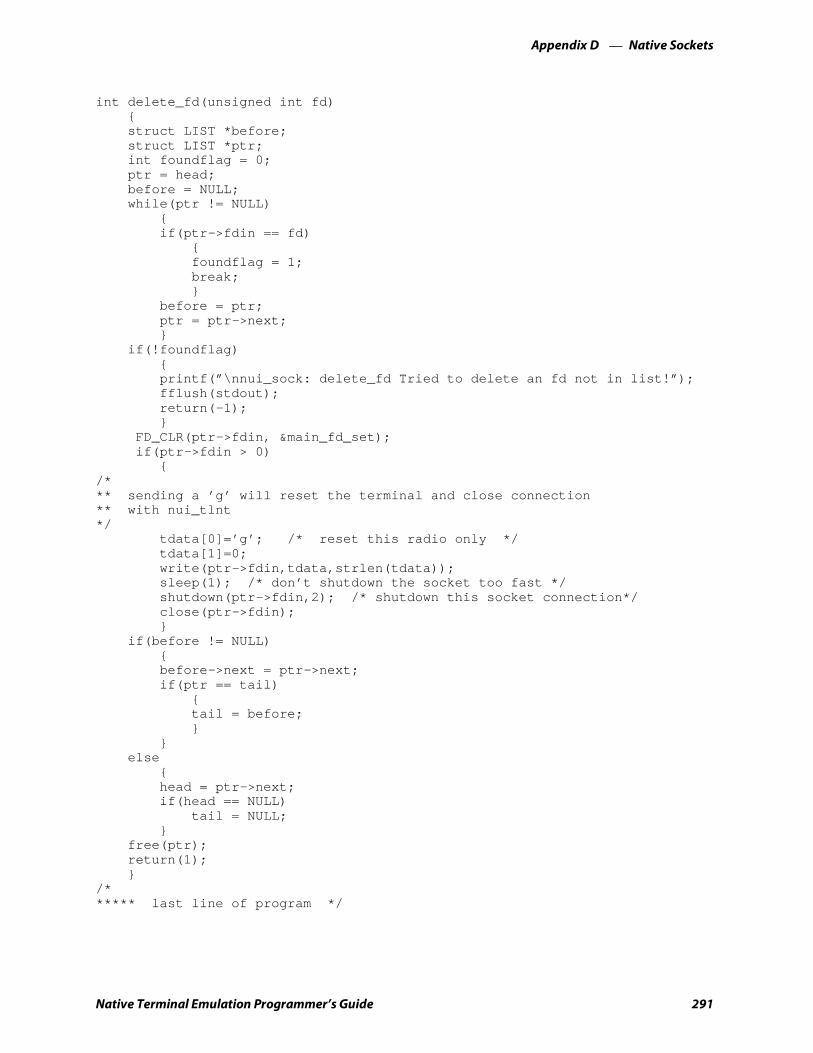
Native SocketsAppendix —D
291Native Terminal Emulation Programmer’s Guide
int delete_fd(unsigned int fd)struct LIST *before;struct LIST *ptr;int foundflag = 0;ptr = head;before = NULL;while(ptr != NULL)
if(ptr->fdin == fd)
foundflag = 1;break;
before = ptr;ptr = ptr->next;
if(!foundflag)printf(”\nnui_sock: delete_fd Tried to delete an fd not in list!”);fflush(stdout);return(-1);
FD_CLR(ptr->fdin, &main_fd_set);if(ptr->fdin > 0)
/*** sending a ’g’ will reset the terminal and close connection** with nui_tlnt*/
tdata[0]=’g’; /* reset this radio only */tdata[1]=0;write(ptr->fdin,tdata,strlen(tdata));sleep(1); /* don’t shutdown the socket too fast */shutdown(ptr->fdin,2); /* shutdown this socket connection*/close(ptr->fdin);
if(before != NULL)before->next = ptr->next;if(ptr == tail)
tail = before;
else
head = ptr->next;if(head == NULL)
tail = NULL;
free(ptr);return(1);
/****** last line of program */

Native SocketsAppendix —D
292 Native Terminal Emulation Programmer’s Guide

293Native Terminal Emulation Programmer’s Guide
IndexI
The General Index covers all topics. Those in italics are figures, those in bold aretables.
The Files Index is to assist you in locating descriptions for device drivers, applica-tions, utilities, batch files, or other files within this publication.

Index
294 Native Terminal Emulation Programmer’s Guide
General IndexSymbols. (Period), key remapping code, 137? (Get Transmit Message Status), 168, (Comma)
encoded sequence, 255key remapping code, 137
# (pound), 107$ (Escape sequence), 254, 256% (Escape sequence), 255, 256+ (Escape sequence), 256- (Hyphen), encoded sequence, 255/ (Escape sequence), 255, 256/F (first in chain), 193/L (last in chain), 193/M (middle of chain), 193^xx (Pass-Through Hex Character extension) syntax, 191|B (Beep extension) syntax, 190|C (Cursor Position extension) syntax, 190|Dxx (bank extension) syntax, 190|X<literal>|A (Pass-Through Hex Stream extension) syntax,
190|xx (Blank extension) syntax, 190
Numbers0 (communications error) message, 1791 (syntax error) message, 17910 (buffer error) message, 164, 17911 (sequence error) message, 17911XX terminal
Auto-Login Restart, 33downloading files to, 146DtV (Terminal Emulation Version), 229function keys, 33keyboard, 32Main menu, 44passwords, Set-up Parms menu, 45remapping keys, 135screen sizes, 82Set-up Parms menu, 45shift keys, 32StD/ (Set Terminal Parameters), 183tab keys, 33user’s guide, xx, 32WtD/ \F (Set Terminal Function Keys), 208
12-volt FLASH cloning cable, 9717XX terminal
Auto-Login Restart, 31downloading files to, 146DtV (Terminal Emulation Version), 229function keys, 31keyboard, 28Main menu, 44passwords, Set-up Parms menu, 45remapping keys, 135screen sizes, 81Set-up Parms menu, 45shift keys, 28
StD/ (Set Terminal Parameters), 183tab keys, 30user’s guide, xx, 28WtD/ \F (Set Terminal Function Keys), 208
2415 terminalAID-generating keys, 9Auto-Login Restart, 9configuring TE parameters, 100cursor keys, 8DK, display column spacing, 232downloading files to, 144DtV (Terminal Emulation Version), 229keyboard, 8Main menu, 42passwords, Set-up Parms menu, 43remapping keys, 135screen sizes, 76Set-up Parms menu, 43setting up, 2shift keys, 8Tab keys, 8user’s manual, xx, 8WtD/ \F (Set Terminal Function Keys), 208
2425 terminalAID-generating keys, 11Auto-Login Restart, 11configuring TE parameters, 100cursor keys, 10DK, display column spacing, 232downloading files to, 144DtV (Terminal Emulation Version), 229keyboard, 10Main menu, 42passwords, Set-up Parms menu, 43remapping keys, 135screen sizes, 76Set-up Parms menu, 43setting up, 2shift keys, 10Tab keys, 10user’s manual, xx, 10WtD/ \F (Set Terminal Function Keys), 208
2435A terminaladditional 5250 functions, 15AID-generating keys, 14Auto-Login Restart, 14configuring TE parameters, 100cursor keys, 12DK, display column spacing, 236DtV (Terminal Emulation Version), 229function keys, 13keyboard, 12Main menu, 42passwords, Set-up Parms menu, 43screen sizes
disabled icons, 76enabled icons, 77
Set-up Parms menu, 43shift keys, 12standard keys, 13

Index
295Native Terminal Emulation Programmer’s Guide
tab keys, 13user’s manual, xx, 12WtD/ \F (Set Terminal Function Keys), 208
2455 terminalAID-generating keys, 17Auto-Login Restart, 17configuring TE parameters, 100cursor keys, 16DK, display column spacing, 243downloading files to, 144DtV (Terminal Emulation Version), 229keyboard, 16Main menu, 42passwords, Set-up Parms menu, 43remapping keys, 135screen sizes, 78Set-up Parms menu, 43setting up, 2shift keys, 16Tab keys, 16user’s manual, xx, 16WtD/ \F (Set Terminal Function Keys), 208
2475 terminalAID-generating keys, 19Auto-Login Restart, 19configuring TE parameters, 100cursor keys, 18DK, display column spacing, 245downloading files to, 144DtV (Terminal Emulation Version), 229keyboard, 18Main menu, 42passwords, Set-up Parms menu, 43screen sizes, 79Set-up Parms menu, 43shift keys, 18Tab keys, 18user’s manual, xx, 18WtD/ \F (Set Terminal Function Keys), 208
248X terminalAID-generating keys, 19Auto-Login Restart, 19configuring TE parameters, 100cursor keys, 18DK, display column spacing, 245downloading files to, 144DtV (Terminal Emulation Version), 229keyboard, 18Main menu, 42passwords, Set-up Parms menu, 43remapping keys, 135screen sizes, 79Set-up Parms menu, 43
setting up, 2shift keys, 18Tab keys, 18user’s manual, xx, 18WtD/ \F (Set Terminal Function Keys), 208
3210 emulation, 623270 options, 59, 61
allow NAWS (negotiate about window size), 62any auto enter, 63auto entr scan, 62auto tab scan, 61BRT (bright) auto enter, 62device name, 62emulate 3210, 62keybrd unlock, 61origin set, 62telnet, 62
3270 power-up types, 1714 (length error) message, 1795 (disabled error) message, 1795-volt FLASH cloning cable, 975020 data collection pc, user’s manual, xx5055 data collection pc
Auto-Login Restart, 25configuring TE parameters, 101downloading files to, 144DtV (Terminal Emulation Version), 229Exit emuation and return to DOS, 103Main menu, 44opening the main menu, 103overlay, 24passwords, Set-up Parms menu, 45remapping keys, 135screen sizes, 80Set-up Parms menu, 45shift keys, 24StD/ (Set Terminal Parameters), 183terminal emulation, 101user’s guide, xx, 24WtD/ \F (Set Terminal Function Keys), 208
5250 options, 59allow alias, 60allow NAWS (negotiate about window size), 60auto tab scan, 59beep on error, 59destructive BS (backspace), 60device name, 60lock error msg (message), 61period-comma, 60skip fldexit (field exit), 60telnet, 59
5250 power-up types, 171
Index
296 Native Terminal Emulation Programmer’s Guide
59XX terminalAuto-Login Restart, 27DBCS code, 132downloading files to, 146DtV (Terminal Emulation Version), 229function keys, 27key repeat, 132keyboard, 26Main menu, 44overlay, 26passwords, Set-up Parms menu, 45remapping keys, 135screen sizes, 81Set-up Parms menu, 45shift keys, 26StD/ (Set Terminal Parameters), 183user’s guide, xx, 26WtD/ \F (Set Terminal Function Keys), 208
6 (gap error) message, 1796400 computer
alpha lock mode, 21Auto-Login Restart, 23configuring TE parameters, 100downloading files to, 144DtV (Terminal Emulation Version), 229Exit emuation and return to DOS, 101function keys, 22Main menu, 44opening the main menu, 100passwords, Set-up Parms menu, 45remapping keys, 135screen sizes, 80Set-up Parms menu, 45shift keys, 20StD/ (Set Terminal Parameters), 183Tab keys, 21user’s guide, xx, 20WtD/ \F (Set Terminal Function Keys), 208
6910 IGAP, 1666910 IGAP Operating Mode (CMT27), 1668 (check error) message, 179800 message, 284802.11 radio, 6802.11 radio test, 6400, 5055, 88802.1x supplicant radio driver, radio comm, 73
user authentication, 73998 message, 284999 message, 284AABC Codabar, 184
CONFIG.DAT option, 119Adapter, communication, 145, 146Adaptive Poll protocol, 128Add Line Feed to Responses (CMT4), 158Add-On 2, CONFIG.DAT option, 123, 124Add-On 5, CONFIG.DAT option, 123, 124Additional 5250 functions, 2435A, 15
AID-generating keys2415, 92425, 112435A, 142455, 172475, 19248X, 19bar code labels, 250
Allow Alias, 5250 options, 60Allow Alpha, CONFIG.DAT option, 126Allow NAWS (negotiate about window size)
3270 options, 625250 options, 60VT/ANSI options, 68
Alpha lock mode, 6400, 21Alphabetic keys, key remapping codes, 138Alternate screen columns, 132Alternate screen rows, 132Annunciator, 187Annunciator format, CONFIG.DAT option, 129Annunciator position, CONFIG.DAT option, 129Annunciators, 84Answerback, 64Any Auto Enter, 3270 options, 63Application
keypad mode, 67starting, 3VT cursor mode, 68
Application Cursor mode, 68Application mode, 67ASCII conversion chart, 186ASCII line feed character, 158Audio annunciator, 187Audio Annunciator (WtB), 187Auto Detect scanner, CONFIG.DAT option, 119Auto entr scan, 62
vt/ansi options, 63Auto tab scan
3270 options, 615250 options, 59vt/ansi options, 64
Auto wrap, VT/ANSI options, 69Auto-Encoded Code 39, CONFIG.DAT option, 124Auto-login
control characters, 108description, 106developing script files, 106disabling, 110
2415, 2425, 2435A, 2455, 2475, 248X, 11059XX, 17XX, 11XX, 1106400, 5055, 110
loading the script file, 1082415, 2425, 2435A, 2455, 2475, 248X, 10859XX, 17XX, 11XX, 1096400, 5055, 109
sample script files, 111script file commands, 106

Index
297Native Terminal Emulation Programmer’s Guide
Auto-Login Restart11XX, 3317XX, 312415, 92425, 112435A, 142455, 172475, 19248X, 195055, 2559XX, 276400, 23bar code label, 253description, 113key remapping code, 140
Automatic Terminal Enable (CMT13), 162BBack Tab
11XX, 3317XX, 302415, 82425, 102435A, 132455, 162475, 18248X, 185055, 246400, 21
Back Tab keybar code label, 250remapped character, 139
Backlightdisplay opts, 71LCD parms, 84
Backlight intensity, CONFIG.DAT option, 129Backlight state, CONFIG.DAT option, 127Backlight timer, CONFIG.DAT option, 127Backspace key, 254
2435A, 13“Bad option name” message, 116“Bad string length” message, 116“Bad value” message, 116Banks
erasing, 211expansion
WtD/ \B (Set Bank), 209WtD/ \yQ (Update, Display, and Print Table), 226WtD/\BU (Update Bank), 210WtD/\P (Print), 213WtD/\PF (Send and Get Data from an External De-
vice), 221WtD/\PM (Port in Use Message), 215WtD/\yR (Update and Print Table), 224WtD/\yS (Download Table), 194WtD/\yT (Download and Display Table), 199WtD/\yU (Update Table), 201WtD/\yV (Update and Display Table), 205
extension, 190
extension limitations, 190response codes, 209rules for designing, 209setting, 209updating, 210
Bar Code, symbologies, 259Codabar, 262Code 11, 262Code 128, 264Code 39, 263Code 39 concatenation, 263Code 39 full ASCII, 263Code 93, 264data string formats, 260EAN, 262I 2 of 5, 266MSI code, 267Plessey, 267S 2 of 5, 266UPC, 261
Bar code parms2415, 2425, 2435A, 2455, 2475, 248X, 5020, 700 Se-
ries, 516400, 5055, 59XX, 17XX, 11XX terminals, 52code 39 encoded, 51concatenate, 51RS232 stream, 51scan all flds, 51scan options, 52scanner type, 52stream scan, 51
Bar code scanningCONFIG.DAT options, 118length options, 56scan options to enable, 54
additional bar codes, 55Basic Service Set ID (B SSID). See Radio test (802.11)Battery capacity
icons, 40low capacity levels, 40low level status, 40
Battery gasicons for levels, 40low capacity levels, 40low level readings, 40
Battery pack, charge level, 40Baud rates, 128BC type char, 53BC Type Character, CONFIG.DAT option, 118Beep extension, 190Beep head set, 87, 130Beep internal, 87, 130Beep on error, 59Beeper
frequency, 131length, 131volume, 131
Beeper select, 87
Index
298 Native Terminal Emulation Programmer’s Guide
Beeper setup6400, 5055, 59XX, 17XX, 11XX, 86beep headset, 87beep internal, 87beeper select, 87error tone, 87key click, 86
frequency, 86length, 86volume, 86
Bit pattern, conversion, 186Blank expansion
WtD/\BU (Update Bank), 209, 210WtD/ \yQ (Update, Display, and Print Table), 226WtD/\P (Print), 213WtD/\PF (Send and Get Data from an External De-
vice), 221WtD/\PM (Port in Use Message), 215WtD/\yR (Update and Print Table), 224WtD/\yS (Download Table), 194WtD/\yT (Download and Display Table), 199WtD/\yU (Update Table), 201WtD/\yV (Update and Display Table), 205
Blank extension, 190Block, 72Block (line edit mode), 66Block blink, 71BRT (bright) Auto Enter, 3270 options, 62Buffers, 164, 168Buzzer, 183, 185
C“Can’t open file” message, 116Caps Lock key, 2435A, 13CCD, 184Center cursor, 82Center Cursor mode, CONFIG.DAT option, 130Changing text, 133Channel, CONFIG.DAT option, 117Character mode, 66Character sets, national replacement, 142Characters
key remapping codes, 137remapping, 140substituting national, 141
Charge level icons, 40Check Digit, CONFIG.DAT option, 124Check Digit 1, CONFIG.DAT option, 125Check Digit 2, CONFIG.DAT option, 125Clear key
2415, 92425, 112435A, 142455, 172475, 19248X, 195055, 2559XX, 276400, 22bar code label, 250
encoded sequence, 255escape sequence, 254remapped character, 139
Cloning opts, 96CMT (Return Parameter Values), 152CMT, (Set All Parameters), 153CMT0 (Response Delay), 155CMT1 (Data Time-Out), 156CMT10 (Extended Response Mode), 161CMT13 (Automatic Terminal Enable), 162CMT2 (Interactive Mode), 157
and CMT5 (Set Gap Time-Out), 159and normal communication flow, 177compatibility with legacy systems, 178
CMT21 (One-Character Address Mode), 163CMT22 (Multiple Buffering Mode), 164CMT27 (6910 IGAP Operating Mode), 166CMT4 (Add Line Feed to Responses), 158CMT5 (Gap Time-Out), 159CMT8 (Set Data Error Checking), 160CMTI (Set Default Parameters), 155, 167Codabar, 184, 262
CONFIG.DAT option, 119Code 11, CONFIG.DAT option, 119, 125Code 128, 184
CONFIG.DAT option, 120, 126Code 39, 184
CONFIG.DAT option, 120Code 39 Encoded, 51
CONFIG.DAT option, 118Code 93, 184
CONFIG.DAT option, 120Codes
11, 262128, 26439, 26339 concatenation, 26339 full ASCII, 26393, 264
Codes in terminal number field, 284Coding host application, 283Cold start, 74Columns
remote display, CONFIG.DAT option, 127terminal screen size, 132wireless station screen size, CONFIG.DAT option, 130
COM select, 75CONFIG.DAT option, 129
Commandsabbreviated radio terminal for Native sockets, 283diagnostic, 151Native extensions, 190parameter, 151terminal, 181
Communication, 46Communication Adapter, 145, 146Communication flow, 177Compatibility with legacy systems, 178, 208Computer Identics 2 of 5, 184
CONFIG.DAT option, 120
Index
299Native Terminal Emulation Programmer’s Guide
Concatenate, 51, 53CONFIG.DAT option, 118
Concatenation, 263Configuring TE parameters, 41
5055, 1016400, 100trakker antares, 100
Contrast mode, CONFIG.DAT option, 127Control bits, 195Control byte, input field, 195Control characters, 108Control keys, 2435A, 13Controllers, 152, 178, 208Copy setup, session menu, 98Copying files, 144Corner mode, 83
CONFIG.DAT option, 130CR to CRLF (carriage return to carriage return/line feed),
63CRC-16 data check, 160Cursor keys
2415, 82425, 102435A, 122455, 162475, 18248X, 18bar code labels, 250
Cursor mode, 71CONFIG.DAT option, 127VT cursor mode, 68
Cursor Position extension, 190Custom configuration files
CFGLIT.DAT, 133CONFIG.DAT
parameter formats, 115parameters and qualifiers, 116prompting for a value, 114sample set-up file, 115syntax, 114verifying your configuration, 116
Cyclic redundancy checking, 160
DData Decode, CONFIG.DAT option, 124Data stream, 58
CONFIG.DAT option, 117initialization files, 134
Data strings, 209Data Time-Out (CMT1), 156Default values
CONFIG.DAT, 116restoring, 74
Defaultsbps, 225CMT0 (Set Response Delay), 155CMT1 (Set Data Time-Out), 156CMT10 (Enable Extended Response Mode), 161CMT13 (Automatically Enable Terminal), 162CMT2 (Enable Interactive Mode), 157
CMT22 (Multiple Buffering Mode), 164CMT4 (Add Line Feed to Responses), 158CMT5 (Set Gap Time-Out), 159CMT8 (Set Data Error Checking), 160maintaining with CMT, (Set All Parameters), 154P values, 214port in use message, 215restoring, 167, 175RS-232 port options, 213StD (Set Terminal Parameters), 183WtD (Write Display), 189, 197WtD/\PG (Get Data from an External Device), 218WtD/\yR (Print Table), 225
Define height, 85CONFIG.DAT option, 129
Define origin, 84Define width, 85
CONFIG.DAT option, 129DEL (delete), 139Del key, encoded sequence, 254DEL to BS (delete to backspace), 63Screen lock, 64Delay time, 155Delete (DEL), 139Delete key, key remapping code, 139Demonstration program, Native sockets, 285Destructive BS (backspace), 5250 options, 60Developing auto-login script files, 106Device name
3270 options, 625250 options, 60
Disabling auto-login, 1102415, 2425, 2435A, 2455, 2475, 248X, 11059XX, 17XX, 11XX, 1106400, 5055, 110
Disabling terminals, 169Disconnect Val, 128DiscreteBells, 64Display annunciators, 38
position 0, radio, 38position 1
communications loss, 38message, 38receiving, 38receiving data, 38sending, 38
position 1-3, laser scanner in use, 39position 2
input inhibited, 39insert mode, 39
position 3alphabetic character shift mode, 39left shift mode, 39right shift mode, 39
position 4alpha lock, 39battery is charging, 39
position 4-6, low battery condition, 40position 4-8, current row/column position, 40position 5, error, 39

Index
300 Native Terminal Emulation Programmer’s Guide
position 5-8, battery pack gas gauge icons, 40position 6
bad battery, 39temperature, 39
positions 4 and 5caps lock, 40num lock, 40
Display column spacing2415 terminal, 2322425 terminal, 2322435A terminal, 2362455 terminal, 2432475 terminal, 245248X terminal, 245
Display options, 71backlight, 71block, 72block blink, 71cursor mode, 71
block, 72block blink, 71underline, 71underline blink, 71
enabled, remote display, 72remote baud, 72remote display, 72
enabled, 72remote baud, 72remote type, 72screen size, 72
remote type, 72screen size, 72underline, 71underline blink, 71
Display Table (WtD/\y)and WtD/\yS (Download Table), 194and WtD/\yT (Download and Display Table), 199and WtD/\yV (Update and Display Table), 205description, 197
Display test, 90Displaying tables, 197, 199DK. See Display column spacingDME (Echo-Back Diagnostics), 174DMP (Reset), 175DMV (Software Version), 176DOS 6.22, terminal emulations, 101Double-byte character set, 59xx parameter, 132Download and Display Table (WtD/\yT), 199Download Table (WtD/\yS), 194, 197, 199Downloading data to terminal, 192, 194Downloading files, 144
flash and utility files, 109INTERLNK/INTERSVR, 109RF communications, 109serial ports, 108
Downloading tables, 194, 199Drop Leading, CONFIG.DAT option, 121Drop Trailing, CONFIG.DAT option, 121DtE (Terminal Echo-Back Diagnostic), 230DtV (Terminal Emulation Version), 229, 283
Dual sessions, 6
EE (Enable Terminals), 169EAN, 184, 262
CONFIG.DAT option, 120EBCDIC, 141Echo-Back Diagnostics (DME), 174Editing files, 144EHLLAPI values, 136Element decode, CONFIG.DAT option, 124Emulate 3210, 62Enable Terminals (E), 169Enabled, remote display, 72Enabling
scanning, 189, 195, 196terminals, 169
Encoded Code 39CONFIG.DAT option, 124key press sequences, 254
Encoded sequences, 254End (viewport) command, 5Enter
auxiliary key, using to navigate through menus, 36key remapping code, 139
Enter keybar code label, 251encoded sequence, 254
EOF key, escape sequence, 254Erase Bank (WtD/\BE), 211Erase EOF key, remapped character, 139Erase Field, 5Erase Last Word, 5Error messages, 179
CONFIG.DAT, 116Error tone, 87
beeperfrequency, 131length, 131volume, 131
Escape characters (Encoded Code 39), 256European Article Numbering code. See EANExchanging files, 144Exit emuation and return to DOS
5055, 1036400, 101
Exit menus, 94Expand 8 to 13, CONFIG.DAT option, 124Expand E to A, CONFIG.DAT option, 123“Expected numeric” message, 116Extended Code 39, 184
CONFIG.DAT option, 124Extended commands, 59Extended Response Mode (CMT10), 161Extended Write Display (WtD//), 192Extensions, Native command, 190
FF (Terminal Power-Up Type), 173F1 is FUNC-0, 127F1MAP1, 208

Index
301Native Terminal Emulation Programmer’s Guide
Fast Cursor Left command, 5Fast Cursor Right command, 5FileCopy utility, 144Files
custom parameter set-up, 114downloading, 144
First in chain (/F), 193Fixed bar code lengths
fixed length 1, CONFIG.DAT option, 121fixed length 2, CONFIG.DAT option, 122fixed length 3, CONFIG.DAT option, 122fixed length 4, CONFIG.DAT option, 122
Flash and utility files, downloading files, 109Flash memory
reprogramming, 145upgrades, 145
Font set, 269Foreground session, CONFIG.DAT option, 131Forward Tab
11XX, 3317XX, 302415, 82425, 102455, 162475, 18248X, 185055, 246400, 21
Forward Tab key2435A, 13bar code label, 250
Frequencybeeper setup, 86CONFIG.DAT option, 117
Full ASCII, CONFIG.DAT option, 125Function keys, 208
11XX, 3317XX, 312415, 92425, 112435A, 132475, 19248X, 195055, 2559XX, 276400, 22bar code labels, 251encoded sequences, 254key remapping codes, 139
GG (Reset Terminal), 182, 283Gap Time-Out (CMT5), 159Get Data from an External Device (WtD/\PG), 218Get Transmit Message Status (?), 168
HHard resets
5055, 1036400, 101
Help, where to find more on, INTERLNK, INTERSVR,146
Hexadecimal characters, 191Hexadecimal conversion chart, 186Histogram, 93Home (viewport) command, 5Home key, encoded sequence, 254Host
adding character count to responses, 161application program, 279buffering commands from, 164communication basics, 280programming, 281time delay for responding to command, 155
Host A, B, or C, CONFIG.DAT option, 117Host mode, 6910 IGAP, 166Host Name, CONFIG.DAT option, 117Host view size, 58HostName command (auto-login), 106
II 2 of 5. See Interleaved 2 of 5IBM mnemonics, 106Illustrations, keyboards
11XX, 3217XX, 282415, 82425, 102435A, 122455, 162475, 18248X, 185055, 2459XX, 266400, 20
Initialization screens, 3, 41, 995055, 1016400, 100trakker antares, 100
Input command, 106
Index
302 Native Terminal Emulation Programmer’s Guide
Input fieldcontrol byte, 195description, 194replacing pairs together, 203rules for designing, 196WtD/, 188WtD/ \yQ (Update, Display, and Print Table), 227WtD/ \yR (Update and Print Table), 225WtD/ \yU (Update Table), 201WtD/ \yV (Update and Display Table), 205, 206WtD// , 192WtD/\y, 197WtD/\y (Display Table), 198WtD/\yQ, 226WtD/\yQ (Update, Display, and Print Table), 226, 227WtD/\yR, 224WtD/\yR (Update and Print Table), 225WtD/\yS (Download Table), 194WtD/\yT, 199WtD/\yT (Download and Display Table), 199, 200WtD/\yU (Update Table), 201WtD/\yV, 205
InputHidden command, 106Insert key
encoded sequence, 254remapping code, 139
Installing INTERLNK/INTERSVR, 144Interactive Mode (CMT2), 157
and CMT5 (Set Gap Time-Out), 159and normal communication flow, 177compatibility with legacy systems, 178
Interleaved 2 of 5, 185, 266CONFIG.DAT option, 120, 125
INTERLNK, 146downloading files, 109installation, 145installing, 146prerequisites for flash update, 145used to interconnect 5055 to PC, 146where to find more help, 146
Intermec Application Server, system manual, xxINTERSVR
downloading files, 109used for, 146where to find more help, 146
K
Key click, 86frequency, 86, 131length, 86, 131volume, 86, 131
Key code table, 137Key repeat, 132Key uppercase, 85
CONFIG.DAT option, 129Keyboard “0” command, 107Keyboard “1” command, 107Keyboard opts, 95Keyboard test, 91
Keyboards11XX, 3217XX, 282415, 82425, 102435A, 122455, 162475, 18248X, 1859XX, 26remapping keys, 135
Keybrd unlock, 61Keypad mode, 67Keypads. See Keyboards
LLAN ID, CONFIG.DAT option, 117Laser scanner, CONFIG.DAT option, 119Last in chain (/L), 193Lazy mode, 83
CONFIG.DAT option, 130LCD contrast, 75, 129LCD parms (parameters), 75
annunciators, 84backlight, 84define height, 85define width, 85key uppercase, 85LCD contrast, 75screen mode, 82
center cursor, 82corner mode, 83define origin, 84lazy mode, 83locked mode, 83page mode, 83
screen size, 76, 8511XX, 8217XX, 812415, 762425, 762435A (disabled icons), 762435A (enabled icons), 772455, 782475, 79248X, 795055, 8059XX, 816400, 80
scroll window, 85define height, 85define width, 85screen size, 85tab size, 85
tab size, 85Legacy multiplexers and controllers, 178Length, beeper setup, 86Length options, 56Length of tables, 194, 196Line Edit (block) mode, 66

Index
303Native Terminal Emulation Programmer’s Guide
Line feed character, 158Loading auto-login script file, 108
2415, 2425, 2435A, 2455, 2475, 248X, 10859XX, 17XX, 11XX, 1096400, 5055, 109
Local echo, 64Lock Error Msg (message), 5250 options, 61Lock mode, 66Locked mode, 83Longitudinal redundancy checking, 160LRC, 160Lucent radio test, 6400, 5055, 88
M
Macroscreating, 136nesting, 137
Main menu, 422415, 2425, 2435A, 2455, 2475, 248X, 425055, 1036400, 1006400, 5055, 59XX, 17XX, 11XX, 44opening, 41, 254options, 41password, CONFIG.DAT option, 129
Main menu 2, 95cloning opts, 96keyboard opts, 95Save parms, 95session menu, 98
copy setup, 98set hot key, 98switch, 98
Maximum bar code length, CONFIG.DAT option, 122Maximum lengths
bar code, 184characters of host data, 174host data, 179keyboard input, 189Norand Native commands, 281WtD/\yS (Download Table), 196
Memory, reprogramming flash, 145Memory view test, 91Menu password, 74Menus, opening, 41, 254Messages
See also Response codes800, 284998, 284999, 284in terminal number field, 284NUI_DEAD, 284NUI_BAD, 284NUI_BOOT, 284NUI_OK, 284NUI_STOP, 284NUI_TIMEOUT, 284port in use, 215power-up, 182server or gateway error, 179
write display, 179WtD (Write Display), 282
Middle of chain (/M), 193Minimum bar code length, 184
CONFIG.DAT option, 123“Missing ‘;’ ” message, 116“Missing ‘=’ ” message, 116MOD 10, 184Mod 10 check, 52
CONFIG.DAT option, 119, 126Mod 11 check, CONFIG.DAT option, 126Mode, CONFIG.DAT option, 117MSI Plessey, 267Multiple Buffering Mode (CMT22), 164, 165Multiplexers, 152, 178, 208
NNational replacement character (NRC) sets, 142Native, 70
CONFIG.DAT option, 127Native power-up types, 171Native sockets
commands and responses, 283communication basics, 280configuration, 284demonstration program, 285description, 279host programming, 281normal communication, 283responses from the server, 284supported products, 279syntax for communicating with terminals, 283syntax source, 284
NC1100 Power Supply and Charger, 97Network, 2No UCC Type, CONFIG.DAT option, 126Non-Telnet power-up types, 171Normal communication flow, 177NRC (national replacement character) sets, 142NUI_BAD message, 284NUI_BOOT message, 284NUI_DEAD message, 284NUI_OK message, 284NUI_STOP message, 284NUI_TIMEOUT message, 284Number field, terminal codes, 284Numbers test, 93Numeric, keypad mode, 67Numeric Keypad mode, 67Numeric keys, key remapping codes, 137
OOne-byte addressing, 182One-character address mode, 163, 175One-Character Address Mode (CMT21), 163Opening main menu
5055, 1036400, 100
Opening TE menus, 41, 254Opening the TE application, 3Origin set, 62
Index
304 Native Terminal Emulation Programmer’s Guide
Overlays5055, 2459XX, 26
PP values, 214Packet driver test, 92
histogram, 93packet stats (statistics), 92
Packet stats (statistics), 92Page mode, 83
CONFIG.DAT option, 130Parameters
radio terminalinput, 188, 192X (screen mode), 212Y (screen mode), 212
terminalbar code, 183input field control byte, 195operating control, 183RS-232, 223
ParmsBySession, CONFIG.DAT option, 119Pass-Through Hex Character extension, 191Pass-Through Hex Stream extension, 190Passwords
Main Menu, CONFIG.DAT option, 128, 129saving parameters, 95Set-up Parms menu
2415, 2425, 2435A, 2455, 2475, 248X, 436400, 5055, 59XX, 17XX, 11XX, 45CONFIG.DAT option, 132
Pause “xxxxx” command, 107PC char set, 68PC100 PCMUX, 178Period-comma, 5250 options, 60Peripherals test, 88Plessey, 267
CONFIG.DAT option, 120Port, Native sockets, 280Port in Use Message (WtD/\PM), 215Port number, CONFIG.DAT option, 117Power-up message, 182Power-up types, 171PRI (primary version). See Radio test (802.11)Print (WtD/\P), 213Print device, 75
CONFIG.DAT option, 129Print Table (WtD/\yP), 223Program name, 6
CONFIG.DAT option, 132Program version, 6
CONFIG.DAT option, 132PromptSessionStart command, 107Protocol options
3210 emulation, 623270 options, 615250 options, 59VT/ANSI, 63
Protocol opts, 573270 options, 61
allow NAWS (negotiate about window size), 62any auto enter, 63auto entr scan, 62auto tab scan, 61BRT (bright) auto enter, 62device name, 62emulate 3210, 62keybrd unlock, 61origin set, 62telnet, 62
5250 options, 59allow alias, 60allow NAWS (negotiate about window size), 60auto tab scan, 59beep on error, 59destructive BS (backspace), 60device name, 60lock error msg (message), 61period-comma, 60skip fldexit (field exit), 60telnet, 59
data stream, 58extended commands, 59host view size, 58RS232 setup
RS232 baud rate, 65RS232 data bits, 65RS232 flow, 65RS232 parity, 65RS232 stop bits, 65
VT/ANSI options, 63allow NAWS (negotiate about window size), 68answerback, 64application (keypad mode), 67application (cursor mode), 68auto entr scan, 63auto wrap, 69block (line edit mode), 66char (character mode), 66CR to CRLF (carriage return to carriage return/line
feed), 63cursor (VT cursor mode), 68DEL to BS (delete to backspace), 63discretebells, 64keypad mode, 67local echo, 64lock mode, 66native, 70numeric (keypad mode), 67PC char set, 68RS232 setup, 65screen lock, 64send XON, 67auto tab scan, 64telnet, 66Term (terminal) setup, 67terminal ID, 69

Index
305Native Terminal Emulation Programmer’s Guide
terminal mode, 68transmit BS, 66userkey locked, 65VT cursor mode, 68VT220 mode, 66
Protocols3270, 595250, 59Adaptive Poll, 128RTC, 128SST, 128VT/ANSI, 57, 58, 59WTP, 6
QQuiet Zone, CONFIG.DAT option, 125
RR (Read), 170
and CMT1 (Set Data Time-Out), 156and WtD/ \y (Display Table), 198and WtD/ \yT (Download and Display Table), 200and WtD/ \yV (Update and Display Table), 206and WtD/\y (Display Table), 197and WtD/\yQ (Update, Display, and Print Table), 227and WtD/\yR (Update and Print Table), 225error message, 179
Radio baud rates, 128Radio comm, 73
2415, 2425, 2435A, 2455, 2475, 248X, 736400, 5055, 59XX, 17XX, 11XX, 73security ID, 73user authentication, 73
Radio configuration number, CONFIG.DAT option, 117Radio number, CONFIG.DAT option, 118Radio protocols, 128Radio test (802.11)
6400, 5055, 88B SSID (Basic Service Set ID), 89PRI (primary version), 89RFLINK, 89SEC (secondary version), 89SNR (Signal-to-Noise Ratio), 89SSID (Service Set ID), 89TxRate, 89
RC2250, 178RC3250, 178RCB4000, 178RCB4030, 178Read (R), 170
and CMT1 (Set Data Time-Out), 156and WtD/ \y (Display Table), 198and WtD/ \yT (Download and Display Table), 200and WtD/ \yV (Update and Display Table), 206and WtD/\y (Display Table), 197and WtD/\yQ (Update, Display, and Print Table), 227and WtD/\yR (Update and Print Table), 225error message, 179
Redundancy, 52CONFIG.DAT option, 119
Redundancy bit, 184Remap command, 135Remapping characters, 140, 141
creating a macro, 136EHLLAPI values, 136key code table, 137key or two-key sequence, 135nesting, 137
Remapping keys, 135per session, 137
Remote baud, 72CONFIG.DAT option, 127
Remote display, 72CONFIG.DAT option, 127
Remote type, 72Renaming auto-login script files, 110
2415, 2425, 2435A, 2455, 2475, 248X, 11059XX, 17XX, 11XX, 1106400, 5055, 110
Repeat Response (T), 172Reprogramming, flash memory, 145Reset (DMP), 175Reset Terminal (G), 182, 283Resetting the server or gateway, 175Resetting the terminal, 182, 283Reshow command, 5Response codes
WtD// (Extended Write Display), 192WtD/\B (Set Bank), 209WtD/\BE (Erase Bank), 211WtD/\BU (Update Bank), 210WtD/\C (Set Screen Mode), 212WtD/\F (Set Terminal Function Keys), 208WtD/\P (Print), 214WtD/\PF (Send and Get Data from an External De-
vice), 221WtD/\PG (Get Data from an External Device), 219WtD/\PM (Port in Use Message), 215WtD/\PS (RS-232 Port Options), 217WtD/\T (Tone), 228WtD/\yP (Print Table), 223WtD/\yQ (Update, Display, and Print Table), 227WtD/\yR (Update and Print Table), 225WtD/\yS (Download Table), 194WtD/\yT (Download and Display Table), 200WtD/\yU (Update Table), 202WtD/\yV (Update and Display Table), 206
Response Delay (CMT0), 155Restart “x” command, 107Return key, 2435A, 13Return Parameter Values (CMT), 152Return result, CONFIG.DAT option, 132Returning parameter values, 152RF communications, downloading files, 109RFLINK. See Radio test (802.11)RM1202, 178RM1204, 178RM2216, 178RM3216, 178RM3242, 178
Index
306 Native Terminal Emulation Programmer’s Guide
RM60/70, 6400, 5055, 48RM80/90, 6400, 5055, 48Rows
remote display, CONFIG.DAT option, 127terminal screen size, 132wireless station screen size, CONFIG.DAT option, 130
RS-232, stream, CONFIG.DAT option, 119RS-232 device, 218RS-232 port
port in use message, 215port options, 217printing table data to, 223receiving data from external device, 221sending data to external device, 213, 221sending table data to, 226
RS-232 Port Options (WtD/\PS), 217RS232 baud rate, 65RS232 data bits, 65RS232 flow, 65RS232 parity, 65RS232 setup, 65RS232 stop bits, 65RS232 stream, 51RS232 test, 90RT3210 hand-held computer, 62RTC diag mode, 128RTC over TCP, CONFIG.DAT option, 118RTC protocol, 128, 162RTC/WTP, 46, 48SS 2 of 5. See Standard 2 of 5Sample auto-login script files, 111Save parms, 95“Save parms” message, 94Scan All Fields, CONFIG.DAT option, 119Scan all flds (fields), 51, 53Scan options, 52
length options, 56Scan postamble character, CONFIG.DAT option, 119Scan postchar, 53Scan preamble character, CONFIG.DAT option, 119Scan prechar, 53Scan timeout, 53
CONFIG.DAT option, 119Scanned data
R (Read), 170setting byte for field, 195WtD// (Extended Write Display), 192
Scannerand WtD/ (Write Display), 188enabling, 184, 185
Scanner test, 91Scanner type, 52
CONFIG.DAT option, 119Scanning, enabling, 189, 195, 196
Screen columns, 132CONFIG.DAT option, 130
Screen mode, 82center cursor, 82CONFIG.DAT option, 130corner mode, 83define origin, 84lazy mode, 83locked mode, 83page mode, 83
Screen rows, 132CONFIG.DAT option, 130
Screen size, 76, 85, 13211XX, 8217XX, 812415, 762425, 762435A
disabled icons, 76enabled icons, 77
2455, 782475, 79248X, 795055, 8059XX, 816400, 80CONFIG.DAT option, 130
CONFIG.DAT option, 130remote display, 72
Scroll setting, CONFIG.DAT option, 130Scroll window, 85
CONFIG.DAT option, 130Security ID, 73, 128Segments of a chain, 193Send and Get Data from an External Device (WtD/\PF),
221Send command, 106Send XON, 67Sending data to a terminal, 188Serial ports, downloading files, 108Server IP, CONFIG.DAT option, 118Session menu, 98
copy setup, 98set hot key, 98switch, 98
Set All Parameters (CMT,), 153Set Bank (WtD/\B), 190, 209Set Data Error Checking (CMT8), 160Set Default Parameters (CMTI), 155, 167Set hot key
CONFIG.DAT option, 131session menu, 98
Set Screen Mode (WtD/\C), 212Set Terminal Function Keys (WtD/\F), 208Set Terminal Parameters (StD), 183, 283
Index
307Native Terminal Emulation Programmer’s Guide
Set-up parmsbarcode parms (2415, 2425, 2435A, 2455, 2475, 248X,
5020, 700 Series)code 39 encoded, 51concatenate, 51RS232 stream, 51scan all flds, 51stream scan, 51
barcode parms (6400, 5055, 59XX, 17XX, 11XX)scan options, 52scanner type, 52
COM select, 75display options, 71menu password, 74print device, 75radio comm, 73RTC/WTP, 46, 48
WTP settings, 46, 48scan options
additional bar codes, 55bc type char, 53concatenate, 53enable bar codes, 54length, 56mod 10 check, 52redundancy, 52scan all flds, 53scan postchar, 53scan prechar, 53scan timeout, 53stream scan, 53
Set-up Parms menu2415, 2425, 2435A, 2455, 2475, 248X, 436400, 5055, 59XX, 17XX, 11XX, 45CONFIG.DAT option, 132
Parameters, server or gateway6910 IGAP, 166restoring default values, 167, 175returning values, 152setting at once, 153
Setting operating control parameters, 183Setting up the network, 2Setting up the terminal, 2Shift keys, 36
11XX, 3217XX, 282415, 82425, 102435A, 12, 132455, 162475, 18248X, 185055, 2459XX, 266400, 20
SEC (secondary version). See Radio test (802.11)Service Set ID (SSID). See Radio test (802.11)
Signal-to-Noise Ratio (SNR). See Radio test (802.11)Skip FldExit (field exit), 5250 options, 60SNA, CONFIG.DAT option, 118Software Version (DMV), 176Software version number, 176, 229Space bar key
2435A, 13key remapping code, 137
Spacing parameters2415 terminal, 2322425 terminal, 2322435A terminal, 2362455 terminal, 2432475 terminal, 245248X terminal, 245
Special characters, encoded sequences, 255, 255SST diag mode, 128SST protocol, 128Standard 2 of 5, 266Standard keys, 2435A, 13START decode, CONFIG.DAT option, 125Starting the TE application, 3Startup menu, WtD/ (Write Display), 284Status codes, 168Status command, 5Status line, 5StD (Set Terminal Parameters), 183, 283Straight 2 of 5, 184
CONFIG.DAT option, 120Stream Scan, CONFIG.DAT option, 119Stream scan, 51, 53Switch, session menu, 98Symbologies, 259
CONFIG.DAT option, 119Symbols, key remapping codes, 137“Syntax error” message, 116System 0 UPCE, CONFIG.DAT option, 123System 1 UPCE, CONFIG.DAT option, 123System messages, CONFIG.DAT, 116
TT (Repeat Response), 172Tab key, bar code labels, 250Tab keys
11XX, 3317XX, 302415, 82425, 102435A, 132455, 162475, 18248X, 185055, 246400, 21encoded sequences, 254
Tab size, 85CONFIG.DAT option, 130
Index
308 Native Terminal Emulation Programmer’s Guide
Tablesdefinition of, 194designing, 194displaying, 197, 205, 226downloading, 194downloading and displaying, 199erasing
WtD/ \yS (Download Table), 194WtD/ \yT (Download and Display Table), 199WtD/ \yU (Update Table), 201
length of, 194, 196number of pairs, 194P values, 214printing, 224, 226printing data in, 223rules for designing, 196sizes, 194updating, 201, 205, 224, 226
TCP/IP Direct Connect, 2TD2400 Communications Dock, xxTE application, opening, 3TE configuration menus
bar code label, 41, 254configuring options, 41
5055, 1016400, 100trakker antares, 100
key remapping code, 140navigating through, 36opening, 41restarting, 98
Telnet3270 options, 625250 options, 59CONFIG.DAT option, 118vt/ansi options, 66
Telnet power-up types, 171Term (terminal) setup, 67Terminal Echo-Back Diagnostic (DtE), 230Terminal emulation program version, 229Terminal Emulation Version (DtV), 229, 283Terminal emulations, 101
updating 50DS1000, 101Terminal Font Set table, 269Terminal ID, VT/ANSI options, 69Terminal mode, 68Terminal number field codes, 284Terminal Power-Up Type (F), 173Terminal power-up types, 171Terminal type, CONFIG.DAT option, 118Terminating keys, 256Tests, 88
802.11 radio, 6400, 5055, 88display, 90keyboard, 91memory view, 6400, 91numbers, 93packet driver, 92
histogram, 93packet stats (statistics), 92
peripherals, 88radio test, 6400, 5055, 88RS-232, 90scanner, 91timed numbers, 93
Three-byte addressing, 182Three-character address mode, 175Time
between characters before terminating message, 159,179
delay to respond to host command, 155server or gateway waits for terminal data, 156
Timed numbers test, 93Tone (WtD/\T), 228Tool Kit, INTERLNK and INTERSVR, 146Trailing characters, 60Transmit BS mode, 66Transmit_rate values (Lucent radios), 88Troubleshooting, 88, 179Turning on the audio annunciator, 187TxRate. See Radio test (802.11)Type, remote display, CONFIG.DAT option, 127Type-ahead, CONFIG.DAT option, 131
UUCC F1 Value, CONFIG.DAT option, 126UCC/EAN, CONFIG.DAT option, 126Underline, 71Underline blink, 71Unit number, CONFIG.DAT option, 118Universal Product Code. See UPC“Unknown type” message, 116Unsupported commands, 5Up and Down arrow keys, 37UPC, 184, 261
CONFIG.DAT option, 120UPC A, 184UPC E, 184Update and Display Table (WtD/\yV), 205Update and Print Table (WtD/\yR), 224Update Bank (WtD/\BU), 210Update Table (WtD/\yU), 201, 205Update Display, and Print Table (WtD/\yQ), 226Updating 50DS1000, 101Updating tables, 201User Auth, 73, 128UserKey locked, 65
V“Value out of range” message, 116Version info, 93Version number, 176, 229Versions
building customized, 148CONFIG.DAT options, 132of program name, 6using CHECKCFG to display, 146using FLSHCONV to display, 147
Vertical bar, 190Volume, beeper setup, 86VT cursor mode, 68

Index
309Native Terminal Emulation Programmer’s Guide
VT/ANSI options, 59, 63allow NAWS (negotiate about window size), 68answerback, 64application
keypad mode, 67VT cursor mode, 68
auto entr scan , 63auto tab scan, 64auto wrap, 69block (line edit mode), 66char (character mode), 66CR to CRLF (carriage return to carriage return/line
feed), 63cursor, VT cursor mode, 68DEL to BS (delete to backspace), 63discretebells, 64keypad mode, 67local echo, 64lock mode, 66menu options, 57native, 70numeric, keypad mode, 67PC char set, 68RS232 baud rate, 65RS232 data bits, 65RS232 flow, 65RS232 parity, 65RS232 setup, 65RS232 stop bits, 65screen lock, 64send XON, 67telnet, 66term (terminal setup), 67terminal ID, 69terminal mode, 68transmit BS, 66userkey locked, 65VT cursor mode, 68VT220 mode, 66
VT220, 68VT220 mode, 66VT220 power-up types, 171VT320, 68
W
WaitFor command, 106Wand Emulate scanner, CONFIG.DAT option, 119Wand scanner, CONFIG.DAT option, 119Window/viewport, 250Write Display (WtD), 188, 193, 283Write display error codes, 282WtB Audio Annunciator), 187WtD (Write Display), 188, 193, 283WtD// (Extended Write Display), 192WtD/\B (Set Bank), 190, 209WtD/\BE (Erase Bank), 211WtD/\BU (Update Bank), 210WtD/\C (Set Screen Mode), 212WtD/\F (Set Terminal Function Keys), 208WtD/\P (Print), 213WtD/\PF (Send and Get Data from an External Device),
221WtD/\PG (Get Data from an External Device), 218WtD/\PM (Port in Use Message), 215WtD/\PS (RS-232 Port Options), 217WtD/\T (Tone), 228WtD/\y (Display Table)
and WtD/\yS (Download Table), 194and WtD/\yT (Download and Display Table), 199and WtD/\yV (Update and Display Table), 205description, 197
WtD/\yP (Print Table), 223WtD/\yQ (Update, Display, and Print Table), 226WtD/\yR (Update and Print Table), 224WtD/\yS (Download Table), 194, 197, 199WtD/\yT (Download and Display Table), 199WtD/\yU (Update Table), 201, 205WtD/\yV (Update and Display Table), 205WTP, 6WTP settings, 46, 48
X
XOrigin, CONFIG.DAT option, 130
YYOrigin, CONFIG.DAT option, 130
Index
310 Native Terminal Emulation Programmer’s Guide
Files IndexNumbers1700BIOS.EXE, 14850BDXXXX.EXE, 14550DS1000, 101
AAUTOEXEC.BAT, 102
updating 50DS1000, 101AUTOLOG.SCR, 106, 108
CCFGLIT.DAT, 35, 116, 133, 147, 148CFGLIT.TXT, 133CHECKCFG.EXE, 114, 116, 146CONFIG.DAT, 43, 45, 74, 99, 114, 116, 144, 146CONFIG.SYS, 145, 146
updating 50DS1000, 101
FFLSHCONV.EXE, 109, 147FWP110H0, 6FWP111H0, 6FWP114H0, 6FWP116H0, 6FWP118H0, 6FWP170H0, 6FWP170H0.EXE, 148FWP170H0.HEX, 148FWP170H3, 6FWP171H0, 6FWP171H3, 6FWP174H0, 6FWP174H3, 6FWP176H0, 6FWP176H3, 6FWP178H0, 6FWP178H3, 6FWP240H0, 6FWP591H1, 6FWP592H0, 6
FWP594H0, 6FWP596H0, 6FWP598H0, 6FWP640H0, 6FWP640H4, 6FWP64TH0, 6FWP64TH4, 6FWP650H0, 6
terminal emulations, 101FWP65TH0, 6
IINTERLNK.EXE, 145, 146INTERSVR.EXE, 146
KKERNEL.EXE, 148
LLOADER.EXE, 108, 144
MMAKELIT.EXE, 133
NNATIVE.INI, 134NATIVE.XLT, 140, 141, 143NET.CFG, 48, 88NEW.HEX, 109Norand Utilities, 146NORAND.FNT, 148
PPROGDUX.EXE, 109, 149
RREMAP.CFG, 135
TT24XCOPY.EXE, 108TOOLS.EXE, 109, 114
WWTPPKT.EXE, 48


Corporate Headquarters6001 36th Avenue WestEverett, Washington 98203U.S.A.
tel 425.348.2600
fax 425.355.9551
www.intermec.com
Native Terminal Emulation Programmer's Guide - March 2005
*977-055-006F*P/N 977-055-006 REV F