project manager manual - inlinkz inlinkz project manager - setting up.pdf · project manager manual...
TRANSCRIPT
Project Manager
Manual

Project Manager Manual - 1
Project Manager Manual
1 Project Manager Manual
1.1 Inlinkz Project Manager 4
1.2 Create a new product list using the existing shops 6
1.3 Link one product to two different shops 20
1.4 The Project Manager Dashboard 24
1.5 Project and Product navigation 34
1.6 Create your own product library 39
1.7 Manage products in your library 58
1.8 Manage affiliates 59

Project Manager Manual - 2
Inlinkz Project Manager
This is a step by step tutorial that will guide you through Inlinkz Project Manager. Learn how to
create your own product lists, how to add new items in your pool and how to connect your Inlinkz
account with your affiliate providers.
Sign In
Sign in using your inlinkz account.
If you don't have an inlinkz account make sure to click on "Register Now" and create one.
Inlinkz Dashboard

Project Manager Manual - 3
When you sign in you have access to your Inlinkz home page.
You want to use the Project Manager tool, so you will be working with the buttons on the right
column.
What would you like to do?
For a step by step tutorial that will guide you through all the features and advantages of Project
Manager follow the links below in the order they appear.

Project Manager Manual - 4
Create a new product list using the existing shops
This is the general dashboard that you see once you sign in to Inlinkz. You can access Project
Manager by using the buttons in the right colunm. Click "Create a new product list"
Add new collection using shops

Project Manager Manual - 5
You are ready to start creating your first product list.
Fisrt you will learn how to create your lists by just dragging and droping products that are already
available through the shops tab. Go ahead and click "Shops"
Shops

Project Manager Manual - 6
When you click on the "Shops" tab you get a drop down box with a number of online shops and
manufacturers that we work with.
Go ahead and pick the one you like!
Let's say we pick SimonSaysStamp in this example

Project Manager Manual - 7
What is this orange exclamation mark?
Are you affiliated with this shop? Then there is a way to connect your Inlinkz Account with your
affiliate ID for this shop. Learn more about managing your affiliates here.
Let's go ahead and make a collection of products using SimonSaysStamp. Type a product name in
the search text and click Search

Project Manager Manual - 8
In the example above I searched for "brokern china". A number of products are available in the
shop with that name.

Project Manager Manual - 9
Pick the one you want, double click on it or drag and drop it to the right.
You can create a collection of products in minutes.
The keyword in the text box may result in a large number of products available that match your
criteria. Try to use a better keyword or just browse through the results using the paging at the
bottom of the screen.
If you see closely in the bottom right corner of each product there are a couple of icons

Project Manager Manual - 10
The first icon (looks like chain) will take you directly on the product's specific page. This is where
your users will be directed also once this list of products will be available in your blog.
The second icon allows you to copy this product in your own library of products. Learn more about
adding your own products here.

Project Manager Manual - 11
Reposition of products
Once your products are in your collection you do have the ability to change their order by dragging
and dropping.
Just grab products and reposition them!
Combining products from different shops
In your collection you can add products from different shops. Select one of the shops and pick up
products to add to your list. Then pick another shop and do the same. There is no restriction to
how many shops you can use nor the number of products you can add.
Do you want to link the same product to two different shops? It is possible! Learn more about
combining shops here.
Deleting products

Project Manager Manual - 12
Removing a product from your product list is easy.
Just click on the bin that appears in the bottom right corner of each product and the product will
dissapear.
Collection Details

Project Manager Manual - 13
Before saving your list of products you need to add some details.
1. Name: The name of the collection is only visible to you from the dashboard. It is also used
by the search function so give it a descriptive name
2. Description: The description is reserved for future use. Just copy and paste the name of
the collection for now.

Project Manager Manual - 14
3. Columns: This is how many images will display in a row. While you can set it to a specific
number, you can also set it to automatic ("Fill width") so it will take as much space possible in
Project Manager Manual - 15
your blog post area. "Fill width" should be used by blogs that have variable width post area so it will
display as good as possible in all screen sizes. This is a setting that can be changed even after the
collection has been created.
4.Thumb size: Your thumbnails can be from 50 to 150 pixels. This setting can be changed even
after the collection creation. When an image is not square, the thumb size represents the bigger
dimension. Eg if your image is 600x400px when downsized to a 150px thumbnail, its final size will
be 150x100px
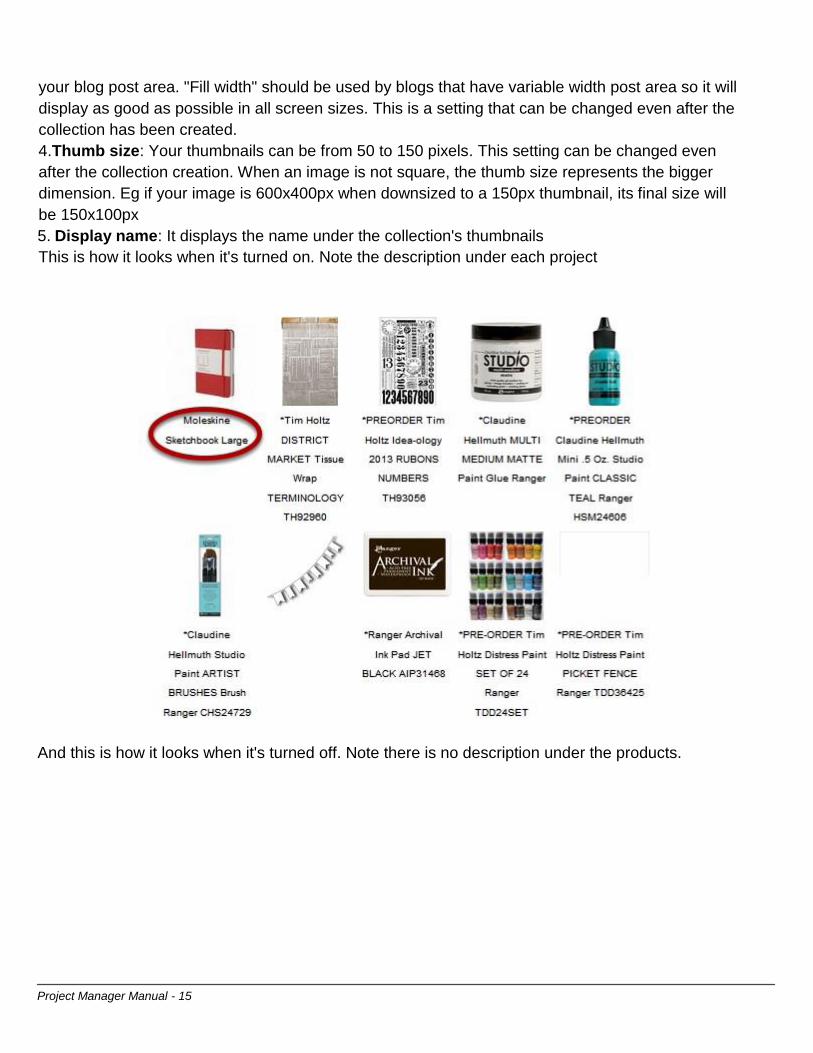
5. Display name: It displays the name under the collection's thumbnails
This is how it looks when it's turned on. Note the description under each project
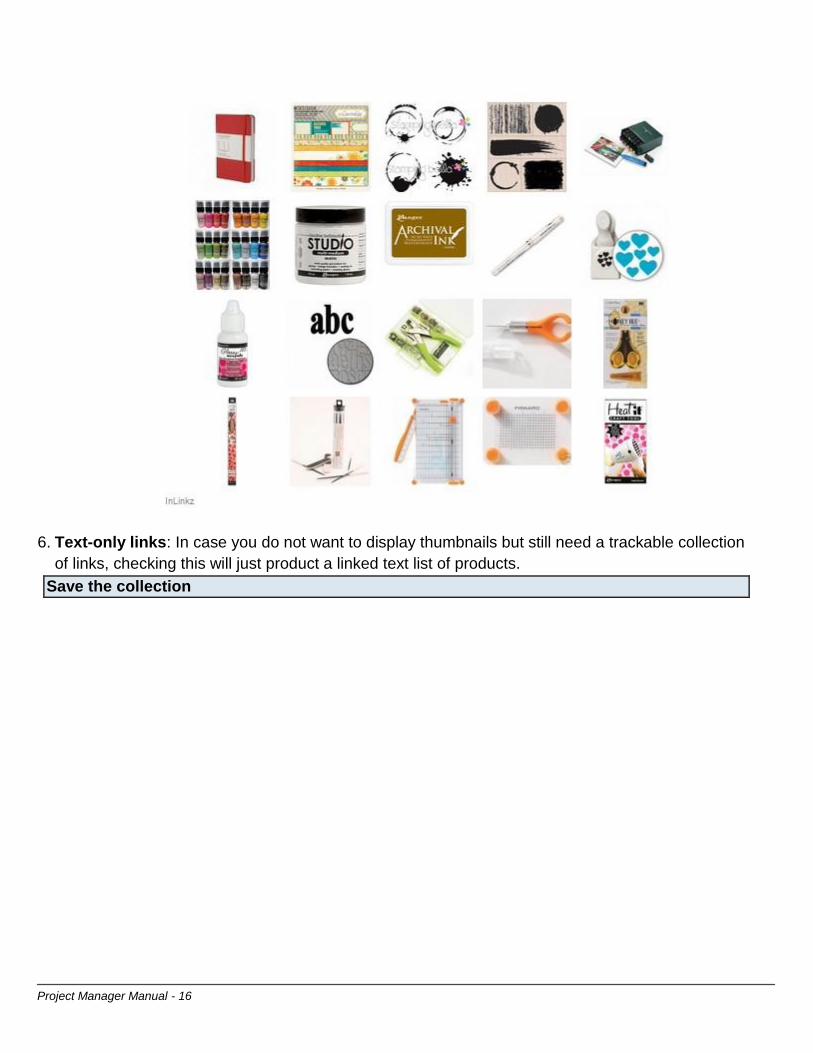
And this is how it looks when it's turned off. Note there is no description under the products.
Project Manager Manual - 16
6. Text-only links: In case you do not want to display thumbnails but still need a trackable collection
of links, checking this will just product a linked text list of products.
Save the collection

Project Manager Manual - 17
When you complete all the details of the collection click "Save".
Congratuations! Your product list is ready and you can now grab the genarated code and paste it to
your blog!
By clicking "close" you will be directed to the Project Manager Dashoboard where you can get the
code, preview and edit your collection. You can learn more about what you can do there by clicking
here.
Link one product to two different shops

Project Manager Manual - 18
In case you are affiliated with a couple of shops you might want to link the same product to both
shops. This will allow your readers to find the product easily on both shops, compare prices and
pick their favorite.
Follow the steps as the example below.
Add products
In your collection select a shop and find the product.
In our example I picked a product from SimonSaysStamp.
Now choose another shop and find the same product. Add it to your list just next to the other one.

Project Manager Manual - 19
That would work great. But wouldn't it look better if you had ONE image linking to two different
shops?
Easy!
See that little chain icon at the bottom left corner of the second product? Just click on it.

Project Manager Manual - 20
The two products are now combined!
Only ONE image will appear in your blog for this product with links to both shops! In case the image
of the product is slightly different in each shop keep in mind that the tool displays the first image on
each pair.
Here is how it looks on your blog

Project Manager Manual - 21
SSS is for SimonSaysStamp and IE is for Inpiration Emporium.
Clicking on SSS or IE will take your readers to the the shop's product page.
If you decide that you don't want these products combined just click on the chain between them.
Happy linking!
The Project Manager Dashboard

Project Manager Manual - 22
You can go to the Project Manager Dashboard from your Inlinkz home page when you are logged in
Also you are automatically directed to the Project Manager Dashboard after you created a new
product list.

Project Manager Manual - 23
This is how your dashboard will look like.
You can hace access to all the product lists you have created. They are displayed by date and by
the name you have added while creating them. See more about how to create a new product list
HERE.
Add the product list to your blog
Adding the product list you have created to your blog is easy.
In the dashboard just below your product list, click on "Get Script".

Project Manager Manual - 24
This will display the above screen where you can copy the code!
You have a number of options on the script you want to copy depending on your needs. You
can select between
• the new widget code
• the old widget code
• static code
For each one of the above different options there is a list of what they do and they don't do just
below their title.
We recommend using the new widget code since it has more capabilities and supports the project
and product navigation features! Learn more about it HERE!
Adding the script on your blog
Whether you are using blogspot, wordpress, typepad or any other type of blog platform/site you
sould paste the above code in HTML view.

Project Manager Manual - 25
Here is an example for wordpress.
While writting your post make sure you switch "Text" and paste your code there. Switch
back to "Visual" and your product list is there!
Here is an example for blogspot

Project Manager Manual - 26
While writting your post on blogspot make sure to switch to "HTML" view. Paste
the code and switch back to "Compose" to finish your post.

Project Manager Manual - 27
Adding your product list on YouTube
Do you have a youtube channel where you want your list of products to be displayed?
Easy! Since the description area on YouTube does not allow images, we will convert the above code
in a YouTube friendly format for you.
Just click on the YouTube link and then copy the text.

Project Manager Manual - 28
You have two options!
Either copy the text together with links to the shops (1) or just click a simple text list with the names
of the products (2).
Go to your YouTube video and paste the code in to your video's description.
Preview and Edit your product lists

Project Manager Manual - 29
1. Date: In the Project Manager Dashboard just next to the name of your product list you can see
the date it was created
2. Preview: By clicking the magnifying glass you can see a preview of your product list. Now is
the time to see how things will look like and make some changes if you want to.
3. Edit Collection: Clck on the edit image and you can will have access to all the details of your
collections. You can edit your product list as much as you like, add new/delete products, change the
order they appear or even change their size.
TIP: If you make changes to a product list that you have already added to your blog post, this will
change automatically if you used the "new widget" or the "old widget" script. That means you don't
have to copy and paste the code again on your blog even if the post is live. However if you used the
"static code" then you have to copy and replace the code in your blog post.
1. Project Settings: Learn more about it HERE
2. Collection Appearance Style: This is where you can chance the appearance of the collection
(update coming soon)
3. Impressions/clicks: This is diplay a window where you can see how many views your product
list had as well as how many clicks you had on your products.
Here is an example:

Project Manager Manual - 30
In the above example I had 20 products in my list. Since I've added the list to my blog 618 people
viewed my list and I had 557 clicks on my 20 products. You want to check these metrics if you are
an affiliate with the shops you are linking to. This will give you a great inside on how well you are
performing.
CSV file
This small button, performs a great job. It compiles an excel-compatible spreadsheet that contains
all the links of the collection, along with their click counts for each one and the link they are pointing
to.
The links you have added from the shops tab are shown WITHOUT their affiliate links. This is not
the link that the user clicks (which contains the affiliate) but the raw link of the product.
Moreover the file includes ALL the click information of each of your links for the specific collection
including:
The name of the link
The time when the click happened
The country code where the click originated from and
The referring URL (That is, the website, email, rss feed, youtube video where the link was
displayed)

Project Manager Manual - 31
This information is very useable as you can see from which channel you get more clicks. If e.g. the
referrer is reader.google.com (or whichever reader in that case) this means that your feed readers
are active. The referrer may also be your blog address, assorted webmail clients (gmail, yahoo mail,
live.com etc) and youtube.
Delete the collection
Depending on your Inlinkz plan you can create unlimited collections. But if for some reason you
want to delete one of them then all you have to do is click the "Delete" button. This will delete the
product list and remove it from your dashboard. Remember that if you delete one of your collections
it will automatically dissapear from your blog post.
Project and Product navigation
You can use the new dynamic project/product widget to add context in your product list and allow
your readers to navigate to related projects in your blog/shop.
Project Manager Manual - 32
Moreover by setting the project data of your blog post, it will be easier to reference your other
projects inside your product lists, thus increasing your traffic and allowing people to discover
more, without ever leaving your blog. Learn how!
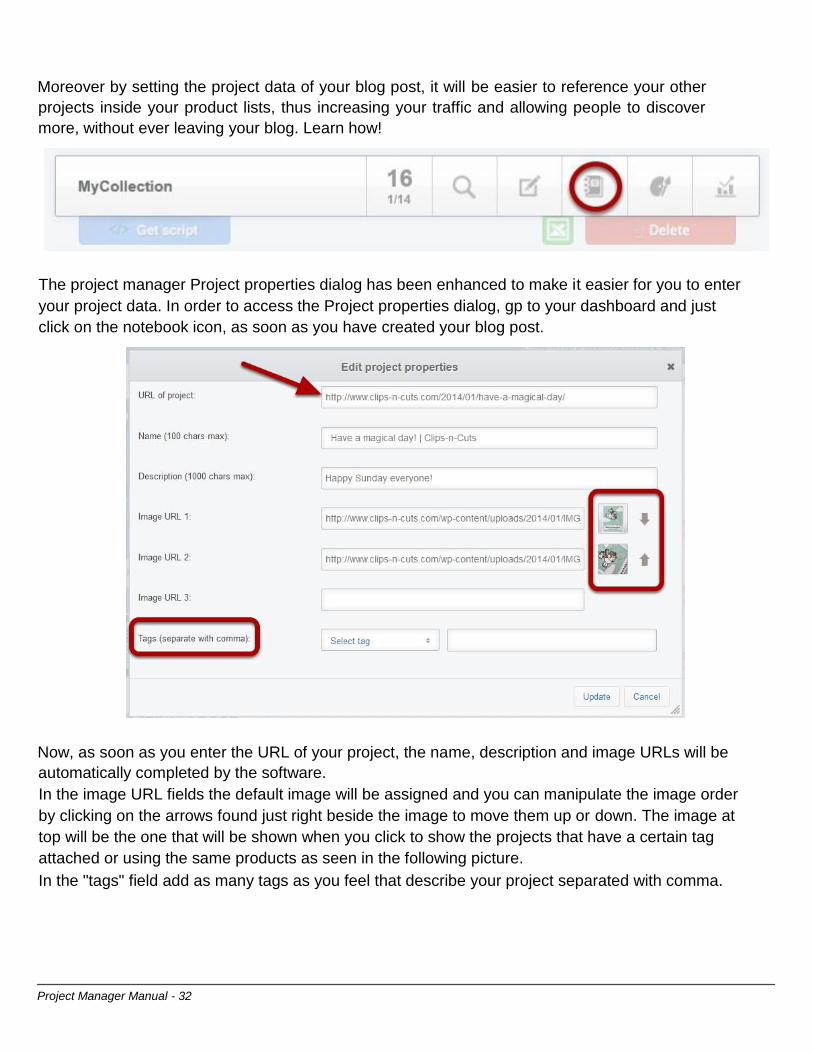
The project manager Project properties dialog has been enhanced to make it easier for you to enter
your project data. In order to access the Project properties dialog, gp to your dashboard and just
click on the notebook icon, as soon as you have created your blog post.
Now, as soon as you enter the URL of your project, the name, description and image URLs will be
automatically completed by the software.
In the image URL fields the default image will be assigned and you can manipulate the image order
by clicking on the arrows found just right beside the image to move them up or down. The image at
top will be the one that will be shown when you click to show the projects that have a certain tag
attached or using the same products as seen in the following picture.
In the "tags" field add as many tags as you feel that describe your project separated with comma.

Project Manager Manual - 33
Now that you have learned how to enter all your data, the InLinkz Project manager new widget will
allow you not only to display a list of products but it keeps track of where each product has been
used on your blog and categorizes your projects so users can navigate easily. Each project is related
to a blog post so, when the user selects to see a project, she will be directed to the relevant blog
post.
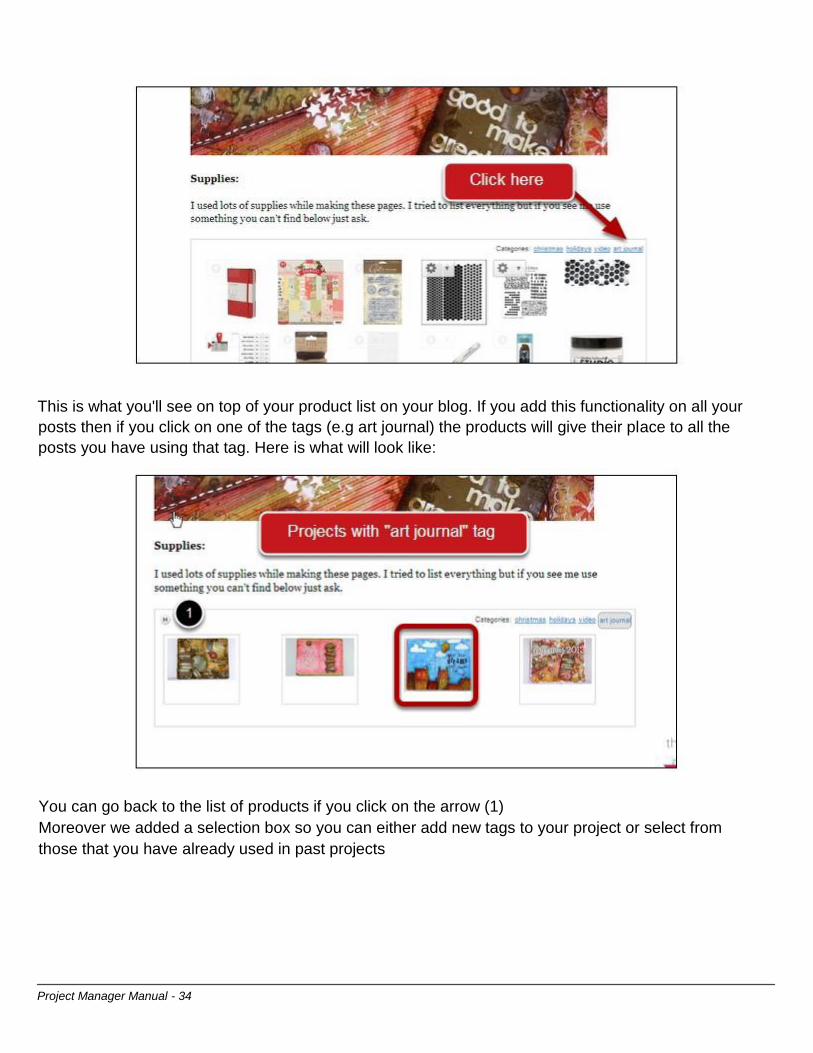
Here is how the Product list will look like on your blog. Notice the Categories (they are the tags you
added above) and the Menus!
The power of the Project manager lies to the fact that projects are connected between each other by
not only categories but by used products too.
The user can click on a category, view all the projects that belong to the selected category and visit
them, without leaving your blog or she can select a product from the list and, by clicking on its menu,
view a list of projects that use that product. (see below)
Projects by Category
Project Manager Manual - 34
This is what you'll see on top of your product list on your blog. If you add this functionality on all your
posts then if you click on one of the tags (e.g art journal) the products will give their place to all the
posts you have using that tag. Here is what will look like:
You can go back to the list of products if you click on the arrow (1)
Moreover we added a selection box so you can either add new tags to your project or select from
those that you have already used in past projects

Project Manager Manual - 35
Projects by products
Clicking on the menu inside your blog, you can select “Projects using this” and a list with all projects
where the selected product is used, will be displayed:

Project Manager Manual - 36
Clicking on one of the listed projects will redirect the user to the relevant article and clicking the back
button on the top left, will display the product list again. If you click on a product directly, it will still
redirect the reader to the shop/link exactly as the old link manager widget. You can see how the
widget works on a real blog here : http://www.clips-n-cuts.com/2013/01/valentines-card-4/
Project Manager Manual - 37
Create your own product library
With the Project Manager tool you can create product lists by dragging and droping from the existing
shops but you can also create your own product library to select products from.
Crafters usually do this in order to have a list of products that they own and they can easily search
there to create their product lists instead of looking through the shops.
Connecting the products in your library with your affiliate providers is also available.
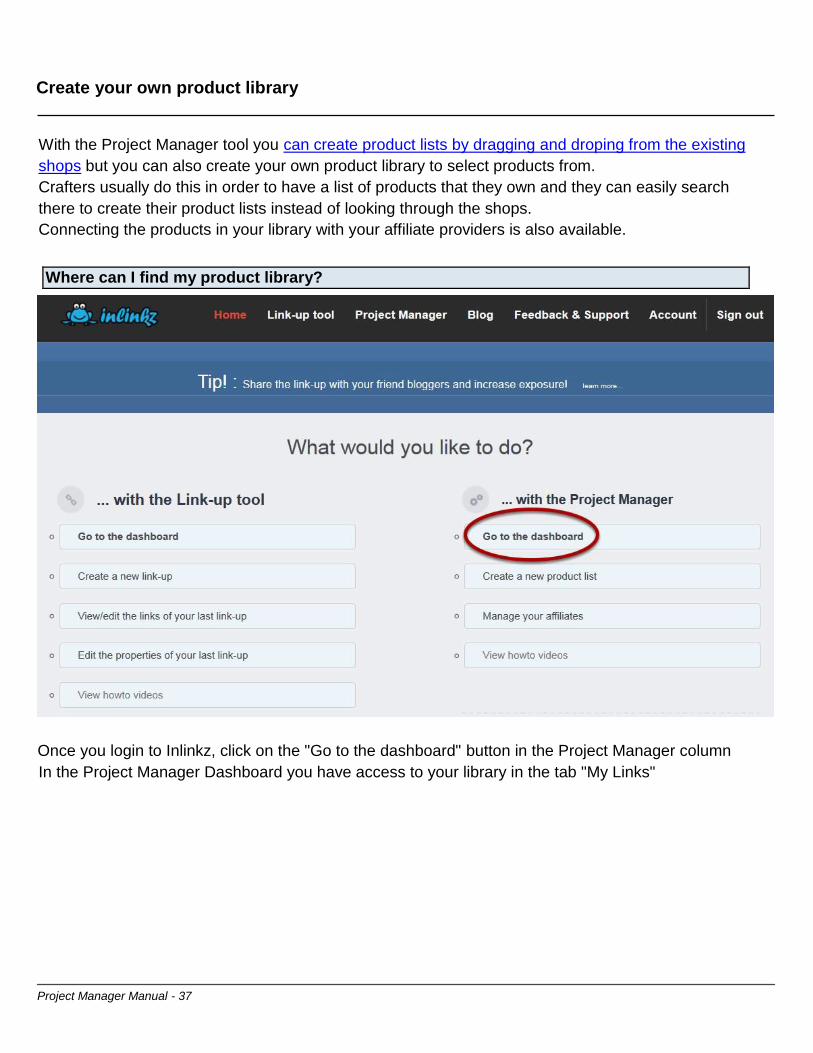
Where can I find my product library?
Once you login to Inlinkz, click on the "Go to the dashboard" button in the Project Manager column
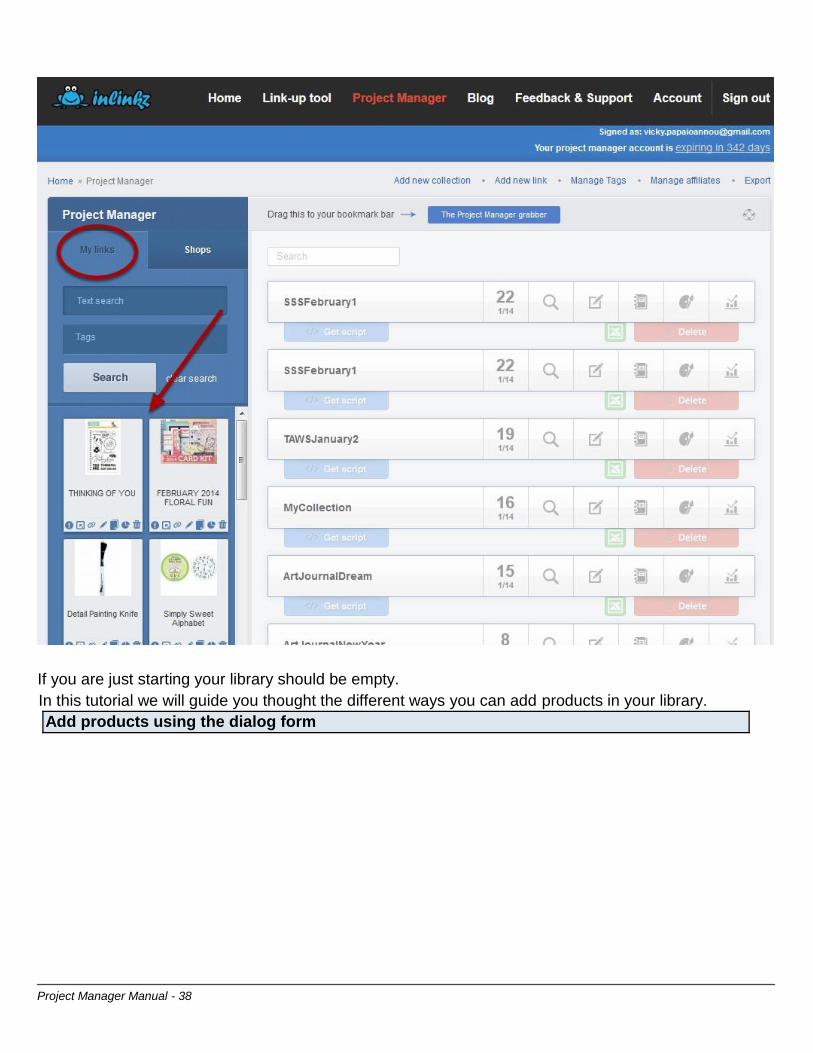
In the Project Manager Dashboard you have access to your library in the tab "My Links"
Project Manager Manual - 38
If you are just starting your library should be empty.
In this tutorial we will guide you thought the different ways you can add products in your library.
Add products using the dialog form
Project Manager Manual - 39
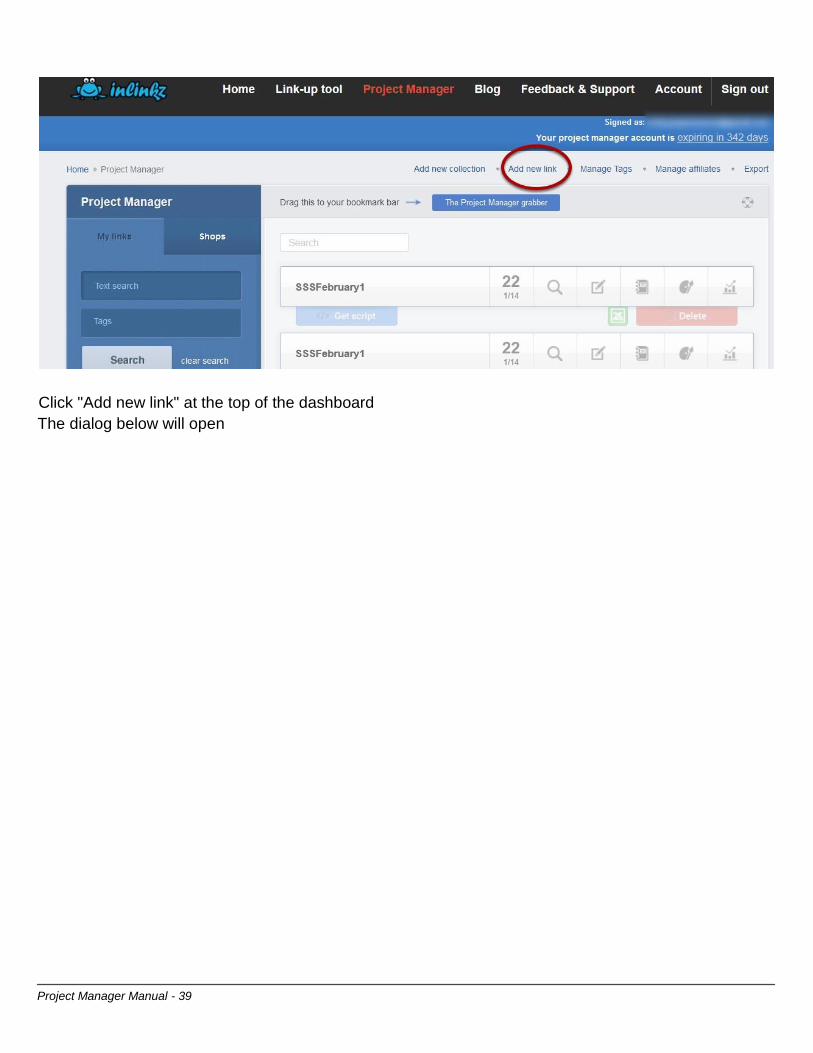
Click "Add new link" at the top of the dashboard
The dialog below will open

Project Manager Manual - 40
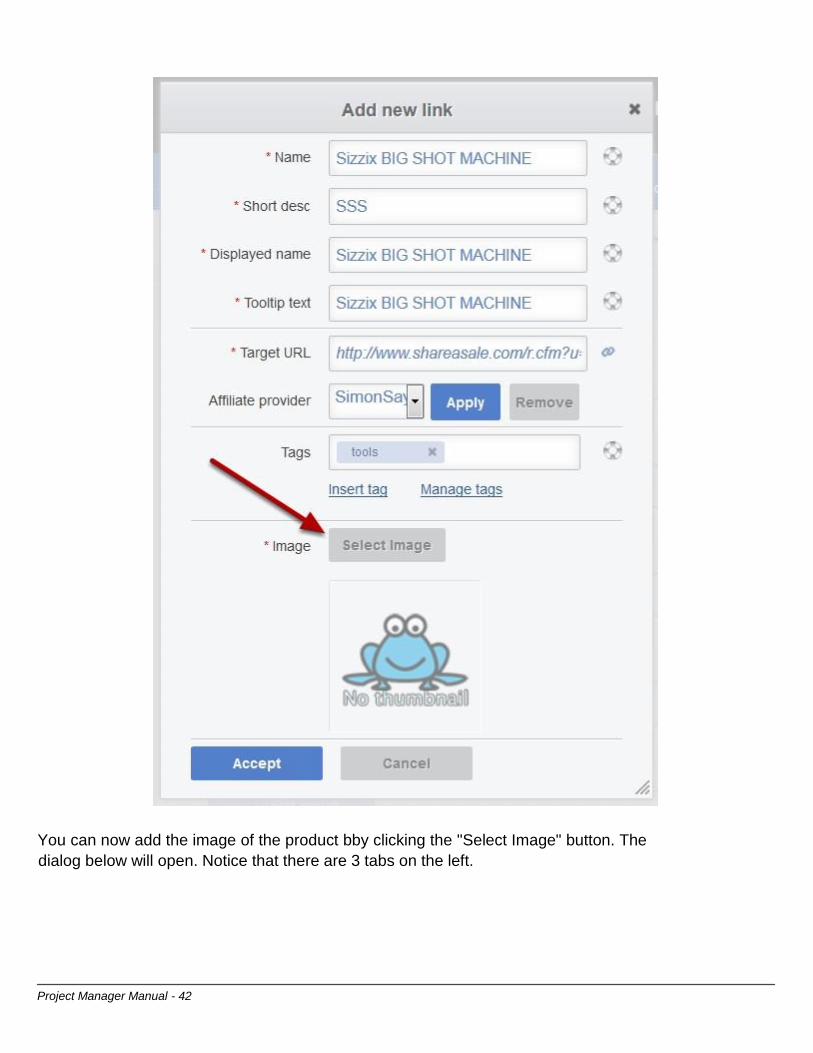
1. Name: This is where you add the name of the product, be as specific as you like! This is only
visible by you.
2. Sort Desc: This field can be used if you are planning on connecting one product to two
different shops. Add the name of the shop here (e.g SSS for simonsaysstamp, EH for Helen Hutson,
IE for

Project Manager Manual - 41
Inspiration Emporium etc) You can learn more about combining products HERE
If you don't plan to use this functionality you can just copy and paste the value of the "name" field
here.
3. Displayed name: This is the name of the product, visible to your readers.
4. Tooltip text: This is what will appear when you hover over the product with your mouse. You
can just copy and paste the value of the "name" field here.
5. Target URL: Enter here the page URL of the product. This is where your readers will be
directed when they click on the product. You can check if the URL you added works correctly click
on the little chain icon next to the field.
6. Affiliate provider: If you are affiliated with the shop you are linking the product to, then you
can set the name here. The drop down box allows you to select between the affiliates you have set
up using Inlinkz. When you select your affiliate click apply and you'll see that the above URL will
change automatically to the affiliate link. You can again click the chain icon if you want to make sure
the new link works fine.
Learn more about managing your affiliates and populating this drop down box HERE.
7. Tags: For easier searching through your library you can add tags on your products (e.g
paper, tool, stamp, ink etc). Find more about how you can browse through your library below.
Here is an example of the above dialog box complete with product details
Project Manager Manual - 42
You can now add the image of the product bby clicking the "Select Image" button. The
dialog below will open. Notice that there are 3 tabs on the left.
Project Manager Manual - 43
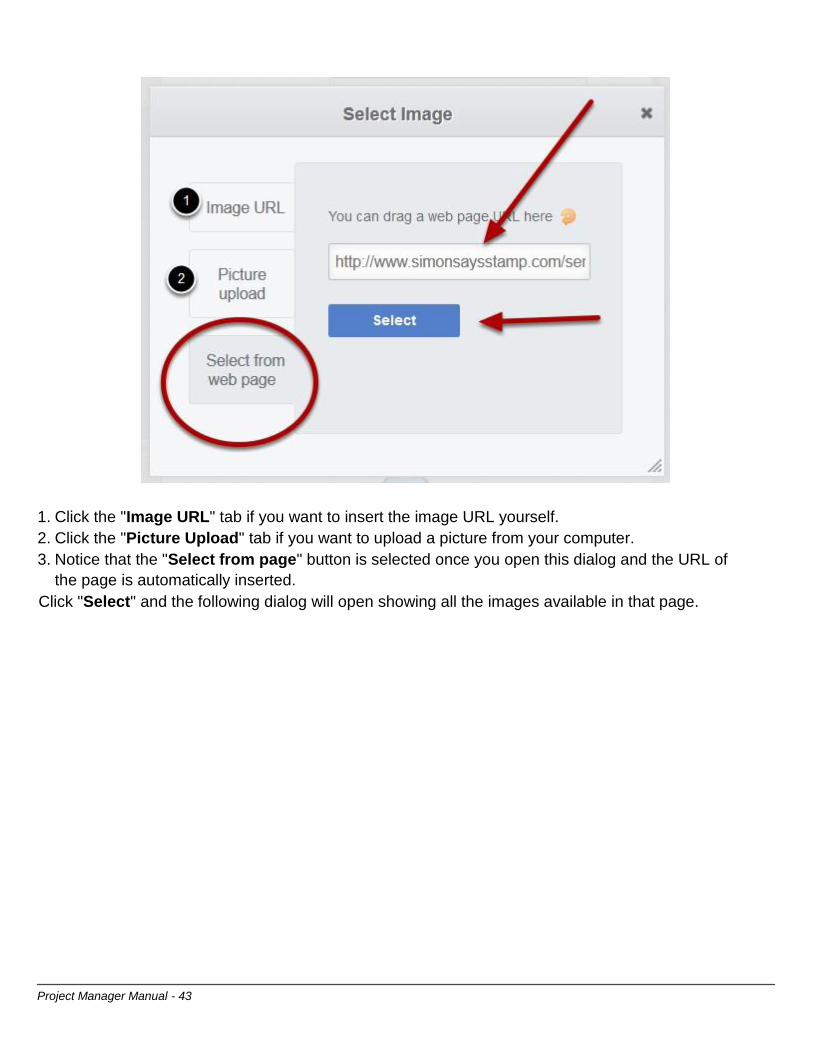
1. Click the "Image URL" tab if you want to insert the image URL yourself.
2. Click the "Picture Upload" tab if you want to upload a picture from your computer.
3. Notice that the "Select from page" button is selected once you open this dialog and the URL of
the page is automatically inserted.
Click "Select" and the following dialog will open showing all the images available in that page.

Project Manager Manual - 44
Just select the image that represents your product.
You can now crop or resize the image if you want and then click "OK"

Project Manager Manual - 45
Once you click OK the main "add image" dialog will open and you'll see that the image of the
product is there.

Project Manager Manual - 46
Click "Accept" and the product will appear in your library.

Project Manager Manual - 47
Notice that the item appears first, as the library is sorted by date (latest added product at top).
If you can't see the product just refresh by clicking Search.
Learn what all these icons below your product do by clicking HERE
Add products using the grabber

Project Manager Manual - 48
In your Project Manager dashboard drag "The Project Manager Grabber" to your browser's
bookmark toolbar.
When you are logged in to Inlinkz the Grabber will be active.
Now just go to the shop you like and find the product you want to add to your library.
In the example below we will add a product from the SimonSaysStamp online shop.
Load the page of the product and click on the grabber that's already in your toolbar. Make sure you
are logged in to Inlinkz.

Project Manager Manual - 49
When you click on the grabber the dialog below will appear.
(If the dialog below does not appear then the remote host of this website does not allow viewing of
the images. No worries! You can use the other two ways to add products described in this tutorial)

Project Manager Manual - 50
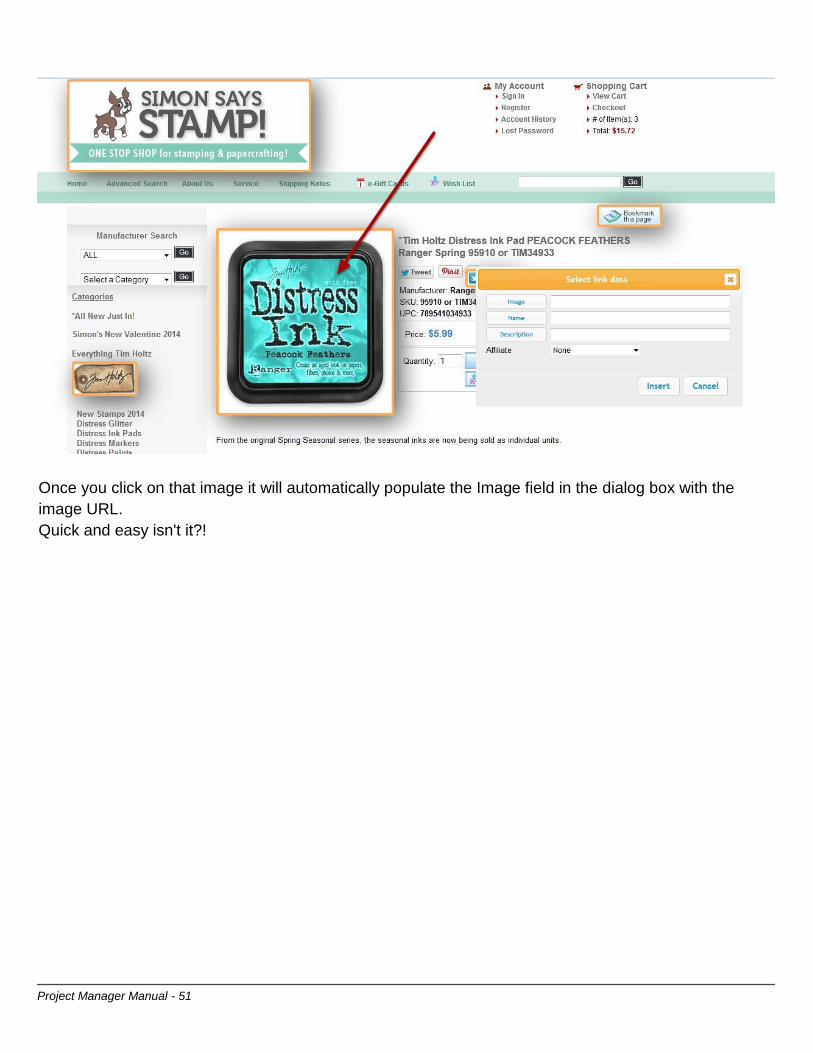
In this dialog box click on the "Image" button and all the images in this page will pop up and appear
with an orange border!
From all those images click on the one that best represents the product.
Project Manager Manual - 51
Once you click on that image it will automatically populate the Image field in the dialog box with the
image URL.
Quick and easy isn't it?!

Project Manager Manual - 52
Now it's time to add the name and description fields in that dialog box.
Select the title of the product with your mouse (1) and then click Name and Description. Both the
fields will be automatically filled with that text. You can of cource choose different text for those two
fields. That is totally up to you!
If you are affiliated with this shop and you have set up a connection to the shop's affiliate provider
through our affiliate manager then you'll be able to find that name in the Affiliate drop down box.
Project Manager Manual - 53
Learn more on how to manage your affiliates and populate this drop down box HERE.
Select the name of the affiliate (if available) and then click Insert.
Congratulations! You just added a new product in your library the easy way!

Project Manager Manual - 54
The product you added will appear first in your library.
If you can't see the product just refresh by clicking Search.
Learn what all these icons below your product do by clicking HERE Adding products by cloning
them from the available shops

Project Manager Manual - 55
1. In your Project Manager dashboard select the "Shops" tab.
2. Look for the product you like by using the search button
3. Notice that below the product there is a clone icon. Click on that icon and the product will
appear in your library!
It doesn't get any easier than that!
You can now go to your library and edit the details of the product if you like (change the name, add
affiliate connection etc.)
Learn more on how you can manage your library products HERE.

Project Manager Manual - 56
Manage products in your library
For each product in your library there is a toolbar that allows you to manage it! Let's take a look at
what all these buttons mean!
Below is a description of what each icon does in the order they appear.
1. It opens a window where you can see some information for this product (such as in how
many collections it appears, it's name, description etc.)
2. It allows you to create a button that links to this product that you can add to your blog. All you
have to do is select the size of the button and we'll provide you the code to copy and paste it.
3. Click on this icon if you want to check that the link works correctly or just hover over it to
check it out.
4.Click on this icon to edit the details of this product.
5. Click on this icon to see a number od statistics about this products (such as how many times
it was clicked in a certain period of time)
6. Clck on the bin to delete the product from your library. Deleting a product from your library will
affect all the product lists that this product appears.
Manage affiliates
Project Manager provides the easiest way to monetize your blog in minnutes, especially if you are
affiliated with more than one shops.
It removes the pain of having to link to each different Affiliate provider to pick up the links for specific
products.
Here is how to connect your affiliate accounts with Inlinkz
Sign In
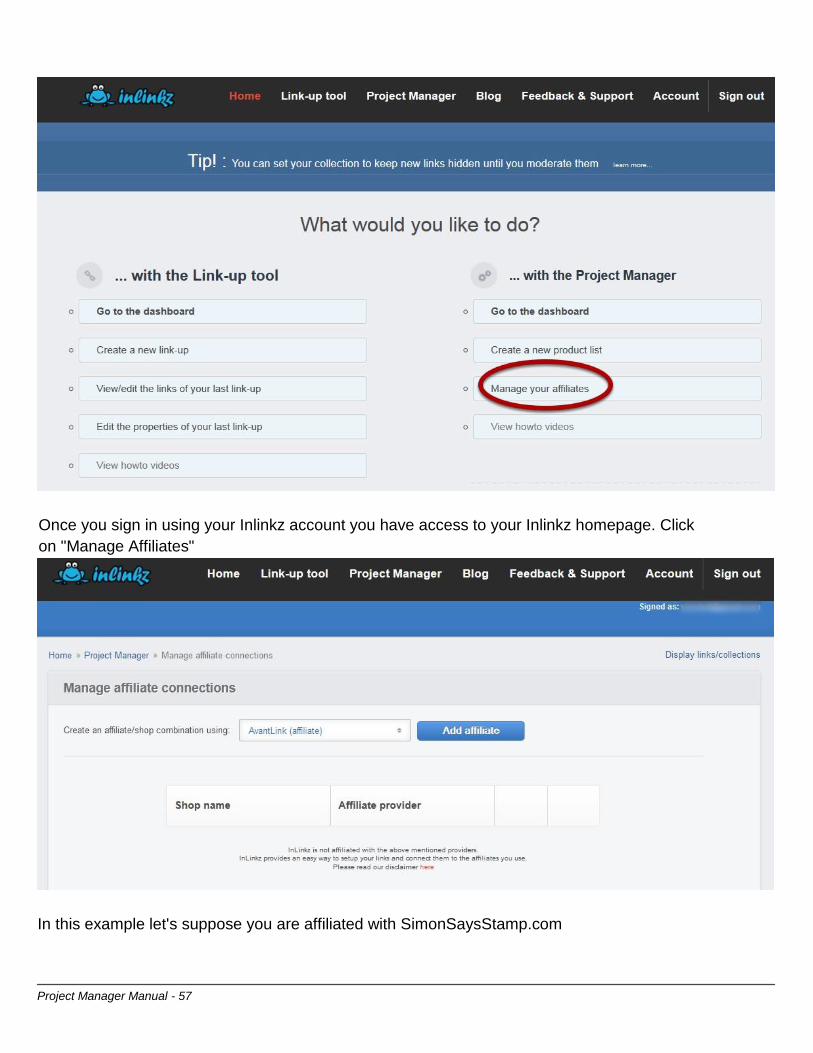
Project Manager Manual - 57
Once you sign in using your Inlinkz account you have access to your Inlinkz homepage. Click
on "Manage Affiliates"
In this example let's suppose you are affiliated with SimonSaysStamp.com

Project Manager Manual - 58
Since you are affiliated with this shop you have an affiliate account with ShareASale.
Let's connect yout Inlinkz account with your affiliate ID to SimonSaysStamp. This will allow Inlinkz to
generate affiliate links for you every time you link SSS products using the Project Manager.

Project Manager Manual - 59
Select your affiliate provider
From the drop down box select your affiliate provider.
In our example ShareASale and click "Add Affiliate" Fill in your details

Project Manager Manual - 60
The above form you have to fill all the details of your shareasale account.
1.Shop name: this is set by default to "shareasale" but you can change it to the name of the shop.
In our case SimonSaysStamp
2. You must fill in a number of fields. Make sure you login to shareasale so you can pick up your User
ID, Merchant ID and Banner ID.
This is a job you have to do just once.
You can find more detailed instructions on where to find all those values if you click on the little help
icons on the right of the screen.

Project Manager Manual - 61
Click Done.
Is my Inlinkz account connected with my affiliate for a certain shop?
It's easy to find out if you did connect your affiliate account correctly.
Try to create a new product list using Project Manager.
In the shops tab select a shop. If next to the shop you can see an orange exclamation mark then
you haven't set up an affiliate.

Project Manager Manual - 62
If you see a check mark next to a shop's name then you know you have already setup an affiliate
connection for this shop.