project: raspberry pi + alexa voice service - smits … · 3/26/2016 github...
TRANSCRIPT
3/26/2016 GitHub amzn/alexaavsraspberrypi: This project demonstrates how to access and test the Alexa Voice Service using a Java client (running on a Rasp...
https://github.com/amzn/alexaavsraspberrypi 1/31
This project demonstrates how to access and test the Alexa Voice Service using a Java client (running on a Raspberry Pi), and a Node.jsserver. https://developer.amazon.com/avs
assets Adding assets 4 days ago
samples Initial 4 days ago
LICENSE.txt Initial 4 days ago
README.md Fixes #7 15 hours ago
RELEASE.txt Initial 4 days ago
149 1,712 129 Watch Star Forkamzn / alexaavsraspberrypi
Code Issues 9 Pull requests 4 Pulse Graphs
15 commits 1 branch 0 releases 1 contributor
New file Find file https://github.com/amzn/alexa‐avs‐raspberry‐pi.gitDownload ZIP master Branch: New pull request
Latest commit ded3d30 15 hours ago ajotwani Fixes #7 …
README.md
Project: Raspberry Pi + Alexa Voice Service
About the Project
This project demonstrates how to access and test the Alexa Voice Service using a Java client (running on a Raspberry Pi),and a Node.js server. You will be using the Node.js server to get a Login with Amazon authorization code by visiting a websiteusing your computer's (Raspberry Pi in this case) web browser.
This guide provides stepbystep instructions for obtaining the sample code, the dependencies, and the hardware you need toget the reference implementation running on your Pi.
HTTPS
Personal Open source Business Explore Pricing Blog Support This repository Search Sign upSign in

3/26/2016 GitHub amzn/alexaavsraspberrypi: This project demonstrates how to access and test the Alexa Voice Service using a Java client (running on a Rasp...
https://github.com/amzn/alexaavsraspberrypi 2/31
Getting Started
Hardware you need
1. Raspberry Pi 2 (Model B) Buy at Amazon2. MicroUSB power cable for Raspberry Pi (included with Raspberry Pi)3. Micro SD Card To get started with Raspberry Pi you need an operating system. NOOBS (New Out Of the BoxSoftware) is an easytouse operating system install manager for the Raspberry Pi. The simplest way to get NOOBS is tobuy an SD card with NOOBS preinstalled Raspberry Pi 8GB Preloaded (NOOBS) Micro SD Card
4. An Ethernet cable5. USB 2.0 Mini Microphone Raspberry Pi does not have a builtin microphone; to interact with Alexa you'll need anexternal one to plug in Buy at Amazon
6. A USB Keyboard & Mouse, and an external HDMI Monitor we also recommend having a USB keyboard and mouseas well as an HDMI monitor handy if for some reason you can’t “SSH” into your Raspberry Pi. More on “SSH” later.
7. WiFi Wireless Adapter (Optional) Buy at Amazon
Skills you need
1. Basic programming experience2. Familiarity with shell
0 Setting up the Raspberry Pi

3/26/2016 GitHub amzn/alexaavsraspberrypi: This project demonstrates how to access and test the Alexa Voice Service using a Java client (running on a Rasp...
https://github.com/amzn/alexaavsraspberrypi 3/31
1. Insert the micro SD card with NOOBS preinstalled into the micro SD card slot on your Raspberry Pi.
2. Plug in the USB 2.0 Mini Microphone, and the (optional) WiFi Wireless Adapter.3. Plug in your USB keyboard and mouse.4. Connect your monitor using the HDMI port.

3/26/2016 GitHub amzn/alexaavsraspberrypi: This project demonstrates how to access and test the Alexa Voice Service using a Java client (running on a Rasp...
https://github.com/amzn/alexaavsraspberrypi 4/31

3/26/2016 GitHub amzn/alexaavsraspberrypi: This project demonstrates how to access and test the Alexa Voice Service using a Java client (running on a Rasp...
https://github.com/amzn/alexaavsraspberrypi 5/31
1 Booting up the Raspberry Pi
1. Now plug in the USB power cable to your Pi.2. Your Raspberry Pi will boot, and a window will appear with a list of different operating systems that you can install.
3. Tick the box next to Raspbian and click on Install.
4. Raspbian will then run through its installation process. Note: this can take a while.
5. When the installation process has completed, the Raspberry Pi configuration menu (raspiconfig) will load. Here you canset the time and date for your region and enable a Raspberry Pi camera board, or even create users. You can exit thismenu by using Tab on your keyboard to move to Finish.
6. Once rebooted, login to your Raspberry Pi. The default login for Raspbian is username pi with the password raspberry

3/26/2016 GitHub amzn/alexaavsraspberrypi: This project demonstrates how to access and test the Alexa Voice Service using a Java client (running on a Rasp...
https://github.com/amzn/alexaavsraspberrypi 6/31
NOTE: To load the graphical user interface at any time type startx into the command line.
More info: raspberrypi.org
2 Installing utilities & dependencies
NOTE: You will be using the Terminal utility on the Raspberry Pi to install the utilities you need for this Alexa Voice Servicewalkthrough. Terminal comes preinstalled on the Raspberry Pi, and you can get to it from the Desktop. You can learn moreabout Terminal here.
2.1 Enable SSH on Raspberry Pi
SSH allows you to remotely gain access to the command line of a Raspberry Pi from another computer (as long as they areboth on the same network). This removes the requirement to have an external monitor connected to your Raspberry Pi.
SSH is enabled by default on Raspberry Pi. If you run into problems getting SSH to work, make sure it’s enabled. This isdone using the raspiconfig utility.
Type the following in the Terminal:
sudo raspi‐config

3/26/2016 GitHub amzn/alexaavsraspberrypi: This project demonstrates how to access and test the Alexa Voice Service using a Java client (running on a Rasp...
https://github.com/amzn/alexaavsraspberrypi 7/31
Then navigate to SSH, hit Enter and select Enable SSH server.
2.2 SSH into the Raspberry Pi
Now let's SSH into your Raspberry Pi. To do that, you need to know the IP address of your Raspberry Pi.
Type this command into the terminal:
hostname ‐I > 192.168.1.10 //this is an example Raspberry Pi’s hostname, it would be different for you
If you’re on a Windows PC, follow the instructions here to SSH Using windows
Now that you know the IP address of your Raspberry Pi, you are ready to connect to it remotely using SSH. To do this, openthe terminal utility on the computer you would like to connect from and type the following:
pi@<YOUR Raspberry Pi IP ADDRESS>
It will prompt you for your password. NOTE: the default password for the user pi is raspberry
Voila! You’re now remotely connected to your Raspberry Pi. Now you’ll install all the utilities while connected remotely viaSSH.
2.3 Install VNC Server
VNC is a graphical desktop sharing system that will allow you to remotely control the desktop interface of your Raspberry Pifrom another computer. This will come in very handy as you get rid of the external monitor connected to your Raspberry Pi.
sudo apt‐get install tightvncserver
Start VNC Server
To start the VNC Server, type: tightvncserver

3/26/2016 GitHub amzn/alexaavsraspberrypi: This project demonstrates how to access and test the Alexa Voice Service using a Java client (running on a Rasp...
https://github.com/amzn/alexaavsraspberrypi 8/31
Run VNCServer at Startup
You want to make sure the VNC Server runs automatically after the Raspberry Pi reboots, so you don’t have to manually startit each time with the command tightvncserver through SSH. To do that, type the following in the terminal:
cd /home/pi cd .config
Note the '.' at the start of the folder name. This makes it a hidden folder that will not show up when you type 'ls'.
mkdir autostart cd autostart
Create a new configuration by typing the following command:
nano tightvnc.desktop
Edit the contents of the file with the following text:
[Desktop Entry] Type=Application Name=TightVNC Exec=vncserver :1 StartupNotify=false
Type ctrlX and then Y to save the changes to the file.
That's it. The next time you reboot the VNC server will restart automatically.
Connecting to Raspberry Pi via VNC
Mac: See https://www.raspberrypi.org/documentation/remoteaccess/vnc/mac.mdWindows: https://www.raspberrypi.org/documentation/remoteaccess/vnc/windows.mdLinux: https://www.raspberrypi.org/documentation/remoteaccess/vnc/linux.md
You may now disconnect the Monitor, keyboard and mouse (if you like). Now with SSH (allows remote access to theterminal) and VNC (allows you to remote control the Raspberry Pi’s desktop interface) installed, the external monitor isoptional. Feel free to disconnect it from the Raspberry Pi.
2.4 Install VLC
Get VLC media player by typing:
sudo apt‐get install vlc‐nox vlc‐data
NOTE: If you are running on Raspberry Pi and already have VLC installed, you will need to remove two conflicting libraries byrunning the following commands:
sudo apt‐get remove ‐‐purge vlc‐plugin‐notify sudo rm /usr/lib/vlc/plugins/codec/libsdl_image_plugin.so
Unable to fetch errors If you run into some "Unable to fetch" errors while trying to install VLC, try the following:
sudo apt‐get update sudo apt‐get upgrade sudo apt‐get install vlc‐nox vlc‐data

3/26/2016 GitHub amzn/alexaavsraspberrypi: This project demonstrates how to access and test the Alexa Voice Service using a Java client (running on a Rasp...
https://github.com/amzn/alexaavsraspberrypi 9/31
Source: https://www.raspberrypi.org/forums/viewtopic.php?f=66&t=67399
Make sure VLC is installed correctly
whereis vlc
This will tell you where VLC is installed.
Most programs are stored in /usr/bin . On my Raspberry Pi, I see:
vlc: /usr/bin/vlc /usr/lib/vlc /usr/share/vlc /usr/share/man/man1/vlc.1.gz
Set the environment variables for VLC
Type the following into the terminal:
export LD_LIBRARY_PATH=/usr/lib/vlc export VLC_PLUGIN_PATH=/usr/lib/vlc/plugins
Check if the environment variables were set successfully
echo $LD_LIBRARY_PATH > /usr/lib/vlc
echo $VLC_PLUGIN_PATH > /usr/lib/vlc/plugins
2.5 Download and install Node.js
Verify Node isn't already installed. It should print 'command not found'.
node —version > command not found
Now type:
sudo apt‐get update sudo apt‐get upgrade
Set up the aptget repo source:
curl ‐sL https://deb.nodesource.com/setup | sudo bash ‐
Install Node itself:
sudo apt‐get install nodejs
2.6 Install Java Development Kit
You need to have Java Development Kit (JDK) version 8 or higher installed on the Raspberry Pi.
Step 1: Download JDK Assuming this is a fresh Raspberry Pi and you do not already have JDK installed, you'll need to

3/26/2016 GitHub amzn/alexaavsraspberrypi: This project demonstrates how to access and test the Alexa Voice Service using a Java client (running on a Rasp...
https://github.com/amzn/alexaavsraspberrypi 10/31
download JDK 8 from Oracle.
Raspberry Pi 1 and 2 models The binary you are looking for is “Linux ARM 32 Hard Float ABI”. Download the tar.gzfile jdk8u73linuxarm32vfphflt.tar.gz from the Oracle link above.Raspberry Pi 3 model The binary you are looking for is “Linux ARM 64 Soft Float ABI”. Download the tar.gz file jdk8u77linuxarm64vfphflt.tar.gz from the Oracle link above.
Step 2: Extract the contents Extract the contents of the tarball to the /opt directory:
sudo tar zxvf jdk‐8u73‐linux‐arm32‐vfp‐hflt.tar.gz ‐C /opt
Set default java and javac to the new installed jdk8.
sudo update‐alternatives ‐‐install /usr/bin/javac javac /opt/jdk1.8.0_73/bin/javac 1
sudo update‐alternatives ‐‐install /usr/bin/java java /opt/jdk1.8.0_73/bin/java 1
sudo update‐alternatives ‐‐config javac sudo update‐alternatives ‐‐config java
NOTE: If asked to choose an alternative, type the number corresponding to the jdk version you just installed for example jdk1.8.0_73
Now verify the commands with the version option:
java ‐version javac ‐version
2.7 Install Maven
Step 1: Download Maven
Download the Binary tar.gz file apachemaven3.3.9bin.tar.gz from https://maven.apache.org/download.cgi
Step 2: Extract the contents Extract the contents of the tarball to the /opt directory
sudo tar zxvf apache‐maven‐3.3.9‐bin.tar.gz ‐C /opt
Step 3: Tell your shell where to find maven You’ll do this in the system profile settings so it is available to all users.
Create a new file /etc/profile.d/maven.sh, and type the following inside it:
export M2_HOME=/opt/apache‐maven‐3.3.9 export PATH=$PATH:$M2_HOME/bin
Save the file. Log out and back into the Raspberry Pi so the profile script takes effect. You can test that it is working with thefollowing command:
mvn ‐version
3 Getting started with Alexa Voice Service
3.1 Register for a free Amazon Developer Account
3/26/2016 GitHub amzn/alexaavsraspberrypi: This project demonstrates how to access and test the Alexa Voice Service using a Java client (running on a Rasp...
https://github.com/amzn/alexaavsraspberrypi 11/31
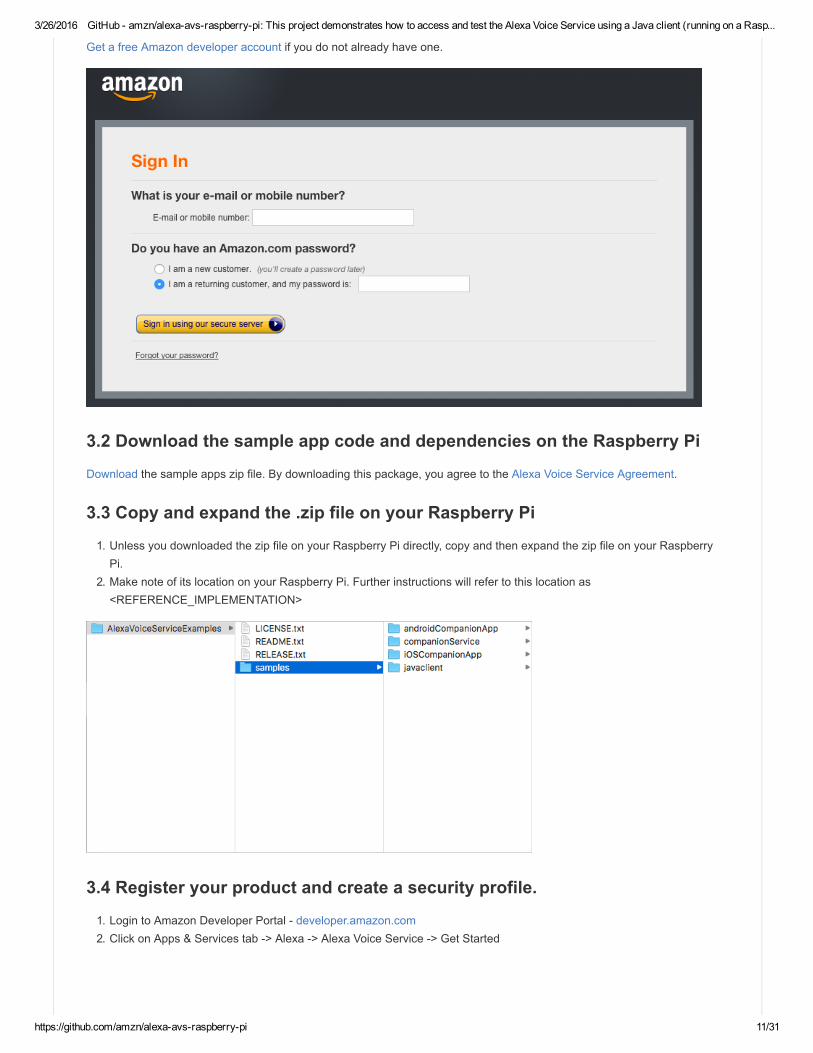
Get a free Amazon developer account if you do not already have one.
3.2 Download the sample app code and dependencies on the Raspberry Pi
Download the sample apps zip file. By downloading this package, you agree to the Alexa Voice Service Agreement.
3.3 Copy and expand the .zip file on your Raspberry Pi
1. Unless you downloaded the zip file on your Raspberry Pi directly, copy and then expand the zip file on your RaspberryPi.
2. Make note of its location on your Raspberry Pi. Further instructions will refer to this location as<REFERENCE_IMPLEMENTATION>
3.4 Register your product and create a security profile.
1. Login to Amazon Developer Portal developer.amazon.com2. Click on Apps & Services tab > Alexa > Alexa Voice Service > Get Started

3/26/2016 GitHub amzn/alexaavsraspberrypi: This project demonstrates how to access and test the Alexa Voice Service using a Java client (running on a Rasp...
https://github.com/amzn/alexaavsraspberrypi 12/31
3. In the Register a Product Type menu, select Device.
4. Fill in and save the following values:
Device Type Info
1. Device Type ID: my_device2. Display Name: My Device3. Click Next
Security Profile
1. Click on the Security Profile dropdown and choose “Create a new profile”

3/26/2016 GitHub amzn/alexaavsraspberrypi: This project demonstrates how to access and test the Alexa Voice Service using a Java client (running on a Rasp...
https://github.com/amzn/alexaavsraspberrypi 13/31
2. General Tab
Security Profile Name: Alexa Voice Service Sample App Security ProfileSecurity Profile Description: Alexa Voice Service Sample App Security Profile DescriptionClick Next
Client ID and Client Secret will be generated for you.
3/26/2016 GitHub amzn/alexaavsraspberrypi: This project demonstrates how to access and test the Alexa Voice Service using a Java client (running on a Rasp...
https://github.com/amzn/alexaavsraspberrypi 14/31
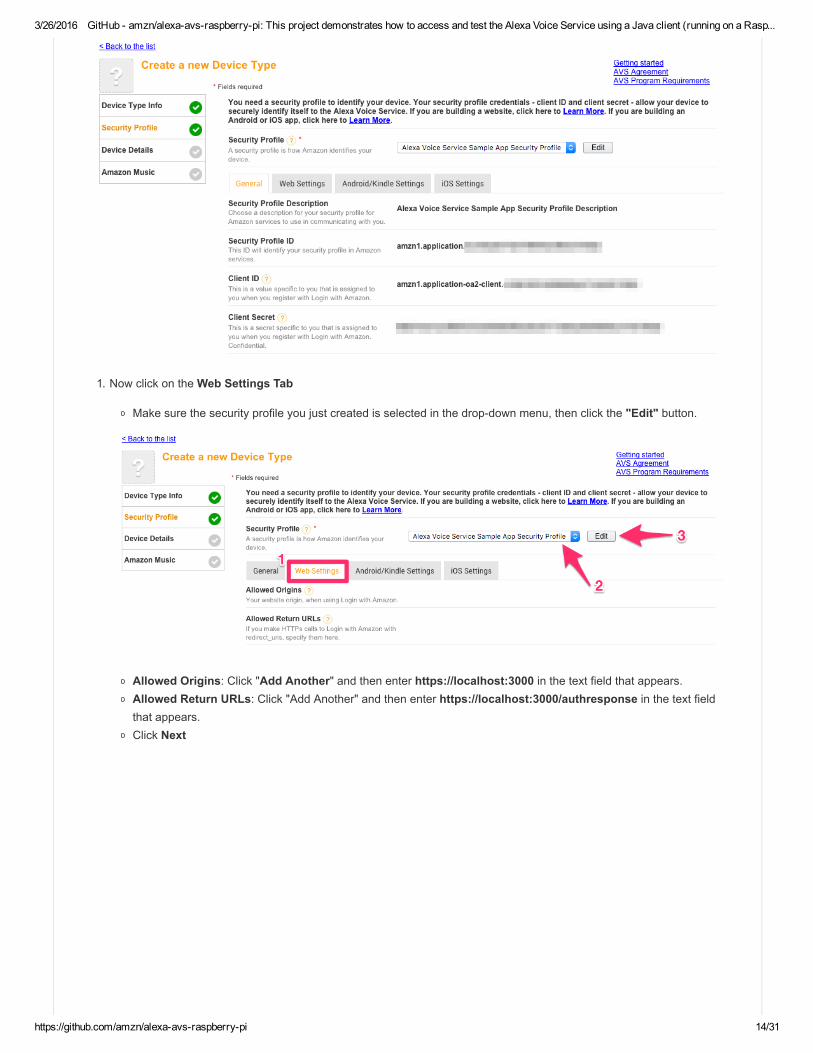
1. Now click on the Web Settings Tab
Make sure the security profile you just created is selected in the dropdown menu, then click the "Edit" button.
Allowed Origins: Click "Add Another" and then enter https://localhost:3000 in the text field that appears.Allowed Return URLs: Click "Add Another" and then enter https://localhost:3000/authresponse in the text fieldthat appears.Click Next

3/26/2016 GitHub amzn/alexaavsraspberrypi: This project demonstrates how to access and test the Alexa Voice Service using a Java client (running on a Rasp...
https://github.com/amzn/alexaavsraspberrypi 15/31
Device Details
1. Image: Save the following test image to your computer, then upload it: 2. Category: Other3. Description: Alexa Voice Service sample app test4. What is your expected timeline for commercialization?: Longer than 4 months / TBD5. How many devices are you planning to commercialize?: 06. Click Next
Amazon Music
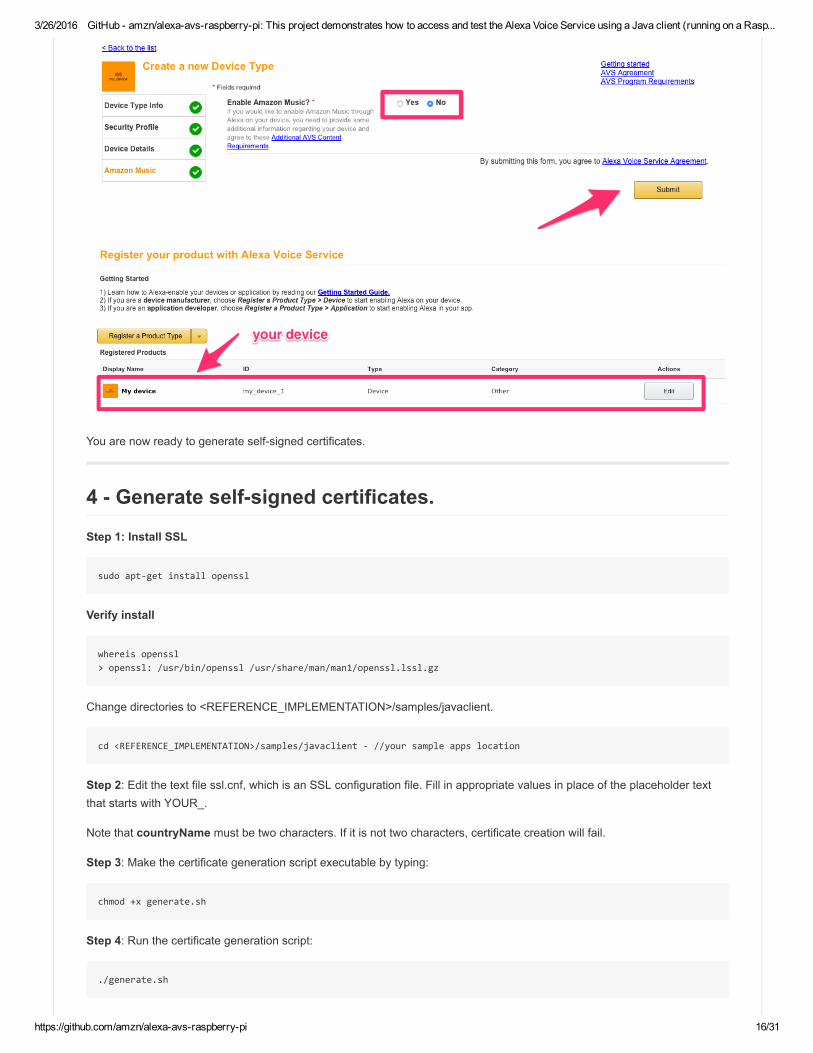
1. Enable Amazon Music?: No (You may optionally select Yes and fill in the required fields if you want to experiment withAmazon Music. However, Amazon Music is not required for basic use of the Alexa Voice Service.)
2. Click the Submit button
3/26/2016 GitHub amzn/alexaavsraspberrypi: This project demonstrates how to access and test the Alexa Voice Service using a Java client (running on a Rasp...
https://github.com/amzn/alexaavsraspberrypi 16/31
You are now ready to generate selfsigned certificates.
4 Generate selfsigned certificates.
Step 1: Install SSL
sudo apt‐get install openssl
Verify install
whereis openssl > openssl: /usr/bin/openssl /usr/share/man/man1/openssl.lssl.gz
Change directories to <REFERENCE_IMPLEMENTATION>/samples/javaclient.
cd <REFERENCE_IMPLEMENTATION>/samples/javaclient ‐ //your sample apps location
Step 2: Edit the text file ssl.cnf, which is an SSL configuration file. Fill in appropriate values in place of the placeholder textthat starts with YOUR_.
Note that countryName must be two characters. If it is not two characters, certificate creation will fail.
Step 3: Make the certificate generation script executable by typing:
chmod +x generate.sh
Step 4: Run the certificate generation script:
./generate.sh

3/26/2016 GitHub amzn/alexaavsraspberrypi: This project demonstrates how to access and test the Alexa Voice Service using a Java client (running on a Rasp...
https://github.com/amzn/alexaavsraspberrypi 17/31
Step 5: You will be prompted for some information:
1. When prompted for a product ID, enter my_device2. When prompted for a serial number, enter 1234563. When prompted for a password, enter any password and remember what you entered
i. Password: talktome (you can even leave it blank)
Step 6: Edit the configuration file for the Node.js server
The configuration file is located at:
<REFERENCE_IMPLEMENTATION>/samples/companionService/config.js.
Make the following changes:
Set sslKey to <REFERENCE_IMPLEMENTATION>/samples/javaclient/certs/server/node.keySet sslCert to <REFERENCE_IMPLEMENTATION>/samples/javaclient/certs/server/node.crtSet sslCaCert to <REFERENCE_IMPLEMENTATION>/samples/javaclient/certs/ca/ca.crt
IMP: Do not use ~ to denote the home directory. Use the absolute path instead. So, instead of ~/documents/samples, use/home/pi/documents/samples.
Step 7: Edit the configuration file for the Java client
The configuration file is located at:
<REFERENCE_IMPLEMENTATION>/samples/javaclient/config.json.
Make the following changes:
Set companionApp.sslKeyStore to <REFERENCE_IMPLEMENTATION>/samples/javaclient/certs/server/jetty.pkcs12Set companionApp.sslKeyStorePassphrase to the passphrase entered in the certificate generation script in step 5above.Set companionService.sslClientKeyStore to<REFERENCE_IMPLEMENTATION>/samples/javaclient/certs/client/client.pkcs12Set companionService.sslClientKeyStorePassphrase to the passphrase entered in the certificate generation script instep 5 above.Set companionService.sslCaCert to <REFERENCE_IMPLEMENTATION>/samples/javaclient/certs/ca/ca.crt
5 Install the dependencies
Change directories to <REFERENCE_IMPLEMENTATION>/samples/companionService
cd <REFERENCE_IMPLEMENTATION>/samples/companionService
Install the dependencies by typing:
npm install
6 Enable Security Profile
1. Open a web browser, and visit https://developer.amazon.com/lwa/sp/overview.html.

3/26/2016 GitHub amzn/alexaavsraspberrypi: This project demonstrates how to access and test the Alexa Voice Service using a Java client (running on a Rasp...
https://github.com/amzn/alexaavsraspberrypi 18/31
2. Near the top of the page, select the security profile you created earlier from the drop down menu and click Confirm.
3. Enter a privacy policy URL beginning with http:// or https://. For this example, you can enter a fake URL such ashttp://example.com.
4. [Optional] You may upload an image as well. The image will be shown on the Login with Amazon consent page to giveyour users context.
5. Click Save.
6. Next to the Alexa Voice Service Sample App Security Profile, click Show Client ID and Client Secret. This will displayyour client ID and client secret. Save these values. You’ll need these.

3/26/2016 GitHub amzn/alexaavsraspberrypi: This project demonstrates how to access and test the Alexa Voice Service using a Java client (running on a Rasp...
https://github.com/amzn/alexaavsraspberrypi 19/31
7 Updating the config files
Login to the Raspberry Pi via VNC
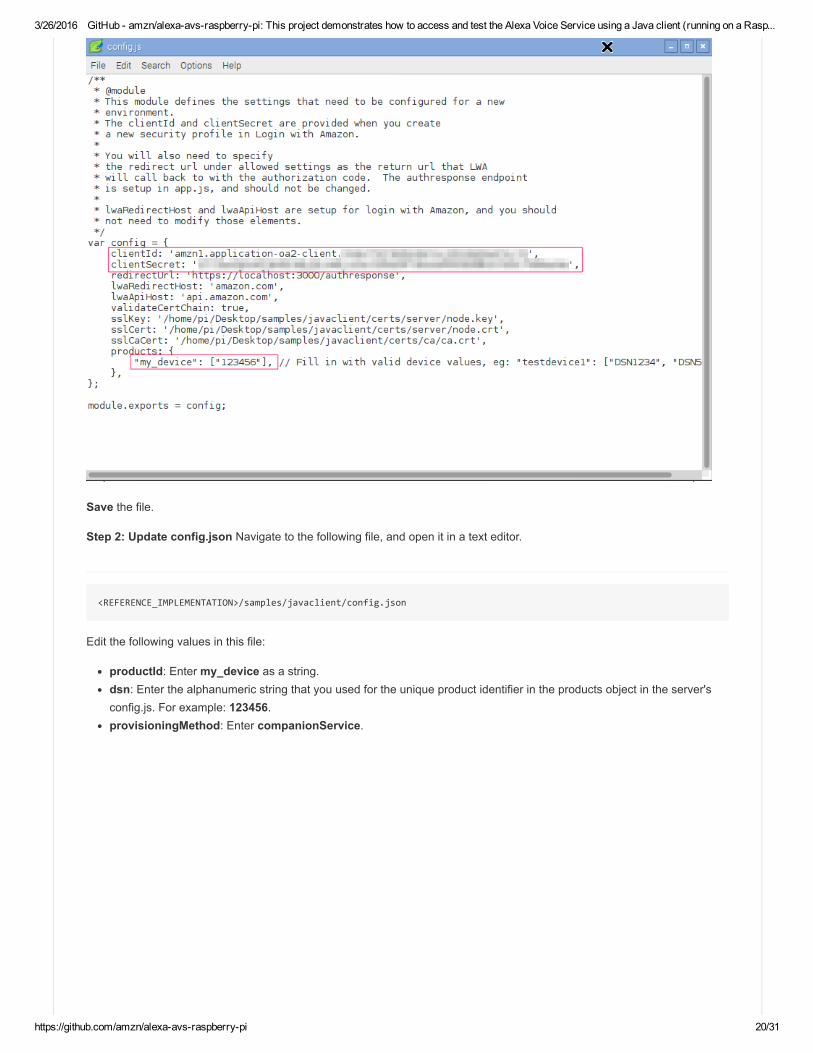
Step 1: Update config.js Navigate to the following file and open it in a text editor.
<REFERENCE_IMPLEMENTATION>/samples/companionService/config.js
Edit thefollowing values in this file
clientId: Paste in the client ID that you noted in the previous step as a string.clientSecret: Paste in the client secret that you noted in the previous step as a string.products: The product's object consists of a key that should be the same as the product type ID that you set up in thedeveloper portal and a value that is an array of unique product identifiers. If you followed the instructions above, theproduct type ID should be my_device. The unique product identifier can be any alphanumeric string, such as 123456.Example products JSON is: products: "my_device": ["123456"]
3/26/2016 GitHub amzn/alexaavsraspberrypi: This project demonstrates how to access and test the Alexa Voice Service using a Java client (running on a Rasp...
https://github.com/amzn/alexaavsraspberrypi 20/31
Save the file.
Step 2: Update config.json Navigate to the following file, and open it in a text editor.
<REFERENCE_IMPLEMENTATION>/samples/javaclient/config.json
Edit the following values in this file:
productId: Enter my_device as a string.dsn: Enter the alphanumeric string that you used for the unique product identifier in the products object in the server'sconfig.js. For example: 123456.provisioningMethod: Enter companionService.

3/26/2016 GitHub amzn/alexaavsraspberrypi: This project demonstrates how to access and test the Alexa Voice Service using a Java client (running on a Rasp...
https://github.com/amzn/alexaavsraspberrypi 21/31
Save the file.
Step 3: Preparing the pom.xml file
Navigate to the following file and open it in a text editor.
<REFERENCE_IMPLEMENTATION>/samples/javaclient/pom.xml
Add the following to the pom.xml in the < dependencies > section:
<dependency> <groupId>net.java.dev.jna</groupId> <artifactId>jna</artifactId> <version>4.1.0</version> <scope>compile</scope> </dependency>

3/26/2016 GitHub amzn/alexaavsraspberrypi: This project demonstrates how to access and test the Alexa Voice Service using a Java client (running on a Rasp...
https://github.com/amzn/alexaavsraspberrypi 22/31
8 Run the server
Login to the Raspberry Pi via VNC
In your terminal window or from the command prompt, type:
cd <REFERENCE_IMPLEMENTATION>/samples/companionService npm start

3/26/2016 GitHub amzn/alexaavsraspberrypi: This project demonstrates how to access and test the Alexa Voice Service using a Java client (running on a Rasp...
https://github.com/amzn/alexaavsraspberrypi 23/31
The server is now running on port 3000 and you are ready to start the client.
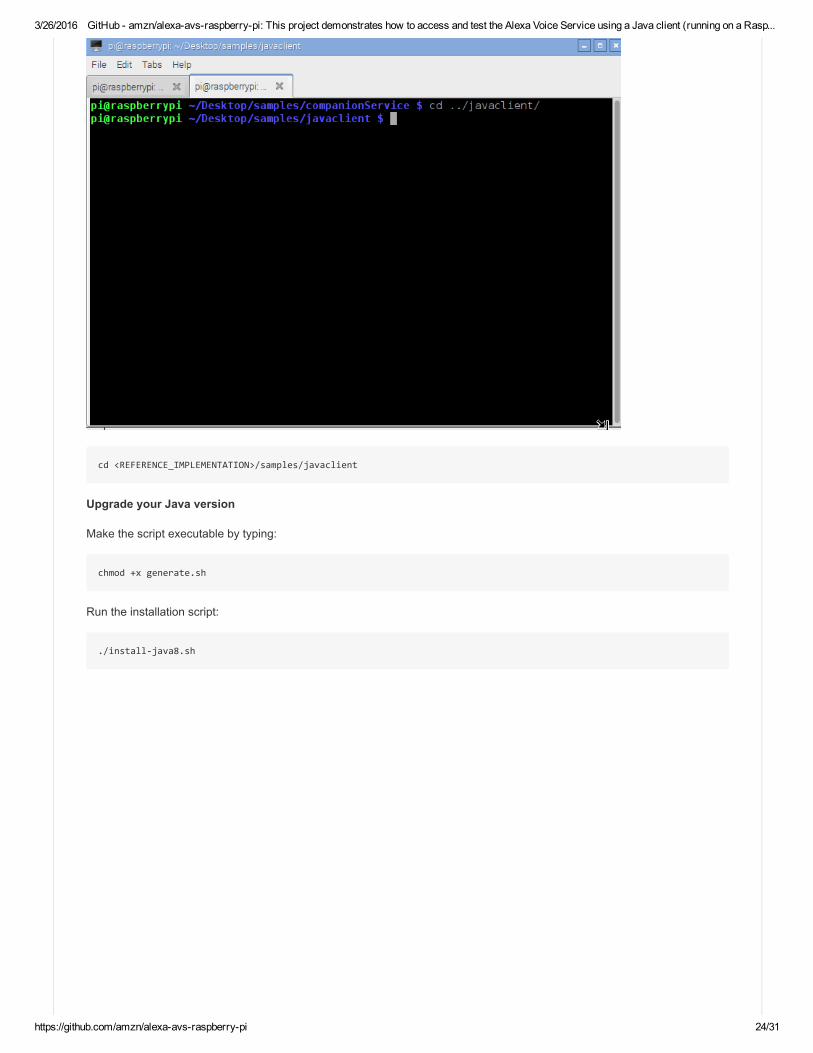
9 Start the client
Open a new terminal window/tab (SHIFT+CTRL+TAB in Raspbian)
3/26/2016 GitHub amzn/alexaavsraspberrypi: This project demonstrates how to access and test the Alexa Voice Service using a Java client (running on a Rasp...
https://github.com/amzn/alexaavsraspberrypi 24/31
cd <REFERENCE_IMPLEMENTATION>/samples/javaclient
Upgrade your Java version
Make the script executable by typing:
chmod +x generate.sh
Run the installation script:
./install‐java8.sh

3/26/2016 GitHub amzn/alexaavsraspberrypi: This project demonstrates how to access and test the Alexa Voice Service using a Java client (running on a Rasp...
https://github.com/amzn/alexaavsraspberrypi 25/31
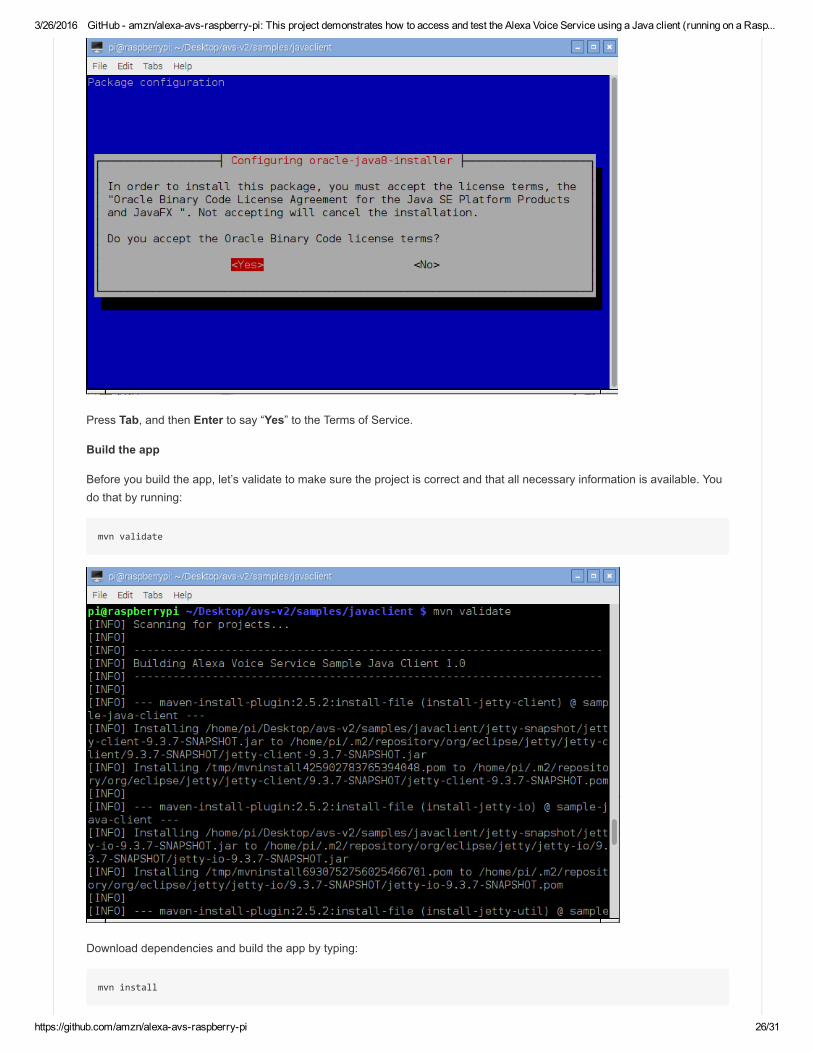
You will get a message from Oracle Java installer that you must accept the Terms of Service for Java SE Platform, pressEnter.
3/26/2016 GitHub amzn/alexaavsraspberrypi: This project demonstrates how to access and test the Alexa Voice Service using a Java client (running on a Rasp...
https://github.com/amzn/alexaavsraspberrypi 26/31
Press Tab, and then Enter to say “Yes” to the Terms of Service.
Build the app
Before you build the app, let’s validate to make sure the project is correct and that all necessary information is available. Youdo that by running:
mvn validate
Download dependencies and build the app by typing:
mvn install

3/26/2016 GitHub amzn/alexaavsraspberrypi: This project demonstrates how to access and test the Alexa Voice Service using a Java client (running on a Rasp...
https://github.com/amzn/alexaavsraspberrypi 27/31
When the installation is completed, you will see a “Build Success” message in the terminal.
Run the client app:
You are now ready to run the client app by typing:
mvn exec:exec
10 Obtain Authorization from Login with Amazon
1. When you run the client, a window should pop up with a message that says something similar to:
Please register your device by visiting the following website on any system and following the instructions:https://localhost:3000/provision/d340f629bd685deeff28a917 Hit OK once completed.

3/26/2016 GitHub amzn/alexaavsraspberrypi: This project demonstrates how to access and test the Alexa Voice Service using a Java client (running on a Rasp...
https://github.com/amzn/alexaavsraspberrypi 28/31
Copy the URL from the popup window and paste it into a web browser. In this example, the URL to copy and paste ishttps://localhost:3000/provision/d340f629bd685deeff28a917.
NOTE: Due to the use of a selfsigned certificate, you will see a warning about an insecure website. This is expected. Itis safe to ignore the warnings during testing.
2. You will be taken to a Login with Amazon web page. Enter your Amazon credentials.

3/26/2016 GitHub amzn/alexaavsraspberrypi: This project demonstrates how to access and test the Alexa Voice Service using a Java client (running on a Rasp...
https://github.com/amzn/alexaavsraspberrypi 29/31
3. You will be taken to a Dev Authorization page, confirming that you’d like your device to access the Security Profilecreated earlier.
Click Okay.
4. You will now be redirected to a URL beginning with https://localhost:3000/authresponse followed by a query string. Thebody of the web page will say device tokens ready.
5. Return to the Java application and click the OK button. The client is now ready to accept Alexa requests.

3/26/2016 GitHub amzn/alexaavsraspberrypi: This project demonstrates how to access and test the Alexa Voice Service using a Java client (running on a Rasp...
https://github.com/amzn/alexaavsraspberrypi 30/31
6. Click the Start Listening button and wait for the audio cue before beginning to speak. It may take a second or two forthe connection to be made before you hear the audio cue.
Press the Stop Listening button when you are done speaking.
Let’s talk to Alexa
Ask for Weather: Click the Start Listening button. You: What's the weather in Seattle? Click the Stop Listening button.Alexa: Current weather report for Seattle
Some other fun questions you can ask Alexa
Once you hear the audio cue after clicking “Start Listening” button, here are a few things you can try saying
Request Music Playback: Play Bruce SpringsteenGeneral Knowledge: What's the mass of the sun in grams?Geek: What are the three laws of robotics?Fun: Can you rap?Set a Timer: Set the timer for 2 minutes.Set Alarm: Set the alarm for 7:30 a.m.
More on Music Playback The "previous", "play/pause", and "next" buttons at the bottom of the Java client UI are todemonstrate the music button events. Music button events allow you to initiate changes in the playback stream withouthaving to speak to Alexa. For example, you can press the "play/pause" button to pause and restart a track of music.
To demonstrate the "play/pause" button, you can speak the following command: Play DC101 on iHeartRadio, then press the"play/pause" button. The music will pause in response to the button click. Press the "play/pause" button again to restart themusic.
3/26/2016 GitHub amzn/alexaavsraspberrypi: This project demonstrates how to access and test the Alexa Voice Service using a Java client (running on a Rasp...
https://github.com/amzn/alexaavsraspberrypi 31/31
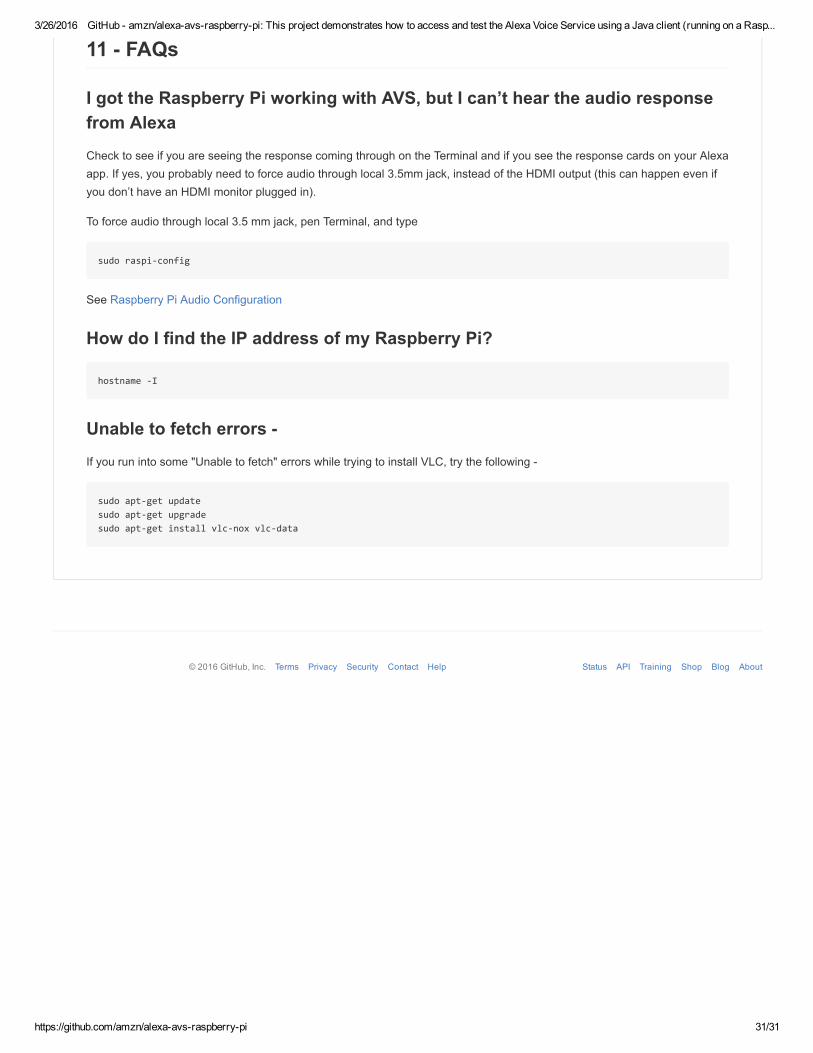
11 FAQs
I got the Raspberry Pi working with AVS, but I can’t hear the audio responsefrom Alexa
Check to see if you are seeing the response coming through on the Terminal and if you see the response cards on your Alexaapp. If yes, you probably need to force audio through local 3.5mm jack, instead of the HDMI output (this can happen even ifyou don’t have an HDMI monitor plugged in).
To force audio through local 3.5 mm jack, pen Terminal, and type
sudo raspi‐config
See Raspberry Pi Audio Configuration
How do I find the IP address of my Raspberry Pi?
hostname ‐I
Unable to fetch errors
If you run into some "Unable to fetch" errors while trying to install VLC, try the following
sudo apt‐get update sudo apt‐get upgrade sudo apt‐get install vlc‐nox vlc‐data
Status API Training Shop Blog About© 2016 GitHub, Inc. Terms Privacy Security Contact Help