proofing documents - winston-salem/forsyth county schools · proofing documents 9 k e yt e r m s...
TRANSCRIPT
287
Proofing Documents 9
KEY TERMS • All Markup
• antonym
• AutoCorrect
• balloons
• inline
• Lock Tracking
• markup
• No Markup
• Original
• Person Card
• Simple Markup
• synonym
LESSON SKILL MATRIX
Skill Exam Objective Objective Number
Validating Content by Using Spelling and Grammar Checking Options
Confi guring AutoCorrect Settings Insert special characters (©, ™, ₤). 2.1.7
Inserting and Modifying Comments in a Document
Viewing Comments
Tracking Changes in a Document
© s
pooh
/iSt
ockp
hoto
Lesson 9288
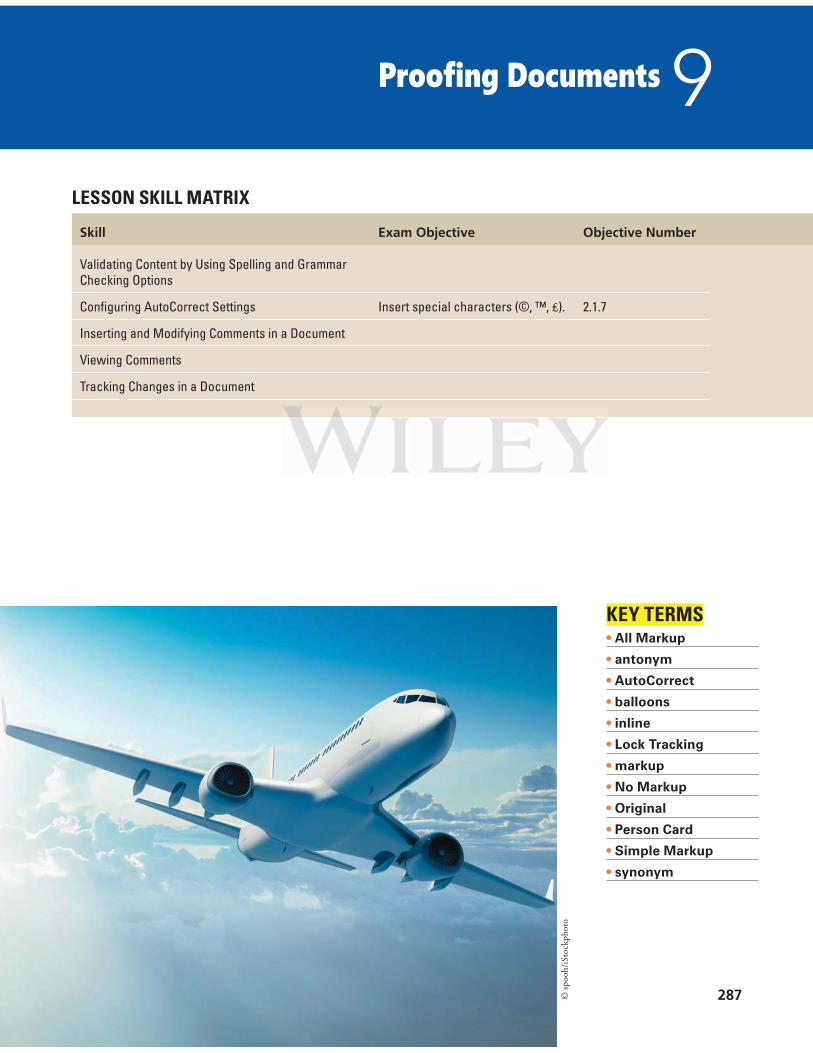
Blue Yonder Airlines is a large company with hundreds of employees. In
your job as a human resources specialist, you are involved in hiring, em-
ployee benefi t programs, and employee communications. M any of the doc-
uments you work with relate to employee issues, and you need to ensure
that these documents are error free. In this lesson, you learn to use the
Spelling and Grammar feature, to fi nd the meaning of a word, to use the
Thesaurus, to review the statistics of words and paragraphs used in a docu-
ment, to insert comments, to change the AutoCorrect settings, and to track
changes.
SOFTWARE ORIENTATION
The Bottom Line
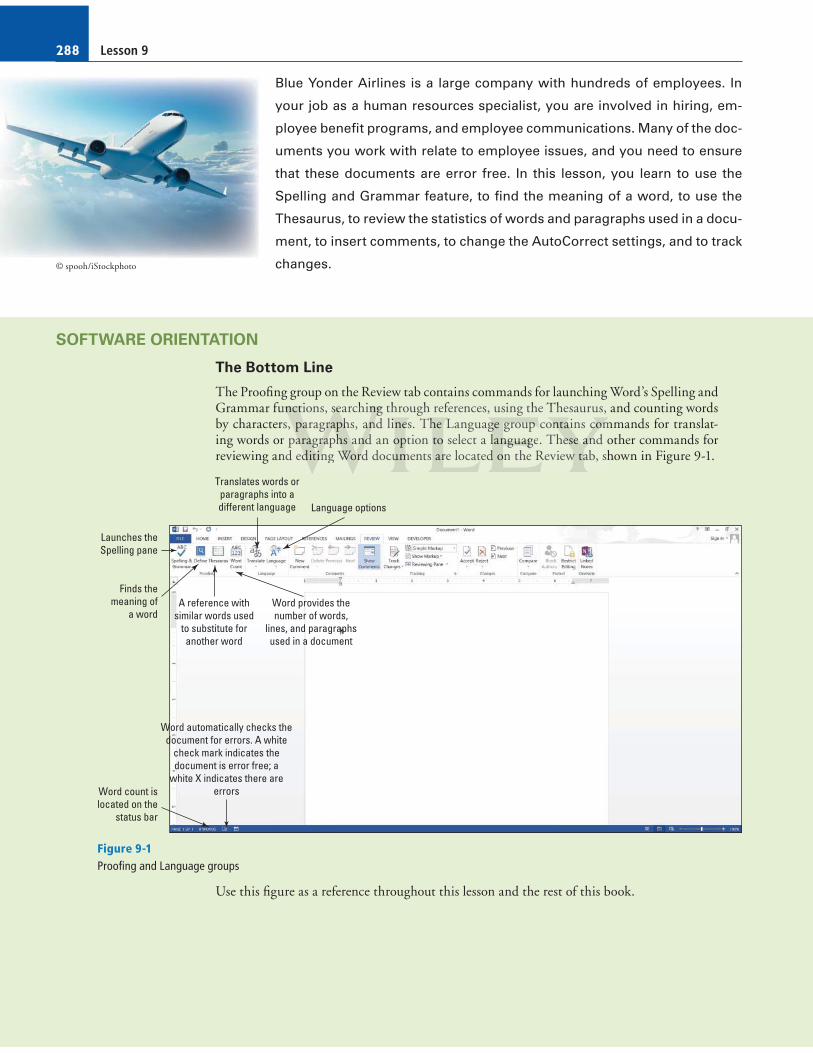
The Proofi ng group on the Review tab contains commands for launching Word’s Spelling and Grammar functions, searching through references, using the Thesaurus, and counting words by characters, paragraphs, and lines. The Language group contains commands for translat-ing words or paragraphs and an option to select a language. These and other commands for reviewing and editing Word documents are located on the Review tab, shown in Figure 9-1.
Use this fi gure as a reference throughout this lesson and the rest of this book.
Figure 9-1Proofi ng and Language groups
Translates words orparagraphs into adifferent language
Launches theSpelling pane
Finds themeaning of
a word
Word count islocated on the
status bar
Word automatically checks thedocument for errors. A white
check mark indicates thedocument is error free; a
white X indicates there areerrors
A reference withsimilar words used
to substitute foranother word
Language options
Word provides thenumber of words,
lines, and paragraphsused in a document
© spooh/iStockphoto
uuuncncnn tititions, ssseaee rchingngng through references, using the Thesaurus, rs, paaaragggrararaphphphs, aaandnn liiineees. ThhhThe LLLanguaggeg gggrroroupupup connnntaaainii s cococommmr paaaragagagrararaphphphs anananddd an ooopption toto select a lllangngnguauauagegg . Thhheseseseee ananand ond eddditinining WoWoWoW rdrdrd documuuments arrre locatededed oon the Revieww taaba , sh
Proofi ng Documents 289
VALIDATING CONTENT BY USING SPELLING AND GRAMMAR CHECKING OPTIONS It is a good business practice to proof a document to ensure it is error free before sharing or printing it. Word provides proofi ng tools such as a Spelling and Grammar checking function, the Defi ne button, the Thesaurus button, and the Word Count tracker. All these tools and commands are located on the Ribbon on the Review tab. The status bar also contains Word Count and Proof-ing Error buttons that give you quick access to some proofi ng features. On the status bar, Word automatically displays the document’s word count.
Checking the Spelling and Grammar Feature Microsoft Word’s Spelling and Grammar feature is automatically on by default and checks the spelling and grammar in a document. Word underlines misspelled words with a wavy red line and underlines grammatical errors with a wavy green line. Proper nouns are usually not found in the dictionary, so they will often be underlined with a wavy red line even if the word is spelled correctly. If there is a word that you use often that is not found in the dictionary, you might want to add it to your dictionary. Adding words to the dictionary is not covered in this lesson. Word can often detect whether words are used inappropriately and it underlines the word with a wavy blue line. In other words, if a word is underlined in blue, the word is in the dictionary but not used correctly in the context. In this exercise, you learn to use Word’s automatic Spelling and Grammar feature and its options to proof and correct your document.
STEP BY STEP Check Spelling and Grammar
GET READY. Before you begin these steps, launch Microsoft Word.
1. OPEN the Emplo y Offer document from the lesson folder.
2. Click the Review tab, and then click the Spelling & Grammar button in the Proofi ng group. The Spelling pane opens—this is a new appearance for this feature (see Figure 9-2).
The Bottom Line
nndddd ittits optiiiononons to ppprrroof and correct your document.
Spellililing andnnn Graaammmmararar
Lesson 9290
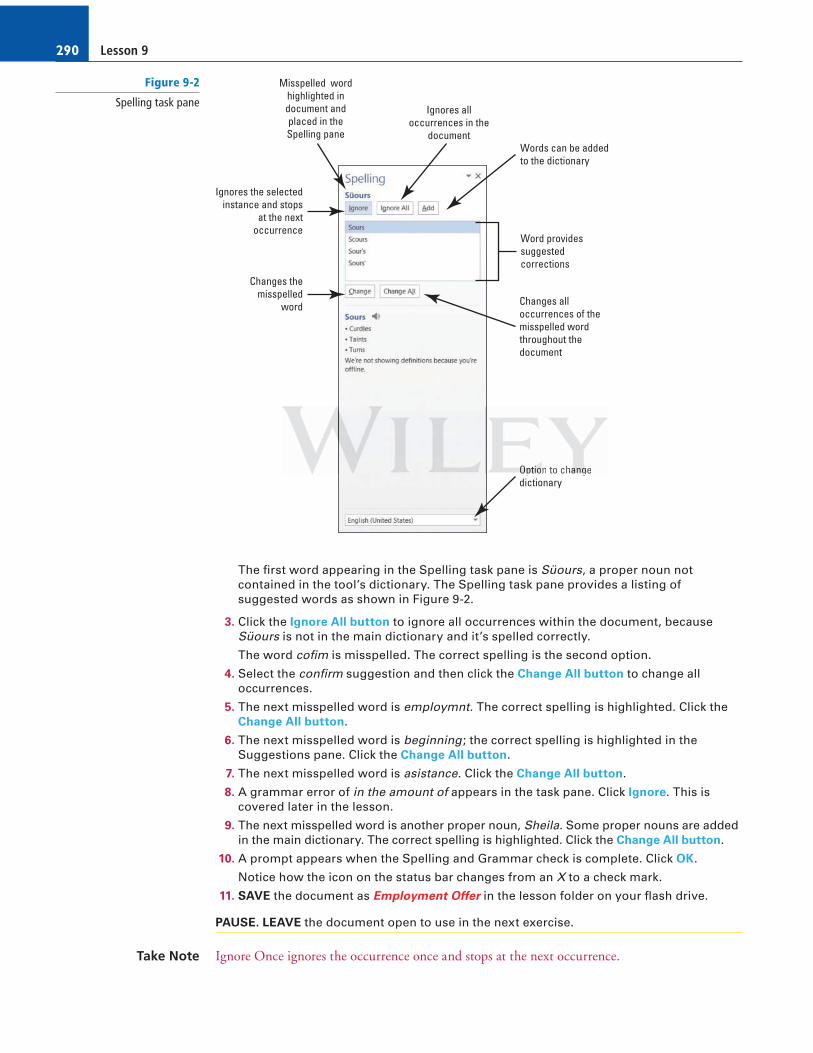
The fi rst word appearing in the Spelling task pane is Süours , a proper noun not contained in the tool’s dictionary. The Spelling task pane provides a listing of suggested words as shown in Figure 9-2.
3. Click the Ignore All button to ignore all occurrences within the document, because Süours is not in the main dictionary and it’s spelled correctly.
The word cofi m is misspelled. The correct spelling is the second option.
4. Select the confi rm suggestion and then click the Change All button to change all occurrences.
5. The next misspelled word is employmnt . The correct spelling is highlighted. Click the Change All button.
6. The next misspelled word is beginning ; the correct spelling is highlighted in the Suggestions pane. Click the Change All button.
7. The next misspelled word is asistance . Click the Change All button.
8. A grammar error of in the amount of appears in the task pane. Click Ignore . This is covered later in the lesson.
9. The next misspelled word is another proper noun, Sheila. Some proper nouns are added in the main dictionary. The correct spelling is highlighted. Click the Change All button.
10. A prompt appears when the Spelling and Grammar check is complete. Click OK .
Notice how the icon on the status bar changes from an X to a check mark.
11. SAVE the document as Employment Offer in the lesson folder on your fl ash drive.
PAUSE. LEAVE the document open to use in the next exercise.
Ignore Once ignores the occurrence once and stops at the next occurrence. Take Note
Misspelled wordhighlighted indocument andplaced in theSpelling pane
Ignores the selectedinstance and stops
at the nextoccurrence
Ignores alloccurrences in the
documentWords can be addedto the dictionary
Word providessuggestedcorrections
Changes themisspelled
word Changes alloccurrences of themisspelled wordthroughout thedocument
Option to changedictionary
Figure 9-2
Spelling task pane
OptOptOptionioio to chhhangangangeee
Proofi ng Documents 291
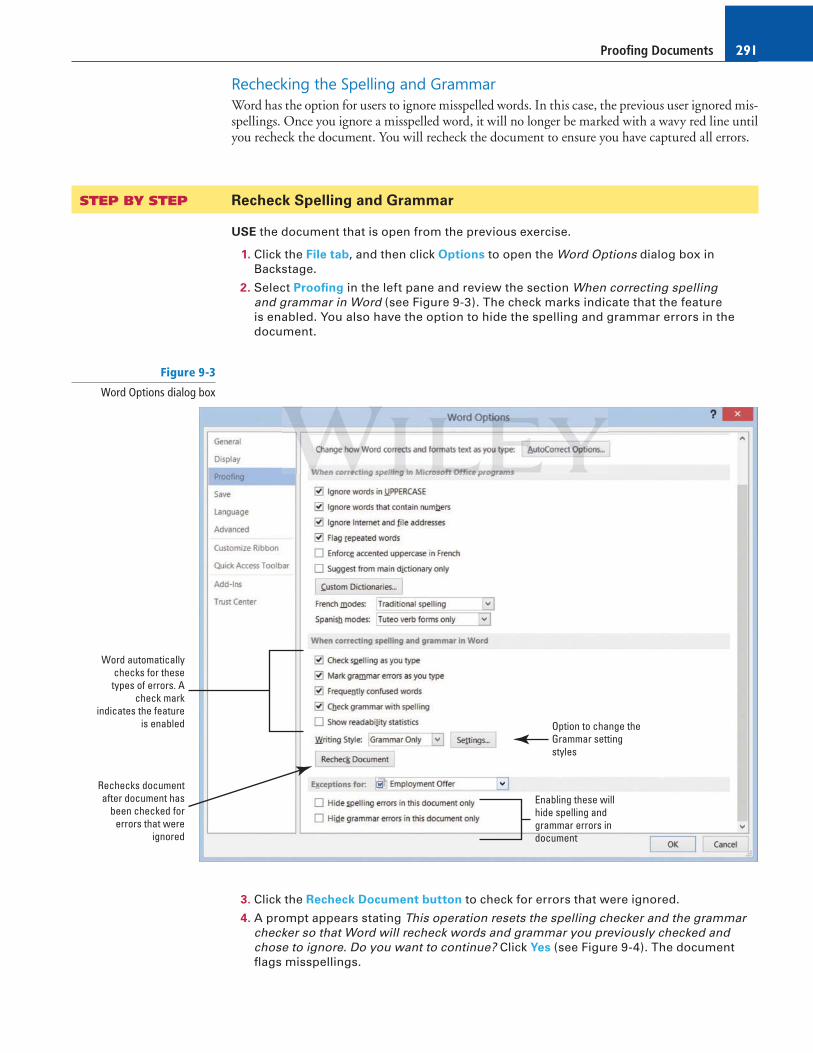
Rechecking the Spelling and Grammar Word has the option for users to ignore misspelled words. In this case, the previous user ignored mis-spellings. Once you ignore a misspelled word, it will no longer be marked with a wavy red line until you recheck the document. You will recheck the document to ensure you have captured all errors.
STEP BY STEP Recheck Spelling and Grammar
USE the document that is open from the previous exercise.
1. Click the File tab, and then click Options to open the Word Options dialog box in Backstage.
2. Select Proofi ng in the left pane and review the section When c orrecting s pelling a nd g rammar i n Word (see Figure 9-3). The check marks indicate that the feature is enabled. You also have the option to hide the spelling and grammar errors in the document.
3. Click the Recheck Document button to check for errors that were ignored.
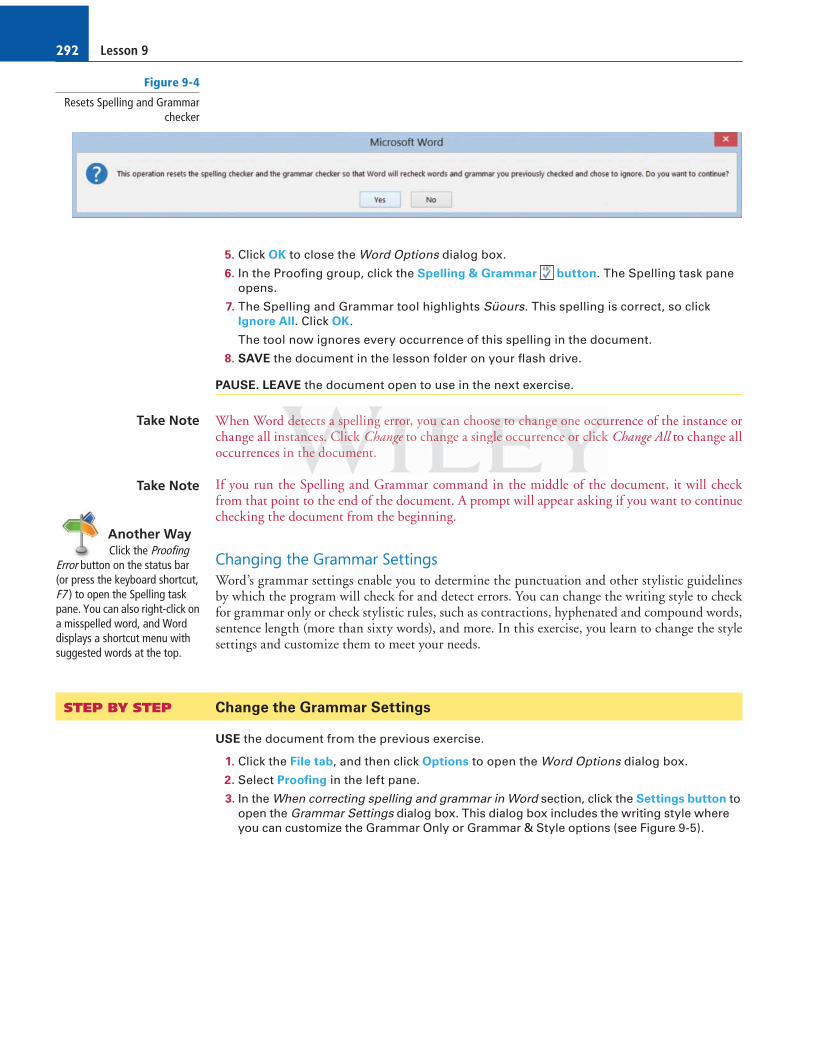
4. A prompt appears stating This operation resets the spelling checker and the grammar checker so that Word will recheck words and grammar you previously checked and chose to ignore. Do you want to continue? Click Yes (see Figure 9-4). The document fl ags misspellings.
Word automaticallychecks for thesetypes of errors. A
check markindicates the feature
is enabled
Rechecks documentafter document has
been checked forerrors that were
ignored
Option to change theGrammar settingstyles
Enabling these willhide spelling andgrammar errors indocument
Figure 9-3
Word Options dialog box
Lesson 9292
5. Click OK to close the Word Options dialog box.
6. In the Proofi ng group, click the Spelling & Grammar button. The Spelling task pane opens.
7. The Spelling and Grammar tool highlights Süours . This spelling is correct, so click Ignore All . Click OK.
The tool now ignores every occurrence of this spelling in the document.
8. SAVE the document in the lesson folder on your fl ash drive.
PAUSE. LEAVE the document open to use in the next exercise.
When Word detects a spelling error, you can choose to change one occurrence of the instance or change all instances. Click Change to change a single occurrence or click Change All to change all occurrences in the document.
If you run the Spelling and Grammar command in the middle of the document, it will check from that point to the end of the document. A prompt will appear asking if you want to continue checking the document from the beginning.
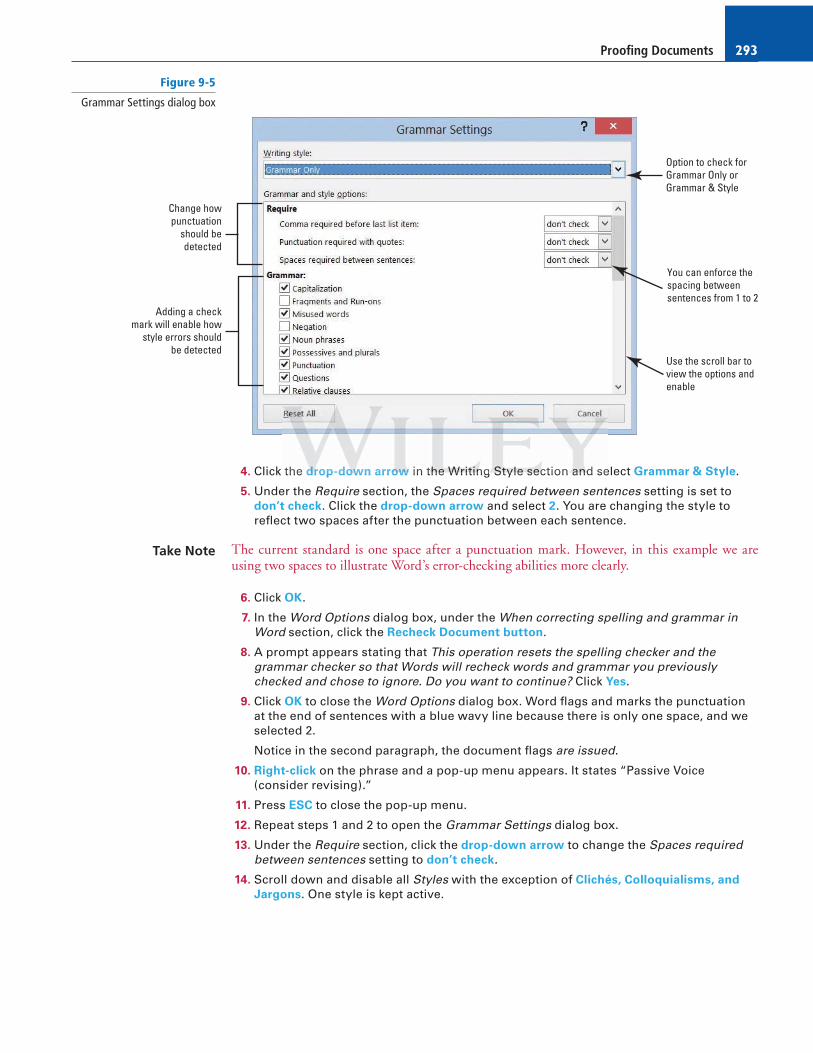
Changing the Grammar Settings Word’s grammar settings enable you to determine the punctuation and other stylistic guidelines by which the program will check for and detect errors. You can change the writing style to check for grammar only or check stylistic rules, such as contractions, hyphenated and compound words, sentence length (more than sixty words), and more. In this exercise, you learn to change the style settings and customize them to meet your needs.
STEP BY STEP Change the Grammar Settings
USE the document from the previous exercise.
1. Click the File tab, and then click Options to open the Word Options dialog box.
2. Select Proofi ng in the left pane.
3. In the When correcting spelling and grammar in Word section, click the Settings button to open the Grammar Settings dialog box. This dialog box includes the writing style where you can customize the Grammar Only or Grammar & Style options (see Figure 9-5).
Take Note
Another WayClick the Proofi ng
Error button on the status bar (or press the keyboard shortcut, F7 ) to open the Spelling task pane. You can also right-click on a misspelled word, and Word displays a shortcut menu with suggested words at the top.
Take Note
Figure 9-4
Resets Spelling and Grammar checker
d ddddettttece ts aaaa ssssppepp llinnnngggg errrrrorororrrr, yououuu ccccan choosososse totototo cccchahahahangngngnge eee oononone occcccucucucunstaaaanccccessss. ClCCC iciccck CCCChangggge to chhhannnnge a singggle ooccccccuruuu rence eee ororrr cccclilililick ein thehehehe ddddocumumumumenenenent.
Proofi ng Documents 293
4. Click the drop-down arrow in the Writing Style section and select Grammar & Style .
5. Under the Require section, the Spaces required between sentences setting is set to don’t check . Click the drop-down arrow and select 2 . You are changing the style to refl ect two spaces after the punctuation between each sentence.
The current standard is one space after a punctuation mark. However, in this example we are using two spaces to illustrate Word’s error-checking abilities more clearly.
6. Click OK .
7. In the Word Options dialog box, under the When c orrecting s pelling a nd g rammar i n Word section, click the Recheck Document button.
8. A prompt appears stating that This operation resets the spelling checker and the grammar checker so that Words will recheck words and grammar you previously checked and chose to ignore. Do you want to continue? Click Yes .
9. Click OK to close the Word Options dialog box. Word fl ags and marks the punctuation at the end of sentences with a blue wavy line because there is only one space, and we selected 2.
Notice in the second paragraph, the document fl ags are issued .
10. Right-click on the phrase and a pop-up menu appears. It states “Passive Voice (consider revising).”
11. Press ESC to close the pop-up menu.
12. Repeat steps 1 and 2 to open the Grammar Settings dialog box.
13. Under the Require section, click the drop-down arrow to change the Spaces required between sentences setting to don’t check .
14. Scroll down and disable all Styles with the exception of Clichés, Colloquialisms, and
Jargons . One style is kept active.
Take Note
Figure 9-5
Grammar Settings dialog box
Option to check forGrammar Only orGrammar & Style
Use the scroll bar toview the options andenable
You can enforce thespacing betweensentences from 1 to 2
Change howpunctuation
should bedetected
Adding a checkmark will enable how
style errors shouldbe detected
the drdrdrop-dowowown arrororowww in thththeee WrWrWritititinininggg StStylylyleee seseseccction anananddd se
Lesson 9294
15. Click OK .
16. In the Word Options dialog box, under When correcting spelling a nd grammar i n Word section, click the Recheck Document button.
A prompt appears stating that This operation resets the spelling checker and the grammar checker so that Word will recheck words and grammar you previously checked and chose to ignore. Do you want to continue?
17. Click Yes .
18. Click OK to close the Word Options dialog box.
Notice “are issued” in the second paragraph is no longer fl agged. In the third paragraph, the phrase “in the amount of” is fl agged with a blue wavy line.
19. When you right-click on the phrase, the pop-up menu appears with a suggestion to change to for . Click on the word to accept the suggestion. This is a word or phrase that may be overused or unnecessary to the meaning of your sentence. To quit checking for these types of style errors, you repeat steps 7–10 to disable Clichés, Colloquialisms, and Jargons.
20. Repeat steps 1–3 to open the Grammar Settings dialog box. Click the Writing Style
command box drop-down arrow and select Grammar Only to set the tool for checking the document’s grammar.
21. Click OK to apply changes.
22. SAVE your document in the lesson folder on your fl ash drive.
PAUSE. LEAVE the document open to use in the next exercise.
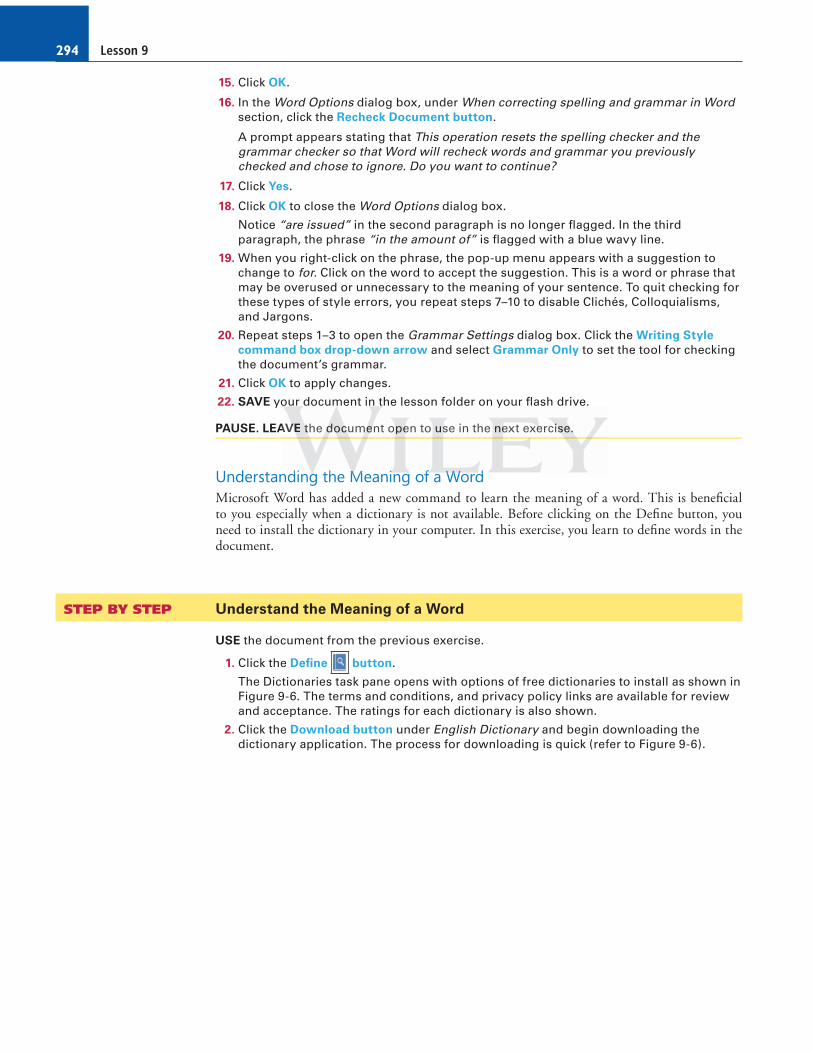
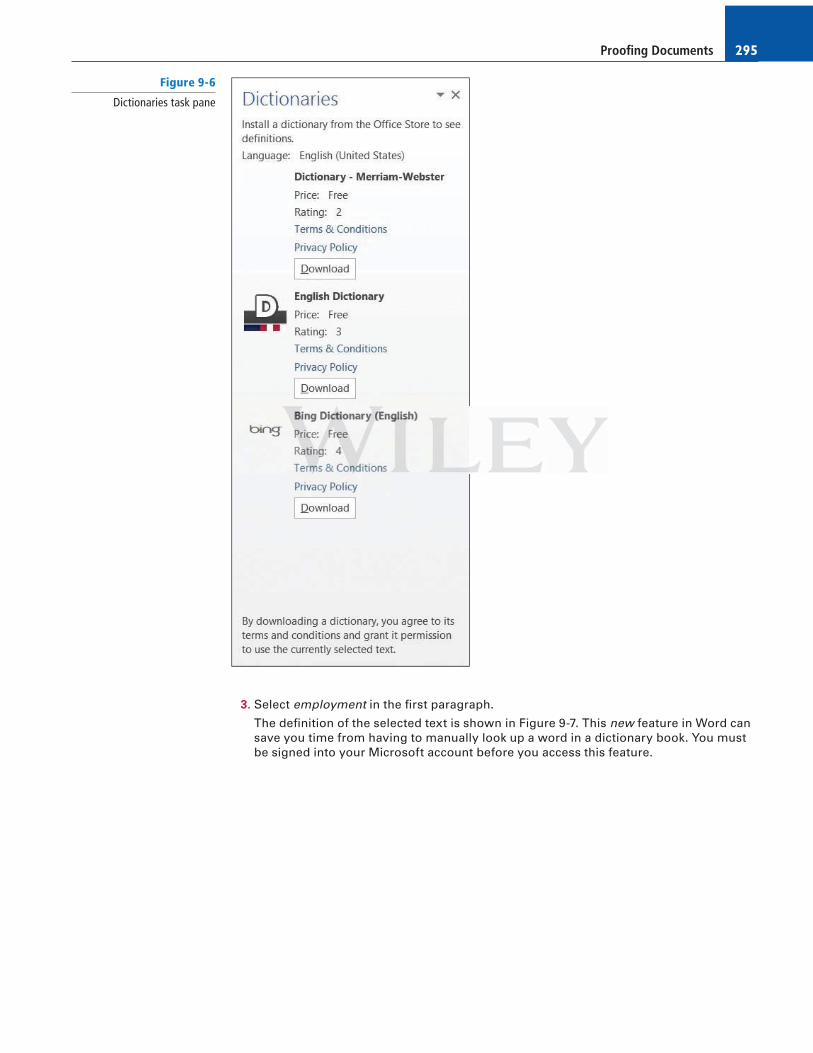
Understanding the Meaning of a Word Microsoft Word has added a new command to learn the meaning of a word. This is benefi cial to you especially when a dictionary is not available. Before clicking on the Defi ne button, you need to install the dictionary in your computer. In this exercise, you learn to defi ne words in the document.
STEP BY STEP Understand the Meaning of a Word
USE the document from the previous exercise.
1. Click the Defi ne button.
The Dictionaries task pane opens with options of free dictionaries to install as shown in Figure 9-6. The terms and conditions, and privacy policy links are available for review and acceptance. The ratings for each dictionary is also shown.
2. Click the Download button under English Dictionary and begin downloading the dictionary application. The process for downloading is quick (refer to Figure 9-6).
y
AVEVEVE ttht e dododoccucumemement opeeen to ussse in the neext exexexercisisisse.e.e.
ndinggg the MeMM aninii g offf a WWWorddd
Proofi ng Documents 295
3. Select employment in the fi rst paragraph.
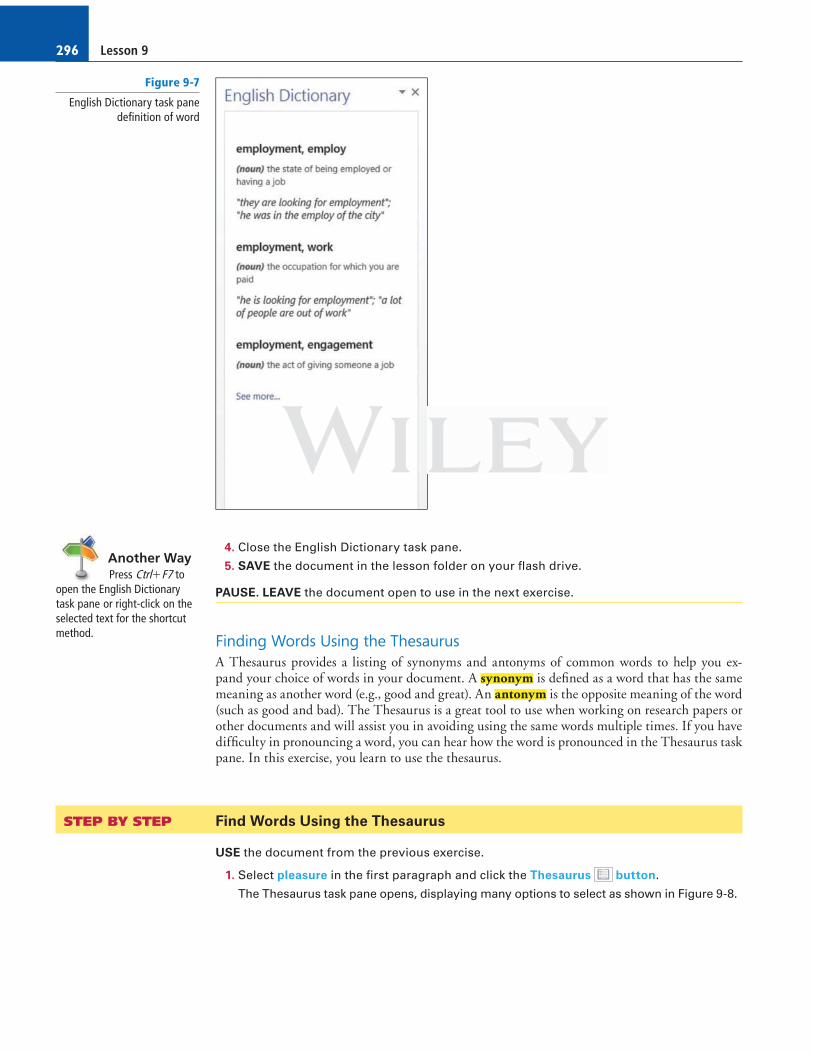
The defi nition of the selected text is shown in Figure 9-7. This new feature in Word can save you time from having to manually look up a word in a dictionary book. You must be signed into your Microsoft account before you access this feature.
Figure 9-6
Dictionaries task pane
Lesson 9296
4. Close the English Dictionary task pane.
5. SAVE the document in the lesson folder on your fl ash drive.
PAUSE. LEAVE the document open to use in the next exercise.
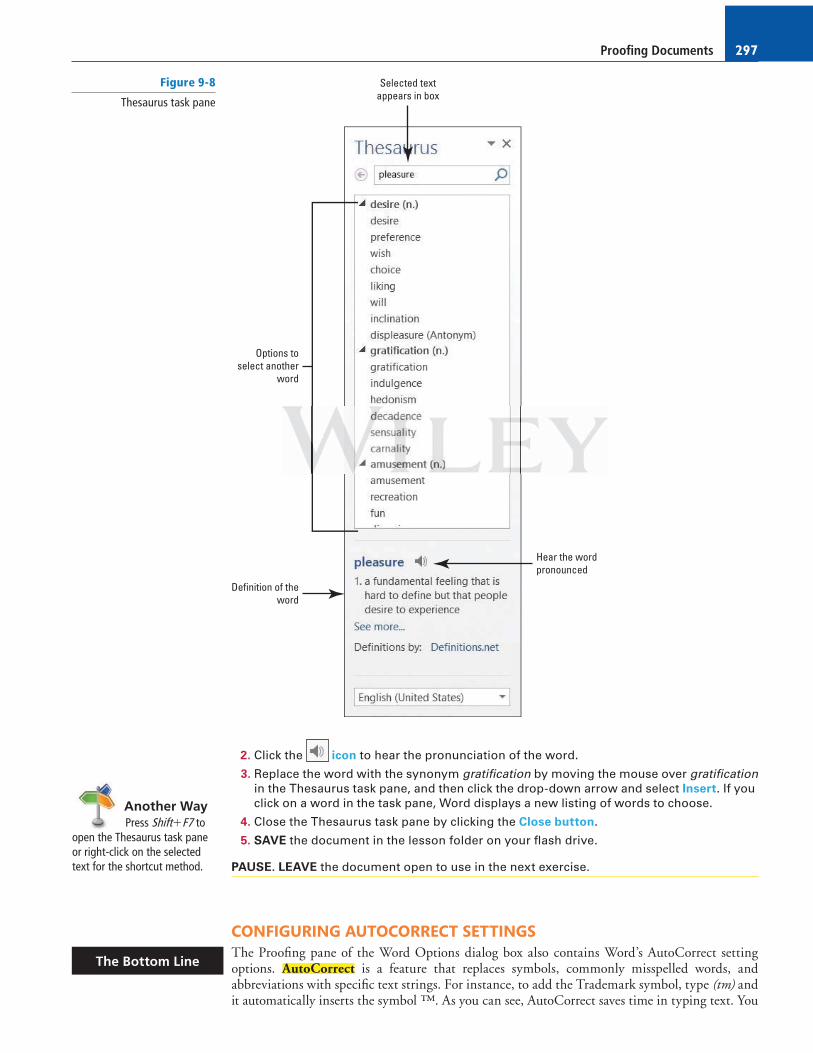
Finding Words Using the Thesaurus A Thesaurus provides a listing of synonyms and antonyms of common words to help you ex-pand your choice of words in your document. A synonym is defi ned as a word that has the same meaning as another word (e.g., good and great). An antonym is the opposite meaning of the word (such as good and bad). The Thesaurus is a great tool to use when working on research papers or other documents and will assist you in avoiding using the same words multiple times. If you have diffi culty in pronouncing a word, you can hear how the word is pronounced in the Thesaurus task pane. In this exercise, you learn to use the thesaurus.
STEP BY STEP Find Words Using the Thesaurus
USE the document from the previous exercise.
1. Select pleasure in the fi rst paragraph and click the Thesaurus button.
The Thesaurus task pane opens, displaying many options to select as shown in Figure 9-8.
Another WayPress Ctrl1F7 to
open the English Dictionary task pane or right-click on the selected text for the shortcut method.
Figure 9-7
English Dictionary task pane defi nition of word
Proofi ng Documents 297
2. Click the icon to hear the pronunciation of the word.
3. Replace the word with the synonym gratifi cation by moving the mouse over gratifi cation in the Thesaurus task pane, and then click the drop-down arrow and select Insert . If you click on a word in the task pane, Word displays a new listing of words to choose.
4. Close the Thesaurus task pane by clicking the Close button.
5. SAVE the document in the lesson folder on your fl ash drive.
PAUSE. LEAVE the document open to use in the next exercise.
CONFIGURING AUTOCORRECT SETTINGS The Proofi ng pane of the Word Options dialog box also contains Word’s AutoCorrect setting options. AutoCorrect is a feature that replaces symbols, commonly misspelled words, and abbreviations with specifi c text strings. For instance, to add the Trademark symbol, type (tm) and it automatically inserts the symbol ™. As you can see, AutoCorrect saves time in typing text. You
Another WayPress Shift1F7 to
open the Thesaurus task pane or right-click on the selected text for the shortcut method.
The Bottom Line
Options toselect another
word
Selected textappears in box
Definition of theword
Hear the wordpronounced
Figure 9-8
Thesaurus task pane
Lesson 9298
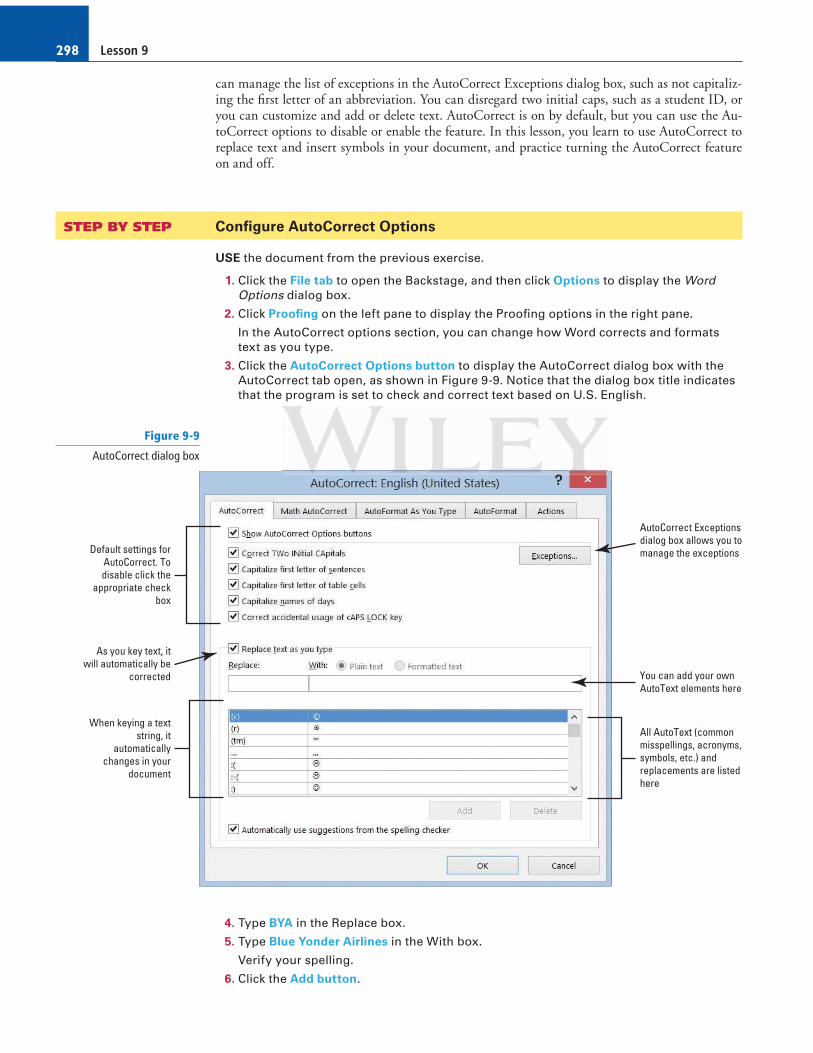
can manage the list of exceptions in the AutoCorrect Exceptions dialog box, such as not capitaliz-ing the fi rst letter of an abbreviation. You can disregard two initial caps, such as a student ID, or you can customize and add or delete text. AutoCorrect is on by default, but you can use the Au-toCorrect options to disable or enable the feature. In this lesson, you learn to use AutoCorrect to replace text and insert symbols in your document, and practice turning the AutoCorrect feature on and off.
STEP BY STEP Confi gure AutoCorrect Options
USE the document from the previous exercise.
1. Click the File tab to open the Backstage, and then click Options to display the Word Options dialog box.
2. Click Proofi ng on the left pane to display the Proofi ng options in the right pane.
In the AutoCorrect options section, you can change how Word corrects and formats text as you type.
3. Click the AutoCorrect Options button to display the AutoCorrect dialog box with the AutoCorrect tab open, as shown in Figure 9-9. Notice that the dialog box title indicates that the program is set to check and correct text based on U.S. English.
As you key text, itwill automatically be
corrected
All AutoText (commonmisspellings, acronyms,symbols, etc.) andreplacements are listedhere
You can add your ownAutoText elements here
AutoCorrect Exceptionsdialog box allows you tomanage the exceptionsDefault settings for
AutoCorrect. Todisable click the
appropriate checkbox
When keying a textstring, it
automaticallychanges in your
document
Figure 9-9
AutoCorrect dialog box
4. Type BYA in the Replace box.
5. Type Blue Yonder Airlines in the With box.
Verify your spelling.
6. Click the Add button.
Proofi ng Documents 299
7. Click OK to close the AutoCorrect dialog box, and then click OK to close the Word Options dialog box.
8. In the fi rst paragraph at the end of the fi rst sentence, place the insertion point after r in for and press the Spacebar once.
9. Type BYA and press the Spacebar once. BYA is automatically replaced with Blue Yonder Airlines .
10. Delete the extra space before the punctuation.
Adding acronyms or other text to AutoCorrect can save you time from having to type additional characters.
11. Repeat steps 1–3 to open the AutoCorrect dialog box.
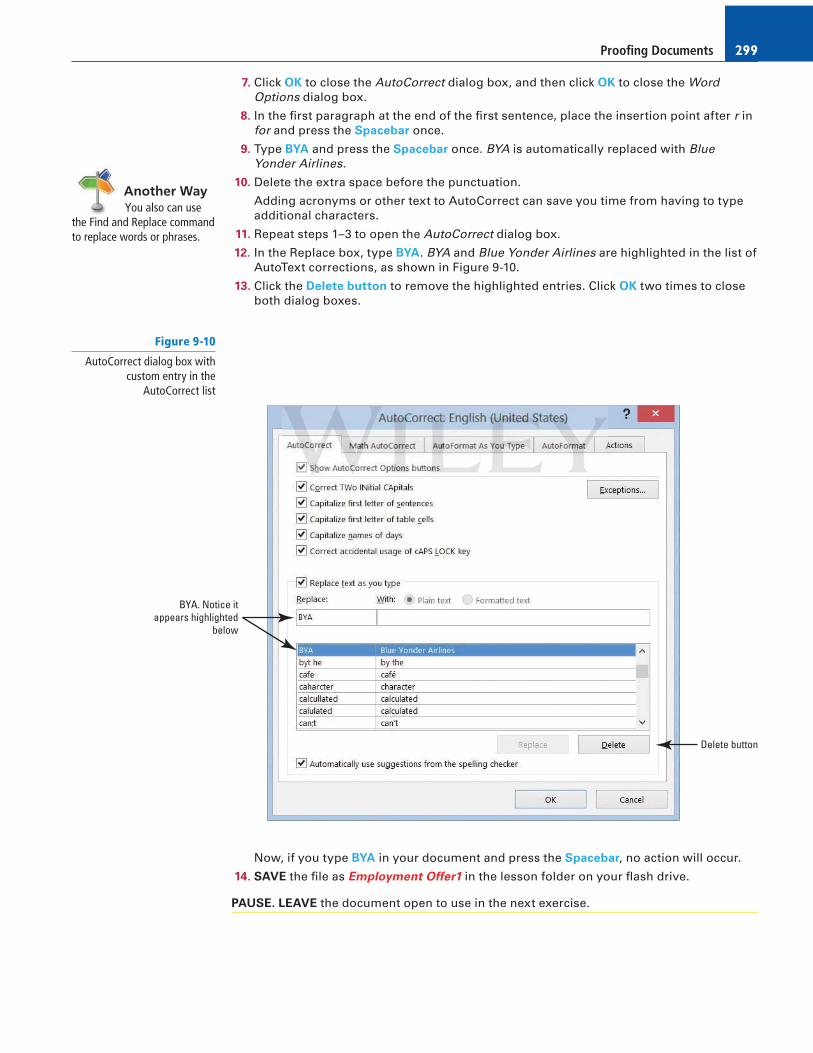
12. In the Replace box, type BYA . BYA and Blue Yonder Airlines are highlighted in the list of AutoText corrections, as shown in Figure 9-10.
13. Click the Delete button to remove the highlighted entries. Click OK two times to close both dialog boxes.
Another WayYou also can use
the Find and Replace command to replace words or phrases.
Figure 9-10
AutoCorrect dialog box with custom entry in the
AutoCorrect list
BYA. Notice itappears highlighted
below
Delete button
Now, if you type BYA in your document and press the Spacebar , no action will occur.
14. SAVE the fi le as Employment Offer 1 in the lesson folder on your fl ash drive.
PAUSE. LEAVE the document open to use in the next exercise.
Lesson 9300
STEP BY STEP Insert Special Characters Using AutoCorrect
USE the document from the previous exercise.
1. Position the insertion point after the s in Airlines in the fi rst body paragraph.
2. Blue Yonder Airlines is the trademark name for the company and requires the trademark symbol after the name.
In Lesson 7, you learn to insert special characters using the Symbol dialog box.
3. Type (tm) to insert the trademark symbol after Airlines .
The trademark symbol is placed in the document as a superscript element.
4. SAVE the fi le as Employment Offer 2 in the lesson folder on your fl ash drive.
PAUSE. LEAVE the document open to use in the next exercise.
STEP BY STEP Disable AutoCorrect
USE the document from the previous exercise.
1. By default, the AutoCorrect Options are enabled. To disable AutoCorrect, begin by repeating steps 1–3 under the Confi gure AutoCorrect Options section.
2. Click to clear the check mark from Replace text as you type . The feature is off and the Automatically Use Suggestions f rom t he Spelling Checker option located at the bottom of the dialog box is shaded gray to show that it is unavailable.
3. To enable the AutoCorrect function, click the check box again; a check mark appears in the box and the Automatically Use Suggestions f rom t he Spelling Checker option again becomes available. (Check with your instructor to determine whether you should leave AutoCorrect disabled or enabled.)
PAUSE. LEAVE the document open to use in the next exercise.
STEP BY STEP Use Exceptions in AutoCorrect
USE the document from the previous exercise.
The AutoCorrect dialog box should still be open. If not, repeat steps 1–3 under the Confi gure AutoCorrect Options section.
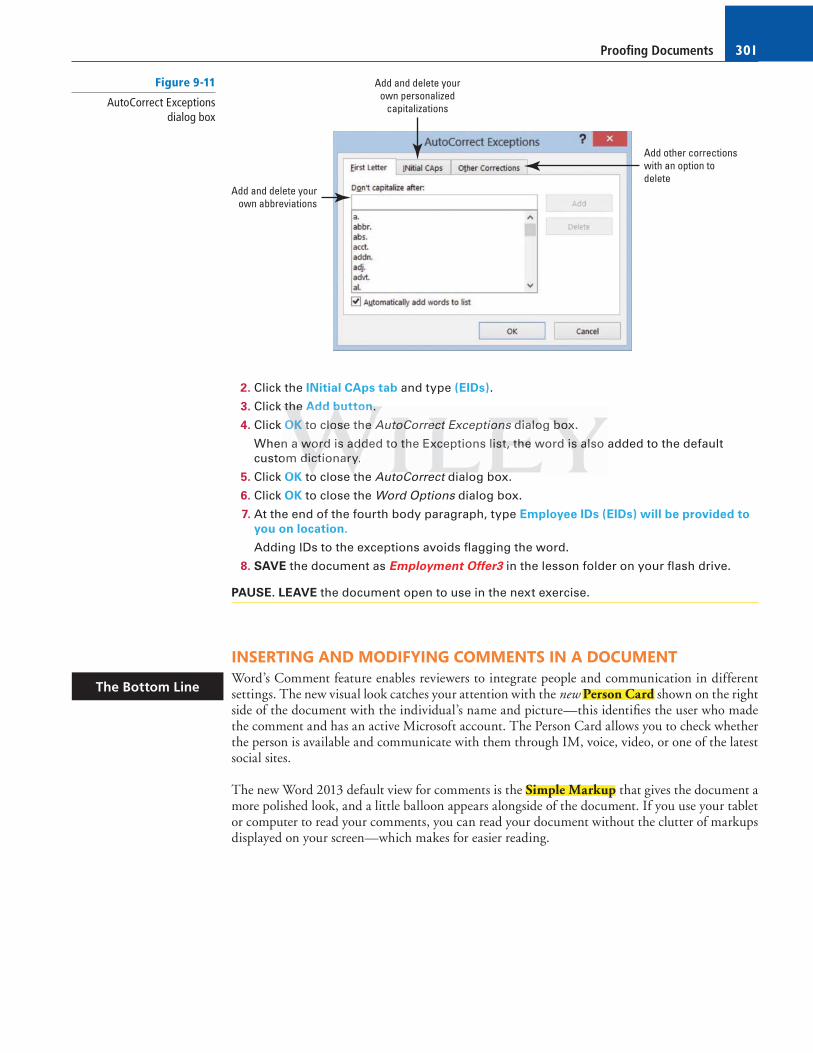
1. Click the Exceptions button. The AutoCorrect Exceptions dialog box opens (see Figure 9-11). If you frequently use a word that is not in the main dictionary, you can add it using the AutoCorrect Exceptions.
Cross Ref
How do you insert a special character?
2.1.7
ultll , thtt e AAAutttoCooorrrrrrecct t t OpOpOptiononoons s s are enababableleled.dd TTTo o o diiisasasablbbb e Auuuutototong stss epepepsss 1–1–1–33 3 unnnnddder ttthee Connnfiggure AutttoCCorrecee t Opppptitt oononss s fififi sses c
cleaaar thththhe chhhecececk marrrk ffrom RRReplace teeextxt as you typee . TTThe faticallllllyyy Use SuSuSuggessstittiononons f rrromomom f f ttt heehe SSSpepepellllining g g ChChCheeckerrrr opopoptionrrr
Proofi ng Documents 301
2. Click the INitial CAps tab and type (EIDs) .
3. Click the Add button.
4. Click OK to close the AutoCorrect Exceptions dialog box.
When a word is added to the Exceptions list, the word is also added to the default custom dictionary.
5. Click OK to close the AutoCorrect dialog box.
6. Click OK to close the Word Options dialog box.
7. At the end of the fourth body paragraph, type Employee IDs (EIDs) will be provided to
you on location .
Adding IDs to the exceptions avoids fl agging the word.
8. SAVE the document as Employment Offer 3 in the lesson folder on your fl ash drive.
PAUSE. LEAVE the document open to use in the next exercise.
INSERTING AND MODIFYING COMMENTS IN A DOCUMENT Word’s Comment feature enables reviewers to integrate people and communication in different settings. The new visual look catches your attention with the new Person Card shown on the right side of the document with the individual’s name and picture—this identifi es the user who made the comment and has an active Microsoft account. The Person Card allows you to check whether the person is available and communicate with them through IM, voice, video, or one of the latest social sites.
The new Word 2013 default view for comments is the Simple Markup that gives the document a more polished look, and a little balloon appears alongside of the document. If you use your tablet or computer to read your comments, you can read your document without the clutter of markups displayed on your screen—which makes for easier reading.
The Bottom Line
Figure 9-11
AutoCorrect Exceptions dialog box
Add and delete yourown personalized
capitalizations
Add other correctionswith an option todelete
Add and delete yourown abbreviations
ttttheehe Add bubb ttonnn.
OOOK tott clololoseee theee K Auttot CCoC rreece tt t Exceptioioonns dididialalaloogo bbbboxoxox. s
n a wwworororddd isss aaadddddded tooo the Exxxceptions list,t,t ttthehehe word isii aaalslsl o om dddicttit onaarary.y.y.
OK t l tthK A t CCC t didi ll bbbt
Lesson 9302
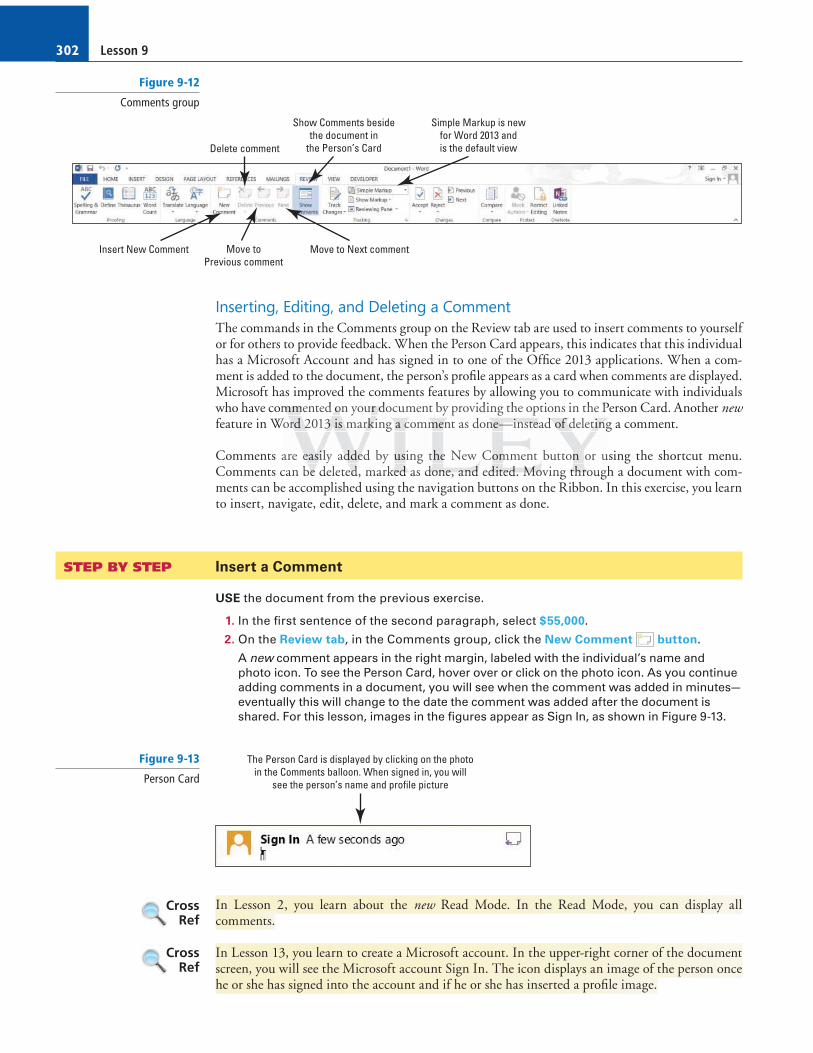
Inserting, Editing, and Deleting a Comment The commands in the Comments group on the Review tab are used to insert comments to yourself or for others to provide feedback. When the Person Card appears, this indicates that this individual has a Microsoft Account and has signed in to one of the Offi ce 2013 applications. When a com-ment is added to the document, the person’s profi le appears as a card when comments are displayed. Microsoft has improved the comments features by allowing you to communicate with individuals who have commented on your document by providing the options in the Person Card. Another new feature in Word 2013 is marking a comment as done—instead of deleting a comment.
Comments are easily added by using the New Comment button or using the shortcut menu. Comments can be deleted, marked as done, and edited. Moving through a document with com-ments can be accomplished using the navigation buttons on the Ribbon. In this exercise, you learn to insert, navigate, edit, delete, and mark a comment as done.
STEP BY STEP Insert a Comment
USE the document from the previous exercise.
1. In the fi rst sentence of the second paragraph, select $55,000 .
2. On the Review tab, in the Comments group, click the New Comment button.
A new comment appears in the right margin, labeled with the individual’s name and photo icon. To see the Person Card, hover over or click on the photo icon. As you continue adding comments in a document, you will see when the comment was added in minutes—eventually this will change to the date the comment was added after the document is shared. For this lesson, images in the fi gures appear as Sign In, as shown in Figure 9-13.
Figure 9-13
Person Card
The Person Card is displayed by clicking on the photoin the Comments balloon. When signed in, you will
see the person’s name and profile picture
In Lesson 2, you learn about the new Read Mode. In the Read Mode, you can display all comments.
In Lesson 13, you learn to create a Microsoft account. In the upper-right corner of the document screen, you will see the Microsoft account Sign In. The icon displays an image of the person once he or she has signed into the account and if he or she has inserted a profi le image.
Cross Ref
Cross Ref
Figure 9-12
Comments group
Delete comment
Insert New Comment Move toPrevious comment
Move to Next comment
Show Comments besidethe document in
the Person’s Card
Simple Markup is newfor Word 2013 andis the default view
mmmmememented ooon yoururur dddocument by providing the options in the PWorrrd 2022 1333 is markrkrkiini g a cccommmmenenent as donnne—e——inininstststeeaead ddd ofofofof dddeletttinining
are eeae sisisilly addddddeede by usuusing ttheee New Coommment buttonn or ucan bbbeee deleteddd,d markekekeddd as dddonononeee, aaandndnd edididiteteteddd MMMoooving thththt rororough
Proofi ng Documents 303
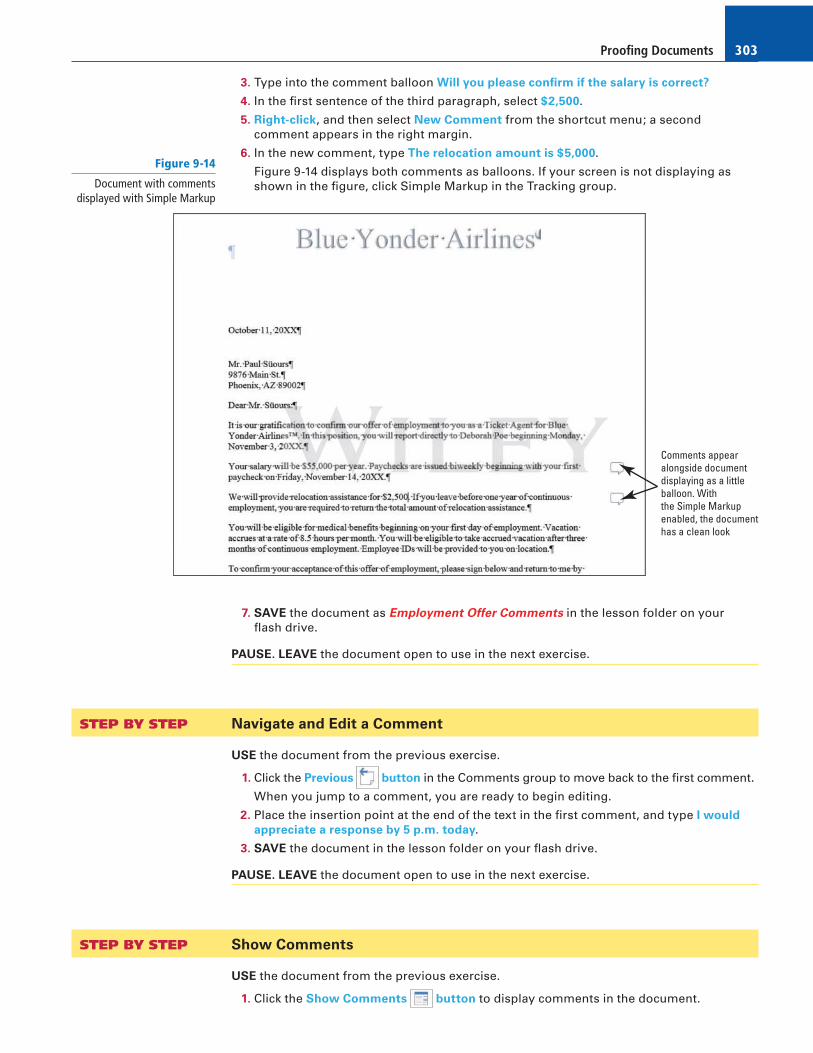
3. Type into the comment balloon Will you please confi rm if the salary is correct?
4. In the fi rst sentence of the third paragraph, select $2,500 .
5. Right-click, and then select New Comment from the shortcut menu; a second comment appears in the right margin.
6. In the new comment, type The relocation amount is $5,000 .
Figure 9-14 displays both comments as balloons. If your screen is not displaying as shown in the fi gure, click Simple Markup in the Tracking group.
7. SAVE the document as Employment Offer Comments in the lesson folder on your fl ash drive.
PAUSE. LEAVE the document open to use in the next exercise.
STEP BY STEP Navigate and Edit a Comment
USE the document from the previous exercise.
1. Click the Previous button in the Comments group to move back to the fi rst comment.
When you jump to a comment, you are ready to begin editing.
2. Place the insertion point at the end of the text in the fi rst comment, and type I would
appreciate a response by 5 p . m . today .
3. SAVE the document in the lesson folder on your fl ash drive.
PAUSE. LEAVE the document open to use in the next exercise.
STEP BY STEP Show Comments
USE the document from the previous exercise.
1. Click the Show Comments button to display comments in the document.
Figure 9-14
Document with comments displayed with Simple Markup
Comments appearalongside documentdisplaying as a littleballoon. Withthe Simple Markupenabled, the documenthas a clean look
Lesson 9304
The comments are placed on the right side of the document and if you hover over them, you see how long ago the comment was added. If the person has signed into his or her Microsoft account, you also see his or her name and picture.
The Show Comments button is a toggle to show and hide comments.
PAUSE. LEAVE the document open to use in the next exercise.
STEP BY STEP Delete and Mark Comments as Done
USE the document from the previous exercise.
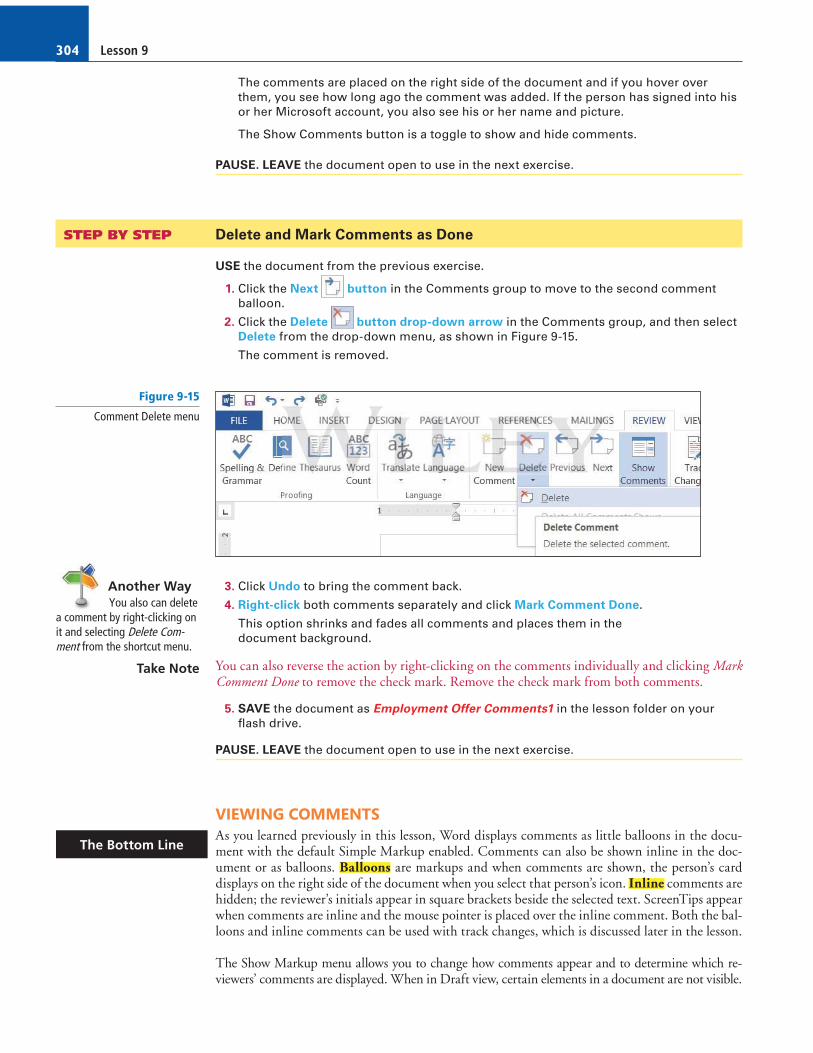
1. Click the Next button in the Comments group to move to the second comment balloon.
2. Click the Delete button drop-down arrow in the Comments group, and then select Delete from the drop-down menu, as shown in Figure 9-15.
The comment is removed.
Another WayYou also can delete
a comment by right-clicking on it and selecting Delete Com-ment from the shortcut menu.
Figure 9-15
Comment Delete menu
3. Click Undo to bring the comment back.
4. Right-click both comments separately and click Mark Comment Done .
This option shrinks and fades all comments and places them in the document background.
You can also reverse the action by right-clicking on the comments individually and clicking Mark Comment Done to remove the check mark. Remove the check mark from both comments.
5. SAVE the document as Employment Offer Comments1 in the lesson folder on your fl ash drive.
PAUSE. LEAVE the document open to use in the next exercise.
VIEWING COMMENTS As you learned previously in this lesson, Word displays comments as little balloons in the docu-ment with the default Simple Markup enabled. Comments can also be shown inline in the doc-ument or as balloons. Balloons are markups and when comments are shown, the person’s card displays on the right side of the document when you select that person’s icon. Inline comments are hidden; the reviewer’s initials appear in square brackets beside the selected text. ScreenTips appear when comments are inline and the mouse pointer is placed over the inline comment. Both the bal-loons and inline comments can be used with track changes, which is discussed later in the lesson.
The Show Markup menu allows you to change how comments appear and to determine which re-viewers’ comments are displayed. When in Draft view, certain elements in a document are not visible.
Take Note
The Bottom Line
Proofi ng Documents 305
Viewing Comments Inline and as Balloons, and Hiding and Showing Reviewer Comments In this exercise, you learn to change the comments display from balloons to inline. In a later les-son, you create a Microsoft Account so that when adding comments, your profi le will be displayed.
STEP BY STEP View Comments Inline
USE the document from the previous exercise.
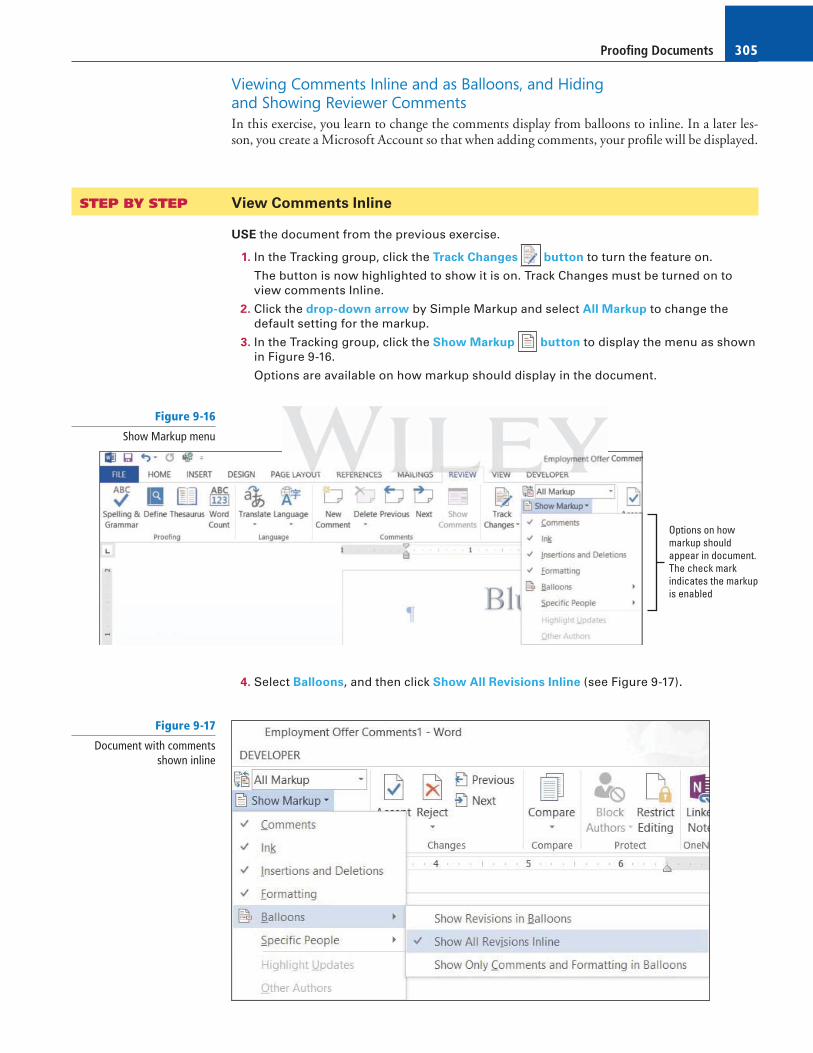
1. In the Tracking group, click the Track Changes button to turn the feature on.
The button is now highlighted to show it is on. Track Changes must be turned on to view comments Inline.
2. Click the drop-down arrow by Simple Markup and select All Markup to change the default setting for the markup.
3. In the Tracking group, click the Show Markup button to display the menu as shown in Figure 9-16.
Options are available on how markup should display in the document.
Figure 9-16
Show Markup menu
Options on howmarkup shouldappear in document.The check markindicates the markupis enabled
4. Select Balloons , and then click Show All Revisions Inline (see Figure 9-17).
Figure 9-17
Document with comments shown inline
Lesson 9306
Figure 9-18
Comment displayed in ScreenTip
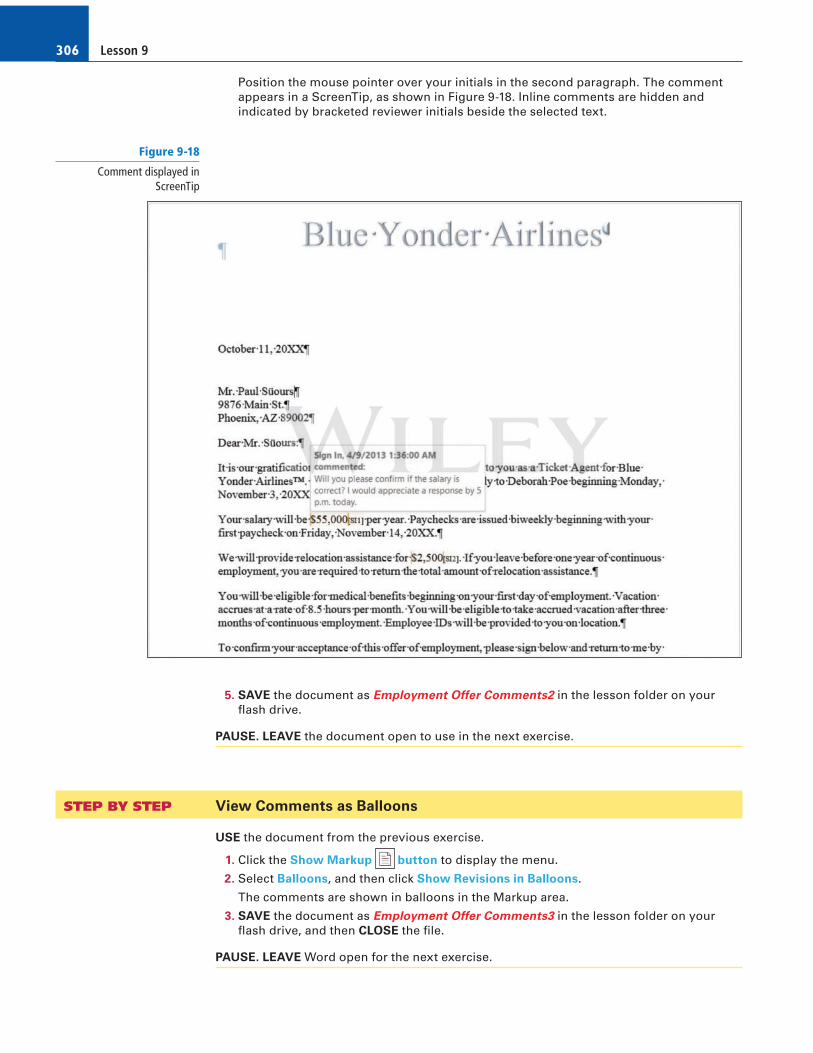
Position the mouse pointer over your initials in the second paragraph. The comment appears in a ScreenTip, as shown in Figure 9-18. Inline comments are hidden and indicated by bracketed reviewer initials beside the selected text.
5. SAVE the document as Employment Offer Comments2 in the lesson folder on your fl ash drive.
PAUSE. LEAVE the document open to use in the next exercise.
STEP BY STEP View Comments as Balloons
USE the document from the previous exercise.
1. Click the Show Markup button to display the menu.
2. Select Balloons , and then click Show Revisions in Balloons .
The comments are shown in balloons in the Markup area.
3. SAVE the document as Employment Offer Comments3 in the lesson folder on your fl ash drive, and then CLOSE the fi le.
PAUSE. LEAVE Word open for the next exercise.
Proofi ng Documents 307
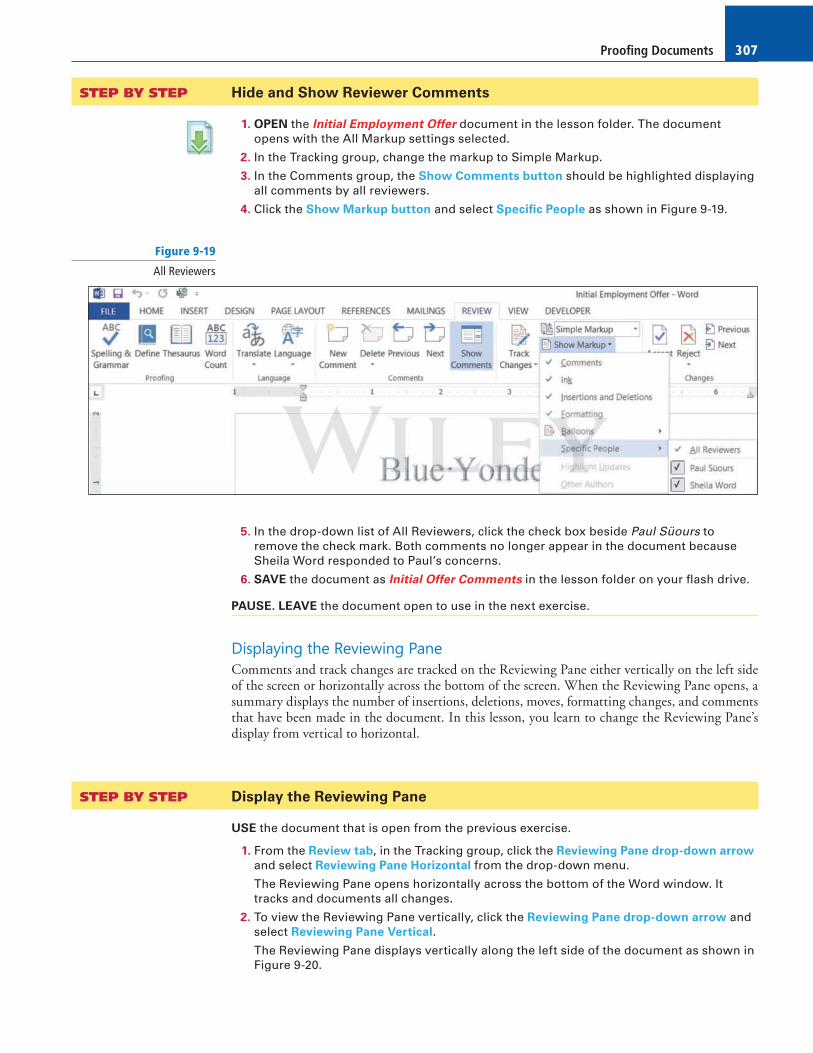
STEP BY STEP Hide and Show Reviewer Comments
1. OPEN the Initial Employment Offer document in the lesson folder. The document opens with the All Markup settings selected.
2. In the Tracking group, change the markup to Simple Markup.
3. In the Comments group, the Show Comments button should be highlighted displaying all comments by all reviewers.
4. Click the Show Markup button and select Specifi c People as shown in Figure 9-19.
Figure 9-19
All Reviewers
5. In the drop-down list of All Reviewers, click the check box beside Paul Süours to remove the check mark. Both comments no longer appear in the document because Sheila Word responded to Paul’s concerns.
6. SAVE the document as Initial Offer Comments in the lesson folder on your fl ash drive.
PAUSE. LEAVE the document open to use in the next exercise.
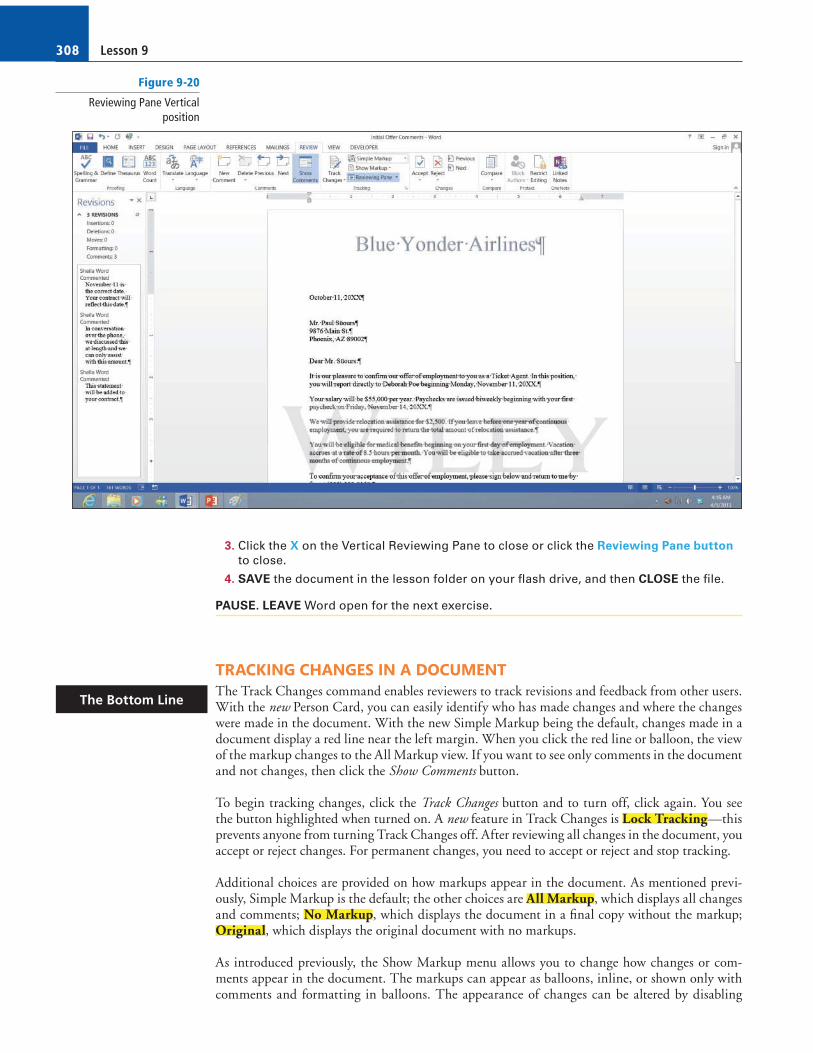
Displaying the Reviewing Pane Comments and track changes are tracked on the Reviewing Pane either vertically on the left side of the screen or horizontally across the bottom of the screen. When the Reviewing Pane opens, a summary displays the number of insertions, deletions, moves, formatting changes, and comments that have been made in the document. In this lesson, you learn to change the Reviewing Pane’s display from vertical to horizontal.
STEP BY STEP Display the Reviewing Pane
USE the document that is open from the previous exercise.
1. From the Review tab, in the Tracking group, click the Reviewing Pane drop-down arrow
and select Reviewing Pane Horizontal from the drop-down menu.
The Reviewing Pane opens horizontally across the bottom of the Word window. It tracks and documents all changes.
2. To view the Reviewing Pane vertically, click the Reviewing Pane drop-down arrow and select Reviewing Pane Vertical .
The Reviewing Pane displays vertically along the left side of the document as shown in Figure 9-20.
Lesson 9308
3. Click the X on the Vertical Reviewing Pane to close or click the Reviewing Pane button
to close.
4. SAVE the document in the lesson folder on your fl ash drive, and then CLOSE the fi le.
PAUSE. LEAVE Word open for the next exercise.
TRACKING CHANGES IN A DOCUMENT The Track Changes command enables reviewers to track revisions and feedback from other users. With the new Person Card, you can easily identify who has made changes and where the changes were made in the document. With the new Simple Markup being the default, changes made in a document display a red line near the left margin. When you click the red line or balloon, the view of the markup changes to the All Markup view. If you want to see only comments in the document and not changes, then click the Show Comments button.
To begin tracking changes, click the Track Changes button and to turn off, click again. You see the button highlighted when turned on. A new feature in Track Changes is Lock Tracking —this prevents anyone from turning Track Changes off. After reviewing all changes in the document, you accept or reject changes. For permanent changes, you need to accept or reject and stop tracking.
Additional choices are provided on how markups appear in the document. As mentioned previ-ously, Simple Markup is the default; the other choices are All Markup , which displays all changes and comments; No Markup , which displays the document in a fi nal copy without the markup; Original , which displays the original document with no markups.
As introduced previously, the Show Markup menu allows you to change how changes or com-ments appear in the document. The markups can appear as balloons, inline, or shown only with comments and formatting in balloons. The appearance of changes can be altered by disabling
The Bottom Line
Figure 9-20
Reviewing Pane Vertical position
Proofi ng Documents 309
comments, ink, insertions and deletions, and formatting. By default, these are enabled. When there are several individuals who have made changes in a document and you want to see chang-es from only specifi c individuals, you can specify which individual’s changes to display in your document. Previously in the lesson, you learned to display the Reviewing Pane horizontally or vertically—this works the same way for track changes.
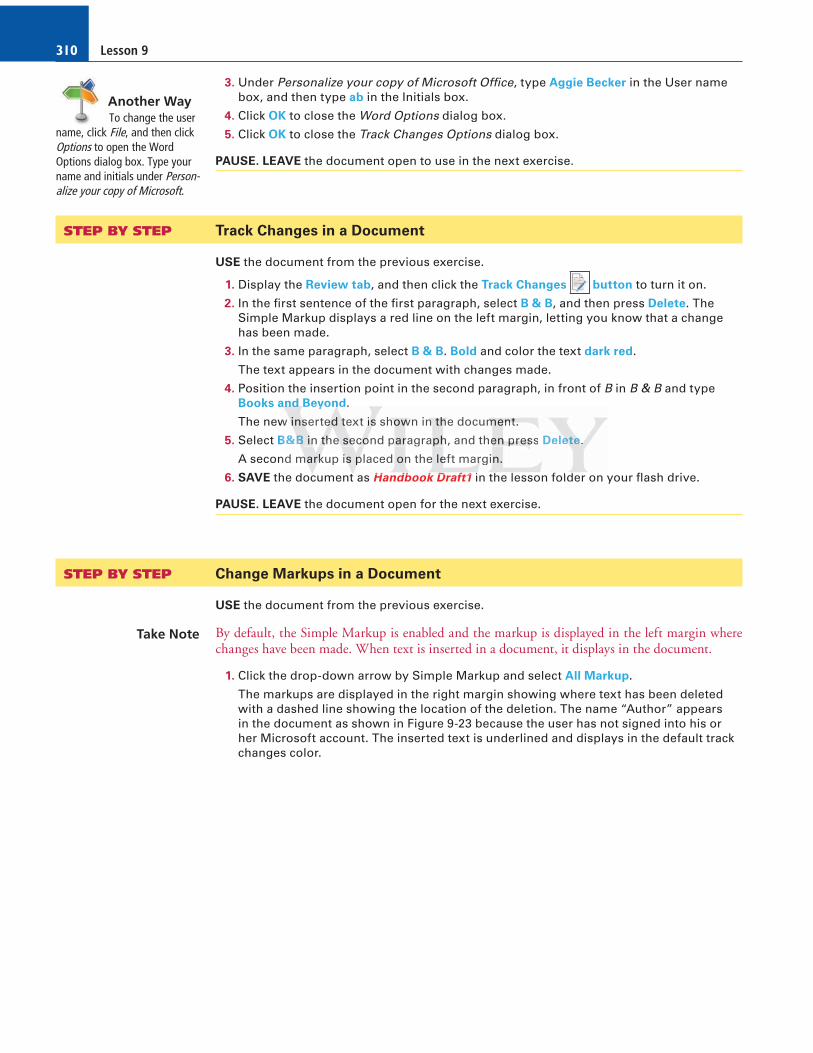
The Track Changes Options dialog box allows you to change the user name. Additional options are available but they are not discussed in this lesson.
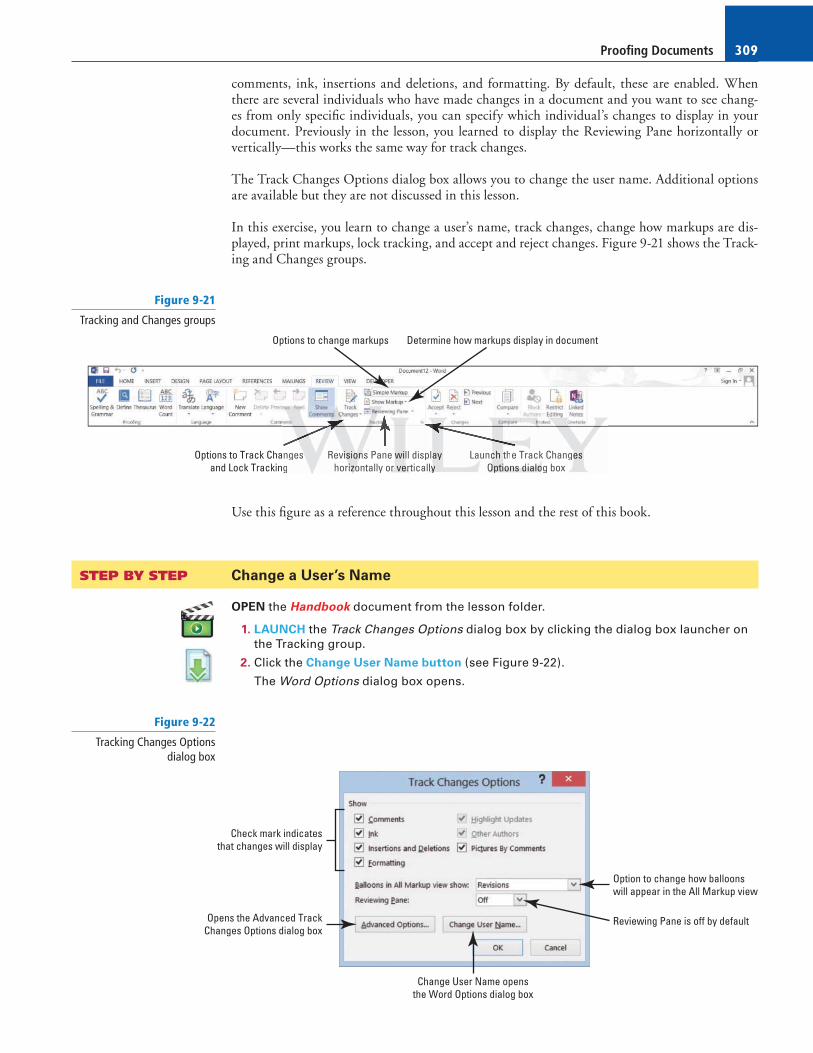
In this exercise, you learn to change a user’s name, track changes, change how markups are dis-played, print markups, lock tracking, and accept and reject changes. Figure 9-21 shows the Track-ing and Changes groups.
Figure 9-21
Tracking and Changes groups
Options to change markups
Options to Track Changesand Lock Tracking
Revisions Pane will displayhorizontally or vertically
Launch the Track ChangesOptions dialog box
Determine how markups display in document
Use this fi gure as a reference throughout this lesson and the rest of this book.
STEP BY STEP Change a User’s Name
OPEN the Handbook document from the lesson folder.
1. LAUNCH the Track Changes Options dialog box by clicking the dialog box launcher on the Tracking group.
2. Click the Change User Name button (see Figure 9-22).
The Word Options dialog box opens.
Figure 9-22
Tracking Changes Optionsdialog box
Option to change how balloonswill appear in the All Markup view
Reviewing Pane is off by defaultOpens the Advanced TrackChanges Options dialog box
Check mark indicatesthat changes will display
Change User Name opensthe Word Options dialog box
ngesg
Revvisiisis ononons Pane wilwi l displayhorizoizoizontally orrr veeertirr callylyly
Launccch tthe Track ChangesOptOptO ionions ds dialialialooog box
Lesson 9310
3. Under Personalize your copy of Microsoft Offi ce , type Aggie Becker in the User name box, and then type ab in the Initials box.
4. Click OK to close the Word Options dialog box.
5. Click OK to close the Track Changes Options dialog box.
PAUSE. LEAVE the document open to use in the next exercise.
STEP BY STEP Track Changes in a Document
USE the document from the previous exercise.
1. Display the Review tab, and then click the Track Changes button to turn it on.
2. In the fi rst sentence of the fi rst paragraph, select B & B , and then press Delete . The Simple Markup displays a red line on the left margin, letting you know that a change has been made.
3. In the same paragraph, select B & B . Bold and color the text dark red .
The text appears in the document with changes made.
4. Position the insertion point in the second paragraph, in front of B in B & B and type Books and Beyond .
The new inserted text is shown in the document.
5. Select B&B in the second paragraph, and then press Delete .
A second markup is placed on the left margin.
6. SAVE the document as Handbook Draft1 in the lesson folder on your fl ash drive.
PAUSE. LEAVE the document open for the next exercise.
STEP BY STEP Change Markups in a Document
USE the document from the previous exercise.
By default, the Simple Markup is enabled and the markup is displayed in the left margin where changes have been made. When text is inserted in a document, it displays in the document.
1. Click the drop-down arrow by Simple Markup and select All Markup .
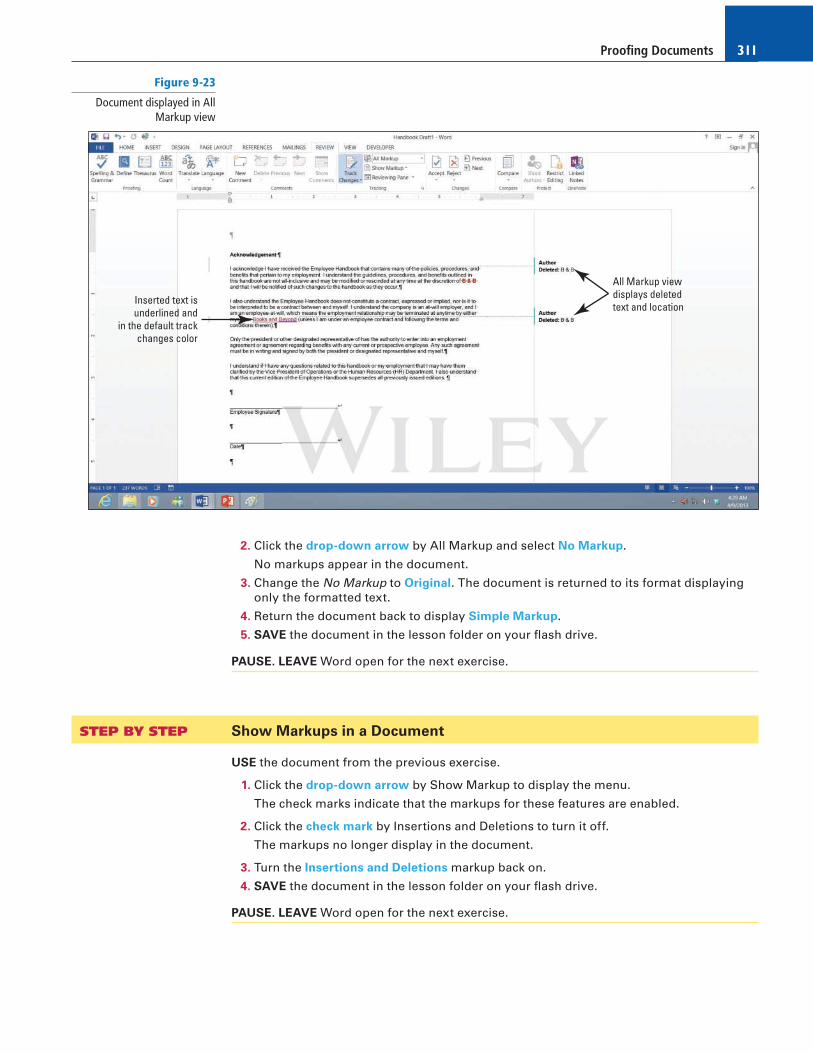
The markups are displayed in the right margin showing where text has been deleted with a dashed line showing the location of the deletion. The name “Author” appears in the document as shown in Figure 9-23 because the user has not signed into his or her Microsoft account. The inserted text is underlined and displays in the default track changes color.
Another WayTo change the user
name, click File, and then click Options to open the Word Options dialog box. Type your name and initials under Person-alize your copy of Microsoft.
Take Note
anananddd Beyondnn .
w iiinssserteeeddd tttext iiisss shhhowowown innn tthehh docummmenenent.tt
B&BBB iiin nn thththeee seeecococond pparragraphphh, and thenenen ppprereressss Deleeetetete...
nd mmmarararkkkup isisiss ppplaced onn the leeeft margrrr in.
h d tttt H db k D ft1 i th l f ld1
Proofi ng Documents 311
2. Click the drop-down arrow by All Markup and select No Markup .
No markups appear in the document.
3. Change the No Markup to Original . The document is returned to its format displaying only the formatted text.
4. Return the document back to display Simple Markup .
5. SAVE the document in the lesson folder on your fl ash drive.
PAUSE. LEAVE Word open for the next exercise.
STEP BY STEP Show Markups in a Document
USE the document from the previous exercise.
1. Click the drop-down arrow by Show Markup to display the menu.
The check marks indicate that the markups for these features are enabled.
2. Click the check mark by Insertions and Deletions to turn it off.
The markups no longer display in the document.
3. Turn the Insertions and Deletions markup back on.
4. SAVE the document in the lesson folder on your fl ash drive.
PAUSE. LEAVE Word open for the next exercise.
Figure 9-23
Document displayed in All Markup view
All Markup viewdisplays deletedtext and location
Inserted text isunderlined and
in the default trackchanges color
Lesson 9312
STEP BY STEP Display Markups in Balloons and Inline
USE the document from the previous exercise.
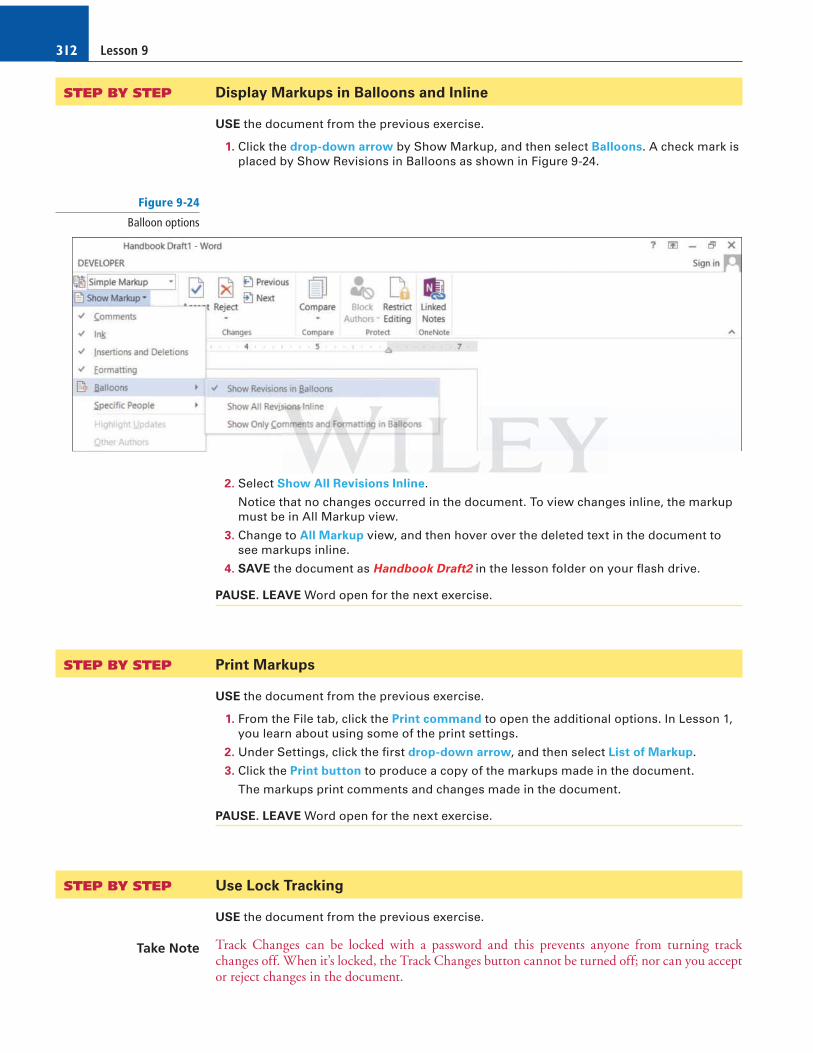
1. Click the drop-down arrow by Show Markup, and then select Balloons . A check mark is placed by Show Revisions in Balloons as shown in Figure 9-24.
Figure 9-24
Balloon options
2. Select Show All Revisions Inline .
Notice that no changes occurred in the document. To view changes inline, the markup must be in All Markup view.
3. Change to All Markup view, and then hover over the deleted text in the document to see markups inline.
4. SAVE the document as Handbook Draft 2 in the lesson folder on your fl ash drive.
PAUSE. LEAVE Word open for the next exercise.
STEP BY STEP Print Markups
USE the document from the previous exercise.
1. From the File tab, click the Print command to open the additional options. In Lesson 1, you learn about using some of the print settings.
2. Under Settings, click the fi rst drop-down arrow, and then select List of Markup .
3. Click the Print button to produce a copy of the markups made in the document.
The markups print comments and changes made in the document.
PAUSE. LEAVE Word open for the next exercise.
STEP BY STEP Use Lock Tracking
USE the document from the previous exercise.
Track Changes can be locked with a password and this prevents anyone from turning track changes off. When it’s locked, the Track Changes button cannot be turned off; nor can you accept or reject changes in the document.
Take Note
Proofi ng Documents 313
1. Click the drop-down arrow by Track Changes and select Lock Tracking .
2. Type the password HDBK^% , and then reconfi rm by typing the password again.
3. Click OK (see Figure 9-25).
Figure 9-25
Lock Tracking dialog box
Figure 9-26
Accept menu
2. Click Accept and Move to Next .
Word accepts the changes and jumps to the next change in the document.
3. Click the drop-down arrow under Reject to produce a menu.
4. Click Reject and Move to Next .
The change made to insert text is not inserted in the document.
5. Change the view by selecting No Mark up to display for review.
The Track Changes, Accept, and Reject buttons turn gray and are not accessible.
4. Click the drop-down arrow by Track Changes and select Lock Tracking , and then reenter the password HDBK^% and click OK to turn the commands back on.
It is good practice to write all your passwords down and keep them in a safe place. If you cannot remember your password, you will not be able unlock Track Changes.
5. SAVE the document in the lesson folder on your fl ash drive.
PAUSE. LEAVE Word open for the next exercise.
STEP BY STEP Accept and Reject Changes
USE the document from the previous exercise. Be sure to start from the beginning of the document.
1. In the Changes group, click the drop-down arrow under Accept to produce a menu as shown in Figure 9-26.
You have options on accepting the changes one at a time or all at once.
EE ththeee docuuumenttt iinnn the lesson folder on your flash drive.fl
LEAEAEAVVVE WoWoWorddd opepepen fooor the nnnexxxt exercisee.
Lesson 9314
This is what the fi nal version of the document will look like. The changes are not deleted and will display again each time the document is opened. Note, to delete the track changes permanently, you must accept or reject changes and stop tracking.
6. Before closing the document, click the Track Changes button to turn it off.
7. SAVE the document as Handbook Final in the lesson folder on your fl ash drive.
CLOSE Word.
In Lesson 13, you learn about inspecting your document before sharing. The Document Inspector is a tool that checks for tracked changes and comments, hidden text, and personal names in prop-erties that you might not want to share.
Cross Ref
SKILL SUMMARY
In This Lesson, You Learned To: Exam ObjectiveObjective Number
Validate Content by Using Spelling and Grammar Checking Options
Confi gure AutoCorrect Settings Insert special characters (©, ™, ₤). 2.1.7
Insert and Modify Comments in a Document
View Comments
Track Changes in a Document
Knowledge Assessment
Multiple Choice
Select the best response for the following statements.
1. The proofi ng option, Correct TWo INitial CApitals, is found in which option? a. CorrectCaps b. AutoCorrect c. Grammar Settings d. Exceptions
2. Which command(s) activate the Spelling & Grammar feature? a. F7 b. Shift 1 F7 c. Spelling and Grammar button d. a and c
3. Exceptions can be added to AutoCorrect: a. by not capitalizing the fi rst letter of an abbreviation. b. by ignoring the INitial CAps. c. from the Other Corrections tab. d. All of the above
ggg p
Modododifii y CoCoCommmmmmennntststs innt
ments
Proofi ng Documents 315
4. Comments are used to add to Word documents. a. concerns b. questions c. reminders d. All of the above
5. The Comments ScreenTips appear in which view? a. Showing Revisions in Balloons b. Show All Revisions Inline c. Show Only Comments and Formatting in Balloons d. ScreenTips display only on the Ribbon
6. How do you display only one reviewer’s comments in a Word document containing multiple reviewers’ comments? a. Leave the check mark in the All Reviewers check box. b. Deselect the All Reviewers check box and place a check mark beside only that one
reviewer’s name. c. This feature displays only all reviewers’ comments. d. This feature cannot display one reviewer’s comments.
7. The Vertical Reviewing Pane displays: a. to the right of the document. b. below the Ribbon. c. to the left of the document. d. above the status bar.
8. A summary of the total number of comments and revisions in a document will appear in the: a. Vertical Reviewing Pane. b. Horizontal Reviewing Pane. c. status bar. d. a and b
9. The Personalizing your copy of Microsoft Offi ce options: a. are located in the Word Options dialog box from Backstage view. b. are located in the Tracking group. c. cannot be changed. d. automatically change when Word is launched.
10. You can insert comments in which of the following types of documents? a. Research papers b. Resumes c. Marketing plans d. All of the above
True/False
Circle T if the statement is true or F if the statement is false.
T F 1. The Proofi ng pane in the Word Options dialog box contains options to change how Word corrects and formats text.
T F 2. You can change your name and initials from the Tracking group.
T F 3. You should always proof documents before sharing them.
T F 4. The AutoCorrect Settings can be found in the Word Options dialog box from the
Backstage view Display screen.
T F 5. By default, comments are shown inline.
T F 6. AutoCorrect cannot be turned off.
T F 7. Inline comments are placed in brackets.
T F 8. You can right-click on a comment and use the shortcut menu to delete the comment.
T F 9. The default Writing Style setting is Grammar & Style.
T F 10. The status bar contains a proofi ng error button for quick access.
mmmmamamary ooofff thththe tooottat l nununumbmm erereer ooof ff commmenenentststs aaandndnd revevevisisissionsss iiinnne: rticccalaa RRReevieeewiwiwinnng Pannnee.
orizontntntal Revvvieeewing Paana e. bbb
Lesson 9316
Competency Assessment
Project 9-1: Proofi ng a Research Paper
You have agreed to help your friend proof her reference letter.
GET READY. LAUNCH Word if it is not already running.
1. OPEN the Reference Letter document from the lesson folder.
2. SAVE the document as 9-1 Reference Letter in the lesson folder on your fl ash drive.
3. Click the File tab to open Backstage, and then click Options .
4. Select Proofi ng and under the When correcting spelling and grammar in Word section. Beside the Writing Style command box select Grammar Only .
5. Click OK .
6. On the Review tab in the Proofi ng group, click the Spelling & Grammar button.
7. The Spelling task pane opens and will stop on the words/phrases listed in the following table; for each misspelled word, take the action indicated in the table. Also, if you are unsure of how a word is pronounced, click the Sound button.
8. When the prompt appears stating that the spelling and grammar check is complete, click OK .
9. Click Word Count on the Proofi ng group to review the information on the document then close.
10. SAVE the document in the lesson folder on your fl ash drive, and then CLOSE the fi le.
LEAVE Word open for the next project.
Project 9-2: Books and Beyond Handbook
You work for Books and Beyond, and the manager needs your assistance in using the AutoCorrect Options in Word. Your task is to manually proof the document and locate the three occurrences of B & B . You have learned that the AutoCorrect command can save you time in typing text and adding special symbols in a document.
GET READY. LAUNCH Word if it is not already running.
1. OPEN the Handbook Acknowledge document in the lesson folder.
2. SAVE the document as 9-2 H andbook Acknowledge Update in the lesson folder on your fl ash drive.
3. Click the File tab to open Backstage, and then click Options .
4. In the Proofi ng section, click the AutoCorrect Options button.
5. In the Replace box, type B & B and in the With box, type Books and Beyond .
6. Click the Add button.
7. Click OK to close the AutoCorrect dialog box.
8. Click OK to close the Word Options dialog box.
9. In the fi rst paragraph, locate and select B & B , and then press Delete .
10. In the same location, type B & B , and then press the spacebar .
Misspelled Word Corrected Word Action to Take
emplyed employed Change All
suprvision supervision Change All
demstrated demonstrated Change All
recomend recommend Change All
heee ppprompppt appeeearaa s stststataa ing g gg thththat the spepepellllllinininggg anaa d d d grgrgrammamamarrrK.
d Woroo d CoCoCorrecececteteteddd WoWoWordrdrd AcAcActio
Proofi ng Documents 317
11. Locate the second occurrence, select B & B and press Delete. Then type B & B and press the spacebar .
12. Locate the third occurrence, select B & B and press Delete . Then type B & B and press the spacebar .
13. In the fi rst paragraph, fi rst sentence, place your insertion point after d in Beyond . Type (c) to insert the copyright symbol in the document.
14. In the fi rst paragraph, second sentence, place your insertion point after d in Beyond . Type (c) to insert the copyright symbol in the document.
15. In the second paragraph, second sentence, place your insertion point after d in Beyond . Type (c) to insert the copyright symbol in the document.
16. Repeat steps 3 and 4 to open the AutoCorrect dialog box.
17. In the Replace box, type B & B . The text should appear in the list below.
18. Click the Delete button.
19. Click OK to close the AutoCorrect dialog box.
20. Click OK to close the Word Options dialog box.
21. SAVE the document in the lesson folder on your fl ash drive.
LEAVE the document open for the next project.
Profi ciency Assessment
Project 9-3: Books and Beyond Handbook Review
Sonny is one of the managers at Books and Beyond and has asked you to comment on the docu-ment that you completed for the Project 9-2 Handbook Acknowledge Update.
GET READY. LAUNCH Word if it is not already running.
1. SAVE the document as 9-3 H andbook My Comments in the lesson folder on your fl ash drive.
2. For every occurrence of Books and Beyond, add the following comments: Format text
by bolding and applying a font color .
3. Use the Find command and locate the title, Vice President of Operations , and add the following comment: The Vice President of Operations title has been changed to Vice
President of Support Services .
4. SAVE the document in the lesson folder on your fl ash drive.
LEAVE the document open for the next project.
Project 9-4: Showing Comments as Inline
Sonny is out of town and is interested in reviewing any comments you might have regarding the handbook. You will email this document to him with comments displayed as inline. You will work with the previous document from Project 9-3 to show comments as Inline.
GET READY. LAUNCH Word if it is not already running.
1. SAVE the document as 9-4 H andbook Inline Comments in the lesson folder on your fl ash drive.
2. If necessary, change the Show Markup settings to display comments as inline only. Also, change the view to All Markup .
3. SAVE the document in the lesson folder on your fl ash drive, and then CLOSE the fi le.
LEAVE the document open for the next project.
Lesson 9318
Mastery Assessment
Project 9-5: Blue Yonder Airlines Stock Agreements
The job description for fl ight attendants has arrived and you are ready to review the comments from the fl ight attendants. Use the track changes command to make changes in the document.
GET READY. LAUNCH Word if it is not already running.
1. OPEN the Flight Attendant Job Description document from the lesson folder.
2. SAVE the document as 9-5 Job Description in the lesson folder on your fl ash drive.
3. Turn on Track Changes and change the user name to Margaret Wright and initials to mw .
4. Under the Responsibilities heading, add a new bullet item at the end and type Prepare
for emergency landings and the evacuation of passengers .
5. Under the Requirements heading, add two new bullets at the end and type Excellent
interpersonal communication skills and Able to work as part of a team .
6. Under the Responsibilities heading, add a new bullet as the fi rst bulleted item. Type Safety of the passengers should be a priority .
7. Select the bulleted item that you typed in step 6.
8. Insert a new comment from Margaret Wright and type The order of the list should be
changed .
9. Display the markup in Simple Markup.
10. To prevent anyone from turning off Track Changes in the document, use the Lock Tracking command and use the password JobDES .
11. SAVE the document in the lesson folder on your fl ash drive.
LEAVE the document open for the next project.
Project 9-6: Job Description
A week has passed and you are ready to continue working on the job description for the fl ight attendants from Project 9-5. These changes will be the fi nal changes made to the job descriptions.
GET READY. LAUNCH Word if it is not already running.
1. SAVE the document as 9-6 Job Description Final in the lesson folder on your fl ash drive.
2. Unlock the tracking.
3. Delete all comments.
4. Accept all changes and stop tracking.
5. SAVE the document in the lesson folder on your fl ash drive, and then CLOSE the fi le.
CLOSE Word.
hhheee bbbullettededed itemmm ttthatatat yyyou ttttypypyped in stttepepep 666.. .
neeew w w cooommmmmmenenenttt fffrommm MMargaarret Wright aand typyy e ThThThe e e orrrdedder
d.
the mamm rkuppp iiinnn Simpppleee Marrrkuuuppp.