prophet2012 user manual version 1.0 09-24-2012 · 3.3.2 intelligent loop points ... - dump all...
TRANSCRIPT

Prophet2012 v1.0 User Manual
Page 1 / 29
Prophet2012 User Manual
Version 1.0
09-24-2012

Prophet2012 v1.0 User Manual
Page 2 / 29
1 Introduction..................................................................................................................................... 5
2 Features........................................................................................................................................... 6
3 Menu Bar ......................................................................................................................................... 7
3.1 File.......................................................................................................................................... 7
3.1.1 Load ................................................................................................................................... 7
3.1.2 Save.................................................................................................................................... 7
3.1.3 Discard ............................................................................................................................... 7
3.1.4 About ................................................................................................................................. 7
3.2 Transfer .................................................................................................................................. 8
3.2.1 Transfer2PC ....................................................................................................................... 8
3.2.2 Transfer2Prophet............................................................................................................... 8
3.2.3 Get parameter ................................................................................................................... 8
3.2.4 Panic .................................................................................................................................. 8
3.2.5 Online update .................................................................................................................... 8
3.3 Options................................................................................................................................... 9
3.3.1 Configure the installed memory of your Prophet ............................................................. 9
3.3.2 Intelligent Loop Points....................................................................................................... 9
3.3.3 Config................................................................................................................................. 9
3.3.4 View ................................................................................................................................. 10
4 Main Window ................................................................................................................................ 11
4.1 General................................................................................................................................. 11
4.2 Managing Samples ............................................................................................................... 11
4.2.1 Loading Samples .............................................................................................................. 11
4.2.2 Play .................................................................................................................................. 12
4.2.3 Delete .............................................................................................................................. 12
4.2.4 Import .............................................................................................................................. 13
4.2.5 Export............................................................................................................................... 14

Prophet2012 v1.0 User Manual
Page 3 / 29
4.2.6 Generate.......................................................................................................................... 14
4.3 Save all ................................................................................................................................. 15
5 Sounds ........................................................................................................................................... 16
5.1 Loop Editor........................................................................................................................... 16
5.1.1 Editing loops .................................................................................................................... 17
5.2 Sample Configuration .......................................................................................................... 18
5.2.1 Key mapping of a sound .................................................................................................. 19
5.3 Analogue Settings ................................................................................................................ 20
5.4 Play sound ............................................................................................................................ 21
5.5 Context Menu ...................................................................................................................... 22
5.5.1 Load ................................................................................................................................. 22
5.5.2 Save.................................................................................................................................. 22
5.5.3 Get Sound ........................................................................................................................ 22
5.5.4 Get Sound Parameter ...................................................................................................... 22
5.5.5 Copy sound ...................................................................................................................... 22
5.5.6 Delete sound.................................................................................................................... 22
5.5.7 Import WAV ..................................................................................................................... 22
5.5.8 Export WAV...................................................................................................................... 23
5.5.9 Wave Generator .............................................................................................................. 23
5.5.10 Purge ........................................................................................................................... 23
6 Maps.............................................................................................................................................. 24
6.1 Context menu....................................................................................................................... 26
6.1.1 Load ................................................................................................................................. 26
6.1.2 Save.................................................................................................................................. 26
6.1.3 Copy ................................................................................................................................. 26
7 Preset tab ...................................................................................................................................... 27
7.1 Context menu....................................................................................................................... 28
7.1.1 Load ................................................................................................................................. 28

Prophet2012 v1.0 User Manual
Page 4 / 29
7.1.2 Save.................................................................................................................................. 28
7.1.3 Copy ................................................................................................................................. 28
8 MIDI Keyboard............................................................................................................................... 29
9 Known issues ................................................................................................................................. 29
10 Contact ..................................................................................................................................... 29

Prophet2012 v1.0 User Manual
Page 5 / 29
1 Introduction
First of all I have to apologize: I am about 25 years late with this software ;-)
17 years ago I had a Prophet 2000, which I had received from a guy, who was interested in my Kawai
K-5. Due to the fact I had no sampler and the K-5 was not the perfect machine for my needs, I just
swapped with him. A few months later the first problems occurred: I had to warm it up for about half
an hour before using it. Before warming up the control panel did wired things – no reaction on
pressing switches or toggling to other columns or rows than selected. Another two years later things
are getting more worse. So I gave my Prophet to a friend.
Meanwhile I have quite a lot of old Synthesizers and I remembered the good old Prophet 2000 filters.
So in April 2012 I bought a Prophet 2002 to get these fantastic filters back.
Looking on the Internet for an editor or librarian I could not find anything running on a modern PC.
There are just a few programs to handle SDS – but none of them could handle the Prophet specific
parameters. After looking into the user manual I found the SysEx specification, and I decided to
implement a tool for my demands. Now a couple of weeks later I thought to share my program with
all Prophet users.
There might be still some bugs – but there might be still some updates in the future.
As for free software common I have to mention, that you are using this Software at your own risk!
If you are working with this software I still recommend saving your data to disk (if you have got a
working disk drive).

Prophet2012 v1.0 User Manual
Page 6 / 29
2 Features
- Dump all samples, presets and parameters from a Prophet 2000/2002 to a PC
- Dump all samples, presets and parameters from a PC to a Prophet 2000/2002
- Save and load dump files on a PC (Build up your Prophet library on your PC and share it with
others)
- Import and export samples as WAV files
- Sample rate conversion when importing WAV files to Prophet supported sample rates
- Edit sustain and release loops with preview on the PC speakers
- Save and load of a single sound (incl. sample)
- Save and load of a single map
- Save and load of a single preset
- Configuration of all parameters
- Graphical display and edit of sample maps
- You could still use your Prophet with a broken disk drive (if you already have got some dump
files to transfer…)
- It is free!
- Remember to save your data, as autosave or reminders (not to mention rollback) are not
implemented

Prophet2012 v1.0 User Manual
Page 7 / 29
3 Menu Bar
The application window contains two sections, the menu bar and a notebook page. This section
describes the functions available under the various menu bar items.
3.1 File
3.1.1 Load
To load a dump file. A dump file consists of all sounds, maps and preset parameters.
3.1.2 Save
To save a dump file. All current sounds, maps and presets will be stored in a dump file.
3.1.3 Discard
This will reset all settings and delete the samples within the Prophet2000Dumper software to start a
new project from scratch.
3.1.4 About
This option displays version, author and other relevant information.

Prophet2012 v1.0 User Manual
Page 8 / 29
3.2 Transfer
3.2.1 Transfer2PC
To transfer all sounds, maps and presets from the Prophet 2000/2002 to the connected PC.
3.2.2 Transfer2Prophet
To transfer all sounds, maps and presets to the connected Prophet. Everything inside the Prophet will
be overwritten – so take care there is not any unsaved data!
3.2.3 Get parameter
Retrieves all sound, map and preset parameters from the connected Prophet. This could be used
after some parameters have been edited by the Prophet panel. No sample data will be transferred to
the PC. Take care to have all the data synchronized between the PC and the Prophet (Transfer2PC or
a transferred dump file to the Prophet before) before using this button.
3.2.4 Panic
We recommend you don’t. If you think you need to, select this option. It will send a note-off to the
connected instrument.
3.2.5 Online update
If the ‘Online’ feature in the ‘Transfer’ menu is selected, all changes of any parameter will be
transferred immediately to the connected Prophet. This will cause a note being played to be cut off.

Prophet2012 v1.0 User Manual
Page 9 / 29
3.3 Options
3.3.1 Configure the installed memory of your Prophet
If the connected Prophet has an extended memory (512MW aka 768KB),select the ‘Extended
Memory’ entry in the ‘Options’ menu . If your Prophet has only 256MW (384KB) please ensure that
‘Extended Memory’ is not selected. Should you be a lucky owner of a working 1MW upgrade
installed, Prophet 2012 will operate on the selected memory page.
3.3.2 Intelligent Loop Points
Will trigger a zero-slope algorithm, useful in the ‘Loop Editor’.
3.3.3 Config
Application settings that define your setup are accessible through this dialogue.

Prophet2012 v1.0 User Manual
Page 10 / 29
- Font Size: If you run a custom screen configuration, you may encounter corruption of the
application interface. Selecting a different font size may remedy this effect. The application
needs to be restarted to put the new setting into effect. A warning will be displayed to
remind you. Standard Setting: 8pt.
- Audio Device: The device that will be used for playback of samples for monitoring purposes
during loop editing or for sample auditing.
- MIDI Input device: Select your MIDI Input Device
- MIDI Output Device: Select your MIDI Output Device
- MIDI Channel: The MIDI Channel Prophet 2012 operates on.
- Use RX Handshake: Switch to full SYSEX Handshake for data exchange with the Prophet. Not
supported by all Midi Interfaces
- Burst Interface Options : Support for custom hardware interface that accelerates the data
exchange between the application and the instrument. Please check the website for
information.
3.3.4 View
This option will bring up the MIDI Keyboard (see section 8). It will also display the log window which
may be useful in case of issues.

Prophet2012 v1.0 User Manual
Page 11 / 29
4 Main Window
4.1 General
The program always starts on the notebook page showing the sample organization. It’s a good idea
to have yourself familiarized with the program options (Menu->Options) and set the configuration to
match your setup (Menu->Options->Config) before you start managing your samples.
4.2 Managing Samples
4.2.1 Loading Samples
You can load your sample slot contents in various ways.
- LOAD a dump file via Menu->File->Load. The name of the file loaded will be displayed in the
title bar of the application.
- TRANSFER2PC: Menu->Transfer->Transfer2PC will issue a series of SYSEX DUMP requests to
the connected Prophet that will retrieve all samples, settings, maps and presets from the
instrument.
- IMPORT: This button will let you import .WAV Files or SoundFont™ Instruments from files.
Standard settings will be used, no mapping will be applied. See ‘Import Dialogue’ for details.
- GENERATE: Use the internal wave generator engine to create a synthesized wave. Please
read section ‘The Wave Generator’ for operation.

Prophet2012 v1.0 User Manual
Page 12 / 29
The gauge will show you the amount of memory used by memory bank.
4.2.2 Play
Audit a sample occupying a certain sample slot.
4.2.3 Delete
The DELETE button will erase the sample in the respective slot. Sample settings, parameters and
mappings related to the sample slot will be retained.
To clear all samples slots at once, select Menu->File->Discard.

Prophet2012 v1.0 User Manual
Page 13 / 29
4.2.4 Import
You can import .WAV files or SoundFont™ instruments using the following options:
- Sample rate: This is the Prophet supported sample rate for the imported sample. If the input
sample has got a different sample rate, a sample rate conversion will be performed.
- Channel: To select the channel to be imported (if a stereo sample has been loaded). The
option ‘both’ will mix both channels to form a mono sample.
- Input sample rate: The original sample rate of the loaded sample.
- Sample words: The number of sample words which are going to be imported.
- Start Point: Start point for the imported sample. A value could be entered as well, but a press
on return is required to carry over the new value. A red line is displaying the start point in the
wave view. When changing the value with the spin controls, the next zero crossing position
will be used.
- End Point: End point of the imported sample. A value could be entered as well, but a press on
return is required to carry over the new value. Another red line is displaying the start point
in the wave view. When changing the value with the spin controls, the next zero crossing
position will be used.
- Sound: Select an instrument from the loaded SoundFont™ file to be loaded.
- Root Key: Will display the Root Key of the selected instrument in the loaded SoundFont™ file.
Click once inside the wave view and use the mouse wheel to zoom in or out.

Prophet2012 v1.0 User Manual
Page 14 / 29
Click once inside ‘Start’ or ‘End’ data field and use the mouse wheel to change the value.
Buttons:
- LOAD: Will load a file (.WAV or .SF/.SF2)
- PLAY: The ‘Play’ button will do its purpose ☺
- IMPORT: Will import the sample to the selected sample slot.
- CANCEL: Close the dialogue without importing the sample.
4.2.5 Export
A sample can be exported as .WAV file by clicking on the ‘Export’ button on a sample slot. A file
dialog is requesting the filename. The file will be converted from the internal 12-bit to 16-bit
resolution, and the original sample rate will used.
4.2.6 Generate
Although the term sample is generally used in the context of ‚externally captured audio event’, the
Prophet2012 software provides means to generate a ‘sample’ based on various algorithms. The
generation of waveforms is not emulating ‘analogue’ circuits. It is based on several purely
mathematical models which are applied to the interaction of 4 ‘Oscillators’. The applicable models
are
- Ring Modulation, XOR, Additive, FM

Prophet2012 v1.0 User Manual
Page 15 / 29
The ‘Oscillators’ are designed to generate complex waveforms using volume and envelope
modulation techniques.
4.3 Save all
‘Save all’ will save all samples as separate WAV files. The filename being entered in the file dialog will
be used as the beginning of each WAV file. E.g. if you specify the filename ‘Samples’ the sample
number will be appended to this filename (Samples_1.wav, Samples_2.wav etc.).

Prophet2012 v1.0 User Manual
Page 16 / 29
5 Sounds
The term ‘Sample’ refers to a waveform that occupies a memory location. A sample has certain
additional properties that define the ‘Sound’. The Prophet 2000/2002 architecture adds these
properties to a ‘Sample’ to define a ‘Sound’:
- Sample data related information: Playback variations, loop points, loop behaviour
- Configuration data: Pitch and Mapping
- Analogue configuration: Envelopes, Filter and Velocity
Each sound (of which the instrument can manage up to 16) has its own tab to manipulate these
sample specific settings. The parameters which affect the mentioned settings are accessible via three
notebook pages on the Sounds page: ‘Loop edit, ‘Sample config’ and ‘Synth’.
5.1 Loop Editor
On this notebook page, all loop relevant parameters can be edited. Furthermore the sample start
and end point can be manipulated here, statically by fixing the points and dynamically, depending on
velocity information.
Click once inside the wave view and use the mouse wheel to zoom in or out. Alternatively, you can
use the ‘+’ and ‘-‘ keys.
Click once inside ‘Start’ or ‘End’ data field and use the mouse wheel to change the value. The
up/down cursor key can be used as well the change the value.
The buttons with the symbols <<,< >,>> will help you navigate through the sample quickly.

Prophet2012 v1.0 User Manual
Page 17 / 29
5.1.1 Editing loops
There are different colored lines:
The red lines are indicating the sample start and end point. The yellow lines are indicating the sustain
loop start and end points, and the green lines are indicating the release loop start and end points.
To change the ‘Play’ button behavior you must select under ‘Play mode’ one of the options:
• ‘whole sample’ will playback the sample defined by its start and end points once. The grey
highlighted area will display the sample part between the start and end points.
• ‘sustain loop’ will playback the sustain loop audible part until you press ‘Play’ again. The
yellow highlighted area will display the sample part between the sustain start and sustain
end points.
• ‘release loop’ will playback the release loop audible part until you press ‘Play’ again. The
green highlighted area will display the sample part between the release start and release end
points.
Remark: The sustain and release start point can not be set before the sample start point. The
release start point will always be after the sustain start point. This is a constraint given by the
Prophet itself. If you move the release start point before the sustain end point, the sustain end
point will be set before the release start point and might destroy the setting for the sustain loop!

Prophet2012 v1.0 User Manual
Page 18 / 29
5.2 Sample Configuration
On this notebook page all sound relevant memory addresses will be displayed for information
purposes. Normally you do not need to take any notice of them. They are just for your information.
The assigned high keys within all maps will be displayed as well. Normally you do not need this
information, due to the fact that all high keys will be displayed on the onscreen display with their
corresponding map number (only if the keyboard edit mode is set to ‘Root key’!).
The velocity depended start point can be changed on this tab as well. Tune table is affecting the fine
tune of the current sound.
A quick-access feature on the right hand will display the maps using the sample by highlighting the
respective map number on the button. Clicking on one of these buttons will display the map page
selected.

Prophet2012 v1.0 User Manual
Page 19 / 29
5.2.1 Key mapping of a sound
Above the keyboard you chose the edit behavior of the onscreen keyboard:
If ‘Root key’ is selected, a left click on the keyboard will set the samples root key. The root key will be
displayed with a ‘R’ on the keyboard. Numbers on the Keyboard will tell you the high keys of the
selected sample in all the other maps. If no number is displayed, the high key might be beyond the
visual range of the Keyboard (init value is C-2).
To map a sample inside one of the 8 maps, you have to select the map to be edited (Key mapping in
map X).
Remember samples 1-8 can only be assigned to the maps 1-8. Samples 9-16 can only be assigned to
maps 9-G.
The mapping of a sample inside a map consists of two parameters:
- High key of the sample
- Original key of the sample
Clicking with the right mouse button on the keyboard will set the high key for the sample in the
selected map. The selected high key will be displayed with a ‘H’ on the keyboard.
Left clicking on the keyboard will set the original key for the sample in the selected map. The selected
original key will be displayed with a ‘O’ on the keyboard. Clicking again on the same key will remove
the assigned original key again.
Remark: To enable a sample inside a map the original key must be set. To disable a sample in a
specific map you have to deactivate the original key by clicking again on the already assigned
original key.

Prophet2012 v1.0 User Manual
Page 20 / 29
5.3 Analogue Settings
All synthesis relevant parameters related to a sample are accessible on this notebook page.
Furthermore the real Prophet values will be displayed below each slider. Some parameters do have a
resolution of 255 steps where as the Prophet’s display has only a resolution of 127.
The attack parameters do have a special value called ‘INST.’ for instant on. The decay and release
parameters do have a special value ‘INF’ for infinite.
As the Prophet has two settings for the RELEASE phase, these are displayed as two lines. The ‘2nd
release’, which is tied to the footswitch, is plotted in a slightly duller color.
The VCF Envelope graph will show the absolute value of the VCA Settings. The volume information
defined in the ‘Sample Configuration’ is related to maps and will therefore influence the display of
the VCA envelope in the map settings ONLY.
Mapping of the Sound can be edited here as well, please see section 5.2.1.
The quick-access feature will switch over to the map number displayed.
Clicking on the VCF Envelope Graph will display the effect of the ‘Filter Envelope Amount’ setting on
the cutoff frequency.

Prophet2012 v1.0 User Manual
Page 21 / 29
The ‘Zero’-Current line will be moved from the lower border of the ‘VCA Envelope Amount’ to the
upper border in case of a negative ‘Filter Envelope Amount’ setting.
5.4 Play sound
Pressing the ‘Play’ button will play the current sample in consideration of its start and end point. The
parameter ‘wave part’ on the ‘Loop edit’ sub tab will influence the behavior of this play button. If
‘wave part’ is set to ‘whole sample’, the sample between the start and end point will be played once.
If set to ‘sustain loop’ or ‘release loop’ the loop part of the current sound will be played as long as the
play button will be pressed again.

Prophet2012 v1.0 User Manual
Page 22 / 29
5.5 Context Menu
On each oft he notebook pages related to a sound, a right click on the mouse will invoke the context
menu to manage the sound data.
5.5.1 Load
This selection will load a sound with all its parameters, mapping, sample data and loop settings from
disk.
5.5.2 Save
This selection will save a sound with all its parameters, mapping, sample data and loop settings to
disk.
5.5.3 Get Sound
This selection will just transfer the current sound from the Prophet to the PC. All the sound’s
parameters, mapping, sample data and loop settings will be transferred.
5.5.4 Get Sound Parameter
This selection works similar to ‘Get Sound’, but will not get the sample from the Prophet.
5.5.5 Copy sound
This button will open a dialog, where the destination sound slot can be selected. All the parameters,
mapping, sample data and loop settings will be copied to the destination sound slot.
5.5.6 Delete sound
This button will delete the current sound. Used memory will be freed up.
5.5.7 Import WAV
Imports a WAV file as sample data.

Prophet2012 v1.0 User Manual
Page 23 / 29
5.5.8 Export WAV
Saves the current sample in .WAV format to disk
5.5.9 Wave Generator
Will invoke the waveform generator (see 4.2.6).
5.5.10 Purge
‘Purge’ will discard all sample data before the start point and after the end point to free up unused
memory.

Prophet2012 v1.0 User Manual
Page 24 / 29
6 Maps
Each map has its own notebook page:
All samples which are assigned to the selected map will be displayed on the keyboard. The sample
positions can be changed by setting the high key of a sample on the ‘Sound tab’.
The same color scheme is used for the 3D representation of the graphical envelope display.
As the Prophet architecture does only alter the analogue setting of a Sound (see 5.3), a percentage of
the analogue sound settings is displayed below each slider to show the influence of the slider setting
in relation to the absolute values define in the analogue sound settings. Volume information defined
in the ‘Sample Configuration’ will be reflected by the upper limit of the graphical display of the
envelope of the sample.
There are two parameters in the ‘Velocity Scaling’ section that affect the sample data of a map:
- Reverse: This will reverse the sample playback direction defined in the ‘Loop Editor’.
- Sample Start: This will manipulate the sample playback start point based on velocity
information.
Each sample will start at the next key of the high key of the previous sample.
Clicking on the ‘VCF Envelope Graph’ will switch over to the ‘VCF Envelope Amount’ display in the
same manner as discussed in 5.3.
Prophet2012 v1.0 User Manual
Page 25 / 29
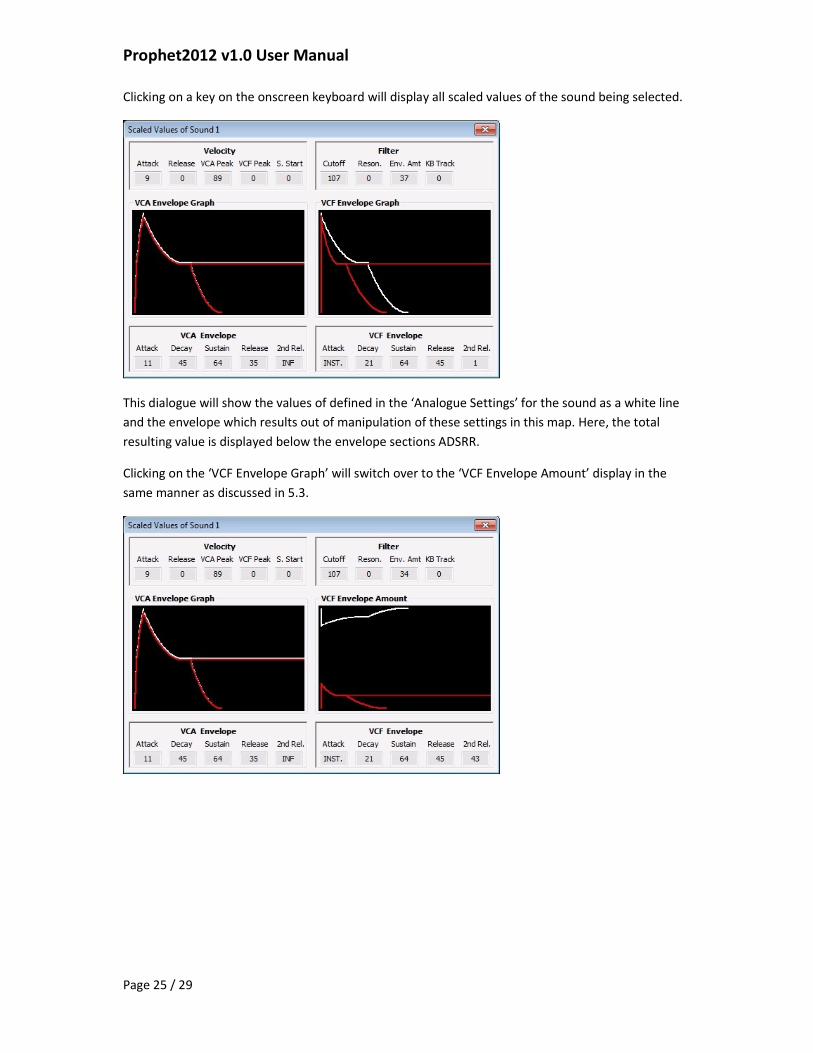
Clicking on a key on the onscreen keyboard will display all scaled values of the sound being selected.
This dialogue will show the values of defined in the ‘Analogue Settings’ for the sound as a white line
and the envelope which results out of manipulation of these settings in this map. Here, the total
resulting value is displayed below the envelope sections ADSRR.
Clicking on the ‘VCF Envelope Graph’ will switch over to the ‘VCF Envelope Amount’ display in the
same manner as discussed in 5.3.

Prophet2012 v1.0 User Manual
Page 26 / 29
6.1 Context menu
6.1.1 Load
‘Load’ will load the map parameters to the current selected map slot. The sound mapping
parameters will not be loaded. These parameters belong to the individual sounds.
6.1.2 Save
‘Save’ will save the map parameters to a file. The sound mapping parameters will not be saved due to
the fact that they are part of the individual sounds.
6.1.3 Copy
‘Copy’ will open a dialog where the destination map can be selected. All map parameters will be
copied to the destination map slot. Keep in mind that the sound mapping parameters will not be
copied. These are part of the individual sounds.
Prophet2012 v1.0 User Manual
Page 27 / 29
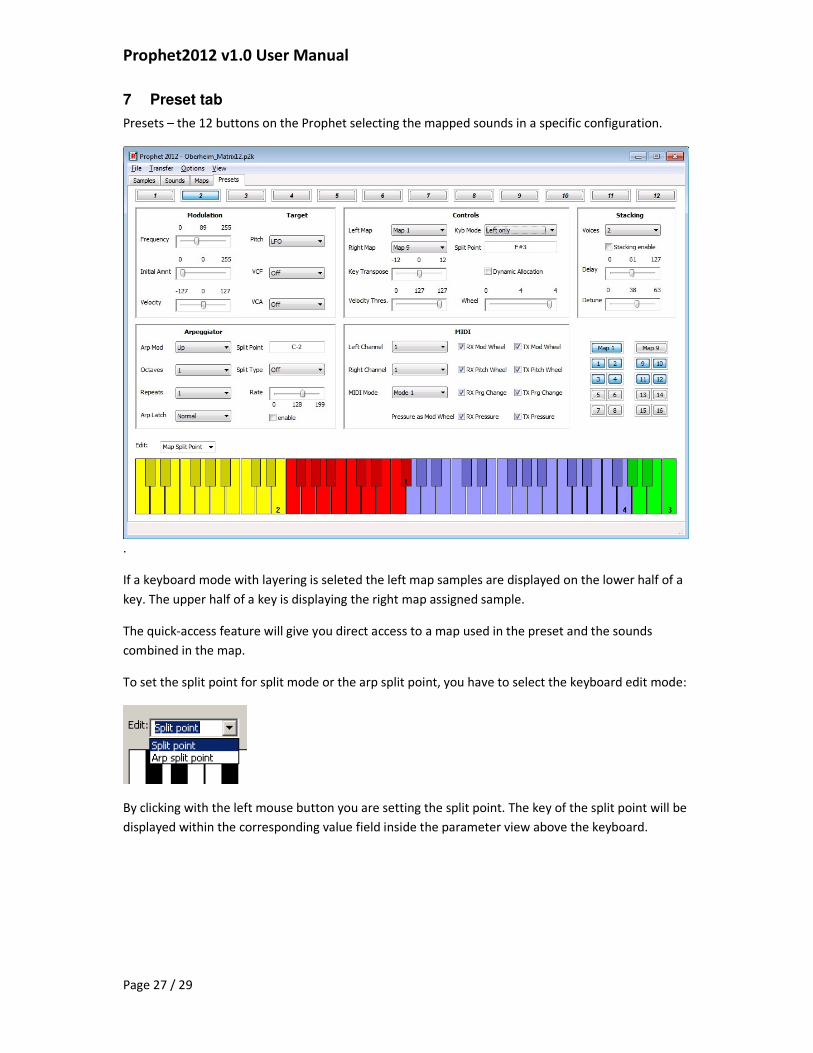
7 Preset tab
Presets – the 12 buttons on the Prophet selecting the mapped sounds in a specific configuration.
.
If a keyboard mode with layering is seleted the left map samples are displayed on the lower half of a
key. The upper half of a key is displaying the right map assigned sample.
The quick-access feature will give you direct access to a map used in the preset and the sounds
combined in the map.
To set the split point for split mode or the arp split point, you have to select the keyboard edit mode:
By clicking with the left mouse button you are setting the split point. The key of the split point will be
displayed within the corresponding value field inside the parameter view above the keyboard.

Prophet2012 v1.0 User Manual
Page 28 / 29
7.1 Context menu
7.1.1 Load
Will load a preset from file to the current preset slot.
7.1.2 Save
Will save the current preset to a file.
7.1.3 Copy
Will open a dialog to select the destination preset. All preset parameters will be copied to the
destination preset.

Prophet2012 v1.0 User Manual
Page 29 / 29
8 MIDI Keyboard
The onscreen MIDI keyboard could be displayed by selected ‘MIDI Keyboard’ in the ‘View’ menu:
Clicking on the keyboard will send a MIDI note to the Prophet. The highest velocity will be sent if the
key is clicked on the bottom. The lowest velocity will be sent if the key is clicked on the top.
Selecting a different preset will be done by just selecting one of the 12 available preset slots above
the keyboard.
On the left hand side is the modulation wheel slider.
If there is no sound played by the Prophet please ensure the MIDI settings on the ‘Preset’ tab are
matching the MIDI channel on the ‘Misc’ tab.
This onscreen keyboard might be very useful for all Prophet 2002 owners ☺
9 Known issues
I had some problems with the MIDI communication with the Prophet. Sometimes some SysEx data
packets are corrupted. Some of them could be restored by my software. I have got some disks which
could not be transferred to the PC due to communication problems at all. I could never figure out
why the communication is not working while having one of these disks loaded into the Prophet.
If you find any bugs please let me know.
Please provide some details about the Prophet you are using (2000/2002, if expanded, which ROM
does it have if known, kind of MIDI interface you are using and your operation system version). I am
very interested which equipment you are using with this software and if you have experienced some
trouble with it.
10 Contact
Email: [email protected]