protrust user guide - softprohelp.softprocorp.com/articles/select/protrust_user_guide_4_0.pdf ·...
TRANSCRIPT

ProTrust User Guide
SoftPro Select 4.0 | Friday, August 21, 2015
4800 Falls of Neuse Road, Suite 400 | Raleigh, NC 27609
p (800) 848-0143 | f (919) 755-8350 | www.softprocorp.com
Table of Contents
SoftPro Select Overview ...................................................................................................................... 5
Resources ............................................................................................................................................. 5
About ProTrust ..................................................................................................................................... 6
Ledger and Transaction Information ................................................................................................... 7
Deleting a Transaction ....................................................................................................................... 11
Reassigning a Transaction .................................................................................................................. 11
Trust Accounts Manager .................................................................................................................... 12
Trust Account Code Examples ........................................................................................................... 14
Trust Accounting Date ....................................................................................................................... 15
Searching for a Ledger ....................................................................................................................... 15
Ledger Search Criteria ........................................................................................................................ 16
Transaction Search Criteria ................................................................................................................ 17
ProTrust Ledgers ................................................................................................................................ 18
Fee Ledgers ........................................................................................................................................ 19
Firm Ledgers....................................................................................................................................... 19
Transfer Ledgers ................................................................................................................................ 20
Adding a Ledger ................................................................................................................................. 20
Adding a Deposit to an Existing Group .............................................................................................. 23
Changing a Pending Transaction Type ............................................................................................... 23
Check Renumbering ........................................................................................................................... 23
Clearing a Deposit .............................................................................................................................. 24
Clearing a Check ................................................................................................................................. 24
Creating a New Ledger ....................................................................................................................... 24
Creating a Combined Check ............................................................................................................... 24
Deleting a Ledger ............................................................................................................................... 25
Deleting a Check ................................................................................................................................ 25
Funds Transfer ................................................................................................................................... 26
Disbursing Transferred Funds ............................................................................................................ 26
Group Deposits .................................................................................................................................. 27
Selected Receipts and Deposit Details ............................................................................................... 28
Miscellaneous .................................................................................................................................... 28
Printing a Deposit Slip ........................................................................................................................ 28
Printing a Ledger ................................................................................................................................ 29
Printing a Transaction Form ............................................................................................................... 29
Removing a Deposit from an Existing Group ..................................................................................... 29

Saving a Ledger .................................................................................................................................. 30
Searching for a Transaction ............................................................................................................... 30
Transactions History .......................................................................................................................... 30
Voiding a Check .................................................................................................................................. 31
Deleting RFD Ledgers ......................................................................................................................... 31
Reconciliation .................................................................................................................................... 32
Include ............................................................................................................................................... 33
Printing a Missing Checks Report ...................................................................................................... 34
Printing a Disbursed Transferred Funds Report ................................................................................ 35
Entering Miscellaneous Transactions ................................................................................................ 35
Clearing a Transaction ....................................................................................................................... 36
Printing a Statement Proofing Register ............................................................................................. 36
Comparing a Proofing Register with a Bank Statement .................................................................... 37
Printing a Multiple Ledger Balances Report (Balances Only) ............................................................ 37
Printing a Receipts and Disbursements Report (Outstanding) .......................................................... 37
Printing a Receipts and Disbursements Report (All) .......................................................................... 38
ProClear ............................................................................................................................................. 38
ProClear Settings and Results ............................................................................................................ 38
Using ProClear.................................................................................................................................... 39
Group Deposits .................................................................................................................................. 40
Selected Receipts and Deposit Details ............................................................................................... 41
Group Deposit Search ........................................................................................................................ 41
Adding Group Deposits ...................................................................................................................... 41
Adding to Existing Group Deposits .................................................................................................... 42
Edit Existing Group Deposits .............................................................................................................. 42
Group Deposit Details ........................................................................................................................ 42
IBA Interest ........................................................................................................................................ 43
Import IBA Interest ............................................................................................................................ 43
About Positive Pay ............................................................................................................................. 45
Creating a New Bank File ................................................................................................................... 45
Recreating a Bank File ........................................................................................................................ 46
Check Renumbering Range ................................................................................................................ 46
Change Trust Account ........................................................................................................................ 47
About Reports .................................................................................................................................... 49
Single Ledger Balance ........................................................................................................................ 50
Receipts and Disbursements Report.................................................................................................. 50
Receipts and Disbursements (Outstanding) Report .......................................................................... 50

Receipts and Disbursements Report (Pending and Held) .................................................................. 50
Receipts and Disbursements Report (Voided and Stop Payment) .................................................... 51
Multiple Ledger Balance, Balances Only ............................................................................................ 51
Multiple Ledger Balance, with Detail ................................................................................................. 51
Interest-Bearing Account Balances (With detail) .............................................................................. 51
IBA Interest Import ............................................................................................................................ 52
Escrow Trail Balance Report (with Detail) ......................................................................................... 52
Monthly Savings Report ..................................................................................................................... 52
Group Deposits Report ...................................................................................................................... 52
Periodic Totals by Ledger ................................................................................................................... 52
Running Account Balance Report ...................................................................................................... 52
Running Ledger Balance Report......................................................................................................... 53
Anticipated Incoming Wires .............................................................................................................. 53
ProClear Results ................................................................................................................................. 53
Reminders Report .............................................................................................................................. 53
Overdraft Report ................................................................................................................................ 53
Dormant Activity Report .................................................................................................................... 53
Disbursed Transferred Funds ............................................................................................................. 53
IOLTA Report ...................................................................................................................................... 53
Office Control Summary Report ........................................................................................................ 54
Dormant Ledgers Report ................................................................................................................... 54
Daily Savings Reports ......................................................................................................................... 54
Missing Checks Report ....................................................................................................................... 54
Book Balance Report .......................................................................................................................... 54
Escrow Account Reconciliation Summary .......................................................................................... 54
Statement Proofing Register .............................................................................................................. 55
Bank Adjustments Report .................................................................................................................. 55
Licensing............................................................................................................................................. 55
SoftPro Sales ...................................................................................................................................... 56
SoftPro Solution Center ..................................................................................................................... 56

p5
SoftPro Select Overview
SoftPro Select is the most complete office solution for the real estate and title industries. See what you can do with
SoftPro Select and inquire today about switching to Select from SoftPro Standard/Enterprise Editions.
The SoftPro Select family of products offer solutions at each level of your needs:
ProForm
ProForm is the leader in title insurance order and closing automation. Enter order data to produce professional
closing and title insurance forms. Manage order tasks and run reports to track your business. Customize screens
for your workflow.
ProTrust
ProTrust is the choice for trust account management and reconciliation. Works seamlessly with your ProForm data.
Print daily and monthly reports according to your criteria.
Pro1099
With Pro1099, your 1099-S filing is now automated. Pro1099 will produce your yearly IRS 1099-S submission file
using the data you enter once in ProForm.
SPImage
SPImage enables you to scan documents and associate them with your ProForm orders — making it easy to view
images, archive complete files and retrieve when needed.
SPAdmin
SPAdmin is the security module of SoftPro .NET. With it, you manage SoftPro users and their permissions, adjust
global program preferences, and create Lookup tables.
Resources
Online
SoftPro Select on the Internet: www.softprocorp.com
mySoftPro login: www.softprocorp.com/mySoftPro/mySoftProLogin.asp
Register with mySoftPro to access the support knowledge base, document downloads, and more.
Support
SoftPro Solution Center
(800) 848-0143
Monday to Friday from 8:00 A.M. to 5:30 P.M. EST
Platinum-level support hours: Monday to Friday from 8:00 A.M. to 10:00 P.M. EST, Saturday 11:00 A.M. to
2:00 P.M. EST

p6
Sales
Call your SoftPro representative to register for platinum support service or inquire about products
SoftPro Select Sales
(800) 848-0143
Monday to Friday from 8:30 A.M. to 5:30 P.M. EST
About ProTrust
ProTrust manages and reconciles one or multiple trust accounts. You can easily and accurately transfer funds and
disbursements from a closing to ProTrust. ProTrust maintains all transactions including deposits and checks that
are active, voided, pending, or held. You can also quickly search for specific ledgers or transactions, as well as print
checks and a variety of reports to assist in reconciliation and auditing procedures.
Reconciliation is quick and easy with ProTrust. Using your monthly bank statement, simply indicate which
transactions have cleared on the full screen listing of deposit and check information. You can clear transactions
individually or in groups. ProTrust does not delete transactions during reconciliation as some programs do,
maintaining the historical data for a detailed audit trail.
Check printing is simple, with automatically-assigned check numbers and the ability to re-print checks. The user
may also print a single check or select only the checks needed.
ProTrust contains a wide variety of reports to assist in your reconciliation and auditing procedures including:
Proofing register
Receipts and disbursements
Balances, ledgers, and reminders report
Running account balance report
Outstanding checks and deposits
Major features:
Manage any number of trust accounts
Generate checks
Clears checks and deposits individually or in batches
With ProClear, electronically import cleared transactions from your bank directly into ProTrust
Maintains a complete audit trail of all transactions
Produces a variety of informative and essential accounting reports
Allows transfer of funds between ledgers
Integrates with ProForm for Windows for one-time data entry
Includes extensive on-line help and user's guides

p7
SoftPro Select updates include:
Separate transaction date reports and trust accounting date reports
The ability to run reports with or without adjustments
A customizable ProTrust report tree, enabling you to group reports into batches for easy printing, add
custom reports and remove unused reports from view.
Ledger and Transaction Information
Ledger Information
If the current ledger has a corresponding ProForm file, ledger information defaults from the ProForm file. The
ledger information fields are blank when adding a new ledger in ProTrust manually to create a fee ledger, transfer
ledger, or a firm ledger.
Transaction Information: Every ledger in ProTrust can have its own transactions associated with it. Various types
of funds come in and come out of a ledger by means of transactions. These transactions can be viewed, added,
edited and deleted through a grid at the bottom of a ProTrust ledger tab.
Ledger balance (Read-only): The current ledger balance. When the balance is zero, all transactions have cleared,
and there are no pending or held checks, the ledger is considered ready for deletion (RFD). If a ledger goes into a
negative balance situation, the amount is shown in parenthesis. This field should be calculated in memory and
update itself after any change to the ledger’s transactions. The data will not be stored in the database. To calculate
the balance, posted incoming funds are totaled and posted disbursements are subtracted from the total (Void
Check adds to the total).
w/Pending (Read-only): Pending items minus balance. To calculate the Balance w/ Pending, pending incoming
funds are added to the balance and pending disbursements are subtracted from the balance. If a ledger goes into a
negative balance situation, the amount is shown in parenthesis. This field should be calculated in memory and
update itself after any change to the ledger’s transactions.
w/Held & Pending (Read-only): To calculate the Balance w/ Held & Pending, held checks are subtracted from the
Balance w/ Pending. If a ledger goes into a negative balance situation, the amount is shown in parenthesis. This
field should be calculated in memory and update itself after any change to the ledger’s transactions.
IBA balance: Displays the overall balance of IBAs associated with that ledger.
Transactions: The current number of transactions in the ledger.
Trust account: Enter the trust account that this ledger belongs to. For new ledgers, this field cannot be left blank
before saving. The default for this field is the Trust Account entered when the corresponding ProForm file was
created.
Ledger type: To create a Fee Ledger, select Fee. To create a Transfer Ledger, select Transfer. To create a Revenue
Ledger, select Revenue. This field will be blank by default, and shows "Order" for an order-related ledger.
Responsible party: Enter the name of the party responsible for disbursement. The default for this field is the
Escrower entered on the Status screen.
Ledger ID: Enter the ledger number.
3-way reconciliation type: The entry you make to this field will determine if this ledger is to be included in the
computation of the 3-way reconciliation reports:

p8
Guaranty - Only Guaranty ledgers will be included in the computation of the 3-way reconciliation. This is
the default entry for all order-related ledgers and cannot be changed.
Non-guaranty - This can be a firm ledger or operating ledger including service fees and other amounts not
related to a specific closing. These ledgers cannot be included in 3-way reconciliation reports.
Reminder date: Enter a reminder date for the purposes of running Reminder Reports. When you run a Reminder
Report, you will be asked to enter a date range. All ledgers with reminder dates that fall within the range you
specify will be included in the report.
Ledger comment: Enter any useful comments about the ledger such as special instructions about actions required
if funds are being held in escrow, or details about the status of a ledger. This field will default to the 1099-S
Description entered on the Division of Proceeds & 1099-S Data screen in ProForm.
Locked: When checked, indicates the ledger has been locked. When locked, the Ledger information and Payee
information sections cannot be modified and transactions cannot be added or deleted from the register. A ledger
may be locked two ways - by auto-locking the ledger once it becomes dormant or manually checking the box.
Exempt: The checkbox is only available on the ProForm register if the register is dormant. With permission, this
box can be checked to exclude it from dormant reports.
Payee Information
Payee: Enter the name of the party to whom the funds are being transferred.
Disburse as: Select the transaction type to use as the default transaction type when disbursing transferred funds.
Check
Outgoing Wire
Miscellaneous Debit
Routing number: Enter the routing number of the default account used when amounts are disbursed as an
outgoing wire.
Address: Enter the bank address of the default account used when amounts are disbursed as a check.
Bank name: Enter the bank name of the default account used when amounts are disbursed as an outgoing wire.
Special instructions: Enter any useful comments for the outgoing wire.
Account number: Enter the routing number of the default account used when amounts are disbursed as an
outgoing wire.
Further credit: Enter information regarding any additional parties to credit for the outgoing wire.
City/State/Zip: Enter the bank city, state and zip of the default account to use when disbursing funds from this
ledger.
Foreign: Check to use an address format other than a standard United States address format (e.g. an address in
Mexico). Checking this box changes the City, State and ZIP code fields to one text box to enter the information.
Transactions
Add: Click the Add button to add a transaction to the ledger. There are eight options to choose from:
Incoming Wire
Interest Credit

p9
Miscellaneous Credit
Receipt
Check
Miscellaneous Debit
Outgoing Wire
Ledger Transfer (-)
Delete: Click the delete button to remove this transaction from the ledger.
Print and Post: Use this drop-down to print or post pending checks, disbursements or transactions and to reprint
checks.
Post: Select this option to add a new posted transaction to the ledger.
Print Pending Checks: Select this option to select pending checks to send to the printer. NOTE: a check
printing manager must be associated with the profile and trust account to perform this action.
Print/Post Pending Disbursements: Select this option to simultaneously post and print pending
disbursements and checks in the ledger.
Reprint Checks: Select this option to reprint checks. NOTE: This action requires a separate permission to
execute.
Actions:
Reassign Transaction: This option allows the user to reassign a posted transaction to another ledger.
Disburse Transferred Funds: This option is only available on Fee, Transfer and Revenue ledgers. It allows a
user to group multiple transfers into one disbursement.
Show Deleted Transactions: Click this option to show deleted transactions in the transactions grid.
Change Pending Transaction Type: This option allows the user to change a pending transaction type to any
other transaction type available.
Generate Pending Transactions: Select to have ProForm-generated transactions feed from an order into
the register (necessary when the Use ProForm-generated transactions option is unchecked as Profile
setting in SPAdmin)
Restore Default Grid Layout: The transactions grid allows the users to drag and drop columns to rearrange
the data to best suit their needs. The Restore Default Grid Layout returns the column order to their original
placement in the grid.
View Fee Details: Launches the "Fee Details" dialog which displays details associated with any posted
transaction to a revenue contact on the ledger/register. Details include: Reference Number, Date, Contact
Code, Contact Name, Description, Bill Code and Amount.
Reports: Click this drop-down to select one of four reports available for viewing:
Disbursement Summary: Prints summary of all checks, outgoing wires, manual checks and miscellaneous
disbursements associated with the ledger.
Single Ledger Balance Report - Prints transaction detail and balances for a single, specified ledger only.
Depending on the report options selected, the report may or may not include pending and held
transactions.

p10
Transaction Form: Prints a receipt for funds showing the parties to the transaction, the trust account
information, and an area to have the recipient sign acknowledging receipt of said funds.
Transaction History: Contains a record of every posted transaction for the current ledger or ProForm order.
Status: Indicates whether a transaction is pending, held, posted, voided or stop payment.
Type: Indicates:
HUD transfer in
Incoming wire
Interest credit
Ledger transfer in
Miscellaneous credit
Receipt
Check
HUD transfer out
Ledger transfer out
Miscellaneous debit
Outgoing wire
Ref. number: The number assigned to the transaction manually, from the reference numbering manager, or from
the check printing manager.
Trans date: Indicates the date the transaction took place.
Amount: Indicates the dollar amount of the transaction.
Payee/Payor: Indicates the name(s) of the person or organization making or receiving a payment.
HUD-1: Indicates which HUD a transaction belongs to. For example, in a closing where the borrower receives a first
mortgage and an equity loan, the first loan is with Lender A and the second loan is with Lender B. The lenders do
not need to see the other lender's information, so they request separate HUDs (settlement statement).
Cleared Date: Indicates the date the payment was completed.
Dep. number: Indicates the number for that specific deposit.
Medium: Indicates the method by which the payment was made:
Bank Check
Bank Error
Cash
Cashier Check
Check
Direct Deposit
Draft
Money Order
NSF Check
Official Check
Statement
Wire
p11
Trust Acct.: Indicates the trust account to which the transaction is tied.
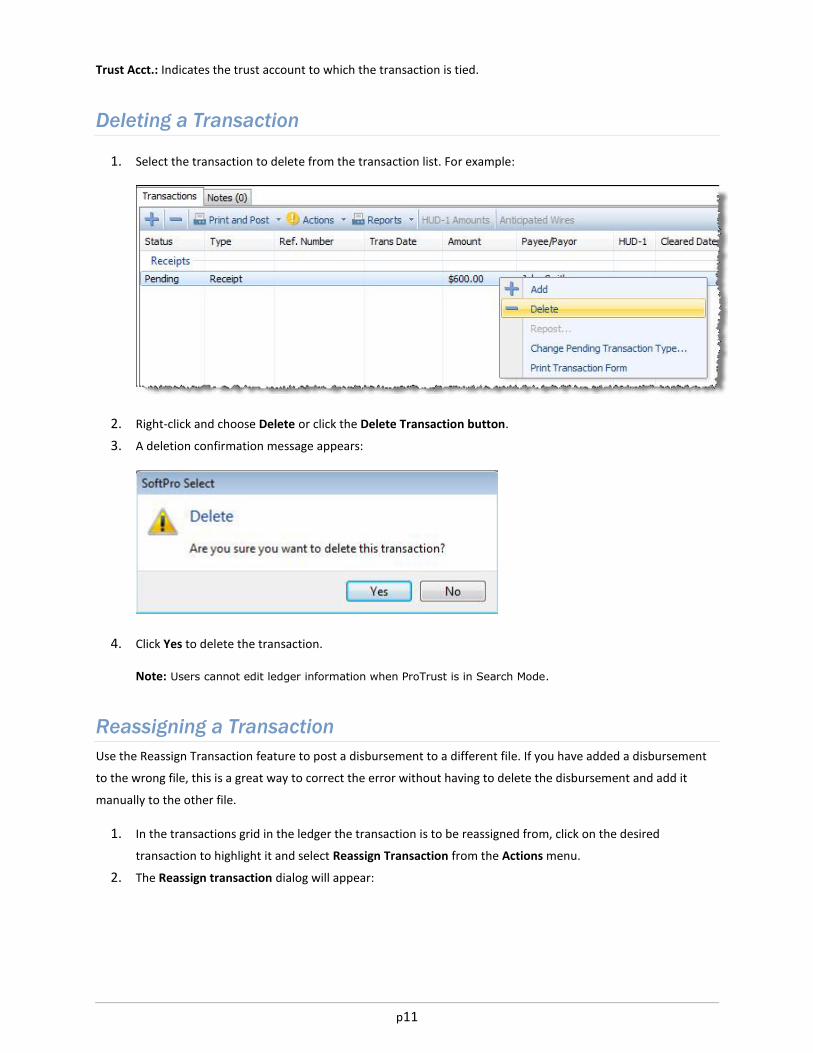
Deleting a Transaction
1. Select the transaction to delete from the transaction list. For example:
2. Right-click and choose Delete or click the Delete Transaction button.
3. A deletion confirmation message appears:
4. Click Yes to delete the transaction.
Note: Users cannot edit ledger information when ProTrust is in Search Mode.
Reassigning a Transaction
Use the Reassign Transaction feature to post a disbursement to a different file. If you have added a disbursement
to the wrong file, this is a great way to correct the error without having to delete the disbursement and add it
manually to the other file.
1. In the transactions grid in the ledger the transaction is to be reassigned from, click on the desired
transaction to highlight it and select Reassign Transaction from the Actions menu.
2. The Reassign transaction dialog will appear:

p12
3. Enter search criteria for to find the ledger to which the transaction should be reassigned.
4. Select the desired ledger from the search results grid and click Next to continue.
5. Enter a Reason for the adjustment and click Next to continue.
6. Click Finish to complete the reassignment.
Trust Accounts Manager
Each trust account has its own unique trust account code. Trust account codes are essential to the proper
organization of ledgers and transactions in the ProTrust database. This information is linked to profiles. Profiles
may have more than one trust account code.
Adding a Trust Account Code
1. Press or Insert key. Enter the applicable information.
2. Enter a code for the trust account (1-10 characters), a brief description and trust (bank) account number.
General
Code: Enter the trust account code. Codes can be from 1-10 characters long. Descriptions can contain up to 30
characters.
Description: Enter a description of the trust account.
Last modified: Defaults to the date the manager was created, and is not editable.
p13
Last Modified By: Defaults to the person name who created the manager, and also is not editable.
Enable this trust account: Check to make the trust account active, leave unchecked to deactivate the trust
account.
Bank and Account Detail
Bank name: Enter the name of the bank.
Bank address: Enter the address.
City/State/Zip: Enter the city, state and ZIP code for the bank.
Foreign: Check to use an address format other than a standard United States address format (e.g. an address in
Mexico). Checking this box changes the City, State and ZIP code fields to one text box to enter the information.
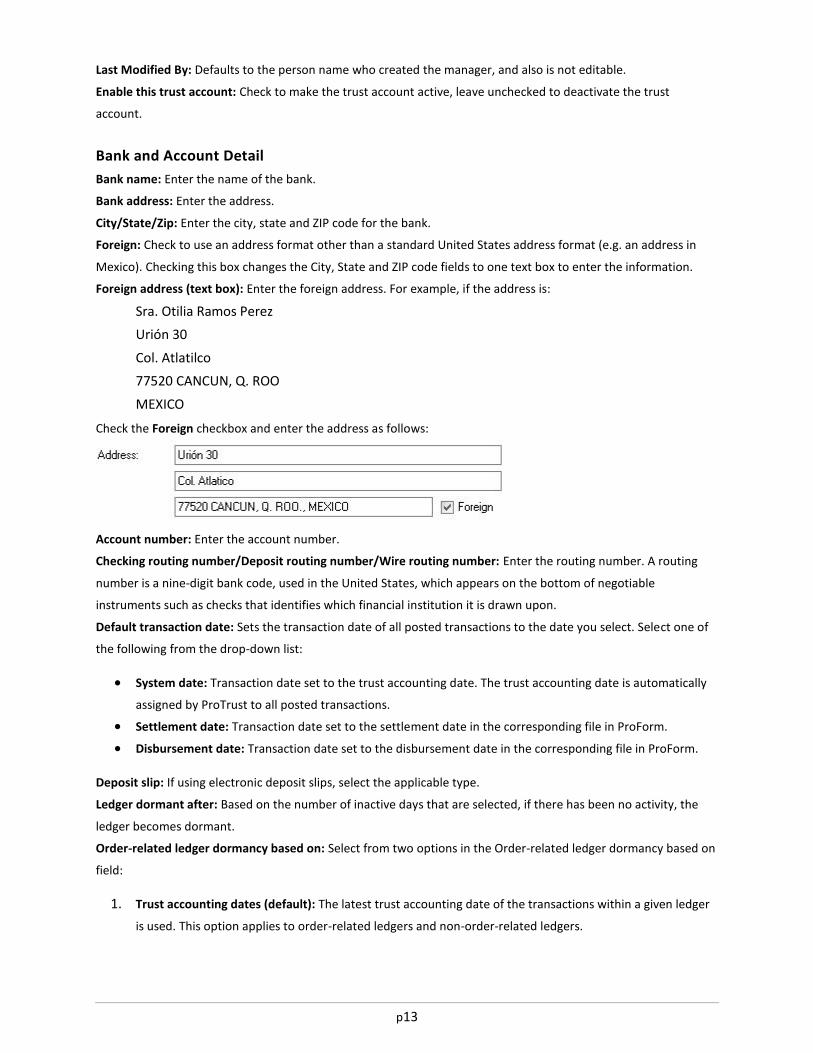
Foreign address (text box): Enter the foreign address. For example, if the address is:
Sra. Otilia Ramos Perez
Urión 30
Col. Atlatilco
77520 CANCUN, Q. ROO
MEXICO
Check the Foreign checkbox and enter the address as follows:
Account number: Enter the account number.
Checking routing number/Deposit routing number/Wire routing number: Enter the routing number. A routing
number is a nine-digit bank code, used in the United States, which appears on the bottom of negotiable
instruments such as checks that identifies which financial institution it is drawn upon.
Default transaction date: Sets the transaction date of all posted transactions to the date you select. Select one of
the following from the drop-down list:
System date: Transaction date set to the trust accounting date. The trust accounting date is automatically
assigned by ProTrust to all posted transactions.
Settlement date: Transaction date set to the settlement date in the corresponding file in ProForm.
Disbursement date: Transaction date set to the disbursement date in the corresponding file in ProForm.
Deposit slip: If using electronic deposit slips, select the applicable type.
Ledger dormant after: Based on the number of inactive days that are selected, if there has been no activity, the
ledger becomes dormant.
Order-related ledger dormancy based on: Select from two options in the Order-related ledger dormancy based on
field:
1. Trust accounting dates (default): The latest trust accounting date of the transactions within a given ledger
is used. This option applies to order-related ledgers and non-order-related ledgers.
p14
2. Escrow open/closed dates: The Ledger dormant after field and the escrow open and escrow closed dates
determine when the ledger is dormant. This option applies for order-related ledgers only since non-order-
related ledgers do not have escrow open or escrow closed dates.
Auto-lock dormant ledgers: Check this preference to automatically lock a register when it becomes dormant. Once
the ledger is locked, you can only unlock the ledger if you have permission.
Revenue Disbursement Defaults
Payee name: Funds transferred to revenue ledgers are disbursed (paid) to this recipient.
Memo: Enter a brief memo. The memo appears on the check, on some reports and on transaction forms. Note:
This field has a maximum of 255 characters.
Disburse revenue as: Select the transaction type to use as the default transaction type when disbursing
transferred funds on revenue ledgers:
Check
Outgoing Wire
Miscellaneous Debit
Wire to: (used when transferred funds on revenue ledgers are disbursed as an outgoing wire)
Bank name: Enter the name of the bank to which the money is wired.
Account number: Enter the account number to which the money is wired.
Wire routing number: Enter the routing number of the bank to which the money is wired.
Profiles
Add the applicable profile under the Profiles tab to ensure that the trust account manager is visible.
Deleting a Trust Account Code
By default, all new accounts will be considered active. To prohibit posting any new transactions to the account
from new ProForm files, uncheck the Enable this trust account check box on the General tab of the trust account
properties.
If a trust account code is deleted, it is marked as inactive and a message will appear to remove all assigned profiles.
To restore, filter by inactive and un-check Inactive in the upper right hand screen. Note that the trust account is
not being deleted from the database, just marked inactive so that new files are not created. When No is selected,
the profile will remain if reactivated. If Yes is selected, the profile will not remain if it is reactivated.
Note: When the entry is saved, a message appears that the check printing manager has not been assigned. This is
merely a reminder to do so, as the check printing manager cannot be added before the trust account code. A
message also prompts that the reference numbering manager needs to be set up.
Trust Account Code Examples
ProTrust may be used for any type of trust or escrow account, including estates and guardianships. It is
recommended to give each account a code that describes the account type, and include more detail in the
description. Numbers may be used in the codes to distinguish accounts of the same type from one another.

p15
Codes can be from 1-10 characters long. Descriptions can contain up to 30 characters. Examples of trust account
codes and descriptions are as follows:
Code Description
RE1 Real Est Acct-First Natl Bank
RE2 Real Est Acct-ABC Bank
FNB First National Bank
JBD Guardianship-John B. Doe
Trust Accounting Date
The Trust accounting date is automatically assigned by ProTrust to every posted transaction (Pending and held
transactions are excluded). This date allows for an accurate accounting of all funds that are receipted and
disbursed on any given day.
The Trust accounting date cannot be modified for a transaction; only a transaction date may be edited.
Administrators can set the Trust Accounting Date to use the current system date and time or use the business days
and cutoff time as set in SPAdmin. To set the Trust Accounting Date preferences, click on SPAdmin, Managers,
Office Calendar and click on the Trust Accounting tab of the selected Office Calendar manager.
Searching for a Ledger
Use the Search feature to search for a ledger to edit, delete, or print. Searches cannot be performed while in Add
Mode. Press Esc to exit Add Mode.
1. Click Ledger Search in the Ledgers action ribbon.
2. Enter the search criteria in the Ledger Search Criteria section of the blank search screen. Use as many or as
few of the fields as needed. Certain wildcards may be used in the entries, if desired. At any time while
entering search criteria, click to Clear the current screen.
p16
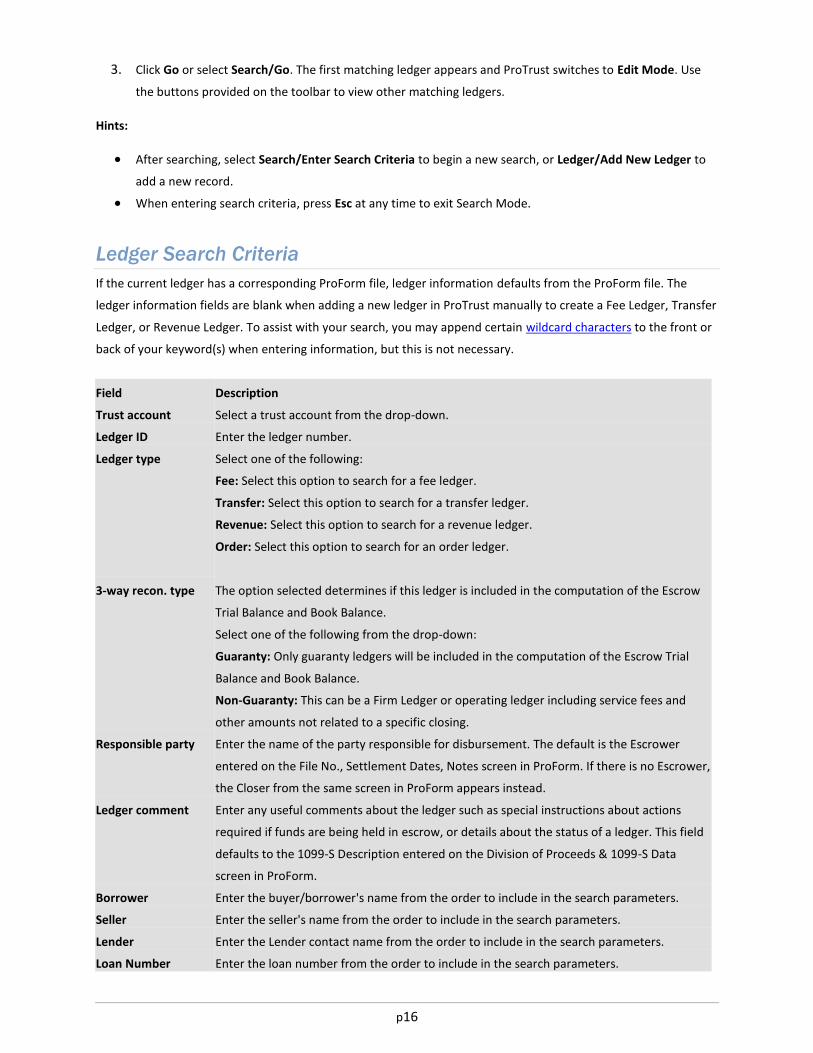
3. Click Go or select Search/Go. The first matching ledger appears and ProTrust switches to Edit Mode. Use
the buttons provided on the toolbar to view other matching ledgers.
Hints:
After searching, select Search/Enter Search Criteria to begin a new search, or Ledger/Add New Ledger to
add a new record.
When entering search criteria, press Esc at any time to exit Search Mode.
Ledger Search Criteria
If the current ledger has a corresponding ProForm file, ledger information defaults from the ProForm file. The
ledger information fields are blank when adding a new ledger in ProTrust manually to create a Fee Ledger, Transfer
Ledger, or Revenue Ledger. To assist with your search, you may append certain wildcard characters to the front or
back of your keyword(s) when entering information, but this is not necessary.
Field Description
Trust account Select a trust account from the drop-down.
Ledger ID Enter the ledger number.
Ledger type Select one of the following:
Fee: Select this option to search for a fee ledger.
Transfer: Select this option to search for a transfer ledger.
Revenue: Select this option to search for a revenue ledger.
Order: Select this option to search for an order ledger.
3-way recon. type The option selected determines if this ledger is included in the computation of the Escrow
Trial Balance and Book Balance.
Select one of the following from the drop-down:
Guaranty: Only guaranty ledgers will be included in the computation of the Escrow Trial
Balance and Book Balance.
Non-Guaranty: This can be a Firm Ledger or operating ledger including service fees and
other amounts not related to a specific closing.
Responsible party Enter the name of the party responsible for disbursement. The default is the Escrower
entered on the File No., Settlement Dates, Notes screen in ProForm. If there is no Escrower,
the Closer from the same screen in ProForm appears instead.
Ledger comment Enter any useful comments about the ledger such as special instructions about actions
required if funds are being held in escrow, or details about the status of a ledger. This field
defaults to the 1099-S Description entered on the Division of Proceeds & 1099-S Data
screen in ProForm.
Borrower Enter the buyer/borrower's name from the order to include in the search parameters.
Seller Enter the seller's name from the order to include in the search parameters.
Lender Enter the Lender contact name from the order to include in the search parameters.
Loan Number Enter the loan number from the order to include in the search parameters.
p17
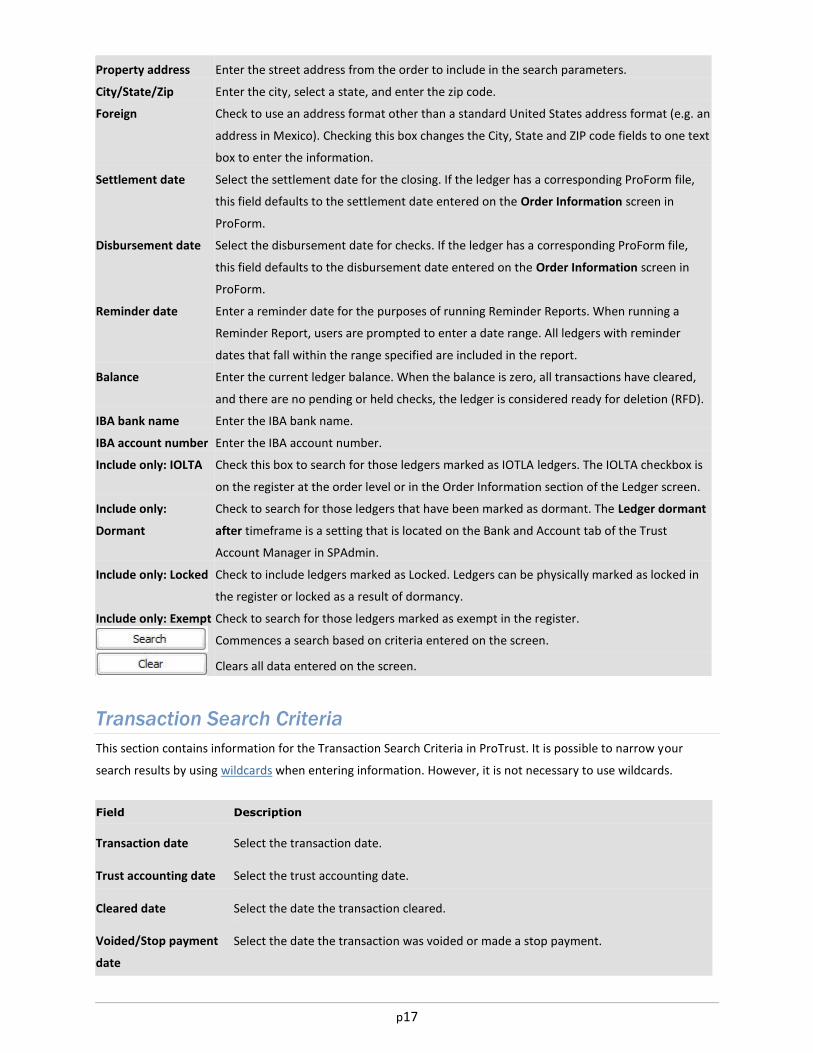
Property address Enter the street address from the order to include in the search parameters.
City/State/Zip Enter the city, select a state, and enter the zip code.
Foreign Check to use an address format other than a standard United States address format (e.g. an
address in Mexico). Checking this box changes the City, State and ZIP code fields to one text
box to enter the information.
Settlement date Select the settlement date for the closing. If the ledger has a corresponding ProForm file,
this field defaults to the settlement date entered on the Order Information screen in
ProForm.
Disbursement date Select the disbursement date for checks. If the ledger has a corresponding ProForm file,
this field defaults to the disbursement date entered on the Order Information screen in
ProForm.
Reminder date Enter a reminder date for the purposes of running Reminder Reports. When running a
Reminder Report, users are prompted to enter a date range. All ledgers with reminder
dates that fall within the range specified are included in the report.
Balance Enter the current ledger balance. When the balance is zero, all transactions have cleared,
and there are no pending or held checks, the ledger is considered ready for deletion (RFD).
IBA bank name Enter the IBA bank name.
IBA account number Enter the IBA account number.
Include only: IOLTA Check this box to search for those ledgers marked as IOTLA ledgers. The IOLTA checkbox is
on the register at the order level or in the Order Information section of the Ledger screen.
Include only:
Dormant
Check to search for those ledgers that have been marked as dormant. The Ledger dormant
after timeframe is a setting that is located on the Bank and Account tab of the Trust
Account Manager in SPAdmin.
Include only: Locked Check to include ledgers marked as Locked. Ledgers can be physically marked as locked in
the register or locked as a result of dormancy.
Include only: Exempt Check to search for those ledgers marked as exempt in the register.
Commences a search based on criteria entered on the screen.
Clears all data entered on the screen.
Transaction Search Criteria
This section contains information for the Transaction Search Criteria in ProTrust. It is possible to narrow your
search results by using wildcards when entering information. However, it is not necessary to use wildcards.
Field Description
Transaction date Select the transaction date.
Trust accounting date Select the trust accounting date.
Cleared date Select the date the transaction cleared.
Voided/Stop payment
date
Select the date the transaction was voided or made a stop payment.

p18
Reference number Enter the reference number.
Amount Enter the amount of the transaction.
Medium Select a medium from the drop-down.
Memo Enter text in the memo field for the transaction.
Type Select the type of transaction to search for from the drop-down; users can select up to
three different types per search. Choices are as follows:
Incoming Wire
Interest Credit
Miscellaneous Credit
Receipt
Check
Miscellaneous Debit
Outgoing Wire
HUD Transfer (+)
HUD Transfer (-)
Ledger Transfer (+)
Ledger Transfer (-)
Group Deposit
Status Select the status of the transaction. The status field is tied to the type field on the left
and the drop-down selection and availability is based on the associated type entry.
Payee/Payor Enter the payee/payor's name as it shows on any transaction in the ledger.
Address Enter the street address of the payee/payor as it appears on the check.
City/State/Zip Enter the city, state and zip of the payee/payor as it appears on the check.
Foreign If the address of the payee/payor is a foreign address click to modify the address fields
to accommodate a foreign address.
IBA transactions only Click to search for those transactions posted to an IBA account.
Transactions with blank
ref. number
Click to search for any transactions entered into the ledger without a reference number.
Draft checks Click to search for those transactions posted as Draft checks in the register.
Transfer to/from Enter to search by the name of the party the transfer transaction was posted to/from .
Commences a search based on criteria entered on the screen.
Clears all data entered on the screen.
ProTrust Ledgers
When creating a ProForm file for a closing, a ProTrust ledger is automatically created to receive trust account
information from the ProForm file. The ledger is added to the trust account that is entered when the ProForm file

p19
is created. Ledgers should only be added manually in ProTrust to create Fee Transfer or any other ledgers not
intended to administer receipts and disbursements for a single ProForm closing.
Manually Adding a Ledger
Users can manually add a ledger in ProTrust – for instance to create a Fee or Transfer or Firm Ledger. Click Add
Ledger or select Ledger/ Add New Ledger.
Deleting a Ledger
Click Delete Ledger or select Ledger/ Delete Current Ledger.
Saving a Ledger
Select Ledger/ Save Ledger Changes.
Click Print or select File/ Print.
Fee Ledgers
A fee ledger is a ledger created to receive transfers of fees from various closing ledgers to a common payee. For
example, a fee ledger can be set up to receive all of the settlement agent fees for a particular settlement agent. All
settlement agent fees are transferred from individual closing ledgers in ProTrust (or from ProForm files using the
disbursements register) to the fee ledger, and each month a single check for the total of all fees is issued to the
agent from the fee ledger.
Setting Up a Fee Ledger
1. Click the New Ledger action item button or from the File menu click New ->New Ledger.
2. The New Ledger dialog appears.
3. Enter the Name of the ledger
4. Select the affiliated Trust account.
5. Select Fee from the Ledger type drop-down, then click OK.
Firm Ledgers
A firm ledger is created to record money for the trust account opening balance, bank service charges, and any
other operating fees not related to a specific closing ledger.
Setting up a Firm Ledger
1. Click Add Ledger.
2. Enter a Firm File ID.
3. Enter a trust account code.
4. The Type field should be blank.
5. Enter any additional information as desired in the ledger fields. The Firm File ID and trust account code
are required.
6. Click File, Save or press Ctrl+S to save the ledger changes.
p20
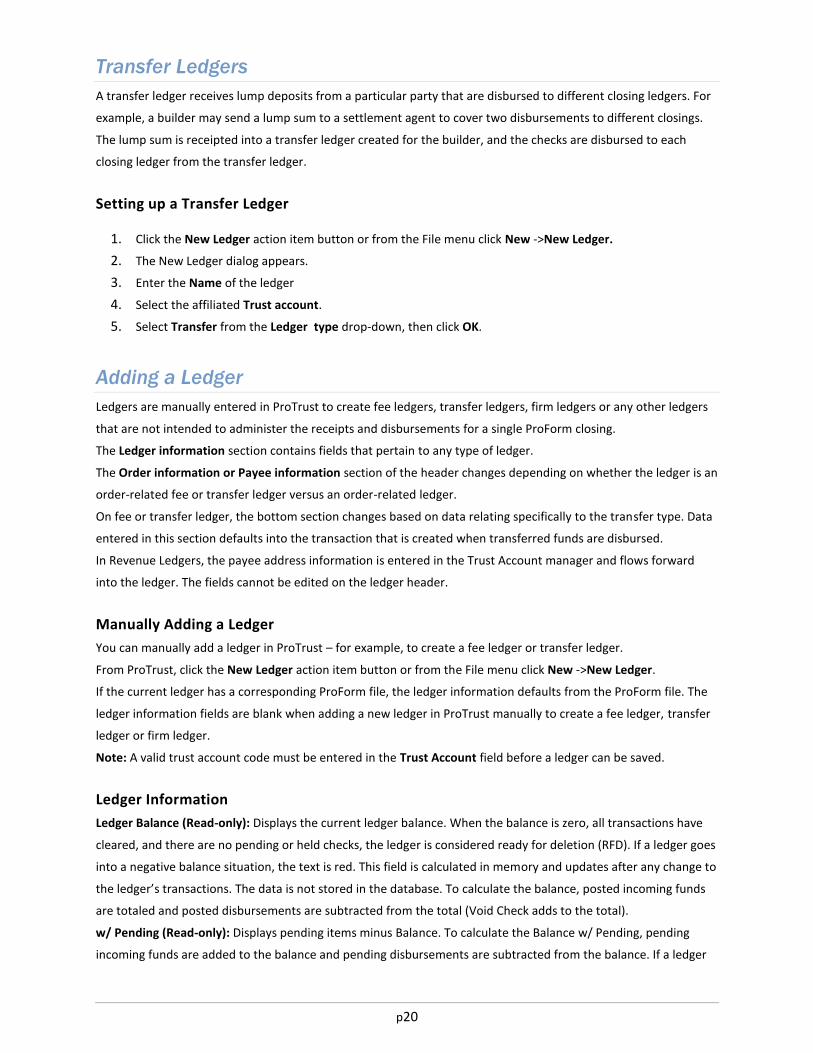
Transfer Ledgers
A transfer ledger receives lump deposits from a particular party that are disbursed to different closing ledgers. For
example, a builder may send a lump sum to a settlement agent to cover two disbursements to different closings.
The lump sum is receipted into a transfer ledger created for the builder, and the checks are disbursed to each
closing ledger from the transfer ledger.
Setting up a Transfer Ledger
1. Click the New Ledger action item button or from the File menu click New ->New Ledger.
2. The New Ledger dialog appears.
3. Enter the Name of the ledger
4. Select the affiliated Trust account.
5. Select Transfer from the Ledger type drop-down, then click OK.
Adding a Ledger
Ledgers are manually entered in ProTrust to create fee ledgers, transfer ledgers, firm ledgers or any other ledgers
that are not intended to administer the receipts and disbursements for a single ProForm closing.
The Ledger information section contains fields that pertain to any type of ledger.
The Order information or Payee information section of the header changes depending on whether the ledger is an
order-related fee or transfer ledger versus an order-related ledger.
On fee or transfer ledger, the bottom section changes based on data relating specifically to the transfer type. Data
entered in this section defaults into the transaction that is created when transferred funds are disbursed.
In Revenue Ledgers, the payee address information is entered in the Trust Account manager and flows forward
into the ledger. The fields cannot be edited on the ledger header.
Manually Adding a Ledger
You can manually add a ledger in ProTrust – for example, to create a fee ledger or transfer ledger.
From ProTrust, click the New Ledger action item button or from the File menu click New ->New Ledger.
If the current ledger has a corresponding ProForm file, the ledger information defaults from the ProForm file. The
ledger information fields are blank when adding a new ledger in ProTrust manually to create a fee ledger, transfer
ledger or firm ledger.
Note: A valid trust account code must be entered in the Trust Account field before a ledger can be saved.
Ledger Information
Ledger Balance (Read-only): Displays the current ledger balance. When the balance is zero, all transactions have
cleared, and there are no pending or held checks, the ledger is considered ready for deletion (RFD). If a ledger goes
into a negative balance situation, the text is red. This field is calculated in memory and updates after any change to
the ledger’s transactions. The data is not stored in the database. To calculate the balance, posted incoming funds
are totaled and posted disbursements are subtracted from the total (Void Check adds to the total).
w/ Pending (Read-only): Displays pending items minus Balance. To calculate the Balance w/ Pending, pending
incoming funds are added to the balance and pending disbursements are subtracted from the balance. If a ledger

p21
goes into a negative balance situation, the text is red. This field is calculated in memory and updates itself after any
change to the ledger's transactions.
w/ Held & Pending (Read-only): To calculate the Balance w/ Held & Pending, held checks are subtracted from the
Balance w/ Pending. If a ledger goes into a negative balance situation, the text is red. This field is calculated in
memory and updates after any change to the ledger's transactions.
IBA Balance: xxxx
Transactions: Displays the current number of transactions in the ledger.
Trust account: Enter the trust account for this ledger. This field is required for new ledgers. The default value is the
trust account entered when the corresponding ProForm file was created.
Ledger type: To create a fee ledger, enter F. To create a transfer ledger, enter T. This field is blank by default when
the information comes from the corresponding ProForm file and is to contain receipts and disbursements for a
closing.
Responsible party: Enter the name of the party responsible for disbursement. The default is the Escrow
Officer/Closer entered on the Order Information screen in ProForm. If there is no escrow officer or closer, the
closer from the same screen in ProForm appears instead.
Ledger ID: File identification for the ledger. Each ledger should have a unique firm file ID. This field defaults to the
ProForm firm file number given to the file when it was created.
3-way recon. type: The entry you make to this field determines if the ledger is to be included in the computation
of the escrow trial balance and book balance (The escrow trial balance and book balance figures include only funds
that come from guaranty files). The default is G (guaranty ledger). The escrow trial balance and book balance
figures include only funds that come from guaranty ledgers.
Guaranty ledger: Only guaranty ledgers are included in the computation of reports that use 3-way
reconciliation. This is the default entry for all ledgers associated with ProForm orders.
Non-guaranty ledger: This can be a firm ledger or operating ledger including service fees and other
amounts not related to a specific closing.
Reminder date: Enter a reminder date for the purposes of running reminder reports. When running a reminder
report, a prompt appears to enter a date range. All ledgers with reminder dates that fall within the specific range
are included in the report.
Ledger comment: Enter any useful comments about the ledger such as special instructions about actions required
if funds are being held in escrow, or details about the status of a ledger.
Locked: If the "Auto-lock dormant ledgers" preference has been checked on the Profiles screen, the Locked
checkbox is automatically checked when a register becomes dormant. The Locked checkbox is available when you
have the "Locked" field locked permission. When the checkbox is available, you can check it to lock the register. If
you have the "Locked" field unlock permission, the checkbox remains available so you can check the Locked option
when needed.
Auto-lock Date dialog: When you uncheck the "Locked" checkbox--to unlock the ledger--a dialog will
appear to confirm a date at which the ledger will automatically re-lock. A date is not required; the date field
may be cleared by using the delete key.
Exempt: If you have permission, (only available when the ledger is dormant) check this box to exclude a ledger
from reports.

p22
Order Information
Buyer/Borrower: Enter the buyer or borrower in the closing. This field defaults to the last names of the buyer(s)
entered on the Buyer/Borrower contact screen in ProForm. Multiple buyers are separated by a slash (/).
Lender: Enter the lender organization in the closing. The default for this field is the Lender entered on the Lender
screen in ProForm.
Seller: Enter the seller in the closing. This field defaults to the last names of the seller(s) entered on the Seller
contact screen in ProForm. Multiple sellers are separated by a slash (/).
Loan number: Enter the loan number. The default for this field is the loan number entered on the Loan, Funding &
ProTrust screen in ProForm.
Property address: Enter the property address for the closing. The default for this field is the property address
entered on the Property screen in ProForm.
Settlement date: Enter the settlement date for the closing. If the ledger has a corresponding ProForm file, this field
defaults to the settlement date entered on the Order Information screen in ProForm.
Disbursement date: Enter the disbursement date for checks. If the ledger has a corresponding ProForm file, this
field defaults to the disbursement date entered on the Order Information screen in ProForm.
City/State/Zip: Enter the property address for the closing. The default for this field is the property address entered
on the Property Address, Legal Description screen in ProForm.
Foreign: Check to use an address format other than a standard United States address format (e.g. an address in
Mexico). Checking this box changes the City, State and ZIP code fields to one text box to enter the information.
Foreign address (text box): Enter the foreign address. For example, if the address is:
Sra. Otilia Ramos Perez
Urión 30
Col. Atlatilco
77520 CANCUN, Q. ROO
MEXICO
Check the Foreign checkbox and enter the address as follows:
IOLTA: Select if this is to be an interest on lawyer’s trust account ledger (IOLTA).
Payee Information
Payee: Who the funds are being transferred to.
Disburse as: Select the transaction type to use as the default transaction type when disbursing transferred funds.
Address: Enter the property address for the closing. The default for this field is the property address entered on
the Property screen in ProForm.
City/State/Zip: Enter the property address for the closing. The default for this field is the property address entered
on the Property Address, Legal Description screen in ProForm.
Foreign address (text box): Enter the foreign address. For example, if the address is:
Sra. Otilia Ramos Perez
Urión 30
p23
Col. Atlatilco
77520 CANCUN, Q. ROO
MEXICO
Check the Foreign checkbox and enter the address as follows:
Bank name: Enter the name of the bank.
Account number: Enter the account number.
Routing number: Enter the routing number.
Special instructions: Enter any specific instructions. These instructions print on the transaction form.
Further credit: Enter further credit information.
Adding a Deposit to an Existing Group
1. In ProTrust, click on the New Group Deposit icon and select Group Deposits Search from the drop-down.
2. Select a trust account code.
3. Enter as much pertinent data as possible to locate the desired deposit and click the Search button.
4. Double-click on the desired group deposit from the search results grid.
5. The deposit screen opens.
6. From the list of available receipts, highlight the deposit to add (select multiple deposits with the mouse by
holding down the Ctrl key) and select the add button.
Note: If all deposits are added, the dialog closes automatically after printing, print previewing, or saving.
Changing a Pending Transaction Type
1. Select a pending transaction.
2. Click Actions, then Change Pending Transaction Type.
3. Select the type of transaction from the Change to list. (For example, change a transaction from a check to a
miscellaneous debit.)
4. Click OK. You cannot change the transaction type for a transaction once it has been posted.
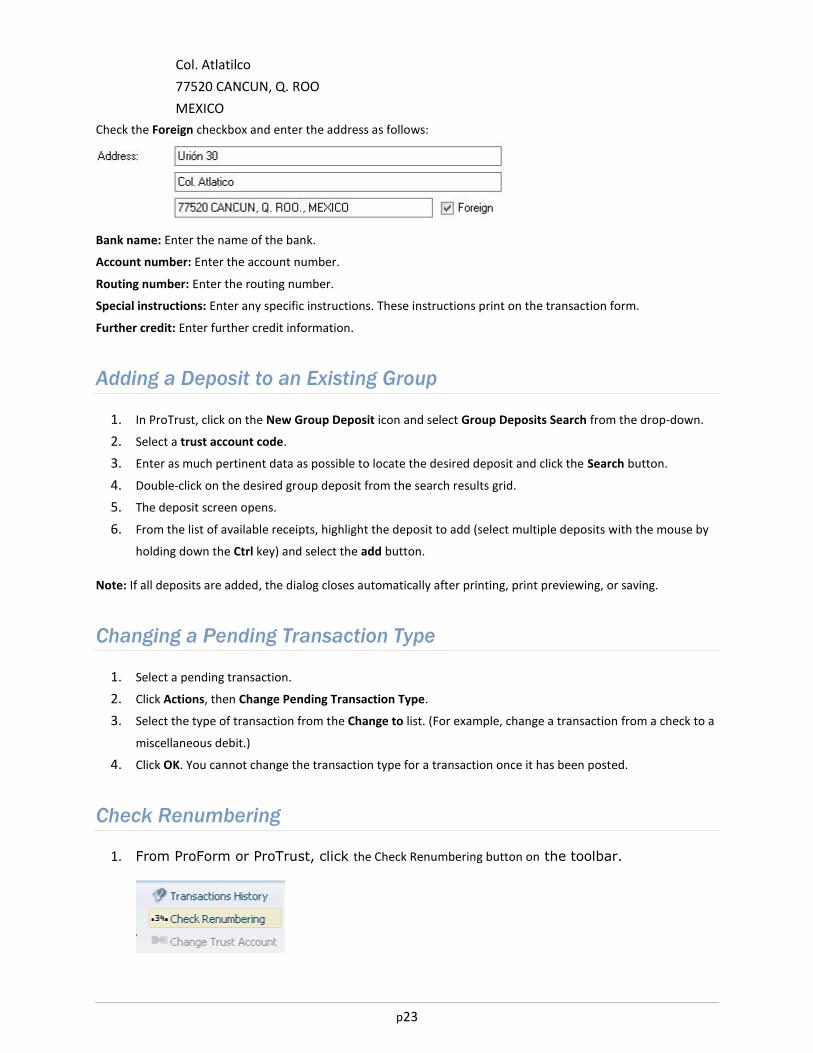
Check Renumbering
1. From ProForm or ProTrust, click the Check Renumbering button on the toolbar.

p24
2. Enter the range of current check numbers to change in the Current Check # Range fields. Numbers must
be consecutive. No fields may be blank.
3. Click OK.
Note: The Check Numbering Range dialog can be accessed from the Transfer Ledger or Disbursement Registers in
ProForm.
Clearing a Deposit
1. Double-click the deposit to clear.
2. Enter the cleared date into the Cleared field.
3. Select OK.
To quickly move to other transactions, users may utilized the up and down arrows on their keyboard.
Note: Ledger information is not editable when ProTrust is in Search Mode.
Clearing a Check
1. Double-click the check on the ProTrust ledger screen.
2. Enter a cleared date.
3. Click OK.
Creating a New Ledger
To create a new ledger from ProTrust:
1. Click File, then Add New Ledger or click the Add New Ledger (plus sign) button.
2. A new ledger tab opens. Enter the required information.
Creating a Combined Check
If a large number of checks are written to a particular party each month from a number of different ProTrust
ledgers, users can save time by combining the amounts together and issuing just one check.

p25
For example, ten checks are written to an overnight shipping company (AirEx) from separate ledgers of one trust
account. To simplify the procedure, create a vendor ledger (instead of a client ledger) with the AirEx in the Firm
File ID: field. Each month, transfer funds from the separate ledgers to the one combined ledger, and then print the
combined check from it.
Enter the transactions to be sent to the combined ledger as funds transfers with Transferred out (-)
transfer types.
Enter fund transfers in the vendor ledger with Transferred In (+) transfer types to account for every
Transferred Out (-) transaction.
Enter and print one pending check in the vendor ledger for the total amount of the check to the vendor.
Deleting a Ledger
1. In ProTrust perform a Ledger Search to pull up the available ledgers.
2. Select the ledger to delete, right click and select Delete.
3. The deletion confirmation message will appear.
4. Click Yes to delete the ledger or No to cancel the action.
Deleting a Check
1. In the appropriate ledger in ProTrust, select the check from the Disbursements section of the
Receipts/Disbursements grid.
2. Right click on the check and select Delete or use the button above the grid
3. The Delete Transaction dialog appears:
4. Click Yes to delete the transaction or No to cancel the action.
5. If Yes is selected, the Adjustment Reason dialog appears:
6. Enter the Reason for the adjustment(s) and click OK.
Note: The adjustment reason is a required field.

p26
Funds Transfer
Transfer funds from one ledger to another using a funds transfer transaction. For example, transferring funds from
a closing ledger to a fee ledger using a funds transfer transaction.
To transfer funds from a closing ledger to a fee ledger or other ledger:
1. Click Add. The Add Transaction dialog appears.
2. Select Ledger Transfer (-).
3. Click OK.
4. Enter the amount, the party to apply the amount to, and the payee name.
5. Enter the ledger you want to transfer the amount to in the Transferred To field. For example, if you are
transferring an appraisal fee from a closing ledger to the Appraiser fee ledger, and the fee ledger was
named appraiser, enter appraiser in the Transferred To field.
6. Click OK.
Note: With ProForm Secure Receipting and Disbursing, users can transfer a fee directly to a Fee Ledger or other
ledger in ProTrust by posting a funds transfer in the Disbursements Register in ProForm. Enter the ledger to
transfer the amount to in the Transferred To field when posting the funds transfer.
Disbursing Transferred Funds
This option is only available on Fee, Transfer and Revenue ledgers. It allows a user to transfer multiple transactions
at once to the target ledger when funds are pending transfer from one account to another.
To disburse a transferred fund:
1. From the Transactions grid menu bar, click Actions and select Disburse Transferred Funds.
2. The Disburse transferred funds dialog opens
3. Select the transactions to include in the transfer from the grid and select from the following Disburse As
possibilities:
p27
Outgoing Wire
Miscellaneous Debit
Check
4. Click Next to continue.
5. The Edit disbursement screen appears allowing the user to confirm/edit the transaction information. Click
Next to continue.
6. If Outgoing Wire was selected, the Edit bank details dialog appears allowing the user to enter/edit any
bank information for the outgoing wire. Click Next to continue.
7. The Finish dialog appears signaling that the operation has completed successfully. Click Finish to close out
of the dialog.
Once disbursed, the transferred funds show under the Disbursements section on the ledger and will not be
available for selection.
Group Deposits
The Group Deposits allows you to “group number” deposits to make one large deposit at the bank to cover all of
the small deposits in each ledger. Users can also print a deposit slip for any deposit number.
Trust Account: Select a trust account code.
Deposit Date: The current business date appears here by default. This date will be assigned to all transactions that
are included in the Group Deposit. The date appears in the Trans. Date column of the Transaction window.
Deposit Number: Enter a number for the Group Deposit. Up to 12 characters are accepted in this field. After
entering a deposit number, select the transactions to include in the Group Deposit and click Assign Deposit
Number.
Total amount: The amount of the deposit.
Receipts: The total number of available receipts that can be added to this deposit.
Reload Receipts: Click to refresh the available receipts window. If the receipts in the selected receipts pane have
not yet been sent to a deposit slip, clicking on the Reload Receipt button will move all receipts back to the
Available Receipts pane, losing any changes made.
Deposit Slip: Click to create the deposit slip for the receipts entered in the Selected Receipts pane.
Available Receipts: Click to search for available receipts under the trust account code and date specified - the
search field can be used to filter the results by typing in a keyword to use for the search.
Available Receipts and Deposit Details
In Transit: Check this option when a deposit has been sent to the bank. Once this has been checked, no further
changes may be made for that deposit. Note: If the Group Deposits "In Transit" preference in SPAdmin is not
checked, then this option is not visible.
Order number: Number of the order.
Payor name: To or from whom the funds are being transferred.
Trans. date: Enter the date the transaction is to take place. The date defaults to today's date.

p28
Ref. number: The reference number can be created from SPAdmin in the Reference Number Manager. If a
numbering scheme is set up, then this box automatically fills in with a number; if not, the box is enabled, and users
can manually enter a reference number.
Amount: The amount of the deposit.
Selected Receipts and Deposit Details
Order number: Number of the order with which the deposit is affiliated.
Payor name: To or from whom the funds are being transferred.
Trans. date: Enter the date the transaction is to take place. The date defaults to today's date.
Ref. number: The reference number can be created from SPAdmin in the Reference Number Manager. If the
numbering scheme is set up, this box automatically fills in with a number; if not, the box is enabled, and users can
manually enter a reference number.
Status: This column indicates if the receipt is pending or has been posted to a deposit slip.
Amount: The amount of the deposit.
Miscellaneous
1. Click Add Transaction or choose Ledger/Transaction/Add New Transaction.
2. Double-click Miscellaneous Credit. A new Miscellaneous dialog appears.
3. Enter the information to complete the deposit (see field descriptions below) and click OK to add it.
Reference Number: The reference number appears automatically if auto-numbering is turned on for
Miscellaneous transactions.
Transaction Date: The Transaction Date defaults to the current system date.
Medium: Click the arrow and select the medium.
Amount: Enter the amount. You do not need to enter a dollar sign.
Payee Name: Enter the payee name.
Memo: Use this scrollable field for any additional notes about the transaction.
Edit: Double-click a transaction on the ProTrust ledger screen to edit it.
Printing a Deposit Slip
1. In ProTrust, click the New Group Deposit action icon and select Group Deposits Search from the drop-down
menu.
2. Enter a trust account code and any other pertinent data to assist in locating the desired group deposit.
3. Click the Search button.
4. Double-click the desired Group Deposit from the search results grid.
5. The Group Deposit dialog appears.
6. Click Deposit Slip.
7. Enter any desired report comments and click OK to continue.

p29
Note: When printing a deposit slip, any changes made will automatically be saved. After adding or removing all
deposits and printing, the dialog will save and close automatically.
Printing a Ledger
1. Click on the Reports action icon in ProTrust
2. Selecting the Single Ledger Balance Report from the General sub-folder of either the By Trust Accounting
Date with Adjustments folder or the By Transactions Date folder.
3. Double-click the report name to bring up the Prompts dialog. (Note: Ledger id is required.)
4. Enter the pertinent information and click Ok to bring up the print preview pane.
5. From the print preview window, click Print to print the report.
Printing a Transaction Form
In the Transactions grid, highlight the desired transaction.
Right-click and select Print Transaction Form from the ledger Print menu:
The print Transaction Form option is also available from the Reports menu on the ledger and register:
Removing a Deposit from an Existing Group
1. In ProTrust, click on the New Group Deposit icon and select Group Deposits Search from the drop-down.
2. Select a trust account code.
3. Enter as much pertinent data as possible to locate the desired deposit and click the Search button.
4. Double-click on the desired group deposit from the search results grid.
5. The deposit screen opens.
6. From the list of selected receipts, highlight the deposit to remove (select multiple deposits with the mouse
by holding down the Ctrl key) and select the Remove button.

p30
Saving a Ledger
At any time, the users may click the Save icon in the Quick Access Toolbar or type Ctrl+S to save changes.
When closing the Ledger tab, the user is prompted to save their changes. Clicking Yes saves the ledger and all
existing changes.
Searching for a Transaction
1. Click the Ledger Search action item button in the Ledgers toolbar in ProTrust.
2. Enter search criteria into the Transaction Search Criteria fields. Use as many or as few of the fields as
desired. Certain wildcards may be used, although they are not required.
3. Click Search.
4. Matching results appear in the Search Results grid at the bottom of the screen.
5. Double-click on the desired transaction to access the corresponding ledger.
Transactions History
The Transactions History report contains a record of every posted transaction for the current ledger or ProForm
data file. To access the Transactions History, select Transaction History from the Reports menu on the
Transactions Grid.

p31
All adjustments are included in the Transactions History dialog. Adjustments will have an ADJ suffix added to their
Reference number in the Reference Number column to distinguish them from the original transactions.
Voiding a Check
1. Double-click the check on the ProTrust ledger screen.
2. Select Void from the Status field drop down.
3. The Enter voided date dialog appears. The current date appears by default.
4. Enter the voided date (if any) or leave the default and click OK.
5. Click OK to save the void or Cancel to cancel the action.
6. Enter the Adjustment Reason. Note: The Adjustment Reason is a required field.
7. Click OK.
Deleting RFD Ledgers
RFD Criteria
A ledger can be deleted using the Delete RFD Ledgers function only if it satisfies four RFD criteria:
1. The ledger balance must equal zero.
2. All transaction in the ledger must be cleared.
3. All other ledgers at the other end of funds transfers must also meet all RFD criteria.
4. If the ledger contains deposits that are part of a group deposit, all other ledgers with deposits in the same
group must also meet all RFD criteria.
Deleting RFD Ledgers
Note: Before deleting RFD ledgers, as with any database maintenance, have a current backup of the ProTrust
database before proceeding.

p32
1. Click the Ledger Search action icon in the ProTrust ribbon.
2. Right-click on the ledger to delete and select Delete from the menu.
3. If the ledger does not meet the RFD criteria, the user will receive an error message stating the deletion has
failed and listing the reasons for failure:
4. If the RFD criteria has been met, the user will receive a confirmation message:
5. Click Yes to confirm the deletion, No to cancel the action.
Reconciliation
Reconciliation is a procedure used to resolve discrepancies between ProTrust account balances and bank account
statements. It is recommended to reconcile all trust accounts monthly. If an account is out of balance, it will be
more difficult to isolate problem transactions the further back in time users must go to find them.
The Reconciliation Tab enables the start of a new reconciliation, continuation of an existing reconciliation,
cancellation of changes since the last save or marking a reconciliation complete.
The reconciliation criteria filters transactions loaded into the Clearing grid. Criteria includes transaction types
(checks, deposits, wires, etc.), reference numbers, transaction dates, amounts, cleared dates, payee/payor
information and ledger IDs. The results of the specified criteria display in the next panel, which contains the
transactions to be cleared.
Trust account: Displays the trust account associated with the current reconciliation.
Beginning balance: Displays the beginning balance of the reconciliation upon which to base the clearing process.
Cleared balance: Displays the total monetary amount of the transactions marked as cleared.
Reconciliation ending date: Displays the end date for the reconciliation statement.
Cleared receipts: Displays the total number of cleared receipts.
Statement ending balance: Displays the end balance as entered by the user when opening the reconciliation.

p33
Complete reconciliation: Selecting this option updates the reconciled as-of date to the reconciliation ending date.
Cleared disbursements: Displays the total number of cleared disbursements.
Difference: Displays the monetary difference between the total cleared amounts and the recorded statement
ending balance.
Search by the range of
Check/Ref. numbers: To search by check or reference number, enter a range of numbers in the From and Through
fields.
Transaction dates: To search by date, enter a range of dates in the From and Through fields.
Amounts: To search by amounts, enter a range in transaction amounts in the From and Through fields.
Include
Transactions after <system date>: Select this option to include transactions dated after the current system date.
Outstanding items only: Select this options to view only the outstanding items.
Transaction type: The view can be filtered by specific transaction types - pick from the following drop-down
choices (the default is All):
All
Check
Group Deposit
Incoming Wire
Interest Credit
Miscellaneous Credit
Miscellaneous Debit
Outgoing Wire
Receipt
Clear: Click this button to remove the data from all of the filter fields.
Search: Click to begin the search function based on the criteria selected in the filter fields. The search button will
need to be clicked after any edits to the filter fields to update the search results.
Clearing Grid
The Clearing grid enables further filtering with the filter-row at the top of the grid. Multiple rows can be selected at
the same time. Use the space bar to toggle a transaction between cleared and uncleared. Double-clicking an item
launches the transaction dialog for that item. Edit the transaction from the dialog and sort by columns by clicking
the header for that column. Filtering only applies to data that has already been loaded into the grid.
Toolbar
Clear button: Press to set the cleared date on any or all transactions highlighted.
Unclear button: Press to undo the currently selected transaction's cleared date.

p34
Alternate cleared date button: Press to type in a different date than the default reconciling end date
to be used when clearing transactions in the clearing grid.
Cancel changes: Press to cancel any changes made in the clearing grid since the last save.
Columns
Transaction: Select or enter a transaction type (for example, check, group deposit, incoming wire).
Ref. Number: Enter or select a reference number.
Trans Date: Enter a transaction date.
Amount: Enter and amount.
Cleared Date: Select the date the transaction cleared.
Payee/Payor: Enter or select a payee or payor.
Ledger ID: Enter or select a ledger ID.
Follow these steps to reconcile accounts:
Printing a Missing Checks Report
Printing a Transferred Funds Report
Entering Miscellaneous Transactions
Clearing Transactions
Printing Statement Proofing Register
Comparing Proofing Register with Bank Statement
Printing Multiple Ledger Balances Report (Balances Only)
Printing a Receipts and Disbursements Report (Outstanding)
Printing a Receipts and Disbursements Report (All)
The Reconciliation Summary contains a summary of various reconciliation amounts.
Printing a Missing Checks Report
Print this report before clearing transactions. Ledgers with missing checks must be corrected before proceeding
with reconciliation. If a range of check numbers is missing (ex. 101-110), it could be an indication that a closing file
has not been exported.
1. Select Reports/By Trust Accounting date with adjustments/General and select the Missing Checks Report.
Or, select Reports/By Transaction Date/General and select the Missing Checks Report.
2. Enter the code for the trust account you are reconciling in the Trust Account field (required field).
3. In the Beginning Check Number field, enter the check number after missing checks are to be found (For
instance, if the first check used was 101, enter 100).
4. In the Report Comments field, enter information that to appear at the top of the report.
5. Click Ok.
6. The Print dialog appears. Click Ok.

p35
For individual check numbers that appear in the report, verify the status of these checks and make the appropriate
corrections to them in their ledgers. Print another Missing Checks report after correcting errors and continue to
edit check transactions until no checks are identified as missing.
Printing a Disbursed Transferred Funds Report
Print this report before clearing transactions. The balance on the report should be zero.
1. Select Reports/By Trust Accounting Date with Adjustments/General/Disbursed Transferred Fund Report
or select Reports/By Transaction Date with adjustments/General/Disbursed Transferred Funds Report.
Select the Disbursed Transferred Funds Report.
2. Enter the Ledger ID transferred from.
3. Enter the Ledger ID transferred to.
4. Select the Ledger Type. Choose from Fee, Transfer, or Fee and Transfer. This is a required field.
5. Enter the Payee.
6. Select the Trust Accounting Date for transfer from and transfer to. Keep in mind that it will auto fill the first
of the month and the current date.
7. Select Group By. Choose from Disbursement Ledger ID, Disbursement Payee or Disbursement
Transaction Type. This is a required field.
8. Select Sort By. Choose from Reference/Check Number or Trust Date.
9. Enter any report comments to appear at the beginning of the report.
10. Click Ok.
The balance on the report should be zero. If the Total transferred funds: amount on the report is less than or
greater than zero (0.00), determine which transferred fund transactions are missing a corresponding entry. Make
the corrections necessary before proceeding with the reconciliation.
Entering Miscellaneous Transactions
1. Click Search.
2. Enter the Ledger ID for the firm ledger.
3. Click Search to open the ledger. Highlight the ledger and select Open.
4. Click Add Transaction. The Add Transaction Type dialog appears.
5. Click Miscellaneous Credit (or Debit)
6. Click OK. The Miscellaneous Credit dialog appears.
7. Enter the Reference number (if applicable).
8. Enter the transaction amount in the Amount field.
9. Enter the bank statement date (or bank cleared date) in the Date field.
10. Enter information into the Medium (ex: Bank Stmt or Bank Error) and Memo fields if desired. The Memo
field can be used for a brief description of the charge.
11. Enter the payee name or transaction description in the Payee Name field.
12. Click Ok.

p36
13. Repeat steps 4-11 for each miscellaneous transaction appearing on the bank statement (bank corrections,
service charges, interest, and fees).
Clearing a Transaction
1. Open the appropriate reconciliation by either clicking the New Reconciliation action icon or searching for an
existing reconciliation using the Reconciliation Search icon.
2. Highlight the desired transaction in the Transactions grid.
3. Right-click and select Clear from the menu.
4. The cleared date will be assigned to the selected transaction.
NOTES:
Assign an alternate cleared date to any cleared transaction by selecting it and clicking Alt Cleared Date.
To unclear a transaction, select it and click Unclear.
Printing a Statement Proofing Register
To print a statement proofing register:
1. Select Reports/By Trust Accounting Date with Adjustments (By Transaction Date with Adjustments)/3-
Way Reconciliation or Reconciliation/Statement Proofing Register. The Statement Proofing Register dialog
appears.
2. Enter the code for the trust account being reconciled in the Trust Account field.
3. In the Statement Date/Cleared date from option, enter the date of the bank statement in the Statement
Date field.
4. In the Format option, select from Brief, Detailed or Summary Page Only.
5. In the Sort option, select Amount, Cleared Date, Reference Number, or Transaction Date.
6. Enter any report comments to appear at the top of the report.
7. Click Ok.
The Statement Proofing Register is made up of three major sections:
Receipts
Disbursements
Proofing Balance Sheet
The Proofing Balance Sheet section reports the amounts of the statement beginning balance, computer account
balance, outstanding deposits, outstanding checks, and statement ending balance.

p37
Comparing a Proofing Register with a Bank Statement
1. Compare the Receipts and Disbursements totals on the Proofing Register to your bank statement. If the
totals on the Statement Proofing Register do not equal those on your bank statement, you must make
corrections before proceeding.
2. Use the Search feature to recall ledgers that need adjustment.
3. After making corrections, reprint the Statement Proofing Register and compare totals again. The beginning
and ending balances on the Proofing Register and bank statement should match before continuing.
4. The Statement Proofing Register is divided into three sections:
Receipts
Disbursements
Proofing Balance Sheet
Printing a Multiple Ledger Balances Report (Balances Only)
1. Select Reports/By Trust Accounting Date with Adjustments (or By Transaction Date with
Adjustments)/General or Reconciliation/Multiple Ledger Balances Report (Balances Only). The Multiple
Ledger Balances Report dialog appears.
2. Enter the code for the trust account to be reconciled in the Trust Account field (required).
3. Enter the date of your bank statement for Balances as of (required).
4. Un-check to Include approval signature lines.
5. Un-check to Include ledgers with zero balances.
6. Add Report Comments to appear at the top of the report.
7. Click Ok. The Balance should match the computer account balance on the Proofing Balance Sheet.
The Multiple Ledger Balances Report (Balances Only) provides a listing of all ledgers in which there is a balance
(positive or negative). The total on this report represents the checkbook balance. The total should always match
the Computer Account Balance amount in the Statement Proofing Register.
Hint: If there is a discrepancy between the Computer Account Balance and the total reported on the Multiple
Ledger Balances Report (Balances Only), check the Total transferred funds: amount on the Transferred Funds
Report. It may not be equal to zero.
Printing a Receipts and Disbursements Report (Outstanding)
1. Select Reports/By Trust Accounting Date with Adjustments (or By Transaction Date with
Adjustments)/General, 3-Way Reconciliation or Reconciliation/Receipts & Disbursements Report. Select
the Receipts & Disbursements Report.
2. Enter the code for the trust account you are reconciling in the Trust Account field (required).
3. Select the medium.
4. Select the Transaction type(s).
5. Type the date of your bank statement in the Outstanding as of field (required).
6. Select the format option by choosing either Brief, Detailed, or Totals Only (No sort) (required).

p38
7. Select Print Payee/Payor names, if desired (detailed format only).
8. Enter the Report Comments that you would like to appear at the top of the report.
9. Click Ok. The Receipts total should match the outstanding deposits and the Disbursements total should
match the outstanding receipts found on the Proofing Balance Sheet.
Printing a Receipts and Disbursements Report (All)
1. Select Reports/By Trust Accounting Date with Adjustments (or By Transaction Date with
Adjustments)/General/Receipts & Disbursements Report. Select the Receipts & Disbursements Report.
2. Enter the code for the trust account you are reconciling in the Trust Account field (required).
3. Select the medium.
4. Select the Transaction type(s).
5. Enter the Trust accounting date from and through.
6. Type the date of your previous month's bank statement in the Cleared Date Through field.
7. Select the format option by choosing either Brief, Detailed, or Totals Only (No Sort) (required).
8. Select the Sort by either Reference/Check Number or Transaction Date.
9. Enter the Report Comments to appear at the top of the report.
10. Click Ok.
ProClear
With ProClear, users can import bank data files containing cleared transactions and reconcile them. ProClear
provides comprehensive feedback, identifying duplicate transactions and other errors on screen and in a report
that users can print and use to manually clear any problematic transactions.
ProClear Definition File (XML): The ProClear definition file (XML) created by SoftPro contains information that is
particular to your bank and firm. It is named with the extension .XML and is included with ProClear.
Bank Data File Containing Transactions: The bank data file containing transactions is the file that you receive from
your bank containing the cleared transactions that ProClear uses to reconcile your ProTrust database. This file can
be in one of several formats including .txt, .csv, .bai or a fixed format file. It can be copied to the directory of your
choice before using ProClear.
ProClear Settings and Results
Settings
Bank file format: Select the file format (I.e. .txt or .csv).
Trust account: Associates the trust account code with the bank account.
Bank file: Enter the bank file or click Browse to find the file.
Cleared date option: Select the type of date to use to clear transactions:
User specific: Allows users to input a date of their choice.
Bank file cleared date: Uses the date in the bank file as the cleared date.

p39
Results
All transactions: Select to view all transactions processed from the bank file.
Errors & warnings: Select to view any errors processed from the bank file.
Cleared transactions: Select to view only cleared transactions processed from the bank file.
Status: Three icons display the transaction status:
- Cleared
- Errors
- Warnings
Type: The transaction type (I.e. deposit, check, etc.)
Amount: Amount of transaction.
Cleared Date: Date transaction was cleared.
Description: Details of the transaction such as the name of the person on a check.
Account number: The associated account number. This column will not display if only one account exists.
Using ProClear
To import bank files and clear transactions:
1. Select the ProTrust tab, then ProClear. The ProClear screen appears.
2. Select a bank file format from the Bank file format drop-down list.
3. Enter a Trust account if applicable.
4. Enter or browse for the path for the bank file (this is the file downloaded from the bank).
5. Select a Cleared date option, either using a user-specified date or the date from the bank file.
6. Click Run. ProClear reads the bank data file containing the transactions then attempts to find a matching
transaction in the ProTrust database. The following message is a confirmation to continue with the process:

p40
7. Click Yes to continue, No to cancel.
8. Once the transactions have been found, the following message is a reminder complete the reconciliation
process:
9. The results appear below in the Results area. Result sort options are:
All transactions
Errors
Cleared transactions
A transaction may not be cleared for a number of reasons. One case in particular occurs when multiple
transactions are found by ProClear in the ProTrust database for the same amount. For example, "Unable to clear,
multiple matches found". ProClear is unable to determine which of these deposits should be cleared in this case,
therefore it is up to the user to clear these transactions manually.
Group Deposits
The Group Deposits allows you to “group number” deposits to make one large deposit at the bank to cover all of
the small deposits in each ledger. Users can also print a deposit slip for any deposit number.
Trust Account: Select a trust account code.
Deposit Date: The current business date appears here by default. This date will be assigned to all transactions that
are included in the Group Deposit. The date appears in the Trans. Date column of the Transaction window.
Deposit Number: Enter a number for the Group Deposit. Up to 12 characters are accepted in this field. After
entering a deposit number, select the transactions to include in the Group Deposit and click Assign Deposit
Number.
Total amount: The amount of the deposit.
Receipts: The total number of available receipts that can be added to this deposit.
Reload Receipts: Click to refresh the available receipts window. If the receipts in the selected receipts pane have
not yet been sent to a deposit slip, clicking on the Reload Receipt button will move all receipts back to the
Available Receipts pane, losing any changes made.
Deposit Slip: Click to create the deposit slip for the receipts entered in the Selected Receipts pane.
Available Receipts: Click to search for available receipts under the trust account code and date specified - the
search field can be used to filter the results by typing in a keyword to use for the search.
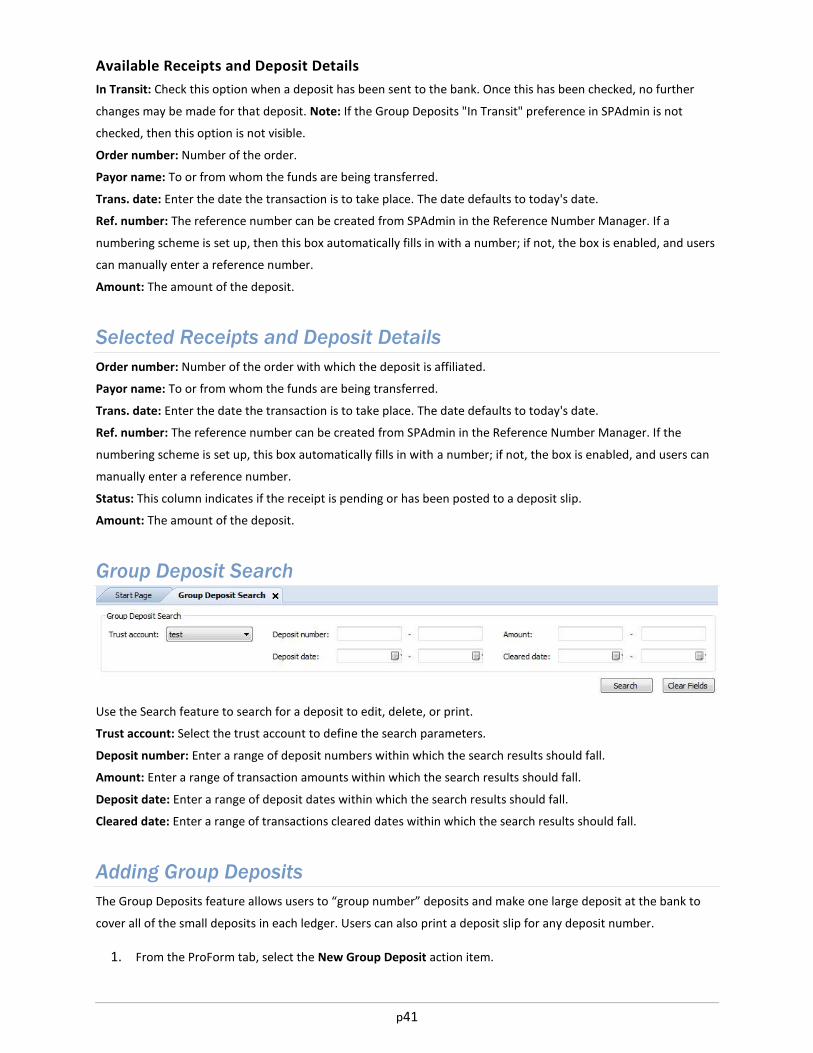
p41
Available Receipts and Deposit Details
In Transit: Check this option when a deposit has been sent to the bank. Once this has been checked, no further
changes may be made for that deposit. Note: If the Group Deposits "In Transit" preference in SPAdmin is not
checked, then this option is not visible.
Order number: Number of the order.
Payor name: To or from whom the funds are being transferred.
Trans. date: Enter the date the transaction is to take place. The date defaults to today's date.
Ref. number: The reference number can be created from SPAdmin in the Reference Number Manager. If a
numbering scheme is set up, then this box automatically fills in with a number; if not, the box is enabled, and users
can manually enter a reference number.
Amount: The amount of the deposit.
Selected Receipts and Deposit Details
Order number: Number of the order with which the deposit is affiliated.
Payor name: To or from whom the funds are being transferred.
Trans. date: Enter the date the transaction is to take place. The date defaults to today's date.
Ref. number: The reference number can be created from SPAdmin in the Reference Number Manager. If the
numbering scheme is set up, this box automatically fills in with a number; if not, the box is enabled, and users can
manually enter a reference number.
Status: This column indicates if the receipt is pending or has been posted to a deposit slip.
Amount: The amount of the deposit.
Group Deposit Search
Use the Search feature to search for a deposit to edit, delete, or print.
Trust account: Select the trust account to define the search parameters.
Deposit number: Enter a range of deposit numbers within which the search results should fall.
Amount: Enter a range of transaction amounts within which the search results should fall.
Deposit date: Enter a range of deposit dates within which the search results should fall.
Cleared date: Enter a range of transactions cleared dates within which the search results should fall.
Adding Group Deposits
The Group Deposits feature allows users to “group number” deposits and make one large deposit at the bank to
cover all of the small deposits in each ledger. Users can also print a deposit slip for any deposit number.
1. From the ProForm tab, select the New Group Deposit action item.

p42
2. Select a trust account.
3. Select a deposit date.
4. Enter the deposit number. This field will accept up to 12 characters. If reference numbering is being used
for group deposits, this field will be unavailable.
5. The deposit displays on the left hand side of the screen with 0.00 for the deposit. From the available
receipts, highlight the transaction to add to the group deposit. (Select multiple transactions with the mouse
by holding down the Ctrl key). Once selected, add it to the deposit.
6. Click Deposit Slip to post the transactions and produce the slip.
Adding to Existing Group Deposits
1. Select Group Deposits Search from the New Group Deposit action icon. The search page allows users to
search based on trust account, deposit number, amount, deposit date and cleared dates.
2. Enter the appropriate data and double-click on the desired group deposit from the search results grid.
3. Select from the Posted since drop-down.
4. The highlighted existing group deposit now appears as its own screen tab.
5. From the listing of available receipts, highlight the deposit to add (select multiple deposits with the mouse
by holding down the Ctrl key) and press Add.
6. Click the Deposit Slip button to regenerate the slip with the additional amount added.
Note: If all deposits are added, the dialog closes automatically after printing, print previewing, or saving.
Edit Existing Group Deposits
1. Select Group Deposits Search from the New Group Deposit action icon. The search page allows users to
search based on trust account, deposit number, amount, deposit date and cleared dates.
2. Enter the appropriate data and double-click on the desired group deposit from the search results grid.
3. Select from the Posted since drop-down.
4. The highlighted existing group deposit now appears as its own screen tab, ready for editing.
Group Deposit Details
Viewing Deposit Information
1. Select Group Deposits Search from the New Group Deposit action icon. The search page allows users to
search based on trust account, deposit number, amount, deposit date and cleared dates.
2. Enter the appropriate data and double-click on the desired group deposit from the search results grid to
bring up the deposit detail screen.

p43
IBA Interest
The IBA Interest screen in ProTrust provides a quick way to enter interest for accounts, eliminating the need to
search for and open each order or ledger separately to post interest. After entering search criteria, click Search to
perform a search or click Clear Fields to clear data from fields.
Criteria
Trust account: Select a trust account.
Interest last posted prior to: Select a date to find only accounts that haven’t already had interest posted for a
given month.
Bank name: Enter the name of the bank.
Profile: Select a profile.
Results Grid
Results display in the results grid, with one row for each matching IBA. The non-editable columns (Bank name,
trust account, order number, account holder name, interest last posted date, and account number) are
unavailable. The Amount column is editable. Users can sort by any column heading, with the default sort by bank
name then account number.
Memo: This field defaults to “Interest” and enables users to specify a customized memo to apply to all the
transactions, for example “November interest”.
Click Post Interest to cycle through each of the rows with amounts entered and post an interest credit transaction
to the appropriate ledger.
Import IBA Interest
The Import IBA Interest screen allows users to import IBA interest from Excel spreadsheets provided by financial
institutions. Note: An IBA interest import can only be run one time per bank file.
Settings
Bank file format: The only option at this time is Default which accepts comma delimited values (.csv). Files
imported using this setting must contain the following columns:
Order Number
Account Number
Account Holder
Beginning Balance
Interest
Ending Balance
Values in Ending Balance are required if a file does not contain values in the Beginning Balance column. Note: The
first row of an import file is considered a column header and is not included during file processing.
Bank file: Displays the .csv file path and name. Press Browse to search for the file you want to import
Go: Press Go to import the file selected in the Bank file field

p44
Results
All results: Select this filter option to display both rows that did and did not post interest amounts to the IBA.
Errors: Select this filter option to display only the rows that could not post interest.
Posted transactions: Select this filter option to display only the rows that were able to post the interest amount to
the IBA.
: Indicates that the displayed rows posted interest to the IBA.
: Indicates the row did not post interest to the IBA.
Line: Indicates in which row the bank file was processed.
Order Number: Displays the order number in the bank file.
Account Number: Displays the account number in the bank file.
Account Holder: Displays the account holder name in the bank file.
Interest: Displays the interest in the bank file.
Beginning Balance: If included in the bank file, displays that bank file data and the ending balance column displays
the total of the bank file's beginning balance plus the interest amount.
End Balance: If the bank file includes the ending balance, the ending balance column displays that bank file data
and the beginning balance column displays the total of the bank file's ending balance minus the interest amount
Detail: Displays a message to confirm that interest was posted successfully or to provide information about the
reason for a failure.
Reports
The IBA Interest Report has been added to display information related to the IBA Interest Import. The IBA Interest
report can be grouped by account and status. Users can display all results, errors only, or posted transactions only.
The report is located in the general folder of the ProTrust report tree and displays the following information from
the import file:
Date the file was imported
Name of the imported file
Who imported the file
IBA account number and holder
Line number
Order number
Beginning balance
Interest
Ending balance
Details on successful posts or reasons why the post failed
History
A history of imported files is maintained for 90 days for reporting purposes. When an import file is processed, any
records older than 90 days are removed from the database.

p45
About Positive Pay
Positive Pay is a SoftPro utility that creates a file containing a list of checks to be authorized for payment.
Before the file is made, users select the date range of checks to include in the file. After saving the file to the folder
or disk of choice, users send the file to the bank. The checks are then authorized for payment by the bank, thus
helping to prevent illicit check writing.
Creating a New Bank File
1. From ProTrust, select New Positive Pay.
2. The Criteria fields are enabled. If no previous Positive pay runs have occurred, the Date from and Date
through fields default to the system date. Once a Positive Pay run has occurred, the Date from defaults to
the date of the last Positive Pay run. The Date through field defaults to the system date. Only checks within

p46
the date range will appear in the transactions grid. Select the date range of checks that you want to include
in the file.
3. Select a Trust account. If there is only one trust account assigned to the profile, that account is the default.
If there are more than one available trust account in the profile, then the drop-down is enabled.
4. Select the Output format. The output format is the bank definition .xml file. If there is only one output file
assigned, that file is the default. The bank output format is used to define the .txt file that is generated in
the Positive Pay run process.
5. Select the Include previously submitted transactions checkbox to include them again in the file. Include
previously submitted transactions is enabled and unchecked by default. If unchecked, only those checks
meeting the criteria, but not included in a previous Positive Pay run, appear in the Transactions grid. If
checked, all checks that meet the criteria entered will be in the Transactions grid.
6. Click Show Transactions. Show transactions is disabled until all criteria has been entered. Once all criteria
is entered the field is enabled and the button can be selected.
7. Click Go to submit the file to the bank. After you have selected transactions for the output file and clicked
the Go button, the Results grid displays. The rows of the Results grid display what has been included in the
output file.
Recreating a Bank File
1. From ProTrust, select Positive Pay Search from the New Positive Pay action item drop-down.
2. The Previous Submissions dialog appears. Enter the List session run prior to date and click Apply.
3. Highlight the desired submission and click Recreate. The Previous Run Date window appears.
4. The date in the List sessions run prior to field defaults to the system date. You can change the date if
necessary.
5. Click Apply (only if you change the date). The top 30 runs appear in descending order.
6. Select a run. Click OK.
7. Click Go to submit the file to the bank. After selecting transactions for the output file and clicking the Go
button, the Results grid appears. The rows of the Results grid display what is included in the output file.
Check Renumbering Range
1. Select the Trust Account.
p47
2. Enter the range of current check numbers to change in the Current Check # Range fields. Numbers must
be consecutive.
3. Enter the new range of numbers in the Revised Check # Range fields. Numbers must be consecutive. No
fields may be blank.
4. Click OK.
Change Trust Account
The Change Trust Account feature in ProTrust allows users to transfer current balances from an existing Trust
Account to a new Trust Account. No new disbursements or deposits will be allowed in the existing account after
the transfer.
This feature allows:
for an automated and efficient bulk transfer of the balance of one trust account to another at the ledger
level
ledgers to contain transactions from two different trust accounts
users to see the trust account associated with each transaction after the transfer
Changing a Trust Account
The ability to use the Change Trust Account feature is permission-based. The Permissions are set in SPAdmin
under Security/Permissions/ProTrust/Change Trust Account.
Once appropriate permissions are granted, proceed as follows:
1. Add the new trust account to SPAdmin.
2. Click the Reports action icon on the ProTrust ribbon and print the Escrow Trial Balance report to get the
current balance of the trust account.
3. In ProTrust, click the Change Trust Account action icon.
4. The Change Trust Account Wizard appears with a warning stating that the entire balance of one trust
account will be moved to another and cannot be undone.
5. Click Next to continue or Cancel to exit out of the action.
6. After clicking Next, select the Current trust account from the drop-down choices and the New trust
account and click Next to proceed. Note: The drop-downs will display all active trust accounts available to
that profile.
7. A warning appears:

p48
8. Check the verification box and click Next to continue
9. Enter the Balance transfer amount and click Next.
10. If the balance entered does not match the balance of the trust account from the Trial Balance report, a
warning will appear:
11. Click Yes to continue or No to amend the balance amount to match the ledger. Note: Override Calculated
Balance permission must be granted in SpAdmin to be able to continue when the balances do not match.
12. If the balanced entered matches the balance of the trust account as listed in the Trial Balance report, a
warning message appears stating the action cannot be undone. Click the Yes, I want to continue box and
Next to proceed
13. A confirmation window that the transfer has been completed successfully appears. Click Finish to exit out
of the wizard.
Editing Transactions after Changing Trust Account
Users must have special permission to edit the old trust account's transactions after a trust account change occurs.
The Transactions after trust account change must be granted in SPAdmin to enable this permission. This
permission has Edit and Delete rights and is not granted to any user or group by default.
Edit: users granted this permission can edit any transaction as normal, except for the following excluded
actions:
change a transaction's amount
reassign transactions between ledgers

p49
repost any voided, stop pay, or deleted transactions
manually post new transactions for the old account on ledgers affected by the trust
account change.
Delete: users granted this permission can delete any transaction as normal
About Reports
The Reports menu contains all of the reports users can run with ProTrust. To run a report, click Reports from
ProForm > Orders and select the report from the menu. To run a daily or monthly report, click the Daily or
Monthly sub-menu. To run 3-way reconciliation reports, click the 3-Way Reconciliation sub-menu.
Reports Tree (collapsed view)
This is the default tree (collapsed view). Copy and customize the default tree to fit your workflow.
Reports not Shown in Tree
Some reports printed from ProTrust do not appear in the report tree. Instead, these reports are printed from
buttons on the ledger, group deposit and other screens. These reports include:
Transaction History: Printed from the ledger and register
Transaction Form: Printed from the ledger and register
Deposit Slip: Printed from the group deposit screen
Disbursement Summary: Printed from the register
Order Balance Summary: Printed from the register. Also available in ProForm ReadyDoc tree under
HUD-1 & Closing | Order Balance Sheets. There is also an Order Summary that is in the ProForm
ReadyDoc tree under the Order Tasks folder.
Checks
p50
Single Ledger Balance
The Single Ledger Balance report prints transaction detail and balances for a single, specified ledger only.
Depending on the report options selected, the report may or may not include pending and held transactions.
Receipts and Disbursements Report
Report Detail
The Receipts and Disbursements Report is a flexible tool used to view information about transactions in a trust
account. Users can select to include all receipts and disbursements, outstanding receipts and/or disbursements, or
pending receipts and/or disbursements in the report. Users can also run a report including only void checks or
miscellaneous items.
Transactions included in the report can be sorted different ways. By default, transactions are sorted by ledger Firm
File ID. Select to sort transactions within each ledger by reference/check numbers, transaction dates, or select to
print totals only with no sorting. The Receipts & Disbursements Report can be printed in four formats:
outstanding, pending and held, void and stop payment or all.
The Receipts & Disbursements Report contains the following information about transactions:
Reference numbers
Transaction dates
Medium
Firm file IDs
Cleared dates (voided dates for void checks)
Amounts
Payee names
Purpose/memos
Ledger comment
Total number of receipts/disbursements
Receipts and Disbursements (Outstanding) Report
Select this to specify the type of outstanding receipts and disbursements to include in the report. Select receipts
and disbursements from a specific time period by entering an outstanding as of date. The report displays receipt
and disbursement totals, and the amount of receipts less disbursements if both were included.
The Receipts and Disbursements report is used during reconciliation to verify outstanding receipts (deposits) and
disbursements (checks) on the Proofing Balance Sheet of the Statement Proofing Register.
Receipts and Disbursements Report (Pending and Held)
The Receipts and disbursements report generates a list of receipts, disbursements or both. Select this to specify
type of Pending and Held receipts and disbursements to be included in the report. The report displays receipt and
disbursement totals, and the amount of receipts less disbursements if both were included.
p51
Receipts and Disbursements Report (Voided and Stop Payment)
The Receipts & Disbursements Report is a flexible tool used to view information about transactions in a trust
account. Users can include all void and stop payment receipts and disbursements in the report. Transactions
included in this report can be sorted different ways. By default, transactions are sorted by Reference number.
The Receipts & Disbursements Report contains the following information about transactions:
Reference numbers
Transaction dates
Medium
Firm file IDs
Cleared dates (voided dates for void checks)
Amounts
Payee names
Purpose/memos
Ledger client/matter
Ledger comment
Total number of receipts/disbursements
Multiple Ledger Balance, Balances Only
The Multiple Ledgers Balances Report (Balances Only) is similar to the Multiple Ledgers Balances Report (with
Detail) in that it allows users to print several Single Ledger Balance Reports at once. The difference is that only
summary and balance information is displayed for each ledger included.
1. Select either the General folder or the Reconciliation folder then Multiple Ledger Balance (Balances only)
report.
2. Enter the required fields: Trust account code, Balances as of and the Sort option.
3. Click Ok. The Multiple Ledger Balance report appears in the report window.
4. To print the report, click the Applications button.
5. Select Print from the Print Options menu.
Multiple Ledger Balance, with Detail
Running a Multiple Ledger Balance report with Detail is an easy way to print several Single Ledger Balance
reports at a time. The Multiple Ledger Balance detailed report exists mainly to show an accountant which ledgers
do not have a zero balance on a given date. The report prints basic information about the ledger, plus all
transactions within the date range.
Interest-Bearing Account Balances (With detail)
The Interest-Bearing Account Balances (With detail) report displays all transactions for interest-bearing accounts
within a specified date range. This report also prints the beginning and ending balances for each account as well as
basic account information.

p52
IBA Interest Import
The IBA Interest Report displays information related to the IBA Interest Import. The IBA Interest report can be
grouped by account and status. Users can display all results, errors only, or posted transactions only. The report is
located in the general folder of the ProTrust report tree and displays the following information from the import
file:
Date the file was imported
Name of the imported file
Who imported the file
IBA account number and holder
Line number
Order number
Beginning balance
Interest
Ending balance
Details on successful posts or reasons why the post failed
Escrow Trail Balance Report (with Detail)
The Escrow Trial Balance detailed reports exist mainly to show an accountant which ledgers do not have a zero
balance on a given date. They print basic information about the ledger, plus all transactions within the date range.
Monthly Savings Report
The Monthly Savings reports are a consolidated view of the individual transaction type Monthly reports. They
print all transactions within the date range for a given trust account, grouped by transaction type.
Group Deposits Report
The Group Deposit report enables users to view information about group deposits for a selected trust account and
transaction date range, grouped by deposit number.
Periodic Totals by Ledger
The Periodic Totals by Ledger Report lists any ledger that has a transaction during the dates specified on the
criteria dialog. If the report is run from 1/1/09 to 12/31/09 for example, then this report will pull up any receipt or
any disbursement that falls between these dates. This report also prints Beginning and Ending balances.
Running Account Balance Report
The Running Account Balance report prints transaction detail and running balances by transaction date for a
specified trust account. The report also shows the balance of a trust account on any day during a selected date
range.

p53
Running Ledger Balance Report
The Running Ledger Balance report prints transaction detail and running balances by transaction date during a
selected date range for a single, specified ledger only.
Anticipated Incoming Wires
The Anticipated Incoming Wire report shows all receipts not yet received that were identified in the receipts
register in ProForm as an anticipated wire.
ProClear Results
The ProClear Results report displays details for cleared transactions and any exceptions encountered during the
transaction clearing process.
Reminders Report
A Reminders report provides users with a calendar of ledgers that require action on or before a given date (the
reminder date). When adding or editing a ledger, users have the opportunity to enter a comment in the Comment
field describing a particular action that needs to be taken, or explaining the funds held in escrow.
A date can also be entered into the Reminder Date field of a ledger to use with the comment. All ledgers with a
Reminder Date on or before the date entered in the Reminders Report dialog are included in the report.
Overdraft Report
The Overdraft report includes any ledgers that have a negative balance as of the report date and includes basic
information about the ledger as well as the last activity date, balance, and number of days the ledger has had a
negative balance.
Dormant Activity Report
The Dormant Activity report tracks when a ledger has been inactive or dormant for six consecutive months and
then has a transaction added or edited after the ledger is in a dormant state (or the time frame entered when the
trust account code was established). The Daily Dormant report is a management report that includes transactions
on dormant ledgers.
Disbursed Transferred Funds
The Disbursed Transferred Funds report displays a list of transfer types. This report can be run for Transfers on
Fee, Transfer or Revenue ledgers..
IOLTA Report
The Interest on Lawyer’s Trust Accounts (IOLTA) report displays information regarding the IOLTA such as ledger ID,
escrow status, buyer/borrower, last activity date, balance and RFD.
p54
Office Control Summary Report
The Office Control Summary report summarizes the overall trust account status. The daily report contains daily,
monthly and yearly totals. The monthly report contains monthly and yearly totals. Users can compare the actual
instruments issued that day (what they have in hand) along with the previous day's ending balance to the totals
contained on the current day’s report to verify that balances are accurate.
Dormant Ledgers Report
The Dormant Ledgers report details any ledgers that have not had any activity within 6 consecutive months (or the
time frame entered when the trust account code was established).
The Monthly Dormant report is a cumulative report that keeps track of all dormant ledgers.
The Daily Dormant report is a management report that includes transactions on dormant ledgers.
Daily Savings Reports
The Daily and Monthly Savings reports are a consolidated view of the individual transaction type daily and
monthly reports. The reports print all transactions within the date range for a given trust account, grouped by
transaction type and include no ledger information except for the order number.
Missing Checks Report
The Missing Checks report displays a list of missing checks in a particular trust account. All existing check numbers
are counted, and those check numbers (or range of check numbers) that are not found will be displayed. For
instance, if checks 1-10 and 15-20 are found, check numbers 11-14 will be listed as missing checks.
Book Balance Report
The Book Balance report lists ledgers containing receipts, disbursements, or voided transactions within the date
range specified in the report criteria. The Book Balance Report only includes Guaranty ledgers and is used for 3-
way reconciliations.
The Periodic Balance report lists ledgers containing receipts, disbursements, or voided transactions within the
date range specified in the report criteria. The book balance is computed by adding the beginning book balance for
the period prior to the beginning date to receipts for the current period, then subtracting disbursements for the
current period, and then adding back any voided transactions.
Escrow Account Reconciliation Summary
The Escrow Account Reconciliation Summary serves as an overall view of the month's reconciliation. It consists of
the following four sections:
Escrow Trial Balance
Book Balance: matching the Book Balance report for Guaranty ledgers
Bank Balance: matching the Statement Proofing Register
Adjusted Bank Balance: the bank balance adjusted for Non-Guaranty ledger transactions
p55
Statement Proofing Register
A statement proofing register can help users reconcile a trust account. The report is based on a cleared date
entered before printing the report. Users can print a summary page or a proofing register in either a brief or fully-
detailed format. Select either the Reconciliation folder or the 3-way Reconciliation folder, then Statement Proofing
Register report.
The Statement Proofing Register report lists all bank transactions in a specified trust account which have cleared
the bank in a given date range. The final page of the report displays summary information including the beginning
bank account balance, totals of receipts and disbursements cleared during the date range and the ending bank
account balance. Run this report to compare the data in the application to the data in the bank statement,
allowing users to verify a correctly completed reconciliation.
As this report is used as a match against the bank statement, only the current transaction detail will be displayed.
History of changes to a transaction (adjustments) are not required.
The report includes transaction detail based on the cleared date (not transaction date or trust accounting date), so
the transaction and trust accounting date reports differ only in the computer account (book) balance and
outstanding calculations on the summary page.
Bank Adjustments Report
When a company reconciles using the 3-way reconciliation method, they balance using guaranty ledgers. Guaranty
ledgers are associated with a ProForm order. The ledgers in ProTrust that are not associated with an order, are
non-guaranty ledgers such as Firm and Transfer ledgers.
When reconciling guaranty ledgers, the balance of the non-guaranty ledgers needs to be determined. The Bank
Adjustments report determines the balance of the non-guaranty ledgers.
Licensing
Upon opening and successfully logging on to SoftPro Select for the first time, the application checks for a license
key. If a key has not been entered, a prompt appears to call SoftPro to request a key. SoftPro will e-mail a license
key file with the extension .SPK. To install the license key, double-click the .SPK file from any client workstation.
A license is acquired the first time action is taken within a module (ProForm, ProTrust, SPImage, etc.). Simply
navigating to the module’s tab will not acquire a license. Likewise, opening the application will not acquire a
ProForm license – action must be taken in ProForm.
Licenses for all modules are released when SoftPro Select is closed. Module licenses are also released when all
module screens are closed and the user navigates to another module tab. For example, open SoftPro Select, view
the ProForm start page, and click the ProTrust tab - no licenses are acquired. However, open the Reconciliation
screen in ProTrust, and a ProTrust license is acquired. Leave the Reconciliation screen open and click the ProForm

p56
tab, the ProTrust license is still acquired and will not be released until the Reconciliation screen is closed. This
process takes approximately 3 minutes.
Exception: ProClear and Positive Pay are licensed separately from ProTrust.
SoftPro Sales
SoftPro's dedicated sales staff is ready to answer your questions.
Contact your account representative for information about the latest SoftPro products, the SoftPro Annual
Maintenance Service Plan, Platinum Level Support Plan, upgrade options and prices, and more. Contact the SoftPro
Solution Center with any technical questions or problems.
Contacting your SoftPro sales representative
Sales phone: 1 (800) 848-0143
Local calling area: 1 (919) 829-1122
Fax: 1-919-755-8350
Web: www.softprocorp.com
Sales e-mail: [email protected]
Sales hours: Monday to Friday from 8:30 A.M. to 5:30 P.M. EST.
Note: When sending e-mail, please include your company name, city, & state to ensure prompt handling of your
request.
SoftPro Solution Center
SoftPro's technical support staff is the best in the industry. Use the information below to contact them.
SoftPro Solution Center
phone:
1 (800) 848-0143
Local calling area: (919) 829-1122
Fax: (919) 755-8350
Web: www.softprocorp.com
mySoftPro: www.softprocorp.com/mySoftPro/mySoftProLogin.asp
(Register with mySoftPro to access the Support Knowledge Base,
Document Downloads, and more).
Solution Center hours Monday to Friday, 8:00 A.M. to 5:30 P.M. EST.
Platinum Level Support
hours
Monday to Friday, 8:00 A.M. to 10:00 P.M. EST.
Saturday, 11:00 A.M. – 2:00 P.M. EST.
Before calling technical support, please have the following information ready:
Program version number - select the File Menu button, then Select Options of SoftPro Select to find this
information.

p57
Text of any error message you have encountered.
Name and version number of your operating system.
Subscribing to SoftPro’s annual maintenance service program can extend technical support service. Subscribing to
platinum maintenance service gives you access to technical support for longer hours during the week and on
Saturday. For more information, call SoftPro Sales at 800-848-0143. You can e-mail SoftPro Sales at