provider enrollment guide-group for state of idaho mmis
TRANSCRIPT

Provider Enrollment Guide-Group
for
State of Idaho MMIS
9415 W. Golden Trout Street Date of Publication: 12/8/2017 Boise, Idaho 83704 Document Number: TR0050 [email protected] Version: 7.0 1 (866) 686-4272 1 (208) 373-1424

Idaho MMIS ProviderEnrollment Guide - Group
Last Updated: 12/8/2017 Page ii
This document and information contains proprietary information and copyrighted works of third parties. Authorization is hereby provided to you to copy documents published by DXC Technologyon the Health PAS-OnLine portal provided such copies are used for non-commercial purposes and solely for use within your organization. This authorization is specifically conditioned upon including all legends, copyright, proprietary, and other notices that appear herein on all copies you make of such documents whether they pertain to DXC Technology or another party. No license is granted herein expressly, impliedly, by estoppel or otherwise under any patent or to use any trademark of any party. No other rights under any copyrights are granted herein, except as expressly stated above. The documents herein may refer to products and/or services that are neither available nor planned for availability in your particular locality. In referring to such products and/or services, DXC Technology incurs no obligation to subsequently make them available in your locality. DOCUMENTS PUBLISHED HEREIN ARE FURNISHED TO YOU "AS IS." THERE ARE NO WARRANTIES, EXPRESS, OR IMPLIED, BY OPERATION OF LAW OR OTHERWISE. DXC TECHNOLOGY DISCLAIMS THE IMPLIED WARRANTIES OF MERCHANTABILITY, FITNESS FOR A PARTICULAR PURPOSE AND NON-INFRINGEMENT AS TO BOTH DXC TECHNOLOGY AND NON-DXC TECHNOLOGY DOCUMENTS FURNISHED HEREIN. Some states do not allow the exclusion of implied warranties and the foregoing exclusions may not be applicable to you. Any communication provided by you to DXC Technology relating to the documents furnished herein by DXC Technology will be received only on a non-confidential basis. There shall be no obligation on the part of DXC Technology with respect to use or disclosure of any information in such communication. DXC Technology shall have the unrestricted right to copy, use and distribute any information you communicate including but not limited to any ideas, concepts, know-how, techniques, software, documentation, diagrams, schematics or blueprints. Additionally, DXC Technology may use all such information in any manner or for any purpose including but not limited to developing products or providing services. The documents furnished herein by DXC Technology are subject to change without notice. All brand names and product names are acknowledged to be the trademarks or registered trademarks of their respective owners. HIPAA Notice This Health PAS-OnLine portal is for the use of authorized users only. Users of this Health PAS-OnLine portal may have access to protected, personally identifiable health data. As such, this Health PAS-OnLine portal and its data are subject to the Privacy and Security Regulations within the Health Insurance Portability and Accountability Act of 1996, Public Law 104-191 (HIPAA). By accessing this Health PAS-OnLine portal, all users agree to protect the privacy and security of the data contained within as required by law. Access to information on this site is only allowed for necessary business reasons and is restricted to those persons with a valid user name and password.

Idaho MMIS ProviderEnrollment Guide - Group
Last Updated: 12/8/2017 Page iii
Revision History
Version Date Author Action/Summary of Changes 1.0 12/01/2010 K Stoudenmire Initial Document 1.1 01/28/2011 J Gillett Updated based on UB00587B comments
from DHW 1.2 05/14/2011 C Stickney Updated screens and verbiage throughout
the document and based on comments from DHW during Provider Documentation meetings.
2.0 07/28/2011 TQD Promoted to next whole version 2.1 10/31/2012 C Stone Updated document with screen print and
changes per CCF 10605 3.0 11/05/2012 TQD Finalized document 3.1 12/17/2013 H McCain Updated with new screen shots and field
names for Financial Agreement screen (previously EFT Agreement) for CCF 10699. Also replaced outdated screen shots of provider portal throughout.
4.0 01/16/2014 TQD Finalized per DHW validation 4.1 04/23/2015 J Bews Updated per CCF 10769 4.2 04/24/2015 H McCain Grammar and syntax updates for clarity.
Updated out-of-date screenshots of provider portal. Rolled sections 14, 15, and 16 into section 13. Corrected Figure 11-3.
5.0 05/14/2015 TQD DHW validated 4/29/15. Promoted to next whole version.
5.0 11/24/2015 J Bews Semi-annual review; no updates necessary. 5.1 02/03/2016 Ryan Albrecht Replaced Figures 5-1 and 11-2 to show new
folder structure for Molina Medicaid home page.
5.2 02/29/2016 B Oliverez Update per DHW comments. 6.0 03/11/2016 TQD Finalized per DHW validated changes. 6.1 8/11/2017 Jose Gardea Updated for TPA upgrade 6.2 8/15/2017 Hope McCain Additional updates for TPA upgrade 6.3 11/29/2017 Myranda Payne Updated screen shots and content for TPA
upgrade based on State review 6.4 11/30/2017 Hope McCain Additional updates based on State review 7.0 12/8/2017 TQD DHW validated changes 12/1/2017. 7.0 6/19/2018 Myranda Payne Semi-annual review; no updates necessary. 7.0 10/5/2018 M Zampierin Removed Molina references and replaced
with DXC Technology

Idaho MMIS ProviderEnrollment Guide - Group
Last Updated: 12/8/2017 Page iv
Table of Contents 1. Introduction ........................................................................................................ 1 2. Information You Will Need ..................................................................................... 1 3. System Requirements ........................................................................................... 3 4. Basic Navigation .................................................................................................. 3 5. Getting Started .................................................................................................... 4 6. Security Login Information .................................................................................... 5 7. Tips, Error Messages, and Notices .......................................................................... 6 8. Complete the Pay-To Provider Segment .................................................................. 7
8.1. Verify Your Enumeration Information and Provide Your Business Contact Information ............................................................................................................ 7
9. Navigation Buttons at the Bottom of the Screen ..................................................... 10 10. Address Information ........................................................................................ 11 11. Service Location(s) ......................................................................................... 13 12. Provider Type and Specialty ............................................................................. 17 13. Programs Screen–Healthy Connections (PCCM) ................................................... 17 14. Rendering Provider .......................................................................................... 21
14.1. Adding a Rendering Provider ...................................................................... 22 15. Affiliations ...................................................................................................... 24 16. Financial Agreement ........................................................................................ 26 17. Submit Required Documentation ....................................................................... 27
17.1. Upload a Document to the Website .............................................................. 29 17.2. Mail, E-mail, or Fax in a Document .............................................................. 29 17.3. Submit .................................................................................................... 30

Idaho MMIS ProviderEnrollment Guide - Group
Last Updated: 12/8/2017 Page v
Table of Figures
Figure 1-1: Group Provider Types and Specialties ........................................................... 1 Figure 4-1: Menu ....................................................................................................... 3 Figure 4-2: Increase Text Size ..................................................................................... 4 Figure 5-1: Provider Enrollment Link............................................................................. 4 Figure 5-2: New Provider Enrollment Application ............................................................ 5 Figure 6-1: Security Login Screen ................................................................................ 5 Figure 7-1: Current Screen Error List ............................................................................ 6 Figure 7-2: Required Field Notice ................................................................................. 6 Figure 7-3: Error Message ........................................................................................... 7 Figure 7-4: Resume Enrollment Application ................................................................... 7 Figure 8-1: Business Information Screen ....................................................................... 8 Figure 8-2: Header Fields ............................................................................................ 8 Figure 9-1: Enrollment Application Saved Pop-Up Box ................................................... 10 Figure 9-2: Enrollment Application Cancel Pop-up Box .................................................. 11 Figure 9-3: Enrollment Application Cancel ................................................................... 11 Figure 9-4: Confirmation to Delete ............................................................................. 11 Figure 10-1: Address Information Screen .................................................................... 12 Figure 11-1: Add Service Location .............................................................................. 14 Figure 11-2: Service Location Screen .......................................................................... 14 Figure 11-3: Provider Directory .................................................................................. 16 Figure 12-1: Provider Type & Specialty Screen ............................................................. 17 Figure 13-1: Programs .............................................................................................. 18 Figure 13-2: PCCM Information Screen ....................................................................... 18 Figure 13-3: Open to Medicaid Patients? ..................................................................... 18 Figure 13-4: Number of Limited Patients ..................................................................... 19 Figure 13-5: Add Medicaid Provider IDs ...................................................................... 20 Figure 13-6: Navigation Choice .................................................................................. 21 Figure 13-7: Add Service Location .............................................................................. 21 Figure 14-1: Search for Rendering Provider ................................................................. 22 Figure 14-2: Rendering Provider Screen ...................................................................... 22 Figure 14-3: Rendering Provider Type & Specialty ........................................................ 23 Figure 15-1: Affiliations Screen .................................................................................. 25 Figure 15-2: Sanctioned, Excluded, Convicted ............................................................. 25 Figure 15-3: Navigation Choice .................................................................................. 26 Figure 16-1: Financial Agreement ............................................................................... 26 Figure 16-2: Check Information ................................................................................. 27 Figure 17-1: Documentation Screen ........................................................................... 28 Figure 17-2: Select File to Upload Box ........................................................................ 29 Figure 17-3: Summary Screen ................................................................................... 31

Idaho MMIS ProviderEnrollment Guide - Group
Last Updated: 12/8/2017 Page 1 of 31
1. Introduction Prior to beginning the enrollment process, you will need to register for a Trading Partner Account. Refer to the Trading Partner Account (TPA) User Guide for more information. The Provider Enrollment Guide - Group describes the enrollment process for you as a Group provider. A Group provider is one or more rendering providers that provide services within a group and submit claims under the group NPI and the group’s tax ID. Figure 1-1 displays the provider type for specialties that are considered Group. If your specialty is not listed here, prior to starting your enrollment, contact Idaho Provider Enrollment toll free at 1 (866) 686-4272 or in Boise at 1 (208) 373-1424, Monday through Friday, 7:00 A.M. to 7:00 P.M. MT. Figure 1-1: Group Provider Types and Specialties
Health PAS Provider Type Health PAS Provider Specialty
Group of Providers Single Specialty Multi-Specialty
In the following sections, you will find a list of the information you should have on hand before starting the enrollment process and a detailed description of how to complete each of the enrollment steps. If you are not a Group provider, refer to the appropriate document, which can be found in the User Guide library on the Idaho DXC Technology Medicaid website at www.idmedicaid.com.
• Provider Enrollment Guide – Individual o A single individual person providing services who will submit claims under their
own personal NPI or Idaho Medicaid provider number and their own tax ID. • Provider Enrollment Guide - Facility
o A building or place that provides services. A glossary of acronyms and terms can be located in the Provider Handbook, Glossary, on the Idaho DXC Technology Medicaid website at www.idmedicaid.com.
2. Information You Will Need The following information may be needed to complete the enrollment process. Before you begin the enrollment process, you should gather the following information you will need during each step. This information includes:
• For the pay-to provider o National Provider Identifier (NPI) (if you have obtained an NPI o Tax ID – Federal Employer Identification Number (FEIN) and/or Social
Security Number (SSN). o Name and title of the office contact person. o An e-mail address for the provider is required to access your record on the
web portal. (If you do not have an e-mail address you can obtain a free one

Idaho MMIS ProviderEnrollment Guide - Group
Last Updated: 12/8/2017 Page 2 of 31
by searching for “Free E-mail” with an internet search engine. It will guide you to sites that offer free e-mail accounts.)
o Phone numbers – primary (required), secondary, emergency, mobile, and fax. o Banking information for Electronic Funds Transfer (EFT), if applicable;
information needed includes: account number, name on the account, account type, routing number, start date, financial institution name, full address, and telephone number.
• For owners and/or board members
o The name, FEIN or SSN, tenure dates, and address information for all owners and/or board members.
o Information regarding sanctions, exclusions, or convictions of owners and/or board members.
o Information regarding owners’ and/or board members’ participation in other organizations that bill Medicaid for services.
o The relationships among owners and/or board members. o Information regarding the provider, owners, and employees with respect to
certain legal situations.
• For service locations o Providers must disclose all service locations. o The physical and mailing addresses of the provider’s service location(s). o A list of any languages spoken by the provider and his or her staff, in addition
to English. o General information about each service location, such as accessibility, office
hours, whether the service location is accepting new patients, and the age range and gender restriction for patients.
o The provider type/specialty pairs that represent the provider’s practice, as well as all licensing and certification documents for those provider type/specialty pairs.
o Information about the individual facilities, including whether the facility has a gero-psychiatric unit or a distinct part unit, the groups of people that the facility services (i.e., children, adults, etc.), fiscal year end date, and the number of beds in the facility.
o If the provider is interested in becoming a Healthy Connections provider, the information needed includes, hours, limitations (gender, age), accommodations (TDD phone, interpretive services, sign language), and after hours coverage.
• For rendering providers, as applicable
o Each rendering provider’s NPI, name, address, gender, phone number, and fax number.
o The provider type/specialty pairs that represent the individual provider, as well as all licensing and certification documents for those provider type/specialty pairs.
o A list of the service locations to which the provider is affiliated. A red asterisk (*) will be used to indicate required fields on each screen. An alert will display if you attempt to move to another screen without entering all required fields. It is recommended that all fields, regardless of whether or not they are required, are filled in. This information is used in a variety of ways, one being the provider directory which is posted at www.idmedicaid.com.

Idaho MMIS ProviderEnrollment Guide - Group
Last Updated: 12/8/2017 Page 3 of 31
3. System Requirements To use all features of the provider portal successfully, ensure that your computer system meets the following minimum requirements:
• Internet Explorer 6.0 above or Firefox • Screen resolution of 1024 x 768 or higher (recommended) • Adobe Acrobat Reader 6.0 or above (for viewing correspondence) Adobe Acrobat
Reader can be downloaded at no cost from: http://get.adobe.com/reader/otherversions/
• Flash Player version 7.0 or above (for viewing tutorials)
4. Basic Navigation There is a menu on the left side of each screen that will show you where you are in the enrollment process. Here are a few very basic navigation tips to help you consider while moving through the application. Figure 4-1: Menu
Legend for Menu Icons
1. The white sheet of paper icon means that there is only one single page of information needed for that specific part.
2. The gray arrow pointing to the yellow folder signifies a drop-down, as there is more than one page of information needed for that specific part. Select the yellow folder to view the contents.
3. The grayed out paper signifies information that is not needed for your type and specialty and therefore is skipped.
4. The vertical line of black dots is used to make the menu larger or smaller. Simply click on the dots and drag either to the left or right.
You can move through the application by selecting a menu option at the left if you want to go to a different screen rather than using the Previous and Next buttons. Before you can Select Previous or Next , you must complete all required data on the page you are updating. If all required fields are not completed prior toSelecting Previous and Next , an alert will display with the fields that must be completed prior to navigating away from the page. Note: If you skipped a screen that requires information, when you submit your application, those screen names will turn red on the menu bar alerting you to go back and add information.

Idaho MMIS ProviderEnrollment Guide - Group
Last Updated: 12/8/2017 Page 4 of 31
There is also Help text for each field. Place your cursor over a field and it will tell you what that field contains. To update information in a modifiable field, you will simply type over the information that that is currently displayed. There is an Increase Text Size button in the top right corner of each page. Select the button as many times as you need to increase the size of the text. Keep in mind that when you increase the text size, you may not see all the information on the page (Figure 4-2).
Figure 4-2: Increase Text Size
Note: While navigating through the application, do not use Back in your browser. It will take you out of the application, and you will have to log in again to continue.
5. Getting Started To start your enrollment you must sign in to the Idaho DXC Technology Medicaid website at www.idmedicaid.com. Once you are signed in, hover over the Account Maintenance tab and Select Provider Enrollment (Figure 5-1). Figure 5-1: Provider Enrollment Link
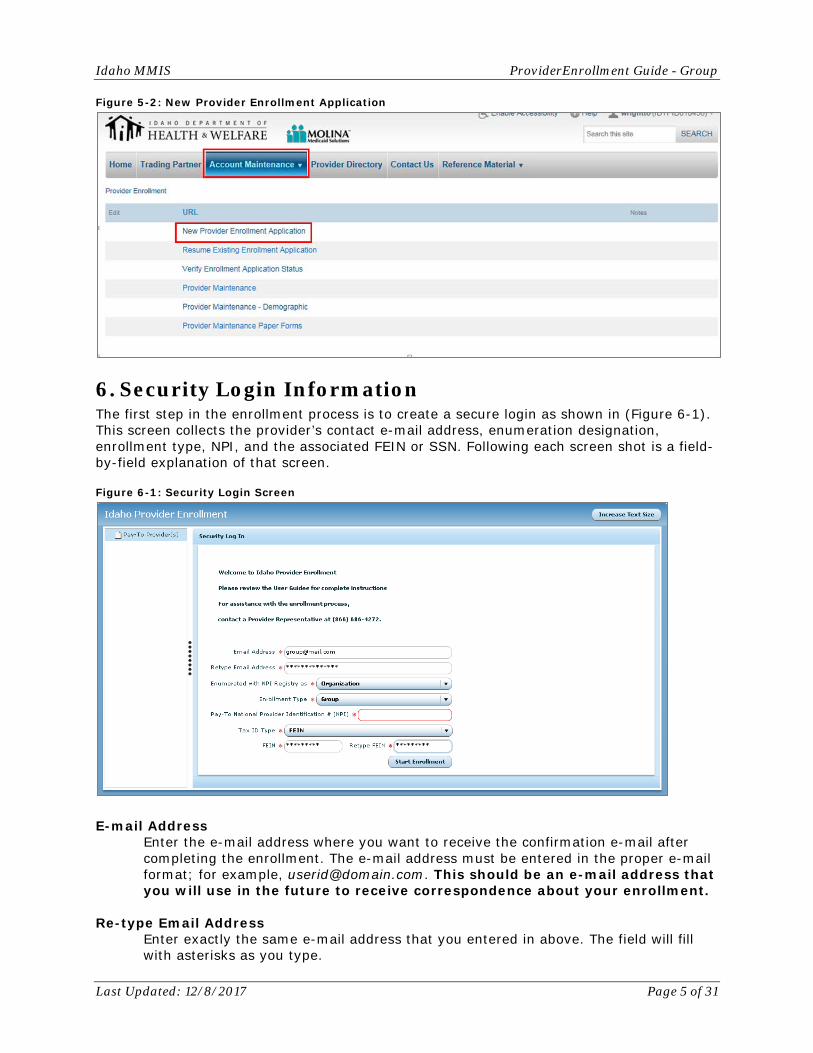
A list of Provider Enrollment links will display. Select New Provider Enrollment Application (Figure 5-2) to open the Provider Enrollment Application.
Idaho MMIS ProviderEnrollment Guide - Group
Last Updated: 12/8/2017 Page 5 of 31
Figure 5-2: New Provider Enrollment Application
6. Security Login Information The first step in the enrollment process is to create a secure login as shown in (Figure 6-1). This screen collects the provider’s contact e-mail address, enumeration designation, enrollment type, NPI, and the associated FEIN or SSN. Following each screen shot is a field-by-field explanation of that screen. Figure 6-1: Security Login Screen
E-mail Address
Enter the e-mail address where you want to receive the confirmation e-mail after completing the enrollment. The e-mail address must be entered in the proper e-mail format; for example, [email protected]. This should be an e-mail address that you will use in the future to receive correspondence about your enrollment.
Re-type Email Address
Enter exactly the same e-mail address that you entered in above. The field will fill with asterisks as you type.

Idaho MMIS ProviderEnrollment Guide - Group
Last Updated: 12/8/2017 Page 6 of 31
Enumerated with NPI Registry as
The drop-down includes Individual, Organization, and No NPI. Because you are enrolling as a Group, you will choose Organization.
Enrollment Type Choose Group. The next field’s name will change based on the option that you chose from the dropdown list.
Pay-To National Provider Identification # (NPI) Enter your NPI.
Tax ID Type Choose either SSN or FEIN and enter that information into the box. An SSN is assigned to an individual in their own name, and an FEIN is assigned to a business in their business name. The Tax ID Type chosen must match the Tax ID Type currently associated to the NPI entered above.
Retype Retype your SSN or FEIN. It must match what you entered in the field above.
Select Start Enrollment. The Business Information screen will appear.
7. Tips, Error Messages, and Notices If you have missed any required fields, you will receive an error message showing what you need to complete (Figure 7-1). Figure 7-1: Current Screen Error List
Required fields will be outlined in red and flagged (Figure 7-2) if you have not completed the information. Figure 7-2: Required Field Notice
If you have previously started your enrollment the following error (Figure 7-3) will be displayed.

Idaho MMIS ProviderEnrollment Guide - Group
Last Updated: 12/8/2017 Page 7 of 31
Figure 7-3: Error Message
Select OK to close the error message and Select Resume Existing Enrollment Application to complete the application process. Refer to Section 5 Getting Started, in this guide. Figure 7-4: Resume Enrollment Application
8. Complete the Pay-To Provider Segment
8.1. Verify Your Enumeration Information and Provide Your Business Contact Information
The Business Information screen displays the tax ID number and the e-mail address entered on the previous screen. The screen also displays a provider type dropdown box, group name, and captures the office contact information, primary, secondary, emergency, mobile and fax numbers for your office (Figure 8-1). On this screen, you will want to ensure that all information is correct. If you entered an NPI on the security screen, the name, phone number, and fax will be pre-populated. If any of this information is incorrect, you will need to update the information on this screen. You will also want to make sure that you update the NPPES database as well at https://npiregistry.cms.hhs.gov/ since this is where the pre-populated information was extracted from.

Idaho MMIS ProviderEnrollment Guide - Group
Last Updated: 12/8/2017 Page 8 of 31
Figure 8-1: Business Information Screen
Multiple header fields appear on every enrollment screen for the remainder of the process. These are displayed in Figure 8-2 and described on the next page. Figure 8-2: Header Fields
Header Field Descriptions • Pay-To Provider Name:
o Since you entered an NPI on the security screen, this field will display the provider name extracted from the NPPES database.
• Enumerated As: o The enumeration designation from the initial screen: Since you entered an NPI on
the security screen, Organization will be displayed in this field. • Pay-To Provider ID:
o The NPI entered on the security screen will display. • Enrollment Case #:
o The case number: This number will be required to resume a saved enrollment, check the status of your enrollment, or to enter maintenance through the portal once you have been enrolled. The case number is automatically generated and is specific to your enrollment.
• Status:

Idaho MMIS ProviderEnrollment Guide - Group
Last Updated: 12/8/2017 Page 9 of 31
o The current status of this enrollment: The enrollment will show a status of NEW up to the point where you submit your application.
On this screen, you will add and verify unique identification data. A description of each field is given. Tax ID Type
The FEIN or SSN has been pre-populated from the previous screen. If the Tax ID is incorrect, delete the number and enter the correct Tax ID.
Organization Name The name of the organization is pre-populated.
Please check if you need to update the name
Once checked, the Organization Name field can be updated. Make sure to update the CMS NPI Registry with the updated name information at https://npiregistry.cms.hhs.gov/.
Provider Type Select the drop down list and choose the appropriate Provider Type. Refer back to Section 1 Introduction for a complete list of provider types and specialties that are considered an FAO. Failure to choose the correct provider type will result in the application needing to be deleted and the provider must then restart the enrollment process from the beginning. For questions on the provider type or provider specialty, contact Idaho Provider Enrollment toll free at 1 (866) 686-4272 or in Boise at 1 (208) 373-1424, Monday through Friday, 7 A.M. to 7 P.M. MT.
Contact Name Enter the name of the office contact that should be notified with any questions pertaining to the information in this enrollment.
Title Specify the title for that contact person. Examples of titles include Office Manager, Administrative Assistant, and M.D.
E-mail This is pre-populated from the security screen. An e-mail containing your Enrollment Case Number will be sent to this address. If the e-mail does not arrive in the inbox, check Junk Mail or SPAM folders.
Retype E-mail This is pre-populated from the security screen.
Primary Phone Enter the primary telephone number for the office if the field is blank. If the field is pre-populated and the phone number is not correct, type over the phone number with the correct number.
If you have a Secondary, Emergency, Mobile, or Fax phone number, enter it in the appropriate field. Click Next to navigate to the Address Information screen.

Idaho MMIS ProviderEnrollment Guide - Group
Last Updated: 12/8/2017 Page 10 of 31
9. Navigation Buttons at the Bottom of the Screen Once you have finished entering all information on any screen, you have the following option buttons available.
• Next • Previous • Save and Close • Cancel • Delete
Depending on the screen, not all will always be available. Do not use the Back button in your browser; it will take you out of the application, and you will have to log in again to continue. Next
Click this button to navigate to the next screen.
Previous Click this button to navigate back to the previous screen.
Save and Close You will save your application to continue with the enrollment process at a later time. A pop-up box will display with instructions on how to resume your record update as in Figure 9-1.
Note: An e-mail will be sent to the e-mail address provided confirming the start of your enrollment process. The e-mail will include instructions on how to resume your enrollment should you need to Save and Close at anytime.
Figure 9-1: Enrollment Application Saved Pop-Up Box
Note: If you Save and Close at any time, you have only 14 DAYS to return and finish your application. If you do not return within 14 days, your enrollment will be deleted and you will be required to start the process from the beginning. Cancel
The pop-up box (Figure 9-2) will display to confirm that you want to cancel changes made on the current screen.
OK, Close Application

Idaho MMIS ProviderEnrollment Guide - Group
Last Updated: 12/8/2017 Page 11 of 31
You will be taken back to the provider portal home page, Welcome to Health PAS-OnLine.
No, Return to Application
The pop-up box disappears and the current screen is displayed.
Figure 9-2: Enrollment Application Cancel Pop-up Box
Delete
Any updates you have made will not be saved and you will have to start the application from the beginning. A confirmation pop-up box shown in Figure 9-3 will confirm that you want to delete the application.
Figure 9-3: Enrollment Application Cancel
Figure 9-4: Confirmation to Delete
Note: Select Delete to exit without saving changes
10. Address Information On the Address Information screen (Figure 10-1), you will verify the Pay-To Physical Address and Pay-To Correspondence Mailing Address for the Group. The pay-to provider is the provider who will receive payments and provider correspondence. The W-9 is a federal tax document and must be completed according to the federal instructions. These instructions can be found at www.irs.gov. The W-9 information collected on this screen will be used to pre-populate the W-9 form at the end of the application. Your 1099 form will be mailed to the W-9 address. You will indicate the provider’s Type of Tax Entity and Exempt Payee status. Refer to Figure 10-1 and the field descriptions immediately following the figure.
Idaho MMIS ProviderEnrollment Guide - Group
Last Updated: 12/8/2017 Page 12 of 31
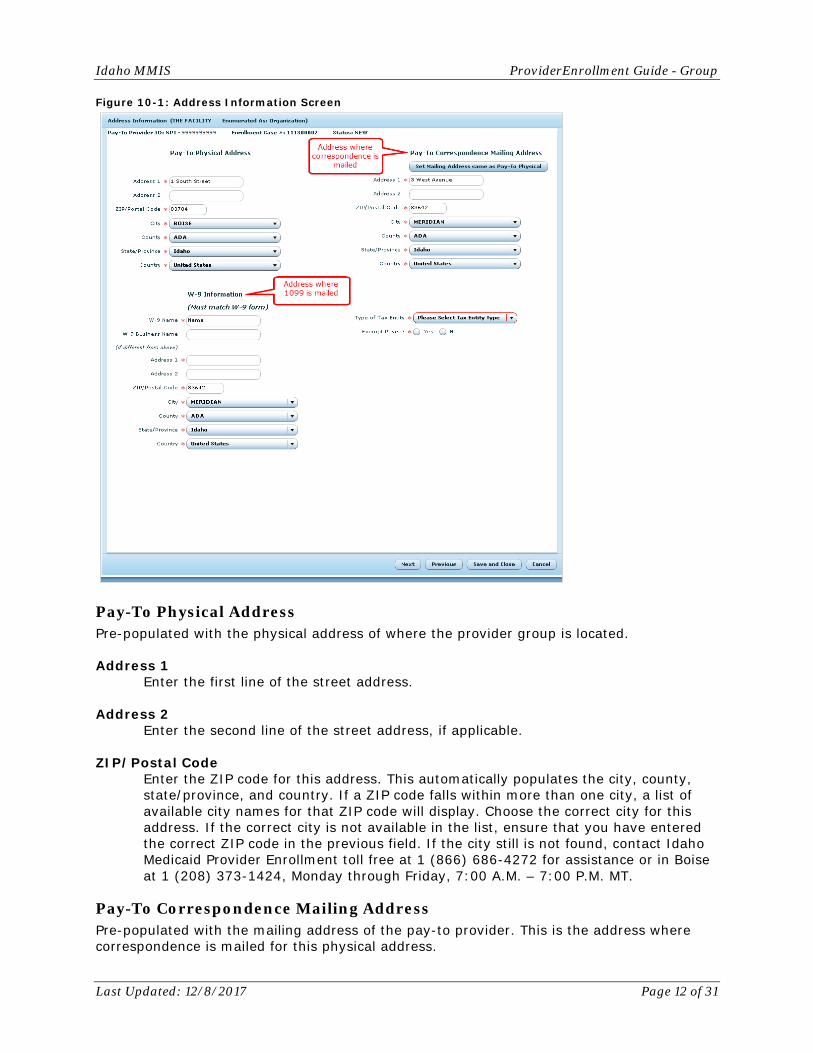
Figure 10-1: Address Information Screen
Pay-To Physical Address Pre-populated with the physical address of where the provider group is located.
Address 1
Enter the first line of the street address.
Address 2 Enter the second line of the street address, if applicable.
ZIP/Postal Code
Enter the ZIP code for this address. This automatically populates the city, county, state/province, and country. If a ZIP code falls within more than one city, a list of available city names for that ZIP code will display. Choose the correct city for this address. If the correct city is not available in the list, ensure that you have entered the correct ZIP code in the previous field. If the city still is not found, contact Idaho Medicaid Provider Enrollment toll free at 1 (866) 686-4272 for assistance or in Boise at 1 (208) 373-1424, Monday through Friday, 7:00 A.M. – 7:00 P.M. MT.
Pay-To Correspondence Mailing Address Pre-populated with the mailing address of the pay-to provider. This is the address where correspondence is mailed for this physical address.

Idaho MMIS ProviderEnrollment Guide - Group
Last Updated: 12/8/2017 Page 13 of 31
Set Mailing Address same as Pay-To Physical Select Pay-To Correspondence Mailing Address to auto-populate fields with Pay-To Physical Address. If the address is not the same, enter the address information as described above.
W-9 Information This is the address where your 1099 information is mailed. The W-9 information collected on this screen will be used to pre-populate the W-9 form at the end of the application.
W-9 Name
This name must match the FEIN that is registered with the IRS
W-9 Business Name If the business name is different from the name in the W-9 Name field above, enter the correct name.
W-9 Address This address is where your 1099 information is mailed. Enter address information as described previously. Address 1 Address 2 ZIP/Postal Code
Type of Tax Entity
Select one of the following from the dropdown list. a. Individual/Sole Proprietor b. Corporation c. Partnership d. LLC Disregarded Entity e. LLC Corporation f. Other – If you choose other, a text box appears that requires you to explain.
Tax Exempt
Indicate if this business organization is exempt from backup withholding or not. A full explanation of this type of tax exempt status can be found at www.irs.gov/pub/irs-pdf/fw9.pdf under Section 131 of the IRS Code. Select Yes or No for Exempt Payee .
Return to Section 9 Navigation Buttons at the Bottom of the Screen for use of the buttons at the bottom of the screen. After selecting the Next button, the Ownership/Board screen appears.
11. Service Location(s) In the Service Location segment, you must identify all service locations for the provider you are enrolling, as well as provide demographic and provider type/specialty information for each service location. You must fully describe one service location before identifying and describing subsequent service locations. Each service location must be supplied a unique name, which will be used to identify the location when submitting claims and will also be displayed in the Provider Directory. In addition, each service location will be assigned a three-digit number which, when appended to the end of the provider’s pay-to NPI, creates a unique numeric identifier for each service

Idaho MMIS ProviderEnrollment Guide - Group
Last Updated: 12/8/2017 Page 14 of 31
location. If you have more than one service location, each location must have a different site name. Provide a name that will help you easily identify this service location later, such as Fairview or Overland. Figure 11-1: Add Service Location
Add Service Location
In the pop-up box, enter a service location name.
Click the Add button to continue. The Service Location Screen displays as shown in Figure 11-2. Figure 11-2: Service Location Screen
To add a service location, complete the following information.
Physical Address This is the Primary Service Location
Check this box if this location is the primary location or the only service location for the provider. The primary service location denotes the location where services are primarily rendered.

Idaho MMIS ProviderEnrollment Guide - Group
Last Updated: 12/8/2017 Page 15 of 31
The Physical Address is not the same as the Pay-To Physical Address. Address is SAME as Pay-To Physical Address
Click on this button and the Pay-To Physical Address fields will populate the Physical Address. If the address is not the same or incorrect, click on the Address is DIFFERENT from Pay-To Physical Address and enter the address information, as described previously.
Address 1 Address 2
Enter the first line of the street address. Enter the second line of the street address, if applicable.
ZIP Code Enter the ZIP code for this address. This automatically populates the city, county, state/province, and country. If a ZIP code falls within more than one city, a list of available city names for that ZIP code will display. Choose the correct city for this address. If the correct city is not available in the list, ensure that you have entered the correct ZIP code in the previous field. If the city still is not found, contact Idaho Medicaid Provider Enrollment for assistance toll free at 1 (866) 686-4272 or in Boise at 1 (208) 373-1424, Monday through Friday, 7 A.M. to 7 P.M. MT.
Phone Number Enter the phone number for this service location.
Fax Number Enter the fax number, if available.
Set Same as Pay-To Physical Address Click on this button and the Pay-To Physical Address fields will populate the Correspondence Mailing Address. If the address is not the same or incorrect, click on the Address is DIFFERENT from Pay-To Mailing Address and enter the address information, as described previously.
All information on the remainder of this screen will be used to populate the provider directory that will be located on the portal for public information, as in Figure 11-3.

Idaho MMIS ProviderEnrollment Guide - Group
Last Updated: 12/8/2017 Page 16 of 31
Figure 11-3: Provider Directory
Additional Languages Spoken
Check all languages spoken at this service location, in addition to English.
Office Hours Enter the hours of operation for you as the provider at this service location in HH:MM format, followed by A.M. or P.M. If this location is closed on a particular day, click the Closed box. The TO time cannot exceed 11:59 pm. Example, to enter time for a 24-hour office, enter 12:00 AM in the From Time box and 11:59 PM in the To Time box. After you enter these in the first day, you may copy and paste the contents to the other days.
Has Servicing Providers A service provider is an employee of the facility. If you have employees in your facility, choose Yes, otherwise, choose No.
Handicap Accessible If service location is handicap accessible, choose Yes, otherwise, choose No.
Accepting New Patients If you are accepting new patients at this location, choose Yes, otherwise, choose No.
Patient Age Indicate the youngest age (in years) for patients in the Min box and the oldest age (also in years) for patients in the Max box. The minimum age that can be entered is 0 and the maximum age that can be entered is 110 years.
Gender Restriction Indicate whether you as the provider have no restrictions (None), accept Females Only, or Males Only at this location.
Return to Section 9 Navigation Buttons at the Bottom of the Screen for use of the buttons at the bottom of the screen.

Idaho MMIS ProviderEnrollment Guide - Group
Last Updated: 12/8/2017 Page 17 of 31
Click the Next button to display the Provider Type and Specialty screen.
12. Provider Type and Specialty After you specify the address and provider directory information, you must select and define the provider types and specialties that describe the provider’s practice at the current service location. Figure 12-1: Provider Type & Specialty Screen
The example in Figure 12-1 shows this screen in its initial state. Depending on the selections you make from the Provider Type list and the Specialty list, this screen dynamically updates to include the appropriate fields necessary to enroll properly. Refer to the Provider Enrollment Requirements document for licesure, certificiation, education, and/ or other supporting documentation for the chosen provider type-specialty pair. Depending on the provider type and specialty chosen the required information may vary. Any fields on this screen marked with a red asterisk (*) must be completed. When clicking on the specialty dropdown box, if the specialty you are looking for is not visible, please contact Idaho Provider Enrollment toll free at 1 (866) 686-4272 or in Boise at 1(208) 373-1424, Monday through Friday, 7 A.M. to 7 P.M. MT. Once you have completed all required fields, select Add This Specialty. The provider type, provider specialty, and begin date are displayed.
Select Next when you are finished to display the Programs screen.
13. Programs Screen–Healthy Connections (PCCM) The Primary Care Case Management (PCCM) program screen is used to collect information from providers who want to become a PCCM (Healthy Connections provider). For all Group provider specialties, the PCCM (Healthy Connections) screen below will display (Figure 13-1).

Idaho MMIS ProviderEnrollment Guide - Group
Last Updated: 12/8/2017 Page 18 of 31
Figure 13-1: Programs
If you are interested in becoming a Healthy Connections provider (PCCM), choose Yes and the PCCM Information screen will display (Figure 13-2). If you are not interested, choose No. Figure 13-2: PCCM Information Screen
Answer the following questions to provide more information for the Healthy Connections program. Additional fields may appear when your response requires more information. These additional fields are explained next. Is your practice open to Medicaid patients?
Choose Yes if this site is open to Medicaid patients, and then respond to the additional questions (Figure 13-3). If not, choose No.
Figure 13-3: Open to Medicaid Patients?

Idaho MMIS ProviderEnrollment Guide - Group
Last Updated: 12/8/2017 Page 19 of 31
Unlimited Choose Unlimited if you do not have a limit to the number of Medicaid patients seen at this location.
Limited Choose Limited if you accept only a limited number of patients, and then respond to the questions that refer to the number of patients (Figure 13-4).
Figure 13-4: Number of Limited Patients
Number of Medicaid patients accepted per month
Enter the number of Medicaid patients that your location can accept per month. Maximum number of Medicaid patients accepted
Enter the number of maximum number of Medicaid patients that will be accepted at your location.
Will you accept auto-assignment of patients?
If you will accept auto-assignment of Medicaid patients, choose Yes, otherwise choose No.
Accept existing clinic patients only If you accept only existing clinic patients, choose Yes, otherwise choose No.
Clinic must be contacted prior to enrollment If the clinic needs to be contacted prior to enrollment, choose Yes, otherwise choose No.
Other Restrictions This section is used to identify any other restrictions this practice may have regarding new Medicaid members. Select any that apply. Pregnant Females Only
Choose this if this provider renders this service at this location. Accept family members of existing patients
Choose this if this provider will see family members of existing patients at this location.
OB services available
Choose this if this provider renders services to OB patients at this location.
Other Choose Other if this provider has restrictions not listed. Enter the other restrictions in the text box that is provided.
Special Accommodations This section is used to describe additional services available through this provider. Select any that apply.

Idaho MMIS ProviderEnrollment Guide - Group
Last Updated: 12/8/2017 Page 20 of 31
TDD phone Choose Yes if a TDD phone is available at this location.
Interpretive services
Choose Yes if interpretive services are available at this service location.
Sign language Choose Yes if sign language is available at this service location.
It is a requirement for all Healthy Connections (PCCM) providers to have 24-hour coverage for their Medicaid patients. After Hours Phone #
Enter the after hours telephone number for the provider(s).
After Hours Coverage This section indicates how the after hours coverage is provided. Indicate how after hours coverage is provided. Answering machine which directs patients to a medical professional
Choose this if the answering machine at the service location directs patients to a medical professional.
Answering service Choose this if the service location uses an answering service.
On-call physician Choose this if the service location has an on-call physician.
On-call nurse Choose this if the service location has an on-call nurse.
Alternative Choose this if the after hour’s coverage is covered in an alternative way.
NPI/Medicaid IDs of Covering Medicaid Providers ID
Enter the NPI/Medicaid ID of all Covering Medicaid Providers by entering one and selecting Add, and then continuing to enter in that same way until they are all added (Figure 13-5).
Figure 13-5: Add Medicaid Provider IDs
If you add a Medicaid provider ID and want to remove it from the list, highlight that ID and click Delete. When you have finished adding all covering Medicaid provider IDs, click Next.

Idaho MMIS ProviderEnrollment Guide - Group
Last Updated: 12/8/2017 Page 21 of 31
If you have no covering providers, click Next. If you do not have the NPI of a covering provider, select the link below the field labeled Link to CMS NPI Registry, and you will be re-directed to the CMS NPI Registry where you can search for the provider and obtain their NPI to enter in the field. Refer to section 9 Navigation Buttons at the Bottom of the Screen for use of the buttons at the bottom of the screen. Click the Next button once all providers have been entered.
Navigation Choice A pop-up box will appear asking if you want to add another service location (Figure 13-6). Figure 13-6: Navigation Choice
If you select No, you will be directed to the Rendering Provider screen. If you choose Yes, another pop-up box appears as shown in Figure 13-7. If you answered Yes incorrectly, you can select No, I’m Done, to be directed to the Rendering Provider screen. Figure 13-7: Add Service Location
If you need to add another service location, enter a unique name in the Site Name field. You can copy information from a previous service location by clicking on the down arrow in the Copy From field and choosing the location that you would like to copy the information from. You can enter all new information for the service location by leaving <New>.
14. Rendering Provider The Rendering Provider screen (Figure 14-1) is used to add rendering providers who will be affiliated to this group.

Idaho MMIS ProviderEnrollment Guide - Group
Last Updated: 12/8/2017 Page 22 of 31
Figure 14-1: Search for Rendering Provider
In the Provider ID Type field, you will choose NPI. Enter the NPI in the Provider ID (NPI) field. Click Search. The Rendering Provider screen is displayed.
14.1. Adding a Rendering Provider Each rendering provider must be added in order to affiliate them properly to your service locations. Complete the required information as described (Figure 14-2). Figure 14-2: Rendering Provider Screen
The rendering provider’s information is pre-populated in the field boxes as shown in Figure 14-2. Validate all information in the following fields is correct. If not, update the information in the appropriate field.
• First Name • Last Name • Address 1 • Address 2 (if applicable) • ZIP/Postal Code
o Validate/update the ZIP code for this address. This will automatically populate the city, county, state/province, and country. If a ZIP code falls within more than one city, a list of available city names for that ZIP code will display. Choose the correct city for this address. If the correct city is not available in the list, ensure that you have entered the correct ZIP code in the previous field. If the city still is not found, contact Idaho Medicaid Provider Enrollment toll free at 1 (866) 686-4272 for assistance or in Boise at 1 (208) 373-1424, Monday through Friday, 7:00 A.M. to 7:00 P.M. MT.

Idaho MMIS ProviderEnrollment Guide - Group
Last Updated: 12/8/2017 Page 23 of 31
These fields will auto-populate based on the ZIP code entered above. • City • County • State • Country
The following information for the rendering provider is not required, but should be entered, if possible. • E-mail • Gender • Primary Phone • Fax • Emergency Phone
Status
This will auto-populate. If the provider is enrolled with Idaho Medicaid, the Status will show ENROLLED and all information will be pre-populated from the rendering providers initial enrollment. If the provider is not enrolled in Idaho Medicaid, the Status will display as NEW and the information will be pre-populated from the NPPES database.
Select Next to proceed to the Rendering Provider Type & Specialty screen (Figure 14-3). Figure 14-3: Rendering Provider Type & Specialty
The rendering provider type is pre-populated and cannot be modified if the provider is already enrolled with Idaho Medicaid. If the provider type displayed is incorrect, please contact Idaho Provider Enrollment toll free at 1 (866) 686-4272 or in Boise at 1 (208) 373-1424, Monday through Friday, 7:00 A.M. to 7:00 P.M. MT. The specialty is pre-populated if the provider is already enrolled with Idaho Medicaid. Only the provider types of Allopathic and Osteopathic Physician, and Physician Assistants & Advanced Practice Nursing Providers, can modify the specialty field. For all other providers, the specialty field is non-modifiable.
Allopathic and Osteopathic Physicians and Physician Assistants & Advanced Practice Nursing Providers ONLY

Idaho MMIS ProviderEnrollment Guide - Group
Last Updated: 12/8/2017 Page 24 of 31
Use the following steps to modify the provider specialty. 1. Click on the specialty you would like to modify. This opens up all current
credentialing information for this provider specialty. 2. Specialty
Click on the down arrow in the specialty drop-down box, and choose the appropriate specialty for this provider.
3. Begin Date Enter a begin date in the Begin Date field in the MM/DD/YYYY format. This will display the credentialing fields that are required and optional for the provider specialty chosen.
4. Add this Specialty Click on this when all fields are entered. This will populate the table at the top of the page with the specialty and begin date information just added.
Continue this process until all of the specialties are added to the Specialties box. If you want to view the credentialing information for the specialties, simply click on the specialty you want to view, and the credentialing information will be displayed. If no changes need to be made, click Cancel Edit. If changes are made, click Save This Specialty. Click Next when you are finished. For ALL Providers Refer to the Provider Enrollment Requirements document for licensure, certification, education, and/ or other supporting documentation for the chosen provider type-specialty pair. Depending on the provider type and specialty chosen the required information may vary. Any fields on this screen marked with a red asterisk (*) must be completed. For more information regarding button functionality, return to section 9 Navigation Buttons at the Bottom of the Screen Select Next when you are finished to display the Affiliations screen.
15. Affiliations After each rendering provider has been added, you will affiliate each provider to the service locations. Affiliating a rendering to a service location allows for you to bill with individual renderings to a specific location(s). The service locations you entered will display on this screen (Figure 15-1).

Idaho MMIS ProviderEnrollment Guide - Group
Last Updated: 12/8/2017 Page 25 of 31
Figure 15-1: Affiliations Screen
Complete the information on this screen using the descriptions that follow. Has this person ever been sanctioned, excluded, or convicted of a criminal offense related to Medicare, Medicaid, or any federal agency or program (42 CFR 455.106)?
If the provider has ever been Sanctioned, Excluded, or Convicted (past or present), Select Yes and then check all that apply, as in Figure 15-2.
Figure 15-2: Sanctioned, Excluded, Convicted
If the provider has not been sanctioned, excluded or convicted, Select No.
Affiliated
Check the box for each service location where this provider renders services.
Begin Date Enter the begin date in MM/DD/YYYY format.
Select Next to continue. If you have multiple rendering providers, the next rendering provider’s information will display for validation. Continue with all of the steps above from Section 14 until you have completed the updates on all of the rendering providers. If there are no additional rendering providers to validate, a pop-up box asks Do you want to add another Rendering Provider?, as in Figure 15-3.
.
Idaho MMIS ProviderEnrollment Guide - Group
Last Updated: 12/8/2017 Page 26 of 31
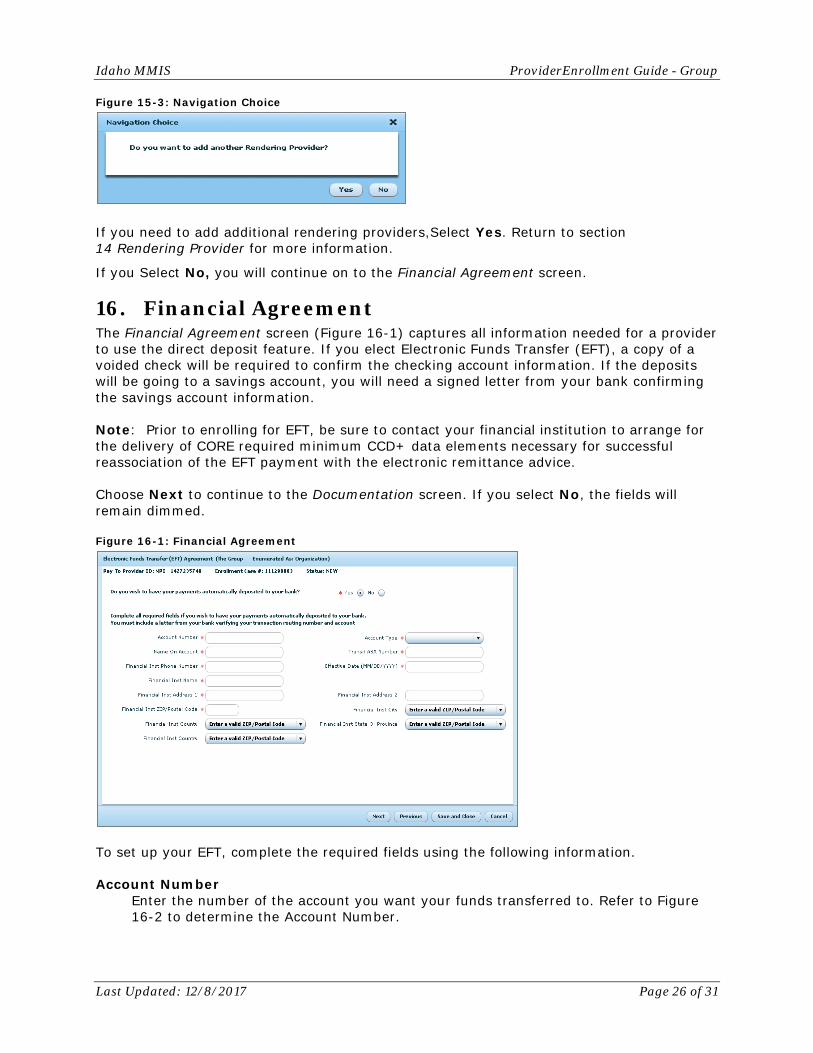
Figure 15-3: Navigation Choice
If you need to add additional rendering providers,Select Yes. Return to section 14 Rendering Provider for more information.
If you Select No, you will continue on to the Financial Agreement screen.
16. Financial Agreement The Financial Agreement screen (Figure 16-1) captures all information needed for a provider to use the direct deposit feature. If you elect Electronic Funds Transfer (EFT), a copy of a voided check will be required to confirm the checking account information. If the deposits will be going to a savings account, you will need a signed letter from your bank confirming the savings account information. Note: Prior to enrolling for EFT, be sure to contact your financial institution to arrange for the delivery of CORE required minimum CCD+ data elements necessary for successful reassociation of the EFT payment with the electronic remittance advice. Choose Next to continue to the Documentation screen. If you select No, the fields will remain dimmed. Figure 16-1: Financial Agreement
To set up your EFT, complete the required fields using the following information. Account Number
Enter the number of the account you want your funds transferred to. Refer to Figure 16-2 to determine the Account Number.

Idaho MMIS ProviderEnrollment Guide - Group
Last Updated: 12/8/2017 Page 27 of 31
Figure 16-2: Check Information
Type of Account
Select either Checking or Savings from the dropdown box.
Name on Account Enter the name of the person who will receive the electronic funds.
Routing Number Enter the routing number on the account. See Figure 16-2 to determine the routing number.
Financial Institution Phone Number
Enter the telephone number of the bank you are using for EFT. Effective Date
Enter the effective date in MM/DD/YYYY format.
Financial Institution Name Enter the name of the bank that you are using for EFT.
Financial Institution Street Address 1
Enter the first line of the street address. Financial Institution Street Address 2
Enter the second line of the street address, if applicable.
ZIP Code Enter the ZIP or postal code for this address. This will automatically populate the city, county, state, and country.
Select Next to continue to the Documentation screen.
17. Submit Required Documentation The Documentation screen displays all of the documentation that must be submitted to complete your enrollment. As a provider, you must read each document, enter the required information, attest to, print, sign, and submit the document for confirmation that you have

Idaho MMIS ProviderEnrollment Guide - Group
Last Updated: 12/8/2017 Page 28 of 31
read and agree to the terms and conditions. The Documentation screen will display as shown in Figure 17-1. Figure 17-1: Documentation Screen
The Signatory Name must be an individual that is authorized on behalf of the provider, to electronically sign and submit the enrollment application. This name will populate on the Medicaid Provider Agreement and the Electronic Provider Enrollment Application Acknowledgement forms. Signatory Name
Enter the name of the authorized individual.
Signatory Title Enter the title of the authorized individual.
Every provider is required to submit the following documents. Each of these documents must be uploaded and electronically submitted, mailed, or faxed to DXC Technology. • Medicaid Provider Agreement with appropriate Additional Terms
o You must preview the Medicaid Provider Agreement by selecting Review Before Signing to open the document.
o Select Sign Electronically. • Electronic Provider Enrollment Application Acknowledgement
o You can preview the Electronic Provider Enrollment Application Acknowledgement by SelectingReview Before Signing to open the document.
o Select Sign Electronically. • W-9
o You can download this document to upload back up to the website, or download to mail or fax in. Instructions follow this section.
• Ownership and Criminal Conviction Form
Idaho MMIS ProviderEnrollment Guide - Group
Last Updated: 12/8/2017 Page 29 of 31
o You can download this document to upload back up to the website, or download to mail or fax in. Instructions follow this section.
• Group Affiliation Roster
o You can download this document to upload back up to the website, or download to mail or fax in. Instructions follow this section.
• If you entered EFT information, the Authorization for Electronic Funds Transfer will display, and must be signed, dated, and submitted along with a voided check or a statement from the bank verifying the routing number and account number.
17.1. Upload a Document to the Website To upload a document, use the following steps.
1. Download a. In the Download for Submission column, for each document you wish to
submit electronically Select Download. 2. Print
a. Once the document displays, Select the print icon on your screen. Once you have printed and entered the information on the document, you will need to scan the document and save it to your computer.
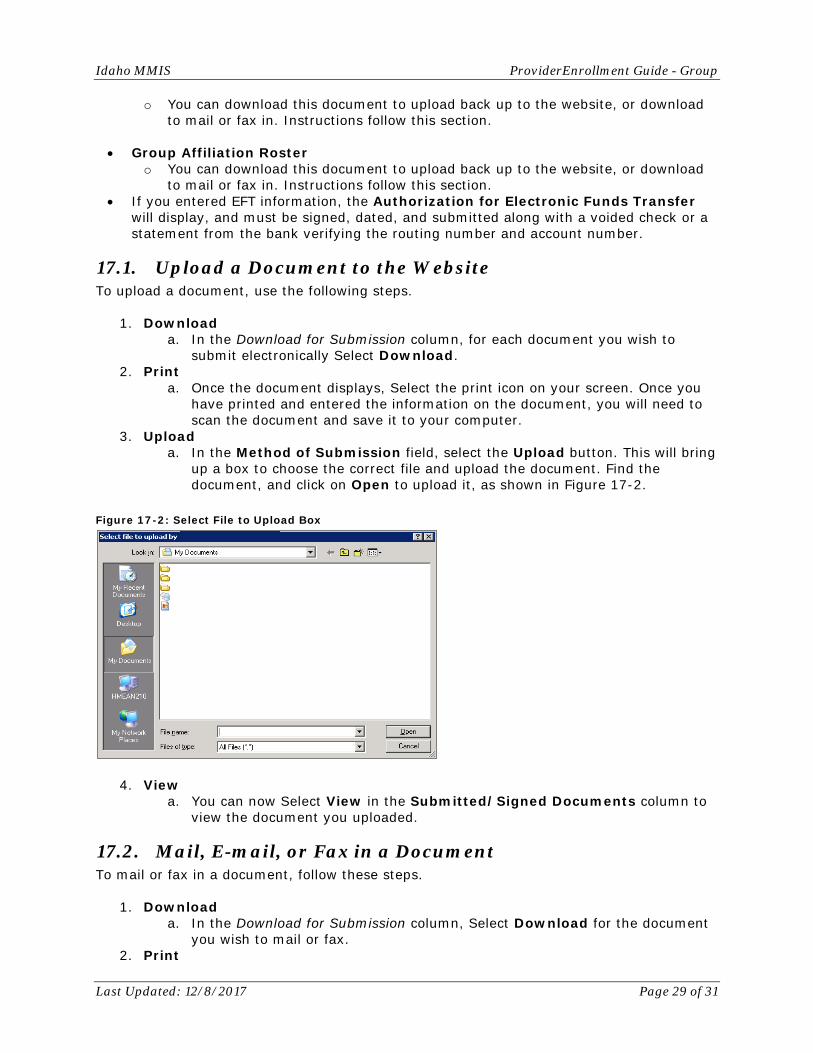
3. Upload a. In the Method of Submission field, select the Upload button. This will bring
up a box to choose the correct file and upload the document. Find the document, and click on Open to upload it, as shown in Figure 17-2.
Figure 17-2: Select File to Upload Box
4. View a. You can now Select View in the Submitted/Signed Documents column to
view the document you uploaded.
17.2. Mail, E-mail, or Fax in a Document To mail or fax in a document, follow these steps.
1. Download a. In the Download for Submission column, Select Download for the document
you wish to mail or fax. 2. Print

Idaho MMIS ProviderEnrollment Guide - Group
Last Updated: 12/8/2017 Page 30 of 31
a. Once the document displays, Select the Print icon on your screen. Print and enter the information in the document.
3. Mail In a. In the Method of Submission field, Select the Mail In radio button. This
selection will be for documents you mail or fax in. The cover sheet must be placed on the top of the documents you are faxing or mailing to DXC Technology Provider Enrollment to ensure that all documents get attached to your electronically submitted application.
Mail documents to DXC Technology at: DXC Technology-New Provider Enrollment PO Box 70082 Boise, ID 83707 Fax documents to Idaho Medicaid Provider Enrollment at DXC Technology: 1 (877) 517-2041
E-mail documents to Idaho Medicaid Provider Enrollment at DXC Technology: [email protected]
For additional questions, you may also call toll free 1 (866) 686-4272 or in Boise call 1 (208) 373-1424, Monday through Friday, 7:00 A.M. to 7:00 P.M. MT.
17.3. Submit Once you are finished printing or uploading all of your documents, select Submit. Figure Figure 17-3 displays the final screen.
An e-mail will be sent to the e-mail address from the Security Login screen notifying you that the application has been submitted.

Idaho MMIS ProviderEnrollment Guide - Group
Last Updated: 12/8/2017 Page 31 of 31
Figure 17-3: Summary Screen
If you have any questions regarding this process, please do not hesitate to call Idaho Medicaid Provider Enrollment to speak with a Provider Enrollment Specialist toll free at 1 (866) 686-4272 or in Boise at 1 (208) 373-1424, Monday through Friday, 7:00 A.M. to 7:00 P.M. MT. Thank you for your participation in the Medicaid Program. The care you provide to Idaho’s Medicaid participants is greatly appreciated.