provider myprofile welcome packet continuing … · welcome packet continuing education provider...
TRANSCRIPT
DICE User Guide 1
Welcome Packet
Continuing Education Provider Letter
Dear Insurance Education Provider, Welcome to the exciting world of insurance education! This packet contains tools and resources that
are designed to assist you as an insurance education provider in Florida. We know they will be
beneficial to you whether you are just beginning your career as an education provider or have been
an education provider for many years. Enclosed in this packet, you will find helpful tips on the following:
Getting Started – Accessing MyProfile Account
Main Page – Provider Inboxes
Main Page – Navigation Buttons
What to do if you log in and do not see the Navigation Buttons
Getting Started – Submitting a Course
Course Reminders
How to Submit a Course
Approved Courses
Getting Started – Submitting a Course Offering
Course Offering Reminders
Preparing to Submit a Course Offering
How to Submit a Course Offering
Approved Course Offerings
Getting Started – Submitting a Roster
Roster Reminders
How to Submit a Roster
Getting Started – Submitting an Instructor Application
Instructor Reminders
How to Submit an Instructor Application
Approved Instructors
Maintaining MyProfile – Adding/Removing School Officials and Contacts
Who Should be Listed as a School Official or Contact in the Provider Account
How to Add a School Official
How to Remove a School Official
How to Add a Contact
How to Change a Contact’s System Permissions
How to Remove (Inactivate) a Contact
How to Reactivate a Contact
Maintaining MyProfile – Provider Profile
How to View and Update the Company (Provider)’s Profile
How to View the Company (Provider)’s Payment History
How to View and Update the User’s Profile
How to View and Update the User’s Preferred Contact Method Please take the time to review the enclosed documents. We wish you well on the ever continuing
pursuit of knowledge. Sincerely,
Education Unit Bureau of Licensing: Education
Division of Agent & Agency Services
PROVIDER MyProfile
Welcome Packet Division of Agent and Agency Services

DICE User Guide 2
Getting Started – Accessing MyProfile Account
The School Official will receive an email regarding the steps needed to create a MyProfile account.
Once the School Official has completed the setup process, they will have access to the Provider
account.
1. Gaining Access
Go to the MyProfile login screen and enter your School Official username and password to
gain access: https://dice.fldfs.com/public/pb_index.aspx
2. Provider Account
Select the Provider Account and click “Next” (Note: There may be only one provider option;
however, “Apply as a new Provider” will always be an alternate option. Some School Officials
act on behalf of multiple providers.)
Getting Started -
Accessing Your Provider MyProfile Account
Trouble logging in?
Utilize the Forgot
Password / Forgot
Username Functions!

DICE User Guide 3
3. Main Page – Provider Inboxes
On the Main Page, you will see the Provider inbox with three provider inboxes: Agency,
Roster/Expired and DFS Requests. The default view is set to the Agency inbox to view
notifications from the Department regarding the Provider account. The DFS Request inbox
will show any requests for information on pending applications that need to be addressed
and responded to in order to avoid closure of the submitted application.
4. Main Page - Navigation Buttons
The Navigation Buttons allow you to do many functions. We will discuss these functions in
more detail throughout this packet.
If you log in and do not see the Navigation Buttons, follow the steps below:
1) Confirm you are using Internet Explorer as your web browser. Please note that Internet
Explorer is the only browser that fully supports the online system for course submissions,
etc.
*Special Note: Windows 10 defaults to the Microsoft Edge browser which requires
downloading and installing “apps” in order to run specific websites. The Department
does not recommend using this browser for our website. Please utilize Internet Explorer
8 or later while viewing and using Department websites for best service.
2) Login to MyProfile and navigate to the Main Page (you will see your inboxes)
3) On the top menu bar select Tools (Alt +x)

DICE User Guide 4
4) Select “Compatibility View Settings”. The address for the current page will appear in the
top box.
5) Click the “Add” button next to the top box to add the page to Compatibility View. The
website will move to the bottom box.
6) Click the “Close” button.
7) Refresh the page. Note: You may need to log in again.
You should now see the Navigation Buttons and have the ability to move throughout the Provider
account.

DICE User Guide 5
Getting Started – Submitting a Course
Getting Started – Submitting a Course
Now that you are able to access your MyProfile account, you are ready to submit a course to the
Department.
1. Course Reminders
Before submitting a course, below are a few reminders:
1) Courses should be submitted for continuing education approval at least 90 days prior to
the course being offered.
The course review can take up to 60 days
The course offering must be submitted 5 days prior to the course being held
2) Advertising a course as “Approval Pending” or any other misleading language is
prohibited in Florida (Department Rule 69B-228.150, F.A.C)
3) The following are not eligible course topics for continuing education in Florida:
Organizational procedures and internal policies of an insurer or any other employer
Motivation
Salesmanship or sales promotion including marketing and courses which are
primarily intended to impart knowledge of specific products or of specific companies
Courses in mechanical office or business skills (i.e. typing, speed racing, etc.)
The use of calculators or other machines or equipment
The use of computer software or equipment, except in computer-based needs
analysis, computer solutions to risk management as related to insurance customers,
rating, and underwriting, or other line of authority
Accounting or tax preparation in connection with the internal business of the licensee
Courses in communication, time management or stress management
You can review course requirements in Department Rule 69B-228.080, F.A.C.
Getting Started -
Submitting a Course

DICE User Guide 6
2. How to Submit a Course
Go to the Navigation Buttons and click on Apply. You will see the drop-down menu below.
Click on “Course”
1) Demographics Screen: This screen is an overview of the course application. Items
marked in red are required.

DICE User Guide 7
Below is a description of each item listed on the Demographics screen:
Course Name: The title of your course
Description: A description for the Department and licensees of what your course will
entail
Course Type: Type of course, Continuing Education or Pre-Licensing
Study Method:
Classroom – Classroom courses must be taught by a FL approved instructor.
Classroom courses expire after they are not offered for 2 years.
Self-study Correspondence – Self-study courses taught by book or other
correspondence method. No instructor is required however a final exam is
needed. Self-study Correspondence courses expire once they are not offered
for 2 years.
Self-study Online – Self-study courses taught online. No instructor is required
however a final exam is needed. Self-study Online courses expire once they are
not offered for 2 years.
Seminar-Full – Courses that will be taught for a year or less, such as the 5-hour
course. Guest speakers are allowed; however an approved instructor in the
course authority being taught must be present. Seminar courses expire one
year from the approval date.
Seminar-Partial – Seminar courses that allow the licensee the option to choose
between several offered lectures to attend during a specific timeframe.
Seminar courses expire one year from the approval date.
IMPORTANT NOTE: Regardless of the study method of the course, all 5 Hour Law & Ethics
Update courses expire one year from the approval date.
Course Level: You should choose Basic, Intermediate or Advanced based on the
difficulty level of the course content, using rule 69B-228.080(9) as a guideline. This
field is grayed out for pre-licensing courses as all pre-licensing courses are basic
level.
Subject Area: The subject area should match the course authority
Comments: Any comments you would like the Department to know regarding the
course
Click “Next” to continue.
DICE User Guide 8
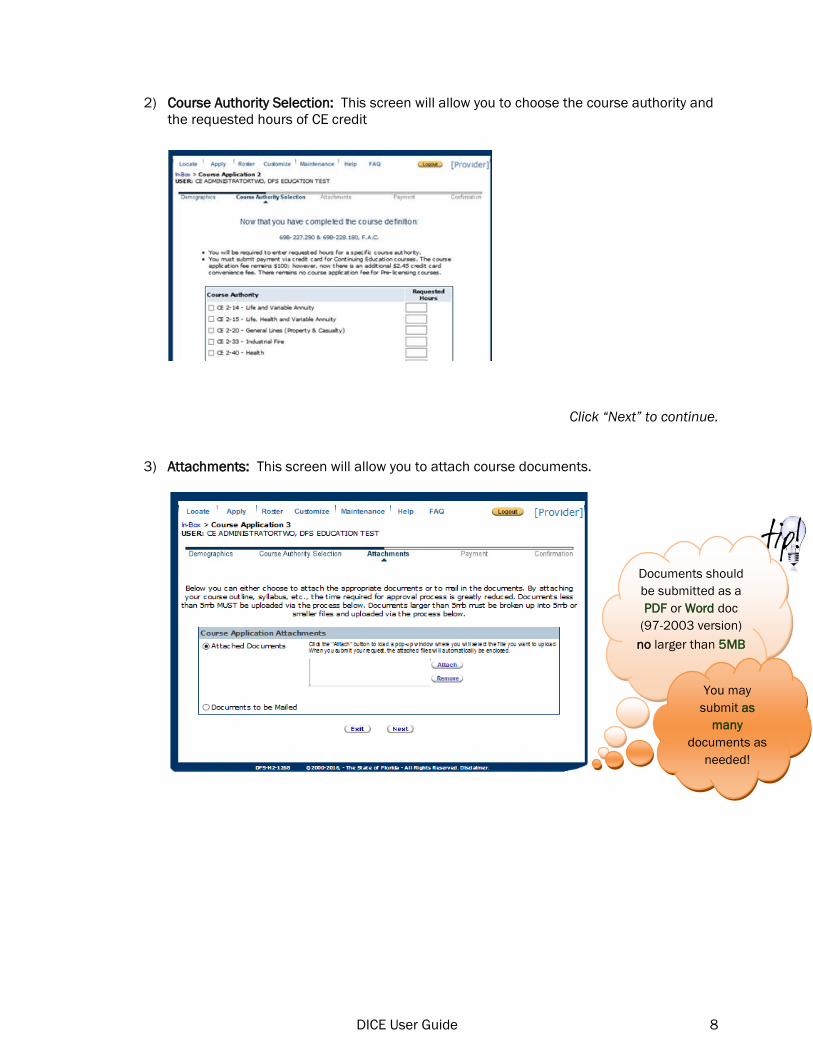
2) Course Authority Selection: This screen will allow you to choose the course authority and
the requested hours of CE credit
Click “Next” to continue.
3) Attachments: This screen will allow you to attach course documents.
Documents should
be submitted as a
PDF or Word doc
(97-2003 version)
no larger than 5MB
You may
submit as
many
documents as
needed!

DICE User Guide 9
What documents should be submitted to the Department?
A complete checklist of “What to Submit in a Pre-Licensing Course Application” and
“What to Submit in a Continuing Education Application” can be found at:
http://www.myfloridacfo.com/Division/Agents/Licensure/Education/default.htm
Click on the Providers Link under Education Information
4) Payment: This screen provides the Payment Summary for the course. The application
fee for Continuing Education courses is $100. There is a processing fee of $2.45.
Note: There is no charge for Pre-licensing courses, so you will not see the Payment
page.
5) Confirmation: The final page that will display is a confirmation page, showing the course
was submitted to the Department for approval.

DICE User Guide 10
3. Course Review
Once the course is submitted, it will be reviewed by the Department. If additional information
is needed to approve the course, you will receive a DFS Request.
To view the DFS Request, go to the DFS Requests tab on the Main Page.
1) Click on the Course Name to review the DFS Request
2) Review “Information Requested” to determine the information needed to complete the
course review.
3) Provider Response: Type your response to the DFS Request
4) Attach Documents: Attach any requested documents
5) Click “Submit”. The Provider Response will be reviewed within 3 business days.
Note: Once you respond to a DFS Request, the request is removed from your inbox.
You will not be able to respond again unless you are resent the request.
4. Approved Courses
DFS Requests
are removed
from your inbox
once you
respond.
Double check
your message
before you
submit!

DICE User Guide 11
Once the course has been approved, you will receive an email in the Agency tab of the Home
Page showing the course has been approved.
1) Viewing Approved Courses:
To view the approved course, click on the blue “Notification” link in the Agency tab of
the Home Page.
To view a listing of all of your approved courses, go to the Navigation Buttons and
click on Maintenance. You will see the drop-down menu below. Click on “Course List”
DICE User Guide 12
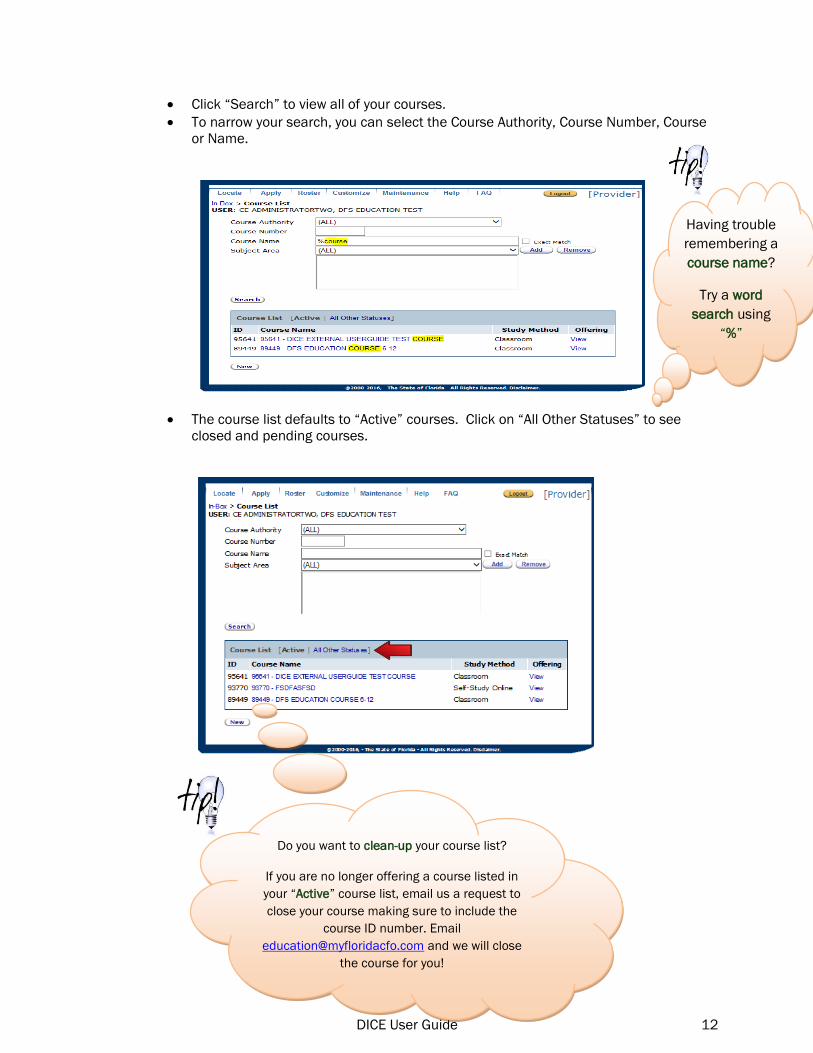
Click “Search” to view all of your courses.
To narrow your search, you can select the Course Authority, Course Number, Course
or Name.
The course list defaults to “Active” courses. Click on “All Other Statuses” to see
closed and pending courses.
Do you want to clean-up your course list?
If you are no longer offering a course listed in
your “Active” course list, email us a request to
close your course making sure to include the
course ID number. Email
[email protected] and we will close
the course for you!
Having trouble
remembering a
course name?
Try a word
search using
“%”

DICE User Guide 13
Getting Started – Submitting a Course Offering
Once your course has been approved, you are ready to submit a course offering. The course offering
notifies the Department you will be offering the CE course.
1. Course Offering Reminders
Before submitting a course offering, below are a few reminders:
1) The course offering must be submitted for approval at least 5 days prior to the course
being offered
Course offerings can be submitted up to 1 year in advance.
You can review course offering requirements in Department Rule 69B-228.090, F.A.C.
2) Instructors:
Classroom courses must be taught by an approved instructor
Seminar courses allow guest lecturers, however they must have an approved
instructor present in the course authority being taught
The approved instructor must be listed on the course offering
The guest lecturer(s) bios/resumes must be on file with the approved course
The instructor listed on the course offering must be the same instructor that
teaches the course. More than one instructor can be listed on a course
offering.
Self-study courses do not require an instructor to be listed, however, if there is an
instructor associated with the course they should be listed on the offering.
3) If there are any changes, a revised course offering must be submitted to the Department.
If an instructor changes
If the date changes
If the time changes
If the location changes
Changes to course offerings are required to be submitted to the Department and
approved prior to the date when the change will be effective per Rule 69B-
228.090(2), F.A.C.
Getting Started -
Submitting a Course Offering

DICE User Guide 14
2. Preparing to Submit a Course Offering
Before submitting a course offering, you will need to complete two very important
steps:
1) Instructor ID: Find the instructor ID number for Classroom and/or Seminar Courses
Instructors attached to your provider account: Go to the Navigation Buttons and click
on Maintenance. You will see the drop-down menu below. Click on “Instructor List”
Click “Search”. You will see a listing of all approved instructors for your
provider account.
The instructor ID number is listed on the left hand side.
To view the course authorities the instructor is approved to teach, click
“Instructor Name”.
Once you find
the ID #, write it
down!

DICE User Guide 15
Instructors not attached to your provider account: Click on the Providers Link under
Education Information at:
http://www.myfloridacfo.com/Division/Agents/Licensure/Education/default.htm
Click on the link “A List of All Instructor IDs as of (current edition date)”
2) Course Location: Add the course location to DICE
Go to the Navigation Buttons and click on Maintenance. You will see the drop-down
menu below. Click on “Location List”

DICE User Guide 16
Click “New”. You will see the Location Detail Screen below. Items marked in red are
required. Once all items are completed, click “Save”.
The location is now saved in the provider Location List and is ready for use in the
course offering.
3. How to Submit a Course Offering
Go to the Navigation Buttons and click on Apply. You will see the drop-down menu below.
Click on “Course Offering”

DICE User Guide 17
1) Offering Application:
This screen is an overview of the course offering application. Items marked in red are
required.
Course: The title of your course (this is a drop-down menu of all approved courses)
Program Type: In-house courses are only offered to a select group of individuals (i.e.
employees). Public courses are offered to any licensee.
Instructor ID: Add the instructor ID number for Classroom and Seminar courses
Date: The date the course will occur
Day of Week: Weekday(s) the course will occur
Time: The time the course will occur
Lunch Break: The time a lunch break occurred (non-CE time)
Location: Location of course (this is a drop-down menu)
Comments: Any comments the Department should know regarding the course, such
as timing or breaks that cannot be included above, venue notes, etc.
What if I make a mistake on a course offering?
Complete the Section: “Does this offering replace another offering (e.g., correction)?
Yes”
State “Yes” if you are replacing a current course offering due to a new
instructor, new location, change in time or date
Complete the section “This offering replaces Course Offering ID” and click
“Search”
This will replace the old course offering with the corrected/revised information.
IMPORATANT NOTE: If your offering was approved with the incorrect course, cancel the
incorrect offering then submit a new course offering and select the appropriate course.
Completing a
brand new
course
offering?
Stop at
Comments
Completing a
replacement course
offering?
Check the box below
the comments
section and fill in the
Course Offering ID to
be replaced.
DICE User Guide 18
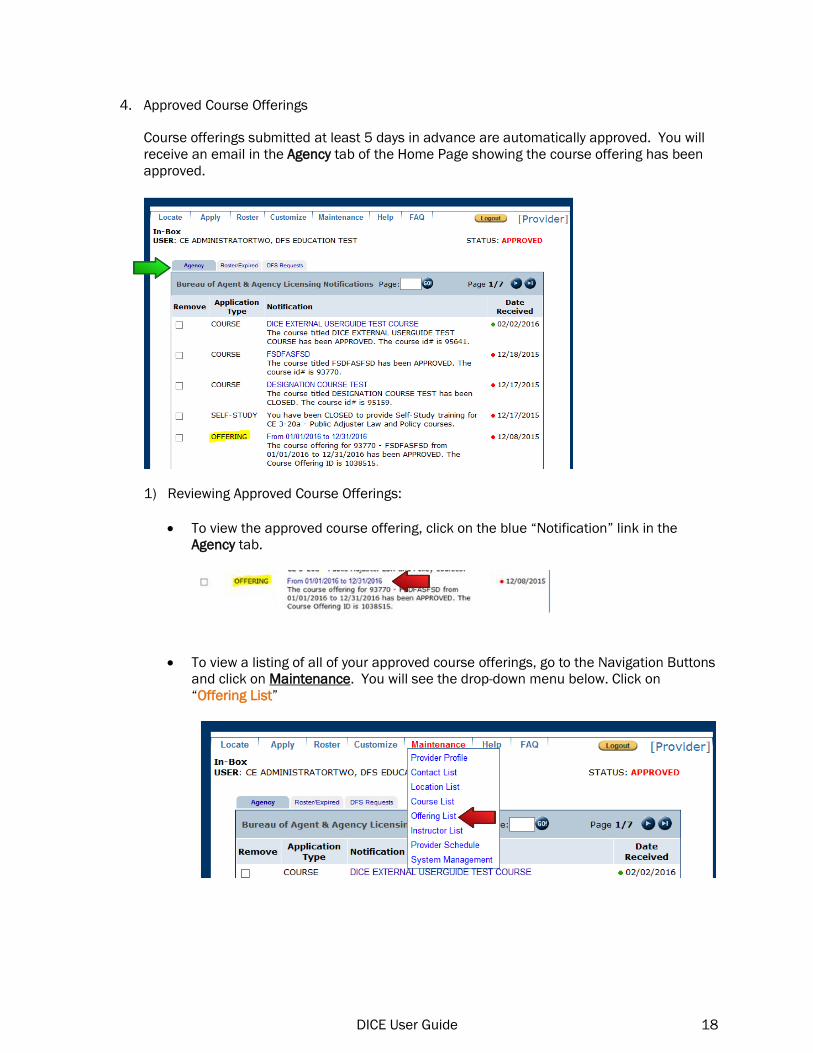
4. Approved Course Offerings
Course offerings submitted at least 5 days in advance are automatically approved. You will
receive an email in the Agency tab of the Home Page showing the course offering has been
approved.
1) Reviewing Approved Course Offerings:
To view the approved course offering, click on the blue “Notification” link in the
Agency tab.
To view a listing of all of your approved course offerings, go to the Navigation Buttons
and click on Maintenance. You will see the drop-down menu below. Click on
“Offering List”

DICE User Guide 19
You can search by “Course” or “Course Offering ID”.
To search by Course, select the course you would like to view the course
offerings for and enter “Search”
The default view is “Active” course offerings. “All Other Statuses” shows
closed, cancelled and expired course offerings.
Course offerings automatically close after the course date has passed. You are
able to upload a roster on closed course offerings.
WARNING: While viewing the course offering, there is a “Save” and a “Cancel”
button. Do not click any buttons on this page if you are just viewing your
offering. If you accidentally click “Cancel”, the course offering will be canceled!

DICE User Guide 20
Getting Started – Submitting a Roster
Now that the course offering is approved and the course has been held, you are ready to submit the
attendance roster to the Department. The roster provides CE credit to the course attendees.
1. Roster Reminders
Before submitting a roster, below are a few reminders:
1) Rosters must be posted within 21 days of the course completion to allot continuing
education credit to licensees who attended the course
Self-study course rosters may be sent once a month on the last day of the month, or
when the last results of examinations for that month are completed
2) A completed Certificate of Completion must be issued to each person completing a
continuing education course
The Certificate of Completion must be issued within 30 days of the date the student
completes the course.
The Certificate of Completion must include:
1. Name of the student
2. License number of the student
3. The provider name
4. The provider ID number
5. The course ID number
6. The course offering ID number
7. The name of the course
8. The name of the instructor (required for classroom and seminar)
9. The instructor ID number (required for classroom and seminar)
10. The completion date of the course
11. The date the certificate was awarded
12. A statement certifying that the person named on the certificate has
successfully completed an insurance course taught in compliance
with the rules of the Department.
13. The signature of the School Official
14. Self-study courses must also include the final examination score
3) Approved course providers must maintain accurate attendance records for 5 years after
each course completion containing:
The name, date and location of the offering
Documentation that an ID was checked
Licensee name and license ID number
Proof of at least 2 attendance checks for classroom and seminar courses over 4
hours
A statement signed by the instructor (and/or school official) that the attendance
records are correct
Getting Started -
Submitting a Roster
DICE User Guide 21
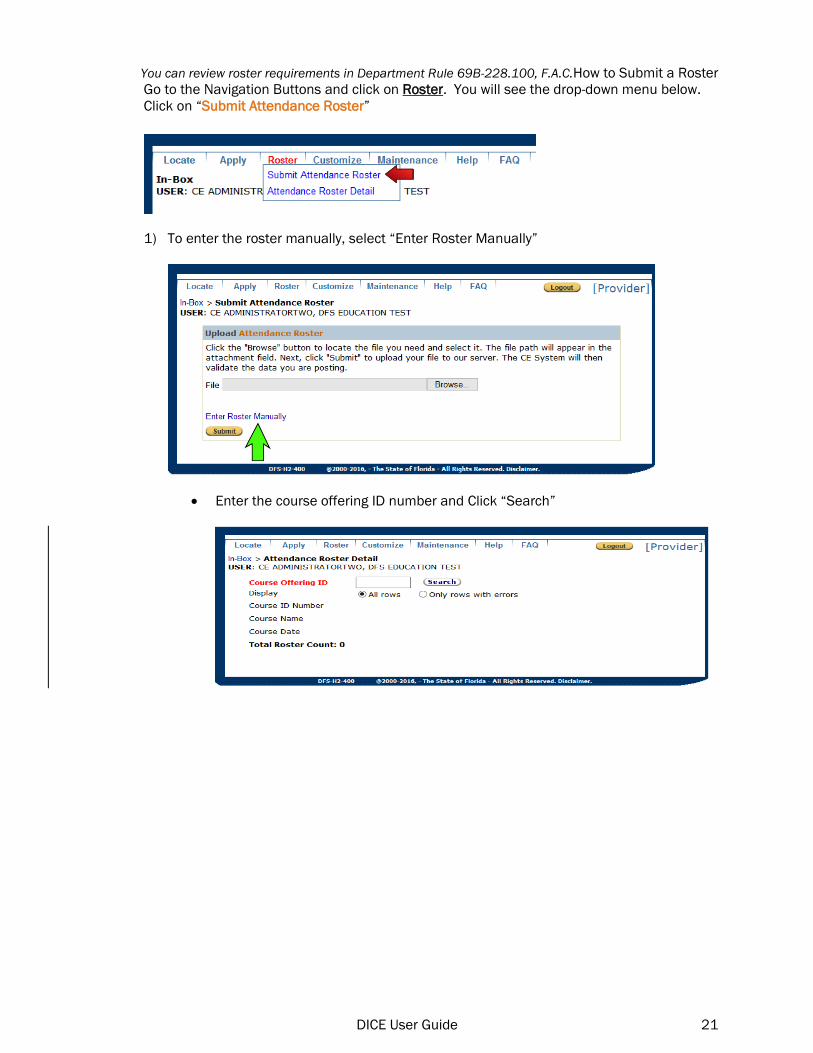
You can review roster requirements in Department Rule 69B-228.100, F.A.C.How to Submit a Roster
Go to the Navigation Buttons and click on Roster. You will see the drop-down menu below.
Click on “Submit Attendance Roster”
1) To enter the roster manually, select “Enter Roster Manually”
Enter the course offering ID number and Click “Search”
DICE User Guide 22
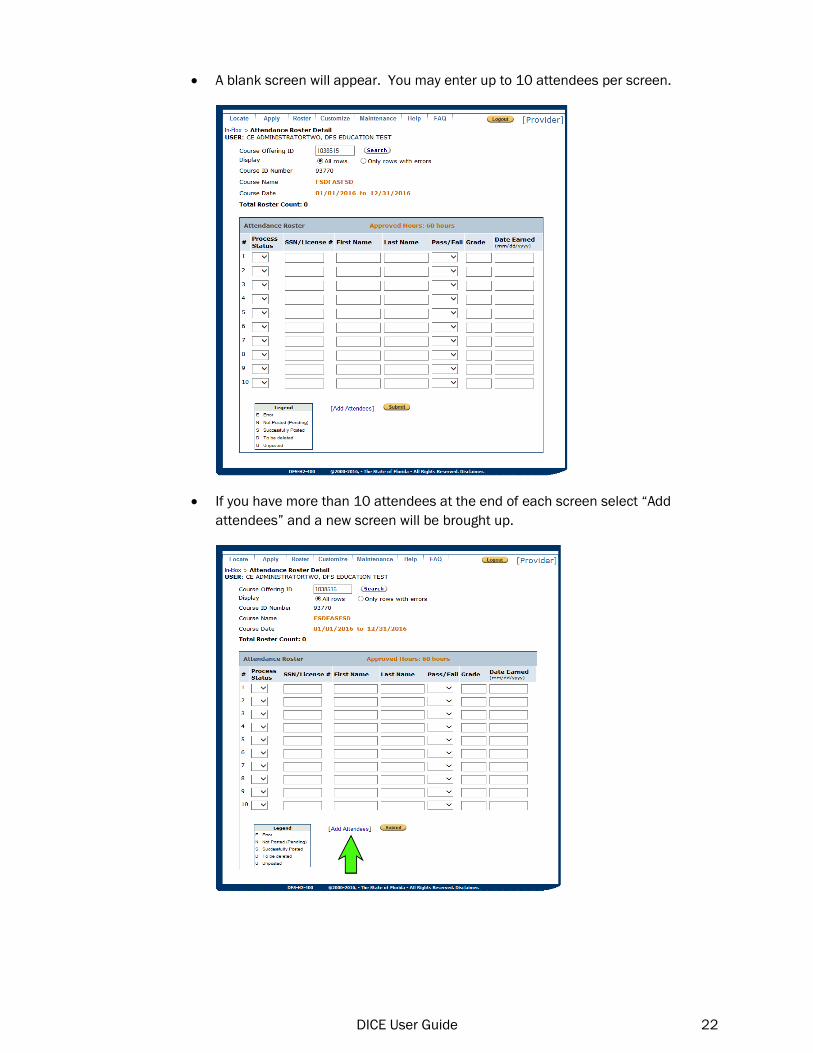
A blank screen will appear. You may enter up to 10 attendees per screen.
If you have more than 10 attendees at the end of each screen select “Add
attendees” and a new screen will be brought up.

DICE User Guide 23
2) To enter the Roster by an Excel Spreadsheet, click on the Help button at the top of this
page (the Help button is located in the Navigation Buttons). Click on “Help for this Page”
Select “Excel Format”
Follow the directions as given for inputting Excel files; then return to the previous
screen.
Once your Excel file is ready to submit, select “Submit Attendance Roster” and click
the “Browse” button. Follow the directions to upload your file to our server.

DICE User Guide 24
Getting Starting – Submitting an Instructor Application
Now that you know how to submit a course, it’s time to learn how to submit an instructor application.
1. Instructor Reminders
Before submitting an instructor application, below are a few reminders:
1) Classroom courses must be taught by an approved instructor. Seminar courses allow
guest lecturers, however they must have an approved instructor present in the course
authority being taught
2) For all continuing education courses, instructors must meet one (1) of the following
qualifications:
Have at least 10 years working experience in the subject matter in the last 20 years.
Have at least 200 hours instructing in the subject matter in the last 4 years.
Possess a chartered property and casualty underwriter (CPCU) or chartered life
underwriter (CLU) designation.
Have a Risk Management Insurance degree.
Membership in the Florida Bar Association with minimum of 2 years of law practice or
counsel in the subject area being taught.
OR instructors must meet two (2) of the following qualifications:
Have at least 5 years working experience in the subject matter in the last 10 years.
Have at least 40 hours of instructional experience in the last 4 years.
Possess a Bachelors degree or higher in the subject matter.
Possess a professional designation recognized by the insurance industry in the
subject matter.
3) For all pre-licensing courses, instructors must meet one (1) of the following qualifications:
At least ten (10) years working experience in the subject matter in the last twenty
(20) years
At least two hundred (200) hours instructing in the subject matter in the last four (4)
years
Chartered property and casualty underwriter (CPCU) or chartered life underwriter
(CLU) designation
Risk Management Insurance degree
Florida Bar membership with two (2) years experience litigating the subject matter
OR the instructor must meet two (2) of the following qualifications:
At least five (5) years working experience in the subject matter in the last ten (10)
years
At least forty (40) hours instructional experience in the last four (4) years
Bachelors degree or higher in the subject matter
Professional designation recognized by the insurance industry in the subject matter
Getting Started -
Submitting an Instructor Application

DICE User Guide 25
4) Bail bond supervising instructors/school officials (continuing education and pre-
licensing) must meet the qualifications as set forth in Section 648.386(4), F.S., subject
to the limitations imposed in Rule 69B-227.310, F.A.C.
You can review instructor requirements in Department Rule 69B-227.160, F.A.C.,
Department Rule 69B-228.060, F.A.C., and Section 648.386(4), F.S.
2. How to Submit an Instructor Application
Go to the Navigation Buttons and click on Apply. You will see the drop-down menu below.
Click on “Instructor”
1) Identification Screen: This screen is the applicant identification screen. This screen is
the beginning of the instructor application.

DICE User Guide 26
2) Course Authority Selection: This screen allows you to select the course authority you
would like the instructor to teach.
A new application must be completed for each course authority.
3) Demographics Screen: This screen is the instructor application, including name and
contact information. Items marked in red are required.
4) Background Questions: Every applicant must answer the background questions. Page
Help, or Instructions, are listed on the left hand side of the screen.
DICE User Guide 27
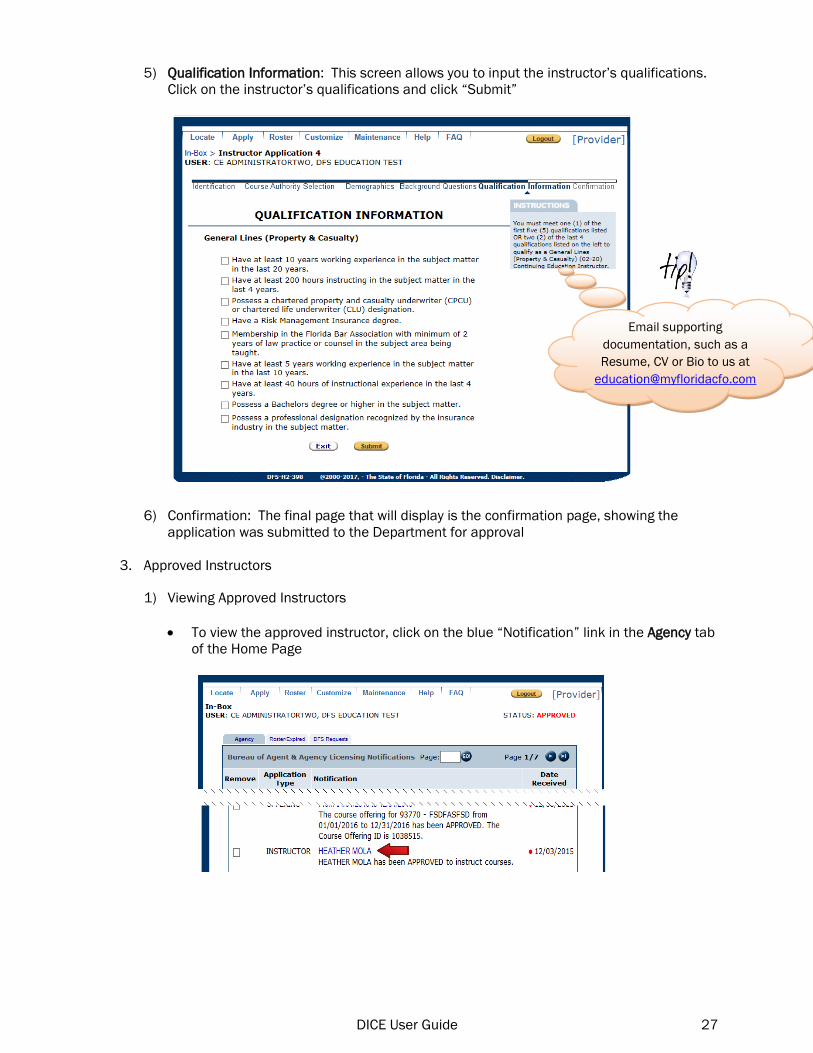
5) Qualification Information: This screen allows you to input the instructor’s qualifications.
Click on the instructor’s qualifications and click “Submit”
6) Confirmation: The final page that will display is the confirmation page, showing the
application was submitted to the Department for approval
3. Approved Instructors
1) Viewing Approved Instructors
To view the approved instructor, click on the blue “Notification” link in the Agency tab
of the Home Page
Email supporting
documentation, such as a
Resume, CV or Bio to us at

DICE User Guide 28
To view a listing of all instructors attached to your provider account, go to the
Navigation Buttons and click on Maintenance. You will see the drop-down menu
below. Click on “Instructor List”
Click “Search”
To narrow your search, you can select the Instructor ID, First Name or Last Name
Click the Instructor Name link to see the course authorities the instructor is approved
to teach.
To find instructors not attached to your provider
account, go to the “Providers” link at
http://www.myfloridacfo.com/Division/Agents/Licensur
e/Education/default.htm
Click on the link “A list of All Instructor IDs as of (current
edition date)”

DICE User Guide 29
Supervising
Instructors are
school officials
for Bail Bond
providers with
additional
duties
Maintaining MyProfile – Adding /Removing School Officials and Contacts
1. Who Should be listed as a School Official or Contact in the Provider Account
Anyone submitting courses, course offerings, rosters or in direct contact with the Department
should be listed in the provider MyProfile account as a school official or contact
Anyone using the provider account should have their unique login and password to
access MyProfile
What is the difference between a School Official and a Contact?
1) A School Official is responsible for the actions of the provider
To become a school official, an application has to be completed
A Supervising Instructor is the School Official for Bail Bond providers with
additional responsibilities as listed in the 2nd bullet below
To become a supervising instructor, an application has to be completed and specific
qualifications must be met per 648.386, F.S. as follows:
1. During the past 15 years, the person must have had at least 10
years’ experience as a manager or officer of a managing general
agent in this state as prescribed in s. 648.388;
2. During the past 15 years, the person must have had at least 10
years’ experience as a manager or officer of an insurance company
authorized to and actively engaged in underwriting bail in this state,
provided there is a showing that the manager’s or officer’s experience
is directly related to the bail bond industry; or
3. The person has been a licensed bail bond agent in this state for at
least 10 years.
A Supervising Instructor must attend all classes and is responsible for
1. All course instructors
2. All guest lecturers
3. The course outlines and curriculum
4. Certification of each attending limited surety agent or professional
bail bond agent
5. Assuring that the course is approved
2) A Contact works under a school official and is not responsible for the actions of the
provider
Contacts do not need to complete an application
Contacts can have different access, or permission, in the provider MyProfile account
depending on each provider’s preference
Contacts can be added or removed at any time
Maintaining MyProfile -
Adding/Removing School Officials and Contacts

DICE User Guide 30
2. How to Add a School Official/Supervising Instructor
School officials require a submitted school official/supervising instructor application. The
application can be added directly through your provider MyProfile account.
Go to the Navigation Buttons and click on Apply. You will see the drop-down menu below.
Click on “School Official”
1) Identification Screen: This screen is the applicant identification screen. This screen is
the beginning of the school official application
The applicant is required by state and federal law to disclose their social security
number on this application

DICE User Guide 31
2) Demographics Screen: This screen is the instructor application, including name and
contact information. Items marked in red are required
3) Background Questions: Every applicant must answer the background questions. Page
Help, or Instructions, are listed on the left hand side of the screen
4) Confirmation: The final page that will display is a confirmation page, showing the
application was submitted to the Department for review
Once the application is approved, the school official will receive an email with
instructions on how to login and access the provider MyProfile account
3. How to Remove a School Official
If a school official is no longer working for the provider and should be removed, email the
Department at [email protected] to remove the school official
1) The request should be made by an active school official or contact
4. How to Add a Contact
To add a contact, go to the Navigation Buttons and click on Maintenance. You will see the
drop-down menu below. Click on “Contact List”
1) Click “Search”

DICE User Guide 32
2) Click “New”
3) Contact Information: This screen is the contact information screen. Items marked in red
are required
The contact will receive an email the following day with instructions on how to login
and access the provider MyProfile account
5. How to Change a Contact’s System Permissions
To change a contact’s system permission, you must first create a User Group (User
Permission) to assign the contact
1) Creating a New User Group
Go to the Navigation Buttons and click on Maintenance. You will see the drop-down
menu below. Hover over “System Management” until a second box appears and then
click on “System Security”
DICE User Guide 33
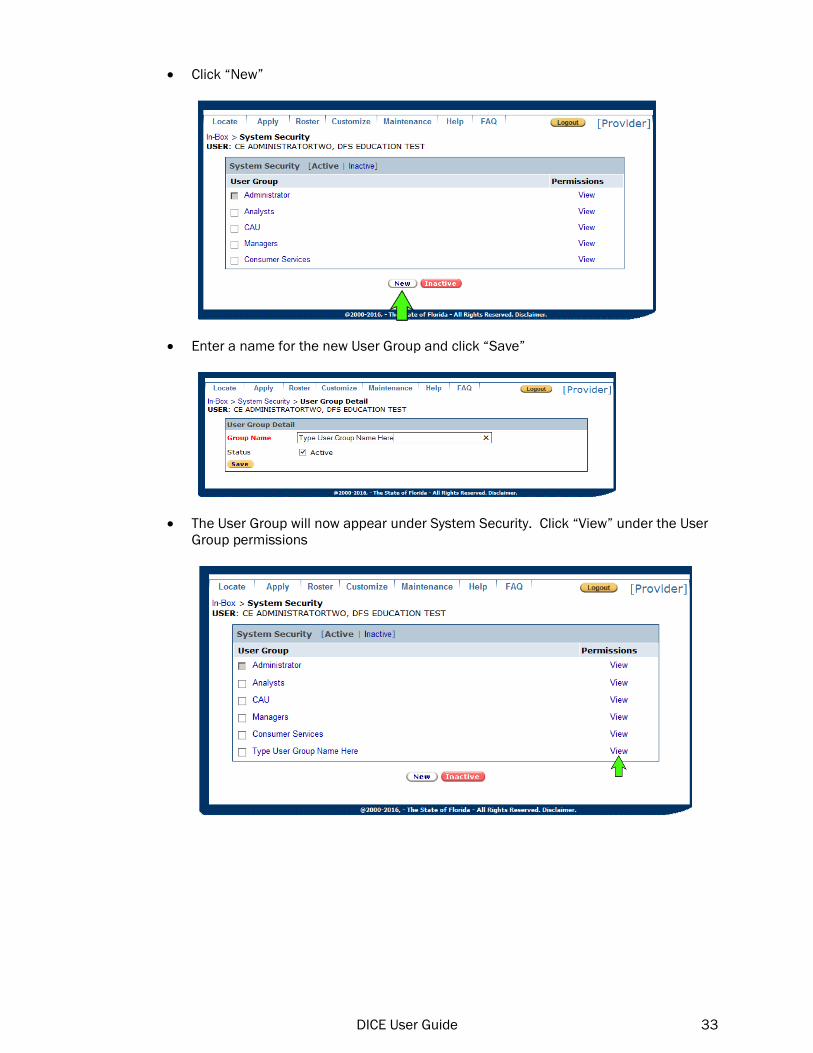
Click “New”
Enter a name for the new User Group and click “Save”
The User Group will now appear under System Security. Click “View” under the User
Group permissions

DICE User Guide 34
Check any permissions you would like to set for the User Group
2) Changing a User Group’s Permissions
Go to the Navigation Buttons and click on Maintenance. You will see the drop-down
menu below. Hover over “System Management” until a second box appears and then
click on “System Security”
Click “View” for the user group’s permissions you would like to review
DICE User Guide 35
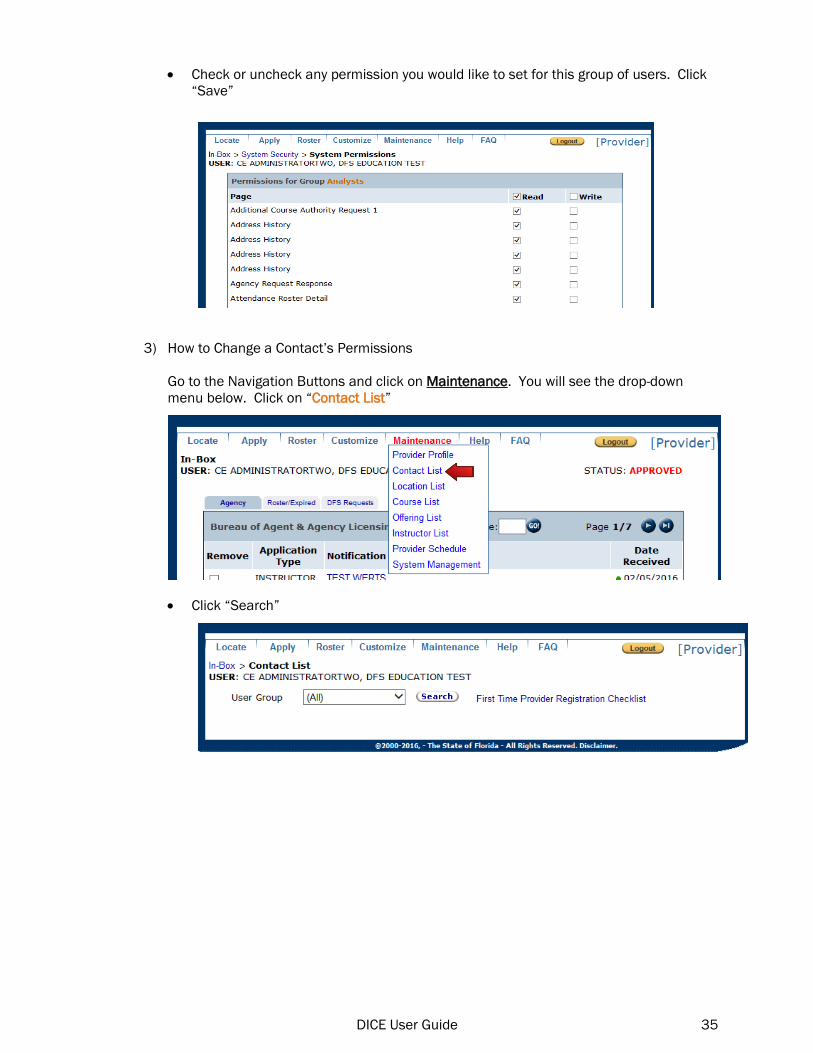
Check or uncheck any permission you would like to set for this group of users. Click
“Save”
3) How to Change a Contact’s Permissions
Go to the Navigation Buttons and click on Maintenance. You will see the drop-down
menu below. Click on “Contact List”
Click “Search”
DICE User Guide 36
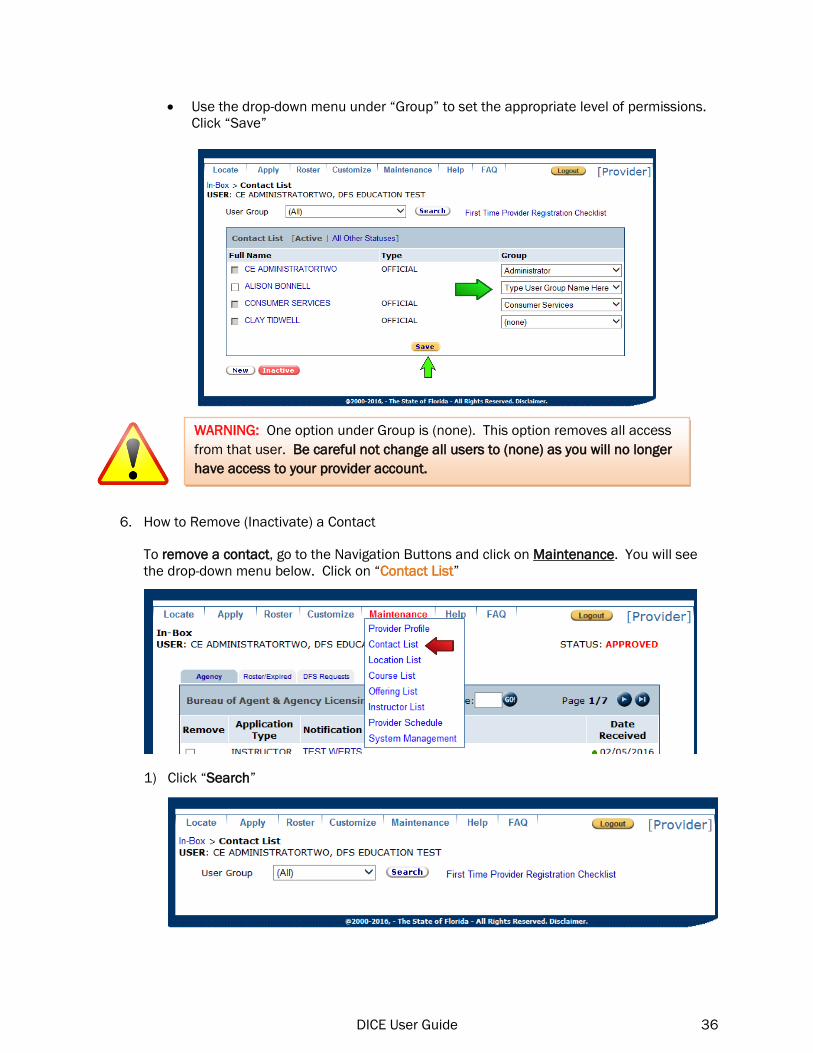
Use the drop-down menu under “Group” to set the appropriate level of permissions.
Click “Save”
6. How to Remove (Inactivate) a Contact
To remove a contact, go to the Navigation Buttons and click on Maintenance. You will see
the drop-down menu below. Click on “Contact List”
1) Click “Search”
WARNING: One option under Group is (none). This option removes all access
from that user. Be careful not change all users to (none) as you will no longer
have access to your provider account.

DICE User Guide 37
2) Check the name of individual you would like to remove, or inactivate. Click “Inactive”
3) A Message will appear “Are you sure you want to inactivate the selected records?” Click
“Ok”. The contact will now be inactive on the provider account.
7. How to Reactivate a Contact
Go to the Navigation Buttons and click on Maintenance. You will see the drop-down menu
below. Click on “Contact List”
1) Click “Search”

DICE User Guide 38
2) Click “All Other Statuses”
3) Contact List:
1. Check the name of individual you would like to reactivate.
2. Use the drop down menu under “Group” to set the appropriate level of user
permission.
3. Click “Active”

DICE User Guide 39
Maintaining MyProfile – Provider Profile
Your Company’s profile is maintained online. The information you provide is used by the
Department to customize your personal contact method.
1. How to View and Update the Company (Provider)’s Profile
Go to the Navigation Buttons and click on Maintenance. You will see the drop-down menu
below. Click on “Provider Profile”
1) You will be able to update the Company (Provider)’s contact information, such as
Provider DBA
FEIN number
Business Address
Mailing Address
Phone Number
2) To update the Company (Provider)’s business name, you will need to send an email to:
Maintaining MyProfile -
Provider Profile

DICE User Guide 40
2. How to View the Company (Provider)’s Payment History
Go to the Navigation Buttons and click on Maintenance. You will see the drop-down
menu below. Hover over “System Management” until a second box appears and then
click on “Payment History”
A listing of the course name, type, fee, receipt number and date will appear
3. How to View and Update the User’s Profile
Go to the Navigation Buttons and click on Customize. You will see the drop-down menu
below. Click on “My Profile”
1) You will be able to update your user contact information such as mailing address, email
and phone number

DICE User Guide 41
4. How to View and Update the User’s Preferred Contact Method
Go to the Navigation Buttons and click on Customize. You will see the drop-down menu
below. Click on “Notices”
1) Choose your preferred contact method and confirm your email address
In-Box or Email
HTML or Plain Text