prow 18 - linzelectric.com · sentono di utilizzare le sue due funzioni contemporaneamente,...
TRANSCRIPT

IT Istruzioni per l’uso e manutenzione
SALDATRICI/ALTERNATORI Istruzioni originali L’INSTALLAZIONE DEVE ESSERE EFFETTUATA SOLO DA PER-
SONALE AUTORIZZATO DALLA LINZ ELECTRIC SPA
EN Operation and maintenance
WELDERS/ALTERNATORS With translation of the original instructions THE INSTALLATION MUST BE PERFORMED ONLY BY PERSON-
NEL AUTHORIZED BY LINZ ELECTRIC SPA
PROW 18
Prima di iniziare ad operare con la macchina, leggere attenta-mente le istruzioni per l’uso.
Before starting to work with the machine, operation read the instructions for use.
Ed: 2018/1

- 2 -
INDICE 1. Misure di sicurezza ........................................................ 3
2. Descrizione dell’alternatore ...................................... 3
3. Messa in servizio ............................................................ 4
4. Istruzioni per il montaggio ......................................... 4
5. Note generali ................................................................... 6
6. Funzionamento come generatore ........................... 7
7. Regolatore di tensione ................................................. 8
8. Funzionamento come saldatrice .............................. 9
9. Norme di sicurezza per la saldatura ........................ 9
10. Installazione ..................................................................... 12
11. Saldatura ........................................................................... 12
12. Resistenze e dati di eccitazione ................................ 13
13. Risoluzione dei problemi (parte generatore) ...... 14
14. Risoluzione dei problemi (parte saldatrice) ......... 15
PARTI DI RICAMBIO ............................................................... 28
Dichiarazione di conformità e di incorporazione ...... 30
INDEX 1. Safety instruction ........................................................... 16
2. Alternator description ................................................. 16
3. Installation and start up .............................................. 17
4. Assembly insructions .................................................. 17
5. General notes .................................................................. 19
6. Operation as generator ............................................... 19
7. Voltage regulation ......................................................... 21
8. Operation as welder ...................................................... 22
9. Safety instructions for welding ................................. 24
10. Installation ........................................................................ 24
11. Welding ............................................................................. 25
12. Resistances and excitation data ............................... 26
13. Trouble shooting (generator) .................................... 26
14. Trouble shooting (welder) .......................................... 27
SPARE PARTS............................................................................ 28
Declaration of conformity and incorporation ............. 30
MOVIMENTAZIONE ALTERNATORI ALTERNATORS HANDLING
PERICOLOA) SCOTTATURE
B) SHOCK ELETTRICOC) ATTENZIONE ALLE MANI
DANGERA) BURNS
B) ELECTRIC SHOCKC) BEWARE TO HANDS
A B C
- 3 -
PROW 18 SALDATRICI DC / ALTERNATORI TRIFASE 4 POLI, SENZA SPAZZOLE CON ECCITATRICE
1. MISURE DI SICUREZZA Prima di utilizzare il gruppo elettrogeno è indispensabile leggere il manuale “Uso e manutenzione” del gruppo elettro-geno e dell’alternatore e seguire le raccomandazioni seguenti. ⇒ Un funzionamento sicuro ed efficiente può essere raggiunto solo se le macchine vengono utilizzate in modo corret-
to, secondo quanto previsto dai relativi manuali di “uso e manutenzione” e dalle norme di sicurezza. ⇒ Una scarica elettrica può causare gravi danni e addirittura la morte. ⇒ È vietato togliere la calotta di chiusura della scatola morsetti e le griglie di protezione dell’alternatore finché lo
stesso è in movimento e prima di avere disattivato il sistema di avviamento del gruppo elettrogeno. ⇒ La manutenzione del gruppo deve essere effettuata esclusivamente da personale qualificato e specializzato. ⇒ Non operare con indumenti “sciolti” in vicinanza del gruppo elettrogeno. Le persone addette alla movimentazione devono sempre indossare guanti da lavoro e scarpe antinfortunistiche. Qualora il ge-neratore o l’intero gruppo debba essere sollevato da terra, gli operai devono usare un casco protettivo.
L’installatore finale del gruppo elettrogeno è responsabile della predisposizione di tutte le misure necessarie a rendere l’intero impianto conforme alle vigenti norme locali di sicurezza (messa a terra, protezioni contro il con-tatto, protezioni contro le esplosioni e l’incendio, arresto di emergenza, ecc…).
MESSAGGI DI SICUREZZA Nel presente manuale useremo dei simboli che hanno il seguente significato:
IMPORTANTE! Si riferisce ad una operazione rischiosa o pericolosa che può causare danni al prodotto.
CAUTELA! Si riferisce ad una operazione rischiosa o pericolosa che può danneggiare il prodotto e può causare ferite alle persone.
ATTENZIONE! Si riferisce ad una operazione rischiosa o pericolosa che può causare gravi ferite o possibile morte.
PERICOLO! Si riferisce ad un rischio immediato che potrebbe causare gravi ferite o la morte.
2. DESCRIZIONE DELL’ALTERNATORE La serie PROW18 è costituita da saldatrici DC/Alternatori trifase a 4 poli, senza spazzole con eccitatrice. Queste macchine con-sentono di utilizzare le sue due funzioni contemporaneamente, saldatura e carico come generatore. La funzione di saldatura è governata da un sistema elettronico di regolazione a corrente costante. L’utilizzo come generatore possiede la propria regolazione elettronica (AVR), che mantiene costante la tensione di uscita. Le macchine sono costruite in conformità con quanto previsto dalle norme EN 60034-1, EN 60204-1, EN 55014-1, EN 55011, EN 6000-6-4, ed alle direttive 2006/95/CE, 2004/108/CE e 2006/42/CE.
Ventilazione assiale con aspirazione dal lato opposto accoppiamento. Protezione standard IP 23. Senso di rotazione sono ammessi ambedue i sensi di rotazione. caratteristiche elettriche gli isolamenti sono realizzati con materiali di classe H sia nello statore che nel rotore. Gli avvol gimen-ti sono tropicalizzati. Potenze sono riferite alle seguenti condizioni: temperatura ambiente non superiore a 40°C, altitudine non superiore a 1000 m. s.l.m., servizio continuo a cos φ = 0.8.
Sovraccarichi Si accetta generalmente un sovraccarico del 10% per 1 ora ogni 6 ore.
Funzionamenti in ambienti particolari Nel caso l’alternatore debba funzionare ad una altitudine superiore ai 1000 m s.l.m. è necessario attuare una riduzione della potenza erogata del 4% ogni 500 m di incremento. Quando la temperatura dell’ambiente è superiore a 40°C si deve ridurre la potenza erogata dall’alternatore del 4% ogni 5°C di incremento. Caratteristiche meccaniche La cassa è realizzata in acciaio, lo scudo L.A. in ghisa, lo scudo in L.O.A. è realizzato in lega di alluminio resistente alle vibra zioni e l’albero in acciaio ad alta resistenza. Il rotore è particolarmente robusto per resistere alla velocità di fuga dei motori di trascinamento ed è dotato di una gabbia di smorzamento che permette un buon funzionamento anche con carichi monofase distorcenti e squilibrati. I cuscinetti sono lubrificati a vita.
ITALIANO

- 4 -
3. MESSA IN SERVIZIO Le seguenti operazioni di controllo e di messa in servizio devono essere eseguite solo da personale qualificato. ⇒ L’alternatore dovrà essere installato in un locale con possibilità di scambio dell’aria con l’atmosfera per impedire che la
temperatura ambiente superi i valori previsti dalle norme. ⇒ Bisogna fare attenzione che le aperture previste per l’aspirazione e lo scarico dell’aria non siano mai ostruite e che la tecnica
prescelta per il piazzamento dell’alternatore sia tale da evitare l’aspirazione diretta dell’aria calda in uscita dall’alternatore stesso e/o dal motore primo.
⇒ Prima della messa in funzione è necessario controllare visivamente e manualmente che tutti i morsetti delle diverse mor-settiere siano serrati regolarmente e che non esista impedimento alcuno alla rotazione del rotore.
Nel caso l’alternatore sia stato inutilizzato per lungo tempo, prima di metterlo in servizio controllare la resistenza di isola-mento verso massa degli avvolgimenti tenendo presente che ogni singola parte da controllare deve essere isolata dalle altre.
Prima di procedere al controllo della resistenza di isolamento verso la massa degli avvolgimenti con un megger o con altri strumenti ad alta tensione, scollegare completamente il regolatore elettronico dall’alternatore; le tensio-ni elevate introdotte dallo strumento possono infatti danneggiare i componenti interni del regolatore.
Normalmente vengono ritenuti sufficientemente isolati gli avvolgimenti che hanno un valore di resistenza verso massa ≥ 1MΩ a 500Vc.c. Nel caso che il dato rilevato sia inferiore è necessario procedere ad un ripristino dell’isolamento asciugando l’av-volgimento (utilizzando per es. un forno a 60-80°C o facendo circolare nell’avvolgimento un adatto valore di corrente elettrica ottenuta da una sorgente ausiliaria). È necessario verificare che le parti metalliche dell’alternatore e la massa dell’intero gruppo siano collegati al circuito di terra e che quest’ultimo risponda alle prescrizioni di legge.
Errori o dimenticanze nella messa a terra possono causare conseguenze anche mortali.
4. ISTRUZIONI PER IL MONTAGGIO
Il montaggio deve essere effettuato da persone qualificate dopo la lettura del manuale.
Forma costruttiva B3/B14 La forma costruttiva B3/B14 obbliga all’uso di un giunto elastico tra motore primo e alternatore. Il giunto elastico non dovrà dare origine a forze assiali o radiali durante il funzionamento e dovrà essere montato rigidamente sulla sporgenza dell’albero dell’alternatore. Si consiglia di eseguire l’assemblaggio seguendo le seguenti fasi: 1) Applicare sull’alternatore il semigiunto e la campana di allineamento come rappresentato nella figura 1a.
Fig. 1a
Nel posizionamento del semigiunto sull’alternatore tenere presente che il rotore, ad accoppiamento completato, deve poter conservare la possibilità di dilatarsi assialmente verso il cuscinetto lato opposto accoppiamento; perché ciò sia possibile è ne-cessario che a montaggio finito la sporgenza dell’albero sia posizionata rispetto alle lavorazioni del coperchio, come rappresen-tato nella figura 1b.
Fig. 1b
2) Applicare sulla parte rotante del motore diesel il relativo semigiunto come indicato in figura 1c.
ITALIANO

- 5 -
Fig. 1c
3) Montare i tasselli elastici del giunto. 4) Accoppiare l’alternatore al motore primo fissando con le apposite viti la campana di accoppiamento (vedi figura 1d).
Fig. 1d
5) Fissare con adatti antivibranti l’insieme motore-alternatore alla base facendo attenzione che non si creino tensioni tendenti a deformare il naturale allineamento delle due macchine.
6) Osservare che il cuscinetto lato opposto accoppiamento dell’alternatore abbia il previsto spazio di dilatazione (minimo 3mm) e sia precaricato dalla molla di precarico.
Forma costruttiva SAE Tale forma costruttiva prevede l’accoppiamento diretto tra motore primo e alternatore. Si consiglia di procedere all’assemblag-gio nel seguente modo: 1) Controllare il corretto posizionamento del rotore con l’ausilio della tabellina riportata in figura 2a.
Fig. 2a
2) Togliere eventuali mezzi di bloccaggio del rotore posti sul lato opposto accoppiamento. 3) Avvicinare l’alternatore al motore primo come rappresentato in figura 2b. 4) Centrare e fissare lo statore alla flangia del motore primo con le apposite viti come indicato in figura 2c.
Fig. 2b
ITALIANO
- 6 -
Fig. 2c
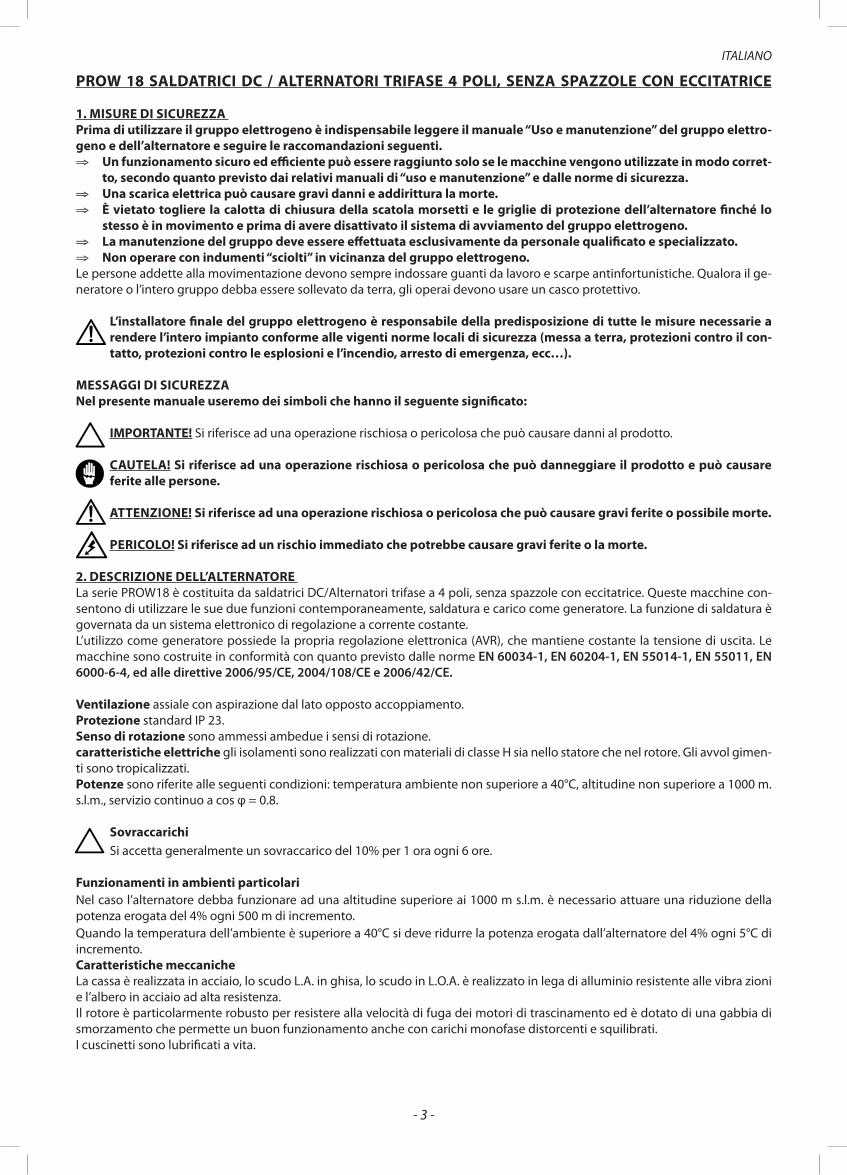
5) Centrare e fissare con le apposite viti il giunto del rotore al volano del motore primo, agendo attraverso le aperture apposite, come indicato in figura 2d.
Fig. 2d
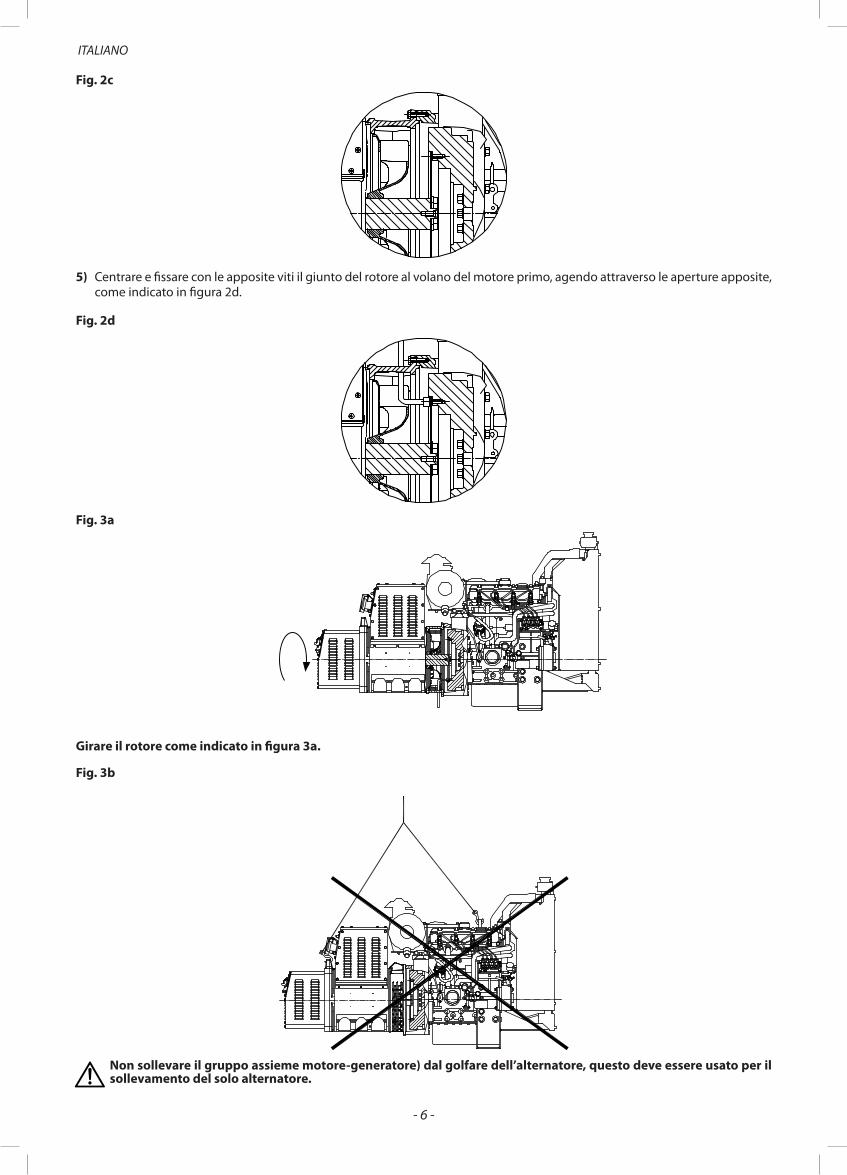
Fig. 3a
Girare il rotore come indicato in figura 3a.
Fig. 3b
Non sollevare il gruppo assieme motore-generatore) dal golfare dell’alternatore, questo deve essere usato per il sollevamento del solo alternatore.
ITALIANO

- 7 -
CONTROLLI FINALI Al termine di tutti gli accoppiamenti descritti è necessario controllare il corretto posizionamento assiale; si deve
cioè verificare che tra la fine del cuscinetto L.O.A. e la parete di bloccaggio assiale esista uno spazio di dilatazione di 3mm.
Le operazioni di collegamento dei cavi di potenza devono essere eseguite da personale qualificato con macchina definitivamente ferma e scollegata elettricamente dal carico.
Tensione e frequenza di erogazione Questi alternatori sono predisposti per erogare esclusivamente la tensione e la frequenza riportate in targa.
5. NOTE GENERALI
Funzionamento in ambienti particolari Nel caso si usi l’alternatore in un gruppo insonorizzato fare attenzione che l’aria aspirata sia sempre quella fresca in entrata; ciò si ottiene sistemandolo vicino alla presa d’aria con l’esterno. Inoltre bisogna tener conto che la quantità d’aria richiesta dall’alternatore è di:
PROW 18 12÷15 m3 /min.
Cuscinetti I cuscinetti sono lubrificati a vita e quindi non richiedono manutenzioni per un periodo di funzionamento superiore alle 10.000 ore. Quando si deve procedere alla revisione generale del gruppo elettrogeno è consigliabile lavare i cuscinetti con adatto sol-vente, rimuovere e sostituire la riserva di grasso. Si possono usare: AGIP GR MW3 - SHELL ALVANIA 3 - MOBIL OIL MOBILUX GREASE 3 o altri grassi equivalenti.
Tipi di cuscinetti
ALTERNATORE L.A. L.O.A.PROW 18 6309-2RS-C3 6307-2RS-C3
Ponti a diodi Normalmente vengono usati dei ponti a diodi previsti per: PROW 18 5A - 1 00V
Verifica dei ponti a diodi La verifica dei singoli diodi componenti il ponte di raddrizzamento può essere eseguita sia con un ohmetro che con una batteria e relativa lampada come qui di seguito descritto.
Un diodo è da ritenersi regolarmente funzionante quando:
- con un ohmetro si verifica che la resistenza è molto bassa in un senso e molto alta nell’altro. - con batteria e lampada (prevista per la tensione della batteria) si verifica che l’accensione della lampada avviene solamente
in uno dei due collegamenti possibili come qui sotto.
ITALIANO
Lampada accesa Lampada spenta
Varistore
Rotore
Rotoreeccitatrice

- 8 -
Come si vede dallo schema precedente, tutta la parte generatore della serie PROW18 viene governata dal regolatore HVR- 11, che agisce sullo statore eccitatrice della stessa. Le uscite trifase e monofase dell’alternatore, sono disponibili, opportunamente protette da interruttore magnetotermico/differenziale, nelle apposite prese.
6. FUNZIONAMENTO COME GENERATORE
OL: TRIMMER DI SOVRACCARICO. La protezione si disinserisce in senso orario
M1M2
M3
M4
M5
M6
M7M8
REGOLATORE ELETTRONICO
230V/400V 50Hz
(+)
(-)
ECCITATRICEROTORE PRINCIPALE PONTE ROTANTE
LAMPADINA ROSSA
L1L2L3
N PEPE
L N
CEE 16A 3PCEE 32A 5P4 POLI SWITCH
VG
STHZOL
HVR-11
GENERATOREAVVOLGIMENTO PRINCIPALE DI STATORE
PRESA PRESA
FUSI
BILE
6.3
A
VG: TRIMMER DI TENSIONE. Aumenta in senso orarioST: TRIMMER DI STABILITA'. Aumenta in senso orarioHz: TRIMMER DI SOTTO FREQ. La protezione si disinserisce in senso orario
BREAKER 15A
7. REGOLATORE DI TENSIONE
Il regolatore elettronico di tensione HVR-11 è costruito con componenti elettronici di ultima generazione, che permettono di ottenere in dimensioni contenute e senza compromessi, tutte le funzioni richieste per il controllo di qualsiasi tipo di alternatore. Le loro principali caratteristiche sono le seguenti: - Errore statico di tensione contenuto entro il ±1%. - Ampia regolazione del controllo di stabilità per adattarsi ad ogni tipo di motore primo ed ogni tipo di alternatore. - Protezione regolabile contro il funzionamento ai bassi giri del motore primo. - Protezione regolabile contro la sovra-eccitazione che consente di proteggere l’alternatore da condizioni di carico pericolose. - Filtro ADR incorporato che riduce al minimo il radio-disturbo emesso. - In abbinamento al dispositivo di parallelo DP01, consente di regolare la tensione di un alternatore collegato in parallelo ad
altri alternatori (purché anch’essi siano dotati di un dispositivo di parallelo). Caratteristiche tecniche HVR-11 - Ingresso tensione di alimentazione: a) 110Vac ± 15%. b) 0Vac - 5%/+15%. - Max. corrente di campo: 10Adc. - Ingresso monofase della tensione di riferimento: 90Vac ÷ 440Vac. - Taratura della tensione di uscita dell’alternatore con trimmer multi-giri. - Taratura del controllo di stabilità con trimmer multi-giri. - Taratura della soglia di intervento della protezione di bassa frequenza con trimmer multi-giri. - Taratura della soglia di intervento della protezione di sovra-eccitazione con trimmer multi-giri. - Ingresso potenziometro remoto. - Possibilità di funzionamento a 50Hz o 60Hz.
Per evitare danni alle persone o alle apparecchiature è necessario che eventuali riparazioni del regolatore di ten-sione siano affidate solo a personale qualificato.
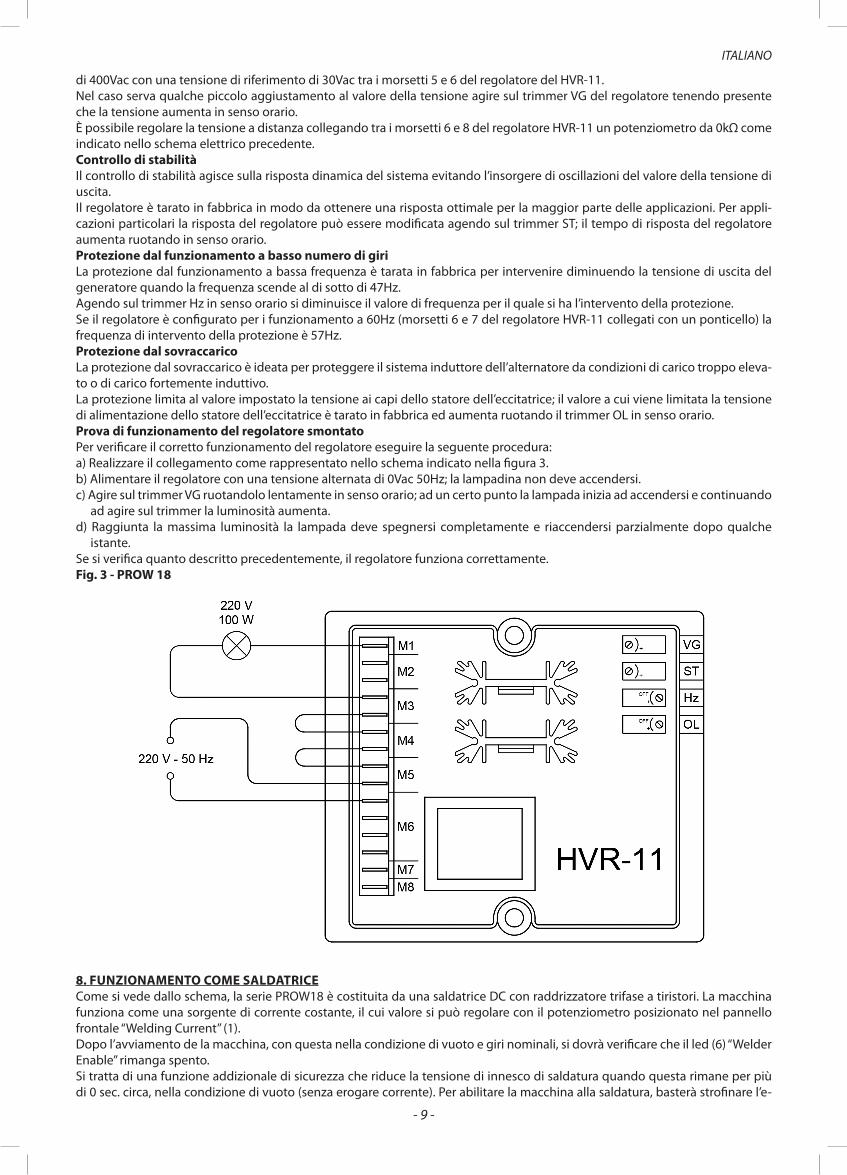
Funzionamento 60hz Per il funzionamento a 60Hz collegare con un ponticello i morsetti 6 e 7 del regolatore HVR-11.
Regolazione della tensione Il regolatore di tensione è tarato in fase di collaudo in modo da avere all’uscita del generatore una tensione concatenata
ITALIANO
- 9 -
di 400Vac con una tensione di riferimento di 30Vac tra i morsetti 5 e 6 del regolatore del HVR-11. Nel caso serva qualche piccolo aggiustamento al valore della tensione agire sul trimmer VG del regolatore tenendo presente che la tensione aumenta in senso orario. È possibile regolare la tensione a distanza collegando tra i morsetti 6 e 8 del regolatore HVR-11 un potenziometro da 0kΩ come indicato nello schema elettrico precedente. Controllo di stabilità Il controllo di stabilità agisce sulla risposta dinamica del sistema evitando l’insorgere di oscillazioni del valore della tensione di uscita. Il regolatore è tarato in fabbrica in modo da ottenere una risposta ottimale per la maggior parte delle applicazioni. Per appli-cazioni particolari la risposta del regolatore può essere modificata agendo sul trimmer ST; il tempo di risposta del regolatore aumenta ruotando in senso orario. Protezione dal funzionamento a basso numero di giri La protezione dal funzionamento a bassa frequenza è tarata in fabbrica per intervenire diminuendo la tensione di uscita del generatore quando la frequenza scende al di sotto di 47Hz. Agendo sul trimmer Hz in senso orario si diminuisce il valore di frequenza per il quale si ha l’intervento della protezione. Se il regolatore è configurato per i funzionamento a 60Hz (morsetti 6 e 7 del regolatore HVR-11 collegati con un ponticello) la frequenza di intervento della protezione è 57Hz. Protezione dal sovraccarico La protezione dal sovraccarico è ideata per proteggere il sistema induttore dell’alternatore da condizioni di carico troppo eleva-to o di carico fortemente induttivo. La protezione limita al valore impostato la tensione ai capi dello statore dell’eccitatrice; il valore a cui viene limitata la tensione di alimentazione dello statore dell’eccitatrice è tarato in fabbrica ed aumenta ruotando il trimmer OL in senso orario. Prova di funzionamento del regolatore smontato Per verificare il corretto funzionamento del regolatore eseguire la seguente procedura: a) Realizzare il collegamento come rappresentato nello schema indicato nella figura 3. b) Alimentare il regolatore con una tensione alternata di 0Vac 50Hz; la lampadina non deve accendersi. c) Agire sul trimmer VG ruotandolo lentamente in senso orario; ad un certo punto la lampada inizia ad accendersi e continuando
ad agire sul trimmer la luminosità aumenta. d) Raggiunta la massima luminosità la lampada deve spegnersi completamente e riaccendersi parzialmente dopo qualche
istante. Se si verifica quanto descritto precedentemente, il regolatore funziona correttamente. Fig. 3 - PROW 18
8. FUNZIONAMENTO COME SALDATRICECome si vede dallo schema, la serie PROW18 è costituita da una saldatrice DC con raddrizzatore trifase a tiristori. La macchina funziona come una sorgente di corrente costante, il cui valore si può regolare con il potenziometro posizionato nel pannello frontale “Welding Current” (1). Dopo l’avviamento de la macchina, con questa nella condizione di vuoto e giri nominali, si dovrà verificare che il led (6) “Welder Enable” rimanga spento. Si tratta di una funzione addizionale di sicurezza che riduce la tensione di innesco di saldatura quando questa rimane per più di 0 sec. circa, nella condizione di vuoto (senza erogare corrente). Per abilitare la macchina alla saldatura, basterà strofinare l’e-
ITALIANO

- 10 -
ITALIANO
POTE
NZI
OM
ETR
O R
EMO
TO
1
1
3
2
2
1
3
3
VER
DE
4
BIAN
CO
4
5 7
5
6 9
6
478 5
9 6
1011
TH_I
ND
TH_W
ELD
TH_S
CR
TH1
TH2
TH_W
ELD
TH_S
CR
TH_I
ND
VEN
TOLA
1 2 3 4 5 6 7 8 9 10 11 12 13
R S T
0_H
ALL
+12_
HAL
L-1
2_H
ALL
SIG
_HAL
L
CO
NN
ETTO
RE
FEM
MIN
AVI
STA
LATO
CAV
I
CO
NN
ETTO
RE
FEM
MIN
A C
AVI N
ERI
VIST
A LA
TO C
AVI
1
CO
NN
ETTO
RE
FEM
MIN
A C
AVI G
IALL
I
1 +1
2_H
ALL
2 -1
2_H
ALL
3 SI
G_H
ALL
4 0_
HAL
L
VIST
A LA
TO C
AVI
CAV
I GIA
LLI
CAV
I NER
I
RS
T
RT
PON
TE S
EMIC
ON
TRO
LLAT
OAV
VOLG
IMEN
TO D
I GEN
ERAT
OR
E
S
SON
DA
HAS
500
-SIN
DU
TTAN
ZA
(+ )
SALD
ATUR
A
(- ) S
ALD
ATU
RA
(- W
ELD
)
(+ W
ELD
)
TH1
TH2
SIG
_TER
M
LED
TH
LED
EN
+12V
AVV.
DI S
ALD
ATU
RA
12
3
CAV
I RO
SSI
6-H
VR-1
1
5-H
VR-1
1
WH
ITE
WH
ITE
WH
ITE
RED
RED
RED
(AVR
)
(AVR
)
CIR
CU
ITO
CS1
8C
IRC
UIT
O D
EL P
ANN
ELLO
Wel
ding
Cur
rent
Arc
Forc
e
R S T N
SIG_HALL-12_HALL+12_HALL
0_HALLKTGTKSGSKRGR
COR_2COR_1COR_3COR_4ARC_1ARC_2ARC_3V_SALD(+)V_SALD(-)12VTERMICO
CAP
SULE
TER
MIC
HE
CO
NTR
OLL
O S
CR
/ SO
ND
A H
AS 5
00S
ALIM
ENTA
ZIO
NE
PAN
NEL
LO C
ON
TRO
LLO
SAL
DAT
UR
A
LOC
ALR
EMO
TO
FUSI
BILE
VEN
TOLA
NER
O
RO
SSO
VER
DE
BIAN
CO
BLU
BLU
BLAC
KFU
SIBI
LE

- 11 -
ITALIANO

- 12 -
lettrodo sul pezzo a saldare, e la stessa si porterà alla sua tensione nominale di innesco (70Vdc÷75Vdc), accendendo il led (6) di abilitazione alla saldatura. In queste condizioni, con i cavi di saldatura collegati ai terminali (5), e con la polarità appropriata, si predispone il potenziometro (1) ad un livello di corrente pari a quella indicata nella scatola di elettrodi che si desidera fondere. Durante il processo di fusione dell’elettrodo, potrebbe essere necessario dare qualche percentuale del potenziometro “Arc-Force” ( ) del pannello frontale. La funzione di ( ) è dare impulsi di sovracorrente che ottimizzino il bagno di saldatura per elettrodi di tipo basico e cellulosico. E’ una funzione da utilizzare da parte di saldatori esperti, altrimenti è consigliabile lavorare con ( ) nella posizione di minimo. Per facilitare il processo di saldatura, il sistema possiede la funzione di “anti-sticking”, cioè nel caso l’elettrodo rimanga incollato al pezzo per qualche secondo, la saldatrice riduce la sua corrente di cortocircuito automaticamente, facilitando il ritiro dell’elet-trodo dal pezzo. Nel caso di un eccessivo surriscaldamento di qualche componente della saldatrice (avvolgimento di saldatura, ponte raddrizza-tore, induttanza), le apposite capsule termiche possono intervenire, accendendo il led (7) e diseccitando la saldatrice. Il ripristino avviene automaticamente, dopo che la capsula termica intervenuta ritorna alla temperatura di funzionamento nor-male. È possibile selezionare la corrente di saldatura tramite un potenziometro remoto, per fare ciò, si collega la scatola del poten-ziometro remoto esterno all’apposito connettore “Remote Potentiometer” (3), e si seleziona lo stesso con il commutatore “Lo-cal-Remote” (4). La quantità di potenza di generatore che è possibile prelevare, mentre la macchina sta saldando, è indicata nei grafici dati a continuazione.
9. NORME DI SICUREZZA PER LA SALDATURA - Evitare i contatti diretti con il circuito di saldatura, la tensione di innesco dell’uscita di saldatura può essere pericolosa in
particolari circostanze. - Eseguire qualsiasi operazione di verifica o riparazione del sistema con il generatore completamente fermo. - Seguire tutte le norme nazionali vigenti per il collegamento equipotenziale di tutte le parte metalliche, così come l’eventuale
collegamento di terra. - Non utilizzare la macchina in ambienti umidi, bagnati o sotto pioggia. - Non utilizzare cavi con isolamento difettoso o con collegamenti allentati. - Non saldare su contenitori o tubazioni che abbiano contenuto prodotti infiammabili liquidi o gassosi. - Allontanare dall’area di lavoro tutte le sostanze infiammabili (legno, carta, stracci, etc.) - Assicurarsi un opportuno ricambio d’aria o di specifici mezzi ad asportare i fumi prodotti di saldatura nelle vicinanze dell’ar-
co. - Proteggere sempre gli occhi con appositi vetri inattinici montati su maschere o caschi. Usare sempre guanti ed indumenti
protettivi evitando di esporre l’epidermide all’arco di saldatura.
10. INSTALLAZIONE Ubicazione: Individuare il luogo di posizionamento della macchina in modo che non vi siano ostacoli in corrispondenza con le entrate ed uscite d’aria di ventilazione. Accertarsi inoltre che non vengano aspirate polveri conduttive, fumi o vapori corrosivi, umidità, etc. Collegamento cavi di saldatura: Il cavo con pinza “porta-elettrodo” va normalmente collegato al terminale positivo (+) della macchina. Il cavo di ritorno di “massa” va normalmente collegato al terminale negativo (-) della saldatrice, il morsetto di massa, nell’altra estremità del filo, va collegato al pezzo a saldare od eventualmente ad un banco metallico, sempre il più vicino possi-bile alla saldatura. Ruotare a fondo i connettori dei cavi di saldatura nelle prese rapidi, per garantire un buon contatto elettrico, contrariamente si provocheranno surriscaldamenti indesiderabili con conseguente deterioramenti degli stessi. Utilizzare cavi di saldatura di sezione appropriata, evitando lunghezze superiore ai 10m. PROW18 400dc: 35 mm² ÷ 50 mm² PROW18 500dc: 50 mm² ÷ 70 mm²
11. SALDATURA La saldatrice è disposta per la saldatura di tutti i tipi di elettrodi rivestiti. La corrente di saldatura va regolata in funzione del diametro dell’elettrodo utilizzato, il tipo di giunto da eseguire, e la posizione dello stesso. Come orientamento si danno a continuazione due tabelle, una con le dimensioni di massima di due lembi a saldare, ed una seconda con indicazioni di correnti e diametri degli elettrodi. Considerare che a parità di diametro d’elettrodo, i valori più elevati di corrente saranno per saldare in posizione piana, e valori più bassi in posizione verticale o sopra-testa. Tenere sempre presente che la qualità della saldatura dipenderà oltre che dalla corrente scelta, anche del tipo e diametro dell’e-lettrodo, lunghezza dell’arco, velocità e posizione dell’esecuzione, stato di conservazione degli elettrodi che devono esserepre-servati dall’umidità negli appositi contenitori.
ITALIANO

- 13 -
Parametro PosizionePiano Verticale Frontale e sopratesta
α 20° 30° 40°g (mm) 2÷3 3÷4 2÷3s (mm) 2÷3 2÷3 2÷3
Diametro elettrodo
(mm)
Corrente di Saldatura (A)
min max.
1.6 25 ÷ 50 2 40 ÷ 80
2.5 60 ÷ 110 3.2 80 ÷ 1604 120 ÷ 2005 150 ÷ 2506 200 ÷ 2508 > 350
Procedimento Con la maschera davanti al viso, per innescare l’arco, strofinare la punta dell’elettrodo sul pezzo a saldare, eseguendo un movi-mento come si dovesse accendere un fiammifero. Non puntellare l’elettrodo sul pezzo, già che si potrebbe rovinare il rivestimento e così rendere difficile l’innesco dell’arco. Con l’arco innescato, mantenere una distanza dal pezzo pari circa al diametro dell’elettrodo; tenere una inclinazione dell’elettro-do di 20°-30° nel senso di avanzamento. Per gli aspetti e i problemi del cordone di saldatura vedere la figura a continuazione.
α
s
g
AVANZAMENTO TROPPO LENTO
ARCOTROPPO CORTO
CORRENTETROPPO BASSA
AVANZAMENTO TROPPO VELOCE
ARCO TROPPO LUNGO
CORRENTE TROPPO ALTA
CORDONE CORRETTO
12. RESISTENZE E DATI DI ECCITAZIONE
RESISTENZA DEGLI AVVOLGIMENTI (Ω ) @ 20°C DATI DI ECCITAZIONE GENERATORE
TIPO STATOREGENERATORE
STATORE SALDATRICE
ROTORE ECCITATRICE A VUOTOStatore Rotore Veccit.(V) Ieccit.(A)
PROW18 400 dc 0.83 0.0135 2.61 13.15 0.73 12 0.91
PROW18 500 dc 0.64 0.0078 2.9 13.15 0.72 11 0.84
TIPO DATI DI ECCITAZIONE GENERATORE TENSIONE-CORRENTE DI USCITA SALDATRICEA CARICO A VUOTO A CARICO
Veccit.(V) Ieccit.(A) (Vdc) (Adc) (Vdc) (Adc)
PROW18 400 dc 24 1.8 75 0 36 400
PROW18 500 dc 24.5 1.9 72 0 40 500
ITALIANO

- 14 -
13. RISOLUZIONE DEI PROBLEMI (PARTE GENERATORE)
GUASTO CAUSE INTERVENTI
L’alternatore non si eccita
1) Insufficiente tensione residua 1) Eccitare lo statore dell’eccitatrice utilizzando una batteria
2) Interruzione di un collegamento 2) Ripristinare il collegamento
3) Ponte a diodi rotante guasto 3) Sostituire il ponte a diodi rotante
4) Velocità insufficiente 4) Intervenire sul regolatore di giri del motore primo
5) Guasto negli avvolgimenti 5) Controllare le resistenze e sostituire la parte danneggiata
6) Regolatore di tensione guasto 6) Sostituire il regolatore di tensione
Tensione a vuoto bassa
1) Velocità ridotta 1) Riportare il motore primo a velocità nominale
2) Guasto negli avvolgimenti 2) Controllare le resistenze e sostituire la parte danneggiata
3) Ponte a diodi rotante guasto 3) Sostituire il ponte a diodi rotante
4) Regolatore di tensione guasto 4) Sostituire il regolatore di tensione
5) Taratura errata del regolatore di tensione 5) Agire sul regolatore del trimmer VG del regolatore di tensio-ne
Tensione corretta a vuoto, ma troppo bassa a carico
1) Velocità ridotta di carico 1) Intervenire sul regolatore di giri del motore primo
2) Regolatore di tensione guasto 2) Sostituire il regolatore di tensione
3) Avvolgimento del rotore difettoso 3) Controllare la resistenza dell’avvolgimento e sostituire se guasto
4) Carico troppo elevato 4) Intervenire sul carico per ridurlo
5) Taratura errata della protezione del sovracca-rico 5) Agire sul trimmer OL del regolatore di tensione
Tensione corretta a vuoto, ma troppo alta a carico
1) Presenza di condensatori sul carico 1) Ridurre il carico capacitivo
2) Regolatore di tensione guasto 2) Sostituire il regolatore di tensione
3) Collegamento delle fasi errato 3) Controllare e correggere il collegamento delle fasi
Tensione instabile
1) Massa rotante troppo piccola 1) Aumentare il volano del motore primo
2) Velocità irregolare 2) Controllare e riparare il regolatore di giri del motore primo
3) Taratura errata del controllo di stabilità 3) Agire sul trimmer ST del regolatore di tensione
Funzionamento rumoroso
1) Cattivo accoppiamento 1) Controllare e modificare l’accoppiamento
2) Corto circuito su un avvolgimento o sul carico 2) Controllare gli avvolgimenti ed il carico
3) Cuscinetto difettoso 3) Sostituire il cuscinetto
ITALIANO
- 15 -
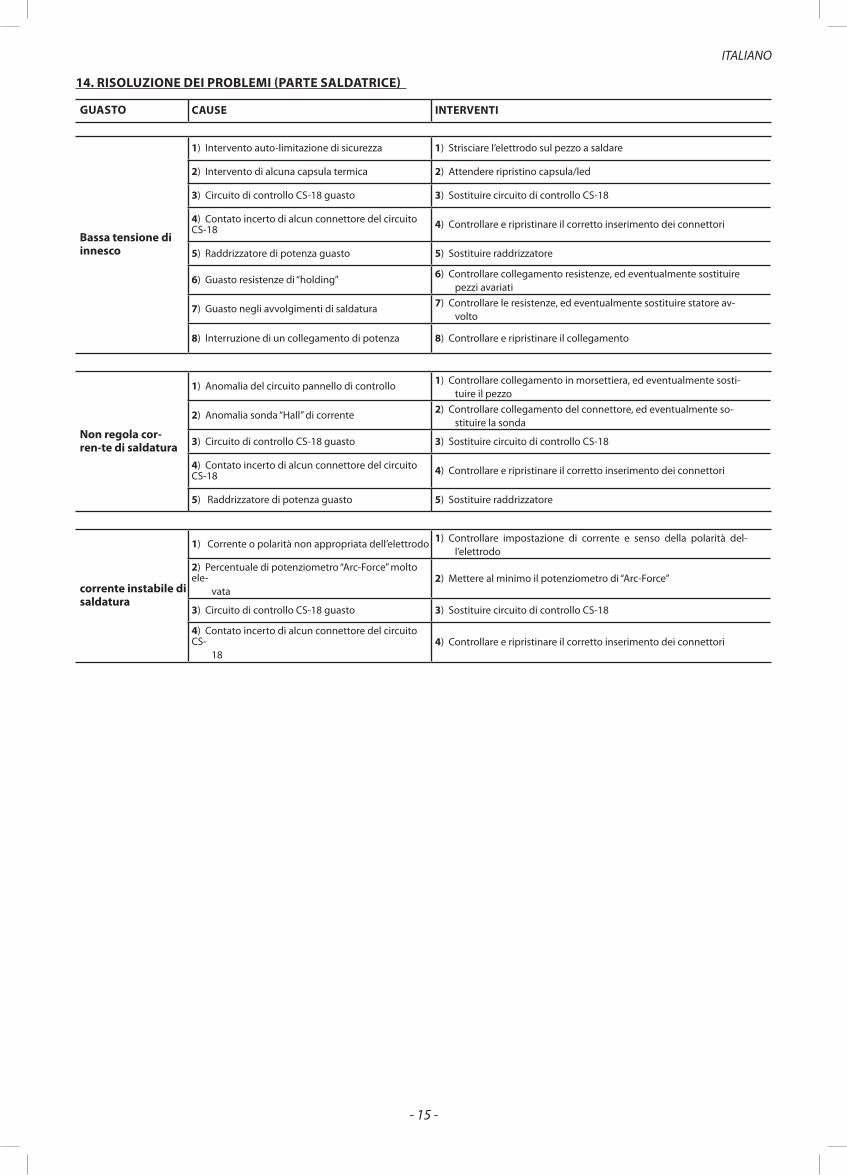
14. RISOLUZIONE DEI PROBLEMI (PARTE SALDATRICE)
GUASTO CAUSE INTERVENTI
Bassa tensione di innesco
1) Intervento auto-limitazione di sicurezza 1) Strisciare l’elettrodo sul pezzo a saldare
2) Intervento di alcuna capsula termica 2) Attendere ripristino capsula/led
3) Circuito di controllo CS-18 guasto 3) Sostituire circuito di controllo CS-18
4) Contato incerto di alcun connettore del circuito CS-18 4) Controllare e ripristinare il corretto inserimento dei connettori
5) Raddrizzatore di potenza guasto 5) Sostituire raddrizzatore
6) Guasto resistenze di “holding” 6) Controllare collegamento resistenze, ed eventualmente sostituire pezzi avariati
7) Guasto negli avvolgimenti di saldatura 7) Controllare le resistenze, ed eventualmente sostituire statore av-volto
8) Interruzione di un collegamento di potenza 8) Controllare e ripristinare il collegamento
Non regola cor-ren-te di saldatura
1) Anomalia del circuito pannello di controllo 1) Controllare collegamento in morsettiera, ed eventualmente sosti-tuire il pezzo
2) Anomalia sonda “Hall” di corrente 2) Controllare collegamento del connettore, ed eventualmente so-stituire la sonda
3) Circuito di controllo CS-18 guasto 3) Sostituire circuito di controllo CS-18
4) Contato incerto di alcun connettore del circuito CS-18 4) Controllare e ripristinare il corretto inserimento dei connettori
5) Raddrizzatore di potenza guasto 5) Sostituire raddrizzatore
corrente instabile di saldatura
1) Corrente o polarità non appropriata dell’elettrodo 1) Controllare impostazione di corrente e senso della polarità del-l’elettrodo
2) Percentuale di potenziometro “Arc-Force” molto ele-
vata2) Mettere al minimo il potenziometro di “Arc-Force”
3) Circuito di controllo CS-18 guasto 3) Sostituire circuito di controllo CS-18
4) Contato incerto di alcun connettore del circuito CS-
184) Controllare e ripristinare il corretto inserimento dei connettori
ITALIANO

- 16 -
PROW18 DC WELDERS/THREE-PHASE, 4 POLE BRUSHLESS ALTERNATORS WITH EXCITER
1. SAFETY INSTRUCTIONS
Before using the generating set it is necessary to read the generating set and alternator ”Use and Maintenance Manual” and to follow the recommendations below. ⇒ Safe and efficient performance may be achieved only if the machines are used correctly, in compliance with the
instructions provided by the relevant use and maintenance manuals and safety regulations. ⇒ An electric shock may cause serious personal injury or even death. ⇒ Do not remove either the terminal board cover or the alternator protection grid before the alternator has come to
a complete stop and the generating set starting system has been deactivated. ⇒ Only competent and qualified personnel should carry out the maintenance of the generating set. ⇒ Do not wear loose garments when working near the generating set. People in charge of operating the set must always wear protective gloves and safety shoes. In the event that the generator, or the whole generating set, needs to be lifted from the floor, the operators must also wear a safety helmet.
The person responsible for the installation of the generating set must make sure that all the necessary safety ar-rangements are in place in order to make the whole plant compliant with current local safety regulations (earth-ing, contact protection, explosion and fire safety measures, emergency stop, etc.…)
SAFETY WARNINGS Safety notices used in this manual have the following meaning.
IMPORTANT! Refers to dangerous or risky operations that may cause damage to the product.
CAUTION! Refers to dangerous or risky operations that may damage the product or cause personal injury.
WARNING! Refers to dangerous or risky operations that may cause serious personal injury or even death.
DANGER! Refers to an immediate risk that may cause serious personal injury or death.
2. ALTERNATOR DESCRIPTION
The PROW 18 series is comprised of DC welders/three-phase 4 poles brushless alternators with exciter and electronic regula-tor. These machines permit simultaneous welding and load feeding. The welder function is controlled by an electronic system that maintains a constant welding current. The generator function has its own electronic voltage regulator (AVR) to control the constant output voltage. They are manufactured in compliance with EN60034-1, EN55014, EN61000-6-4 and directives 2006/95/CE, 2004/108/CE and 2006/42/CE.
Ventilation Axial with air inlet on the non-drive end side.
Protection IP 23 standard.
Direction of rotation Both directions are allowed.
Electrical features Both the stator and rotor insulation components are made from class H materials. The windings are tropi-calized.
Power values Refer to the following conditions: ambient temperature up to 40°C, altitude up to 1000m above sea-level and continuous duty at cos φ = 0.8.
Overloads A 10% overload for one hour every six hours is normally acceptable.
Operation in unusual settings If the alternator is used at an altitude over 1000m above-sea-level, a 4% de-rating for every 500m overplus must be ap-plied. If the ambient temperature exceeds 40°C a 4% de-rating for every 5°C overplus must be applied.
Mechanical features The casing is made of steel, the drive end side cover of cast iron and the non drive end side cover of vibration resistant allumin-ium alloy. The shaft is made of high-tensile steel. The rotor is particularly sturdy in order to resist the runaway speed of the drive motors. It is also equipped with a damp-ing cage which permits a satisfactory operation even with single-phase, distorted loads. The bearings have lifelong lubrication.
ENGLISH

- 17 -
3. INSTALLATION AND START UP Only qualified personnel should carry out the following start up and control operations. ⇒ The alternator must be installed in a well ventilated room. The ambient temperature should not exceed standard
recom-mended values. ⇒ It is important to ensure that the air inlets and outlets are never obstructed. When installing the alternator it is impor-tant
to avoid the possibility of the direct suction of hot air expelled from the alternator outlet and/or from the prime motor. ⇒ Before starting up the alternator it is advisable to check (both visually and manually) that all the terminals on every
ter-minal board are properly clamped and that the rotation of the rotor in not blocked in any way. If the alternator has not been used for a long time, it is recommended that the winding’s insulation resistance to earth be tested before starting up, taking into account that each individual part has to be isolated from the others.
Disconnect the alternator’s electronic voltage regulator before testing the winding’s insulation resistance to earth with a megger or other high voltage instruments. The high tensions produced by the test instruments could cause damage to the electronic regulator’s internal components.
Mistakes or oversights concerning the earthing may have fatal effects.
4. ASSEMBLY INSTRUCTIONS
B3/B14 Construction Form The B3/B14 construction form requires the use of a flexible coupling between the drive motor and the alternator. The flexible coupling should not exert any axial or radial forces during operation, and should be mounted rigidly on the alternator shaft end. During assembly please follow the instructions below. 1) Apply the flexible coupling and the adaptor to the alternator as shown in figure 1a.
Fig. 1a
When positioning the flexible coupling, it is important to do so so as to allow for the axial expansion of the rotor towards the coupling located on the non-drive end; this is done by positioning the shaft end as illustrated in figure 1b and the related table.
Fig. 1b
2) Place the relevant flexible coupling on the revolving part of the diesel engine, as shown in figure 1c.
Fig. 1c
ENGLISH

- 18 -
3) Mount the coupling’s rubber blocks 4) Couple the alternator to the drive motor by securing, with suitable screws, the adaptor to the motor (see figure 1d).
Fig. 1d
5) Fix the motor-alternator unit to the bed-plate using appropriate rubber anti-vibration dampers. Special attention must be paid not to create any tension that may affect the natural alignment of the two machines.
6) Make sure that the alternator’s non-driving end bearing has the recommended expansion allowance (min. 3 mm) and that it is preloaded by the preload spring.
SAE construction Form This construction form provides a direct coupling between the drive motor and the alternator. 1) Check that the rotor is positioned correctly, as illustrated in figure 2a. Fig. 2a
2) Remove the rotor’s locking components on the non-driving end side. 3) Place the alternator next to the drive motor, as illustrated in figure 2b. 4) Centre and secure the stator to the drive motor’s flange using suitable screws, as shown in figure 2c. Fig. 2b
Fig. 2c
ENGLISH

- 19 -
5) Centre and secure the coupling to the drive motor’s flywheel using appropriate screws, working through the air outlets as indicated in figure 2d.
Fig. 2d
Fig. 3a
Turning the rotor as shown in figure 3a.
Fig. 3b
Do not lift the group of assembled alternator-motor from the eye bolt of the alternator, this one should be used only and exclusively to lift the alternator.
FINAL CHECKS After completing all of the described couplings, it is necessary to check that the axial positioning is correct; there
must be a 3mm expansion space between the non-drive end side bearing and the axial clamping surface.
The power cable connections should be carried out by qualified personnel when the machine is at a comple-te standstill and disconnected from the power source.
Voltage and output frequency These alternators are designed to supply the voltage and frequency specified on the rating plate.
ENGLISH

- 20 -
Lamp ON Lamp OFF
Varistor
Rotor
Exciterrotor
ENGLISH5. GENERAL NOTES
Operation in unusual settings If the alternator is going to be used as part of a soundproof generating set, make sure that only fresh air enters it. This can be ensured by placing the alternator’s air inlet near the external air intake. Furthermore, it is important to remember that the quantity of air required is:
PROW 18 12÷15 m3 /min.
Bearings The bearings are self lubrificated and therefore do not require maintenance for a period of more than 10,000 hours. When it is necessary to carry out a general overhaul of the generating set it is advisable to wash the bearings with a suit-able solvent and to remove and replace the grease reserve. It is possible to use: AGIP GR MW3 - ShELL ALVANIA 3 - MOBIL OIL MOBILuX GREASE 3 or any other equivalent grease. Bearings model
ALTERNATOR D.E N.D.EPROW 18 6309-2RS-C3 6307-2RS-C3
Diode bridge The following diodes are normally used: PROW 18 5A - 1 00V
Checkout of the diode bridge The checkout of the individual diode valves of a rectifier bridge can be executed using either an ohmmeter or a battery and relative lamp as described below.
A diode works properly when:
- the resistance measured with an ohmmeter is very low in one sense and very high in the other. - using the battery and lamp, it is verified that the lamp illuminates when using only one of the two possible connections
shown below.
6. OPERATION AS GENERATOR
The diagram shows that the generator function of PROW18 series is controlled by the HVR-11 regulator, which works on the stator exciter. The three-phase output and single phase output through the thermo-magnetic switch are available on their sockets.

- 21 -
(+)
(-)
EXCITERMAIN ROTOR ROTATING BRIDGE
220V RED LAMP
L1L2L3
N PEPE
L N
CEE 16A 3PCEE 32A 5P
4P. SWITCH 20A
VG
STHZOL
HVR-11
GENERATOR
SOCKET SOCKET
FUSE
6.3
A
VG: VOLTAGE TRIMMER. It increases in clockwise directionST: STABILITY TRIMMER. It increases in clockwise directionHz: UNDER FREQUENCY TRIMMER. The protection is off in clockwise directionOL: OVER LOAD TRIMMER. The protection is OFF in clockwise direction
230V/400V 50Hz
MAIN WINDING STATOR
BREAKER 15A
M1M2
M3
M4
M5
M6
M7M8
ELECTRONIC REGULATOR
7. VOLTAGE REGULATOR The HRV-11 electronic regulator comprises state-of-the-art electronic components which make it possible to obtain, with a product of reduced dimensions, all of the functions needed to control any type of alternator. Their main features are as follows: - Voltage static error within a ±1% limit. - Wide stability control regulation to fit any type of drive motor and alternator (with exciting current up to 10 A in direct current). - Adjustable protection against low speed operation of the drive motor. - Adjustable protection from over exciting that protects the alternator from dangerous load conditions. - Incorporated EMI filter that reduces the radio-interference emitted to a minimum. - When equipped with a parallel device DP01 it is possible to regulate the voltage of an alternator connected in parallel with
other alternators (if they are also equipped with a parallel device). hVR-11 technical features - Supply voltage inlet: a) 110Vac ± 15%. b) 0Vac - 5%/+15%. - Maximum field current: 10Adc. - Single phase reference voltage inlet: 90Vac ÷ 440Vac. - Outlet voltage setting of the alternator with multi-turn trimmer. - Stability control setting with multi-turn trimmer. - Threshold setting of low frequency protection with multi-turn trimmer. - Threshold setting of over-exciting protection with multi-turn trimmer. - Remote potentiometer inlet. - Possible operation at 50Hz or 60Hz.
Only qualified personnel should carry out the repair of the voltage regulator in order to avoid causing da-mage to either persons or equipment.
Operation at 60hz When operating at 60Hz connect terminals 6 and 7 of the HVR-11 regulator with a bridge. Voltage regulation The voltage regulator is set during testing in order to obtain a line-to-line voltage of 400Vac with a sensing voltage of 30Vac between terminals 5 and 6 of the HRV-11 regulator. In the event that some adjustment to the voltage value is needed, act on the VG trimmer with a clock-wise rotation in order to increase the voltage. It is also possible to set the voltage using a remote potentiometer of 0kΩ, connecting it between terminals 6 and 8 of the HVR-11 regulator.
ENGLISH

- 22 -
Stability control The stability control acts on the dynamic response of the system thus ensuring that the creation of oscillations in the outlet voltage value is avoided. The regulator is preset by Linz Electric S.r.l. in order to obtain the best performance in the vast majority of applications. In the event of a special application, the regulator may be set by acting on the ST trimmer; the response time is increased with a clockwise rotation. Protection against low speed operation The protection against low frequency operation is preset by Linz Electric S.r.l. so that the outlet voltage is decreased when the frequency falls below 47Hz. By acting on Hz trimmer with a clockwise rotation it is possible to decrease the frequency of the operating threshold. If the regulator is set for operation at 60Hz (terminals 6 and 7 of the HVR-11 regulator with a bridge) the operating frequency of the protection is 57Hz. Overload Protection The overload protection protects the alternator against overload conditions and high inductive loads. The protection limits the voltage of the exciter stator to the set value. This value is set by Linz Electric S.r.l and may be increased with a clockwise rotation of the OL trimmer. Operation test of the disassembled regulator To verify the correct operation of the regulator proceed as follows: a) Make the connection as indicated in the diagram of figure 3. b) Apply an alternating voltage of 0Vac - 50Hz; the light bulb should not switch on. c) Act on the VG trimmer with a slow clockwise rotation; the light-bulb will switch on progressively. d) When the maximum brillancy is reached the light- bulb will switch off completely for a few seconds and then switch on again. If the conditions described above are satisfied, then the regulator works properly. Fig. 3 - PROW 18
8. OPERATION AS WELDER The PROW18 series is equipped with a three-phase tyristor rectifier bridge. The machine works at a constant welding current, its value can be selected by the “Welding Current” potentiometer (1) located in the front panel. After the start-up, (with the welder at no-load and rated RPM) verify that the “Welder Enable” output led (6) is OFF. This is an ad-ditional safety function which reduces the welding no load voltage output when the welder is at no-load for more than approx 0 seconds. To activate the machine, strike the electrode tip on the work piece, the welding no load voltage output will rise auto-matically to the rated value ( 7 Vdc ÷ 75Vdc) and the “Welder Enable” led will come ON. Under these conditions, connect the wel-ding cables with the proper polarity to the output terminals (5), and set the proper welding current with the potentiometer (1). During the electrode fusion process it might be necessary to give some percentage of “Arc Force” with the potentiometer ( ) located in the front panel. The function of ( ) is to give over-current impulses to optimize the welding bath. This function must only be used by qualified personnel, otherwise keep the potentiometer ( ) at minimum. To make the welding process easy, the welder has an anti-sticking function. When the electrode remains stuck to the work piece for some seconds, the machine automatically reduces its welding current to facilitate withdrawal of the electrode. To prevent the over-heating of the following parts: welding winding, power rectifier and welding inductor, the machine has thermal pro-tectors, this protectors work to disable the welding operation, and the output led (7) will come ON. The reset is automatic, after the temperature drops below safety values. It is possible to use this machine with a remote external potentiometer: Connect it to the “Remote Potentiometer” connector (3) and select remote position on the “Local-remote” selector (4). The PROW18 series machine allows simultaneous welding and load feeding. The quantity of electrical power obtainable throu-gh the plugs whilst welding is indicated in the following graphs.
ENGLISH

- 23 -
REM
OTE
PO
TEN
TIO
MET
ER
1
1
3
2
2
1
3
3
GR
EEN
4
WH
ITE
4
5 7
5
6 9
6
478 5
9 6
101011 11
TH_I
ND
TH_W
ELD
TH_S
CR
TH1
TH2
TH_W
ELD
TH_S
CR
TH_I
ND
FAN
1 2 3 4 5 6 7 8 9 10 11 12 13
R S T
0_H
ALL
+12_
HAL
L-1
2_H
ALL
SIG
_HAL
L
FEM
ALE
CO
NN
ECTO
RC
ABLE
S SI
DE
VIEW
FEM
ALE
BLAC
K C
ABLE
S C
ON
NEC
TOR
CAB
LES
SID
E VI
EW
1
FEM
ALE
YELL
OW
CAB
LES
CO
NN
ECTO
R
1 +1
2_H
ALL
2 -1
2_H
ALL
3 SI
G_H
ALL
4 0_
HAL
L
CAB
LES
SID
E VI
EW
YELL
OW
CAB
LES
BLAC
K C
ABLE
S
RS
T
RT
SCR
PO
WER
REC
TIFI
ERG
ENER
ATO
R M
AIN
WIN
DIN
G
S
HAS
500
-S C
UR
REN
T SE
NSO
RIN
DUCT
OR
(+ )
OU
TPU
T W
ELD
ING
(- ) O
UTP
UT
WEL
DIN
G
(- W
ELD
)
(+ W
ELD
)
TH1
TH2
SIG
_TER
M
LED
TH
LED
EN
+12V
WEL
DIN
G W
IND
ING
12
3
RED
CAB
LES
6-H
VR-1
1
5-H
VR-1
1
WH
ITE
WH
ITE
WH
ITE
RED
RED
RED
(AVR
)
(AVR
)
CS1
8W
ELD
ER C
ON
TRO
LPA
NEL
CIR
CU
IT
Wel
ding
Cur
rent
Arc
Forc
e
R S T N
SIG_HALL-12_HALL+12_HALL
0_HALLKTGTKSGSKRGR
COR_2COR_1COR_3COR_4ARC_1ARC_2ARC_3V_SALD(+)V_SALD(-)12VTERMICO
THER
MAL
PRO
TEC
TIO
NS
SCR
CO
NTR
OL
/ HAS
500
S SE
NSO
R
FEED
ING
WEL
DER
PAN
EL C
ON
TRO
L
LOC
ALR
EMO
TE
FAN
FU
SE
BLAC
K
RED
GR
EEN
WH
ITE
BLUE
BLUE
BLAC
KFU
SE
ENGLISH

- 24 -
ENGLISH
- 25 -
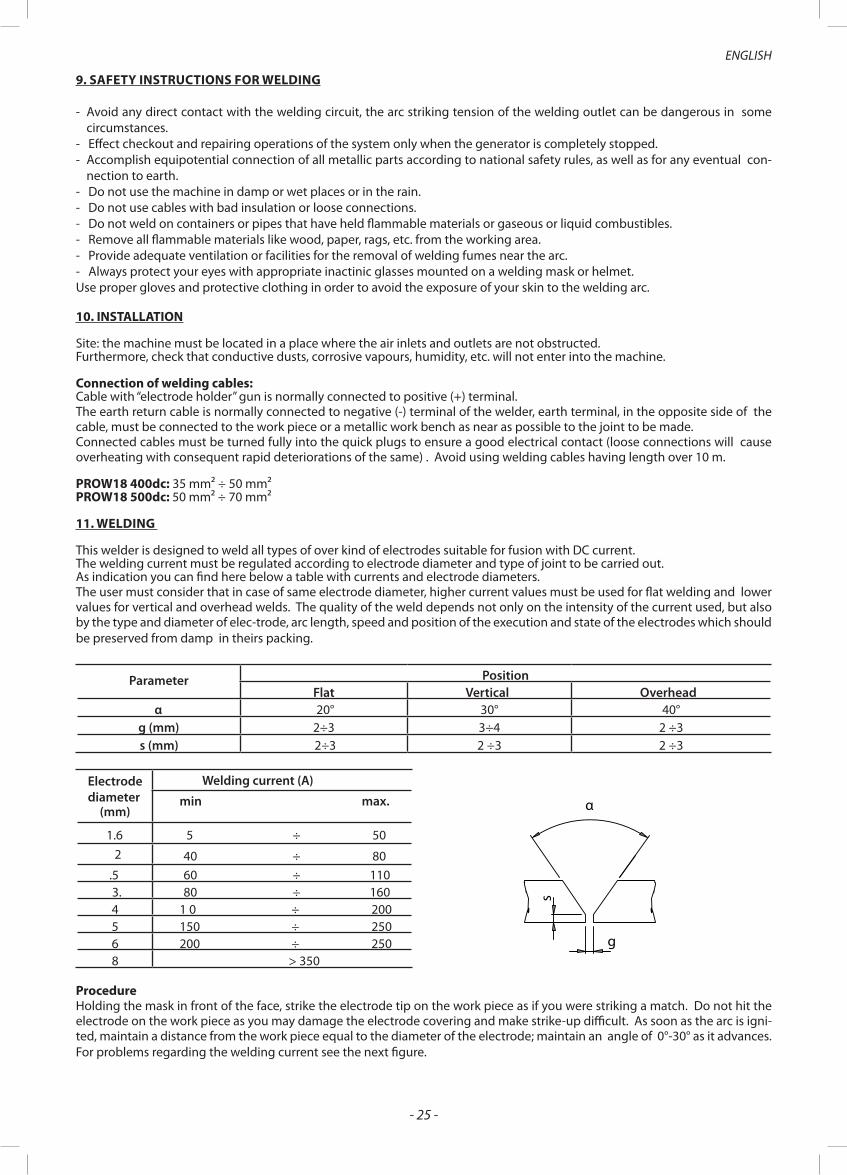
α
s
g
ENGLISH
9. SAFETY INSTRUCTIONS FOR WELDING
- Avoid any direct contact with the welding circuit, the arc striking tension of the welding outlet can be dangerous in some circumstances.
- Effect checkout and repairing operations of the system only when the generator is completely stopped. - Accomplish equipotential connection of all metallic parts according to national safety rules, as well as for any eventual con-
nection to earth. - Do not use the machine in damp or wet places or in the rain. - Do not use cables with bad insulation or loose connections. - Do not weld on containers or pipes that have held flammable materials or gaseous or liquid combustibles. - Remove all flammable materials like wood, paper, rags, etc. from the working area. - Provide adequate ventilation or facilities for the removal of welding fumes near the arc. - Always protect your eyes with appropriate inactinic glasses mounted on a welding mask or helmet. Use proper gloves and protective clothing in order to avoid the exposure of your skin to the welding arc.
10. INSTALLATION
Site: the machine must be located in a place where the air inlets and outlets are not obstructed. Furthermore, check that conductive dusts, corrosive vapours, humidity, etc. will not enter into the machine.
Connection of welding cables: Cable with “electrode holder” gun is normally connected to positive (+) terminal. The earth return cable is normally connected to negative (-) terminal of the welder, earth terminal, in the opposite side of the cable, must be connected to the work piece or a metallic work bench as near as possible to the joint to be made. Connected cables must be turned fully into the quick plugs to ensure a good electrical contact (loose connections will cause overheating with consequent rapid deteriorations of the same) . Avoid using welding cables having length over 10 m.
PROW18 400dc: 35 mm² ÷ 50 mm² PROW18 500dc: 50 mm² ÷ 70 mm²
11. WELDING
This welder is designed to weld all types of over kind of electrodes suitable for fusion with DC current. The welding current must be regulated according to electrode diameter and type of joint to be carried out. As indication you can find here below a table with currents and electrode diameters. The user must consider that in case of same electrode diameter, higher current values must be used for flat welding and lower values for vertical and overhead welds. The quality of the weld depends not only on the intensity of the current used, but also by the type and diameter of elec-trode, arc length, speed and position of the execution and state of the electrodes which should be preserved from damp in theirs packing.
Parameter PositionFlat Vertical Overhead
α 20° 30° 40°g (mm) 2÷3 3÷4 2 ÷3s (mm) 2÷3 2 ÷3 2 ÷3
Electrode diameter
(mm)
Welding current (A)
min max.
1.6 5 ÷ 50 2 40 ÷ 80
.5 60 ÷ 110 3. 80 ÷ 1604 1 0 ÷ 2005 150 ÷ 2506 200 ÷ 2508 > 350
Procedure Holding the mask in front of the face, strike the electrode tip on the work piece as if you were striking a match. Do not hit the electrode on the work piece as you may damage the electrode covering and make strike-up difficult. As soon as the arc is igni-ted, maintain a distance from the work piece equal to the diameter of the electrode; maintain an angle of 0°-30° as it advances. For problems regarding the welding current see the next figure.
- 26 -
13. TROUBLE SHOOTING (GENERATOR)
FAULT CAUSE SOLUTION
The alternator does not excite
1) Insufficient residual voltage 1) Excite the exciter stator using a battery
2) Connection break 2) Reset the connection
3) Broken rotating diode bridge 3) Replace rotating diode bridge
4) Insufficient speed 4) Adjust speed regulator of the engine
5) Windings failure 5) Check winding resistance and replace damaged parts
6) Broken voltage regulator 6) Replace voltage regulator
Low no load voltage
1) Low speed 1) Reset engine to nominal speed
2) Winding failure 2) Check winding resistance and replace damaged parts
3) Broken rotating diode bridge 3) Replace rotating diode bridge
4) Broken voltage regulator 4) Replace voltage regulator
5) Wrong voltage regulator setting 5) Adjust VG trimmer of voltage regulator
correct no-load voltage but too low at load condition
1) Low speed with load 1) Adjust engine rotation speed
2) Broken voltage regulator 2) Replace voltage regulator
3) Defective rotor winding 3) Check winding resistance and replace damaged parts
4) Load is too high 4) Reduce the load
5) Wrong overload protection setting 5) Adjust OL trimmer of voltage regulator
correct no-load vol-tage but too high at load condition
1) Appliances with capacitors on the load 1) Reduce capacitive load
2) Broken voltage regulator 2) Replace voltage regulator
3) Wrong phase connection 3) Check and reset the phase connection
ENGLISH
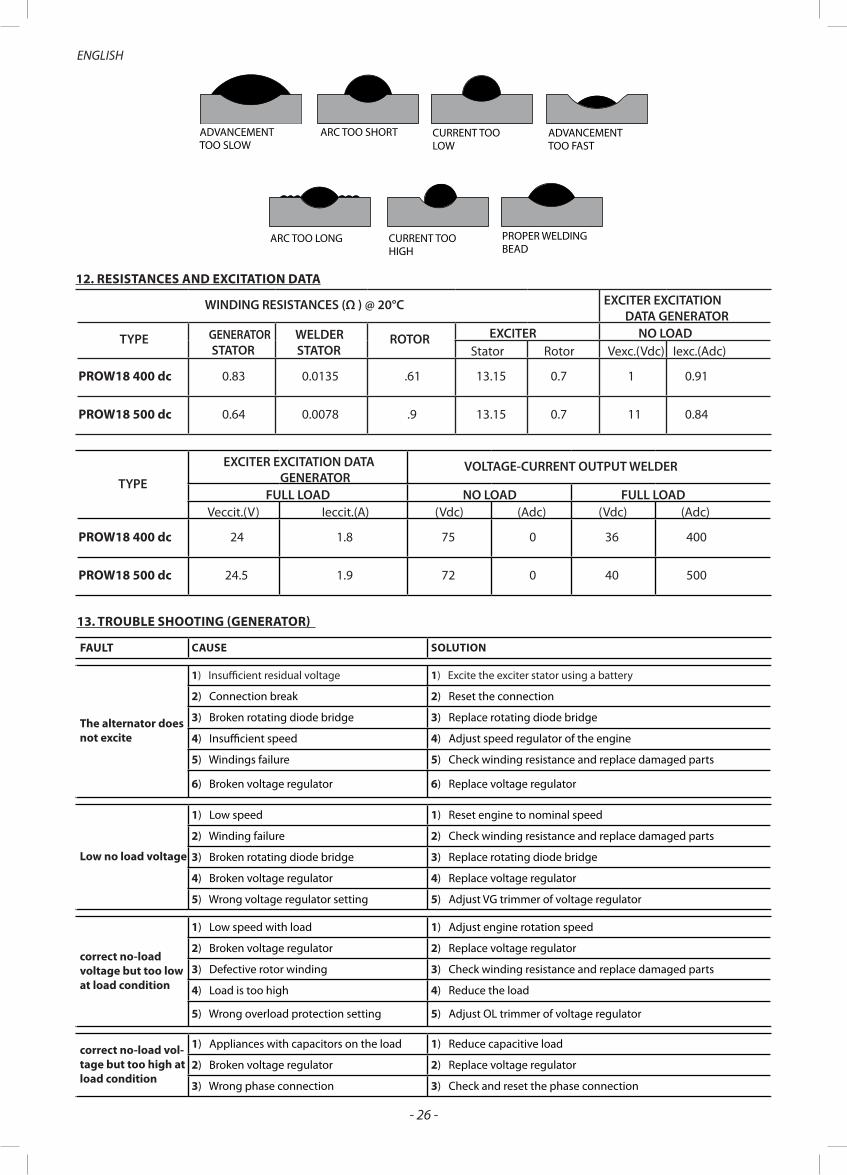
12. RESISTANCES AND EXCITATION DATA
WINDING RESISTANCES (Ω ) @ 20°C EXCITER EXCITATION DATA GENERATOR
TYPE GENERATOR STATOR
WELDER STATOR
ROTOR EXCITER NO LOADStator Rotor Vexc.(Vdc) Iexc.(Adc)
PROW18 400 dc 0.83 0.0135 .61 13.15 0.7 1 0.91
PROW18 500 dc 0.64 0.0078 .9 13.15 0.7 11 0.84
TYPE
EXCITER EXCITATION DATA GENERATOR
VOLTAGE-CURRENT OUTPUT WELDER
FULL LOAD NO LOAD FULL LOADVeccit.(V) Ieccit.(A) (Vdc) (Adc) (Vdc) (Adc)
PROW18 400 dc 24 1.8 75 0 36 400
PROW18 500 dc 24.5 1.9 72 0 40 500
AVANZAMENTO TROPPO LENTO
ARCOTROPPO CORTO
CORRENTETROPPO BASSA
AVANZAMENTO TROPPO VELOCE
ARCO TROPPO LUNGO
CORRENTE TROPPO ALTA
CORDONE CORRETTO
ADVANCEMENT TOO SLOW
CURRENT TOO LOW
ADVANCEMENT TOO FAST
ARC TOO SHORT
CURRENT TOO HIGH
PROPER WELDING BEAD
ARC TOO LONG

- 27 -
14. TROUBLE SHOOTING FOR WELDING FUNCTION
FAULT CAUSE SOLUTION
Low start voltage
1) Intervention of safe self-limiting function 1) Strike the electrode tip on the work piece
2) Intervention of a thermal protection 2) Wait for the automatic reset of thermal protection
3) CS18 welder controller broken 3) Replace CS18 welder controller
4) Uncertain contact in a CS18 connector 4) Check and correct the connector contact
5) Power rectifier broken 5) Replace power rectifier
6) Failure in the holding resistances 6) Check and eventually replace the resistance damaged
7) Failure in the welding winding 7) Replace the frame with wound stator
8) Interrupt in power connection 8) Check and repair the power connection
It does not regulate the welding current
1) Failure in the circuit panel 1) Check the 13 terminals connection and eventually replace the circuit panel
2) Failure in HAS-500 current sensor 2) Check sensor connector and eventually replace the current sensor
3) CS18 welder controller broken 3) Replace CS18 welder controller
4) Uncertain contact in a CS18 connector 4) Check and correct the connector contact
5) Power rectifier broken 5) Replace power rectifier
unstable welding current
1) Current or polarity is not correct for the electrode type
1) Check current setting and polarity of the electrode
2) The percentage of “Arc Force” is too much 2) Take to minimum the “Arc Force” potentiometer
3) CS18 welder controller broken 3) Replace CS18 welder controller
4) Uncertain contact in a CS18 connector 4) Check and correct the connector contact
ENGLISH
unstable voltage
1) Rotating mass is too small 1) Increase the flywheel of the primary engine
2) Uneven speed 2) Check and repair speed regulator of the engine
3) Wrong stability control setting 3) Adjust ST trimmer of voltage regulator
Noisy
1) Wrong coupling 1) Check and correct coupling
2) Short circuit in a winding or on load 2) Check windings and load
3) Faulty bearing 3) Replace faulty bearing

- 28 -
RICAMBI - SPARE PARTS - PROW 18

- 29 -
N° COD. RICAMBI SPARE PARTS
1 * CARCASSA CON STATORE FRAME WITH STATOR 2b * INDUTTORE ROTANTE B14 B14 ROTATING INDUCTOR 2c * INDUTTORE ROTANTE MD35 MD35 ROTATING INDUCTOR 3 E18SE021B SCUDO POSTERIORE REAR SHIELD 4b E18SB021B SCUDO ANTERIORE B3/B14 B3/B14 FRONT COVER 4c E18SB019B SCUDO ANTERIORE SAE5 SAE5 FRONT COVER 4c E18SB027B SCUDO ANTERIORE SAE4 SAE4 FRONT COVER4c E18SB023B SCUDO ANTERIORE SAE3 SAE3 FRONT COVER4c E18SB005B SCUDO ANTERIORE SAE2 SAE2 FRONT COVER6 * SCATOLA BASETTA TERMINAL BOX 7 E18BT013B COPRISCATOLA BASETTA TERMINAL BOX COVER 8 E18KA018C PROTEZIONE POSTERIORE REAR COVER 10 E18VE002C VENTOLA FAN 11 EX411668335 CUSCINETTO POSTERIORE REAR BEARING 12 EX411668345 CUSCINETTO ANTERIORE FRONT BEARING 18a E10KA012A MORSETTIERA 4 PIOLI 4 STUD TERMINAL BOX 38 * DISCHI SAE SAE COUPLING DISC PLATE 40 E18KA028B INDUTTANZA SALDATRICE WELDING INDUCTOR 44 E18BT015B PANNELLO SALDATRICE WELDING PANEL 45 E18BT016B PANNELLO PRESE SOCKETS PANEL 53 E18EC017B STATORE ECCITATRICE AVVOLTO EXCITER STATOR 54 E18EC020A ROTORE ECCITATRICE EXCITER ROTOR 55 E18EC010A SETTORE PORTADIODI POSITIVI COMPLETO (+) ROTATING BRIDGE SECTOR 56 E18EC011A SETTORE PORTADIODI NEGATIVI COMPLETO (-) ROTATING BRIDGE SECTOR 57d * REGOLATORE ELETTRONICO HVR11 HVR-11 ELECTRONIC REGULATOR 61 EX561820600 PRESE DINSE FEMALE WELDING TERMINAL 63 EX541810550 PONTE A DIODI PTH PTH RECTIFIER BRIDGE 68 E18KA022A SUPPORTO REGOLATORE ELECTRONIC REGULATOR SUPPORT 69a E18KA006A RETE PROTEZIONE SCUDO SAE2 SAE2 GRILLE PROTECTION 69b E18KA082B RETE PROTEZIONE SCUDO B14 B14 GRILLE PROTECTION 69c E18KA084B RETE PROTEZIONE SCUDO SAE4 SAE4 GRILLE PROTECTION69c E18KA080B RETE PROTEZIONE SCUDO SAE5 SAE5 GRILLE PROTECTION69d E18KA074C GRIGLIA PROTEZIONE SCUDO SAE3 SAE3 GRILLE PROTECTION69e E18KA073B TETTOIA PROTEZIONE SCUDO B14 B14 SHED PROTECTION70 E18KA014B PASSACAVO FAIR LEAD 71 E18EC000B ISOLAMENTO PORTADIODI ROTATING BRIDGE INSULATOR 73 EXCOM2PVLR DEVIATORE A 2 VIE 2 POSITION SWITCH 75 EYCONCKF03 CONNETTORE POTENZIOMETRO REMOTO REMOTE POTENTIOMETER CONNECTOR 76 E10BT042A GRAFFA INT. MAGNETOTERMICO MGT SWITCH SUPPORT 79 EYPLPS2232 SPIA LUMINOSA LAMP 80 * TIRANTI CASSA FRAME TIE ROD 88 EX391300840 DISTANZIALE MF MF SPACER 89 E18BT022A SCHEDA POTENZIOMETRI POTENTIOMETERS CIRCUIT 90 E18KA020B SUPPORTO PTH PTH RECTIFIER SUPPORT 91 EX541600050 RESISTORE DI POTENZA POWER RESISTOR 92 EX541850500 SONDA HAS HAS CURRENT SENSOR 93 E18BT023A CONTROLLO SALDATURA CS18 CS18 WELDING CONTROLLER 94 E18KA039A STAFFA VENTILATORE FAN SUPPORT 95 * VENTILATORE INDUTTANZA INDUCTOR FAN 96 E18KA019C PANNELLO STRUMENTI FRONT SUPPORT WELDING PANEL 97a * LED TERMICO THERMAL PROTECTION LED 97b * LED ABILITAZIONE ENABLE LED 113 E13GE210A ANELLO DISTANZIALE SPACER RING114 E13GE220B DISTANZIALE SPACER
* Specificare codice dell’alternatore e data di produzione * When requesting spare parts please indicate the alternator’s code and date of production

- 30 -
Arcole (Vr): Data del documento di consegna Date of the delivery document
LINZ ELECTRIC SpaGiulio Pedrollo
Rappresentante legale - custode e detentore del Fascicolo TecnicoLegal representative - Keeper and holder of the Technical Dossier
DECLARATION OF CONFORMITY
AND INCORPORATION
The manufacturer LINZ ELECTRIC Spa - Viale del Lav-
oro, 30 - 37040 Arcole (VR) Italy, declares that the com-
ponents described in this manual are manufactured in
compliance with standards: EN 60034-1, EN 60204-1, EN
61000-6-2, EN 61000-6-4, EN 55014-1, EN 55011.
They are therefore in conformity with the Directives:
- 2006/42/EC (Machinery Directive);
- 2014/35/UE (Low Voltage);
- 2014/30/UE (Electromagnetic Compatibility).
Such conformity, allows the use of these ranges of com-
ponents in machines that apply the Directive 2006/42/EC,
provided that their integration or their incorporation and/
or assembly conforms to, among other things, the rules of
EN 60204 «Electrical equipment of Machines» and our in-
stallation instructions.
The components defined above can not be put into service
until the machinery into which they are incorporated has
been declared in conformity with the applicable directives.
Note: When the components are fed with specially adapt-
ed electronic converters and/or subservient to electronic
monitoring and control systems must be installed by a
professional who assumes responsibility for compliance
with the rules on electromagnetic compatibility regula-
tions of the country in which it is installed machine.
DICHIARAZIONE DI CONFORMITÀ
E DI INCORPORAZIONE
Il costruttore LINZ ELECTRIC Spa - Viale del Lavoro,
30 - 37040 Arcole (Vr) Italia, dichiara che i componenti
descritti in questo manuale, sono costruiti in osservanza
alle norme: EN 60034-1, EN 60204-1, EN 61000-6-2, EN
61000-6-4, EN 55014-1, EN 55011.
Sono quindi conformi alle Direttive:
- 2006/42/CE (Direttiva Macchine);
- 2014/35/UE (Bassa Tensione);
- 2014/30/UE (Compatibilità Elettromagnetica).
Queste conformità consentono l’uso di queste gamme di
componenti in macchine che applicano la Direttiva Mac-
chine 2006/42/CE, con riserva che la loro integrazione o la
loro incorporazione e/o assemblaggio siano effettuati con-
formemente, tra l’altro, alle regole della norma EN 60204
«Apparecchiatura Elettrica delle Macchine» e alle nostre
istruzioni d’installazione.
I componenti sopra definiti non potranno essere messi in
servizio prima che la macchina in cui sono incorporati sia
stata dichiarata conforme alle direttive applicabili.
Nota: Quando i componenti sono alimentati con converti-
tori elettronici adattati e/o asserviti a dispositivi elettronici
di controllo e di comando, devono essere installati da un
professionista che si assuma la responsabilità del rispetto
delle regole sulla compatibilità elettromagnetica vigenti
nel Paese in cui viene installata la macchina.

- 31 -

LINZ ELECTRIC SpaSocietà a Socio Unico
Viale del Lavoro, 30 - 37040 Arcole (Vr) ItaliaTel. +39 045 7639201 - Fax +39 045 7639202
www.linzelectric.com - [email protected]