proweld™ equipment manual uf2000/1 - asahi … 7 capacity of welding data is exhausted error 8...
TRANSCRIPT
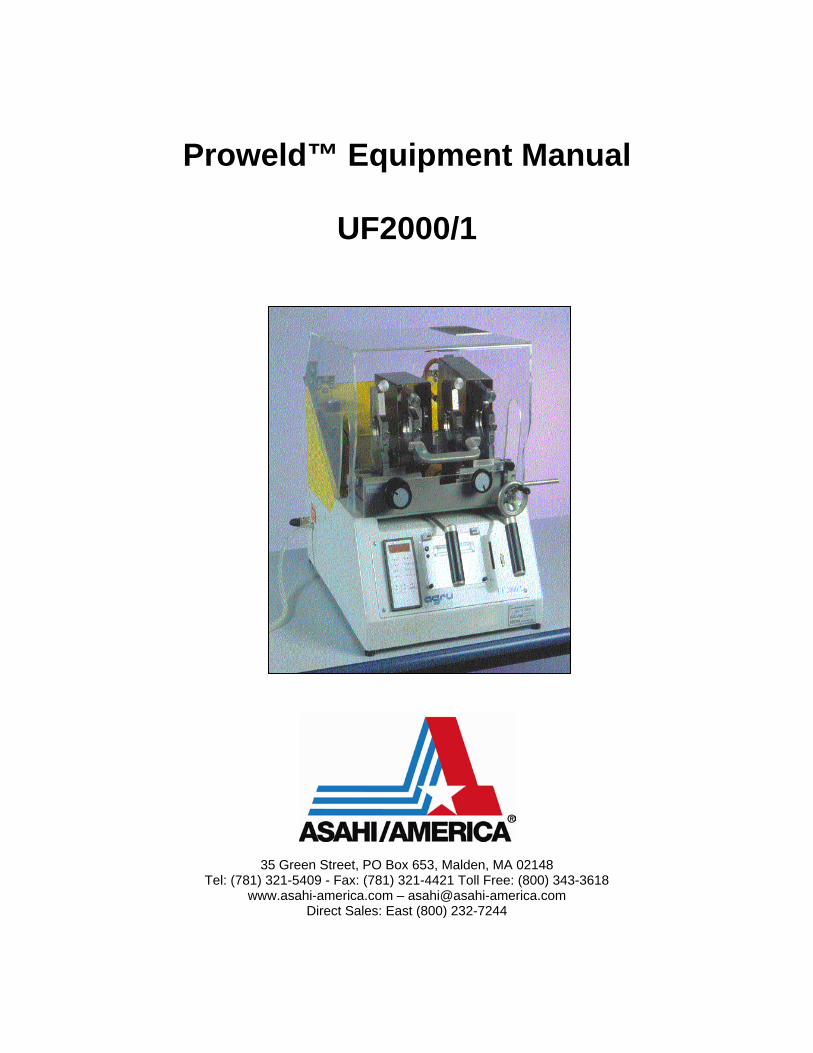
Proweld™ Equipment Manual
UF2000/1
35 Green Street, PO Box 653, Malden, MA 02148 Tel: (781) 321-5409 - Fax: (781) 321-4421 Toll Free: (800) 343-3618
www.asahi-america.com – [email protected] Direct Sales: East (800) 232-7244

TABLE OF CONTENTS
SECTION I: Training overview on the UF2000/1
Series Equipment
SECTION II: Operation and Welding Concerns
SECTION II: Inspection Procedures
Asahi/America, Inc. UF 2000/1 Page 2 of 18

Section I--Training Overview on the UF2000 Series Equipment A. Welder
I . Packaging and unpacking of UF2000/1 a) The transport box is explained as push and vibration protection and offers
protection against transport influences. b) Transport the machine only in the special transport box. c) For loading and unloading of the machine, use the included lever belt. d) Do not force the machine into the box. e) Pay attention to the correct seal of the box top!
2. Securing the UF2000/1 for Transportation To realize a maximum protection against damage and in the interest of a long service, follow these steps:
a) Stretch a short piece of pipe between the two middle clamping jaws so that the right carriage cannot move. The carriage must be unstressed. ⇒ Move the carriage close together to avoid a long projecting length of the rack from the machine. b) Relieve back-run safety device, so that no pressure presses on the compressing spring and thus the load cell in the internal of the machine.
c) Put the included set collar over the projecting rack. d) Fix the set collar sturdy with the adjusting screw concisely to the machine frame. e) Secure the position lever of the plane and of the heating element against slipping.
⇒ Tie the levers with the attached rubber band together and fasten it at the hand wheel.
f) If your machine is equipped with protective cover: ⇒ Pull the handle with the rubber band down and fasten it to the machine using the handles for the heater and planer.
Important: If done incorrectly, damages to the machine, particularly the load cell, can occur!
Pay attention that the rack is not exposed because this can lead to damages at the load cell!
Asahi/America, Inc. UF 2000/1 Page 3 of 18

3. Preparation of Machine for Operation
a) With each supplied machine, a general authorization card is delivered. It authorizes all functions (including the special function.)
b) Install the machine on a plane and dry floor. c) The transportation box can be used as a working table.
Close the cover of the transportation box and secure with all side fasteners!
d) Remove transportation protection. e) Check all plug connections. Check the machine for visible damages. f) Connect the machine only to current supply when the main switch at the frontside of the machine is switched OFF. g) The housing is made of plastic-composite material and can get charged electrostatically.
h) After connection of the machine to the current supply, you must provide a sufficient grounding. i) Depending on the pipe size, the respective clamping devices should be screwed to the clamp tools. j) With non contact-welding, the distance between the end of the pipe and the heating element must be 1mm. This can be tested with the help
of the included reference gauge. If necessary, adjust the distance screws at the heating element.
Important: Before switching on the machine, if the heating elements for butt welding or tek welding (HS or IS) are required, make sure they are in place before the machine is turned on. Never operate machine set for non contact butt welding (BS) with the crown plate on. This will damage crown plates.
k) Connect transformer to 110V current supply and turn on the switch on the transformer and then turn the main switch on.
The machine begins with the initialization of the computer. This is apparent by lighting up all green, red and yellow LED's and all display segments. The end of initialization is indicated by an acoustic signal.
Asahi/America, Inc. UF 2000/1 Page 4 of 18

4. Welding parameter set-up UF2000/1 Quick Review Press (+) (-) simultaneously UF - I Tool name is displayed <Mat> Select material to be welded <dia> Select the outside diameter (mm) <wth> Wall thickness of material welded <temp> Temperature of the heating element BS: Non-Contact Butt-Fusion HS: Conventional Butt-Fusion IS: Tekweld Butt-Fusion <proj no> Any 4 digits <joint no> automatic count <time/date> set time and date Welding parameters by material, diameter and wall thickness are on page 6. Also enclosed is a cut sheet which can be checked off and attached to each tool.
5. Welding method UF2000/1
Quick Review <pl> Planing <al> Alignment <t(A)> Increase pressure against heating element <t(Aw)> Heat soak time, the heating time pipe together. <t(U)> Adjustment time, Time allowed to remove HE and bring pipe together. <t(F)> Joining Pressure and ramp-up time
<t(K)> Cooling Time
Asahi/America, Inc. UF 2000/1 Page 5 of 18

PVDF Programmed Parameters UF2000/1 UF2000/2 Diameter Wall Diameter Wall
Thickness Thickness
½” (20mm) 1.9mm (230psi) 2 ½ “ (75mm) 2.5mm (150psi) ¾” (25mm) 1.9mm (230psi) 2 ½” (75mm) 3.6mm (230psi) 1” (32mm) 2.4mm (230psi) 2 ½” (75mm) 4.3mm (300psi) 1 ¼” (40mm) 2.4mm (230psi) 3” (90mm) 2.8mm (150psi) 1 ½” (50mm) 2.5mm (150psi) 3” (90mm) 4.3mm (230psi) 1 ½” (50mm) 3.0mm (230psi) 3” (90mm) 5.1mm (300psi) 2” (63mm) 2.5mm (150psi) 4” (110mm) 3.0mm (liner) 2” (63mm) 3.0mm (230psi) 4” (110mm) 3.5mm (150psi) 2” (63mm) 3.6mm (300psi) 4” (110mm) 5.3mm (230psi)
4” (110mm) 6.3mm (300psi) 4 ½” (125mm) 3.0mm (liner) 4 ½” (125mm) 3.9mm (150psi) 4 ½” (125mm) 6.1mm (230psi) 5” (140mm) 4.4mm (150psi) 5” (140mm) 6.7mm (230psi) 6” (160mm) 3.0mm (liner) 6” (160mm) 4.9mm (150psi) 6” (160mm) 7.7mm (230psi) 7” (180mm) 5.6mm (150psi) 7” (180mm) 8.7mm (230psi) 8” (200mm) 6.2mm (150psi) 9” (225mm) 7.1mm (150psi) 9” (225mm) 10.9mm (230psi) 10” (250mm) 7.6mm (150psi)
To be checked off at project start and followed throughout the project.
Asahi/America, Inc. UF 2000/1 Page 6 of 18

6. Error Codes on label printer. UF2000/1 (page) and UF2000/2 (page 40) See UF Binder for instructions on error correction. Error 1 Alignment time out of tolerance (Butt fusion Only) Error 2 Heat Soak Time out of tolerance Error 3 Adjustment time too long Error 4 Ramp-up time and/or joining pressure out of tolerance Error 5 Cooling time too short Error 6 During cool down period, the joining pressure is out of tolerance Error 7 Capacity of welding data is exhausted Error 8 1990 welds complete, unit may need to be returned for routine maintenance. (Only displayed when cycling tool on/off) Error 9 2200 welds complete, unit should be returned for routine maintenance. (Only displayed when cycling tool on/off).
Asahi/America, Inc. UF 2000/1 Page 7 of 18

IR-Fusion Parameters for PVDF These welding parameters are valid at 20°C (68°F) (gap 1mm)
Dimension PN Temperature Pre-Heating Adjusting Joining Cooling (mm/inch) (bar/psi) (°C) Time (sec.) Time (sec.) Time (sec.) Time (min.)
20xl..9 (1/2") 20/284 480 30 3 3 2 25xl..9 (3/4") 20/284 480 32 3 3 2 32x2.4 (1”) 20/284 480 37 3 3 2.5
40x2.4 (1-1/4") 20/284 480 45 3 3 3 50x3.0 (1-1/2") 20/284 480 48 3 3 4
63x3.0 (2") 16/230 480 53 3 3 4 IR-Fusion Parameters for PPR + PPH These welding parameters are valid at 20°C (68°F) (gap 1mm)
Dimension PN Temperature Pre-Heating Adjusting Joining Cooling (mm/inch) (bar/psi) (°c) Time (sec.) Time (sec.) Time (sec.) Time (min.)
20x2.5 (1/2”) 10/150 450 30 3 3 4 25x2.7 (3/4”) 10/150 450 35 3 3 4 32x3.0 (1") 10/150 450 40 3 3 5
40x3.7 (1-1/4") 10/150 450 45 3 3 6 50x4.6 (1-1/2”) 10/150 450 50 3 4 7
63x5.8 (2”) 10/150 450 60 3 4 8
IR-Fusion Parameters for E-CTFE These welding parameters are valid at 20°C (68°F) (gap1mm)
Dimension PN Temperature Pre-Heating Adjusting Joining Cooling (mm/inch) (bar/psi) (°C) Time (sec.) Time (sec.) Time (sec.) Time (min.)
20xl.9 (1/2") 20/284 480 50 3 3 2 25xl.9 (3/4") 20/284 480 55 3 3 2 32x2.4 (1") 20/284 480 65 3 3 2.5
40x2.4 (1-1/4") 20/284 480 75 3 3 3 50x3.0 (1-1/2") 20/284 480 85 3 3 4
63x3.0 (2") 16/230 480 90 3 3 4 IR-Fusion Parameters for PFA These welding parameters are valid at 20°C (68°F) (gap 1mm)
Dimension Temperature Pre-Heating Adjusting Joining Cooling (mm/inch) (°C) Time (sec.) Time (sec.) Time (sec.) Time (min.)
21.3x3.0 (1/2") 510 80 3 3 3 26.5x3.0 (3/4") 510 90 3 3 3 33.4x3.6 (1") 510 104 3 3 3 60.5x4.2 (2") 510 120 3 4 5
Asahi/America, Inc. UF 2000/1 Page 8 of 18

Section III—Operation and Welding Concerns This section is to be utilized to assist in visual inspection of welded joints performed on the UF2000 non-contact butt-fusion equipment. The manual outlines common problems to look for during fusion and how to correct them. The manual also describes a few techniques for ensuring your tool is performing to manufacturer’s expectations. However, it should be noted that even the best looking joint can still be a “cold weld” and that inspection can never replace the need for strict accordance to welding procedures. Common Concern #1 Poor Alignment: When a joint is welded without properly being aligned, the joint will not be fully pressure rated. The amount of the offset will determine the likelihood of a failure. Solution: It is recommended that the pipe be aligned, not to exceed an offset of 10% of the wall thickness. As standard procedure, the UF2000 equipment is provided with the best alignment features of any tool on the market. It is essential to fully utilize these adjustments during the alignment process. If the pipe and fittings cannot be aligned, the pipe should be removed and reloaded. If alignment problems persist, it may be necessary to adjust the tool. Common Concern #2 Oversized beads: Joints may appear oversized after the joint has been made. This problem may be from attempting to preheat the pipe or from welding with incorrect parameters. Solution: It is not recommended to preheat pipe. The tool automatically compensates for the outside temperature. If there is a significant amount of air flow, preheating will not overcome the flow of air. It is preferred to move the tool or protect it in some fashion against the wind. If joints appear larger than normal, it may be due to welding at incorrect parameters. Check the tool setup to ensure you are utilizing the correct outside diameter and wall thickness. If the problem persists, verify the temperature of the heating element. Common Concern #3 Non uniform bead: If a bead appears wavy or notched, it may be due to improper planning or capping of the material. It is common on the UF2000/2 that joints have a wave in the three areas of the clamp opening. The size of the wave will vary depending on the diameter size and wall thickness. The waves will appear most prevalent in 6” and 10” welding. The wave is not significant to the joint quality and only appears on the outside, not internally. Since weld strength is primarily based on the material internally and in the pipe wall, the waves are normally not cause for concern, unless there is a large wave on one side where the bead disappears altogether. If the wave causes the bead on either side to disappear, the joint should be cut and redone.
Asahi/America, Inc. UF 2000/1 Page 9 of 18

Solution: Although it is good practice to cap the pipe to reduce contamination and windflow, it may cause the bead to disappear especially in short sections of pipe (less than 4 feet). Since the UF2000/2 creates a tremendous amount of heat, the air in the pipe is heated and expanded. If the air is not allowed to flow out the pipe end, it will flush back through the heating element and out through the openings in the clamp, cooling the joint as it rushes by the molten material. To avoid this, remove caps or use caps that are perforated. Perforation needs to be several holes that are 1” in diameter. When utilizing caps, it is necessary to inspect the bead formation. If the bead disappears, more holes are required in the caps. Also, when welding fittings (90’s), it is better to turn them so that there is not an upward opening that may create a “chimney” like affect. This is most common in larger diameters (6”). If it is not possible to turn the fitting on its side, then caps with perforation should be utilized. Common Concern #4 Burnt Joint: If a joint appears discolored under light, it may be slightly burned. The burning is normally caused by insufficient planing or incorrect welding temperature. Solution: Each time a joint is conducted, the pipe end must be planed to the mechanical stop on the planer. Insufficient planing will cause the pipe to be closer to the heating element and cause the material to “burn” rather than melt. Always double check your planing and also check the security of the pins and mechanical stops on the planer. If “burning” of joints persists, it may be due to the incorrect calibration of the heating element. The heating element can be recalibrated in the field, contact Asahi/America for assistance. It is important to note that heating elements cannot be switched from one tool to another without requiring calibration. Each tool has two specific heating elements (6” and 10”) that are calibrated at the factory prior to shipment, for that particular unit only.
Asahi/America, Inc. UF 2000/1 Page 10 of 18

Bead Sizing
The following table outlines the normal bead height and width when welding with the UF2000/1 equipment. Depending on site conditions, the measurements may vary slightly. This table is based on PVDF and shall not be applicable for other materials.
UF2000/1 Bead Heights
Pipe Diameter
Pressure Rating
Height Width
mm inches mm inches ½” (20mm) 230 psi .6-1.4 .023-.055 2.1-3.6 .082-.180 ¾” (25mm) 230 psi .7-1.55 .027-.061 2.6-4.0 .102-.158 1” (32mm) 230 psi .9-1.60 .035-.068 2.7-5.0 .106-.196
1-1/4” (50mm) 230 psi 1.2-1.9 .047-.075 2.9-5.0 .114-.196 1-1/2” (50mm) 230 psi 1.2-2.2 .047-.087 3.0-5.1 .118-.201
2” (63mm) 230 psi 1.2-2.3 .047-.091 3.0-5.45 .118-.215
Bead Formation
The following describes typical bead formation when utilizing the UF2000/1 and UF2000/2 equipment. The information is standard to PVDF and Halar only. When welding with PolyPro, the uniformity is the same for pipe as it is for pipe to fitting. Pipe to Pipe Very uniform and equal on both sides. Pipe to Fitting Uniform, but the fitting bead is normally slightly
larger. Fitting to Fitting Very uniform, but larger in general, compared to
pipe to pipe. Top versus Bottom Due to the natural effects of gravity, the bead
externally will appear smaller on top and larger on the bottom. Internally, the bead will appear straighter on top and flatter on bottom.
UF2000/2 Due to the heat from the heating element, an air flow is always present during fusion. The air flow will not affect the joint, but there will be waves on the bead exterior in the three points of the clamp openings. -In thicker wall pipe fittings (230 psi) the wavesare more pronounced. -90’s should be turned to the side rather than facing up. This will prevent a “chimney” like wind flow that would create a cold weld.
Asahi/America, Inc. UF 2000/1 Page 11 of 18
Certifying a Machine
When a new tool arrives on-site, it should be tested for proper welding operation prior to being utilized on a project. All tools are tested at the factory prior to delivery, but conditions of delivery cannot be controlled and equipment could be damaged. Several joints should be prepared on the tool of varying pipe diameters. The quality of the joint should be within the parameters of the above manual. In addition to the above manual, several other checks can be done as follows:
1. After the heat soak time is complete, when making a joint, the pipe should be pulled apart and the heating element should be removed. The pipe ends should be inspected for full even melt 360 degrees around the ends. This will help to verify the heat temperature and welding parameters. 2. After the heat soak time is complete, when making a joint and the pipe is rejoined together, a narrow object (such as a pencil or finger) can be placed
inside the pipe without touching the joint. The operator should be able to see through the molten material for a few seconds and see the object. This will verify the welding pressure. If the operator cannot see the object and has joined the material together without receiving an error, the pressure utilized to make the joint may be too great and the tool may need to be recalibrated. Also verify correct welding parameters are set on the tool.
All joints should be as described in Sections: Bead Formation and Bead Sizing. When receiving a new tool and testing it for operation, questionable joints may be returned to Asahi/America, Inc. for evaluation.
Asahi/America, Inc. UF 2000/1 Page 12 of 18

Section IV—Inspection Procedures Non-Contact Butt-Fusion Inspection Recommendations To help ensure the success of an installation, it is recommended to follow all welding guidelines and inspection procedures. The information in this section pertains to Asahi/America’s recommendations for inspection techniques. Use these procedures in conjunction with Section II, Operation and Welding Criteria. 1. Inspection Labels Since the UF2000 equipment is designed to help guard against the possibilities of cold welds or incomplete fusion, the label feature should be utilized in a manner to track all welds. Enclosed in each tool is a Quality Control log book that may be used to track the weld information. In the log book, the welder should note the joint number and tool serial number and place the entire weld label on the pipe joint. The other option is to place the weld label from the UF equipment in the log book and mark the physical weld with the joint number. Utilizing the blank part of the label is ideal for marking the joint number on the pipe, See Below:
UF2000/1 Serial no. 1295030 12/12/97 10:20 SR01 BS matl: PVDF dia: 160 wth: 4.9 Welding Parameters OK **********
Blank
Section
Utilizing the weld label helps the inspector to ensure that the operators are running the equipment in the correct fashion to make a reliable fusion. If the tool was to operate incorrectly, this is easily identified by the error numbers on the weld label. All joints with printed error numbers are recommended to be cut and redone. 2. Air Movement In addition to the weld label, visual inspection can assist in limiting the likelihood of a failure. The UF2000 equipment can control the majority of mistakes that can be made during the fusion, but it does have limitations such as wind or incorrect input of the pipe material, size and wall thickness. These items must be controlled by the operator and can be found by inspection. Even though the UF2000 is designed to compensate for different outside temperatures, wind and air movement can have a negative affect on the weld. Since the concept of non-contact butt- fusion is to heat the air between the pipe and the heating element, any air movement can disrupt this small area of radiant heat transfer and prevent against proper fusion. In clean room environments, it may also be necessary to block air movement from Hepa Filters around the unit. The smaller UF2000/1 unit is supplied with a protection hood which can be utilized to avoid air movement around the joint. The UF2000/2, the larger unit, does not encompass a hood due to the size it would have to be. Therefore, it is best to place the unit so that it is not directly below a fan filter unit. In some cases, depending on the clean room class, the air movement may be so great as to require a single filter to be either shut down or blocked using a plastic wind guard.
Asahi/America, Inc. UF 2000/1 Page 13 of 18

3. Bubbles in the Joint In the fusion process, it is possible to find tiny bubbles trapped in the welded region. These bubbles are a common occurrence in Non-Contact Butt-fusion. The bubbles are from one of two sources; either air that has been trapped in the weld during the joining process, or small vacuums that appear due to material shrinkage during the cooling down time. In either case, the bubbles are not an area of concern and there is not a specification for the size of a bubble that would cause a joint failure. The combination of the welding parameters and the melt flow index of the Solef PVDF resin help to ensure against tiny bubbles affecting the quality of the joint. 4. Limitations of Inspection As mentioned in section 1, the UF2000 is designed to assist in preventing against a cold weld. A cold weld is a weld that has either not been heated properly or has been joined together at too high a force. In both cases there is insufficient molten material that is joined together to create a proper fusion of the materials. Typically a joint that has been heated improperly, or what we will call incomplete fusion, is possible to identify by inspection. The signs of a joint heated insufficiently are:
1. Decreased bead size in certain sections of the joint 2. Decreased bead size all around as compared to other joints of the same size. 3. No bead formation in a section of the weld
These occurrences are generally from:
1. air movement 2. Incorrect capping of the joints 3. Chimney affect in 90s turned upward 4. Incorrect welding parameters such as OD and wall thickness
The cold weld can also be from too high a joining force as previously mentioned. In this case, cold weld inspection is less likely to identify the weld. Below are two cross-sectional views of a pipe wall that has been welded. Weld 1 is a good fusion joint, while weld 2 is a cold weld. Notice in the cold weld that there is very little material that has been joined together in the pipe wall area. The molten material has been forced to the outer and inner bead and the unheated sections of the pipe have been forced together in the pipe wall region. In the proper weld 1, you can see there is material joined together in the pipe wall as well as in the inner and outer beads.
Weld 1 Weld 2
Asahi/America, Inc. UF 2000/1 Page 14 of 18

The problem with inspecting this type of cold weld is that the outer bead of the joint is the same as that of a good joint. In the sample above, the top bead represents the outer look of the weld. It can be seen very clearly that both welds look the same according to the bead formation. Since the occurrence of a cold weld is difficult to inspect and find, the UF2000 equipment has been designed to measure the joining force during the fusion process. Therefore, if an operator joins the material with too high or too low a force or brings the material together at too fast or slow a rate, the unit will identify this and produce an error message on the print out label. 5. Downloading Data / Data Transfer The UF2000 Equipment is equipped with a memory to store information on each weld. The tool has a capacity of approximately 1000 to 1100 welds. The data on each weld can be transferred to a PC computer utilizing the Wicon software that is included in each unit. The data transferred from each weld provides an inspector with more information about the weld than what appears on the printout label. Below is an example of the data:
AGRU UF 2000/1 Serial No. 1293005 ************************************ date: 02.09.96/10:58 ident-key AA01 proj. no: 1265 joint no. 405 dia: 63mm wth: 3.0mm mat: PVDF nitro. pres: 0.0bar method: IR amb temp: 21 C des. temp: 480 C act. temp: 481 C t(AW) 60 sec t(U) 2.8 sec pres ramp: 3.8 sec des. press: 73 N act. press: 72 N t(F) 05:00 errorcode: 64
The data transfer feature allows the inspector or installer to have back-up documentation on the welds conducted on the tool. By reviewing the welds, it can also be identified if weld counts were reset during the installation, since the tool will record all welds. The procedure for the Wicon software installation and Data transfer usage is found in the UF2000 binder in the last section. Below is brief description of the process which can be utilized as a reminder. For further details refer to the binder. Loading Wicon Program
Asahi/America, Inc. UF 2000/1 Page 15 of 18

With each tool, a copy of the Wicon program is provided on a 3.5” disk (PC based). Instructions on loading Wicon are also on the disk itself. In DOS, type the following to load: a: install a: c: when installing from the “a” drive b: install b: c: when installing from the “b” drive On the PC, type: cd wicon at the C: prompt (In the Wicon directory Type: Puffer +2) -only necessary if data transfer is not successful. Type: Wicon
Data Transfer Procedure I. Check the memory availability on the UF equipment regularly. An over loaded memory
can corrupt the data and cause it to become unreadable.
II. As required, transfer the data to a PC and save it on a disk or print it out in hard form. It is recommended to conduct a data transfer once a week to detect problems before they multiply. III. Delete all stored weldings to free the memory. 1. Checking the memory:
a. Press <+> and <enter> key simultaneously b. The tool screen will display 0000 c. Using the <+> and <-> keys and the <enter> key to advance through each number.
Enter the number 0030 d. The screen will now display the amount of welds available for storage.
Press the <enter> key four times to scroll out of the command 30. 2. The Data Transfer
a. Connect the communication cable to the tool and the PC comport. b. On the PC, open the Wicon program and select file window and click on the
command dtf (data transfer). The PC screen will display in incorrect grammar "please wait wile I read data"
c. On the UF Tool, now press <-> and <enter> key simultaneously. The Tool screen will now read dTF and a red light will be blinking in the upper left corner of the led display. To start the transfer, press the <enter> key again. The unit will now show on the screen a count of the individual data being transferred to the PC.
d. In the lower right hand corner of the PC, a small smiling face will blink indicating the transfer is being accepted. If the face is not blinking, consult the UF binder for more detail.
e. Once the transfer is complete, the Tool will revert to its normal operation mode. The PC will, however, remain with the same screen, simply press enter to clear the “reading” message.
f. Select the option window and click on the show all data command. You will now be able to view all the data transferred. Utilize other Option of File commands to print or save the data to disk.
Asahi/America, Inc. UF 2000/1 Page 16 of 18

3. Clearing the Memory After the data has been successfully transferred and saved, the tool memory should be cleared to allow for more welds to be stored.
a. Press <+> and <enter> key simultaneously and the tool screen will display 0000
b. Enter in 0030
c. The screen will now display the amount of available storage left on the unit. Enter in 0001 and press <enter>
d. The memory is now deleted. To double check, enter in command 0030 again and the amount of available storage should be 1101 or 1100, indicating the memory is completely empty.
Asahi/America, Inc. UF 2000/1 Page 17 of 18

Asahi/America, Inc. UF 2000/1 18 of 18
Tool Department Contacts
Asahi/America35 Green St, Malden, MA 02148
Phone: 1-800-343-3618 or 781-321-5409Fax: 781-388-4749
Equipment Rental
Rental Equipment Manager
Rental Administration, Billing & Returns
Field Technician/Onsight Training
Technical Service
High Purity, Double Wall or Industrial Piping
�