pstrotatoraz - qsl.net user manual.pdf · loop ant controller ... trx-manager ... win-test,...
TRANSCRIPT

PstRotatorAz – Software for Antenna Rotators User’s Manual Rev. 2.7
1
PstRotatorAz Software for Antenna Rotators
User’s Manual
Rev. 2.7
© 2017 Codrut Buda – YO3DMU
http://www.qsl.net/yo3dmu/index_Page346.htm

PstRotatorAz – Software for Antenna Rotators User’s Manual Rev. 2.7
2
Content
Introduction ................................................................................................................................................. 5
PstRotatorAz ............................................................................................................................................ 6
Automatic tracking ................................................................................................................................... 7
Antenna pointing...................................................................................................................................... 7
Maps ........................................................................................................................................................ 8
Communication ........................................................................................................................................ 10
RS232 communication............................................................................................................................ 10
TCP/IP communication ........................................................................................................................... 10
UDP Interface ......................................................................................................................................... 11
DTMF Control ......................................................................................................................................... 12
Web Server Setup ................................................................................................................................... 12
Global Beam Display ............................................................................................................................... 14
Flex-6000 TCP/IP connection .................................................................................................................. 14
Setup ......................................................................................................................................................... 16
Select the rotator controller from the list. ............................................................................................. 16
My Location ............................................................................................................................................ 16
Presets .................................................................................................................................................... 17
Antenna Offset and ANT button ............................................................................................................. 17
Antenna Limits ....................................................................................................................................... 18
3dB Beam Width .................................................................................................................................... 18
Refresh Rate ........................................................................................................................................... 18
Trackers setup ........................................................................................................................................ 18
Controllers setup .................................................................................................................................... 18
Distance Unit .......................................................................................................................................... 19
Label ....................................................................................................................................................... 19
Parking Setup ......................................................................................................................................... 19
Shortcuts Setup ...................................................................................................................................... 19
Google Maps Setup ................................................................................................................................ 19
Close by Ext. Program ............................................................................................................................. 19
Start Ext. Programs ................................................................................................................................. 20
Start Other Windows .............................................................................................................................. 20
WX Setup ................................................................................................................................................ 20
WX Info................................................................................................................................................... 20
Point into the Wind ................................................................................................................................ 21
Bidirectionality ....................................................................................................................................... 21
Start as TCP Client .................................................................................................................................. 21
Start in Manual Mode ............................................................................................................................ 21
Confirm Imported Data .......................................................................................................................... 21

PstRotatorAz – Software for Antenna Rotators User’s Manual Rev. 2.7
3
Double Click on Map .............................................................................................................................. 22
Use FCC Database ................................................................................................................................... 22
11 Meter Prefixes ................................................................................................................................... 22
Master/Slave Mode ................................................................................................................................ 22
Master/Slave Counter ............................................................................................................................ 22
UDP Control............................................................................................................................................ 22
DTMF Control ......................................................................................................................................... 22
Web Server ............................................................................................................................................. 22
SteppIR Controller .................................................................................................................................. 23
UltraBeam Controller ............................................................................................................................. 23
Loop Ant Controller ................................................................................................................................ 23
Relays Board ........................................................................................................................................... 23
GH Everyware ......................................................................................................................................... 24
Tracker ...................................................................................................................................................... 25
KST2Me .................................................................................................................................................. 25
DX Monitor ............................................................................................................................................. 25
CC User ................................................................................................................................................... 25
BBLogger ................................................................................................................................................ 25
DX4WIN .................................................................................................................................................. 26
DXLab Suite ............................................................................................................................................ 26
DXLog.net ............................................................................................................................................... 27
HamScope .............................................................................................................................................. 29
HamRadioDeluxe .................................................................................................................................... 29
JT65-HF ................................................................................................................................................... 30
KLog ........................................................................................................................................................ 30
Logger32 ................................................................................................................................................. 30
LOGic8 .................................................................................................................................................... 31
N1MM .................................................................................................................................................... 31
Rotor control ...................................................................................................................................... 31
N1MM Logger.ini file .......................................................................................................................... 32
Rotor Port, Rotor Name ..................................................................................................................... 32
Multiple rotors control ....................................................................................................................... 33
N3FJP’s loggers ....................................................................................................................................... 34
nGenLog ................................................................................................................................................. 34
Swisslog .................................................................................................................................................. 34
TACLog ................................................................................................................................................... 35
TRX-Manager .......................................................................................................................................... 35
VHFCtest4WIN ........................................................................................................................................ 35
VHFLog ................................................................................................................................................... 35
VQLog ..................................................................................................................................................... 35
Win-Test ................................................................................................................................................. 37

PstRotatorAz – Software for Antenna Rotators User’s Manual Rev. 2.7
4
WinREF-HF ............................................................................................................................................. 39
WinREF-THF ............................................................................................................................................ 39
Wlog2000 ............................................................................................................................................... 39
WriteLog ................................................................................................................................................. 39
WSJT-X .................................................................................................................................................... 39
Radio-Eyes .............................................................................................................................................. 40
Sidereal .................................................................................................................................................. 40
QRZ.com Callsign database .................................................................................................................. 40
PstRotatorAz managing more than one rotator (multiple instances) ................................................ 40
SP/LP and BD buttons ............................................................................................................................ 41
SteppIR Controller ................................................................................................................................... 41
Settings................................................................................................................................................... 42
Manual Mode ......................................................................................................................................... 42
Tracking Mode........................................................................................................................................ 43
Using DTR and RTS ................................................................................................................................. 44
Remote Control ........................................................................................................................................ 46
ERC-M (dual azimuth controller) ........................................................................................................... 46
Using N1MM Logger and PstRotatorAz with the ERC-M to Control Two Azimuth Rotators ................... 46
FT/FTDX + Yaesu DXA rotators ............................................................................................................ 49
AlfaSpid USB Controller ......................................................................................................................... 49
Run-time error ‘8020’ ................................................................................................................................. 50
SUPPORT ................................................................................................................................................ 51

PstRotatorAz – Software for Antenna Rotators User’s Manual Rev. 2.7
5
Introduction PstRotatorAz handles just almost every controllable rotator in common use:
Controller Protocol Speed Web site
Prosistel D Prosistel 9800 http://www.prosistel.net
Prosistel C Prosistel 9800
ERC DCU-1 4800
http://www.schmidt-alba.de ERC-M GS-232A/B 9600
ERC-R GS-232A/B 9600
Green Heron RT21 DCU-1 4800
Green Heron RT20 DCU-1 4800
MDS RC-1 DCU-1 4800
Idiom Press Rotor-EZ DCU-1 4800
Hy Gain DCU-1 DCU-1 4800
Hy Gain DCU-2 DCU-2 4800
Cytrol 5000 DCU-1 4800
Yaesu GS-232A/B 360deg GS-232A/B 9600
Yaesu GS-232A/B 450 deg GS-232A/B 9600
AlfaSpid RAK 360 deg AlfaSpid 1200
www.rfhamdesign.com
AlfaSpid RAK 720 deg AlfaSpid 1200
AlfaSpid RAK Yaesu PS GS-232A/B 1200
AlfaSpid RAS AlfaSpid RAS (1deg) 600
AlfaSpid BIG-RAS AlfaSpid RAS (0.5 deg) 600
M2 RC2800PX M2 9600
M2 RC2800P-A M2 9600
Easycomm Easycomm1 9600
K4JRG GS-232A/B 19200
EA4TX ARSWIN ARSWIN Program http://www.ea4tx.com
ZL1BPU ZL1BPU 9600
SARtek SARtek 1200
Zelpro SAK-232 GS-232A/B 9600
K3NG Arduino GS-232A/B 9600
WinRotor FUNKBOX WinRotor Program http://www.funkbox.de
SAEBRTrack SAEBRTrack 9600 Saebrtrack
Heathkit HD 1780 Heathkit 9600
Channel Master USB-UIRT interface USB
FT950, FT2000, FTDX5000,
FTDX9000 FT/DX CAT (RTS disabled) 38400
GB127M Rohde-Schwarz Rohde-Schwarz 9600
UltraBeam UB-ONE DCU-1 4800 http://www.ultrabeam.it
TrueNORTH VK3LL/VK3KQ GS-232A via USB Interface 9600 http://www.emdrc.com.au/
Radant APU1-AE Radant APU1 9600 povorotka.ru/
12PR1A Portable Rotation GS-232A/B 9600 www.portablerotation.com
If you need to control an azimuth + elevation rotator, or separate azimuth and elevation rotators, you can
use the PstRotator program.

PstRotatorAz – Software for Antenna Rotators User’s Manual Rev. 2.7
6
PstRotatorAz
The PstRotatorAz program can control not only rotors, but also SteppIR http://www.steppir.com/ ,
UltraBeam http://www.ultrabeam.it or Loop http://www.ciromazzoni.com/English/Loop%20Antenna.htm
antennas via RS232, USB to serial adapters, or Ethernet to serial adapters (serial servers).
It is also possible to control some Relays Boards for antenna selection, or any other purpose.
The EA4TX and WinRotor rotor interfaces are controlled communicating via DDE with their own programs.
Connect the rotator interface, antenna controller or relays board to PC using RS232 cables (or USB to
serial convertors) and select communication ports from the available COM Ports, in the COM1 to COM16
range.
All these devices can be controlled directly from the PstRotatorAz GUI, or from other programs
communicating with PstRotatorAz.
This program includes separate GUIs to control SteppIR, UltraBeam, Loop Antennas and Relays
Boards interfaces:

PstRotatorAz – Software for Antenna Rotators User’s Manual Rev. 2.7
7
Automatic tracking PstRotatorAz includes automatic tracking for almost all well-known loggers.
Logging / Other programs: BBLogger, CommCat, DM780, DX4WIN, DXLab, EasyLog 5,
Fldigi, GenLog, Ham Office, HamScope, Ham Radio Deluxe, JT65-HF, KLog, LOG-X, Log4OM,
Logger32, Logic8, Loki5ace, Lux-Log, MicroLog, MixW, N1MM, N3FJP’s loggers, nGenLog,
Power SDR, QARTest, RCKLog, Swisslog, TACLog, TR4W, TRX-Manager, UcxLog, UR5EQF,
VHFCtest4WIN, VHF LOG, VQLog, Win-Test, Win-Contest, Winlog32, WinREF-HF, WinREF-
THF, Wlog2000, WriteLog, WSJT-X, XMLog
DX Cluster clients: KST2Me, DX Monitor, CC User, GPcluster
Radio Astronomy: Radio-Eyes
The Moon can be tracked also using internal algorithms.
Sidereal tracking of the celestial bodies uses an internal algorithm too.
Antenna pointing
The user interface offers quite a selection of methods for antenna pointing:
mouse click over the compass rose
left/right arrows
setting the azimuth
setting the QTH locator (4, 6 or 8 digits)
mouse click on a map
selecting the DXCC
writing the country prefix, or the full callsign
numeric keypad
The numeric keypad can be used also when the PstRotatorAz is NOT the active window.
So you will don't need to switch in contests the focus between logger and PstRotatorAz, you can
keep the focus on logger.
Ctrl + Up Arrow (8) Move to 0 deg
Ctrl + Page Up (9) Move to 45 deg
Ctrl + Right Arrow (6) Move to 90 deg
Ctrl + Page Down (3) Move to 135 deg
Ctrl + Down Arrow (2) Move to 180 deg
Ctrl + End (1) Move to 225 deg

PstRotatorAz – Software for Antenna Rotators User’s Manual Rev. 2.7
8
Ctrl + Left Arrow (4) Move to 270 deg
Ctrl + Home (7) Move to 315 deg
The rotator can be stopped at any moment before to finish the moving. Of course, only if the rotor’s
interface has implemented the STOP command.
Maps
With Internet connection, just click over a map from Google Maps and your antenna will be pointed on the
DX direction!!!
You can also use some default maps, or you can add your maps.
APRS maps (like for UI-View application) can be used. Thousands of maps in this format can be found on
Internet. Try on Google: UI-View maps. Or try this: http://sharon.esrac.ele.tue.nl/pub/aprs/maps
Put both *.jpg (or *.gif or *.bmp) and *.inf files in the \Maps1 folder, and this is all what you have to do.
Click on: My Maps, and start to use them.
Or you can just create from program a map (based on Google Maps) and automatically save it. This tool
can be found in “Help > Maps generator”.
You can add how many maps you want. For the first ten maps you can also use keyboard shortcuts to
open them (CTRL+F1 – CTRL+F10).

PstRotatorAz – Software for Antenna Rotators User’s Manual Rev. 2.7
9

PstRotatorAz – Software for Antenna Rotators User’s Manual Rev. 2.7
10
Communication
RS232 communication Select RS232 / TCP Server if the rotor controller is connected via RS232 (or a USB to RS232 convertor)
to the PC where the PstRotatorAz program is installed.
Select the COM ports used to connect the rotator controllers to PC in the COM1 - COM16 range.
TCP/IP communication For the TCP server, “RS232 / TCP Server” must be checked.
Open the “TCP Server Setup” and set the IP ports for the server (the PC where the rotator controller is
RS232 connected).
For the TCP client, check the “TCP Client” and the following window will be opened:

PstRotatorAz – Software for Antenna Rotators User’s Manual Rev. 2.7
11
Set the IP address (is the network address for the PC where the server runs).
Set the IP ports (must be the same as for server)
Press the “Connect” button to connect the client to server and remote operation.
In order to not have so much traffic over the network and antenna position to be displayed faster on the
client PC, you can set Refresh Rate = None on the client PC, but be careful to have Refresh rate > 0 on
the server PC.
If the server is a serial server one (serial to Ethernet convertor) and not a PC running the PstRotatorAz
software, you mast to set Refresh Rate > 0 on the client PC.
UDP Interface PstRotatorAz can receive commands from other programs and report the antenna position via UDP
messages. For this:
Go to "Communication/UDP Control Port..." and set the UDP port number where
the program listens. The default value is 12000.
The port used for antenna position report is UDP Port + 1. For example, if you set the default UDP
Port = 12000, the program reports the antenna position to UDP port = 12001
Enable UDP Control in Setup
PstRotatorAz can receive commands like these:
<PST><PARK>1</PARK></PST>
- stop rotor, switch to manual mode, park antenna
<PST><TRACK>1</TRACK></PST>
- switch to tracking mode
<PST><TRACK>0</TRACK></PST>
- switch to manual mode
<PST><STOP>1</STOP></PST>
- stop rotor, switch to manual mode
PstRotatorAz – Software for Antenna Rotators User’s Manual Rev. 2.7
12
<PST><AZIMUTH>85</AZIMUTH></PST>
- set azimuth to 85 deg
<PST><QRA>KN34BJ</QRA></PST>
- send to program the locator (4/6/8 digits) and set the azimuth
<PST><STF>2824500</STF></PST>
- tune a SteppIR antenna on 28.245MHz
<PST><STR>1</STR></PST>
- select OmniRig (1/2) used by a SteppIR antenna)
<PST>AZ?</PST>
- in answer to this command the program will report the position to UDP Port + 1
PstRotatorAz reports the antenna position like this:
AZ:xxx<CR>
Any message must start with <PST> and end with </PST>
You can send many commands in one message:
<PST><STOP>1</STOP><TRACK>0</TRACK><AZIMUTH>85</AZIMUTH></PST>
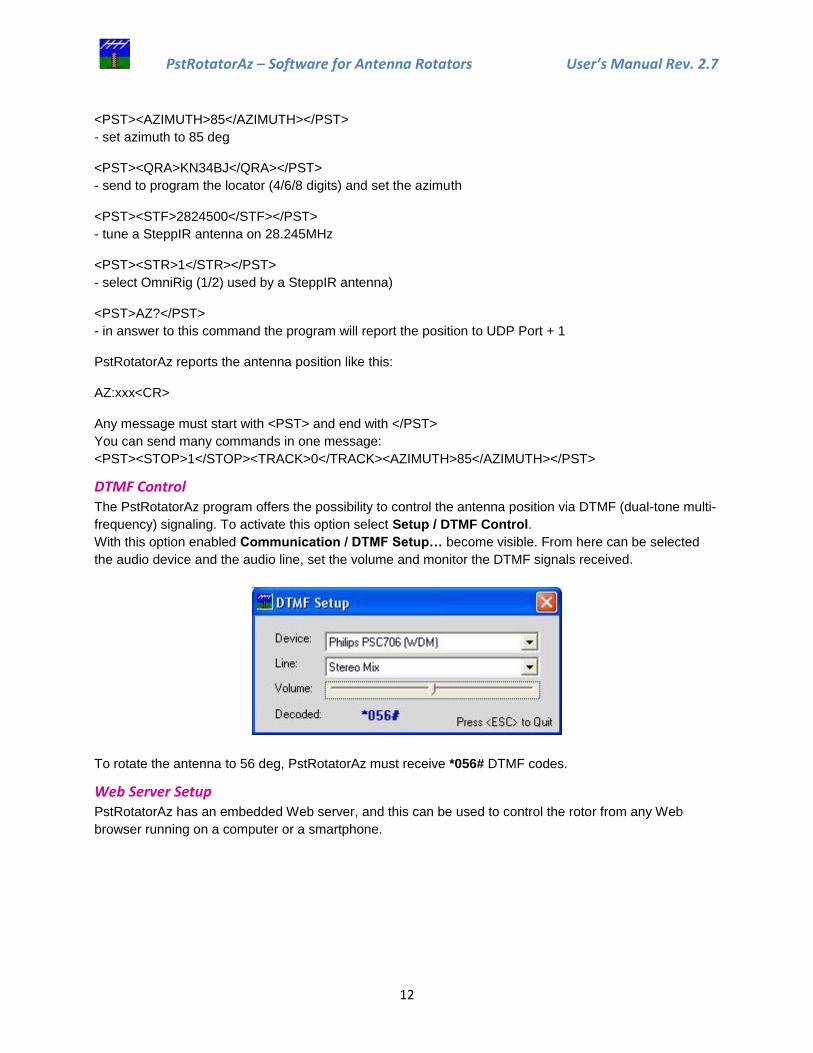
DTMF Control The PstRotatorAz program offers the possibility to control the antenna position via DTMF (dual-tone multi-
frequency) signaling. To activate this option select Setup / DTMF Control.
With this option enabled Communication / DTMF Setup… become visible. From here can be selected
the audio device and the audio line, set the volume and monitor the DTMF signals received.
To rotate the antenna to 56 deg, PstRotatorAz must receive *056# DTMF codes.
Web Server Setup PstRotatorAz has an embedded Web server, and this can be used to control the rotor from any Web
browser running on a computer or a smartphone.

PstRotatorAz – Software for Antenna Rotators User’s Manual Rev. 2.7
13
To use this feature:
- In Communication > Web Server Setup... set the IP address and the port number.
If you intend to access the Web server using a computer from the same local network, or you
don’t use a router, select the first option to use the IP address of the PC.
But if you intend to access the Web server from internet and you use a router, select the second
option and enter the router IP address. You can set it as xxx.xxx.xxx.xxx or put there a "friendly
name".
You can keep the default port 80, or use any other port.
- In Setup enable the Web Server option
- Restart the program
- Set your router to forward the port set in the Web Server Setup.

PstRotatorAz – Software for Antenna Rotators User’s Manual Rev. 2.7
14
Global Beam Display PstRotatorAz can pass the position information received from rotor to a Global Beam Display, using for
this the AUX COM Port. So you will have all the features of the PstRotatorAz program, but also a nice
electronic display on your wall.
Select the COM port used to connect the Global Beam Display to PC in the COM1 - COM16 range.
Flex-6000 TCP/IP connection PstRotatorAz supports a Direct Flex connection via TCP/IP (port 4992).
You can find the setting under Communication:

PstRotatorAz – Software for Antenna Rotators User’s Manual Rev. 2.7
15
You will need the IP address of the actual radio.
The IP address can be found many ways, the but simplest is in SmartSDR. Highlight the radio and then
the Network tab.
Your will then see Connected in PstRotatorAZ and it will start to track frequencies for all configured
devices.

PstRotatorAz – Software for Antenna Rotators User’s Manual Rev. 2.7
16
Setup
Select the rotator controller from the list.
My Location Open the “My Location” window (Setup > My Location…).
Set your QTH locator using for this 6, 8 or 10 digits, or set the latitude and longitude for your location.

PstRotatorAz – Software for Antenna Rotators User’s Manual Rev. 2.7
17
Presets 12 position presets are available. Open the “Presets” window (Setup > Presets) and set the preset name,
the azimuth and the elevation.
Some other ways to set the Presets: In the main window, a right click over a Preset button will set it with
the callsign from Call text box and the azimuth/elevation information from Az and El boxes.
Ctrl+1….Ctrl+6 – set Preset 1…Preset 6
Alt+1….Alt+6 – set Preset 7…Preset 12
Antenna Offset and ANT button
Open the “Antenna Offset” window (Setup / Antenna Offset) and you can set the Azimuth Offset 1 and
Azimuth Offset 2.
The default values are 0 deg. for both ANT1 and ANT2.
With the 1/2 button you can select between Azimuth Offset 1 and Azimuth Offset 2 (see Setup / Antenna
Offset...).
It could be useful if you have two antennas on the same mast, orientated on different directions.
Let say that your controller display correct the position of the first antenna (Offset 1 = 0 deg.), but you
have a second antenna at 60 deg. from the first. Set Offset 2 = 60 deg., and use the 1/2 button to point the
first or the second antenna on direction.

PstRotatorAz – Software for Antenna Rotators User’s Manual Rev. 2.7
18
Antenna Limits
End-point limits can be set.
3dB Beam Width Set the 3dB Beam width of your antenna in order to be displayed on the Compass Rose.
Refresh Rate The time interval between position requests sent to controller can be adjusted from 0.5 sec to 5 sec.
Open the “Refresh Rate” window (Setup > Refresh Rate) and select the time interval value.
The default value is 1 sec.
Trackers setup Some trackers need special settings. Don’t forget to set "Tracking" as Mode in the main window!
Controllers setup The settings of some controllers can be configured from this menu.

PstRotatorAz – Software for Antenna Rotators User’s Manual Rev. 2.7
19
Distance Unit You can select Kilometers or Miles.
Label Use Setup > Label… to put different labels.
Parking Setup Set the position where the antenna will be parked when the “Park” button is pressed.
Shortcuts Setup Set shortcuts for rotor control and customize how these works.
AUDIO shortcut - support for visually impaired
In Setup / Shortcuts Setup... you can set a new shortcut key (Audio). The default shortcut is CTRL+B.
Every time when you press this key the program speaks and reports the rotor position.
The rotor control using the left/right arrows was implemented long time ago. So it will be very easy to
move the rotor and hear about position pressing only few keys.
Google Maps Setup The Google maps are located on two servers. It is possible to select which server to be used.
Close by Ext. Program PstRotatorAz can be automatically closed when another program from computer is closed.
Use a significant part of the external program name, exactly like it appears on the title bar (caps sensitive).

PstRotatorAz – Software for Antenna Rotators User’s Manual Rev. 2.7
20
Start Ext. Programs PstRotatorAz can automatically start other programs from when it is opened. You can choose to start up
to 5 programs together with PstRotatorAz.
Start Other Windows Select which another program windows are opened when the program start.
WX Setup PstRotatorAz can display information about the wind speed, wind direction and temperature in your
location, and also can automatically point the antenna into the wind if the wind speed is over the limit.
In this window can be set if the program will use a specific weather station connected to
www.wunderground.com or will use only the information provided by this site based on your location.
Also it can be set the wind speed trigger value for automatically pointing antenna into the wind.
WX Info Open the Wind Info window. The information in this window is refreshed at every 5 minutes.

PstRotatorAz – Software for Antenna Rotators User’s Manual Rev. 2.7
21
Point into the Wind Automatically point the antenna into the wind if the wind speed is over the limit. Click on this button to
enable or disable this function.
- The function is enabled.
- The function is disabled.
Bidirectionality The PstRotatorAz program can control a Yagi and a bi-directional rotary dipole on the same rotator, with
the dipole in line with the Yagi's boom (90° offset from Yagi heading). This mode is BD-90.
A second bidirectional mode (BD-0) supports the SteppIR antennas.
With “Start in Bidirectional-0 Mode” or “Start in Bidirectional-90 Mode” checked the PstRotatorAz
program will start in one of these two bidirectional modes.
Or press one of the BD buttons to enter in the bidirectional mode.
Start as TCP Client If “Start as TCP Client” is checked, the PstRotatorAz program will start as a TCP Client.
The TCP Client window will be minimized, and the program will automatically connect to the TCP Server
Start in Manual Mode With this option selected the program will start in Manual Mode, else the program will start in the last
mode used before to close the program.
Confirm Imported Data With this option checked, the callsign, locator or azimuth information is passed in the Tracking mode from
logger to PstRotatorAz, but you will need to press the "GO" button to rotate the antenna.

PstRotatorAz – Software for Antenna Rotators User’s Manual Rev. 2.7
22
Double Click on Map Use this option to select between click or double click on map to rotate the antenna.
This feature is available for the embedded maps (Maps), My Maps and the Google Maps.
Use FCC Database The program checks when a callsign is write in "Call" textbox in:
- cty.dat
- VHF_USA.mdb (or the FCC.mdb when the “Use FCC Database” option is selected)
- VHF_EU.mdb
- Call3.txt
The FCC database contains over 750,000 active callsigns.
This database is created using the latest EN.dat and HD.dat files from l_amat.zip archive downloaded
from the official FCC web page, and the us_zip_codes.mdb file, a database containing the coordinates for
almost all US zip codes.
The FCC.mdb database contains callsign, locator, name and state.
If a callsign is found in more than one database, the information is taken from the last database. For
example, if a callsign exists in both VHF_EU.mdb and call3.txt, the program will use the information found
in call3.txt.
11 Meter Prefixes With this option selected the DvPRA.txt database containing the 11 Meter prefixes is used instead of the
cty.dat database.
Master/Slave Mode The Master/Slave mode is useful when you have antennas rotated by different rotors, you use a program
instance for every rotor, and you want from one instance to move all of them on the same direction
(stacked antennas, or VHF/UHF/SHF antennas on different towers/rotors).
Master/Slave Counter The Master/Slave Counter mode can be used if you have a tower which turns the antennas that are fixed
to it, and a separate rotor turns a mast above the tower.
The rotor position of the tower is passed by the main program instance to the second one and it is used by
this instance as an antenna offset. The second rotor will counter rotate when the main rotor is moving.
UDP Control Select this option to enable the UDP communication with an external program. The external program can
stay on the same PC with PstRotatorAz, or on another computer from the local network.
DTMF Control Select this option to enable the DTMF control. With this option enabled Communication / DTMF Setup…
become visible.
Web Server Select this option to start the embedded Web server.

PstRotatorAz – Software for Antenna Rotators User’s Manual Rev. 2.7
23
SteppIR Controller Select this option to open the SteppIR Controller window. From this window it is possible to control a
SteppIR antenna.
UltraBeam Controller Select this option to open the UltraBeam Controller window. From this window it is possible to control an
UltraBeam antenna.
Loop Ant Controller Select this option to open the Loop Antenna Controller window. From this window it is possible to control
a Magnetic Loop antenna.
Relays Board Select this option to open the Relays Control window. From this window it is possible to control some
relays boards.
Set the COM port used by the relay board in Communication > Relays COM Port
If the relays board communicates with the program, the relay buttons become red or green, depending if
the relay is ON or OFF. A click over a button switch the relay status (if it is OFF, it becomes ON; if it is ON,
it becomes OFF).
In the Relays Control window you can find a Setup menu, with the next options:
- Relays Board – select your relays board model;
- Refresh Rate – the time between two relays status requests (default 1 sec);
- Board Setup – at this moment only the KMTronic 8 Relays UDP and WEB boards needs some
settings (IP address, port number, user, password);
- Rename Relays – customize the relays name;
- Rename Commands – customize the commands name;
- Remote PTT – a footswitch connected between GND and CTS pins of the AUX COM Port can
control one or more relays. This feature works also in the TCP client/server mode, for PTT remote
control;
- Commands Setup – set the relay status when a Command button is pressed. There are three
possibilities: 1 – relay go ON, 0 – relay go OFF, nothing – the relay state is not changed;
- Interlock – When interlocked, selecting a relay releases all other relays;
- Automatic Control Setup – the settings for the Automatic Control. Using Omni-Rig or one of
the loggers from below, the relays can be automatic controlled from radio, when the bands or the
frequency are changed.
(Win-Test, N1MM, Logger32, CommCat, Ham Radio Deluxe, UR5EQF, MixW, DXLab, Log4OM,
PowerSDR, Winlog32, Fldigi, DX4WIN, WSJT-X)

PstRotatorAz – Software for Antenna Rotators User’s Manual Rev. 2.7
24
- Automatic Control – select to use this feature;
GH Everyware Select this option to enable an UDP communication with the Green Heron Everyware program.

PstRotatorAz – Software for Antenna Rotators User’s Manual Rev. 2.7
25
Tracker
KST2Me KST2Me is a telnet based client for Windows that is tailored to the ON4KST Chats.
There is nothing to be configured in the KST2Me.
In the PstRotatorAz, select KST2Me as Tracker and set Tracking to mode in the main window.
With a mouse click over DX or Submitter, the azimuth information computed by KST2Me is sent to
PstRotatorAz, and this will rotate the antenna on that direction.
DX Monitor DX Monitor is a standalone Windows program which monitors the DX announcements available on the
internet at DX Summit.
PstRotatorAz is DX Monitor aware. Simply clicking on a callsign or a beam heading in the DX Monitor
window will transfer the information to the PstRotatorAz control program, which will automatically turn
the rotator.
To use PstRotatorAz with DX Monitor, simply select DX Monitor from the Tracker menu and change
the Mode to Tracking.
CC User CC User is a DX Cluster client program.
There is nothing to be configured in CC User program.
In the PstRotatorAz program select "CC User" from the Tracker menu and change the Mode to
Tracking.
An Alt+Click over a callsign in CC User will automatically rotate your antenna.
BBLogger There is nothing to be configured in BBLoger program.
In the PstRotatorAz program select BBLogger as Tracker and set mode to "Tracking" in the main
window.
PstRotatorAz – Software for Antenna Rotators User’s Manual Rev. 2.7
26
The “AZIMUTH – Short” information from the QSO data window will be sent to PstRotatorAz, and
PstRotatorAz will turn the antenna.
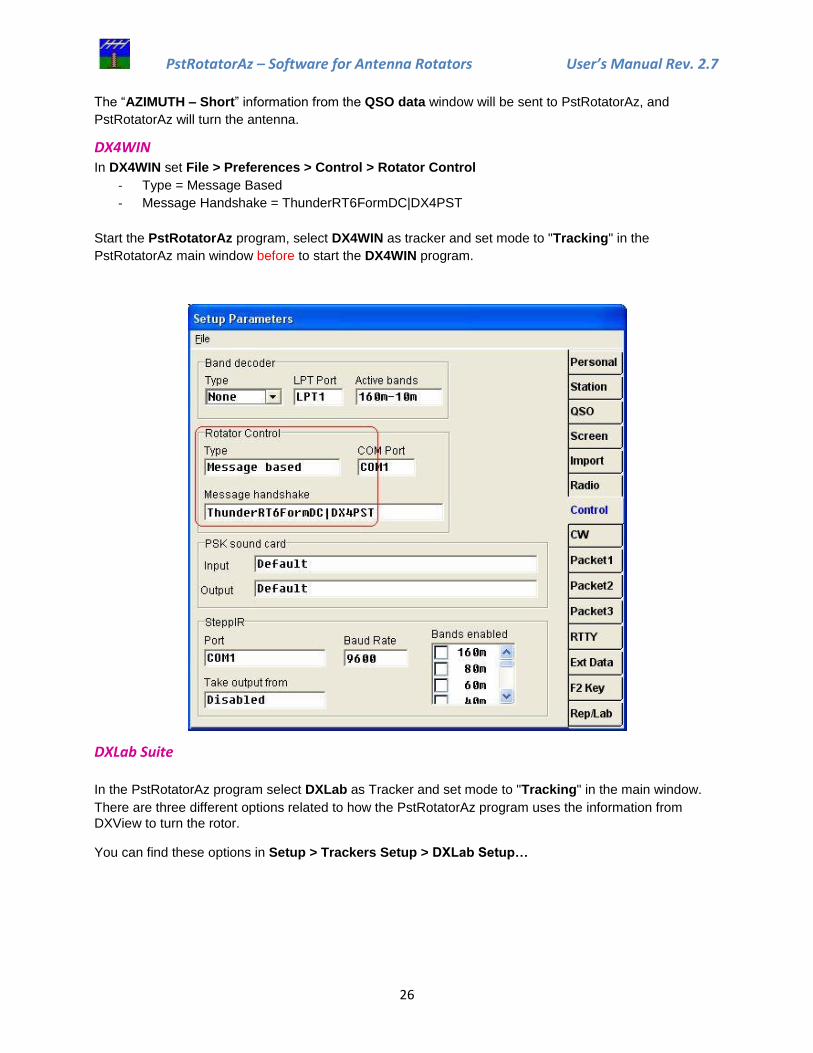
DX4WIN In DX4WIN set File > Preferences > Control > Rotator Control
- Type = Message Based
- Message Handshake = ThunderRT6FormDC|DX4PST
Start the PstRotatorAz program, select DX4WIN as tracker and set mode to "Tracking" in the
PstRotatorAz main window before to start the DX4WIN program.
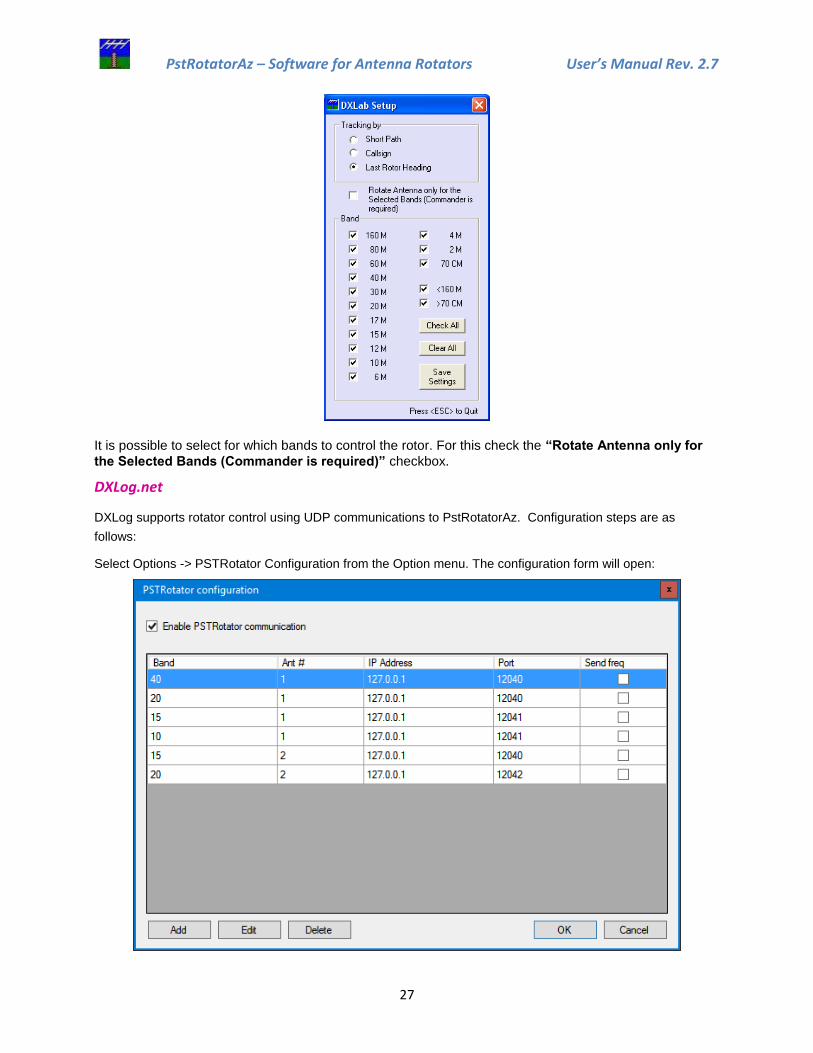
DXLab Suite
In the PstRotatorAz program select DXLab as Tracker and set mode to "Tracking" in the main window.
There are three different options related to how the PstRotatorAz program uses the information from
DXView to turn the rotor.
You can find these options in Setup > Trackers Setup > DXLab Setup…
PstRotatorAz – Software for Antenna Rotators User’s Manual Rev. 2.7
27
It is possible to select for which bands to control the rotor. For this check the “Rotate Antenna only for
the Selected Bands (Commander is required)” checkbox.
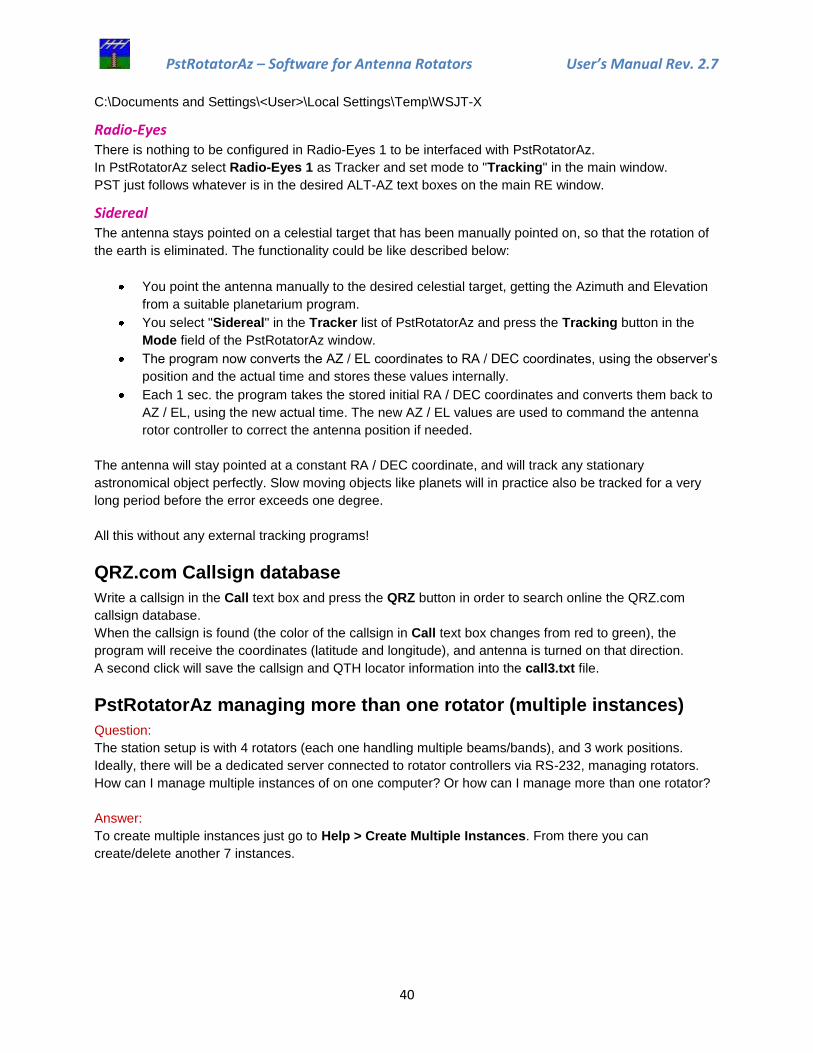
DXLog.net
DXLog supports rotator control using UDP communications to PstRotatorAz. Configuration steps are as
follows:
Select Options -> PSTRotator Configuration from the Option menu. The configuration form will open:

PstRotatorAz – Software for Antenna Rotators User’s Manual Rev. 2.7
28
Check the "Enable PSTRotator communication" box at the top of the form.
Enter the required data in each column. Use the Add, Edit, and Delete buttons as required. Here are
descriptions of each column:
Band: Value in meters for which this rotator is active.
Ant #: The number of the antenna for this band turned by this rotator, beginning at 1. Antennas are numbered in
the order shown on the Radio/Ant Status Window.
IP Address: If you are running PstRotatorAz on the same machine as DXLog, enter 127.0.0.1. Otherwise enter
the IP address of the rotator control server.
Port: The UDP port used to communicate with the rotator interface. Normally PstRotatorAz uses 12040 for the
first rotator, 12041 for the second, etc. However, any port that is free can be used. Write down the ports used as
they are needed for PstRotatorAz configuration.
Send freq: Check this box if you need the radio frequency to be sent to PstRotatorAz.
When completed, press OK.
From the PstRotatorAz menu bar, Select Setup -> Trackers Setup -> DXLog.net/UR5EQF/LogHX Setup... The
Setup form will be displayed:
Enter the port number used for this rotator in the Ethernet box. Select 'Azimuth' in the "Tracking by" box. Click
Save Settings.
Select Tracker -> DXLog.net from the PstRotatorAz menu bar.
In the main display, select 'Tracking' from the Mode box. Depending on the view you have selected, you may
need to select View -> Full View to see the Mode box. The following shows the location of the Mode box in
PstRotatorAz:

PstRotatorAz – Software for Antenna Rotators User’s Manual Rev. 2.7
29
If you have more than one rotator, repeat the steps on each instance of PstRotatorAz, using the appropriate
UDP Port number. See the PstRotatorAz documentation to enable multiple instances of PstRotatorAz.
Once you have everything configured, return to DXLog. Ensure you are on the appropriate band (and the
proper antenna selected). Enter a callsign or an azimuth value into the callsign field. Press Ctrl-F12. DXLog will
show the value sent on the status line, and PstRotatorAz will rotate to the selected azimuth.
Enter a callsign and press Alt-F12. Rotator will move to the long path azimuth.
This completes PstRotatorAz configuration
HamScope Start the HamScope program before to start PstRotatorAz.
There is nothing to be configured in HamScope program.
In the PstRotatorAz select HamScope as tracker and set mode to "Tracking" in the main window.
Write a callsign in HamScope, and it will be sent to PstRotatorAz (in the Call field). PstRotatorAz will
compute the azimuth and turn antenna on that direction.
HamRadioDeluxe The PstRotatorAz program provides some different possibilities to be interfaced with Ham Radio Deluxe.
It can uses the DDE communication between programs (PstRotatorAz will just replace in this case the
HRD Rotator), or it can capture and use to rotate the antenna the callsign or the locator from the
HRDLogbook.
To choose how the programs will be interfaced, open the window from below (“Setup >Trackers Setup >
HRD Setup…” )
If you chose to track the Azimuth by Callsign or Locator, you must keep the ALE window opened in
HRDLogbook.

PstRotatorAz – Software for Antenna Rotators User’s Manual Rev. 2.7
30
In PstRotatorAz, in addition to selecting HamRadioDeluxe as the Tracker, you also need to select the
Tracking box in Mode.
JT65-HF There is nothing to be configured in JT65-HF to be interfaced with PstRotatorAz.
In the PstRotatorAz program select JT65-HF as Tracker and set mode to "Tracking" in the main window.
Write a callsign in the JT65-HF (“TX to Call Sign” text box), and the PstRotatorAz will rotate the antenna.
KLog There is nothing to be configured in KLog to be interfaced with PstRotatorAz.
In the PstRotatorAz program select KLog as Tracker and set mode to "Tracking" in the main window.
Write a callsign in the KLog, and the PstRotatorAz will rotate the antenna.
Logger32 Open both programs PstRotatorAz and Logger32.
In the PstRotatorAz program select Logger32 as Tracker, and set Tracking to mode in the main window.
Under “Setup > Trackers Setup” it can be find “Logger32 Setup…”. This provides filtering by bands,
giving the possibility to manage more than one rotor. Take a look at “PstRotatorAz managing more than
one rotator (multiple instances)” chapter. You can select the band (or the bands) in wich PstRotatorAz
program will control the antenna.

PstRotatorAz – Software for Antenna Rotators User’s Manual Rev. 2.7
31
In the Logger32 program:
check to enable global capture of CTL+A and ALT+A keys to turn rotor
enter a callsign
use Ctrl A to send the azimuth information from Logger32 to PstRotatorAz program
LOGic8 Start the LOGic8 program before to start PstRotatorAz.
There is nothing to be configured in LOGic8 program.
In the PstRotatorAz select Logic8 as tracker and set mode to "Tracking" in the main window.
Write a callsign in Logic8 LOG--MAIN window, press TAB, and it will be sent to PstRotatorAz (in the Call
field). PstRotatorAz will compute the azimuth and turn antenna on that direction.
N1MM The PstRotatorAz program uses the UDP broadcasts of the N1MM logger, and it is compatible with N1MM
classic (versions 12.12.2 and later), and N1MM Logger+.
PstRotatorAz and N1MM can stay on the same PC or on different PCs in the same local network.
Rotor control
Rotators can be controlled from N1MM logger in several different ways:
Entry window: o by entering a beam heading in the callsign field and press Alt+J. The rotor will turn to the
entered beam heading Example:234 Alt+J will turn the rotor to 234 degrees The number must be numeric, >= 0 and <= 360
o using the menu items in the Tools menu Turn Rotor Alt+J - Turn rotor to bearing for the callsign in the Entry window Stop Rotor Ctrl+Alt+J - Stop turning the rotor when turning and no bearing in
callsign field in Entry window o using the short cut keys below:
Alt+J - Turn rotor to bearing for the callsign in the Entry window or to the callsign in the callframe (when callsign field is empty)
Alt+L - Turn rotor to long path bearing for the callsign in the Entry window

PstRotatorAz – Software for Antenna Rotators User’s Manual Rev. 2.7
32
Ctrl+Alt+J - Stop turning the rotor when turning and no bearing in callsign field in Entry window
Bandmap window: by right clicking on a spot and select: 'Turn Rotor'
Available Mult's and Q's window: by right clicking on a spot and select: 'Turn Rotor'
N1MM Logger.ini file
For external UDP broadcasts there are some lines that need to be added manually to the N1MM
Logger.ini file. This has to be done with an external text editor, such as Notepad or Wordpad (there is no
UI for this option). Do not use a word processing program, such as Microsoft Word.
When the section [ExternalBroadcast] is not there it must be added. An example is:
[ExternalBroadcast]
BroadcastRotorAddr=127.0.0.1:12040 192.168.1.255:12040
BroadcastRadioAddr=127.0.0.1:12060 192.168.1.255:12060
IsBroadcastRadio=True
Start with IP address 127.0.0.1 (the pc you are running on) and add other PC's IP-addresses (space
delimited). You can send to multiple IP addresses in the subnet by specifying 255 for the last octet.
E.g. 192.168.1.255 will send to all computers that are in the 192.168.1 subnet.
Do not specify 255 in the higher order octets, or you will risk broadcasting to the internet. While
eventually the packets will be discarded by the internet, it will not endear you to your ISP.
Rotor Port, Rotor Name
N1MM Setup window in the PstRotatorAz program
In the N1MM program go to “Config > Configure Ports, Telnet Address, Other > Antennas”

PstRotatorAz – Software for Antenna Rotators User’s Manual Rev. 2.7
33
The Rotor Description in the N1MM Antennas tab can either be a number, or an alphanumeric name for the rotator. If a number or alphanumeric name in entered in the Rotor Port Antenna tab, then the same number or alphanumeric name must be entered in the PstRotatorAz Rotor Setup form.
Setting “Bands” and “Rotor Description” can be obtained filters for antenna groups. For example, if you
have an antenna for 14,21 and 28 and want to turn it only when you work in these bands, use the same
Rotor Description / Rotor Name in both programs (N1MM and PstRotatorAz) and 14,21,28 to Bands in
N1MM.
N1MM Configurer window
“Config > Configure Ports, Telnet Address, Other > Antennas”
Multiple rotors control
If you have more than one rotor controllers connected to the same PC you need to run on that PC multiple
PstRotatorAz instances (one for every rotor). You can find in this manual how to run multiple PstRotatorAz
instances.
But two programs (instances) cannot listen to the same UDP port. To solve this problem, PstRotatorAz
broadcast the UDP messages received on rotor port to rotor port + 1. So you must set in PstRotatorAz
(Setup > Trackers Setup > N1MM Logger Setup…) the rotor port = 12041 for the second instance, 12042
for the third instance, and so on. Enable “Broadcast Info over Network”.
Another solution is to set the N1MM Logger to send the UDP messages to all 12040, 12041, 12042 ports.
For this edit the N1MM Logger.ini file like this:
ExternalBroadcast]
BroadcastRotorAddr=127.0.0.1:12040 127.0.0.1:12041 127.0.0.1:12042

PstRotatorAz – Software for Antenna Rotators User’s Manual Rev. 2.7
34
“Broadcast Info over Network” must be disabled in this case.
N3FJP’s loggers There is nothing to be configured in AC Log program.
In the PstRotatorAz program select AC Log as Tracker and set mode to "Tracking" in the main window.
Write a callsign in the AC Log and the PstRotatorAz will compute the azimuth and turn antenna.
nGenLog There is nothing to be configured in LOGic8 program.
In the PstRotatorAz program select nGenLog as Tracker and set mode to "Tracking" in the main window.
Write a callsign in the nGenLog - QSO Editor and the PstRotatorAz will compute the azimuth and will turn
antenna on that direction.
Swisslog PstRotatorAz settings:
Select Swisslog as Tracker
Set mode to "Tracking" in the main window
Swisslog settings:
Go to Swisslog > Options > Rotor-Interface and:
Enable EA4TX Rotor Control Interface
Enter the full path of the DDE.exe file from the PstRotatorAz folder (to set DDE.exe as control
program)
Check the "Start automatically" box
Write a callsign in the Swisslog, and press F2 key to rotate antenna on the short path direction.

PstRotatorAz – Software for Antenna Rotators User’s Manual Rev. 2.7
35
TACLog Upgrade the TACLog program to V2.01. It appears that V1.991 did not include the rotator control feature.
Open the TACLog program, start a contest and press Alt+A.
Open the PstRotatorAz program, select TACLog as Tracker and set Tracking to Mode.
Use Alt+A to send the azimuth information from TACLog to PstRotatorAz.
TRX-Manager In TRX-Manager:
- Select PstRotatorAz (or PstRotatorAz) to rotor model. (Parameters > Setup > Rotator 1 >
PstRotatorAz).
- Set Path for PstRotatorAz (or PstRotatorAz).
In PstRotatorAz select TRX-Manager as Tracker and set Tracking to mode.
VHFCtest4WIN There is nothing to be configured in VHFCtest4WIN to be interfaced with PstRotatorAz.
In PstRotatorAz select VHFCtest4WIN as Tracker and set mode to "Tracking" in the main window.
PstRotatorAz captures the information from the locator box of the VHFCtest4WIN, and if a valid value is
found, PstRotatorAz calculates the antenna azimuth and rotates it automatically.
VHFLog There is nothing to be configured in VHFLog to be interfaced with PstRotatorAz.
In PstRotatorAz select VHFLog as Tracker and set mode to "Tracking" in the main window.
PstRotatorAz captures the information from the locator box of the VHFLog, and if a valid value is found,
PstRotatorAz calculates the antenna azimuth and rotates it automatically.
VQLog
VQLog settings:

PstRotatorAz – Software for Antenna Rotators User’s Manual Rev. 2.7
36
- in Configuration > Rotor Control > Sets set the location of the DDE1.exe file from the
PstRotator folder, and press the Enable button
- Check all the checkboxes in the Common window
PstRotator settings:
- Select VQLog as Tracker, and Tracking to Mode.

PstRotatorAz – Software for Antenna Rotators User’s Manual Rev. 2.7
37
- If you don’t need to rotate antenna for all the bands, or you use many PstRotator instances to
control more than one antenna rotator, check Rotate Antenna only for the Selected Bands
checkbox and select the bands where your antenna works.
Win-Test Type a prefix in Win-Test, press CTRL+F12 (or ALT+F12), and the PstRotatorAz will turn the antenna.
You don’t need to have wtRotators on your PC. Win-Test sends broadcast the azimuth information via
UDP and the PstRotatorAz will receive it.
So, you can have the PstRotatorAz on the same PC with Win-Test or on another PC on network.
Or you can have WinTest on a PC and many other PCs with PstRotatorAz installed and every
PstRotatorAz will control an antenna (all antennas will be on the same direction).
Win-Test and PstRotatorAz configuration:
In Win-Test go to “Options>Configure interfaces”, pres “By default” buttons for both “Broadcast
address” and “Port number”, and check “Enable Ethernet network”. And press the “OK” button.
In “Advanced settings” press the “All” buttons for Inbound and Outbound protocols.

PstRotatorAz – Software for Antenna Rotators User’s Manual Rev. 2.7
38
To send azimuth information from Win-Test to PstRotatorAz, press Alt+F12 for Long Path, or Ctrl+F12 for
Short Path.
In PstRotatorAz, you must to select Win-Test as Tracker and set “Tracking” to mode.
PstRotatorAz allows to set the UDP communication port (default value is 9871) and to select the bands as
a filter for the position information received from the Win-Test program.
Set the station name "STN1" or "STN2" etc in the “Station” field. This is useful when you are in a multi
station contest environment and other win-test stations send UDP packets over the network with
frequency or azimuth information.
To communicate both programs must to have the same Station name. So don't forget to set this!

PstRotatorAz – Software for Antenna Rotators User’s Manual Rev. 2.7
39
WinREF-HF There is nothing to be configured in WinREF-HF to be interfaced with PstRotatorAz.
In the PstRotatorAz program select WinREF-HF as Tracker and set mode to "Tracking" in the main
window.
Write a callsign in the WinREF-HF, and the PstRotatorAz will rotate the antenna.
WinREF-THF There is nothing to be configured in WinREF-HF to be interfaced with PstRotatorAz.
In PstRotatorAz select WinREF-THF as Tracker and set mode to "Tracking" in the main window.
PstRotatorAz captures the information from the locator box of the WinREF-HF, and if a valid value is
found, PstRotatorAz calculates the antenna azimuth and rotates it automatically.
Wlog2000 There is nothing to be configured in Wlog2000.
In the PstRotator / PstRotatorAz programs select Wlog2000 as Tracker and set mode to "Tracking" in the
main window.
Write a callsign in the Wlog2000 and the PstRotatorAz will compute the azimuth based on the cty.dat file,
and will turn antenna on the right direction.
WriteLog In WriteLog go to Port Setup and set Rotator Control to MSG and Sartek
In PstRotatorAz select WriteLog as Tracker and set mode to "Tracking" in the main window.
Start PstRotatorAz before to start WriteLog. To turn antenna go to Radio > Antena to … Azimuth
WSJT-X There is nothing to be configured in WSJT-X.
In PstRotatorAz, Setup > Trackers Setup > WSJT-X Setup... you must set the path of the folder which
contains the "wsjtx_status.txt" file.
In the WSJT-X v1.4 version, the "wsjtx_status.txt" file is no more placed in the WSJT-X folder. You can
find it in a Temp folder, and only when the WSJT-X program is running. The path could be:
PstRotatorAz – Software for Antenna Rotators User’s Manual Rev. 2.7
40
C:\Documents and Settings\<User>\Local Settings\Temp\WSJT-X
Radio-Eyes There is nothing to be configured in Radio-Eyes 1 to be interfaced with PstRotatorAz.
In PstRotatorAz select Radio-Eyes 1 as Tracker and set mode to "Tracking" in the main window.
PST just follows whatever is in the desired ALT-AZ text boxes on the main RE window.
Sidereal The antenna stays pointed on a celestial target that has been manually pointed on, so that the rotation of
the earth is eliminated. The functionality could be like described below:
You point the antenna manually to the desired celestial target, getting the Azimuth and Elevation
from a suitable planetarium program.
You select "Sidereal" in the Tracker list of PstRotatorAz and press the Tracking button in the
Mode field of the PstRotatorAz window.
The program now converts the AZ / EL coordinates to RA / DEC coordinates, using the observer’s
position and the actual time and stores these values internally.
Each 1 sec. the program takes the stored initial RA / DEC coordinates and converts them back to
AZ / EL, using the new actual time. The new AZ / EL values are used to command the antenna
rotor controller to correct the antenna position if needed.
The antenna will stay pointed at a constant RA / DEC coordinate, and will track any stationary
astronomical object perfectly. Slow moving objects like planets will in practice also be tracked for a very
long period before the error exceeds one degree.
All this without any external tracking programs!
QRZ.com Callsign database
Write a callsign in the Call text box and press the QRZ button in order to search online the QRZ.com
callsign database.
When the callsign is found (the color of the callsign in Call text box changes from red to green), the
program will receive the coordinates (latitude and longitude), and antenna is turned on that direction.
A second click will save the callsign and QTH locator information into the call3.txt file.
PstRotatorAz managing more than one rotator (multiple instances)
Question:
The station setup is with 4 rotators (each one handling multiple beams/bands), and 3 work positions.
Ideally, there will be a dedicated server connected to rotator controllers via RS-232, managing rotators.
How can I manage multiple instances of on one computer? Or how can I manage more than one rotator?
Answer:
To create multiple instances just go to Help > Create Multiple Instances. From there you can
create/delete another 7 instances.

PstRotatorAz – Software for Antenna Rotators User’s Manual Rev. 2.7
41
You can use Setup > Label… to put different labels to instances.
SP/LP and BD buttons
SP/ LP goes to the short and long-path headings respectively.
BD-90 goes to a 90deg offset from the heading specified - intended for a bidirectional dipole
mounted parallel with the booms of yagis on the same mast.
BD-0 is intended for the SteppIR antennas.
SteppIR Controller
Use a 3-wire ONLY female-to-female null modem serial cable between computer and the SteppIR
controller. The connection is made between the DataOut port on the SteppIR controller and the chosen
serial port on the computer. Don’t use a cable with more than 3 wires!!!

PstRotatorAz – Software for Antenna Rotators User’s Manual Rev. 2.7
42
Settings
Set the serial port: Communication > SteppIR COM Port.
Select Setup > SteppIR Controller. A "SteppIR Controller" window will be opened. From there
you have all the control over the SteppIR controller.
In the SteppIR Controller window go to Setup and set the Baud Rate to be the same as to the
SteppIR controller (in the 4800-19200 range), and the Pooling Rate (default is 1000 ms).
The SteppIR controller must be set for General Freq operation!
Manual Mode
This mode provides for manual selection of frequency using the Bands buttons and <<, <, >, >> buttons.
<< / >> decrease / increase the frequency with 100 kHz
< / > decrease / increase the frequency with 50 kHz

PstRotatorAz – Software for Antenna Rotators User’s Manual Rev. 2.7
43
Tracking Mode
PstRotatorAz receives the frequency information from Omni-Rig, or some of the loggers, and uses this
information to control the the SteppIR SDA controller.
Radio > Logger > PstRotatorAz > SteppIR controller
From Tracking Radio you can select to track the Radio1….Radio4.
SteppIR control is available for the programs from below when these are selected as Tracker:
Win-Test
N1MM
Logger32
CommCat
Ham Radio Deluxe
UR5EQF
MixW
DXLab
Log4OM
PowerSDR
Winlog32
Fldigi
DX4WIN
WSJT-X
N1MM settings:
Select N1MM as Tracker in PstRotatorAz, and Tracking as Mode. The SDA SteppIR controller will
automatically track the frequency provided by N1MM contest logger.
Add "IsBroadcastRadio=True" in the N1MMlogger.ini file, and N1MM will broadcast
UDP messages (port 12060) containing the frequency information.
[ExternalBroadcast]
DestinationIPs=127.0.0.1 192.168.1.255
IsBroadcastRadio=True
DXLab settings:
Select DXLab as Tracker in PstRotatorAz and Tracking as Mode. The SDA SteppIR controller will
automatically track the frequency provided by Commander.
Both the DXView and Commander programs must be opened.
PstRotatorAz works with Commander for up to 4 radios to run the Steppir controller.
DX4WIN settings:
Select DX4WIN as Tracker in PstRotatorAz and Tracking as Mode.
Connect a serial cable between two COM ports (let say COM1 and COM2).
Set in PstRotator Communication > AUX COM Port = COM1
Set in DX4WIN, File > Preferences > Control > SteppIR:

PstRotatorAz – Software for Antenna Rotators User’s Manual Rev. 2.7
44
o Port = COM2
o Baudrate = 4800
o Take Output From = Enabled
With these settings the PstRotatorAz will receive the frequency information from DX4WIN, and will
use this info to control a SteppIR antenna.
Using DTR and RTS
For PTT disabling when the antenna is tuning, the PstRotatorAz program set the RTS signal to high.
This signal can be used to disable PTT with a relay, transistor or optocoupler.

PstRotatorAz – Software for Antenna Rotators User’s Manual Rev. 2.7
45

PstRotatorAz – Software for Antenna Rotators User’s Manual Rev. 2.7
46
Remote Control
PstRotatorAz also provides support for remote over IP operation.
You have to install the same PstRotatorAz in both remote and base station locations.
Set Communication/TCP Client to the base station.
Configure the IP address for Client, and the Ports for both Server and Client.
When you work from home set in the Remote site the Pooling Rate to 0 and for the home site Pooling
Rate to 1000.
When you work remote from home, you don't need programs from both sides to send status requests to
controller. Only from home, is better because keeps the timing between commands and status requests.
In the remote site could be not only a PC running PstRotatorAz as server, but also a serial server
(Ethernet to RS232 converter).
ERC-M (dual azimuth controller)
PstRotatorAz supports the ERC-M dual azimuth controller http://easy-rotor-control.com/ .
DUAL-AZ is a new protocol based on Yaesus GS232-protocol that includes the possibility to control 2
different azimuth-rotators through 1 interface. The protocol was introduced by VE2DX in June 2011.
Run two PstRotatorAz instances. Those could be on the same PC, or on different PCs in a
network. The communication between instances is UDP.
You can find in this User Manual how to put two instances on the same PC.
Select ERC-M (Rotor1) and set the COM port where is connected the ERC-M controller.
Select ERC-M (Rotor2) to the second PstRotatorAz instance.
Using N1MM Logger and PstRotatorAz with the ERC-M to Control Two Azimuth Rotators
N1MM Logger can control up to 15 rotators on the basis of one rotator per serial port, but is not
designed to control two through a single port, which is how the ERC-M works. However, there is a
workaround. You will need the PstRotatorAz program.
Download the installer and install the PstRotatorAz program. Now start the program, and enter your
registration data.
This is where you start. Click Communication, then click Azimuth COM Port and select the port that is
connected to your ERC-M. Now click Setup, then Controller (the first item on the menu). Scroll way
down, off the first page, until you come to ERC-M Rotor 1. Select it. Now click on Tracker, and select
N1MM. Go back to Setup, select Trackers Setup, and then N1MM Setup. The pop-up dialog’s default
settings are correct, so the only thing you need to do is to enter the number or name of the rotator to be
controlled. Now click on Save Settings.

PstRotatorAz – Software for Antenna Rotators User’s Manual Rev. 2.7
47
Now click Setup > Label, and enter a distinctive name for the rotator this instance will control. That will
help you keep track of which is which by appearing in the title bar.
You’re almost done with the first instance. The last step is to click on Help, then Multiple Instances… That
pops up this dialog. Click on “2” in the first row, and then press ESC to quit.
If you want, before going any further, you can click on View and select one of the Compact choices to
save some screen real estate.
Now start the second instance. Don’t select a COM port for this second instance. After that, all the
configuration settings are the same until you reach the N1MM Settings dialog.
Change the rotor port to 12041. Type the number or name of the second rotator (again exactly matching
that used on N1MM’s Antenna tab) into the textbox shown, and click on Save Settings.
At this point, you should have two fairly compact PSTR dialogs on the screen:

PstRotatorAz – Software for Antenna Rotators User’s Manual Rev. 2.7
48
Now you can verify that your two PSTRs are working, and that they each control the proper rotor. Just
click anywhere in the light orange area and the antenna should move there. Note the labels that
distinguish them.
Just one more thing to do here: Click Tracking under Mode on each of the two instances, to tell
PstRotatorAz to follow N1MM Logger’s instructions
Now, go on to N1MM Logger+. Open Config > Ports…, Other, and click on the Antennas tab.
In order for your rotators to follow N1MM commands, you need to do only three things:
PstRotatorAz – Software for Antenna Rotators User’s Manual Rev. 2.7
49
Tell N1MM Logger+ what band you are on, either by connecting to a radio or by using manual
means such as entering a frequency in the call-sign textbox of the entry window.
On this tab, fill in exactly the same names for your rotators as you used in the PSTRotatorAz
setup. Note that on 20, 15 and 10 meters two rotators are named, separated by a comma. This is
to simulate a stack using two rotators.
Fill in any offset between antennas on the same rotator. 40M yagi, for example, is offset 90
degrees clockwise from his top tribander. Clockwise offset is denoted by the “-“ sign; for
counterclockwise, just use the positive value.
Now close the Configurer, and go back to the N1MM Entry window. Enter a callsign in the callsign field, or click on a call from Telnet in the Available Mults and Qs window. You’ll see a bearing and distance appear in the Entry window. Press Alt+J, and the rotator for the current band should turn to that bearing. Press Ctrl+Alt+J to stop rotation. There are a variety of other ways to control a rotator or rotators from inside N1Mm Logger+, but let’s leave that to the N1MM User Manual.
FT/FTDX + Yaesu DXA rotators
PstRotatorAz supports the FT/FTDX rotator controllers directly without the need of external hardware or
electronics.
Connect the FT-950/FT-2000/FTDX-5000/FTDX-9000 *ROT* port with the port on the
G-1000DXC rotator (800, 1000 and 2800 models supported). This is a straight 6-wire cable with 6-
pins mini din plugs on both sides.
In the menu on the radio set the Baud-rate to 38400 and disable RTS (RTS OFF)
Since the PstRotatorAz software will talk with the radio via the RS232 cat interface you have to
understand that the com port is occupied and no longer free for logging software. But there are
some software programs that let you share a com port with more than one application. Install
*VSPE* http://www.eterlogic.com/downloads/SetupVSPE.zip (virtual serial port emulator by
*Eterlogic*).
After installing the port emulator, add a device called "splitter" and share the com port (the real
device that points to the radio). Let say that the shared com port is com 1 and the virtual shared
port was labeled com 7. You need to adjust the baud rate to38400.
Set com port 7 in both PstRotatorAz and logger programs.
AlfaSpid USB Controller
The new AlfaSpid Controllers “Rot1Prog_USB” and “Rot2Prog_USB” operate the same as the older Rot1Prog and Rot2Prog controllers with the exception of the serial connection. In the new USB Versions, the RS232 connection and the internal interface chip have been replaced with a USB “A” Connector and a FTDI FT232RL interface chip. If the computer being used to control the AlfaSpid

PstRotatorAz – Software for Antenna Rotators User’s Manual Rev. 2.7
50
Controller has already been used with another device that uses the FTDI chip, then it will already have the appropriate drivers loaded. If not, the drivers will need to be loaded the first time the controller USB port is connected to the Computer. Some Operating systems have FTDI drivers that will automatically load. If your system does not, then go to the FTDI site listed below: http://www.ftdichip.com/Support/Documents/InstallGuides.htm Follow the installation manual for your computer and operating system. Then go to the following site and download the current driver for your operating system: http://www.ftdichip.com/Drivers/VCP.htm Follow the instructions and install the proper driver. When complete, go to the Device Manager, expand the “Ports (COM & LPT)”, determine which COM port has been assigned to the USB interface, then set-up your controller software with that COM port. Experimentation done at Alfa Radio Ltd. has determined that no other set-up is required. Ensure that the AlfaSpid Controller is in the “A” mode, run the PC program and enjoy. Note 1: The PstRotatorAz program requires a COM port in the COM1-COM16 range. If the COM port which has been assigned to the USB interface is out of this range, you must change its number to be in the 1-16 range from the Device Manager. Note 2: The baudrate is fixed in PstRotatorAz to 1200 bauds for the Rot1Prog (RAK) controller, and 600 bauds for the Rot2Prog (RAS) controller.
Run-time error ‘8020’
If when you run the PstRotator software get the following error message:
Uninstall the old drivers and install the latest drivers for your USB to RS232 adapter.
If your addapter uses an FTDI chip, you can download the last driver version from:
http://www.ftdichip.com/Drivers/VCP.htm
For an adapter which uses a Prolific chip, the driver can be downloaded from:
http://www.prolific.com.tw/US/ShowProduct.aspx?p_id=225&pcid=41

PstRotatorAz – Software for Antenna Rotators User’s Manual Rev. 2.7
51
SUPPORT
Your questions regarding the PstRotatorAz software will be answered fast by [email protected] .
You can also use the support-forum at http://groups.yahoo.com/group/PstRotatorAz to answer questions
or to exchange with other users.
Become a member of this Yahoo-Group and you will automatically be informed about improvements and
news regarding PstRotatorAz program.
The PstRotatorAz web page is http://www.qsl.net/yo3dmu/index_Page346.htm .