pulsar & renegade - airguns of arizona€¦ · 2 general information congratulations on...
TRANSCRIPT

PULSAR & RENEGADEOFFICIAL HANDBOOK

www.daystate.com2
GENERAL INFORMATIONCongratulations on choosing a Daystate air rifle. Your rifle has been hand assembled using the finest materials available, from parts precision-made using CNC engineering technology. This rifle is the culmination of the company’s involvement with pre-charged air rifles and uses knowledge gained from manufacturing this type of air rifle for almost four decades, making your Daystate one of the most accurate and reliable rifles available today. Use this handbook to get the best from your rifle.
Further information that includes more detail on the topics covered can be found online at www.daystate.com/support under the online handbook.
Daystate also has an active owners club which is free to join and can be found online at daystateownersclub.com
CONTENTS
2. SAFETY & GENERAL INFORMATION
3. FILLING YOUR AIR RIFLE WITH COMPRESSED AIR
3. LOADING YOUR RIFLE – SINGLE SHOT
4. LOADING THE DAYSTATE MULTI-SHOT MAGAZINE
4. FITTING A RIFLE SCOPE
5. SWITCHING SIDE-LEVER POSITIONS
6. PELLET RECOMMENDATIONS
6. PULSAR PROGRAMMING
7. STOCK REMOVAL
7. LASER ADJUSTMENT
8. RECOMMENDED MAINTENANCE
9. TRIGGER ADJUSTMENT
10. EXPLODED DIAGRAM
11. EXPLODED DIAGRAM
12. WARRANTY
SAFETY
• Never point your airgun at anyone or anything other than a legitimate target
• Always check that your airgun is not loadedwhenyoufirstpickitup
• Always treat your airgun as if it was loaded, even if you know it’s not
• Never shoot on land where you do not have permission to shoot
• Always use a safe, large backstop to catch your pellets - and pay due attention to what’s behind it, should you miss
• Never leave your airgun unattended
• Always store your airgun and pellets separately and securely so that no unauthorised person can use them
• Know and abide by the laws relating to airguns.

www.daystate.com 3
FILLING YOUR AIR RIFLE WITH COMPRESSED AIR
Note: Do not use any other gas than clean, dry compressed AIR
• Unscrew the dust cap from the rifle’s charging connector and attach the female snap-on charging connector onto the inlet valve. Ensure that the connector’s outer sleeve is fully forward and that the connection is secure
• Check that the bleed screw on the charging unit is closed and open the feed valve on the air bottle
• Compressed air will now fill the reservoir
• Fill to a maximum of 230 bar. The exact filling pressure (SWP) is printed on a small disc at the rear of the breech block
• Close the feed valve
• Sharply open the bleed valve on the charging unit and bleed off the air from the filler hose
• Remove the Snap-On connector and replace the rifle’s dust cap.
LOADING YOUR RIFLE – SINGLE SHOT
Remember to keep the muzzle of the air rifle pointing in a safe direction at all times
• Apply the safety catch
• Pull the cocking lever all the way back*
• Check that the pellet is not damaged and push the pellet directly in to the barrel
• Push the lever forwards
The air rifle is now loaded
• Disengage the safety catch a built-in laser will illuminate the target**
The rifle can now be fired.
1
2
3
4
5

www.daystate.com4
FITTING A RIFLE SCOPE
ATTACHING THE MOUNTSDaystate recommend the use of Blueprint Mounts.
• Loosely fix one mount to the dovetails on the front section of the breech block and the other on the rear*
LOADING THE DAYSTATE MULTI-SHOT MAGAZINE
• Apply the safety catch
• Pull the cocking lever all the way back*
• Remove the magazine from the left side
• The magazine can now be loaded. Load one pellet into the LARGE bottom hole ensuring that the pellet head passes the seating O-ring
• Rotate the magazines inner pellet carrier anti-clockwise to load subsequent pellets one click at a time up to a maximum of ten pellets
• Replace the magazine back into the breech block and return the lever forward to the closed position
• Disengage the safety catch. On Pulsar a red LED will light on the rear of the gun and the built-in laser will illuminate the target**
• The rifle can now be fired
• To fire the next shot repeat the cycling of the side lever. Note: the rifle is designed not to double-load, the magazine will not rotate unless the rifle has been fired
• When the last shot is chambered a red dot is displayed on the left side of the magazine. On Pulsar When the last shot is taken, the red light at the rear of the gun will pulse to indicate the magazine is empty. It is possible to
remove and ‘top up’ the magazine should shooting time allow
NOTE: The Pulsars laser will switch off 1.5secondsafterfiring,ortheriflewill settostandbymodeiftherifleisnotfiredwithinoneminute.
The rifle can be ‘dry’ fired (with air and no pellet in the breech) without any mechanical damage occurring as long as there is enough air.
*With the breech bolt open the trigger is disengaged and the rifle will not fire. **The laser can be switched off.
DAYSTATE 10-SHOT MAGAZINE
• The picture shows the stop pin correctly fitted for Pulsar Wolverine. For other daystate rifles such as Huntsman or Air Wolf use the lower hole.
The magazine can be adapted to be inserted from the right side. Use a small Allen key or needle to push out the magnet and along with the stop pin move to the opposite side.

www.daystate.com 5
ALIGNING THE CROSSHAIRYou will need either a gun-vice or ‘Workmate’ because to perfectly align the sight the rifle will need to be held firm and level.
• Place the gun vice or Workmate on a firm and level surface
• Clamp the rifle, making sure you do not damage the stock
• Place one spirit level across the flat part of the breech block and adjust the rifle until it is level
• Now look through the sight and without moving the rifle, rotate the scope until the vertical cross hair aligns with a vertical plumb line. All screws should now be tightened
TO ZERO THE RIFLE
• Set up a large paper target, with a safe and suitable backstop at around 10 metres
• Mark a simple cross on the target and from about 10 metres fire a test shot
• If the pellet is close to the ‘mark’ then note its position
• If the shot was lower than 5 inches (130 mm) then you will probably run out of adjustment on the elevation turret and it will be necessary to pack up the back of the scope*
• Using the turrets on your scope, adjust until the centre of the crosshair and the pellet hole coincide
• Repeat stages 1-4 at your chosen zeroing distance
*It is quite common when sighting in an airgun to need to tilt the scope forward by shimming the rear mount by up to .3 mm. A good material to use for this purpose is 35mm film negative or lead tape (used to weight golf clubs). Simply cut the shim to the same size as the mount and place it between the scope tube and the base of the rearmost mount ring.
SWITCHING SIDE-LEVER POSITIONS
All Pulsar and Renegade rifles are fitted with an ambidextrous stock. Pulsar can be converted by the shooter to left or right-handed lever action. Renegade rifles are factory set to be left or right handed and needs to be returned to a factory trained technician to effect a switch.
PULSAR: TO SWITCH THE LEVER:
• Loosen the two retaining screws on the cheek-piece and slide it rearwards off the dovetail
• Remove lever pivot bolt – slide out the complete lever assembly
• Loosen the two blanking plate securing screws and slide out the blanking plate – replace on the opposite side
• Re-insert the lever assembly on the opposite side and replace lever pivot bolt – do not overtighten
• Reverse the cocking lever handle to underside of the lever

www.daystate.com6
PULSAR BATTERIES
• Before changing batteries the safety switch should be in the ‘SAFE’ position
• The information display will display “LOW BATTERY” when the 9 volt battery pack drops close to 7 volts
• Batteries are primary (non-rechargeable) Alkaline AA cell (R6). A high quality battery will ensure a long battery life of thousands of shots
• Battery options: The Mk5 GCU system fitted to the pulsar has been designed to work with different capacity batteries other than those supplied. It is also possible to use lithium (disposable) batteries, or lithium-ion (rechargeable) batteries, even high-capacity Lithium 9 volt (PP3) can be used by connecting directly into the battery box terminals. A reduced shot count and battery life should be expected when using lower capacity primary, or secondary batteries.
Note; Low Battery indicator is calibrated for the standard Alkaline batteries supplied and may give a misleading reading when used with other types
AUTO-SAFE FEATURE
• If the safety catch is left in the ‘Fire’ position for 5 minutes without the rifle being fired, the rifle automatically switches to standby (power-save). To reactivate the rifle, re-apply the safety catch or open/close the side lever.
RENEGADE BATTERY
The renegades electronic trigger is powered by a single PP3 (9volt) battery which will power the trigger for many thousands of shots. When the battery needs changing the rifle is programmed to release the sear a second time after the shot to give an audible ‘double click’. To change the battery it is necessary to remove the stock.
PELLET RECOMMENDATIONS
The Daystate multi-shot magazine has been engineered for round-nosed pellets and may misalign or even jam if used with other shapes. Recommended pellet types:
• Rangemaster Sovereign .177, .22, .25
• Rangemaster Kaiser .177, .22
• Rangemaster Monster .25
PULSAR PROGRAMMING
CAUTION ENSURE THE RIFLE IS UNLOADED AND CROSS BAR SAFETY IN THE ‘SAFE’ POSITION (RIGHT SIDE PROTRUDING).
Point the muzzle in a safe direction and opening the side lever. If the rifle is in standby mode it will be necessary to activate the side lever twice or flick the safety to fire and back to safe to switch the rifles power on.
With the side lever open, programming mode is then entered by keeping the trigger pulled for 5 seconds. Release and re-apply the trigger. The rifle will now scroll through the options available:
• Power adjustment
• Magazine on/off reset
• Laser on/off
Release the trigger when the required option is reached. Using the trigger you will now be able to toggle between further options:
• Power adjustment* – low power – medium power – high power
• Magazine on/off reset – with magazine counter on, the rifle resets to 10 and will count down to 0, when the rifle will pulse 4 times and stop firing. To reset the counter and resume firing, open the bolt for 5 seconds to replace the magazine
www.daystate.com 7
• Magazine off – the rifle will fire single
shot. Reopen, reload and close the side lever to continue firing
• Laser on/off – toggle between on and off to control the laser
ADDITIONAL PROGRAMS
In addition to the user program options, there are two additional features that automatically apply:
• Low Battery – Batteries need changing
• Low Pressure – refill the gun with air - up to the pressure shown on the small disc on the left side of the breechblock. The low pressure warning comes on when the air pressure drops to 10 bar below the minimum. This pressure changes depending on the power setting in use.
* Power settings vary depending on calibre, specification and local legal restrictions. On high power rifles power settings are LOW=65% MEDIUM=85% HIGH=100% of available power. On UK specification rifles (12 ft/lbs) the power levels are 10.5, 11, 11.5 ft/lbs – depending on the pellets in use. *Power settings vary depending on calibre, specification and local legal restrictions.
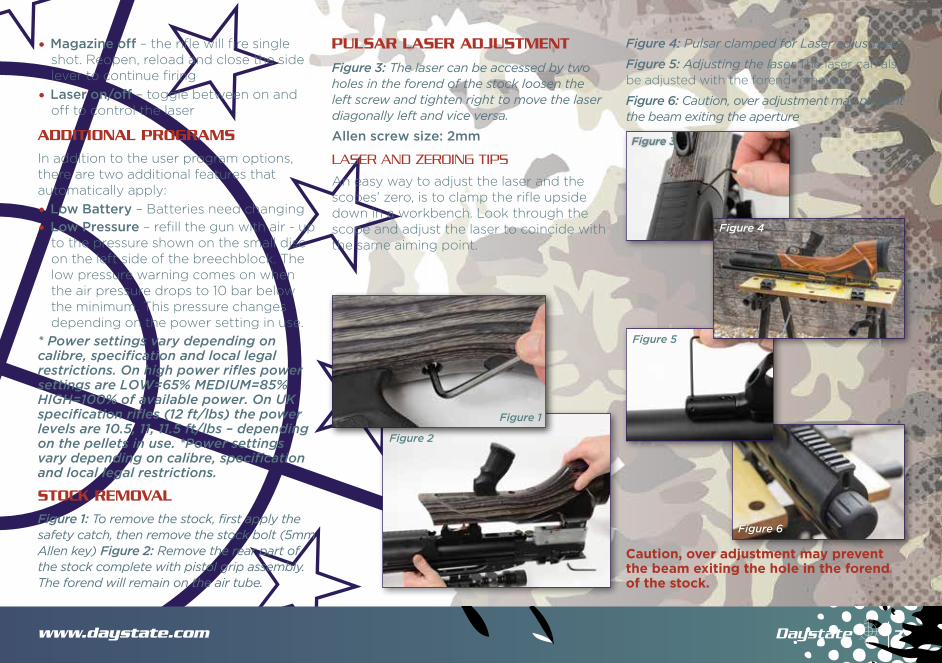
STOCK REMOVAL
Figure 1: To remove the stock, first apply the safety catch, then remove the stock bolt (5mm Allen key) Figure 2: Remove the rear part of the stock complete with pistol grip assembly. The forend will remain on the air tube.
PULSAR LASER ADJUSTMENT
Figure 3: The laser can be accessed by two holes in the forend of the stock loosen the left screw and tighten right to move the laser diagonally left and vice versa.
Allen screw size: 2mm
LASER AND ZEROING TIPS
An easy way to adjust the laser and the scopes’ zero, is to clamp the rifle upside down in a workbench. Look through the scope and adjust the laser to coincide with the same aiming point.
Figure 6
Caution, over adjustment may prevent the beam exiting the hole in the forend of the stock.
Figure 4: Pulsar clamped for Laser adjustment
Figure 5: Adjusting the laser The laser can also be adjusted with the forend removed
Figure 6: Caution, over adjustment may prevent the beam exiting the aperture
Figure 5
Figure 3
Figure 1
Figure 2
Figure 4

www.daystate.com8
BUTT-PAD ADJUSTMENT
The butt pad can be adjusted to many positions
• Loosen pad screw for up/down adjustment - 5mm Allen key
• Loosen pad screws for cant adjustment - 2.5mm Allen key
servicing agent for routine maintenance every three years.
BARREL CLEANINGFor optimum performance the barrel should be periodically cleaned with a barrel cleaning solution recommended for air rifles or a pellet lubricant. Daystate also advises the use of a lubricant applied to the pellets to reduce lead deposits and maintain the barrel. Frequency of cleaning depends on the pellet type used and the individual barrel, but as general guidance the barrel should be cleaned after every tin of pellets.
AIR RESERVOIRThe alloy under-barrel pressure cylinder will withstand pressures many times the working pressure of the rifle. The air cylinder should be replaced every 10 years.
HAND PUMPSThis type of charger offers an inexpensive and convenient method of charging your rifle. If you regularly use this type of charger, care should be taken to avoid condensation build-up from inside the pump being transferred to the air cylinder.
Always refer to the pump manufacturer’s operating instructions.
RECOMMENDED MAINTENANCE
Pre-charged air rifles contain extremely high pressures and can be dangerous if not serviced correctly, all work should be carried out by a Daystate factory-trained gunsmith. Correct maintenance will ensure a longer trouble-free life. Daystate recommends that the rifle be returned to the factory or your Daystate approved
SYNTHETIC STOCKSynthetic stocks are coated with a soft touch finish that can be wiped over with a mild detergent.
ACTIONTo keep the rifle clean, a suitable gun cleaner or oil can be applied to a cloth and used to wipe over the outside of the gun.

www.daystate.com 9
LUBRICATIONDaystate has teamed up with Ballistol to provide ecologically and dermatologically safe lubricants for the maintenance your rifle. The bolt shaft and sidelever pivots should be lubricated periodically with a small amount of light grease or oil. Do not lubricate any of the internal parts such as the firing valve or hammer assembly. The snap-on filling connector is factory lubricated with a special non-combustible grease.
The connector can be maintained by wiping over with oil or grease but should be left dry.
MORE INFORMATIONMore servicing information can be found online at www.daystate.com/support and daystateownersclub.com
TRIGGER ADJUSTMENT
Allen Key Size: 1.5 mm
Note: It is not necessary to remove the rifle’sactionfromthestocktoadjust the trigger
Ensure that the safety switch is in the ‘SAFE’ position and that the rifle is unloaded
Screw A: 2nd Stage Contact Screw - Factory Set
Screw B: 2nd Stage Weight Screw - Adjust clockwise to make heavier
Screw C: 1st stage Weight Screw - Adjust clockwise to make heavier
Screw D: 1st Stage Travel Screw - Adjust clockwise to Decrease trigger travel
Some models are fitted with a match trigger blade. Use a .9mm (supplied) Allen key to adjust the trigger shoe position

www.daystate.com
Pulsar Parts Diagram
10
1 Breech block
2 Trigger
3 GCU electronics
4 GCU Screw
5 Seal
6 Washer
7 Screw
8 Valve seal O-ring
9 Valve seal
10 Valve
11 Spring
12 O -rings
13 Housing
14 Screw
15 Screw
16 O-ring
17 Air cylinder
18 Front body
19 O-ring
20 O-ring
1 Breech block
2 O-ring
3 Valve
4 O-ring
5 O-ring
6 Bush
7 Pin
8 Spring
9 Plate
10 Screw
11 Washer
12 Dowty seal
13 Sensor
14 Cover
15 Screw
16 Bolt
17 Arm
18 Spring
19 Ball bearing
20 Pin
21 Washer
22 Filter
23 O-ring
24 Piston
25 Dowty seal
26 Filler
27 O-ring
28 O-ring
29 Barrel
30 Screw
31 Screw
32 Bush
33 O-ring
34 Bubble
35 Screw
36 Intermount
37 Screw
38 Adapter
39 Screw
40 Spring
21 Lever
22 Arm
23 Screw
24 Bush
25 Magnet
26 Screw
27 Solenoid
28 Spacer
29 O-ring
30 Spring
31 Hammer
32 Grommet
33 Spring
34 Shaft
35 Pin
36 O-ring
37 Shaft
38 Plug
39 Screw
40 Screw
41 Baffle
42 Shroud
43 Adapter
44 Cover
45 Screw
46 Plate
47 Forend
48 Cover
49 Housing
50 Stock
51 Cover
52 Plate
53 Plate
54 Screw
55 Adapter
56 Grip
57 Washer
58 Screw
59 Nut
60 Plate
41 Cheek rest
42 Screw
43 Cover
44 Pressure disc
61 Screw
62 Pad
63 Screw

www.daystate.com
Renegade Parts Diagram
11
1
2
4
6
10
11
14
12
16
20
21
24
26
11
40
41
42
44
46
64
61 66
60
62
22
1
11
50
51
4
16
44
45
46
41
40
54
55
15
14
10
5
6
1 Breech block
2 O-ring
3 Core valve
4 O-ring
5 O-ring
6 Bush
7 Indexing pin
8 Spring
9 Plate
10 Screw
11 Screw
12 Screw
13 Washer
14 Screw
15 Cover
16 Bolt
17 Pin
18 Arm
19 Ball bearing
20 Spring
1 Breech block
2 Trigger
3 HTI Group
4 Screw
5 Douty washer
6 Screw
7 Valve seal O-ring
8 Valve seal
9 Valve
10 Spring
11 O-ring
12 Housing B
13 Screw
14 Screw
15 O-ring
16 Air cylinder
17 Front body
18 O-ring
19 O-ring
20 Filter
21 Magnet
22 Lever
23 Spacer
24 Spacer
25 Screw
26 Screw
27 Arm
28 Screw
29 Hammer insert
30 Nylon spacer
31 Screw
32 Sleeve
33 Sleeve
34 Dowel
35 Spring
36 Spring Guide
34 Dowel
35 Spring
36 Spring Guide
37 Spring
21 Washer
22 O-ring
23 Piston
24 Dowty seal
25 Filler
26 O-ring
27 O-ring
28 Barrel
29 Screw
30 Screw
31 Bush
32 O-ring
33 Spirit level
34 Screw
35 Intermount
36 Screw
37 Adaptor
38 Screw
39 Spring
40 Baffle
38 Damper
39 Plug
40 Lens
41 Screw
*42 Screw
*43 Dowel
44 Spring
45 Saftey pin
46 Saftey pin head
47 Screw
48 Dowty seal
49 Adaptor
50 Dowty seal
51 Pressure gauge
52 Pressure disc
53 Cover
54 Cheek rest
55 Screw
41 Shroud
42 Adaptor
43 Knurled cover
44 Screw
45 Plate
46 Forend
47 Dust cover BP
48 Battery PP3
49 Stock
50 Plate
51 plate
52 Screw
53 Plate
54 Adaptor
55 Grip
56 Washer
57 Screw
58 Stock screw
59 Nut
60 Plate
61 Screw
62 Recoil pad adaptor
63 Screw
64 Screw
65 Recoil pad
66 Nut

www.daystate.com
3 YEAR WARRANTY
All new Daystate rifles are guaranteed against faulty parts and labour for a period of 3 years from date of purchase (proof of purchase required). After this period it is recommended that the rifle be returned to Daystate or its authorised agent for a scheduled service and subsequently every 3 years. Servicing is charged at current rates. The warranty applies to the first purchase of a new rifle and is not transferable to subsequent owners.
DAYSTATE LTD.UNIT 3, RALEIGH HALL INDUSTRIAL ESTATE, ECCLESHALL, STAFFORDSHIRE ST21 6JL.
© Daystate Ltd. May 2016. E&OE.
EXCLUDED FROM WARRANTY
Failure due to misuse or abuse, the fittingofnon-standardparts,springs,seals, water-damage to wooden stocks, batteries and fair wear and tear. Daystate Ltd or their approved agent must carry out all maintenance and warranty work. Theriflemustbemaintainedandusedasoutlined in this Instruction Manual.
Should a rifle be returned or collected under warranty, Daystate or its approved agent reserve the right to charge for postage and inspection costs.
A return form, which should be included with the rifle, can be downloaded here: http://www.daystate.com/images/reviews/RifleReturnForm.pdf Please remove where possible stock, scopes and other accessories, to avoid the possibility of transit damage to these items. Ensure that the rifle is securely packed.
While every effort is taken to ensure the accuracy of the information in this instruction manual, Daystate Ltd or their agents cannot be held responsible for errors or omissions. Products are continually updated and specification may change without notice.
Visit the online handbook at www.daystate.com/support for the latest information.
12