pulse oximetry p1 - leeds › docs › hca_pulse-oximetry_p... · it is important to measure oxygen...
TRANSCRIPT
Page 1 of 4
Observations
Pulse oximetryEdited by Francina Hyatt, Senior Lecturer and HCA Lead / Nurse Practitioner Primary Care,
Kingston University and St George’s University of London
©2018 Clinical Skills Limited. All rights reserved
The pulse oximeter is a common measurement device used in acute wards, operating theatres and ward environments, and in general practice settings. It is also used by healthcare professionals such as paramedics and physiotherapists. It measures the saturation of haemoglobin by oxygen in the arterial system (SaO2) as a percentage, providing a guide to oxygen delivery to the tissues. Haemoglobin usually carries a high percentage of oxygen: an oxygen saturation reading of 94–98% is normal for adults who do not have respiratory disease (O’Driscoll et al., 2017). The colloquial term “checking the patient’s sats” refers to pulse oximetry measurements.
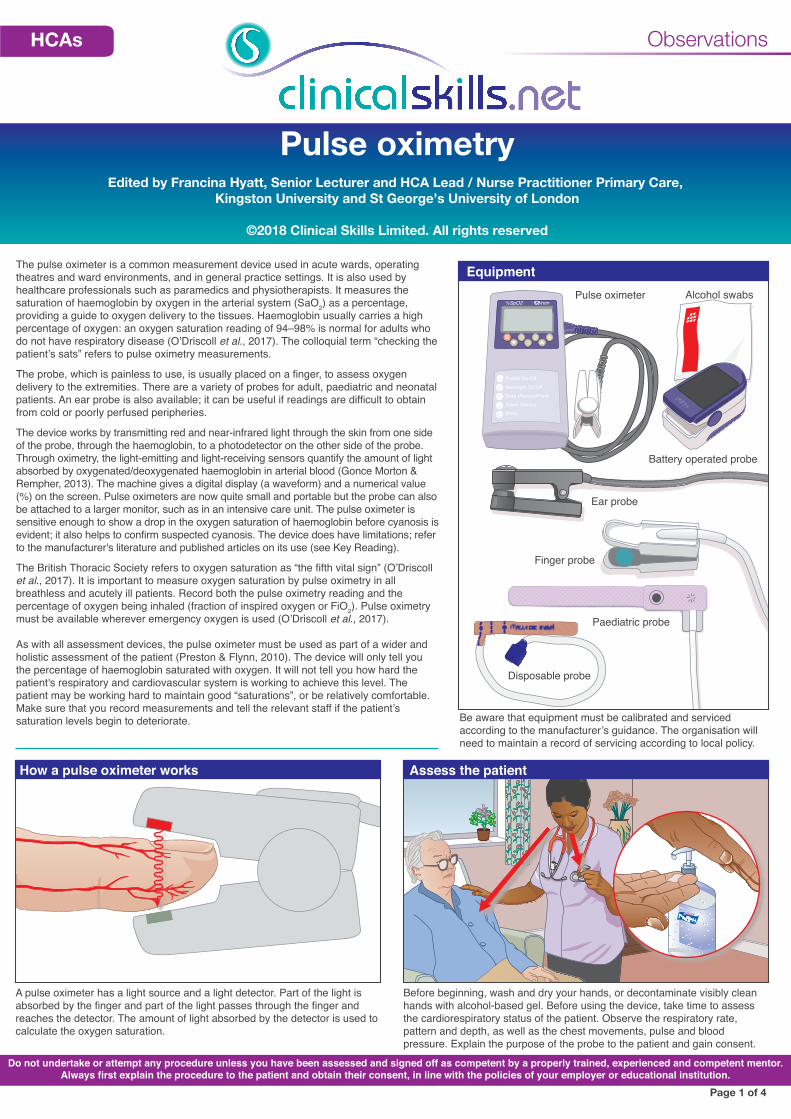
The probe, which is painless to use, is usually placed on a finger, to assess oxygen delivery to the extremities. There are a variety of probes for adult, paediatric and neonatal patients. An ear probe is also available; it can be useful if readings are difficult to obtain from cold or poorly perfused peripheries.
The device works by transmitting red and near-infrared light through the skin from one side of the probe, through the haemoglobin, to a photodetector on the other side of the probe. Through oximetry, the light-emitting and light-receiving sensors quantify the amount of light absorbed by oxygenated/deoxygenated haemoglobin in arterial blood (Gonce Morton & Rempher, 2013). The machine gives a digital display (a waveform) and a numerical value (%) on the screen. Pulse oximeters are now quite small and portable but the probe can also be attached to a larger monitor, such as in an intensive care unit. The pulse oximeter is sensitive enough to show a drop in the oxygen saturation of haemoglobin before cyanosis is evident; it also helps to confirm suspected cyanosis. The device does have limitations; refer to the manufacturer's literature and published articles on its use (see Key Reading).
The British Thoracic Society refers to oxygen saturation as “the fifth vital sign” (O’Driscoll et al., 2017). It is important to measure oxygen saturation by pulse oximetry in all breathless and acutely ill patients. Record both the pulse oximetry reading and the percentage of oxygen being inhaled (fraction of inspired oxygen or FiO2). Pulse oximetry must be available wherever emergency oxygen is used (O’Driscoll et al., 2017).
As with all assessment devices, the pulse oximeter must be used as part of a wider and holistic assessment of the patient (Preston & Flynn, 2010). The device will only tell you the percentage of haemoglobin saturated with oxygen. It will not tell you how hard the patient's respiratory and cardiovascular system is working to achieve this level. The patient may be working hard to maintain good “saturations”, or be relatively comfortable. Make sure that you record measurements and tell the relevant staff if the patient’s saturation levels begin to deteriorate.
Do not undertake or attempt any procedure unless you have been assessed and signed off as competent by a properly trained, experienced and competent mentor. Always first explain the procedure to the patient and obtain their consent, in line with the policies of your employer or educational institution.
Paediatric probe
Finger probe
Disposable probe
Ear probe
Pulse oximeter Alcohol swabs
Battery operated probe
Power On/OffBacklight On/OffData (Record/Print)Alarm SilenceMenu
%SpO2 /min
Equipment
Sanja VergheseCommunity Nurse
The Royal Surrey County Hospitals NHS
Purell
How a pulse oximeter works Assess the patient
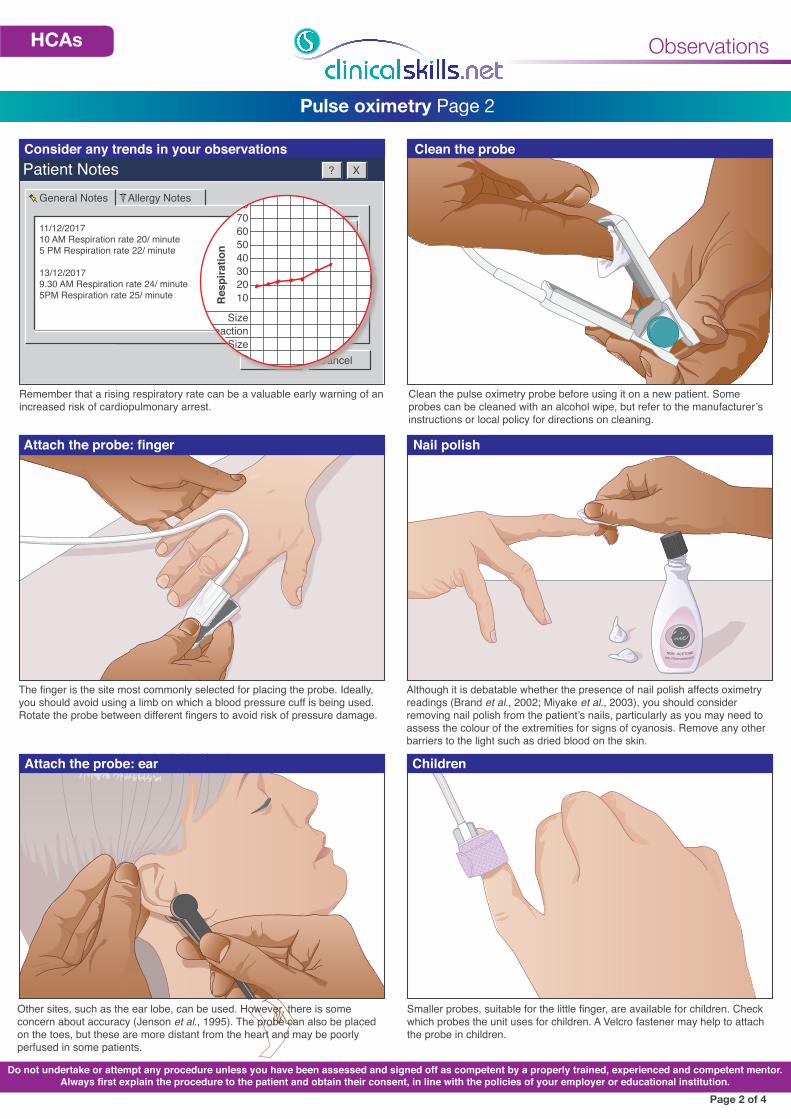
A pulse oximeter has a light source and a light detector. Part of the light is absorbed by the finger and part of the light passes through the finger and reaches the detector. The amount of light absorbed by the detector is used to calculate the oxygen saturation.
Before beginning, wash and dry your hands, or decontaminate visibly clean hands with alcohol-based gel. Before using the device, take time to assess the cardiorespiratory status of the patient. Observe the respiratory rate, pattern and depth, as well as the chest movements, pulse and blood pressure. Explain the purpose of the probe to the patient and gain consent.
Be aware that equipment must be calibrated and serviced according to the manufacturer’s guidance. The organisation will need to maintain a record of servicing according to local policy.
Francina - Pulse oximetry – HCA in GP practice may undertake this skill when assisting a registered DR or Nurse in an emergency, or assessing a patient who becomes breathless during a consultation. HCAs in the community do not carry this equipment routine-ly but may be asked to perform a saturation level on a patient with COPD as part of a basic observation assessment. HCAs in care homes do not normally undertake this task. Therefore the current procedure depicts a hospital setting; although many of the pictures could be used some would need changing to suit a GP practice consulting room situation.
HCAs
Patient Notes ? X
OK Cancel
General Notes
11/12/2017 10 AM Respiration rate 20/ minute5 PM Respiration rate 22/ minute
13/12/20179.30 AM Respiration rate 24/ minute5PM Respiration rate 25/ minute
Allergy Notes 908070605040302010
SizeReaction
SizeReaction
Normal power
Res
pira
tion
Observations
Pulse oximetry Page 2
Consider any trends in your observations Clean the probe
Attach the probe: finger
Attach the probe: ear Children
Remember that a rising respiratory rate can be a valuable early warning of an increased risk of cardiopulmonary arrest.
Clean the pulse oximetry probe before using it on a new patient. Some probes can be cleaned with an alcohol wipe, but refer to the manufacturer’s instructions or local policy for directions on cleaning.
The finger is the site most commonly selected for placing the probe. Ideally, you should avoid using a limb on which a blood pressure cuff is being used. Rotate the probe between different fingers to avoid risk of pressure damage.
Although it is debatable whether the presence of nail polish affects oximetry readings (Brand et al., 2002; Miyake et al., 2003), you should consider removing nail polish from the patient’s nails, particularly as you may need to assess the colour of the extremities for signs of cyanosis. Remove any other barriers to the light such as dried blood on the skin.
Smaller probes, suitable for the little finger, are available for children. Check which probes the unit uses for children. A Velcro fastener may help to attach the probe in children.
Other sites, such as the ear lobe, can be used. However, there is some concern about accuracy (Jenson et al., 1995). The probe can also be placed on the toes, but these are more distant from the heart and may be poorly perfused in some patients.
Page 2 of 4
Do not undertake or attempt any procedure unless you have been assessed and signed off as competent by a properly trained, experienced and competent mentor. Always first explain the procedure to the patient and obtain their consent, in line with the policies of your employer or educational institution.
Please remove white clip
NON - ACETONENAIL POLISH REMOVER PROTEIN ENRICHED
Nail polish
Francina: I like the picture on page 2 showing the respirations going up, this is a good visual with explanation of the importance of spotting this early warning sign, although community clinicians will not document the observation in this way (on a computer , hand held I PAD or notes in the house) .
HCAs
%SpO2 /min
Sanja VergheseCommunity Nurse
The Royal Surrey County Hospitals NHS
Power On/OffBacklight On/OffData (Record/Print)Alarm SilenceMenu
%SpO2 /min
Patient Notes ? X
OK Cancel
General Notes
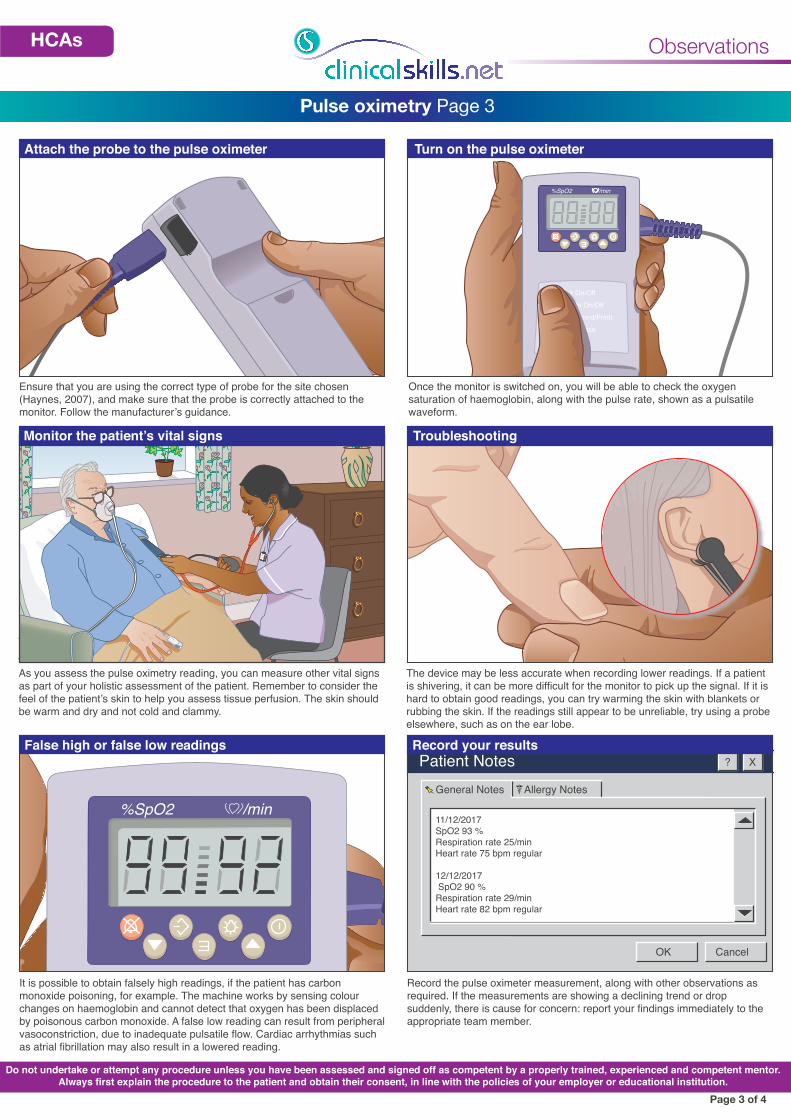
11/12/2017SpO2 93 %Respiration rate 25/minHeart rate 75 bpm regular
12/12/2017 SpO2 90 %Respiration rate 29/minHeart rate 82 bpm regular
Allergy Notes
Observations
Pulse oximetry Page 3
Attach the probe to the pulse oximeter Turn on the pulse oximeter
Monitor the patient’s vital signs Troubleshooting
False high or false low readings Record your results
Ensure that you are using the correct type of probe for the site chosen (Haynes, 2007), and make sure that the probe is correctly attached to the monitor. Follow the manufacturer’s guidance.
Once the monitor is switched on, you will be able to check the oxygen saturation of haemoglobin, along with the pulse rate, shown as a pulsatile waveform.
As you assess the pulse oximetry reading, you can measure other vital signs as part of your holistic assessment of the patient. Remember to consider the feel of the patient’s skin to help you assess tissue perfusion. The skin should be warm and dry and not cold and clammy.
The device may be less accurate when recording lower readings. If a patient is shivering, it can be more difficult for the monitor to pick up the signal. If it is hard to obtain good readings, you can try warming the skin with blankets or rubbing the skin. If the readings still appear to be unreliable, try using a probe elsewhere, such as on the ear lobe.
It is possible to obtain falsely high readings, if the patient has carbon monoxide poisoning, for example. The machine works by sensing colour changes on haemoglobin and cannot detect that oxygen has been displaced by poisonous carbon monoxide. A false low reading can result from peripheral vasoconstriction, due to inadequate pulsatile flow. Cardiac arrhythmias such as atrial fibrillation may also result in a lowered reading.
Record the pulse oximeter measurement, along with other observations as required. If the measurements are showing a declining trend or drop suddenly, there is cause for concern: report your findings immediately to the appropriate team member.
Page 3 of 4
Do not undertake or attempt any procedure unless you have been assessed and signed off as competent by a properly trained, experienced and competent mentor. Always first explain the procedure to the patient and obtain their consent, in line with the policies of your employer or educational institution.
HCAs

ObservationsHCAs
Do not undertake or attempt any procedure unless you have been assessed and signed off as competent by a properly trained, experienced and competent mentor. Always first explain the procedure to the patient and obtain their consent, in line with the policies of your employer or educational institution.
Pulse oximetry: check list Page 4
Page 4 of 4
This checklist can be used for assessment or as a developmental tool. If used for assessment, education staff will need to set the pass mark. However detailed a checklist is, assessment will always be subjective, so input from the moderator and assessors will help to determine whether a candidate passes. Some checklists include suggested questions for the assessor to ask—notably where it may be difficult to determine what the candidate is doing when looking at or examining the patient.
Practitioner’s/student’s name: Date:
Overall comments: Total score out of maximum possible score of 13 = %
Assessor’s name: Signature:
Moderator’s name: Signature:
Assessor questions Suggested answers Score
1. What is a normal pulse oximetry range for an adult without respiratory disease? 94–98 % (1 mark)
2. Apart from a finger probe, another probe is made specifically for another part of the body, what is it? The ear (1 mark)
3. Poisoning with which gas can result in a falsely high pulse oximetry reading? Carbon monoxide poisoning (1 mark)
4. Why should you periodically rotate the probe between fingers? To avoid pressure blisters (1 mark) (Joint stiffness may also be mentioned.)
AchievedNot
achievedNot
undertaken Comment
1. Explains the procedure to the patient and gains their consent as appropriate.
2. Washes hands and dries them thoroughly or decontaminates them with an alcohol-based hand rub.
3. Cleans the probe as necessary and appropriately.
4. Assesses the need to remove any nail polish from patient (as appropriate).
5. Places the probe on an appropriate part of the body (usually a finger or ear lobe).
6. Attaches the probe to the pulse oximeter.
7. Turns on the pulse oximeter.
8. Gains an appropriate wave form trace and gains an oximeter saturation of haemoglobin reading.
9. Records the saturation of haemoglobin reading correctly in the patient’s records/notes.