punto um gb 20-07-2007 11:35 pagina 1 fia t...
TRANSCRIPT

The data contained in this publication is intended merely as a guide. FIAT reserves the right to modify the models and versions described in this booklet at any time for technical and commercial reasons.
If you have any further questions please consult your FIAT dealer. Printed in recycled paper without chlorine. O W N E R H A N D B O O K
F I A T P U N T OENGLISH
PUNTO UM GB 20-07-2007 11:35 Pagina 1


Dear Customer,
Thank you for selecting Fiat and congratulations on your choice of a Fiat Punto.
We have written this handbook to help you get to know all your new Fiat Punto features and use it in the best possible way.
You should read it right through before taking the road for the first time.
You will find information, tips and important warnings regarding the driving of your car to help you derive the maximum from yourFiat Punto technological features.
You are recommended to read carefully the warnings and indications, marked with the respective symbols, at the end of the page:
personal safety;
the car’s wellbeing;
environmental protection.
The enclosed Warranty Booklet lists the services that Fiat offers to its Customers:
❒ the Warranty Certificate with terms and conditions for maintaining its validity
❒ the range of additional services available to Fiat Customers.
Best regards and good motoring!
This Owner Handbook describes all Fiat Punto versions. As a consequence, you should consider only the information which is related to the engine
and bodywork version of the car you purchased.

MUST BE READ!
�
K
REFUELLING
Petrol engines: only refuel with unleaded petrol with octane rating (RON) not less than 95 conforming to the Eu-ropean specification EN 228.Diesel engines: only refuel with diesel fuel conforming to the European specification EN590.Using other products or mixtures may damage the engine beyond repair and cause the forfeiture of the warranty cov-er for caused damages as a consequence.
ENGINE STARTING
Petrol engines: make sure that the handbrake is engaged; set the gearshift lever to neutral; fully depress the clutchwithout pressing the accelerator, then turn the ignition key to AVV and release it as soon as the engine has started.
Diesel engines: make sure that the handbrake is engaged; set the gearshift lever to neutral; fully depress the clutchwithout pressing the accelerator, then turn the ignition key to MAR and wait for the warning lights Y and m togo off; turn the ignition key to AVV and release it as soon as the engine has started.
PARKING ON FLAMMABLE MATERIAL
While working, the catalyst develops a very high temperature. Do not park the car over grass, dry leaves, pine nee-dles or any other inflammable materials: risk of fire.
RESPECTING THE ENVIRONMENT
The car is fitted with a system that allows continuous diagnosis of the components correlated with emissions to en-sure better respect for the environment.

ELECTRICAL ACCESSORIES
If, after buying the car, you decide to add electrical accessories (that will gradually drain the battery), visit a FiatDealership. They can calculate the overall electrical requirement and check that the car’s electric system can sup-port the required load.
CODE card
Keep the code card in a safe place, not in the car. You should always keep the electronic card code written on theCODE card with you.
SCHEDULED SERVICING
Correct maintenance of the car is essential for ensuring it stays in tip-top condition and safeguards its safety fea-tures, its environmental friendliness and low running costs for a long time to come.
THE OWNER’S MANUAL CONTAINS…
… information, tips and important warnings regarding the safe, correct driving of your car, and its maintenance. Payparticular attention to the symbols " (personal safety) # (environmental protection) ! (the car’s wellbeing).
�

4
SAFE
TYDE
VICE
SCO
RREC
T USE
OF TH
E CAR
WAR
NING
LIGHT
S AND
MESS
AGES
IN A
NEM
ERGE
NCY
CAR
MAIN
TENA
NCE
TECHN
ICAL
SPEC
IFICA
TIONS
INDE
XDA
SHBO
ARD
AND
CONT
ROLS
DASHBOARD ...................................................................... 5SYMBOLS ............................................................................... 7THE FIAT CODE SYSTEM.................................................. 7THE KEYS .............................................................................. 8ALARM ................................................................................... 11IGNITION DEVICE .............................................................. 13INSTRUMENT PANEL ........................................................ 14INSTRUMENTS ..................................................................... 16DIGITAL DISPLAY ............................................................... 18MULTIFUNCTION DISPLAY ............................................ 23RECONFIGURABLE MULTIFUNCTION DISPLAY .... 26DISPLAY FUNCTIONS ...................................................... 29TRIP COMPUTER ................................................................ 35FRONT SEATS ..................................................................... 37REAR SEATS .......................................................................... 38HEAD RESTRAINTS............................................................. 39STEERING WHEEL .............................................................. 40REARVIEW MIRRORS ......................................................... 40HEATING AND VENTILATION ...................................... 42MANUAL CLIMATE CONTROL SYSTEM .................... 46AUTOMATIC TWO-ZONE CLIMATE CONTROL SYSTEM ........................................................... 52EXTERNAL LIGHTS............................................................. 59WINDOW WASHING ....................................................... 61CRUISE CONTROL ............................................................ 64CEILING LIGHTS .................................................................. 66
CONTROLS........................................................................... 69
FUEL CUT-OFF SWITCH .................................................. 71
INTERIOR FITTINGS........................................................... 72
SKY-DOME SUNROOF ..................................................... 76
DOORS .................................................................................. 78
POWER WINDOWS/WINDOW WINDERS .............. 81
BOOT ...................................................................................... 84
BONNET................................................................................. 87
ROOF RACK/SKI RACK .................................................... 88
HEADLIGHTS ........................................................................ 89
ABS SYSTEM ......................................................................... 91
ESP SYSTEM .......................................................................... 92
EOBD SYSTEM ..................................................................... 95
DUALDRIVE ELECTRIC POWER STEERING SYSTEM ............................................................. 96
T.P.M.S. SYSTEM .................................................................. 98
PARKING SENSORS ........................................................... 101
SOUND SYSTEM .................................................................. 103
HANDS FREE KIT WITH VOICE RECOGNITION AND Bluetooth® TECHNOLOGY ................................ 104
RADIONAVIGATOR PRESETTINGSYSTEM .................................................................................. 104
ACCESSORIES PURCHASED BY THE OWNER.......... 105
AT THE FILLING STATION ............................................. 106
PROTECTING THE ENVIRONMENT............................. 107
DDDAASSHHBBOOAARRDD AANNDD CCOONNTTRROOLLSS

DASHBOARD
Left hand drive version
The presence and the position of the instruments and warning lights may vary according to the versions.
1. Side adjustable air vents - 2. Side fixed air vents - 3. Left steering column stalk: external lights - 4. Instrument panel - 5. Rightsteering column stalk: windscreen, rear window wiper and trip computer controls - 6. Dashboard controls - 7. Central adjustable airvents - 8. Upper fixed air vent - 9. Front passenger’s air bag - 10. Glovebox - 11. Sound system (where provided) - 12. Heating/ven-tilation/climate controls - 13. Ignition switch - 14. Driver’s air bag - 15. Steering wheel adjusting lever - 16. Control plate: frontfog lights/rear fog lights/headlight aiming device/digital display/multifunction display.
5
SAFE
TYDE
VICE
SCO
RREC
T USE
OF TH
E CAR
WAR
NING
LIGHT
S AND
MESS
AGES
IN A
NEM
ERGE
NCY
CAR
MAIN
TENA
NCE
TECHN
ICAL
SPEC
IFICA
TIONS
INDE
XDA
SHBO
ARD
AND
CONT
ROLS
F0M0350m
fig. 1

6
SAFE
TYDE
VICE
SCO
RREC
T USE
OF TH
E CAR
WAR
NING
LIGHT
S AND
MESS
AGES
IN A
NEM
ERGE
NCY
CAR
MAIN
TENA
NCE
TECHN
ICAL
SPEC
IFICA
TIONS
INDE
XDA
SHBO
ARD
AND
CONT
ROLS Right hand drive version
The presence and the position of the instruments and warning lights may vary according to the versions.
1. Side adjustable air vents - 2. Side fixed air vents - 3. Left steering column stalk: external lights - 4. Instrument panel - 5. Rightsteering column stalk: windscreen, rear window wiper and trip computer controls - 6. Dashboard controls - 7. Central adjustable airvents - 8. Upper fixed air vent - 9. Front passenger’s air bag - 10. Glovebox - 11. Sound system (where provided) - 12. Heating/ven-tilation/climate controls - 13. Ignition switch - 14. Driver’s air bag - 15. Steering wheel adjusting lever - 16. Control plate: frontfog lights/rear fog lights/headlight aiming device/digital display/multifunction display.
F0M0380m
fig. 1a

7
SAFE
TYDE
VICE
SCO
RREC
T USE
OF TH
E CAR
WAR
NING
LIGHT
S AND
MESS
AGES
IN A
NEM
ERGE
NCY
CAR
MAIN
TENA
NCE
TECHN
ICAL
SPEC
IFICA
TIONS
INDE
XDA
SHBO
ARD
AND
CONT
ROLS
Special coloured labels have been attachednear or actually on some of the compo-nents of your Fiat Punto. These labels bearsymbols that remind you of the precau-tions to be taken as regards that particu-lar component.
The plate summarising the symbols usedcan be found under the bonnet fig. 2.
THE FIAT CODE SYSTEM
To further protect you car from theft, ithas been fitted with an engine immobilis-ing system. This system is automatically ac-tivated when the ignition key is removed.
An electronic device, in fact, is fitted ineach ignition key grip. The device trans-mits a radio-frequency signal when the en-gine is started through a special aerial builtinto the ignition switch. The modulate sig-nal, which changes each time the engine isstarted, is the “password”, by means ofwhich the control unit recognises the keyand enables to start the engine.
OPERATION
Each time the car is started turning the ig-nition key to MAR, the Fiat CODE sys-tem control unit sends a recognition codeto the engine control unit to deactivatethe inhibitor.
The code is sent only if the Fiat CODEsystem control unit has recognised thecode transmitted from the key.
Each time the ignition key is turned toSTOP, the Fiat CODE system deactivatesthe functions of the engine electronic con-trol unit.
If the code has not been recognised cor-rectly, the warning light Y turns on (seesection “Warning lights and messages”).
In this case, the key should be moved tothe STOP position and then back toMAR; if the lock continues, possibly tryagain with the other key provided with thecar. If it is still not possible to start the car,contact Fiat Dealership.
IMPORTANT Every key has its own code,which must be memorised by the systemcontrol unit. To memorise new keys, upto a maximum of eight, apply to Fiat Deal-ership.
Warning light Ycoming on when driving
❒ If the warning light Y turns on, thismeans that the system is running a self-test (for example for a voltage drop).
❒ If the warning light Y stays on, con-tact a Fiat Dealership.
fig. 2 F0M0005m
The electronic componentsinside the key may be dam-aged if the key is submitted tosharp knocks.
SYMBOLS

8
SAFE
TYDE
VICE
SCO
RREC
T USE
OF TH
E CAR
WAR
NING
LIGHT
S AND
MESS
AGES
IN A
NEM
ERGE
NCY
CAR
MAIN
TENA
NCE
TECHN
ICAL
SPEC
IFICA
TIONS
INDE
XDA
SHBO
ARD
AND
CONT
ROLS
KEY WITH REMOTE CONTROLfig. 4/a
The metal insert A is retractable and it op-erates:
❒ the ignition switch;
❒ the door locks.
❒ fuel cap opening/closing (where pro-vided).
To extract the metal insert, press buttonB.
To refit it proceed as follows:
❒ keep button B pressed and move themetal insert A;
❒ release button B and turn the metal in-sert A until hearing the proper lock-ing click.
THE KEYS
CODE CARD fig. 3
The car is delivered with two copies of theignition key and with the CODE cardwhich bears the following:
A the electronic code;
B the mechanical key code to be givento the Fiat Dealership when orderingduplicate keys.
Make sure you have the electronic codeA-fig. 3 with you at all times.
IMPORTANT In order to ensure perfectefficiency of the electronic devices con-tained inside the keys, they should neverbe exposed to direct sunlight.
All the keys and the CODEcard must be handed over tothe new owner when sellingthe car.
fig. 3 F0M0351m fig. 4/a F0M0007m

9
SAFE
TYDE
VICE
SCO
RREC
T USE
OF TH
E CAR
WAR
NING
LIGHT
S AND
MESS
AGES
IN A
NEM
ERGE
NCY
CAR
MAIN
TENA
NCE
TECHN
ICAL
SPEC
IFICA
TIONS
INDE
XDA
SHBO
ARD
AND
CONT
ROLS
Button Ë shall be used for opening thedoors and the tailgate.
Button Á shall be used for closing thedoors and the tailgate.
Button R shall be used for remoteopening of the tailgate.
When unlocking the doors, the passen-ger’s compartment lights will come on fora preset time.
Button B should only bepressed when the key is
away from the body, in particularfrom the eyes and from objects thatcan be spoilt (e.g. clothes). Make surethe key can never be touched by oth-ers, especially children, who may in-advertently press the button.
WARNING
Dashboard led indications
When locking the doors, led A-fig. 6switches on for about 3 seconds and thanstarts flashing (deterrence function).
Once doors are locked, if one or moredoors or the tailgate are not closed cor-rectly, the led and direction indicatorsstart flashing quickly.
fig. 6 F0M0013m
RETRACTABLE KEY WITHOUTREMOTE CONTROL fig. 4/b
The metal insert A is retractable and it op-erates:
❒ the ignition switch;
❒ the door locks.
❒ fuel cap opening/closing (where pro-vided).
To extract the metal insert, press buttonB.
To refit it proceed as follows:
❒ keep button B pressed and move themetal insert A;
❒ release button B and turn the metal in-sert A until hearing the proper lock-ing click.
fig. 4/b F0M0262m
Button B should only bepressed when the key is
away from the body, in particularfrom the eyes and from objects thatcan be spoilt (e.g. clothes). Make surethe key can never be touched by oth-ers, especially children, who may in-advertently press the button.
WARNING

10
SAFE
TYDE
VICE
SCO
RREC
T USE
OF TH
E CAR
WAR
NING
LIGHT
S AND
MESS
AGES
IN A
NEM
ERGE
NCY
CAR
MAIN
TENA
NCE
TECHN
ICAL
SPEC
IFICA
TIONS
INDE
XDA
SHBO
ARD
AND
CONT
ROLS
Replacing the battery of the keywith remote control fig. 7
Battery replacement:
❒ press button A and open the metal in-sert B;
❒ turn the screw C to : using a fine bitscrewdriver;
❒ take out the battery case D and replacethe battery E making sure that the biasis correct;
❒ refit the battery case D inside the keyand lock it turning the screw C to Á .
Used batteries are harmful tothe environment. They shouldbe disposed of as specified bylaw in the special containers
provided, or take them to a Fiat Deal-ership, which will deal with their dis-posal.
fig. 7 F0M0010m
Request for additional remotecontrols
The system can recognise up to 8 keyswith incorporated remote control. Shoulda new key with remote control be nec-essary, contact a Fiat Dealership, takingwith you the CODE card, a personal iden-tity document and the car’s ownershipdocuments.

11
SAFE
TYDE
VICE
SCO
RREC
T USE
OF TH
E CAR
WAR
NING
LIGHT
S AND
MESS
AGES
IN A
NEM
ERGE
NCY
CAR
MAIN
TENA
NCE
TECHN
ICAL
SPEC
IFICA
TIONS
INDE
XDA
SHBO
ARD
AND
CONT
ROLSKEY WITHOUT REMOTE
CONTROL fig. 8
The metal insert of the key A is fixed.
The key operates:
❒ the ignition switch;
❒ the door locks;
❒ fuel cap opening/closing (where pro-vided). fig. 8 F0M0352m
ALARM
The car alarm system is available at Lin-eaccessori Fiat.

12
SAFE
TYDE
VICE
SCO
RREC
T USE
OF TH
E CAR
WAR
NING
LIGHT
S AND
MESS
AGES
IN A
NEM
ERGE
NCY
CAR
MAIN
TENA
NCE
TECHN
ICAL
SPEC
IFICA
TIONS
INDE
XDA
SHBO
ARD
AND
CONT
ROLS The main functions that can be activated with the keys (with or without remote control) are the following:
Type
Key without remote control
Key with remote control
Direction indicators flashing (only with key with remote control)
Door opening
Key turning counterclockwise(driver side)
Key turning counterclockwise(driver side)
Press briefly button Ë
2 flashings
Turning off
Door closingform the outside
Key turning clockwise(driver side)
Key turning clockwise (driver side)
Brief press onbutton Á
1 flashing
Turning on glowing steadilyfor about 3 seconds followedby deterrence led flashing
Dead lock activation
(where provided)
–
–
Double pressing on button Á
3 flashings
Double flashing,followed by de-terrence led flashing
Tailgate opening
–
–
Pressing onbutton R
2 flashings
Deterrence ledflashing
IMPORTANT Window opening operation is a consequence of a door unlocking control; window closing operation is a consequenceof a door locking control.
Window closing(where provided)
–
–
Long press(for over 2 seconds)
on button Á
1 flashings
Deterrence ledflashing
Window openin(where provided
–
–
Long press(for over 2 seconds)
on button Ë
2 flashings
Turning off

13
SAFE
TYDE
VICE
SCO
RREC
T USE
OF TH
E CAR
WAR
NING
LIGHT
S AND
MESS
AGES
IN A
NEM
ERGE
NCY
CAR
MAIN
TENA
NCE
TECHN
ICAL
SPEC
IFICA
TIONS
INDE
XDA
SHBO
ARD
AND
CONT
ROLSIGNITION DEVICE
The key can be turned to 3 different po-sitions fig. 9:
❒ STOP: engine off, key can be removed,steering column locked. Certain elec-trical devices (e.g.: sound system, pow-er windows…) can work.
❒ MAR: driving position. All electrical de-vices are powered.
❒ AVV: engine starting (unstable posi-tion).
The ignition switch is fitted with an elec-tronic safety system that, in the event theengine is not started, turns back the igni-tion key to STOP before repeating thestarting operation.
STEERING COLUMN LOCK
Engaging
When the key is at STOP, remove thekey and turn the steering wheel until itlocks.
Disengaging
Rock the steering wheel slightly as youturn the ignition key to MAR.
If the ignition device is tam-pered with (e.g.: attempted
theft), have it checked over by a FiatDealership as soon as possible.
WARNING
When getting out of the car,always remove the key to
prevent any occupants from acci-dentally activating the controls. Re-member to engage the handbrakeand if the car is parked on uphill slopeto engage the first gear. If the car isfacing downhill, engage the reversegear. Never leave unsupervised chil-dren in the car.
WARNING
fig. 9 F0M0015m
Never remove the ignitionkey while the car is moving.
The steering wheel would automati-cally lock as soon as you try to turnit. This also applies when the car isbeing towed.
WARNING
It is absolutely forbidden tocarry out whatever after-
market operation involving steeringsystem or steering column modifica-tions (e.g.: installation of anti-theftdevice) that could badly affect per-formance and safety, cause the lapseof warranty and also result in non-compliance of the car with homolo-gation requirements.
WARNING

14
SAFE
TYDE
VICE
SCO
RREC
T USE
OF TH
E CAR
WAR
NING
LIGHT
S AND
MESS
AGES
IN A
NEM
ERGE
NCY
CAR
MAIN
TENA
NCE
TECHN
ICAL
SPEC
IFICA
TIONS
INDE
XDA
SHBO
ARD
AND
CONT
ROLS INSTRUMENT PANEL
Left hand drive version Right hand drive version
A Speedometer (speed indicator) - B Fuel level gauge with reserve warning lightC Engine coolant temperature gauge and excessive temperature warning light - D Rev counter - E Display
F0M0255mfig. 10 - with digital display
F0M0256mfig. 10a - with multifunction display
F0M0257mfig. 11 - with digital display
F0M0258mfig. 11a - with multifunction display

15
SAFE
TYDE
VICE
SCO
RREC
T USE
OF TH
E CAR
WAR
NING
LIGHT
S AND
MESS
AGES
IN A
NEM
ERGE
NCY
CAR
MAIN
TENA
NCE
TECHN
ICAL
SPEC
IFICA
TIONS
INDE
XDA
SHBO
ARD
AND
CONT
ROLS
Left hand drive version
A Speedometer (speed indicator) - B Fuel level gauge with reserve warning lightC Engine coolant temperature gauge and excessive temperature warning light - D Rev counter - E Display
Right hand drive version
F0M0259mfig. 12 - Sport versions with multifunctionreconfigurable display
F0M0260mfig. 12 - Sport versions with multifunctionreconfigurable display
F0M0353mfig. 12/a - Reconfigurable multifunction display version F0M0381mfig. 12/a - Reconfigurable multifunction display version

16
SAFE
TYDE
VICE
SCO
RREC
T USE
OF TH
E CAR
WAR
NING
LIGHT
S AND
MESS
AGES
IN A
NEM
ERGE
NCY
CAR
MAIN
TENA
NCE
TECHN
ICAL
SPEC
IFICA
TIONS
INDE
XDA
SHBO
ARD
AND
CONT
ROLS INSTRUMENTS
Instrument background color and typemay vary according to the version.
SPEEDOMETER fig. 13
It shows the engine speed.
REV. COUNTER fig. 14
Rev counter shows engine rpm.
IMPORTANT The electronic injectioncontrol system gradually shuts off the flowof fuel when the engine is “over-revving”resulting in a gradual loss of engine pow-er.
When the engine is idling, the rev countermay indicate a gradual or sudden higher-ing of the speed.
This is normal as it takes place during nor-mal operation, for example when activat-ing the climate control system or the fan.In particular a slow change in the speedpreserves the battery charge.
fig. 13 F0M0021m fig. 14 F0M0022m

17
SAFE
TYDE
VICE
SCO
RREC
T USE
OF TH
E CAR
WAR
NING
LIGHT
S AND
MESS
AGES
IN A
NEM
ERGE
NCY
CAR
MAIN
TENA
NCE
TECHN
ICAL
SPEC
IFICA
TIONS
INDE
XDA
SHBO
ARD
AND
CONT
ROLS
FUEL LEVEL GAUGE fig. 15
This shows the amount of fuel left in thefuel tank.
E tank empty.
F full tank.
The reserve warning light A turns on toindicate that approximately 7 litres of fu-el are left in the tank.
Do not travel with the fuel tank almostempty: the gaps in fuel delivery could dam-age the catalyst.
See the indications given in paragraph “At the filling station”.
IMPORTANT The needle sets to E withwarning light A flashing to indicate that thesystem is failing. In this event contact FiatDealership to have the system checked.
ENGINE COOLANTTEMPERATURE GAUGE fig. 16
This shows the temperature of the enginecoolant fluid and begins working when thefluid temperature exceeds approx. 50°C.
Under normal conditions, the needleshould hover around the middle of thescale according to the working conditions.
C Low engine coolant temperature.
H High engine coolant temperature.
The turning on of the warning light B (oncertain versions with a message on themultifunction display) indicates that thecoolant fluid temperature is too high; inthis case, stop the engine and contact a Fi-at Dealership.
fig. 15 F0M0023m fig. 16 F0M0024mIf the needle reaches the redarea, stop the engine imme-diately and contact a FiatDealership.

18
SAFE
TYDE
VICE
SCO
RREC
T USE
OF TH
E CAR
WAR
NING
LIGHT
S AND
MESS
AGES
IN A
NEM
ERGE
NCY
CAR
MAIN
TENA
NCE
TECHN
ICAL
SPEC
IFICA
TIONS
INDE
XDA
SHBO
ARD
AND
CONT
ROLS DIGITAL DISPLAY
STANDARD SCREEN fig. 17
The standard screen shows the followingindications:
A Headlight aiming position (only withdipped beam headlights on).
B Clock (always displayed, even with ig-nition key removed and front doorsclosed).
C Odometer (covered km or miles).
Note With key removed (when openingone of the front doors) the display willturn on and show for a few seconds thekm or mi covered.
CONTROL BUTTONS fig. 18
+ To scroll the displayed menu and therelated options upwards or to in-crease the value displayed.
MENU Press briefly to displayESC the menu and/or to go to next
screen or to confirm the re-quired menu option.
Long press to go back to thestandard screen.
– To scroll the displayed menu and therelated options downwards or to de-crease the value displayed.
Note Buttons + and – activate differentfunctions according to the following situ-ations: To adjust light inside the passenger compartment
– to adjust instrument panel, sound sys-tem and automatic climate control systemdisplay brightness when standard screenis active.
Setup menu
– to scroll the menu options upwards anddownwards;– to increase or decrease values during set-tings.
fig. 17 F0M0119m fig. 18 F0M0122m

19
SAFE
TYDE
VICE
SCO
RREC
T USE
OF TH
E CAR
WAR
NING
LIGHT
S AND
MESS
AGES
IN A
NEM
ERGE
NCY
CAR
MAIN
TENA
NCE
TECHN
ICAL
SPEC
IFICA
TIONS
INDE
XDA
SHBO
ARD
AND
CONT
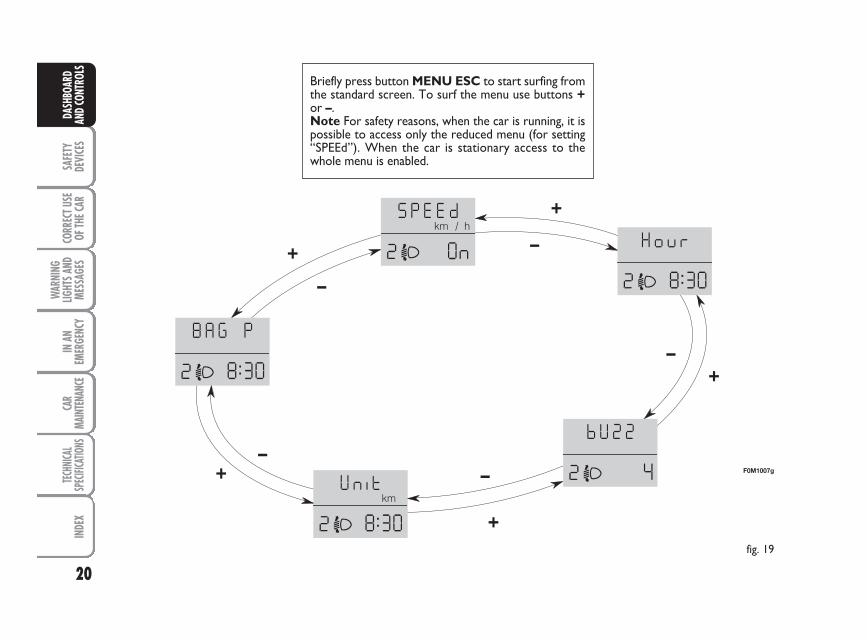
ROLSSETUP MENU fig. 19
The menu comprises a series of functionsarranged in a “circular fashion” which canbe selected through buttons + and – toaccess the different select operations andsettings (setup) given in the following para-graphs.
The setup menu can be activated by press-ing briefly button MENU ESC.
Single presses on buttons + and – willscroll the setup menu options.
Handling modes differ with each other ac-cording to the characteristic of the optionselected.
Selecting a menu option
– press briefly button MENU ESC to se-lect the menu option to set;
– press buttons + and – (by single press-es) to select the new setting;
– press briefly button MENU ESC tostore the new setting and to go back tothe previously selected menu option.
Selecting “Set Clock”
– briefly press button MENU ESC to se-lect the first value to change (hours);
– press buttons + and – (by single press-es) to select the new setting;
– briefly press button MENU ESC tostore the new setting and to go to thenext setup menu option (minutes);
– after setting the values with the sameprocedure, you’ll go back to the menu op-tion previously selected.
Press the button MENU ESC for long– to quit the set up menu if you are in themenu;– to quit the displayed menu if you are set-ting an option;– to save only the settings stored yet (andconfirmed by pressing button MENUESC).
The setup menu displaying is timed; whenquitting the menu due to timing expiry, on-ly settings stored yet by the user (and con-firmed by pressing briefly button MENUESC).
20
SAFE
TYDE
VICE
SCO
RREC
T USE
OF TH
E CAR
WAR
NING
LIGHT
S AND
MESS
AGES
IN A
NEM
ERGE
NCY
CAR
MAIN
TENA
NCE
TECHN
ICAL
SPEC
IFICA
TIONS
INDE
XDA
SHBO
ARD
AND
CONT
ROLS
Briefly press button MENU ESC to start surfing fromthe standard screen. To surf the menu use buttons +or –.Note For safety reasons, when the car is running, it ispossible to access only the reduced menu (for setting“SPEEd”). When the car is stationary access to thewhole menu is enabled.
fig. 19
F0M1007g
+
–
+–
+
–
+–
+
–

21
SAFE
TYDE
VICE
SCO
RREC
T USE
OF TH
E CAR
WAR
NING
LIGHT
S AND
MESS
AGES
IN A
NEM
ERGE
NCY
CAR
MAIN
TENA
NCE
TECHN
ICAL
SPEC
IFICA
TIONS
INDE
XDA
SHBO
ARD
AND
CONT
ROLSSetting the speed limit (SPEEd)
With this function it is possible to set thecar speed limit (km/h or mph), when thislimit is exceeded the driver is immediate-ly alerted (see section “Warning lights andmessages”).
To set the speed limit, proceed as follows:
– briefly press button MENU ESC, thedisplay will show the wording (SPEEd) andthe unit (km/h) or (mph) previously set;
– press button + or – to select speed lim-it activation (On) or deactivation (OFF);
– if the function has been activated (On),press buttons + or – to select the re-quired speed limit and then press MENUESC to confirm;
Note The possible setting is between 30and 200 km/h, or between 20 and 125mph depending on the unit set previous-ly (see paragraph “Setting the distance unit(Unit)”) described later. Every press onbutton +/– increases/decreases by 5 units.Keeping the button +/– pressed obtainsthe automatic fast increase or decrease.When you are near the required settingcomplete adjustment by single presses.
– briefly press button MENU ESC to goback to the menu screen or press the but-ton for long to go back to the standardscreen without storing settings.To cancel the setting, proceed as follows:
– briefly press button MENU ESC: (On)will flash on the display;
– press button – (Off) will flash on the dis-play;
– briefly press button MENU ESC to goback to the menu screen or press the but-ton for long to go back to the standardscreen without storing settings.
Setting the clock (Hour)
With this function it is possible to set theclock.
To set the clock, proceed as follows:– briefly press button MENU ESC,“hours” will flash on the display;– press button + or – for setting;– briefly press button MENU ESC, “min-utes” will flash on the display;– press button + or – for setting;
– briefly press button MENU ESC to goback to the menu screen or press the but-ton for long to go back to the standardscreen without storing settings.
Adjusting the buzzer volume(bUZZ)
This function enables to adjust the volumeof the buzzer accompanying any fail-ure/warning indication and the roger-beepaccompanying the activation of buttonsMENU ESC, + and –.
To adjust the volume proceed as follows:
– briefly press button MENU ESC, thedisplay will show the wording (bUZZ);
– press button + or – to select the re-quired volume (volume can be adjusted ac-cording to 8 levels).
– briefly press button MENU ESC to goback to the menu screen or press the but-ton for long to go back to the standardscreen without storing settings.

22
SAFE
TYDE
VICE
SCO
RREC
T USE
OF TH
E CAR
WAR
NING
LIGHT
S AND
MESS
AGES
IN A
NEM
ERGE
NCY
CAR
MAIN
TENA
NCE
TECHN
ICAL
SPEC
IFICA
TIONS
INDE
XDA
SHBO
ARD
AND
CONT
ROLS Front passenger’s air bag
and side bag (where provided)activation/deactivation (BAG P)
This function shall be used to activate/de-activate the front passenger’s air bag.
Proceed as follows:
❒ press button MENU ESC and afterdisplaying the message (BAG P OFF) (todeactivate) or (BAG P On) (to activate)by pressing buttons + or –, press againbutton MENU ESC;
❒ the confirmation request message willbe displayed;
❒ press buttons + or – to select (YES)(confirming activation/deactivation) or(no) (to abort);
❒ briefly press button MENU ESC toconfirm setting e to go back to themenu screen or press the button forlong to go back to the standard screenwithout storing settings.
MENU ESC
MENU ESC
MENU ESC
–+
–+
–+
–+
F0M
1001
g
F0M
1003
g
F0M
1002
gF0
M10
05g
F0M
1006
g
F0M
1002
g
F0M
1003
g
Setting the distance unit (Unit)
With this function it is possible to set theunit.
To set the required unit proceed as fol-lows:
– briefly press button MENU ESC, thedisplay will show the wording (Unit) andthe previously set unit (km) or (mi);
– press button + or – to select the re-quired distance unit.
– briefly press button MENU ESC to goback to the menu screen or press the but-ton for long to go back to the standardscreen without storing settings.

23
SAFE
TYDE
VICE
SCO
RREC
T USE
OF TH
E CAR
WAR
NING
LIGHT
S AND
MESS
AGES
IN A
NEM
ERGE
NCY
CAR
MAIN
TENA
NCE
TECHN
ICAL
SPEC
IFICA
TIONS
INDE
XDA
SHBO
ARD
AND
CONT
ROLS
CONTROL BUTTONS fig. 21
+ To scroll the displayed menu and therelated options upwards or to in-crease the value displayed.
MENU Press briefly to displayESC the menu and/or to go to next
screen or to confirm the re-quired menu option.Long press to go back to thestandard screen.
– To scroll the displayed menu and therelated options downwards or to de-crease the value displayed.
MULTIFUNCTIONDISPLAY (where provided)
The car can be equipped with the multi-function display that, according to the set-tings made, will show useful informationnecessary when driving.
INFORMATION ON“STANDARD” SCREEN fig. 20The standard screen shows the followingindications:A Date.B Odometer (covered km or miles).C Clock (always displayed, even with ig-
nition key removed and front doorsclosed).
D External temperature.E Headlight aiming position (only with
dipped beam headlights on).Note When opening one of the frontdoors, the display will turn on and showfor a few seconds the clock and the km ormi covered.
Note Buttons + and – activate differentfunctions according to the following situ-ations: To adjust light inside the passenger compartment
– to adjust instrument panel, sound sys-tem and automatic climate control systemdisplay brightness when standard screenis active.
Setup menu
– to scroll the menu options upwards anddownwards;– to increase or decrease values during set-tings.
fig. 20 F0M0121m fig. 21 F0M0122m

24
SAFE
TYDE
VICE
SCO
RREC
T USE
OF TH
E CAR
WAR
NING
LIGHT
S AND
MESS
AGES
IN A
NEM
ERGE
NCY
CAR
MAIN
TENA
NCE
TECHN
ICAL
SPEC
IFICA
TIONS
INDE
XDA
SHBO
ARD
AND
CONT
ROLS SETUP MENU fig. 22
The menu comprises a series of functionsarranged in a “circular fashion” which canbe selected through buttons + and – toaccess the different select operations andsettings (setup) given in the following para-graphs. For certain options (Hour andUnit) a submenu is provided.The setup menu can be activated by press-ing briefly button MENU ESC.Single presses on buttons + or – will scrollthe setup menu options.Handling modes differ with each other ac-cording to the characteristic of the optionselected.
Selecting an option of the main menu with-out submenu:– press briefly button MENU ESC to se-lect the main menu option to set;– press buttons + or – (by single press-es) to select the new setting;– press briefly button MENU ESC tostore the new setting and to go back tothe main menu option previously select-ed.
Selecting “Set Date” and “Set time”:– briefly press button MENU ESC to se-lect the first value to change (e.g. hours/minutes or year / month / day);– press buttons + or – (by single press-es) to select the new setting;– briefly press button MENU ESC to storethe new setting and to go to the next set-up menu option, if this is the last one youwill go back to the previously selected op-tion of the main menu.
Press button MENU ESC for long:– to quit the set up menu if you are in themain menu;– to quit the main menu if you are at an-other point of the menu (e.g.: at submenuoption setting level, at submenu level orat main menu option setting level);– to save only the settings stored yet (andconfirmed by pressing button MENUESC).The setup menu displaying is timed; whenquitting the menu due to timing expiry,only settings stored yet by the user (andconfirmed by pressing briefly buttonMENU ESC) will be saved.
Selecting an option of the main menu withsubmenu:– press briefly button MENU ESC to dis-play the first submenu option;– press buttons + or – (by single press-es) to scroll all the submenu options;– press briefly button MENU ESC to se-lect the displayed submenu option and toopen the relevant setup menu;– press buttons + or – (by single press-es) to select the new setting for this sub-menu option;– press briefly button MENU ESC tostore the new setting and to go back tothe previously selected submenu option.

25
SAFE
TYDE
VICE
SCO
RREC
T USE
OF TH
E CAR
WAR
NING
LIGHT
S AND
MESS
AGES
IN A
NEM
ERGE
NCY
CAR
MAIN
TENA
NCE
TECHN
ICAL
SPEC
IFICA
TIONS
INDE
XDA
SHBO
ARD
AND
CONT
ROLS
Day
Year MonthEnglish
Español
Deutsch
Français Português
Italiano
Polski
Nederland
Example:
fig. 22
Example:
MENUESCbriefly press button
Briefly press button MENU ESC to start surfing fromthe standard screen. To surf the menu use buttons + or –.Note For safety reasons, when the car is running, it ispossible to access only the reduced menu (for settingthe “Speed Beep”). When the car is stationary accessto the whole menu is enabled.
F0M1000g
MENUESCbriefly pressbutton
+
–+–
–+
+ –
+ –
––+
+ ++–
–
–
–
+
+
+–
–+
+
–
EXIT MENU
SPEED BEEP RAIN SENSOR
SET TIME
SET DATE
SEE RADIO
AUTOCLOSE
UNITSLANGUAGE
BUZZER VOLUME
BUTTON VOL.
BELT BUZZER (*)
SERVICE
PASSENGER BAG
(*) This function can be only displayed after deactivating the S.B.R. system (at Fiat Dealership).
– +
TRIP B DATA

26
SAFE
TYDE
VICE
SCO
RREC
T USE
OF TH
E CAR
WAR
NING
LIGHT
S AND
MESS
AGES
IN A
NEM
ERGE
NCY
CAR
MAIN
TENA
NCE
TECHN
ICAL
SPEC
IFICA
TIONS
INDE
XDA
SHBO
ARD
AND
CONT
ROLS
fig. 23 F0M2050g fig. 24 F0M9000m
fig. 25 F0M0122m
RECONFIGURABLEMULTIFUNCTIONDISPLAY (where provided)
The car can be provided with the recon-figurable multifunction display that showsuseful information, according to the previ-ous settings made, necessary when driving.
INFORMATION ON“STANDARD” SCREEN fig. 23The standard screen shows the followingindications:A ClockB DateC Sport function indication (where pro-
vided)D Odometer (covered km or miles)E Indications about car conditions (e.g.:
doors open, or possible presence of iceon road, etc. ...)
F Headlight aiming position (only withdipped beam headlights on)
G External temperatureWhen rotating the ignition key to MARposition, the display shows, as mainscreen, the indication of the date fig. 23or the overpressure of the turbo-charg-er fig. 24 according to the previous se-lection in the menu item “First screen”(“Date” or “Engine Info”).
CONTROL BUTTONS fig. 25
+ To scroll the display and the relatedoptions upwards or to increase thevalue displayed.
MENU Press briefly to displayESC the menu and/or to go to next
screen or to confirm the re-quired menu option.
Long press to go back to the standardscreen.– To scroll the display and the related
options downwards or to decreasethe value displayed.
Note Buttons + and – activate differentfunctions according to the following situ-ations:
– to scroll the menu options upwards anddownwards;
– to increase or to decrease values duringsettings.
Note When opening one of the frontdoors the display will show for a few sec-onds the clock and covered km or miles.

27
SAFE
TYDE
VICE
SCO
RREC
T USE
OF TH
E CAR
WAR
NING
LIGHT
S AND
MESS
AGES
IN A
NEM
ERGE
NCY
CAR
MAIN
TENA
NCE
TECHN
ICAL
SPEC
IFICA
TIONS
INDE
XDA
SHBO
ARD
AND
CONT
ROLSSETUP MENU fig. 25
The menu comprises a series of functionsarranged in a “circular fashion” which canbe selected through buttons + and – toaccess the different select operations andsettings (setup) given in the following para-graphs. For certain options (Hour andUnit) a submenu is provided.The setup menu can be activated by press-ing briefly button MENU ESC.Single presses on buttons + or – will scrollthe setup menu options.Handling modes differ with each other ac-cording to the characteristic of the optionselected.
Selecting an option of the main menu with-out submenu:– press briefly button MENU ESC to se-lect the main menu option to set;– press buttons + or – (by single press-es) to select the new setting;– press briefly button MENU ESC tostore the new setting and to go back tothe main menu option previously select-ed.
Selecting “Set Date” and “Set time”:– briefly press button MENU ESC to se-lect the first value to change (e.g. hours/minutes or year / month / day);– press buttons + or – (by single press-es) to select the new setting;– briefly press button MENU ESC to storethe new setting and to go to the next set-up menu option, if this is the last one youwill go back to the previously selected op-tion of the main menu.
Press button MENU ESC for long:– to quit the set up menu if you are in themain menu;– to quit the main menu if you are at an-other point of the menu (e.g.: at submenuoption setting level, at submenu level orat main menu option setting level);– to save only the settings stored yet (andconfirmed by pressing button MENUESC).The setup menu displaying is timed; whenquitting the menu due to timing expiry,only settings stored yet by the user (andconfirmed by pressing briefly buttonMENU ESC) will be saved.
Selecting an option of the main menu withsubmenu:– press briefly button MENU ESC to dis-play the first submenu option;– press buttons + or – (by single press-es) to scroll all the submenu options;– press briefly button MENU ESC to se-lect the displayed submenu option and toopen the relevant setup menu;– press buttons + or – (by single press-es) to select the new setting for this sub-menu option;– press briefly button MENU ESC tostore the new setting and to go back tothe previously selected submenu option.

28
SAFE
TYDE
VICE
SCO
RREC
T USE
OF TH
E CAR
WAR
NING
LIGHT
S AND
MESS
AGES
IN A
NEM
ERGE
NCY
CAR
MAIN
TENA
NCE
TECHN
ICAL
SPEC
IFICA
TIONS
INDE
XDA
SHBO
ARD
AND
CONT
ROLS
Example:Day
Year MonthEnglish
Portugês
Español
Français
Deutsch
Italiano
BELT BUZZER
RAIN SENSOR (where provided)
TRIP B DATA
SET DATE
FIRST PAGE
SEE RADIO
AUTOCLOSEUNITS
LANGUAGE
BUZZER VOLUME
BUTTON VOL.
MODEbriefly press button
MENUESCbriefly press button
fig. 26
SERVICE
F0M1034g
SET TIME
SPEED BEEP EXIT MENU
PASSENGER AIRBAG
Nederlands
Briefly press button MENU ESC to start surfing from the stan-dard screen. To surf the menu use buttons + or –. Note Forsafety reasons, when the car is running, it is possible to accessonly the reduced menu (for setting “Dimmer” and “Speed Beep”).When the car is stationary access to the whole menu is enabled.On cars provided with Connect Nav+ many functions are dis-played on the navigator display.

29
SAFE
TYDE
VICE
SCO
RREC
T USE
OF TH
E CAR
WAR
NING
LIGHT
S AND
MESS
AGES
IN A
NEM
ERGE
NCY
CAR
MAIN
TENA
NCE
TECHN
ICAL
SPEC
IFICA
TIONS
INDE
XDA
SHBO
ARD
AND
CONT
ROLS
– briefly press button MENU ESC to goback to the menu screen or press the but-ton for long to go back to the standardscreen without storing settings.To cancel the setting, proceed as follows:
– briefly press button MENU ESC: (On)will flash on the display;
– press button –: (Off) will flash on the dis-play;
– briefly press button MENU ESC to goback to the menu screen or press the but-ton for long to go back to the standardscreen without storing settings.
Rain sensor sensitivity adjustment(Rain sensor) (where provided)
With this function it is possible to adjustthe rain sensor sensitivity according to 4levels.
To set the required sensitivity level pro-ceed as follows:
– briefly press button MENU ESC, thepreviously set sensitivity “level” will flashon the display;
Speed limit (Speed Beep)
With this function it is possible to set thecar speed limit (km/h or mph); when thislimit is exceeded the driver is immediate-ly alerted (see section “Warning lights andmessages”).
To set the speed limit, proceed as follows:
– briefly press button MENU ESC, thedisplay will show the wording (SpeedBeep);
– press button + or – to select speed lim-it activation (On) or deactivation (Off);
– if the function has been activated (On),press buttons + or – to select the re-quired speed limit and then press MENUESC to confirm.
Note The possible setting is between 30 and200 km/h, or between 20 and 125 mph de-pending on the unit set previously (see para-graph “Setting the distance unit (Units)”) de-scribed later. Every press on button + / – in-creases/decreases by 5 units. Keeping thebutton + / – pressed obtains the automaticfast increase or decrease. When you arenear the required setting complete adjust-ment by single presses.
– press button + or – for setting;
– briefly press button MENU ESC to goback to the menu screen or press the but-ton for long to go back to the standardscreen without storing settings.
Trip B On/Off (tripB data)
Through this option it is possible to acti-vate (On) or deactivate (Off) the Trip B(partial trip).
For further information see “Trip com-puter”.
For activation / deactivation, proceed asfollows:
– briefly press button MENU ESC: (On)or (Off) will flash on the display (accord-ing to previous setting);
– press button + or – for setting;
– briefly press button MENU ESC to goback to the menu screen or press the but-ton for long to go back to the standardscreen without storing settings.
DISPLAY FUNCTIONS (see Multifunctional Display or Reconfigurable Multifunctional Display)

30
SAFE
TYDE
VICE
SCO
RREC
T USE
OF TH
E CAR
WAR
NING
LIGHT
S AND
MESS
AGES
IN A
NEM
ERGE
NCY
CAR
MAIN
TENA
NCE
TECHN
ICAL
SPEC
IFICA
TIONS
INDE
XDA
SHBO
ARD
AND
CONT
ROLS Set date (Set Date)
This function enables to update the date(day - month - year).To correct the date proceed as follows:– briefly press button MENU ESC: “day”will flash on the display;– press button + or – for setting;– briefly press button MENU ESC:“month” will flash on the display;– press button + or – for setting;– briefly press button MENU ESC:“year” will flash on the display;
– press button + or – for setting.Note Every press on button + or – in-creases/decreases by 1 unit. Keeping thebutton pressed obtains automatic fast in-crease or decrease. When you are nearthe required setting complete adjustmentby single presses.– briefly press button MENU ESC to goback to the menu screen or press the but-ton for long to go back to the standardscreen without storing settings.
Set clock (Set time)This function enables to set the clockthrough two sub-menus: “Time” and“Mode”.Proceed as follows:– briefly press button MENU ESC, thedisplay will show the two sub-menus“Time” and “Mode”;– press button + or – to surf the two sub-menus;– select the required option and thenpress button MENU ESCbriefly;– if selecting “Time”, briefly press buttonMENU ESC, “hours” will flash on thedisplay;– press button + or – for setting;– briefly press button MENU ESC, “min-utes” will flash on the display;– press button + or – for setting;– if selecting “Mode”: briefly press buttonMENU ESC , “24h” or “12h” mode willflash on the display;– press button + or – to select “24h” or“12h”. After setting, briefly press button MENUESC to go back to the submenu screenor press the button for long to go back tothe main menu screen without storing set-tings. – Press again button MENU ESC for longto go back to the standard screen or tothe main menu according to the currentmenu level displayed.
First screen (information displayedin the main screen) (where provided)
This function enables to select the type ofinformation displayed in the main screen.It is possible to display the date or thepressure of the turbo-compressor.
To select one of the two items, proceedas follows:– push the button MENU ESC for ashort time, “First screen” is displayed;– press again the button MENU ESC fora short time to display the “Date” and“Engine Info” options;– press + or – to select the type of infor-mation to be displayed in the main screen;– press MENU ESC for a short time tostore the selection and return to the pre-vious screen or press the button for alonger time to return to the standardscreen without storing the selection.
Rotating the ignition key on MAR, the re-configurable multifunctional display, afterthe start-up check, displays the previous-ly set information using the “First screen”function of the menu.

31
SAFE
TYDE
VICE
SCO
RREC
T USE
OF TH
E CAR
WAR
NING
LIGHT
S AND
MESS
AGES
IN A
NEM
ERGE
NCY
CAR
MAIN
TENA
NCE
TECHN
ICAL
SPEC
IFICA
TIONS
INDE
XDA
SHBO
ARD
AND
CONT
ROLSAutomatic door locking with car
running (Autoclose)
When activated (On), this function locksautomatically the doors when the carspeed exceeds 20 km/h.
To activate (On) or to deactivate (Off) thisfunction proceed as follows:
– briefly press button MENU ESC to goback to the sub-menus;
– briefly press button MENU ESC: (On)or (Off) will flash on the display (accord-ing to previous setting);
– press button + or – for setting;
– briefly press button MENU ESC to goback to the submenu screen or press thebutton for long to go back to the mainmenu screen without storing settings;
– press again button MENU ESC for longto go back to the standard screen or tothe main menu according to the currentmenu level displayed.
Audio repetition (See radio)With this function the display repeats in-formation relevant to the sound system.– Radio: selected radio station frequencyor RDS message, automatic tuning acti-vation or AutoSTore;– audio CD, MP3 CD: track number;– CD Changer: CD number and tracknumber;To activate (On) or to deactivate (Off)sound system info displaying proceed asfollows:– briefly press button MENU ESC: (On)or (Off) will flash on the display (accord-ing to previous setting);
– press button + or – for setting;
– briefly press button MENU ESC to goback to the menu screen or press the but-ton for long to go back to the standardscreen without storing settings.
Set unit (Units)
With this function it is possible to set theunits through three sub-menus: “Distances”,“Consumption” and “Temperature”.
To set the required unit proceed as follows:
– briefly press button MENU ESC to dis-play the three sub-menus;
– press button + or – to surf the three sub-menus;
– select the required sub-menu and thenpress briefly button MENU ESC;
– if selecting “Distances”: briefly press buttonMENU ESC, the display will show “km”or “mi” (according to previous setting);
– press button + or – for setting;
– if selecting “Consumption”: briefly press but-ton MENU ESC, the display will show“km/l”, “l/100km” or “mpg” (according toprevious setting);

32
SAFE
TYDE
VICE
SCO
RREC
T USE
OF TH
E CAR
WAR
NING
LIGHT
S AND
MESS
AGES
IN A
NEM
ERGE
NCY
CAR
MAIN
TENA
NCE
TECHN
ICAL
SPEC
IFICA
TIONS
INDE
XDA
SHBO
ARD
AND
CONT
ROLS Selecting the language (Language)
Display messages can be shown in differ-ent languages: Italiano, Deutsch, English,Español, Français, Português, Polski andNederland.
To set the required language proceed asfollows:
– briefly press button MENU ESC: thepreviously set “language” “ will flash on thedisplay;
– press button + or – for setting;
– briefly press button MENU ESC to goback to the menu screen or press the but-ton for long to go back to the standardscreen without storing settings.
Adjusting the failure/warningbuzzer volume (Buzzer Volume)
With this function the volume of thebuzzer accompanying any failure/warningindication can be adjusted according to 8levels.
To adjust the volume proceed as follows:
– briefly press button MENU ESC: thepreviously set volume “level” will flash onthe display;
– press button + or – for setting;
– briefly press button MENU ESC to goback to the menu screen or press the but-ton for long to go back to the standardscreen without storing settings.
If the distance unit set is “km” the fuel con-sumption unit will be displayed in km/l orl/100km.
If the distance unit set is “mi” the fuel con-sumption unit will be displayed in “mpg”.
– press button + or – for setting;
– if selecting “Temperature”: briefly press but-ton MENU ESC, the display will show“°C” or “°F” (according to previous setting);
– press button + or – for setting;
– briefly press button MENU ESC to goback to the menu screen or press the but-ton for long to go back to the standardscreen without storing settings.
After setting, briefly press button MENUESC to go back to the submenu screenor press the button for long to go back tothe main menu screen without storing set-tings.
– Press again button MENU ESC for longto go back to the standard screen or tothe main menu according to the currentmenu level displayed.
33
SAFE
TYDE
VICE
SCO
RREC
T USE
OF TH
E CAR
WAR
NING
LIGHT
S AND
MESS
AGES
IN A
NEM
ERGE
NCY
CAR
MAIN
TENA
NCE
TECHN
ICAL
SPEC
IFICA
TIONS
INDE
XDA
SHBO
ARD
AND
CONT
ROLSAdjusting the button volume
(Button Vol.)
With this function the volume of theroger-beep accompanying the activationof buttons MENU ESC, + and – can beadjusted according to 8 levels.
To adjust the volume proceed as follows:
– briefly press button MENU ESC: thepreviously set volume “level” will flash onthe display;
– press button + or – for setting;
– briefly press button MENU ESC to goback to the menu screen or press the but-ton for long to go back to the standardscreen without storing settings.
S.B.R. buzzer reactivation (Belt Buzzer)
This function can be only displayed afterFiat Dealership has deactivated the S.B.R.system (see paragraph “S.B.R. system” insection “Safety devices”).
Scheduled Servicing (Service)
Through this function it is possible to dis-play information connected to proper carservicing.
Proceed as follows:
– briefly press button MENU ESC: ser-vice in km or mi, according to previoussetting, will be displayed (see paragraph“Units”);
– briefly press button MENU ESC to goback to the menu screen or press the but-ton for long to go back to the standardscreen.
Note The “Service schedule” includes carmaintenance every 30,000 km (or 18,000mi); this is shown automatically, with theignition key at MAR, starting from 2,000km (or 1,240 mi) from this deadline andit is shown again every 200 km (or 124mi). Below 200 km servicing indicationsare displayed more frequently. Service in-dications will be displayed km or mi ac-cording to previous unit setting. When aprogrammed maintenance interval(coupon) is near to come, turning the ig-nition key to MAR, the display will showthe message “Service” followed by thenumber of km/mi to go before car servic-ing. Contact a Fiat Dealership to carry outany service operation provided by the“Service schedule” and to reset the dis-play.

34
SAFE
TYDE
VICE
SCO
RREC
T USE
OF TH
E CAR
WAR
NING
LIGHT
S AND
MESS
AGES
IN A
NEM
ERGE
NCY
CAR
MAIN
TENA
NCE
TECHN
ICAL
SPEC
IFICA
TIONS
INDE
XDA
SHBO
ARD
AND
CONT
ROLS Front passenger’s air bag
and side bag (where provided)activation/deactivation (Passenger Bag)
This function shall be used to activate/deactivate the front passenger’s air bag.
Proceed as follows:
❒ press button MENU ESC and, afterdisplaying of messages (Bag pass: Off)(to deactivate) or (Bag pass: On) (to ac-tivate) by pressing buttons + and –,press again button MENU ESC;
❒ display will show the confirmation mes-sage;
❒ press buttons + or – to select (Yes) (toconfirm activation/deactivation) or(No) (to abort);
❒ briefly press button MENU ESC todisplay the confirmation message andto go back to the menu screen or pressthe button for long to go back to thestandard screen without storing set-tings.
MENU ESC
MENU ESC
MENU ESC
–+
–+
–+
–+
F0M
1009
g
F0M
1011
g
F0M
1010
gF0
M10
13g
F0M
1014
g
F0M
1009
g
F0M
1015
g
F0M
1016
g
F0M
1009
g
MENU ESC
F0M
1035
gF0
M10
36g
+–
F0M
1037
g
MENU ESC+–

35
SAFE
TYDE
VICE
SCO
RREC
T USE
OF TH
E CAR
WAR
NING
LIGHT
S AND
MESS
AGES
IN A
NEM
ERGE
NCY
CAR
MAIN
TENA
NCE
TECHN
ICAL
SPEC
IFICA
TIONS
INDE
XDA
SHBO
ARD
AND
CONT
ROLSTRIP COMPUTER
General features
The “Trip computer” displays information(with ignition key at MAR), relating to theoperating status of the car. This functioncomprises two separate and independenttrips: “Trip A” and “Trip B” concerningthe “complete mission” of the car (jour-ney).
Both functions are resettable (reset - startof new mission).
“Trip A” shall be used to display the fig-ures relating to:
– Range
– Trip distance
– Average consumption
– Instant consumption
– Average speed
– Travel time (driving time).
“Trip B”, available on multifunction displayonly, shall be used to display the figuresrelating to:
– Trip distance B
– Average consumption B
– Average speed B
– Travel time B (driving time).
Note “Trip B” function can be excluded(see paragraph “Trip B On/Off”). “Range”and “Instant consumption” cannot be re-set.
Values displayed
Range
This value shows the distance in km (ormi) that the car can still cover before needing fuel, assuming that driving condi-tions are kept unvaried. The display willshow “----” in the following cases:
– value lower than 50 km (or 30 mi)
– car left parked with engine running forlong.
Trip distance
This value shows the distance coveredfrom the start of the new mission.
Exit Menu
This is the last function that closes the cir-cular setting cycle listed in the initial menuscreen.
Briefly press button MENU ESC to goback to the standard screen without stor-ing settings.
Press button – to return to the first menuoption (Speed Beep).

36
SAFE
TYDE
VICE
SCO
RREC
T USE
OF TH
E CAR
WAR
NING
LIGHT
S AND
MESS
AGES
IN A
NEM
ERGE
NCY
CAR
MAIN
TENA
NCE
TECHN
ICAL
SPEC
IFICA
TIONS
INDE
XDA
SHBO
ARD
AND
CONT
ROLS Average consumption
This value shows the average consump-tion from the start of the new mission.
Instant consumption
This value shows instant fuel consumption(this value is updated second by second).If parking the car with engine on, the display will show “----”.
Average speed
This value shows the car average speed asa function of the overall time elapsed sincethe start of the new mission.
Travel time
This value shows the time elapsed sincethe start of the new mission.
IMPORTANT Lacking information, Tripcomputer values are displayed with “----”.When normal operating condition is re-set, calculation of different units willrestart regularly. Values displayed beforethe failure will not be reset.
fig. 26 F0M0124m
TRIP button fig. 26Button TRIP, set on the top of the rightsteering column stalk, shall be used (withignition key at MAR) to display and to re-set the previously described values to starta new mission:– short push to display the different val-ues– long push to reset and then start a newmission.
New mission
Reset can be:– “manual” resetting by the user, by press-ing the relevant button;– “automatic” resetting, when the “Trip dis-tance” reaches 3999.9 km or 9999.9 km(according to the type of display) or whenthe “Travel time” reaches 99.59 (99 hoursand 59 minutes);– after disconnecting/reconnecting thebattery.
IMPORTANT The reset operation in thepresence of the screens concerning the“Trip A” makes it possible to reset onlythe information associated with this func-tion.
IMPORTANT The reset operation in thepresence of the screens concerning the“Trip B” makes it possible to reset onlythe information associated with this func-tion.
Start of journey procedure
With ignition key at MAR, press and keepbutton TRIP pressed for over 2 secondsto reset.
Exit Trip
To quit the Trip function: keep buttonMENU ESC pressed for over 2 seconds.

37
SAFE
TYDE
VICE
SCO
RREC
T USE
OF TH
E CAR
WAR
NING
LIGHT
S AND
MESS
AGES
IIN A
NEM
ERGE
NCY
CAR
MAIN
TENA
NCE
TECHN
ICAL
SPEC
IFICA
TIONS
INDE
XDA
SHBO
ARD
AND
CONT
ROLS
Seat height adjustment (where provided) fig. 27
Move lever B upwards or downwards toachieve the required height.
IMPORTANT Adjustment must be car-ried out only seated in the relevant seat.
Back rest angle adjustment fig. 27
Turn knob C.
FRONT SEATS
fig. 27 F0M0055m
Only make adjustmentswhen the car is stationary.
WARNING
Moving the seat backwards orforwards fig. 27
Lift the lever A and push the seat forwardsor backwards: in the driving position thearms should rest on the rim of the steer-ing wheel.
Once you have released thelever, check that the seat is
firmly locked in the runners by tryingto move it back and forth. Failure tolock the seat in place could result inthe seat moving suddenly and the dri-ver losing control of the car.
WARNING
For maximum safety, keepthe back of your seat up-
right, lean back into it and make surethe seat belt fits closely across yourchest and hips.
WARNING
Upholstery of your car hasbeen designed to withstandwear deriving from commonuse of the car. You are how-
ever recommended to avoid strongand/or continuous scratching withclothing accessories such as metallicbuckles, studs, Velcro fastenings andthe like, since these items cause cir-cumscribed stress of the cover fabricthat could lead to yarn breaking, anddamage the cover as a consequence.
fig. 28 F0M0057m
Tilting the back rest (3-door versions) fig. 28
Pull handle A upwards, the back rest willtilt and the seat can slide forward by push-ing the back rest.
Bringing back the back rest the seat willreturn to its original position (mechani-cal memory).
Check that the seat is firm-ly locked in the runners by
trying to move it back and forth.
WARNING

Seat warming (where provided) fig. 30
With ignition key at MAR, press buttonF to switch the seat warming on/off. Theled on the button will light up when thefunction is on.
REAR SEATS
To tilt rear seats refer to paragraph “Ex-tending the boot” in this section.
fig. 30 F0M0058m
Upholstery of your car hasbeen designed to withstandwear deriving from commonuse of the car. You are how-
ever recommended to avoid strongand/or continuous scratching withclothing accessories such as metallicbuckles, studs, Velcro fastenings andthe like, since these items cause cir-cumscribed stress of the cover fabricthat could lead to yarn breaking, anddamage the cover as a consequence.
38
SAFE
TYDE
VICE
SCO
RREC
T USE
OF TH
E CAR
WAR
NING
LIGHT
S AND
MESS
AGES
IN A
NEM
ERGE
NCY
CAR
MAIN
TENA
NCE
TECHN
ICAL
SPEC
IFICA
TIONS
INDE
XDA
SHBO
ARD
AND
CONT
ROLS
fig. 29 F0M0231m
Electric lumbar adjustment (where provided) fig. 29
For electric lumbar adjustment, use con-trols E.

39
SAFE
TYDE
VICE
SCO
RREC
T USE
OF TH
E CAR
WAR
NING
LIGHT
S AND
MESS
AGES
IIN A
NEM
ERGE
NCY
CAR
MAIN
TENA
NCE
TECHN
ICAL
SPEC
IFICA
TIONS
INDE
XDA
SHBO
ARD
AND
CONT
ROLSHEAD RESTRAINTS
FRONT fig. 31
On certain versions head restraints are ad-justable in height and they lock automati-cally in the required position.
To adjust head restraints proceed as fol-lows:
❒ to raise: raise the head restraint untilhearing the locking click.
❒ to lower: press button A and lower thehead restraint.
To lift out front head restraints: press atthe same time buttons A and B set onboth sides and take them out.
REAR (where provided) fig. 32
To use the head restraint, raise it until hear-ing the click (position of use).
To bring it back to the original position(position of non use), press button A andpush the head restraint down into theback rest.
To lift out rear head restraints: press atthe same time buttons A and B set onboth sides and take them out.
IMPORTANT Rear seat passengers shallalways set the head restraints in the po-sition of use.
fig. 31 F0M0025m fig. 32 F0M0026m
To optimise head restraint protective ac-tion, adjust the seat back upright and keepyour head as close as possible to the headrestraint.
Remember that the head re-straints should be adjusted
to support the back of your head andnot your neck. Only in this positiondo they exert their protective action.
WARNING

40
SAFE
TYDE
VICE
SCO
RREC
T USE
OF TH
E CAR
WAR
NING
LIGHT
S AND
MESS
AGES
IN A
NEM
ERGE
NCY
CAR
MAIN
TENA
NCE
TECHN
ICAL
SPEC
IFICA
TIONS
INDE
XDA
SHBO
ARD
AND
CONT
ROLS REARVIEW MIRRORS
DRIVING MIRROR fig. 34/a
The mirror is fitted with a safety devicethat causes it to be released in the eventof a violent crash.
STEERING WHEEL
The driver can adjust the steering wheelposition both axially and in height.
Proceed as follows:
❒ release the lever A-fig. 33 pushing itforwards (position 1);
❒ adjust the steering wheel as required;
❒ lock the lever A pulling it towards thesteering wheel (position 2).
fig. 33 F0M0354m
Any adjustment of the steer-ing wheel position must be
carried out only with the car station-ary and the engine turned off.
WARNING
It is absolutely forbidden tocarry out whatever after-
market operation involving steeringsystem or steering column modifica-tions (e.g.: installation of anti-theftdevice) that could badly affect per-formance and safety, cause the lapseof warranty and also result in non-compliance of the car with homolo-gation requirements.
WARNING

41
SAFE
TYDE
VICE
SCO
RREC
T USE
OF TH
E CAR
WAR
NING
LIGHT
S AND
MESS
AGES
IIN A
NEM
ERGE
NCY
CAR
MAIN
TENA
NCE
TECHN
ICAL
SPEC
IFICA
TIONS
INDE
XDA
SHBO
ARD
AND
CONT
ROLS
DOOR MIRRORS
Adjustment fig. 34/b
This operation is only possible with igni-tion key at MAR.
Proceed as follows:
❒ use switch B to select the mirror re-quired (left or right);
fig. 34/a F0M0028m fig. 34/b F0M0030m
It can be moved using the lever A to twodifferent positions: normal or antiglare.
fig. 34/c F0M0250m
❒ to adjust the mirror move the switchC in the four directions;
Folding
When required (for example when themirror causes difficulty in narrow spaces)it is possible to fold the mirror moving itfrom position 1-fig. 34/c to position 2.
When driving the mirrors shallalways be in position 1-fig. 34/c.
As the driver’s door mirror iscurved, it may slightly alter
the perception of distance.
WARNING
Demisting/defrosting (where provided)
Mirrors are fitted with resistors that willactivate when turning the heated rear win-dow on (by pressing button ().
IMPORTANT This function is timed andit will turn off automatically a few minuteslater.

42
SAFE
TYDE
VICE
SCO
RREC
T USE
OF TH
E CAR
WAR
NING
LIGHT
S AND
MESS
AGES
IN A
NEM
ERGE
NCY
CAR
MAIN
TENA
NCE
TECHN
ICAL
SPEC
IFICA
TIONS
INDE
XDA
SHBO
ARD
AND
CONT
ROLS
fig. 35
F0M0355m
HEATING AND VENTILATION
1. Fixed upper vent - 2. Central swivel vents - 3. Fixed side vents - 4. Adjustable side vents - 5. Lower vents for front seats - 6. Lower vents for rear seats.

43
SAFE
TYDE
VICE
SCO
RREC
T USE
OF TH
E CAR
WAR
NING
LIGHT
S AND
MESS
AGES
IIN A
NEM
ERGE
NCY
CAR
MAIN
TENA
NCE
TECHN
ICAL
SPEC
IFICA
TIONS
INDE
XDA
SHBO
ARD
AND
CONT
ROLS
CONTROLS fig. 37
Air temperature knob A(mixing hot and cold air)
Red section = hot air
Blue section = cold air
Fan activation /speed adjustmentknob B
p 0 = fan off
1-2-3 = fan speed
4 - = max. fan speed
fig. 37 F0M0035m
fig. 36/a F0M0033m
fig. 36/b F0M0034m
ADJUSTABLE AND SWIVELSIDE AND CENTRAL VENTS fig. 36/a-36/b
A Fixed vent for side windows.
B Side adjustable vents.
C Centre adjustable vents.
Vents A are fixed.
To use vents B and C, operate the rele-vant device to turn them as required.

44
SAFE
TYDE
VICE
SCO
RREC
T USE
OF TH
E CAR
WAR
NING
LIGHT
S AND
MESS
AGES
IN A
NEM
ERGE
NCY
CAR
MAIN
TENA
NCE
TECHN
ICAL
SPEC
IFICA
TIONS
INDE
XDA
SHBO
ARD
AND
CONT
ROLS Air distribution knob C
¶ to convey air to the centre and sidevents;
ß to warm the feet and convey coolerair to the dashboard vents, in inter-mediate temperature conditions;
© to heat with outside harsh tempera-ture: to convey as much air as possi-ble to the feet;
® to warm the feet and at the same timedemist the windscreen;
- for quick windscreen demisting.
Air recirculation on/off button D
Press the button (button led on) to turnair recirculation on.
Press the button (button led off) to turnair recirculation off.
FAST HEATING
For fast heating of the passenger com-partment, proceed as follows:
❒ knob A turned to red section;
❒ turn air recirculation on by pressingbutton D (button led on);
❒ knob C turned to ©;
❒ knob B turned to 4 - (max. fanspeed).
Then use the controls to keep the re-quired comfort conditions and press but-ton D to turn air recirculation off (buttonled off) and to prevent misting up.
IMPORTANT With cold engine, you haveto wait for a few minutes to let the sys-tem fluid reach the operating temperature.
VENTILATION
To ventilate the passenger’s compartmentproperly proceed as follows:
❒ knob A turned to blue section;
❒ turn air recirculation off by pressingbutton D (button led off);
❒ knob C turned to ¶;
❒ knob B turned to the required speed.
WARMING THE PASSENGERCOMPARTMENT
Proceed as follows:
❒ knob A turned to red section;
❒ knob C turned to the required posi-tion;
❒ knob B turned to the required speed.

45
SAFE
TYDE
VICE
SCO
RREC
T USE
OF TH
E CAR
WAR
NING
LIGHT
S AND
MESS
AGES
IIN A
NEM
ERGE
NCY
CAR
MAIN
TENA
NCE
TECHN
ICAL
SPEC
IFICA
TIONS
INDE
XDA
SHBO
ARD
AND
CONT
ROLSFRONT WINDOW FAST
DEMISTING/DEFROSTING (WINDSCREENAND SIDE WINDOWS)
Proceed as follows:
❒ knob A turned to red section;
❒ turn air recirculation off by pressingbutton D (button led off);
❒ knob C turned to -;
❒ knob B turned to 4 - (max. fanspeed).
After demisting/defrosting, operate thecontrols to restore the required comfort.
Window demisting
In the event of considerable outside mois-ture and/or rain and/or considerable dif-ferences in temperature inside and outsidethe passenger compartment, perform thefollowing preventive demisting procedure:
❒ knob A turned to red section;
❒ turn air recirculation off by pressingbutton D (button led off);
❒ turn knob C to - or to ® if the win-dows do not demist;
❒ turn knob B to 2nd speed.
HEATED REAR WINDOW AND DOOR MIRRORDEMISTING/DEFROSTING (where provided) fig. 38
Press button A to start this function;when this function is on the button led ison.
This function is timed and switches off au-tomatically after 20 minutes. To cut outthis function press again button A.
IMPORTANT Do not apply stickers onthe inside of the rear window over theheating filaments to avoid damage thatmight cause it to stop working properly.
fig. 38 F0M0036m

46
SAFE
TYDE
VICE
SCO
RREC
T USE
OF TH
E CAR
WAR
NING
LIGHT
S AND
MESS
AGES
IN A
NEM
ERGE
NCY
CAR
MAIN
TENA
NCE
TECHN
ICAL
SPEC
IFICA
TIONS
INDE
XDA
SHBO
ARD
AND
CONT
ROLS MANUAL CLIMATECONTROL SYSTEM(where provided)
CONTROLS fig. 39
Air temperature knob A(mixing hot and cold air)
Red section = hot air
Blue section = cold air
Fan activation /speed adjustmentknob B
p 0 = fan off
1-2-3 = fan speed
4 - = max. fan speed
AIR RECIRCULATION
Turn this function on by pressing button•, the button led with turn on.
This function is particularly useful whenthe outside air is heavily polluted (in a traf-fic jam, tunnel etc.). However, it is betternot to use it for long periods, especiallyif there several people in the car.
IMPORTANT The inside air recirculationsystem makes it possible to reach the re-quired “heating” or “cooling” conditionsfaster.
Do not use the air recirculation functionon rainy/cold days as it would consider-ably increase the possibility of the win-dows misting inside.

47
SAFE
TYDE
VICE
SCO
RREC
T USE
OF TH
E CAR
WAR
NING
LIGHT
S AND
MESS
AGES
IIN A
NEM
ERGE
NCY
CAR
MAIN
TENA
NCE
TECHN
ICAL
SPEC
IFICA
TIONS
INDE
XDA
SHBO
ARD
AND
CONT
ROLS
Air distribution knob C
¶ to convey air to the centre and sidevents;
ß to warm the feet and convey coolerair to the dashboard vents, in inter-mediate temperature conditions;
© to heat with outside harsh tempera-ture: to convey as much air as possi-ble to the feet;
Air recirculation on/off button D
Press the button (button led on) to turnair recirculation on.
Press the button again (button led off) toturn air recirculation off.
Climate control system on/offbutton E
Press the button (button led on) to turnclimate control system on.
Press the button again (button led off) toturn climate control system off.
fig. 39 F0M0037m
® to warm the feet and at the same timedemist the windscreen;
- for quick windscreen demisting.

48
SAFE
TYDE
VICE
SCO
RREC
T USE
OF TH
E CAR
WAR
NING
LIGHT
S AND
MESS
AGES
IN A
NEM
ERGE
NCY
CAR
MAIN
TENA
NCE
TECHN
ICAL
SPEC
IFICA
TIONS
INDE
XDA
SHBO
ARD
AND
CONT
ROLS VENTILATION
To ventilate the passenger’s compartmentproperly proceed as follows:
❒ knob A turned to blue section;
❒ turn air recirculation off by pressingbutton D (button led off);
❒ knob C turned to¶;
❒ knob B turned to the required speed.
CLIMATE CONTROL (cooling)
For fast cooling of the passenger com-partment, proceed as follows:
❒ knob A turned to blue section;
❒ turn air recirculation on by pressingbutton D (button led on);
❒ knob C turned to ¶;
❒ press button E to turn the climate con-trol system on; the button led E willturn on;
❒ knob B turned to 4 - (max. fanspeed).
Cooling adjustment
❒ turn knob A to the right to raise tem-perature;
❒ turn air recirculation off by pressingbutton D (button led off);
❒ turn knob B to reduce the fan speed.

49
SAFE
TYDE
VICE
SCO
RREC
T USE
OF TH
E CAR
WAR
NING
LIGHT
S AND
MESS
AGES
IIN A
NEM
ERGE
NCY
CAR
MAIN
TENA
NCE
TECHN
ICAL
SPEC
IFICA
TIONS
INDE
XDA
SHBO
ARD
AND
CONT
ROLSWARMING THE PASSENGER
COMPARTMENT
Proceed as follows:
❒ knob A turned to red section;
❒ turn knob C to the required symbol;
❒ turn knob B to the required speed;
FAST HEATING
For fast heating of the passenger com-partment, proceed as follows:
❒ knob A turned to red section;
❒ turn air recirculation on by pressingbutton D (button led on);
❒ knob C turned to ©;
❒ knob B turned to 4 - (max. fanspeed).
Then use the controls to keep the re-quired comfort conditions and press but-ton D to turn air recirculation off (buttonled off).
IMPORTANT With cold engine, you haveto wait for a few minutes to let the sys-tem fluid reach the operating temperature.
FRONT WINDOW FASTDEMISTING/DEFROSTING (WINDSCREENAND SIDE WINDOWS)
Proceed as follows:
❒ knob A turned to red section;
❒ knob B turned to 4- (max. fan speed);
❒ knob C turned to-;
❒ turn air recirculation off by pressingbutton D, button led off.

50
SAFE
TYDE
VICE
SCO
RREC
T USE
OF TH
E CAR
WAR
NING
LIGHT
S AND
MESS
AGES
IN A
NEM
ERGE
NCY
CAR
MAIN
TENA
NCE
TECHN
ICAL
SPEC
IFICA
TIONS
INDE
XDA
SHBO
ARD
AND
CONT
ROLS Window demisting
In the event of considerable outside mois-ture and/or rain and/or considerable dif-ferences in temperature inside and outsidethe passenger compartment, perform thefollowing preventive demisting procedure:
❒ knob A turned to red section;
❒ turn air recirculation off by pressingbutton D, button led off;
❒ turn knob C to - or to ® if the win-dows do not demist;
❒ turn knob B to 2nd speed.
IMPORTANT The climate control systemis very useful to prevent window mistingup in presence of high humidity since it de-humidifies the air.
HEATED REAR WINDOW AND DOOR MIRRORDEMISTING/DEFROSTING (where provided) fig. 40
Press button A to start this function;when this function is on the button led ison.
This function is timed and switches off au-tomatically after 20 minutes. To cut outthis function press again button A.
IMPORTANT Do not apply stickers onthe inside of the rear window over theheating filaments to avoid damage thatmight cause it to stop working properly.
fig. 40 F0M0038m
After demisting/defrosting, operate thecontrols to keep the required comfort.
IMPORTANT The climate control systemis very useful to speed up demisting sinceit dehumidifies the air. Set controls todemisting function and switch on the cli-mate control system by pressing buttonE; the knob led will turn on.

51
SAFE
TYDE
VICE
SCO
RREC
T USE
OF TH
E CAR
WAR
NING
LIGHT
S AND
MESS
AGES
IIN A
NEM
ERGE
NCY
CAR
MAIN
TENA
NCE
TECHN
ICAL
SPEC
IFICA
TIONS
INDE
XDA
SHBO
ARD
AND
CONT
ROLSLOOKING AFTER THE SYSTEM
During winter, the climate control systemmust be turned on at least once a monthfor about 10 minutes. Before summer,have the system checked at a Fiat Deal-ership.
The system is filled withR134a refrigerant which willnot pollute the environmentin the event of leakage. Un-
der no circumstances should R12 fluidbe used as it is incompatible with thesystem components.
IMPORTANT The inside air recirculationsystem makes it possible to reach the re-quired “heating” or “cooling” conditionsfaster.
Do not use the air recirculation functionon rainy/cold days as it would consider-ably increase the possibility of the win-dows misting inside.
AIR RECIRCULATION
Turn this function on by pressing button•, the button led with turn on.
This function is particularly useful whenthe outside air is heavily polluted (in a traf-fic jam, tunnel etc.). However, it is betternot to use it for long periods, especiallyif there are several people in the car.

52
SAFE
TYDE
VICE
SCO
RREC
T USE
OF TH
E CAR
WAR
NING
LIGHT
S AND
MESS
AGES
IN A
NEM
ERGE
NCY
CAR
MAIN
TENA
NCE
TECHN
ICAL
SPEC
IFICA
TIONS
INDE
XDA
SHBO
ARD
AND
CONT
ROLS AUTOMATIC
TWO-ZONECLIMATE CONTROLSYSTEM(where provided)
DESCRIPTION
The car is fitted with a two-zone climatecontrol system which makes it possible toseparately adjust the air temperatures andair distribution on the driver’s side and onthe passenger’s side. Temperature controlis based on the “equivalent temperature”logic, i.e.: the system continuously worksto keep constant the comfort inside thepassenger compartment and to compen-sate any variation of the outside climateconditions, including sunshine detected bya proper sensor provided for the purpose.
The climate control system automaticallycontrols and adjusts the following para-meters and functions:
❒ air temperature at driver/front passen-ger vents;
❒ air distribution at driver/front passen-ger vents;
❒ fan speed (continuous air flow varia-tion);
❒ compressor activation (to cool/dehu-midify air);
❒ air recirculation.
All the above functions can be changedmanually by selecting the required func-tion/s and by changing the set parameters.In this way the automatic control is de-activated; the system will resume auto-matic control only for safety reasons. Man-ual selections prevail over automatic onesand remain in storage until the user de-cides to resume automatic control (pressbutton AUTO), except when the systemcuts in for particular safety conditions. Thecontrol of functions not changed manual-ly remains automatic. The amount of airadmitted to the passenger compartmentdoes not depend on the car speed, sinceit is electronically controlled by the fan.The temperature of the air admitted tothe passenger compartment is always con-trolled automatically according to the tem-peratures set on the driver’s and frontpassenger’s display (except when the sys-tem is off or under certain conditionswhen the compressor is off).
The following parameters and functionscan be set or changed manually:
❒ air temperatures on driver/front pas-senger side;
❒ fan speed (continuous variation);
❒ air distribution on seven levels (dri-ver/front passenger side);
❒ climate control compressor on/off en-able;
❒ monozone/two-zone distribution prior-ity;
❒ fast demisting/defrosting;
❒ air recirculation;
❒ rear heated window;
❒ system deactivation.

53
SAFE
TYDE
VICE
SCO
RREC
T USE
OF TH
E CAR
WAR
NING
LIGHT
S AND
MESS
AGES
IIN A
NEM
ERGE
NCY
CAR
MAIN
TENA
NCE
TECHN
ICAL
SPEC
IFICA
TIONS
INDE
XDA
SHBO
ARD
AND
CONT
ROLS
CONTROLS fig. 41
A button for activating the MONOfunction (alignment of set tempera-tures) driver/passenger;
B climate control compressor on/offbutton;
C air recirculation on/off button;
D display showing climate control systemdata;
E climate control off button;
N AUTO (automatic operation) functionon button and knob for adjusting tem-perature on driver side.
USING THE CLIMATECONTROL SYSTEM
The system can be started in differentways, but it is advisable to press one of theAUTO buttons and then to turn theknobs to set the temperatures requiredon the display.
It is possible to personalise required tem-peratures (driver and passenger) with amaximum difference of 7 °C.
This way the system will start workingcompletely automatically to reach thecomfort temperatures as quickly as pos-sible. The system will set air temperature,quantity and distribution and it will con-trol the air recirculation function and theactivation of conditioner compressor.
fig. 41 F0M0039m
F MAX-DEF function on button (frontwindow fast defrosting/demisting);
G rear window heating on/off button;
H AUTO (automatic operation) functionon button and knob for adjusting tem-perature on passenger side;
I air distribution button on passenger side;
L fan speed increase/decrease;
M Air distribution button on driver side;

54
SAFE
TYDE
VICE
SCO
RREC
T USE
OF TH
E CAR
WAR
NING
LIGHT
S AND
MESS
AGES
IN A
NEM
ERGE
NCY
CAR
MAIN
TENA
NCE
TECHN
ICAL
SPEC
IFICA
TIONS
INDE
XDA
SHBO
ARD
AND
CONT
ROLS During fully automatic operation, the on-
ly manual settings required are the fol-lowing:
❒ MONO, to align the air temperatureand distribution set on the passenger’sside with that on the driver’s side;
❒ • air recirculation, to keep it alwayson or off;
❒- to speed up demisting/defrosting ofwindscreen, side windows, rear windowand door mirrors;
❒( to demist/defrost heated rear win-dow and door mirrors.
During full automatic system operation,you can change at any time set tempera-tures, air distribution and fan speed by us-ing the relevant buttons or knobs: the sys-tem will automatically change its settingsto adjust to the new requirements.
During (FULL AUTO) operation, chang-ing air distribution and/or flow and/orcompressor activation and/or air recircu-lation will make the FULL wording dis-appear. In this way the system will keepon controlling automatically all functions,excluding those changed manually. Fanspeed is the same for every area of thepassenger compartment.
Air temperature adjusting knobs H - NTurning the knobs clockwise or counter-clockwise, respectively highers or lowersthe temperature of the air required re-spectively in the front left zone (knob N) orin the right zone (knob H) of the passengercompartment. Since the system controlstwo zones of the passenger compartment,it is possible to personalise required tem-peratures (driver and passenger) with amaximum difference of 7 °C. The temper-atures set are shown on the displays nearthe relevant knobs. Pressing button A(MONO) automatically aligns the temper-ature on the passenger’s side with that onthe driver’s side; you can therefore set thesame temperature for both zones by turn-ing knob N on driver side. Separate oper-ation of air temperatures and distribution isrestored by turning knobs H or pressingagain button A (MONO) when the buttonled is on.
Turn the knobs fully clockwise or counter-clockwise to engage respectively HI (max-imum heating) or LO (maximum cooling).
To deactivate these two functions, justturn the temperature knob and set the re-quired temperature.
Front air distribution buttons I-M
Pressing these buttons it is possible tochoose manually one of the seven possi-ble air distributions to the passenger com-partment (right or left side):
N Air flow to the windscreen and frontside window vents to demist or de-frost them.
˙ Air flow at central and side dashboardvents to ventilate the chest and theface during the hot season.
O Air flow towards the front and rearlower parts of the passenger com-partment. Due to the natural tenden-cy of heat to spread upwards, this typeof distribution allows heating of thepassenger compartment in the short-est time, also giving a prompt feelingof warmth.

55
SAFE
TYDE
VICE
SCO
RREC
T USE
OF TH
E CAR
WAR
NING
LIGHT
S AND
MESS
AGES
IIN A
NEM
ERGE
NCY
CAR
MAIN
TENA
NCE
TECHN
ICAL
SPEC
IFICA
TIONS
INDE
XDA
SHBO
ARD
AND
CONT
ROLS˙ Splitting of the air flow
O between the vents to the lower partof the passenger compartment(warmest air) and the dashboard cen-tre and side outlets (coolest air). Thisair flow distribution is particularly use-ful in spring and autumn when the sunis shining.
N Splitting of the air flow between O windscreen and front side window
demisting/defrosting vents and thelower part of the passenger compart-ment. This type of air distribution al-lows satisfactory heating of the pas-senger compartment while preventingpossible misting of the windows.
N Splitting of the air flow between ˙ windscreen demisting/defrosting vents
and central and side dashboard vents.This type of air distribution allows sat-isfactory ventilation when the sun isshining.
N Splitting of the air flow between ˙ all car vents.O
During FULL AUTO operation the sys-tem will control automatically air distrib-ution choosing the most appropriate ac-cording to climate conditions. When inFULL AUTO distribution leds are off.
The type of air distribution, when select-ed by hand, is shown by lighting up of therelevant led on the selected button. In thecombined function, pressing a button willactivate the relevant function whereas,pressing a button relevant to an alreadyoperating function will turn off this func-tion and the relevant button led. To re-store automatic air distribution control af-ter a manual selection, press button AU-TO.
When the driver selects air distribution tothe windscreen, also the air distributionon passenger side will be distributed to thewindscreen. The passenger can howeverselect the required air distribution bypressing the relevant buttons.
Fan speed adjusting buttons L
Press button p to increase or to decreasethe fan speed and therefore the amountof air admitted into the passenger com-partment, although keeping the requiredtemperature set.
The fan speed is shown by the lit bars onthe display:
❒ max fan speed = all bars lit;
❒ min fan speed = one bar lit.
The fan can be cut off only if the climatecontrol compressor has been switched offpressing button B.
IMPORTANT To restore automatic fanspeed control after a manual adjustment,press button AUTO.
AUTO buttons (automatic operation) H-N
Pressing the AUTO button (on driverand/or front passenger side) the system au-tomatically adjusts the amount and distri-bution of the air admitted to the passengercompartment, cancelling all the previousmanual adjustments. This condition is in-dicated by the message FULL AUTO onthe front system display. Manual operationof at least one automatic function (air re-circulation, air distribution, fan speed or cli-mate control compressor off) will causeFULL message going off the display. Thismeans that automatic control is not com-plete (except temperature control which isalways automatic).

56
SAFE
TYDE
VICE
SCO
RREC
T USE
OF TH
E CAR
WAR
NING
LIGHT
S AND
MESS
AGES
IN A
NEM
ERGE
NCY
CAR
MAIN
TENA
NCE
TECHN
ICAL
SPEC
IFICA
TIONS
INDE
XDA
SHBO
ARD
AND
CONT
ROLS IMPORTANT Should the system (after
manual settings) be no longer able to guar-antee the required temperature set in thepassenger compartment, the set tempera-ture value will start flashing to indicate thiscondition, after one minute the AUTOmessage will turn off.
To restore system automatic control atany time, after one or more manual ad-justments, press button AUTO.
MONO button (to align settemperatures and air distribution) A
Pressing button MONO automaticallyaligns the temperature on the passengerside with that on the driver side, it istherefore possible to set the same tem-perature and air distribution between thetwo zones by turning the knob on driverside. This function is provided to simplifytemperature adjustment of the whole pas-senger compartment when only the dri-ver is onboard. Separate operation of settemperature and air distribution is re-stored by turning knob H (to set tem-perature on front passenger side) or bypressing again button MONO when thebutton led is on.
Air recirculation on/off button C
Air recirculation works according to thefollowing operating logics:
❒ automatic switching on, by pressing oneof the AUTO buttons and indicated bythe turning on of the AUTO icon on thedisplay near the car outline.
❒ forced switching on (inside air recircu-lation always on), indicated by the turn-ing off of the button led C and symbolí on the display;
❒ forced switching off (air recirculationalways off with air inlet from the out-side), indicated by the turning off of thebutton led and symbol êon the dis-play. Forced recirculation on/off can beselected through button C.
IMPORTANT The inside air recirculationsystem makes it possible to reach the re-quired heating or cooling conditions faster.
It is however inadvisable to use it onrainy/cold days as it would considerablyincrease the possibility of the windowsmisting inside, especially if the climate con-trol system is off.
When outside temperature is cold, recir-culation is forced to off (outside air inlet)to prevent window misting up.
In automatic operation inside air recircu-lation will be controlled automatically bythe system according to outside environ-mental conditions.
When setting manual recirculation, word-ings FULL and AUTO disappear fromthe display.
It is inadvisable to use air re-circulation on rainy/cold
days as it would considerably increasethe possibility of windows misting upinside.
WARNING

57
SAFE
TYDE
VICE
SCO
RREC
T USE
OF TH
E CAR
WAR
NING
LIGHT
S AND
MESS
AGES
IIN A
NEM
ERGE
NCY
CAR
MAIN
TENA
NCE
TECHN
ICAL
SPEC
IFICA
TIONS
INDE
XDA
SHBO
ARD
AND
CONT
ROLSClimate control compressor on/off
button B
Pressing button √ when the button ledis on, will deactivate compressor and turnthe button led off. Pressing the buttonwhen the led is off will activate compres-sor and turn the button led on. Whenturning the compressor off, the system willdeactivate air recirculation to prevent win-dow misting up.
In this event, although the system is ableto keep the required temperature, thewording FULL will disappear from thedisplay. If the system is no longer able tokeep the required temperature, temper-ature value will flash and the wording AUTO will disappear from the display.
IMPORTANT With the climate controlcompressor off, it is not possible to admitair to the passenger compartment with atemperature below the outside tempera-ture; moreover, under certain environ-mental conditions, windows could mist upfastly since air is not dehumidified.
The switching off of the climate controlcompressor remains in storage even whenthe engine has been stopped.
To restore automatic control for switch-ing on the climate control compressor,press again button √ or press button AU-TO.
With climate control compressor off ifoutside temperature is higher than the setone the system will not be able to keepthe required condition, the temperature
value will then start to flash on the displayfor a few seconds and wording AUTOwill then go off.
With climate control compressor off, thefan speed can be set to zero manually.
With compressor on and engine running,the fan speed cannot be lower that onebar on the display.
Fast window demisting/defrostingbutton F
Press this button: the climate control sys-tem will automatically switch on all thefunctions required for fast windscreen andfront side window demisting/defrosting,that is:
❒ switches on climate control compres-sor when climatic conditions are suit-able;
❒ air recirculation off;
❒ maximum air temperature HI on bothareas;
❒ activates proper fan speed according toengine coolant temperature to limit theflow into the passenger compartment ofair not warm enough to demist the win-dows;
❒ directs air flow to windscreen and frontside windows vents;
❒ turns heated rear window on.
IMPORTANT Fast demisting/defrostingfunction stays on for about 3 minutes,since engine coolant temperature reach-es the proper temperature.
When the max. demisting/defrosting func-tion is on, the button led and the heatedrear window button led are on.
FULL AUTO wording on the display isoff.
When the max. demisting/defrosting func-tion is on, the only manual operations pos-sible are manual adjustment of the fanspeed and switching heated rear windowoff. Pressing the max. demisting/defrost-ing button or the air recirculation buttonsor compressor off button or the AUTObutton, the system switches off the max.demisting/defrosting function and restoresthe operating conditions of the system pri-or to turning it on.

58
SAFE
TYDE
VICE
SCO
RREC
T USE
OF TH
E CAR
WAR
NING
LIGHT
S AND
MESS
AGES
IN A
NEM
ERGE
NCY
CAR
MAIN
TENA
NCE
TECHN
ICAL
SPEC
IFICA
TIONS
INDE
XDA
SHBO
ARD
AND
CONT
ROLS Heated rear window and door
mirror demisting/defrosting button (where provided) G
Press this button to activate heated rearwindow demisting/defrosting.
When this function is on, the button ledis on.
This function is timed and switches off au-tomatically after about 20 minutes or bypressing again the button or by turning theengine off. It will not be switched on au-tomatically when restarting the engine.
IMPORTANT Do not apply stickers on theinside of the rear window over the heat-ing filaments to avoid damage that mightcause it to stop working properly.
Switching the climate controlsystem off (OFF) E
Press button E to turn the system off.When turned off the system conditionsare the following:
❒ set temperature displays off;
❒ air recirculation is on;
❒ conditioner compressor off;
❒ fan off.
Heated rear window can be turned on oroff also when the system is off.
IMPORTANT The system will store thetemperatures set before turning off andwill resume them when pressing any but-ton (except heated rear window); if thefunction corresponding to the buttonpressed is off it will be turned on; if on itwill be kept active.
Press AUTO to turn the system in au-tomatic mode.
ADDITIONAL HEATER (where provided)
This device shall be used to speed up pas-senger compartment warming when it isvery cold.
The additional heater turns off automati-cally after reaching the required comfortconditions.
Automatic two-zone climatecontrol system
The additional heater will switch on au-tomatically after turning the ignition keyto ON.
Manual Heater and Climatecontrol system
The additional heater will switch on au-tomatically by turning knob A to the lastred sector and turning the fan on (knobB) to the first speed at least.
IMPORTANT Heater works only withlow outside temperature and enginecoolant temperature.
IMPORTANT Heater will not turn on ifthe battery voltage is not sufficient.

59
SAFE
TYDE
VICE
SCO
RREC
T USE
OF TH
E CAR
WAR
NING
LIGHT
S AND
MESS
AGES
IIN A
NEM
ERGE
NCY
CAR
MAIN
TENA
NCE
TECHN
ICAL
SPEC
IFICA
TIONS
INDE
XDA
SHBO
ARD
AND
CONT
ROLSEXTERNAL LIGHTS
The left-hand stalk fig. 42 operates mostof the external lights.
The external lights can only be switchedon when the ignition key is at MAR.
The instrument panel and the differentdashboard controls will come on with theexternal lights.
LIGHTS SWITCHED OFF
Knurled ring turned to symbol O.
SIDELIGHTS
Turn the knurled ring to 6.
The warning light 3 on the instrumentcluster will come on at the same time.
DIPPED BEAM HEADLIGHTS
Turn the knurled ring to 2.
The warning light 3 on the instrumentcluster will come on at the same time.
MAIN BEAM HEADLIGHTS
When the knurled ring is at 2, pull thelever towards the steering wheel (2nd un-stable position).
The warning light 2 on the instrumentcluster will come on at the same time.
To turn the main beams off, pull again thelever towards the steering wheel (dippedbeams will turn on again).
FLASHING THE HEADLIGHTS
Pull the lever towards the steering wheel(1st unstable position) regardless of theposition of the knurled ring. The warninglight 1 on the instrument panel will turnon.
fig. 42 F0M0060m

60
SAFE
TYDE
VICE
SCO
RREC
T USE
OF TH
E CAR
WAR
NING
LIGHT
S AND
MESS
AGES
IN A
NEM
ERGE
NCY
CAR
MAIN
TENA
NCE
TECHN
ICAL
SPEC
IFICA
TIONS
INDE
XDA
SHBO
ARD
AND
CONT
ROLS DIRECTION INDICATORS fig. 43
Push the stalk to (stable) position:
❒ Up (position 1): right-hand direction in-dicator;
❒ Down (position 2): left-hand directionindicator.
Warning light Î or ¥will come on flash-ing on the instrument cluster at the sametime.
Indicators are switched off automaticallywhen the steering wheel is straightened.
If you want the indicator to flash briefly toshow that you are about to change lane,move the stalk up or down without click-ing into position (unstable position). Whenreleased the stalk will return to its homeposition.
“FOLLOW ME HOME” DEVICE
This function allows the illumination of thespace in front of the car for a preset pe-riod of time.
Activation
With the ignition key at STOP or re-moved, pull the left-hand stalk towards thesteering wheel within 2 minutes fromwhen the engine is turned off.
At each single movement of the stalk, thestaying on of the lights is extended by 30seconds up to a maximum of 210 seconds;then the lights are switched off automati-cally.
Each time the lever is operated, the in-strument panel warning light 3will turnon together with a message on the display(see section “Warning lights and mes-sages”) until the function is active. Thewarning light comes on the first time thelever is operated and will stay on up to au-tomatic function deactivation. Each oper-ation of the lever will extend lights switch-ing on time.
Deactivation
Keep the stalk pulled towards the steer-ing wheel for more than 2 seconds.
fig. 43 F0M0061m

61
SAFE
TYDE
VICE
SCO
RREC
T USE
OF TH
E CAR
WAR
NING
LIGHT
S AND
MESS
AGES
IIN A
NEM
ERGE
NCY
CAR
MAIN
TENA
NCE
TECHN
ICAL
SPEC
IFICA
TIONS
INDE
XDA
SHBO
ARD
AND
CONT
ROLSWINDOW WASHING
The right stalk fig. 44 controls windscreenwiper/washer and heated rear windowwiper/washer operation.
WINDSCREEN WASHER/WIPER
The device can only work when the igni-tion key is at MAR.
The stalk ring nut can be moved to fourdifferent positions:O windscreen wiper off;
≤ intermittent;
≥ continuous slow;
¥ continuos fast.
Moving the stalk to A (unstable position)operation is limited to the time the stalkis held in this position. When the stalk isreleased it returns to its original positionautomatically stopping the wiper.
Never use the window wiperto remove ice or snow fromthe windscreen. In these con-ditions, the wiper is submitted
to excessive effort that results in motorprotection cutting in and wiper opera-tion inhibition for few seconds as a con-sequence. If operation is not restored(also after restarting the car by the ig-nition key) contact Fiat Dealership.
With ring nut at ≤, wiping speed is au-tomatically adapted to the car speed.
IMPORTANT Replace wiper blades asspecified in section “Car maintenance”.
fig. 44 F0M0062m

62
SAFE
TYDE
VICE
SCO
RREC
T USE
OF TH
E CAR
WAR
NING
LIGHT
S AND
MESS
AGES
IN A
NEM
ERGE
NCY
CAR
MAIN
TENA
NCE
TECHN
ICAL
SPEC
IFICA
TIONS
INDE
XDA
SHBO
ARD
AND
CONT
ROLS RAIN SENSOR (where provided)
The rain sensor is located behind the dri-ving mirror in contact with the windscreenand has the purpose of automatically ad-just, during the intermittent operation, thefrequency of the windscreen wiperstrokes as to the rain intensity.
IMPORTANT Keep clean the glass in thesensor area.
Activation
Move the right-hand stalk knurled ring to≤ fig. 44.
The activation of the rain sensor is sig-nalled by a control acquisition “stroke”.
Through the set up menu it is possible toincrease the sensitivity of the rain sensor.
The increase of the sensitivity of the rainsensor is signalled by a control and acqui-sition “stroke”.
Operating the windscreen washer withthe rain sensor activated the normal wash-ing cycle is performed at the end of whichthe rain sensor resumes its normal auto-matic function.
Deactivation
Change the stalk knurled ring positionfrom ≤ fig. 44 or turn the ignition keyto STOP.
At next engine starting (key at MAR), thesensor will not be reactivated even if theknurled ring is still at ≤ fig. 44. To ac-tivate the rain sensor you have to movethe knurled ring from ≤ to another po-sition and then again to ≤.
Rain sensor activation will be indicated byat least one wiper “stroke” even if thewindscreen is dry.
The rain sensor is able to recognize andautomatically adjust itself in the presenceof the following particular conditions:
❒ impurities on the controlled surface(salt, dirt, etc.);
❒ difference between day and night.
IMPORTANT Streaks of water may causeunrequired blade moving.
“Smart washing” function
Pulling the stalk towards the steering wheel(unstable position) operates the wind-screen washer.
Keeping the stalk pulled for more than halfa second, with just one movement it ispossible to operate the washer jet and thewiper at the same time.
The wiper stops working three strokes af-ter releasing the stalk.
A further stroke after 6 seconds com-pletes the wiping operation.

63
SAFE
TYDE
VICE
SCO
RREC
T USE
OF TH
E CAR
WAR
NING
LIGHT
S AND
MESS
AGES
IIN A
NEM
ERGE
NCY
CAR
MAIN
TENA
NCE
TECHN
ICAL
SPEC
IFICA
TIONS
INDE
XDA
SHBO
ARD
AND
CONT
ROLS
REAR WINDOW WASHER/WIPERfig. 45
The device can only work when the igni-tion key is at MAR.
Operation will stop when releasing thestalk.
Turning the knurled ring from O to 'willoperate the rear window wiper as follows:
❒ intermittent operation if the wind-screen wiper is off;
❒ synchronised with the windscreenwiper (but with half stroke frequency);
❒ continuous operation with reverse en-gaged and windscreen wiper on .
HEADLIGHT WASHER(where provided) fig. 46
Headlight washers are “retractable”, i.e.:they are located inside the front bumpersand they are activated when (with dippedbeams on) the windscreen washer is op-erated.
IMPORTANT Check at regular intervalscorrect operation and cleanness of noz-zles.
fig. 46 F0M0356m
Never use the rear windowwiper to remove ice or snowfrom the rear window. In theseconditions, the wiper is sub-
mitted to excessive effort that results inmotor protection cutting in and wiperoperation inhibition for few seconds asa consequence. If operation is not re-stored contact Fiat Dealership.
With windscreen wiper on and reversegear engaged, rear window wiping will becontinuous.
Pushing the stalk towards the dashboard(unstable position) will activate the rearwindow washer.
Keeping the stalk pushed for over half asecond will activate also the rear windowwiper.
Releasing the stalk will activate the smartwashing function as described for thewindscreen wiper.
fig. 45 F0M0218m

64
SAFE
TYDE
VICE
SCO
RREC
T USE
OF TH
E CAR
WAR
NING
LIGHT
S AND
MESS
AGES
IN A
NEM
ERGE
NCY
CAR
MAIN
TENA
NCE
TECHN
ICAL
SPEC
IFICA
TIONS
INDE
XDA
SHBO
ARD
AND
CONT
ROLS CRUISE CONTROL
(constant speedregulator)(where provided)
It is a device able to support the driver,with electronic control, which allows dri-ving at speed over 30 km/h on long andstraight dry roads (e.g.: motorways), at adesired speed, without pressing the ac-celerator pedal. Therefore it is not sug-gested to use this device on extra-urbanroads with traffic. Do not use it in town.
DEVICE ENGAGEMENT
Turn knob A-fig. 47 to ON.
The Cruise Control cannot be engagedin first or reverse gear. It is advisable toengage it in 4th or higher gears.
Travelling downhill with the device en-gaged, the car speed may increase morethan the memorised one.
When the device is activated the warn-ing light Ü turns on together with the rel-evant message on the instrument panel(where provided).
TO MEMORISE SPEED
Proceed as follows:
❒ turn knob A-fig. 47 to ON and pressthe accelerator pedal to the requiredspeed;
❒ move the stalk upwards (+) for atleast one second, then release it. Thecar speed is memorised and it istherefore possible to release the ac-celerator pedal.
In the case of need (when overtaking forinstance) acceleration is possible simplypressing the accelerator pedal: releasingthe accelerator pedal, the car will returnto the speed memorised previously.
fig. 47 F0M0064m

65
SAFE
TYDE
VICE
SCO
RREC
T USE
OF TH
E CAR
WAR
NING
LIGHT
S AND
MESS
AGES
IIN A
NEM
ERGE
NCY
CAR
MAIN
TENA
NCE
TECHN
ICAL
SPEC
IFICA
TIONS
INDE
XDA
SHBO
ARD
AND
CONT
ROLSTO RESET THE
MEMORISED SPEED
If the device has been disengaged for ex-ample pressing the brake or clutch pedal,the memorised speed can be reset as fol-lows:
❒ accelerate gradually until reaching aspeed approaching the one memorised;
❒ engage the gear selected at the time ofspeed memorising;
❒ press button RES B-fig. 47.
TO INCREASE THE MEMORISED SPEED
The speed memorised can be increased intwo ways:
❒ pressing the accelerator and then mem-orising the new speed reached;
or
❒ moving the stalk upwards (+).
Each operation of the stalk will corre-spond to a slight increase in speed (about1 km/h), while keeping the stalk upwardswill correspond to a continuous speed in-crease.
TO REDUCE MEMORISED SPEED
The speed memorised can be increased intwo ways:
❒ disengaging the device and then mem-orising the new speed;
or
❒ moving the stalk downwards (–) untilreaching the new speed which will bememorised automatically.
Each operation of the stalk will corre-spond to a slight reduction in speed (about1 km/h), while keeping the stalk down-wards will correspond to a continuousspeed reduction.
DEVICE DISENGAGEMENT
The device can be disengaged in the fol-lowing ways:
❒ turn knob A to OFF;
❒ turning the engine off;
❒ pressing the brake pedal;
❒ pressing the clutch pedal;
❒ pressing the accelerator pedal; in thiscase the system is not really disengagedbut the request for acceleration takespriority over the system. The cruisecontrol is however active and it will notbe necessary to press button RES B-fig. 47 to resume previous conditionsafter ending acceleration.
The device is automatically deactivated inone of the following cases:
❒ ABS or ESP system cut-in;
❒ with car speed below the preset limit;
❒ system failure.
When travelling with the de-vice on, never set the
gearshift lever to neutral.
WARNING
In the event of device mal-function or failure, turn knob
A to OFF and contact a Fiat Dealer-ship.
WARNING

66
SAFE
TYDE
VICE
SCO
RREC
T USE
OF TH
E CAR
WAR
NING
LIGHT
S AND
MESS
AGES
IN A
NEM
ERGE
NCY
CAR
MAIN
TENA
NCE
TECHN
ICAL
SPEC
IFICA
TIONS
INDE
XDA
SHBO
ARD
AND
CONT
ROLS CEILING LIGHTS
FRONT CEILING LIGHT WITHMOVABLE LENS
The light will turn on/off by pressing themovable lens rightwards or leftwards asshown in fig. 48.
FRONT CEILING LIGHT WITHSPOT LIGHTS
Switch A-fig. 49 turn on/off these lights.
With switch A-fig. 49 in central position,lights C and D will turn on/off when open-ing/closing the front doors.
With switch A-fig. 49 pressed on the leftside, lights C and D will always stay off.
With switch A-fig. 49 pressed on the rightside, lights C and D will always stay on.
Light turning on/off is gradual.
Switch B-fig. 49 performs the spot func-tion; with light off, it will turn on:
❒ light C if pressed on the left side;
❒ light D if pressed on the right side.
fig. 49 F0M0065m
IMPORTANT Before getting out of thecar, make sure the switch is at central po-sition: lights off with doors closed in or-der to avoid draining the battery.
In any case, if the switch is left inadver-tently to the On position, the lights willturn off automatically 15 minutes afterturning the engine off.
fig. 48 F0M0067m

67
SAFE
TYDE
VICE
SCO
RREC
T USE
OF TH
E CAR
WAR
NING
LIGHT
S AND
MESS
AGES
IIN A
NEM
ERGE
NCY
CAR
MAIN
TENA
NCE
TECHN
ICAL
SPEC
IFICA
TIONS
INDE
XDA
SHBO
ARD
AND
CONT
ROLSCeiling light timing
On certain versions to facilitate gettingin/out of the car at night or with poorlighting, 2 different timed switching onmodes have been provided.
LIGHT TIMING WHEN GETTING INTO THE CAR
Lights will turn on as follows:
❒ for about 10 seconds when openingfront doors;
❒ for about 3 minutes when opening oneof the side doors;
❒ for about 10 seconds when closing thedoors.
Timing will stop when turning the ignitionkey to MAR.
LIGHT TIMING WHEN GETTING OUT OF THE CAR
After removing the key from the ignitionswitch, the ceiling lights will turn on as fol-lows:
❒ within 2 minutes from turning the en-gine off for about 10 seconds;
❒ when opening one of the side doors forabout 3 minutes;
❒ when closing one of the doors forabout 10 seconds.
Timing will stop automatically when lock-ing the doors.
REAR CEILING LIGHT WITHMOVABLE LENS (where provided)
The light will turn on/off by pressing themovable lens rightwards or leftwards asshown in fig. 50.
fig. 50 F0M0067m

68
SAFE
TYDE
VICE
SCO
RREC
T USE
OF TH
E CAR
WAR
NING
LIGHT
S AND
MESS
AGES
IN A
NEM
ERGE
NCY
CAR
MAIN
TENA
NCE
TECHN
ICAL
SPEC
IFICA
TIONS
INDE
XDA
SHBO
ARD
AND
CONT
ROLS
COURTESY LIGHTS (where provided) fig. 53
On certain versions on the back of thepassenger's sun visor there is a courtesylight. To turn the light on/off press buttonA-fig. 53.
fig. 51 F0M0068m fig. 53 F0M0173mfig. 52 F0M0176m
BOOT LIGHT(where provided) fig. 51
For versions fitted with boot light, it willturn on automatically when opening thetailgate and it will turn off at closing.
PUDDLE LIGHTS (where provided) fig. 52
These lights A are located in the doorsand they will turn on when opening therelevant door, regardless of the ignitionkey position.

69
SAFE
TYDE
VICE
SCO
RREC
T USE
OF TH
E CAR
WAR
NING
LIGHT
S AND
MESS
AGES
IIN A
NEM
ERGE
NCY
CAR
MAIN
TENA
NCE
TECHN
ICAL
SPEC
IFICA
TIONS
INDE
XDA
SHBO
ARD
AND
CONT
ROLSCONTROLS
HAZARD LIGHTS fig. 54
They turn on by pressing switch A, re-gardless of the position of the ignition key.
When the device is on, the switch is flash-ing and warning lights Î and ¥ on thecluster come on.
Press the switch again to turn the lightsoff.
The use of hazard lights is governed by theHighway Code of the country you are in.Keep to the rules.
FRONT FOG LIGHTS (where provided) fig. 55
To active, with front side lights on, pressbutton 5.
Warning light 5 on the instrument pan-el will turn on.
Press the button again to turn the lightsoff.
The use of front fog lights is governed bythe Highway Code of the country you arein. Keep to the rules.
fig. 54 F0M0069m fig. 55 F0M0070m
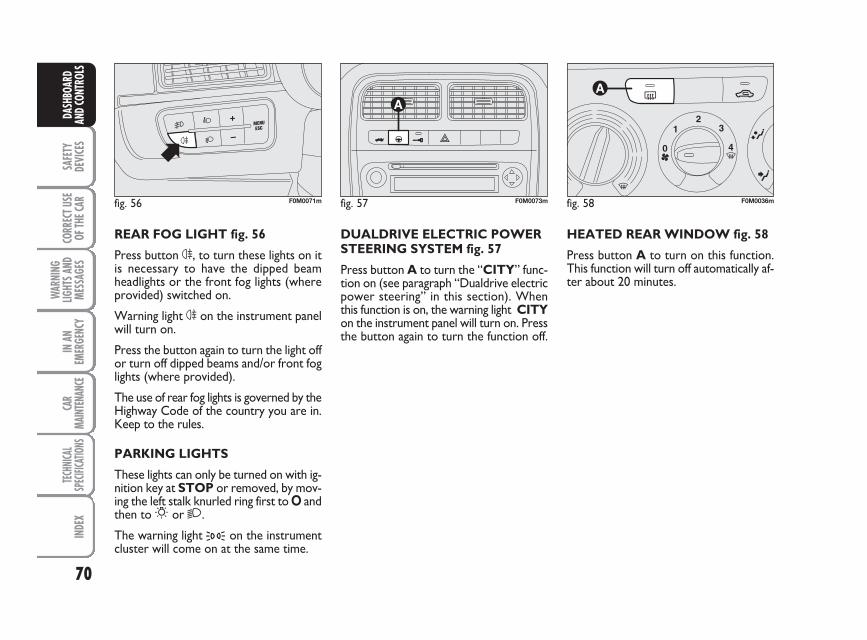
70
SAFE
TYDE
VICE
SCO
RREC
T USE
OF TH
E CAR
WAR
NING
LIGHT
S AND
MESS
AGES
IN A
NEM
ERGE
NCY
CAR
MAIN
TENA
NCE
TECHN
ICAL
SPEC
IFICA
TIONS
INDE
XDA
SHBO
ARD
AND
CONT
ROLS
HEATED REAR WINDOW fig. 58
Press button A to turn on this function.This function will turn off automatically af-ter about 20 minutes.
fig. 58 F0M0036m
DUALDRIVE ELECTRIC POWERSTEERING SYSTEM fig. 57
Press button A to turn the “CITY” func-tion on (see paragraph “Dualdrive electricpower steering” in this section). Whenthis function is on, the warning light CITYon the instrument panel will turn on. Pressthe button again to turn the function off.
fig. 57 F0M0073m
REAR FOG LIGHT fig. 56
Press button 4, to turn these lights on itis necessary to have the dipped beamheadlights or the front fog lights (whereprovided) switched on.
Warning light 4 on the instrument panelwill turn on.
Press the button again to turn the light offor turn off dipped beams and/or front foglights (where provided).
The use of rear fog lights is governed by theHighway Code of the country you are in.Keep to the rules.
PARKING LIGHTS
These lights can only be turned on with ig-nition key at STOP or removed, by mov-ing the left stalk knurled ring first to O andthen to 6 or 2.
The warning light 3 on the instrumentcluster will come on at the same time.
fig. 56 F0M0071m

71
SAFE
TYDE
VICE
SCO
RREC
T USE
OF TH
E CAR
WAR
NING
LIGHT
S AND
MESS
AGES
IIN A
NEM
ERGE
NCY
CAR
MAIN
TENA
NCE
TECHN
ICAL
SPEC
IFICA
TIONS
INDE
XDA
SHBO
ARD
AND
CONT
ROLSDoor unlocking in the event
of a crash
In the event of a crash that triggers the fu-el cut-off switch, the doors will unlock au-tomatically to enable getting into the carand at the same time the passenger’s com-partment lights will turn on. It is howev-er always possible to open the doors fromthe passenger’s compartment by means ofthe internal door handles.
If, after a crash no fuel leaks are found andthe car can be started again, reset the fu-el cut-off switch as specified in the fol-lowing paragraph.
DOOR LOCK fig. 59
To lock all doors at the same time, pressbutton A, located on the central consolecontrol panel, regardless of the positionof the ignition key.
FUEL CUT-OFF SWITCH
The car is fitted with a safety switch thatin the event of a crash comes into opera-tion by cutting off fuel and turning off theengine as a consequence.
This device therefore prevents fuel leaksdue to fuel piping breaking.
IMPORTANT After a crash, remember toremove the electronic key from the igni-tion switch to prevent battery run-down.
Fuel cut-off switch activation is indicatedby the message “FPS on” on the digital dis-play.
On the multifunction display, the message“Fuel cut-off switch on, see Handbook”is displayed.
fig. 59 F0M0013m
If, after a crash, you smell fu-el or see leaks from the fuel
system, do not reset the switch toavoid fine risk.
WARNING
If central door locking hasbeen activated from inside
the car and after a crash the fuel cut-off switch cannot activate automaticdoor unlocking, it will not be possibleto get into the car. In any case, dooropening from the outside depends ondoor conditions after the crash: if adoor is badly damaged it will be im-possible to open it. In this event try toopen one of the other doors.
WARNING

72
SAFE
TYDE
VICE
SCO
RREC
T USE
OF TH
E CAR
WAR
NING
LIGHT
S AND
MESS
AGES
IN A
NEM
ERGE
NCY
CAR
MAIN
TENA
NCE
TECHN
ICAL
SPEC
IFICA
TIONS
INDE
XDA
SHBO
ARD
AND
CONT
ROLS
fig. 62 F0M0077m
fig. 61 F0M0104m
fig. 63 F0M0078m
INTERIOR FITTINGS
GLOVEBOX fig. 61-62
To open the glovebox operate handle A-fig. 61.
Inside the glovebox there is a space A-fig.62 to keep documents.
ODDMENT COMPARTMENTS
Oddment compartment A-fig. 63, is lo-cated on the dashboard, on the left of thesteering wheel.
Resetting the fuel cut-off switch
Before resetting the fuel cut-off switch carefully inspect
the car for fuel leaks.
WARNING
To reset the fuel cut-off switch, press but-ton A-fig. 60.
fig. 60 F0M0174m

73
SAFE
TYDE
VICE
SCO
RREC
T USE
OF TH
E CAR
WAR
NING
LIGHT
S AND
MESS
AGES
IIN A
NEM
ERGE
NCY
CAR
MAIN
TENA
NCE
TECHN
ICAL
SPEC
IFICA
TIONS
INDE
XDA
SHBO
ARD
AND
CONT
ROLS
DOOR POCKETS fig. 66
Document / map pockets are located indoor panels.
FRONT ARMREST WITHODDMENT COMPARTMENT (where provided)
Certain versions are fitted with armrestA-fig. 67 between the front seats.
To use it, push it down as shown in fig. 67.
Press button A-fig. 68 to raise the topof the armrest in order to use space B.Use lever C to tilt down the armrest withrespect to the normal position of use.
fig. 64 F0M0079m
fig. 65 F0M0080m fig. 67 F0M0225m
fig. 68 F0M0245mfig. 66 F0M0081m
Oddment compartment B-fig. 64 is lo-cated in the middle of the dashboard.
Oddment compartment B can be re-moved to install the sound system, if re-quired.
CENTRAL CONSOLE ODDMENTCOMPARTMENT
This compartment A-fig. 65 is located onthe central console in front of the hand-brake.

74
SAFE
TYDE
VICE
SCO
RREC
T USE
OF TH
E CAR
WAR
NING
LIGHT
S AND
MESS
AGES
IN A
NEM
ERGE
NCY
CAR
MAIN
TENA
NCE
TECHN
ICAL
SPEC
IFICA
TIONS
INDE
XDA
SHBO
ARD
AND
CONT
ROLS
CIGAR LIGHTER fig. 72
It is located on the central console in frontof the handbrake.
Press button A to switch on the cigarlighter with ignition key at MAR.
After about 15 seconds the button will re-turn to its initial position and is ready foruse.
IMPORTANT Always check that the cig-ar lighter has turned off.
fig. 72 F0M0084m
The cigar lighter gets veryhot. Handle it with care and
make sure that it is not used by chil-dren: danger of fire and/or burns.
WARNING
GLASS HOLDER - CAN HOLDERfig. 69-70
The central console houses the recesses(two in front of the handbrake and one be-hind it) for glasses, cups or cans.
CARD BOX - CD BOXfig. 71
The central console features recesses tokeep cards or CDS.
fig. 69 F0M0082m fig. 71 F0M0083m
fig. 70 F0M0118m

75
SAFE
TYDE
VICE
SCO
RREC
T USE
OF TH
E CAR
WAR
NING
LIGHT
S AND
MESS
AGES
IIN A
NEM
ERGE
NCY
CAR
MAIN
TENA
NCE
TECHN
ICAL
SPEC
IFICA
TIONS
INDE
XDA
SHBO
ARD
AND
CONT
ROLS
ASHTRAY fig. 73-74
The ashtray is a removable plastic box thatcan be fitted into the glass/can recesses onthe central console.
IMPORTANT Do not use the ashtray aswaste paper basket: it might set on fire incontact with cigarette stubs.
SUN VISORS fig. 75
These are positioned to the sides of therear-view mirror. They can swing to thesides and up or down.
A courtesy mirror can be applied to theback of sun visors.
On certain versions to use the mirror(where provided) you shall open the slid-ing cover A.
MAP POCKET (where provided)
On certain versions a map pocket is lo-cated on the back of the seat backrest fig. 76.
fig. 73 F0M0085m fig. 75 F0M0086m fig. 76 F0M0117m
fig. 77 F0M0249mfig. 74 F0M0116m
CURRENT OUTLET(where provided)
It is located in the boot, on the left side ofthe plastic support of the parcel shelf fig. 77.
To use it open cap A.

76
SAFE
TYDE
VICE
SCO
RREC
T USE
OF TH
E CAR
WAR
NING
LIGHT
S AND
MESS
AGES
IN A
NEM
ERGE
NCY
CAR
MAIN
TENA
NCE
TECHN
ICAL
SPEC
IFICA
TIONS
INDE
XDA
SHBO
ARD
AND
CONT
ROLS SUNROOF SKY-DOME
(where provided)
The sunroof consists of two wide panes(a fixed one and a moving one), fitted withmanually-operated sun curtains. Sun cur-tains can be used in the “wide open” and“wide shut” positions (fixed intermediatepositions are not provided). To open suncurtains: take handle A-fig. 79, release itand then guide it to the “wide open” po-sition as shown by the arrows. To closesun curtains reverse this procedure. Sun-roof only works with ignition key at MAR.Controls A-B fig. 78 set near the frontceiling light on the dedicated control pan-el, shall be used to open/close the sunroof.
To open
Press and keep pressed button B-fig. 78,the front pane will set to the “spoiler” po-sition; press button B-fig. 78 again forover half a second to make the sunroofsliding automatically to the wide open po-sition; press the button to stop the sun-roof at an intermediate position.
To close
When in wide open position, press but-ton A-fig. 78 for over half a second to setthe front pane to the “spoiler” position;press the button again to stop the sunroofat an intermediate position; press buttonA-fig. 78 again and keep it pressed toclose the sunroof completely.
fig. 78
A
B
F0M0087m
Use the sunroof only at“spoiler” position if cross roofracks are fitted.
Do not open the sunroof ifthere is snow or ice on it: itcould be damaged.
When leaving the car, the ig-nition key should be removed
to prevent the sunroof from being op-erated inadvertently and harming any-one remaining in the car. Improper useof the sunroof can be dangerous. Be-fore and during its operation ensurethat any passengers are not at riskfrom the moving roof either by per-sonal objects getting caught in themechanism or by being injured by it di-rectly.
WARNING
fig. 79 F0M0172m

77
SAFE
TYDE
VICE
SCO
RREC
T USE
OF TH
E CAR
WAR
NING
LIGHT
S AND
MESS
AGES
IIN A
NEM
ERGE
NCY
CAR
MAIN
TENA
NCE
TECHN
ICAL
SPEC
IFICA
TIONS
INDE
XDA
SHBO
ARD
AND
CONT
ROLSANTI-CRUSHING SAFETY
SYSTEM
Sunroof is fitted with anti-crushing safetysystem that detects the presence of an ob-stacle during sunroof closing stroke andthat cuts in by stopping and reversing thesunroof stroke.
INITIALISATION PROCEDURE
Sunroof shall be re-initialised after dis-connecting the battery or if the relevantprotection fuse is blown.
Proceed as follows:
❒ press button A-fig. 79 at close posi-tion;
❒ keep the button pressed to close com-pletely by steps the sunroof;
❒ after full closing, wait for sunroof mo-tor stopping.
When leaving the car, the ignition keyshould be removed to prevent the sun-roof from being operated inadvertentlyand harming anyone remaining in the car.Improper use of the sunroof can be dan-gerous. Before and during its operationensure that any passengers are not at riskfrom the moving roof either by personalobjects getting caught in the mechanismor by being injured by it directly.
EMERGENCY OPERATION
If the switch does not work, the sunroofcan be operated manually as follows:
❒ remove the protection cap set betweenthe two sun curtains;
❒ take the setscrew wrench (provided asstandard) from the tool bag in the boot;
❒ fit the wrench into A-fig. 80 and turnit:– clockwise to open the sunroof; – counter-clockwise to close the sun-
roof.
fig. 80 F0M0088m

78
SAFE
TYDE
VICE
SCO
RREC
T USE
OF TH
E CAR
WAR
NING
LIGHT
S AND
MESS
AGES
IN A
NEM
ERGE
NCY
CAR
MAIN
TENA
NCE
TECHN
ICAL
SPEC
IFICA
TIONS
INDE
XDA
SHBO
ARD
AND
CONT
ROLS DOORS
CENTRAL DOORLOCKING/UNLOCKING SYSTEM
Locking from the outside
With the doors closed, press the buttonÁ on the remote control fig. 81 or fit andturn clockwise the metal insert into thedriver’s door lock fig. 82. Door locking isindicated by the turning on of the buttonled A-fig. 83. Door locking is only possi-ble if all the doors are closed. Opening oneor more doors by pressing the button Áon the remote control fig. 81 will makethe direction indicators and the button ledA-fig. 83 flash quickly for about 3 sec-onds.
Opening one or more doors by turningthe metal insert of the key will make on-ly the button led A-fig. 83 flash quicklyfor about 3 seconds. If the doors areclosed but the boot is open door lockingwill be engaged: direction indicators (on-ly for locking performed by pressing but-ton Á fig. 81) and the button led A-fig.83 will flash quickly for about 3 seconds.
With this function active it is however pos-sible to open the other doors by pressingbutton A-fig. 83 on the central console.
Pressing twice briefly the button Á on theremote control fig. 81 will engage thedead lock device (see paragraph “Deadlock device”).
Door unlocking from the outside
Briefly press button Ë fig. 81 to obtainremote door unlocking, timed ceiling lightturning on, directions indicator doubleflashing or fit the metal insert into the dri-ver’s door lock and turn it counter-clock-wise as shown in fig. 82.
fig. 82 F0M0357m
fig. 83 F0M0075m
Door locking/unlocking from theinside
Press button A-fig. 83 to lock/ unlock allthe doors. The button has a led showingthe door condition (locked or unlocked).When doors are locked the button led ison and pressing the button will obtain cen-tral unlocking of the doors and turning offof the led. When doors are unlocked, thebutton led is off and pressing the buttonwill obtain central locking of the doors.Door locking is activated only if all thedoors are perfectly closed.
fig. 81 F0M0220m

79
SAFE
TYDE
VICE
SCO
RREC
T USE
OF TH
E CAR
WAR
NING
LIGHT
S AND
MESS
AGES
IIN A
NEM
ERGE
NCY
CAR
MAIN
TENA
NCE
TECHN
ICAL
SPEC
IFICA
TIONS
INDE
XDA
SHBO
ARD
AND
CONT
ROLSAfter locking doors by:
❒ remote control;
❒ door revolving plug;
it will not be possible to unlock the doorsby pressing button A-fig. 83 set on thedashboard.
IMPORTANT With central locking systemon, pulling the internal door handle of oneof the front doors will unlock that door.Pulling the internal door handle of one of therear doors will unlock the relevant door.
Lacking power (blown fuse, battery discon-nected, etc.) it is however possible to lockthe doors manually.
After exceeding 20 km/h speed, doors willbe locked automatically if the set up menufunction has been selected (see paragraph“Multifunction display” in this section).
Once the dead lock devicehas been actuated, doors
cannot be opened from the passen-ger’s compartment in any way what-soever. For this reason, make surethere are no person left inside the car.If the battery of the key with remotecontrol is down, the dead lock devicecan be deactivated only by fitting themetal insert of the key in both frontdoor revolving plugs as described pre-viously: in this case the dead lock de-vice will stay engaged only on the reardoors.
DEAD LOCK DEVICE (where provided)This safety device enables to inhibit:
❒door internal handles;
❒ locking/unlocking button A-fig. 83;thus hindering doors opening from insidethe passenger’s compartment in case of at-tempt to break-into (e.g.: window breaking).The dead lock device guarantees the bestprotection against unwanted access.Therefore, it should be actuated everytime the car is parked and left unattended.
Device activation
The dead lock device is automatically ac-tivated on every door when pressing twicebriefly the remote control button Á , fig.81.
Device activation is indicated by 3 flashingof direction indicators and flashing of thebutton led A-fig. 83 located on the dash-board.
If one of the doors is not perfectly closed,the dead lock device will not activate, thuspreventing that a person getting into the carfrom the open door remains blocked insidethe passenger’s compartment when she/hecloses the door.
Device deactivation
The device is deactivated automatically onevery door in the following cases:
❒ when opening the driver’s door using thekey without remote control;
❒ when unlocking doors using the remotecontrol;
❒ turning the ignition key to MAR.
WARNING

80
SAFE
TYDE
VICE
SCO
RREC
T USE
OF TH
E CAR
WAR
NING
LIGHT
S AND
MESS
AGES
IN A
NEM
ERGE
NCY
CAR
MAIN
TENA
NCE
TECHN
ICAL
SPEC
IFICA
TIONS
INDE
XDA
SHBO
ARD
AND
CONT
ROLS
REAR DOORS EMERGENCYLOCK DEVICE (5-door versions)fig. 85
Rear doors are fitted with an emergencydevice to lock doors when lacking current.
In this event, proceed as follows:
❒ fit the ignition key into the revolvingplug B;
❒ turn the device from position 2 to po-sition 1 and then close.
When the device is active, to open therear doors use the internal doors handles.
fig. 85 F0M0129m
CHILD LOCK (5-door versions)fig. 84
To prevent opening the rear doors fromthe inside.
This device can be engaged only with reardoors open.
❒ position 1 - engaged (door locked);
❒ position 2 - disengaged (door can beopened from the passenger’s compart-ment).
fig. 84 F0M0128m
The device A-fig. 84 stays on even if thedoors are unlocked by the centralised sys-tem.
Always use this device whentransporting children.
WARNING
After engaging the child lockon both rear doors, check for
proper engagement by trying to opena rear door with the internal handle.
WARNING
Do not activate the childsafety lock device if the rear
door emergency lock device has beenactivated yet.If both safety devices are active: toopen the door again, operate the in-ternal handle to deactivate the reardoor emergency lock device andthen open the door using the exter-nal handle.
WARNING

81
SAFE
TYDE
VICE
SCO
RREC
T USE
OF TH
E CAR
WAR
NING
LIGHT
S AND
MESS
AGES
IIN A
NEM
ERGE
NCY
CAR
MAIN
TENA
NCE
TECHN
ICAL
SPEC
IFICA
TIONS
INDE
XDA
SHBO
ARD
AND
CONT
ROLSPOWER WINDOWS/
WINDOW WINDERS
POWER WINDOWS
The driver’s door armrest features twofig. 87 or (where provided) five fig. 86switches that with key at MAR shall beused:
Automatic continuos operation(where provided)
Versions with 2 front power windows arefitted with automatic window opening/closing on the driver’s side.
Versions with 4 power windows (frontand rear) are fitted with automatic win-dow opening/closing on all doors.
fig. 86 F0M0089m
fig. 87 F0M0136m
A to open/close the left front window;
B to open/close the right front window;
C to open/close the left rear window(where provided);
D to open/close the right rear window(where provided);
E to inhibit rear door controls (whereprovided).

82
SAFE
TYDE
VICE
SCO
RREC
T USE
OF TH
E CAR
WAR
NING
LIGHT
S AND
MESS
AGES
IN A
NEM
ERGE
NCY
CAR
MAIN
TENA
NCE
TECHN
ICAL
SPEC
IFICA
TIONS
INDE
XDA
SHBO
ARD
AND
CONT
ROLS Automatic continuous operation ac-
tivates by pressing control switches forover half a second. The window will stopwhen it is completely open or when press-ing the button again.
Versions with 4 power windows (frontand rear) are fitted with anti-crushing safe-ty device to detect the presence of an ob-stacle in the window closing stroke. If anobstacle is detected, the safety system willstop window closing and, according towindow position, will also reverse windowstroke.
IMPORTANT In the event that the anti-crushing function is activated 5 times inonly 1 minute, the system will automati-cally enter the “recovery” mode (self-pro-tection). This conditions is pointed out bythe fact that, in the closing phase, the win-dow goes up in jerks.
The system conforms to theforthcoming standard
2000/4/EC concerning the safety ofpassengers leaning out of the pas-senger compartment.
WARNINGSo, it is necessary to carry out the sys-tem restore procedure, acting as follows:
❒ open the windows;
or
❒ turn the ignition key to STOP and thento MAR.
If no malfunction is present, the windowreturns to its normal operation automat-ically.
IMPORTANT With ignition key at STOPor removed, the power windows remainactivated for about 2 minutes and are de-activated immediately the moment a dooris opened.
IMPORTANT On certain versions, press-ing the remote control button Ë for over2 seconds will open the windows where-as pressing the remote control button Áfor over 2 seconds will close them.

83
SAFE
TYDE
VICE
SCO
RREC
T USE
OF TH
E CAR
WAR
NING
LIGHT
S AND
MESS
AGES
IIN A
NEM
ERGE
NCY
CAR
MAIN
TENA
NCE
TECHN
ICAL
SPEC
IFICA
TIONS
INDE
XDA
SHBO
ARD
AND
CONT
ROLS
Window safety system initialisation
Safety system shall be re-initialised afterdisconnecting the battery or if the rele-vant protection fuse is blown.
Initialisation procedure:
❒ fully close manually the window to ini-tialise;
❒ after window stopping, keep on press-ing the closing control for at least 1 sec-ond.
Improper use of the powerwindows can be dangerous.
Before and during its operation en-sure that any passengers are not atrisk from the moving glass either bypersonal objects getting caught in themechanism or by being injured by itdirectly. Always remove the ignitionkey when getting out of the car toprevent the power windows being op-erated accidentally and constitutinga danger to the passengers in the car.
WARNING
Front and rear passenger doorwindows (where provided)
Front passenger door armrest and reardoor armrests feature the switches A-fig.88 to be used for controlling the corre-sponding window.
Press button A-fig. 89 to inhibit rear doorcontrols (where provided).
REAR WINDOW WINDERS (5-door versions)(where provided) fig. 90
To open and to close the window use therelevant window winder.
fig. 90 F0M0091mfig. 88 F0M0251m
fig. 89 F0M0252m

84
SAFE
TYDE
VICE
SCO
RREC
T USE
OF TH
E CAR
WAR
NING
LIGHT
S AND
MESS
AGES
IN A
NEM
ERGE
NCY
CAR
MAIN
TENA
NCE
TECHN
ICAL
SPEC
IFICA
TIONS
INDE
XDA
SHBO
ARD
AND
CONT
ROLS
fig. 94 F0M0095m
BOOT
OPENING THE TAILGATE
The tailgate can be opened at any timefrom the passenger’s compartment bypressing button A-fig. 92.
The tailgate can be opened from the out-side by pressing the remote control but-ton R, fig. 91.
Tailgate opening is indicated by doubleflashing of direction indicators.
TAILGATE CLOSING Lower the tailgate until hearing the lock-ing click fig. 93.
TAILGATE EMERGENCY OPENING fig. 94To open the tailgate from the passenger’scompartment if the car battery is flat orthe electric tailgate lock is faulty, proceedas follows:❒ tilt the rear seats (see paragraph “Ex-
tending the boot” in this section);❒ press lever B in the boot.
fig. 91 F0M0092m
fig. 92 F0M0093m
fig. 93 F0M0094m
The addition of objects(speakers, spoilers, etc.) onthe rear shelf or boot lid, ex-cept those envisaged by the
manufacturer, may prevent the gasfilled struts at the sides of the bootfrom working properly.
When using the boot, makesure the loads do not exceed
the permitted weight (see “Technicalspecifications” chapter). Also makesure the items in the boot arearranged properly to prevent thembeing thrown forwards and injuringpassengers should you brake sharply.
WARNING
Never travel with objects onthe rear shelf to prevent
them being thrown forwards and in-juring passengers in case of accidentor sharp braking.
WARNING

85
SAFE
TYDE
VICE
SCO
RREC
T USE
OF TH
E CAR
WAR
NING
LIGHT
S AND
MESS
AGES
IIN A
NEM
ERGE
NCY
CAR
MAIN
TENA
NCE
TECHN
ICAL
SPEC
IFICA
TIONS
INDE
XDA
SHBO
ARD
AND
CONT
ROLS
EXTENDING THE BOOT
Partial extension (where provided)(1/3 or 2/3) fig. 97
The boot can be partially (1/3 or 2/3) ortotally extended splitting the rear seat.
Proceed as follows:
❒ lower completely the rear seat head re-straints;
❒ check that the seat belt is not twisted; ❒ tilt cushions as shown by the arrow fig.95;
❒ use handles A or B-fig. 96 to unlockrespectively the left or right section ofthe backrest and then guide the back-rest onto the cushion.
The boot extension to the right makes itpossible to carry two passengers on therear seat left-hand side. The boot exten-sion to the left makes it possible to carryone passenger on the rear seat right-handside.
fig. 95 F0M0096m fig. 96 F0M0097m
fig. 97 F0M0137m
Total extension fig. 98
Tilt the rear seat completely to obtainmaximum boot extension.
Proceed as follows:
❒ lower completely the rear seat head re-straints;
❒ check that the seat belt is not twisted;
❒ tilt cushions as shown by the arrow fig.95;
❒ lift handles A and B-fig. 98 to releasethe backrests and guide them onto thecushion.
IMPORTANT If after tilting the rear seat,you have to remove the rear parcel shelf,position it as shown in fig. 100.
fig. 98 F0M0098m

86
SAFE
TYDE
VICE
SCO
RREC
T USE
OF TH
E CAR
WAR
NING
LIGHT
S AND
MESS
AGES
IN A
NEM
ERGE
NCY
CAR
MAIN
TENA
NCE
TECHN
ICAL
SPEC
IFICA
TIONS
INDE
XDA
SHBO
ARD
AND
CONT
ROLS
fig. 101 F0M0101m
fig. 100 F0M0099mfig. 99 F0M0221m fig. 102 F0M0222m
REMOVING THE REAR PARCEL SHELF
To remove the rear parcel shelf to extendthe boot: release the upper ends A-fig.101 by removing the eyelets from the pins,release and turn the rear parcel shelf fromits seat and then release both pins fig. 102from side seats.Once removed, the rear parcel shelf canbe positioned between front seat backrests and the folded cushion of the rearseat fig. 100.
CARGO BOX (where provided)
The cargo box, see fig. 104, is set in theboot, it can be used to house items andit enables to have a level loading surface.
IMPORTANT To place loads on the Car-go box surface, keep the long bar in cen-tral position. Max. admitted load is 50 kg.
To return the rear seat back to itsoriginal position fig. 99
Raise the seat backrests and push themback until hearing the locking click of bothretainers.
Position seat belt buckles upwards and setthe cushion in the normal position of use.
IMPORTANT When the backrest is prop-erly secured, the “red band” on leversshall no longer be visible. The “red band”actually indicates that the backrest is notproperly secured. Make sure the head re-straints are properly positioned.
Make sure the backrest is properly se-cured at both sides (red bands not visible)to prevent it moves forward in the eventof sharp braking causing injuries to pas-sengers.
fig. 103 F0M0175m

87
SAFE
TYDE
VICE
SCO
RREC
T USE
OF TH
E CAR
WAR
NING
LIGHT
S AND
MESS
AGES
IIN A
NEM
ERGE
NCY
CAR
MAIN
TENA
NCE
TECHN
ICAL
SPEC
IFICA
TIONS
INDE
XDA
SHBO
ARD
AND
CONT
ROLS
TO CLOSE THE BONNET
Proceed as follows:
❒ hold the bonnet up with one hand andwith the other remove rod C-fig. 107 from recess E and fit it backinto its catch D-fig. 106;
BONNET
TO OPEN THE BONNET
Proceed as follows:
❒ pull lever fig. 104 in the direction ofthe arrow;
❒ pull lever A-fig. 105 as shown in thefigure;
❒ lift the bonnet and at the same time re-lease the rod D-fig. 106 from thecatch, then fit the rod end C-fig. 107into the bonnet recess E.
IMPORTANT Before opening the bonnet,check that windscreen wiper arms are notlifted from the windscreen.
❒ lower the bonnet at approx. 20 cen-timetres from the engine compartmentand then let it drop, ensuring that it isfully closed and not just held in positionby the safety catch. If the bonnet doesnot close properly, do not push it downbut open it again and repeat the aboveprocedure.
IMPORTANT Always check that the bon-net is closed properly to avoid its openingwhile the car is travelling.
fig. 104 F0M0135m
fig. 105 F0M0358m
fig. 106 F0M0134m
fig. 107 F0M0133m

88
SAFE
TYDE
VICE
SCO
RREC
T USE
OF TH
E CAR
WAR
NING
LIGHT
S AND
MESS
AGES
IN A
NEM
ERGE
NCY
CAR
MAIN
TENA
NCE
TECHN
ICAL
SPEC
IFICA
TIONS
INDE
XDA
SHBO
ARD
AND
CONT
ROLS
For safety reasons the bon-net must be closed properly
to avoid its opening while the car istravelling. Therefore, always check itis properly closed and the catch en-gaged. Should you notice that thecatch is not perfectly engaged whentravelling, stop the car immediatelyand close the bonnet.
WARNING
If the supporting rod is notpositioned correctly the bon-
net may fall violently.
WARNING
Carry out operations onlywhen the car is stationary.
WARNING
ROOF RACK/SKI RACK
3-door versions
Front couplings are set at points A-fig.109.
Front couplings are set at points B nearthe silk-screen printing (O) on rear sidewindows.
5-door versions
Front couplings are set at points A-fig.109.
Rear couplings are set at points B and areidentified by a slot on the upper dooropening.
IMPORTANT Strictly follow the installa-tion instructions contained in the kit. In-stallation hall be carried out by skilled per-sonnel.
fig. 109 F0M0102m
After travelling a few kilo-metres, check that the cou-
pling fastening screws are tight.
WARNING
Strictly comply with currentlaw regulations concerningmax. overall dimensions.
Distribute the load evenlyand when driving, bear in
mind the increased sensitivity of thecar to side wind.
WARNING
Never exceed the permittedweight (see section “Techni-cal specifications”).

89
SAFE
TYDE
VICE
SCO
RREC
T USE
OF TH
E CAR
WAR
NING
LIGHT
S AND
MESS
AGES
IIN A
NEM
ERGE
NCY
CAR
MAIN
TENA
NCE
TECHN
ICAL
SPEC
IFICA
TIONS
INDE
XDA
SHBO
ARD
AND
CONT
ROLSHEADLIGHTS
ADJUSTING THE HEADLIGHT BEAM
Proper adjustment of the headlight beamsis of vital importance for your safety andcomfort and also for the other road users.To ensure you and other drivers have thebest visibility conditions when travellingwith the headlights on, the headlights mustbe set properly. Contact Fiat Dealershipto have the headlights properly adjusted. HEADLIGHT AIMING DEVICE
It works with ignition key at MAR anddipped beams on. When the car is loaded,it slopes backwards. This means that theheadlight beam rises. In this case, it is nec-essary to return it to the correct position.
To adjust the headlight slant fig. 110
Press buttons Ò and set on the con-trol panel.
The display located on the instrument pan-el, provides the visual indication of the po-sitions during the adjustment operation.
Position 0 - one or two passengers onfront seats.
Position 1 - five passengers.
Position 2 - five passengers + load in theboot.
Position 3 - driver + maximum admittedload in the boot.
IMPORTANT Check beam aiming everytime the load carried changes.
ADJUSTING THE FRONT FOGLIGHTS (where provided)
Contact Fiat Dealership to have the head-lights properly adjusted.
fig. 110 F0M0103m

90
SAFE
TYDE
VICE
SCO
RREC
T USE
OF TH
E CAR
WAR
NING
LIGHT
S AND
MESS
AGES
IN A
NEM
ERGE
NCY
CAR
MAIN
TENA
NCE
TECHN
ICAL
SPEC
IFICA
TIONS
INDE
XDA
SHBO
ARD
AND
CONT
ROLS HEADLIGHT BEAMADJUSTMENT ABROAD fig. 111-112
The dipped beam headlights are adjustedfor circulation in the country in which thecar is marketed. In countries with oppo-site circulation, to avoid glaring oncom-ing vehicles, it is necessary to cover theareas of the headlight using a special stick-er tape provided for the purpose.
Suitable sticker tape is provided in Lin-eaccessori Fiat and it is available at FiatDealership.
fig. 111 F0M0105m
fig. 112 F0M0106m

91
SAFE
TYDE
VICE
SCO
RREC
T USE
OF TH
E CAR
WAR
NING
LIGHT
S AND
MESS
AGES
IIN A
NEM
ERGE
NCY
CAR
MAIN
TENA
NCE
TECHN
ICAL
SPEC
IFICA
TIONS
INDE
XDA
SHBO
ARD
AND
CONT
ROLS
ABS SYSTEM INTERVENTION
The driver can tell the ABS system hascome into action because the brake pedalpulsates slightly and the system gets noisi-er: it means that the car speed should bealtered to fit the type of road surface.
If the ABS system cuts in, itis a sign that the grip be-
tween tyre and the road surface hasreached the limit: you must slowdown to match the speed to the roadgrip available.
WARNING
ABS SYSTEM
If this is the first car with ABS you drive, getfamiliar with it by some preliminary “drivingtests” on poor grip roadbeds, obviously un-der safety conditions and in compliancewith the traffic regulations of the Countryyou are driving in. Read carefully the fol-lowing instructions.
The car is fitted with an ABS braking sys-tem, which prevents the wheels from lock-ing when braking, makes the most of roadgrip and gives the best control when emer-gency braking under difficulty road condi-tions.
System is completed by EBD (ElectronicBraking force Distribution), which dis-tributes the braking action between frontand rear wheels.
IMPORTANT To have the maximum ef-ficiency of the braking system, it is neces-sary a setting period of about 500 km(with new car after replacing brakepads/discs): during this period it is betterto avoid sharp, repeated and prolongedbrakes.
The ABS exploits the tyre-road grip at the best, but it
cannot improve it; you should there-fore take every care when driving onslippery surfaces without taking un-necessary risks.
WARNING FAILURE INDICATIONS
ABS failure
ABS failure is indicated by the turning onof warning light >on the instrument pan-el together with the dedicated message onthe multifunction display (where provid-ed), (see section “Warning lights and mes-sages”).
In this case the braking system is still effi-cient, though without the aid of the ABSsystem. Drive carefully to the closest FiatDealership to have the system checked.

BRAKE ASSIST (emergency braking assistanceintegral with ESP) (where provided)
The system, which cannot be cut out, rec-ognizes emergency braking (on the groundof the brake pedal operation speed) andconsiderably increases the pressure in thebrake circuit thus supporting the driver toobtain prompt and effective braking.
Brake Assist is deactivated on the versionsequipped with ESP, in the event of ESP sys-tem failure (indicated by warning light áswitching on together with the messageon the multifunction display, where pro-vided).
ESP SYSTEM (Electronic StabilityProgram) (where provided)
The ESP system is an electronic systemcontrolling the car stability in the event oftyre grip loss.
The ESP system is therefore particularlyuseful when grip conditions of the road sur-faces changes.
In addition to the ESP system, ASR systemand Hill Holder, (where provided) also theMSR system (adjusting the engine brakingtorque) and the HBA system (improvingthe braking force during emergency brak-ing) are provided.
ABS SYSTEM INTERVENTION
It is signalled by the blinking of the warn-ing light á on the instrument panel, to in-form the driver that the car is in criticalstability and grip conditions.
When the ABS cuts in, andyou feel the brake pedal pul-
sating, do not remove your foot, butkeep it pressed; in doing so you willstop in the shortest amount of spacepossible under the current road con-ditions.
WARNING
92
SAFE
TYDE
VICE
SCO
RREC
T USE
OF TH
E CAR
WAR
NING
LIGHT
S AND
MESS
AGES
IN A
NEM
ERGE
NCY
CAR
MAIN
TENA
NCE
TECHN
ICAL
SPEC
IFICA
TIONS
INDE
XDA
SHBO
ARD
AND
CONT
ROLS EBD failure
EBD failure is indicated by the turning onof warning lights > and x on the in-strument panel together with the dedi-cated message on the multifunction dis-play (where provided), (see section“Warning lights and messages”).
In this case with sharp braking the rearwheels might lock too early, with the pos-sibility of skidding. Drive extremely care-fully to the nearest Fiat Dealership to havethe system checked.
If warning light x alonecomes on (together with the
message on the multifunction display,where provided), stop the car imme-diately and contact the nearest FiatDealership. Fluid leaks from the hy-draulic system, in fact, can compro-mise the braking system, both tradi-tional systems and systems with ABS.
WARNING

ESP SYSTEM ACTIVATION
The ESP system is automatically activat-ed when the car is started and cannot bede-activated.
FAILURE INDICATIONS
In the event of failure, the ESP system isautomatically disconnected, the warninglight á, comes on with fixed light on theinstrument panel, together with the mes-sage on the multifunction display (whereprovided) (see section “Warning lights andmessages”) and with the button led ASROFF. In this case contact a Fiat Dealer-ship as soon as possible.
Performance of the ESP sys-tem, in terms of active safe-
ty should not induce the driver to takepointless and unnecessary risks. Thestyle of driving must in any case al-ways be adapted to the conditions ofthe road surface, visibility and traffic.Road safety is always the driver’s re-sponsibility.
WARNING
93
SAFE
TYDE
VICE
SCO
RREC
T USE
OF TH
E CAR
WAR
NING
LIGHT
S AND
MESS
AGES
IIN A
NEM
ERGE
NCY
CAR
MAIN
TENA
NCE
TECHN
ICAL
SPEC
IFICA
TIONS
INDE
XDA
SHBO
ARD
AND
CONT
ROLSHILL HOLDER SYSTEM
This system is an integral part of the ESPsystem and it is provided to facilitate start-ing on slopes.
It will activate automatically with the fol-lowing conditions:
❒ Uphill: car at a standstill on a road witha gradient higher than 5%, engine run-ning, clutch and brake pedal pressed,gearbox to neutral or engaged gear oth-er than reverse.
❒ Downhill: car at a standstill on a roadwith a gradient higher than 5%, enginerunning, clutch and brake pedal pressedand reverse gear engaged.
At pickup the ESP system control unit willkeep brake force on wheels until reachingthe torque suitable for starting, or in anycase for max. 2 seconds in order to passeasily from the brake pedal to the accel-erator pedal.
After two seconds without starting, thesystem will deactivate automatically by re-leasing gradually the brake force.
At releasing, the typical brake disengage-ment noise indicating that the car is go-ing to move will be heard.
FAILURE INDICATIONS
System failure is indicated by the turningon of warning light * on the instrumentpanel with digital display and warning lightá on the instrument panel with multi-function display (where provided) (seesection “Warning lights and messages”).
IMPORANT The Hill Holder system is nota parking brake therefore, never leave thecar without having engaged the handbrake,turned the engine off and engaged the firstspeed.
For correct operation of theESP and ASR systems, the
tyres must absolutely be of the samebrand and type on all wheels, in per-fect conditions and, above all, oftype, brand and size specified.
WARNING

94
SAFE
TYDE
VICE
SCO
RREC
T USE
OF TH
E CAR
WAR
NING
LIGHT
S AND
MESS
AGES
IN A
NEM
ERGE
NCY
CAR
MAIN
TENA
NCE
TECHN
ICAL
SPEC
IFICA
TIONS
INDE
XDA
SHBO
ARD
AND
CONT
ROLS
MSR system (engine brakingtorque control)
It is an integral part of the ASR system thatin case of sudden gear shifting, cuts in pro-viding torque to the engine thus prevent-ing excessive driving wheel drive that, spe-cially in poor grip conditions, can lead toloss of stability.
Switching the system on/off fig. 113The ASR system switches on automaticallyeach time the engine is started. When travelling, the ASR can be switchedoff and on again pressing button A set onthe dashboard fig. 113. When the ASR is switched off this isshown by the lighting up of the led on thebutton and by relevant message on themultifunction display, where provided.If the ASR is switched off when travelling,it will turn on again automatically the nexttime the engine is started.When travelling on snowy roads withsnow chains, it may be helpful to turn theASR off: in fact, in these conditions, slip-ping of the driving wheels when moving offmakes it possible to obtain better drive.
For correct operation of theESP and ASR systems, the
tyres must absolutely be of the samebrand and type on all wheels, in per-fect conditions and, above all, oftype, brand and size specified.
WARNING
fig. 113
ASROFF
F0M0109m
ASR SYSTEM (Antislip Regulator)
The ASR function controls car drive andcuts in automatically every time one orboth driving wheels slip.
According to slipping conditions, two dif-ferent control systems are activated:
❒ if slipping involves both driving wheels,the ASR function intervenes reducingthe power transmitted by the engine;
❒ if the slipping involves only one drivingwheel, the ASR system cuts in auto-matically braking the wheel that is slip-ping.
The action of the ASR is particularly help-ful in the following circumstances:
❒ slipping of the inner wheel due to theeffect of dynamic load changes or ex-cessive acceleration;
❒ too much power transmitted to thewheels also in relation to the conditionsof the road surface;
❒ acceleration on slippery, snowy orfrozen surfaces;
❒ in the case of loss of grip on a wet sur-face (aquaplaning).

95
SAFE
TYDE
VICE
SCO
RREC
T USE
OF TH
E CAR
WAR
NING
LIGHT
S AND
MESS
AGES
IIN A
NEM
ERGE
NCY
CAR
MAIN
TENA
NCE
TECHN
ICAL
SPEC
IFICA
TIONS
INDE
XDA
SHBO
ARD
AND
CONT
ROLS
The performance of the sys-tem, in terms of active safe-
ty should not induce the driver to takepointless and unnecessary risks. Thestyle of driving must in any case al-ways be adapted to the conditions ofthe road surface, visibility an traffic.Road safety is always the driver’s re-sponsibility.
WARNING
For correct operation of the ASR system,the tyres must absolutely be of the samebrand and type on all wheels, in perfectconditions and, above all, of type, brandand size specified.
FAILURE INDICATIONS
In the event of malfunctioning, the ASRsystem is automatically disconnected andthe warning light á will come with fixedlight on the instrument panel togetherwith the message on the multifunction dis-play, where provided, (see section “Warn-ing lights and messages”). In this case con-tact Fiat Dealership as soon as possible.
EOBD SYSTEM
The EOBD system (European On BoardDiagnosis) allows continuous diagnosis ofthe components of the car correlated withemissions.
It also alerts the driver, by turning on thewarning light U on the instrument pan-el (together with relevant message on themultifunction display, where provided)(see section “Warning lights and mes-sages”), when these conditions are nolonger in peak conditions.
The objective is:
❒ to keep the system efficiency under con-trol;
❒ warn when a fault causes emissions lev-els to increase;
❒ warn of the need to replace deteriorat-ed components.
The system also has a diagnostic connec-tor that can be interfaced with appropriatetools, which makes it possible to read theerror codes stored in the control unit, to-gether with a series of specific parametersfor engine operation and diagnosis. Thischeck can also be carried out by the traf-fic police.
IMPORTANT After eliminating the incon-venience, to check the system completely,Fiat Dealerships are obliged to run a benchtest and, if necessary, road tests which mayalso call for a long journey.
If turning the ignition key toMAR, the warning light Udoes not turn on or if, whiletravelling it turns on glowing
steadily or flashing (together with themessage on the multifunction display,where provided), contact Fiat Dealer-ship as soon as possible. Warning lightUoperation can be checked by meansof special equipment by traffic agents.Always comply with the traffic regula-tions in force in the country where youare travelling.

96
SAFE
TYDE
VICE
SCO
RREC
T USE
OF TH
E CAR
WAR
NING
LIGHT
S AND
MESS
AGES
IN A
NEM
ERGE
NCY
CAR
MAIN
TENA
NCE
TECHN
ICAL
SPEC
IFICA
TIONS
INDE
XDA
SHBO
ARD
AND
CONT
ROLS “DUALDRIVE” ELECTRIC
POWER STEERINGSYSTEM
The car is provided with the electricallycontrolled power steering system called“Dualdrive” working only with ignition keyat MAR and engine running, that can becustomised by the driver according to thedriving conditions.
ACTIVATION/DEACTIVATION(CITY function)
To activate/deactivate the CITY function,press the button set on the dashboard.
Activation is indicated by the turning onof:
❒ wording CITY on the instrument pan-el (for versions with multifunction dis-play);
❒ wording CITY on the button, afterpressing it fig. 114.
When the CITY function is on, the steer-ing wheel effort is lighter and thus parkingoperations are easier: therefore this func-tion is particularly useful for driving in citycentres.
For Sport versions, this function guaran-tees improved driving comfort since theaccelerator pedal results suitably calibrat-ed for gradual accelration/deceleration.
fig. 114 F0M0111m

97
SAFE
TYDE
VICE
SCO
RREC
T USE
OF TH
E CAR
WAR
NING
LIGHT
S AND
MESS
AGES
IIN A
NEM
ERGE
NCY
CAR
MAIN
TENA
NCE
TECHN
ICAL
SPEC
IFICA
TIONS
INDE
XDA
SHBO
ARD
AND
CONT
ROLSFAILURE INDICATIONS
Any failure is indicated by instrument pan-el warning light g coming on togetherwith the message on the multifunction dis-play (where provided) (see section“Warning lights and messages”).
In the event of electric power steering sys-tem failure, the car can be driven with me-chanical steering.
IMPORTANT In some circumstances, fac-tors independent from the electric pow-er steering could cause the illumination ofthe warning light g on the instrumentpanel.
We suggest to stop immediately the car,turn off the engine for about 20 secondsand then re-start the car. If the warninglight g stays on together with the mes-sage on the multifunction display (whereprovided), contact Fiat Dealership.
IMPORTANT The steering may becomeslightly stiff following parking manoeuvresincluding a great deal of steering. This isnormal and caused by a system to preventmotor overheating. No servicing is re-quired. The electric power steering sys-tem will return to normal operation thenext time the car is used.
It is absolutely forbidden tocarry out whatever after-
market operation involving steeringsystem or steering column modifica-tions (e.g.: installation of anti-theftdevice) that could badly affect per-formance and safety, cause the lapseof warranty and also result in non-compliance of the car with homolo-gation requirements.
WARNING
Always switch the engine off,remove the key from the
starting device and actuate the steer-ing lock before carrying out any main-tenance operation, especially whenthe wheels are raised from theground. In case this is not possible(e.g. when the key must be in MARposition or the engine running); re-move the electric power steeringmain fuse before carrying out anymaintenance operation.
WARNING

98
SAFE
TYDE
VICE
SCO
RREC
T USE
OF TH
E CAR
WAR
NING
LIGHT
S AND
MESS
AGES
IN A
NEM
ERGE
NCY
CAR
MAIN
TENA
NCE
TECHN
ICAL
SPEC
IFICA
TIONS
INDE
XDA
SHBO
ARD
AND
CONT
ROLS TYRE PRESSURE
MONITORINGSYSTEM - T.P.M.S.(where provided)
The car can be equipped with the T.P.M.S.(Tyre Pressure Monitoring System). Thissystem consists of a radio-frequency sen-sor, installed on each wheel (on the riminside the tyre) that sends pressure infor-mation to the control unit.
IMPORTANT NOTES ABOUT THE T.P.M.S. SYSTEM
Failure indications will not be stored andtherefore will not be displayed when turn-ing the engine off and on again. If failurepersists, the control unit will send warn-ing indications to the instrument panel on-ly after a few seconds when the car ismoving.
IMPORTANT Strong radio- frequencynoises could inhibit regular operation ofthe T.P.M.S. system. This condition is in-dicated by a dedicated message on the dis-play that will disappear automatically assoon as radio-frequency noises will stopto disturb the system.
Pay the utmost attentionwhen checking or inflating
tyres. Excessive pressure impairs roadholding, increases suspension andwheel stress and causes abnormaltyre wear.
WARNING
Tyre pressure should bechecked with tyres rested
and cold. Should it become necessaryfor whatever reason to check pressurewith hot tyres, do not reduce pressurealthough it is higher than the pre-scribed value but repeat the checkwhen tyres are cold.
WARNING
The T.P.M.S. system helpsthe driver to monitor tyre
pressure since the driver is the alwaysresponsible for proper inflation pres-sure of tyres and spare wheel (seeparagraph “Wheels” in section “CarMaintenance”).
WARNING
T.P.M.S. system cannot indi-cate sudden tyre pressure
drops (e.g.: tyre burst). In this event,brake the car cautiously and avoidsudden steering.
WARNING

99
SAFE
TYDE
VICE
SCO
RREC
T USE
OF TH
E CAR
WAR
NING
LIGHT
S AND
MESS
AGES
IIN A
NEM
ERGE
NCY
CAR
MAIN
TENA
NCE
TECHN
ICAL
SPEC
IFICA
TIONS
INDE
XDA
SHBO
ARD
AND
CONT
ROLS
Replacing standard tyreswith winter tyres and vice
versa involves T.P.M.S. system set-upthat shall be performed at Fiat Deal-erships only.
WARNING
The T.P.M.S. system requiresspecial equipment. Consult
Fiat Dealership to know what type ofaccessories are compatible with thesystem (wheels, wheel caps, etc.). Us-ing other accessories could cause sys-tem malfunctioning.
WARNING
Tyre pressure could changeaccording to outside tem-
perature. For this reason the T.P.M.S.system could temporarily indicate lowtyre pressure. In this event check pres-sure with cold tyres and restore prop-er inflation values if required.
WARNING
If the car is fitted withT.P.M.S. system, tyre and/or
rim removal and refitting operationsinvolve special precautions; to pre-vent damages or wrong sensor refit-ting, contact Fiat Dealership to havetyre and/or rim changed.
WARNING
If the car is fitted withT.P.M.S. system, when
changing a tyre, change also the rub-ber seal of the valve. Contact a FiatDealership.
WARNING
Strong radio-frequency nois-es could inhibit the regular
operation of the T.P.M.S. system. This condition will be indicated by amessage on the multfunction display(where provided).The warning message will go off au-tomatically as soon as the radio-fre-quency noise will stop to disturb thesystem.
WARNING

100
SAFE
TYDE
VICE
SCO
RREC
T USE
OF TH
E CAR
WAR
NING
LIGHT
S AND
MESS
AGES
IN A
NEM
ERGE
NCY
CAR
MAIN
TENA
NCE
TECHN
ICAL
SPEC
IFICA
TIONS
INDE
XDA
SHBO
ARD
AND
CONT
ROLS
–
NO
NO
YES
YES
YES
YES
YES
YES
NO
NO
NO
Contact Fiat Dealership
Repair damaged wheel
Contact Fiat Dealership
–
–
In order to use the system properly, refer to the following table when you have to change wheels/tyres:
Operation Sensor presence Failure indication Fiat Dealership service operation
–
Wheel change with spare wheel
Wheel change with snow tyres
Wheel change with snow tyres
Wheel change with others of different
size (*)
Wheel cross switching (front/rear) (**)
(*) Given as an alternative on the Owner Handbook and available at Lineaccessori Fiat.
(**) Not cross switched (tyres shall stay on the same side).

101
SAFE
TYDE
VICE
SCO
RREC
T USE
OF TH
E CAR
WAR
NING
LIGHT
S AND
MESS
AGES
IIN A
NEM
ERGE
NCY
CAR
MAIN
TENA
NCE
TECHN
ICAL
SPEC
IFICA
TIONS
INDE
XDA
SHBO
ARD
AND
CONT
ROLSPARKING SENSORS
(where provided)
Parking sensors are located in the rearbumper fig. 115 and their function is toinform the driver, through an intermittentbuzzer, about the presence of obstaclesbehind the car.
ACTIVATION
The sensors are automatically activatedwhen the reverse gear is engaged.
As the distance from the obstacle behindthe car decreases, the acoustic alarm be-comes more frequent.
BUZZER WARNINGS
When the reverse gear is engaged an in-termittent acoustic signal is automaticallyactivated.
The acoustic signal:
❒ becomes louder as the reduction of dis-tance between the car and the obsta-cle decreases;
❒ becomes continuous when the distancebetween the car and the obstacle is lessthat 30 cm and stops immediately if thedistance raises;
❒ is constant if the distance is unvaried;if this situation concerns the side sen-sors, the buzzer will stop after about3 seconds to avoid, for example, warn-ing indications in the event of manoeu-vres along walls.
Detection distances
Central action radius 150 cm
Side action radius 60 cm
If several obstacles are detected, the con-trol unit indicates the nearest one.
FAILURE INDICATIONS
Parking sensor failures, if any, will be in-dicated when engaging reverse by theturning on of the instrument panel warn-ing light t together with the message onthe multifunction display, where provided(see section “Warning lights and mes-sages”).
fig. 115 F0M0359m

102
SAFE
TYDE
VICE
SCO
RREC
T USE
OF TH
E CAR
WAR
NING
LIGHT
S AND
MESS
AGES
IN A
NEM
ERGE
NCY
CAR
MAIN
TENA
NCE
TECHN
ICAL
SPEC
IFICA
TIONS
INDE
XDA
SHBO
ARD
AND
CONT
ROLS GENERAL WARNINGS
❒ When parking, take the utmost care toobstacles that may be set above or un-der the sensors.
❒ Objects set close to the car, under cer-tain circumstances are not detected andcould therefore cause damages to thecar or be damaged.
❒ Indications sent by the sensors can bealtered by dirt, snow or ice depositedon the sensors or by ultrasound systems(e.g.: truck pneumatic brakes or pneu-matic hammers) set nearby the car.
For proper operation, theparking sensors shall alwaysbe clean from mud, dirt, snowor ice. When cleaning the sen-
sors, take the utmost care to preventtheir damaging; do not use thereforedry or rough clothes. Sensors shall bewashed with clean water and car de-tergent, if required.
Parking manoeuvres howev-er are always under the dri-
ver’s responsibility that shall alwayscheck the absence of people (spe-cially children) or animals in the ma-noeuvre space. This system is just ahelp for the driver but she/he shallnever reduce attention during dan-gerous manoeuvres even if performedat low speed.
WARNINGOPERATION WITH TRAILER
Parking sensor operation is deactivatedautomatically when the trailer electric ca-ble plug is fitted into the car tow hooksocket.
Sensors are reactivated when removingthe trailer cable plug.
In washing stations, clean sensors quicklykeeping the vapour jet/high pressurewashing nozzles at 10 cm at least from thesensors.

103
SAFE
TYDE
VICE
SCO
RREC
T USE
OF TH
E CAR
WAR
NING
LIGHT
S AND
MESS
AGES
IIN A
NEM
ERGE
NCY
CAR
MAIN
TENA
NCE
TECHN
ICAL
SPEC
IFICA
TIONS
INDE
XDA
SHBO
ARD
AND
CONT
ROLSSOUND SYSTEM
(where provided)
For the operation of the radio withCD/MP3 CD (where provided), read theinstructions for use given in the Supple-ment attached to the Owner Handbook.
SOUND SYSTEM PRESETTING(where provided)The system consists of:❒ sound system power wires❒ front and rear speaker connecting
wires❒ aerial power wire❒ 2 tweeters on front doors (30W max
power each);❒ 2 mid-woofers on front doors (165
mm diameter, 40W max powereach);
❒ 2 full-range speakers on rear doorsand rear valance panels (130 mmdiameter, 40W max power each);
❒ radio aerial wire.
Sound system installation
The sound system shall be installed in theproper space occupied by the centraloddment compartment, here you will findthe preset cables.
To remove the oddment compartmentpress the retaining devices in the pointsshown in the figure.
fig. 116 F0M0114m
For connection to existing carpresetting system, contact Fi-
at Dealership to prevent any troublethat could impair car safety.
WARNING

104
SAFE
TYDE
VICE
SCO
RREC
T USE
OF TH
E CAR
WAR
NING
LIGHT
S AND
MESS
AGES
IN A
NEM
ERGE
NCY
CAR
MAIN
TENA
NCE
TECHN
ICAL
SPEC
IFICA
TIONS
INDE
XDA
SHBO
ARD
AND
CONT
ROLS RADIONAVIGATOR
PRESETTING SYSTEM (where provided)
The system consists of:
❒ radionavigator power wires
❒ front and rear speaker connecting wires
❒ aerial power wire
❒ 2 tweeters on front doors (30W maxpower each);
❒ 2 mid-woofers on front doors (165 mmdiameter, 40W max power each);
❒ 2 full-range speakers on rear doors andrear valance panels (130 mm diameter,40W max power each);
❒ radio aerial;
❒ navigator aerial (GPS signal);
❒ radio aerial wire;
❒ navigator aerial wire (GPS signal).
Radionavigator installation
The radionavigator shall be installed in theproper space occupied by the central odd-ment compartment, here you will find thepreset cables.
HANDS FREE KIT WITHVOICE RECOGNITIONAND Bluetooth®
TECHNOLOGY(where provided)
As concerns the operation of the handsfree kit with Bluetooth® technology(where provided), refer to the Supplementattached to this Owner Handbook.
For connection to existing carpresetting system, contact Fi-
at Dealership to prevent any troublethat could impair car safety.
WARNING

105
SAFE
TYDE
VICE
SCO
RREC
T USE
OF TH
E CAR
WAR
NING
LIGHT
S AND
MESS
AGES
IIN A
NEM
ERGE
NCY
CAR
MAIN
TENA
NCE
TECHN
ICAL
SPEC
IFICA
TIONS
INDE
XDA
SHBO
ARD
AND
CONT
ROLSRADIO TRANSMITTERS AND
CELLULAR TELEPHONES
Radio transceiver equipment (e.g.: e-tacsmobile phones, HAM radio systems andthe like) shall not be used inside the carunless a separate aerial is mounted on theroof.
IMPORTANT The use of similar devicesinside the passenger compartment (with-out separated aerial) produces radio-fre-quency electromagnetic fields which, am-plified by the resonance effects inside thepassenger compartment, may cause elec-trical systems equipping the car to mal-function. This could compromise safety inaddition to constituting a potential hazardfor the passengers.
In addition, transmission and reception ofthese devices may be affected by theshielding effect of the car body.
As concerns EC-approved mobile phones(GSM, GPRS, UMTS), strictly comply withthe instructions for use provided by themobile phone’s manufacturer.
ACCESSORIESPURCHASEDBY THE OWNER
If after buying the car, you decide to installelectrical accessories that require a per-manent electric supply (alarm, satellite an-titheft system, etc.) or accessories that inany case burden the electric supply, con-tact Fiat Dealership, whose qualified per-sonnel, besides suggesting the most suit-able devices belonging to Lineaccessori Fi-at, will also evaluate the overall electric ab-sorption, checking whether the car’s elec-tric system is able to withstand the loadrequired, or whether it needs to be inte-grated with a more powerful battery.
Take care when fitting addi-tional spoilers, alloy rims and
non-standard wheel caps: they mightreduce ventilation of the brakes, thustheir efficiency, during abrupt and re-peated braking, or long downhillslopes. Make sure that nothing (mats,etc.) gets in the way of the pedalswhen they are pushed down.
WARNING
INSTALLATION OFELECTRIC/ELECTRONICDEVICES
Electric/electronic devices installed afterbuying the vehicle and in after-market shallbear the following marking:
Fiat Auto S.p.A. authorizes the installationof transceivers, provided that installationis workmanlike performed in compliancewith Manufacturer’s specifications at a spe-cialised service centre.
IMPORTANT The installation of devicesinvolving modifications of vehicle charac-teristics may determine the withdrawal ofthe driving licence by the appointed pub-lic authorities and the forfeiture of thewarranty as concerns defects/failures dueto said modification or leading directly orindirectly to it.
Fiat Auto S.p.A. declines all responsibilitydue to damages connected with the in-stallation of accessories/devices not sup-plied by or recommended by Fiat AutoS.p.A. and installed not in compliance withthe specified prescriptions.

106
SAFE
TYDE
VICE
SCO
RREC
T USE
OF TH
E CAR
WAR
NING
LIGHT
S AND
MESS
AGES
IN A
NEM
ERGE
NCY
CAR
MAIN
TENA
NCE
TECHN
ICAL
SPEC
IFICA
TIONS
INDE
XDA
SHBO
ARD
AND
CONT
ROLS AT THE FILLING
STATION
PETROL ENGINES
Use only unleaded petrol.
To prevent errors, the diameter of the fu-el tank filler is too small to introduce a leadpetrol pump filler. Use petrol with a rat-ed octane number (R.O.N.) not lowerthan 95.
IMPORTANT An inefficient catalyst leadsto harmful exhaust emissions, thus con-tributing to air pollution.
IMPORTANT Never use leaded petrol,even in small amount or in an emergency,as this would damage the catalyst beyondrepair.
DIESEL ENGINES
If the outside temperature is very low,the diesel thickens due to the formationof paraffins and could clog the diesel fu-el filter.
In order to avoid these problems, differ-ent types of diesel are distributed ac-cording to the season: summer type, win-ter type and arctic type (cold, mountainareas).
Topping up with diesel fuel not complyingwith EN590 European Norm might makeit necessary to replace the filter more fre-quently than indicated in the Serviceschedule.
If refuelling with diesel fuel not suitable forthe current temperature, mix diesel fuelwith TUTELA DIESEL ART additive in theproportions stated on the can, putting firstthe antifreeze in the tank and then thediesel fuel.
If driving or parking the vehicle for a longperiod in cold areas/mountains, refuel withthe diesel fuel available at local filling sta-tions.
In this situation you are also recom-mended to have in the tank an amount offuel 50% higher than usable capacity.
The car must only be filledwith diesel fuel for motor ve-hicles, in compliance with Eu-ropean Standard EN590. The
use of other products or mixtures mayirreparably damage the engine with in-validation of the warranty due to thedamage caused. In the event of acci-dentally filling with another type of fu-el, do not start the engine and emptythe tank. If the engine has been runeven for only a very short time, in ad-dition to the tank, it is also necessaryto drain out the whole fuel circuit.

107
SAFE
TYDE
VICE
SCO
RREC
T USE
OF TH
E CAR
WAR
NING
LIGHT
S AND
MESS
AGES
IIN A
NEM
ERGE
NCY
CAR
MAIN
TENA
NCE
TECHN
ICAL
SPEC
IFICA
TIONS
INDE
XDA
SHBO
ARD
AND
CONT
ROLS
FUEL FILLER CAP fig. 117
To carry out fuelling, open lid A and un-screw cap B; the cap is fitted with an an-tiloss device C which fastens it to the lidso it cannot be mislaid.
On certain versions cap B is provided witha key-lock, to open it, open lid A, thenturn the ignition key counter-clockwiseand slacken the cap.
The sealing of the tank may cause lightpressurising in the tank. A little breathingoff, while slackening the cap, is absolutelynormal.
When refuelling, position the cap on thedevice inside the lid as shown in fig. 117.
PROTECTING THEENVIRONMENT
The devices for curtailing petrol engineemissions are the following:
❒ three-way catalytic converter;
❒ Lambda sensor;
❒ fuel evaporation system.
In addition, do not let the engine run, evenfor a test, with one or more spark plugsdisconnected.
The devices for curtailing diesel fuel en-gine emissions are the following:
❒ oxidising catalytic converter;
❒ exhaust gas recirculation system(E.G.R.);
❒ diesel particulate filter (DPF) (whereprovided).
fig. 117 F0M0138m
Do not put naked flames orlighted cigarettes near the
fuel filler hole as there is a danger offire. Do not bend too close to the holeeither so as not to breathe in harmfulvapours.
WARNING
Refuelling
To guarantee full tank filling, carry out tworefuelling operations after the first click ofthe fuel delivery gun. Avoid further top-ping up operations that could cause dam-ages to the fuel system.

108
SAFE
TYDE
VICE
SCO
RREC
T USE
OF TH
E CAR
WAR
NING
LIGHT
S AND
MESS
AGES
IN A
NEM
ERGE
NCY
CAR
MAIN
TENA
NCE
TECHN
ICAL
SPEC
IFICA
TIONS
INDE
XDA
SHBO
ARD
AND
CONT
ROLS DIESEL PARTICULATE FILTER
(DPF) (where provided)
The Diesel Particulate Filter is a mechan-ical filter, integral with the exhaust system,that physically traps particulates presentin the exhaust gases of Diesel engines.
The diesel particular filter has been adopt-ed to eliminate almost totally particulatesin compliance with current / future lawregulations.
During normal use of the car, the enginecontrol unit records a set of data (e.g.:travel time, type of route, temperatures,etc.) and it will then calculate how muchparticulates has been trapped by the filter.
Since this filter physically traps particulates,it shall be cleaned (reclaimed) at regularintervals by burning carbon particles.
Reclaiming procedure is controlled auto-matically by the engine control unit ac-cording to the filter conditions and theconditions of use of the car.
During reclaiming the following phenom-ena could take place: idling slight increase,fan activation, slight smoke increase, highexhaust temperatures. These situationsshall not be considered as faults and theydo not affect car performance and envi-ronment.
If the dedicated message is displayed, re-fer to section “Warning lights and mes-sages”.
During normal service thediesel particulate filter (DPF)
reaches high temperatures. Do nottherefore park the car over inflam-mable materials (grass, dry leaves, pineneedles, etc.): fire hazard.
WARNING
During normal service thecatalyst reaches high tem-
peratures. Do not therefore park thecar over inflammable materials (grass,dry leaves, pine needles, etc.): firehazard.
WARNING

109
CORR
ECT U
SEOF
THE C
ARW
ARNI
NGLIG
HTS A
NDME
SSAG
ES
IN A
NEM
ERGE
NCY
CAR
MAIN
TENA
NCE
TECHN
ICAL
SPEC
IFICA
TIONS
INDE
XDA
SHBO
ARD
AND C
ONTR
OLS
SAFE
TYDE
VICE
S
SEAT BELTS ........................................................................... 110
S.B.R. SYSTEM ....................................................................... 111
PRETENSIONERS.................................................................. 112
CARRYING CHILDREN SAFELY...................................... 115
PRESETTING FOR MOUNTING THE “UNIVERSAL ISOFIX” CHILD RESTRAINT SYSTEM ..... 120
FRONT AIR BAGS................................................................ 121
SIDE AIR BAGS .................................................................... 124
SSSAAFFEETTYY DDEEVVIICCEESS

110
CORR
ECT U
SEOF
THE C
AR
WAR
NING
LIGHT
S AND
MESS
AGES
IN A
NEM
ERGE
NCY
CAR
MAIN
TENA
NCE
TECHN
ICAL
SPEC
IFICA
TIONS
IINDE
XDA
SHBO
ARD
AND C
ONTR
OLS
SAFE
TYDE
VICE
S
When the car is parked on a steep slopethe reel mechanism may block; this is nor-mal. The reel mechanism prevents thewebbing coming out when it is jerked orif the car brakes sharply, in a collision orwhen cornering at high speeds.
The rear seat is fitted with inertial seatbelts with three anchor points and reel.
Rear seat belts shall be worn as shown infig. 2.
SEAT BELTS
USING THE SEAT BELTS fig. 1
The belt should be worn keeping the cheststraight and rested against the seat back.
To fasten the seat belts, take hold thetongue A and insert it into the buckle B,until hearing the locking click.
At removal, if it jams, let it rewind for ashort stretch, then pull it out again with-out jerking.
To unfasten the seat belts, press buttonC. Guide the seat belt with your handwhile it is rewinding, to prevent it fromtwisting.
Through the reel, the belt automaticallyadapts to the body of the passenger wear-ing it, allowing freedom of movement.
fig. 1 F0M0040m fig. 2 F0M0041m
Never press button C-fig. 1when travelling.
WARNING

111
CORR
ECT U
SEOF
THE C
ARW
ARNI
NGLIG
HTS A
NDME
SSAG
ES
IN A
NEM
ERGE
NCY
CAR
MAIN
TENA
NCE
TECHN
ICAL
SPEC
IFICA
TIONS
INDE
XDA
SHBO
ARD
AND C
ONTR
OLS
SAFE
TYDE
VICE
S
IMPORTANT Correct backrest fasteningis guaranteed when the “red band” on thebackrest folding levers is no longer visible.The “red band” actually indicates that thebackrest is not properly secured. Makesure the backrest is properly repositioned,you should hear the locking click.
IMPORTANT After putting the seats backto their travelling position, restore theseat belt position to make them ready foruse.
S.B.R. SYSTEM
The car is fitted with the S.B.R. system(Seat Belt Reminder), consisting of abuzzer which, together with the turningon of warning light < on the instrumentpanel, warns the driver to fasten the seatbelt.
The buzzer can be deactivated (until thenext engine stop) as follows:
❒ fasten the driver’s and passenger’s seatbelt;
❒ turn the ignition key to MAR;
❒ wait for over 20 seconds and then re-lease one of the seat belts.
For permanent deactivation, contact FiatDealership.
With digital display, the S.B.R. system canonly be reset at Fiat Dealership.
With multifunction display, the S.B.R. sys-tem can also be reset through the set-upmenu.
fig. 3 F0M0042m
Remember that in the eventof a violent collision, back
seat passengers not wearing seat beltsalso represent a serious danger forthe front seat passengers.
WARNING
Make sure the backrest isproperly secured at both
sides to prevent it moves forward inthe event of sharp braking causing in-juries to passengers.
WARNING

112
CORR
ECT U
SEOF
THE C
AR
WAR
NING
LIGHT
S AND
MESS
AGES
IN A
NEM
ERGE
NCY
CAR
MAIN
TENA
NCE
TECHN
ICAL
SPEC
IFICA
TIONS
IINDE
XDA
SHBO
ARD
AND C
ONTR
OLS
SAFE
TYDE
VICE
SPRETENSIONERS
To increase the efficiency of the seat belts,the car is fitted with pretensioners. Thesedevices, in the event of a violent crash,rewind the seat belts a few centimetres.In this way they ensure that the seat beltadheres perfectly to the wearer before therestraining action begins.
The seat belt locks to indicate that the de-vice has intervened; the seat belt cannotbe drawn back up even when guiding itmanually.
IMPORTANT To obtain the highest de-gree of protection from the action of thepretensioning device, wear the seat beltkeeping it firmly close to the chest andpelvis.
A small amount of smoke may be pro-duced. This smoke is in no way toxic andpresents no fire hazard.
The pretensioner does not require anymaintenance or greasing.
Anything that modifies its original condi-tions invalidates its efficiency.
If due to unusual natural events (floods,seas storm, etc.) the device has been af-fected by water and mud, it must neces-sarily be replaced.
LOAD LIMITERS
To increase passenger’s safety, the frontseat belt reels contain a load limiter whichallows controlled sag in such a way as todose the force acting on the chest andshoulders during the belt restraining ac-tion in case of front crash.
The pretensioner can onlybe used once. After a colli-
sion that has triggered it, have it re-placed at a Fiat Dealership. Preten-sioner validity is indicated on the la-bel in the glove compartment: thepretensioners should be replaced at aFiat Dealership as this date ap-proaches.
WARNING
Operations which lead toknocks, vibrations or localisedheating (over 100°C for amaximum of 6 hours) in the
area around the pretensioners maycause damage or trigger them. Thesedevices are not affected by vibrationscaused by irregularities of the road sur-face or low obstacles such as kerbs, etc.Contact a Fiat Dealership for any as-sistance.

GENERAL INSTRUCTIONS FORUSING THE SEAT BELTS
The driver must comply with (and havethe car occupants follow) all the local le-gal regulations concerning the use of seatbelts. Always fasten the seat belts beforestarting.
Seat belts are also to be worn by expec-tant mothers: the risk of injury in the caseof accident is greatly reduced for them andthe unborn child if they are wearing a seatbelt.
Of course they must position the lowerpart of the belt very low down so that itpasses under the abdomen, see fig. 4.
113
CORR
ECT U
SEOF
THE C
ARW
ARNI
NGLIG
HTS A
NDME
SSAG
ES
IN A
NEM
ERGE
NCY
CAR
MAIN
TENA
NCE
TECHN
ICAL
SPEC
IFICA
TIONS
INDE
XDA
SHBO
ARD
AND C
ONTR
OLS
SAFE
TYDE
VICE
S
fig. 4 F0M0043m fig. 5 F0M0044m fig. 6 F0M0045m
The belt should not be twist-ed. The upper part should
pass over the shoulder and cross thechest diagonally. The lower partshould adhere to the pelvis and notthe abdomen of the passenger, seefig. 5 Do not use any objects (pegs,stoppers, etc.) to keep the belts awayfrom the body.
WARNING

114
CORR
ECT U
SEOF
THE C
AR
WAR
NING
LIGHT
S AND
MESS
AGES
IN A
NEM
ERGE
NCY
CAR
MAIN
TENA
NCE
TECHN
ICAL
SPEC
IFICA
TIONS
IINDE
XDA
SHBO
ARD
AND C
ONTR
OLS
SAFE
TYDE
VICE
SFor maximum safety, keepthe back of your seat up-
right, lean back into it and make surethe seat belt fits closely across yourchest and hips. Make sure that theseat belts of the front and rear pas-sengers are fastened at all times! Youincrease the risk of serious injury ordeath in a collision if you travel withthe belts unfastened.
WARNING
Under no circumstancesshould the components of
the seat belts and pretensioners betampered with or removed. Any op-eration should be carried out by qual-ified and authorised personnel. Al-ways contact a Fiat Dealership.
WARNING
If the belt has been subject-ed to heavy stress, for ex-
ample after and accident, it should bechanged completely together withthe anchors, anchor fastening screwsand the pretensioners. In fact, even ifthe belt has no visible defects, it couldhave lost its resilience.
WARNING
Never travel with a child sit-ting on the passenger’s lap
with a single belt to protect themboth. Do not fasten other objects tothe body.
WARNING

HOW TO KEEP THE SEATBELTS ALWAYS IN EFFICIENTCONDITIONS
Observe the following:
❒ always use the belt with the tap taut andnever twisted; make sure that it is freeto run without impediments;
❒ after a serious accident, replace the beltbeing worn at that time, even if it doesnot appear damaged. Always replacethe seat belts if pretensioners havebeen activated;
❒ to clean the belts, wash by hand withneutral soap, rinse and leave to dry inthe shade. Never use strong deter-gents, bleach or dyes or other chemi-cal substance that might weaken the fi-bres;
❒ prevent the reels from getting wet:their correct operation is only guaran-teed if water does not get inside;
❒ replace the seat belt when showing sig-nificant wear or cut signs.
For optimal protection in the event of acrash, all passengers must be seated andwearing adequate restraint systems.
This is even more important for children.
This prescription is compulsory in all ECcountries according to EC Directive2003/20/EC.
Compared with adults, their head is pro-portionally larger and heavier than the restof the body, while the muscles and bonestructure are not completely developed.Therefore, correct restraint systems arenecessary, other than adult seat belts. Theresults of research on the best child re-straint systems are contained in the Euro-pean Standard EEC-R44. This Standard en-forces the use of restraint systems classi-fied in five groups:
Group 0 - 0-10 kg in weight
Group 0+ - 0-13 kg in weight
Group 1 9-18 kg in weight
Group 2 15-25 kg in weight
Group 3 22-36 kg in weight
As it may be noted, the groups overlappartly and in fact, in commerce it is pos-sible to find devices that cover more thanone weight group.
All restraint devices must bear the certi-fication data, together with the controlbrand, on a solidly fixed label which mustabsolutely never be removed.
115
CORR
ECT U
SEOF
THE C
ARW
ARNI
NGLIG
HTS A
NDME
SSAG
ES
IN A
NEM
ERGE
NCY
CAR
MAIN
TENA
NCE
TECHN
ICAL
SPEC
IFICA
TIONS
INDE
XDA
SHBO
ARD
AND C
ONTR
OLS
SAFE
TYDE
VICE
S
CARRYING CHILDREN SAFELY

116
CORR
ECT U
SEOF
THE C
AR
WAR
NING
LIGHT
S AND
MESS
AGES
IN A
NEM
ERGE
NCY
CAR
MAIN
TENA
NCE
TECHN
ICAL
SPEC
IFICA
TIONS
IINDE
XDA
SHBO
ARD
AND C
ONTR
OLS
SAFE
TYDE
VICE
SWith passenger’s air bag ac-tive, never place child’s seats
with the cradle facing backwards sincethe air bag activation could cause tothe child serious injuries, even mortal,regardless of the seriousness of thecrash that triggered it. You are advisedto carry children always with properrestraint systems on the rear seats, asthis is the most protected position inthe case of a crash.
WARNING
SERIOUS DANGER Shouldit be absolutely necessary tocarry a baby on the frontpassenger seat with a child'sseat with the cradle facingbackwards, deactivate the
passenger's front and side bags (forchest and pelvis protection, whereprovided) using the set up menu andthen check warning light F on thecluster to make sure that deactivationhas actually took place. The frontpassenger's seat shall be adjusted inthe most backward position to pre-vent any contact between child's seatand dashboard.
WARNINGOver 1.50 m in height, from the point ofview of restraint systems, children areconsidered as adults and wear the seatbelts normally.
Lineaccessori Fiat offers seats for eachweight group, which are the recommend-ed choice, as they have been designed andexperimented specifically for Fiat cars.

117
CORR
ECT U
SEOF
THE C
ARW
ARNI
NGLIG
HTS A
NDME
SSAG
ES
IN A
NEM
ERGE
NCY
CAR
MAIN
TENA
NCE
TECHN
ICAL
SPEC
IFICA
TIONS
INDE
XDA
SHBO
ARD
AND C
ONTR
OLS
SAFE
TYDE
VICE
S
GROUP 0 and 0+Babies up to 13 kg must be carried facingbackwards on a cradle seat, which, sup-porting the head, does not induce stress onthe neck in the event of sharp deceleration.The cradle is restrained by the car seatbelts fig. 7 and in turn it must restrain thechild with its own belts.
fig. 7 F0M0046m
The figure is only an example for mounting. Attain to the instructionsfor fastening which must be enclosed with the specific child restraining
system you are using.
WARNING
Seats exist which are suitable for covering weight groups 0 and 1 with arear connection to the car belts and their own belts to restrain the child.
Due to their size, they can be dangerous if installed incorrectly fastened to thecar belts with a cushion. Carefully follow the instructions for installation provid-ed with the seat.
WARNING
fig. 8 F0M0047m fig. 9 F0M0048m
GROUP 2
Starting from 15 kg to 25 kg in weight, chil-dren may be restrained directly by the carbelts fig. 9. The only function of the seatis to position the child correctly in rela-tion to the belts, so that the diagonal partadheres to the chest and not to the neckand that the horizontal part clings to thechild’s pelvis and not the abdomen.
GROUP 1
Starting from 9 kg to 18 kg in weight, chil-dren may be carried facing forwards, withseat fitted with front cushion, throughwhich the car seat belt restrains both childand seat fig. 8.
The figure is only an exam-ple for mounting. Attain to
the instructions for fastening whichmust be enclosed with the specificchild restraining system you are using.
WARNING

118
CORR
ECT U
SEOF
THE C
AR
WAR
NING
LIGHT
S AND
MESS
AGES
IN A
NEM
ERGE
NCY
CAR
MAIN
TENA
NCE
TECHN
ICAL
SPEC
IFICA
TIONS
IINDE
XDA
SHBO
ARD
AND C
ONTR
OLS
SAFE
TYDE
VICE
S
Group 3
For children from 22 kg to 36 kg the sizeof the child’s chest no longer requires asupport to space the child’s back from theseat back.
Fig. 10 shows proper child seat posi-tioning on the rear seat.
Children taller than 1.50 m can wear seatbelts like adults.
PASSENGER SEAT COMPLIANCE WITH REGULATIONS ON CHILD’S SEAT USE
Your car complies with the new European Directive 2000/3/EC regulating child’s seatassembling on the different car seats according to the following table:
fig. 10 F0M0049m
The figure is only an exam-ple for mounting. Attain to
the instructions for fastening whichmust be enclosed with the specificchild restraining system you are using.
WARNING
Front Rear Rear Group
Range ofpassenger passenger centralweight passenger
Group 0, 0+ up to 13 kg U (▼) U *
Group 1 9-18 kg U (▼) U *
Group 2 15-25 kg U (▼) U *
Group 3 22-36 kg U (▼) U *
Key:
U = suitable for child restraint systems of the “Universal” category, according to Eu-ropean Standard EEC-R44 for the specified “Groups”.
(▼) on cars not fitted with passenger’s seat adjustable in height, the seat back shall bepositioned perfectly upright.
* Never mount child restraint systems on the rear central seat.

119
CORR
ECT U
SEOF
THE C
ARW
ARNI
NGLIG
HTS A
NDME
SSAG
ES
IN A
NEM
ERGE
NCY
CAR
MAIN
TENA
NCE
TECHN
ICAL
SPEC
IFICA
TIONS
INDE
XDA
SHBO
ARD
AND C
ONTR
OLS
SAFE
TYDE
VICE
S
Below is a summary of the rules ofsafety to be followed for carryingchildren:
1) The recommended position for in-stalling child’s seat is on the rear seat, asit is the most protected in the case of acrash.
2) If the passenger’s air bag is deactivat-ed always check the amber warning lighton the cluster to make sure that it has ac-tually been deactivated.
3) Attain to the instructions for fasteningthe specific child restraint system whichyou are using. These instructions must beprovided by the manufacturer. Keep thechild restraint system installation instruc-tions with the car documents and thisHandbook. Never use a child restraint sys-tem without installation instructions.
4) Always check the seat belt is well fas-tened by pulling the webbing.
5) Only one child is to be strapped toeach retaining system.
6) Always check the seat belts do not fitaround the child’s throat.
7) While travelling, do not let the childsit incorrectly or release the belts.
8) Passengers should never carry childrenon their laps. No-one, however strongthey are, can hold a child in the event ofa crash.
9) In case of an accident, replace thechild’s seat with a new one.
With passenger’s air bag ac-tive, never place child’s seats
with the cradle facing backwardssince the air bag activation couldcause to the child serious injuries,even mortal, regardless of the seri-ousness of the crash that triggered it.You are advised to carry children al-ways with proper restraint systems onthe rear seats, as this is the most pro-tected position in the case of a crash.
WARNING

120
CORR
ECT U
SEOF
THE C
AR
WAR
NING
LIGHT
S AND
MESS
AGES
IN A
NEM
ERGE
NCY
CAR
MAIN
TENA
NCE
TECHN
ICAL
SPEC
IFICA
TIONS
IINDE
XDA
SHBO
ARD
AND C
ONTR
OLS
SAFE
TYDE
VICE
SPRESETTING FOR MOUNTING THE “UNIVERSAL ISOFIX”CHILD RESTRAINTSYSTEM
This car is preset for mounting the Uni-versal Isofix child restraint system, a newEuropean standardised system for carry-ing children safely.
Fig. 11 shows an example of child's re-straint system.
The Universal Isofix child’s seat coversweight group: 1.
Due to its different anchoring system, theUniversal Isofix child's seat shall be an-chored to the proper lower metal ringsA-fig. 12, set between rear seat back andcushion. The upper belt (provided withthe child's seat) shall be then secured toring B-fig. 13 set at the back of seat backrest at child's seat level.
It is possible to mount at the same timeboth the traditional restraint system andthe “Universal Isofix” one.
Remember that in case of “UniversalIsofix” child's seat, you can only use allthose seats approved with the markingECE R44/03 “Universal Isofix”.
fig. 12 F0M0050m
fig. 11 F0M0253m fig. 13 F0M0051m
Mount the child restraintsystem only with the car sta-
tionary. The Isofix child restraint sys-tem is properly anchored to themounting brackets when clicks areheard. In any case, keep to the in-stallation instructions that must beprovided by the child restraint systemManufacturer.
WARNING"Universal Isofix" “Duo Plus” child's seatis available at Lineaccessori Fiat.
For any further installation/use detail, re-fer to the “Instructions Manual” that mustbe provided by the child restraint systemManufacturer.

121
CORR
ECT U
SEOF
THE C
ARW
ARNI
NGLIG
HTS A
NDME
SSAG
ES
IN A
NEM
ERGE
NCY
CAR
MAIN
TENA
NCE
TECHN
ICAL
SPEC
IFICA
TIONS
INDE
XDA
SHBO
ARD
AND C
ONTR
OLS
SAFE
TYDE
VICE
S
FRONT AIR BAGS
The car is fitted with front air bags for thedriver, for the passenger and with driver’sknees air bag (where provided).
The front driver / passenger air bags andthe driver’s knees air bag (where provid-ed) have been designed to protect the oc-cupants in the event of head-on crashes ofmedium-high severity, by placing the cush-ion between the occupant and the steer-ing wheel or dashboard.
Front air bags are designed to protectcar’s occupants in front crashes and there-fore non-activation in other types of col-lisions (side collisions, rear shunts, roll-overs, etc.) is not a system malfunction.
In case of crash, an electronic control unit,when required, triggers the inflation of thecushion. The cushion immediately inflates,placing itself as a protection between thebody of the front occupants and the struc-ture that could cause injuries. Immediate-ly after, the cushion deflates.
The front driver / passenger air bags andthe driver’s knees air bag (where provid-ed) are not a replacement of but comple-mentary to the use of belts, which shouldalways be worn, as specified by law in Eu-rope and most non European countries.
Facing backwards
Facing backwards
Facing backwards
Facing backwards
Facing backwards
Facing backwards
Facing forwards
Facing forwards
Facing forwards
IL
IL
IL
IL
IL
IL
IUF
IUF
IUF
E
E
D
C
D
C
B
B1
A
PASSENGER SEAT COMPLIANCE WITH REGULATIONS ON ISOFIX UNIVERSAL CHILD’S SEAT USE
The table below, according to ECE 16 European Directive, shows the different instal-lation possibilities of Isofix restraint systems on seats fitted with Isofix Universal fas-teners.
Range of weight Child’s seat Isofix Isofix position direction size group side rear
Group 0 - 0 to 10 kg
Group 0+ - 0 to 13 kg
Group I - 9 to 18 kg
IUF: suitable for Isofix child restraint systems to be set facing forwards, universalclass (fitted with third upper fastener), approved for the weight group.
IL: suitable for Isofix Type child restraint systems, specific and approved for this typeof car. The child's seat can be installed by moving forward the front seat.

122
CORR
ECT U
SEOF
THE C
AR
WAR
NING
LIGHT
S AND
MESS
AGES
IN A
NEM
ERGE
NCY
CAR
MAIN
TENA
NCE
TECHN
ICAL
SPEC
IFICA
TIONS
IINDE
XDA
SHBO
ARD
AND C
ONTR
OLS
SAFE
TYDE
VICE
S
PASSENGER’S FRONT AIR BAG(where provided) fig. 15
It consists of an instant-inflating cushioncontained into a special recess in thedashboard, this cushion has a volume big-ger than that of the driver.
fig. 14 F0M0360m
fig. 15 F0M0053m
In minor crashes (for which the restrain-ing action of the seat belts is sufficient), theair bags are not deployed. Also in this caseit is of vital importance to wear the seatbelts since in case of side crash they guar-antee proper positioning of the occupantand prevent the occupants to be pitchedout of the car in case of violent crashes.
DRIVER’S FRONT AIR BAG fig. 14
It consists of an instant-inflating cushioncontained in a special recess in the cen-tre of the steering wheel.
Do not apply stickers or oth-er objects to the steering
wheel or to the air bag cover on thepassenger’s side or on the side rooflining. Never put objects (e.g. mobilephones) on the dashboard on pas-senger side since they could interferewith proper air bag inflation and al-so cause serious injury.
WARNINGThe volume of front air bags at max. in-flation fills most of the space between thesteering wheel and the driver and betweenthe dashboard and the passenger.
In case of crash, a person not wearing theseat belt moves forward and may come in-to contact with the cushion while it is stillinflating. Under this circumstance the pro-tection offered by the air bag is reduced.
Front air bag may not be activated in thefollowing situations:
❒ in collisions against highly deformableobjects not affecting the car front sur-face (e.g. bumper collision against guardrail, etc.);
❒ in case of wedging under other vehiclesor protective barriers (for example un-der a truck or guard rail), the air bagis not triggered as it offers no additionalprotection compared with the seatbelts, consequently it would be point-less. Therefore, failure to come into ac-tion in the above circumstance doesnot mean that the system is not work-ing properly.

123
CORR
ECT U
SEOF
THE C
ARW
ARNI
NGLIG
HTS A
NDME
SSAG
ES
IN A
NEM
ERGE
NCY
CAR
MAIN
TENA
NCE
TECHN
ICAL
SPEC
IFICA
TIONS
INDE
XDA
SHBO
ARD
AND C
ONTR
OLS
SAFE
TYDE
VICE
S
DRIVER’S KNEES AIR BAG(where provided) fig. 16
Knees air bag consists of an instant-inflat-ing cushion housed into a special com-partment provided for the purpose underthe steering wheel at driver’s knees lev-el, designed to give further protection inthe event of frontal crash.
MANUAL DEACTIVATION OFPASSENGER’S FRONT AIR BAG AND SIDE BAG (where provided)
Should it be absolutely necessary to car-ry a child on the front seat, the passenger’sfront air bag and the Side Bag (where pro-vided) can be deactivated.
The instrument panel warning light Fwillstay on glowing steadily until reactivatingthe passenger’s front air bag and the SideBag (where provided).
SERIOUS DANGER: Withpassenger’s air bag active(ON), never place child’sseats with the cradle facingbackwards since the air bagactivation could cause to
the child serious injuries, even mortal.In the case of need, always deactivatethe passenger’s air bag when a child’sseat is placed on the front seat. Thefront passenger’s seat shall be ad-justed in the most backward positionto prevent any contact betweenchild’s seat and dashboard. Even ifnot compulsory by law, you are rec-ommended to reactivate the air bagimmediately as soon as child trans-port is no longer necessary.
WARNING
fig. 16 F0M0054m
To deactivate the passen-ger’s front air bag and the
Side Bag (where provided), refer toparagraphs “Digital display” and“Multifunction display” in section“Dashboard and controls”.
WARNING

SIDE AIR BAGS
The car is fitted with front side bags fordriver and passenger (where provided) forprotecting the chest and window bags(where provided) for protecting front andrear passengers’ head.
Side bags (where provided) protect caroccupants from side crashes of medium-high severity, by placing the cushion be-tween the occupant and the internal partsof the side structure of the car.
Non-activation of side bags in other typesof collisions (front collisions, rear shunts,roll-overs, etc...) is not a system malfunc-tion.
In case of side crash, an electronic controlunit, when required triggers the inflationof the cushion. The cushion immediatelyinflates, placing itself as a protection, be-tween the occupant’s body and the struc-ture that could cause injuries. Immediate-ly after, the cushion deflates.
Side bags (where provided) are not a re-placement of but complementary to thebelts, which you are recommended to al-ways wear, as specified by law in Europeand most non-European countries.
FRONT SIDE BAGS - CHESTAND PELVIS ZONEPROTECTION fig. 17(where provided)
Front side bags are housed in the seat backrests, they consist of an instant inflationcushion designed to increase protectionof the occupants’ chest and pelvis zone inthe event of a side crash of medium-highseverity.
SIDE WINDOW BAGS - HEADPROTECTION fig. 18 (where provided)
They consist of two “curtain” cushions,one on the right and the other on the leftside of the car, located behind the sidecoverings of the roof and covered byproper finishing.
Window bags have been designed for pro-tecting the head of front and rear occu-pants in the event of side crash, thanks tothe wide cushion inflation surface.
IMPORTANT In the event of side crash,you can obtain the best protection by thesystem keeping a correct position on theseat, allowing thus a correct window bagunfolding.
124
CORR
ECT U
SEOF
THE C
AR
WAR
NING
LIGHT
S AND
MESS
AGES
IN A
NEM
ERGE
NCY
CAR
MAIN
TENA
NCE
TECHN
ICAL
SPEC
IFICA
TIONS
IINDE
XDA
SHBO
ARD
AND C
ONTR
OLS
SAFE
TYDE
VICE
S
fig. 17 F0M0140m fig. 18 F0M0141m

125
CORR
ECT U
SEOF
THE C
ARW
ARNI
NGLIG
HTS A
NDME
SSAG
ES
IN A
NEM
ERGE
NCY
CAR
MAIN
TENA
NCE
TECHN
ICAL
SPEC
IFICA
TIONS
INDE
XDA
SHBO
ARD
AND C
ONTR
OLS
SAFE
TYDE
VICE
S
IMPORTANT The front air bags and/orside bags may be deployed if the car is sub-ject to heavy knocks or accidents involv-ing the underbody area, such as for ex-ample violent shocks, against steps, kerbsor low obstacles, falling of the car in bigholes or sags in the road.
IMPORTANT When the airbag inflates itemits a small amount of dusts. These dustsare harmless and is not the beginning ofa fire; then the unfold cushion surface andthe car interiors can be covered by a dustyremains: this dust can irritate skin andeyes. In case of contact, wash yourself us-ing neutral soap and water.
Expiration dates of pyrotechnic charge andcoil contact are indicated on the label in-side the glovebox. As these dates ap-proach, contact Fiat Dealership to havethem replaced.
IMPORTANT Should an accident occur inwhich any of the safety devices is activat-ed, take the car to a Fiat Dealership tohave the devices activated replaced and tohave the system checked.
Every control, repair and replacement op-erations concerning the air bags must on-ly be carried out c/o Fiat Dealership.
If you are having the car scrapped, havethe air bag system deactivated at a FiatDealership first. If the car changes own-ership, the new owner must be informedof the method of use of air bags and theabove warnings and also be given this“Owner Handbook”.
IMPORTANT The triggering of preten-sioners, front air bags and side bags is de-cided in a differentiated manner by theelectronic control unit, depending on thetype of crash. The failure to deploy one ormore of them does not mean that the sys-tem is not working properly.
Never rest head, arms andelbows on the door, on the
windows and in the window bag areato prevent possible injuries during in-flation phase.
WARNING
Never lean head, arms andelbows out of window.
WARNING
GENERAL WARNINGS
If when turning the key toMAR the warning light ¬
does not turn on or if it stays on whentravelling (together with the messageon the multifunction display, whereprovided) there could be a failure insafety systems; in this event air bagsor pretensioners could not trigger incase of impact or, in a minor num-ber of cases, they could trigger acci-dentally. Contact Fiat Dealership im-mediately to have the systemchecked.
WARNING
Do not cover the backrest offront and rear seats with
trims or covers that are not suitableto be used with side bags.
WARNING
Never travel with objects onyour lap, in front of your
chest or with a pipe, pencil, etc. be-tween your lips; injury may result inthe event of the air bag being trig-gered.
WARNING

126
CORR
ECT U
SEOF
THE C
AR
WAR
NING
LIGHT
S AND
MESS
AGES
IN A
NEM
ERGE
NCY
CAR
MAIN
TENA
NCE
TECHN
ICAL
SPEC
IFICA
TIONS
IINDE
XDA
SHBO
ARD
AND C
ONTR
OLS
SAFE
TYDE
VICE
SAlways keep your hands onthe steering wheel rim when
driving, so that if the air bag is trig-gered, it can inflate without meetingany obstacles which could cause seri-ous harm to you. Do not drive withthe body bent forwards, keep the seatback rest in the erect position andlean your back well against it.
WARNING
Remember that with the keyengaged and at MAR, even if
the engine is not running, the air bagsmay be triggered on a stationary carif it is bumped by another moving car.Therefore, never seat children on thefront seat even when the car is sta-tionary. On the other hand rememberthat if the key is at STOP, no safetysystem (air bags or pretensioners) istriggered in the event of an impact; inthis case, failure to come into actioncannot be considered as a sign thatthe system is not working properly.
WARNING
Do not wash the seat backrest with pressurised water
or steam (by hand or at automaticseat washing stations).
WARNING
The front air bag is triggeredfor shocks greater in magni-
tude that the pretensioners. For im-pacts between these two thresholds,it is therefore normal that only thepretensioners are triggered.
WARNING
Do not hook rigid objects tothe coat hooks and to the
support handles.
WARNING
The air bag does not substi-tute the seat belts, but only
increases their effectiveness. More-over, since the front air bags do notcome into operation in the event offront impact at low speed, side colli-sions, bumps from behind or over-turning, in these circumstances theoccupants would only be protectedby the seat belts which must thereforealways be fastened.
WARNING
When the ignition key isturned to MAR, the warning
light F (with passenger’s front airbag active) turns on and flashes forfew seconds to remind that passen-ger’s air bag will be deployed in acrash, after which it should go off.
WARNING
If the car has been stolen oran attempt to steal it has
been made, if it has been subjected tovandals or floods, have the air bagsystem checked by Fiat Dealership.
WARNING

127
WAR
NING
LIGHT
S AND
MESS
AGES
IN A
NEM
ERGE
NCY
CAR
MAIN
TENA
NCE
TECHN
ICAL
SPEC
IFICA
TIONS
INDE
XDA
SHBO
ARD
AND C
ONTR
OLS
SAFE
TYDE
VICE
SCO
RREC
T USE
OF
THE C
AR
ENGINE STARTING ........................................................... 128
PARKING................................................................................ 131
USING THE MANUAL GEARBOX ................................. 132
CONTAINING RUNNING COSTS................................. 133
SNOW TYRES ....................................................................... 137
SNOW CHAINS ................................................................... 137
CAR INACTIVITY ............................................................... 138
CCCOORRRREECCTT UUSSEE OOFF TTHHEE CCAARR

128
WAR
NING
LIGHT
S AND
MESS
AGES
IN A
NEM
ERGE
NCY
CAR
MAIN
TENA
NCE
TECHN
ICAL
SPEC
IFICA
TIONS
INDE
XDA
SHBO
ARD
AND C
ONTR
OLS
SAFE
TYDE
VICE
SCO
RREC
T USE
OF
THE C
ARENGINESTARTING
The car is fitted with an electronic enginelock device: if the engine fails to start, seethe paragraph “The Fiat CODE system” insection “Dashboard and controls”.
The engine may be noisier than usual dur-ing the first seconds of operation, espe-cially after it has not been used for a while.This characteristic feature does not com-promise functionality or reliability of thehydraulic tappets: the timing system de-vised to limit servicing.
We recommend that duringthe initial period you do notdrive to full car performance(e.g.: excessive acceleration,
long journeys at top speed, sharp brak-ing, etc.).
When the engine is switchedoff never leave the key intothe ignition switch to preventpointless current absorption
from draining the battery.
Running the engine in con-fined areas is extremely dan-
gerous. The engine consumes oxygenand produces carbon monoxidewhich is a highly toxic and lethal gas.
WARNING
Remember that the servo-brake and power steering
are not operational until the enginehas been started, therefore much ef-fort than usual is required on thebrake pedal and steering wheel.
WARNING
STARTING PROCEDURE FORPETROL VERSIONS
Proceed as follows:
❒ ensure that the handbrake is up;
❒ put the gear lever into neutral;
❒ press the clutch pedal down to thefloor without touching the accelerator;
❒ turn the ignition key to AVV and letit go the moment the engine starts.
If the engine does not start at the first at-tempt, return the ignition key to STOPbefore repeating starting.

129
WAR
NING
LIGHT
S AND
MESS
AGES
IN A
NEM
ERGE
NCY
CAR
MAIN
TENA
NCE
TECHN
ICAL
SPEC
IFICA
TIONS
INDE
XDA
SHBO
ARD
AND C
ONTR
OLS
SAFE
TYDE
VICE
SCO
RREC
T USE
OF
THE C
AR
If, when the ignition key is at MAR, warn-ing light Y remains lit together withwarning light U turn the key to STOPSTOP and then back to MAR; if the warn-ing light remains on, try with the otherkeys provided with the car.
IMPORTANT If the instrument panelwarning light Y stays on glowing steadi-ly, contact immediately Fiat Dealership.
IMPORTANT Never leave the ignition keyto MAR when the engine is off.
STARTING PROCEDURE FORDIESEL VERSIONS
Proceed as follows:
❒ Ensure that the handbrake is up;
❒ Put the gear lever into neutral;
❒ Turn the ignition key to MAR: thewarning lights m and Y on the in-strument panel will turn on;
❒ Wait for the warning lights Y andm to turn off. The hotter the engineis, the quicker this will happen;
❒ Press the clutch pedal down to thefloor without touching the accelerator;
❒ Turn the ignition key to AVV as soonas warning light m goes out. If youwait too long you will lose the benefitof the work done by the glow plugs. Re-lease the key as soon as the enginestarts.
If the engine does not start at the first at-tempt, return the ignition key to STOPbefore repeating starting.
If, when the ignition key is at MAR, the in-strument panel warning light Y remainslit together with warning light m turnthe key to STOP and then back to MAR;if the warning lights remain on, try withthe other keys provided with the car.
IMPORTANT If the instrument panelwarning light Y stays on glowing steadi-ly, contact immediately Fiat Dealership.
IMPORTANT Never leave the ignition keyto MAR when the engine is off.
The warning light m willflash for 60 seconds at start-up or during prolonged crank-ing to indicate a fault in the
glow plug heating system. You can usethe car as usual if the engine starts butyou should contact Fiat Dealership assoon as possible.

130
WAR
NING
LIGHT
S AND
MESS
AGES
IN A
NEM
ERGE
NCY
CAR
MAIN
TENA
NCE
TECHN
ICAL
SPEC
IFICA
TIONS
INDE
XDA
SHBO
ARD
AND C
ONTR
OLS
SAFE
TYDE
VICE
SCO
RREC
T USE
OF
THE C
ARSTOPPING THE ENGINE
Turn the ignition to STOP while the en-gine is idling.
IMPORTANT After a taxing drive, youshould allow the engine to “catch itsbreath” before turning it off by letting itidle to allow the temperature in the en-gine compartment to fall.
A quick burst on the acceler-ator before turning off the en-gine serves absolutely nopractical purpose, it wastes
fuel and is damaging especially to tur-bocharged engines.
HOW TO WARM UP THEENGINE AFTER IT HAS JUSTSTARTED (petrol and diesel engines)
Proceed as follows:
❒ Drive off slowly, letting the engine turnat medium revs. Do not accelerateabruptly;
❒ Do not drive at full performance for theinitial kilometres. Wait until the coolanttemperature gauge starts moving.
Remember that the servo-brake and power steering arenot operational until the en-gine has been started, there-
fore much effort than usual is requiredon the brake pedal and steering wheel.
Never bump start the engineby pushing, towing or coast-ing downhill as this couldcause fuel to flow into the
catalytic exhaust system and damageit beyond repair.

131
WAR
NING
LIGHT
S AND
MESS
AGES
IN A
NEM
ERGE
NCY
CAR
MAIN
TENA
NCE
TECHN
ICAL
SPEC
IFICA
TIONS
INDE
XDA
SHBO
ARD
AND C
ONTR
OLS
SAFE
TYDE
VICE
SCO
RREC
T USE
OF
THE C
AR
HANDBRAKE fig. 1
The handbrake lever is located betweenthe two front seats.
Pull the handbrake lever upwards until thecar cannot be moved. Four or five clicksare generally enough when the car is onlevel ground while nine or ten may be re-quired if the car is on a steep slope orladen.
IMPORTANT If this is not the case, con-tact Fiat Dealership to have the handbrakeadjusted.
When the handbrake lever is pulled upand the ignition key is at MAR, the in-strument panel warning light x will turnon.
PARKING THE CAR
Proceed as follows:
❒ Stop the engine and engage the hand-brake;
❒ Engage a gear (on a slope, engage firstgear if the car is faced uphill or reverseif it is faced downhill) and leave thewheels steered.
Block the wheels with a wedge or a stoneif the car is parked on a steep slope. Donot leave the key in the ignition switch toprevent draining the battery. Always re-move the key when you leave the car.
Never leave children unat-tended in the car. Always re-
move the ignition key when leavingthe car and take it out with you.
WARNING
fig. 1 F0M0115m
To release the handbrake:
❒ slightly lift the handbrake and press re-lease button A;
❒ keep button A pressed and lower thelever. Warning light x will turn off.
Press the brake pedal when carrying outthis operation to prevent the car frommoving accidentally.

132
WAR
NING
LIGHT
S AND
MESS
AGES
IN A
NEM
ERGE
NCY
CAR
MAIN
TENA
NCE
TECHN
ICAL
SPEC
IFICA
TIONS
INDE
XDA
SHBO
ARD
AND C
ONTR
OLS
SAFE
TYDE
VICE
SCO
RREC
T USE
OF
THE C
ARUSING THE MANUALGEARBOX
To engage the gears, press the clutch ped-al fully and shift the gear lever into one ofthe required positions (the diagram isshown on the knob fig. 2-3).
To engage the 6th gear, move the gearshiftlever pressing slightly rightwards to pre-vent engaging the 4th gear accidentally. Dothe same for shifting from 6th to 5th gear.
IMPORTANT The car can only be put in-to reverse gear when it has stopped mov-ing completely. With the engine running,before engaging the reverse, wait at least2 seconds with the clutch pedal fully downto prevent damage and grating of thegears.
fig. 2 F0M0142m
To change gears properlyyou must push the clutch
pedal fully down. It is therefore es-sential that there is nothing under thepedals: make sure the mats are lyingflat and do not get in the way of thepedals.
WARNING
Do not drive with your handresting on the gear lever asthe force exerted, even ifslight, could lead over time to
premature wear on the gearbox inter-nal components.
To engage reverse R (6-speed gearbox)from neutral, proceed as follows: raise ringA under the knob and at the same timemove the gearshift lever leftwards andthen forward fig. 2.
For 1.4 16v version, to engage reverse Rfrom neutral, lift the sliding ring A underthe knob and shift the lever to the rightand back fig. 3.
To engage reverse R (5-speed gearbox)from neutral, proceed as follows: raise ringA under the knob and at the same timemove the gearshift lever rightwards andthen forward fig. 2.
fig. 3 - 1.4 16v version F0M0285m

133
WAR
NING
LIGHT
S AND
MESS
AGES
IN A
NEM
ERGE
NCY
CAR
MAIN
TENA
NCE
TECHN
ICAL
SPEC
IFICA
TIONS
INDE
XDA
SHBO
ARD
AND C
ONTR
OLS
SAFE
TYDE
VICE
SCO
RREC
T USE
OF
THE C
AR
Roof rack/ski rack
Remove the roof rack or the ski rack fromthe roof as soon as they are no longerused. These accessories lower air pene-tration and adversely affect consumptionlevels. When needing to carry particular-ly voluminous objects, preferably use atrailer.
Electric devices
Use electric devices only for the amountof time needed. Rear heated window, ad-ditional headlights, windscreen wipers andheater fan need a considerable amount ofenergy, therefore increasing the require-ment of current increases fuel consump-tion (up to +25% in the urban cycle).
Climate control
The air conditioner is an additional loadwhich greatly affects the engine leading tohigher consumption (on average up to+20%). When the temperature outsidethe car permits it, use the air vents wherepossible.
Spoilers
The use of non-certified aerodynamicitems may adversely affect air drag andconsumption levels.
DRIVING STYLE
Starting
Do not warm the engine with the car ata standstill or at idle or high speed: underthese conditions the engine warms upmuch more slowly, increasing electricalconsumption and emissions. It is thereforeadvisable to move off immediately, slow-ly, avoiding high speeds. This way the en-gine will warm faster.
Unnecessary actions
Avoid accelerating when waiting at trafficlights or before switching off the engine.This and also double declutching is ab-solutely pointless on modern cars and al-so increase consumption and pollution.
Gear selection
As soon as the conditions of the traffic androad allow, use a higher gear. Using a lowgear to obtain brilliant performance in-creases consumption.
In the same way improper use of a highgear increases consumption, emissions anengine wear.
CONTAININGRUNNING COSTS
Here are some suggestions which mayhelp you to keep the running costs of yourcar down and lower the amount of toxicemissions released into the atmosphere.
GENERAL CONSIDERATIONS
Car maintenance
Have checks and adjustments carried outin accordance with the “Service schedule”.
Tyres
Check the pressure of the tyres routine-ly at an interval of no more than 4 weeks:if the pressure is too low, consumptionlevels increase as resistance to rolling ishigher.
Unnecessary loads
Do not travel with too much luggagestowed in the boot. The weight of the car(especially when driving in town) and itstrim greatly affects consumption and sta-bility.

134
WAR
NING
LIGHT
S AND
MESS
AGES
IN A
NEM
ERGE
NCY
CAR
MAIN
TENA
NCE
TECHN
ICAL
SPEC
IFICA
TIONS
INDE
XDA
SHBO
ARD
AND C
ONTR
OLS
SAFE
TYDE
VICE
SCO
RREC
T USE
OF
THE C
ARCONDITIONS OF USE
Cold starting
Short journeys and frequent cold starts donot allow the engine to reach optimum op-erating temperature. This results in a sig-nificant increase in consumption levels(from +15 to +30% on the urban cycle)and emission of harmful substances.
Traffic and road conditions
Rather high consumption levels are tied tosituations with heavy traffic, for examplein queues with frequent use of the lowergears or in cities with many traffic lights.Also winding mountain roads and roughroad surfaces adversely affect consump-tion.
Traffic hold-ups
During prolonged hold-ups (level crossings)the engine should be switched off.
TOWING TRAILERS
IMPORTANT NOTES
For towing caravans or trailers the carmust be fitted with a certified tow hookand an adequate electric system. Installa-tion should be carried out by specialisedpersonnel who release a special documentfor circulation on the road.
Install any specific and/or additional rear-view mirrors as specified by law.
Remember that when towing a trailer,steep hills are harder to climb, the brak-ing spaces increase and overtaking takeslonger depending on the overall weight.
Engage a low gear when driving downhill,rather than constantly using the brake.
The weight the trailer exerts on the cartow hook reduces by the same amountthe actual car loading capacity. To makesure the maximum towable weight is notexceeded (given in the log book) accountshould be taken of the fully laden trailer,including accessories and personal be-longings.
Top speed
Fuel consumption considerably increaseswith speed. Avoid superfluous braking andaccelerating, which cost in terms of bothfuel and emissions.
Acceleration
Accelerating violently increasing the revswill greatly affect consumption and emis-sions: acceleration should be gradual andshould not exceed the maximum torque.

135
WAR
NING
LIGHT
S AND
MESS
AGES
IN A
NEM
ERGE
NCY
CAR
MAIN
TENA
NCE
TECHN
ICAL
SPEC
IFICA
TIONS
INDE
XDA
SHBO
ARD
AND C
ONTR
OLS
SAFE
TYDE
VICE
SCO
RREC
T USE
OF
THE C
AR
INSTALLING THE TOW HOOK
The towing device should be fastened tothe body by specialised personnel accord-ing to any additional and/or integrative in-formation supplied by the Manufacturer ofthe device.
The towing device must meet current reg-ulations with reference to 94/20/EC Di-rective and subsequent amendments.
For any version the towing device usedmust match the towable weight of the caron which it is to be installed.
For the electric connection a unified con-nector should be used which is generallyplaced on a special bracket normally fas-tened to the towing device, and a specialECU for external trailer light control shallbe installed on the car.
For the electrical connection, 7 or 13 pin12VDC connection is to be used (CU-NA/UNI and ISO/DIN Standards). Followthe instructions provided by the car man-ufacturer and/or the tow hitch manufac-turer.
An electric brake should be supplied di-rectly by the battery through a cable witha cross section of no less than 2.5 mm2.
IMPORTANT Electric brake or other de-vice shall be used with running engine.
In addition to the electrical branches, thecar’s electric system can only be con-nected to the supply cable for an electricbrake and to the cable for an internal light,though not above 15W.
For connections use the preset controlunit with battery cable no less than 2.5mm2.
Do not exceed the speed limits of thecountry you are driving in. In any case donot exceed 100 km/h.
Fit a suitable towing stabilizer to the trail-er to be towed.
The ABS system with whichthe car may be fitted does
not control the trailer braking system.Therefore be cautious on slipperyroads.
WARNING
Under no circumstancesshould the car brake system
be altered to control the trailer brake.The trailer braking system must befully independent of the car’s hy-draulic system.
WARNING

136
WAR
NING
LIGHT
S AND
MESS
AGES
IN A
NEM
ERGE
NCY
CAR
MAIN
TENA
NCE
TECHN
ICAL
SPEC
IFICA
TIONS
INDE
XDA
SHBO
ARD
AND C
ONTR
OLS
SAFE
TYDE
VICE
SCO
RREC
T USE
OF
THE C
ARAssembly diagram fig. 3
The tow hook structure must be fastenedin the points shown by the symbol Ø us-ing a total of 6 M10 screws.
The internal counterplates are to be atleast 6 mm thick.
The hook should be fastened to the bodyavoiding any type of drilling and trimmingof the rear bumpers that remains visiblewhen the hook is removed.
IMPORTANT It is compulsory to fasten alabel (plainly visible) of suitable size andmaterial with the following wording:
MAX LOAD ON BALL 60 kg
After fitting, screw holesshall be sealed to prevent ex-
haust gas inlet.
WARNING
fig. 3 F0M0143m
Existinghole
Existingscrew
Existing screw
Existinghole
Existinghole
Existing holeSt
anda
rd t
ow b
all
Full
load

137
WAR
NING
LIGHT
S AND
MESS
AGES
IN A
NEM
ERGE
NCY
CAR
MAIN
TENA
NCE
TECHN
ICAL
SPEC
IFICA
TIONS
INDE
XDA
SHBO
ARD
AND C
ONTR
OLS
SAFE
TYDE
VICE
SCO
RREC
T USE
OF
THE C
AR
IMPORTANT When snow tyres are usedwith a max speed index below the onethat can be reached by the car (increasedby 5%), place a notice in the passenger’scompartment, plainly in the driver’s viewwhich states the max permissible speed ofthe snow tyres (as per EC Directive).
All four tyres should be the same (brandand track) to ensure greater safety whendriving and braking and better driveability.
Remember that it is inappropriate tochange the direction of rotation of tyres.
SNOW CHAINS
Use of snow chains should be in compli-ance with local regulations.
Snow chains should only be applied to thedriving wheels (front wheels). We rec-ommend using Lineaccessori Fiat snowchains.
Check the tension of the chains after thefirst few metres have been driven.
IMPORTANT With snow chains, use theaccelerator with extreme care to preventor to limit as much as possible slipping ofthe driving wheels that could cause chainbreaking resulting in damages to the carbody or mechanical components.
IMPORTANT Use 9 mm reduced sizesnow chains.
SNOW TYRES
Use snow tyres of the same size as thenormal tyres provided with the car.
Fiat Dealership will be happy to provideadvice concerning the most suitable typeof tyre for the customer’s requirements.
For the type of tyre to be used, inflationpressures and the specifications of snowtyres, follow the instructions given in para-graph “Wheels” in section “Technicalspecifications”.
The winter features of these tyres are re-duced considerably when the tread depthis below 4 mm. In this case, they shouldbe replaced.
Due to the snow tyre features, under nor-mal conditions of use or on long motor-way journeys, the performance of thesetyres is lower than that of normal tyres. Itis therefore necessary to limit their use tothe purposes for which they are certified.
The max speed for snowtyres with “Q” marking is
160 km/h; 190 km/h for tyres with “T”marking and 210 km/h for tyres withH marking. The Road Traffic Codespeed limits must however be alwaysstrictly observed.
WARNING

138
WAR
NING
LIGHT
S AND
MESS
AGES
IN A
NEM
ERGE
NCY
CAR
MAIN
TENA
NCE
TECHN
ICAL
SPEC
IFICA
TIONS
INDE
XDA
SHBO
ARD
AND C
ONTR
OLS
SAFE
TYDE
VICE
SCO
RREC
T USE
OF
THE C
ARCAR INACTIVITY
If the car is to be left inactive for longerthan a month, the following precautionsshould be noted:
❒ park the car in covered, dry and if pos-sible well-ventilated premises;
❒ engage a gear;
❒ check that the handbrake is not en-gaged;
❒ disconnect the battery negative termi-nal and check the battery charge. Thischeck is to be repeated every threemonths. Recharge if the optical indica-tor shows a dark colour without thecentral green area;
❒ clean and protect the painted parts us-ing protective wax;
❒ clean and protect the shiny metal partsusing special compounds readily avail-able;
❒ sprinkle talcum powder on the rubberwindscreen and rear window wiperblades and lift them off the glass;
❒ slightly open the windows;
❒ cover the car with a cloth or perforat-ed plastic sheet. Do not use sheets ofnon-perforated plastic as they do notallow moisture on the car body toevaporate;
❒ inflate tyres to +0.5 bar above the nor-mal specified pressure and check it atintervals;
❒ if you don’t disconnect the battery fromthe electric system, check its chargeevery month and recharge it if the op-tical indicator shows a dark colourwithout the central green area;
❒ do not drain the engine cooling system.
IMPORTANT Where relevant, switch offthe car alarm with the remote control.
Keep your speed down whensnow chains are fitted. Donot exceed 50 km/h. Avoidpotholes, steps and pave-ments and avoid also to dri-ve for long distances on
roads not covered with snow to pre-vent damaging the car and theroadbed.
WARNING
Tyres 195/55 R16 87H and205/45 R17 88V cannot be
fitted with snow chains.
WARNING

139
IN A
NEM
ERGE
NCY
CAR
MAIN
TENA
NCE
TECHN
ICAL
SPEC
IFICA
TIONS
INDE
XDA
SHBO
ARD
AND C
ONTR
OLS
SAFE
TYDE
VICE
SCO
RREC
T USE
OF TH
E CAR
WAR
NING
LIGHT
S AND
MESS
AGES
GENERAL WARNINGS ..................................................... 140
LOW BRAKE FLUID ............................................................ 140
HANDBRAKE ON................................................................ 140
AIR BAG FAILURE................................................................ 141
ENGINE COOLANT HIGH TEMPERATURE................ 141
LOW BATTERY CHARGE ................................................. 142
LOW ENGINE OIL PRESSURE.......................................... 142
EXHAUSTED OIL ................................................................ 142
“DUALDRIVE” ELECTRIC POWER STEERING FAILURE............................................................. 142
INCOMPLETE DOOR LOCKING.................................... 143
LOW ENGINE OIL LEVEL ................................................ 143
SEAT BELTS NOT FASTENED.......................................... 143
EBD SYSTEM FAILURE ........................................................ 143
INJECTION SYSTEM FAILURE (DIESEL VERSIONS) ............................................................ 144
ENGINE CONTROL SYSTEM FAILURE (EOBD) (PETROL VERSIONS) ......................................................... 144
FRONT PASSENGER AIR BAG DEACTIVATED.......... 145
ABS SYSTEM FAILURE......................................................... 145
FUEL RESERVE....................................................................... 145
GLOW PLUG WARMING ................................................ 146
GLOW PLUG WARMING FAILURE ............................... 146
WATER IN DIESEL FUEL FILTER ..................................... 146
CAR PROTECTION SYSTEM FAILURE FIAT CODE ........................................................................... 146
EXTERNAL LIGHTS FAILURE........................................... 147
REAR FOGLIGHTS............................................................... 147
GENERIC FAILURE INDICATION ................................. 147
ESP SYSTEM FAILURE ........................................................ 148
BRAKE PAD WEAR ............................................................ 148
HILL HOLDER FAILURE .................................................... 148
PARKING SENSOR FAILURE ............................................ 149
CHECK TYRE PRESSURE .................................................. 149
LOW TYRE PRESSURE ...................................................... 149
TYRE PRESSURE UNSUITABLE FOR SPEED ................ 149
SIDELIGHTS AND LOW BEAMS ..................................... 150
FOLLOW ME HOME........................................................... 150
FRONT FOG LIGHTS.......................................................... 151
LEFT-HAND DIRECTION INDICATOR........................ 151
RIGHT-HAND DIRECTION INDICATOR.................... 151
“DUALDRIVE” ELECTRIC POWER STEERING .......... 151
CRUISE CONTROL ............................................................ 151
MAIN BEAM HEADLIGHTS............................................... 151
POSSIBLE PRESENCE OF ICE ON THE ROAD ........... 152
LIMITED RANGE ................................................................. 152
ASR SYSTEM ......................................................................... 152
SPEED LIMIT EXCEEDED .................................................. 152
WWWAARRNNIINNGG LLIIGGHHTTSS AANNDD MMEESSSSAAGGEESS

140
IN A
NEM
ERGE
NCY
CAR
MAIN
TENA
NCE
TECHN
ICAL
SPEC
IFICA
TIONS
INDE
XDA
SHBO
ARD
AND C
ONTR
OLS
SAFE
TYDE
VICE
SCO
RREC
T USE
OF TH
E CAR
WAR
NING
LIGHT
S AND
MESS
AGES
WARNING LIGHTSAND MESSAGES
GENERAL WARNINGSTurning on of warning light is accompa-nied by specific message and/or by buzzersound where provided by instrument pan-el. These indications are concise andcautionary and shall not be consideredas exhaustive and/or as an alternative tothe specifications contained in this Own-er Handbook which shall always be readthrough carefully and thoroughly. In caseof failure indication always refer to thespecifications contained in this sec-tion.IMPORTANT Failure indications displayedare divided into two categories: very se-rious and less serious failures.Very serious failures are indicated by arepeated and prolonged warning “cycle”.Less serious failures are indicated by a lim-ited warning “cycle”.The warning cycle of both failure cate-gories can be stopped by pressing buttonMENU ESC. The instrument panel warn-ing light will stay on until eliminating thefault.As concerns messages relevant to the ver-sions equipped with Dualogic gearbox, seethe attached Supplement.
LOW BRAKE FLUIDLEVEL (red)
HANDBRAKE ON (red)
Turning the ignition key to MAR thewarning light turns on, but it should go offafter few seconds.
Low brake fluid level
The warning light turns on when the lev-el of the brake fluid in the reservoir fallsbelow the minimum level, due to possi-ble leak in the circuit.
On certain versions the dedicated messageis displayed.
x
If the warning light x turnson when travelling (on cer-
tain versions together with the mes-sage on the display) stop the car im-mediately and contact Fiat Dealer-ship.
WARNING
Handbrake on
The warning light turns on when the hand-brake is on.
On certain versions, if the car is movingthe buzzer will also sound.
IMPORTANT If the warning light turns onwhen travelling, check that the handbrakeis not engaged.

141
IN A
NEM
ERGE
NCY
CAR
MAIN
TENA
NCE
TECHN
ICAL
SPEC
IFICA
TIONS
INDE
XDA
SHBO
ARD
AND C
ONTR
OLS
SAFE
TYDE
VICE
SCO
RREC
T USE
OF TH
E CAR
WAR
NING
LIGHT
S AND
MESS
AGES
FAILURE AIR BAGFAILURE (red)
Turning the ignition key toMAR the warning light turns on, but itshould go off after few seconds.
The warning light stays on glowing steadi-ly if there is a failure in the air bag system.
On certain versions the dedicated messageis displayed.
¬ If when turning the ignitionkey to MAR, the warning
light ¬ does not turn on or stays onwhen travelling there could be a fail-ure in safety systems; in this event airbags or pretensioners could not trig-ger in case of impact or, in a minornumber of cases, they could triggeraccidentally. Contact Fiat Dealershipimmediately to have the systemchecked.
WARNING
The failure of the warninglight ¬ (warning light off) is
also indicated by the flashing formore than the normal 4 seconds ofthe passenger’s front air bag deacti-vated warning light F.
WARNING
HIGH TEMPERATUREENGINE COOLANTFLUID (red)
Turning the ignition key to MAR thewarning light turns on, but it should go offafter few seconds.
The warning light turns on when the en-gine is overheated.
If the warning light comes on, proceed asfollows:
❒ normal driving conditions: stopthe car, switch off the engine andcheck whether the water level in thereservoir is not below the MIN mark.Otherwise wait for few seconds to al-low the engine cooling, then openslowly and carefully the cap, top upcoolant and check whether its level isfalling between MIN and MAX marksin the reservoir. Check visually anyleak. If, when restarting, the warninglight comes on again, contact a FiatDealership.
ç

LOW ENGINE OILPRESSURE (red)
EXHAUSTED OIL (red)(Multijet versions withDPF)
Low engine oil pressure
Turning the ignition key to MAR thewarning light turns on, but it should go outas soon as the engine is started.
On certain versions the dedicated messageis displayed.
v
If the warning light vturns on when the car is trav-
elling (on certain versions togetherwith the message on the display) stopthe engine immediately and contacta Fiat Dealership.
WARNING“DUALDRIVE”ELECTRIC POWERSTEERING FAILURE(red)
Turning the ignition key to MAR thewarning light turns on, but it should go offafter few seconds.
If the warning light stays on, you will nothave the steering assistance and the efforton the steering wheel will be increased,steering is however possible. Contact Fi-at Dealership.
On certain versions the dedicated messageis displayed.
g
142
IN A
NEM
ERGE
NCY
CAR
MAIN
TENA
NCE
TECHN
ICAL
SPEC
IFICA
TIONS
INDE
XDA
SHBO
ARD
AND C
ONTR
OLS
SAFE
TYDE
VICE
SCO
RREC
T USE
OF TH
E CAR
WAR
NING
LIGHT
S AND
MESS
AGES
❒ Car heavy duty (e.g.: towing traileruphill of fully laden car): decreasespeed, if the warning light stays on,stop the car. Wait for 2 or 3 minutesleaving the engine on and slightly ac-celerated to further activate the cir-culation of the coolant fluid, thenswitch the engine off. Check propercoolant level as described previously.
IMPORTANT Under severe use of thecar, keep the engine on and slightly accel-erated for few minutes before switching itoff.
On certain versions the dedicated messageis displayed.
LOW BATTERYCHARGE (red)
Turning the ignition key toMAR the warning light turns on, but itshould go out as soon as the engine isstarted (with the engine running at idlespeed a brief delay in going out is allowed).
If the warning light stays on glowing steadi-ly or flashing: contact immediately FiatDealership.
w
Exhausted oil
The warning light with turn on flashing to-gether with the message on the displaywhen the system detects that the engineoil is exhausted.
After the first indication, at each enginestarting the warning light v will go onflashing for about 60 seconds and thenevery 2 hours until oil is changed.
If warning light v flash-es, contact Fiat Dealership
immediately to have oil changed andinstrument panel warning light turnedoff.
WARNING

INCOMPLETE DOORLOCKING (red)
On certain versions the warn-ing light turns on when one or moredoors or the tailgate are not properlyshut.
On certain versions the dedicated messageis displayed.
A buzzer will sound when doors/tailgateare open and the car is moving.
´
143
IN A
NEM
ERGE
NCY
CAR
MAIN
TENA
NCE
TECHN
ICAL
SPEC
IFICA
TIONS
INDE
XDA
SHBO
ARD
AND C
ONTR
OLS
SAFE
TYDE
VICE
SCO
RREC
T USE
OF TH
E CAR
WAR
NING
LIGHT
S AND
MESS
AGES
INEFFICIENTEBDELECTRONICBRAKINGDISTRIBUTOR(red) (amber)
The turning on at the same time of warn-ing lights x and > with the engine run-ning indicates an EBD system failure orthat the system is unavailable; in this caseheavy braking may cause the rear wheelsto lock before time, with the possibility ofskidding. Drive with the utmost care tothe nearest Fiat Dealership to have thesystem checked.
On certain versions the dedicated messageis displayed.
x >
LOW ENGINE OILLEVEL (red)(where required)
Turning the ignition key to MAR,the warning light on the dial turns on but itshould go off after few seconds.
The warning light (if any) on the dial comeson when the engine oil level falls below theminimum level. Restore proper oil level(see “Checking levels” in section “Carmaintenance”).
On certain versions the dedicated mes-sage is displayed.
k
SEAT BELTS NOTFASTENED (red)
The warning light on the dialturns on glowing steadily with car station-ary and driver’s or passenger’s seat belt notfastened correctly. The warning light willturn on flashing together with the buzzerwhen, with car moving, driver’s or passen-ger’s seat belt are not fastened correctly.The S.B.R. (Seat Belt Reminder) buzzer canonly be excluded by Fiat Dealership. Oncertain versions the system can be reacti-vated through the set-up menu.
<

If, turning the ignition key toMAR, the warning light Udoes not turn on or if it turnson glowing steadily or flash-
ing when travelling (on certain versionstogether with the message on the dis-play), contact Fiat Dealership as soonas possible. Warning light Uoperationcan be checked by traffic agents byproper equipment. Comply with lawsand regulations of the country whereyou are driving.
If the light flashes, it is necessary to releasethe accelerator pedal to lower the speedof the engine until the warning light stopsflashing; continue the journey at moder-ate speed, trying to avoid driving condi-tions that may cause further flashing andcontact Fiat Dealership as soon as possi-ble.
EOBD engine control systemfailure
Under normal conditions, turning the ig-nition key to MAR, the warning light turnson, but it should go out as soon as the en-gine is started. The initial turning on indi-cates that the warning light is working prop-erly. If the warning light stays on or turnson when travelling:
❒ glowing steadily: means a fault in thesupply/ignition system which couldcause high emissions at the exhaust,possible lack of performance, poorhandling and high consumption levels.
On certain versions the dedicated mes-sage is displayed.
In these conditions it is possible to con-tinue driving without however requiringheavy effort or high speed from the en-gine. Prolonged use of the car with thewarning light on may cause damages. Con-tact Fiat Dealership as soon as possible.The warning light goes off if the fault dis-appears, but it is still stored by the system.
❒ flashing: indicates the possibility ofdamage to the catalyst (see “EOBDsystem” in section “Dashboard andcontrols”).
144
IN A
NEM
ERGE
NCY
CAR
MAIN
TENA
NCE
TECHN
ICAL
SPEC
IFICA
TIONS
INDE
XDA
SHBO
ARD
AND C
ONTR
OLS
SAFE
TYDE
VICE
SCO
RREC
T USE
OF TH
E CAR
WAR
NING
LIGHT
S AND
MESS
AGES
INJECTION SYSTEM FAILURE (Multijet versions - amber)
EOBD SYSTEMFAILURE (petrolversions - amber)
Injection system failure
Under normal conditions, turning the ig-nition key to MAR, the warning light turnson but it should go off after engine start-ing.
If the warning light stays on or turns onwhen travelling, means a fault in the sup-ply/ignition system which could cause highemissions at the exhaust, possible lack ofperformance, poor handling and high con-sumption levels.
On certain versions the dedicated messageis displayed.
In these conditions it is possible to con-tinue driving without however requiringheavy effort or high speed from the en-gine. In any case, contact Fiat Dealershipas soon as possible.
U

çFUEL RESERVE(amber)
Turning the ignition key toMAR the warning light turns on, but itshould go off after few seconds.
The warning light turns on when about 7litres fuel are left in the tank.
IMPORTANT The warning light flashes toindicate a failure, contact Fiat Dealershipas soon as possible to have the systemchecked.
145
IN A
NEM
ERGE
NCY
CAR
MAIN
TENA
NCE
TECHN
ICAL
SPEC
IFICA
TIONS
INDE
XDA
SHBO
ARD
AND C
ONTR
OLS
SAFE
TYDE
VICE
SCO
RREC
T USE
OF TH
E CAR
WAR
NING
LIGHT
S AND
MESS
AGES
INEFFICIENT ABSSYSTEM (amber)
Turning the ignition key toMAR the warning light turns on, but itshould go off after few seconds.
The warning light turns on when the sys-tem is inefficient or unavailable. In this casethe braking system keeps its effectivenessunchanged, but without the potential of-fered by the ABS system. Caution is ad-visable and it is necessary to contact FiatDealership.
On certain versions the dedicated messageis displayed.
>FFRONT PASSENGER’SAIR BAGDEACTIVATED(amber)
Warning light F comes on when frontpassenger’s air bag is deactivated.
With front passenger’s air bag on, turn-ing the ignition key to MAR, warning lightF comes on steadily for about 4 sec-onds, it flashes for other 4 seconds andthen it shall go off.
Warning light F indicatesalso warning light ¬ fail-
ures. This is indicated by intermittentflashing, over 4 seconds, of warninglight F. In this event warning light¬ indicates that there could be a fail-ure in safety systems. Contact FiatDealership immediately to have thesystem checked.
WARNING

146
IN A
NEM
ERGE
NCY
CAR
MAIN
TENA
NCE
TECHN
ICAL
SPEC
IFICA
TIONS
INDE
XDA
SHBO
ARD
AND C
ONTR
OLS
SAFE
TYDE
VICE
SCO
RREC
T USE
OF TH
E CAR
WAR
NING
LIGHT
S AND
MESS
AGES
GLOW PLUGWARMING (Multijet versions - amber)
GLOW PLUGWARMING FAILURE (Multijet versions -amber)
Glow plug warming
Turning the ignition key to MAR, thewarning light turns on and it will turn offwhen glow plugs reach the preset tem-perature. Start the engine immediately af-ter warning light switching off.
IMPORTANT With hot ambient temper-ature, warning light stays on for very shorttime.
Glow plug warming failure
The warning light turns on when there isa failure in the glow plug warming system.Contact Fiat Dealership as soon as possi-ble.
On certain versions the dedicated messageis displayed.
m
WATER IN DIESELFUEL FILTER (Multijet versions-amber)
Turning the ignition key to MAR thewarning light turns on, but it should go offafter few seconds.
The warning light turns on when there iswater in the diesel fuel filter.
On certain versions the dedicated messageis displayed.
c
The presence of water in thefuel circuit may cause seriousdamage to the entire injec-tion system and cause irreg-
ular engine operation. If the warninglight c turns on (on certain versions to-gether with the message on the display)contact Fiat Dealership as soon as pos-sible to have the system relieved. If theabove indications come on immedi-ately after refuelling, water has prob-ably been poured into the tank: turnthe engine off immediately and contactFiat Dealership.
CAR PROTECTIONSYSTEM FAILURE -FIAT CODE(amber)
Turning the key to MAR the warning lightshall flash only once and then go off.
If with the ignition key at MAR, the warn-ing light stays on, this indicates a possiblefailure (see “Fiat Code system” in section“Dashboard and controls”).
IMPORTANT The turning on at the sametime of the U and Y warning lights in-dicates a failure of the Fiat CODE system.
If with the engine running the warning lightY flashes, this means that the car is notprotected by the engine inhibitor device(see “Fiat Code system” in section “Dash-board and controls”).
Contact Fiat Dealership to have all the keymemorised.
Y

147
IN A
NEM
ERGE
NCY
CAR
MAIN
TENA
NCE
TECHN
ICAL
SPEC
IFICA
TIONS
INDE
XDA
SHBO
ARD
AND C
ONTR
OLS
SAFE
TYDE
VICE
SCO
RREC
T USE
OF TH
E CAR
WAR
NING
LIGHT
S AND
MESS
AGES
GENERIC FAILUREINDICATION (amber)
The warning light turns on in the follow-ing circumstances.
Engine oil pressure sensor failureThe warning light comes on when the en-gine oil pressure sensor is faulty. ContactFiat Dealership as soon as possible.
External lights failure
See what described for warning light 6.
Inertial fuel cut-off switchintervenedThe warning light comes on when the in-ertial fuel cut-off switch is triggered.
The display will show the dedicated mes-sage.
èEXTERNAL LIGHTFAILURE (amber)
The warning light turns onwhen one of the following lights
is failing:
– sidelights
– brake lights
– rear fog guards
– direction indicators
– number plate lights.
The failure referring to these lights couldbe: one or more blown bulbs, a blownprotection fuse or an electric connectioncut-off.
On certain versions warning light è turnson as an alternative.
On certain versions the dedicated messageis displayed.
W
REAR FOG LIGHTS(amber)
The warning light turns onwhen the rear fog lights are turned on.
4
Rain sensor failureThe warning light on the dial turns onwhen the rain sensor is faulty. Contact Fi-at Dealership.The display will show the dedicated mes-sage.
Parking sensor failure (where provided)See what described for warning light t.
Tyre pressure monitoring systemfailure (where provided)The warning light turns on when a failureis detected in the T.P.M.S. system (whereprovided).Contact Fiat Dealership as soon as possi-ble.Should one or more wheels without sen-sor be fitted, the instrument panel warn-ing light will come on and stay on untilrestoring initial conditions.The display will show the dedicated mes-sage.

ESP SYSTEM FAILURE(amber)
Turning the ignition key toMAR the warning light turns on, but itshould go off after few seconds.
If the warning light does not go off or stayson when travelling together with the but-ton led ASR OFF, contact Fiat Dealer-ship.
On certain versions the dedicated mes-sage is displayed.
Note Warning light flashing when drivingindicates that the ESP system is active.
á
HILL HOLDER FAILURE(amber)
Turning the ignition key toMAR the warning light turns on, but itshould go off after few seconds.
The warning light will turn on when theHill Holder system is faulty. Contact FiatDealership as soon as possible.
On certain versions warning light á turnson as an alternative.
On certain versions the dedicated mes-sage is displayed.
*
BRAKE PAD WEAR(amber)
The warning light on the dialturns on if the front brake pads are worn;in this case have them changed as soonas possible.
On certain versions the dedicated mes-sage is displayed.
d
148
IN A
NEM
ERGE
NCY
CAR
MAIN
TENA
NCE
TECHN
ICAL
SPEC
IFICA
TIONS
INDE
XDA
SHBO
ARD
AND C
ONTR
OLS
SAFE
TYDE
VICE
SCO
RREC
T USE
OF TH
E CAR
WAR
NING
LIGHT
S AND
MESS
AGES
Diesel particulate filter clogged(Multijet versions)The warning light turns on when the dieselparticulate filter is clogged and the drivingconditions do not enable to activate au-tomatically the reclaiming procedure.
To enable the cleaning procedure, keepthe car running until the warning lightturns off.
The display will show the dedicated mes-sage.

PARKING SENSORFAILURE (where provided) (amber)
The warning light turns on when failureis detected in parking sensors.
On certain versions warning light è turnson as an alternative.
Contact Fiat Dealership.
On certain versions the dedicated mes-sage is displayed.
tCHECK TYREPRESSURE (whereprovided) (amber)
LOW TYRE PRESSURE(where provided) (amber)
TYRE PRESSUREUNSUITABLE FORSPEED(where provided) (amber)
Turning the ignition key to MAR thewarning light will come but it should go offafter a few seconds.
Check tyre pressure
The warning light turns on to indicate theflat tyre.
Should two or more tyre be flat, the dis-play will show the indications corre-sponding to each tyre in sequence.Restore proper inflation pressure valuesas soon as possible (see paragraph “Coldinflation pressures” in section “TechnicalSpecifications”).
n
149
IN A
NEM
ERGE
NCY
CAR
MAIN
TENA
NCE
TECHN
ICAL
SPEC
IFICA
TIONS
INDE
XDA
SHBO
ARD
AND C
ONTR
OLS
SAFE
TYDE
VICE
SCO
RREC
T USE
OF TH
E CAR
WAR
NING
LIGHT
S AND
MESS
AGES
Low tyre pressure
The warning light will turn on when thepressure of one or more tyres falls belowthe preset threshold. In this way theT.P.M.S. system warns the driver that tyre/sis/are dangerously flat; possible puncture!
IMPORTANT Stop immediately with oneor more tyres flat, avoid braking sharply andabrupt turns. Replace immediately thepunctured tyre with the space-saver sparewheel (where provided) or repair the punc-ture tyre using the proper kit (see para-graph “If a tyre is punctured” in section “Inan emergency”) and then contact Fiat Deal-ership as soon as possible.

150
IN A
NEM
ERGE
NCY
CAR
MAIN
TENA
NCE
TECHN
ICAL
SPEC
IFICA
TIONS
INDE
XDA
SHBO
ARD
AND C
ONTR
OLS
SAFE
TYDE
VICE
SCO
RREC
T USE
OF TH
E CAR
WAR
NING
LIGHT
S AND
MESS
AGES
SIDE/TAILLIGHTS ANDLOW BEAMS (green)
FOLLOW ME HOME (green)
Side/taillights and low beams
The warning light turns on when side/tail-lights or low beams are turned on.
Follow me home
Testo:The warning light will turn when thisdevice is active (see “Follow me home”in section “Dashboard and controls”). Thedisplay will show the dedicated message.
3Strong radio-frequency nois-es could inhibit the regular
operation of the T.P.M.S. system.This condition will be indicated by amessage (where provided). The warn-ing message will go off automatical-ly as soon as the radio-frequencynoise will stop to disturb the system.
WARNINGTyre pressure unsuitable for speed
Should it be required to journey at a speedhigher than 160 km/h, inflate tyres at pres-sures values specified in paragraph “Infla-tion pressures”.
If the T.P.M.S. system (where provided)detects that the pressure of one or moretyres is unsuitable for the current speed,the warning light will turn on (togetherwith the message on the display) (see para-graph “Low tyre pressure” in this section)and it will stay on until the car speed slowdowns below the preset threshold.
IMPORTANT In this case slow down im-mediately since tyre overheating could im-pair tyre performance and life beyond re-pair, and even make the tyre to blow-out.

151
IN A
NEM
ERGE
NCY
CAR
MAIN
TENA
NCE
TECHN
ICAL
SPEC
IFICA
TIONS
INDE
XDA
SHBO
ARD
AND C
ONTR
OLS
SAFE
TYDE
VICE
SCO
RREC
T USE
OF TH
E CAR
WAR
NING
LIGHT
S AND
MESS
AGES
CRUISE CONTROL(where provided) (green)
Turning the ignition key toMAR the warning light will turn
on but it should go off after a few seconds.
The warning light turns on together withthe message on the display when turningthe knurled ring of the Cruise Control toON.
On certain versions the dedicated mes-sage is displayed.
Ü
“DUALDRIVE”ELECTRIC POWERSTEERINGACTIVATION (green)
The indication CITY will turn on when en-gaging the “Dualdrive” electric powersteering by pressing the relevant button.The indication CITY will turn off whenpressing the button again.
CITYMAIN BEAMS (blue)
The warning light turns onwhen the main beams are
turned on.
1
FRONT FOG LIGHTS(green)
The warning light turns onwhen the front fog lights are
turned on.
5
LEFT-HANDDIRECTIONINDICATOR (green - intermittent)
The warning light turns on when the di-rection indicator control lever is moveddownwards or, together with the right in-dicator, when the hazard warning lightbutton is pressed.
F
RIGHT-HANDDIRECTIONINDICATOR(green - intermittent)
The warning light turns on when the di-rection indicator control lever is movedupwards or, together with the left indica-tor, when the hazard warning light buttonis pressed.
D

152
IN A
NEM
ERGE
NCY
CAR
MAIN
TENA
NCE
TECHN
ICAL
SPEC
IFICA
TIONS
INDE
XDA
SHBO
ARD
AND C
ONTR
OLS
SAFE
TYDE
VICE
SCO
RREC
T USE
OF TH
E CAR
WAR
NING
LIGHT
S AND
MESS
AGES
ASR SYSTEM (versions withmultifunction display)
The ASR system can be turned off bypressing the button ASR OFF.
The display will show the dedicated mes-sage to warn the driver that the systemis off; at the same time the button led willturn on.
Pressing again button ASR OFF the but-ton led will turn off and the display willshow the dedicated message to warn thedriver that the system is on again.
POSSIBLE PRESENCE OF ICEON THE ROAD (versions withmultifunction display)
This indication starts flashing when theoutside temperature reaches or falls be-low 3°C to warn the driver of the possi-ble presence of ice on the road.
The display will show the dedicated mes-sage.
LIMITED RANGE (versions withmultifunction display)
The display will show the dedicated mes-sage to warn the driver that the cruisingrange is less than 50 km.
SPEED LIMIT EXCEEDED
The display will show the dedicated mes-sage when the car exceeds the set speedlimit (see “Multifunction Display” in sec-tion “Dashboard and controls”).

153
WAR
NING
LIGHT
S AND
MESS
AGES
CAR
MAIN
TENA
NCE
TECHN
ICAL
SPEC
IFICA
TIONS
INDE
XDA
SHBO
ARD
AND C
ONTR
OLS
SAFE
TYDE
VICE
SCO
RREC
T USE
OF TH
E CAR
IN A
NEM
ERGE
NCY
ENGINE STARTING ........................................................... 154
IF A TYRE IS PUNCTURED ............................................... 155
QUICK TYRE REPAIR KIT FIX & GO automatic ........................................................... 161
WHEN NEEDING TO CHANGE A BULB ................... 166
IF AN EXTERIOR LIGHT BURNS OUT.......................... 168
IF AN INTERIOR LIGHT BURNS OUT .......................... 173
IF A FUSE BLOWS................................................................ 175
IF THE BATTERY IS FLAT .................................................. 185
JACKING THE CAR............................................................. 186
TOWING THE CAR ........................................................... 187
IIINN AANN EEMMEERRGGEENNCCYY

154
WAR
NING
LIGHT
S AND
MESS
AGES
CAR
MAIN
TENA
NCE
TECHN
ICAL
SPEC
IFICA
TIONS
IINDE
XDA
SHBO
ARD
AND C
ONTR
OLS
SAFE
TYDE
VICE
SCO
RREC
T USE
OF TH
E CAR
IN A
NEM
ERGE
NCY
ENGINESTARTING
EMERGENCY START-UP
If the instrument panel warning light Yturns on glowing steadily, contact im-mediately Fiat Dealership.
JUMP STARTING fig. 1
If the battery is flat, it is possible to startthe engine using an auxiliary battery withthe same capacity or a little higher thanthe flat one.
Proceed as follows:
❒ Connect positive terminals (+ near theterminal) of the two batteries with ajump lead;
❒ With a second lead, connect the nega-tive terminal (–) of the auxiliary batteryto an earthing point Eon the engine orthe gearbox of the car to be started;
❒ Start the engine;
❒ When the engine has been started, re-move the leads reversing the orderabove.
If after a few attempts the engine does notstart, do not insist but contact the near-est Fiat Dealership.
fig. 1 F0M0361m
The starting procedure mustbe carried out by qualified
personnel because incorrect opera-tions may cause electrical discharge ofconsiderable intensity. The liquid con-tained in the battery is poisonous andcorrosive. Avoid contact with the skinand eyes. Keep naked flames and light-ed cigarettes away from the batteryand do not cause sparks.
WARNING

155
WAR
NING
LIGHT
S AND
MESS
AGES
CAR
MAIN
TENA
NCE
TECHN
ICAL
SPEC
IFICA
TIONS
INDE
XDA
SHBO
ARD
AND C
ONTR
OLS
SAFE
TYDE
VICE
SCO
RREC
T USE
OF TH
E CAR
IN A
NEM
ERGE
NCY
IMPORTANT Do not directly connect thenegative terminals of the two batteries:sparks could ignite the flammable gas fromthe battery. If the other battery is fitted inanother car, prevent accidental contactsbetween the metal parts of the two cars.
BUMP STARTING
Never bump start the engine (by pushing,towing, or coasting downhill) as this couldcause fuel to flow into the catalytic ex-haust system and damage it beyond repair.
IMPORTANT Remember that the brakebooster and the power steering systemare not operating until the engine is start-ed, a greater effort will therefore be re-quired to press the brake pedal or turnthe steering wheel.
IF A TYRE IS PUNCTURED
GENERAL INSTRUCTIONS
Wheel changing and correct use of thejack and spare wheel call for some pre-cautions as listed below.
Alert other drivers that thecar is stationary in compli-
ance with the regulations in force:hazard warning lights, warning trian-gle etc. Any passengers on boardshould leave the car, especially if itis heavily laden. Passengers shouldstay away from oncoming trafficwhile the wheel is being changed on.Pull the handbrake.
WARNING

156
WAR
NING
LIGHT
S AND
MESS
AGES
CAR
MAIN
TENA
NCE
TECHN
ICAL
SPEC
IFICA
TIONS
IINDE
XDA
SHBO
ARD
AND C
ONTR
OLS
SAFE
TYDE
VICE
SCO
RREC
T USE
OF TH
E CAR
IN A
NEM
ERGE
NCY
The spare wheel is specific toyour car, do not use it on
other models, or use the spare wheelof other models on your car. Wheelbolts are specific to your car: do notuse them on other models and do notuse bolts of other models.
WARNING
Have the punctured wheelrepaired and refitted as soon
as possible. Do not grease the threadsof bolts before installing them: theymight slip out.
WARNING
The jack shall only be usedfor changing wheels on the
car with which it is provided or oncars of the same model. It must notbe used for other purposes such as forinstance raising cars of other models.In no case should it be used for repairsunder the car. Incorrect positioningof the jack may cause the jacked carto fall. Do not use the jack for high-er capacities than stated on its label.
WARNING
Fasten the wheel cap cor-rectly to prevent the wheel
from coming free in motion. Nevertamper with the inflation valve. Nev-er place tools between the rim andtyre. Check and restore, if required,the pressure of tyres and spare wheelto the values given in section “Tech-nical Specifications”.
WARNING
Please note:
❒ the jack weight is 1.76 kg;
❒ the jack requires no adjustment;
❒ the jack cannot be repaired. If it breaksit must be replaced with a new jack;
❒ no tool other than its cranking devicemay be fitted on the jack.

157
WAR
NING
LIGHT
S AND
MESS
AGES
CAR
MAIN
TENA
NCE
TECHN
ICAL
SPEC
IFICA
TIONS
INDE
XDA
SHBO
ARD
AND C
ONTR
OLS
SAFE
TYDE
VICE
SCO
RREC
T USE
OF TH
E CAR
IN A
NEM
ERGE
NCY
To change a wheel proceed asfollows:
❒ Stop the car in a position that is notdangerous for oncoming traffic whereyou can change the wheel safely. Theground should be flat and adequatelyfirm;
❒ Turn the engine off and pull up thehandbrake;
❒ Engage first gear or reverse;
❒ Wear the reflecting safety jacket (com-pulsory by law in certain countries) be-fore getting out of the car;
❒ open the tailgate and lift the carpet orremove the Cargo box (where provid-ed);
❒ loosen the fastener A-fig. 2;
❒ take out the tool container C-fig. 2 andtake it near to the wheel to be changed;
❒ take the spare wheel B-fig. 2;
fig. 2 F0M0188m

158
WAR
NING
LIGHT
S AND
MESS
AGES
CAR
MAIN
TENA
NCE
TECHN
ICAL
SPEC
IFICA
TIONS
IINDE
XDA
SHBO
ARD
AND C
ONTR
OLS
SAFE
TYDE
VICE
SCO
RREC
T USE
OF TH
E CAR
IN A
NEM
ERGE
NCY
❒ loosen the bolts of the wheel to be re-placed by about one turn with thewrench provided E-fig. 3; if the car isfitted with alloy rims, shake the car tofacilitate removing the rim from thewheel hub; ❒ operate the device F-fig. 4 to extend
the jack until the top of the jack G-fig.4 fits correctly into catch H-fig. 4;
❒ warn anybody nearby that the car isabout to be lifted. They must stay clearand not touch the car until it is back onthe ground;
❒ fit the handle L-fig. 4 to operate thejack and lift the car until the wheel tobe changed is several centimetres offthe ground;
fig. 3 F0M0362m
fig. 4 F0M0191m

159
WAR
NING
LIGHT
S AND
MESS
AGES
CAR
MAIN
TENA
NCE
TECHN
ICAL
SPEC
IFICA
TIONS
INDE
XDA
SHBO
ARD
AND C
ONTR
OLS
SAFE
TYDE
VICE
SCO
RREC
T USE
OF TH
E CAR
IN A
NEM
ERGE
NCY
❒ for versions with wheel cap, remove thewheel cap after loosening the 3 fasteningbolts and finally loosen the fourth bolt L-fig. 5 and extract the wheel;
❒ make sure the contact surfaces be-tween spare wheel and hub are cleanso that the fastening bolts will not comeloose;
❒ fit the spare wheel by inserting the firstbolt for two threads into the hole clos-est to the inflation valve;
❒ fit the wheel cap making the lunettehole coincide with the bolt you have fit-ted using the wrench;
❒ tighten the fastening bolts;
❒ turn the jack handle L-fig. 4 to lowerthe car and remove the jack;
❒ use the wrench provided to fasten thebolts completely in a criss-cross fashionas shown in fig. 6;
❒ if replacing a wheel with alloy rim, stoveit temporarily into the spare wheelcompartment with the pleasant side fac-ing upwards.
REFITTING THE STANDARD WHEEL
Following the procedure described previ-ously, raise the car and remove the sparewheel.
fig. 5 F0M0192m fig. 6 F0M0194m

160
WAR
NING
LIGHT
S AND
MESS
AGES
CAR
MAIN
TENA
NCE
TECHN
ICAL
SPEC
IFICA
TIONS
IINDE
XDA
SHBO
ARD
AND C
ONTR
OLS
SAFE
TYDE
VICE
SCO
RREC
T USE
OF TH
E CAR
IN A
NEM
ERGE
NCY
Versions with steel rims
Proceed as follows:
❒ Make sure the contact surfaces be-tween standard wheel and hub areclean so that the fastening bolts will notcome loose;
❒ Fit the standard wheel by inserting thefirst bolt for two threads into the holeclosest to the inflation valve;
❒ Fit the wheel cap making the lunettehole coincide with the bolt you have fit-ted then, fit the other 3 bolts;
❒ Using the wrench provided, tighten thefastening bolts;
❒ Lower the car and remove the jack;
❒ Using the wrench provided, fully tight-en the bolts in the sequence shownpreviously in the figure.
Versions with alloy rims
Proceed as follows:
❒ Insert the wheel on the hub and usingthe wrench provided tighten the bolts;
❒ Lower the car and remove the jack;
❒ Using the wrench provided, fully tight-en the bolts in the sequence shown inthe figure.
When you have finished
❒ Stow the spare wheel in the space pro-vided in the boot;
❒ Fit the jack partially open in its con-tainer C-fig. 2 forcing it lightly to pre-vent it from vibrating when travelling;
❒ Put the tools back into their places inthe container;
❒ Stow the container C-fig. 2, completewith tools in the spare wheel;
❒ Tighten the tool container clamping de-vice A-fig. 2;
❒ refit the boot carpet or the Cargo box(where provided).

161
WAR
NING
LIGHT
S AND
MESS
AGES
CAR
MAIN
TENA
NCE
TECHN
ICAL
SPEC
IFICA
TIONS
INDE
XDA
SHBO
ARD
AND C
ONTR
OLS
SAFE
TYDE
VICE
SCO
RREC
T USE
OF TH
E CAR
IN A
NEM
ERGE
NCY
QUICK TYRE REPAIRKIT - FIX & GOautomatic
The quick tyre repair kit Fix & Go auto-matic is placed in the boot.
The kit fig. 7 includes:
❒ bottle A containing sealer and fittedwith:
– filling pipe B;
– sticker C bearing the notice “max.80 km/h”, to be placed in a positionvisible to the driver (on the instru-ment panel) after fixing the tyre;
❒ instruction brochure (see fig. 8), to beused for prompt and proper use of thequick repair kit and to be then handedto the personnel charged with handlingthe treated tyre;
❒ compressor D-fig. 7 including gaugeand connections;
❒ a pair of protection gloves located inthe side space of the compressor;
❒ adapters for inflating different elements.
fig. 7 F0M0198m
In the kit container (placed in the boot un-der the carpet) are also housed the screw-driver and the tow hitch.
fig. 8 F0M0199m
Hand the instructionbrochure to the personnel
charged with treating the tyre re-paired with the kit.
WARNING

162
WAR
NING
LIGHT
S AND
MESS
AGES
CAR
MAIN
TENA
NCE
TECHN
ICAL
SPEC
IFICA
TIONS
IINDE
XDA
SHBO
ARD
AND C
ONTR
OLS
SAFE
TYDE
VICE
SCO
RREC
T USE
OF TH
E CAR
IN A
NEM
ERGE
NCY
IT SHOULD BE NOTICED THAT:
The sealing fluid of the quick tyre repairkit is effective with external temperaturesbetween –20 °C and +50 °C.
The sealing fluid has limited life.
The compressor shall not beoperated for more than 20
minutes. Risk of overheating!. Tyresrepaired with the quick tyre repair kitshall be used temporarily only.
WARNING
In the event of a puncturecaused by foreign bodies, it ispossible to repair tyres show-ing damages on the track or
shoulder up to max 4 mm diameter.
Holes and damages on thetyre side walls cannot be re-
paired. Do not use the quick tyre re-pair kit if damaging is due to runningwith flat tyre.
WARNING
Repairs are not possible incase of damages on the
wheel rim (bad groove distortioncausing air loss). Do not remove for-eign bodies (screws or nails) from thetyre.
WARNING

163
WAR
NING
LIGHT
S AND
MESS
AGES
CAR
MAIN
TENA
NCE
TECHN
ICAL
SPEC
IFICA
TIONS
INDE
XDA
SHBO
ARD
AND C
ONTR
OLS
SAFE
TYDE
VICE
SCO
RREC
T USE
OF TH
E CAR
IN A
NEM
ERGE
NCY
INFLATING PROCEDURE
The cylinder contains ethyl-ene glycol. The cylinder con-
tains latex: it can cause allergic reac-tions. It is harmful if ingested or in-haled and irritant for the eyes and incase of contact. In case of contactrinse immediately with water and takeoff contaminated clothes. If swal-lowed, do not induce vomit, rinse outthe mouth, drink a lot of water andcall the doctor immediately. Keepaway from children. This product mustnot be used by asthmatics. Do not in-hale vapours. Call the doctor imme-diately in case of allergic reactions.Keep the cylinder in the space provid-ed for the purpose and far from heat.The sealing fluid has limited life.
WARNING Replace the cylinder if sealerhas run out. Do not throwaway the cylinder and thesealing fluid. Have the sealing
fluid and the cylinder disposed of incompliance with national and localregulations.
Put on the protection glovesprovided together with quick
tyre repair kit.
WARNING
❒ Pull up the handbrake. Loosen tyreinflation valve cap, take out the fillerhose A-fig. 9 and screw the ring nutB on the tyre valve;
fig. 9 F0M0363m

164
WAR
NING
LIGHT
S AND
MESS
AGES
CAR
MAIN
TENA
NCE
TECHN
ICAL
SPEC
IFICA
TIONS
IINDE
XDA
SHBO
ARD
AND C
ONTR
OLS
SAFE
TYDE
VICE
SCO
RREC
T USE
OF TH
E CAR
IN A
NEM
ERGE
NCY
❒ make sure the compressor switch D-fig. 10 is set to 0 (off), start the engineand fit plug E-fig. 11 into the nearestcurrent outlet and then turn on thecompressor by setting switch D-fig. 10to I (on). Inflate the tyre to the pres-sure specified in paragraph “Inflationpressure” in section “Technical Speci-fications”.
Check tyre pressure on gauge F-fig.10 with compressor off to obtain pre-cise reading;
❒ if after 5 minutes it is still impossibleto reach at least 1.5 bar, disengage com-pressor from valve and current outlet,then move the car forth for approx. tenmetres in order to distribute the seal-ing fluid inside the tyre evenly, then re-peat the inflation operation;
❒ If after this operation it is still impossi-ble after 5 minutes to reach at least 1.8bar, do not start driving since the tyreis excessively damaged and the quicktyre repair kit cannot guarantee suit-able sealing, contact Fiat Dealership;
❒ if reaching the tyre pressure specifiedin paragraph “Inflation pressure” in sec-tion “Technical Specifications”, startdriving immediately;
fig. 10 F0M0202m
fig. 11 F0M0203m
fig. 12 F0M0364m
Apply the sticker in a visibleposition for the driver to in-
dicate that the tyre has been treat-ed with the quick tyre repair kit. Dri-ve carefully especially when corner-ing. Do not exceed 80 km/h. Avoidheavy braking and accelerating.
WARNING
❒ after driving for about 10 minutes stopand check again the tyre pressure; pullup the handbrake;
If the pressure falls below 1.8bars, do not drive any fur-
ther: the quick tyre repair kit Fix & Goautomatic cannot guarantee properhold because the tyre is too muchdamaged. Contact Fiat Dealership.
WARNING

165
WAR
NING
LIGHT
S AND
MESS
AGES
CAR
MAIN
TENA
NCE
TECHN
ICAL
SPEC
IFICA
TIONS
INDE
XDA
SHBO
ARD
AND C
ONTR
OLS
SAFE
TYDE
VICE
SCO
RREC
T USE
OF TH
E CAR
IN A
NEM
ERGE
NCY
❒ if at least 1.8 bar pressure is read, re-store proper pressure (with enginerunning and handbrake on) and restart;
❒ drive with the utmost care to the near-est Fiat Dealership.
FOR CHECKING ANDRESTORING PRESSURE ONLY
The compressor can be also used just forrestoring pressure. Disconnect the quickconnection and connect it directly to thetyre valve fig. 13; in this way the cylinderis not connected to compressor and thesealing fluid will not flow into the tyre.
CYLINDER REPLACEMENT PROCEDURE
To replace the cylinder proceed as fol-lows:
❒ disconnect connection A-fig. 14;
❒ turn counter-clockwise the cylinder toreplace and raise it;
❒ fit the new cylinder and turn it clock-wise;
❒ connect connection A to the cylinderand fit the transparent tube B into theproper space.
It is of vital importance tocommunicate that the tyre
has been repaired using the quick tyrerepair kit. Hand the instructionbrochure to the personnel chargedwith treating the tyre repaired withthe kit.
WARNING
fig. 13 F0M0365m fig. 14 F0M0206m

166
WAR
NING
LIGHT
S AND
MESS
AGES
CAR
MAIN
TENA
NCE
TECHN
ICAL
SPEC
IFICA
TIONS
IINDE
XDA
SHBO
ARD
AND C
ONTR
OLS
SAFE
TYDE
VICE
SCO
RREC
T USE
OF TH
E CAR
IN A
NEM
ERGE
NCY
WHEN NEEDING TO CHANGE A BULB
GENERAL INSTRUCTIONS
❒ When a light is not working, check thatthe corresponding fuse is intact beforechanging a bulb. For the location of fus-es, refer to the paragraph “If a fuseblows” in this section;
❒ Before changing a bulb check the con-tacts for oxidation;
❒ Burnt bulbs must be replaced by oth-ers of the same type and power;
❒ Always check the height of the head-light beam after changing a bulb.
IMPORTANT The headlight inner surfacemay be lightly misted over: this is not afault but a natural fact due to low tem-perature and the level of air humidity. Itwill disappear as soon the headlights areturned on. The presence of drops insidethe headlights means water infiltration,therefore contact Fiat Dealership.
TYPES OF BULBS
Various types of bulbs are fitted to yourcar:
A Glass bulbs: clipped into position. Pullto remove.
B Bayonet type bulbs: to remove thistype of bulb from its holder, pressthe bulb and turn it counter-clock-wise.
C Tubular bulbs: release them fromtheir contacts to remove.
D-E Halogen bulbs: to remove the bulb,release the clip holding the bulb inplace.
Halogen bulbs must be han-dled touching only the metal-lic part. If the transparent bulbis touched with the fingers, its
lighting intensity is reduced and life ofthe bulb may be compromised. Iftouched accidentally, rub the bulb witha cloth moistened with alcohol and al-low to dry.
Modifications or repairs tothe electrical system (elec-
tronic control units) carried out in-correctly and without bearing the fea-tures of the system in mind can causemalfunctions with the risk of fire.
WARNING
Halogen bulbs contain pres-surised gas which, if broken,
may cause small fragments of glass tobe projected outwards.
WARNING
fig. 15 F0M0207m

167
WAR
NING
LIGHT
S AND
MESS
AGES
CAR
MAIN
TENA
NCE
TECHN
ICAL
SPEC
IFICA
TIONS
INDE
XDA
SHBO
ARD
AND C
ONTR
OLS
SAFE
TYDE
VICE
SCO
RREC
T USE
OF TH
E CAR
IN A
NEM
ERGE
NCY
Bulbs Ref. figure Type Power
Main-beam headlights
Dipped beam headlights
Front sidelights
Front fog lights (where provided)
Front direction indicators
Side direction indicators
Rear direction indicators
Taillights
Brake lights
Third brake light (additional brake light)
Reversing light
Rear fog lights
Number plate light
Front ceiling light with movable lens
Front ceiling light with spot lights
Rear ceiling light
Boot light
Courtesy light
H4
H4
W5W
H3
PY21W
WY5W
P21W
R5W
P21/5W
–
P21W
P21W
W5W
C10W
C10W
C10W
W5W
C5W
D
D
A
–
B
A
B
B
B
B
–
–
A
C
C
C
A
C
55W
60W
5W
55W
21W
5W
21W
5W
5W
2.3W
21W
21W
5W
10W
10W
10W
5W
5W

168
WAR
NING
LIGHT
S AND
MESS
AGES
CAR
MAIN
TENA
NCE
TECHN
ICAL
SPEC
IFICA
TIONS
IINDE
XDA
SHBO
ARD
AND C
ONTR
OLS
SAFE
TYDE
VICE
SCO
RREC
T USE
OF TH
E CAR
IN A
NEM
ERGE
NCY
IF AN EXTERIOR LIGHTBURNS OUT
For the type of bulb and power rating, see“When needing to change a bulb”.
FRONT LIGHT UNITS fig. 16
The front light units contain sidelights,dipped beam, main beam and direction in-dicator bulbs.
The bulbs are arranged inside the light unitas follows:
A sidelights
B dipped beams/main beams (doublelight)
C direction indicators
SIDELIGHTS fig. 17
To change the bulb, proceed as follows:
❒ remove the snap-fitted rubber cap A,as shown by the arrow;
❒ press tabs B and remove the bulb hold-er;
❒ remove the bulb C and replace it;
❒ refit the bulb holder and refit the capA, check for proper locking.
fig. 16 F0M0178m fig. 17 F0M0179m

169
WAR
NING
LIGHT
S AND
MESS
AGES
CAR
MAIN
TENA
NCE
TECHN
ICAL
SPEC
IFICA
TIONS
INDE
XDA
SHBO
ARD
AND C
ONTR
OLS
SAFE
TYDE
VICE
SCO
RREC
T USE
OF TH
E CAR
IN A
NEM
ERGE
NCY
DIPPED BEAM/ MAIN BEAMHEADLIGHTS fig. 18
To change the bulb, proceed as follows:
❒ remove the snap-fitted rubber cap A,as shown by the arrow;
❒ disconnect the central electric connec-tor and release the bulb holder catch;
❒ remove the bulb B and replace it;
❒ fit the new bulb, making the outlines ofthe metallic part coincide with thegrooves on the reflector;
❒ refit the bulb holder catch and reconnectthe electrical connector;
❒ refit the cap A locking it properly.
DIRECTION INDICATORS
Front fig. 19/a - 19/b
To change the bulb, proceed as follows:
❒ steer the right/left wheel outwards;
❒ turn the catch A-fig. 19/a as shown bythe arrow, then use the lid B;
❒ remove the cover/bulb holder C-fig. 19/b turning counterclockwise;
❒ remove the bulb D pushing it gently andturning counterclockwise (“bayonet”clamping), then replace it;
❒ refit the cover/bulb holder C by turn-ing it clockwise and locking it proper-ly;
❒ close the lid B-fig. 19/a the turn thecatch A.
fig. 18 F0M0180m fig. 19/a F0M0261m fig. 19/b F0M0181m

170
WAR
NING
LIGHT
S AND
MESS
AGES
CAR
MAIN
TENA
NCE
TECHN
ICAL
SPEC
IFICA
TIONS
IINDE
XDA
SHBO
ARD
AND C
ONTR
OLS
SAFE
TYDE
VICE
SCO
RREC
T USE
OF TH
E CAR
IN A
NEM
ERGE
NCY
Side fig. 20
To change the bulb, proceed as follows:
❒ work on the lens A to compress the in-ternal catch B, then pull the unit out-wards;
❒ turn the bulb holder Ccounterclock-wise, remove the snap-fitted bulb Dand replace it;
❒ refit the bulb holder C in the lens byturning it clockwise;
❒ refit the unit making sure the catchclicks into place B.
FRONT FOG LIGHTS (where provided)
Contact Fiat Dealership to have front foglights A-fig. 21 replaced.
REAR LIGHT UNITS fig. 22-23
Rear light units contain taillights, brakelight and direction indicators bulbs.
The bulbs are arranged inside the light unitas follows:
B direction indicators
C taillights
D taillights/brake light (double light).
fig. 20 F0M0182m
fig. 22 F0M0184m
fig. 21 F0M0223m

171
WAR
NING
LIGHT
S AND
MESS
AGES
CAR
MAIN
TENA
NCE
TECHN
ICAL
SPEC
IFICA
TIONS
INDE
XDA
SHBO
ARD
AND C
ONTR
OLS
SAFE
TYDE
VICE
SCO
RREC
T USE
OF TH
E CAR
IN A
NEM
ERGE
NCY
To change the bulb proceed as follows:
❒ open the tailgate then, slacken the twofastening screws A;
❒ disconnect the central electric connec-tor and pull the lens unit outwards;
❒ slacken the screws E and remove thebulb holder;
❒ remove the bulb to replace B, C or Dpushing it slightly and turning it coun-terclockwise (“bayonet” clamping) andreplace it;
❒ refit the bulb holder and tighten thescrews E;
❒ reconnect the electric connector, suit-ably refit the unit to the car body andthen tighten the fastening screws A.
REAR FOG LIGHTS fig. 24
Contact Fiat Dealership to have rear foglights A replaced.
REVERSING LIGHT fig. 25
Contact Fiat Dealership to have reversinglight A replaced.
fig. 24 F0M0208m fig. 25 F0M0209m
fig. 23 F0M0185m

172
WAR
NING
LIGHT
S AND
MESS
AGES
CAR
MAIN
TENA
NCE
TECHN
ICAL
SPEC
IFICA
TIONS
IINDE
XDA
SHBO
ARD
AND C
ONTR
OLS
SAFE
TYDE
VICE
SCO
RREC
T USE
OF TH
E CAR
IN A
NEM
ERGE
NCY
THIRD BRAKE LIGHT fig. 26-27
To change the bulb proceed as follows:
❒ open the tailgate;
❒ remove the rubber caps A-fig. 26;
❒ press the catches B-fig. 26 and removethe lens unit C-fig. 27;
❒ disconnect the electric connector;
❒ press the tabs D-fig. 27 and removethe bulb holder;
❒ remove the snap-fitted bulb and replaceit.
NUMBER PLATE LIGHT fig. 28-29
To change the bulb proceed as follows:❒ work in the point shown by the arrow
and remove lens A-fig. 28;❒ change the bulb fig. 29 releasing it from
the side contacts and making sure thenew bulb is correctly fastened betweenthe contacts;
❒ refit the snap-fitted lens unit.
fig. 26 F0M0210m fig. 27 F0M0211m fig. 28 F0M0212m
fig. 29 F0M0233m

173
WAR
NING
LIGHT
S AND
MESS
AGES
CAR
MAIN
TENA
NCE
TECHN
ICAL
SPEC
IFICA
TIONS
INDE
XDA
SHBO
ARD
AND C
ONTR
OLS
SAFE
TYDE
VICE
SCO
RREC
T USE
OF TH
E CAR
IN A
NEM
ERGE
NCY
IF AN INTERIOR LIGHTBURNS OUT
For the type of bulb and power rating, see“When needing to change a bulb”.
FRONT CEILING LIGHT
To replace the bulbs proceed as follows:
❒ work in the points shown by the ar-rows and remove light A-fig. 30;
❒ open the protection lid B;
❒ replace bulbs C-fig. 31 releasing themfrom the side contacts; make sure thatnew bulbs are correctly clamped be-tween contacts;
❒ re-close the lid B-fig. 31 and secure lightA-fig. 30 into its housing locking itproperly.
REAR CEILING LIGHT(where provided)
To replace the bulbs proceed as follows:
❒ work in the points shown by the ar-rows and remove light D-fig. 32;
❒ open the protection lid E-fig. 33;
❒ replace bulb F-fig. 33 releasing it fromthe side contacts making sure that thenew bulb is correctly clamped betweenthe contacts;
❒ re-close the protection lid E-fig. 33and secure light D-fig. 32 into its hous-ing locking it properly.
fig. 30 F0M0213m
fig. 31 F0M0234m
fig. 32 F0M0214m
fig. 33 F0M0235m

174
WAR
NING
LIGHT
S AND
MESS
AGES
CAR
MAIN
TENA
NCE
TECHN
ICAL
SPEC
IFICA
TIONS
IINDE
XDA
SHBO
ARD
AND C
ONTR
OLS
SAFE
TYDE
VICE
SCO
RREC
T USE
OF TH
E CAR
IN A
NEM
ERGE
NCY
COURTESY LIGHT fig. 34
To change the bulb, proceed as follows:
❒ remove the bulb A-fig. 34 levering inthe points shown by the arrow.
BOOT LIGHT fig. 35
To change the bulb, proceed as follows:
❒ open the tailgate;
❒ remove the light A levering in the pointshown by the arrow.
❒ open the protection B and replace thesnap-fitted bulb;
❒ re-close the protective cover B on thelens;
❒ refit the light A inserting it in its cor-rect position firstly on one end andthen on the other until it clicks intoplace.
PUDDLE LIGHTS(where provided) fig. 36
To change the bulb, proceed as follows:
❒ remove the light by pressing clip A-fig.36 with a screwdriver;
❒ press the bulb protection cover sidesB-fig. 37 on the two fastening pins andturn it;
❒ replace the snap-fitted bulb C-fig. 37;
❒ refit bulb protection cover fitting thetwo fastening pins;
❒ refit the ceiling light inserting first endD-fig. 36 and then pressing the otherend until hearing the locking click of theclip.
fig. 34 F0M0215m fig. 35 F0M0216m fig. 36 F0M0217m
fig. 37 F0M0229m

175
WAR
NING
LIGHT
S AND
MESS
AGES
CAR
MAIN
TENA
NCE
TECHN
ICAL
SPEC
IFICA
TIONS
INDE
XDA
SHBO
ARD
AND C
ONTR
OLS
SAFE
TYDE
VICE
SCO
RREC
T USE
OF TH
E CAR
IN A
NEM
ERGE
NCY
IF A FUSE BLOWS
GENERAL
The fuse is a protective device for theelectric system: it comes into action (i.e.it cuts off) mainly due to a fault or im-proper action on the system.
When a device does not work, check theefficiency of its fuse: the conductor ele-ment A- fig. 38 must be intact. If not, re-place the fuse with one of the same amprating (same colour).
B undamaged fuse fig. 38
C fuse with damaged filament fig. 38.
fig. 38 F0M0236m
Never change a fuse withanother with a higher amp
rating, DANGER OF FIRE.
WARNING
Never replace a broken fusewith anything other than anew fuse.
If a general fuse (MEGA-FUSE, MIDI-FUSE, MAXI-
FUSE) cuts in, do not attempt any re-pair and contact Fiat Dealership.
WARNING
If a fuse blows again, contacta Fiat Dealership.
WARNING
Before changing a fuse,check the ignition key has
been removed and that all the otherelectric devices have been turnedoff/disabled.
WARNING

176
WAR
NING
LIGHT
S AND
MESS
AGES
CAR
MAIN
TENA
NCE
TECHN
ICAL
SPEC
IFICA
TIONS
IINDE
XDA
SHBO
ARD
AND C
ONTR
OLS
SAFE
TYDE
VICE
SCO
RREC
T USE
OF TH
E CAR
IN A
NEM
ERGE
NCY
FUSE LOCATION
Fuses are grouped into four fuse boxes tobe found respectively on the dashboard,on the battery positive pole, in the enginecompartment and inside the boot (left-hand side).
Fuse box on the dashboard
To gain access to the fuses in the fuse boxon the dashboard, loosen the fasteningscrews A-fig. 39 and remove the cover.
fig. 40 F0M0370m
fig. 39 F0M0016m

177
WAR
NING
LIGHT
S AND
MESS
AGES
CAR
MAIN
TENA
NCE
TECHN
ICAL
SPEC
IFICA
TIONS
INDE
XDA
SHBO
ARD
AND C
ONTR
OLS
SAFE
TYDE
VICE
SCO
RREC
T USE
OF TH
E CAR
IN A
NEM
ERGE
NCY
Fuse box in engine compartment
To gain access to the fuses in the fuse boxnext to the battery, remove the protec-tion cover fig. 41.
fig. 41 F0M0239m
fig. 42 F0M0371m

178
WAR
NING
LIGHT
S AND
MESS
AGES
CAR
MAIN
TENA
NCE
TECHN
ICAL
SPEC
IFICA
TIONS
IINDE
XDA
SHBO
ARD
AND C
ONTR
OLS
SAFE
TYDE
VICE
SCO
RREC
T USE
OF TH
E CAR
IN A
NEM
ERGE
NCY
Fuse box in the boot
To gain access to the fuse box located onthe left side of boot open the relevant in-spection lid (as shown in fig. 43).
fig. 44 F0M0372m
fig. 43 F0M0246m

179
WAR
NING
LIGHT
S AND
MESS
AGES
CAR
MAIN
TENA
NCE
TECHN
ICAL
SPEC
IFICA
TIONS
INDE
XDA
SHBO
ARD
AND C
ONTR
OLS
SAFE
TYDE
VICE
SCO
RREC
T USE
OF TH
E CAR
IN A
NEM
ERGE
NCY
–
10
15
7.5
20
15
20
–
7.5
7.5
7.5
7.5
10
01
02
03
04
05
06
07
08
09
10
11
12
13
FUSE SUMMARY TABLE
Fuse box on dashboard
USERS FUSE AMPERE
Free
Power + battery instrument panel, EOBD diagnostic socket
Power + battery sound system, control unit for hands free kit with voice recognition and Bluetooth® technology, control unit for Hi-Fi audio system
Power + battery ignition switch
Power for windscreen/rear window washer motor pump
Power for tailgate actuator
Power for door lock motor actuators, dead lock motor actuators
Free
Power for front ceiling light, rear ceiling light, boot light, puddle light, courtesy lights
Power + key electric power steering system control unit
Power + key instrument panel, switch on brake pedal (brake light control circuit), switch on clutch pedal
Power + key brake system control unit, VDC system, switch on brake pedal
Power + key air bag system control unit

180
WAR
NING
LIGHT
S AND
MESS
AGES
CAR
MAIN
TENA
NCE
TECHN
ICAL
SPEC
IFICA
TIONS
IINDE
XDA
SHBO
ARD
AND C
ONTR
OLS
SAFE
TYDE
VICE
SCO
RREC
T USE
OF TH
E CAR
IN A
NEM
ERGE
NCY
7.5
7.5
7.5
14
14
14
USERS FUSE AMPERE
Power + key side button panel light, steering wheel control lights, central button panel (ASR control and led)
Power + key button panel light on ceiling light, front seat warming button panel (system control and led), rain sensor
Power + key power sunroof control unit, tyre pressure sensor control unit, control unit for hands free kit with voice recognition and Bluetooth® technology, parking sensor system control unit

181
WAR
NING
LIGHT
S AND
MESS
AGES
CAR
MAIN
TENA
NCE
TECHN
ICAL
SPEC
IFICA
TIONS
INDE
XDA
SHBO
ARD
AND C
ONTR
OLS
SAFE
TYDE
VICE
SCO
RREC
T USE
OF TH
E CAR
IN A
NEM
ERGE
NCY
53
38
39
40
41
47
48
46
34
Fuse box in engine compartment
USERS FUSE AMPERE
Power + brake system battery (solenoid valves)
Left dipped beam power, headlight aiming device
Right dipped beam power
Left main beam power
Right main beam power
Power + key engine control unit
Power + key passenger’s compartment cooling unit, electronic control unit for driver’s window, power door mirrors, reversing light (1.4 8v Dualogic version)
Free
Power for engine diagnosis system secondary loads
30
10
10
10
10
7.5
7.5
–
15

182
WAR
NING
LIGHT
S AND
MESS
AGES
CAR
MAIN
TENA
NCE
TECHN
ICAL
SPEC
IFICA
TIONS
IINDE
XDA
SHBO
ARD
AND C
ONTR
OLS
SAFE
TYDE
VICE
SCO
RREC
T USE
OF TH
E CAR
IN A
NEM
ERGE
NCY
15
10
15
15
30
15
7.5
30
7.5
7.5
7.5
20
10
10
30
33
51
25
27
37
42
49
29
54
32
31
45
43
USERS FUSE AMPERE
Power for engine diagnosis system primary loads (ignition coils, injectors, engine control unit - Multijet versions)
Power for engine control unit (1.4 engine)
Power for fuel motor pump
Power for front fog lights
Power for headlight washer motor pump
Power for single tone horn
Power for conditioner compressor
Power for starter motor (magnet + 50)
Power for slider solenoid valve (1.4 16V engine)
Power + battery internal cooling control unit
Power + battery engine control unit
Power for passenger’s compartment current outlet
Power + key reversing light, glow plug control unit, flow meter, water in diesel fuel sensor
Power for electric door mirror defrosting devices

183
WAR
NING
LIGHT
S AND
MESS
AGES
CAR
MAIN
TENA
NCE
TECHN
ICAL
SPEC
IFICA
TIONS
INDE
XDA
SHBO
ARD
AND C
ONTR
OLS
SAFE
TYDE
VICE
SCO
RREC
T USE
OF TH
E CAR
IN A
NEM
ERGE
NCY
20
20
–
–
26
28
52
44
USERS FUSE AMPERE
Power for front passenger’s power window motor
Power for driver’s power window motor
Free
Free
–
–
–
10
15
–
–
10
10
20
20
–
01
02
03
04
05
06
07
08
09
10
11
12
Fuse box in the boot
USERS FUSE AMPERE
Free
Free
Free
Power for driver’s seat lumbar adjustment motor
Power for boot current outlet
Free
Free
Power for driver’s seat warming unit
Power for passenger’s seat warming unit
Power + battery power window motor on right rear door
Power + battery power window motor on left rear door
Free

184
WAR
NING
LIGHT
S AND
MESS
AGES
CAR
MAIN
TENA
NCE
TECHN
ICAL
SPEC
IFICA
TIONS
IINDE
XDA
SHBO
ARD
AND C
ONTR
OLS
SAFE
TYDE
VICE
SCO
RREC
T USE
OF TH
E CAR
IN A
NEM
ERGE
NCY
–
–
10
20
20
13
14
15
16
17
USERS FUSE AMPERE
Free
Free
Power + battery tyre pressure monitoring system control unit
Power + battery hi-fi system subwoofer
Power + battery power sunroof system

185
WAR
NING
LIGHT
S AND
MESS
AGES
CAR
MAIN
TENA
NCE
TECHN
ICAL
SPEC
IFICA
TIONS
INDE
XDA
SHBO
ARD
AND C
ONTR
OLS
SAFE
TYDE
VICE
SCO
RREC
T USE
OF TH
E CAR
IN A
NEM
ERGE
NCY
IF THE BATTERY IS FLAT
WARNING The battery charging proce-dure is described only for information pur-poses. This operation should be carriedout by Fiat Dealership.
Charging should be slow at a low amp rat-ing for 24 hours. Charging for a longertime may damage the battery.
Charge the battery as follows:
❒ disconnect battery negative terminal;
❒ connect the charger cables to the bat-tery terminals, observing the poles;
❒ turn on the charger;
The liquid contained in thebattery is poisonous and cor-
rosive. Avoid contact with the skin oreyes. The battery should be chargedin a well ventilated place, away fromnaked flames or possible sources ofsparks: danger of explosion and fire.
WARNING❒ when you have finished, turn the charg-er off before disconnecting the battery;
❒ reconnect battery negative terminal.

186
WAR
NING
LIGHT
S AND
MESS
AGES
CAR
MAIN
TENA
NCE
TECHN
ICAL
SPEC
IFICA
TIONS
IINDE
XDA
SHBO
ARD
AND C
ONTR
OLS
SAFE
TYDE
VICE
SCO
RREC
T USE
OF TH
E CAR
IN A
NEM
ERGE
NCY
fig. 45 F0M0366m
JACKING THE CAR
If the car is to be lifted, go to a Fiat Deal-ership which is equipped with the armhoist or workshop lift.
Jack up the car only by positioning the jackarms or the shop jack in the points shownin the figure.
Do not attempt to charge afrozen battery: it must first-
ly be thawed, otherwise it may burst.If freezing has occurred, the batteryshould be checked by skilled person-nel to make sure that the internal el-ements are not damaged and that thebody is not cracked, with the risk ofleaking poisonous and corrosive acid.
WARNING
IMPORTANT For Sport versions, in caseof side lifting with workshop lifter, takecare to avoid damages to the spoilers.

187
WAR
NING
LIGHT
S AND
MESS
AGES
CAR
MAIN
TENA
NCE
TECHN
ICAL
SPEC
IFICA
TIONS
INDE
XDA
SHBO
ARD
AND C
ONTR
OLS
SAFE
TYDE
VICE
SCO
RREC
T USE
OF TH
E CAR
IN A
NEM
ERGE
NCY
TOWING THE CARThe tow ring provided with the car ishoused in the tool box under the bootmat.
fig. 46 F0M0243m
fig. 47 F0M0238m
TOW RING HOOKING fig. 46-47Proceed as follows:❒ release the cap A;❒ take the tow hook B from the sup-
port;
❒ tighten the ring on the rear or frontthreaded pin.
When towing, remember thatwithout the help of the ser-
vobrake and power steering, a greatereffort is required on the pedal andsteering wheel. Do not use flexible ca-bles for towing and avoid jerks. Duringtowing operations make sure that fas-tening the joint to the car does notdamage the components in contactwith it. When towing the car, you mustcomply with the specific traffic regu-lations regarding the tow ring and howto tow on the road.
WARNING
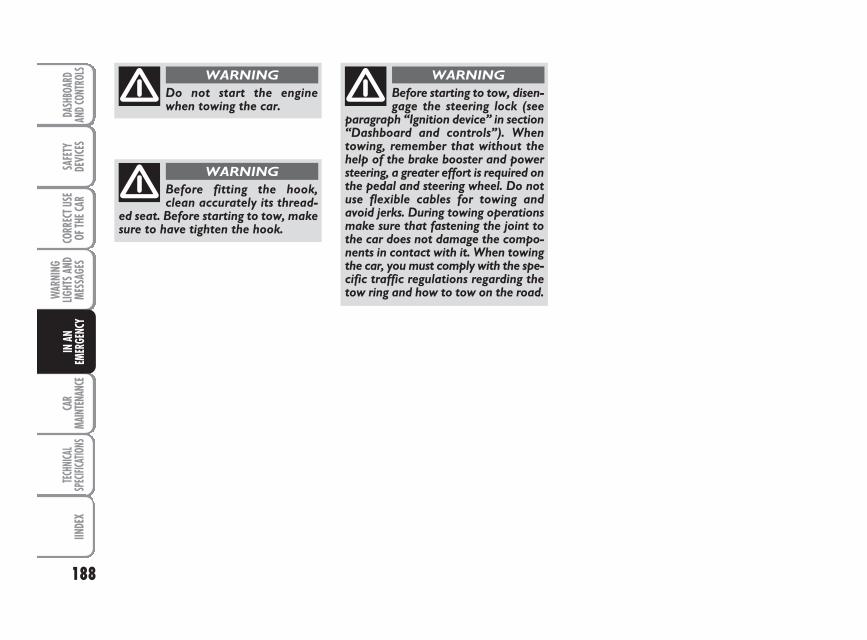
188
WAR
NING
LIGHT
S AND
MESS
AGES
CAR
MAIN
TENA
NCE
TECHN
ICAL
SPEC
IFICA
TIONS
IINDE
XDA
SHBO
ARD
AND C
ONTR
OLS
SAFE
TYDE
VICE
SCO
RREC
T USE
OF TH
E CAR
IN A
NEM
ERGE
NCY
Do not start the enginewhen towing the car.
WARNING
Before fitting the hook,clean accurately its thread-
ed seat. Before starting to tow, makesure to have tighten the hook.
WARNING
Before starting to tow, disen-gage the steering lock (see
paragraph “Ignition device” in section“Dashboard and controls”). Whentowing, remember that without thehelp of the brake booster and powersteering, a greater effort is required onthe pedal and steering wheel. Do notuse flexible cables for towing andavoid jerks. During towing operationsmake sure that fastening the joint tothe car does not damage the compo-nents in contact with it. When towingthe car, you must comply with the spe-cific traffic regulations regarding thetow ring and how to tow on the road.
WARNING
189
WAR
NING
LIGHT
S AND
MESS
AGES
TECHN
ICAL
SPEC
IFICA
TIONS
INDE
XDA
SHBO
ARD
AND C
ONTR
OLS
SAFE
TYDE
VICE
SCO
RREC
T USE
OF TH
E CAR
IN A
NEM
ERGE
NCY
CAR
MAIN
TENA
NCE
SCHEDULED SERVICING ................................................ 190
SERVICE SCHEDULE ........................................................... 191
PERIODICAL CHECKS........................................................ 195
USE OF THE CAR UNDER HEAVY CONDITIONS ... 195
CHECKING FLUID LEVELS................................................ 196
AIR FILTER ............................................................................ 202
POLLEN FILTER ................................................................... 202
BATTERY ................................................................................ 202
WHEELS AND TYRES ......................................................... 205
RUBBER HOSES .................................................................... 206
WINDSCREEN/REAR WINDOW WIPERS ................... 206
BODYWORK ........................................................................ 208
INTERIORS ............................................................................ 210
CCCAARR MMAAIINNTTEENNAANNCCEE
190
WAR
NING
LIGHT
S AND
MESS
AGES
TECHN
ICAL
SPEC
IFICA
TIONS
INDE
XDA
SHBO
ARD
AND C
ONTR
OLS
SAFE
TYDE
VICE
SCO
RREC
T USE
OF TH
E CAR
IN A
NEM
ERGE
NCY
CAR
MAIN
TENA
NCE
IMPORTANT The Programmed Mainte-nance coupons are specified by the Man-ufacturer. The failure to have them car-ried out may invalidate the warranty.
Scheduled Servicing is performed by all Fi-at Dealership, at pre-established times.
If during each operation, in addition to theones programmed, the need arises for fur-ther replacements or repairs, these maybe carried out only with the explicit agree-ment of the Customer.
IMPORTANT You are advised to contactFiat Dealership in the event of any minoroperating faults, without waiting for thenext service coupon.
If your car is used frequently for towing,the interval between one service couponand the other must be reduced.
SCHEDULED SERVICING
Correct maintenance is essential for en-suring long car life under the best condi-tions.
This is why Fiat has programmed a seriesof checks and maintenance operationsevery 30,000 km.
It is however important to remember thatscheduled servicing does not completelycover all the car’s requirements: also inthe initial period before 30,000 km servicecoupon and later, between one couponand another, ordinary care is still requiredsuch as for example routine check andtopping up the level of fluids, tyre pressurecheck, etc...

191
WAR
NING
LIGHT
S AND
MESS
AGES
TECHN
ICAL
SPEC
IFICA
TIONS
INDE
XDA
SHBO
ARD
AND C
ONTR
OLS
SAFE
TYDE
VICE
SCO
RREC
T USE
OF TH
E CAR
IN A
NEM
ERGE
NCY
CAR
MAIN
TENA
NCE
30 60 90 120 150 180
● ● ● ● ● ●
● ● ● ● ● ●
● ● ● ● ● ●
● ● ● ● ● ●
● ● ●
● ● ● ● ● ●
● ● ● ● ● ●
● ●
● ●
●
● ● ● ● ● ●
● ● ●
SERVICE SCHEDULE FOR PETROL ENGINESService coupons shall be performed every 30,000 km
Thousands of km
Check tyre conditions/wear and adjust pressure if required
Check light system operation (headlights, direction indicators, hazard lights, boot lights, passenger compartment lights, instrument panel warning lights, etc.)
Check windscreen wiper/washer operation
Check front disk brake pad conditions and wear
Check rear drum brake linings and wear
Sight inspect the conditions of: bodywork, underbody protection, pipes and hoses (exhaust - fuel - brakes), rubber parts (boots, sleeves, bushes, etc.)
Check cleanness of locks, bonnet and boot and lever cleanness and lubrication
Check tension and adjust accessory drive belts (versions 1.2 - 1.4 with heater)
Sight inspect accessory drive belt conditions
Replace accessory drive belt/s
Check and adjust handbrake lever stroke, if required
Check and adjust tappet clearance, if required (excluding 1.4 16V version)

If the car is mainly used for driving in the city, and in any case with an annual mileage of below 10,000 km, changeengine oil and filter every 12 months.
192
WAR
NING
LIGHT
S AND
MESS
AGES
TECHN
ICAL
SPEC
IFICA
TIONS
INDE
XDA
SHBO
ARD
AND C
ONTR
OLS
SAFE
TYDE
VICE
SCO
RREC
T USE
OF TH
E CAR
IN A
NEM
ERGE
NCY
CAR
MAIN
TENA
NCE
30 60 90 120 150 180
● ● ● ● ● ●
● ●
● ● ●
● ● ● ● ● ●
● ● ● ● ● ●
● ●
● ● ● ● ● ●
● ● ● ● ● ●
●
● ● ● ● ● ●
● ● ●
● ● ● ● ● ●
Thousands of km
Check exhaust emissions
Check antievaporation system
Replace air cleaner cartridge
Change spark plugs
Top up fluids (engine coolant, brakes, battery, windscreen washer, etc.)
Check timing belt conditions
Check engine control system operation(through diagnosis socket)
Replace spark plugs
Replace timing belt (*)
Change engine oil and oil filter (or every 24 months)
Change brake fluid (or every 24 months)
Change pollen filter (or every 24 months)
(*) Regardless of the km covered, the timing belt shall be replaced every 4 years for particularly demanding use (cold climates, driving in the city, idling for a long time) or in any case every 5 years
For 1.4 T-JET 120 HP version, in order to ensure correct operation and avoid significant damages to the engine,it is mandatory:- to use spark plugs specifically certified for the T-JET engine only, of the same type and brand (see paragraph“Engine”);
- to replace the plugs as often as required by the Service Schedule; - we recommend to refer to the Fiat Dealership.

193
WAR
NING
LIGHT
S AND
MESS
AGES
TECHN
ICAL
SPEC
IFICA
TIONS
INDE
XDA
SHBO
ARD
AND C
ONTR
OLS
SAFE
TYDE
VICE
SCO
RREC
T USE
OF TH
E CAR
IN A
NEM
ERGE
NCY
CAR
MAIN
TENA
NCE
30 60 90 120 150 180
● ● ● ● ● ●
● ● ● ● ● ●
● ● ● ● ● ●
● ● ● ● ● ●
● ● ●
● ● ● ● ● ●
● ● ● ● ● ●
● ●
●
● ● ● ● ● ●
● ● ●
SERVICE SCHEDULE FOR MULTIJET ENGINES
Service coupons shall be performed every 30,000 km
Thousands of km
Check tyre conditions/wear and adjust pressure if required
Check light system operation (headlights, direction indicators, hazard lights, boot lights, passenger compartment lights, instrument panel warning lights, etc.)
Check windscreen wiper/washer operation
Check front and rear (where provided) disk brake pad conditions and wear
Check rear drum brake linings and wear (1.3 Multijet versions)
Sight inspect the conditions of: bodywork, underbody protection, pipes and hoses (exhaust - fuel - brakes), rubber parts (boots, sleeves, bushes, etc.)
Check cleanness of locks, bonnet and boot and lever cleanness and lubrication
Sight inspect accessory drive belt conditions
Replace accessory drive belt/s
Check and adjust handbrake lever stroke, if required
Check and adjust tappet clearance, if required (1.9 Multijet versions)

194
WAR
NING
LIGHT
S AND
MESS
AGES
TECHN
ICAL
SPEC
IFICA
TIONS
INDE
XDA
SHBO
ARD
AND C
ONTR
OLS
SAFE
TYDE
VICE
SCO
RREC
T USE
OF TH
E CAR
IN A
NEM
ERGE
NCY
CAR
MAIN
TENA
NCE
30 60 90 120 150 180
● ● ● ● ● ●
● ● ●
● ● ●
● ● ● ● ● ●
● ● ● ● ● ●
●
● ● ● ● ● ●
(●) (●) (●) (●) (●) (●)
● ● ●
● ● ● ● ● ●
Thousands of km
Check exhaust emissions/smoke
Replace fuel filter
Replace air cleaner cartridge
Top up fluids (engine coolant, brakes, battery, windscreen washer, etc.)
Check engine control system operation(through diagnosis socket)
Replace timing belt (1.9 Multijet versions) (*)
Change engine oil and oil filter (Multijet versions without DPF)(or every 24 months)
Change engine oil and oil filter (Multijet versions with DPF) (**)(or every 24 months)
Change brake fluid (or every 24 months)
Change pollen filter (or every 24 months)
(*) Regardless of the km covered, the timing belt shall be replaced every 4 years for particularly demanding use (cold climates, driving in the city, idling for a long time) or in any case every 5 years
(**) Engine oil and oil filter shall actually be changed according to the conditions of use of the car and it is indicated by the relevant warning light or message(where provided) on the instrument panel (see section “Warning lights and messages”).

USE OF THE CARUNDER HEAVYCONDITIONS
Should prevailing use of the car be underone of the following specially heavy con-ditions:
❒ trailer or caravan towing;
❒ dusty roads;
❒ short distances (less than 7-8 km) andrepeated with external temperaturesbelow zero;
❒ frequently idling engines or long dis-tance low speed driving (e.g.: door-to-door deliveries) or in case of a longterm inactivity;
❒ urban routes;
carry out checks more frequently than re-quired on Service Schedule:
❒ check front disk brake pad conditionsand wear;
❒ check cleanness of bonnet and bootlocks and lever cleanness and lubrica-tion;
❒ sight inspect the conditions of: engine,gearbox, transmission, pipes and hoses(exhaust - fuel - brakes), rubber parts(boots, sleeves, bushes, etc.);
❒ check battery charge and fluid level(electrolyte);
❒ visual check on various drive belt con-ditions;
❒ check and replace pollen filter, if re-quired;
❒ check and replace air cleaner, if re-quired.
PERIODICAL CHECKS
Every 1,000 km or before long journeys,check and top up if required:
❒ engine coolant fluid level;
❒ brake fluid level;
❒ windscreen washer fluid level;
❒ tyre pressure and conditions.
❒ check light system operation (head-lights, direction indicators, hazardlights, etc.);
❒ check windscreen wiper/washer op-eration and windscreen/rear windowblade position/wear;
Every 3,000 km check and top up if re-quired: engine oil level.
You are recommended to use FL Seleniaproducts, designed and produced specifi-cally for Fiat cars (see table “Capacities”in section “Technical specifications”).
195
WAR
NING
LIGHT
S AND
MESS
AGES
TECHN
ICAL
SPEC
IFICA
TIONS
INDE
XDA
SHBO
ARD
AND C
ONTR
OLS
SAFE
TYDE
VICE
SCO
RREC
T USE
OF TH
E CAR
IN A
NEM
ERGE
NCY
CAR
MAIN
TENA
NCE

196
WAR
NING
LIGHT
S AND
MESS
AGES
TECHN
ICAL
SPEC
IFICA
TIONS
INDE
XDA
SHBO
ARD
AND C
ONTR
OLS
SAFE
TYDE
VICE
SCO
RREC
T USE
OF TH
E CAR
IN A
NEM
ERGE
NCY
CAR
MAIN
TENA
NCE
CHECKING FLUIDLEVELS
fig. 1 - 1.2 and 1.4 8V versions
Never smoke while workingin the engine compartment:
gas and inflammable vapours may bepresent, with the risk of fire.
WARNING
Be careful!, when topping uptake care not to confuse thevarious types of fluids: theyare all incompatible with one
another and could seriously damagethe car.
1. Engine coolant
2. Battery
3. Windscreen washer fluid
4. Brake fluid
5. Engine oil.
F0M0145m
F0M0367mfig. 2a - 1.4 16V version

197
WAR
NING
LIGHT
S AND
MESS
AGES
TECHN
ICAL
SPEC
IFICA
TIONS
INDE
XDA
SHBO
ARD
AND C
ONTR
OLS
SAFE
TYDE
VICE
SCO
RREC
T USE
OF TH
E CAR
IN A
NEM
ERGE
NCY
CAR
MAIN
TENA
NCE
1. Engine oil
2. Engine coolant
3. Windscreen washer fluid
4. Brake fluid
5. Battery
6. Diesel fuel filter.
1. Engine coolant
2. Battery
3. Windscreen washer fluid
4. Brake fluid
5. Engine oil.
fig. 2b - 1.4 T-JET version
fig. 3 - 1.3 Multijet versions
F0M0219m
F0M0146m

198
WAR
NING
LIGHT
S AND
MESS
AGES
TECHN
ICAL
SPEC
IFICA
TIONS
INDE
XDA
SHBO
ARD
AND C
ONTR
OLS
SAFE
TYDE
VICE
SCO
RREC
T USE
OF TH
E CAR
IN A
NEM
ERGE
NCY
CAR
MAIN
TENA
NCE
fig. 4 - 1.9 Multijet versions F0M0148m
1. Engine oil
2. Engine coolant
3. Windscreen washer fluid
4. Brake fluid
5. Battery
6. Diesel fuel filter.

If the oil level is near or even below theMIN mark, add oil through the filler neckA, until reaching the MAX mark.
Oil level shall never exceed the MAXmark.
ENGINE OIL CONSUMPTION
Max engine oil consumption is usually 400grams every 1000 km.
When the car is new, the engine needsto run in, therefore the engine oil con-sumption can only be considered stabilisedafter the first 5,000 ÷ 6,000 km.
IMPORTANT The oil consumption de-pends on driving style and the conditionsunder which the car is used.
IMPORTANT After adding or changingthe oil, let the engine turn over for a fewseconds and wait a few minutes after turn-ing it off before you check the level.
ENGINE OIL fig. 5, 6, 7 and 8
Check the oil level a few minutes (about5) after the engine has stopped, with thecar parked on level ground.
The oil level shall be included between theMIN and MAX marks on the dipstick B.
The gap between the MIN and MAXmarks corresponds to about one litre ofoil.
fig. 5 - 1.2 and 1.4 8V versions
fig. 6a - 1.4 16V version
F0M0149m
F0M0268m
fig. 8 - 1.9 Multijet versions F0M0151m
fig. 7 - 1.3 Multijet versions F0M0150m
199
WAR
NING
LIGHT
S AND
MESS
AGES
TECHN
ICAL
SPEC
IFICA
TIONS
INDE
XDA
SHBO
ARD
AND C
ONTR
OLS
SAFE
TYDE
VICE
SCO
RREC
T USE
OF TH
E CAR
IN A
NEM
ERGE
NCY
CAR
MAIN
TENA
NCE
fig. 6b - 1.4 T-JET versions F0M0319m

200
WAR
NING
LIGHT
S AND
MESS
AGES
TECHN
ICAL
SPEC
IFICA
TIONS
INDE
XDA
SHBO
ARD
AND C
ONTR
OLS
SAFE
TYDE
VICE
SCO
RREC
T USE
OF TH
E CAR
IN A
NEM
ERGE
NCY
CAR
MAIN
TENA
NCE
When the engine is hot, takecare when working inside the
engine compartment to avoid burns.Remember that when the engine ishot, fan may cut in: danger of injury.Scarves, ties and other loose cloth-ing might be pulled by moving parts.
WARNING
Do not add oil with specifica-tions other than that alreadyin the engine.
fig. 9 F0M0152m
Used engine oil and filter con-tain harmful substances forthe environment. Contact Fi-at Dealership to have the oil
and filter changed, as they areequipped to dispose of the waste oiland filters respecting the nature andthe law.
ENGINE COOLANT fig. 9
The coolant level shall be checked withcold engine and shall be within the MINand MAX marks on the tank.
If the level is low, pour slowly a mixtureof 50% distilled water and 50%PARAFLU UP of the FL Selenia Groupthrough the filler neck A until the levelreaches MAX.
A 50-50 mixture of PARAFLU UP anddistilled water gives freeze protection to–35°C.
When the vehicle is used under particu-larly harsh climate conditions, we recom-mend using a 60-40 mixture of PARAFLUUP and demineralised water.
The engine cooling system us-es protective antifreeze fluidPARAFLU UP. Use the samefluid type as that already in
the cooling system when topping up.PARAFLU UP fluid cannot be mixedwith any other type of fluid. Should ithappen, under no circumstances startthe engine; contact a Fiat Dealership.
The cooling system is pres-surised. If necessary, replace
the cap only with another genuineone, otherwise system efficiencycould be compromised. Do not re-move the reservoir cap when the en-gine is hot: you risk scalding yourself.
WARNING

201
WAR
NING
LIGHT
S AND
MESS
AGES
TECHN
ICAL
SPEC
IFICA
TIONS
INDE
XDA
SHBO
ARD
AND C
ONTR
OLS
SAFE
TYDE
VICE
SCO
RREC
T USE
OF TH
E CAR
IN A
NEM
ERGE
NCY
CAR
MAIN
TENA
NCE
fig. 10 F0M0154m
WINDSCREEN/REAR WINDOWWASHER FLUID fig. 10
To top up, remove the cap A.
Pour a mixture of water and TUTELAPROFESSIONAL SC35, in the follow-ing concentrations:
30% TUTELA PROFESSIONALSC35 and 70% water in summer.
50% TUTELA PROFESSIONALSC35 and 50% water in winter.
In case of temperatures below –20°C, useundiluted TUTELA PROFESSIONALSC35 fluid.
BRAKE FLUID fig. 11
Unscrew cap A: check that the fluid levelin the reservoir is at maximum.
Fluid level in the reservoir shall not exceedthe MAX mark.
If fluid has to be added, it is suggested touse the brake fluid in table “Fluids and lu-bricants” (see chapter “Technical charac-teristics”).
Check level through the reservoir.
Do not travel with the wind-screen washer reservoir emp-
ty: the windscreen washer is funda-mental for improving visibility.
WARNING
Certain commercial addi-tives for windscreen washers
are inflammable. The engine com-partment contains hot componentswhich may set it on fire.
WARNING
fig. 11
NOTE Clean accurately the tank cap Aand the surrounding surface.
At plug opening, pay maximum attentionin order to prevent any impurities fromentering the tank.
For topping up, always use a funnel withintegrated filter with mesh equal to orlower than 0.12 mm.
IMPORTANT Brake fluid absorbs mois-ture, for this reason, if the vehicle is main-ly used in areas with a high degree of at-mospheric humidity, the fluid should bereplaced at more frequent intervals thanspecified in the “Service schedule”.
F0M0155m
Make sure that the highlycorrosive brake fluid does notdrip onto the paintwork; if itdoes, wash it off immediate-
ly with water.

202
WAR
NING
LIGHT
S AND
MESS
AGES
TECHN
ICAL
SPEC
IFICA
TIONS
INDE
XDA
SHBO
ARD
AND C
ONTR
OLS
SAFE
TYDE
VICE
SCO
RREC
T USE
OF TH
E CAR
IN A
NEM
ERGE
NCY
CAR
MAIN
TENA
NCE
Brake fluid is poisonous andhighly corrosive. In the event
of accidental contact, wash the partsinvolved immediately with neutralsoap and water, then rinse thor-oughly. Call the doctor immediatelyif the fluid is swallowed.
WARNING
The symbol π on the con-tainer indicates synthetic
brake fluid, distinguishing it from themineral kind. Using mineral fluids ir-reversibly damages the special brak-ing system rubber seals.
WARNING
AIR CLEANER
Air cleaner replacement shall be carriedout at Fiat Dealership.
POLLEN FILTER
Pollen filter replacement shall be carriedout at Fiat Dealership.

203
WAR
NING
LIGHT
S AND
MESS
AGES
TECHN
ICAL
SPEC
IFICA
TIONS
INDE
XDA
SHBO
ARD
AND C
ONTR
OLS
SAFE
TYDE
VICE
SCO
RREC
T USE
OF TH
E CAR
IN A
NEM
ERGE
NCY
CAR
MAIN
TENA
NCE
INSPECTING THE CHARGE AND THE ELECTROLYTE LEVEL
Inspection operations must be carried outby specialised personnel, following theprescriptions contained in the Use andmaintenance booklet. Any top-up opera-tions must be carried out by specialisedpersonnel and by Fiat Dealership.
Battery liquid is poisonousand corrosive. Avoid contact
with the skin and eyes. Keep nakedflames and sources of sparks awayfrom the battery: risk of explosionand fire.
WARNING
Running the battery with anexcessively low liquid level
will damage the battery beyond re-pair and even cause an explosion.
WARNINGBATTERY
The car fits a low-maintenance battery: notop-ups with distilled water are needed innormal conditions of use.
CHANGING THE BATTERY
If required, replace the battery with a gen-uine spare part having the same specifi-cations.
If a battery with different specifications isfitted, the service intervals given in the“Service schedule” in this section will nolonger be valid.
Refer therefore to the instructions pro-vided by the battery manufacturer.

204
WAR
NING
LIGHT
S AND
MESS
AGES
TECHN
ICAL
SPEC
IFICA
TIONS
INDE
XDA
SHBO
ARD
AND C
ONTR
OLS
SAFE
TYDE
VICE
SCO
RREC
T USE
OF TH
E CAR
IN A
NEM
ERGE
NCY
CAR
MAIN
TENA
NCE
Incorrect assembly of electricand electronic devices maycause severe damage to yourcar. Go to a Fiat Dealership if
you want to install accessories (alarms,mobile phone, etc.): they will suggestthe most suitable devices and adviseyou if a higher capacity battery needsto be installed.
Batteries contain substancesthat can be very dangerousfor the environment. t is ad-visable to have the battery
changed by a Fiat Dealership where itwill be disposed of according to thelaw.
If the vehicle must remainunused for a long time at
very low temperature, remove thebattery and carry it to a warm place,to avoid freezing.
WARNING
When you must perform anyoperation on the battery or
near it, always protect your eyes withthe special goggles.
WARNING
USEFUL ADVICE FORLENGTHENING THE LIFE OFYOUR BATTERY
To avoid draining your battery and length-en its life, observe the following indica-tions:
❒ when you park the car, ensure thedoors, tailgate and bonnet are closedproperly;
❒ switch off all lights inside the car: thecar is however equipped with a systemwhich switches all internal lights off au-tomatically;
❒ do not keep accessories (e.g. sound sys-tem, hazard lights, etc.) switched on fora long time when the engine is not run-ning;
❒ before performing any operation on theelectrical system, disconnect the bat-tery negative cable;
❒ battery terminals shall always be per-fectly tightened.
IMPORTANT If the charge level remainsfor a long time under 50%, the battery isdamaged by sulphation, reducing its ca-pacity and starting attitude.
The battery will also be more at risk offreezing (e.g. already at -10°C). Refer tothe paragraph “Car inactivity” in “Startingand driving” if the car is left parked for along time.
If after buying the car, you want to installelectric accessories which require per-manent electric supply (alarm, etc.) con-tact Fiat Dealership whose qualified per-sonnel, in addition to suggesting the mostsuitable devices, will evaluate the overallelectric absorption, checking whether thecar’s electric system is capable of with-standing the load required, or whether itshould be integrated with a more power-ful battery.
Since these devices continue absorbing en-ergy even when the ignition key is off, theygradually run down the battery.

205
WAR
NING
LIGHT
S AND
MESS
AGES
TECHN
ICAL
SPEC
IFICA
TIONS
INDE
XDA
SHBO
ARD
AND C
ONTR
OLS
SAFE
TYDE
VICE
SCO
RREC
T USE
OF TH
E CAR
IN A
NEM
ERGE
NCY
CAR
MAIN
TENA
NCE
WHEELS AND TYRES
Check the pressure of each tyre, includ-ing the spare, every two weeks and beforelong journeys. The pressure should bechecked with the tyre rested and cold.
For the correct tyre inflation pressure, see“Wheels” in “Technical specifications”section.
Incorrect pressure causes abnormal tyrewear fig. 14:
A normal pressure: tread evenly worn.
B low pressure: tread particularly wornat the edges.
C high pressure: tread particularly wornin the centre.
Tyres must be replaced when the treadwears down to 1.6 mm. In any case, com-ply with the laws in the country where thecar is being driven.
IMPORTANT NOTES
❒ As far as possible, avoid sharp brakingand screech starts etc. Be careful notto hit the kerb, potholes or other ob-stacles hard. Driving for long stretch-es over bumpy roads can damage thetyres;
❒ periodically check that the tyres haveno cuts in the side wall, abnormalswelling or irregular tyre wear. If any ofthese occur, have the car seen to at aFiat Dealership;
fig. 14 F0M0160m
❒ avoid overloading the car when travel-ling: this may cause serious damage tothe wheels and tyres;
❒ if a tyre is punctured, stop immediate-ly and charge it to avoid damage to thetyre, the rim, suspensions and steeringsystem;
❒ tyres age even if they are not usedmuch. Cracks in the tread rubber area sign of ageing. In any case, if the tyreshave been on the car for over 6 years,they should be checked by specialisedpersonnel, to see if they can still beused. Also remember to check thespare wheel;
❒ in the case of replacement, always fitnew tyres, avoiding those of dubiousorigin;
❒ if a tyre is changed, also change the in-flation valve;
❒ to allow even wear between the frontand rear tyres, it is advisable to changethem over every 10-15 thousand kilo-metres, keeping them on the same sideof the car so as not to reverse the di-rection of rotation.
Remember that road holdingdepends also on the correct
tyre inflating pressure.
WARNING

206
WAR
NING
LIGHT
S AND
MESS
AGES
TECHN
ICAL
SPEC
IFICA
TIONS
INDE
XDA
SHBO
ARD
AND C
ONTR
OLS
SAFE
TYDE
VICE
SCO
RREC
T USE
OF TH
E CAR
IN A
NEM
ERGE
NCY
CAR
MAIN
TENA
NCE
WINDSCREEN/REARWINDOW WIPERS
BLADES
Periodically clean the rubber part usingspecial products; TUTELA PROFES-SIONAL SC 35 is recommended.
If the rubber blades are bent or worn theyshould be replaced. In any case theyshould be changed once a year.
A few simple notions can reduce the pos-sibility of damage to the blades:
❒ if the temperature fall below zero,make sure that ice has not frozen therubber against glass. If necessary, thawusing an antifreeze product;
❒ remove any snow from the glass: in ad-dition to protecting the blades, this pre-vents effort on the motor and over-heating;
❒ do not operate the windscreen wiperson dry glass.
Driving with worn wiperblades is a serious hazard,
because visibility is reduced in badweather.
WARNING
RUBBER HOSES
As far as the brake system and fuel rubberhoses are concerned, carefully follow the“Service schedule” in this section.
Indeed ozone, high temperatures and pro-longed lack of fluid in the system maycause hardening and cracking of the hoses,with possible leaks. Careful control istherefore necessary.
If the pressure is too low thetyre overheats and this can
cause it serious damage.
WARNING
Do not cross switch thetyres, moving them from the
right of the car to the left and viceversa.
WARNING
Never submit alloy rims torepainting treatments re-
quiring to use temperatures exceed-ing 150°C. The mechanical propertiesof the wheels could be impaired.
WARNING

207
WAR
NING
LIGHT
S AND
MESS
AGES
TECHN
ICAL
SPEC
IFICA
TIONS
INDE
XDA
SHBO
ARD
AND C
ONTR
OLS
SAFE
TYDE
VICE
SCO
RREC
T USE
OF TH
E CAR
IN A
NEM
ERGE
NCY
CAR
MAIN
TENA
NCE
Changing the windscreen wiperblades fig. 15
To remove the blade:
❒ raise the windscreen wiper arm A;
❒ turn blade B 90° around pin C, locat-ed at the end of the wiper arm;
❒ remove the blade from the pin C.
To refit the blade:
❒ fit pin C into the hole loacted in themiddle of the blade B;
❒ refit the arm with the blade on thewindscreen.
fig. 15 F0M0161m
Changing the rear window blade fig. 16
Proceed as follows:
❒ raise the cover A and remove the armfrom the car, slackening the nut B thatfastens it to the pivot pin;
❒ fit the new arm, positioning it correct-ly, and fully tighten the nut;
❒ lower the cover.
fig. 16 F0M0162m
SPRAY NOZZLES
Windscreen wiper fig. 17
If the jet of fluid is inadequate, firstly checkthat there is fluid in the reservoir: see“Checking fluid levels” in this section).
Then check that the nozzle holes are notclogged, if necessary use a needle.
fig. 17 F0M0163m

208
WAR
NING
LIGHT
S AND
MESS
AGES
TECHN
ICAL
SPEC
IFICA
TIONS
INDE
XDA
SHBO
ARD
AND C
ONTR
OLS
SAFE
TYDE
VICE
SCO
RREC
T USE
OF TH
E CAR
IN A
NEM
ERGE
NCY
CAR
MAIN
TENA
NCE
❒ Spraying of plastic parts, with a pro-tective function, in the more exposedpoints: underdoor, inner fender parts,edges, etc.;
❒ Use of “open” boxed sections to pre-vent condensation and pockets of mois-ture from triggering rust inside.
BODY AND UNDERBODY WARRANTY
Your Fiat Punto is covered by warrantyagainst perforation due to rust of any orig-inal element of the structure or body.
For the general terms of this warranty, re-fer to Fiat Warranty Booklet.
ADVICE FOR PRESERVING THE BODYWORK
Paint
Paintwork does not only serve an aesteth-ic purpose, but also protects the under-lying sheet metal.
In the case of deep scrapes or scores, youare advised to have the necessary touchingup carried out immediately to avoid the for-mation of rust. For touching up use onlyoriginal products (see “Bodywork paintidentification plate” in section “Technicalspecifications”).
BODYWORK
PROTECTION FROMATMOSPHERIC AGENTS
The main causes of corrosion are the fol-lowing:
❒ atmospheric pollution;
❒ salty air and humidity (coastal areas, orhot humid climates);
❒ seasonal environment conditions.
Not to be underestimated is also the abra-sive action of wind-borne atmosphericdust and sand and mud and gravel raisedby other cars.
On your car, Fiat implemented the bestmanufacturing technologies to effectivelyprotect the bodywork against corrosion.
These include:
❒ Painting products and systems whichgive the car particular resistance to cor-rosion and abrasion;
❒ Use of galvanised (or pretreated) steelsheets, with high resistance to corro-sion;
❒ Spraying the underbody, engine com-partment, wheelhouse internal partsand other parts with highly protectivewax products;
Rear window wiper fig. 18
Rear window washer jets are fixed.
The nozzle holder is on the rear window.
fig. 18 F0M0164m

209
WAR
NING
LIGHT
S AND
MESS
AGES
TECHN
ICAL
SPEC
IFICA
TIONS
INDE
XDA
SHBO
ARD
AND C
ONTR
OLS
SAFE
TYDE
VICE
SCO
RREC
T USE
OF TH
E CAR
IN A
NEM
ERGE
NCY
CAR
MAIN
TENA
NCE
Normal paint maintenance consists inwashing at intervals depending on the con-ditions and environment of use. For exam-ple, in highly polluted areas, or if the roadsare sprayed with salt, it is wise to wash thecar more frequently.
To correctly wash the car:
❒ remove the aerial from the roof to pre-vent damage to it if the car is washed inan automatic system;
❒ wash the body using a low pressure jetof water;
❒ wipe a sponge with a slightly soapy so-lution over the bodywork, frequentlyrinsing with the sponge;
❒ rinse well with water and dry with a jetof air or a chamois leather.
When drying, take particular care with theless visible parts like door surrounds, bon-net and around the headlights where wa-ter may stagnate. The car should not betaken to a closed area immediately, but leftin the open so that residual water canevaporate.
Do not wash the car after it has been leftin the sun or with the bonnet hot: this mayalter the shine of the paintwork.
Exterior plastic parts must be cleaned inthe same way as the rest of the car.
Where possible, do not park under trees;the resinous substance many species re-lease give the paint a dull appearance andincrease the possibility of triggering rustprocesses.
IMPORTANT Bird droppings must bewashed off immediately and thoroughly asthe acid they contain is particularly ag-gressive.
Detergents cause water pollu-tion. Therefore the enginecompartment should bewashed in areas equipped for
collecting and purifying the liquid usedin the washing process.
Windows
Use specific window cleaner products.
Use also clean cloths to avoid scratchingthe glass or damaging the transparency.
IMPORTANT The inside of therearscreen should be wiped gently with acloth in the direction of the filaments toavoid damaging the heating device.
Engine compartment
At the end of the winter the engine com-partment should be carefully washed,without directing the jet against electron-ic control units. Contact a specialisedworkshop to have this done.
IMPORTANT The car should be washedwith the engine cold and the ignition keyat STOP. After washing make sure thatthe various protections (e.g. rubber capsand various covers) have not been dam-aged or removed.
Front headlights
IMPORTANT Never use aromatic sub-stances (e.g.: petrol) or ketones (e.g.: ace-tone) for cleaning front headlight plasticlens.

210
WAR
NING
LIGHT
S AND
MESS
AGES
TECHN
ICAL
SPEC
IFICA
TIONS
INDE
XDA
SHBO
ARD
AND C
ONTR
OLS
SAFE
TYDE
VICE
SCO
RREC
T USE
OF TH
E CAR
IN A
NEM
ERGE
NCY
CAR
MAIN
TENA
NCE
CLEANING SEATS AND FABRICAND VELVET PARTS
Use a soft brush or vacuum cleaner to re-move dust. Velvet is cleaned better if thebrush is moistened.
Rub the seats with a sponge moistenedwith a solution of water and neutral de-tergent.
Never use flammable prod-ucts like oil ether or rectified
petrol for cleaning car interiors. Elec-trostatic discharges generated by rub-bing during cleaning operations couldcause fire.
WARNING
Do not keep aerosol cans inthe car: they might explode.
Aerosol cans must never be exposedto a temperature above 50° C. Thetemperature inside the car exposedto the sun may go well beyond thatfigure.
WARNING
INTERIORS
Periodically check that water is nottrapped under the mats (due to waterdripping off shoes, umbrellas, etc.) whichcould cause oxidisation of the sheet met-al.
INTERIOR PLASTIC PARTS
For routine cleaning of interior plasticparts use a soft cloth moistened with wa-ter and neutral soap. Remove grease orpersisting stains using appropriate solvent-free products designed to preserve ap-pearance and colour of plastic compo-nents.
IMPORTANT Never use spirit or petro-leum to clean the instrument panel.
STEERING WHEEL/GEAR LEVERKNOB WITH GENUINELEATHER COVERING
These components shall only be cleanedwith water and neutral soap. Never usespirit or alcohol-based products.
Before using special products for clean-ing interiors, read carefully label instruc-tions and indications to make sure theyare free from spirit and/or alcohol-basedsubstances.
If when cleaning the windscreen with spe-cial glass products, some drops fall on theleather covering of the steering wheel/gearlever knob remove them immediately andthen clean with water and neutral soap.
IMPORTANT Take the utmost care whenengaging the steering lock to preventscratching the leather covering.
Upholstery of your car hasbeen designed to withstandwear deriving from commonuse of the car. You are how-
ever recommended to avoid strongand/or continuous scratching withclothing accessories such as metallicbuckles, studs, Velcro fastenings andthe like, since these items cause cir-cumscribed stress of the cover fabricthat could lead to yarn breaking, anddamage the cover as a consequence.

211
WAR
NING
LIGHT
S AND
MESS
AGES
INDE
XDA
SHBO
ARD
AND C
ONTR
OLS
SAFE
TYDE
VICE
SCO
RREC
T USE
OF TH
E CAR
IN A
NEM
ERGE
NCY
CAR
MAIN
TENA
NCE
TECH
NICA
LSP
ECIFI
CATIO
NS
IDENTIFICATION DATA ................................................. 212
ENGINE CODES - BODYWORK VERSIONS............... 214
ENGINE .................................................................................. 215
FUEL FEED/IGNITION ....................................................... 217
TRANSMISSION .................................................................. 217
BRAKES ................................................................................... 218
SUSPENSIONS....................................................................... 218
STEERING............................................................................... 218
WHEELS .................................................................................. 219
DIMENSIONS......................................................................... 223
PERFORMANCE ................................................................... 224
WEIGHTS ............................................................................... 225
CAPACITIES .......................................................................... 227
FLUIDS AND LUBRICANTS.............................................. 228
FUEL CONSUMPTION ....................................................... 230
CO2 EMISSIONS .................................................................. 231
TTTEECCHHNNIICCAALL SSPPEECCIIFFIICCAATTIIOONNSS

212
WAR
NING
LIGHT
S AND
MESS
AGES
INDE
XDA
SHBO
ARD
AND C
ONTR
OLS
SAFE
TYDE
VICE
SCO
RREC
T USE
OF TH
E CAR
IN A
NEM
ERGE
NCY
CAR
MAIN
TENA
NCE
TECH
NICA
LSP
ECIFI
CATIO
NS
MODEL PLATE fig. 1
The plate is to be found on the left side ofthe boot floor and it bears the followingidentification data:
B Homologation number.
C Vehicle type code.
D Chassis number.
E Maximum vehicle weight fully loaded.
F Maximum vehicle weight fully loadedwith trailer.
G Maximum vehicle weight on front axle.
H Maximum vehicle weight on rear axle.
I Engine type.
L Body version code.
M Spare part code.
N Smoke opacity index (for diesel en-gines).
IDENTIFICATION DATA
You are advised to note the identificationcodes. The identification data stamped andgiven on the plates and their position arethe following:
❒ Model plate.
❒ Chassis marking.
❒ Bodywork paint identification plate.
❒ Engine marking.
fig. 1 F0M0368m

CHASSIS MARKING fig. 3
It is printed on the passenger compart-ment floor, near the right-hand front seat.
❒ car model (ZFA 199000);
❒ chassis number.
ENGINE MARKING
Engine marking is stamped on the cylinderblock and includes the model and thechassis number.
BODYWORK PAINTIDENTIFICATION PLATE fig. 2
The plate is applied on the external tail-gate post (left side) and it bears the fol-lowing data:
A Paint manufacturer.
B Colour name.
C Fiat colour code.
D Respray and touch up code.
fig. 2 F0M0167m fig. 3 F0M0168m
213
WAR
NING
LIGHT
S AND
MESS
AGES
INDE
XDA
SHBO
ARD
AND C
ONTR
OLS
SAFE
TYDE
VICE
SCO
RREC
T USE
OF TH
E CAR
IN A
NEM
ERGE
NCY
CAR
MAIN
TENA
NCE
TECH
NICA
LSP
ECIFI
CATIO
NS

214
WAR
NING
LIGHT
S AND
MESS
AGES
INDE
XDA
SHBO
ARD
AND C
ONTR
OLS
SAFE
TYDE
VICE
SCO
RREC
T USE
OF TH
E CAR
IN A
NEM
ERGE
NCY
CAR
MAIN
TENA
NCE
TECH
NICA
LSP
ECIFI
CATIO
NSENGINE CODES - BODYWORK VERSIONS
Versions Engine Body versioncode 3-door 5-door
4-seat 5-seat
1.2
1.4
1.4 16V
1.4 T-JET
1.3 Multijet 75HP
1.3 Multijet 90HP
1.9 Multijet
1.9 Multijet Sport
(❒) Version with 5-speed gearbox(❍) Version with 6-speed gearbox(*) Version with DPF
199A4000
350A1000
199A6000
198A4000
199A2000
199A3000
939A1000
199A5000
199BXA1A 01
199BXB1A 03
199BXG1B 14
199BXMIA 26
199BXC1A 05
199BXD1A 12 (❒)
199BXD1B 07 (❍)199BXD1B 07B (*)
199BXE1B 09199BXE1B 09B (*)
–
199AXA1A 00D
199AXB1A 02D
199AXG1B 13
199AXMIA 25
199AXC1A 04
199AXD1A 11 (❒)
199AXD1B 06 (❍)199AXD1B 06D (*)
199AXE1B 08199AXE1B 08G (*)
199AXF1B 10
199AXA1A 00E
199AXB1A 02E
199AXG1B 13B
199AXMIA 25B
199AXC1A 04C
199AXD1A 11B (❒)
199AXD1B 06C (❍)199AXD1B 06E (*)
199AXE1B 08E199AXE1B 08H (*)
199AXF1B 10C

215
WAR
NING
LIGHT
S AND
MESS
AGES
INDE
XDA
SHBO
ARD
AND C
ONTR
OLS
SAFE
TYDE
VICE
SCO
RREC
T USE
OF TH
E CAR
IN A
NEM
ERGE
NCY
CAR
MAIN
TENA
NCE
TECH
NICA
LSP
ECIFI
CATIO
NS
1.4
350A1000
Otto
4 in line
72 x 84
1368
11.1
5777
6000
11511.73000
NGK ZKR7A-10
Unleaded petrol 95RON
(SpecificationEN228)
1.2
199A4000
Otto
4 in line
70.8 x 78.86
1242
11.1
4865
5500
10210.43000
NGK ZKR7A-10
Unleaded petrol 95RON
(SpecificationEN228)
1.4 16V
199A6000
Otto
4 in line
72 x 84
1368
10.8:1
7095
6000
12512.94500
NGK ZKR7A-10
Unleaded petrol 95RON
(SpecificationEN228)
1.4 T-JET
198A4000
Otto
4 in line
72,0 x 84,0
1368
9,8
881205000
20621
1750
NGK IKR9F8
Unleaded petrol 95RON
(SpecificationEN228)
ENGINE
GENERAL
Engine code
Cycle
Number and layout of cylinders
Piston bore and stroke mm
Total displacement cm3
Compression ratio
Maximum power (EEC) kWHP
corresponding ratio rpm
Maximum torque (EEC) Nmkgm
corresponding ratio rpm
Spark plugs
Fuel

216
WAR
NING
LIGHT
S AND
MESS
AGES
INDE
XDA
SHBO
ARD
AND C
ONTR
OLS
SAFE
TYDE
VICE
SCO
RREC
T USE
OF TH
E CAR
IN A
NEM
ERGE
NCY
CAR
MAIN
TENA
NCE
TECH
NICA
LSP
ECIFI
CATIO
NS
1.3 Multijet75 HP
199A2000
Diesel
4 in line
69.6 x 82
1248
17.6
5575
4000
19019.41750
–
Diesel fuel for motor vehicles
(SpecificationEN590)
1.3 Multijet 90 HP
199A3000
Diesel
4 in line
69.6 x 82
1248
17.6
6690
4000
20020.41750
–
Diesel fuelfor motor vehicles
(SpecificationEN590)
1.9 Multijet
939A1000
Diesel
4 in line
82 x 90.4
1910
18
881204000
28028.52000
–
Diesel fuel for motor vehicles
(SpecificationEN590)
1.9 Multijet Sport
199A5000
Diesel
4 in line
82 x 90.4
1910
18
961304000
28028.52000
–
Diesel fuel for motor vehicles
(SpecificationEN590)
GENERAL
Engine code
Cycle
Number and layout of cylinders
Piston bore and stroke mm
Total displacement cm3
Compression ratio
Maximum power (EEC) kWHP
corresponding ratio rpm
Maximum torque (EEC) Nmkgm
corresponding ratio rpm
Spark plugs
Fuel

217
WAR
NING
LIGHT
S AND
MESS
AGES
INDE
XDA
SHBO
ARD
AND C
ONTR
OLS
SAFE
TYDE
VICE
SCO
RREC
T USE
OF TH
E CAR
IN A
NEM
ERGE
NCY
CAR
MAIN
TENA
NCE
TECH
NICA
LSP
ECIFI
CATIO
NS
Modifications or repairs to the fuel feed system that are not carried out properly or do not take the system’stechnical specifications into account can cause malfunctions leading to the risk of fire.
WARNING
TRANSMISSION
1.2 1.4 1.3 Multijet 75HP 1.3 Multijet 90HP 1.4 16V - 1.9 Multijet
Gearbox
Clutch
Drive
Self-adjusting pedal without idle stroke
Front
Five forward gears and reverse with synchromesh forforward gear engagement
Six forward gears and reverse with
synchromesh for forward gearengagement
Five or six forward gears and reverse with
synchromesh for forward gear engagement
IGNITION
1.2 - 1.4 - 1.4 16V 1.4 T-JET 1.3 Multijet - 1.9 Multijet
Fuel feed Multipoint electronic Multipoint sequential Multijet direct injection phased electronic injection “Common Rail”injection
with turbosupercharger and intercooler

218
WAR
NING
LIGHT
S AND
MESS
AGES
INDE
XDA
SHBO
ARD
AND C
ONTR
OLS
SAFE
TYDE
VICE
SCO
RREC
T USE
OF TH
E CAR
IN A
NEM
ERGE
NCY
CAR
MAIN
TENA
NCE
TECH
NICA
LSP
ECIFI
CATIO
NS
SUSPENSIONS
1.2 - 1.4 - 1.4 16V - 1.3 Multijet - 1.9 Multijet
Front
Rear
BRAKES
1.2 1.4 - 1.4 16V 1.3 Multijet 1.9 Multijet
Service brakes:
– front
– rear
Parking brake
IMPORTANT Water, ice and antifreeze salt on roads may deposit on the brake discs thus reducing braking efficiency at first braking.
Mc Pherson independent wheels
twisting axle with interconnected wheels
rack and pinion with electric power steering
controlled by hand lever, it works on rear brakes
drum or disc (on certain versions)
disc (self-ventilating for versions where provided)
STEERING
1.2 1.4 1.4 16V 1.3 Multijet 1.3 Multijet 1.9 Multijet75HP 90HP
Type
Minimum steeringcycle m 10,1 10,1 10,5 10,1 10,9 10,9

219
WAR
NING
LIGHT
S AND
MESS
AGES
INDE
XDA
SHBO
ARD
AND C
ONTR
OLS
SAFE
TYDE
VICE
SCO
RREC
T USE
OF TH
E CAR
IN A
NEM
ERGE
NCY
CAR
MAIN
TENA
NCE
TECH
NICA
LSP
ECIFI
CATIO
NS
UNDERSTANDING TYRE MARKING fig. 4
Example: 175/65 R 15 84T
175 = Nominal width (S, distance be-tween sidewalls in mm).
65 = Percentage height/width ratio(H/ S).
R = Radial tyre.
15 = Rim diameter in inches (Ø).
84 = Load rating (capacity).
T = Maximum speed rating.
WHEELS
RIMS AND TYRES
Pressed steel or alloy rims. Tubeless tyreswith radial carcass. The homologated tyresare listed in the Log book.
IMPORTANT In the event of discrepan-cies between the information provided onthis “Owner handbook” and the “Logbook”, consider the specifications shownin the log book only.
Attaining to the prescribed size, to ensuresafety of the car in movement, it must befitted with tyres of the same make andtype on all wheels.
IMPORTANT Do not use inner tubeswith Tubeless tyres.
fig. 4 F0M0169m
SPARE WHEEL
Pressed steel rim. Tubeless tyre.
WHEEL GEOMETRY
Front wheel toe-in: 1 ± 1 mm
Rear wheel toe-in: 1.7 ± 2 mm
The values refer to the car in running or-der.

UNDERSTANDING RIM MARKING fig. 4
Example: 6J x 15 ET43
6 = rim width in inches 1.
J = rim drop centre outline (sideprojection where the tyre beadrests) 2.
15 = rim nominal diameter in inches(corresponds to diameter of thetyre to be mounted) 3 = Ø.
ET43 = wheel camber angle (distance be-tween the disc/rim supportingplane and the wheel rim centreline).
Load rating (capacity)
70 = 335 kg 81 = 462 kg
71 = 345 kg 82 = 475 kg
72 = 355 kg 83 = 487 kg
73 = 365 kg 84 = 500 kg
74 = 375 kg 85 = 515 kg
75 = 387 kg 86 = 530 kg
76 = 400 kg 87 = 545 kg
77 = 412 kg 88 = 560 kg
78 = 425 kg 89 = 580 kg
79 = 437 kg 90 = 600 kg
80 = 450 kg 91 = 615 kg
220
WAR
NING
LIGHT
S AND
MESS
AGES
INDE
XDA
SHBO
ARD
AND C
ONTR
OLS
SAFE
TYDE
VICE
SCO
RREC
T USE
OF TH
E CAR
IN A
NEM
ERGE
NCY
CAR
MAIN
TENA
NCE
TECH
NICA
LSP
ECIFI
CATIO
NSMaximum speed rating
Q = up to 160 km/h.
R = up to 170 km/h.
S = up to 180 km/h.
T = up to 190 km/h.
U = up to 200 km/h.
H = up to 210 km/h.
V = up to 240 km/h.
Maximum speed ratingfor snow tyres
QM + S = up to 160 km/h.
TM + S = up to 190 km/h.
HM + S = up to 210 km/h.

221
WAR
NING
LIGHT
S AND
MESS
AGES
INDE
XDA
SHBO
ARD
AND C
ONTR
OLS
SAFE
TYDE
VICE
SCO
RREC
T USE
OF TH
E CAR
IN A
NEM
ERGE
NCY
CAR
MAIN
TENA
NCE
TECH
NICA
LSP
ECIFI
CATIO
NS
175/65 R15 84T (M+S)185/65 R15 88T (M+S)
175/65 R15 84T (M+S)185/65 R15 88T (M+S)
185/65 R15 88T (M+S)195/65 R16 87H (M+S)
185/65 R15 88T (M+S)195/65 R16 87H (M+S)
175/65 R15 84T (M+S)185/65 R15 88T (M+S)
185/65 R15 88T (M+S)195/55 R16 87H (M+S)
185/65 R15 88H (M+S)195/55 R16 87H (M+S)
175/65 R15 84T185/65 R15 88T
175/65 R15 84T185/65 R15 88T
185/65 R15 88T195/55 R16 87H205/45 R17 88V
185/65 R15 88H195/55 R16 87H205/45 R17 88V
175/65 R15 84T185/65 R15 88T
185/65 R15 88T195/55 R16 87H205/45 R17 88V
185/65 R15 88H195/55 R16 87H205/45 R17 88V
6J X 15'' - ET 43
6J X 15'' - ET 43
6J X 15'' - ET 43
6J X 15'' - ET 43
6J X 15'' - ET 43
6J X 15'' - ET 43
6J X 15'' - ET 43
175/65 R15 84T185/65 R15 88T
175/65 R15 84T185/65 R15 88T
185/65 R15 88T
185/65 R15 88T
175/65 R15 84T185/65 R15 88T
185/65 R15 88T
185/65 R15 88H
6J X 15'' - ET 43
6J X 15'' - ET 43
6J X 15'' - ET 436J X 16'' - ET 45
6,5J X 17'' - ET 46
6J X 15'' - ET 436J X 16'' - ET 45
6,5J X 17'' - ET 46
6J X 15'' - ET 43
6J X 15'' - ET 436J X 16'' - ET 45
6,5J X 17'' - ET 46
6J X 15'' - ET 436J X 16'' - ET 45
6,5J X 17'' - ET 46
Version Rims (*) Tyres Spare wheelStandard tyre Snow tyre Rim (*) Tyre
1.2
1.4
1.4 16V
1.4 T-JET 120 HP
1.3 Multijet 75 HP
1.3 Multijet 90 HP
1.9 Multijet
(*) Spacing of studs 100 mm and studs M12 x 1.5 use only wheels specified for this car.

222
WAR
NING
LIGHT
S AND
MESS
AGES
INDE
XDA
SHBO
ARD
AND C
ONTR
OLS
SAFE
TYDE
VICE
SCO
RREC
T USE
OF TH
E CAR
IN A
NEM
ERGE
NCY
CAR
MAIN
TENA
NCE
TECH
NICA
LSP
ECIFI
CATIO
NS
2.2 2.12.2 2.2
2.2 2.02.2 2.2
– –– –
– –– –
– –– –
2.2 2.12.2 2.2
2.2 2.02.2 2.2
– –– –
– –– –
– –– –
2.4 2.12.5 2.2
2,3 2.12.3 2.3
– –– –
– –– –
– –– –
– –– –
2.3 2.12.3 2.3
– –– –
2.3 2.12.4 2.4
2.4 2.22.5 2.4
– –– –
– –– –
2.4 2.22,4 2.2
2.4 2.22.6 2.4
2.6 2.32.8 2.5
– –– –
2.2 2.02.2 2.2
– –– –
2.2 2.02.2 2.2
2.4 2.22.4 2.4
– –– –
– –– –
2.2 2.02.2 2.2
2.2 2,02.2 2.2
2.4 2,22.4 2.4
COLD TYRE INFLATION PRESSURE (bar)
Versions 1.2 1.4 1.4 16V 1.4 T-JET 1.3 Multijet 1.3 Multijet 1.9 Multijet75 HP 90 HP
Front Rear Front Rear Front Rear Front Rear Front Rear Front Rear Front Rear
175/65 R15 84TMedium loadFull load
185/65 R15 88TMedium loadFull load
185/65 R15 88HMedium loadFull load
195/55 R16 87HMedium loadFull load
205/45 R17 88VMedium loadFull load
Add +0.3 bar to the prescribed inflation pressure when the tyres are warm. Recheck pressure value with cold tyres.With snow tyres, add +0.2 bar to the inflation pressure value prescribed for standard tyres.When running at speed higher than 160 km/h, inflate tyres at full load inflation values.With T.P.M.S. system, pressure value shall be + 0.1 bar than prescribed value.T.P.M.S. system not available for tyre 175/65 R15 84T

223
WAR
NING
LIGHT
S AND
MESS
AGES
INDE
XDA
SHBO
ARD
AND C
ONTR
OLS
SAFE
TYDE
VICE
SCO
RREC
T USE
OF TH
E CAR
IN A
NEM
ERGE
NCY
CAR
MAIN
TENA
NCE
TECH
NICA
LSP
ECIFI
CATIO
NS
DIMENSIONS
Dimensions are expressed in mm and re-fer to the vehicle fitted with standardtyres.
The height refers to the vehicle unladen.
Boot volume
Unladen boot volume (V.D.A. standards) ...................... 275 dm3
Boot volume with rear seat folded .................................... 638 dm3
F0M0369m
fig. 5
Versions A B C D E F G H3 - 5 door
1.2 -1.4 - 1.4 16V1.3 Multijet 4030 875 2510 645 1490 1473 1687 14661.9 Multijet
IMPORTANT Track measurements may vary according to rim/tyre size.

224
WAR
NING
LIGHT
S AND
MESS
AGES
INDE
XDA
SHBO
ARD
AND C
ONTR
OLS
SAFE
TYDE
VICE
SCO
RREC
T USE
OF TH
E CAR
IN A
NEM
ERGE
NCY
CAR
MAIN
TENA
NCE
TECH
NICA
LSP
ECIFI
CATIO
NSPERFORMANCE
Top admitted speed after initial car use in km/h.
PETROL VERSIONS
1.2 1.4 1.4 16V 1.4 T-JET
155 165 178 195
MULTIJET VERSIONS
1.3 Multijet 75 HP 1.3 Multijet 90 HP 1.9 Multijet 1.9 Multijet Sport
165 175 190 200

3 door4 seat
1015
480
8508501495
900400
75
60
3 door5 seat
1015
560
8508501575
900400
75
60
5 door5 seat
1030
560
8508501590
900400
75
60
3 door4 seat
1025
480
8508501505
1000400
75
60
3 door5 seat
1025
560
8508501585
1000400
75
60
5 door5 seat
1040
560
8508501600
1000400
75
60
3 door4 seat
1060
480
8508501540
1000400
75
60
3 door5 seat
1060
560
8508501620
1000400
75
60
5 door5 seat
1075
560
8508501635
1000400
75
60
3 door4 seat
1155
480
9508501635
1000400
75
60
3 door5 seat
1155
560
9508501715
1000400
75
60
5 door5 seat
1170
560
9508501730
1000400
75
60
225
WAR
NING
LIGHT
S AND
MESS
AGES
INDE
XDA
SHBO
ARD
AND C
ONTR
OLS
SAFE
TYDE
VICE
SCO
RREC
T USE
OF TH
E CAR
IN A
NEM
ERGE
NCY
CAR
MAIN
TENA
NCE
TECH
NICA
LSP
ECIFI
CATIO
NS
WEIGHTS
Petrol versions 1.2 1.4 1.4 16V 1.4 T-JET
Weights (kg)
Empty weight (including all fluids, fuel tank at 90% and with no optional):
Payload (*) including the driver:
Maximum admitted loads (**)– front axle:– rear axle:– total:
Towable loads– trailer with brakes:– trailer without brakes:
Maximum load on roof:
Maximum load on tow hitch(trailer with brakes):
(*) If special equipment is fitted (sunroof, tow hitch, etc.) the unladen car weight increases, thus reducing the specified payload.(**) Loads not be exceeded. The driver is responsible for arranging the loads in the boot and/or on the roof so that they comply
with these limits.

226
WAR
NING
LIGHT
S AND
MESS
AGES
INDE
XDA
SHBO
ARD
AND C
ONTR
OLS
SAFE
TYDE
VICE
SCO
RREC
T USE
OF TH
E CAR
IN A
NEM
ERGE
NCY
CAR
MAIN
TENA
NCE
TECH
NICA
LSP
ECIFI
CATIO
NS3 Door4-seat
1090
480
9508501570
1000400
75
60
3 Door5-seat
1090
560
9508501650
1000400
75
60
5 Door5-seat
1105
560
9508501665
1000400
75
60
3 Door4-seat
1130
480
9508501610
1000400
75
60
3 Door5-seat
1130
560
9508501690
1000400
75
60
5 Door5-seat
1145
560
9508501705
1000400
75
60
3 Door4-seat
1205
480
10008501685
1000400
75
60
3 Door5-seat
1205
560
10008501765
1000400
75
60
5 Door5-seat
1220
560
10008501780
1000400
75
60
Multijet versions 1.3 Multijet 75 HP 1.3 Multijet 90 HP 1.9 Multijet
Weights (kg)
Empty weight (including all fluids, fuel tank at 90% and with no optional):
Payload (*) including the driver:
Maximum admitted loads (**)– front axle:– rear axle:– total:
Towable loads– trailer with brakes:– trailer without brakes:
Maximum load on roof:
Maximum load on tow hitch(trailer with brakes):
(*) If special equipment is fitted (sunroof, tow hitch, etc.) the unladen car weight increases, thus reducing the specified payload.(**) Loads not be exceeded. The driver is responsible for arranging the loads in the boot and/or on the roof so that they comply
with these limits.

Specified fuels and original lubricants
Unleaded petrol with no less than 95 R.O.N. (EN 228 Specification)
Diesel fuel for motor vehicles (EN590 Specification)
Mixture of 50% water and PARAFLU UP (❒)
SELENIA K P.E.
SELENIA WR
TUTELA CAR TECHNYX (▲)TUTELA CAR MATRYX (❍)
TUTELA TOP 4
Mixture of water and TUTELA PROFESSIONAL SC 35
227
WAR
NING
LIGHT
S AND
MESS
AGES
INDE
XDA
SHBO
ARD
AND C
ONTR
OLS
SAFE
TYDE
VICE
SCO
RREC
T USE
OF TH
E CAR
IN A
NEM
ERGE
NCY
CAR
MAIN
TENA
NCE
TECH
NICA
LSP
ECIFI
CATIO
NS
1.3 Multijet75 HP
––
455 ÷ 7
7.3
––
3.03.2
1.7 (▲)(*)
0.5
2.24.5
1.4
455 ÷ 7
––
5.27
2.42.6
––
1.5 (▲)
0.5
2.24.5
1.2
455 ÷ 7
––
5.27
2.42.6
––
1.5 (▲)
0.5
2.24.5
1.3 Multijet90 HP
––
455 ÷ 7
7.4
––
3.03.2
2.0 (❍)(**)
0.5
2.24.5
1.9 Multijet
––
455 ÷ 7
6.35
––
3.84.18
2.0 (❍)
0.5
2.24.5
1.4 16V
455 ÷ 7
––
5.27
2.752.9
––
1.65 (▲)
0.5
2.24.5
1.4T-JET
455 ÷ 7
––
6.0
2,42,6
––
1.7 (▲)
0.5
2,24,5
CAPACITIES
Fuel tank: litresincluding a reserve of: litres
Fuel tank: litresincluding a reserve of: litres
Engine cooling system:litres
Engine sump: litresEngine sump and filter: litres
Engine sump: litresEngine sump and filter: litres
Gearbox/differential casing kg:
Hydraulic brake circuit: kg
Windscreen, rear window andheadlight washer litresfluid reservoir: litres
(*) Valve also valid for 1.3 Multijet 90 HP version with 5-gear transmission.(**) Version with 6-speed gearbox(❒) When the vehicle is used under particularly harsh climate conditions, we recommend using a 60-40 mixture of PARAFLU UP
and demineralised water.

228
WAR
NING
LIGHT
S AND
MESS
AGES
INDE
XDA
SHBO
ARD
AND C
ONTR
OLS
SAFE
TYDE
VICE
SCO
RREC
T USE
OF TH
E CAR
IN A
NEM
ERGE
NCY
CAR
MAIN
TENA
NCE
TECH
NICA
LSP
ECIFI
CATIO
NS
SELENIA K P.E.Contractual Technical Reference N° F603.C07
SELENIA WRContractual Technical Reference N° F515.D06
According to Service Schedule
According to Service Schedule
Synthetic-based oils, grade SAE 5W-40, ACEA C3.FIAT 9.55535-S2 qualification
Synthetic-based oils, grade SAE 5W-40.FIAT 9.55535-N2 qualification
FLUIDS AND LUBRICANTS
RECOMMENDED PRODUCTS AND THEIR SPECIFICATIONS
Use Fluid and lubricant specifications Original Changefor correct car operation fluids and
lubricants
Oil forpetrol engines
Oils fordiesel engines
For diesel engines, in the event of emergencies when genuine products are not available, lubricants providing at least ACEA B4performance are allowed; in that case, engine best performance is not guaranteed; we recommend to have it replaced as soon aspossible with the recommended lubricants by the Fiat Dealership.Use of products with low-quality properties than ACEA A3 and ACEA B4 could cause damages to the engine that are not coveredby the warranty.For very cold climate conditions, ask Fiat Dealership for the appropriate Selenia product to use.

Lubricants and greases for transmission
Use Fluid and lubricant specifications Original fluids and Applicationsfor correct car operation lubricants
(*) IMPORTANT Do not top up or mix with fluids having characteristics different from those specified.(❒) When the vehicle is used under particularly harsh climate conditions, we recommend using a 60-40 mixture of PARAFLU UP anddemineralised water.
LSynthetic-based oils, grade SAE 75W- 85that passes API GL4 PLUS specifications.
Synthetic-based oil, grade SAE 75W-85that passes API GL-4 specifications
Grease containing Molybdenum bisulphide for high temperature appliances. N.L.G.I. 1-2 consistency.y
Specifc grease to be used for constant-velocity joints withlow friction coefficient. N.L.G.I. 0-1 consistency.
Poly-urea oil synthetic-based grease suitable for high temperatures. NL.GI. 2 consistency
Synthetic fluid FMVSS no. 116 DOT 4, ISO 4925 SAE J1704, CUNA NC 956- 01
Red protective with antifreeze action, based on inhibited monoethylen glycol with organic formula based on O.A.T, that passes CUNA NC 956-16, ASTM D 3306 specifications.
Mixture of alcohol, water and surfactants CUNA NC 956-II
TUTELA CAR TECHNYXContractual TechnicalReference N° F010.B05
TUTELA CARMATRYXContractual TechnicalReference N° F108.F02
TUTELA ALLSTAR Contractual Technical Reference N° F702.G07
TUTELA STAR 700Contractual TechnicalReference N° F701.C07
TUTELA STAR 325Contractual TechnicalReference N° F301.D03
TUTELA TOP 4Contractual TechnicalReference N° F001.A93
PARAFLU UP (*)Contractual TechnicalReference N° F101.M01
TUTELA PROFES-SIONAL SC 35Contractual TechnicalReference N° F201.D02
Mechanical gearbox and differential (petrolversions and 1.3 Multijet75 HP versions)
Mechanical gearbox and differential (1.3 Multijet 90HP versions and 1.9 Multijet versions)
CV joints on wheel side
CV joints on differentialside (excluding 1.9 Multijet versions)
CV joints on differential side (1.9 Multijet versions)Brake and clutch hydraulic controls
Radiator antifreeze proportion: 50% waterand 50% PARAFLU UP (❒)
To be used diluted orundiluted in windscreen/rear window washer/wiper systems
229
WAR
NING
LIGHT
S AND
MESS
AGES
INDE
XDA
SHBO
ARD
AND C
ONTR
OLS
SAFE
TYDE
VICE
SCO
RREC
T USE
OF TH
E CAR
IN A
NEM
ERGE
NCY
CAR
MAIN
TENA
NCE
TECH
NICA
LSP
ECIFI
CATIO
NS
Brake fluids
Protective agent forradiators
Windscreen/ rearwindow washer fluid
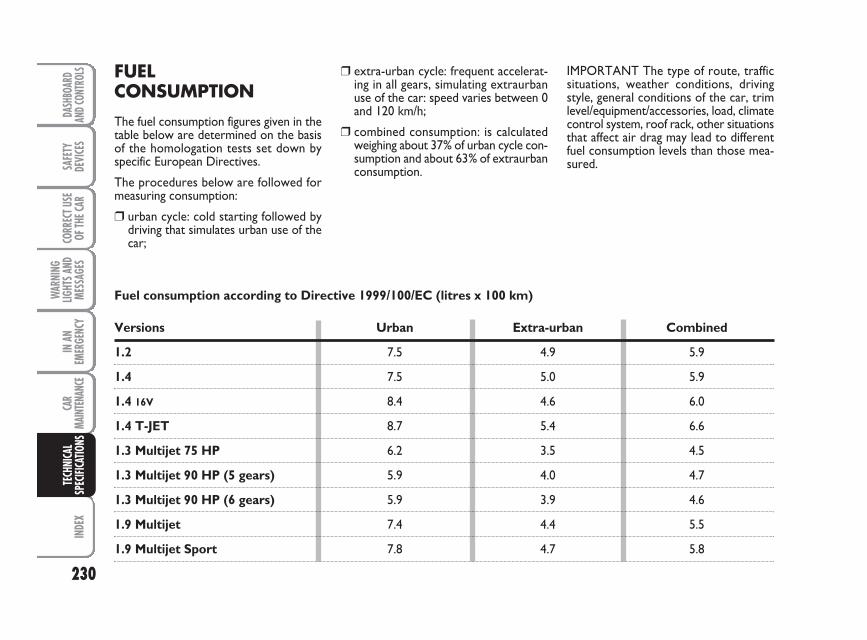
230
WAR
NING
LIGHT
S AND
MESS
AGES
INDE
XDA
SHBO
ARD
AND C
ONTR
OLS
SAFE
TYDE
VICE
SCO
RREC
T USE
OF TH
E CAR
IN A
NEM
ERGE
NCY
CAR
MAIN
TENA
NCE
TECH
NICA
LSP
ECIFI
CATIO
NS❒ extra-urban cycle: frequent accelerat-
ing in all gears, simulating extraurbanuse of the car: speed varies between 0and 120 km/h;
❒ combined consumption: is calculatedweighing about 37% of urban cycle con-sumption and about 63% of extraurbanconsumption.
FUELCONSUMPTION
The fuel consumption figures given in thetable below are determined on the basisof the homologation tests set down byspecific European Directives.
The procedures below are followed formeasuring consumption:
❒ urban cycle: cold starting followed bydriving that simulates urban use of thecar;
IMPORTANT The type of route, trafficsituations, weather conditions, drivingstyle, general conditions of the car, trimlevel/equipment/accessories, load, climatecontrol system, roof rack, other situationsthat affect air drag may lead to differentfuel consumption levels than those mea-sured.
Fuel consumption according to Directive 1999/100/EC (litres x 100 km)
Versions Urban Extra-urban Combined
1.2 7.5 4.9 5.9
1.4 7.5 5.0 5.9
1.4 16V 8.4 4.6 6.0
1.4 T-JET 8.7 5.4 6.6
1.3 Multijet 75 HP 6.2 3.5 4.5
1.3 Multijet 90 HP (5 gears) 5.9 4.0 4.7
1.3 Multijet 90 HP (6 gears) 5.9 3.9 4.6
1.9 Multijet 7.4 4.4 5.5
1.9 Multijet Sport 7.8 4.7 5.8

231
WAR
NING
LIGHT
S AND
MESS
AGES
INDE
XDA
SHBO
ARD
AND C
ONTR
OLS
SAFE
TYDE
VICE
SCO
RREC
T USE
OF TH
E CAR
IN A
NEM
ERGE
NCY
CAR
MAIN
TENA
NCE
TECH
NICA
LSP
ECIFI
CATIO
NS
CO2 EMISSIONS
The CO2 emission levels at the exhaust given in the following tables refer to combined consumption.
Versions CO2 Emissions accordingto 1999/100/CE Directive (g/km)
1.2 139
1.4 139
1.4 16V 142
1.4 T-JET 155
1.3 Multijet 75 HP 119
1.3 Multijet 90 HP (5 gears) 123
1.3 Multijet 90 HP (6 gears) 122
1.9 Multijet 145
1.9 Multijet Sport 154

232
WAR
NING
LIGHT
S AND
MESS
AGES
DASH
BOAR
DAN
D CON
TROL
SSA
FETY
DEVI
CES
CORR
ECT U
SEOF
THE C
ARIN
AN
EMER
GENC
YCA
RMA
INTE
NANC
ETEC
HNICA
LSP
ECIFI
CATIO
NSIN
DEX
Bodywork
– maintenance .................................. 208
– version codes ............................... 214
Bonnet .................................................. 88
Boot........................................................ 84
– extension ........................................ 85
– tailgate opening/closing ............... 84
– emergency opening....................... 85
Boot light .............................................. 174
Brake Assist (brake assistin an emergency)............................... 92
Brakes
– fluid level ........................................ 201
– technical data ................................ 218
Bulb (replacement)
– general instructions ..................... 166
– types of bulbs ................................ 166
Capacities ............................................ 106
Car inactivity ....................................... 138
Car maintenance
– periodical checks........................... 195
– scheduled servicing ...................... 190
– service schedule ........................... 191
– use of the car under heavy conditions............................ 195
Card box - CD box............................. 74
Carrying children safely ..................... 115
Ceiling lights
– boot light ....................................... 68
– courtesy ......................................... 68
– front ................................................ 66
– puddle/door .................................. 68
– rear ................................................. 67
Central console oddment compartment ..................................... 73
Chassis (marking) ............................... 213
Checking levels..................................... 197
Child lock .............................................. 80
Child restraint systems
– “Universal Isofix” ......................... 120
– Passenger’s seat compliance ...... 115
Cigar lighter .......................................... 74
Clutch ................................................... 217
CO2 emissions ..................................... 231
Code Card ........................................... 7
ABS ...................................................... 91
Accessories purchased by the owner .................................... 105
Additional heater ................................. 58
Air bag
– front................................................. 121
– side .................................................. 124
Air filter ................................................ 202
Air vents ............................................... 43
Alarm...................................................... 11
Armrest ................................................. 73
Ashtray................................................... 75
ASR ......................................................... 94
– activation/deactivation ................. 94
At the filling station ............................ 106
Automatic two-zone climate control system .................................. 52
Battery
– checking the charge ..................... 202
– jump starting ................................. 154
– recharging ...................................... 185
– replacing ......................................... 203
IIINNDDEEXX

233
WAR
NING
LIGHT
S AND
MESS
AGES
DASH
BOAR
DAN
D CON
TROL
SSA
FETY
DEVI
CES
CORR
ECT U
SEOF
THE C
ARIN
AN
EMER
GENC
YCA
RMA
INTE
NANC
ETEC
HNICA
LSP
ECIFI
CATIO
NSIN
DEX
– side bulb replacement ................. 170
Doors ..................................................... 78
Electrical socket ................................ 75
Engine
– identification code ........................ 212
– marking ........................................... 213
– technical data ................................ 215
Engine compartment
– washing ........................................... 197
Engine coolant fluid level .................. 200
Engine coolant temperature gauge .. 17
Engine oil
– consumption .................................. 196
– level check............................... 196-199
– specifications ................................. 228
EOBD system ...................................... 95
ESP system ............................................ 92
External lights ...................................... 59
Fiat CODE system ............................. 7
Fix & Go automatic ............................ 161
Flashing the headlights ....................... 59
Fluid levels ............................................ 196
Fluids and lubricants ........................... 228
Follow me home (device) ................. 60
Front ceiling lights
– bulb replacement........................... 173
– control ............................................ 66
Front fog lights
– bulb replacement .......................... 170
– control button .............................. 69
Fuel
– consumption................................... 230
– cut-off switch.................................. 71
– level gauge....................................... 17
Fuel cut-off switch ............................... 71
Fuel filler cap ....................................... 106
Fuel level gauge ................................... 17
Fuses (replacement) ........................... 175
Gearbox
– using manual gearbox .................. 132
Glass holder - can holder................... 74
Glove box/oddment compartment.. 72
Handbrake .......................................... 184
Hands free kit with voice recognitionand Bluetooth® technology ............. 104
Hazard lights ........................................ 69
Consumption
– engine oil ........................................ 196
– fuel ................................................... 230
Control buttons .................................. 69
Correct use of the car ...................... 127
Cruise Control..................................... 64
Courtesy light
– bulb replacement .......................... 174
– control button .............................. 68
Current outlet...................................... 75
Dashboard
– Left hand drive version ............... 5
– Right hand drive version ............. 6
Dashboard and controls..................... 4
Dead lock device ................................. 79
Digital display ....................................... 18
Dimensions .......................................... 223
Dipped beam headlights
– bulb replacement........................... 169
– control ............................................ 59
Direction indicators
– control ............................................ 60
– front bulb replacement ............... 169
– rear bulb replacement ................. 170

234
WAR
NING
LIGHT
S AND
MESS
AGES
DASH
BOAR
DAN
D CON
TROL
SSA
FETY
DEVI
CES
CORR
ECT U
SEOF
THE C
ARIN
AN
EMER
GENC
YCA
RMA
INTE
NANC
ETEC
HNICA
LSP
ECIFI
CATIO
NSIN
DEX
Load limiters ...................................... 112
Main beam headlights
– bulb replacement .......................... 169
– control ............................................ 59
– flashing ............................................ 59
Manual climate control system ........ 46
Multifunction display ........................... 23
Number plate light ............................ 172
Oddment compartments.................. 72
Paint ..................................................... 208
Parking .................................................. 131
Parking sensors .................................... 101
Performance ........................................ 224
Plates
– bodywork paint identification plate ....................... 213
– model plate .................................... 212
Pollen filter ........................................... 202
Power socket ...................................... 75
Power steering .................................... 96
Power windows .................................. 81
Presetting for mounting the
“Isofix Universal” child restraint system................................. 120
Pretensioners ...................................... 112
Prolonged car inactivity...................... 138
Protecting the environment ............. 107
Puddle/door light
– bulb replacement .......................... 174
Radio transmitters and cellular telephones ......................................... 105
Radionavigator presetting system .... 104
Rain sensor............................................ 62
Rear ceiling lights
– bulb replacement........................... 173
– control ............................................ 67
Rear doors emergency lock device.... 81
Rear fog lights
– bulb replacement .......................... 171
– control button .............................. 70
Rear window washer
– control ............................................ 63
– fluid level ........................................ 200
Head restraints
– front ................................................ 38
– rear ................................................... 39
Headlight washer
– control ............................................ 63
– fluid level ........................................ 200
Headlights.............................................. 89
– beam adjustment .......................... 89
– headlight slant adjusting device . 89
Heated rear window ............... 45-50-58
Heating and ventilation system ........ 42
Identification data .............................. 212
Ignition switch ..................................... 13
In an emergency .................................. 153
Instrument panel ................................. 14
Instruments .......................................... 16
Interior fittings .................................... 72
Interiors ................................................ 210
Isofix (child restraint system) .......... 120
Jack ........................................................ 156
Jacking the car ..................................... 186
Key with remote control ................ 8
Key without remote control ........... 11
Keys ........................................................ 8

235
WAR
NING
LIGHT
S AND
MESS
AGES
DASH
BOAR
DAN
D CON
TROL
SSA
FETY
DEVI
CES
CORR
ECT U
SEOF
THE C
ARIN
AN
EMER
GENC
YCA
RMA
INTE
NANC
ETEC
HNICA
LSP
ECIFI
CATIO
NSIN
DEX
Side/taillights
– control ............................................ 59
– front bulb replacement................. 168
– rear bulb replacement .................. 170
Smart washing ..................................... 62
Snow chains ......................................... 137
Sound system ...................................... 103
Spark plugs
– type ................................................. 215
Speedometer ....................................... 16
Starting the engine
– bump starting ................................ 155
– diesel engines ................................ 129
– emergency start-up ...................... 154
– ignition switch ............................... 13
– jump starting .................................. 154
– petrol engines ............................... 128
– stopping the engine ....................... 130
– warming up the engine ................ 130
Steering .................................................. 218
Steering column lock ......................... 13
Steering wheel (adjustment) ............ 40
Sunroof .................................................. 76
Sun visors ............................................. 75
Suspensions .......................................... 218
Symbols ................................................. 7
Tailgate ................................................ 84
Technical specifications ..................... 211
Third brake light ................................. 172
Top speeds ........................................... 224
Towing the car .................................... 187
Towing trailers
– tow hook installation ................... 135
T.P.M.S. system .................................... 98
Transmission ........................................ 217
Trip computer ..................................... 34
Tyre pressure ...................................... 222
Tyres
– changing .......................................... 155
– maintenance .................................. 205
– standard tyres ................................ 221
– understanding tyre marking ....... 219
Using the manual gearbox .............. 132
Ventilation .......................................... 42
Warning lights and messages ......... 139
Weights ................................................ 225
Rear window wiper
– blades .............................................. 207
– control ............................................ 63
– nozzles ............................................ 208
Rearview mirrors
– door mirrors ................................. 41
– driving mirror ................................ 40
Refuelling ............................................... 106
Rev counter .......................................... 16
Reversing light ..................................... 171
Roof rack/ski rack .............................. 88
Rubber hoses ....................................... 206
Safety devices ..................................... 109
Seat adjustment ................................... 38
Seat belts
– general instructions ..................... 113
– load limiters ................................... 112
– maintenance .................................. 115
– use ................................................... 110
Seats
– adjustment ..................................... 38
– cleaning ........................................... 210
– tilting (rear seats) .......................... 85

236
WAR
NING
LIGHT
S AND
MESS
AGES
DASH
BOAR
DAN
D CON
TROL
SSA
FETY
DEVI
CES
CORR
ECT U
SEOF
THE C
ARIN
AN
EMER
GENC
YCA
RMA
INTE
NANC
ETEC
HNICA
LSP
ECIFI
CATIO
NSIN
DEX
Wheel
– changing .......................................... 155
– spare wheel ................................... 221
Wheel geometry ................................. 219
Wheel rims
– understanding rim marking ........ 220
Window (washing/cleaning) ....................... 61-209
Window winders ................................. 81
Windscreen/rear window/headlight washer fluid level ............ 200
Windscreen/rear windowwiper blades ...................................... 206
Windscreen washer
– control ............................................ 61
– fluid level ........................................ 200
Windscreen wiper
– blades .............................................. 206
– control ............................................ 61
– nozzles ............................................ 207

PROVISIONS FOR THE PROCESSING OF A VEHICLE AT THE END OF ITSLIFE-CYCLE
For years now Fiat has been developing its global commitment towards the safeguarding and protection of the Environment throughthe continuous improvement of its production processes and the making of increasingly more “eco friendly” products. With a viewto guaranteeing the best possible service to clients in full observance of environmental norms and in response to the obligationsimposed by European Directive 2000/53/EC on end-of-life vehicles, Fiat offers its clients the possibility to hand in their vehicle* atthe end of its life span without additional costs.The European Directive, in fact, provides for the collection of the vehicle without the last holder or owner of the same incurringexpenses due to the fact that the market value of the vehicle is zero or negative. In particular, in almost all of the countries of theEuropean Union, up until 1st January 2007, collection of the vehicle free of charge only applies to vehicles registered from 1 July 2002on, while, from 2007 on collection will be carried out free of charge independently of the year of registration, provided that the ve-hicle still contains its essential component parts (especially engine and body) and is free from additional waste materials.To have your end-of-life vehicle collected at no additional cost, simply contact one of our dealers or one of the collection and de-molition centres authorised by Fiat. These centres have been carefully selected with a view to guaranteeing a good quality servicefor the collection, processing and recycling of discarded vehicles while protecting the Environment.Information on collection and demolition centres may be obtained from the network of Fiat and Fiat Commercial Vehicle dealers,by calling the toll free number 00800 3428 0000 or by consulting the Fiat web site.
* Passenger transportation vehicles to seat a max. of nine persons, having a total admissible weight of 3.5 t


Fiat Group Automobiles S.p.A. - Servizi al Cliente - Assistenza Tecnica - Ingegneria Assistenziale - Largo Senatore G. Agnelli. 5 - 10040 Volvera - Torino (Italia)Print N. 603.81.203 - 07/2007 - 1st edition
1.2 - 1.4 - 1.4 16V - 1.4 T-JET - 1.3 Multijet 75 HP - 1.3 Multijet 90 HP - 1.9 Multijet
Tank capacity 45
Riserve 5 ÷ 7
Only refuel cars with petrol engines with unleaded petrol with octane rating (RON) not less than 95.Only refuel cars with diesel engines with diesel fuel for motor vehicles conforming to the EN590 European Specification
FUEL CAPACITY (litres)
ENGINE OIL REPLACEMENT
COLD TYRE INFLATION PRESSURE (bar)
2,2 2,12,2 2,2
2,2 2,02,2 2,2
– –– –
– –– –
– –– –
2,2 2,12,2 2,2
2,2 2,02,2 2,2
– –– –
– –– –
– –– –
2,4 2,12,5 2,2
2,3 2,12,3 2,3
– –– –
– –– –
– –– –
– –– –
2,3 2,12,3 2,3
– –– –
2,3 2,12,4 2,4
2,4 2,22,5 2,4
– –– –
– –– –
2,4 2,22,4 2,2
2,4 2,22,6 2,4
2,6 2,32,8 2,5
– –– –
2,2 2,02,2 2,2
– –– –
2,2 2,02,2 2,2
2,4 2,22,4 2,4
– –– –
– –– –
2,2 2,02,2 2,2
2,2 2,02,2 2,2
2,4 2,22,4 2,4
Versions 1.2 1.4 1.4 16V 1.4 T-JET 1.3 Multijet 75 HP 1.3 Multijet 90 HP 1.9 MultijetFront Rear Front Rear Front Rear Front Rear Front Rear Front Rear Front Rear
175/65 R15 84TMedium loadFull load
185/65 R15 88TMedium loadFull load
185/65 R15 88HMedium loadFull load
195/55 R16 87HMedium loadFull load
205/45 R17 88VMedium loadFull load
Add +0.3 bar to the prescribed inflation pressure when the tyres are warm. Recheck pressure value with cold tyres.With snow tyres, add +0.2 bar to the inflation pressure value prescribed for standard tyres.
1.2 1.4 1.4 16 1.4 T-JET 1.3 Multijet 75 HP 1.3 Multijet 90 HP 1.9 Multijetliter kg liter kg liter kg liter kg liter kg liter kg liter kg
Sump and filter 2.6 2.25 2.6 2.25 2.9 2.55 2.4 2.6 3.2 2.75 3.2 2.75 4.18 3.49

The data contained in this publication is intended merely as a guide. FIAT reserves the right to modify the models and versions described in this booklet at any time for technical and commercial reasons.
If you have any further questions please consult your FIAT dealer. Printed in recycled paper without chlorine. O W N E R H A N D B O O K
F I A T P U N T OENGLISH
PUNTO UM GB 20-07-2007 11:35 Pagina 1