pupil transportation guide - nebraska dept of education department of education pupil transportation...
TRANSCRIPT

Pupil Transportation Guide
Nebraska Department of Education DECEMBER 6, 2012
This document should be printed in color to provide the best representation of pupil transportation vehicle operational regulations.
Approximately 65,000 Nebraska schoolchildren are transported each day between home and school in pupil transportation vehicles. These vehicles could be school buses, vans, or cars. Pupil transportation vehicles annually travel almost 50,000,000 miles carrying Nebraska students to and from school and for activity trips. Since schoolchildren are transported so many miles each year, their safety depends on the dedicated men and women who accept the important responsibility of driving pupil transportation vehicles.
The primary role of the pupil transportation driver is ensuring the safe transportation of children to and from school and school-related activities. Drivers have many roles and responsibilities during the school year. Some of which include the following:
Knowledge of the DMV’ “Rules of the Road,”
Keen awareness of student welfare and safety,
Full understanding of the proper use and care for a vehicle.
The construction and the safety equipment of pupil transportation vehicles are critical to providing safety to school bus occupants when an accident occurs. However, the pupil transportation vehicle driver often prevents these incidents each school day by their knowledge and driving skills.
For more information: Nebraska Department of Education
Education Support Services 301 Centennial Mall South
Lincoln NE 68509 402/471-2486
TABLE OF CONTENTS
Qualifications and licensing 1
Operating regulations 7
Inspection Process 12
Safe Pupil Transportation 17
Strategies for Safe Driving 20
Emergency Driving situations 26
Emergency Evacuations & Equipment 29
Basic First Aid Procedures 33
Appendix A – Sample Daily Vehicle inspection Form 37
Appendix B - Sample Post Trip Form 38
Appendix C – Requirements for First School Bus Permit 39
Appendix D – Requirements for Schools & Licensed Drivers of Pupil Transportation Vehicles 41
Appendix E – FMCSA Requirements for Passenger Vehicles – 9-15 43
Appendix G – Commercial Driver’s Manual Section 10A 45
This document and related forms can be downloaded at
http://www.education.ne.gov/FOS/OrgServices/PupilTrans
Photos Courtesy of: Elisabeth Reinkordt, AAA Foundation for Traffic Safety, 2safeschools.org ©2002
Additional thanks to Lincoln Public Schools All Rights Reserved
Nebraska Department
of
Education
Pupil Transportation
Guide
Pupil transportation is an integral part of today’s educational system. The pupil transportation vehicle driver is expected to present a strong role model for children, as well as to represent the school district before the public.
These drivers set an example of good driving practices and an attitude of professional responsibility that encourages the development of social responsibility among students. Good driving practices promote public confidence in school personnel and programs.
The safety of every student depends on the judgment and skill of the pupil transportation vehicle driver. Each time the driver sits behind the wheel, he or she has accepted the responsibility for the lives of many young people. A good pupil transportation vehicle driver must also be well informed. Teaching the driver to deal with all possible situations is a primary objective of a pupil transportation educational program.
The purpose of the Pupil Transportation Guide is to provide each pupil transportation driver in Nebraska with the basic information needed to develop the skills, attitudes, and knowledge for safe and efficient driving. It should be used as an educational tool and reference manual. It is not intended to take the place of any official publication.
For reference purposes, it is suggested that this guide be carried in each pupil transportation vehicle.

1
QUALIFICATIONS AND LICENSING
All pupil transportation vehicle drivers must meet the specific qualifications established by the employing district and requirements set by the Nebraska Department of Education and the DMV (DMV). These statutory requirements must be met to ensure safe and effective operation of pupil transportation vehicles.
This guide has been developed based on rules and regulations found in Nebraska Department of Education Rule 91, Regulations Governing Driver Qualifications, and Operational Procedures for Pupil Transportation Vehicles and Rule 92, Minimum Equipment Standards and Safety Inspection Criteria for Pupil Transportation Vehicles. These Rules have been adopted pursuant to Section 79-318(13) of the Revised Statutes of Nebraska (R.R.S.). The issuance of permits to operate pupil transportation vehicles is also subject to the regulations and procedures of the Nebraska DMV (DMV).
A School Bus Permit issued by DMV is required for the driver of all vehicles used to transport one or more schoolchildren provided that such transportation service is sponsored and approved by a school’s governing board. This regulation does not include small vehicles used exclusively to carry members of the vehicle owner’s household, or the operation of small vehicles (cars and vans) in emergency situations when approved by a school official as designated by the governing board. A school bus permit is not required for a person driving a small vehicle used only for activity purposes.
Pupil transportation vehicle drivers must always carry the following documentation when operating a pupil transportation vehicle:
Appropriate and valid DMV school bus permit,
Appropriate and valid operator’s license (Class O or CDL),
Valid medical exam certificate. (For drivers holding an Operators’ License from a
state other than Nebraska, a valid Level I or II Instructional Card must be included among the documentation listed above.)
Driver’s Eligibility The following requirements shall be met prior to applying for an initial school bus permit:
Possess an appropriate valid operator’s license (Class O or CDL)
Be able to read and comprehend driving regulations and written test questions
Be a minimum of 18 years of age
Shall be of good moral character
Pass a medical examination
Complete all requirement of the 11 hours Level I instructional Course.
Additionally, schools must meet the following requirements:
Before the employment of the individual, the school (or employing agency) must obtain a record of satisfactory driving through the DMV as determined by the local board of education policy. A copy of the individual’s driving record must be on file with the employing agency before employment as a pupil transportation vehicle operator.
The school or employing agency must also obtain a criminal record of the driver applicant through the Nebraska State Patrol or local law enforcement agency before employment as a pupil transportation vehicle operator.
The school or employing agency is required to update the DMV Driving Record annually and update the criminal history record with the

2
Nebraska State Patrol every five years to assure the most current information is on file.
DMV School Bus Permit The following requirements must be met prior to the issuance of a school bus permit if an applicant has never held such a permit:
Complete an 11 hour Level I Instructional Course for driving pupil transportation vehicles.
o An applicant may waive the Level I requirement for 60 days if the applicant receives the minimum score on the Level I waiver exam. The waiver exam is given online through the Nebraska Safety Center. Within 60 days of the waiver exam, the applicant must complete the Level I class. DMV is notified upon completion of this course.
Complete the Pre-Service Evaluation and Road Test which is the “Behind the Wheel” training and evaluation conducted by a pupil transportation driver that holds a valid school bus permit and a Commercial Driver’s License (CDL). The forms for this evaluation (Pre-Service Evaluation & Road Test Form) are available on the Department of Education’s Pupil Transportation website. This evaluation must be completed within six months of completion of Level I Instructional Course and before a Level I Instructional Course Card is issued or before confirmation of completion is forwarded to DMV for inclusion in the Interactive Driver’s License Database maintained by the DMV.
If the vehicle requires the driver to hold a CDL, the applicant must hold a Learner’s Permit for Commercial Vehicles (LPC) prior to the Pre-Service Evaluation and Road Test. In order to
obtain an LPC, the applicant must pass a general knowledge written test based on the information contained in the CDL Manual. The LPC is valid for six months. (The CDL Manual is available online at the DMV website.)
Pass a medical examination within 90 days of application for a license. The physician documents this examination by completing a form prescribed by the Department of Transportation. This form (Medical Examination Report) is available on the Department of Education Pupil Transportation website. For purposes of obtaining a permit, the medical exam is valid for 90 days from date of examination.
Pass the vision test, written, and driving tests administered by the DMV.
Substitute and volunteer pupil transportation vehicle drivers must meet the same requirements as a regular pupil transportation vehicle driver.
Documentation of Medical Exams Schools or employing agencies must retain a copy of the valid Medical Examiner’s Certificate for each driver for which it employs or contracts his/her services. A driver must provide the school with a copy of the valid Medical Examiner’s Certificate each year or be subject to the recall of his/her permit.
If a school learns a driver’s Medical Examiner’s Certificate has expired or becomes invalid due to health reasons, the school must notify the DMV. The permit becomes subject to recall upon notification of the DMV.
Renewal Requirements School bus permits expire on the applicant’s birthday in the year after issuance. The applicant makes an application to renew their school bus permit at a DMV Examining site. The applicant must provide the following documentation:
Provide an original Medical Examination Report as prescribed by the Department of Transportation. The DMV will retain the original of this report for their records. For purposes of obtaining a permit, the medical exam is valid for 90 days from date of examination.

3
Provide documentation of valid current Level I or Level II Instructional Course completion.
Within five years of completing a Level I Program and each subsequent five-year period, the driver must attend the Level II instructional course administered by an instructor approved by NDE.
If more than five years have passed since completion of the Level 1 course, the driver must retake Level 1 to be eligible to hold a Nebraska School Bus permit.
Each year pass the annual vision test administered by the DMV.
On the year that coincides with the expiration of the individual’s motor vehicle operator’s license, the individual shall pass the written exam, driving test, and vision test administered by the DMV. The driving test must be taken in a vehicle that is representative of the class of vehicle the applicant will drive.
Types of Permits - The DMV tests for and issues the following pupil transportation
vehicle operator permits and commercial driver’s licenses:
Permit Class Type
Vehicle Capacity*/Activity Passengers only
count does not include driver *Originally manufactured capacity of
vehicle
License Type
Required
A
B
C
D
E
Small Vehicle
School Bus
School Bus/Activity Bus or MFSAB
School Bus
School Bus, Activity Bus, MFSAB, MFSAB Bus
1 to 10 passengers
Up to 14 passengers
Up to 14 passengers – activity only
15 or more passengers
15 or more passengers – activity only
Class O
Class O
Class O
CDL
CDL
At a minimum, all applicants for a school bus permit must hold a valid Class O Operator’s License. A Class O License authorizes a person to operate any motor vehicle except a commercial motor vehicle or a motorcycle.
School Bus - Permit (Class A) - (Small Vehicle)
The applicant is subject to the regulations and testing procedures administered by the DMV
The applicant must pass a written test for a small vehicle and a driving test. The driving test must be taken in a vehicle that is representative of the class of vehicle the applicant will drive.
The holder of this permit can only operate a
small vehicle such as a car as a pupil transportation vehicle.
School Bus - Class B Permit
The applicant is subject to the regulations and testing procedures administered by the DMV
The applicant must pass a written test for a pupil transportation driver and driving test, including the process of controlling traffic and
4
loading/unloading pupils on a highway. The driving test must be taken in a vehicle that is representative of the class of vehicle the applicant will drive.
The holder of this permit can operate a school bus/activity bus (designed to carry 14 passengers or less) and a small vehicle.
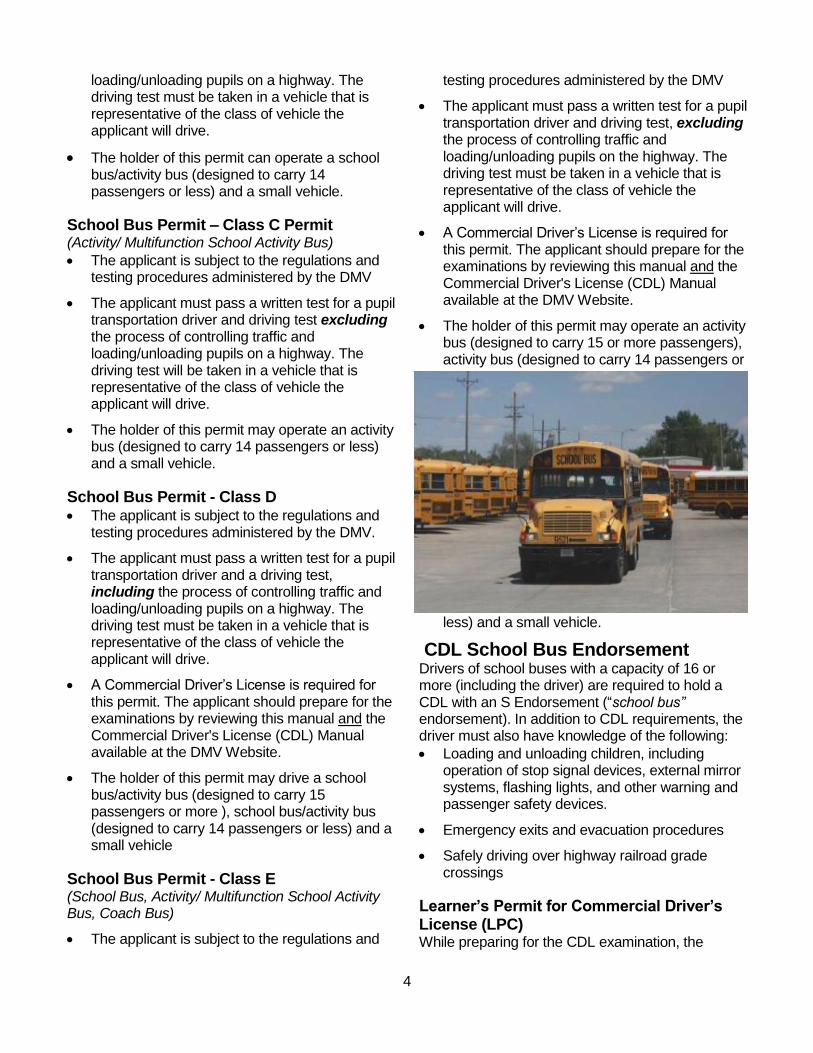
School Bus Permit – Class C Permit (Activity/ Multifunction School Activity Bus)
The applicant is subject to the regulations and testing procedures administered by the DMV
The applicant must pass a written test for a pupil transportation driver and driving test excluding the process of controlling traffic and loading/unloading pupils on a highway. The driving test will be taken in a vehicle that is representative of the class of vehicle the applicant will drive.
The holder of this permit may operate an activity bus (designed to carry 14 passengers or less) and a small vehicle.
School Bus Permit - Class D The applicant is subject to the regulations and
testing procedures administered by the DMV.
The applicant must pass a written test for a pupil transportation driver and a driving test, including the process of controlling traffic and loading/unloading pupils on a highway. The driving test must be taken in a vehicle that is representative of the class of vehicle the applicant will drive.
A Commercial Driver’s License is required for this permit. The applicant should prepare for the examinations by reviewing this manual and the Commercial Driver's License (CDL) Manual available at the DMV Website.
The holder of this permit may drive a school bus/activity bus (designed to carry 15 passengers or more ), school bus/activity bus (designed to carry 14 passengers or less) and a small vehicle
School Bus Permit - Class E (School Bus, Activity/ Multifunction School Activity Bus, Coach Bus)
The applicant is subject to the regulations and
testing procedures administered by the DMV
The applicant must pass a written test for a pupil transportation driver and driving test, excluding the process of controlling traffic and loading/unloading pupils on the highway. The driving test must be taken in a vehicle that is representative of the class of vehicle the applicant will drive.
A Commercial Driver’s License is required for this permit. The applicant should prepare for the examinations by reviewing this manual and the Commercial Driver's License (CDL) Manual available at the DMV Website.
The holder of this permit may operate an activity bus (designed to carry 15 or more passengers), activity bus (designed to carry 14 passengers or
less) and a small vehicle.
CDL School Bus Endorsement Drivers of school buses with a capacity of 16 or more (including the driver) are required to hold a CDL with an S Endorsement (“school bus” endorsement). In addition to CDL requirements, the driver must also have knowledge of the following:
Loading and unloading children, including operation of stop signal devices, external mirror systems, flashing lights, and other warning and passenger safety devices.
Emergency exits and evacuation procedures
Safely driving over highway railroad grade crossings
Learner’s Permit for Commercial Driver’s License (LPC) While preparing for the CDL examination, the
5
applicant must hold a Learner’s Permit for a Commercial Driver’s License. This permit allows the applicant to drive a school bus with no passengers on board (or a commercial vehicle) on roadways before he or she completes the requirements for a commercial driver’s license.
The applicant must pass a written test on general driving knowledge administered by the DMV. This examination is based on the information contained in the CDL Manual.
When a school bus is driven by a holder of an LPC, the school bus must not be carrying any passengers.
The LPC is valid for six months.
Drug and Alcohol Use and Testing Requirements A pupil transportation driver subject to CDL requirements is also subject to the drug and alcohol use and testing requirements found in 49 CFR Part 382 and Part 40 of the Federal Motor Carrier Safety Regulations.
The following is a general overview of the Federal Motor Carrier Safety Administration's (FMCSA) alcohol and drug testing rules for persons required to obtain a CDL. The information is intended to provide a general summary of the rules; it should not be relied upon to fulfill all legal requirements stipulated in the regulations. It does not contain many of the requirements or special circumstances detailed in the FMCSA and DOT rules.
Test Requirements for CDL The following tests apply to all persons who are required to have a CDL for the type vehicle being operated:
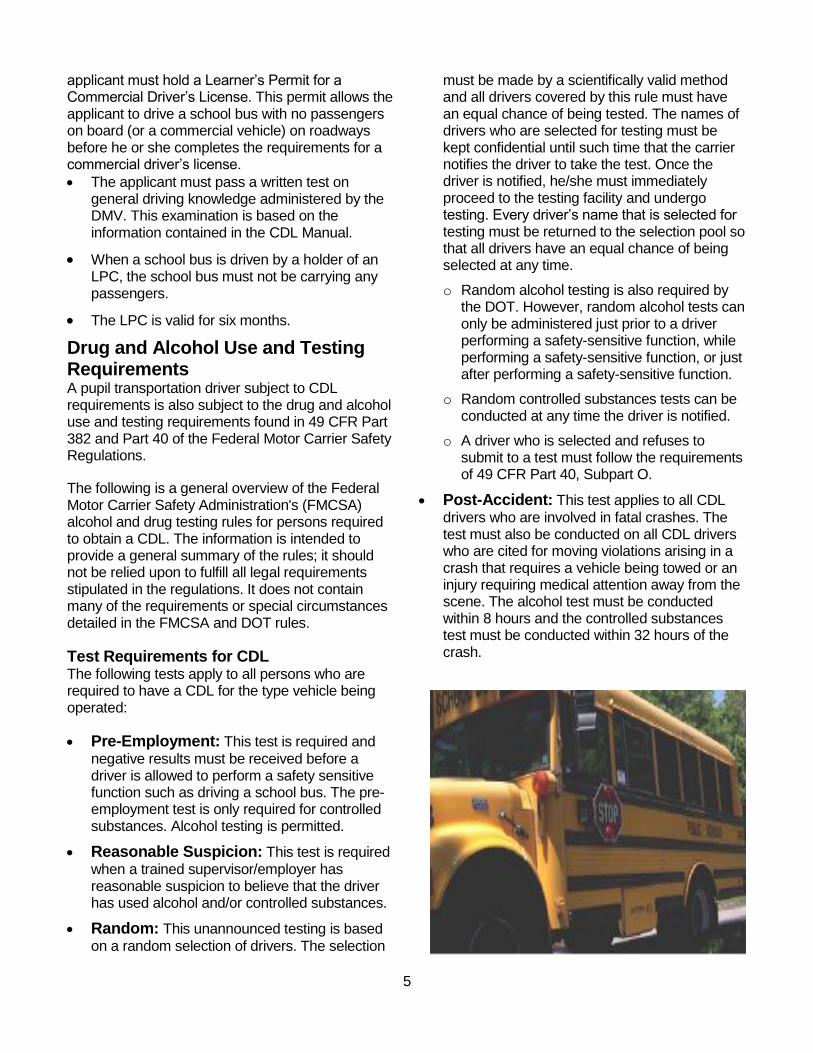
Pre-Employment: This test is required and
negative results must be received before a driver is allowed to perform a safety sensitive function such as driving a school bus. The pre-employment test is only required for controlled substances. Alcohol testing is permitted.
Reasonable Suspicion: This test is required
when a trained supervisor/employer has reasonable suspicion to believe that the driver has used alcohol and/or controlled substances.
Random: This unannounced testing is based
on a random selection of drivers. The selection
must be made by a scientifically valid method and all drivers covered by this rule must have an equal chance of being tested. The names of drivers who are selected for testing must be kept confidential until such time that the carrier notifies the driver to take the test. Once the driver is notified, he/she must immediately proceed to the testing facility and undergo testing. Every driver’s name that is selected for testing must be returned to the selection pool so that all drivers have an equal chance of being selected at any time.
o Random alcohol testing is also required by the DOT. However, random alcohol tests can only be administered just prior to a driver performing a safety-sensitive function, while performing a safety-sensitive function, or just after performing a safety-sensitive function.
o Random controlled substances tests can be conducted at any time the driver is notified.
o A driver who is selected and refuses to submit to a test must follow the requirements of 49 CFR Part 40, Subpart O.
Post-Accident: This test applies to all CDL
drivers who are involved in fatal crashes. The test must also be conducted on all CDL drivers who are cited for moving violations arising in a crash that requires a vehicle being towed or an injury requiring medical attention away from the scene. The alcohol test must be conducted within 8 hours and the controlled substances test must be conducted within 32 hours of the crash.
6
More Information: For additional research and reading on the Federal Motor Carrier Safety Administration’s Alcohol and Drug Testing Regulations, please visit their web site at http://www.fmcsa.dot.gov/rules-regulations/topics/drug/drug.htm.
For the rules and regulations on controlled substances and alcohol use and testing, go to http://www.fmcsa.dot.gov/, click on Rules and Regulations and then on Driver Regulations and Parts 40 and 382.
Training for Drivers of Small Vehicles: Drivers of small vehicles used for activity trips shall be provided instruction on emergency evacuation and first aid procedures by the school, agency, or contractor.

7
OPERATING REGULATIONS
Pupil transportation vehicle operators are required to comply with operational requirements set by the Nebraska Department of Education and the DMV (DMV). These operating requirements are based on Nebraska statutes to ensure the safe transportation of Nebraska schoolchildren.
Any officer or employee of any school who violates any of these regulations or fails to include obligations to comply with these regulations in any contract executed by him or her on behalf of a school shall be guilty of a misdemeanor and is subject to removal from office or employment.
Any person operating a pupil transportation vehicle under contract with a school who fails to comply with these regulations shall be guilty of breach of contract and their contract shall be cancelled after notice and hearing by responsible officers of the school.
Authorized Passengers No one except school personnel and schoolchildren regularly assigned to a pupil transportation vehicle for a particular route schedule or for a school-approved activity/function may ride in such vehicles. Supervisory and monitoring personnel are recognized as authorized passengers.
Backing The driver of a pupil transportation vehicle shall not drive backwards on the school grounds unless the rear of the vehicle is observed and directed by a second responsible person. The driver of the vehicle shall not back up on any roadway unless such movement can be made with safety and without interfering with other traffic.
Convoy Distance A pupil transportation vehicle shall not follow another vehicle within 475 feet when traveling outside the corporate limits of a town or city. This is not intended to prevent a pupil transportation vehicle from passing another motor vehicle.
Emergency Evacuation Drills At least twice during each school year, each pupil to be transported in a pupil transportation vehicle shall be instructed in safe riding practices and participate in emergency evacuation drill. If the vehicle is equipped with seat belt systems, this drill shall include instruction on the proper use of such seat belts. (See page 29).
Headlights All pupil transportation vehicles shall operate with headlights on at all times.
Hourly Driving Limitation Any person operating a pupil transportation vehicle shall not remain on duty for a longer period than 16 consecutive hours. When he/she has been continuously on duty for 16 consecutive hours, he/she shall be relieved and not be permitted or required to again go on duty without having at least 10 consecutive hours of rest off-duty. Any pupil transportation vehicle driver, who has been on duty 16 hours in the aggregate in any 24-hour period, shall not be required or permitted to continue or again go on duty without having had at least eight consecutive hours off duty. (When the transportation of pupils is subject
8
to the hourly driving limitations of the Federal Motor Carrier Safety Regulations, then those regulations shall govern.)
“On duty” means time spent doing any of the following: driving, loading, unloading, repairing, inspecting, or otherwise attending the vehicle or its passengers.
Loading and Unloading Children The following procedures shall be observed when controlling traffic with a school bus during the process of loading and unloading children:
Check for oncoming traffic.
Use rear view mirror system to check traffic approaching from the rear.
Reduce the school bus speed with minimal braking and without greatly interrupting the flow of traffic.
Activate the amber school bus flashing yellow warning signal lamps within these criteria:
►Not less than 500 feet nor more than 1,000 feet from the bus stop in any area outside the corporate limits of any city or village.
►Not less than 300 feet and not more than 600 feet from the bus stop within the corporate limits of any city of village.
Exception – School bus loading and unloading zones, which are properly designated marked and supervised within the corporate limits of a town or city.
These loading zones must be out of the flow of traffic and adjacent to the school building, may be exempted from the use of a stop sign and flashing warning lights by local given authority and board of education policy.
Students should stand off the traveled portion of the roadway while waiting for traffic to pass.
No stops are to be made to load or unload students when they must cross over a median that separates lanes of traffic traveling in opposite directions, unless there is a traffic control light or a patrol stationed to assist students who must cross the highway. When unloading at such a place, students must wait to cross until after the bus has departed.
As the bus slows down to a stop, allow sufficient area to the right of the bus for pupils to load or unload.
After the bus has stopped, place transmission in “Park” – or if there is no “Park” shift point, place in “Neutral” – and set the parking brake.
Students shall remain seated while the bus is in motion.
Check to see if traffic is able to stop, activate the alternating flashing red warning lamps, and extend stop arm.
Check to see if drop off location is safe, road is clear in both directions, and that all traffic is stopped.
When the road is clear and all traffic has stopped, open the door to load and unload children.
When the children have left the bus, they should walk to a distance of approximately 12 feet in front of the bus. Signal to the children when it is safe to cross the roadway.
When children and other passengers are safely across the road, or on their way home, retract stop arm, turn off alternately flashing warning lights, check traffic and proceed.
When loading, do not put bus in motion until door is closed and children are seated. All passengers shall remain seated while the bus is in motion.
Students are not allowed to cross the roadway behind the bus when it is stopped to load or unload. The driver must tell the children to stay at least 12 feet away when crossing in front of the bus.
Students who walk along the roadway to and from the bus stop should do so along the left side of the roadway, facing traffic.
When a small vehicle is used to transport students on a route, the driver shall pull off the road into a driveway, parking lot, or other appropriate safe location prior to loading or unloading students.
Unless a running engine is required to operate a power lift or ramp, drivers of pupil transportation vehicles shall not leave a pupil transportation vehicle when passengers are
9
on board unless the vehicle is parked in a safe location, the engine is in the off position, the keys have been removed and in the possession of the driver. Vehicles with brake transmission interlock are exempt.
Passengers Restraint Systems (Seat Belts) The pupil transportation vehicle operator is required to wear a lap belt whenever the vehicle is in motion. When passenger restraint systems or seat belts are provided in the pupil transportation vehicle, all passengers must use them. Children under the age of 6 must be seated in an appropriate child protection system when the pupil transportation vehicle is equipped with seat belts.
Post-Trip Check of Vehicle Pupil transportation driver s shall conduct an interior “walk through” inspection for students that may remain on a school/activity/MFSAB bus at the end of each route and/or activity trip. Drivers of small vehicles shall do a visual inspection for students that may remain on the vehicle at the end of each route or activity trip. An example of a Post-trip Check of Vehicle Form has been included for schools to use on page 38.
Pre-Trip Check of Vehicle At a minimum, designated pupil transportation personnel or designated personnel employed by a contractor which contracts for pupil transportation services with any school district or nonpublic school shall perform a pre-trip inspection each day a vehicle is used to transport children. An example of a Pre-Trip Vehicle Inspection Form appears on page 38.
Any defects discovered that may affect the operational safety of the vehicle or result in its mechanical breakdown must be reported immediately to the administrator or supervisor. The vehicle should not be operated until the defect(s) are repaired. Documentation of the daily inspections are filed weekly with the administrator and kept on file with the school.
Railroad Crossing The following regulations shall apply to school buses, activity buses, and Multi-Functional School Activity Buses (MFSAB), either loaded or
unloaded, during the process of approaching and crossing railroad tracks except at any such crossing where a police officer or a traffic control flagman directs traffic to proceed:
Approach the tracks with caution and decelerate the vehicle.
Activate the hazard warning flasher lights at a distance of not less than 200 feet from the nearest railroad track.
Stop the school bus within 50 feet, but not less than 15 feet from the nearest rail. Place the transmission in “Park. If there is no “Park” shift point, place in “Neutral” and press down on the service brake or set the parking brakes.
Command the cooperation of passengers in an effort to provide maximum quietness. Demand cooperation if necessary.
After quietness aboard the stopped school bus has been achieved, open the service door and driver’s window.
Listen and look in both directions along such track for any approaching train and for signals indicating the approach of a train.
If no train is approaching, proceed in a gear low enough to permit crossing the tracks without having to shift gears. Vehicles with automatic transmissions should put the transmission in the drive gear. The door must be closed by the time the rear bumper of the bus is clear of the track.
When two (2) or more tracks are to be crossed, do not stop unnecessarily a second time unless the rear bumper of the school bus is completely clear of the first track and has at least 15 feet clearance in front and at least 15 feet clearance from the track to the rear.
Railroad tracks shall not be crossed unless absolutely certain there would be at least 15 feet of clearance from the rear bumper of the school bus to the nearest rail should the bus need to stop after crossing the railroad tracks.
Deactivate warning hazard lights after the bus completely crosses the railroad tracks.
Safe Pupil Transportation Plan – Each school providing pupil transportation must have a safe pupil transportation plan addressing
10
appropriate procedures to deal with weapons, hazardous materials, security threats, severe weather, medical emergencies, pupil behavior, mechanical breakdowns of the vehicle, and driver procedures in the event the drop off location is unsafe.
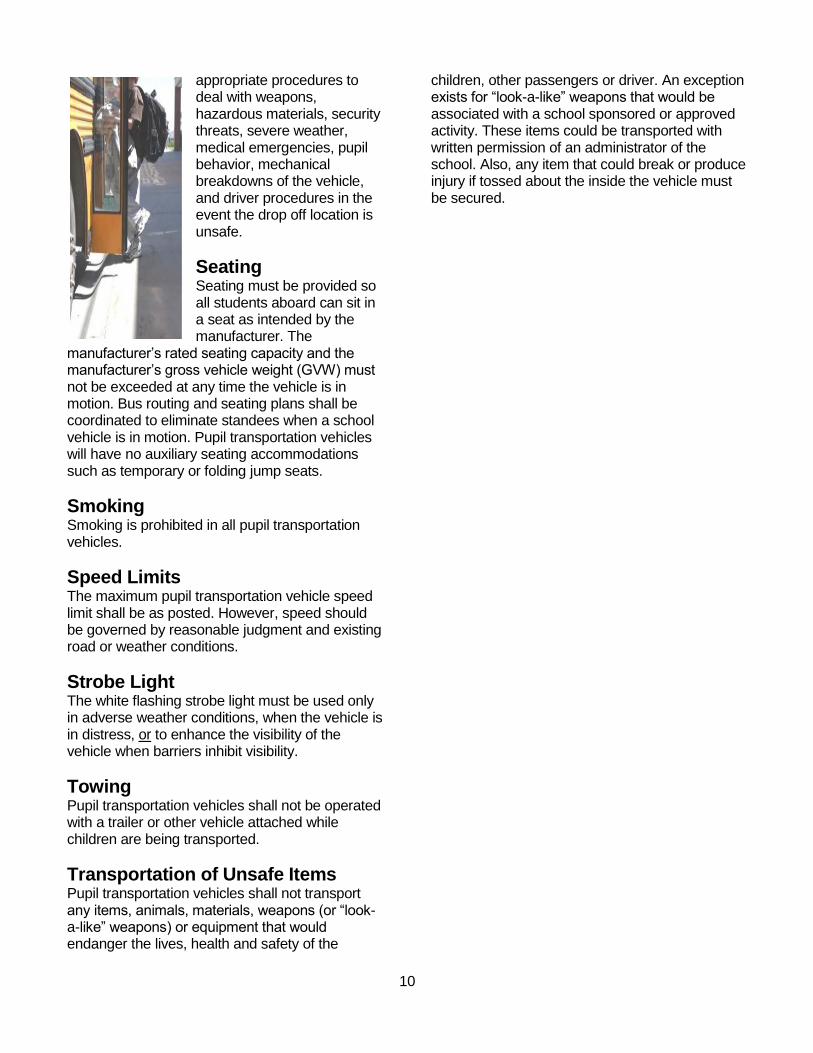
Seating Seating must be provided so all students aboard can sit in a seat as intended by the manufacturer. The
manufacturer’s rated seating capacity and the manufacturer’s gross vehicle weight (GVW) must not be exceeded at any time the vehicle is in motion. Bus routing and seating plans shall be coordinated to eliminate standees when a school vehicle is in motion. Pupil transportation vehicles will have no auxiliary seating accommodations such as temporary or folding jump seats.
Smoking Smoking is prohibited in all pupil transportation vehicles.
Speed Limits The maximum pupil transportation vehicle speed limit shall be as posted. However, speed should be governed by reasonable judgment and existing road or weather conditions.
Strobe Light The white flashing strobe light must be used only in adverse weather conditions, when the vehicle is in distress, or to enhance the visibility of the vehicle when barriers inhibit visibility.
Towing Pupil transportation vehicles shall not be operated with a trailer or other vehicle attached while children are being transported.
Transportation of Unsafe Items Pupil transportation vehicles shall not transport any items, animals, materials, weapons (or “look-a-like” weapons) or equipment that would endanger the lives, health and safety of the
children, other passengers or driver. An exception exists for “look-a-like” weapons that would be associated with a school sponsored or approved activity. These items could be transported with written permission of an administrator of the school. Also, any item that could break or produce injury if tossed about the inside the vehicle must be secured.
11
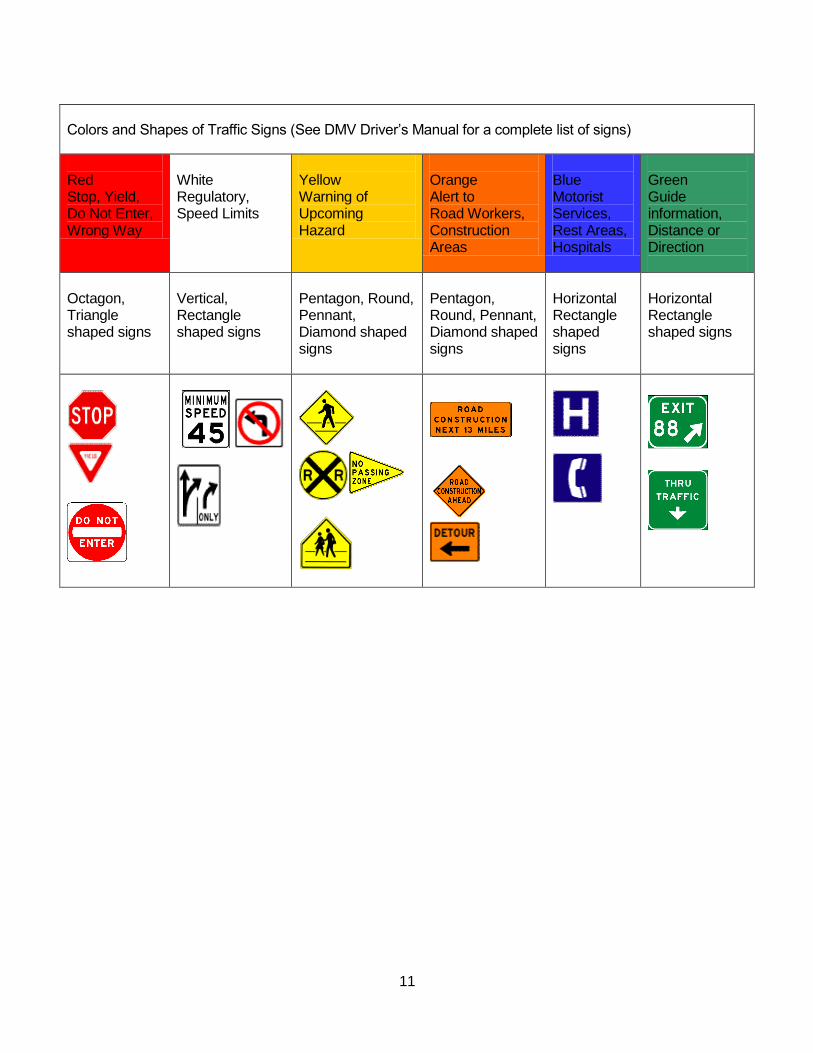
Colors and Shapes of Traffic Signs (See DMV Driver’s Manual for a complete list of signs)
Red Stop, Yield, Do Not Enter, Wrong Way
White Regulatory, Speed Limits
Yellow Warning of Upcoming Hazard
Orange Alert to Road Workers, Construction Areas
Blue Motorist Services, Rest Areas, Hospitals
Green Guide information, Distance or Direction
Octagon, Triangle shaped signs
Vertical, Rectangle shaped signs
Pentagon, Round, Pennant, Diamond shaped signs
Pentagon, Round, Pennant, Diamond shaped signs
Horizontal Rectangle shaped signs
Horizontal Rectangle shaped signs
12
INSPECTION PROCESS
To ensure that Nebraska children are being transported safely between home and school as well as to and from activities, the Nebraska Department of Education requires frequent vehicle mechanical inspections. These inspections are conducted on all pupil transportation vehicles.
These mechanical inspections are a two-part process.
Complete inspection conducted before school starts in the fall and every 80 days thereafter. These inspections are done by school-appointed mechanics. (See NDE Rule 92 for more information.)
Daily pre-trip inspection must be performed before the vehicle is used for transporting students. If a vehicle is used several times during the day, this inspection may be done more than once a day. This inspection can be conducted by the driver or the designated pupil transportation personnel.
The daily pre-trip inspection consists of:
Exterior inspection of vehicle (the “daily walk-around”)
Interior inspection of vehicle
Operational inspection (performed while the vehicle is being driven)
If faulty or improperly functioning equipment is discovered during this inspection, a written report (signed and dated) must be immediately filed with the school administration or the transportation supervisor. The vehicle should not be used until repairs are completed.
The daily pre-trip inspections are documented by the person conducting the inspection by completion of a “checklist.” Those checklists should be kept on the vehicle and then submitted on a weekly basis to the transportation supervisor or school administrator. Schools are required to
keep these daily inspection forms on file in order to document that the daily inspections have been properly conducted.
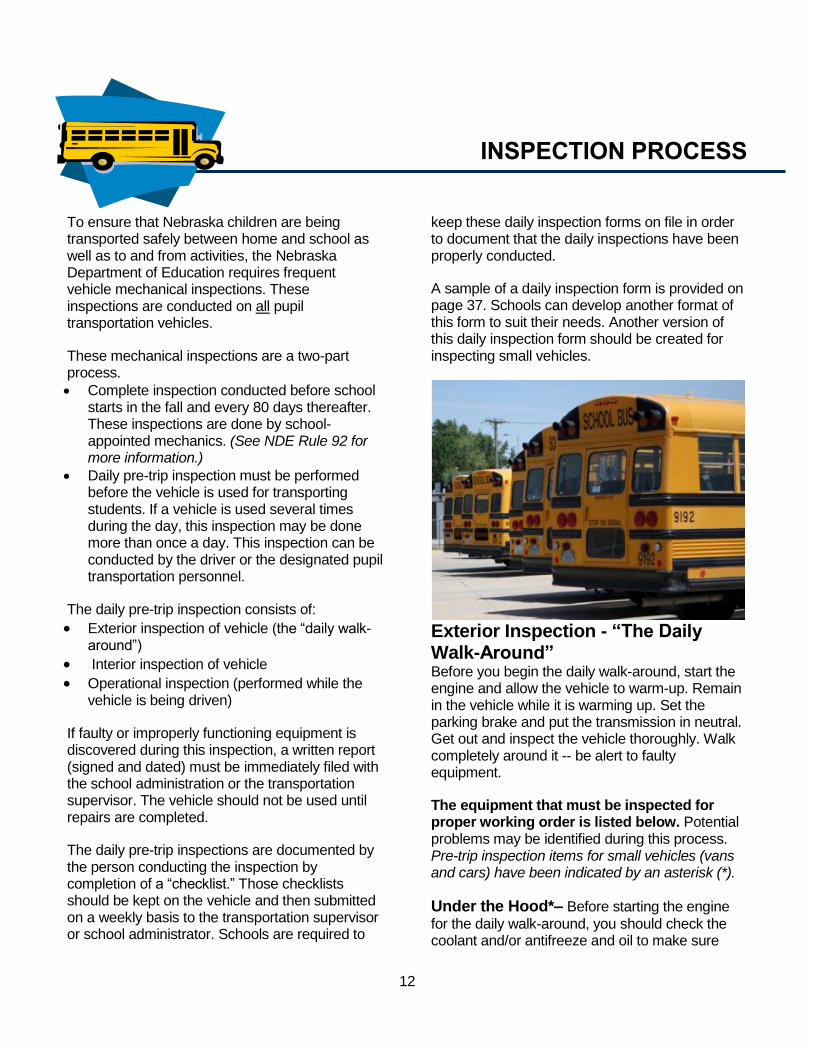
A sample of a daily inspection form is provided on page 37. Schools can develop another format of this form to suit their needs. Another version of this daily inspection form should be created for inspecting small vehicles.
Exterior Inspection - “The Daily Walk-Around” Before you begin the daily walk-around, start the engine and allow the vehicle to warm-up. Remain in the vehicle while it is warming up. Set the parking brake and put the transmission in neutral. Get out and inspect the vehicle thoroughly. Walk completely around it -- be alert to faulty equipment.
The equipment that must be inspected for proper working order is listed below. Potential problems may be identified during this process. Pre-trip inspection items for small vehicles (vans and cars) have been indicated by an asterisk (*).
Under the Hood*– Before starting the engine
for the daily walk-around, you should check the coolant and/or antifreeze and oil to make sure

13
they are at the proper level. Also, look for cracked, loose, or worn drive belts, hoses, and hose clamps.
Fluid Leaks* – Examine inner wheels and tires
and the area under the vehicle for wetness. Leaks can be engine oil, coolant, fuel, rear axle fluid, or grease, as well as brakes, clutch, or transmission fluid. Leaks should immediately be reported and repaired.
Lights* – Check all lights applicable to the
vehicle: back-up lights, brake lights, directional signals, hazard flashers, headlights, lighted school bus sign, reflectors, running lights, stop arm lights, taillights, and warning lights. Any lights or reflectors exhibiting such problems as inconsistent flashing, cracks, or other damage, should be reported in writing and repaired.
Mirrors* – Mirrors should be clean, aimed and
tightly adjusted so visibility is unobstructed. [For school buses, refer to Section 10 of the Department of Motor Vehicle’s Commercial Driver’s License (CDL) Manual for more detailed information to properly adjust school bus mirrors. Page 45]
Windows* – All windows, especially the
windshield and rear window, should be clear of dirt, ice, road film, and snow that can cause glare or impair visibility. Do not clear just a “peephole.”
Emergency Rear Door – Check to see that it
opens easily from the outside. The emergency door-warning buzzer should sound when the door is opened and the ignition key is on. This door must always be ready for emergencies, yet tightly sealed when closed to prevent possible entrance
of exhaust fumes.
Exhaust System* – Look for visible exhaust
and listen for excessive noise and vibration. Check for leaks in the exhaust system and holes in the body of the vehicle. Leaks should immediately be reported and repaired. Look for sagging tailpipes (exhaust pipes) and mufflers. Carbon monoxide poisoning occurs most frequently when a vehicle is standing still or is in an enclosed space with the engine running. Also, be aware that smoke from a faulty exhaust system in a diesel engine is filled with carcinogens.
Tires *– Check the tires and to see if they are
properly inflated. Do not drive the vehicle unless the tires are in good shape. One flat rear tire can place a dangerous weight on the companion tire of a dual set.
Wheels* – Look for loose or missing nuts,
excessive corrosion, cracks or other damage. Tighten loose nuts. There must be no damaged wheels on the vehicle.
Interior Inspection
Pre-trip inspection items for small vehicles (vans and cars) have been indicated by an asterisk (*).
After the exterior inspection is complete, the vehicle should be checked thoroughly on the inside. All driver’s instruments and controls must be functioning properly. All of the following items should be checked before operating the vehicle.
14
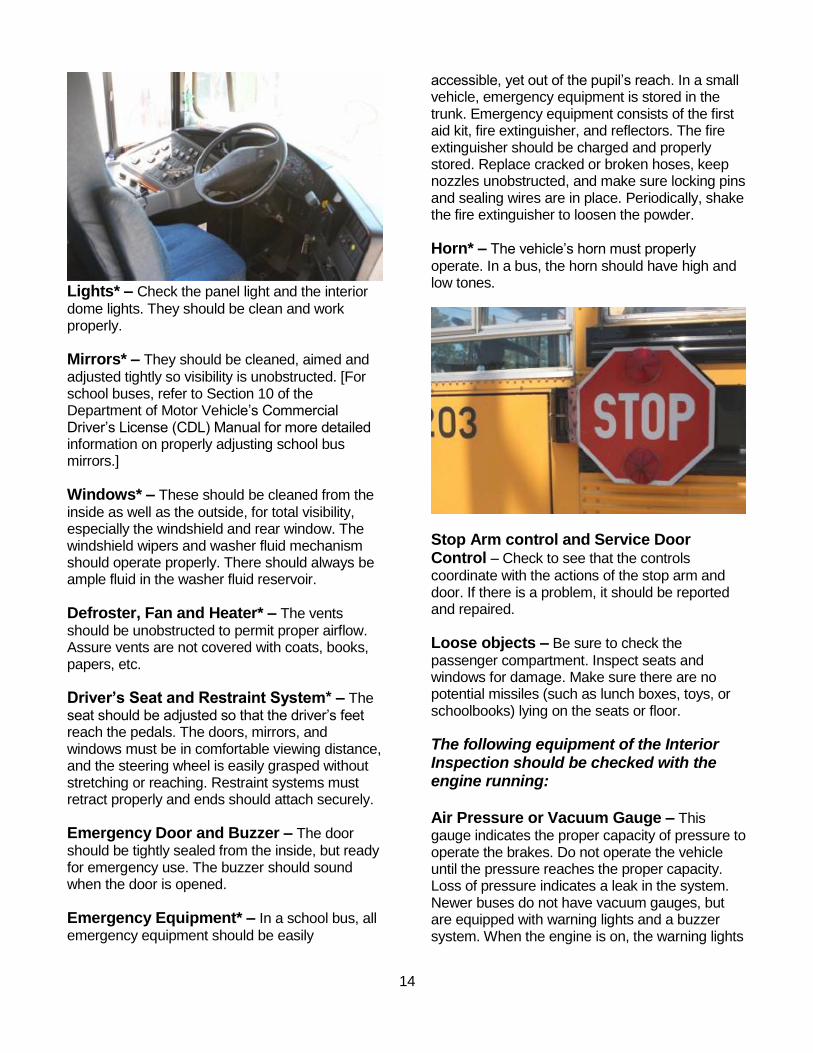
Lights* – Check the panel light and the interior
dome lights. They should be clean and work properly.
Mirrors* – They should be cleaned, aimed and
adjusted tightly so visibility is unobstructed. [For school buses, refer to Section 10 of the Department of Motor Vehicle’s Commercial Driver’s License (CDL) Manual for more detailed information on properly adjusting school bus mirrors.]
Windows* – These should be cleaned from the
inside as well as the outside, for total visibility, especially the windshield and rear window. The windshield wipers and washer fluid mechanism should operate properly. There should always be ample fluid in the washer fluid reservoir.
Defroster, Fan and Heater* – The vents
should be unobstructed to permit proper airflow. Assure vents are not covered with coats, books, papers, etc.
Driver’s Seat and Restraint System* – The
seat should be adjusted so that the driver’s feet reach the pedals. The doors, mirrors, and windows must be in comfortable viewing distance, and the steering wheel is easily grasped without stretching or reaching. Restraint systems must retract properly and ends should attach securely.
Emergency Door and Buzzer – The door
should be tightly sealed from the inside, but ready for emergency use. The buzzer should sound when the door is opened.
Emergency Equipment* – In a school bus, all
emergency equipment should be easily
accessible, yet out of the pupil’s reach. In a small vehicle, emergency equipment is stored in the trunk. Emergency equipment consists of the first aid kit, fire extinguisher, and reflectors. The fire extinguisher should be charged and properly stored. Replace cracked or broken hoses, keep nozzles unobstructed, and make sure locking pins and sealing wires are in place. Periodically, shake the fire extinguisher to loosen the powder.
Horn* – The vehicle’s horn must properly
operate. In a bus, the horn should have high and low tones.
Stop Arm control and Service Door Control – Check to see that the controls
coordinate with the actions of the stop arm and door. If there is a problem, it should be reported and repaired.
Loose objects – Be sure to check the
passenger compartment. Inspect seats and windows for damage. Make sure there are no potential missiles (such as lunch boxes, toys, or schoolbooks) lying on the seats or floor.
The following equipment of the Interior Inspection should be checked with the engine running: Air Pressure or Vacuum Gauge – This
gauge indicates the proper capacity of pressure to operate the brakes. Do not operate the vehicle until the pressure reaches the proper capacity. Loss of pressure indicates a leak in the system. Newer buses do not have vacuum gauges, but are equipped with warning lights and a buzzer system. When the engine is on, the warning lights
15
should go off and the electric brake motor should not be running. When the engine is turned off, listen for a motor noise when the brakes are applied.
Voltmeter Gauge – The voltmeter gauge
indicates the voltage of the electrical charging system. This meter should show about 14 volts with the engine running or 12 volts if the engine is off. If it shows a higher or lower voltage, report the problem to the transportation supervisor.
Brake Pedal and Warning Light* – If the light
comes on during a hard brake application, in a vehicle equipped with a dual brake system, it indicates that at least one of the brake systems is not working properly. Vehicles equipped with anti-lock brakes will have an additional red warning light if the brakes are not working properly.
Fuel Gauge* – It should indicate a safe margin
of fuel for operating. A pupil transportation vehicle should always have at least a quarter tank of fuel.
Oil Pressure Gauge* – The oil pressure gauge
indicates the proper oil pressure. If it does not, the engine should be turned off. Check the owner’s manual to ask the school mechanic to learn what the proper oil pressure is for the vehicle.
Water Temperature Gauge* – The water
temperature gauge indicates the temperature of the coolant in the engine. It should read cool or warm. If it reads hot, the engine should immediately be turned off and the problem reported.
Passenger Restraint Systems*-- In vehicles
equipped with passenger-restraint systems, ensure that the systems operate properly (i.e. belts retract properly and ends attach securely).
Operational Inspection The operating inspection is performed while the vehicle is being driven. A daily road check, both before and after loading the pupils, allows the driver to evaluate the working condition of that equipment which can only be inspected while the vehicle is in motion.
A driver should be constantly aware of the weight and motion of the passengers and how the
vehicle is affected (as in pick-up characteristics, the tendency to drift, how the vehicle handles on curves, etc.) by always monitoring how the engine performs under load.
The operational inspection consists of checking the following points. [Small vehicles should be inspected for items with an asterisk (*)]
Brakes *– Do not wait until the vehicle is on the
road to test the brakes. They can be tested in the yard at the bus garage. Moving at a low speed, come to a complete stop. The vehicle should stop in a straight line without pulling to one side, skidding, or swerving. The brakes should not grab, lock, or make excessive noise such as squeaking or squealing. The brake pedal should not feel grabby, over sensitive, or spongy. When the brakes are not in use, watch for dragging which causes the vehicle to pull to one side.
Clutch – The following instructions apply if the
bus has a manual transmission. When changing gears, the driver should control the speed of the engine so the shift can be completed easily and smoothly without jerking or slipping. Careless shifting wears out the clutch and reduces its service life. When the shift is completed, remove foot from the clutch-do not “ride” the clutch. When the pedal is released, the clutch should have some “free play.” Watch for dragging, grabbing, or lack of free play on the pedal. Listen for unusual sounds. If you smell an odor like burning rubber, the vehicle should immediately be stopped.
Emergency (Parking) Brake – Slowly engage
the clutch while the parking brake is on to test both air and mechanical brakes. If the bus has automatic transmission, select the drive gear, and with the parking brake applied, apply the accelerator. If the vehicle moves easily, the parking brake is not holding and should immediately be reported. With air brake systems, the parking brake will remain applied if there is partial or complete air loss in the service brakes. Release the parking brake when the vehicle is in motion.
Engine* – Warm the engine for several minutes
before putting the vehicle into drive. Increase the engine’s speed slowly so that all the parts can be lubricated. Do not exceed the maximum rpm.
16
Listen for unusual sounds such as backfire, light tapping, occasional misfire, piston slap, rapid hammering, or whistling. Be alert to slow engine warm-up, lack, or normal response, vibrations of the chassis, or failure of a warm engine to start.
Steering*– The steering should be easy to
handle, precise, responsive, and steady in turns and over rough roads. Power steering should be exceptionally quiet. The steering should not have excessive “play,” jerking, “kickback,” or rattles.
Suspension* – Improper suspension can cause
“bottoming,” excessive bounce, swaying and weaving on curves or rough roads, or one end of the vehicle to sag. Check for broken springs or faulty shock absorbers.
Transmission* – With the transmission in a
moving gear, the vehicle should move smoothly in response to depressing the accelerator. An automatic or manual transmission should slip into gear and have easy and smooth gear changes throughout the shifting range. Do not exceed the manufacturer’s recommended speed for each specific gear (rpm). Exceeding speed recommendations could damage the transmission or reduce its service life. Any metallic or unusual sounds or shifting difficulty should be reported immediately.
Continue to check all equipment throughout the day being alert to warning signs that will indicate potential problems. Be aware that the condition of the vehicle changes during the day.
At the end of the operating period, check the passenger compartment for lost articles such as books, lunch boxes, clothing, or toys. Inspect the seats for damaged upholstery and the window for cracks or breaks. Clean the vehicle, sweeping the floor, washing the seats, windows, and exterior.
If faulty or improperly functioning equipment is discovered during an inspection, do not drive that vehicle until repairs have been completed.
17
SAFE PUPIL TRANSPORTATION
Securing maximum transportation safety for the students is one of the primary responsibilities for a pupil transportation vehicle driver.
School bus stops are the most dangerous part of the school bus ride. Nationally, most of the children are injured or killed when they exit a bus.
Routes must be developed so no stops are made to load or unload students when they must cross over a median that separates lanes of traffic traveling in opposite directions. However, if there is a traffic control light or a patrol stationed to assist students who must cross the highway, a stop could be made at that point in the route. When unloading at such a place, students must wait to cross until after the bus has departed.
Route shall mean a designated course regularly traveled by a pupil transportation vehicle to pick up students from home or pickup points and take them to school; or to deliver students from school to their homes or designated drop off points.
All pupil transportation vehicles should carry a list of phone numbers to contact in the case of an emergency. These numbers should include the following:
Police, Sheriff, and/or State Patrol
Fire Department
Hospital
School Administration
School Superintendent’s or Principal’s home phone numbers
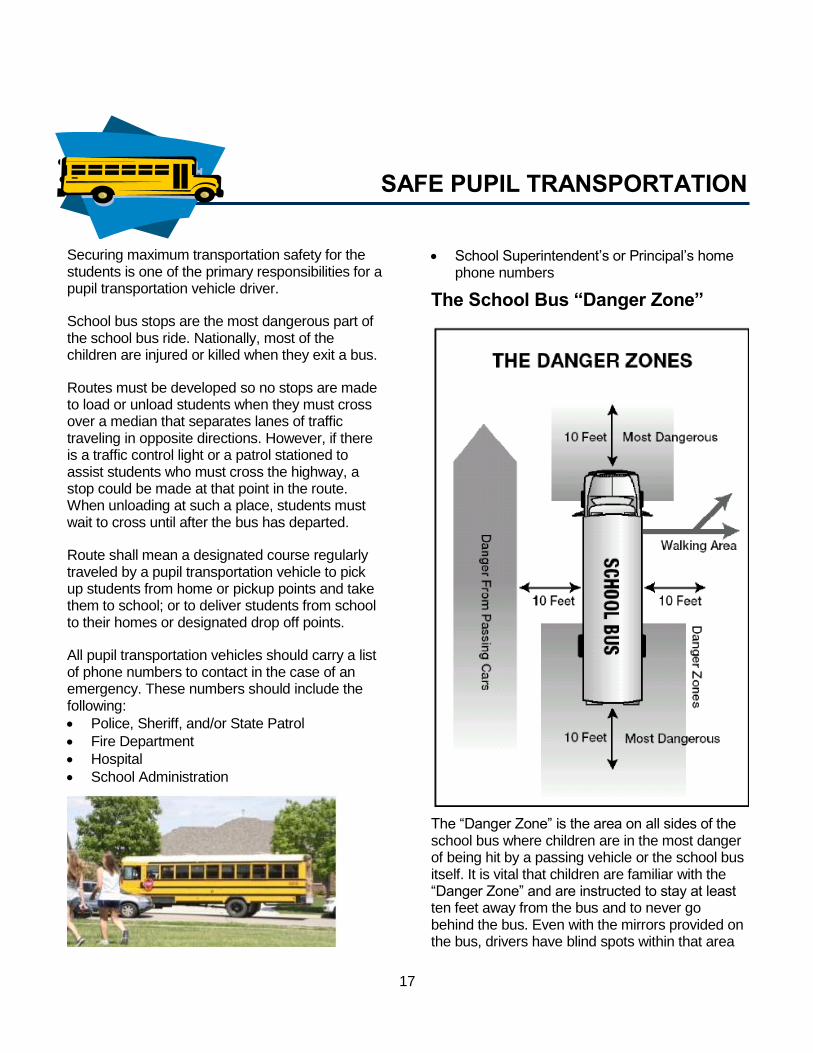
The School Bus “Danger Zone”
The “Danger Zone” is the area on all sides of the school bus where children are in the most danger of being hit by a passing vehicle or the school bus itself. It is vital that children are familiar with the “Danger Zone” and are instructed to stay at least ten feet away from the bus and to never go behind the bus. Even with the mirrors provided on the bus, drivers have blind spots within that area
18
around the bus.
Remind the schoolchildren of these two important points:
If they cannot see the pupil transportation driver in a bus mirror, the bus driver will not be able to see them.
If they drop an item near or under the bus when exiting, tell the bus driver but leave the object where it dropped. The student should ask an adult to retrieve it.
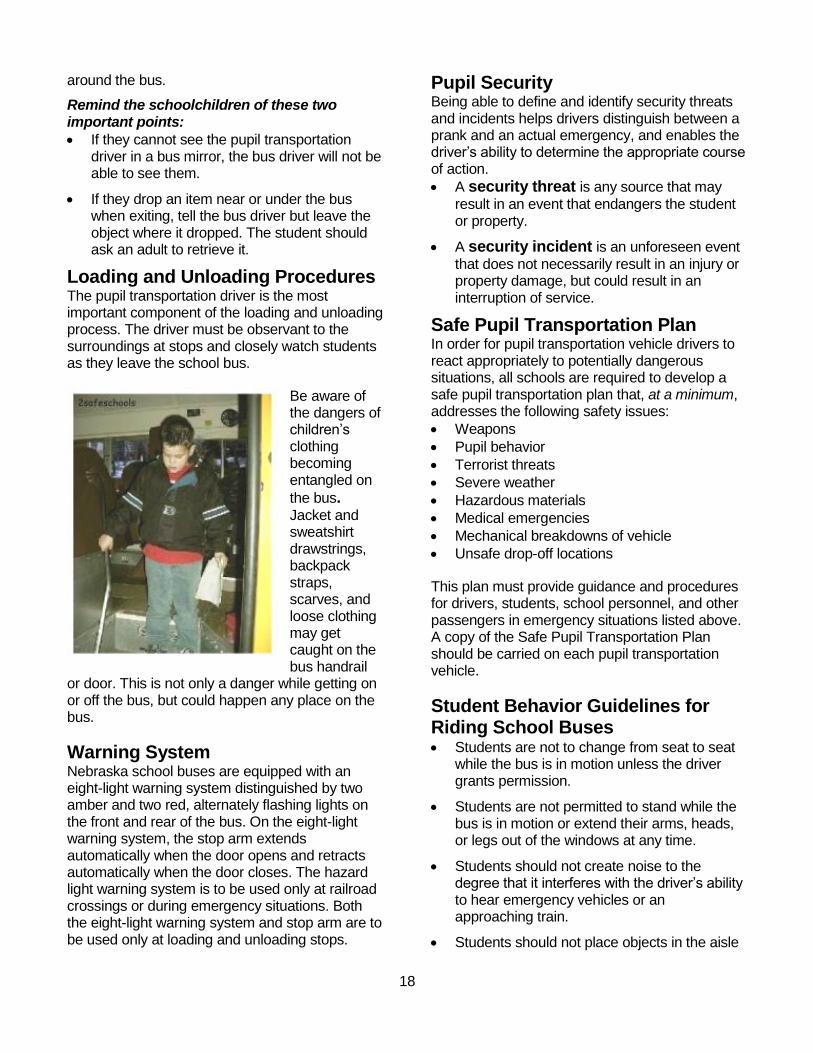
Loading and Unloading Procedures The pupil transportation driver is the most important component of the loading and unloading process. The driver must be observant to the surroundings at stops and closely watch students as they leave the school bus.
Be aware of the dangers of children’s clothing becoming entangled on
the bus. Jacket and sweatshirt drawstrings, backpack straps, scarves, and loose clothing may get caught on the bus handrail
or door. This is not only a danger while getting on or off the bus, but could happen any place on the bus.
Warning System Nebraska school buses are equipped with an eight-light warning system distinguished by two amber and two red, alternately flashing lights on the front and rear of the bus. On the eight-light warning system, the stop arm extends automatically when the door opens and retracts automatically when the door closes. The hazard light warning system is to be used only at railroad crossings or during emergency situations. Both the eight-light warning system and stop arm are to be used only at loading and unloading stops.
Pupil Security Being able to define and identify security threats and incidents helps drivers distinguish between a prank and an actual emergency, and enables the driver’s ability to determine the appropriate course of action.
A security threat is any source that may
result in an event that endangers the student or property.
A security incident is an unforeseen event
that does not necessarily result in an injury or property damage, but could result in an interruption of service.
Safe Pupil Transportation Plan In order for pupil transportation vehicle drivers to react appropriately to potentially dangerous situations, all schools are required to develop a safe pupil transportation plan that, at a minimum, addresses the following safety issues:
Weapons
Pupil behavior
Terrorist threats
Severe weather
Hazardous materials
Medical emergencies
Mechanical breakdowns of vehicle
Unsafe drop-off locations
This plan must provide guidance and procedures for drivers, students, school personnel, and other passengers in emergency situations listed above. A copy of the Safe Pupil Transportation Plan should be carried on each pupil transportation vehicle.
Student Behavior Guidelines for Riding School Buses Students are not to change from seat to seat
while the bus is in motion unless the driver grants permission.
Students are not permitted to stand while the bus is in motion or extend their arms, heads, or legs out of the windows at any time.
Students should not create noise to the degree that it interferes with the driver’s ability to hear emergency vehicles or an approaching train.
Students should not place objects in the aisle
19
or in front of the emergency exits.
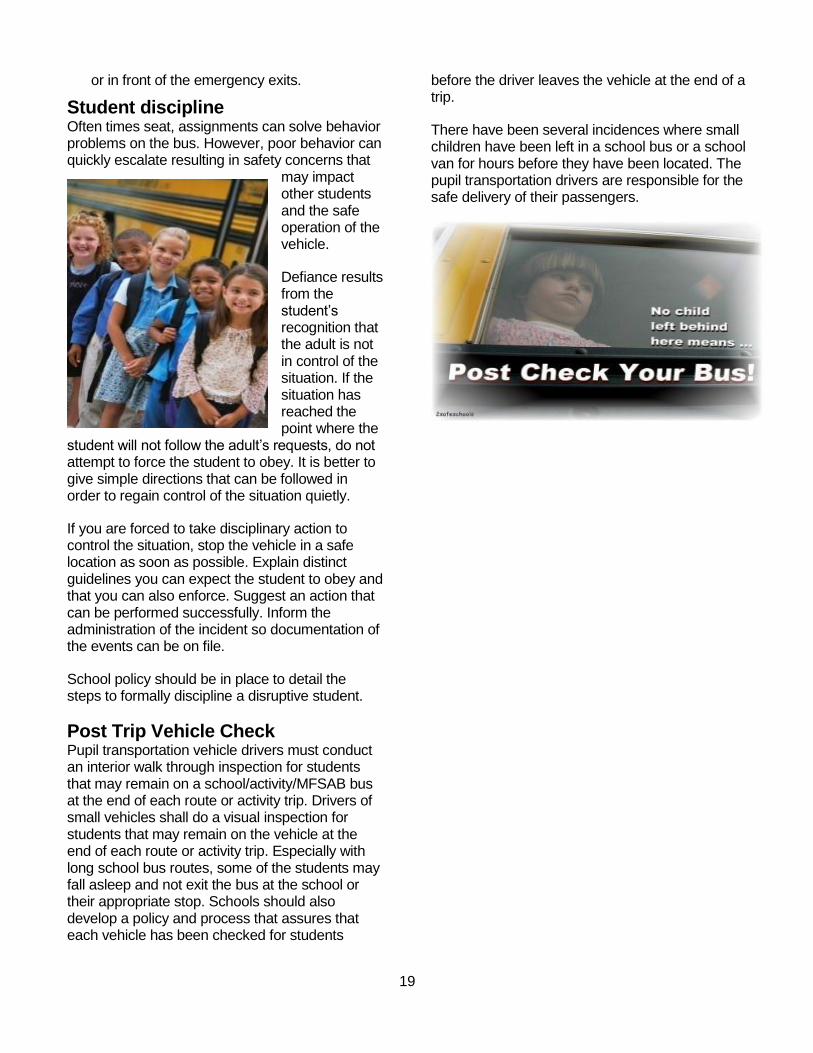
Student discipline Often times seat, assignments can solve behavior problems on the bus. However, poor behavior can quickly escalate resulting in safety concerns that
may impact other students and the safe operation of the vehicle.
Defiance results from the student’s recognition that the adult is not in control of the situation. If the situation has reached the point where the
student will not follow the adult’s requests, do not attempt to force the student to obey. It is better to give simple directions that can be followed in order to regain control of the situation quietly.
If you are forced to take disciplinary action to control the situation, stop the vehicle in a safe location as soon as possible. Explain distinct guidelines you can expect the student to obey and that you can also enforce. Suggest an action that can be performed successfully. Inform the administration of the incident so documentation of the events can be on file.
School policy should be in place to detail the steps to formally discipline a disruptive student.
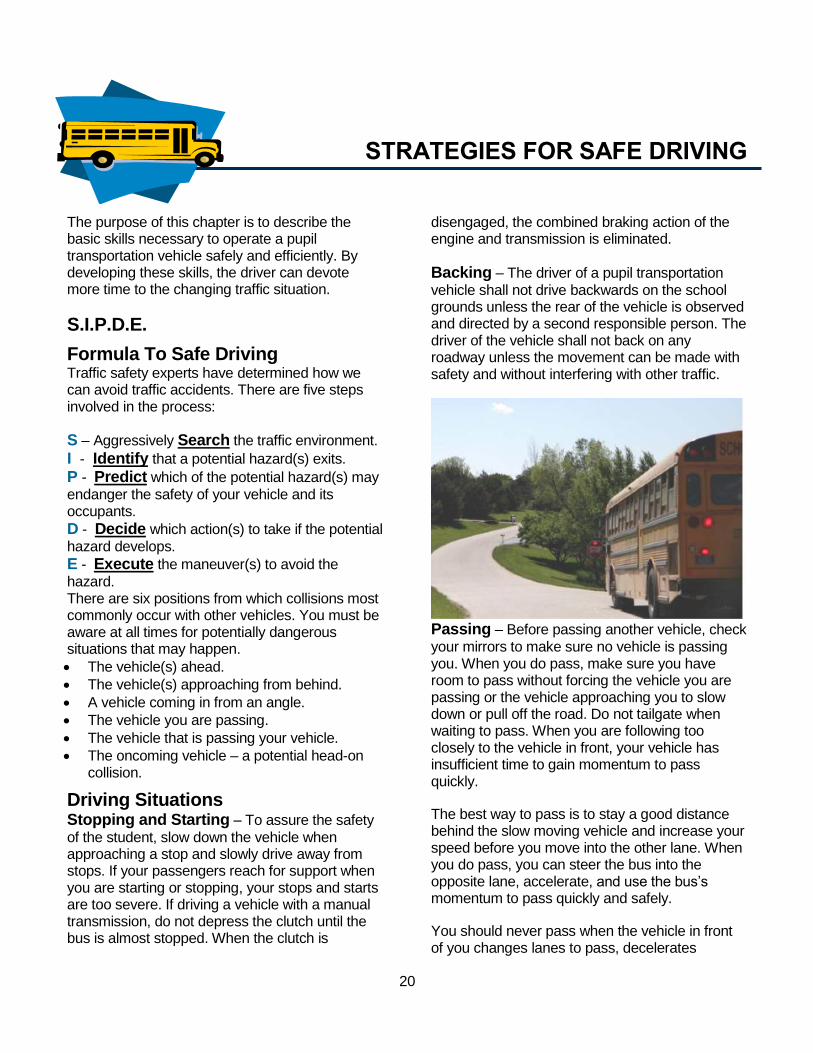
Post Trip Vehicle Check Pupil transportation vehicle drivers must conduct an interior walk through inspection for students that may remain on a school/activity/MFSAB bus at the end of each route or activity trip. Drivers of small vehicles shall do a visual inspection for students that may remain on the vehicle at the end of each route or activity trip. Especially with long school bus routes, some of the students may fall asleep and not exit the bus at the school or their appropriate stop. Schools should also develop a policy and process that assures that each vehicle has been checked for students
before the driver leaves the vehicle at the end of a trip.
There have been several incidences where small children have been left in a school bus or a school van for hours before they have been located. The pupil transportation drivers are responsible for the safe delivery of their passengers.
20
STRATEGIES FOR SAFE DRIVING
The purpose of this chapter is to describe the basic skills necessary to operate a pupil transportation vehicle safely and efficiently. By developing these skills, the driver can devote more time to the changing traffic situation.
S.I.P.D.E.
Formula To Safe Driving Traffic safety experts have determined how we can avoid traffic accidents. There are five steps involved in the process:
S – Aggressively Search the traffic environment.
I - Identify that a potential hazard(s) exits.
P - Predict which of the potential hazard(s) may
endanger the safety of your vehicle and its occupants.
D - Decide which action(s) to take if the potential
hazard develops.
E - Execute the maneuver(s) to avoid the
hazard. There are six positions from which collisions most commonly occur with other vehicles. You must be aware at all times for potentially dangerous situations that may happen.
The vehicle(s) ahead.
The vehicle(s) approaching from behind.
A vehicle coming in from an angle.
The vehicle you are passing.
The vehicle that is passing your vehicle.
The oncoming vehicle – a potential head-on collision.
Driving Situations Stopping and Starting – To assure the safety
of the student, slow down the vehicle when approaching a stop and slowly drive away from stops. If your passengers reach for support when you are starting or stopping, your stops and starts are too severe. If driving a vehicle with a manual transmission, do not depress the clutch until the bus is almost stopped. When the clutch is
disengaged, the combined braking action of the engine and transmission is eliminated.
Backing – The driver of a pupil transportation
vehicle shall not drive backwards on the school grounds unless the rear of the vehicle is observed and directed by a second responsible person. The driver of the vehicle shall not back on any roadway unless the movement can be made with safety and without interfering with other traffic.
Passing – Before passing another vehicle, check
your mirrors to make sure no vehicle is passing you. When you do pass, make sure you have room to pass without forcing the vehicle you are passing or the vehicle approaching you to slow down or pull off the road. Do not tailgate when waiting to pass. When you are following too closely to the vehicle in front, your vehicle has insufficient time to gain momentum to pass quickly.
The best way to pass is to stay a good distance behind the slow moving vehicle and increase your speed before you move into the other lane. When you do pass, you can steer the bus into the opposite lane, accelerate, and use the bus’s momentum to pass quickly and safely.
You should never pass when the vehicle in front of you changes lanes to pass, decelerates
21
suddenly, signals a left turn, wanders, weaves, or when you are being passed by another vehicle.
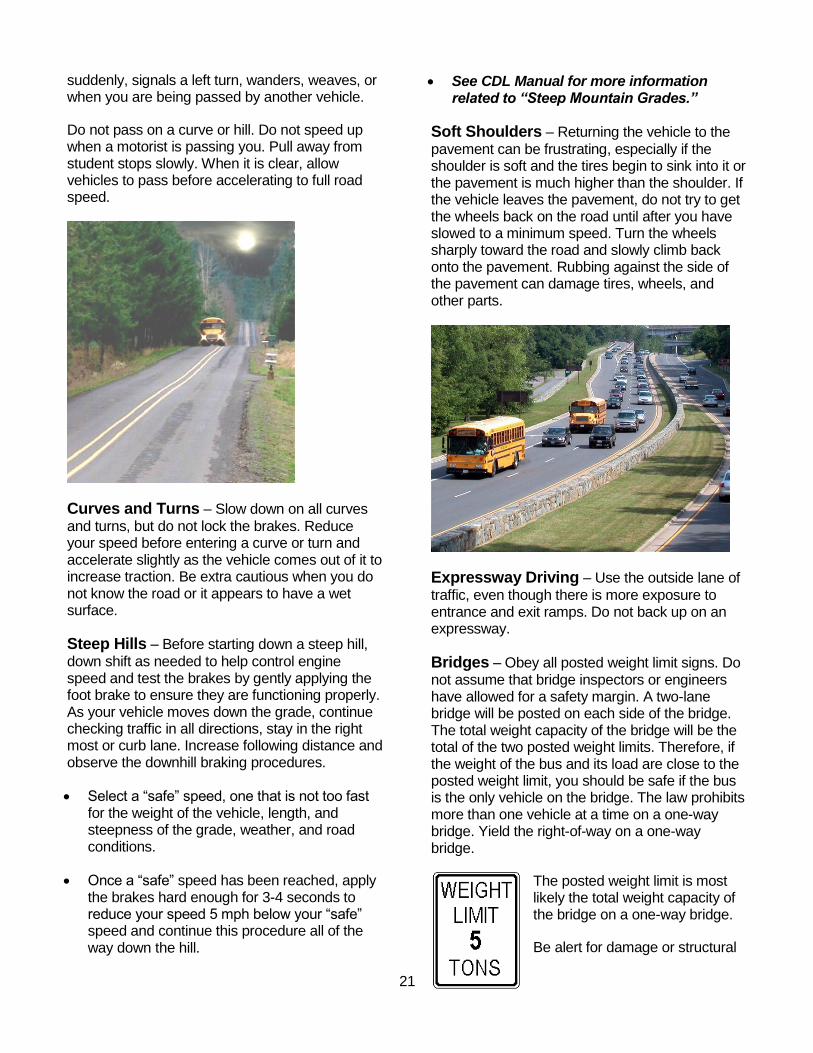
Do not pass on a curve or hill. Do not speed up when a motorist is passing you. Pull away from student stops slowly. When it is clear, allow vehicles to pass before accelerating to full road speed.
Curves and Turns – Slow down on all curves
and turns, but do not lock the brakes. Reduce your speed before entering a curve or turn and accelerate slightly as the vehicle comes out of it to increase traction. Be extra cautious when you do not know the road or it appears to have a wet surface.
Steep Hills – Before starting down a steep hill,
down shift as needed to help control engine speed and test the brakes by gently applying the foot brake to ensure they are functioning properly. As your vehicle moves down the grade, continue checking traffic in all directions, stay in the right most or curb lane. Increase following distance and observe the downhill braking procedures.
Select a “safe” speed, one that is not too fast for the weight of the vehicle, length, and steepness of the grade, weather, and road conditions.
Once a “safe” speed has been reached, apply the brakes hard enough for 3-4 seconds to reduce your speed 5 mph below your “safe” speed and continue this procedure all of the way down the hill.
See CDL Manual for more information related to “Steep Mountain Grades.”
Soft Shoulders – Returning the vehicle to the
pavement can be frustrating, especially if the shoulder is soft and the tires begin to sink into it or the pavement is much higher than the shoulder. If the vehicle leaves the pavement, do not try to get the wheels back on the road until after you have slowed to a minimum speed. Turn the wheels sharply toward the road and slowly climb back onto the pavement. Rubbing against the side of the pavement can damage tires, wheels, and other parts.
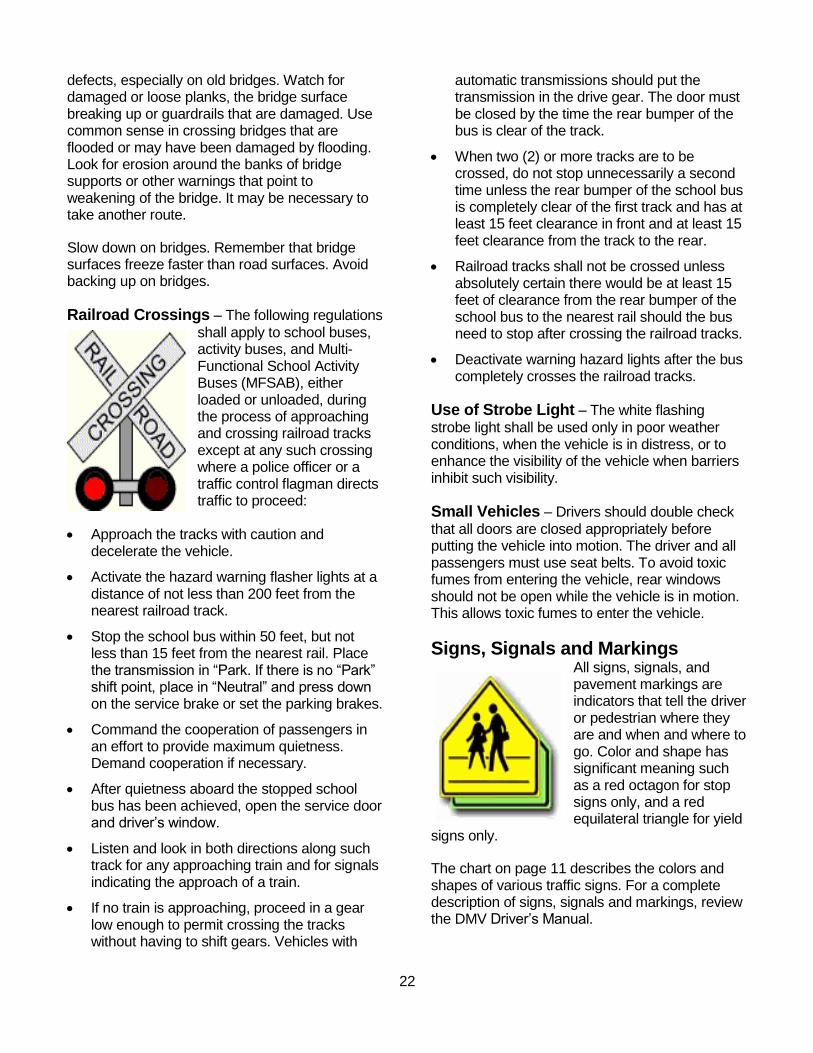
Expressway Driving – Use the outside lane of
traffic, even though there is more exposure to entrance and exit ramps. Do not back up on an expressway.
Bridges – Obey all posted weight limit signs. Do not assume that bridge inspectors or engineers have allowed for a safety margin. A two-lane bridge will be posted on each side of the bridge. The total weight capacity of the bridge will be the total of the two posted weight limits. Therefore, if the weight of the bus and its load are close to the posted weight limit, you should be safe if the bus is the only vehicle on the bridge. The law prohibits more than one vehicle at a time on a one-way bridge. Yield the right-of-way on a one-way bridge.
The posted weight limit is most likely the total weight capacity of the bridge on a one-way bridge.
Be alert for damage or structural
22
defects, especially on old bridges. Watch for damaged or loose planks, the bridge surface breaking up or guardrails that are damaged. Use common sense in crossing bridges that are flooded or may have been damaged by flooding. Look for erosion around the banks of bridge supports or other warnings that point to weakening of the bridge. It may be necessary to take another route.
Slow down on bridges. Remember that bridge surfaces freeze faster than road surfaces. Avoid backing up on bridges.
Railroad Crossings – The following regulations
shall apply to school buses, activity buses, and Multi-Functional School Activity Buses (MFSAB), either loaded or unloaded, during the process of approaching and crossing railroad tracks except at any such crossing where a police officer or a traffic control flagman directs traffic to proceed:
Approach the tracks with caution and decelerate the vehicle.
Activate the hazard warning flasher lights at a distance of not less than 200 feet from the nearest railroad track.
Stop the school bus within 50 feet, but not less than 15 feet from the nearest rail. Place the transmission in “Park. If there is no “Park” shift point, place in “Neutral” and press down on the service brake or set the parking brakes.
Command the cooperation of passengers in an effort to provide maximum quietness. Demand cooperation if necessary.
After quietness aboard the stopped school bus has been achieved, open the service door and driver’s window.
Listen and look in both directions along such track for any approaching train and for signals indicating the approach of a train.
If no train is approaching, proceed in a gear low enough to permit crossing the tracks without having to shift gears. Vehicles with
automatic transmissions should put the transmission in the drive gear. The door must be closed by the time the rear bumper of the bus is clear of the track.
When two (2) or more tracks are to be crossed, do not stop unnecessarily a second time unless the rear bumper of the school bus is completely clear of the first track and has at least 15 feet clearance in front and at least 15 feet clearance from the track to the rear.
Railroad tracks shall not be crossed unless absolutely certain there would be at least 15 feet of clearance from the rear bumper of the school bus to the nearest rail should the bus need to stop after crossing the railroad tracks.
Deactivate warning hazard lights after the bus completely crosses the railroad tracks.
Use of Strobe Light – The white flashing
strobe light shall be used only in poor weather conditions, when the vehicle is in distress, or to enhance the visibility of the vehicle when barriers inhibit such visibility.
Small Vehicles – Drivers should double check
that all doors are closed appropriately before putting the vehicle into motion. The driver and all passengers must use seat belts. To avoid toxic fumes from entering the vehicle, rear windows should not be open while the vehicle is in motion. This allows toxic fumes to enter the vehicle.
Signs, Signals and Markings All signs, signals, and pavement markings are indicators that tell the driver or pedestrian where they are and when and where to go. Color and shape has significant meaning such as a red octagon for stop signs only, and a red equilateral triangle for yield
signs only.
The chart on page 11 describes the colors and shapes of various traffic signs. For a complete description of signs, signals and markings, review the DMV Driver’s Manual.

23
Vehicle Signals: Steady red – Vehicles must stop and not move
until the signal indicates that they may enter the intersection.
Steady yellow – A steady yellow signal
is a warning to drivers that the signal is going to turn red. The driver should stop on a steady yellow signal. If you are in the intersection when the signal changes from yellow to red, continue moving and clear the intersection safely.
Steady green – A steady green signal indicates
that vehicles can move through the intersection, turn left, or turn right. The driver should give the right-of way to vehicles approaching in the opposite lane when he is crossing that lane to make a left turn. Pedestrians should also be given the right-of-way.
Flashing red – A flashing red signal means
vehicles must come to a complete stop and then proceed if clear. This signal is used at dangerous intersections, where visibility is limited.
Flashing yellow – A flashing yellow signal
means vehicles should slow down and move with caution.
Steady green arrow – A steady green arrow
means vehicles can cautiously move in the direction of the arrow without stopping. Again, vehicles should yield the right-of-way to pedestrians.
Pedestrian Signals: Don’t Walk – Pedestrians should
not leave the curb until the signal indicates.
Don’t Walk, FLASHING – If the
signal is flashing, the pedestrian should not cross. If the pedestrian is in the crosswalk, allow him to
complete the crossing.
Walk – Pedestrians are
permitted to leave the curb to cross the road.
Pavement Markings: Broken yellow line – Separates traffic moving
in opposite directions. Passing and turning are allowed. Traffic should stay to the right of a yellow centerline.
Broken yellow line with solid yellow line (two-lane road) – Indicates that passing is not
permitted from the lane in which the line is located.
Double solid yellow line (two lane road) –
Indicates that passing is not permitted in either direction, from either lane (passing prohibited zone).
Multi-lane with white center line – White
lines separate lanes of traffic going in the same direction. Broken white lines separate lanes of traffic going in the same direction, and may be crossed with care.
Multi-lane with middle left turn lane – The
two-way turn lane is for left turns only.
Crosswalk lines – Solid lines mark pedestrian
crosswalks. These lines extend the entire width of the roadway.
Stop lines – White stop lines are painted across
the lane to indicate the stopping point for vehicles.
Following Distance To determine the proper following distance when
driving a small vehicle, use the Two-Second Rule. Choose a reference point ahead of the
vehicle you are following -- a sign, utility pole, tree, etc. When the vehicle you are following passes the chosen reference point, begin counting seconds -- one thousand and one, one thousand
24
and two, etc.
If the small vehicle reaches the reference point any earlier than one thousand two (or two seconds) you are following too closely. Two seconds is the recommended minimum interval between your small vehicle and the vehicle in front of you. The two-second interval should be doubled on wet, slippery roads and at interstate speeds.
Refer to the CDL Manual for the proper following distance concerning school buses.
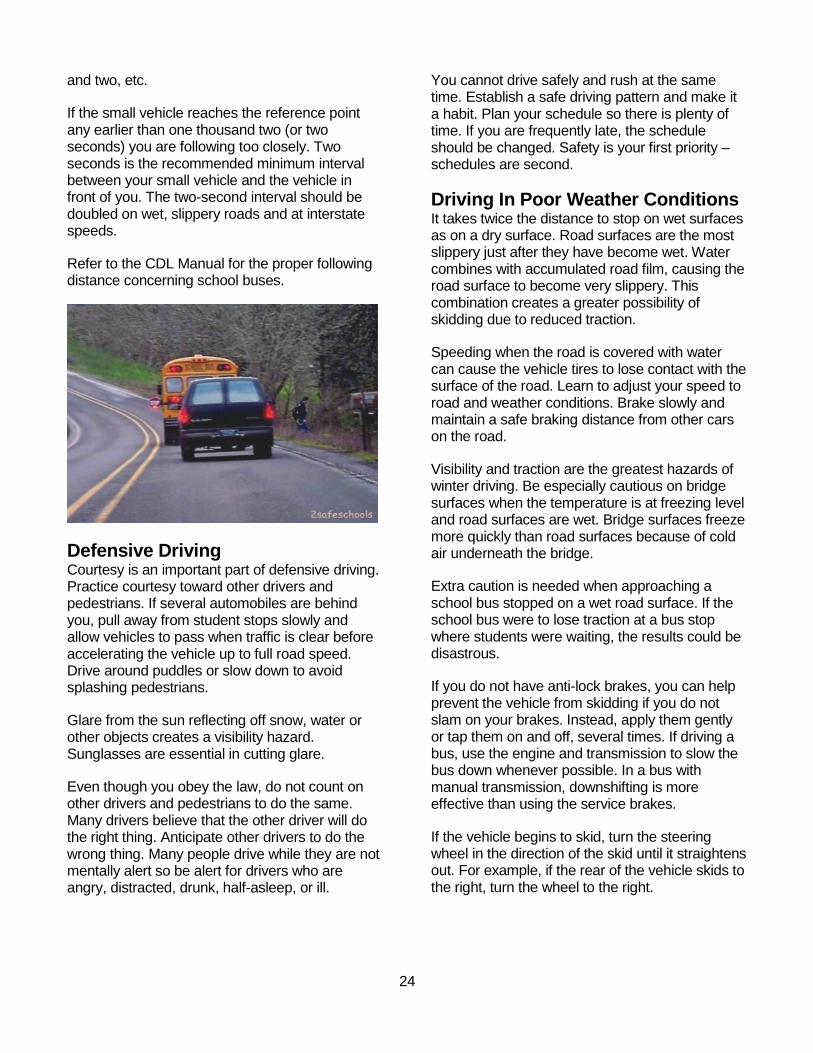
Defensive Driving Courtesy is an important part of defensive driving. Practice courtesy toward other drivers and pedestrians. If several automobiles are behind you, pull away from student stops slowly and allow vehicles to pass when traffic is clear before accelerating the vehicle up to full road speed. Drive around puddles or slow down to avoid splashing pedestrians.
Glare from the sun reflecting off snow, water or other objects creates a visibility hazard. Sunglasses are essential in cutting glare.
Even though you obey the law, do not count on other drivers and pedestrians to do the same. Many drivers believe that the other driver will do the right thing. Anticipate other drivers to do the wrong thing. Many people drive while they are not mentally alert so be alert for drivers who are angry, distracted, drunk, half-asleep, or ill.
You cannot drive safely and rush at the same time. Establish a safe driving pattern and make it a habit. Plan your schedule so there is plenty of time. If you are frequently late, the schedule should be changed. Safety is your first priority – schedules are second.
Driving In Poor Weather Conditions It takes twice the distance to stop on wet surfaces as on a dry surface. Road surfaces are the most slippery just after they have become wet. Water combines with accumulated road film, causing the road surface to become very slippery. This combination creates a greater possibility of skidding due to reduced traction.
Speeding when the road is covered with water can cause the vehicle tires to lose contact with the surface of the road. Learn to adjust your speed to road and weather conditions. Brake slowly and maintain a safe braking distance from other cars on the road.
Visibility and traction are the greatest hazards of winter driving. Be especially cautious on bridge surfaces when the temperature is at freezing level and road surfaces are wet. Bridge surfaces freeze more quickly than road surfaces because of cold air underneath the bridge.
Extra caution is needed when approaching a school bus stopped on a wet road surface. If the school bus were to lose traction at a bus stop where students were waiting, the results could be disastrous.
If you do not have anti-lock brakes, you can help prevent the vehicle from skidding if you do not slam on your brakes. Instead, apply them gently or tap them on and off, several times. If driving a bus, use the engine and transmission to slow the bus down whenever possible. In a bus with manual transmission, downshifting is more effective than using the service brakes.
If the vehicle begins to skid, turn the steering wheel in the direction of the skid until it straightens out. For example, if the rear of the vehicle skids to the right, turn the wheel to the right.

25
If you have difficulty getting the vehicle started on a slick surface or the vehicle becomes stuck, attempt to ease the rear wheels into motion by feeding the gas slowly. If the vehicle has manual transmission, release the clutch gently. As soon as one of the rear wheels spin, let up on the gas. Do not allow the rear wheels to continue spinning. Spinning can damage the rear axle and the vehicle may become stuck even further. It may be necessary to “rock” the vehicle by quickly shifting from low to reverse to low again until the vehicle moves in either direction. If driving a bus, using a higher gear ratio will help to prevent the wheels from spinning.
Essential equipment for safe winter driving includes ice scrapers, squeegees, defrosters, wiper blades, windshield washers (in proper working order), and antifreeze in the radiator.
Before starting, be sure that the lights, signals, mirrors, windshield, and windows are completely clear. Defrost or scrape until you have the proper visibility, not just a “peephole.”
In fog or mist, turn on your lights and slow down to a speed which enables you to see ahead an adequate and safe distance. Use the headlights on low beam -- high beam creates glare. Use fog lights if the vehicle is so equipped. Fog lights are specifically designed to light the road, rather than the fog. Fog lights not only help you to see the road, but also help other drivers to see you. Turn on strobe light.
If you cannot see more than a few feet ahead of the bus, pull off the road and turn on all lights, including the emergency flashers to make certain the vehicle can be seen by other driver(s). When you can see enough to continue, use the white line on the edge of the road and the centerline as guides to keep the vehicle on the road.
Driving At Night Make sure your headlights are clean and properly aimed at all times. To avoid blinding other drivers, dim your headlights before going over the crest of a hill or entering a curve.
When you see oncoming headlights, switch your headlights from high beam to low beam. If the oncoming driver does not dim his headlights, do
not retaliate. If the oncoming lights are blinding you, do not look directly at the vehicle, but look toward the right edge of the road.
Driver Visibility Driver visibility is a key safety issue. The mirrors, lights, and signs should be cleaned often. Other motorists may approach behind the bus before they are able to react if lights and signs are not visible. You also have less time to respond to other traffic when dirty windows and lights cause visibility problems when you drive.
Operating Small Vehicles Ensure that all passengers are required to be properly restrained in small vehicles

26
EMERGENCY DRIVING SITUATIONS
There are a variety of emergency driving situations that may occur while you are driving a pupil transportation vehicle. While the possibility of these emergencies occurring is slight, you must know how to effectively respond.
Tire Blowouts If a tire blows out, especially a front tire, the pupil transportation vehicle can suddenly swerve and skid to one side, even more so when driving at a high speed. Do not panic and slam on the brakes. Slamming on the brakes will send the vehicle into a skid. Get a firm grip on the steering wheel and hold it steady to maintain control.
Slow down until you can gently and safely apply the brakes and pull off the road. In case of brake failure, engage the parking brake and turn off the ignition. Rubbing the front tire against a curb or foliage will help to slow down.
Accelerator Malfunction If the accelerator sticks, pump it with several sharp jabs. Shift the transmission to neutral or depress the clutch, steer the bus onto the shoulder of the road, and then turn off the ignition.
Flooded Engine Flooding of the carburetor is remedied by holding the accelerator down to the floor but not by pumping it. Engage the starter for 20-30 seconds. Let the engine cool and repeat these steps if necessary.
Lights Malfunction When lights fail, try other lights such as high or low beams, turn signals, parking, fog, or brake lights. It is important to remain visible at all times.
Release of Hood Latch Decelerate immediately if the hood latch releases. The pupil transportation vehicle must be stopped so that the hood can be re-latched. Until it can be re-latched, some visibility will be possible either through the small space between where the hood
hinges to the body of the vehicle or through the driver’s left window.
Colliding with an Animal Do not swerve drastically to miss a small animal or you might lose control of the bus. If the pupil transportation vehicle does strike, injure, or kill an animal, the driver should not stop the vehicle. However, if the pupil transportation vehicle hits a large animal, such as a deer or a farm animal, there may be damage that may cause the vehicle to be inoperable.
These would be considered “reportable” accidents for insurance purposes. Stop the vehicle and inspect for damage. If the vehicle has sustained considerable damage, report the incident to the local authorities and the school administration. If the vehicle can be driven, continue on the route.
Driver Distractions The pupil transportation vehicle driver may be affected by a physical emergency such as dirt in the eyes, violent coughing, or sneezing. Slow down and stop; then correct the condition.
Drivers shall not use a handheld wireless communication device to read written communication, type written communication, or send written communication while operating pupil transportation vehicles. If the use of a handheld wireless communication device is necessary, the

27
driver shall pull over onto the shoulder of the road or parking lots before using this device.
School policy shall determine appropriate use of the cell phone for conversations.
Do not try to retrieve any dropped item from the floor of the bus while it is in motion. Again stop; then recover or dispose of the dropped item.
A stinging insect, such as a bee, in the pupil transportation vehicle can create mild panic among the students. Ignore it while the bus is in motion. If it becomes a dangerous distraction, stop on the shoulder of the road; then remove the insect.
Student behavior problems and related issues are very distracting to the driver of a pupil transportation vehicle. Dangerous situations can occur quickly when the driver’s attention is drawn away from the road due to students’ disruptive actions. It may be necessary to pull the vehicle over to the side of the road in order to take control of the situation.
Accidents and Emergencies If an accident is unavoidable, remain in the driver’s seat and maintain control of the steering wheel. Just before impact of the accident, the driver should protect himself by crossing his arms over his face and pressing his head and arms against the dash or steering wheel. Students should cross their arms over their faces and press their heads and arms against the backs of the seat in front of them.
Accident Procedures The operator of any pupil transportation vehicle which is involved in an accident in Nebraska in which any person is killed or injured, or, where
property damage exceeds $1,000 for any one person, including the pupil transportation vehicle driver, must make a report within 10 days to the DMV.
As a pupil transportation vehicle driver, you must follow the specific procedures in the case of an accident involving a pupil transportation vehicle. Also, local school policy and the school’s Safe Pupil Transportation Plan should include procedures for transporting pupils to their homes or to school in case of a pupil transportation vehicle being involved in an accident.
The following steps address post-accident procedures:
Stop the vehicle immediately.
Remain at the scene of the accident. Provide reasonable assistance to any person injured in the accident.
Make certain all pupils are in a safe place away from traffic. They must not leave the assigned area without permission.
Notify the law enforcement agency immediately. As necessary, inform the school administrator and request medical assistance.
Make accurate notes of the incident including information such as names, license numbers, registration numbers, location, time, road, and weather conditions.
Set three flares or reflectors to warn traffic, as follows:
o On the traffic side of the vehicle, within ten (10) feet of the rear corner to mark the location of the vehicle.
o On the shoulder of the road or in the lane the vehicle is stopped in, about 100 feet behind and ahead of the vehicle.
o Back beyond any hill, curve, or other obstruction that prevents other drivers from seeing the vehicle within 500 feet.
o If the vehicle must stop on or by a one-way, or divided highway, place warning devices 10 feet, 100 feet, and 200 feet toward the approaching traffic.
If you are driving a pupil transportation vehicle and approach a scene of an accident in which
28
your vehicle is not involved and no other assistance is available, you must stop to provide assistance. If you are driving a bus, activate the four (4)-way flashers to warn approaching traffic; if driving a small vehicle, activate the flashers.
Inform your passengers of the situation and park the vehicle in a safe location. Call local authorities to obtain help for those affected by the accident. Provide reasonable assistance until assistance arrives and then continue on the route schedule. Local school policy should include specific instructions to handle these situations.
Understanding the law and knowing the correct driving procedures will help you become a safe driver. When you begin to identify the mistakes of others and adjust your driving to compensate, you have mastered the basic fundamentals for “defensive driving.
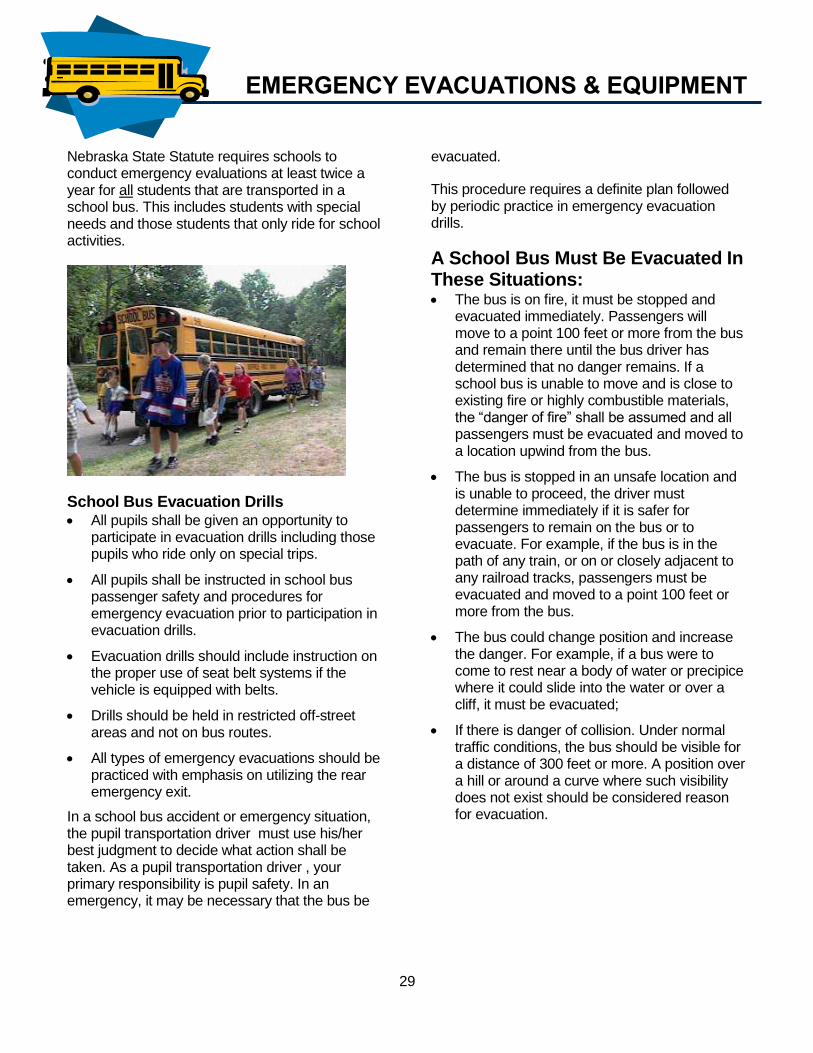
29
EMERGENCY EVACUATIONS & EQUIPMENT
Nebraska State Statute requires schools to conduct emergency evaluations at least twice a year for all students that are transported in a school bus. This includes students with special needs and those students that only ride for school activities.
School Bus Evacuation Drills All pupils shall be given an opportunity to
participate in evacuation drills including those pupils who ride only on special trips.
All pupils shall be instructed in school bus passenger safety and procedures for emergency evacuation prior to participation in evacuation drills.
Evacuation drills should include instruction on the proper use of seat belt systems if the vehicle is equipped with belts.
Drills should be held in restricted off-street areas and not on bus routes.
All types of emergency evacuations should be practiced with emphasis on utilizing the rear emergency exit.
In a school bus accident or emergency situation, the pupil transportation driver must use his/her best judgment to decide what action shall be taken. As a pupil transportation driver , your primary responsibility is pupil safety. In an emergency, it may be necessary that the bus be
evacuated.
This procedure requires a definite plan followed by periodic practice in emergency evacuation drills.
A School Bus Must Be Evacuated In These Situations: The bus is on fire, it must be stopped and
evacuated immediately. Passengers will move to a point 100 feet or more from the bus and remain there until the bus driver has determined that no danger remains. If a school bus is unable to move and is close to existing fire or highly combustible materials, the “danger of fire” shall be assumed and all passengers must be evacuated and moved to a location upwind from the bus.
The bus is stopped in an unsafe location and is unable to proceed, the driver must determine immediately if it is safer for passengers to remain on the bus or to evacuate. For example, if the bus is in the path of any train, or on or closely adjacent to any railroad tracks, passengers must be evacuated and moved to a point 100 feet or more from the bus.
The bus could change position and increase the danger. For example, if a bus were to come to rest near a body of water or precipice where it could slide into the water or over a cliff, it must be evacuated;
If there is danger of collision. Under normal traffic conditions, the bus should be visible for a distance of 300 feet or more. A position over a hill or around a curve where such visibility does not exist should be considered reason for evacuation.
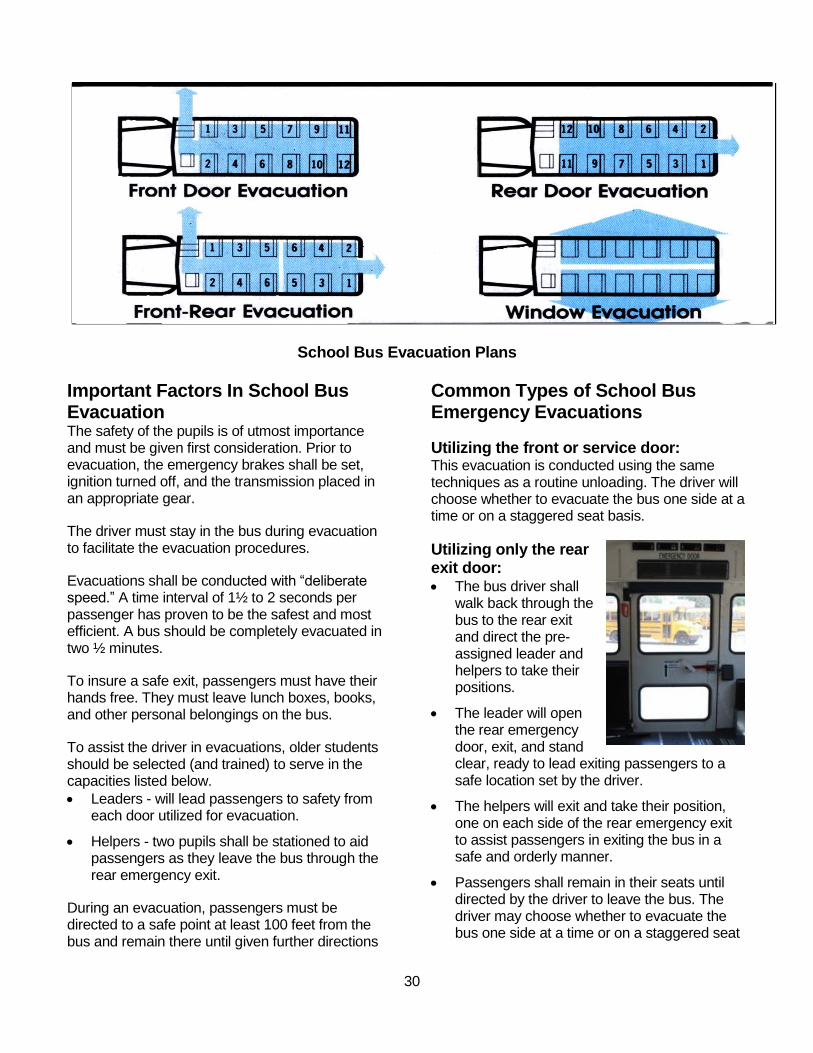
30
School Bus Evacuation Plans
Important Factors In School Bus Evacuation The safety of the pupils is of utmost importance and must be given first consideration. Prior to evacuation, the emergency brakes shall be set, ignition turned off, and the transmission placed in an appropriate gear.
The driver must stay in the bus during evacuation to facilitate the evacuation procedures.
Evacuations shall be conducted with “deliberate speed.” A time interval of 1½ to 2 seconds per passenger has proven to be the safest and most efficient. A bus should be completely evacuated in two ½ minutes.
To insure a safe exit, passengers must have their hands free. They must leave lunch boxes, books, and other personal belongings on the bus.
To assist the driver in evacuations, older students should be selected (and trained) to serve in the capacities listed below.
Leaders - will lead passengers to safety from each door utilized for evacuation.
Helpers - two pupils shall be stationed to aid passengers as they leave the bus through the rear emergency exit.
During an evacuation, passengers must be directed to a safe point at least 100 feet from the bus and remain there until given further directions
Common Types of School Bus Emergency Evacuations
Utilizing the front or service door: This evacuation is conducted using the same techniques as a routine unloading. The driver will choose whether to evacuate the bus one side at a time or on a staggered seat basis.
Utilizing only the rear exit door: The bus driver shall
walk back through the bus to the rear exit and direct the pre-assigned leader and helpers to take their positions.
The leader will open the rear emergency door, exit, and stand clear, ready to lead exiting passengers to a safe location set by the driver.
The helpers will exit and take their position, one on each side of the rear emergency exit to assist passengers in exiting the bus in a safe and orderly manner.
Passengers shall remain in their seats until directed by the driver to leave the bus. The driver may choose whether to evacuate the bus one side at a time or on a staggered seat

31
basis.
The driver shall advise all passengers to have their hands free and coats buttoned. Each passenger shall be two steps away from the bus before the next person exits. Taller passengers would be reminded to duck their heads in order to exit safely.
Utilizing roof hatches, side emergency doors, and side/rear emergency windows: The side door is located on the left side (the
street side) of the bus. Use caution exiting, as belongings may be tossed around and might be a hazard underfoot.
Evacuation procedures are the same as if utilizing the 5-step rear door exit evacuation. Follow the instructions for opening the side/rear window emergency exits. Instructions are displayed on the door and below the window.
Evacuation of Pupils with Disabilities Each bus route must have its own written emergency evacuation plan. This plan shall include a pupil’s ability to evacuate or to help others.
When possible, pupils with disabilities should practice their evacuation skills as required of their non-disabled peers.
The driver/attendant shall also be familiar with any extra equipment on the bus that would aid in the actual evacuation.
It is important to enlist the help of school liaisons,
parents and other personnel (such as physical therapists) to train and help pupils understand emergency procedures.
Local emergency personnel should also be involved in developing the plans, especially if there are unique medical complexities of the pupils on board.
School Bus Pupil Representatives The pupil transportation driver is responsible for the safety of pupils. However, in an emergency a driver might be incapacitated, unable to direct evacuation. Therefore, school bus representatives (school safety patrol members or appointed pupil) should be selected, trained, and prepared to direct the evacuation.
School bus representatives should be:
mature pupil – maturity is more important than age;
good citizens – a desire to serve is most important;
Choosing pupils who live near the end of the route might be helpful. They must also have written parental permission in advance.
Training programs shall prepare pupils to respond appropriately in case of an emergency. The school bus representatives should be instructed the proper way to:
turn off ignition switches;
set emergency brakes;
summon help when and where needed (instructions and telephone numbers shall be available on buses);
use windows for evacuation in emergencies;
set flags and reflectors or reflective triangles;
open and close service and emergency exit doors;
direct school bus evacuations;
perform other duties as directed by the driver.
Emergency Equipment Pupil transportation vehicle drivers must be knowledgeable about the use and location of all emergency equipment. Emergency equipment includes the following:
reflector kit.
bus-mounted hazard flashers.
body fluid clean-up kit.
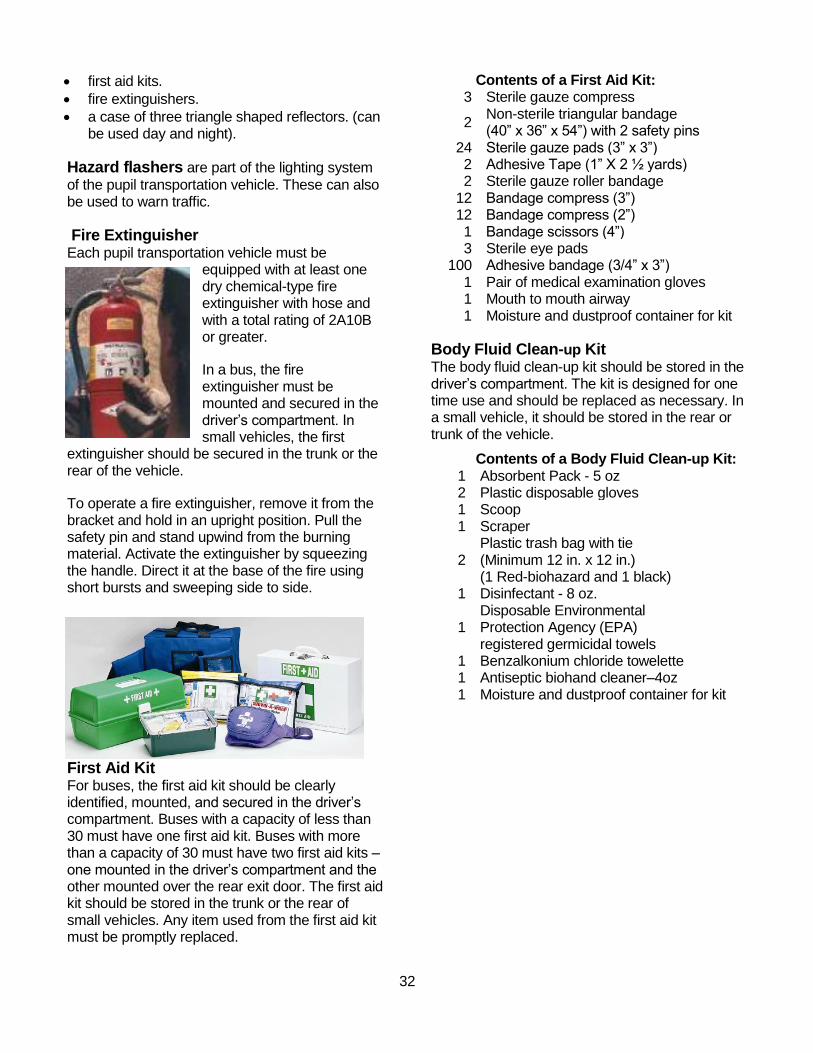
32
first aid kits.
fire extinguishers.
a case of three triangle shaped reflectors. (can be used day and night).
Hazard flashers are part of the lighting system
of the pupil transportation vehicle. These can also be used to warn traffic.
Fire Extinguisher Each pupil transportation vehicle must be
equipped with at least one dry chemical-type fire extinguisher with hose and with a total rating of 2A10B or greater.
In a bus, the fire extinguisher must be mounted and secured in the driver’s compartment. In small vehicles, the first
extinguisher should be secured in the trunk or the rear of the vehicle.
To operate a fire extinguisher, remove it from the bracket and hold in an upright position. Pull the safety pin and stand upwind from the burning material. Activate the extinguisher by squeezing the handle. Direct it at the base of the fire using short bursts and sweeping side to side.
First Aid Kit For buses, the first aid kit should be clearly identified, mounted, and secured in the driver’s compartment. Buses with a capacity of less than 30 must have one first aid kit. Buses with more than a capacity of 30 must have two first aid kits – one mounted in the driver’s compartment and the other mounted over the rear exit door. The first aid kit should be stored in the trunk or the rear of small vehicles. Any item used from the first aid kit must be promptly replaced.
Contents of a First Aid Kit: 3 Sterile gauze compress
2 Non-sterile triangular bandage (40” x 36” x 54”) with 2 safety pins
24 Sterile gauze pads (3” x 3”) 2 Adhesive Tape (1” X 2 ½ yards) 2 Sterile gauze roller bandage
12 Bandage compress (3”) 12 Bandage compress (2”) 1 Bandage scissors (4”) 3 Sterile eye pads
100 Adhesive bandage (3/4” x 3”) 1 Pair of medical examination gloves 1 Mouth to mouth airway 1 Moisture and dustproof container for kit
Body Fluid Clean-up Kit The body fluid clean-up kit should be stored in the driver’s compartment. The kit is designed for one time use and should be replaced as necessary. In a small vehicle, it should be stored in the rear or trunk of the vehicle.
Contents of a Body Fluid Clean-up Kit: 1 Absorbent Pack - 5 oz 2 Plastic disposable gloves 1 Scoop 1 Scraper
2 Plastic trash bag with tie (Minimum 12 in. x 12 in.) (1 Red-biohazard and 1 black)
1 Disinfectant - 8 oz.
1 Disposable Environmental Protection Agency (EPA) registered germicidal towels
1 Benzalkonium chloride towelette 1 Antiseptic biohand cleaner–4oz 1 Moisture and dustproof container for kit
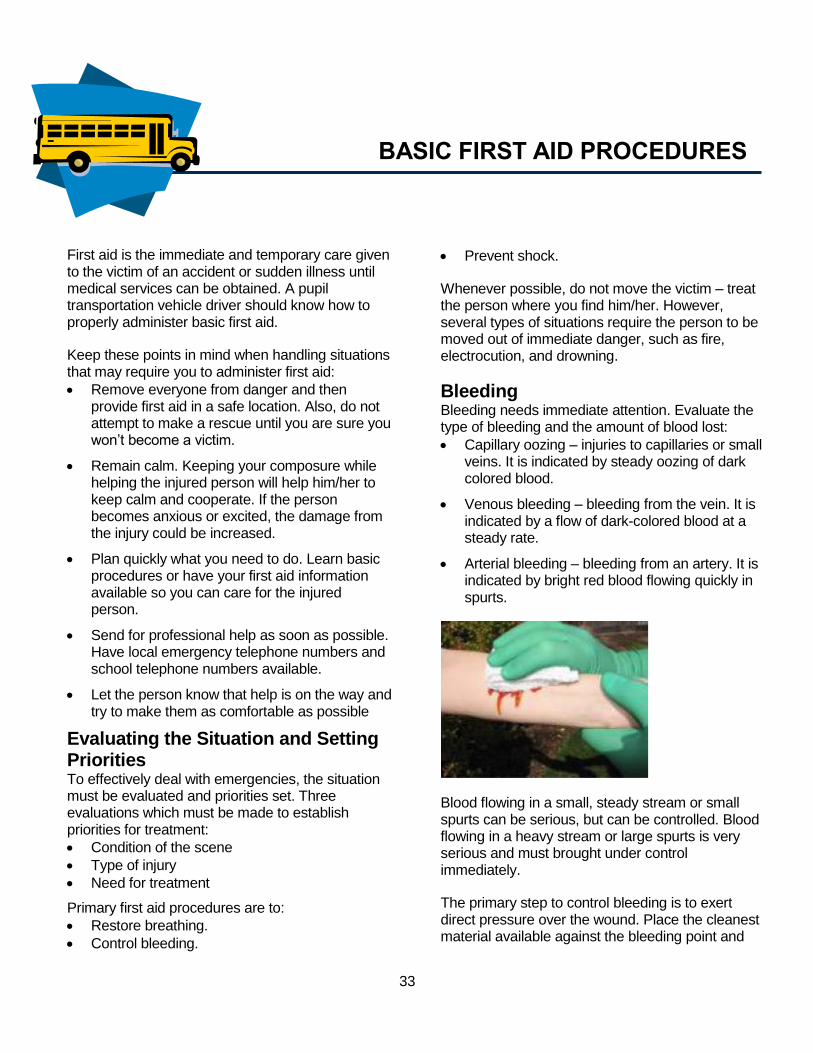
33
BASIC FIRST AID PROCEDURES
First aid is the immediate and temporary care given to the victim of an accident or sudden illness until medical services can be obtained. A pupil transportation vehicle driver should know how to properly administer basic first aid.
Keep these points in mind when handling situations that may require you to administer first aid:
Remove everyone from danger and then provide first aid in a safe location. Also, do not attempt to make a rescue until you are sure you won’t become a victim.
Remain calm. Keeping your composure while helping the injured person will help him/her to keep calm and cooperate. If the person becomes anxious or excited, the damage from the injury could be increased.
Plan quickly what you need to do. Learn basic procedures or have your first aid information available so you can care for the injured person.
Send for professional help as soon as possible. Have local emergency telephone numbers and school telephone numbers available.
Let the person know that help is on the way and try to make them as comfortable as possible
Evaluating the Situation and Setting Priorities To effectively deal with emergencies, the situation must be evaluated and priorities set. Three evaluations which must be made to establish priorities for treatment:
Condition of the scene
Type of injury
Need for treatment
Primary first aid procedures are to:
Restore breathing.
Control bleeding.
Prevent shock.
Whenever possible, do not move the victim – treat the person where you find him/her. However, several types of situations require the person to be moved out of immediate danger, such as fire, electrocution, and drowning.
Bleeding Bleeding needs immediate attention. Evaluate the type of bleeding and the amount of blood lost:
Capillary oozing – injuries to capillaries or small veins. It is indicated by steady oozing of dark colored blood.
Venous bleeding – bleeding from the vein. It is indicated by a flow of dark-colored blood at a steady rate.
Arterial bleeding – bleeding from an artery. It is indicated by bright red blood flowing quickly in spurts.
Blood flowing in a small, steady stream or small spurts can be serious, but can be controlled. Blood flowing in a heavy stream or large spurts is very serious and must brought under control immediately.
The primary step to control bleeding is to exert direct pressure over the wound. Place the cleanest material available against the bleeding point and
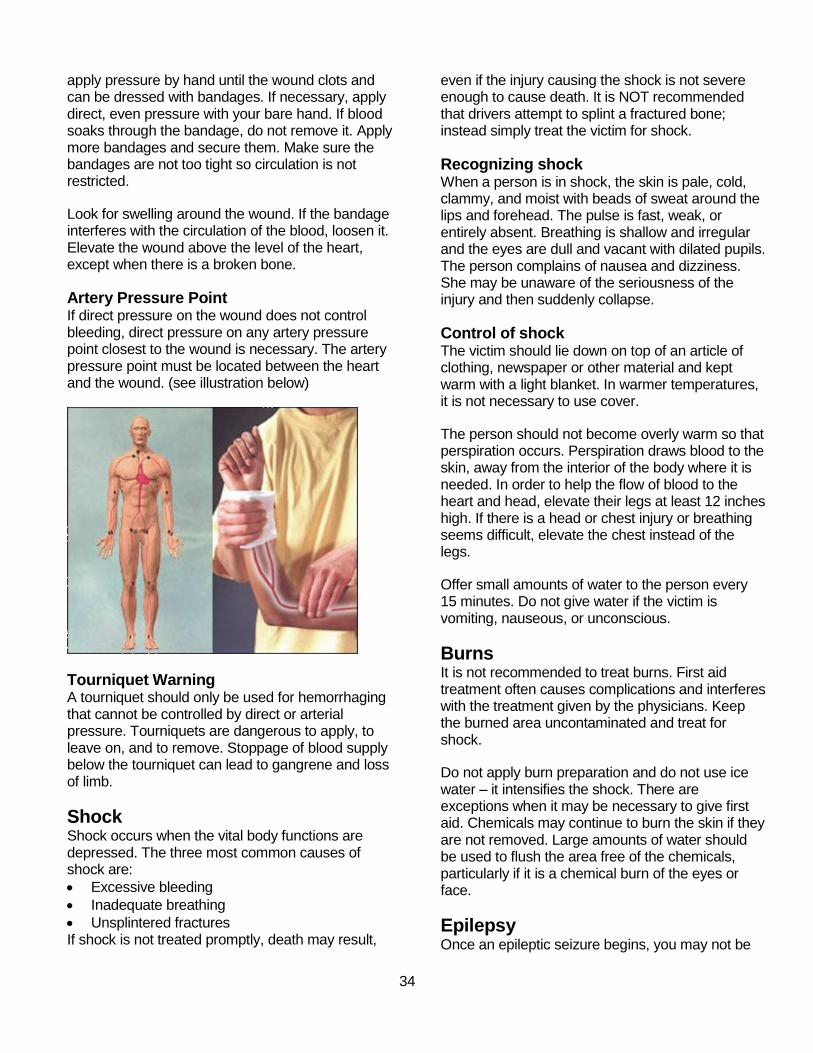
34
apply pressure by hand until the wound clots and can be dressed with bandages. If necessary, apply direct, even pressure with your bare hand. If blood soaks through the bandage, do not remove it. Apply more bandages and secure them. Make sure the bandages are not too tight so circulation is not restricted.
Look for swelling around the wound. If the bandage interferes with the circulation of the blood, loosen it. Elevate the wound above the level of the heart, except when there is a broken bone.
Artery Pressure Point If direct pressure on the wound does not control bleeding, direct pressure on any artery pressure point closest to the wound is necessary. The artery pressure point must be located between the heart and the wound. (see illustration below)
Tourniquet Warning A tourniquet should only be used for hemorrhaging that cannot be controlled by direct or arterial pressure. Tourniquets are dangerous to apply, to leave on, and to remove. Stoppage of blood supply below the tourniquet can lead to gangrene and loss of limb.
Shock Shock occurs when the vital body functions are depressed. The three most common causes of shock are:
Excessive bleeding
Inadequate breathing
Unsplintered fractures If shock is not treated promptly, death may result,
even if the injury causing the shock is not severe enough to cause death. It is NOT recommended that drivers attempt to splint a fractured bone; instead simply treat the victim for shock.
Recognizing shock When a person is in shock, the skin is pale, cold, clammy, and moist with beads of sweat around the lips and forehead. The pulse is fast, weak, or entirely absent. Breathing is shallow and irregular and the eyes are dull and vacant with dilated pupils. The person complains of nausea and dizziness. She may be unaware of the seriousness of the injury and then suddenly collapse.
Control of shock The victim should lie down on top of an article of clothing, newspaper or other material and kept warm with a light blanket. In warmer temperatures, it is not necessary to use cover.
The person should not become overly warm so that perspiration occurs. Perspiration draws blood to the skin, away from the interior of the body where it is needed. In order to help the flow of blood to the heart and head, elevate their legs at least 12 inches high. If there is a head or chest injury or breathing seems difficult, elevate the chest instead of the legs.
Offer small amounts of water to the person every 15 minutes. Do not give water if the victim is vomiting, nauseous, or unconscious.
Burns It is not recommended to treat burns. First aid treatment often causes complications and interferes with the treatment given by the physicians. Keep the burned area uncontaminated and treat for shock.
Do not apply burn preparation and do not use ice water – it intensifies the shock. There are exceptions when it may be necessary to give first aid. Chemicals may continue to burn the skin if they are not removed. Large amounts of water should be used to flush the area free of the chemicals, particularly if it is a chemical burn of the eyes or face.
Epilepsy Once an epileptic seizure begins, you may not be
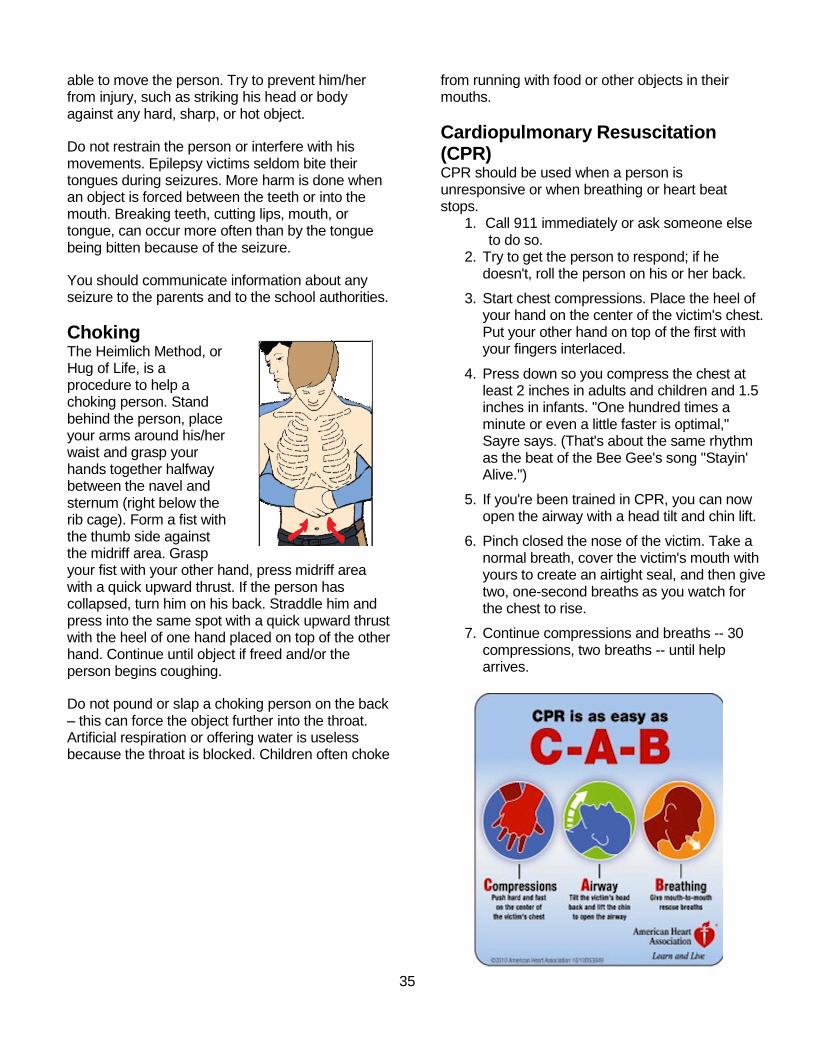
35
able to move the person. Try to prevent him/her from injury, such as striking his head or body against any hard, sharp, or hot object.
Do not restrain the person or interfere with his movements. Epilepsy victims seldom bite their tongues during seizures. More harm is done when an object is forced between the teeth or into the mouth. Breaking teeth, cutting lips, mouth, or tongue, can occur more often than by the tongue being bitten because of the seizure.
You should communicate information about any seizure to the parents and to the school authorities.
Choking The Heimlich Method, or Hug of Life, is a procedure to help a choking person. Stand behind the person, place your arms around his/her waist and grasp your hands together halfway between the navel and sternum (right below the rib cage). Form a fist with the thumb side against the midriff area. Grasp your fist with your other hand, press midriff area with a quick upward thrust. If the person has collapsed, turn him on his back. Straddle him and press into the same spot with a quick upward thrust with the heel of one hand placed on top of the other hand. Continue until object if freed and/or the person begins coughing.
Do not pound or slap a choking person on the back – this can force the object further into the throat. Artificial respiration or offering water is useless because the throat is blocked. Children often choke
from running with food or other objects in their mouths.
Cardiopulmonary Resuscitation (CPR) CPR should be used when a person is unresponsive or when breathing or heart beat stops.
1. Call 911 immediately or ask someone else to do so.
2. Try to get the person to respond; if he doesn't, roll the person on his or her back.
3. Start chest compressions. Place the heel of your hand on the center of the victim's chest. Put your other hand on top of the first with your fingers interlaced.
4. Press down so you compress the chest at least 2 inches in adults and children and 1.5 inches in infants. ''One hundred times a minute or even a little faster is optimal," Sayre says. (That's about the same rhythm as the beat of the Bee Gee's song "Stayin' Alive.")
5. If you're been trained in CPR, you can now open the airway with a head tilt and chin lift.
6. Pinch closed the nose of the victim. Take a normal breath, cover the victim's mouth with yours to create an airtight seal, and then give two, one-second breaths as you watch for the chest to rise.
7. Continue compressions and breaths -- 30 compressions, two breaths -- until help arrives.
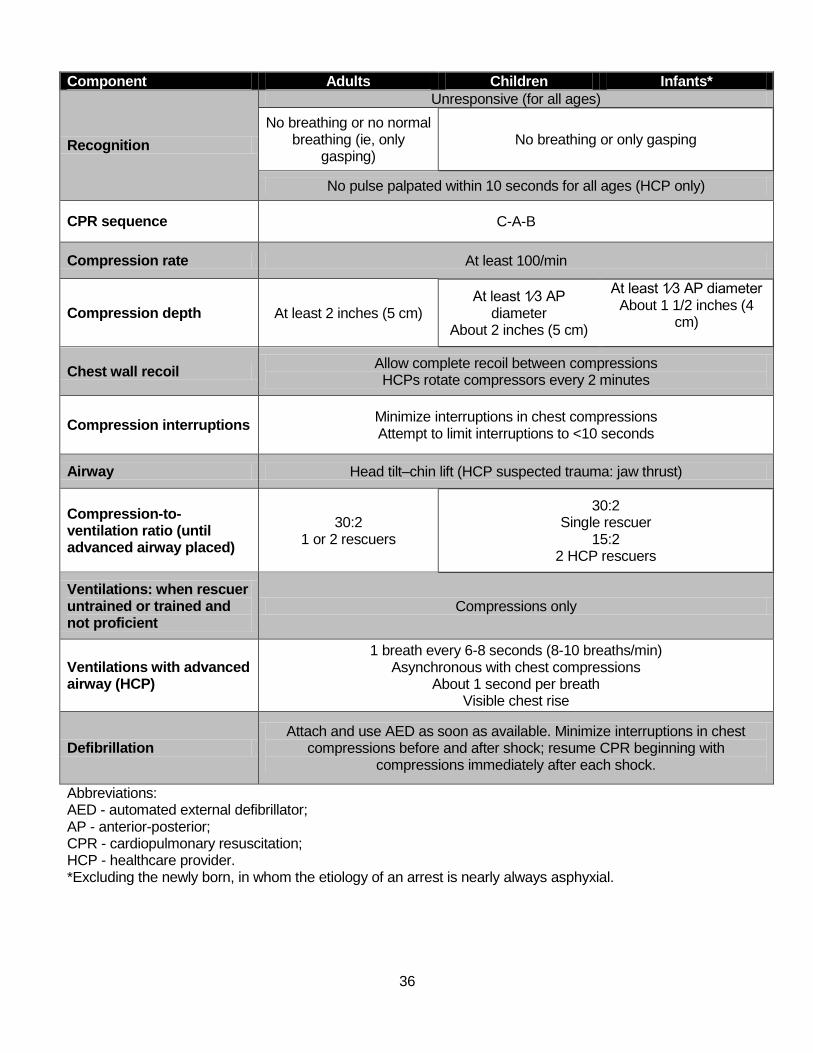
36
Component Adults Children Infants*
Recognition
Unresponsive (for all ages)
No breathing or no normal breathing (ie, only
gasping) No breathing or only gasping
No pulse palpated within 10 seconds for all ages (HCP only)
CPR sequence C-A-B
Compression rate At least 100/min
Compression depth At least 2 inches (5 cm) At least 1⁄3 AP
diameter About 2 inches (5 cm)
At least 1⁄3 AP diameter About 1 1/2 inches (4
cm)
Chest wall recoil Allow complete recoil between compressions HCPs rotate compressors every 2 minutes
Compression interruptions Minimize interruptions in chest compressions Attempt to limit interruptions to <10 seconds
Airway Head tilt–chin lift (HCP suspected trauma: jaw thrust)
Compression-to-ventilation ratio (until advanced airway placed)
30:2 1 or 2 rescuers
30:2 Single rescuer
15:2 2 HCP rescuers
Ventilations: when rescuer untrained or trained and not proficient
Compressions only
Ventilations with advanced airway (HCP)
1 breath every 6-8 seconds (8-10 breaths/min) Asynchronous with chest compressions
About 1 second per breath Visible chest rise
Defibrillation Attach and use AED as soon as available. Minimize interruptions in chest
compressions before and after shock; resume CPR beginning with compressions immediately after each shock.
Abbreviations: AED - automated external defibrillator; AP - anterior-posterior; CPR - cardiopulmonary resuscitation; HCP - healthcare provider. *Excluding the newly born, in whom the etiology of an arrest is nearly always asphyxial.

37
APPENDIX A – SAMPLE DAILY VEHICLE INSPECTION FORM This document is provided as an example of a pre-trip/Daily Inspection Form – schools should adapt to suit the district individual needs. Completed forms should be kept for your school records. Do not submit this form to the Nebraska Department of Education.
Daily Vehicle Inspection Form
Vehicle No. Monday Tuesday Wednesday Thursday Friday Saturday Other
Under the Hood 1. Water Level 2. Oil Level 3. Belts & Hoses 4. Fluid Leaks
Inside Vehicle 5. Floor Clean 6. Seats & Windows 7. Emergency Equipment
Start Engine
8. Oil Pressure 9. Air/Vacuum Pressure 10. Fuel Level
11. Heaters & Defrosters 12. Wipers & Washer 13. Service Door 14. Low & High Beam Indicator 15. Left Signal Indicator 16. Amber Warning Lights 17. Emergency Exit & Buzzer
Outside Vehicle 18. Rear Clear Lights 19. Amber Warning Lights 20. Left Turn Signal, Rear 21. Brake & Taillights 22. I.D. Lights 23. Exhaust System 24. Tires & Wheels, Rear
Move to Front
25. Headlights, High Beam 26. Clear Lights 27. Amber Warning Lights 28. Left Turn Signal, Front 29. Front Tires & Wheels 30. Crossover Mirror 31. Both Rear View Mirrors
Re-Enter Vehicle 32. Low Beam Indicator 33. Right Signal Indicator 34. Red Warning Lights
Outside Vehicle
35. Right Turn Signal, Front 36. Red Warning Lights
Move to Front 37. Right Turn, Signal 38. Red Warning Lights
Re-Enter Vehicle 39. Service Brakes 40. Parking Brake
(Suggestion: Sign your initials at the top of each day to confirm the inspections have been completed for that day)
Odometer Mon. Tues. Wed. Thurs. Fri. Date:
Regular Route
Before Am Activity Trips
Before Am
After Pm After Pm
Signature: _________________________________ Provided by NDE
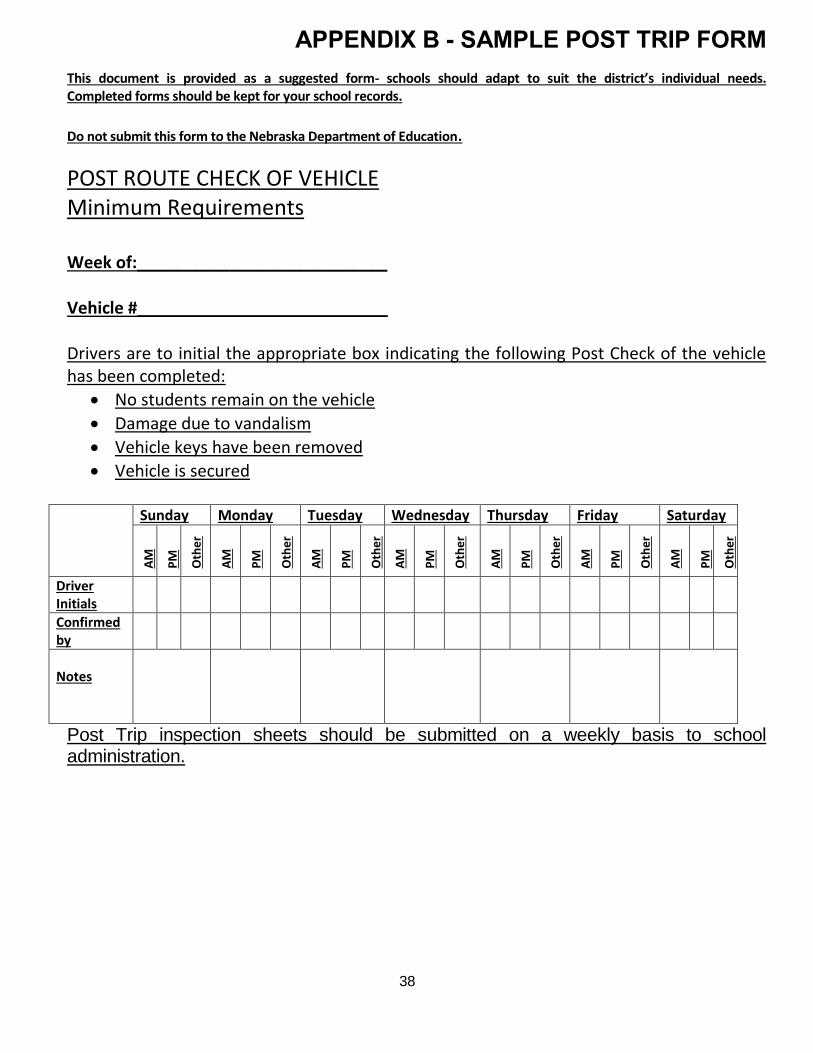
38
APPENDIX B - SAMPLE POST TRIP FORM
This document is provided as a suggested form- schools should adapt to suit the district’s individual needs. Completed forms should be kept for your school records.
Do not submit this form to the Nebraska Department of Education.
POST ROUTE CHECK OF VEHICLE Minimum Requirements Week of:___________________________ Vehicle #___________________________ Drivers are to initial the appropriate box indicating the following Post Check of the vehicle has been completed:
No students remain on the vehicle
Damage due to vandalism
Vehicle keys have been removed
Vehicle is secured
Sunday Monday Tuesday Wednesday Thursday Friday Saturday
AM
PM
Oth
er
AM
PM
Oth
er
AM
PM
Oth
er
AM
PM
Oth
er
AM
PM
Oth
er
AM
PM
Oth
er
AM
PM
Oth
er
Driver Initials
Confirmed by
Notes
Post Trip inspection sheets should be submitted on a weekly basis to school administration.
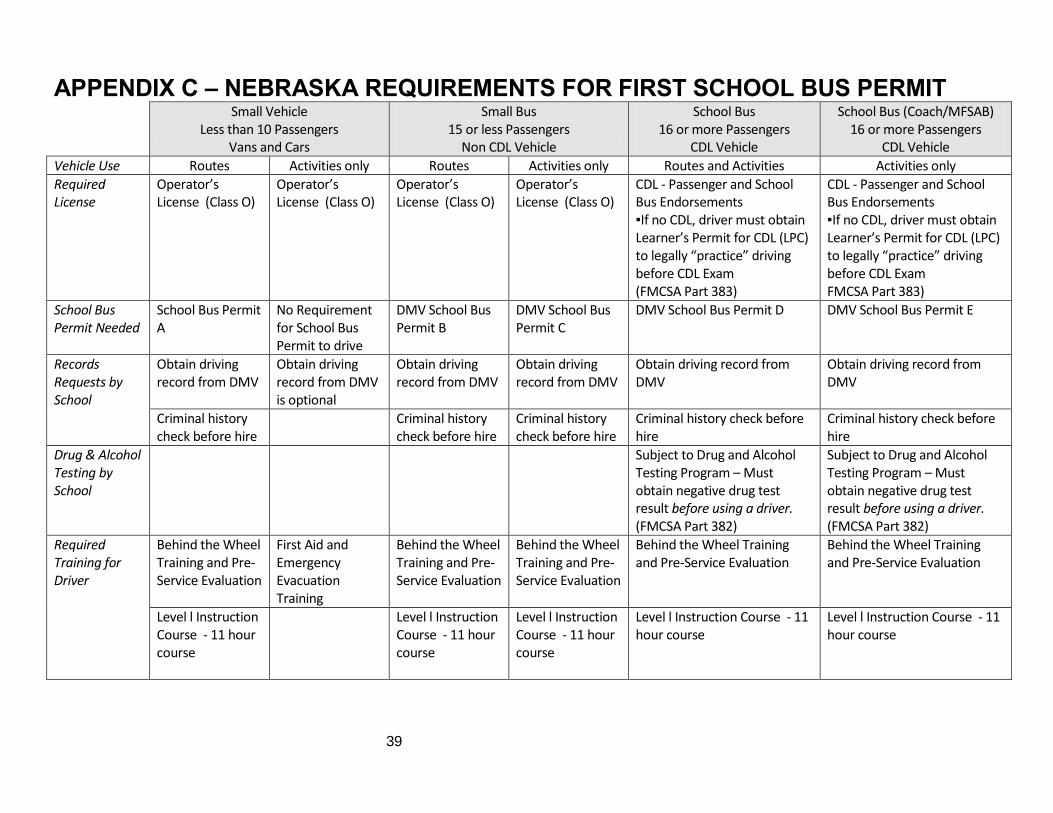
39
APPENDIX C – NEBRASKA REQUIREMENTS FOR FIRST SCHOOL BUS PERMIT
Small Vehicle Less than 10 Passengers
Vans and Cars
Small Bus 15 or less Passengers
Non CDL Vehicle
School Bus 16 or more Passengers
CDL Vehicle
School Bus (Coach/MFSAB) 16 or more Passengers
CDL Vehicle
Vehicle Use Routes Activities only Routes Activities only Routes and Activities Activities only
Required License
Operator’s License (Class O)
Operator’s License (Class O)
Operator’s License (Class O)
Operator’s License (Class O)
CDL - Passenger and School Bus Endorsements ▪If no CDL, driver must obtain Learner’s Permit for CDL (LPC) to legally “practice” driving before CDL Exam (FMCSA Part 383)
CDL - Passenger and School Bus Endorsements ▪If no CDL, driver must obtain Learner’s Permit for CDL (LPC) to legally “practice” driving before CDL Exam FMCSA Part 383)
School Bus Permit Needed
School Bus Permit A
No Requirement for School Bus Permit to drive
DMV School Bus Permit B
DMV School Bus Permit C
DMV School Bus Permit D DMV School Bus Permit E
Records Requests by School
Obtain driving record from DMV
Obtain driving record from DMV is optional
Obtain driving record from DMV
Obtain driving record from DMV
Obtain driving record from DMV
Obtain driving record from DMV
Criminal history check before hire
Criminal history check before hire
Criminal history check before hire
Criminal history check before hire
Criminal history check before hire
Drug & Alcohol Testing by School
Subject to Drug and Alcohol Testing Program – Must obtain negative drug test result before using a driver. (FMCSA Part 382)
Subject to Drug and Alcohol Testing Program – Must obtain negative drug test result before using a driver. (FMCSA Part 382)
Required Training for Driver
Behind the Wheel Training and Pre-Service Evaluation
First Aid and Emergency Evacuation Training
Behind the Wheel Training and Pre-Service Evaluation
Behind the Wheel Training and Pre-Service Evaluation
Behind the Wheel Training and Pre-Service Evaluation
Behind the Wheel Training and Pre-Service Evaluation
Level l Instruction Course - 11 hour course
Level l Instruction Course - 11 hour course
Level l Instruction Course - 11 hour course
Level l Instruction Course - 11 hour course
Level l Instruction Course - 11 hour course
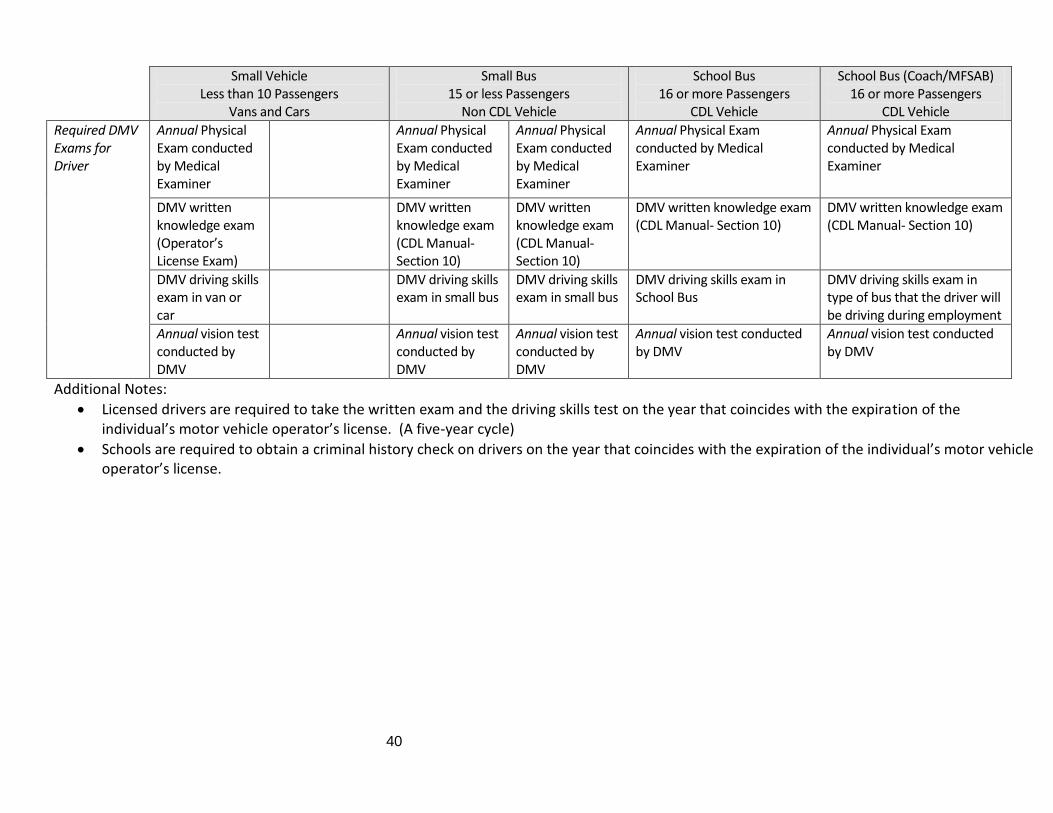
40
Small Vehicle Less than 10 Passengers
Vans and Cars
Small Bus 15 or less Passengers
Non CDL Vehicle
School Bus 16 or more Passengers
CDL Vehicle
School Bus (Coach/MFSAB) 16 or more Passengers
CDL Vehicle
Required DMV Exams for Driver
Annual Physical Exam conducted by Medical Examiner
Annual Physical Exam conducted by Medical Examiner
Annual Physical Exam conducted by Medical Examiner
Annual Physical Exam conducted by Medical Examiner
Annual Physical Exam conducted by Medical Examiner
DMV written knowledge exam (Operator’s License Exam)
DMV written knowledge exam (CDL Manual- Section 10)
DMV written knowledge exam (CDL Manual- Section 10)
DMV written knowledge exam (CDL Manual- Section 10)
DMV written knowledge exam (CDL Manual- Section 10)
DMV driving skills exam in van or car
DMV driving skills exam in small bus
DMV driving skills exam in small bus
DMV driving skills exam in School Bus
DMV driving skills exam in type of bus that the driver will be driving during employment
Annual vision test conducted by DMV
Annual vision test conducted by DMV
Annual vision test conducted by DMV
Annual vision test conducted by DMV
Annual vision test conducted by DMV
Additional Notes:
Licensed drivers are required to take the written exam and the driving skills test on the year that coincides with the expiration of the individual’s motor vehicle operator’s license. (A five-year cycle)
Schools are required to obtain a criminal history check on drivers on the year that coincides with the expiration of the individual’s motor vehicle operator’s license.
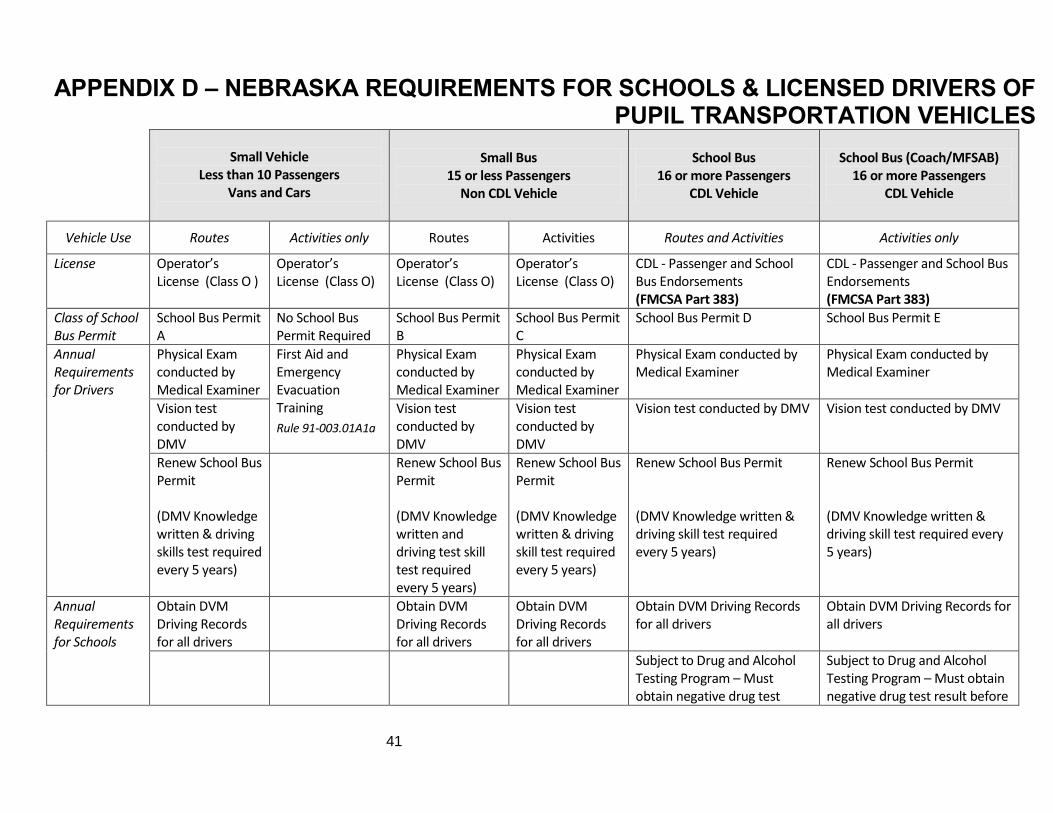
41
APPENDIX D – NEBRASKA REQUIREMENTS FOR SCHOOLS & LICENSED DRIVERS OF PUPIL TRANSPORTATION VEHICLES
Small Vehicle
Less than 10 Passengers Vans and Cars
Small Bus 15 or less Passengers
Non CDL Vehicle
School Bus 16 or more Passengers
CDL Vehicle
School Bus (Coach/MFSAB) 16 or more Passengers
CDL Vehicle
Vehicle Use Routes Activities only Routes Activities Routes and Activities Activities only
License Operator’s License (Class O )
Operator’s License (Class O)
Operator’s License (Class O)
Operator’s License (Class O)
CDL - Passenger and School Bus Endorsements (FMCSA Part 383)
CDL - Passenger and School Bus Endorsements (FMCSA Part 383)
Class of School Bus Permit
School Bus Permit A
No School Bus Permit Required
School Bus Permit B
School Bus Permit C
School Bus Permit D School Bus Permit E
Annual Requirements for Drivers
Physical Exam conducted by Medical Examiner
First Aid and Emergency Evacuation Training
Rule 91-003.01A1a
Physical Exam conducted by Medical Examiner
Physical Exam conducted by Medical Examiner
Physical Exam conducted by Medical Examiner
Physical Exam conducted by Medical Examiner
Vision test conducted by DMV
Vision test conducted by DMV
Vision test conducted by DMV
Vision test conducted by DMV Vision test conducted by DMV
Renew School Bus Permit (DMV Knowledge written & driving skills test required every 5 years)
Renew School Bus Permit (DMV Knowledge written and driving test skill test required every 5 years)
Renew School Bus Permit (DMV Knowledge written & driving skill test required every 5 years)
Renew School Bus Permit (DMV Knowledge written & driving skill test required every 5 years)
Renew School Bus Permit (DMV Knowledge written & driving skill test required every 5 years)
Annual Requirements for Schools
Obtain DVM Driving Records for all drivers
Obtain DVM Driving Records for all drivers
Obtain DVM Driving Records for all drivers
Obtain DVM Driving Records for all drivers
Obtain DVM Driving Records for all drivers
Subject to Drug and Alcohol Testing Program – Must obtain negative drug test
Subject to Drug and Alcohol Testing Program – Must obtain negative drug test result before
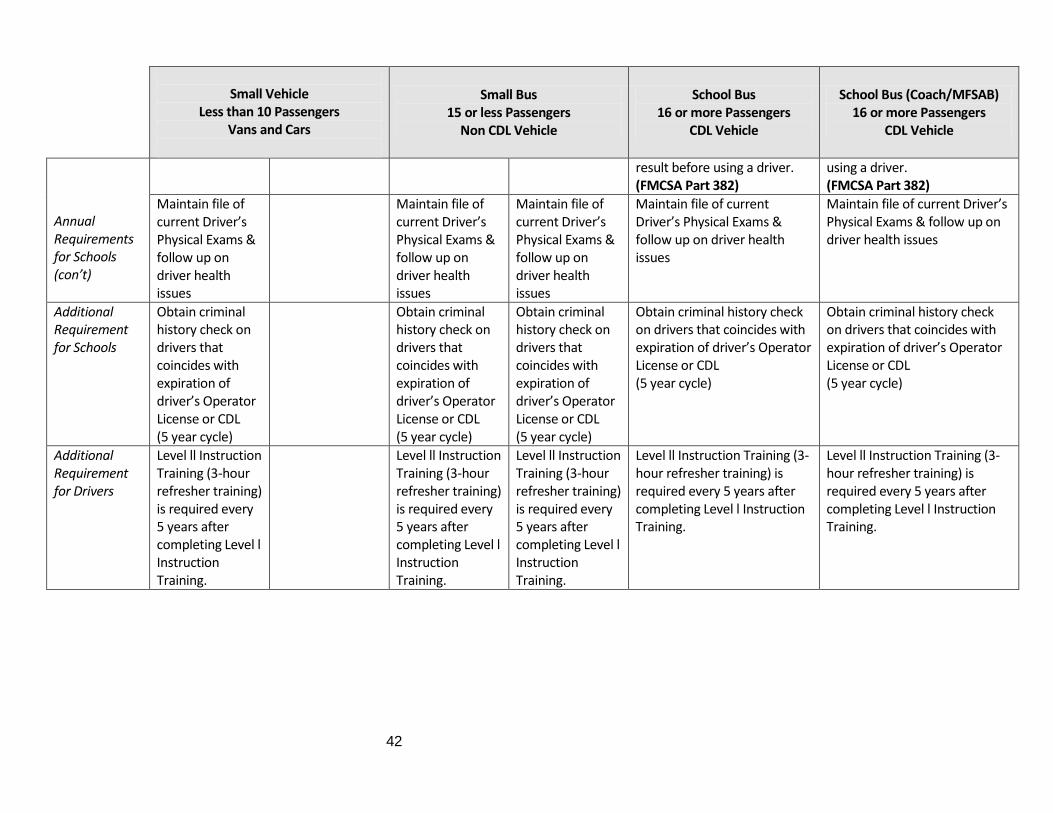
42
Small Vehicle
Less than 10 Passengers Vans and Cars
Small Bus 15 or less Passengers
Non CDL Vehicle
School Bus 16 or more Passengers
CDL Vehicle
School Bus (Coach/MFSAB) 16 or more Passengers
CDL Vehicle
Annual Requirements for Schools (con’t)
result before using a driver. (FMCSA Part 382)
using a driver. (FMCSA Part 382)
Maintain file of current Driver’s Physical Exams & follow up on driver health issues
Maintain file of current Driver’s Physical Exams & follow up on driver health issues
Maintain file of current Driver’s Physical Exams & follow up on driver health issues
Maintain file of current Driver’s Physical Exams & follow up on driver health issues
Maintain file of current Driver’s Physical Exams & follow up on driver health issues
Additional Requirement for Schools
Obtain criminal history check on drivers that coincides with expiration of driver’s Operator License or CDL (5 year cycle)
Obtain criminal history check on drivers that coincides with expiration of driver’s Operator License or CDL (5 year cycle)
Obtain criminal history check on drivers that coincides with expiration of driver’s Operator License or CDL (5 year cycle)
Obtain criminal history check on drivers that coincides with expiration of driver’s Operator License or CDL (5 year cycle)
Obtain criminal history check on drivers that coincides with expiration of driver’s Operator License or CDL (5 year cycle)
Additional Requirement for Drivers
Level ll Instruction Training (3-hour refresher training) is required every 5 years after completing Level l Instruction Training.
Level ll Instruction Training (3-hour refresher training) is required every 5 years after completing Level l Instruction Training.
Level ll Instruction Training (3-hour refresher training) is required every 5 years after completing Level l Instruction Training.
Level ll Instruction Training (3-hour refresher training) is required every 5 years after completing Level l Instruction Training.
Level ll Instruction Training (3-hour refresher training) is required every 5 years after completing Level l Instruction Training.
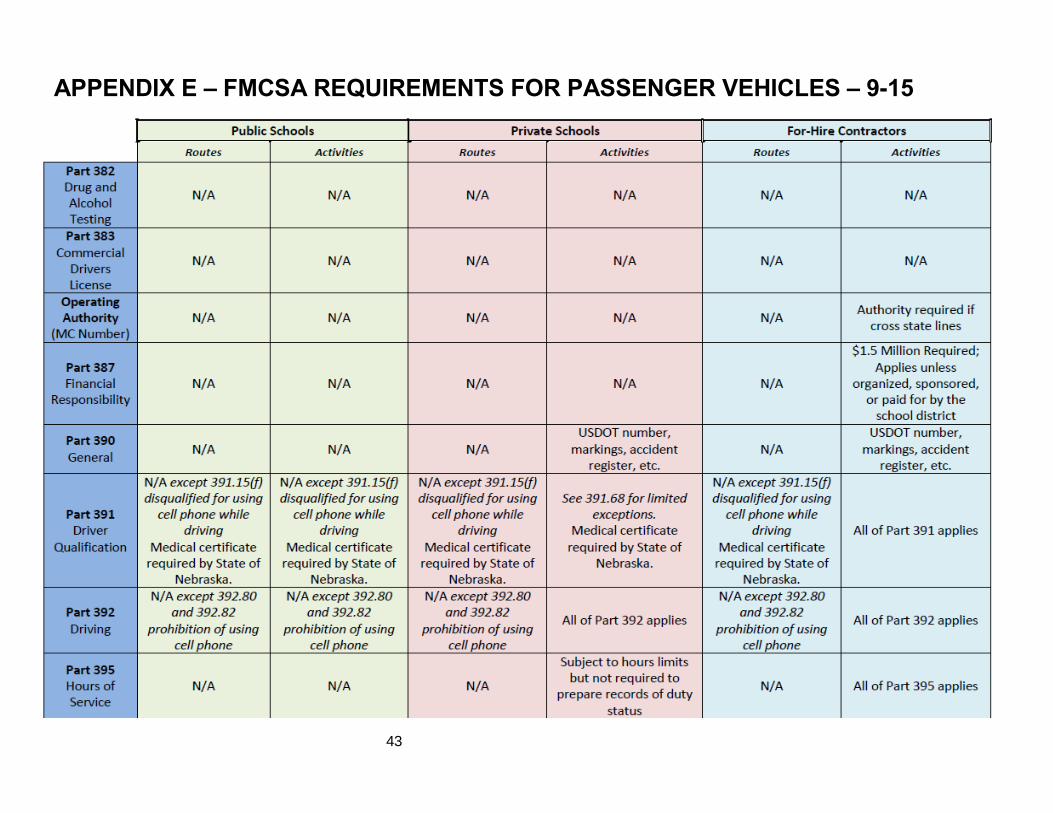
43
APPENDIX E – FMCSA REQUIREMENTS FOR PASSENGER VEHICLES – 9-15

44
APPENDIX F – FMCSA REQUIREMENTS FOR PASSENGER VEHICLES – 16-MORE
45
APPENDIX G – COMMERCIAL DRIVER’S MANUAL SECTION 10A
Section 10A SCHOOL BUSES
THIS SECTION IS FOR SCHOOL BUS DRIVERS Commercial Driver's Manual/2.0

Pre-Trip Vehicle Inspection Test/2.0 Page 10-37
SECTION 10 SCHOOL BUSES
This Section Covers
Danger Zones and Use of Mirrors
Loading and Unloading
Emergency Exit and Evacuation
Railroad-highway Grade Crossings
Student Management
Antilock Braking Systems
Special Safety Considerations Because state and local laws and regulations regulate so much of school transportation and school bus operations, many of the procedures in this section may differ from state to state. You should be thoroughly familiar with the laws and regulations in your state and local school district.
10.1 – Danger Zones and Use of Mirrors 10.1.1 – Danger Zones The danger zone is the area on all sides of the bus where children are in the most danger of being hit, either by another vehicle or their own us. The danger zones may extend as much as 30 feet from the front bumper, 10 feet from the left and right sides of the bus and 10 feet behind the rear bumper of the school bus. In addition, the area to the left of the bus is always considered dangerous because of passing cars. Figure 10.1 illustrates these danger zones.
10.1.2 – Correct Mirror Adjustment Proper adjustment and use of all mirrors is vital to the safe operation of the school bus in order to observe the danger zone around the bus and look for students, traffic, and other objects in this area. You should always check each mirror before operating the school bus to obtain maximum viewing area consistent with the vision requirements of Federal Motor Vehicle Safety Standard No. 111 “Mirror Systems”.. If necessary have the mirrors adjusted.
Figure 10.1
10.1.3 – Outside Left and Right Side Flat Mirrors These mirrors are mounted at the left and right front corners of the bus at the side or front of the windshield. They are used to monitor traffic, check clearances and students on the sides and to the rear of the bus. There is a blind spot immediately below and in front of each mirror and directly in back of the rear bumper. The blind spot behind the bus could extend up to 400 feet depending on the width of the bus. Ensure that the mirrors are properly adjusted so you can see:
200 feet or 4 bus lengths behind the bus.
Along the sides of the bus.
The rear tires touching the ground.
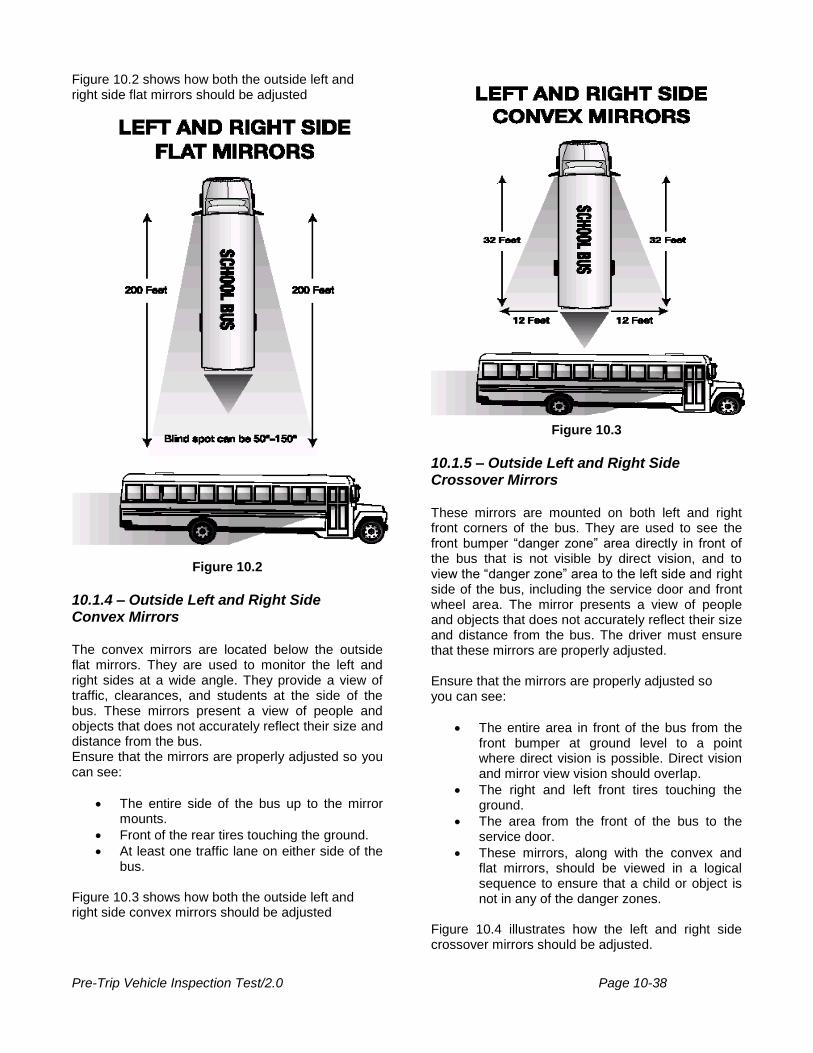
Pre-Trip Vehicle Inspection Test/2.0 Page 10-38
Figure 10.2 shows how both the outside left and right side flat mirrors should be adjusted
Figure 10.2
10.1.4 – Outside Left and Right Side Convex Mirrors The convex mirrors are located below the outside flat mirrors. They are used to monitor the left and right sides at a wide angle. They provide a view of traffic, clearances, and students at the side of the bus. These mirrors present a view of people and objects that does not accurately reflect their size and distance from the bus. Ensure that the mirrors are properly adjusted so you can see:
The entire side of the bus up to the mirror mounts.
Front of the rear tires touching the ground.
At least one traffic lane on either side of the bus.
Figure 10.3 shows how both the outside left and right side convex mirrors should be adjusted
Figure 10.3
10.1.5 – Outside Left and Right Side Crossover Mirrors These mirrors are mounted on both left and right front corners of the bus. They are used to see the front bumper “danger zone” area directly in front of the bus that is not visible by direct vision, and to view the “danger zone” area to the left side and right side of the bus, including the service door and front wheel area. The mirror presents a view of people and objects that does not accurately reflect their size and distance from the bus. The driver must ensure that these mirrors are properly adjusted. Ensure that the mirrors are properly adjusted so you can see:
The entire area in front of the bus from the front bumper at ground level to a point where direct vision is possible. Direct vision and mirror view vision should overlap.
The right and left front tires touching the ground.
The area from the front of the bus to the service door.
These mirrors, along with the convex and flat mirrors, should be viewed in a logical sequence to ensure that a child or object is not in any of the danger zones.
Figure 10.4 illustrates how the left and right side crossover mirrors should be adjusted.
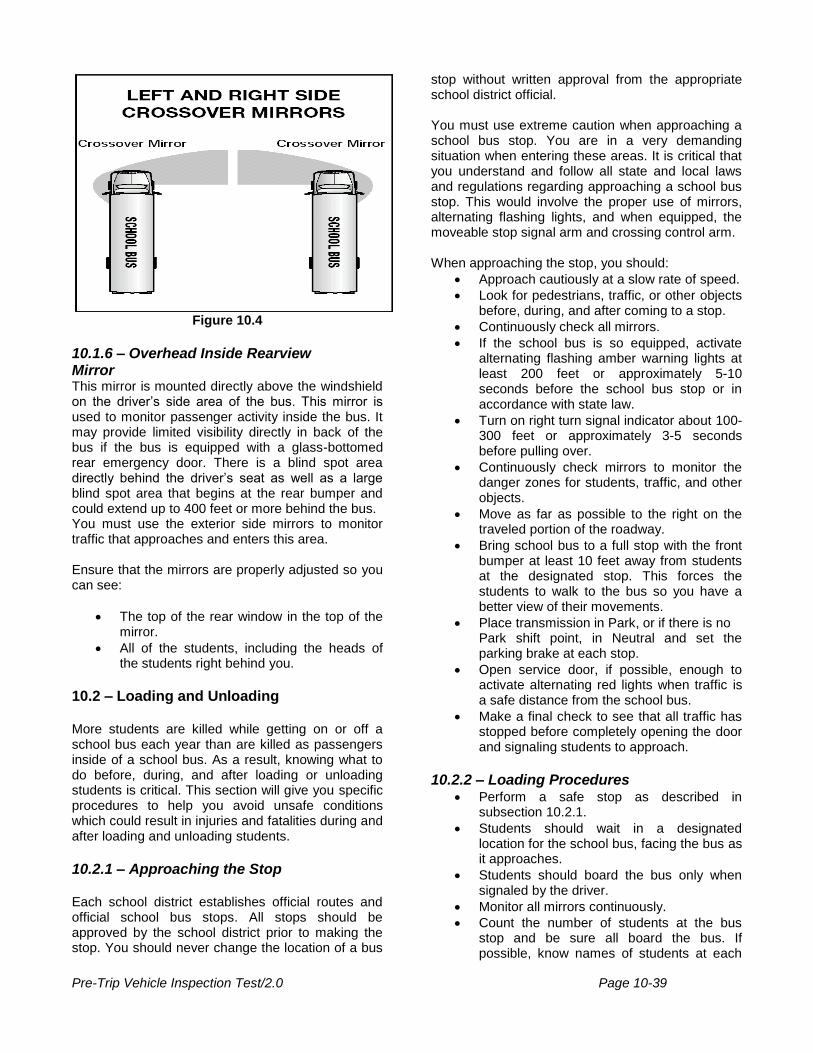
Pre-Trip Vehicle Inspection Test/2.0 Page 10-39
Figure 10.4
10.1.6 – Overhead Inside Rearview Mirror This mirror is mounted directly above the windshield on the driver’s side area of the bus. This mirror is used to monitor passenger activity inside the bus. It may provide limited visibility directly in back of the bus if the bus is equipped with a glass-bottomed rear emergency door. There is a blind spot area directly behind the driver’s seat as well as a large blind spot area that begins at the rear bumper and could extend up to 400 feet or more behind the bus. You must use the exterior side mirrors to monitor traffic that approaches and enters this area. Ensure that the mirrors are properly adjusted so you can see:
The top of the rear window in the top of the mirror.
All of the students, including the heads of the students right behind you.
10.2 – Loading and Unloading More students are killed while getting on or off a school bus each year than are killed as passengers inside of a school bus. As a result, knowing what to do before, during, and after loading or unloading students is critical. This section will give you specific procedures to help you avoid unsafe conditions which could result in injuries and fatalities during and after loading and unloading students.
10.2.1 – Approaching the Stop Each school district establishes official routes and official school bus stops. All stops should be approved by the school district prior to making the stop. You should never change the location of a bus
stop without written approval from the appropriate school district official. You must use extreme caution when approaching a school bus stop. You are in a very demanding situation when entering these areas. It is critical that you understand and follow all state and local laws and regulations regarding approaching a school bus stop. This would involve the proper use of mirrors, alternating flashing lights, and when equipped, the moveable stop signal arm and crossing control arm. When approaching the stop, you should:
Approach cautiously at a slow rate of speed.
Look for pedestrians, traffic, or other objects before, during, and after coming to a stop.
Continuously check all mirrors.
If the school bus is so equipped, activate alternating flashing amber warning lights at least 200 feet or approximately 5-10 seconds before the school bus stop or in accordance with state law.
Turn on right turn signal indicator about 100-300 feet or approximately 3-5 seconds before pulling over.
Continuously check mirrors to monitor the danger zones for students, traffic, and other objects.
Move as far as possible to the right on the traveled portion of the roadway.
Bring school bus to a full stop with the front bumper at least 10 feet away from students at the designated stop. This forces the students to walk to the bus so you have a better view of their movements.
Place transmission in Park, or if there is no Park shift point, in Neutral and set the parking brake at each stop.
Open service door, if possible, enough to activate alternating red lights when traffic is a safe distance from the school bus.
Make a final check to see that all traffic has stopped before completely opening the door and signaling students to approach.
10.2.2 – Loading Procedures
Perform a safe stop as described in subsection 10.2.1.
Students should wait in a designated location for the school bus, facing the bus as it approaches.
Students should board the bus only when signaled by the driver.
Monitor all mirrors continuously.
Count the number of students at the bus stop and be sure all board the bus. If possible, know names of students at each
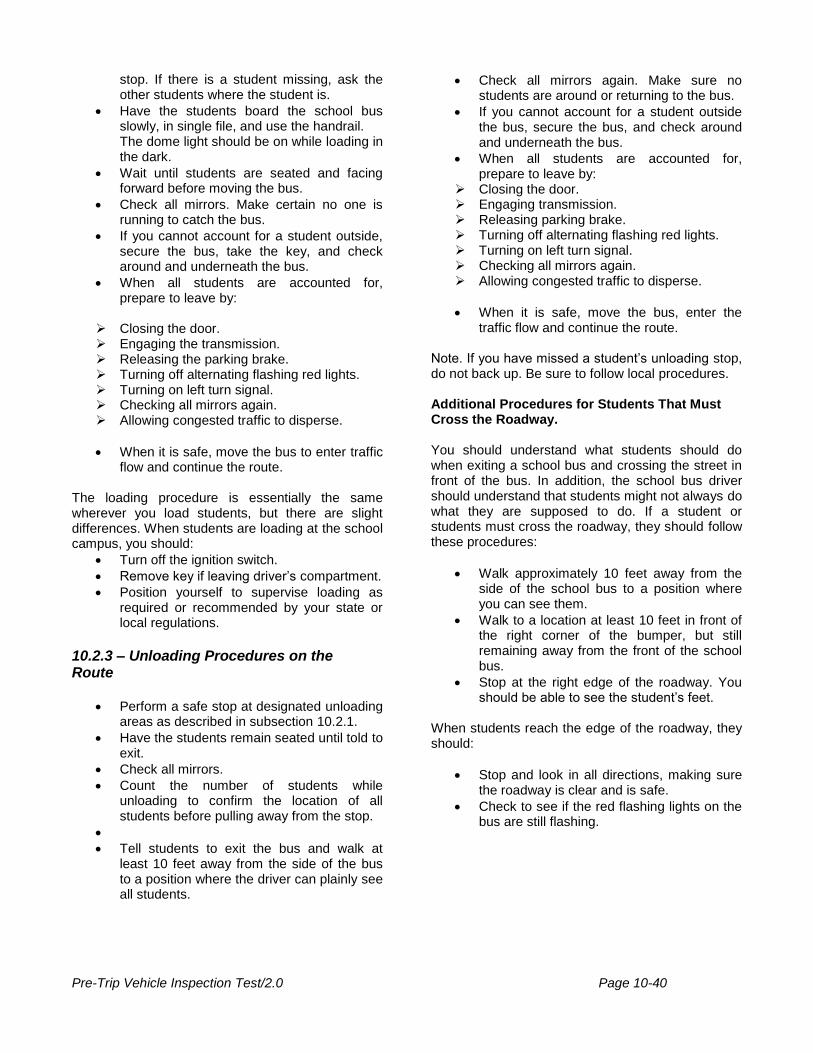
Pre-Trip Vehicle Inspection Test/2.0 Page 10-40
stop. If there is a student missing, ask the other students where the student is.
Have the students board the school bus slowly, in single file, and use the handrail. The dome light should be on while loading in the dark.
Wait until students are seated and facing forward before moving the bus.
Check all mirrors. Make certain no one is running to catch the bus.
If you cannot account for a student outside, secure the bus, take the key, and check around and underneath the bus.
When all students are accounted for, prepare to leave by:
Closing the door. Engaging the transmission. Releasing the parking brake. Turning off alternating flashing red lights. Turning on left turn signal. Checking all mirrors again. Allowing congested traffic to disperse.
When it is safe, move the bus to enter traffic flow and continue the route.
The loading procedure is essentially the same wherever you load students, but there are slight differences. When students are loading at the school campus, you should:
Turn off the ignition switch.
Remove key if leaving driver’s compartment.
Position yourself to supervise loading as required or recommended by your state or local regulations.
10.2.3 – Unloading Procedures on the Route
Perform a safe stop at designated unloading areas as described in subsection 10.2.1.
Have the students remain seated until told to exit.
Check all mirrors.
Count the number of students while unloading to confirm the location of all students before pulling away from the stop.
Tell students to exit the bus and walk at least 10 feet away from the side of the bus to a position where the driver can plainly see all students.
Check all mirrors again. Make sure no students are around or returning to the bus.
If you cannot account for a student outside the bus, secure the bus, and check around and underneath the bus.
When all students are accounted for, prepare to leave by:
Closing the door. Engaging transmission. Releasing parking brake. Turning off alternating flashing red lights. Turning on left turn signal. Checking all mirrors again. Allowing congested traffic to disperse.
When it is safe, move the bus, enter the traffic flow and continue the route.
Note. If you have missed a student’s unloading stop, do not back up. Be sure to follow local procedures. Additional Procedures for Students That Must Cross the Roadway. You should understand what students should do when exiting a school bus and crossing the street in front of the bus. In addition, the school bus driver should understand that students might not always do what they are supposed to do. If a student or students must cross the roadway, they should follow these procedures:
Walk approximately 10 feet away from the side of the school bus to a position where you can see them.
Walk to a location at least 10 feet in front of the right corner of the bumper, but still remaining away from the front of the school bus.
Stop at the right edge of the roadway. You should be able to see the student’s feet.
When students reach the edge of the roadway, they should:
Stop and look in all directions, making sure the roadway is clear and is safe.
Check to see if the red flashing lights on the bus are still flashing.
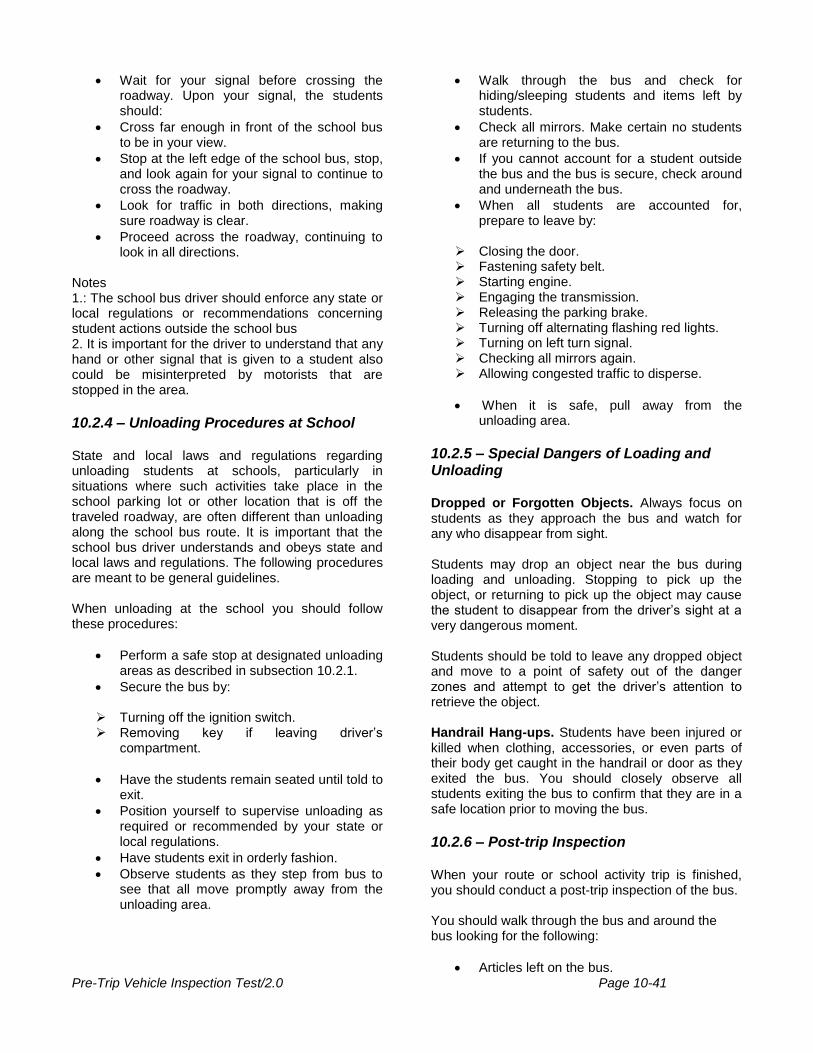
Pre-Trip Vehicle Inspection Test/2.0 Page 10-41
Wait for your signal before crossing the roadway. Upon your signal, the students should:
Cross far enough in front of the school bus to be in your view.
Stop at the left edge of the school bus, stop, and look again for your signal to continue to cross the roadway.
Look for traffic in both directions, making sure roadway is clear.
Proceed across the roadway, continuing to look in all directions.
Notes 1.: The school bus driver should enforce any state or local regulations or recommendations concerning student actions outside the school bus 2. It is important for the driver to understand that any hand or other signal that is given to a student also could be misinterpreted by motorists that are stopped in the area.
10.2.4 – Unloading Procedures at School State and local laws and regulations regarding unloading students at schools, particularly in situations where such activities take place in the school parking lot or other location that is off the traveled roadway, are often different than unloading along the school bus route. It is important that the school bus driver understands and obeys state and local laws and regulations. The following procedures are meant to be general guidelines. When unloading at the school you should follow these procedures:
Perform a safe stop at designated unloading areas as described in subsection 10.2.1.
Secure the bus by:
Turning off the ignition switch. Removing key if leaving driver’s
compartment.
Have the students remain seated until told to exit.
Position yourself to supervise unloading as required or recommended by your state or local regulations.
Have students exit in orderly fashion.
Observe students as they step from bus to see that all move promptly away from the unloading area.
Walk through the bus and check for hiding/sleeping students and items left by students.
Check all mirrors. Make certain no students are returning to the bus.
If you cannot account for a student outside the bus and the bus is secure, check around and underneath the bus.
When all students are accounted for, prepare to leave by:
Closing the door. Fastening safety belt. Starting engine. Engaging the transmission. Releasing the parking brake. Turning off alternating flashing red lights. Turning on left turn signal. Checking all mirrors again. Allowing congested traffic to disperse.
When it is safe, pull away from the unloading area.
10.2.5 – Special Dangers of Loading and Unloading Dropped or Forgotten Objects. Always focus on students as they approach the bus and watch for any who disappear from sight. Students may drop an object near the bus during loading and unloading. Stopping to pick up the object, or returning to pick up the object may cause the student to disappear from the driver’s sight at a very dangerous moment. Students should be told to leave any dropped object and move to a point of safety out of the danger zones and attempt to get the driver’s attention to retrieve the object. Handrail Hang-ups. Students have been injured or killed when clothing, accessories, or even parts of their body get caught in the handrail or door as they exited the bus. You should closely observe all students exiting the bus to confirm that they are in a safe location prior to moving the bus.
10.2.6 – Post-trip Inspection When your route or school activity trip is finished, you should conduct a post-trip inspection of the bus. You should walk through the bus and around the bus looking for the following:
Articles left on the bus.
Pre-Trip Vehicle Inspection Test/2.0 Page 10-42
Sleeping students.
Open windows and doors.
Mechanical/operational problems with the bus, with special attention to items that are unique to school buses – mirror systems, flashing warning lamps and stop signal srms.
Damage or vandalism. Any problems or special situations should be reported immediately to your supervisor or school authorities.
10.3 – Emergency Exit and Evacuation An emergency situation can happen to anyone, anytime, anywhere. It could be a crash, a stalled school bus on a railroad-highway crossing or in a high-speed intersection, an electrical fire in the engine compartment, a medical emergency to a student on the school bus, etc. Knowing what to do in an emergency–before, during and after an evacuation–can mean the difference between life and death.
10.3.1 – Planning for Emergencies Determine Need to Evacuate Bus. The first and most important consideration is for you to recognize the hazard. If time permits, school bus drivers should contact their dispatcher to explain the situation before making a decision to evacuate the school bus. As a general rule, student safety and control is best maintained by keeping students on the bus during an emergency and/or impending crisis situation, if so doing does not expose them to unnecessary risk or injury. Remember, the decision to evacuate the bus must be a timely one. A decision to evacuate should include consideration of the following conditions:
Is there a fire or danger of fire?
Is there a smell of raw or leaking fuel?
Is there a chance the bus could be hit by other vehicles?
Is the bus in the path of a sighted tornado or rising waters?
Are there downed power lines?
Would removing students expose them to speeding traffic, severe weather, or a dangerous environment such as downed power lines?
Would moving students complicate injuries such as neck and back injuries and fractures?
Is there a hazardous spill involved? Sometimes, it may be safer to remain on the bus and not come in contact with the material.
Mandatory Evacuations. The driver must evacuate the bus when:
The bus is on fire or there is a threat of a fire.
The bus is stalled on or adjacent to a railroad-highway crossing.
The position of the bus may change and increase the danger.
There is an imminent danger of collision.
There is a need to quickly evacuate because of a hazardous materials spill.
10.3.2 – Evacuation Procedures Be Prepared and Plan Ahead. When possible, assign two responsible, older student assistants to each emergency exit. Teach them how to assist the other students off the bus. Assign another student assistant to lead the students to a “safe place” after evacuation. However, you must recognize that there may not be older, responsible students on the bus at the time of the emergency. Therefore, emergency evacuation procedures must be explained to all students. This includes knowing how to operate the various emergency exits and the importance of listening to and following all instructions given by you. Some tips to determine a safe place:
A safe place will be at least 100 feet off the road in the direction of oncoming traffic. This will keep the students from being hit by debris if another vehicle collides with the bus.
Lead students upwind of the bus if fire is present.
Lead students as far away from railroad tracks as possible and in the direction of any oncoming train.
Lead students upwind of the bus at least 300 feet if there is a risk from spilled hazardous materials.
If the bus is in the direct path of a sighted tornado and evacuation is ordered, escort students to a nearby ditch or culvert if shelter in a building is not readily available, and direct them to lie face down, hands covering their head. They should be far enough away so the bus cannot topple on them. Avoid areas that are subject to flash floods.
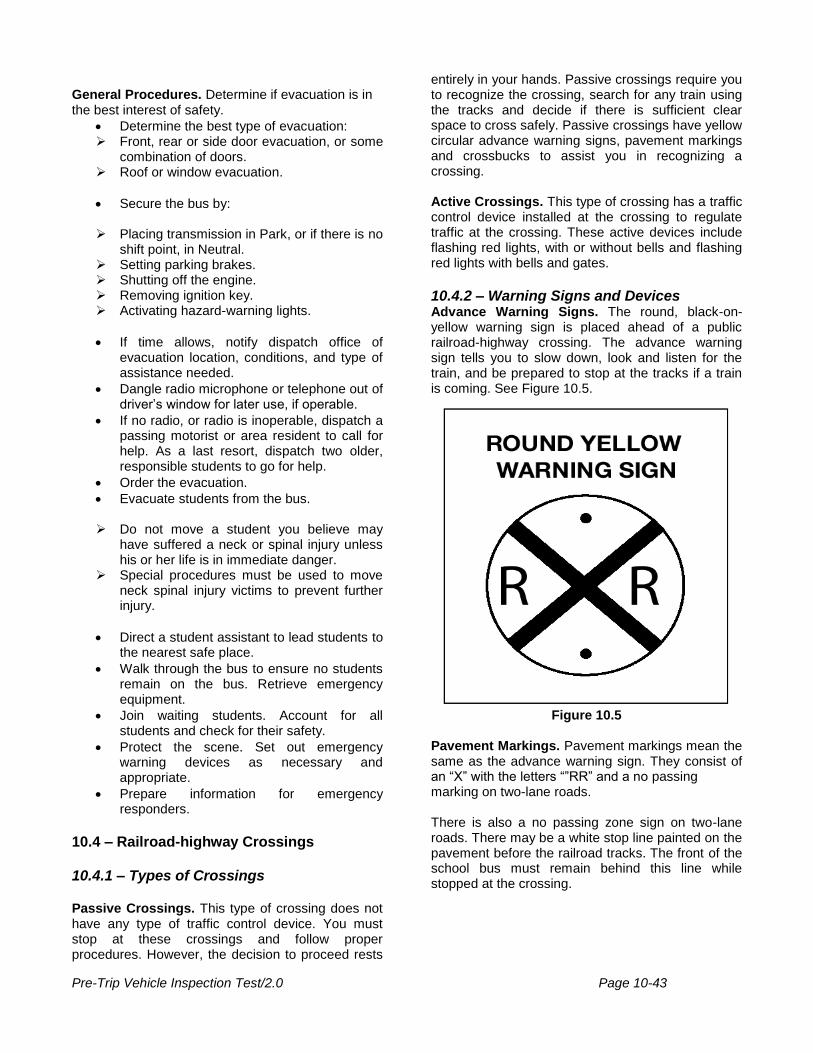
Pre-Trip Vehicle Inspection Test/2.0 Page 10-43
General Procedures. Determine if evacuation is in the best interest of safety.
Determine the best type of evacuation: Front, rear or side door evacuation, or some
combination of doors. Roof or window evacuation.
Secure the bus by:
Placing transmission in Park, or if there is no shift point, in Neutral.
Setting parking brakes. Shutting off the engine. Removing ignition key. Activating hazard-warning lights.
If time allows, notify dispatch office of evacuation location, conditions, and type of assistance needed.
Dangle radio microphone or telephone out of driver’s window for later use, if operable.
If no radio, or radio is inoperable, dispatch a passing motorist or area resident to call for help. As a last resort, dispatch two older, responsible students to go for help.
Order the evacuation.
Evacuate students from the bus.
Do not move a student you believe may have suffered a neck or spinal injury unless his or her life is in immediate danger.
Special procedures must be used to move neck spinal injury victims to prevent further injury.
Direct a student assistant to lead students to the nearest safe place.
Walk through the bus to ensure no students remain on the bus. Retrieve emergency equipment.
Join waiting students. Account for all students and check for their safety.
Protect the scene. Set out emergency warning devices as necessary and appropriate.
Prepare information for emergency responders.
10.4 – Railroad-highway Crossings 10.4.1 – Types of Crossings Passive Crossings. This type of crossing does not have any type of traffic control device. You must stop at these crossings and follow proper procedures. However, the decision to proceed rests
entirely in your hands. Passive crossings require you to recognize the crossing, search for any train using the tracks and decide if there is sufficient clear space to cross safely. Passive crossings have yellow circular advance warning signs, pavement markings and crossbucks to assist you in recognizing a crossing. Active Crossings. This type of crossing has a traffic control device installed at the crossing to regulate traffic at the crossing. These active devices include flashing red lights, with or without bells and flashing red lights with bells and gates.
10.4.2 – Warning Signs and Devices Advance Warning Signs. The round, black-on-yellow warning sign is placed ahead of a public railroad-highway crossing. The advance warning sign tells you to slow down, look and listen for the train, and be prepared to stop at the tracks if a train is coming. See Figure 10.5.
Figure 10.5
Pavement Markings. Pavement markings mean the same as the advance warning sign. They consist of an “X” with the letters “”RR” and a no passing marking on two-lane roads. There is also a no passing zone sign on two-lane roads. There may be a white stop line painted on the pavement before the railroad tracks. The front of the school bus must remain behind this line while stopped at the crossing.
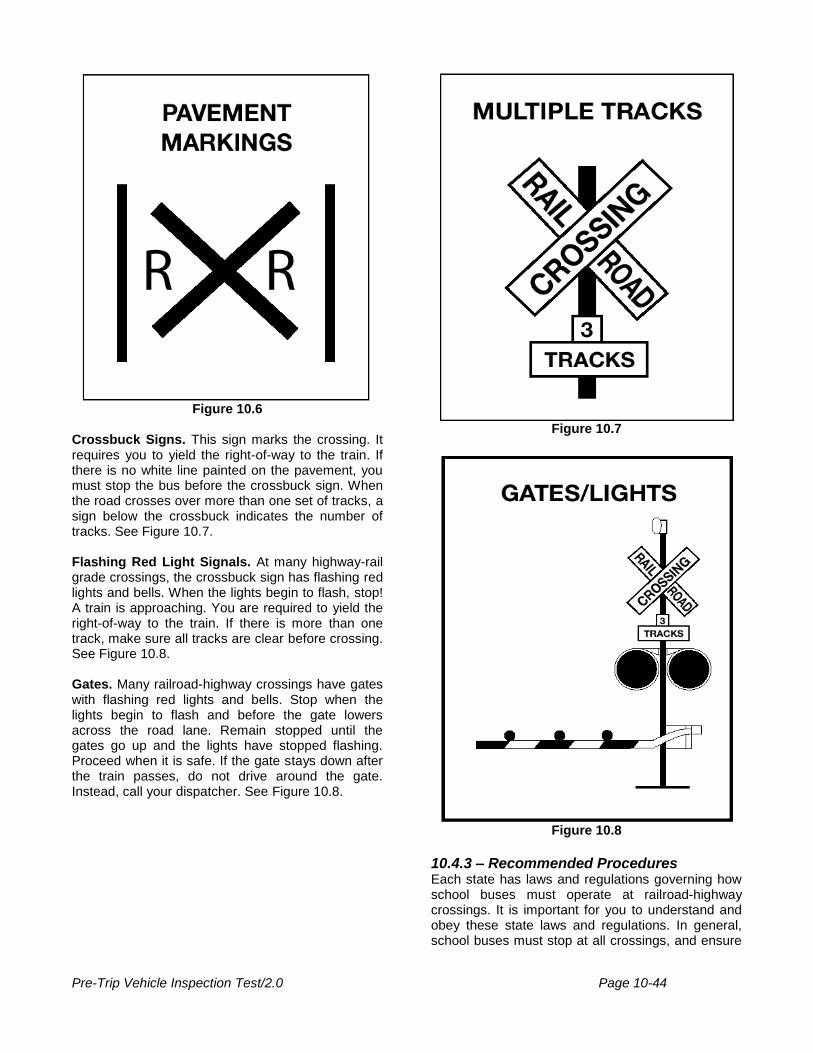
Pre-Trip Vehicle Inspection Test/2.0 Page 10-44
Figure 10.6 Crossbuck Signs. This sign marks the crossing. It requires you to yield the right-of-way to the train. If there is no white line painted on the pavement, you must stop the bus before the crossbuck sign. When the road crosses over more than one set of tracks, a sign below the crossbuck indicates the number of tracks. See Figure 10.7. Flashing Red Light Signals. At many highway-rail grade crossings, the crossbuck sign has flashing red lights and bells. When the lights begin to flash, stop! A train is approaching. You are required to yield the right-of-way to the train. If there is more than one track, make sure all tracks are clear before crossing. See Figure 10.8. Gates. Many railroad-highway crossings have gates with flashing red lights and bells. Stop when the lights begin to flash and before the gate lowers across the road lane. Remain stopped until the gates go up and the lights have stopped flashing. Proceed when it is safe. If the gate stays down after the train passes, do not drive around the gate. Instead, call your dispatcher. See Figure 10.8.
Figure 10.7
Figure 10.8
10.4.3 – Recommended Procedures Each state has laws and regulations governing how school buses must operate at railroad-highway crossings. It is important for you to understand and obey these state laws and regulations. In general, school buses must stop at all crossings, and ensure
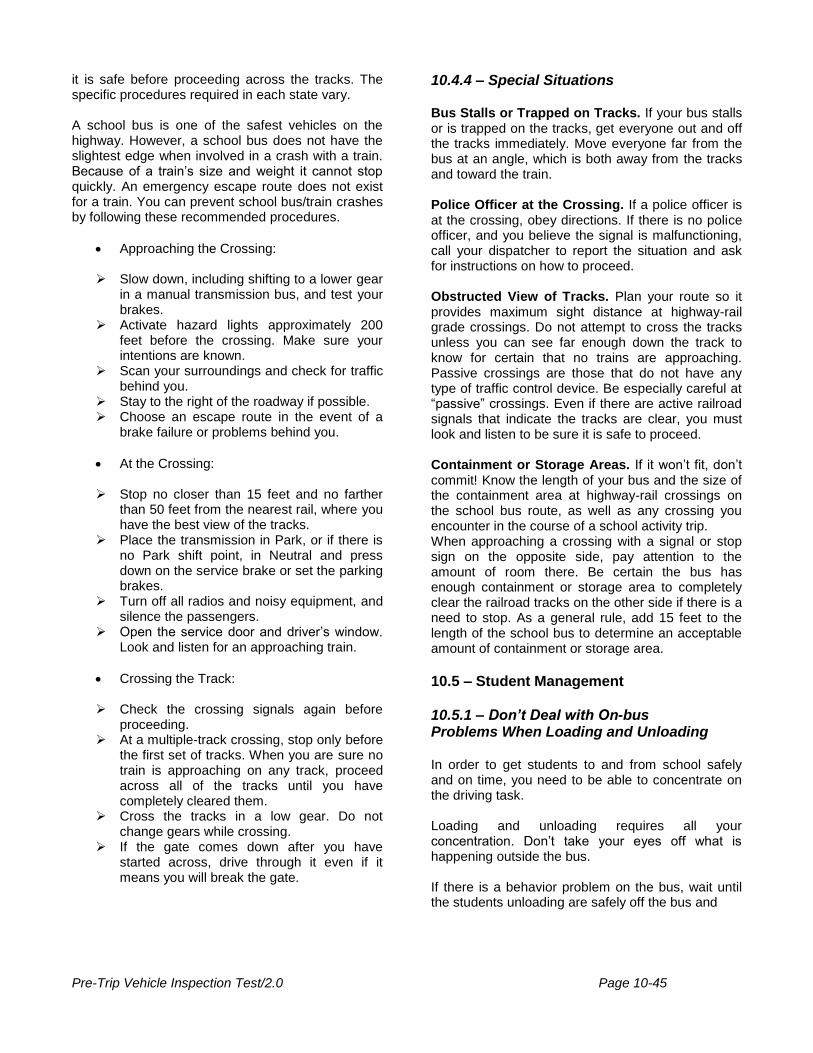
Pre-Trip Vehicle Inspection Test/2.0 Page 10-45
it is safe before proceeding across the tracks. The specific procedures required in each state vary. A school bus is one of the safest vehicles on the highway. However, a school bus does not have the slightest edge when involved in a crash with a train. Because of a train’s size and weight it cannot stop quickly. An emergency escape route does not exist for a train. You can prevent school bus/train crashes by following these recommended procedures.
Approaching the Crossing:
Slow down, including shifting to a lower gear in a manual transmission bus, and test your brakes.
Activate hazard lights approximately 200 feet before the crossing. Make sure your intentions are known.
Scan your surroundings and check for traffic behind you.
Stay to the right of the roadway if possible. Choose an escape route in the event of a
brake failure or problems behind you.
At the Crossing:
Stop no closer than 15 feet and no farther than 50 feet from the nearest rail, where you have the best view of the tracks.
Place the transmission in Park, or if there is no Park shift point, in Neutral and press down on the service brake or set the parking brakes.
Turn off all radios and noisy equipment, and silence the passengers.
Open the service door and driver’s window. Look and listen for an approaching train.
Crossing the Track:
Check the crossing signals again before proceeding.
At a multiple-track crossing, stop only before the first set of tracks. When you are sure no train is approaching on any track, proceed across all of the tracks until you have completely cleared them.
Cross the tracks in a low gear. Do not change gears while crossing.
If the gate comes down after you have started across, drive through it even if it means you will break the gate.
10.4.4 – Special Situations Bus Stalls or Trapped on Tracks. If your bus stalls or is trapped on the tracks, get everyone out and off the tracks immediately. Move everyone far from the bus at an angle, which is both away from the tracks and toward the train. Police Officer at the Crossing. If a police officer is at the crossing, obey directions. If there is no police officer, and you believe the signal is malfunctioning, call your dispatcher to report the situation and ask for instructions on how to proceed. Obstructed View of Tracks. Plan your route so it provides maximum sight distance at highway-rail grade crossings. Do not attempt to cross the tracks unless you can see far enough down the track to know for certain that no trains are approaching. Passive crossings are those that do not have any type of traffic control device. Be especially careful at “passive” crossings. Even if there are active railroad signals that indicate the tracks are clear, you must look and listen to be sure it is safe to proceed. Containment or Storage Areas. If it won’t fit, don’t commit! Know the length of your bus and the size of the containment area at highway-rail crossings on the school bus route, as well as any crossing you encounter in the course of a school activity trip. When approaching a crossing with a signal or stop sign on the opposite side, pay attention to the amount of room there. Be certain the bus has enough containment or storage area to completely clear the railroad tracks on the other side if there is a need to stop. As a general rule, add 15 feet to the length of the school bus to determine an acceptable amount of containment or storage area.
10.5 – Student Management 10.5.1 – Don’t Deal with On-bus Problems When Loading and Unloading In order to get students to and from school safely and on time, you need to be able to concentrate on the driving task. Loading and unloading requires all your concentration. Don’t take your eyes off what is happening outside the bus. If there is a behavior problem on the bus, wait until the students unloading are safely off the bus and
Pre-Trip Vehicle Inspection Test/2.0 Page 10-46
have moved away. If necessary, pull the bus over to handle the problem.
10.5.2 – Handling Serious Problems Tips on handling serious problems:
Follow your school’s procedures for discipline or refusal of rights to ride the bus.
Stop the bus. Park in a safe location off the road, perhaps a parking lot or a driveway.
Secure the bus. Take the ignition key with you if you leave your seat.
Stand up and speak respectfully to the offender or offenders. Speak in a courteous manner with a firm voice. Remind the offender of the expected behavior. Do not show anger, but do show that you mean business.
If a change of seating is needed, request that the student move to a seat near you.
Never put a student off the bus except at school or at his or her designated school bus stop. If you feel that the offense is serious enough that you cannot safely drive the bus, call for a school administrator or the police to come and remove the student. Always follow you state or local procedures for requesting assistance.
10.6 – Antilock Braking Systems 10.6.1 – Vehicles Required to Have Antilock Braking Systems The Department of Transportation requires that antilock braking systems be on:
Air brakes vehicles, (trucks, buses, trailers and converter dollies) built on or after March 1, 1998.
Hydraulically braked trucks and buses with a gross vehicle weight rating of 10,000 lbs or more built on or after March 1, 1999.
Many buses built before these dates have been voluntarily equipped with ABS. Your school bus will have a yellow ABS malfunction lamp on the instrument panel if it is equipped with ABS.
10.6.2 – How ABS Helps You When you brake hard on slippery surfaces in a vehicle without ABS, your wheels may lock up. When your steering wheels lock up, you lose steering control. When your other wheels lock up, you may skid or even spin the vehicle.
ABS helps you avoid wheel lock up and maintain control. You may or may not be able to stop faster with ABS, but you should be able to steer around an obstacle while braking, and avoid skids caused by over braking.
10.6.3 – Braking with ABS When you drive a vehicle with ABS, you should brake as you always have. In other words:
Use only the braking force necessary to stop safely and stay in control.
Brake the same way, regardless of whether you have ABS on the bus. However, in emergency braking, do not pump the brakes on a bus with ABS.
As you slow down, monitor your bus and back off the brakes (if it is safe to do so) to stay in control.
10.6.4 – Braking if ABS is Not Working Without ABS, you still have normal brake functions. Drive and brake as you always have. Vehicles with ABS have yellow malfunction lamps to tell you if something is not working. The yellow ABS malfunction lamp is on the bus’s instrument panel. As a system check on newer vehicles, the malfunction lamp comes on at start-up for a bulb check and then goes out quickly. On older systems, the lamp could stay on until you are driving over five mph. If the lamp stays on after the bulb check, or goes on once you are under way, you may have lost ABS control at one or more wheels. Remember, if your ABS malfunctions, you still have regular brakes. Drive normally, but get the system serviced soon.
Pre-Trip Vehicle Inspection Test/2.0 Page 10-47
10.6.5 – Safety Reminders
ABS won’t allow you to drive faster, follow more closely, or drive less carefully.
ABS won’t prevent power or turning skids– ABS should prevent brake-induced skids but not those caused by spinning the drive wheels or going too fast in a turn.
ABS won’t necessarily shorten stopping distance. ABS will help maintain vehicle control, but not always shorten stopping distance.
ABS won’t increase or decrease ultimate stopping power–ABS is an “add-on” to your normal brakes, not a replacement for them.
ABS won’t change the way you normally brake. Under normal brake conditions, your vehicle will stop as it always stopped. ABS only comes into play when a wheel would normally have locked up because of over braking.
ABS won’t compensate for bad brakes or poor brake maintenance.
Remember: The best vehicle safety feature is still a safe driver.
Remember: Drive so you never need to use your ABS.
Remember: If you need it, ABS could help to prevent a serious crash.
10.7 – Special Safety Considerations 10.7.1 – Strobe Lights Some school buses are equipped with roofmounted, white strobe lights. If your bus is so equipped, the overhead strobe light should be used when you have limited visibility. This means that you cannot easily see around you – in front, behind, or beside the school bus. Your visibility could be only slightly limited or it could be so bad that you can see nothing at all. In all instances, understand and obey your state or local regulations concerning the use of these lights.
10.7.2 – Driving in High Winds Strong winds affect the handling of the school bus! The side of a school bus acts like a sail on a sailboat. Strong winds can push the school bus sideways. They can even move the school bus off the road or, in extreme conditions, tip it over. If you are caught in strong winds:
Keep a strong grip on the steering wheel. Try to anticipate gusts.
You should slow down to lessen the effect of the wind, or pull off the roadway and wait.
Contact your dispatcher to get more information on how to proceed.
10.7.3 – Backing Backing a school bus is strongly discouraged. You should back your bus only when you have no other safe way to move the vehicle. You should never back a school bus when students are outside of the bus. Backing is dangerous and increases your risk of a collision. If you have no choice and you must back your bus, follow these procedures:
Post a lookout. The purpose of the lookout is to warn you about obstacles, approaching persons, and other vehicles. The lookout should not give directions on how to back the bus.
Signal for quiet on the bus.
Constantly check all mirrors and rear windows.
Back slowly and smoothly.
If no lookout is available: Set the parking brake. Turn off the motor and take the keys with
you. Walk to the rear of the bus to determine
whether the way is clear.
If you must back-up at a student pick-up point, be sure to pick up students before backing and watch for late comers at all times.
Be sure that all students are in the bus before backing.
If you must back-up at a student drop-off point, be sure to unload students after backing.
10.7.4 – Tail Swing A school bus can have up to a three-foot tail swing. You need to check your mirrors before and during any turning movements to monitor the tail swing.
Pre-Trip Vehicle Inspection Test/2.0 Page 10-48
Section 10 Test Your Knowledge
1. Define the danger zone. How far does the danger zone extend around the bus?
2. What should you be able to see if the outside flat mirrors are adjusted properly? The outside convex mirrors? The crossover mirrors?
3. You are loading students along the route. When should you activate your alternating flashing amber warning lights?
4. You are unloading students along your route. Where should students walk to after exiting the bus?
5. After unloading at school, why should you walk through the bus?
6. What position should students be in front of the bus before they cross the roadway?
7. Under what conditions must you evacuate the bus?
8. How far from the nearest rail should you stop at a highway-rail crossing?
9. What is a passive highway-rail crossing? Why should you be extra cautious at this type of crossing?
10. How should you use your brakes if your vehicle is equipped with antilock brakes (ABS)?
These questions may be on your test. If you can’t answer them all, re-read Section10.