purpose - office equipment, office printing, and office
TRANSCRIPT

dc06cc0376 Customer Support
Configuration and UseMeterAssistant Option Purpose The MeterAssistant tool automatically submits meter reads to Xdevices, so that you do not need to manually collect and report document describes how to set up the MeterAssistant and autoyou when a meter read occurs.
Note: The configuration described in this document is unique to255/265/275 devices. To use the MeterAssistant with other XeroSMart eSolutions page on www.xerox.com/smartesolutions and
Xerox Device Configuration MeterAssistant configuration includes 3 activities:
• Proxy Server Setup. A proxy server is used to enable commfirewall. If you do not use a proxy server, you must configur
• Register with the Xerox Communication Server. This activitycommunication between the device and Xerox. You must mbefore you can enable MeterAssistant on xerox.com. See “RAccount and Setting Up Automatic Meter Reads,” later in th
• Setup Email Notification (optional). This option sends an aleyou provide. Alerts are available to report when the commuthe meter data and/or if registration with the communicationmust have SMTP set up and functioning to use the email nodocumentation you received with your device to configure S
The following sections contain configuration procedures to setup
Xerox Multifunction Devices
Customer Tips … fo dc06cc0376
June 21, 2006
This document applies to these Xerox products:
WC
x WC Pro 232/238/245/ 255/265/275
x WC 232/238/245/255/ 265/275
WC Pro C2128/C2636/ C3545
WC Pro 165/175
WC M165/M175
WC Pro 32/40 Color
WC Pro 65/75/90
WC Pro 35/45/55
WC M35/M45/M55
DC 555/545/535
DC 490/480/470/460
DC 440/432/425/420
This document applies to the Xerox products indicated in the table below. For some products, it is assumed that your device is equipped with the appropriate option to support this document.
x WC 7655/7665
x WC Pro 232/238/245/ 255/265/275
x WC 232/238/245/255/ 265/275
WC Pro C2128/C2636/ C3545
WC Pro 165/175
WC M165/M175
WC Pro 32/40 Color
WC Pro 65/75/90
WC Pro 35/45/55
WC M35/M45/M55
DC 555/545/535
DC 490/480/470/460
DC 440/432/425/420
r the user
Page 1
of the
erox from networked these figures. This matic email alerts to notify
WC/WCP 232/238/245/ x devices, access the
follow the instructions.
unication through a e a DNS or WINS server.
establishes ake the connection egistering for a Xerox
is document.
rt to the email addresses nication server receives server is cancelled. You tification (refer to the MTP).
the MeterAssistant.

dc06cc0376 Page 2 Customer Support
Proxy Server Setup If you do not use an Internet proxy server in your network, skip this section and follow the instructions in the one of the following sections, “DNS Server Information” or WINS Server Information.
1. To access the MeterAssistant setup pages, enter your Xerox device’s IP address in a browser’s (for example, Internet Explorer or Netscape) Address field. On the device’s home page, select the Properties tab, expand General Setup and Billing & Counters, then select Meter Assistant.
2. On the Meter Assistant page, select Enable Proxy Server.
Note: This procedure requires that you enter the IP address or hostname and a port number. If you use Netscape, ask your system administrator where to find the information. If you use Internet Explorer, do the following to determine this data:
a. On the Internet Explorer menu select Tools.
b. Select Internet Options.

dc06cc0376 Customer Support Page 3
c. Select the Connections tab, then click Lan Settings. The proxy server IP address or host name and the port are located in the Proxy server section. Click in the Address field and scroll right/left to view the complete entry.
d. Click Cancel when finished.
3. Select Enabled and choose IP Address or Host Name.
4. Enter the IP address or host name of the proxy server in your network. The default port is 8080. You can change the port number if necessary.
5. Click Apply when finished. The MeterAssistant page is displayed again.
6. If requested, enter the administrator User name and Password.

dc06cc0376 Page 4 Customer Support
DNS Server Configuration Use the information in this section if you do not have a proxy server in your network configuration and you use DNS. Skip this section if you already configured your proxy server. If you use a WINS server skip to the next section “WINS Server Configuration.”
DNS information is located in the TCP/IP page of a device’s Web UI. To access the TCP/IP page access the device’s Web UI and select Properties>Connectivity>Protocols>TCP/IP.
There are several ways to acquire the DNS information.
• If your DHCP server is configured to transfer DNS information:
− DNS information may already be entered. If the IP Address Resolution field contains DHCP the DNS Configuration section is populated with as much information as the DHCP server has available.
− If the IP Address Resolution field contains STATIC, select DHCP and click Apply. The Xerox device requests TCP/IP configuration information from the DHCP server. The DNS Configuration section is populated with as much information as the DHCP server has available.
Note: If you change from STATIC to DHCP the IP address assigned to the device can change. To access the device’s Web UI use the new IP address.
• To enter DNS information manually, in the IP Address Resolution select STATIC. After the information is entered, leave STATIC in the IP Address Resolution field, or change it to DHCP (which ever is appropriate for your network), and click Apply.

dc06cc0376 Customer Support Page 5
WINS Server Configuration Use the procedure in this section if you do not have a proxy server in your network configuration and you use a WINS server. Skip this section if you already configured your DNS or proxy server.
WINS information is located in the Microsoft Networking page of a device’s Web UI. To access the Microsoft Networking page, access the device’s Web UI and select Properties>Connectivity>Protocols>Microsoft Networking.
1. If you are using a WINS server check the box to enable the Protocol.
2. To enter WINS Server Information:
• If IP Address Resolution is set to DHCP on the TCP/IP page and the DHCP server is configured to transfer WINS information, the primary and secondary IP address and port fields are populated.
• If IP Address Resolution is set to STATIC on the TCP/IP page, enter the primary and secondary IP address and port information manually. If the IP Address Resolution is changed to DHCP these settings are overridden.
3. Click Apply.

dc06cc0376 Page 6 Customer Support
Registering with the Xerox Communication Server 1. On the MeterAssistant page, select Register with Xerox Communication Server.
2. If the Communication Server Registration Status is Not Registered, select the
Request Registration box and click Apply.
Wait a few minutes while the device registers with the communication server at xerox.com. The following message appears when the registration is complete.
3. Click OK to return to the Xerox Communication Server page.
4. In the Communication Setup section, verify the Enabled box is checked. A random time appears in the Transmission Time fields. You can change this time if required. Click Apply when complete.
5. If requested, enter the administrator User name and Password.

dc06cc0376 Customer Support Page 7
Setup Email Notification (optional) On the MeterAssistant page, select Setup Email Notification to display the Billing Meter Read Alerts page.
1. Click Add to display the Meter Read Alert Addresses page.
2. In the Add E-mail field, enter the valid email address of a recipient of the meter read
alerts. Click Add. The address appears in the E-mail Addresses box. If others are to receive the meter read alerts, repeat this step.
3. Click Delete to remove a highlighted address from the E-mail Addresses box. To change an address, highlight an entry in the E-mail Addresses box, make changes to the address that appears in Edit E-mail, and click Replace.
4. In the “Reply to” E-mail Address field, enter an address that appears in the To line when alert recipients reply to an email alert.
5. When finished, click Apply.
6. If requested, enter the administrator User name and Password.

dc06cc0376 Page 8 Customer Support
When all MeterAssistant setup is complete, the Meter Assistant page displays the status of each item.
Reboot Device to Apply All Settings To verify that all settings are applied, reboot the device.
1. Select the Status tab at the top left side of the devices Internet Services page.
2. Click Reboot Machine.

dc06cc0376 Customer Support Page 9
Registering for a Xerox Account and Setting Up Automatic Meter Reads Processing communication server registration may take up to one hour before it appears in your account’s list of devices. To use the MeterAssistant tool you must have an online Xerox account.
1. Access www.Xerox.com.
2. In the column on the left of the page under Customer Resources, select Meter Reads.
3. If you already have an account, select Log in. If not, select Sign up for Meter
Readings.

dc06cc0376 Page 10 Customer Support
4. When the Log in window appears, if you have an account, enter your email address in What is your email address?, then skip to step 6. If not, select register and continue with the next step.
5. Enter the registration information and click Submit.
6. On the Account Management tab, in the Meter Readings section, select Submit meter readings.
dc06cc0376 Customer Support Page 11
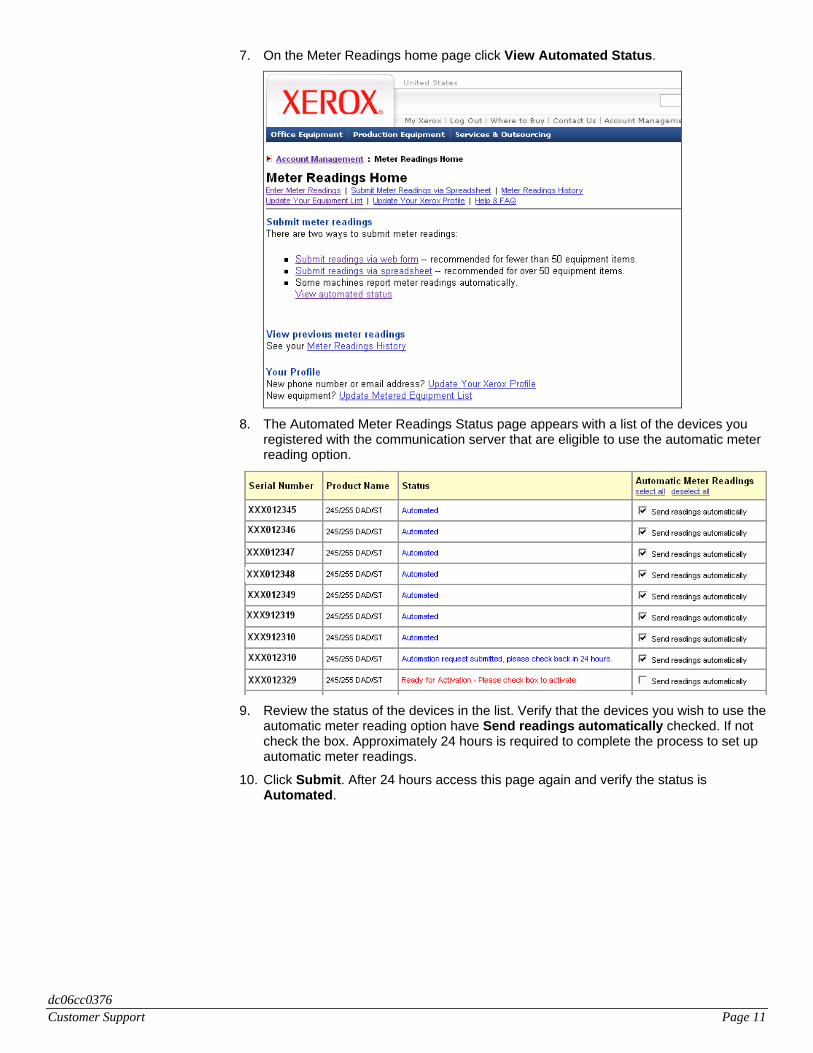
7. On the Meter Readings home page click View Automated Status.
8. The Automated Meter Readings Status page appears with a list of the devices you
registered with the communication server that are eligible to use the automatic meter reading option.
9. Review the status of the devices in the list. Verify that the devices you wish to use the
automatic meter reading option have Send readings automatically checked. If not check the box. Approximately 24 hours is required to complete the process to set up automatic meter readings.
10. Click Submit. After 24 hours access this page again and verify the status is Automated.

dc06cc0376 Page 12 Customer Support
Additional Information Xerox Customer Support welcomes feedback on all documentation - send feedback via e-mail to: [email protected].
You can reach Xerox Customer Support at 1-800-821-2797 (USA), TTY 1-800-855-2880 or at http://www.xerox.com.
Other Tips about Xerox multifunction devices are available at the following URL: http://www.office.xerox.com/support/dctips/dctips.html.
XEROX ®, The Document Company ®, the digital X ®, and all Xerox product names are trademarks of XEROX CORPORATION. Other trademarks belong to their respective owners.
Copyright © XEROX CORPORATION 2006. All Rights Reserved.