qsg106: getting started with emberznet pro - silicon labs · silabs.com | building a more connected...
TRANSCRIPT

silabs.com | Building a more connected world. Rev. 1.1
QSG106: Getting Started with EmberZNet PRO
This quick start guide provides basic information on configuring, building, and installing applications for the Mighty Gecko (EFR32MG) family of SoCs using the EmberZNet PRO stack v. 6.4.0 and higher and Simplicity Studio version 4.
This guide is designed for developers who are new to EmberZNet PRO and the Silicon Labs development hardware. It provides instructions to get started using the example applications provided with the EmberZNet PRO stack.
KEY FEATURES
• Product overview • Setting up your development environment • Installing Simplicity Studio and Em-
berZNet PRO • Creating an example application network • Using the Network Analyzer
QSG106: Getting Started with EmberZNet PRO Product Overview
silabs.com | Building a more connected world. Rev. 1.1 | 1
1 Product Overview
Before following the procedures in this guide you must have • Purchased your Mighty Gecko (EFR32MG) Mesh Networking Kit (see http://www.silabs.com/products/wireless/mesh-network-
ing/zigbee/Pages/zigbee.aspx ): • Downloaded the required software components, as described below. A card included in your development hardware kit contains a
link to a Getting Started page, which will direct you to links for the Silicon Labs software products.
1.1 Software Components
See the stack release notes for version restrictions and compatibility constraints for the stack and these components. To develop Em-berZNet PRO applications, you will need the following. Installation instructions are provided in section 2.3 Install Simplicity Studio and the EmberZNet PRO Stack. • The Simplicity Studio version 4 development environment, which incorporates AppBuilder. If you do not have version 4, please con-
nect to http://www.silabs.com/products/mcu/Pages/simplicity-studio-v4.aspx to download it. AppBuilder is an interactive GUI tool that allows you to configure a body of Silicon Labs-supplied code to implement applications. Online help for AppBuilder and other Simplicity Studio modules is provided.
• The EmberZNet PRO stack, an advanced implementation of a Zigbee stack, installed through Simplicity Studio. The stack API is documented in an online API reference. The stack is delivered as a collection of libraries that you can link to your applications. A description of each library is provided in the development environment. The release notes contain details on the folders installed along with their contents.
• Simplicity Commander, installed along with Simplicity Studio. A GUI with limited functionality can be accessed through Simplicity Studio’s Tools menu. Most functions are accessible through a CLI invoked by opening a command prompt in the Simplicity Com-mander directory (\SiliconLabs\SimplicityStudio\v4\developer\adapter_packs\commander). See UG162: Simplicity Commander Ref-erence Guide for more information.
• Compiler toolchain: • GCC (The GNU Compiler Collection) is provided with Simplicity Studio. GCC is used in this document. Note, however, that the
dynamic multiprotocol and Z3 Switch with Micrium examples must be compiled with IAR.
Note: Application images created with GCC are larger than those created with IAR. If you use GCC to compile the example applications in this SDK, you must use a part with at least 512 kB of flash.
• IAR Embedded Workbench for ARM (IAR-EWARM) (must be used with the Dynamic Multiprotocol and Z3Switch with Micrium examples).
Note: See the SDK Release Notes for the IAR version supported by this version of the EmberZNet SDK. Download the supported version from the Silicon Labs Support Portal, as described at the end of section 2.3 Install Simplicity Studio and the EmberZNet PRO Stack. Refer to the “QuickStart Installation Information” section of the IAR installer for additional information about the instal-lation process and how to configure your license. Once IAR-EWARM is installed, the next time Simplicity Studio starts it will automatically detect and configure the IDE to use IAR-EWARM.
While Simplicity Studio and Simplicity Commander can be run on a Mac OS or Linux machine, these instructions assume you are working with a Microsoft Windows-based PC. If you are using a non-Windows system, IAR-EWARM must be run via WINE or some other form of emulator or virtual machine.
1.2 Support
You can access the Silicon Labs support portal at https://www.silabs.com/support through Simplicity Studio’s Resources tab, as described in section 3.4 Accessing Documentation and Other Resources. Use the support portal to contact Customer Support for any questions you might have during the development process.
1.3 Documentation
Stack documentation is accessed through Simplicity Studio, as described in section 3.4 Accessing Documentation and Other Resources. Simplicity Studio also provides links to hardware documentation and other application notes. See the release notes for further details about your EmberZNet PRO software.

QSG106: Getting Started with EmberZNet PRO Setting Up Your Development Environment
silabs.com | Building a more connected world. Rev. 1.1 | 2
2 Setting Up Your Development Environment
2.1 Connect the WSTK
Connect your WSTK, with radio board mounted, to your PC using a USB cable. By having it connected when Simplicity Studio installs, Simplicity Studio will automatically obtain the relevant additional resources it needs.
Note: For best performance in Simplicity Studio, be sure that the power switch on your WSTK is in the Advanced Energy Monitoring or “AEM” position as shown in the following figure.
Figure 1. EFR32MG12 on a WSTK
2.2 Register your Development Kit
Before you install Simplicity Studio, you need to create an account on the support portal. Be sure to record your account username and password as you will use it to log in to Simplicity Studio. In order to install the EmberZNet PRO stack from Simplicity Studio, you must also register your kit on https://siliconlabs.force.com/KitRegistration, using your Mighty Gecko Kit serial number. You can register your kit through Simplicity Studio during installation if you prefer.

QSG106: Getting Started with EmberZNet PRO Setting Up Your Development Environment
silabs.com | Building a more connected world. Rev. 1.1 | 3
2.3 Install Simplicity Studio and the EmberZNet PRO Stack
1. Run the Simplicity Studio installation application. 2. When the Simplicity Studio installer first launches, it presents a License Agreement dialog. Accept the terms of the agreement and
click Next >.
3. Choose a destination location, click Next > and then click Install. 4. When the application launches, you are invited to log in. Log in using your support account username and password. Although you
can skip log in here, you must be logged in and have registered your development kit to download a protected stack such as Em-berZNet PRO.
QSG106: Getting Started with EmberZNet PRO Setting Up Your Development Environment
silabs.com | Building a more connected world. Rev. 1.1 | 4
5. After login, Simplicity Studio adds software information. Once initial software installation is complete, Simplicity Studio checks for connected hardware. If you have the WSTK connected by USB cable, Simplicity Studio will detect the USB cable and prompt you to download a Device Inspector. Click Yes.
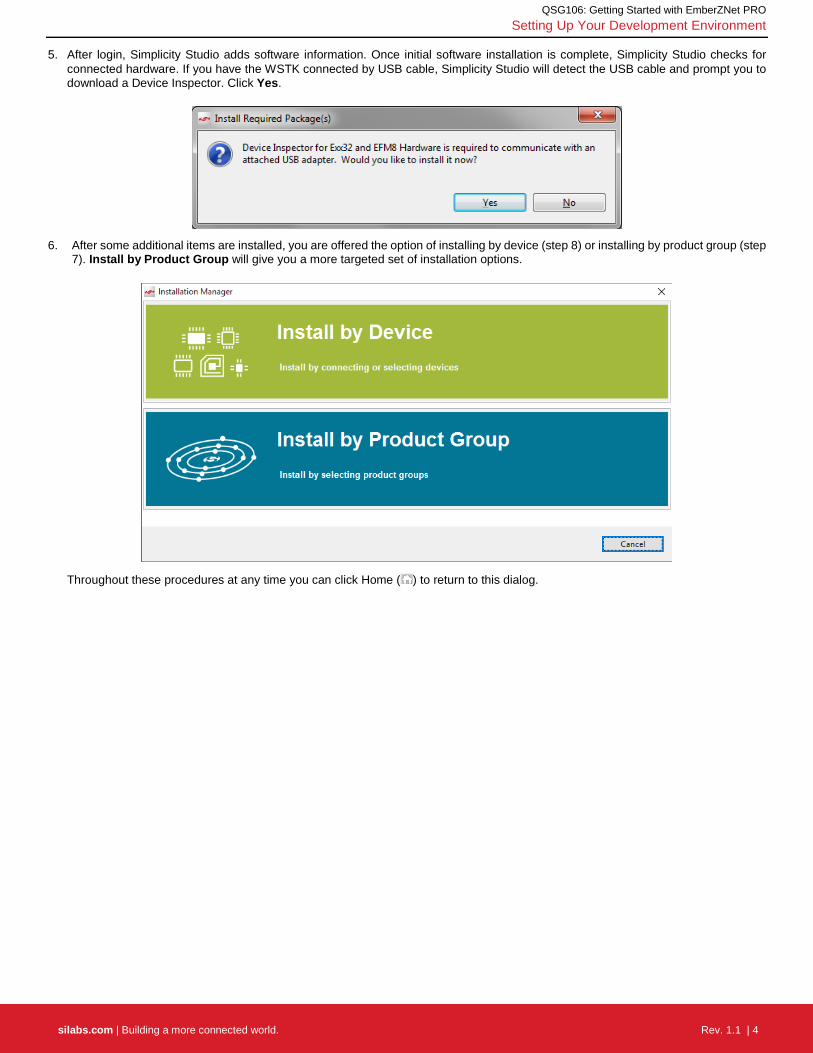
6. After some additional items are installed, you are offered the option of installing by device (step 8) or installing by product group (step
7). Install by Product Group will give you a more targeted set of installation options.
Throughout these procedures at any time you can click Home ( ) to return to this dialog.
QSG106: Getting Started with EmberZNet PRO Setting Up Your Development Environment
silabs.com | Building a more connected world. Rev. 1.1 | 5
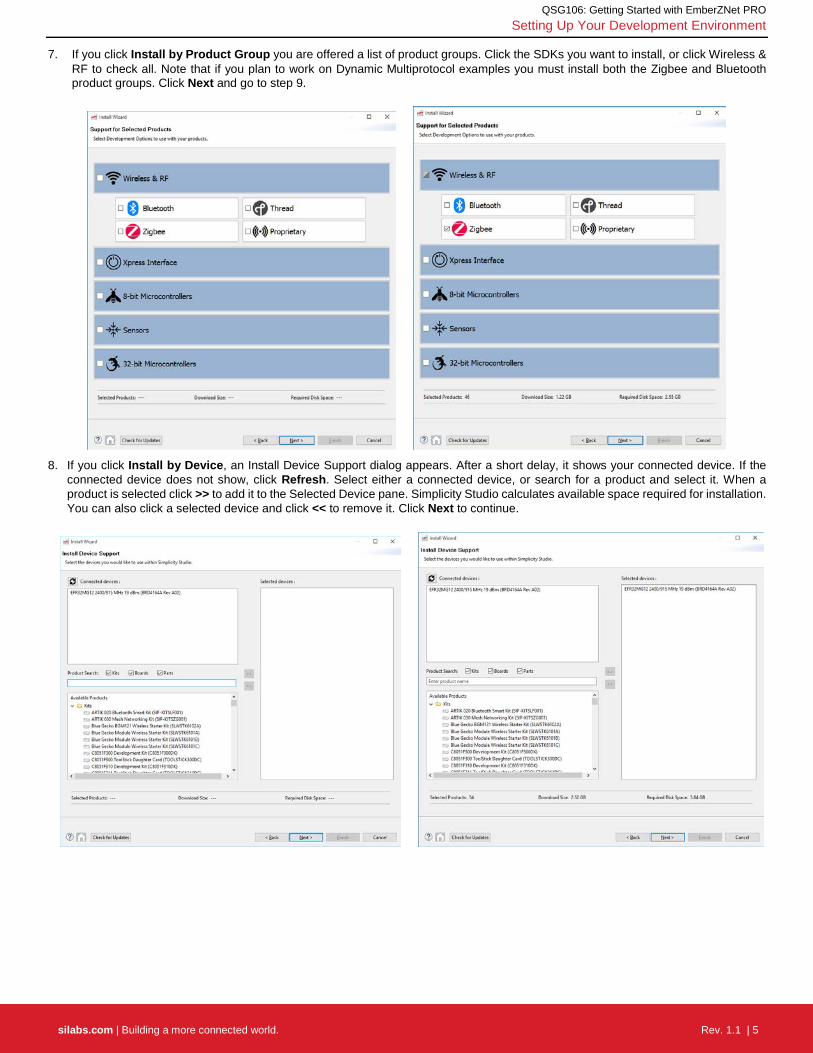
7. If you click Install by Product Group you are offered a list of product groups. Click the SDKs you want to install, or click Wireless & RF to check all. Note that if you plan to work on Dynamic Multiprotocol examples you must install both the Zigbee and Bluetooth product groups. Click Next and go to step 9.
8. If you click Install by Device, an Install Device Support dialog appears. After a short delay, it shows your connected device. If the
connected device does not show, click Refresh. Select either a connected device, or search for a product and select it. When a product is selected click >> to add it to the Selected Device pane. Simplicity Studio calculates available space required for installation. You can also click a selected device and click << to remove it. Click Next to continue.
QSG106: Getting Started with EmberZNet PRO Setting Up Your Development Environment
silabs.com | Building a more connected world. Rev. 1.1 | 6
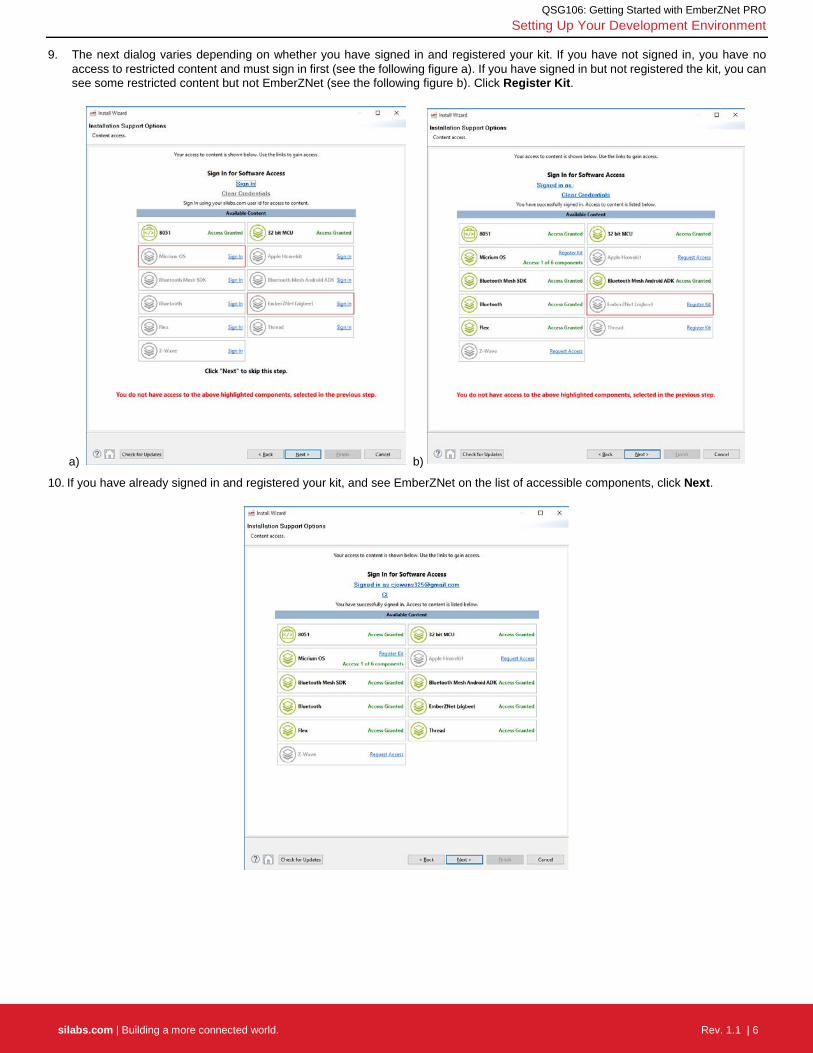
9. The next dialog varies depending on whether you have signed in and registered your kit. If you have not signed in, you have no access to restricted content and must sign in first (see the following figure a). If you have signed in but not registered the kit, you can see some restricted content but not EmberZNet (see the following figure b). Click Register Kit.
a) b)
10. If you have already signed in and registered your kit, and see EmberZNet on the list of accessible components, click Next.

QSG106: Getting Started with EmberZNet PRO Setting Up Your Development Environment
silabs.com | Building a more connected world. Rev. 1.1 | 7
11. The Installation Options dialog shows the tools and software packages that can be installed (your versions may be different). The following shows Installation options after selecting the Zigbee product group (a), and after selecting an EFR32MG device (b). In both views you can uncheck anything you don’t want to install. If you have installed by Product Group, the selection is filtered more spe-cifically to your needs than if you have installed by device, and installing all checked options is recommended. If you have installed by device, and are unchecking: items: • If you plan to use GCC, leave GNU ARM Toolchain checked. • If you plan to work on Dynamic Multiprotocol examples, leave Bluetooth SDK checked.
Click Next >.
a) b)
Note: Previous stack versions are shown under Other Options. 12. Studio displays a Review Licenses dialog. Accept the licenses shown and click Finish. Note that this dialog will present again if in
the future you install a component with a separate license.
QSG106: Getting Started with EmberZNet PRO Setting Up Your Development Environment
silabs.com | Building a more connected world. Rev. 1.1 | 8
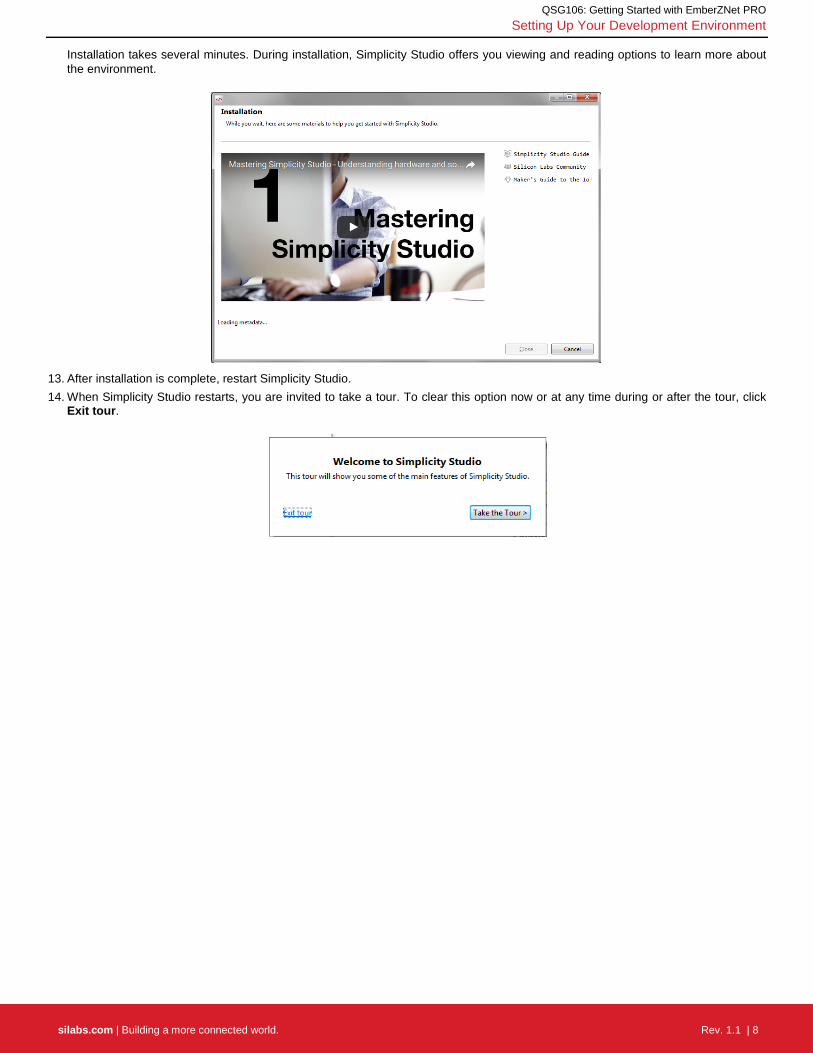
Installation takes several minutes. During installation, Simplicity Studio offers you viewing and reading options to learn more about the environment.
13. After installation is complete, restart Simplicity Studio. 14. When Simplicity Studio restarts, you are invited to take a tour. To clear this option now or at any time during or after the tour, click
Exit tour.
QSG106: Getting Started with EmberZNet PRO Setting Up Your Development Environment
silabs.com | Building a more connected world. Rev. 1.1 | 9
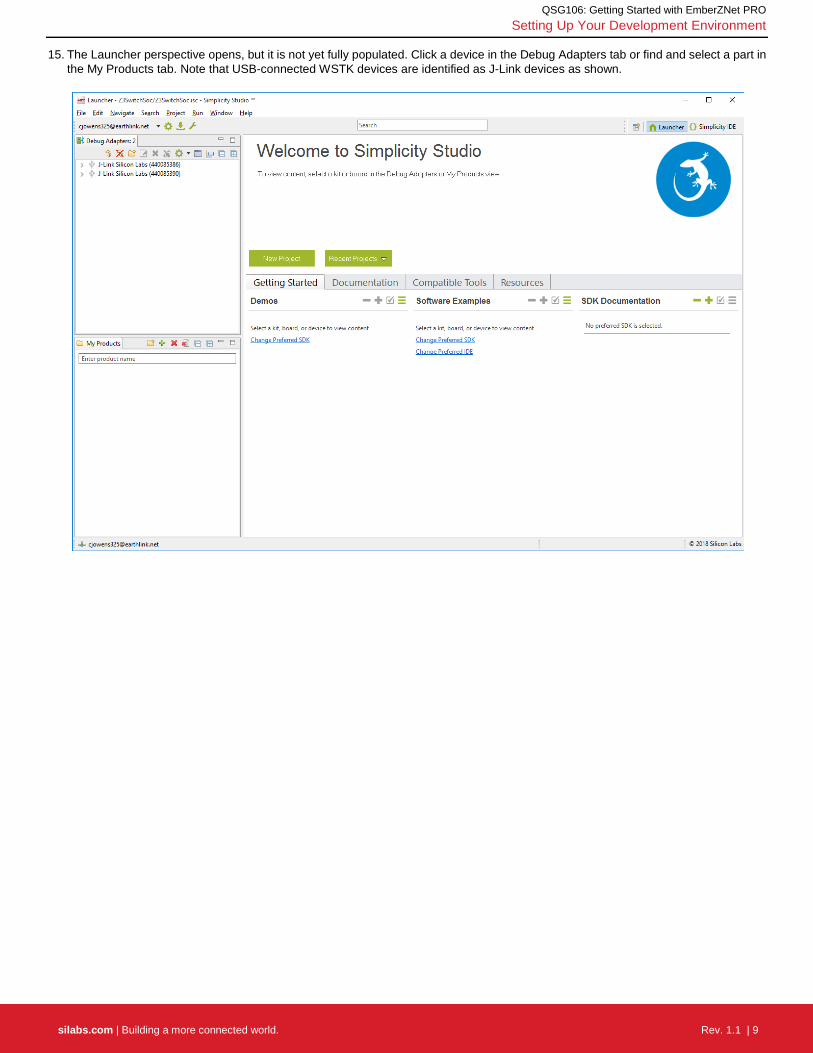
15. The Launcher perspective opens, but it is not yet fully populated. Click a device in the Debug Adapters tab or find and select a part in the My Products tab. Note that USB-connected WSTK devices are identified as J-Link devices as shown.

QSG106: Getting Started with EmberZNet PRO Setting Up Your Development Environment
silabs.com | Building a more connected world. Rev. 1.1 | 10
16. The Launcher perspective then is populated with the software components and functionality associated with your hardware and stack. Note if you see Stackless applications, click the link to change the preferred SDK, as described in section 3.2 Changing the Preferred SDK. Update your device firmware as described in section 3.3 Updating Adapter Firmware.
Finally, if you plan to use IAR as your compiler (required for dynamic multiprotocol and Micrium OS examples), find the Release Notes on the SDK Documentation list and check for software version requirements, in particular for IAR-EWARM. To install IAR-EWARM: 1. On the Launcher page’s Resources tab, click Technical Support. 2. Scroll down to the bottom of the page, and click Contact Support 3. If you are not already signed in, sign in. 4. Click the Software Releases tab. In the View list select Latest EmberZNet Software. Click Go. In the results is a link to the appro-
priate IAR-EWARM version. 5. Download the IAR package (takes approximately 1 hour). 6. Install IAR. 7. In the IAR License Wizard, click Register with IAR Systems to get an evaluation license. 8. Complete the registration and IAR will provide a 30-day evaluation license.
QSG106: Getting Started with EmberZNet PRO Functionality in the Launcher Perspective
silabs.com | Building a more connected world. Rev. 1.1 | 11
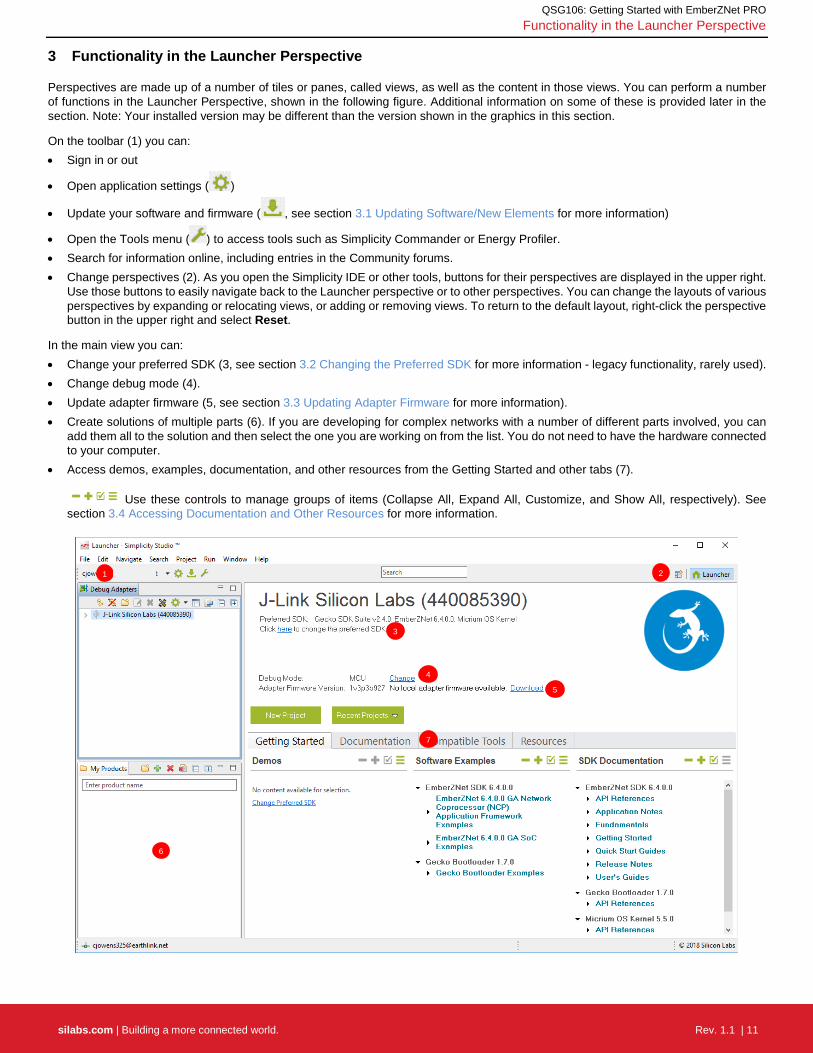
3 Functionality in the Launcher Perspective
Perspectives are made up of a number of tiles or panes, called views, as well as the content in those views. You can perform a number of functions in the Launcher Perspective, shown in the following figure. Additional information on some of these is provided later in the section. Note: Your installed version may be different than the version shown in the graphics in this section.
On the toolbar (1) you can: • Sign in or out
• Open application settings ( )
• Update your software and firmware ( , see section 3.1 Updating Software/New Elements for more information)
• Open the Tools menu ( ) to access tools such as Simplicity Commander or Energy Profiler. • Search for information online, including entries in the Community forums. • Change perspectives (2). As you open the Simplicity IDE or other tools, buttons for their perspectives are displayed in the upper right.
Use those buttons to easily navigate back to the Launcher perspective or to other perspectives. You can change the layouts of various perspectives by expanding or relocating views, or adding or removing views. To return to the default layout, right-click the perspective button in the upper right and select Reset.
In the main view you can: • Change your preferred SDK (3, see section 3.2 Changing the Preferred SDK for more information - legacy functionality, rarely used). • Change debug mode (4). • Update adapter firmware (5, see section 3.3 Updating Adapter Firmware for more information). • Create solutions of multiple parts (6). If you are developing for complex networks with a number of different parts involved, you can
add them all to the solution and then select the one you are working on from the list. You do not need to have the hardware connected to your computer.
• Access demos, examples, documentation, and other resources from the Getting Started and other tabs (7).
Use these controls to manage groups of items (Collapse All, Expand All, Customize, and Show All, respectively). See section 3.4 Accessing Documentation and Other Resources for more information.
2
3
4
5
6
7
1

QSG106: Getting Started with EmberZNet PRO Functionality in the Launcher Perspective
silabs.com | Building a more connected world. Rev. 1.1 | 12
3.1 Updating Software/New Elements
The Update Software icon will be red if updates to installed components are available. If Simplicity Studio detects an available update, and you are in another perspective, you will be notified that an update is available.
To download a new or updated component, click the Update Software icon. Click Package Manager. Note: If you are installing based on a new device, or want to install a new product group, you can do so through this dialog as well. In subsequent dialogs, click Home ( ) to return to this dialog. Note that Simplicity Studio does not show you options, such as the GNU ARM Toolchain, that have already been installed.
Simplicity Studio shows you available updates or SDKs in the Package Manager dialog. You can update all or select individual updates for installation. Click the tabs in the Package Manager dialog to see other components available for installation. Use the filters to reduce long lists.
QSG106: Getting Started with EmberZNet PRO Functionality in the Launcher Perspective
silabs.com | Building a more connected world. Rev. 1.1 | 13
3.2 Changing the Preferred SDK
Use this function if on startup Simplicity Studio defaults to Stackless applications. Otherwise, most Silicon Labs protocol stack users will have one SDK available to them, the Gecko SDK Suite.
Within that suite you can have multiple protocols installed. The protocol used in any given instance is controlled either by the example you select, or the stack you select if you go through the ‘New Project’ interface. In general, you should add or remove protocol stacks through the Simplicity Studio update manager. If you need to install a stack or the Gecko SDK Suite outside of the normal installation process, you will receive separate instructions.
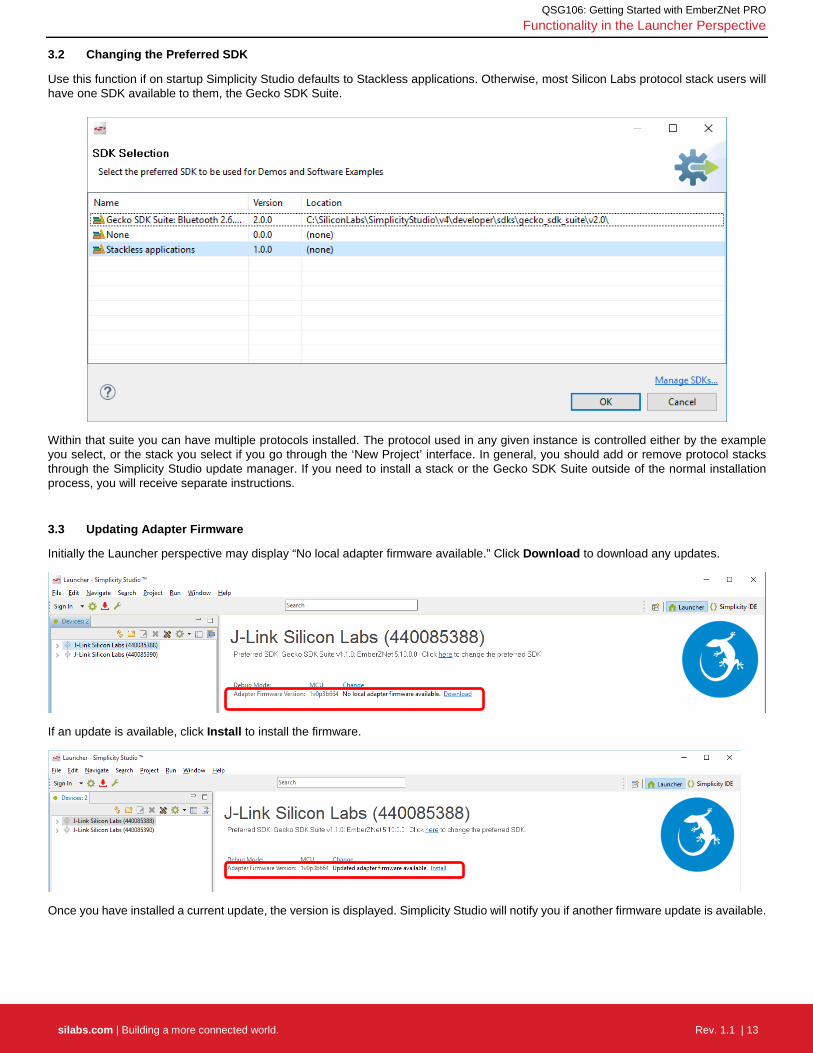
3.3 Updating Adapter Firmware
Initially the Launcher perspective may display “No local adapter firmware available.” Click Download to download any updates.
If an update is available, click Install to install the firmware.
Once you have installed a current update, the version is displayed. Simplicity Studio will notify you if another firmware update is available.

QSG106: Getting Started with EmberZNet PRO Functionality in the Launcher Perspective
silabs.com | Building a more connected world. Rev. 1.1 | 14
3.4 Accessing Documentation and Other Resources
The Getting Started tab provides access to demos, example applications, and stack-related documentation. To show/hide specific cate-
gories, click . Select or deselect categories, then click OK.
The Documentation tab lists all documentation about the stack and the hardware on the right, and documents you select as favorites on the left. Click the star icon on any document to move it to the My Favorite Documents list.
QSG106: Getting Started with EmberZNet PRO Functionality in the Launcher Perspective
silabs.com | Building a more connected world. Rev. 1.1 | 15
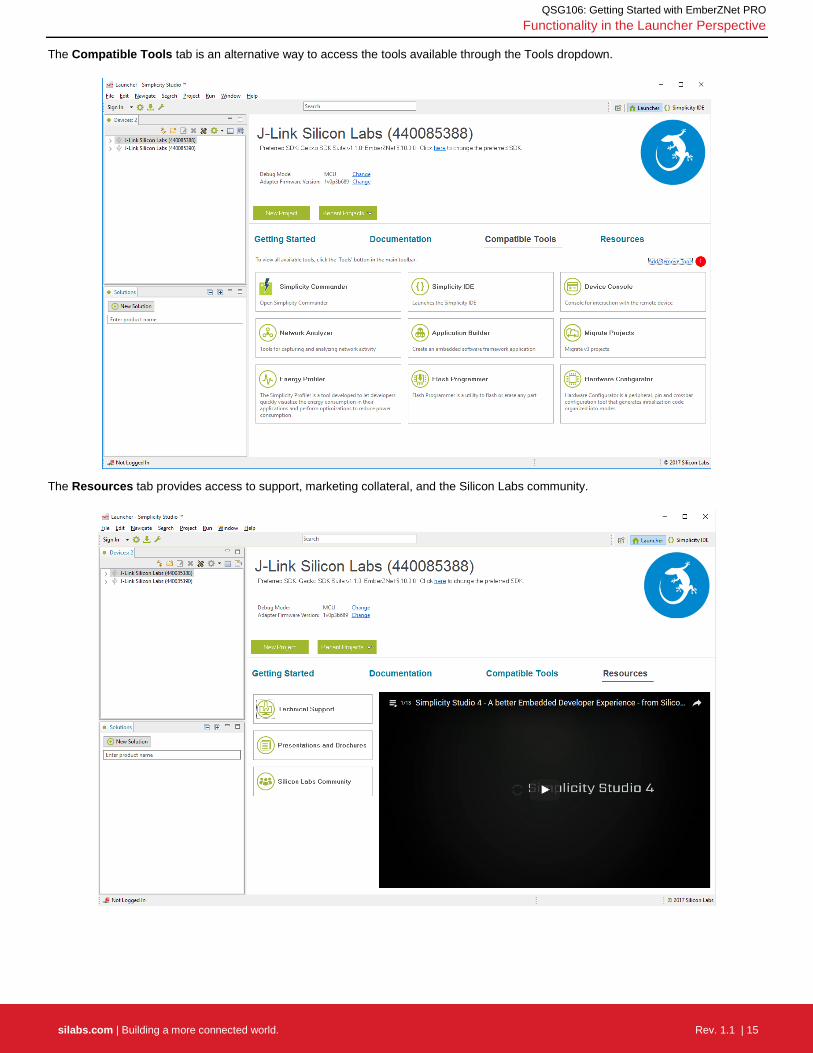
The Compatible Tools tab is an alternative way to access the tools available through the Tools dropdown.
The Resources tab provides access to support, marketing collateral, and the Silicon Labs community.
QSG106: Getting Started with EmberZNet PRO About Demos and Examples
silabs.com | Building a more connected world. Rev. 1.1 | 16
4 About Demos and Examples
Because starting application development from scratch is difficult, the EmberZNet SDK comes with a number of built-in demos and examples covering the most frequent use cases. Demos are pre-built application images that you can run immediately. Software examples can be modified before building the application image. The software examples with the same names as the demos provide the demo functionality.
Note: The demos and examples you see are determined by the part selected. If you are using a custom solution with more than one part, be sure to click on the part you are working with to see only those items applicable to that part.
Silicon Labs recommends that you start with an example and modify it according to your needs instead of starting with a blank project. The examples provide default configurations needed by the stack and a basic application structure that you can build on. However, if you want to start with a blank project you can.
4.1 Demos
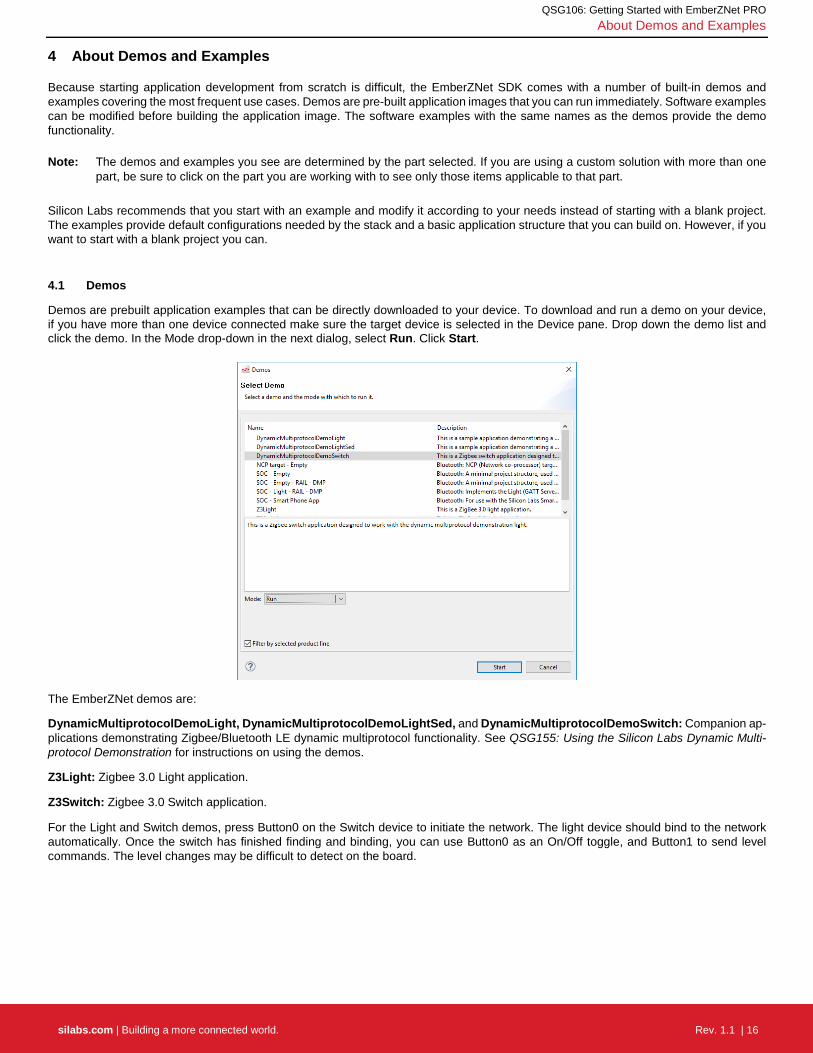
Demos are prebuilt application examples that can be directly downloaded to your device. To download and run a demo on your device, if you have more than one device connected make sure the target device is selected in the Device pane. Drop down the demo list and click the demo. In the Mode drop-down in the next dialog, select Run. Click Start.
The EmberZNet demos are:
DynamicMultiprotocolDemoLight, DynamicMultiprotocolDemoLightSed, and DynamicMultiprotocolDemoSwitch: Companion ap-plications demonstrating Zigbee/Bluetooth LE dynamic multiprotocol functionality. See QSG155: Using the Silicon Labs Dynamic Multi-protocol Demonstration for instructions on using the demos.
Z3Light: Zigbee 3.0 Light application.
Z3Switch: Zigbee 3.0 Switch application.
For the Light and Switch demos, press Button0 on the Switch device to initiate the network. The light device should bind to the network automatically. Once the switch has finished finding and binding, you can use Button0 as an On/Off toggle, and Button1 to send level commands. The level changes may be difficult to detect on the board.

QSG106: Getting Started with EmberZNet PRO About Demos and Examples
silabs.com | Building a more connected world. Rev. 1.1 | 17
4.2 Software Examples
Note: Examples provided for the EFR32xG12 and newer parts include Silicon Labs Gecko Bootloader examples. Examples are pro-vided for all compatible Simplicity Studio SDKs. When configuring security for a Gecko Bootloader example, you must use Simplicity Commander, not the Simplicity Studio IDE interface. For more information on using the Gecko Bootloader see UG266: Silicon Labs Gecko Bootloader User Guide.
The EmberZNet software examples are grouped by category. If you are not familiar with the differences between System-on-Chip (SoC) and Network Coprocessor (NCP) application models, see UG103.03: Application Development Fundamentals: Design Choices.
You can start an example from the list on the Launcher perspective, as described in section 5 Working with Example Applications. This list is filtered by the selected device. To see all examples, including the Host and NCP examples, and to have additional configuration options including project name, click New Project. If you access examples through New Project, the NCP examples are based on the Customizable network coprocessor (NCP) applications type, and the SoC and Host examples are based on the ZCL Application Framework V2 type. Be sure to check the complete example description for any platform restrictions.
Customizable Network Coprocessor (NCP) Application Framework Examples
NCP SPI: Supports communication with a host application over a SPI interface.
NCP UART HW (Hardware Flow Control): Supports communication with a host application over a UART interface with hardware flow control.
NCP UART SW (Software Flow Control): Supports communication with a host application over a UART interface with software flow control.
SecureEZSPNCP: Demonstration of an NCP application that securely communicates with the Host.
xNCP CommsHub Dual: Demonstration of an NCP application for a simultaneous dual-PHY device (2.4 GHz and sub-GHz) that com-municates to a host application over a UART interface.
xNCP LED: An extensible network co-processor (xNCP) application with an LED controlled by a HOST.
SoC Examples
DynamicMultiprotocolDemoLight: Demonstrates a full-function light application using dynamic multiprotocol (Zigbee + Bluetooth stacks running concurrently as MicriumOS tasks). Note: This example must be compiled with IAR.
DynamicMultiprotocolDemoLightSed: Demonstrates a sleepy end device light application using dynamic multiprotocol (Zigbee + Blue-tooth stacks running concurrently as MicriumOS tasks). Note: This example must be compiled with IAR.
DynamicMultiprotocolDemoSwitch: Demonstrates a Zigbee switch application used with both Dynamic Multiprotocol Light examples. Note: This example must be compiled with IAR.
DynamicMultiprotocolDemoLightwithNvm3: Demonstrates a full function light application using dynamic multiprotocol (Zigbee + Blue-tooth) and NVM3 for persistent storage. Note: This example must be compiled with IAR.
DynamicMultiprotocolDemoLightSedwithNvm3: Demonstrates a sleepy end device light application using dynamic multiprotocol (Zigbee + Bluetooth) and NVM3 for persistent storage. Note: This example must be compiled with IAR.
DynamicMultiprotocolDemoSwitchwithNvm3: Demonstrates a Zigbee switch application using NVM3 used with both Dynamic Multi-protocol Light example. Note: This example must be compiled with IAR.
Note: In order to work with the Dynamic Multiprotocol examples, you must also have installed the Bluetooth SDK. See AN1133: Dy-namic Multiprotocol Development with Bluetooth and Zigbee for additional instructions on working with the Dynamic Multiprotocol exam-ples.
SwitchedMultiprotocolJoiningDevice: Demonstrates switched multiprotocol, acting as a joining device. This application uses Zigbee 3.0 security.
Z3CapSenseDimmerSwitch: Zigbee 3.0 Reference software for use with the dimmer switch IST-A39. This implements a dimmer switch capable of sending on/off, dimmer, color temperature, and HSV color control messages to a light bulb.
Z3ColorControlLight: Zigbee 3.0 Reference software for use with the lighting reference design. Use board header ist_a0085 with the RD-0085-0401 using the EFR32MG1P732F256GM32, and ist-a22-rgb with the RD-0020-0601 with EM357 and RD-0035-0601 with EM3585. This implements a dimmable color controllable light bulb. This is Zigbee 3.0-certifiable.
QSG106: Getting Started with EmberZNet PRO About Demos and Examples
silabs.com | Building a more connected world. Rev. 1.1 | 18
Z3ColorTempLight: Zigbee 3.0 Reference software for use with the lighting reference design. Use board header ist_a0085 with the RD-0085-0401 using the EFR32MG1P732F256GM32, and ist-a22-rgb with the RD-0020-0601 with EM357 and RD-0035-0601 with EM3585. This implements a dimmable color-temperature controllable light bulb. This is Zigbee 3.0-certifiable.
Z3ContactSensor: Zigbee 3.0 Reference software for use with the contact sensor IST-A30. This implements a magnetic reed switch based contact sensor for a security system.
Z3DimmableLight: Zigbee 3.0 Reference software for use with the lighting reference design. Use board header ist_a0085 with the RD-0085-0401 using the EFR32MG1P732F256GM32, and ist-a22-bw with the RD-0020-0601 with EM357 and RD-0035-0601 with EM3585. This implements a dimmable white light bulb. This is Zigbee 3.0-certifiable.
Z3Light: a ZigBee 3.0 light application
Z3OccupancySensor: Zigbee 3.0 Reference software for use with the occupancy sensor reference design. This implements an occu-pancy sensor capable of supporting the Occupancy Measurement server, Temperature Measurement server, Relative Humidity Meas-urement server, and Illuminance Measurement server clusters.
Z3SmartOutlet: Zigbee 3.0 Reference software for use with the smart outlet reference design IST-A51. This implements a smart outlet capable of supporting On/Off server, Simple Metering server, Temperature Measurement server, Relative Humidity Measurement server, and Illuminance Measurement server clusters.
Z3SwitchWithMicrium: In addition to normal Switch operations, this application uses the Micrium RTOS plugin to create an Application Task. The task is used to toggle LED 0 on the board periodically. Note: This application must be compiled with IAR.
Z3Switch: A Zigbee 3.0 switch application.
ZllSampleController and ZllSampleLight: These example applications demonstrate basic Zigbee Light Link functionality between a light and a sleepy controller.
Host Examples
SeSampleCommsHub: A Communications Hub application for a GBCS Smart Energy 1.4 network.
SwitchedMultiprotocolTrustCenter: Demonstrates switched multiprotocol, acting as a trust center. This application uses Zigbee 3.0 security.
XncpLed: Demonstration of a UNIX host controlling an LED on an NCP.
Z3Gateway: A Zigbee 3.0 gateway application for a Unix host. Plugins may be enabled to provide MQTT and CoAP interfaces to the application.
SecureEzsp: A host application that securely communicates with the NCP.
4.3 Starting with a Blank Application
While Silicon Labs strongly recommends starting development from one of the example applications, if you want to start with a blank application you can: 1. On the launcher page click New Project. 2. Click ZCL Application Framework V2, and click Next. 3. Click EmberZNet <version> GA SoC <version>, and click Next. 4. Check Start with a blank application, and click Next. 5. Name your application, and click Next. 6. (If you have installed IAR and GCC) GCC is set as active by default, but you can change the active toolchain to IAR. You can also
change the toolchain once the project has opened. 7. Click Finish. The Simplicity IDE opens, but nothing is configured.

QSG106: Getting Started with EmberZNet PRO Working with Example Applications
silabs.com | Building a more connected world. Rev. 1.1 | 19
5 Working with Example Applications
In these instructions you will compile and load two example applications, Z3Light and Z3Switch. Section 6 Creating a Network describes how to use the examples to create a network. Section 7 Using the Network Analyzer describes how to use Network Analyzer to observe traffic across the network.
When working with example applications in Simplicity Studio, you will first execute the following steps: 1. Select an example application. 2. Generate application files. 3. Compile and flash the application (and, the first time, a bootloader) to the radio board.
These steps are described in detail in the following sections. These procedures are illustrated for a WSTK with an EFR32MG. Note: Your SDK version may be later than the version shown in the procedure illustrations.
Note: SDK version 6.0 and later contain a number of changes to the way hardware peripherals are configured and managed. You may see the following dialog when you open an example or generate code. Always click Yes.
QSG106: Getting Started with EmberZNet PRO Working with Example Applications
silabs.com | Building a more connected world. Rev. 1.1 | 20
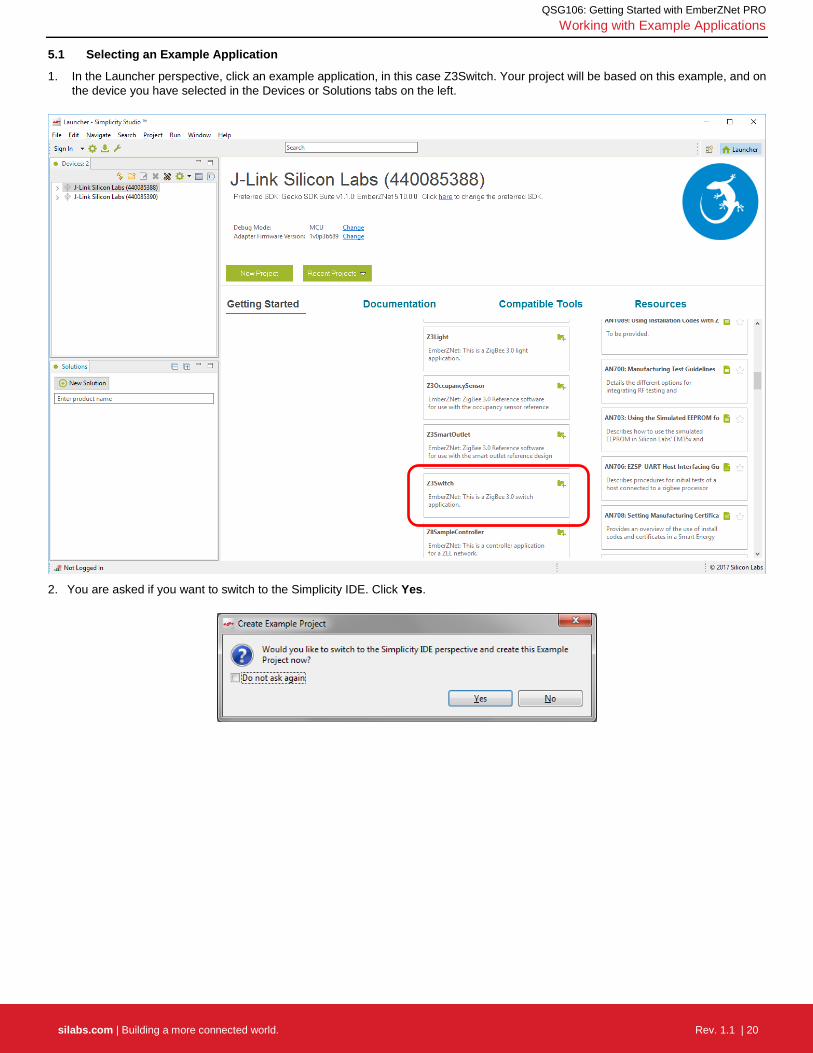
5.1 Selecting an Example Application
1. In the Launcher perspective, click an example application, in this case Z3Switch. Your project will be based on this example, and on the device you have selected in the Devices or Solutions tabs on the left.
2. You are asked if you want to switch to the Simplicity IDE. Click Yes.

QSG106: Getting Started with EmberZNet PRO Working with Example Applications
silabs.com | Building a more connected world. Rev. 1.1 | 21
3. Simplicity IDE opens with the new project in AppBuilder view, and the focus on the General tab.
Note: You now have a Simplicity IDE button next to the Launcher button in the upper right. Make sure the toolchain shown is the one you want to use. If you have both IAR and GCC installed, GCC is the default. Note that if you are compiling the example for a part with less than 512 kB, such as the EFR32xG1, or you are compiling the Dynamic Multiprotocol Light or Switch with Micrium examples, you must use IAR.

QSG106: Getting Started with EmberZNet PRO Working with Example Applications
silabs.com | Building a more connected world. Rev. 1.1 | 22
4. To change the toolchain click Edit Architecture. In the resulting dialog, select the desired toolchain and click OK.
Note: You can also start an example project by clicking New Project in the Launcher perspective or selecting New from the Project menu in the Simplicity IDE perspective, and completing a series of dialogs. The second path allows you more input into the project creation, including changing the project name and modifying the default board and part selections. It also provides access to additional examples.

QSG106: Getting Started with EmberZNet PRO Working with Example Applications
silabs.com | Building a more connected world. Rev. 1.1 | 23
5.2 Generating the Application Source Files
1. In the Simplicity IDE, click Generate.
If you get the following overwrite warning, click OK.

QSG106: Getting Started with EmberZNet PRO Working with Example Applications
silabs.com | Building a more connected world. Rev. 1.1 | 24
2. Once generation is complete, a dialog reporting results is displayed. Click OK.
The generated files are shown in the Project Explorer view.
QSG106: Getting Started with EmberZNet PRO Working with Example Applications
silabs.com | Building a more connected world. Rev. 1.1 | 25
5.3 Compiling and Flashing the Application
5.3.1 About Bootloading
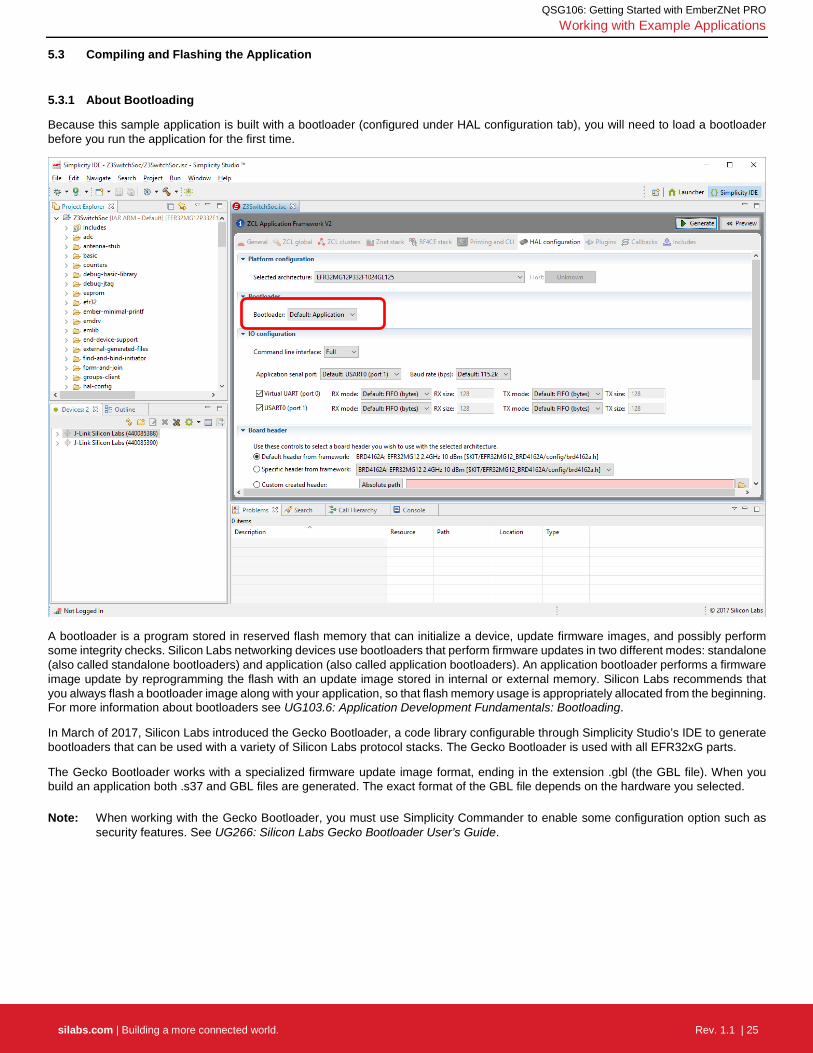
Because this sample application is built with a bootloader (configured under HAL configuration tab), you will need to load a bootloader before you run the application for the first time.
A bootloader is a program stored in reserved flash memory that can initialize a device, update firmware images, and possibly perform some integrity checks. Silicon Labs networking devices use bootloaders that perform firmware updates in two different modes: standalone (also called standalone bootloaders) and application (also called application bootloaders). An application bootloader performs a firmware image update by reprogramming the flash with an update image stored in internal or external memory. Silicon Labs recommends that you always flash a bootloader image along with your application, so that flash memory usage is appropriately allocated from the beginning. For more information about bootloaders see UG103.6: Application Development Fundamentals: Bootloading.
In March of 2017, Silicon Labs introduced the Gecko Bootloader, a code library configurable through Simplicity Studio’s IDE to generate bootloaders that can be used with a variety of Silicon Labs protocol stacks. The Gecko Bootloader is used with all EFR32xG parts.
The Gecko Bootloader works with a specialized firmware update image format, ending in the extension .gbl (the GBL file). When you build an application both .s37 and GBL files are generated. The exact format of the GBL file depends on the hardware you selected.
Note: When working with the Gecko Bootloader, you must use Simplicity Commander to enable some configuration option such as security features. See UG266: Silicon Labs Gecko Bootloader User’s Guide.
QSG106: Getting Started with EmberZNet PRO Working with Example Applications
silabs.com | Building a more connected world. Rev. 1.1 | 26
5.3.2 Building and Flashing Files
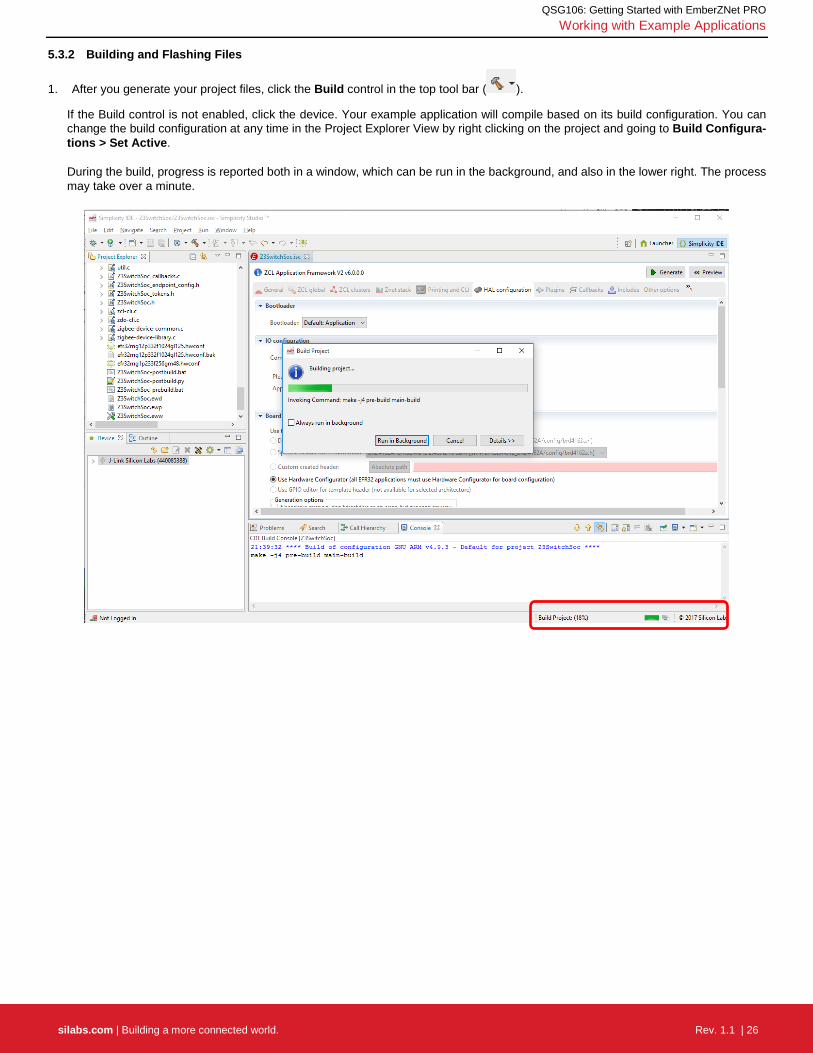
1. After you generate your project files, click the Build control in the top tool bar ( ).
If the Build control is not enabled, click the device. Your example application will compile based on its build configuration. You can change the build configuration at any time in the Project Explorer View by right clicking on the project and going to Build Configura-tions > Set Active. During the build, progress is reported both in a window, which can be run in the background, and also in the lower right. The process may take over a minute.

QSG106: Getting Started with EmberZNet PRO Working with Example Applications
silabs.com | Building a more connected world. Rev. 1.1 | 27
Build completion is reported in the Build Console.
The build should complete with no errors. The line above the completion line is not an error. It refers to an option, not enabled in the default example configuration, to build a special application image used by the Zigbee Cluster Library Over-the-Air (OTA) bootload func-tionality.
If any errors occur they are highlighted in the console. Contact technical support for assistance.
Note: If you are using GCC on a Windows platform, and experience a build error concerning a missing include file, you may have en-countered a known issue concerning GCC and long pathnames. If this happens, you may be able to work around the problem by opening the Windows Registry and setting the 'HKLM\SYSTEM\CurrentControlSet\Control\FileSystem' registry key to a value of 1. If after making this adjustment you still experience build issues with GCC and the example applications, please contact Silicon Labs technical support.

QSG106: Getting Started with EmberZNet PRO Working with Example Applications
silabs.com | Building a more connected world. Rev. 1.1 | 28
2. To load the application and the bootloader images, first make sure your hardware is displayed in the Device perspective. Expand the radio board to show the part number, as you will need that along with the board number to find the correct bootloader folder. Note that the folder in which the example was generated is displayed on the General tab.
QSG106: Getting Started with EmberZNet PRO Working with Example Applications
silabs.com | Building a more connected world. Rev. 1.1 | 29
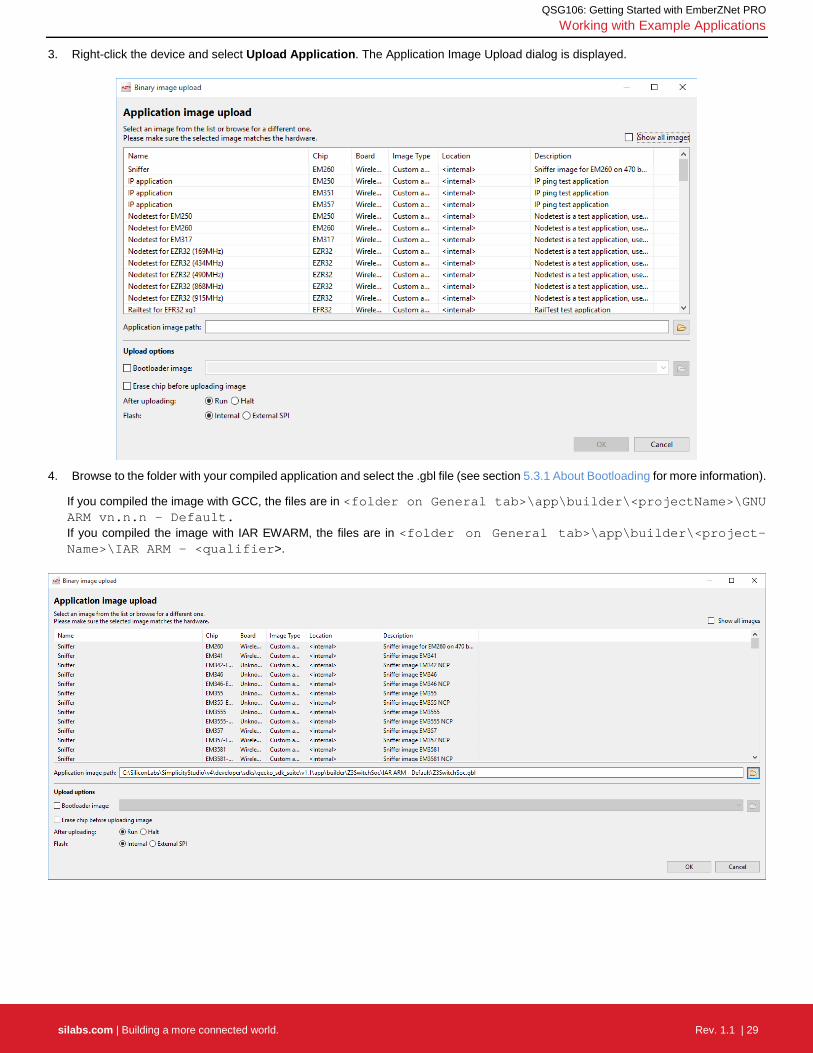
3. Right-click the device and select Upload Application. The Application Image Upload dialog is displayed.
4. Browse to the folder with your compiled application and select the .gbl file (see section 5.3.1 About Bootloading for more information).
If you compiled the image with GCC, the files are in <folder on General tab>\app\builder\<projectName>\GNU ARM vn.n.n - Default. If you compiled the image with IAR EWARM, the files are in <folder on General tab>\app\builder\<project-Name>\IAR ARM - <qualifier>.

QSG106: Getting Started with EmberZNet PRO Working with Example Applications
silabs.com | Building a more connected world. Rev. 1.1 | 30
5. If you have not already loaded a bootloader, check Bootloader image, then browse to the folder containing a prebuilt bootloader image. Images are located in the Simplicity Studio platform bootloader folder under sample apps. In this case open the ‘SPI Flash Single’ folder, for example:
C:\SiliconLabs\SimplicityStudio\v4\developer\sdks\gecko_sdk_suite\<version>\plat-form\bootloader\sample-apps\bootloader-storage-spiflash-single). Open the folder that corresponds to your board and part number and select the .s37 file, for example: \\efr32mg12p332f1024gl125-brd4162a\bootloader-storage-spiflash-single-combined.s37
6. Check Erase Chip, to make sure that the main flash block is erased before your new image is uploaded. New users will typically always check this. • The After uploading options are Run (begin executing the code immediately) and Halt (wait for an event, such as a debugger to
connect or manual initiation of a boot sequence). During initial development you will typically leave this set to Run. • The Flash options determine the storage location, and are Internal and External SPI. Leave the option set to Internal.
Your completed dialog should resemble the following:
7. Click OK.
QSG106: Getting Started with EmberZNet PRO Working with Example Applications
silabs.com | Building a more connected world. Rev. 1.1 | 31
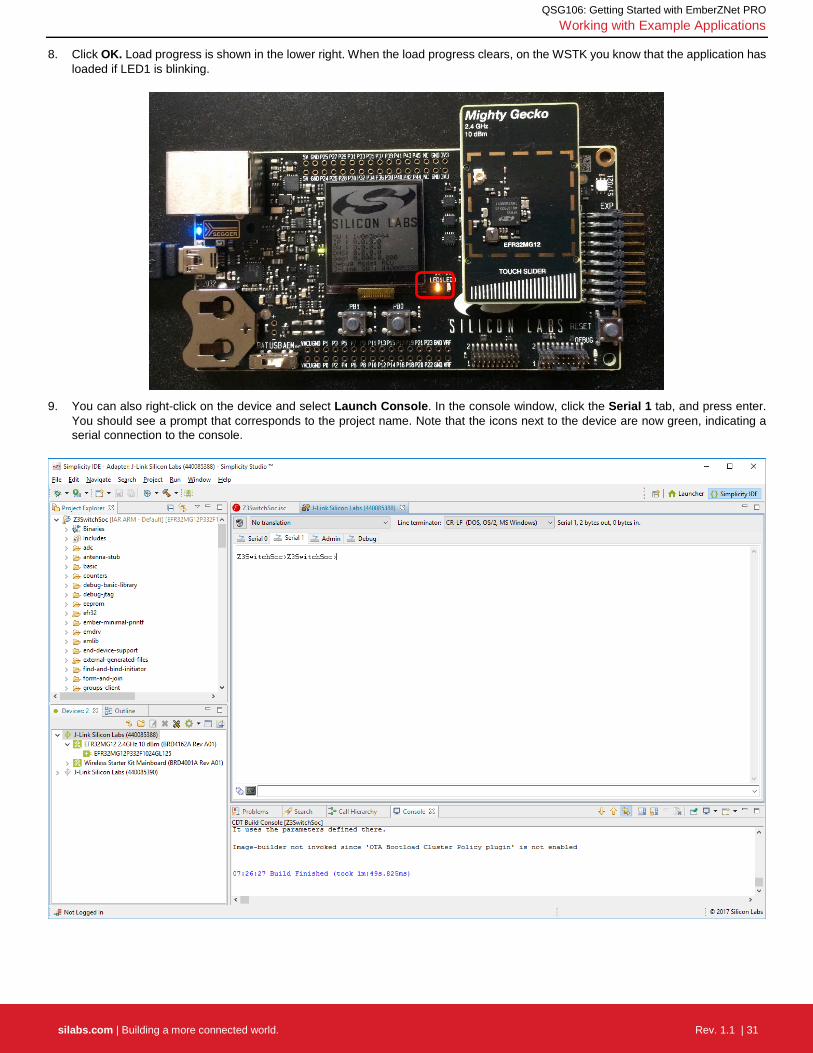
8. Click OK. Load progress is shown in the lower right. When the load progress clears, on the WSTK you know that the application has loaded if LED1 is blinking.
9. You can also right-click on the device and select Launch Console. In the console window, click the Serial 1 tab, and press enter.
You should see a prompt that corresponds to the project name. Note that the icons next to the device are now green, indicating a serial connection to the console.

QSG106: Getting Started with EmberZNet PRO Working with Example Applications
silabs.com | Building a more connected world. Rev. 1.1 | 32
Note: Before you can load a different application, you must disconnect from the console. Right-click the device and select Disconnect.
Now repeat the procedure for the Z3Light example, by clicking Launcher in the upper right, and following the steps beginning in section 5.1 Selecting an Example Application.
Since Simplicity Studio remembers your last download location and you are using identical parts for the light and switch devices, it is more efficient to download the bootloader image first, and then browse to your application.
Z3Light also blinks LED1, and after you launch the console you can see the name of the project in a prompt on the Serial1 tab of a connected console.
QSG106: Getting Started with EmberZNet PRO Creating a Network
silabs.com | Building a more connected world. Rev. 1.1 | 33
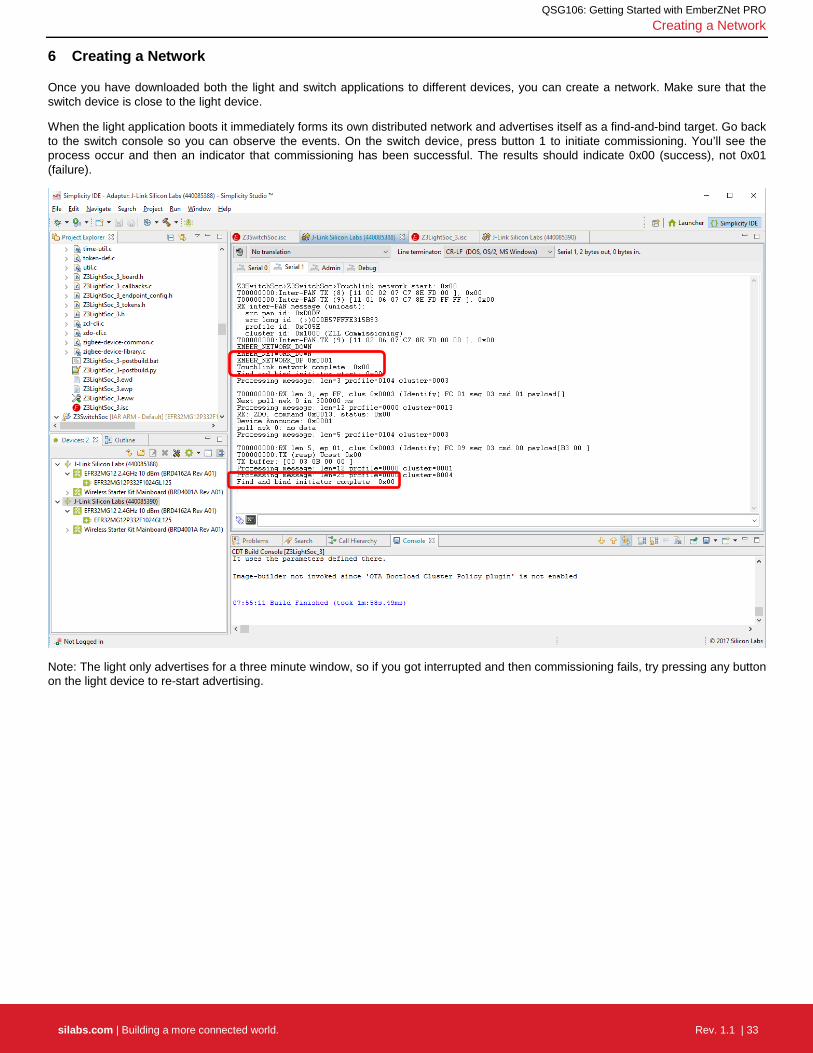
6 Creating a Network
Once you have downloaded both the light and switch applications to different devices, you can create a network. Make sure that the switch device is close to the light device.
When the light application boots it immediately forms its own distributed network and advertises itself as a find-and-bind target. Go back to the switch console so you can observe the events. On the switch device, press button 1 to initiate commissioning. You’ll see the process occur and then an indicator that commissioning has been successful. The results should indicate 0x00 (success), not 0x01 (failure).
Note: The light only advertises for a three minute window, so if you got interrupted and then commissioning fails, try pressing any button on the light device to re-start advertising.

QSG106: Getting Started with EmberZNet PRO Creating a Network
silabs.com | Building a more connected world. Rev. 1.1 | 34
Now, if you press button 0 on the switch, you’ll notice that LED0 on the light toggles on and off, and you can see the activity on both the switch console and the light console.
you can see a message such as the following, indicating you are sending an On/Off toggle command to the light:
T00000000:RX len 5, ep 01, clus 0x0006 (On/off) FC 08 seq 0C cmd 0B payload[02 00 ]
QSG106: Getting Started with EmberZNet PRO Using the Network Analyzer
silabs.com | Building a more connected world. Rev. 1.1 | 35
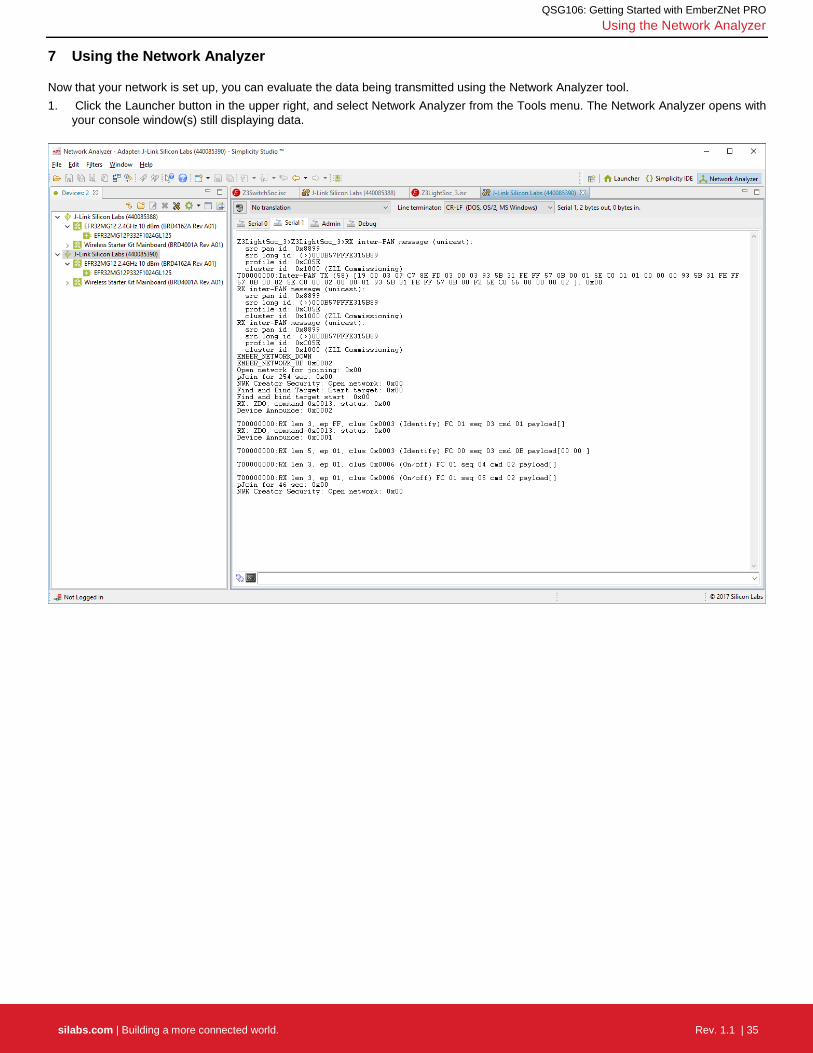
7 Using the Network Analyzer
Now that your network is set up, you can evaluate the data being transmitted using the Network Analyzer tool. 1. Click the Launcher button in the upper right, and select Network Analyzer from the Tools menu. The Network Analyzer opens with
your console window(s) still displaying data.
QSG106: Getting Started with EmberZNet PRO Using the Network Analyzer
silabs.com | Building a more connected world. Rev. 1.1 | 36
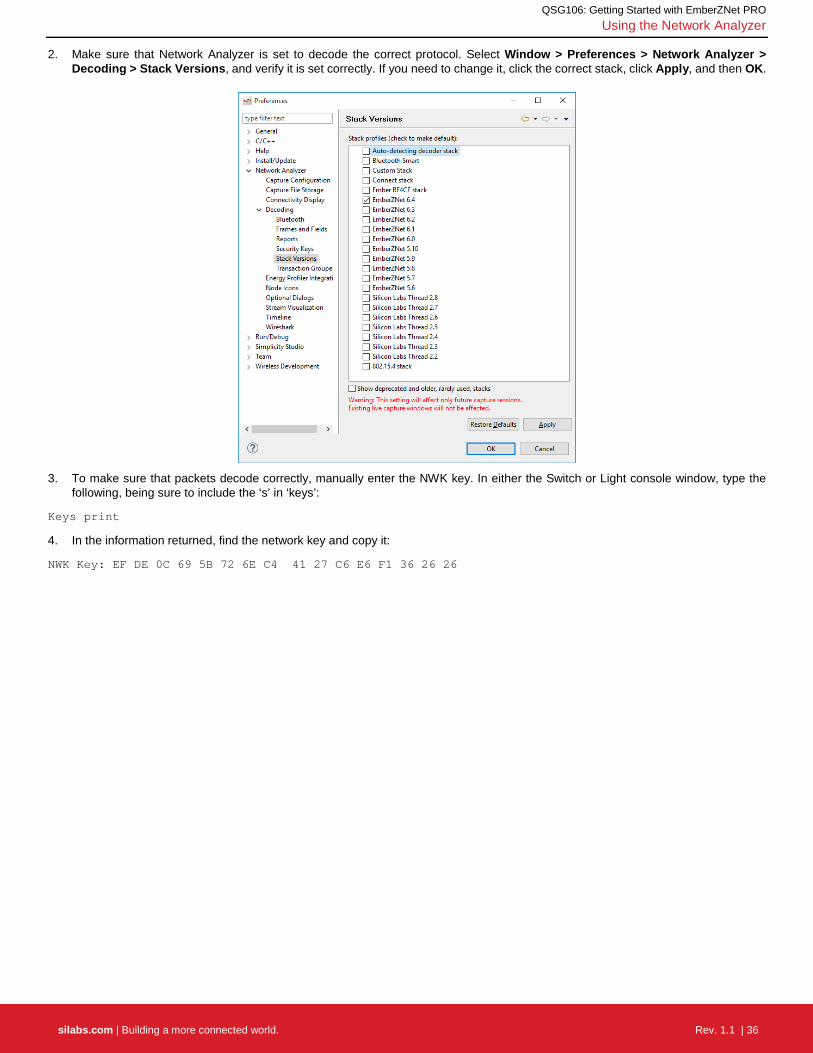
2. Make sure that Network Analyzer is set to decode the correct protocol. Select Window > Preferences > Network Analyzer > Decoding > Stack Versions, and verify it is set correctly. If you need to change it, click the correct stack, click Apply, and then OK.
3. To make sure that packets decode correctly, manually enter the NWK key. In either the Switch or Light console window, type the
following, being sure to include the ‘s’ in ‘keys’:
Keys print
4. In the information returned, find the network key and copy it:
NWK Key: EF DE 0C 69 5B 72 6E C4 41 27 C6 E6 F1 36 26 26

QSG106: Getting Started with EmberZNet PRO Using the Network Analyzer
silabs.com | Building a more connected world. Rev. 1.1 | 37
5. In Window > Preferences, open Network Analyzer > Decoding > Security Keys, click New, name the new entry, and paste the copied key into it. Click Apply. Click OK to leave.
6. Right-click on the light or the switch device, and select Start Capture. Do the same for the other device. 7. If you are in an environment with a number of wireless devices, you may have a very noisy Network Analyzer environment, as
reflected both in the event traffic and in the map. To show additional information in the map, click on the map.
On the toolbar, click the PAN ID button:
8. Right-click on the representation of your Switch device (the dot that has the same ISA3 adapter name or WSTK name or J-Link serial
number as the device) and select Show only this PAN.
QSG106: Getting Started with EmberZNet PRO Using the Network Analyzer
silabs.com | Building a more connected world. Rev. 1.1 | 38
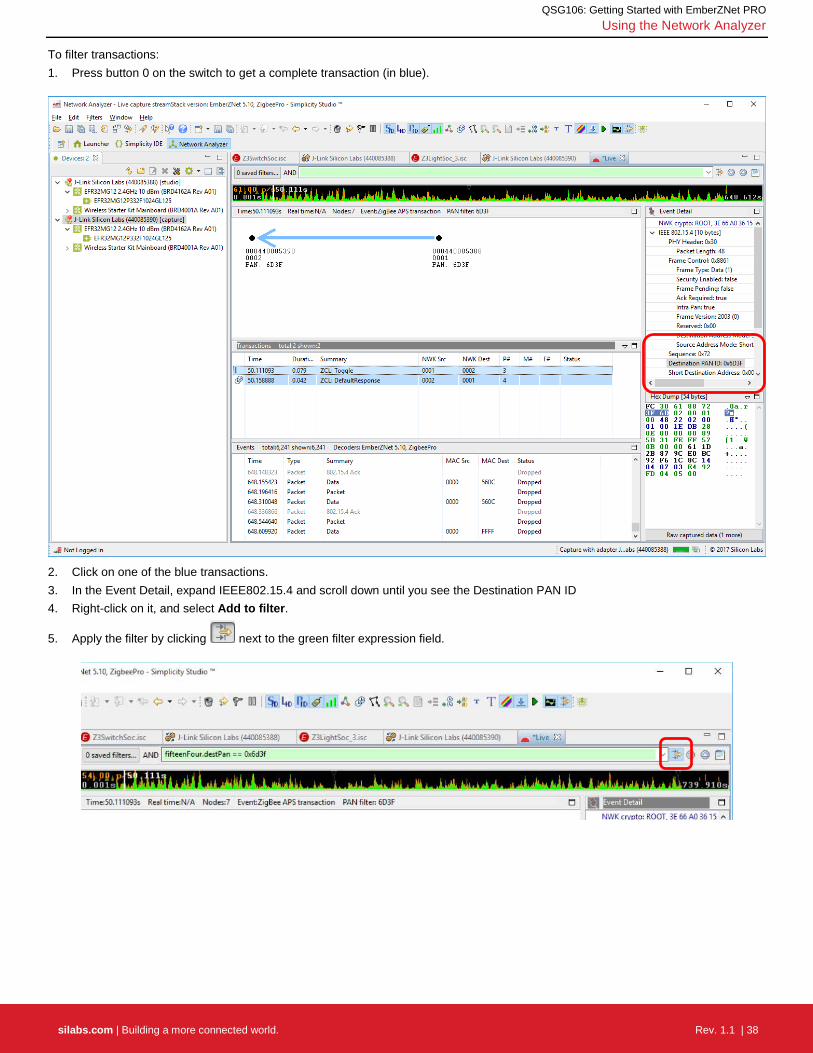
To filter transactions: 1. Press button 0 on the switch to get a complete transaction (in blue).
2. Click on one of the blue transactions. 3. In the Event Detail, expand IEEE802.15.4 and scroll down until you see the Destination PAN ID 4. Right-click on it, and select Add to filter.
5. Apply the filter by clicking next to the green filter expression field.
QSG106: Getting Started with EmberZNet PRO Using the Network Analyzer
silabs.com | Building a more connected world. Rev. 1.1 | 39
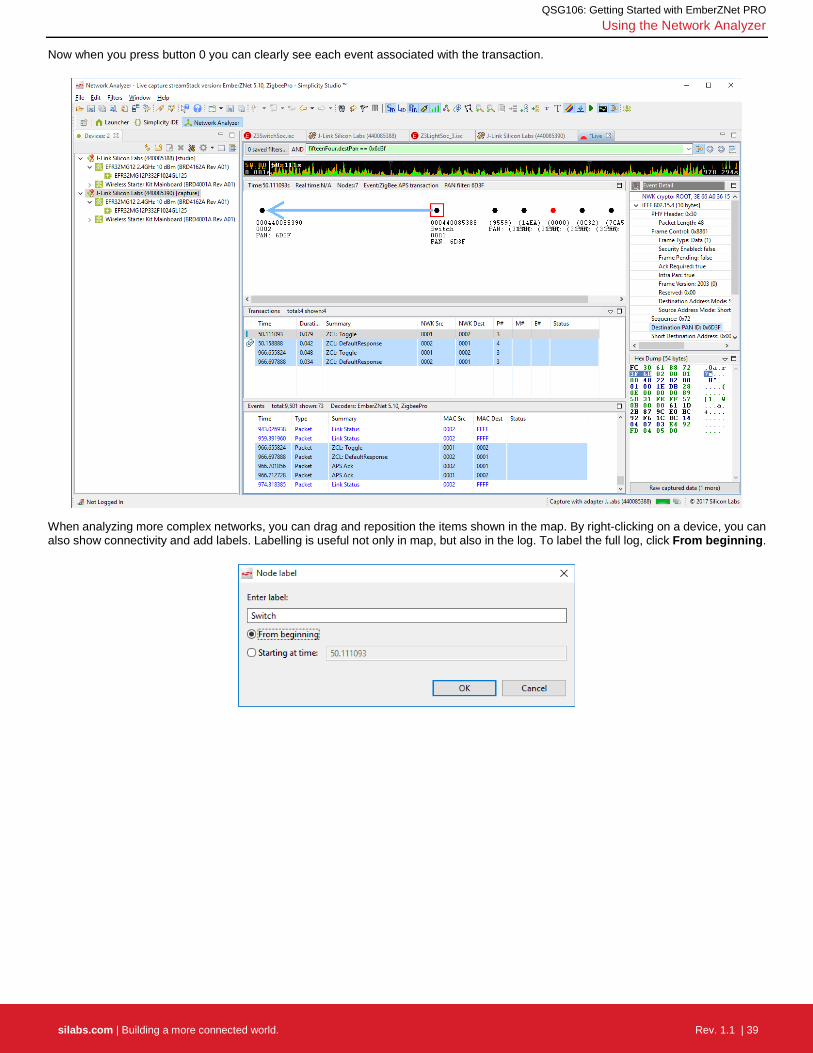
Now when you press button 0 you can clearly see each event associated with the transaction.
When analyzing more complex networks, you can drag and reposition the items shown in the map. By right-clicking on a device, you can also show connectivity and add labels. Labelling is useful not only in map, but also in the log. To label the full log, click From beginning.
QSG106: Getting Started with EmberZNet PRO Next Steps
silabs.com | Building a more connected world. Rev. 1.1 | 40
8 Next Steps
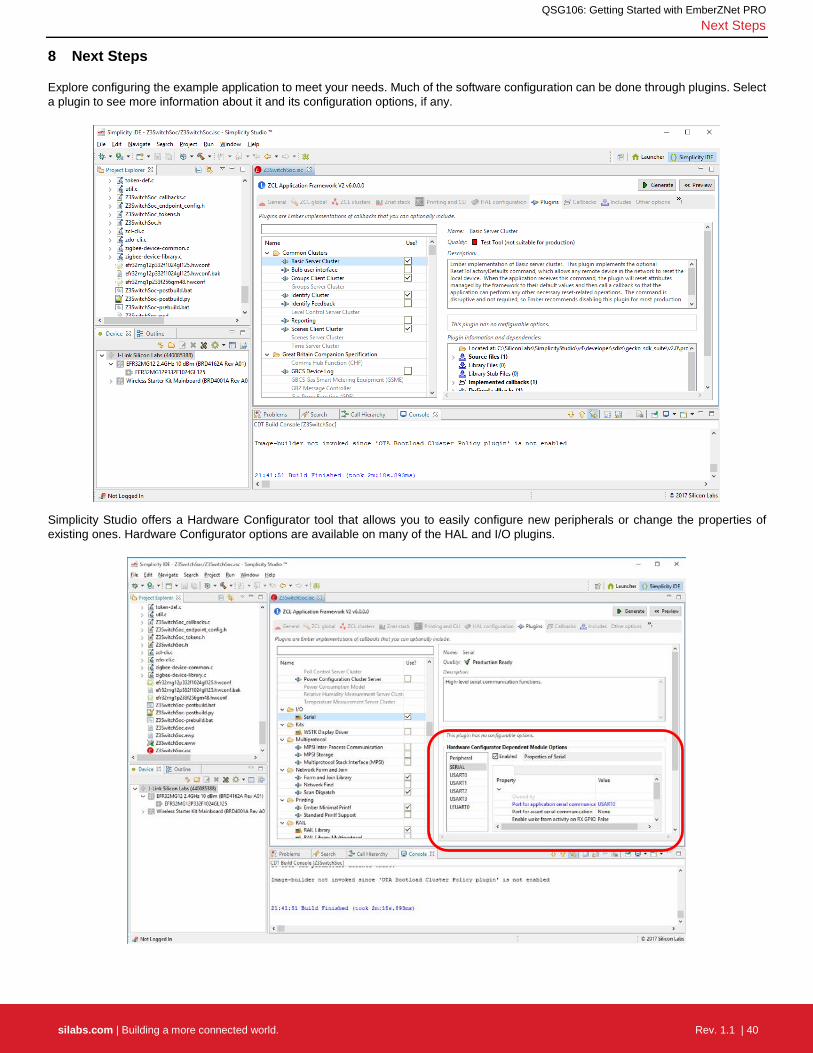
Explore configuring the example application to meet your needs. Much of the software configuration can be done through plugins. Select a plugin to see more information about it and its configuration options, if any.
Simplicity Studio offers a Hardware Configurator tool that allows you to easily configure new peripherals or change the properties of existing ones. Hardware Configurator options are available on many of the HAL and I/O plugins.
QSG106: Getting Started with EmberZNet PRO Next Steps
silabs.com | Building a more connected world. Rev. 1.1 | 41
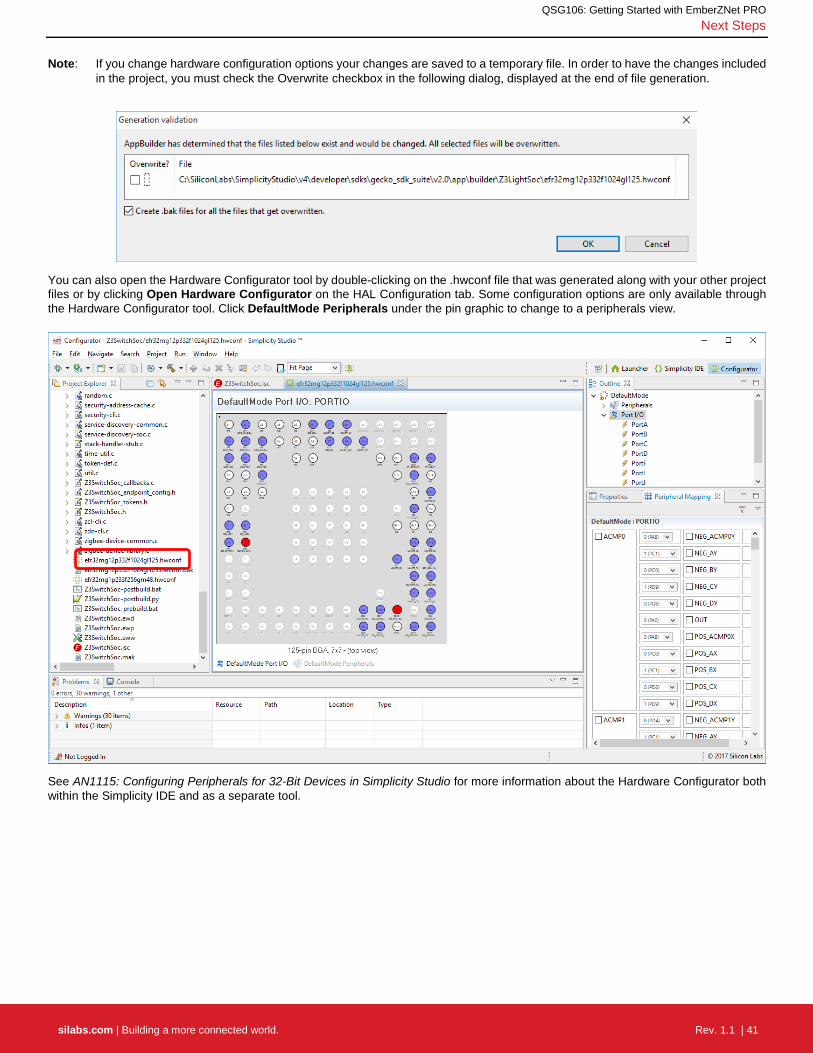
Note: If you change hardware configuration options your changes are saved to a temporary file. In order to have the changes included in the project, you must check the Overwrite checkbox in the following dialog, displayed at the end of file generation.
You can also open the Hardware Configurator tool by double-clicking on the .hwconf file that was generated along with your other project files or by clicking Open Hardware Configurator on the HAL Configuration tab. Some configuration options are only available through the Hardware Configurator tool. Click DefaultMode Peripherals under the pin graphic to change to a peripherals view.
See AN1115: Configuring Peripherals for 32-Bit Devices in Simplicity Studio for more information about the Hardware Configurator both within the Simplicity IDE and as a separate tool.

http://www.silabs.com
Silicon Laboratories Inc.400 West Cesar ChavezAustin, TX 78701USA
Simplicity StudioOne-click access to MCU and wireless tools, documentation, software, source code libraries & more. Available for Windows, Mac and Linux!
IoT Portfoliowww.silabs.com/IoT
SW/HWwww.silabs.com/simplicity
Qualitywww.silabs.com/quality
Support and Communitycommunity.silabs.com
DisclaimerSilicon Labs intends to provide customers with the latest, accurate, and in-depth documentation of all peripherals and modules available for system and software implementers using or intending to use the Silicon Labs products. Characterization data, available modules and peripherals, memory sizes and memory addresses refer to each specific device, and "Typical" parameters provided can and do vary in different applications. Application examples described herein are for illustrative purposes only. Silicon Labs reserves the right to make changes without further notice and limitation to product information, specifications, and descriptions herein, and does not give warranties as to the accuracy or completeness of the included information. Silicon Labs shall have no liability for the consequences of use of the information supplied herein. This document does not imply or express copyright licenses granted hereunder to design or fabricate any integrated circuits. The products are not designed or authorized to be used within any Life Support System without the specific written consent of Silicon Labs. A "Life Support System" is any product or system intended to support or sustain life and/or health, which, if it fails, can be reasonably expected to result in significant personal injury or death. Silicon Labs products are not designed or authorized for military applications. Silicon Labs products shall under no circumstances be used in weapons of mass destruction including (but not limited to) nuclear, biological or chemical weapons, or missiles capable of delivering such weapons.
Trademark InformationSilicon Laboratories Inc.® , Silicon Laboratories®, Silicon Labs®, SiLabs® and the Silicon Labs logo®, Bluegiga®, Bluegiga Logo®, Clockbuilder®, CMEMS®, DSPLL®, EFM®, EFM32®, EFR, Ember®, Energy Micro, Energy Micro logo and combinations thereof, "the world’s most energy friendly microcontrollers", Ember®, EZLink®, EZRadio®, EZRadioPRO®, Gecko®, ISOmodem®, Micrium, Precision32®, ProSLIC®, Simplicity Studio®, SiPHY®, Telegesis, the Telegesis Logo®, USBXpress®, Zentri, Z-Wave, and others are trademarks or registered trademarks of Silicon Labs. ARM, CORTEX, Cortex-M3 and THUMB are trademarks or registered trademarks of ARM Holdings. Keil is a registered trademark of ARM Limited. All other products or brand names mentioned herein are trademarks of their respective holders.