quest user manual - dprdpr.sourceforge.net/docs/dpr_user_manual.pdf · national archives of...
TRANSCRIPT

Digital Preservation Recorder
User Manual
Liz McCredie
24 October 2005
2006/603 ( 2005/2701)RkS

National Archives of Australia – DPR User Manual
Document Change Record
Version Changed By Description of Changes Change Date
1 Chris Strusz, Liz McCredie Original document 24 October 2005 2 Liz McCredie Updated to reflect changes to the DPR User Interface June 2006
i

Document Overview
Purpose The purpose of this document is to describe the functions and processes
associated with the Digital Preservation Recorders (DPRs).
Intended Audience
The intended audience for this document is the staff of the Digital Preservation Section.
Assumed Knowledge
This document was created with the assumption that all users have an understanding of the Digital Preservation System created and maintained by the National Archives of Australia (NAA).
Document Organisation This document contains the following Chapters.
Chapter Title Contains
1. Introduction A high level description of DPR functionality including Xena and Quest.
2. User Interface Information about components of the user interface.
3. Getting Started Information about logging on and setting system preferences.
4. Access & Security Information about creating user profiles and granting permissions.
5. Quarantine Processing Detailed procedure for processing transfer jobs through the quarantine phase.
6. Preservation Processing Detailed procedure for processing transfer jobs through the preservation phase.
7. Digital Repository Processing
Detailed procedure for processing transfer jobs through the digital repository phase.
8. Stopping Transfer Jobs A description of how to reject or reprocess transfer jobs that fail a processing step.
Contact For more information or additional assistance on the DPR, please contact
Michael Carden at the NAA on telephone 6212 6223.
DPR User Manual i
Chapter 1 – Introduction• Overview • What is the DPR? • Quarantine DPR • Preservation DPR • Digital Repository DPR
Chapter 2 – User Interface• Overview • DPR Menu Overview • Quarantine DPR User Interface • Preservation DPR User Interface • Digital Repository DPR User Interface
Chapter 3 – Getting Started• Overview • Logging On • Setting System Preferences
Chapter 4 – Access & Security• Overview • User Profiles & Permissions • About User Ids • How to Add or Edit User Ids
Chapter 5 – Quarantine Processing• Overview • QF-DPR Prerequisites • Pre-Quarantine Phase • Post-Quarantine Phase • QF-DPR Reports
Chapter 6 – Preservation Processing• Overview • PF-DPR Prerequisites • Pre Normalisation Phase • Perform Binary Normalisation • Perform Normalisation • Perform Advanced Normalisation • Post Normalisation Phase • PF-DPR Reports
DPR User Manual ii

Chapter 7 - Digital Repository Processing• Overview • Verify Checksums • Digital Repository Phase • DR-DPR Reports
Chapter 8 – Handling Exception Errors• Overview • Stop a Transfer Job • Reject a Transfer Job • Perform Remedial Action • Reprocess a Transfer Job
DPR User Manual iii


Chapter 1 - Introduction
Overview
Introduction This chapter introduces the three Digital Preservation Recorders. It lists the
functions that they were designed to perform and describes the main components of each DPR user interface.
It is intended as an overview for Digital Preservation staff members.
In this chapter This chapter contains the following topics:
Topic See Page
What is the DPR? 1-2Quarantine DPR 1-3Preservation DPR 1-4Digital Repository DPR 1-5
DPR User Manual Chapter 1-1

What is the DPR?
Description The Digital Preservation Recorder (DPR) was built to record a log of the
activities conducted in the treatment of digital records within the National Archives of Australia digital preservation process. It operates over three isolated servers – Quarantine, Preservation and Digital Repository. A separate DPR is attached to each server.
Applications that support the DPR
DPR is only one part of a suite of applications that support the digital preservation process. The Preservation DPR calls on the services of an application called Xena and the Digital Repository DPR exports data to an application called Quest.
Xena During the preservation phase, Xena converts a data object into two different
formats; binary normalised and normalised. The resulting data objects are referred to as Archival Information Packages (AIPs).
The purpose of this conversion is to overcome the problem of software obsolescence. The converted data objects can now be presented in open, documented and accessible formats.
Quest During the digital repository phase of DPR processing, metadata relating to
each AIP is ingested into the Quest database. Quest then uses this metadata to manage the preserved AIPs.
For more information on Quest see the Quest User Manual.
Carrying Device
Each transfer job, accompanied by its manifest, is copied from the original transfer media onto a quarantine carrying device. The data objects on the quarantine carrying device are then converted to AIPs and copied onto a preservation carrying device.
XML Export File
As each DPR is contained on an isolated server, metadata is exported to the next DPR through an XML export file copied to the carrying device. This file contains information about each data object/AIP that was processed. Audit and security data is also included in this file.
DPR User Manual Chapter 1-2

Quarantine DPR
Description During the quarantine phase the work is done at transfer job level. If a data
object contains a virus or the checksum for a data object listed in the manifest file does not match the checksum of the actual data object received, the whole transfer job is rejected.
Virus Check Using a commercial virus checker, all data objects are initially scanned for
viruses. If a virus is detected in a particular data object, the whole transfer job that the data object came with is rejected and referred back to the NAA Transfer Section.
Quarantine Period
If all data objects in the transfer job pass the checksum authentication process and are clear of any viruses, the transfer job is put into quarantine for a minimum period of 28 days.
Post Quarantine Processing
A checksum authentication is again performed when the transfer job is brought out of quarantine. This is to ensure that none of the data objects have been corrupted whilst in quarantine.
The data objects are also again checked for virus contamination, this time using an updated version of the virus checker.
Preservation DPR (PF-DPR) The transfer job is now ready to be processed in the PF-DPR.
DPR User Manual Chapter 1-3

Preservation DPR
Description During the preservation phase the process is working at data object level
rather than transfer job level.
Checksum Authentication
Checksum authentication is again performed to confirm that the data objects match exactly what was originally transferred and that the data has not been corrupted during the quarantine to preservation transit.
Xena Processing
The PF-DPR calls on Xena to create binary normalised and normalised versions of the original data object – Archival Information Packages (AIPs). The AIPs are now identified by their Xena id and new MD5 checksum authentication files are created mapped to this new identifier.
Digital Repository DPR (DR-DPR)
The AIPs are now ready to be processed in the DR-DPR.
DPR User Manual Chapter 1-4

Digital Repository DPR
Description During the digital repository phase the process is working at AIP level.
Checksum Authentication
Checksum authentication is again performed to confirm that the AIPs match exactly what was processed by Xena and that the data has not been corrupted during the preservation to digital repository transit.
Digital Repository
During this phase the AIPs are copied into the Digital Repository using an external copy program.
Quest Processing
Quest provides a user interface to access and manage the AIPs. The final step in the DR-DPR process is to ingest metadata relating to all the AIPs into the Quest database.
The digital preservation process is now complete.
DPR User Manual Chapter 1-5


Chapter 2 – User Interface
Overview
Introduction Each of the DPRs has a different user interface with different options
available for selection.
In this chapter This chapter contains the following topics:
Topic See PageDPR Menu Overview 2-2Quarantine DPR Interface 2-3Preservation DPR Interface 2-5Digital Repository DPR Interface 2-7
DPR User Manual Chapter 2-1

DPR Menu Overview
Description This topic describes the screen elements and common functions included in
all DPR screens.
Top Menu Each DPR has the following options available on the top menu bar:
Menu Item Purpose
Actions Change PasswordQuit – logoff and close the DPR
Users Administer the users of the DPR. This option is only available to Archival and User Administrators
Reports Generate reports relating to all the transfer jobs that have been processed through the DPR.
The DR-DPR includes a report providing statistics on the number of AIPs that have been processed.
Settings Update System Reference DetailsUpdate Quest Location Details
Help Details of the version number and date of releaseLicensing Information
DPR User Manual Chapter 2-2

Quarantine DPR User Interface
Description This topic lists the main QF-DPR screens.
QF-DPR Screens
There are six screens attached to the QF-DPR. They each represent a step in the quarantine process. They are:
1. Select Transfer Job to Process2. Register a New Transfer Job in DPR 3. Working on Transfer Job4. Pre-Quarantine Processing5. Post-Quarantine Processing6. Mark Complete
As each step is completed and the Done button is clicked, the user is returned to Screen 3. From this screen, the user can access the next step in the process.
Primary Access Screen
The Select Transfer Job to Process screen is the primary access to all QF-DPR functions. It is the first screen that is displayed after logging on to the QF-DPR and shows the status of all existing transfer jobs registered in the QF-DPR. From this screen a user can:
• Register a New Transfer Job in DPR – this button provides access to screen 2;
• Process a Selected Transfer Job – this button provides access to screen 3.
Screen Diagram
Below is an example of the QF-DPR Select Transfer Job to Process screen.
DPR User Manual Chapter 2-3

Continued on next page
DPR User Manual Chapter 2-4

Quarantine DPR User Interface, Continued
Main Processing Screen
As each step of the process is completed, the user is returned to the Working on Transfer Job screen for further processing. The screen attributes change during processing to show what step the transfer job is at, for example:
• The Process button for each completed step changes to a Review button with a green tick. If a step has not yet been processed, a blue arrow is displayed next to the Process button.
• The Export button creates the XML export file. However, this option only becomes available when all the processing steps have a green tick.
Completed process steps may be displayed, but not altered, by clicking the Review button.
Screen Diagram
Below is an example of the QF-DPR Working on Transfer Job screen.
DPR User Manual Chapter 2-5

Preservation DPR User Interface
Description This topic lists the main PF-DPR screens.
PF-DPR Screens
There are 8 screens attached to the PF-DPR. They each represent a step in the preservation process. They are:
1. Select Transfer Job to Process2. Working on Transfer Job 3. Enter Carrier Locations4. Pre-Normalisation5. Perform Binary Normalisation6. Perform Normalisation7. Post-Normalisation8. Mark Complete
As each step is completed and the Done button is clicked, the user is returned to screen 2 where the next step in the process can be accessed.
Primary Access Screen
The Select Transfer Job to Process screen is the primary access to all preservation functions. It is the first screen that is displayed after logging on to the PF-DPR and shows the status of all existing transfer jobs imported into the PF-DPR. From this screen, a user can:
• Import Transfer Job Information; • Process a Selected Transfer Job – this button provides access to screen
3.
Continued on next page
DPR User Manual Chapter 2-6

Preservation DPR User Interface, Continued
Screen Diagram
Below is an example of the PF-DPR Select Transfer Job to Process screen.
Continued on next page
DPR User Manual Chapter 2-7

Preservation DPR User Interface, Continued
Screen Diagram
Below is an example of the PF-DPR Working on Transfer Job screen. It is the first screen displayed after the transfer job has been imported and selected for processing. This screen functions in the same way as its counterparts in both the QF-DPR and DR-DPR.
DPR User Manual Chapter 2-8

Digital Repository DPR User Interface
Description This topic lists the main DR-DPR screens.
DR-DPR Screens
There are 6 screens attached to the PF-DPR. They each represent a step in the preservation process They are:
1. Select Transfer Job to Process *2. Working on <Transfer Number & Step Reached)3. Enter Carrier Locations4. Verify Checksums (DR)5. Record Details of Digital Repository6. Mark Complete
As each step is completed and the Done button is clicked, the user is returned to Screen 2 where the next step in the process can be accessed.
* This screen looks and performs the same as its counterpart in the PF-DPR.
Primary Access The Select Transfer Job to Process screen is the primary access to all
preservation functions. It is the first screen that is displayed after logging on to the DR-DPR.
Continued on next page
DPR User Manual Chapter 2-9

Digital Repository DPR User Interface, Continued
Screen Diagram
Below is an example of the DR-DPR Working on <Transfer Job Number> screen. It is the first screen displayed after the transfer job has been imported and selected for processing. This screen functions in the same way as its counterparts in both the QF-DPR and PF-DPR.
DPR User Manual Chapter 2-10

Chapter 3 – Getting Started
Overview
Introduction Each DPR must be logged on to individually. There is no built in time out
facility incorporated into the DPRs. If a user does not log off correctly, when the system restarts an advice will appear indicating that they are currently logged on and asking if they wish to continue. If they select Yes the old session is closed and a new session is opened.
There are system preferences that need to be set to ensure that virus definitions are recorded in the QF-DPR and that the DR-DPR is connected to the Quest database
Contents
Topic See PageLogging On 3-2Setting System Preferences 3-3
DPR User Manual Chapter 3-1
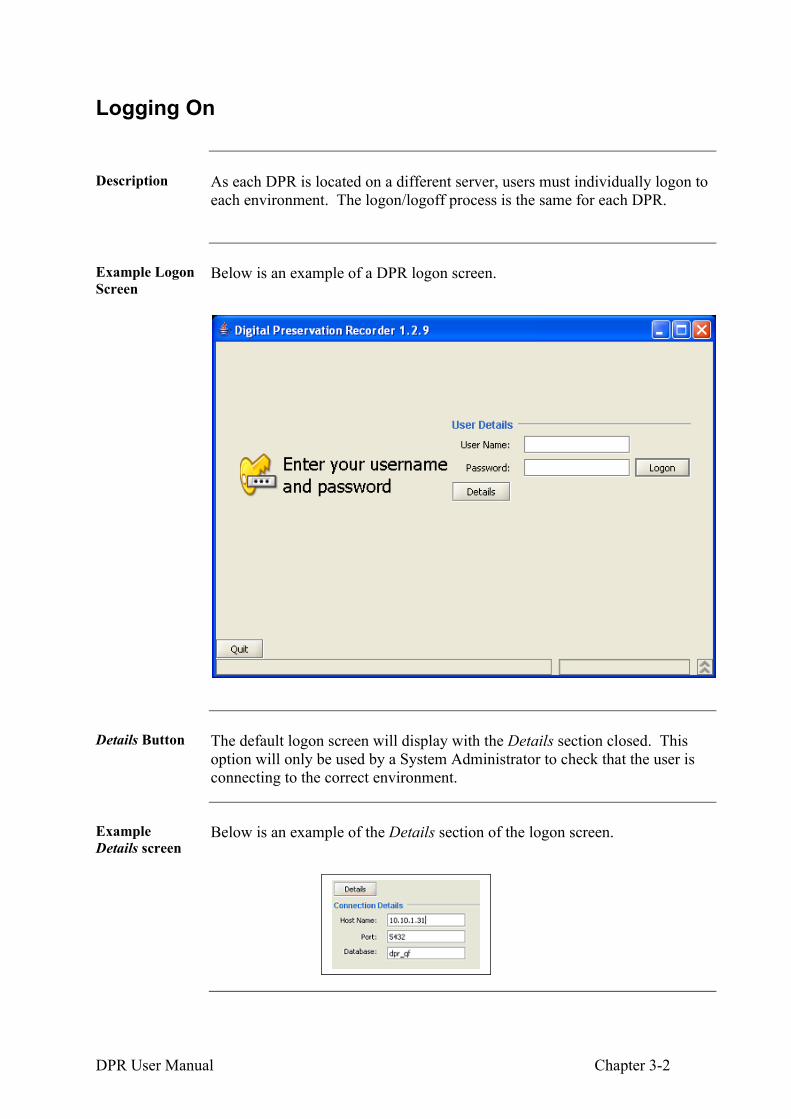
Logging On
Description As each DPR is located on a different server, users must individually logon to
each environment. The logon/logoff process is the same for each DPR.
Example Logon Screen
Below is an example of a DPR logon screen.
Details Button The default logon screen will display with the Details section closed. This option will only be used by a System Administrator to check that the user is connecting to the correct environment.
Example Details screen
Below is an example of the Details section of the logon screen.
DPR User Manual Chapter 3-2

Setting System Preferences
Description There are two sets of preferences that can be modified in the DPRs. They are:
• Update System Reference Details• Update Quest Location Details
They can be accessed by clicking Settings located on the menu bar.
Update System Reference Details
The table below provides an example of the Update System Reference Details preferences.
Option ExampleVirus Checker Name SymantecVirus Checker Version 8.1.0.825Virus Definitions Version 12345
Update Quest Location Details
The table below provides an example of the Update Quest Location Details preferences.
Option ExampleThe name of the Quest database QuestThe host of the Quest database 10.10.1.33The port of the Quest database 5432Quest Username postgresQuest Password postgres
DPR User Manual Chapter 3-3

Chapter 4 - Access & Security
Overview
Introduction Access to each DPR is restricted and controlled by a user id and password.
User profiles and permissions are set up in the QF-DPR as the master and are copied across, with the XML export file, to the PF-DPR and DR-DPR.
User ids can only be added or edited by an Archival or User Administrator.
In this chapter This chapter contains the following topics:
Topic See PageUser Profiles & Permissions 4-2About User IDs 4-4How to Add or Edit User IDs 4-6
DPR User Manual Chapter 4-1

User Profiles & Permissions
Description Users can be allocated permissions individually or allocated a set of
permissions by associating them with a profile.
Profiles The list of profiles include:
1. Archival Administrator2. User Administrator3. Normal User4. Custom (a manually selected set of permissions)
Permissions The table below describes the allocation of permissions to profiles:
Permissions Profile
Administer a Transfer Job 1 3Record Details of Quarantine Process 1 3Record Details of Preservation Process 1 3Record Details of Entry into the Digital Repository 1 3Mark an AIP as being Deleted 1 3User Administration 1 2Update System Reference Details 1 2Alter Saved Records 1Reports 1 2 3
Continued on next page
DPR User Manual Chapter 4-2
User Profiles & Permissions, Continued
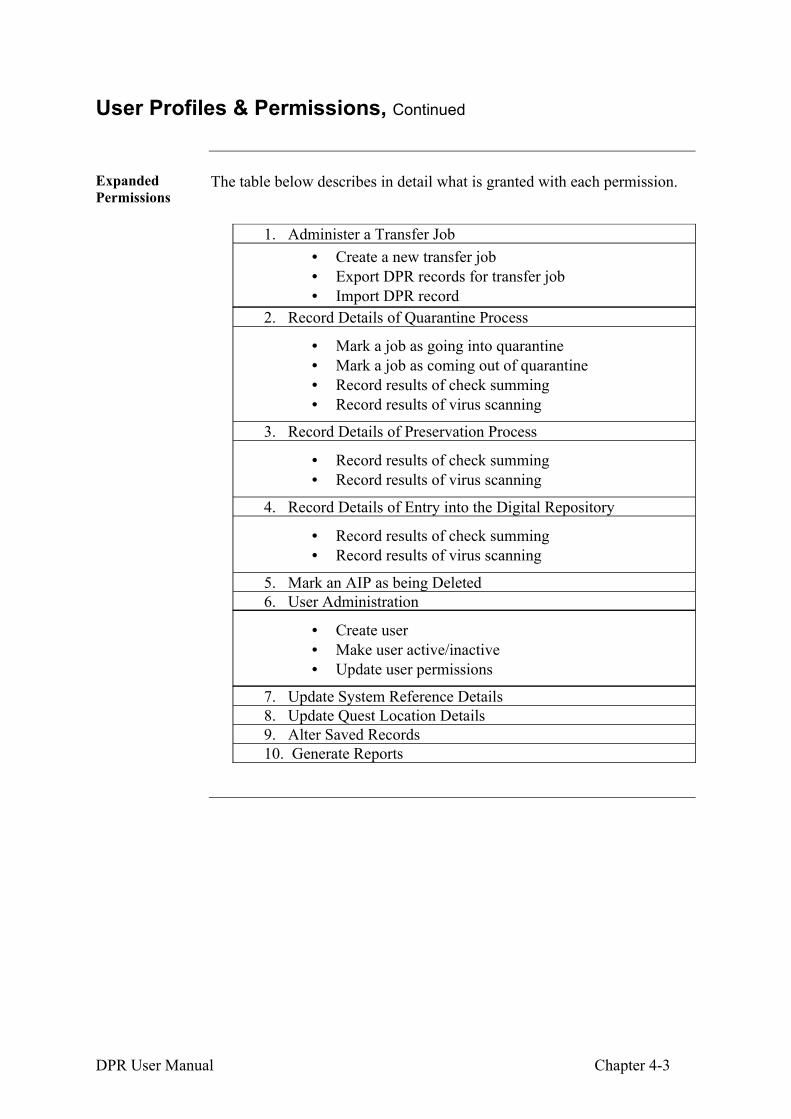
Expanded Permissions
The table below describes in detail what is granted with each permission.
1. Administer a Transfer Job
• Create a new transfer job• Export DPR records for transfer job• Import DPR record
2. Record Details of Quarantine Process
• Mark a job as going into quarantine• Mark a job as coming out of quarantine• Record results of check summing• Record results of virus scanning
3. Record Details of Preservation Process
• Record results of check summing• Record results of virus scanning
4. Record Details of Entry into the Digital Repository
• Record results of check summing• Record results of virus scanning
5. Mark an AIP as being Deleted6. User Administration
• Create user• Make user active/inactive• Update user permissions
7. Update System Reference Details8. Update Quest Location Details9. Alter Saved Records10. Generate Reports
DPR User Manual Chapter 4-3

About User Ids
Description The screen to add a new user or to edit an existing user is accessed by
clicking Users>Administer Users on the menu bar. Only Archival or User Administrators have permission to add and edit user ids.
User information
The following information is required for each new user:
• User log-in ID• User password• User first name• User last name• User permissions• User activation
Example Below is an example of the Add and Edit Users screen.
NoteAny column list on this screen can be sorted by clicking on a column heading.
Continued on next page
DPR User Manual Chapter 4-4

About User Ids, Continued
Imported into PF-DPR
User ids can only be created in the Quarantine DPR. When the next transfer job is imported into Preservation, the new user information will be included in that transfer job's XML export file.
The new user must wait until their details have been exported with a transfer job, processed by an existing user id, before they can log on to either the PF-DPR or the DR-DPR.
Example Import
Below is an example of the screen message that is displayed when a transfer job containing user id information is imported into the PF-DPR.
DPR User Manual Chapter 4-5

How to Add or Edit User IDs
Add or Edit User ID Process
Follow these steps to add or edit a user id.
Step Action1. Using an administrator user id, open the QF-DPR.2. Select Users/Administer Users from the main menu bar.
ResultThe Add and Edit Users screen will display.
3. Click the Add User button located on the bottom left hand corner of the screen.
ResultThe Enter Details of New User screen will display.
4. Complete the user details section of this screen.
Example
NoteUser name and password should all be created in lower case.
5. Select a Profile from the drop down list.
Example
NoteEach Profile has a selection of permissions associated with it. To modify any or all of these permissions, select the Custom option.
Continued on next page
DPR User Manual Chapter 4-6

How to Add or Edit User IDs, Continued
Add or Edit User ID Process (continued)
Step Action6. Click the Done button.
ResultThe new user will be saved in the QF-DPR and exported to the PF-DPR with the next transfer job.
7. To edit an existing user id, click the Edit User button located on the bottom left hand corner of the screen.
ResultThe Edit Details of <User Id> screen will display.
NoteWhen editing a user id, if the user's name is clicked on, the edit screen will automatically open with that user's details.
8. The existing user id details can now be edited.9. Click the Done button to save the updates.
DPR User Manual Chapter 4-7

Chapter 5 - Quarantine Processing
Overview
Introduction This chapter covers the processes undertaken in the Quarantine phase of the
digital preservation process.
Purpose The purpose of the Quarantine phase is:
1. to confirm that the digital objects received from a government agency match the contents of the transfer manifest;
2. to check that the data does not include any malware or virus content; and
3. to check that no data has been corrupted during transfer.
Contents This chapter contains the following topics:
Topic See PageQF-DPR Pre-Requisites 5-2
• Manifest Maker 5-3• Virus Check 5-6
Pre-Quarantine Phase 5-8Post-Quarantine Phase 5-13QF-DPR Reports 5-16
DPR User Manual Chapter 5 - 1

QF-DPR Prerequisites
Description There are two external utilities that support QF-DPR processing. They are:
• Manifest Maker • Virus Check
Manifest Maker
This utility creates a single manifest file to describe and authenticate all of the data objects in a transfer. The file is a plain text, tab separated file, with each row representing one data object on the transfer media.
Virus Checker This application checks that there are no viruses contained in the Transfer Data. The data is checked twice during quarantine processing. The first check is performed pre-quarantine; the second is performed post-quarantine. During the 28 day quarantine period virus definitions are kept up to date and any virus that may not have been picked up during the first scan, may be picked up in the later run.
Utility Processes
The following pages describe how to run both of these utilities.
DPR User Manual Chapter 5 - 2
Manifest Maker
Purpose The purpose of the Manifest Maker utility is to create a manifest file if one
was not included with the transfer.
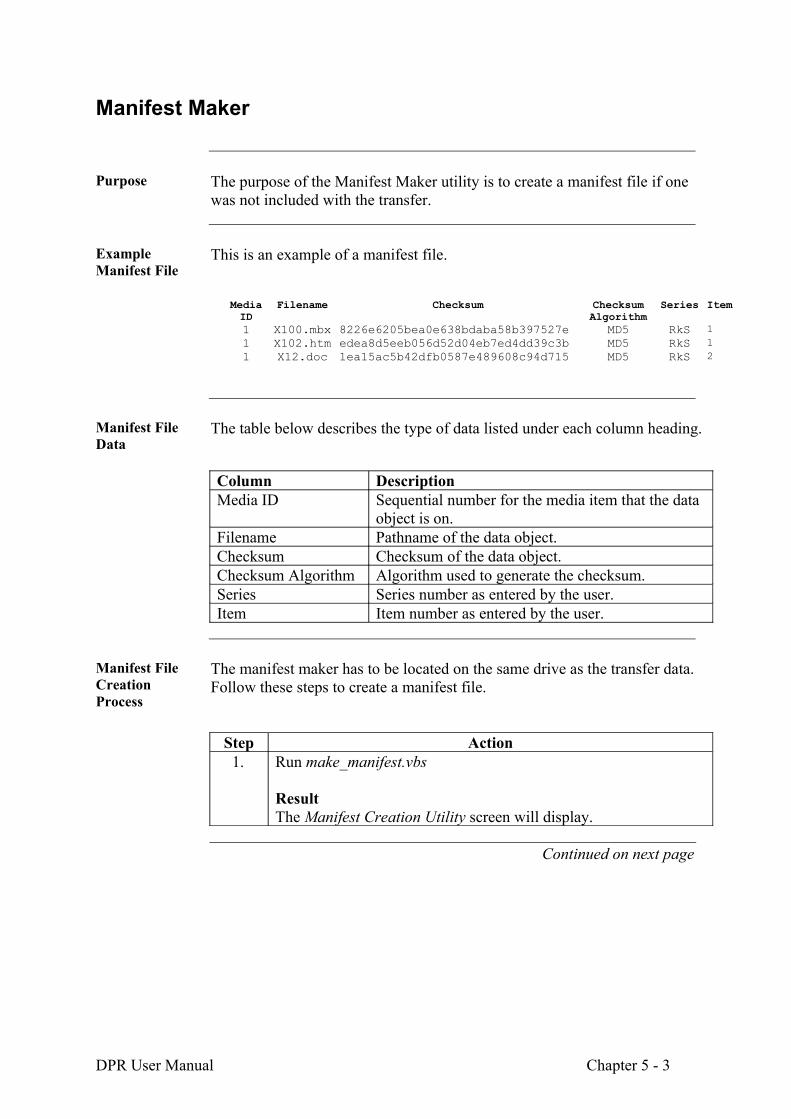
Example Manifest File
This is an example of a manifest file.
Manifest File Data
The table below describes the type of data listed under each column heading.
Column DescriptionMedia ID Sequential number for the media item that the data
object is on.Filename Pathname of the data object. Checksum Checksum of the data object.Checksum Algorithm Algorithm used to generate the checksum.Series Series number as entered by the user.Item Item number as entered by the user.
Manifest File Creation Process
The manifest maker has to be located on the same drive as the transfer data. Follow these steps to create a manifest file.
Step Action1. Run make_manifest.vbs
ResultThe Manifest Creation Utility screen will display.
Continued on next page
DPR User Manual Chapter 5 - 3
Media ID
Filename Checksum Checksum Algorithm
Series Item1 X100.mbx 8226e6205bea0e638bdaba58b397527e MD5 RkS 11 X102.htm edea8d5eeb056d52d04eb7ed4dd39c3b MD5 RkS 11 X12.doc 1ea15ac5b42dfb0587e489608c94d715 MD5 RkS 2

Manifest Maker, Continued
Manifest File Creation Process (continued)
Step Action2. For Manifest file pathname enter the full path and name for the
manifest file, e.g D:/Transfer/manifest.tsv.
NoteThe manifest file should use the file extension '.tsv'.
3. For Series Code enter the series number of the transferred records.4. For Item Code enter the item barcode of the transferred records.5. Click OK.
ResultA window for entering in the path of the data directory will display.
6. Enter the path for the first piece of transfer media, e.g. D:\Transfer\2005_00000001
7. Click OK.
ResultA window for altering the series or item codes will display.
8. To change the series or item codes at subdirectory level, check the Change descriptors for sub-directories check box and click OK.
NoteManifest Maker will prompt for series and item codes for each sub-directory inside the data directory.
9. To change the series of items codes at document level, check the Change descriptors for documents check box and click OK.
NoteManifest Maker will prompt for series and items codes for each document inside the current directory.
Continued on next page
DPR User Manual Chapter 5 - 4

Manifest Maker, Continued
Manifest File Creation Process (continued)
Step Action10. Click OK.
ResultManifest Maker will create checksums for each data object and save the manifest file to the selected directory.
11. A prompt will ask if there is any more media to process. Click Yes or No as appropriate.
ResultYes will return to Step 6. No will end the process.
DPR User Manual Chapter 5 - 5

Virus Check
Description A virus check is performed twice on all data objects contained in a transfer job. If
a virus is found, this information will be noted in the QF-DPR and the process documented in Chapter 8 – Handling Exception Errors will be followed.
Virus Checker Process
Follow these steps to run the virus checker utility.
Step Action1. Select Symantec Client Security/Symantec AntiVirus Client from
the Start menu on the quarantine workstation.2. From the left hand option tree, select Scan>Scan a Computer.3. In the Scan Computer pane, select and check the check box for the
transfer job to be scanned.4. Click on the Options button.
ResultThe Scan Options window will display.
5. For Options, select the following:
File Types : All TypesMacro Virus : Action : Leave alone (log only)Non Macro Virus : Action : Leave alone (log only)
Example
Continued on next page
DPR User Manual Chapter 5 - 6

Virus Check, Continued
Virus Checker Process (continued)
Step Action6. Check the Display message on infected computer checkbox.7. Click OK.
ResultScan Options window will close.
8. Click the Scan button.9. When complete, close the Symantec Antivirus Client window.
NoteIf a virus is found, keep the warning open and copy the virus information into the QF-DPR.
10. The virus checking process is now completed.
Failed Virus Check Process
The details of a failed virus check are recorded in the QF-DPR as follows:
Step Action
1. For Virus Check X or Y Passed select the No radio button.2. Click on the Set Details button3. The Set Details of Failed Virus Check window will display, listing
all the data objects in the transfer.4. Select the infected data object from the list.
NoteUse the filter option to assist with locating the data object. See Using the Filter Option below.
5. Click on the Change Found Virii? button.6. In the drop down list, type in the virus name.7. Click on the Add button.8. Repeat steps 6 and 7 for each virus found in the data object.9. Click on the OK button.
Continued on next page
DPR User Manual Chapter 5 - 7
Virus Check, Continued
Failed Virus Check Process (continued)
Step Action10. Repeat steps 4 through to 9 for each infected data object.11. Click OK.
Using the Filter Option
In the Filter box type in any string of characters from the file name of the data object you wish to select. The filter will only display data objects whose names include that string. For example, typing in doc will return any of the following data objects: Fed_doc.png, file.doc and doctoral_thesis.pdf.
To clear the filter, press the X button.
DPR User Manual Chapter 5 - 8
Pre-Quarantine Phase
Description The Pre-Quarantine phase covers all the steps performed prior to the transfer
job going into the 28-day quarantine period.
Prerequisite Before a transfer job can be processed in the QF-DPR a manifest file must
have been created and a Virus Check on the data objects in the transfer job must have been run.
Registration Process
Follow these steps to register and validate a transfer job in the QF-DPR.
Step Action1. Logon on to the Quarantine Workstation and open up a copy of the
QF-DPR.2. Enter your user name and password in the fields provided and
click the Logon button.
ResultThe Select Transfer Job to Process screen will display.
NoteIf you do not have a user id then one will need to be created for you by an administrator. See Chapter 4 – Access & Security
3. Click on the Register a New Transfer Job in DPR button.
ResultThe Working on a New Transfer Job screen will display.
4. Enter the transfer job number allocated to the transfer media.
NoteThe format for this number is yyyy/nnnnnnnn
5. To enter the location of the carrying device, click the Select Location button and navigate to the required location. Click Open.
ResultThe Carrier Device ID and Location fields will be populated.
6. Under Process the Manifest click on the Read from File button.7. Navigate to and select the manifest file.
NoteIf you wish to look at the contents of the manifest file, click on the Review Details button.
Continued on next page
DPR User Manual Chapter 5 - 9

Pre-Quarantine Phase, Continued
Registration Process (continued)
Step Action8. Click on the Done button.9. Click Yes to commit the changes.
ResultThe Registration process is now complete. The Working on <Transfer Job Number> screen will display with a tick against the registration process.
10. NoteTo review the data that has just been entered, click the Review button and a read only copy of the Register a New Transfer Job screen will display.
Example
Pre-Quarantine Process
Follow these steps to perform Pre-Quarantine processing.
Step Action1. To start pre-quarantine processing click on the Process button for
Pre-Quarantine processing.
Example
ResultThe Pre Quarantine Processing screen will display.
Continued on next page
DPR User Manual Chapter 5 - 10

Pre-Quarantine Phase, Continued
Pre-Quarantine Process (continued)
Step Action2. Click the Do Packing button.
ResultA popup box will display.
Example
3. Click the Browse button to navigate to where the data objects are located. Click Go.
ResultA standardised directory structure will be created on the quarantine carrying device and the data objects will be copied from the transfer carrying device to the quarantine carrying device.
4. Click the Verify Checksums button.5. Click the Review Details button to display the Checksum Details
window. All the data objects whose checksums matched will be ticked.
Example
Continued on next page
DPR User Manual Chapter 5 - 11

Pre-Quarantine Phase, Continued
Pre-Quarantine Process (continued)
Step Action11. Click OK to close the Checksum Details window.12. Under Virus Check X Passed select the yes button. The virus
checker would have been run before the transfer job was imported into the QF-DPR.
NoteIf the virus check X failed, see Chapter 8 – Handling Exception Errors for what to do next.
13. Under Verify Transfer select the yes option.
NoteIf the transfer cannot be verified, see Chapter 8 – Handling Exception Errors for what to do next.
14. Check the Transfer Job in Quarantine check box.
ResultA default date out of quarantine 28 days after the current date will be set.
15. Click the Done button.16. Click Yes to really commit the changes.
NoteTo review the data that has just been entered, click the Review button and a read only copy of the Pre-quarantine Processing screen will display.
17. This is the end of the Pre-Quarantine phase process. The quarantine carrying device will be disconnected from the Quarantine Workstation and stored until the end of the 28 day quarantine period.
Continued on next page
DPR User Manual Chapter 5 - 12

Post-Quarantine Phase
Description The Post-Quarantine phase covers all the steps performed after the 28-day
quarantine period.
Prerequisite Before a transfer job can be reprocessed in the QF-DPR the virus definitions
need to have been updated and a new virus check performed.
Post-Quarantine DPR Process
Follow these steps to perform Post-Quarantine processing:
Step Action1. Connect to the Quarantine Workstation and open up a copy of the
QF-DPR.2. Enter your user name and password in the fields provided and
click the Logon button.
ResultThe Select Transfer Job to Process screen will display.
3. Select the transfer job to be processed.4. Click on the Process Selected Transfer Job button.
ResultThe Working on <Transfer Job Number> screen will display.
5. Click on the Process button.
ResultThe Post-quarantine Processing screen will display.
6. Check the Virus Definitions Updated check box.
NoteThe virus definitions are regularly updated by the Systems Administrator.
7. Check the Out of Quarantine check box.
ResultThe Date Out will auto populate with the current system date.
Continued on next page
DPR User Manual Chapter 5 - 13

Post-Quarantine Phase, Continued
Post-Quarantine DPR Process (continued)
Step Action8. Run the external virus check application.9. Under Virus Check Y Passed select the Yes radio button.
NoteIf the virus check Y failed, see Chapter 8 – Handling Exception Errors for what to do next.
10. Click the Verify Checksums button.11. Click the Review Details button to display Checksum Details
window.12. Click the Done button.13. Click Yes to really commit the changes.
ResultThe Working on <Transfer Job Number> screen will display.
NoteTo review the data that has just been entered, click the Review button and a read only copy of the Post-quarantine Processing screen will display.
14. To mark the job complete, click on the Process button.
ResultThe Mark Complete screen will display.
15. Check the QF Processing Complete check box.16. Add comments if required.
NoteIf there have been any failures during the Quarantine process, the check box for the effected step will remain unchecked. However, the transfer job can still be marked complete and an XML export file created if a reason for proceeding is provided in the Comments text box.
Continued on next page
DPR User Manual Chapter 5 - 14

Post-Quarantine Phase, Continued
Post-Quarantine DPR Process (continued)
Step Action17. To create the XML file that will be imported into the PF-DPR,
click the Export button.18. Navigate to and select the save location.19. This is the end of the QF-DPR process. Click Quit from the
Action menu to close the QF-DPR.
DPR User Manual Chapter 5 - 15

QF-DPR Reports
Description There are six reports that can be generated through the Quarantine DPR. They
are:• Transfer Jobs Currently in QF• Transfer Jobs that Failed QF• Transfer Jobs that Finished QF• Transfer Jobs that were Rejected• Transfer Jobs Awaiting Final Verification• User Report
The reports can be saved as a CSV file to a specified output directory.
QF-DPR Report Description
The table below describes the type of data that is displayed by each report.
Report Report DataTransfer Jobs Currently in QF
• Transfer Job Number• Status• Carrier Ids• Number of Data Objects• Order• Checksum A• Virus Check X• Verified• Into Quarantine• Out of Quarantine• Virus Check Y• Checksum B
NoteIf a transfer job has a status of QF Processing Complete it will not be included in this report.
Transfer Jobs that Failed in QF
• Transfer Job Number• Current Status• Failure Reasons
Transfer Jobs that Finished QF
• Transfer Job Number• Date Completed• Completion Comment• Completed By
Continued on next page
DPR User Manual Chapter 5 - 16

QF-DPR Reports, Continued
QF-DPR Report Description (continued)
Report Report DataTransfer Jobs that were Rejected
• Transfer Job Number• Rejection reasons• Rejected By
Transfer Jobs Awaiting Final Verification
• Transfer Job Number• Date of Checksum B• Checksummed By
User Report • User Name• Transfer Job Number• Tasks Performed
Report Generation Process
Follow these steps to generate a report.
Step Action1. Select Generate Reports from the Report menu.
ResultThe Select the Report to Produce screen will display.
Example
Continued on next page
DPR User Manual Chapter 5 - 17

QF-DPR Reports, Continued
Report Generation Process (continued)
Step Action2. Click the Show Report button for the required report.3. To save the report, click the Save as CSV button located at the
bottom left hand corner of the screen.4. Navigate to an output directory and enter a name for this file.5. Click the Save button
ResultReport will be saved to the output directory.
6. Click the Close button on the report window.7. End of Report Generation process.
DPR User Manual Chapter 5 - 18

Chapter 6 – Preservation Processing
Overview
Introduction This chapter covers the steps undertaken in the Preservation phase of the
digital preservation process. During this phase the process is working at data object level. Xena software converts each data object into two different formats; binary normalised and normalised. These are now referred to as Archival Information Packages (AIPs). Each AIP, post preservation process, will be identified by a unique identifier allocated by Xena during conversion.
Purpose The purpose of the Preservation phase is:
1. to confirm that the digital records match exactly what was processed in the quarantine phase
2. to create binary normalised and normalised AIPs.3. to create new checksum files using the AIP Xena identifiers.
Contents This chapter contains the following topics:
Topic See PagePre Normalisation Phase 6-2Perform Binary Normalisation 6-5Perform Normalisation 6-6Perform Advanced Normalisation 6-7Post Normalisation Phase 6-9PF-DPR Reports 6-13
DPR User Manual Chapter 6-1
Pre Normalisation Phase
Description The Pre Normalisation phase of the Preservation process imports the XML
Export file created at the end of the quarantine phase, creates a standardised directory structure on the preservation carrying device and checks that the data on the quarantine carrying device has not been corrupted or changed since the last checksum authentication during the quarantine phase.
Quarantine Export File
As there is no direct connection between the Quarantine workstation and the Preservation Workstation, information relating to each data object must be imported into the PF-DPR. The Quarantine XML Export file contains metadata relating to each data object.
It also contains information on new users and/or new permissions. See Chapter 4 – Access and Security for more details.
Pre Preservation Processing
Following these steps to import and commence Pre Normalisation processing
Step Action1. Connect the carrying device to the PF-DPR and log in.2. Click on the Import Transfer Job Information button located at the
bottom left hand corner of the Select Transfer Job screen.3. In the Open dialogue box, navigate to and select the QF Export
file.4. Click Open.
ResultThe transfer job is now added to the list of transfer jobs.
5. Select transfer job to be processed.6. Click the Process Selected Transfer Job button.
ResultThe Working on <Transfer Job Number> screen will display.
7. Click on the Enter Carrier Locations button.
ResultA popup window will display.
Continued on next page
DPR User Manual Chapter 6-2

Pre Normalisation Phase, Continued
Pre Preservation Processing (continued)
Step Action8. Browse to the location of the quarantine carrying device and click
Open.
NoteThe identity of the input carrier device will auto populate.
9. Browse to the location for the preservation carrying device and click Open.
Example
NoteThe identity of the output carrier device will auto populate.
10. Click Done.11. Click Yes to really commit the changes.12. Click the Process button for Pre Normalisation.
ResultThe Pre Normalisation screen will display.
13. Click the Verify Checksums button.
ResultIf the checksums passed, the radio button will switch to Yes. If they failed, the radio button will remain on No, the Stop Processing button will become active and an error message will display.
Example
Continued on next page
DPR User Manual Chapter 6-3

Pre Normalisation Phase, Continued
Pre Preservation Processing (continued)
Step Action14. Click the Do Packing button.
ResultA standardised directory structure will be created on the Preservation carrying device. This is the directory to which the Xena AIPs will be copied.
15. Click the Done button.16. Click Yes to really commit the changes.17. This is the end of the Pre Normalisation process.
DPR User Manual Chapter 6-4

Perform Binary Normalisation
Description Binary normalisation involves converting a data object into a Base64
representation of the bit stream and wrapping it in XML containing metadata about that data object.
Binary Normalisation
Follow these steps to perform binary normalisation.
Step Action1. Click the Process button for Perform Binary Normalisation.
ResultThe Perform Binary Normalisation screen will display. The Data Objects column will be populated with the names of all the data objects included in the transfer job.
2. Click the Do binary normalisation! button.
ResultAs each data object is successfully binary normalised, the Binary Normalised checkbox will be ticked and the new AIP ID will be displayed in the Output File Name column. The Status and Processed data fields will be updated during the process.
FailuresIf a data object(s) fails to normalise, the Error check box will be ticked and a description of the error will be displayed in the Error Reason field. As well, the Stop Processing button will become active and the No radio button will be selected. See Chapter 8 – Handling Exception Errors.
NoteTo delete the new AIPs from both the output carrying device and the preview screen, click the Clear button.
3. When all data objects have been binary normalised, the Yes radio button will be selected.
4. Click the Done button.5. Click Yes to really commit the changes.
ResultThe Perform Binary Normalisation process is now complete. The Working on <Transfer Job Number> screen will display with a tick against this process.
DPR User Manual Chapter 6-5

Perform Normalisation
Description Normalisation involves the conversion of the data objects from their original
formats into standardised, openly documented formats that will be accessible into the future.
Perform Normalisation
Follow these steps to perform normalisation.
Step Action1. Click the Process button for Perform Normalisation.
ResultThe Perform Normalisation screen will display. The Data Objects column will be populated with the names of all the data objects included in the transfer job.
2. Click the Do Normalisation button.
ResultThe first part of the normalisation process is to determine the file type of the data object. Once this has been done, the data objects will be normalised by the appropriate Xena plugin.
As each data object is successfully normalised, the Guessed Type and Normalised by checkboxes will be ticked and the new AIP Id will be displayed in the Output File Name column. The Status and Processed data fields will be updated during the process.
NoteFor additional normalisation preferences, see Perform Advanced Normalisation
3. If a data object fails normalisation, it can be binary normalised by clicking the Binary Normalise Errors button.
4. When all data objects have been normalised, the Yes radio button will be selected.
5. Click the Done button.6. Click Yes to really commit the changes.
ResultThe Perform Normalisation process is now complete. The Working on <Transfer Job Number> screen will display with a tick against this process.
DPR User Manual Chapter 6-6

Perform Advanced Normalisation
Description The Advanced Normalisation panel provides the user with the ability to
bypass the Guesser and select their own choice of normaliser.
Perform Advanced Normalisation
Follow these steps to perform advanced normalisation.
Step Action1. Click the Advanced Normalisation button located on the right hand
side of the Perform Normalisation screen, directly under the preview window.ResultThe Advanced Normalisation panel will display.
Example – Before Guesser.
2. Click the Guess All button.Example – After Guesser.
NoteData objects can be either individually normalised or normalised as a total.
Continued on next page
DPR User Manual Chapter 6-7

Perform Advanced Normalisation, Continued
Perform Advanced Normalisation (continued)
Step Action3. To select all data objects, click the Select All button4. To select an individual data object – or a selection of data objects,
highlight them in the preview window.5. When the data object(s) has been selected, you can choose a
specific normaliser type by clicking the Set Type button.
ResultA popup window with a drop down list of normaliser types will display.
Example
6. Select a New Type and then click the Normalise button.
ResultThe highlighted data objects will be normalised by the selected normaliser type. This process can be stopped at any time by clicking the Stop button. The normalised AIPs can then be deleted by clicking either the Clear or Clear Output Folder buttons.
7. Click the Close button to return to the Perform Normalisation screen.
DPR User Manual Chapter 6-8

Post Normalisation Phase
Description After normalisation processing, a data object is ready to be moved to the DR-
DPR. It is now referred to as an Archival Information Package not a data object and can only be identified by a unique Xena identifier.
However before it is imported into the DR-DPR, quality assurance checks need to be carried out to ensure that:
1. The binary normalised AIPs, when exported back to their original file format, exactly match the original data object; and
2. The normalised AIPs contain the essence of the original data objects.
Checksums for the new AIPs also need to be generated. These new checksums will be used to ensure that the data does not become corrupt prior to the AIPs being copied to the Digital Repository.
Post Normalisation Process
Follow these steps to perform post normalising processing.
Step Action1. Select the Process button for Post Normalisation.
ResultThe Post Normalisation screen will display.
Example
Continued on next page
DPR User Manual Chapter 6-9

Post Normalisation Phase, Continued
Post Normalisation Process (continued)
Step Action2. Click the Verify binary packages button.
ResultAll the binary normalised AIPs will be exported back to their original file format and then checked against the original data objects. This is to ensure that the binary normalisation process has not corrupted the original data object.
3. Click the Details button.
ResultA popup window will display showing the results of the verification process.
Example
4. Click OK to close this window.5. Check the Perform Normalised Quality Assurance Yes radio
button.
NoteThis option is currently only a placeholder. In future versions this process will be performed by the PF-DPR.
6. Click the Generate Checksums button.
ResultNew checksums will be created for the AIPs.
Continued on next page
DPR User Manual Chapter 6-10

Post Normalisation Phase, Continued
Post Normalisation Process (continued)
Step Action7. Click the Details button.
ResultA popup window will display showing the results of the checksum generation process.
Example
8. Click OK to close this window.9. Click the Done button.10. Click Yes to really commit the changes.
ResultThe Post Normalisation process is now complete. The Working on <Transfer Job Number> screen will display with a tick against this process.
11. To mark the job complete, click on the Mark Complete Process button.
ResultThe Mark Complete screen will display.
Continued on next page
DPR User Manual Chapter 6-11

Post Normalisation Phase, Continued
Post Normalisation Process (continued)
Step Action12. Check the PF Processing Complete check box.13. Add comments if required.
NoteIf there has been any failure during the Preservation process, the check box for the effected step will remain unchecked. However, the transfer job can still be marked complete and an XML export file created if a reason for proceeding is provided in the Comments text box.
14. To create the XML file that will be imported into the DR-DPR, click the Export button.
15. Navigate to and select the save location.16. This is the end of the PR-DPR process. Click Quit from the
Action menu to close the PF-DPR.
DPR User Manual Chapter 6-12

PF-DPR Reports
Description There are six reports that can be generated through the Preservation DPR.
They are:
• Transfer Jobs Currently in PF• No Normaliser Report• Transfer Jobs that Finished PF• Transfer Jobs that Failed Wrapping• Transfer Jobs Awaiting Final Verification• User Report
The reports can be saved as a CSV file to a specified output directory.
PF-DPR Report Description
The table below describes the type of data that is displayed by each report.
Report Report DataTransfer Jobs Currently in PF
• Transfer Job Number• Status• Checksum C passed• Wrapping Successful• Normalising Successful
No Normaliser Report
• Transfer Job Number• Data Object• Processing Order• Error Message
Transfer Jobs that Finished QF
• Transfer Job Number• Date Completed• Completion Comment• Completed By
Transfer Jobs that Failed Wrapping
• Transfer Job Number• Status• Processing Order• Binary normalised by• Wrapping Date• Failed Data Objects
Transfer Jobs Awaiting Final Verification
• Transfer Job Number• Date of Normalising• Normalised By
Continued on next page
DPR User Manual Chapter 6-13

PF-DPR Reports, Continued
PF-DPR Report Description (continued)
Report Report DataUser Report • User Name
• Transfer Job Number• Tasks Performed
Report Generation Process
Follow these steps to generate a report.
Step Action1. Select Generate Reports from the Report menu.
ResultThe Select the Report to Produce screen will display.
Example
Continued on next page
DPR User Manual Chapter 6-14

PF-DPR Reports, Continued
Report Generation Process (continued)
Step Action2. Click the Show Report button for the required report.3. To save the report, click the Save as CSV button located at the
bottom left hand corner of the screen.4. Navigate to an output directory and enter a name for this file.5. Click the Save button
ResultReport will be saved to the output directory.
6. Click the Close button on the report window.7. End of Report Generation process.
DPR User Manual Chapter 6-15


Chapter 7 – Digital Repository Processing
Overview
Introduction After going through the preservation process, an AIP is ready to go into the
Repository.
The DPRs collect a pre-determined list of metadata for each data object within each step of the digital preservation process and this metadata is ingested into Quest during the digital repository phase. Quest then uses this metadata to manage the preserved AIPs.
For more information on Quest see the Quest User Manual.
Contents This chapter contains the following topics:
Topic See PageDigital Repository Phase 7-2DR-DPR Reports 7-6
DPR User Manual Chapter 7-1

Digital Repository Phase
Purpose The purpose of digital repository phase is to import the transfer metadata into
the DR-DPR, to validate checksum authentication, to copy the transfer data into the digital repository and to then ingest the metadata into Quest.
Copy Transfer to Digital Repository
The AIP files are manually copied from the preservation carrying device to the Digital Repository by the operator.
Digital Repository Process
Follow these steps to perform digital repository processing.
Step Action1. Connect the carrying device to the DR-DPR and log in.2. Click the Import Transfer Job Information button located at the
bottom left hand corner of the Select Transfer Job screen.3. Navigate to and select the XML export file created at the end of
preservation processing.4. Click the Open button.
ResultThe transfer job will be shown on the transfer job list.
5. Select the transfer job.6. Click on the Process Selected Transfer Job button.
ResultThe Working on <Transfer Job Number> screen will display.
Example
Continued on next page
DPR User Manual Chapter 7-2
Digital Repository Phase, Continued
Digital Repository Process (continued)
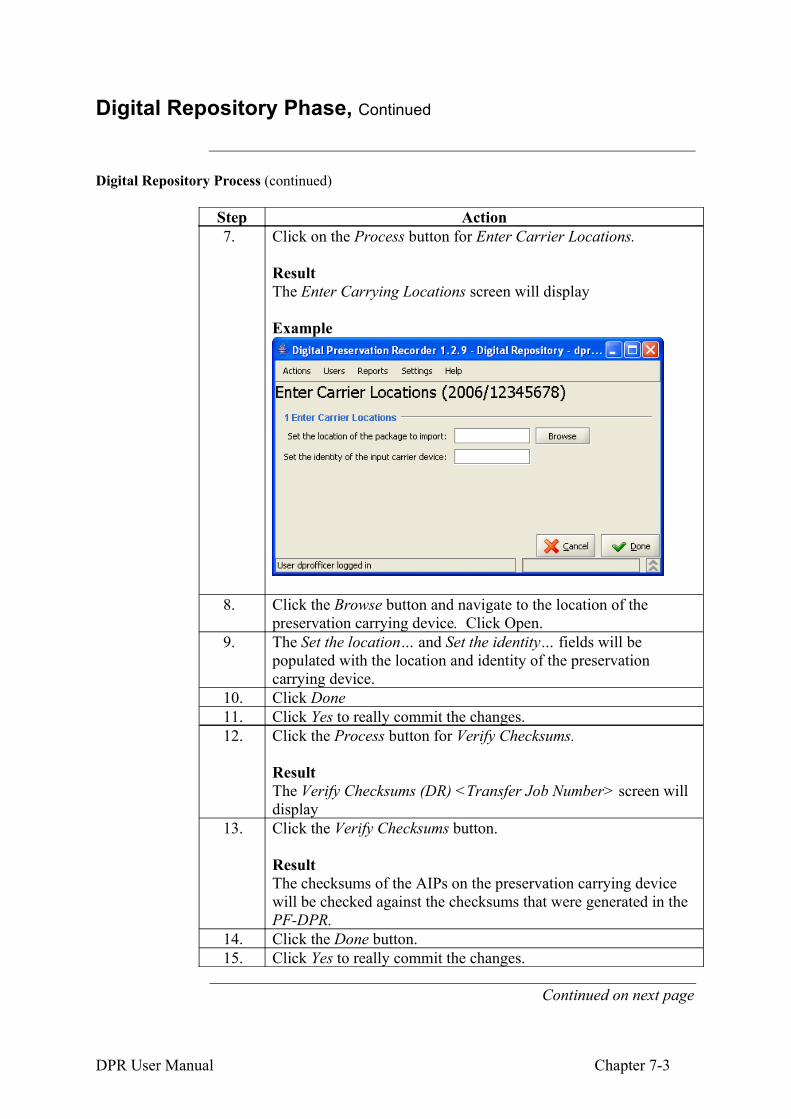
Step Action7. Click on the Process button for Enter Carrier Locations.
ResultThe Enter Carrying Locations screen will display
Example
8. Click the Browse button and navigate to the location of the preservation carrying device. Click Open.
9. The Set the location… and Set the identity… fields will be populated with the location and identity of the preservation carrying device.
10. Click Done11. Click Yes to really commit the changes.12. Click the Process button for Verify Checksums.
ResultThe Verify Checksums (DR) <Transfer Job Number> screen will display
13. Click the Verify Checksums button.
ResultThe checksums of the AIPs on the preservation carrying device will be checked against the checksums that were generated in the PF-DPR.
14. Click the Done button.15. Click Yes to really commit the changes.
Continued on next page
DPR User Manual Chapter 7-3

Digital Repository Phase, Continued
Digital Repository Process (continued)
Step Action16. Click the Process button for Record Details of Digital Repository.
ResultThe Record Details of Digital Repository <Transfer Job Number> screen will display
17. Under Copy to DR Passed check the Yes radio button.18. Click the Export to Quest button.19. To open a window to view details of the export, click the two blue
arrow icon at the bottom right hand corner of the screen.
Example
Result
Continued on next page
DPR User Manual Chapter 7-4
Click here

Digital Repository Phase, Continued
Digital Repository Process (continued)
Step Action20. Click the Close button.21. When the ingest is complete, the Details Exported to Quest box is
ticked. Click the Done button.22. Click Yes to really commit the changes.23. Click the Process button for Mark Complete.24. Check the Confirm DR Processing Complete box.25. Click the Done button.
NoteIf not all the checkboxes have been ticked – that is not all steps have been completed - an error message will display.
Example
26. Add text to the Comments text box
Example
27. Click Yes to really commit the changes.28. Click Quit from the Action menu to close the DR-DPR.29. This is the end of the DR-DPR process.
DPR User Manual Chapter 7-5

DPR Reports
Description There are six reports that can be generated through the Digital Repository DPR. They are:
• Transfer Jobs Currently in DR• Transfer Jobs that Failed in DR • Transfer Jobs that Finished DR• Transfer Jobs Awaiting Final Verification in DR• User Report• DPR Statistics
The reports can be saved as a CSV file to a specified output directory.
DR-DPR Report Description
The table below describes the type of data that is displayed by each report.
Report Report DataTransfer Jobs Currently in DR
• Transfer Job Number• Status• Checksum D passed• Copy to DR• Exported to Quest
Transfer Jobs that Failed in DR
• Transfer Job Number• Current Status• Failure Reasons
Transfer Jobs that Finished DR
• Transfer Job Number• Date Competed• Completed Comment• Completed By
Transfer Jobs Awaiting Final Verification in DR
• Transfer Job Number• Date Exported to Quest• Exported By
User Report • User Name• Transfer Job Number• Tasks Performed
DPR Statistics • Number of Transfer Jobs• Number of AIPs• Number of Binary normalised AIPs• Number of Normalised AIPs
Continued on next page
DPR User Manual Chapter 7-6

DPR Reports, Continued
Report Generation Process
Follow these steps to generate a report.
Step Action1. Select Generate Reports from the Report menu.2. Click the Show Report button for the required report.
ResultThe report will display in its own window.
3. To save the report, click the Save as CSV button located at the bottom left hand corner of the screen.
4. Navigate to an output directory and enter a name for this file.5. Click the Save button.
ResultReport will be saved to the output directory.
6. Click the Close button on the report window.7. End of Report Generation Process.
DPR User Manual Chapter 7-7


Chapter 8 – Handling Errors
Overview
Introduction The user may stop transfer jobs if they fail a particular process step. There are
two options for dealing with transfer jobs that have been stopped. They are to:
• reject the job; or• perform remedial action and reprocess it.
The Digital Preservation Process Manager will decide which of these options will be followed. This will be dependant on many factors and must be recorded in writing.
Contents This chapter contains the following topics:
Topic See PageStop a Transfer Job 8-2Reject a Transfer Job 8-4Perform Remedial Action 8-6Reprocess a Transfer Job 8-7
DPR User Manual Chapter 8-1

Stop a Transfer Job
Description When a process step fails, the Stop Processing button on the bottom left hand
corner of selected screens becomes active. When this button is clicked, the Handle Stopped Transfer Job screen displays.
Handle Stopped Transfer Job Screen
Below is an example of the Handle Stopped Transfer Job screen in the QF-DPR.
Failed Process Steps
The table below lists the processes that can result in the Stop Processing button becoming active when they fail.
Continued on next page
DPR User Manual Chapter 8-2

Stop a Transfer Job, Continued
Mark Complete Failed Transfer Job
Transfer Jobs that fail a process step cannot complete the Mark Complete step without a reason being entered in the Comments text box. For example, the name of the Transfer Officer who approved continuation, the date of that approval and the file reference where that approval is recorded.
DPR User Manual Chapter 8-3
DPR Process Step Label This process step will fail if…….
QF
Checksum A and BThe checksums of the data objects copied to the quarantine carrying device do not match the checksums listed in the manifest file.
Virus Check X and YOne or a number of data objects contain a virus. If a virus is found, the virus and data object it is in are noted and the transfer is referred back to the Transfer Section.
Transfer Job VerifiedThe data objects listed in the supporting documentation that came with the transfer job do not match what was actually contained on the transfer carrying device.
PF
Verify Checksums
The checksums of the data objects on the quarantine carrying device do not match the checksums listed in the quarantine XML export file that was imported into the PF-DPR.
Do Packing The PF-DPR is unable to create the standardised directory structure on the preservation carrying device.
Perform Binary Normalisation A data object cannot be binary normalised.
Perform Normalisation A data object cannot be normalised.
Verify Binary Packages
A binary normalised AIP that has been exported back to its original file format does not exactly match the original data object.
Generate Checksums Checksums for the newly created AIPs cannot be generated.
DRVerify Checksums
The checksums of the data objects on the preservation carrying device do not match the checksums listed in the preservation XML file that was imported into the DR-DPR.
Transfer Copied to Digital Repository The AIPs cannot be copied into the Digital Repository.

Reject a Transfer Job
Description A transfer job can be rejected in all three DPRs. If a job is rejected in the
QF-DPR, no further processing can take place on that job and its transfer job number cannot be used again. If a job is rejected in the PF-DPR, it can be reprocessed in the QF-DPR and then reimported into the PF-DPR. Similarly, if a job is rejected in the DR-DPR it can be reprocessed in the PF-DPR and then reimported.
Reject Transfer Job
Follow these steps to reject a Transfer Job.
Step Action1. When a process step fails, click the now active Stop Processing
button located on the bottom left hand corner of the screen. ResultA popup Stop Processing box will display.
Example
2. Click Yes to stop processing this transfer job.
ResultThe Handle Stopped Transfer Job screen will display.
3. Click the Reject button.
ResultA popup Confirm Rejection box will display.
Example
Continued on next page
DPR User Manual Chapter 8-4

Reject a Transfer Job, Continued
Reject Transfer Job (continued)
Step Action4. Enter a reason for rejecting the job.5. Click OK
ResultBoth the popup box and the Handle Stopped Job screen will close, the Working on <Transfer Job> screen will display. If in the QF-DPR, no further processing can take place on this transfer. If in either the PF-DPR or the DR-DPR, this job can be reprocessed via QF and re-imported.
Example
End of Reject Transfer Job process.
DPR User Manual Chapter 8-5

Perform Remedial Action
Description Remedial work is done on a transfer job when it is impractical to ask the
agency to resubmit the transfer or when the error can be rectified.
The details of all remedial action undertaken should be entered even if the action was unsuccessful.
Perform Remedial Action Process
Follow these steps to perform remedial action.
Step Action
1. Click on the Stop Processing button.2. Click Yes to really stop processing this transfer job.
ResultThe Handle Stopped Transfer Job (QF) screen will display.
3. Select the Perform Remedial Action button.4. Enter the Details of Remedial Action in the text box.
Example
NoteIt is mandatory to enter the details of the remedial action.
5. Select Yes or No for Remedial Action Successful.
ResultIf you select Yes, the Restart button will become active. If you select No, the Resubmit button will become active.
6. Click the Restart button to return to the Working on Transfer Job screen. Reprocessing can now take place.
7. Alternatively, click the Resubmit button to return to the Handle Stopped Transfer Job screen. A different remedial action or rejection of the transfer job can now take place.
8. End of Perform Remedial Action process.
DPR User Manual Chapter 8-6

Reprocess a Transfer Job
Description A failed transfer job can be reprocessed in all three DPRs if Remedial Action
is successful.
• If the failure occurred in the QF-DPR, the job can be reprocessed from the Pre-Quarantine step.
• If the failure occurred in the PF-DPR, the job can be returned to the QF-DPR for reprocessing and then reimported back into the PF-DPR.
• If the failure occurred in the DR-DPR, the job can be returned back to the PF-DPR or, if required, back to the PF-DPR for reprocessing and then reimported back into the PF-DPR and then the DR-DPR.
NoteThe process for reprocessing and reimporting a transfer job from the DR-DPR to the PF-DPR is the same as from the PR-DPR to the QF-DPR.
Quarantine Exception Processing
Follow these steps to reprocess a transfer job in the QF-DPR.
NoteThe job status displayed in the Quarantine > Select Transfer Job to Process screen will have been set back to Restarted in QF.
Step Action1. From the Working on <Transfer Job Number> screen, click the
Pre-quarantine Processing process button.
Example
DPR User Manual Chapter 8-7

Continued on next page
DPR User Manual Chapter 8-8

Reprocess a Transfer Job, Continued
Quarantine Exception Processing (continued)
Step Action2. Follow the steps outlined in Chapter 5 - Pre-Quarantine Phase to
reprocess the job through to the Export stage.
Preservation & Digital Repository Exception Processing
Follow these steps to return and then reprocess a transfer job in the QF-DPR or PF-DPR:
NoteThe job status displayed in the Preservation/Digital Repository > Select Transfer Job to Process screen will have been set to Returned to QF or Returned to PF.
Step Action1. Log on to the Quarantine Workstation.2. Select the transfer job from the Select Transfer Job to Process
screen and click the Process Selected Job button.
NoteThe current status of this job will be Exported to PF?
3. The Working on <Transfer Job Number> screen will display.
NoteAll the Process buttons will have a green tick beside them.
4. Click the Reprocess button.
ResultA popup box will display.
Example
Continued on next page
DPR User Manual Chapter 8-9

Reprocess a Transfer Job, Continued
Preservation & Digital Repository Exception Processing (continued)
Step Action5. Click OK.
ResultThe Reprocess a Transfer Job (QF) screen will display.
Example
6. Enter a Reprocessing Reason.
NoteIt is mandatory to enter a reason for reprocessing.
7. Record New Carrier Device IDs.8. Click the Done button.9. Click Yes to really commit the changes.
ResultThe Working on <Transfer Job Number> screen will display.
10. Follow the steps outlined in Chapter 5 - Pre-Quarantine Phase to reprocess the job through to the Export stage.
Continued on next page
DPR User Manual Chapter 8-10

Reprocess a Transfer Job, Continued
Preservation & Digital Repository Exception Processing (continued)
Step Action11. Log in to the Preservation Workstation.12. Click the Import Transfer Job button and navigate to the XML
Export file created at the end of step 10 above.
ResultA popup box will display.
Example
13. Click Yes.
ResultThe transfer job will be reimported into PF-DPR.
14. Follow the steps beginning at Chapter 6 – Pre Normalisation Phase to reprocess the job through the PF-DPR.
DPR User Manual Chapter 8-11

End of Digital Preservation Recorder User Manual
DPR User Manual Chapter 8-12