quick guide - creditreform
TRANSCRIPT

Quick Guide
Copyright Bureau van Dijk 2010 Last updated September 2010
Table Of Contents 1.0. INTRODUCTION.......................................................................................................................... 1
1.1. WHAT INFORMATION DOES AMADEUS CONTAIN?.......................................................................... 1 1.2. HOW IT HELPS YOU........................................................................................................................ 1 1.3. COVERAGE .................................................................................................................................... 2 1.4. SOFTWARE OVERVIEW................................................................................................................... 2 1.5. SYSTEM REQUIREMENTS ............................................................................................................... 2 1.6. FREQUENTLY ASKED QUESTIONS................................................................................................... 2
2.0. GETTING STARTED ................................................................................................................... 6 2.1. HOME PAGE ................................................................................................................................... 6
2.1.1 Overview ................................................................................................................................... 6 2.1.2 Advanced search tool-box......................................................................................................... 7 2.1.3 Search side menu ...................................................................................................................... 8 2.1.4 Search strategy tool-box ........................................................................................................... 9
2.2. PRODUCT TOOL-BAR...................................................................................................................... 9 2.3. DEFINING YOUR DEFAULT HOME PAGE .......................................................................................... 9 2.4. NAVIGATING ............................................................................................................................... 10
3.0. SEARCH....................................................................................................................................... 11 3.1. QUICK SEARCH ............................................................................................................................ 11 3.2. WORKING WITH THE ALPHABETICAL LIST OF SEARCH CRITERIA .................................................. 12 3.3. WORKING WITH THE GROUPED VIEW OF SEARCH CRITERIA ......................................................... 13 3.4. WORKING WITH YOUR SAVED SEARCHES..................................................................................... 14
3.4.1 Load a saved search................................................................................................................ 14 3.4.2 Delete a saved search ............................................................................................................. 14 3.4.3 Add/remove a saved search to your favourites ....................................................................... 15 3.4.4 Sorting the list of saved searches ............................................................................................ 15
3.5. WORKING WITH YOUR FAVOURITE SEARCHES ............................................................................. 15 3.5.1 Loading a search..................................................................................................................... 15 3.5.2 Organising your favourites ..................................................................................................... 15 3.5.3 Removing a favourite search or directory............................................................................... 16
3.6. WORKING WITH YOUR SEARCH HISTORY ..................................................................................... 16 3.7. SEARCH STRATEGY TOOL-BOX .................................................................................................... 17
3.7.1 Working with search steps ...................................................................................................... 17 3.7.2 Search strategy tool-bar.......................................................................................................... 17
3.8. BOOLEAN SEARCHING................................................................................................................. 18 3.9. SAVE A SEARCH........................................................................................................................... 19
3.9.1 Procedure................................................................................................................................ 19 3.9.2 Other functions........................................................................................................................ 19
4.0. VIEWING SEARCH RESULTS ................................................................................................ 20 4.1. LIST OF RESULTS ......................................................................................................................... 20
4.1.1 Overview ................................................................................................................................. 20 4.1.2 Working with a list of companies ............................................................................................ 20 4.1.3 List tool-bar ............................................................................................................................ 21 4.1.4 List side-menu ......................................................................................................................... 22
4.2. LIST FORMATS ............................................................................................................................. 23 4.2.1 Overview ................................................................................................................................. 23 4.2.2 Create a new list format.......................................................................................................... 24 4.2.3 Modify a list format................................................................................................................. 24 4.2.4 Save a list format .................................................................................................................... 25 4.2.5 Load a previously saved or predefined list ............................................................................. 25 4.2.6 Delete a previously saved list format ...................................................................................... 25
ii

Table Of Contents
4.2.7 Define the default list format................................................................................................... 25 4.3. MARKING COMPANIES FROM THE LIST OF RESULTS ..................................................................... 26
5.0. COMPANY REPORTS ............................................................................................................... 27 5.1. OVERVIEW .................................................................................................................................. 27 5.2. REPORT SECTIONS ...................................................................................................................... 27
5.2.1 Report section tool-bar ........................................................................................................... 28 5.3. REPORT TOOL-BAR ...................................................................................................................... 28 5.4. REPORT LATERAL MENU.............................................................................................................. 29
5.4.1 Back to the list of results ......................................................................................................... 29 5.4.2 Search ..................................................................................................................................... 29 5.4.3 Define the format .................................................................................................................... 29 5.4.4 Display a specific section........................................................................................................ 30
5.5. REPORT FORMATS ....................................................................................................................... 30 5.5.1 Overview ................................................................................................................................. 30 5.5.2 Create a new report format..................................................................................................... 31 5.5.3 Modify a report format............................................................................................................ 31 5.5.4 Save a report format ............................................................................................................... 31 5.5.5 Load a previously saved or predefined report ........................................................................ 32 5.5.6 Delete a previously saved report format ................................................................................. 32 5.5.7 Define the default report ......................................................................................................... 32
5.6. REPORT SECTION DISPLAY OPTIONS............................................................................................. 32 5.7. CUSTOMISED SECTIONS ............................................................................................................... 33 5.8. MODIFY DATA OF A COMPANY .................................................................................................... 33
5.8.1 Edit a specific section ............................................................................................................. 33 5.8.2 Update data: ........................................................................................................................... 35
6.0. ALERTS........................................................................................................................................ 36 6.1. ALERTS - OVERVIEW.................................................................................................................... 36
6.1.1 Entity specific alerts................................................................................................................ 36 6.1.2 Global alerts ........................................................................................................................... 36
6.2. CREATING AND CONFIGURING ALERTS ........................................................................................ 37 6.3. LIST OF ALERTS ........................................................................................................................... 37
6.3.1 Overview ................................................................................................................................. 37 6.3.2 Working with the list of alerts ................................................................................................. 38
6.4. ALERTS SETTINGS........................................................................................................................ 38 6.5. ADDRESS BOOK ........................................................................................................................... 39
7.0. EXPORTING ............................................................................................................................... 40 7.1. WORKING WITH THE EXPORT SYSTEM ......................................................................................... 40
7.1.1 Overview ................................................................................................................................. 40 7.1.2 Limitations .............................................................................................................................. 40
7.2. EXPORT FORMATS ....................................................................................................................... 41 7.2.1 Which export format is more appropriate?............................................................................. 41
7.3. EXPORTING FROM THE LIST OF RESULTS...................................................................................... 43 7.3.1 Overview ................................................................................................................................. 43 7.3.2 Procedure................................................................................................................................ 43
7.4. EXPORTING FROM A REPORT........................................................................................................ 45 7.4.1 Overview ................................................................................................................................. 45 7.4.2 Basic export ............................................................................................................................ 46
8.0. ANALYSES .................................................................................................................................. 47 8.1. SEGMENTATION........................................................................................................................... 47 8.2. PEER ANALYSIS ........................................................................................................................... 47 8.3. AGGREGATION ............................................................................................................................ 48 8.4. STATISTICAL DISTRIBUTION ........................................................................................................ 48
iii

Amadeus - Quick Guide
8.5. CONCENTRATION ANALYSIS ........................................................................................................ 48 8.6. LINEAR REGRESSION ................................................................................................................... 49
9.0. DEFINE YOUR SETTINGS....................................................................................................... 50 9.1. MANAGING THE APPLICATION SETTINGS ..................................................................................... 50 9.2. MANAGING YOUR ACCOUNT SETTINGS ........................................................................................ 50 9.3. GENERAL OPTIONS ...................................................................................................................... 50 9.4. MANAGING YOUR EXPORTS ......................................................................................................... 51 9.5. MANAGING YOUR SEARCH SETTINGS........................................................................................... 51 9.6. MANAGING LIST FORMATS AND LIST SETTINGS ........................................................................... 51 9.7. MANAGING REPORT FORMATS AND REPORT SETTINGS ................................................................ 51 9.8. MANAGING OWNERSHIP SETTINGS .............................................................................................. 51 9.9. ANALYSIS SETTINGS.................................................................................................................... 51 9.10. MY OWN PEER GROUPS................................................................................................................ 52
9.10.1 View/change the companies associated to a peer group ..................................................... 52 9.10.2 Delete a peer group............................................................................................................. 52
9.11. MANAGING CUSTOMISED SECTIONS SETTINGS............................................................................. 53 9.12. MANAGING USER DEFINED VARIABLES SETTINGS ........................................................................ 53 9.13. MANAGING MY DATA ................................................................................................................. 53 9.14. MY IMPORTED FIELDS.................................................................................................................. 53
9.14.1 Importing new fields ............................................................................................................ 54 9.14.2 Manage your imported fields............................................................................................... 55
10.0. INDEX........................................................................................................................................... 57
iv

1.0. Introduction
Amadeus contains comprehensive information on over 14 million companies across Europe. You can use it to research individual companies, search for companies with specific profiles and for analysis. Amadeus now has a new front end that makes it even easier and faster to use.
1.1. What information does Amadeus contain?
• Company information for both Western and Eastern Europe, with a focus on private company information
• Company financials in a standard format so you can compare companies across borders
• Financial strength indicators
• Directors
• Images of report and accounts for listed companies
• Stock prices for listed companies
• Detailed corporate structures
• Market research
• Business and company-related news
• M&A deals and rumours
• Maps and cartographic analysis
1.2. How it helps you
Amadeus is easy to use and helps you navigate company information quickly and easily.
• Search by hundreds of criteria – you can search by trends and over multiple years
• Create analysis across borders using our standard financial template
• Do a detailed financial analysis on a company – you can also include our complementary information including M&A deals and rumours, news and market research
• Refer to original filings using our library of scanned images
• Illustrate financials with our easy-to create graphs
• Get a quick view of a company’s financial strength
• See where companies are distributed geographically using the map analysis
• Monitor companies using our alert system
• Look at a company’s corporate structure in a tree diagram and find all companies with the same parent
• Create and analyse peer groups
• Know more about your leads and prospects, enrich your CRM system, create prospect lists and develop your accounts
1

Amadeus - Quick Guide
1.3. Coverage
Amadeus contains information for the following countries: Albania, Austria, Belarus, Belgium, Bosnia-Herzegovina, Bulgaria, Croatia, Cyprus, Czech Republic, Denmark, Estonia, Finland, France, Germany, Greece, Hungary, Iceland, Ireland, Italy, Kosovo, Latvia, Liechtenstein, Lithuania, Luxembourg, Rep. of Macedonia, Malta, Rep. of Moldova, Monaco, Montenegro, Netherlands, Norway, Poland, Portugal, Romania, Russian Federation, Serbia, Slovak Republic, Slovenia, Spain, Sweden, Switzerland, Turkey, Ukraine, United Kingdom.
1.4. Software overview
Over 100 search criteria can be combined using Boolean criteria to clearly identify the company set on which information will be displayed (reports) or that will be used for analysis (statistical analysis, peer reports, segmentations, etc.).
Data than can be displayed, exported, sent by e-mails or printed in customised lists or reports formats.
1.5. System Requirements
In order to use Amadeus, you will need the following:
• Windows 2000, XP, Vista or higher.
• Minimum screen resolution of 1024 x 768.
• Access to the Internet using either Internet Explorer 6.0 or Netscape 8.0, Firefox 1.5 or higher.
• A username and a password provided by Bureau van Dijk.
1.6. Frequently asked questions
Where is the data collected?
The data is collected by the Information Providers (IPs) of Amadeus at each national official public body in charge of collecting the annual accounts in its country They are always the official filed and audited accounts.
In some East-European countries where the data is difficult to get from a central source, IPs might collect it directly from the companies.
How is the data normalised?
The data is normalised in two ways :
a. Standard presentation of the accounts :BvD has done a detailed analysis of the most common formats of accounts used in Europe, either compulsory formats (like in France or in Belgium) or suggested formats (UK, Netherlands, Germany). The result of this analysis is BvD's standard format. This is a balance between a very detailed format that could have lots of gaps if information is not filed, and a very brief format with not enough information.
b. Standard industry codification : As most IPs use different industry classifications, BvD has manually allocated each company a CSO code (derived from the UK Statistical Office SIC codes). This avoids errors that arise when codes are automatically translated or cross-referenced.
2

Introduction
Are the notes to the accounts available ?
The notes are used to complete the Amadeus format of accounts. They are not separated out or added as another section of information on Amadeus.
Why does Amadeus not cover financial institutions and insurance companies ?
Because these two types of organisations have formats of accounts which are completely different from other companies and are not compatible with the format of accounts on Amadeus.
BvD has two products worldwide coverage on these institutions :
• BankScope for Banks and Financial Institutions
• ISIS for Insurance Companies.
How does BvD enrich the ownership data ?
BvD merges the ownership data it receives from all its IPs into one big database. This information is then analysed to identify each cross-border holding/subsidiary link by the national identification number of the companies involved.
BvD also enriches this database by the data it collects directly from the companies (e.g. annual reports listing shareholders and subsidiaries, private communications i.e. questionnaires sent to the companies) or from any other available source.
Does Amadeus list all owners and subsidiaries of a company ?
We aim to show complete ownership information on Amadeus but in some cases e.g. listed companies it is impossible.
We try also to collect complete information on all subsidiaries which are present in the Amadeus database (a subsidiary which does not satisfy the size criteria to be on Amadeus will not be listed).
What are the consolidation codes ?
The consolidation codes indicate for each statement its type :
• C: Consolidated
• U: Unconsolidated
• LF: Limited financials
• NA: No financials
and for the consolidated and unconsolidated statements whether the company's unconsolidated or consolidated companion statement is present or not :
• 1: there is no companion statement
• 2: there is a companion statement in the database
Thus e.g. C2 means : this is a consolidated statement and the unconsolidated statement of that company is also available in the database.
What is the difference between Public and Quoted ?
"Public" is a legal definition of the status of company used in the UK and Ireland. On Amadeus, this indicates the legal form of a company rather than a company's relationship to a Stock Exchange. "Quoted" companies are those companies listed on a Stock Exchange. There are about 6,200 such companies on Amadeus.
Could the trade descriptions be more detailed?
3

Amadeus - Quick Guide
It is financially impossible to maintain a database of 200,000 companies with more detailed trade description in English and in the local language.
Have the NAICS codes replaced the US SIC codes ?
No. They are both are now available on Amadeus.
What are the plans to add new countries ?
There are no short term plans to extend the coverage as it is difficult to source reliable and detailed information in other countries.
What is the difference between Operating Revenue/Turnover and Sales ?
The Sales figure includes all the revenue a company gets from selling its products to its clients.
The Operating Revenue/Turnover figure includes Sales plus all other revenue linked to the normal operations of the company (e.g. stock variation, subsidies in some countries).
In most cases the figure of Sales is very close to the figure of Operating Revenue/Turnover.
Is Operating Profit shown after Depreciation ?
Yes, in almost all cases.
Are Fixed Assets shown net of Depreciation ?
Yes.
Why are there no interim statements ?
Because only listed companies make interim statements available i.e. 3% of the companies in Amadeus.
Amadeus concentrates on private companies.
We publish other products with much more detailed information including interim reports about listed companies (e.g. BankScope, Osiris).
Why are there gaps in some reports ?
There are gaps in reports when the data is not made available by the companies (e.g. detailed accounts for many German companies, turnover for smaller British companies) either in accordance with the national laws or in violation with the national laws.
Note : Germany is a special case as accounts are only made available for a limited number of 15,000 companies (of which there are many small companies). Other German companies do not file their accounts.
Do the values for Operating Revenue/ Turnover published in Amadeus include the excise taxes for tobacco, petroleum or alcoholic beverages companies ?
There is no fixed rule for how companies deal with this issue. Amadeus provides the figures as they appear in a company's officially filed accounts; harmonizing them would be impossible, so some country-to-country differences remain.
In general, Amadeus includes the gross value for Operating Revenue/ Turnover, including excise taxes. For the United Kingdom and The Netherlands, however, Operating Revenue/ Turnover is provided net of excise taxes.
More detailed information is available for listed companies on Osiris.
Why are details of Operating Expenses (a.o. Cost of Goods sold vs. Material Costs) not comparable between countries on Amadeus?
4

Introduction
Based on difference of history and philosophy in accounting practices in Europe, there are mainly two types of reporting operating costs: by type of operations or by type of expenses.
• By type of operations: All costs are reported based on their link to the production process (costs necessary for the production + costs related to the operations but not the production such as administrative costs)
• By type of expenses: All costs, including depreciation, are reported based on the nature of the expense (material/goods, services, personnel, etc.)
Hence costs of goods sold is not equal as material costs on BvD format because "Cost of Goods sold" includes all costs directly related to the production process and their depreciation in the ‘by type of operations’ P/L structure while the "Material costs" include all purchases of the company (raw materials but also goods sold or distributed) in the ‘by type of expenses’ PL structure.
Amadeus displays by default the type of operation, but puts details of type of expenses in Memo Lines when available.
Do the sales figures represent external sales, internal sales or both?
Sisters or intragroup companies are treated as external companies at the local level. Only the consolidated figures of the mother company leverage the intragroup sales after having applied consolidation rules (revenues/costs).
5
2.0. Getting started
2.1. Home page
2.1.1 Overview
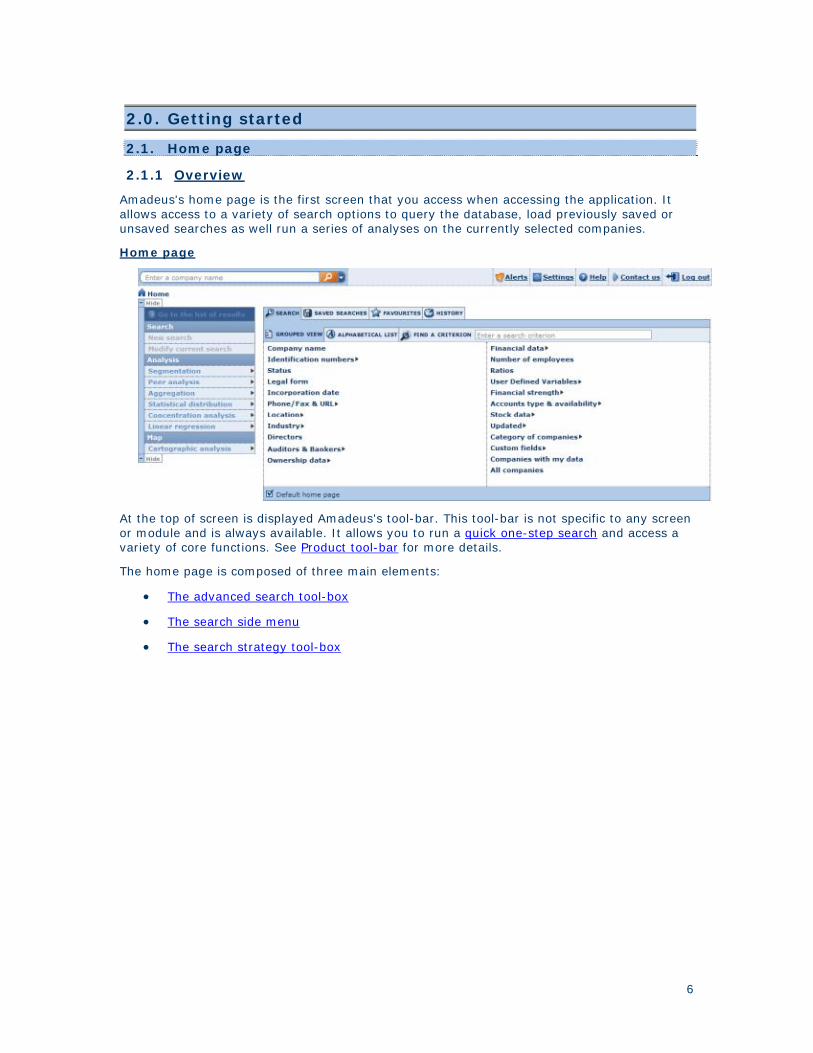
Amadeus's home page is the first screen that you access when accessing the application. It allows access to a variety of search options to query the database, load previously saved or unsaved searches as well run a series of analyses on the currently selected companies.
Home page
At the top of screen is displayed Amadeus's tool-bar. This tool-bar is not specific to any screen or module and is always available. It allows you to run a quick one-step search and access a variety of core functions. See Product tool-bar for more details.
The home page is composed of three main elements:
• The advanced search tool-box
• The search side menu
• The search strategy tool-box
6

Getting started
2.1.2 Advanced search tool-box
The advanced search options provide you with multiple search criteria allowing you to accurately find and retrieve companies.
Advanced search
The advanced search is composed of tabs and sub-tabs.
2.1.2.1 Search tab
Under the Search tab you may access all the available search criteria. The Search tab has two sub-tabs:
• Grouped view: unless you specify otherwise (see 'Defining your default home page' for more details) you are presented with the Grouped view of search criteria. The grouped view organises the different available search criteria by logical category. See 'Working with the grouped view of search criteria' for more details
• Alphabetical list: the alphabetical list tab presents all the available search criteria in an alphabetical list. See 'Working with the alphabetical list of search criteria' for more details.
In addition to these two sub-tabs, an edit-box enabling you to find a criterion is available:
1. Type in one or more words included in the search criterion you wish to use in the available edit-box.
2. As you type, a look-up menu is displayed underneath with all the criteria matching the text you typed in so far.
3. Click on the criterion you wish to use to access it.
2.1.2.2 Saved searches tab
Under the saved searches tab are listed all your previously saved search strategies and company sets. From this tab you may load a previously saved search, delete a previously saved search or add/remove a saved search to your favourites.
See 'Working with your saved searches' for more details.
7

Amadeus - Quick Guide
2.1.2.3 Favourites tab
Under the favourites tab are listed all the saved searches that you added as a favourite. You may create directories and sub-directories in order to organise and place favourite searches.
See 'Working with your favourite searches' for more details.
2.1.2.4 History tab
Under the history tab are listed all the searches you ran regardless of whether you saved them or not. Your history is organised by time period so you can easily find and access them according to whether you ran the search today, yesterday, two days ago, etc. You may load an unsaved search by clicking on it from this screen.
See 'Working with your search history' for more details.
2.1.3 Search side menu
The search side-menu contains a variety of links and menus allowing you to view the list of results, trash and create a new search as well as run a series of analyses on the currently selected companies.
Search side menu
You may hide the side menu in order to maximize your working space by clicking on the Hide button.
The other options are defined hereunder
Option Action Go to list of results: View the list of results
New search: Trash your current search and start a new search Modify current
search:Nothing
Segmentation: Run a segmentation analysis on the currently selected companies Peer analysis: Run a peer analysis on the currently selected companies Aggregation: Run an aggregation analysis on the currently selected companies
Concentration analysis:
Run a concentration analysis on the currently selected companies
Statistical distribution:
Run a statistical distribution analysis on the currently selected companies
Linear regression:Run a linear regression analysis on the currently selected companies
8

Getting started
2.1.4 Search strategy tool-box
The search strategy tool-box lists all the search steps that you specified and allows you to: modify a search step, save a search, delete one or all search steps, ignore a search step and more importantly, if you have more than one search step, build complex search strategies using Boolean operators.
See Search strategy tool-box for more details.
Notes: • The search strategy tool-box is only displayed if you specified at least one search step. • You may access this home page at any time by clicking on the navigation bread-
crumbs displayed at the top left of any screen. • By default you are presented with the grouped view of search criteria. Your default
home page may be customised. See Defining your default home page for more details.
2.2. Product tool-bar
At the top of any screen available in Amadeus are displayed a number of features and options accessible at any time when you are working.
• The edit-box allows you to run a quick one-step search according to a variety of criteria. See Quick search for more details.
• To the right of the tool-bar are displayed a number of buttons and menus defined below:
Button / Menu item
Function
Alerts Hover over this option to expand the alerts menu items allowing you to view and manage your list of alerts, define your alert settings and manage your list of recipients through the address book.
Settings Click on this button to access your user settings to fine-tune your preferences and manage your saved searches, layouts, reports, etc.
Help Hover over this option to expand the help menu items allowing you to access end-user documentation, list of tips of the day, coverage tables, download of the Web Add-in, etc.
Contact us Click on this button to access a screen allowing you to provide product feed-back and submit technical questions to BvD.
Log out End your current session and log-out of Amadeus
2.3. Defining your default home page
By default, when you access Amadeus's Home page you are presented with the grouped view of search criteria. You may change this default home page to:
• The alphabetical list of search criteria
• Your saved searches
• Your favourites
• Your search history
9

Amadeus - Quick Guide
To do so, go to the screen you wish to set as your default home page and activate the option Default home page. By doing so, each time you access the home page, you are presented with that tab.
2.4. Navigating
Navigation between the different screens and modules is very easy and intuitive. In addition to the different clearly labelled buttons and links, the following navigational features are available:
• At the top-left of each page, bread-crumbs are displayed allowing you to trace back the different operations you did. Click on a bread-crumb to go to that page (e.g. click on Home to return to the home page).
• You may freely use the Back button on your browser to return to the previous screen you were working from (e.g. modify your search criteria when viewing the list of results).
10
3.0. Search
3.1. Quick search
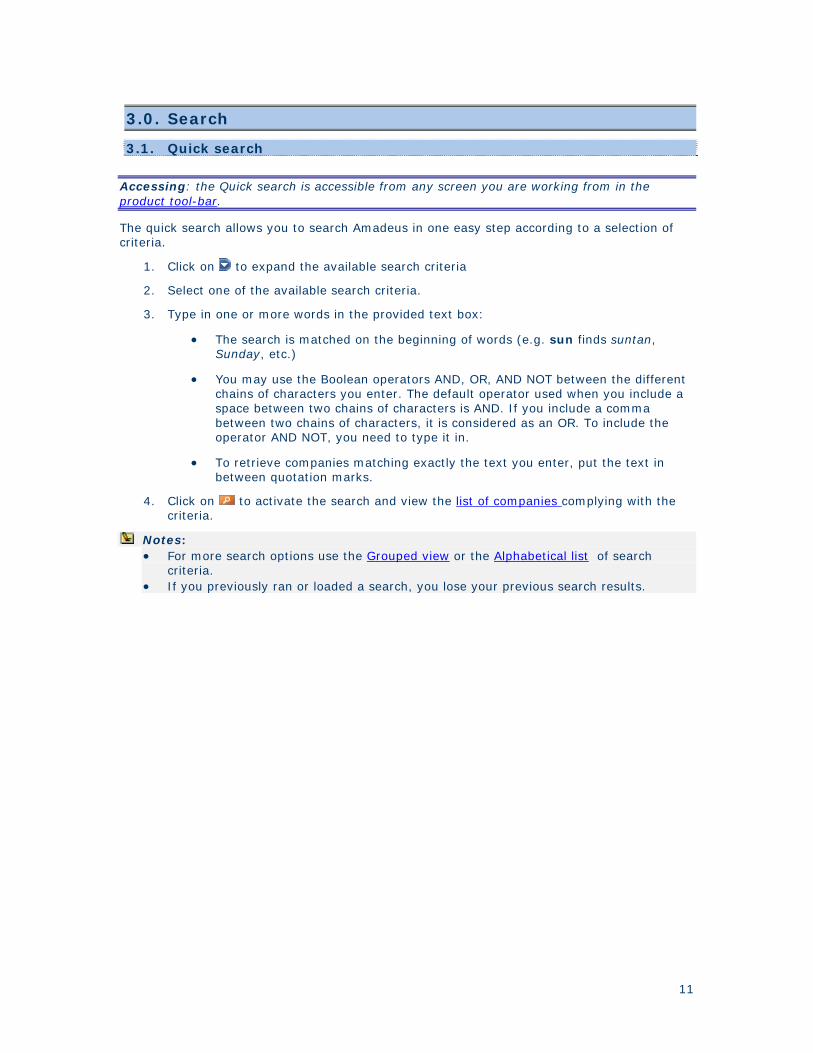
Accessing: the Quick search is accessible from any screen you are working from in the product tool-bar.
The quick search allows you to search Amadeus in one easy step according to a selection of criteria.
1. Click on to expand the available search criteria
2. Select one of the available search criteria.
3. Type in one or more words in the provided text box:
• The search is matched on the beginning of words (e.g. sun finds suntan, Sunday, etc.)
• You may use the Boolean operators AND, OR, AND NOT between the different chains of characters you enter. The default operator used when you include a space between two chains of characters is AND. If you include a comma between two chains of characters, it is considered as an OR. To include the operator AND NOT, you need to type it in.
• To retrieve companies matching exactly the text you enter, put the text in between quotation marks.
4. Click on to activate the search and view the list of companies complying with the criteria.
Notes: • For more search options use the Grouped view or the Alphabetical list of search
criteria. • If you previously ran or loaded a search, you lose your previous search results.
11

Amadeus - Quick Guide
3.2. Working with the alphabetical list of search criteria
Accessing: go to Amadeus's Home page, click on the Search tab and then click on the Alphabetical list sub-tab
The alphabetical list tab presents all the available search criteria in an alphabetical list.
Alphabetical list of criteria
1. Scroll down the list or use the shortcuts displayed above the list to find the search criterion by which you wish to search.
2. Click on the search criterion to access the search screen and specify your search step.
3. After you complete a search step, you return to the home page and your search step is displayed in the search strategy tool-box.
4. From there on, you may:
• Add another search step from the grouped view or the alphabetical list
• View your list of search results by clicking on the button View list of results from the search strategy tool-bar or the menu item Go to list of results from the search side-menu.
• Save your search by clicking on the Save button from the search strategy tool-box
• Run some analyses on the selected companies from the search side-menu
12

Search
3.3. Working with the grouped view of search criteria
Accessing: go to Amadeus's Home page, click on the Search tab and then click on the Grouped view sub-tab
The grouped view of search criteria organises the different available search criteria by logical category for easy access.
Grouped view of search criteria
1. To access a search screen and specify a search step, either:
• If there are no sub-criteria, click on the search criterion.
• If you see a displayed, hover over the option to expand to the category and click on the criterion.
2. After you complete a search step, you return to the home page and your search step is displayed in the search strategy tool-box
3. When you return to the home page, you may:
• Add another search step from the grouped view or the alphabetical list
• View your list of search results by clicking on the button View list of results from the search strategy tool-bar or the menu item Go to list of results from the search side-menu.
• Save your search by clicking on the Save button from the search strategy tool-box
• Run some analyses on the selected companies from the search side-menu
13
Amadeus - Quick Guide
3.4. Working with your saved searches
Access: • Go to Amadeus's Home page, click on the Saved searches tab, or • Click on the Settings link in the product tool-bar, hover over the Searches menu
item in the side menu and select My searches
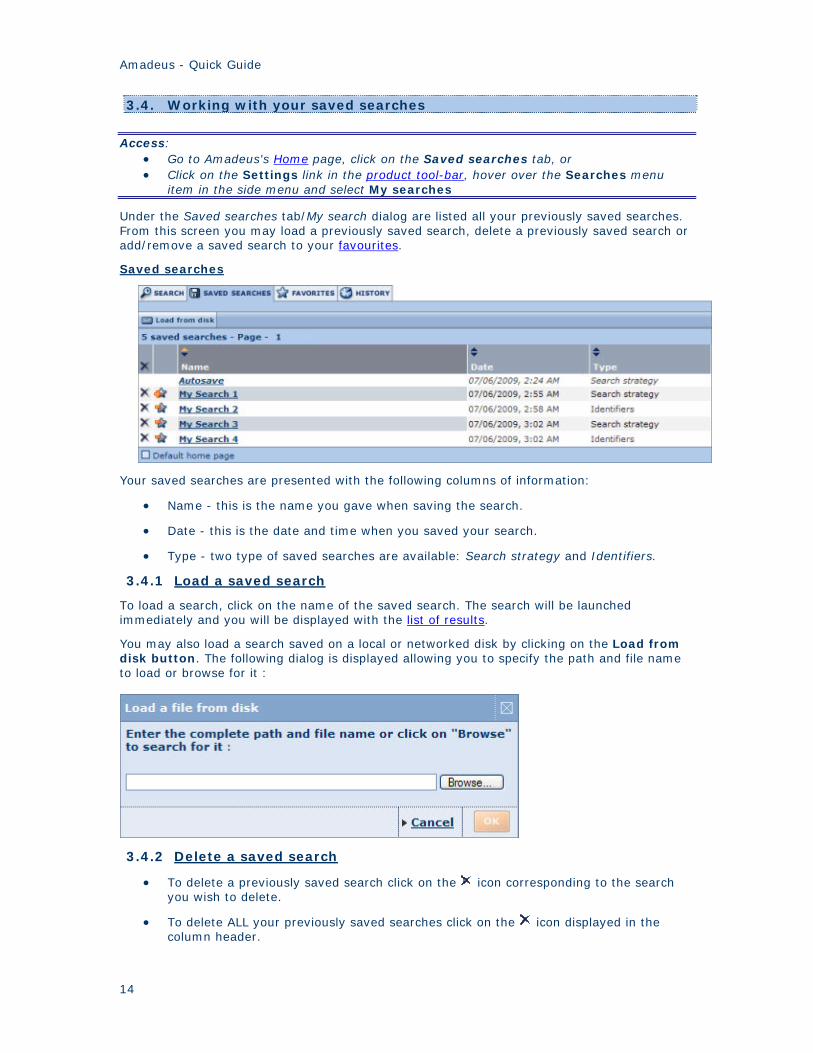
Under the Saved searches tab/My search dialog are listed all your previously saved searches. From this screen you may load a previously saved search, delete a previously saved search or add/remove a saved search to your favourites.
Saved searches
Your saved searches are presented with the following columns of information:
• Name - this is the name you gave when saving the search.
• Date - this is the date and time when you saved your search.
• Type - two type of saved searches are available: Search strategy and Identifiers.
3.4.1 Load a saved search
To load a search, click on the name of the saved search. The search will be launched immediately and you will be displayed with the list of results.
You may also load a search saved on a local or networked disk by clicking on the Load from disk button. The following dialog is displayed allowing you to specify the path and file name to load or browse for it :
3.4.2 Delete a saved search
• To delete a previously saved search click on the icon corresponding to the search you wish to delete.
• To delete ALL your previously saved searches click on the icon displayed in the column header.
14

Search
3.4.3 Add/remove a saved search to your favourites
• To add a saved search to your favourites, click on the corresponding to the search you wish to add.
• To remove a saved search previously added to your favourites, click on the corresponding to the search you wish to remove.
3.4.4 Sorting the list of saved searches
By default, your saved searches are sorted by name in alphabetical order (from A to Z). The arrows displayed in the columns headers indicate how the list is sorted:
• : indicates the list is sorted according to that column in ascending order
• : indicates the list is sorted according to that column in descending order
To sort the list of saved searches according to a different column or change the sort order, click on the arrows in the corresponding column header.
3.5. Working with your favourite searches
Accessing: go to Amadeus's Home page, click on the Favourites tab
Under the favourites tab are listed all the saved searches that you added as a favourite. You may load a search, create directories in order to organise your favourites as well as remove a favourite search or directory.
Favourites
3.5.1 Loading a search
To load a search that you added in your favourites, simply click on the name of your search. You will be displayed with the list of results.
3.5.2 Organising your favourites
Organising your favourites is easy and intuitive. You may create directories with custom labels and place your favourites in them by dragging and dropping them on the directory. You may also simply reorder your favourites by dragging and dropping in the position you wish.
To create a new directory:
1. Click on the button labelled New directory. The screen refreshes with a newly created directory.
2. In the edit-box, type in the label you wish to give to this directory and press Enter on your keyboard.
At any time you may rename a directory by clicking on the label and rendering it editable.
15
Amadeus - Quick Guide
3.5.3 Removing a favourite search or directory
• To remove a favourite search, click on the icon corresponding to the favourite search you wish to remove. Note that removing a favourite search does not delete the search from your saved searches. You may re-include the search in your favourites from your list of saved searches.
• To remove a directory,
1. Click on the icon corresponding to the directory you wish to delete.
2. A dialog pops-up asking you if you would like to remove the directory and all favourite searches included in the directory or just the directory
3. Click on the radio button corresponding to the option you wish to select and click on the OK button.
You may also remove the full list of favourites and all directories in one operation by clicking on the button labelled Remove all favourites from the list.
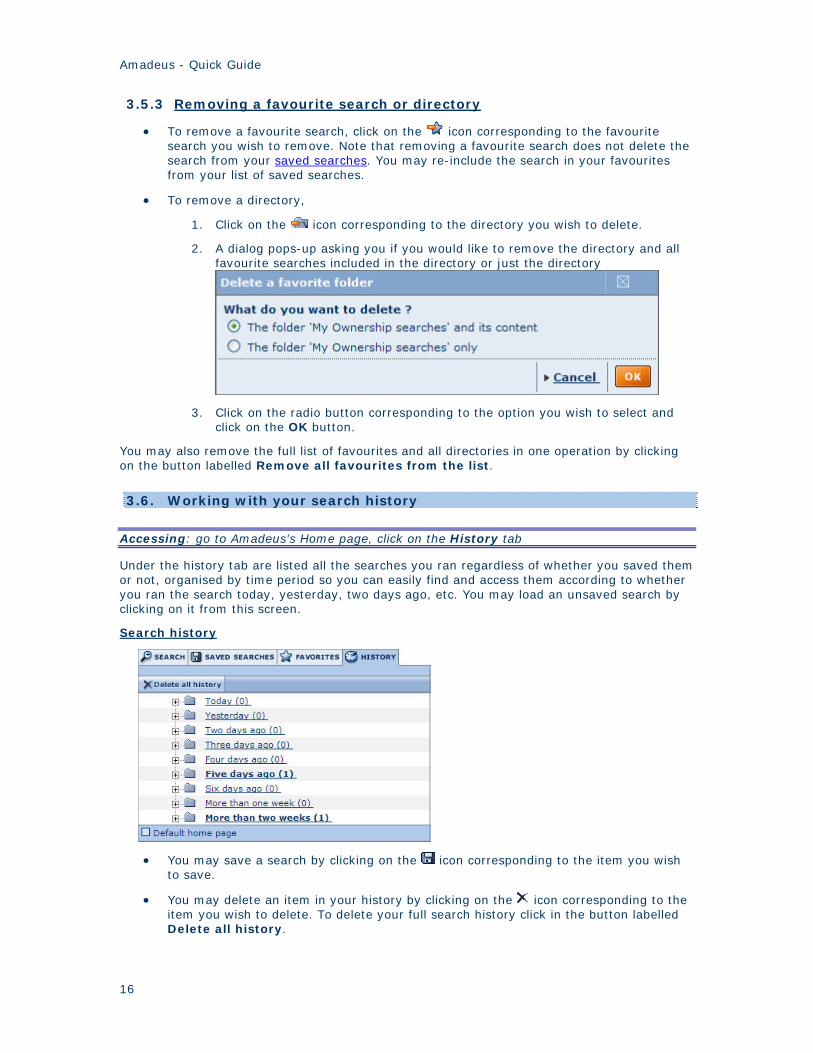
3.6. Working with your search history
Accessing: go to Amadeus's Home page, click on the History tab
Under the history tab are listed all the searches you ran regardless of whether you saved them or not, organised by time period so you can easily find and access them according to whether you ran the search today, yesterday, two days ago, etc. You may load an unsaved search by clicking on it from this screen.
Search history
• You may save a search by clicking on the icon corresponding to the item you wish to save.
• You may delete an item in your history by clicking on the icon corresponding to the item you wish to delete. To delete your full search history click in the button labelled Delete all history.
16

Search
3.7. Search strategy tool-box
Accessing: After specifying at least one search criteria or loading a search, the search strategy tool-box is accessible from the Home page or the List .
The search strategy tool-box lists all the search steps that you specified and allows you to: modify a search step, save a search, delete one or all search steps, ignore a search step and more importantly, if you have more than one search step, build complex search strategies using Boolean operators.
• The number displayed next to each search step corresponds to the number of companies the search step has selected (also known as "step result")
• The total number of companies selected is displayed underneath (in the example above, this number is 10). The total number of companies selected results from the combination of all search step. This number depends on the Boolean expression specified in the Boolean search edit-box.
3.7.1 Working with search steps
• To modify a search step, click on the search step you wish to modify. The search screen is displayed allowing you to modify the search step criteria.
• To ignore a search step, without actually deleting the step from your search strategy, deactivate the check-box corresponding to the search step you wish to ignore. Once you deactivate a search step is greyed out and the Boolean expression is automatically amended.
Note: you may ignore a search step by deleting the search step from the Boolean search edit-box and clicking on the Refresh button.
• To delete a search step, click on the corresponding to the search step you wish to delete.
3.7.2 Search strategy tool-bar
The icons/link displayed in the tool-bar are defined below:
Icon / Link : Action Save Save your searchClear all steps Delete all search steps currently specified
Note: from the list, the search strategy tool-bar contains an extra item labelled 'Add a
search step' allowing to return to the home page to add a search step.
17
Amadeus - Quick Guide
3.8. Boolean Searching
Accessing: boolean searching is possible if you specify at least two search steps from the Search Strategy toolbar available from the Home page or the List.
Boolean searching is an intuitive way to combine search steps when searching by more than one criterion.
Amadeus allows you to conduct any number of search steps, one after the other using different criteria. As each search step is performed it is linked to the preceding search steps with either:
• The "AND" operator (most of the search criteria): This means that companies selected in the current search step are compared with those in the preceding ones and only company records satisfying all steps are selected. Example: 1 And 2 And 3 And 4
• The "FROM" operator: (if you do a search by "Top", available in searches based on financials and number of employees) This means that the current search step is "taken from" the company set resulting from your previous search steps. This search step will always be positioned before all others and parentheses are automatically inputted. Example: 4 From (1 And 2 And 3)
You may modify how the different search steps are combined to one another as well as exclude one or more of them from the search strategy, by appending the Boolean expression from the provided edit-box. You may change the order of execution of the different steps as well as modify the Boolean operators (FROM, AND, AND NOT, OR). You may also include parenthesis in order to specify which part of the Boolean expression needs to be executed first.
The priority order of execution of a Boolean expression is as follows:
1. Expression included in parenthesis
2. From
3. AND / AND NOT
4. OR
Tip: When you have more than two search steps and use more than one different type of Boolean operators, it is highly recommended to use parenthesis in order to insure that the companies selected by the Boolean expression specified are indeed the ones you intended to select.
18

Search
3.9. Save a search
Accessing: from search strategy or List tool-bar click on the Save icon
Save a search screen
3.9.1 Procedure
1. Amadeus offers two options to save a search:
• Save the search strategy (default option): if you select this option you are not saving the actual companies selected by your search strategy, but the different search steps that you specified and the Boolean expression used to combine them. When you select this option, each time you load this search, the number of companies may change as the database is updated.
• Save the companies ID: if you select this option you are saving the list of identification numbers that uniquely identify each company currently included in your list of results. This means that when you load this search, the same companies will always be included in your search results. Note that if you marked companies in your list of results, only those will be saved.
2. Give a name to your search in the provided text box (or keep the default one).
3. Click on one of the two following icons:
Icon Function Save the search to the application server. The name of the saved search will
be listed under you saved searches. If a search with that name already exists, a warning message asking you if you would like to replace it or save the report under a new name is displayed.
Save the search to a local or network drive.
3.9.2 Other functions
3.9.2.1 Load or delete a previously saved search
If you have previously saved a search to the application server, your previously saved searches are displayed at the top if the screen:
• Click on the name of a search to load it
• Click on the icon to delete the search.
3.9.2.2 Add search file to alert system
Activate the option Include this file in your alerts before clicking on the save icon to add the file to your alerts.
19

4.0. Viewing search results
4.1. List of results
Accessing: • Execute a quick search, or • Execute a search step from the grouped view or alphabetical list of criteria and click on
View list of results or Go to list of results, or • Load a search from your saved searches, favourites or search history and click on
View list of results or Go to list of results.
4.1.1 Overview
The list module is composed of four main elements:
• The list of companies selected by your search
• The list tool-bar
• The list side-menu
• The search strategy tool-box
List of results screen
4.1.2 Working with a list of companies
The list of results displays all the companies that comply with criteria you specified in the search module in a list format.
Each line contains the name of the company along with a number of columns containing the value of a variable. If this is the first time you access a list of results or have not specified otherwise you are presented with the Standard list. See List formats for more information on how to change the list format.
To access a company report, click on the name of the company you wish to view.
To the left of each company name, are displayed:
20

Viewing search results
• The occurrence of the company according to how the list is sorted. The occurrence number is used to specify the company or companies you would like to consider when exporting, printing etc.
• A check-box allowing to mark the company.
4.1.2.1 Working with the columns of a list
You may work on the columns displayed directly from the list:
• You may change the order of the columns by clicking on a column header and dragging it to the desired position
• Resize the width of a column by clicking on a column border and dragging it to the desired width
• Delete a column by clicking on the icon in the corresponding column header
• You may sort the list of companies according to any variable where you see in the column header. The list is sorted according to the column displayed with in darker grey ( indicates ascending, indicates descending).
To change the columns that are displayed in the list, go to the Customise the list page by clicking on the Add link in the header of the last column.
4.1.3 List tool-bar
The list tool-bar, displayed at the top of the list of results, includes a number of icons and controls summarized hereunder:
Icon / Control:
Action
Note: Create, modify or delete a note to one or more companies. PG : Associate a default peer group to the companies included/selected in the
list of results. Columns : Add or remove columns from the list. Alert me : Set up scheduled e-mail alerts for all or some of the companies included in
the list. Export : Export the information as displayed in the list or the report of all
companies, all marked/unmarked companies or range of companies to an external file (Excel, PDF, Word, etc).
Send : Export and send by e-mail the information as displayed in the list or the report of all companies, all marked/unmarked companies or range of companies to an external file (Excel, PDF, Word, etc).
Print : Print out the information as displayed in the list or the report of all companies, all marked/unmarked companies or range of companies to an external file (Excel, PDF, Word, etc).
: Jump to first page. : Go to previous page.
1 of xx pages :
Enter a page number in the text box and hit the return key on your keyboard to jump to that page.
: Go to next page. : Jump to last page.
21

Amadeus - Quick Guide
4.1.4 List side-menu
The list side-menu contains a variety of links and menus allowing you to view the list of results, trash and create a new search as well as run a series of analyses on the currently selected companies.
List side menu
You may hide the side menu in order to maximize your working space by clicking on the Hide button.
The other options are defined hereunder
Option: Action: Back to search : Return to the home page
New search :Trash your current search and start a new search from the home page
Modify current search :
Return to the home page to add search steps or modify a current search step
List format : Create a new list format from scratch or load a predefined or previously saved list format
Segmentation : Run a segmentation analysis on the currently selected companies Peer analysis : Run a peer analysis on the currently selected companies Aggregation : Run an aggregation analysis on the currently selected companies Concentration
analysis :Run a concentration analysis on the currently selected companies
Statistical distribution :
Run a statistical distribution analysis on the currently selected companies
Linear regression :Run a linear regression analysis on the currently selected companies
Map analysis : Run a cartographic analysis on the currently selected companies
22

Viewing search results
4.2. List formats
Access: • From the list of results side menu, expand the List format menu item and select
New format, or • Click on Columns from the list tool-bar, or • Click on the Add link displayed in the last column of your list, or • From My lists click on the name of a previously saved list format or the New list
button.
4.2.1 Overview
The Customise the list dialog allows you to:
• Create a new list format
• Modify a list format
• Save a list format
• Load a previously saved or predefined list format
• Delete a previously saved list format
• Define the default list format
Format the list dialog
Note: if you selected the option Add/remove section, the report sections currently selected for display in the report are listed under 'Your selection'
23

Amadeus - Quick Guide
4.2.2 Create a new list format
In the left pane are listed all the variables that you may add the columns of your list. These variables are organised by category.
1. Adding variables:
• To add a single variable:
a. Click on the category in which the variable is included to expand it.
b. Click on the variable name or corresponding check-box to add it to the list format. The variable is then displayed under Your selection.
• To add a group of variables:
a. Activate the check-box corresponding to the category you wish to add.
b. All the variables contained in that category are then displayed under Your selection.
• If you cannot easily find a variable in the tree-like structure, use the search feature to easily find and select variables:
a. Type in one or more chains of characters in the provided edit-box and click on the Search button
b. The variables that have a word in their label starting with the entered text are displayed (e.g. subs name will find Subsidiary Name)
c. Activate the check-box corresponding to the variables you wish to add.
2. After having added all the desired variables, you may:
• Remove a previously selected variable by deactivating the check-box corresponding to that section in Your selection.
• Change the order of the columns in which the variables will appear in the list by clicking on a variable's name under Your selection and dragging it to the desired position.
3. Click on the OK button to view the list of results.
Note: By default list formats will not be saved meaning that when you start a new session of Amadeus your modifications will be lost. See Save a list format below.
4.2.3 Modify a list format
To modify a previously saved list format or a predefined list, click on the icon corresponding to the list you wish to modify.
Follow the instructions above to add/remove sections or reorder them.
24

Viewing search results
4.2.4 Save a list format
1. Type in the name you would like to give to the list format from the Give a name text box. Note that you cannot specify the same as a predefined list (e.g. Standard list).
2. Click on one of the following icons:
Icon Function Save the list format to the application server. The name of the saved list will be
listed under you saved lists. If a list with that name already exists, a warning message asking you if you would like to replace it or save the list under a new name is indicated.
Save the list format to a local or network drive (.list extension file).
4.2.5 Load a previously saved or predefined list
• To load a list previously saved on the application server or a predefined list click on the list format you wish to load from the left side of the screen.
• To load a list saved on a local or networked disk click on the link Load from disk. The following dialog is displayed allowing you to specify the path and file name to load or browse for it :
After having successfully loaded a list, you are displayed with the list of results.
4.2.6 Delete a previously saved list format
To delete a list format that you previously saved on the application server, click on the corresponding icon.
4.2.7 Define the default list format
The default list is the list used by default when viewing the results of a search at each new session of Amadeus. Unless you specify otherwise it is the Standard list that is considered as the default list.
You may change this default behavior by activating the check-box corresponding to the list format (predefined or previously saved) that you wish to use by default. By doing this, it will be the list that you marked that will always be used by default when viewing a list of results at each new session.
Note: the list that is displayed by default in an open session is the last list format that was displayed (also known as the current list).
25

Amadeus - Quick Guide
4.3. Marking companies from the list of results
In the list of results, a check-box is displayed next to each company allowing you to mark it. Marking companies is a very useful feature as it allows you to indicate which companies you which to:
• Save
• Export (or not export)
• Send (or not send)
• Print (or not print)
• Delete (or keep)
• Include in your analyses.
26
5.0. Company reports
Access: to access a company report, click on a company name from the list of results after having specified some search criteria or loaded a search.
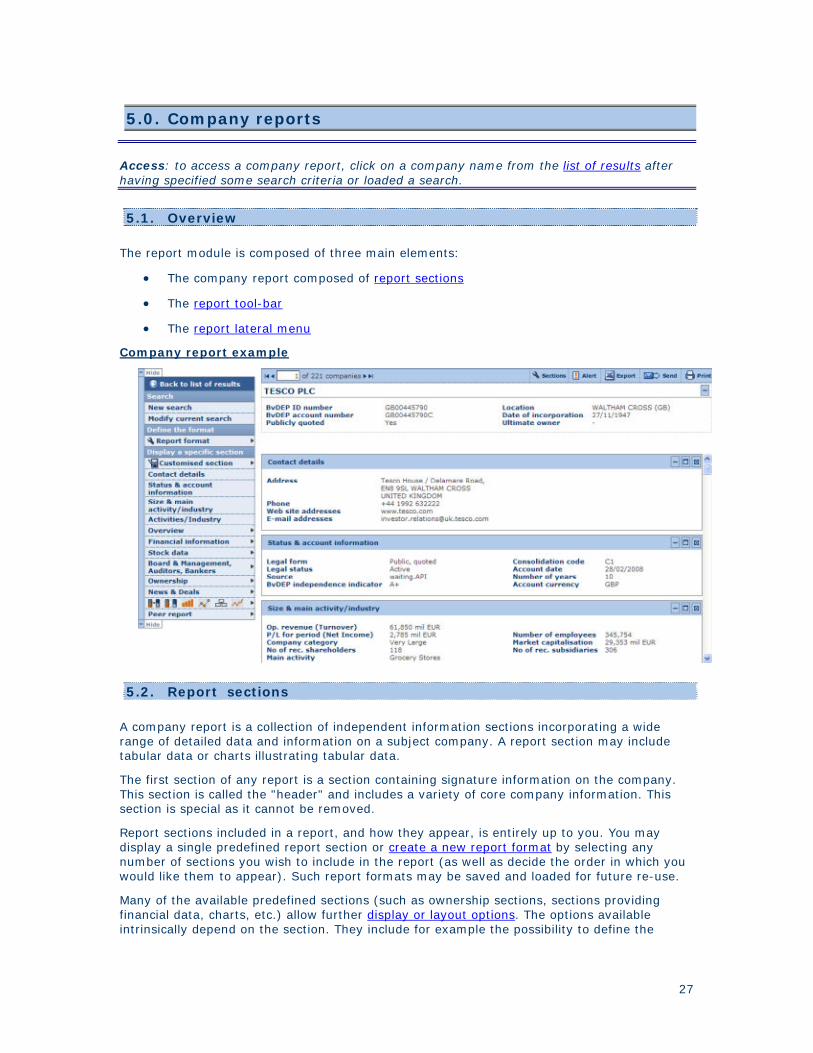
5.1. Overview
The report module is composed of three main elements:
• The company report composed of report sections
• The report tool-bar
• The report lateral menu
Company report example
5.2. Report sections
A company report is a collection of independent information sections incorporating a wide range of detailed data and information on a subject company. A report section may include tabular data or charts illustrating tabular data.
The first section of any report is a section containing signature information on the company. This section is called the "header" and includes a variety of core company information. This section is special as it cannot be removed.
Report sections included in a report, and how they appear, is entirely up to you. You may display a single predefined report section or create a new report format by selecting any number of sections you wish to include in the report (as well as decide the order in which you would like them to appear). Such report formats may be saved and loaded for future re-use.
Many of the available predefined sections (such as ownership sections, sections providing financial data, charts, etc.) allow further display or layout options. The options available intrinsically depend on the section. They include for example the possibility to define the
27

Amadeus - Quick Guide
columns (years) of data you wish to display, the units and currency in which you wish to express financial data, and much more.
Furthermore, you may create you own customised section. Customised sections allow you to incorporate data and information available from one or more predefined sections in one single section. You may create your own labels for these items as well as create new items based on a formula. These customised sections may be saved for future re-use.
Lastly, Amadeus offers you the possibility to edit the data contained in several report sections (such as the header, financial statements and directors) as well as add companies to the database. Such data is called Own data.
5.2.1 Report section tool-bar
At the top-right of each section the following icons are available:
Icon Action Notes
Collapse the section to hide the contents of the section.
After the section is collapsed, you may expand it by clicking on .
Open/maximise the section in a new browser window. From this new window, you may then export, send or print the section individually.
Double clicking within the heading of a section also opens the section in a new window.
Remove the section from report.
In addition to the icons, many sections also include the link Options or Layout, allowing you to edit the display options of the section.
5.3. Report tool-bar
The report toolbar, displayed at the top of each report, includes buttons and links allowing you to navigate from one company report to another, return to the list of results, export, etc.
Icon / Link : Action
PG : Associate a default peer group to the subject companies Locate : Locate the company on a map (not available on all products).
Edit : Edit information and data for the company currently displayed. Sections : Format the reportAlert me : Set an alert on the company
Export : Export one or more company reports Send : Export and send one or more company reports to a selection of
recipients by email Print : Print out the report of one or more companies
: Display the report of the first company (according to how the list is sorted)
Previous : Display the previous company report (according to how the list is sorted)
1 of xx companies :
Enter the occurrence number of the company and hit the Enter key on your keyboard to jump to that company report
Next View next company report (according to how the list is sorted) : Display the report of the first company (according to how the list is
28

Company reports
sorted)
5.4. Report lateral menu
To the left or right of the report is displayed the following menu :
5.4.1 Back to the list of results
Use this link to return to the list of results.
5.4.2 Search
Use the menu items to either start a New search (you will lose your current search results) or Modify current search.
5.4.3 Define the format
A report format is defined by a collection of report sections selected for the report (and the sequence in which they appear).
Hover over the Report format menu item to expand the following menu of options:
• Create/modify a format: The items under this heading allow you to create a new report format (New format) or modify the current report format (Add/remove sections)
• Display a predefined format: Click on one of the predefined report formats to display it.
29
Amadeus - Quick Guide
• Display a saved format: Click on one of your previously saved format to display it. Note that this category is empty if you have not previously saved a report format.
5.4.4 Display a specific section
The options under this section of the lateral menu allow you to:
• Display a specific report section:
• Click on the section you would like to display
• Items with a > expand into report sections (i.e. they are not sections but categories).
• Create a new customised section or load a previously saved customised section.
Note : This lateral menu may be hidden by clicking on Hide.
5.5. Report formats
Access : • From the company report lateral menu, expand the Report format menu item and
select New report or Add/remove section, or • Click on Add / remove sections from the report tool-bar.
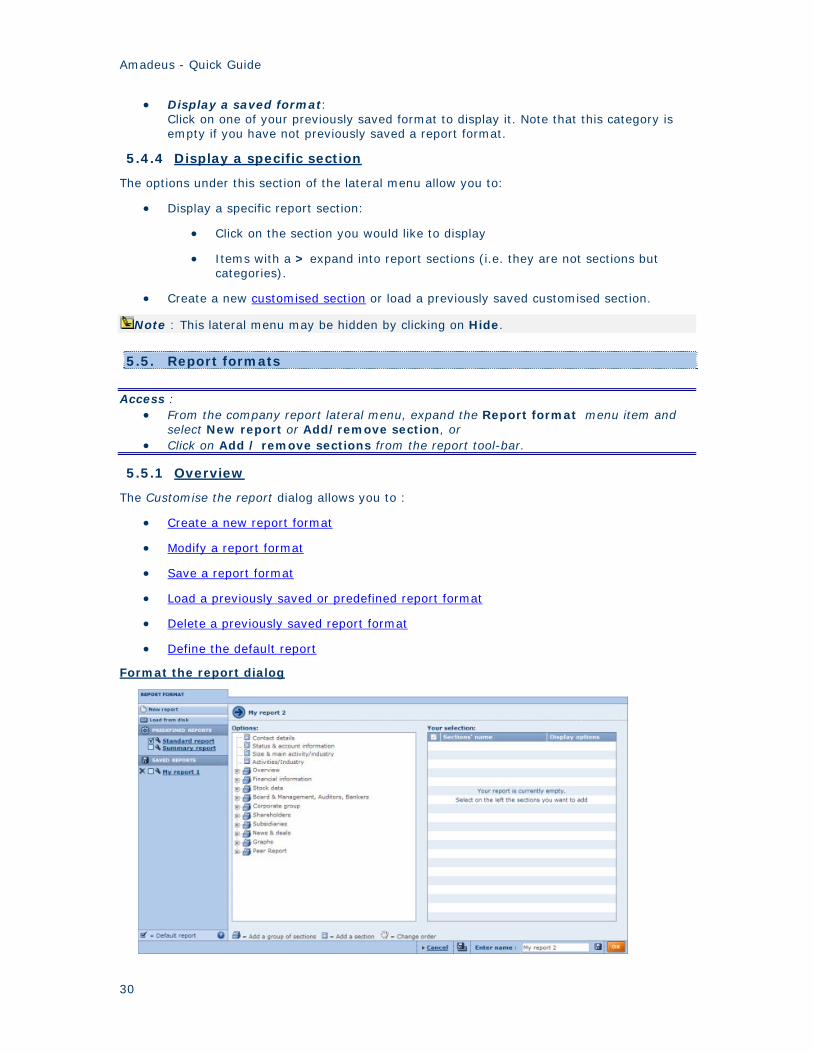
5.5.1 Overview
The Customise the report dialog allows you to :
• Create a new report format
• Modify a report format
• Save a report format
• Load a previously saved or predefined report format
• Delete a previously saved report format
• Define the default report
Format the report dialog
30
Company reports
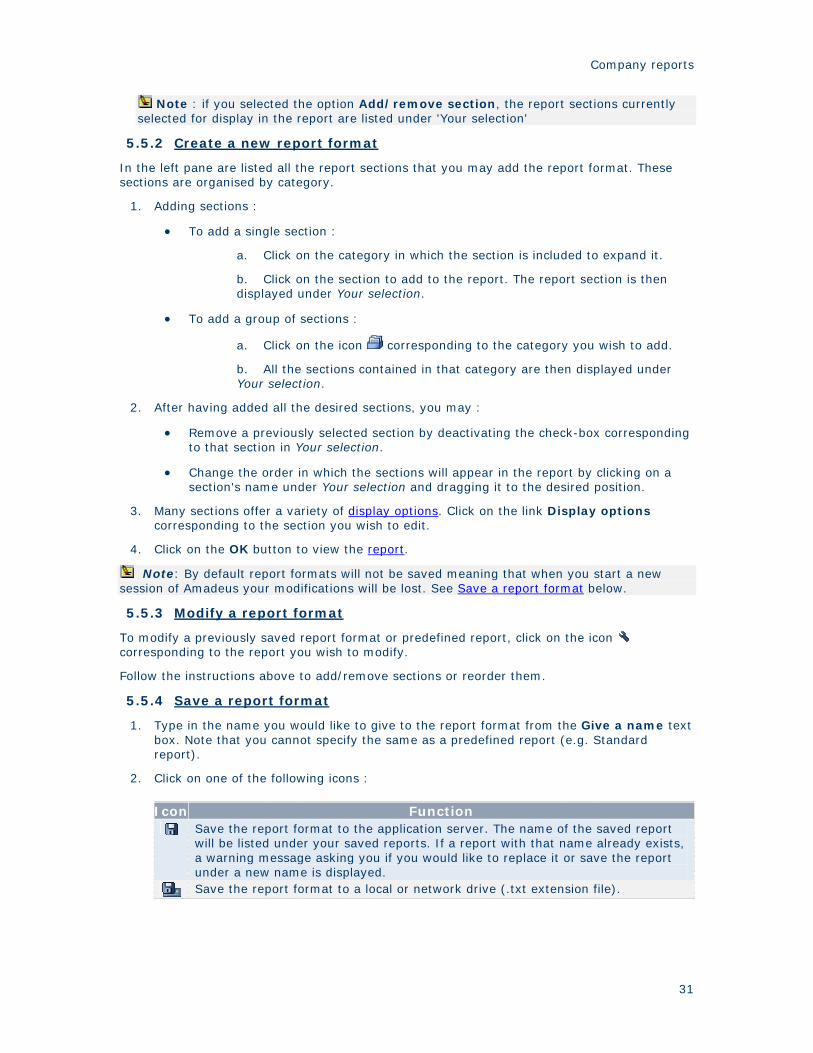
Note : if you selected the option Add/remove section, the report sections currently selected for display in the report are listed under 'Your selection'
5.5.2 Create a new report format
In the left pane are listed all the report sections that you may add the report format. These sections are organised by category.
1. Adding sections :
• To add a single section :
a. Click on the category in which the section is included to expand it.
b. Click on the section to add to the report. The report section is then displayed under Your selection.
• To add a group of sections :
a. Click on the icon corresponding to the category you wish to add.
b. All the sections contained in that category are then displayed under Your selection.
2. After having added all the desired sections, you may :
• Remove a previously selected section by deactivating the check-box corresponding to that section in Your selection.
• Change the order in which the sections will appear in the report by clicking on a section's name under Your selection and dragging it to the desired position.
3. Many sections offer a variety of display options. Click on the link Display options corresponding to the section you wish to edit.
4. Click on the OK button to view the report.
Note: By default report formats will not be saved meaning that when you start a new session of Amadeus your modifications will be lost. See Save a report format below.
5.5.3 Modify a report format
To modify a previously saved report format or predefined report, click on the icon corresponding to the report you wish to modify.
Follow the instructions above to add/remove sections or reorder them.
5.5.4 Save a report format
1. Type in the name you would like to give to the report format from the Give a name text box. Note that you cannot specify the same as a predefined report (e.g. Standard report).
2. Click on one of the following icons :
Icon Function Save the report format to the application server. The name of the saved report
will be listed under your saved reports. If a report with that name already exists, a warning message asking you if you would like to replace it or save the report under a new name is displayed.
Save the report format to a local or network drive (.txt extension file).
31
Amadeus - Quick Guide
5.5.5 Load a previously saved or predefined report
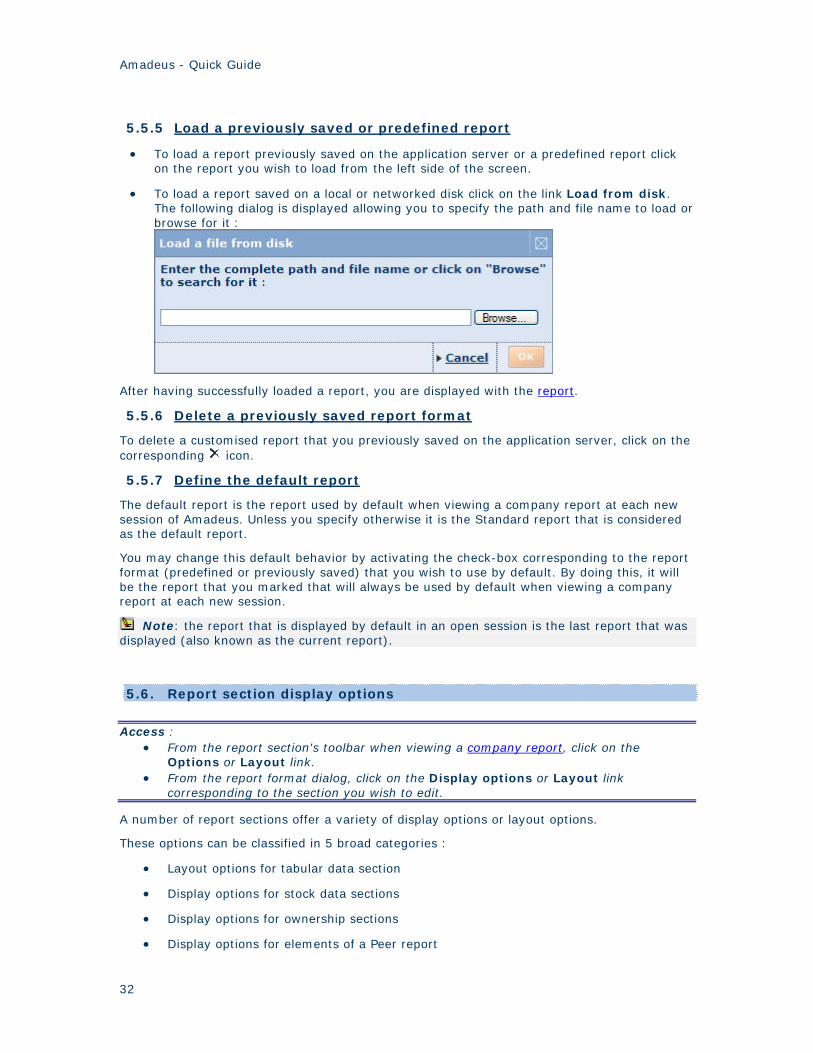
• To load a report previously saved on the application server or a predefined report click on the report you wish to load from the left side of the screen.
• To load a report saved on a local or networked disk click on the link Load from disk. The following dialog is displayed allowing you to specify the path and file name to load or browse for it :
After having successfully loaded a report, you are displayed with the report.
5.5.6 Delete a previously saved report format
To delete a customised report that you previously saved on the application server, click on the corresponding icon.
5.5.7 Define the default report
The default report is the report used by default when viewing a company report at each new session of Amadeus. Unless you specify otherwise it is the Standard report that is considered as the default report.
You may change this default behavior by activating the check-box corresponding to the report format (predefined or previously saved) that you wish to use by default. By doing this, it will be the report that you marked that will always be used by default when viewing a company report at each new session.
Note: the report that is displayed by default in an open session is the last report that was displayed (also known as the current report).
5.6. Report section display options
Access : • From the report section's toolbar when viewing a company report, click on the
Options or Layout link. • From the report format dialog, click on the Display options or Layout link
corresponding to the section you wish to edit.
A number of report sections offer a variety of display options or layout options.
These options can be classified in 5 broad categories :
• Layout options for tabular data section
• Display options for stock data sections
• Display options for ownership sections
• Display options for elements of a Peer report
32
Company reports
• Display options for charts
5.7. Customised sections
A customised section is a fully customisable report section allowing you to incorporate any available item (financial or not) in the desired sequence or layout. Furthermore, customised sections allow you to include variables that you define using an algebraic expression of other financial items.
Each item available is associated with a unique code. In turn, each item that you create in a customised section is associated with a new code starting with the characters BVD and followed by 5 numerical digits (e.g. BVD00000).
Just like any other report section, customised sections may be individually displayed or included in report formats.
You may access the dialog allowing you to create or modify a customised section by :
• Clicking on a the name of a previously saved customised section or the link New customised section from Settings > My customised sections > My saved customised section.
• Clicking on New section from the Customised section menu of side menu of the report.
• Clicking on the link Modify from a customised section tool-bar displayed in a report.
5.8. Modify data of a company
Access: • From a company report click on the Edit icon of the report tool-bar. • From Settings > My data > Companies with My data, click on the name of the
company you wish to edit (supposes that you have already created My data).
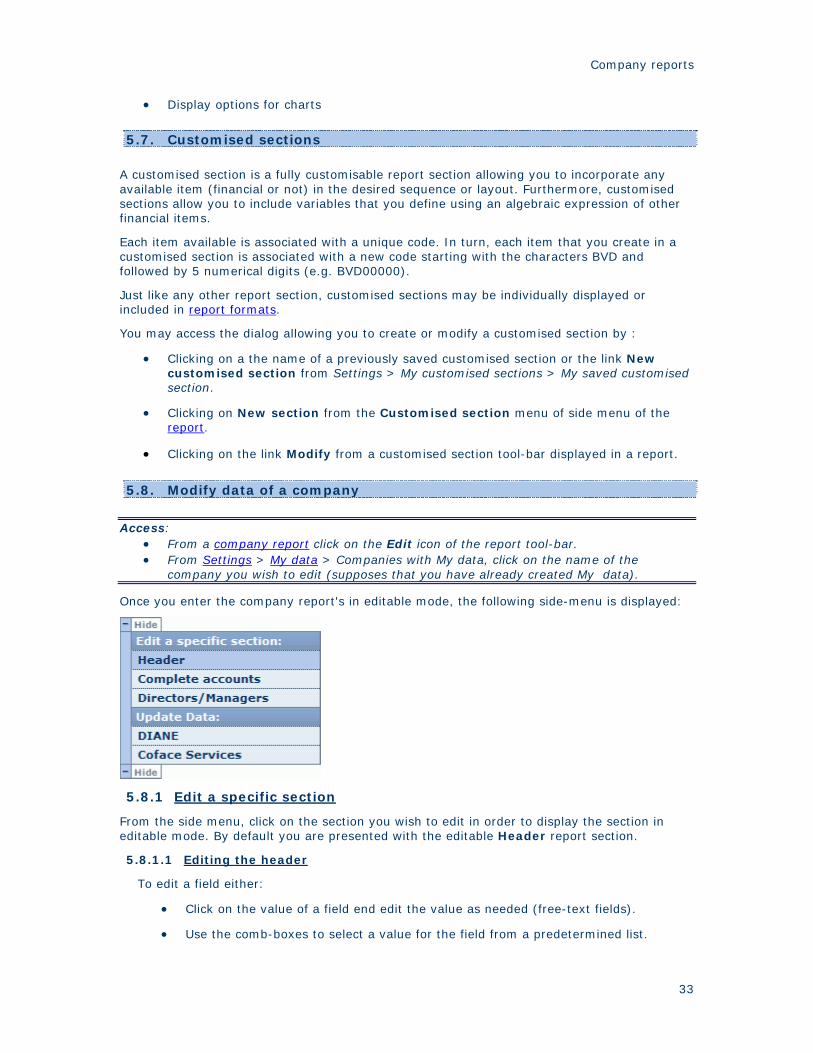
Once you enter the company report's in editable mode, the following side-menu is displayed:
5.8.1 Edit a specific section
From the side menu, click on the section you wish to edit in order to display the section in editable mode. By default you are presented with the editable Header report section.
5.8.1.1 Editing the header
To edit a field either:
• Click on the value of a field end edit the value as needed (free-text fields).
• Use the comb-boxes to select a value for the field from a predetermined list.
33

Amadeus - Quick Guide
• Click on the icon to select a value from a hierarchical table (displayed in a layered pop-up).
When you are finished editing the header click on the to save your modifications.
5.8.1.2 Editing financial sections
• You may edit the value of any figure available by simply clicking on the value of a field and typing as needed.
• You may delete a year by clicking on the icon corresponding to the year you wish to delete.
• You may change the characteristics of a year (type of statement, closing date, number of months, currency and units) by clicking on the header of the column.
• You may add a new column of data by clicking on the link Add a year. You are then presented with the following dialog allowing you to define the type of statement (consolidated/unconsolidated), closing date, number of months, currency and units.
• When you are finished editing click on the to save your modifications.
Notes:
• All fields that depend on other fields (by sum, difference, products, etc) are automatically updated once all fields on which it depends on are filled in. You may however override the automatic computation of these fields by typing in values as you see fit.
• The link Check validity of accounts allows you to check that the different formulas are valid as well as verify the Total Assets and Liabilities are equal to one another and non-negative. When you click on the link a window is displayed informing you of the existence of any inconsistencies and their origin.
34
Company reports
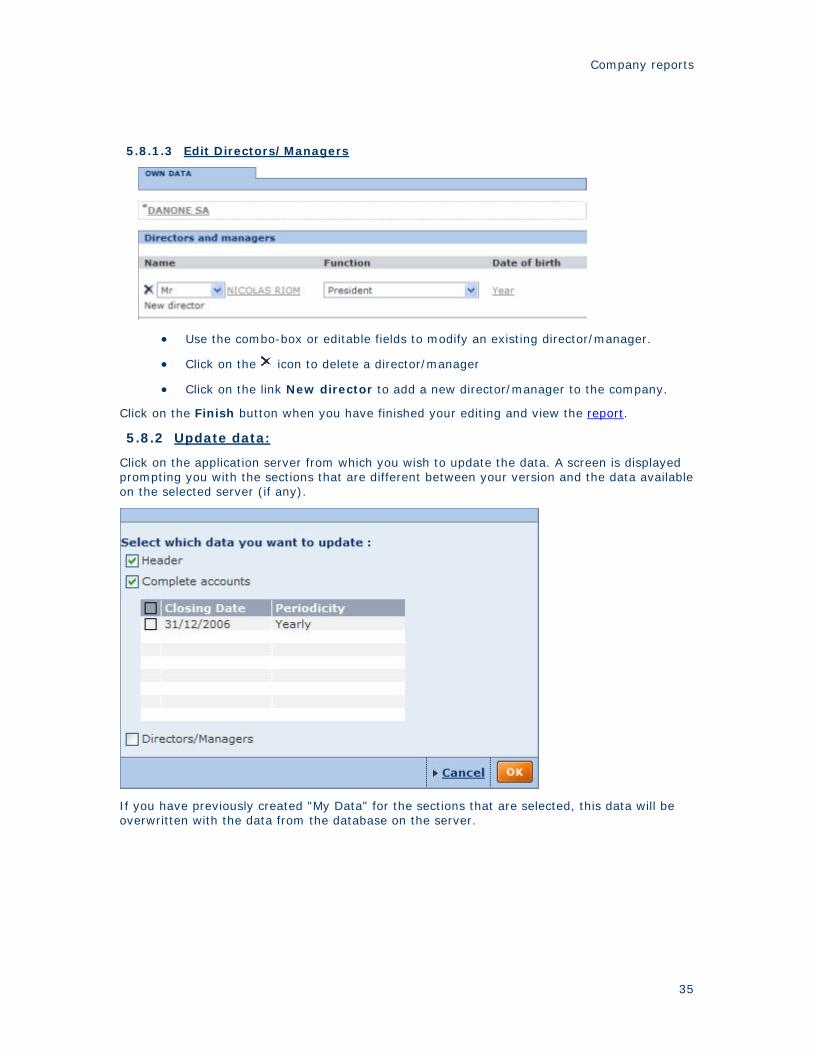
5.8.1.3 Edit Directors/Managers
• Use the combo-box or editable fields to modify an existing director/manager.
• Click on the icon to delete a director/manager
• Click on the link New director to add a new director/manager to the company.
Click on the Finish button when you have finished your editing and view the report.
5.8.2 Update data:
Click on the application server from which you wish to update the data. A screen is displayed prompting you with the sections that are different between your version and the data available on the selected server (if any).
If you have previously created "My Data" for the sections that are selected, this data will be overwritten with the data from the database on the server.
35

6.0. Alerts
6.1. Alerts - overview
Amadeus has a built-in Alert System allowing you to set-up and configure scheduled alerts in order to stay informed on any software or data updates. These alerts can be sent to yourself or a selection of recipients.
6.1.1 Entity specific alerts
You may place data update alerts on the following types of entities:
• Search strategies: a series of search steps linked together with Boolean operators [AND, OR, AND NOT]. When saving a search strategy, the number of companies included in your results may vary through time as the database gets updated. On the other hand, when saving a company set, the number of companies remains constant through time. You may create and configure alerts on this type of entity from the Save my search screen, from the list of results or from the list of alerts.
• company sets: a static array of companies that are saved using a unique identifier. A company set is said to be static because the companies included in it remain constant through time. You may create and configure alerts on this type of entity from the Save my search screen, from the list of results or from the list of alerts.
• Specific companies: refers to a single company record in the database. You may create and configure alerts on this type of entity from the company report or from the list of alerts.
For each of the above entities, you may set alert criteria for any changes in data ranging from ownership and financial data to new deal information and news articles.
For search strategies, you may additionally set an alert for newly included companies complying with your search strategy.
6.1.2 Global alerts
Two special types of alerts are also available and do not relate to any specific entity type but to the product as a whole:
• Database update alert: sends out an e-mail notification when Amadeus's database has been updated.
• Software update alert: sends out an e-mail notification when Amadeus's software has been updated.
These types of alerts may be activated from the alerts settings screen.
36

Alerts
6.2. Creating and configuring alerts
Access : • From the Save a search screen, activate the option Include this file in your alerts
before saving.
• From the list of results tool-bar, click on the Alerts icon, save the file and then click on the Next button.
• From the report tool-bar, click on the Alerts icon. • From the list of alerts, click on the yes or no link under the active alert column.
Creating and configuring alerts is an easy straightforward process. The different alert criteria available are organised by category:
1. Expand the categories from which you wish to select alert criteria from
2. Activate the check-box(es) corresponding to the alert criteria you wish to apply to the file.
3. Select the recipients you wish to send the alert to by either:
• Typing in the e-mail addresses separated by semi-columns.
• Click on to select recipients stored in your address book.
4. Specify the result layout you wish to apply to the Excel spreadsheet attached to your e-mail alert.
5. Click on the OK button to confirm your selection and create the alert.
6.3. List of alerts
Access : from Amadeus's tool-bar, click on List of Alerts from the Alerts menu.
6.3.1 Overview
The list of alerts allows you to manage all your alert:
• Determine the active alerts,
• Modify or include a file in the alert system,
• Modify the list format associated to each alert,
• Determine and update recipients associated to each alerts.
37

Amadeus - Quick Guide
6.3.2 Working with the list of alerts
6.3.2.1 Sorting the list
You may sort the list of companies according to any column where you see in the column header. The list is sorted according to the column displayed with in darker grey ( indicates ascending, indicates descending).
To sort the list according to a different column or change the sort order, click on the arrows in the corresponding column header.
6.3.2.2 Including or modifying an alert
The active alert column indicates the files currently included in the alert system:
• Yes: Indicates that an alert is associated to this file. Click on the link to modify the alert criteria associated to the file.
• No: Indicates that no alert has been set-up for this file. Click on the link to create and configure the alert associated to the file.
6.3.2.3 Modifying the recipients associated to an alert file
The list of recipients associated to each alert are displayed un the Recipients column.
You may add/remove recipients by:
• Editing the text-box associated to each alert. Use a semi-column (;) if you include more than one recipient.
• Clicking on the to select or ignore recipients stored in your address book.
6.4. Alerts settings
Access : • From Amadeus's tool-bar, click on Settings from the Alerts menu. • Click on the Settings when creating or configuring your alert.
Amadeus allows you to set-up some global settings on all alerts that you have set-up.
The following settings may be configured:
• Select the format of your e-mail alerts: Choose whether you would like your e-mail alerts to be sent out in html or text format.
• Select the frequency of your e-mail alerts: Choose if you would like your alerts to be sent out Daily, Weekly or Monthly. For daily alerts you may additionally choose the desired day.
38

Alerts
• Place alerts on hold : Allows you to temporarily stop sending out e-mail alerts for a specific time period.
In addition to these alert configuration settings, the following global settings may be activated:
• Database update: activate this option to receive an e-mail notification when the database has been updated.
• Software update: activate this option to receive an e-mail notification when the software has been updated.
Note that the e-mail alerts will only be sent to your address and not to the addresses stored in your address book.
6.5. Address book
Access : from Amadeus's tool-bar, click on Address books from the Alerts menu.
Amadeus's address book allows you to specify and store a list of recipient e-mail addresses in order to easily include them in your alerts.
1. Type in as many e-mail addresses as you wish in the provided text-box separated by a semicolon (;)
2. Click on the OK button to confirm your selection.
39

7.0. Exporting
7.1. Working with the export system
7.1.1 Overview
Amadeus includes an integrated and dedicated system allowing you to export, to a selection of different file formats, lists, company reports, peer reports, analyses, graphs and more.
Whenever you can export data displayed on your screen you will see the two following icons displayed on the upper right hand side of section in which the data is included:
Icon Explanation Use this button to display the export settings dialog and export the data to a predefined format
Use this button if, on top of exporting the data to a predefined file format, you wish to send the file to a selection recipients by email
In order to not hinder the performance of the application, most exports are not processed on the server hosting the application but on a dedicated, independent server. Each time you execute an export you are sending a request to this dedicated server to begin the export process.
In real terms, this means that you can continue working normally and do not have to wait for your requested export to be processed.
7.1.2 Limitations
Because at any one time there can potentially be a large amount of requests, a certain number of limitations have been implemented in order to optimise the performance of the dedicated export servers:
• Each dedicated server can process a maximum number of simultaneous exports. This number depends on the application you are using.
• At any one time, the application under use can only send one request per user to the dedicated export server. Hence if you request two consecutive exports in a short time period, your first request will be processed immediately while the other will pend until the first one is successfully processed. If for technical reasons, the subsequent file cannot be processed after a specific laps of time, a message is displayed informing you that the export cannot be immediately processed and that you will be notified by email when it is ready. When your export is finished you can then download it to your hard drive or on to your local network.
7.1.2.1 Specific limitations when exporting a list of results
1. In order to minimise potential performance problems on the dedicated export servers, a limit in terms of the amount of data you can export in one go has been set. This limit is determined by a formula that takes into account the number of companies, the nature and the number of variables you are exporting. If the list you are exporting exceeds this preset limit, a message is displayed asking you to refine your selection.
2. An Excel spreadsheet is limited to 255 columns, 65 536 lines and 32 768 characters per cell. If your list exceeds any of these thresholds, a message is displayed recommending you to select another export format.
7.1.2.2 Specific limitations when exporting a company report
40

Exporting
1. When exporting the company report currently displayed on your screen, it is executed directly by the server hosting the application. This means that you have to wait for the export to be fully processed before continuing your work. Also these exports are not listed under the "My Exports" in your custom settings.
2. You can export a maximum of 50 company reports in one go.
3. If you export to Excel, you are not limited to 65 536 lines. If your report exceeds this limit, the excess lines of the report will be included in a new excel spreadsheet.
4. Exporting the subsidiary section on several level or the Corporate Group section is only possible for a single company (Current company).
7.2. Export formats
Amadeus offers a variety of formats to which data can be exported. These formats depend on the module from which you wish to export the data:
Module Available export formats
Excel (*.xls, *.xlsx)
Text (Tab
delimited) (*.txt)
XML
Adobe Acropbat
PDF (*.pdf)
List Reports Analyses
7.2.1 Which export format is more appropriate?
7.2.1.1 Excel (*.xls)
Advantages Ability to contain and organise data in a structured manner Supports graphics Disadvantages The main disadvantage is that you cannot export a large amount of data to an Excel spreadsheet due to the inherent limitations of Excel: an Excel spreadsheet is limited to 255 columns, 65 536 lines and 32 768 characters per cell. Assessment It is an ideal format if you are exporting a medium amount of data and would like to further process the data in order to integrate the data to a larger database or format the data for presentation purposes. It is an inappropriate format if you exporting a large amount of data. If you are exporting a list with over 253 variables and/or 65 535 companies you should consider exporting to a text file.
41

Amadeus - Quick Guide
7.2.1.2 Text (tab delimited) (*.txt)
Advantages No limitations in terms of the amount of data it can contain. Disadvantages Does not support graphics. Data contained is unstructured and therefore needs to be further processed in order to be usable. Assessment It is an ideal format if you are exporting a large amount of raw data that you wish to process at a later stage with applications such as Excel, Access or other Database Management System. It is inappropriate if you are exporting the data for presentation purposes or if you wish to export to data that will be directly usable without further processing.
Note: exports to text files are encoded in UTF-16 meaning that double-byte characters are
supported (special characters, Russian characters, Chinese etc.)
7.2.1.3 Adobe Acrobat PDF (*.pdf)
Advantages Supports graphics Disadvantages Supports a limited amount of data Data cannot be further processed. Assessment This is an ideal format if you are exporting a limited amount of data and are including graphics for presentation purposes. It is inappropriate if you wish to further process the data or which to integrate the data in a larger database.
42
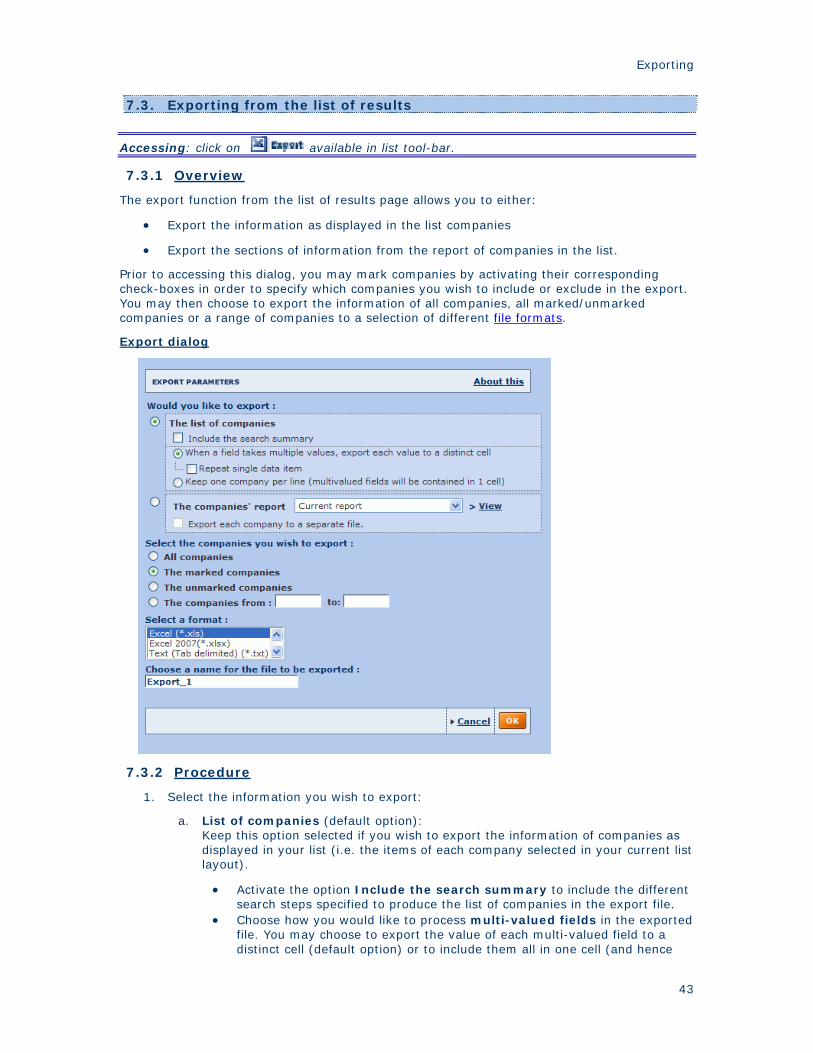
Exporting
7.3. Exporting from the list of results
Accessing: click on available in list tool-bar.
7.3.1 Overview
The export function from the list of results page allows you to either:
• Export the information as displayed in the list companies
• Export the sections of information from the report of companies in the list.
Prior to accessing this dialog, you may mark companies by activating their corresponding check-boxes in order to specify which companies you wish to include or exclude in the export. You may then choose to export the information of all companies, all marked/unmarked companies or a range of companies to a selection of different file formats.
Export dialog
7.3.2 Procedure
1. Select the information you wish to export:
a. List of companies (default option): Keep this option selected if you wish to export the information of companies as displayed in your list (i.e. the items of each company selected in your current list layout).
• Activate the option Include the search summary to include the different search steps specified to produce the list of companies in the export file.
• Choose how you would like to process multi-valued fields in the exported file. You may choose to export the value of each multi-valued field to a distinct cell (default option) or to include them all in one cell (and hence
43
Amadeus - Quick Guide
keeping one line per company). In the prior option you may additionally choose to repeat single data items
Note: keeping one line per company is only available for exports to Excel. Repeating single data items is only available for exports to Excel and text files.
b. The companies' report: Select this option to export sections of information contained in the report of the selected companies for the export. If you select this option, you can only select a maximum of 100 companies for the export and cannot export the Corporate Group or the subsidiaries section with 3 levels or more.
• Select the report format: By default, the report(s) of company(ies) you wish to export will include the sections as defined in your Current report, i.e. the last report format you defined. Use the drop-down text-box to select another report format (predefined or previously created and saved) You may also directly create a new report format by clicking on View / Modify.
• Export each company to a separate file: By default, all the reports will be exported to a single file. Activate this option if you wish to export each company report to a distinct file.
2. Select the companies you wish to export:
• All companies: Select this option to export the information of all companies currently included in the list. If there are more than 100 companies in the list and you selected to export the reports of the selected companies, you need to choose one of the other available options.
• The marked companies: Select this option to export all companies currently marked in the list. This option is only available if you have previously marked at least one company.
• The unmarked companies: Select this option to export all companies currently unmarked in the list. This option is only available if you have previously marked at least one company.
• The companies from: Select this option to export a range of companies. The numbers that you enter correspond to the position of the companies according to how the list is sorted.
Notes: • The options marked companies and unmarked companies are only available if
you previously marked companies . • Some options may be unavailable due to limitations regarding the export of a
list or limitations regarding the export of reports
3. Select the format of the file to which you wish to export:
• If you are exporting a list you may export to an Excel spreadsheet, a text file or and XML file.
• If you are exporting one or more reports, you may export to an Excel spreadsheet or a PDF file
For more information on the different available formats, see "Export formats"
4. Choose your name for the file to be exported. A default name is given to each exported file. We recommend you to give each file a distinctive name that characterises the content of the file so you can easily find it in the future.
5. Click on OK to confirm your settings and start the export process.
44

Exporting
Tips: • If you wish to export a large number of companies, mark all those you do not wish to
export before accessing this dialog. Inversely, if you wish to export a limited amount of companies, mark all those you wish to export.
• If you wish to export all companies with a value for a certain variable above, inferior or within a certain threshold, sort your list according to that variable, identify the occurrence(s) of the companies outranking your threshold and export the range.
7.4. Exporting from a report
Access:
• Click on available in report tool-bar to export all the report sections currently displayed and included in the report format.
• Maximise a report section and then click on from the new window to export a single report section.
7.4.1 Overview
The export function from a company report allows you to export to a selection of file formats the report section(s) currently displayed of the current company, all companies, all marked/unmarked companies or of a range of companies. Also note that you may export a single report section by maximising it in a new window and exporting that section from the new window.
The different option available from the export dialog depends on the report sections currently included in your report format. There are extra options if you have the ownership tree, M&A deals, news or the subsidiary section included in the report.
Note: The companies that you previously marked from the list are maintained in the report.
Export dialog
45

Amadeus - Quick Guide
7.4.2 Basic export
1. Select the companies you wish to export:
• Current company: Select this option if you wish to export the report of the company currently displayed in your screen.
• The marked companies: Select this option to only export the companies that you previously marked from your list or from the report
• The unmarked companies: Select this option to only export the companies that you did not previously mark
• The companies from: Select this option to export a range of companies. The numbers that you enter correspond to the position of the companies according to how the list is sorted.
Notes: • The options marked companies and unmarked companies are only available if
you previously marked companies. • Some options may be unavailable due to limitations regarding the export of
reports
2. Options:
• Export each company to a separate file: select this option to export each company to a separate file, i.e. if you are exporting the report of 5 companies, 5 files will be created.
3. Address options:
• Export the address / phone / fax of the company: Activate this option to include the address, phone number and/or fax number of the company in your report export. If the box stays unchecked, the information will not be included in the export file.
• Export the address / phone / fax of the related companies / persons. Activate this option to include the address, phone number and/or fax number of the shareholder, subsidiaries and/or managers source VVC in your report export. If the box stays unchecked, the information will not be included in the export file.
4. Select the format of the file to which you wish to export: when exporting a company report. For more information on the different available formats, see "Export formats"
5. Choose your name for the file to be exported: a default name is given to each exported file. We recommend you to give each file a distinctive name that characterises the content of the file so you can easily find it in the future.
46

8.0. Analyses
8.1. Segmentation
The Segmentation analysis can be performed on any number of companies, breaking-down the group of companies according to up to two variables. The two variables are defined by a primary and secondary variable such as industry, location, a financial variable etc.
The results of the analysis can be viewed in a segmentation table as well as illustrated with a bar chart or a pie chart.
The primary use of the analysis is to allow you to target and characterise sub-groups of companies according to two variables, such as industry and turnover or any other pair of relevant variables.
Segmentation analyses are fully customisable to meet your needs:
• You may choose what the number displayed in each class (the descriptive variable) is to represent. By default it represents the number of companies comprised in the class but you may choose other variable (such as aggregate number of employees, aggregate turnover etc.) in which case the number in each cell represents the sum of the selected variable's value for all the companies in a class. You may also choose to display figures in each cell as a percentage of the total of the line, column or total with or without penetrations indices.
• You may choose the classes to use for each variable from a list of predefined standard/default classes. Standard and default classes can then be modified by changing the thresholds, deleting or adding a class, inserting subtotals or rendering a class invisible.
8.2. Peer analysis
The peer analysis is a benchmarking tool enabling you to compare a group of companies against one another as well as against some summary statistics of the group of companies. The group of companies in which each company is compared to one another is composed of each company currently selected from the list of results.
The distinction between a peer analysis and a peer report is that the peer report (available from the company report side menu) compares a subject company to a predefined peer group (defined by a proximity variable, year and/or industry) whereas a peer analysis enables you to fully customise the composition of the group companies you wish to compare to one another and include a subject company. Moreover, the peer report is considered as a section of a company report whereas a peer analysis is independent of any company report.
The comparison can be based on any variable available from any financial section of the company report for any of the available years.
The results of the peer analysis can viewed in a table and illustrated with a variety of charts and graphs:
• Bar chart
• Pie chart
• Lorenz curve
• Distribution chart
• Indices chart
47
Amadeus - Quick Guide
• Quantile chart
Note: you may run this analysis on maximum 500 companies
8.3. Aggregation
The aggregation analysis allows you to sum up, year by year, the lines of the accounts of each company selected from the list of results.
The results of the analysis presents you with one final virtual company's yearly account statement.
The aggregated account can be illustrated with four different types of graphs:
• Structure of the balance sheet
• Structure of the P&L account
• Bar chart
• Evolution of several variables in indices
Notes: • You may run this analysis on maximum 500 companies. • When viewing the aggregated accounts, the number of companies included in the
accounts varies from year to year due to the fact that not all accounts included in your selected company group have the same availability. So when viewing and comparing the evolution of a variable through time, you need to take into account that there are not the same number of observations and that therefore the results may be biased.
8.4. Statistical distribution
The statistical distribution analysis allows you to analyse how a specific variable is distributed in a group of companies selected from the list of results.
The results of the analysis are presented in a table displaying summary statistics such as the median, the average, the standard deviation, etc. The results may also be illustrated with a distribution chart.
Note: you may run this analysis on maximum 500 companies.
8.5. Concentration analysis
The concentration analysis enables you to determine the share (or weight) of any additive financial variable for each company included in a group of companies selected from the list of results.
The results of the analysis may be viewed in a tabular form as well as illustrated with the following types of graphs:
• Pie chart
• Lorenz curve Note: The analysis may be performed on a group of companies ranging from 2 to 500.
48
Analyses
8.6. Linear regression
Linear regression is a classical statistical technique that is used to determine the relationship between two random variables by plotting, in a two dimensional graph, all the observations and constructing a vertical line that best fits the data.
A good way to understand how useful this technique is, is to take an example.
Let's say that the variable X measures the Turnover and that variable Y measures the Number of employees of a group of companies. Intuitively, one might logically assume that these two variables should be correlated positively, i.e., the larger the turnover the more employees one company will have.
This technique not only allows you to verify this assumption but also allows you to measure the correlation between the variables.
Formally, the linear regression postulates that:
Yi = a + bXi + ei, (i=1,...,N)
where:
• ei: is said to be the "residual" and is a randomly distributed variable following a normal distribution with a zero mean.
• Yi: is said to be the endogenous or dependent variable
• Xi: is said to be the exogenous or independent variable
• a and b: are the two parameters that the model estimates by fitting a line that best fits the data
With a company set, you can estimate these two parameters by using the Least Square Estimation (LSE) method which simply minimises the sum of the squared residuals. The solution to the problem gives you a unique answer for the values of a and b.
The results of the analysis may be viewed in a regression table and/or in a regression chart. Note: The analysis may be performed on a group of companies ranging from 2 to 500.
49

9.0. Define your settings
9.1. Managing the application settings
Access: click on the Settings link from the product tool-bar
Amadeus's settings module allows you to:
• Configure and fine-tune general application and module specific settings
• Access and manage previously saved data.
The settings are organised in categories, displayed in the side menu:
• Account • General options • Exports • Searches • Lists • Reports • Ownership • Analysis • Own Peer Groups • Customised sections • User defined variables settings • Own data • Custom fields
9.2. Managing your account settings
The account settings category allows you to:
• View your account information
• Change your username and password
For each option, when you are finished click on the Finish button
9.3. General options
The general options settings allow you define your:
• User preferences
• Regional settings
• Printer settings
• Send settings
• Time consistency settings
For each sub-category of the general options:
• Click on the Finish button to apply your settings.
• Revert to the default settings by clicking on the Revert to default settings link.
50
Define your settings
9.4. Managing your exports
Under the Exports category in Amadeus settings, you may:
• View and manage active exports
• Define you export settings
For each option, when you are finished click on the Finish button.
9.5. Managing your search settings
Under the Searches category in Amadeus settings, you may:
• View and manage previously saved searches
• Define your search settings
For each option, when you are finished click on the Finish button.
9.6. Managing list formats and list settings
Under the Lists category in Amadeus settings, you may:
• View and manage previously saved list formats
• Define your lists settings
For each option, when you are finished click on the Finish button.
9.7. Managing report formats and report settings
Under the Lists category in Amadeus settings, you may:
• View and manage previously saved report formats
• Define your report settings
For each option, when you are finished click on the Finish button.
9.8. Managing ownership settings
Under the Ownership settings you may customise the definition of the ultimate owner.
9.9. Analysis settings
Access: 1. Click on the Settings link in the product tool-bar 2. Hover over the Analysis menu item in the side menu 3. Select Settings
The analysis settings allow you to choose to show or hide a help message when designing self designed classed in the segmentation analysis.
51

Amadeus - Quick Guide
9.10. My own peer groups
Access: 1. Click on the Settings link in the product tool-bar 2. Hover over the Own Peer Groups menu item in the side menu 3. Select My own peer groups
The My own peer groups dialog lists all the own peer groups that you previously defined as a default peer group for at least one company.
My Own peer group dialog
Each peer group is displayed with the following information:
• Name of the peer group
• Description of the peer group
• Size of the peer group
• Date of last changes
• User who applied the last changed
9.10.1 View/change the companies associated to a peer group
1. Click on the name of a peer group to view all companies currently associated to it. The companies are presented in your current list format.
2. To remove an association, deactivate the check-box corresponding to the company you wish to remove.
Notes: • The list of companies displayed corresponds to all the companies for which the peer
group is currently defined as the default peer group. It does not correspond to the companies composing the peer group.
• To change the composition of the peer group, you may load the previously saved search and modify the companies from the list of results or the peer report.
9.10.2 Delete a peer group
• To delete a peer group click on the icon corresponding to the peer group you wish to delete.
• To delete all peer groups, click on the in the column header.
Note: When you delete a peer group, all companies that were associated to it will be associated to the default peer group.
52

Define your settings
9.11. Managing customised sections settings
Under the Customised sections category in Amadeus settings, you may:
• View and manage previously saved customised sections
• Define your customised sections settings
For each option, when you are finished click on the Finish button.
9.12. Managing user defined variables settings
Under the Customised sections category in Amadeus settings, you may:
• View and manage previously saved user defined variables
• Define user defined variables settings
For each option, when you are finished click on the Finish button.
9.13. Managing My data
Under the My data section category in Amadeus settings, you may:
• View and manage user created data
• Define settings associated with user created data
For each option, when you are finished click on the Finish button.
9.14. My imported fields
Access: 1. Click on the Settings link in the product tool-bar 2. Hover over the User imported fields menu item in the side menu 3. Select My imported fields
The My imported fields dialog lists all previously created imported fields allowing you to manage them and create new ones. For background information on imported fields, see Imported fields.
My imported fields dialog
53

Amadeus - Quick Guide
9.14.1 Importing new fields
9.14.1.1 Define the label and properties of the field
1. Click on the grey link New label to render the cell editable and type in the label of the field and press the Enter key on your keyboard.
2. Repeat step 1 for as many fields as you wish to import.
3. Once the label is entered, a code is automatically generated and is associated to the field. This code is unique to the field and cannot be modified. You will need to use these codes in the client file containing the values of the field
4. For each label created, define the properties of the user imported field by clicking on the icon. Defining the properties allows you to assign the type of value associated to the field.
9.14.1.2 Prepare and enter the location of the file of values to import
1. In one or more Excel (.xls) or tab delimited text (.txt) file(s), input the values of the fields you wish to create and save it to a local or networked disk. See Prepare the file containing the values of user imported fields for more information on the rules associated to how to prepare these files.
2. Enter the complete path and file name of the file you created and saved or click on the Browse button to locate it visually.
Notes: you can only import one file at a time.
9.14.1.3 Import values from disk
1. After ensuring that the properties of each field match the values of the fields you are going to import, click on the Import button.
2. The import in progress screen is displayed showing the progress of your import.
3. Once complete, one of the following will happen
Import successful
If successful, the following screen is displayed showing the results of the import:
• On the left hand side are displayed the company IDs that have been matched on the database and for which the values of imported fields were assigned to.
• On the right hand side are displayed the company IDs that have not been found on the database.
54

Define your settings
Import failed
If the import file does not respect the validity rules, following screen is displayed informing you of the nature of the error:
Close the window and either:
• Modify the properties of the field encountering the issue by clicking on the icon.
• Open the import file and modify the cell displaying the error.
9.14.2 Manage your imported fields
9.14.2.1 Sorting your imported fields
All columns with the icon can be sorted in both ascending ( ) and descending ( ) order. By default, fields are sorted by Code with an ascending order.
9.14.2.2 Deleting user imported fields
• To delete an imported field click on the icon corresponding to the user imported field you wish to delete.
• To delete all user imported fields, click on the in the column header.
Note: When you delete an imported field, all values associated to the field are also deleted.
9.14.2.3 Define/view the properties of a user imported field
Click on the icon corresponding to the user imported field for which you wish to view or edit the properties. You may not edit the properties of fields for which you already have imported data.
9.14.2.4 Change the label associated to a user imported field
Click on the label of the field you which to change to render it editable, then type in a new name.
9.14.2.5 Checking import status and data associated to last import
• : Indicates that no values have yet been imported for that field
• : Indicates that values have been imported. The name of the source file, date and user who last imported it are displayed.
55


10.0. Index
A
Address book..................................... 39
Aggregation....................................... 48
Alerts - overview................................ 36
Alerts settings.................................... 38
Analysis settings ................................ 51
B
Boolean Searching.............................. 18
C
Company reports................................ 27
Concentration analysis ........................ 48
Create/manage custom fields ............... 53
Creating and configuring alerts............. 37
Customised sections ........................... 33
D
Defining your default home page ............9
E
Export formats................................... 41
Exporting from a company report ......... 45
Exporting from the list of results........... 43
F
Frequently asked questions....................2
G
General options.................................. 50
H
Home page..........................................6
L
Linear regression................................ 49
List formats ....................................... 23
List of alerts ...................................... 37
List of results..................................... 20
M
Managing customised sections settings.. 53
Managing list formats and list settings... 51
Managing own data settings................. 53
Managing ownership settings ............... 51
Managing report formats and report settings.......................................... 51
Managing the application settings ......... 50
Managing user defined variables settings53
Managing your account settings............ 50
Managing your exports........................ 51
Managing your search settings ............. 51
Marking companies from the list of results..................................................... 26
Modify data of a company.................... 33
My own peer groups ........................... 52
N
Navigating......................................... 10
P
Peer analysis ..................................... 47
Product tool-bar ...................................9
Q
Quick search...................................... 11
R
Report formats................................... 30
Report section display options .............. 32
S
Save a search .................................... 19
Search strategy tool-box ..................... 17
Segmentation ...............................47, 51
Software overview................................2
Statistical distribution ......................... 48
System Requirements ...........................2
W
Working with the alphabetical list of search criteria ........................................... 12
Working with the export system ........... 40
Working with the grouped view of search criteria ........................................... 13
Working with your favourite searches .... 15
57

Amadeus - Quick Guide
Working with your saved searches ........ 14 Working with your search history.......... 16
58